#embroidery scissors for scale
Explore tagged Tumblr posts
Visit Tumblr Blog
Explore Tumblr blogs with no restrictions, modern design and the best experience.
Last Seen Tumblr Blogs


Fun Fact
Tumblr Inc. has $15.1M in annual revenue.
Text
Tiny Book? Tiny Book. Pt3.
Previously we covered everything from typesetting and printing, to rounding and backing. Let's continue on with step 4, endbands!
Tiny books part 1; Tiny books part 2

Just like with regular ficbinding, there are layers, and they are:
1 - Typesetting and Imposing 2 - Printing 3 - Cutting, Folding, and Sewing 4 - Gluing, Rounding/Backing, Endbands 5 - Building the Case and Casing In 6 - BOOK
In this part we will be focusing on the rest of step 4, and we'll see how far we get before I run out of photo space tbqh. Please feel free to skip to the area you're interested in most.
4, pt2 - Endbands
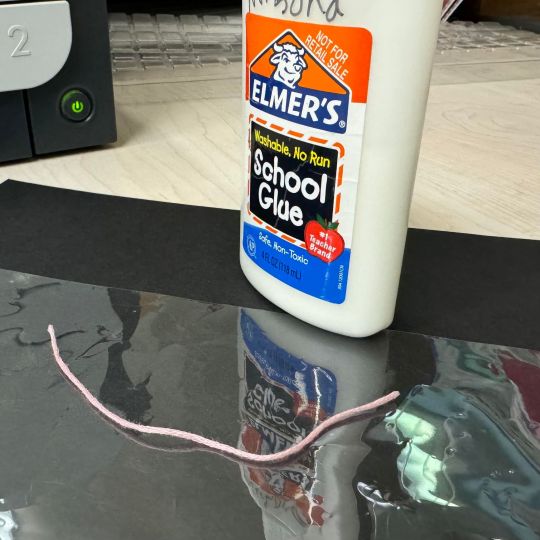
Endbands--there isn't anything overly exciting to say here, except that sewn endbands on tiny books isn't impossible, just ridiculously fiddly. For a core I recommend going with embroidery floss, stiffened with PVA. It's a nice relatable scale to the tiny book and will be perfectly firm-yet-flexible with the PVA coating. Because of the thickness I do not recommend using more than one strand of embroidery floss, if that's what you are using right now for your regular books. For all of the examples I include below, they've been sewn in a double core french style with a single strand of satin-finish sewing cotton sewing thread. Here are some examples of ones I've done:


Doable, but at what cost? My sanity. If you've got some to spare though, it will be very impressive to other bookbinders lol.
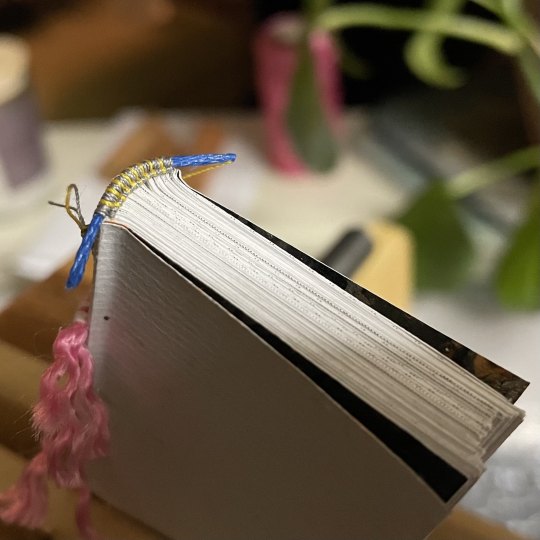
Don't be fooled into thinking tiny sewn endbands will be quicker or easier than their regular sized counterparts. And as a treat, here is how the tiny endband looked in my press while I sewed:
It's just 🧍♂️
In a sewn endband's stead I can recommend using prefab endbands, which will just be snipped to size and glued to the spine. Might be hard to do on tiny books with fewer signatures but not impossible, and it will look... as fine as a prefab endband can. Otherwise what I've really liked doing are paper endbands. I make these a bit wider than my textblock, so that I can trim them down later after they've been glued.
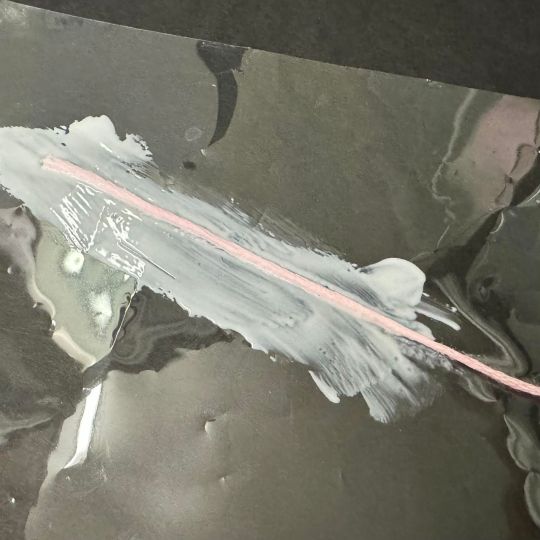
These are made from taking a strip of paper, applying glue around 15mm down the length, and laying down a piece of the PVA-coated embroidery floss. After a moment, to let the paper soften from the moisture and the core material stick a bit, you just roll it up a few times. Go slowly, as it can be finicky. Set aside to let it dry completely, then glue to your spine, as with the prefab ones. Let that dry, and trim to size carefully with your scissors.
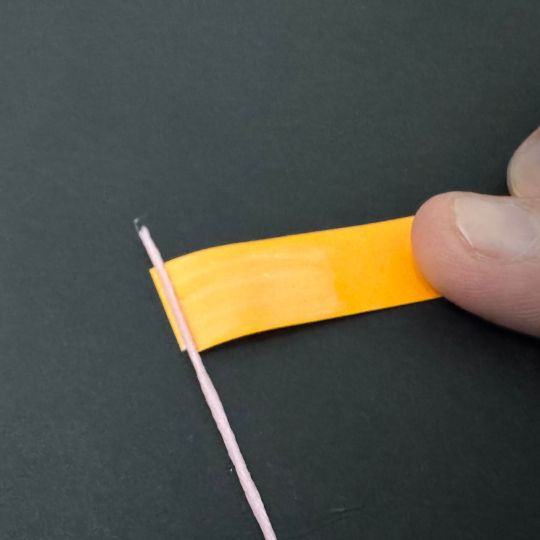


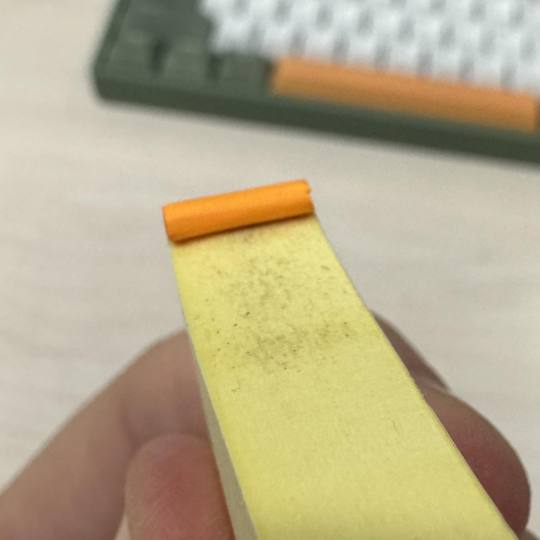
(Imagine the pad of sticky notes is our tiny book lol, it's what I had on hand) Anywho it's that easy! I find these so preferable in part because the rolled up core sits forward and covers the folds of my signatures, where prefab endbands usually don't. A tip--while you're coating your floss in PVA, you can take advantage of any remaining glueyness to roll it between your fingers, to remove any hard edges or unevenness from the thread before it's totally dry, and won't transfer any lumps or bumps to your finished paper endband. Once you've glued and trimmed the paper endband to size, you can reshape it with your fingers to remove the pinched ends from the scissors. @simply-sithel got me onto this process and it changed the game for me. She's been my tiny-book mentor 🙏

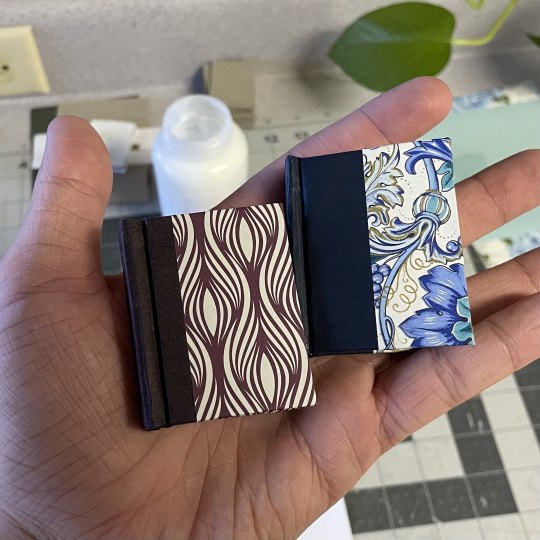
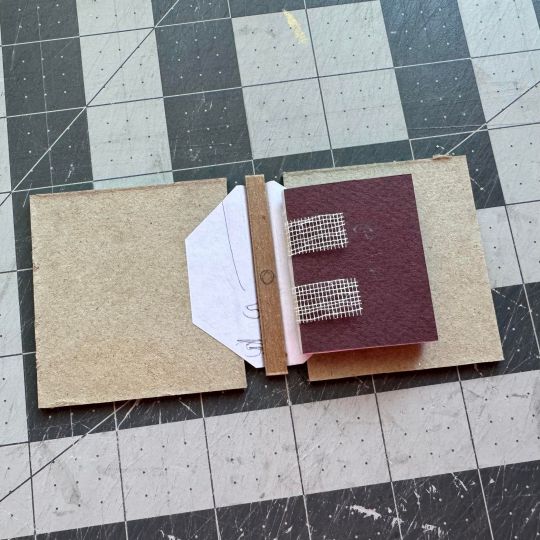
Referencing this image again, the book on the right has the paper endband, compared to the left, which has a sewn endband. On a regular book endbands are protective, decorative, and offer some support; on a tiny book they are purely decorative. I like to use the accent paper of my case as the paper for the endband, to bring everything together.
5 - Building the case and casing in
SO! We've made it this far, to what I believe are the easiest steps of this whole thing, building the case and casing in. As with my regular sized books I do these tiny ones in a square back bradel binding method. This construction uses a piece of connecting paper across the spine stiffener and allows you to tailor the case to your textblock's unique shape, rather than fiddling with it's exact measurements.
Instead of making this a square back bradel binding tutorial, I will refer you to DAS's video where I learned it myself. The case construction begins around the 13 minute mark. There are no notable different between using this method between regular sized books and tiny books.
The first things to note in this step are your hinge measurements. Whereas on regular books they may be 9-12mm, depending, on tiny books anything much wider than 8mm is noticeable and not strictly necessary. The full range of motion gained from the hinge measurement isn't as important with tiny books, so I recommend staying within the 6-7-8mm range for the aesthetics.
My other note is that the 2mm overhang measurement surrounding the textblock is still preferable, even on this tiny size. Something in your heart will try to make it nearer to scale, like .5mm or less, but this will result in a tiny book that looks badly made. My recommendation is not to go any narrower than 1mm in your overhang measurement. But also this is purely for appearances' sake and I'm not your mom, and even if I was you're (hopefully) an adult. Go nuts and find out what works best for your tastes!
In my experience you also have a slight bit more freedom selecting your cover materials. I've never gotten full-paper cases to work where regular sized books are concerned, but it's been my preference for tiny books. I have so much decorative scraps of paper that otherwise wouldn't have a home with regular books. This is also a great place to use offcuts of bookcloth as well. No gods so rules!!
Here are some photos of the process of building my tiny case on a tiny textblock following the square back bradel method:


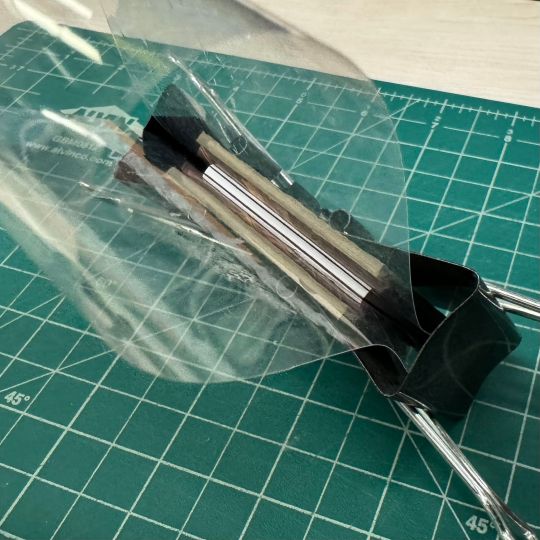
Now comes casing in. This part also couldn't be easier imo. I almost feel like I don't need to even say anything. I've found straight PVA, while having too short a worktime for full sized books, is perfect for casing in tiny books. You're brushing over like 2 square inches of paper?? You're using virtually no glue AND it takes 15 seconds?? I can only get so hard. As standard you should use some kind of moisture barrier between your endpages and your textblock while it dries in whatever your press situation looks like. For me these are sheets of plastic stolen from some plastic envelopes you use for archival work. These stop the moisture from going into your textblock and warping it. Some people have luck with parchment paper, but I am not one of them.
If you're using plain PVA, these babies will totally dry in maybe like, 3 or 4 hours. Take them out after an initial nipping time of like 20 minutes and let them dry open.
6 - BOOK

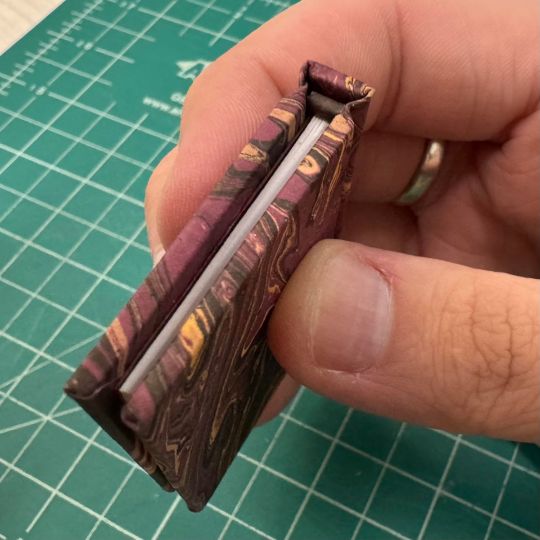
You've got a tiny book!!!

If you have any questions on something I've covered or didn't cover, please don't hesitate to ask!
117 notes
·
View notes
Text

A friend knitted this tiny socks for a new born and it's the cutest ! ! !
(Embroidery scissors for scale)
19 notes
·
View notes
Photo


Cozy Cabin Wrap Pouch - This is a little something I made for myself, however, despite following the measure twice, cut once adage, it ended up being too small for what I needed to use it for. If you like it, it’s available in my kofi shop.
[ID: Three closeup photos showing a sewn wrap pouch with one large pocket that rolls up into a rectangular clutch. The outside is a bright red and black plaid flannel fabric and the inside lining is a fake fur fabric that is marbled in black, greys, white, and some pops of blue. The first photo highlights the pocket size with a set of gold embroidery scissors for scale. The second picture shows the wrap completely closed and secured with a black cotton twill ribbon while the last features the full expanse of the fur lining when the pouch is completely unwrapped. End.]
#sewn#sewing#pouch#ooak#ko-fi-tonkai#little different than the projects I normally post#more sewing things for Fireside soon#just wanted to put this out alone since it's not Fireside related fabric
13 notes
·
View notes
Text
for Mark and Debra: Malleus Maleficarum The ground was never recovered, nor the legions, for their numbers were thought so ill omened that they never again appear in the army lists. —J. M. Roberts
It begins with Diane—the gold shingles of her razored hair
alight in the wind that whips the trees,
the cotton slips pinned to nylon lines: these improbable ghosts.
The first I ever loved can still incite such desperation. Betrayal
lashes the careful stitches, the slight fabric;
its design undone.
She would take her switchblade and cut spiders in half—
a quadrant of scars radiating from her wrists and elbows, she wrote my name in blood,
let matches flare against the cuts
small yellow head, searing. I used to operate on myself, she said.
Separate a triangle of skin and place objects—silver pin
heads, glass beads — close to the bone.
A private surgical kit, embroidery scissors, alcohol, fine needles, and
violet thread; silk, cat whiskers tied in complicated bows. She
remembers this way, where things are
where they are buried. We studied history together, this is how we met. Recovering the Roman
Empire; she draws military disasters in her margins, mail clad horsemen pitching
violently to the ground, the movement of the cavalry
a swarm of locusts. Her silver compact slit open, because there are assassins in the narrow hallway;
her fine pale feet turn to form an arabesque (a delicate design of flowers,
leaves), furrows in the sheets and mattress,
pearls. Ropes of black pearls and a black rubber dress—submerged in the green haze,
the depths of a nightclub, listening. Submission; she hit his thighs with a chain, a hook in his mouth—
her lips were alluring. Red feather quills, bright red flies. I think of him, brought violently
to the surface, his tensile body still below the thin edge of the filleting knife
his slick flesh streaming as he surrenders—a ceremony of scales and gills, useless to him now,
as he breathes in and out. She told me once that she was like a scorpion, and I did not listen.
I let her creep between my fingers, and danger was exotic to me then. I lived somewhere deep
beyond the coastline, in the crevices of rocks and wood planks,
her gold hair spins like loose coins, strange and valuable. The currency of nightmares, where
the sun burns the earth and empties the seas—there are skeletons, gingerly reaching for night—
night will fall in a rustle of wings, the gentle sweep of the legs of scorpions.
— Lynn Crosbie, “Submission,” Pearl: Poems
4 notes
·
View notes
Text
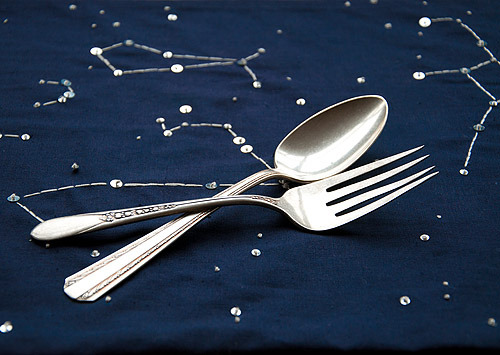
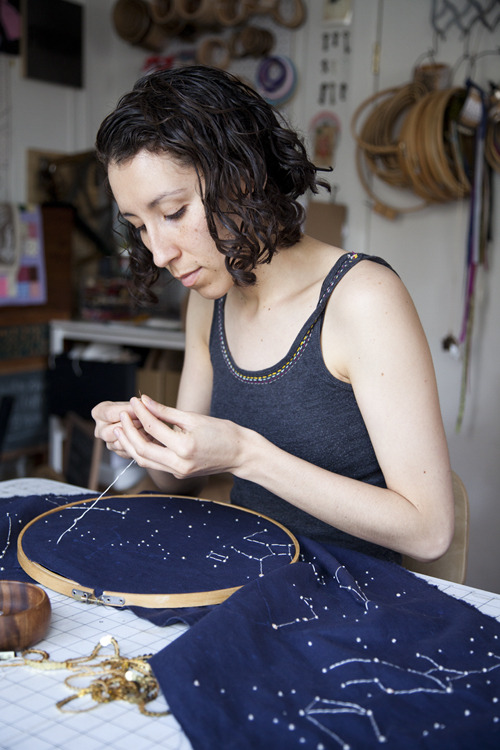
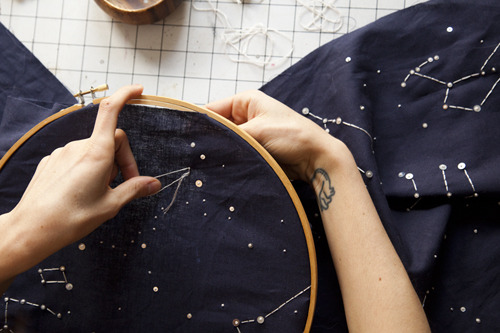
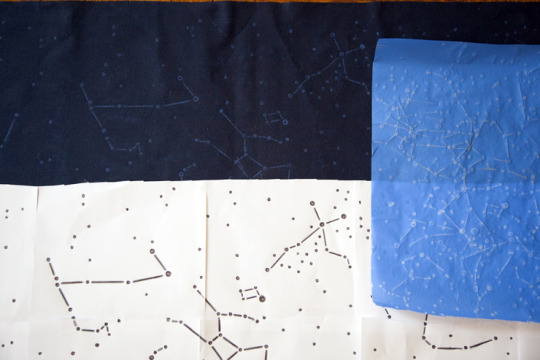
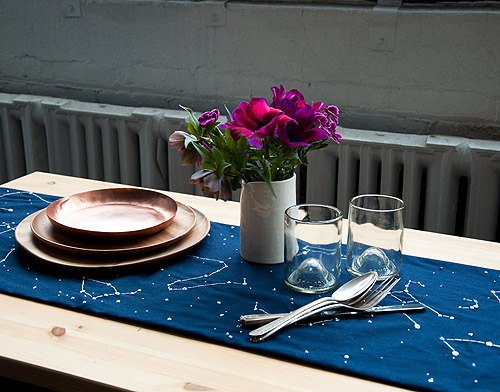
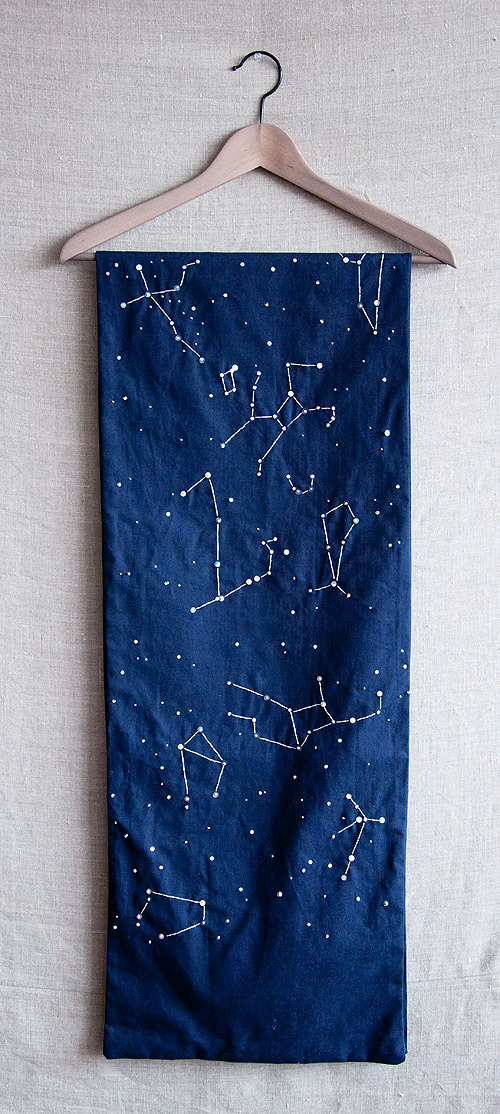
DIY French Dot Constellation Runner
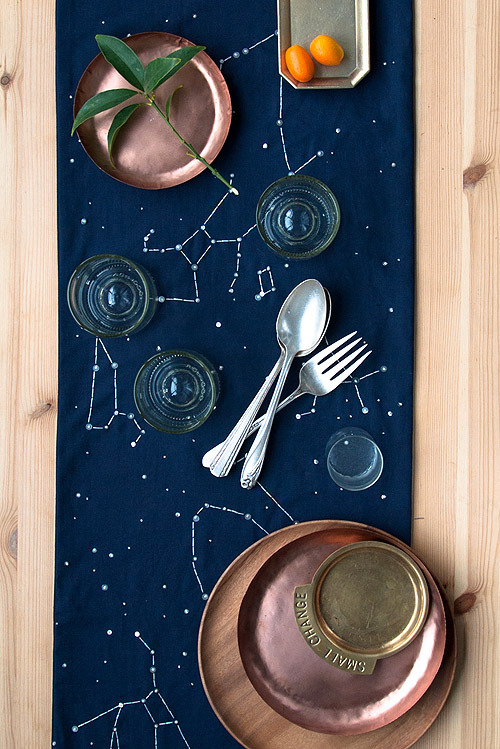
Project by Jessica Marquez:
Trying to invoke the Spring to finally arrive I made this table runner of stitched spring constellations. Stargazers will find Ursa Major and Minor, Cygnus, Draco, Virgo, Orion, Gemini and lots more. It’s definitely a statement piece that shines and shimmers with the addition of sequins held in place by french knots. One of the things I love about french knots is how three-dimensional they are. The little knots are raised, creating texture and here, stars that you can touch. This project might be large in scale, but the steps are super easy. You can also break up the pattern to make smaller pieces or work on a pre-made runner to keep things simple.
Materials:
Constellation Template (download here) (2) 15 x 72” pieces of linen, washed and ironed (or a pre-made runner) Tape Scissors Sewing pins Saral transfer paper Self-healing mat Pen DMC embroidery thread 3866 4mm Flat Silver Sequins 6mm Flat Silver Sequins Size 7 embroidery needle Large embroidery hoop, 12” hoop shown Sewing thread
Steps:
1. Enlarge template 600% for a 14 x 60 runner, or size to your desired dimensions. Tile print the template. You can do this is in Adobe: Print> Tile All Pages or Poster (depending on which version you have) > enlarge 600%> Overlap .075 with Cut Marks.
2. Trim pages to cut marks and tape template pages together. Trim edges and set aside.
3. Center pattern on fabric and pin the across the top to fabric. Layer a piece of transfer paper face down under the paper pattern and over the fabric. Begin tracing over the pattern with a pen. Apply a fair amount of pressure, but not enough to rip the paper. It helps to have a self-healing mat under your fabric for this step. Transfer section by section moving your transfer paper over as you complete a section. I used one piece of 12 x 15” transfer paper for the entire piece. Check your work as you go, lifting the papers to make sure your marks are coming through.

4. Stitch it! Hoop your fabric loosely and use the french knot for the star points and the backstitch or running stitch for the constellations. As you complete sections move your hoop around. You don’t want to apply too much pressure when hooping the fabric or you could disrupt the previous knots. Jump from stitch to stitch between points, but be careful not to pucker fabric by pulling too much.
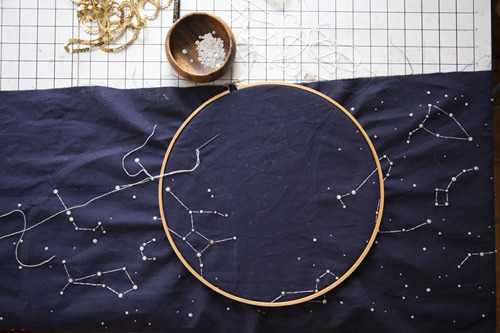
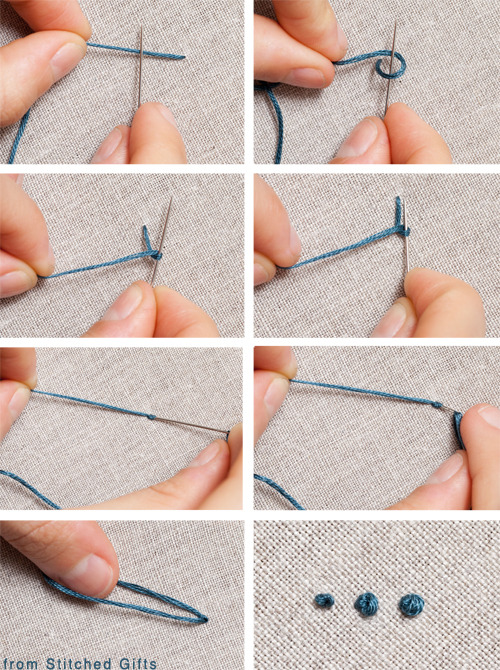
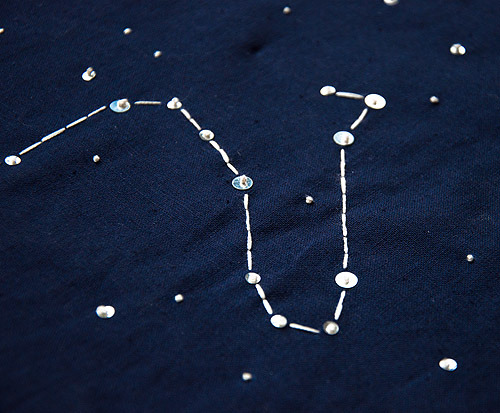
The french knot is all about getting the right tension. Come up through the fabric, and hold the thread taut about 1 or 2 inches from the fabric with your non-dominant hand. With your other hand, wrap the thread around the needle once, twice, or three times, for a larger knot. Insert the needle back into the fabric close to, but not in, the original hole. Slide the knot down to meet the fabric and hold the tension as you pull the needle through the knot. Pull slowly trying to keep the tension on the thread all the way as you pull through. (image of French Knot from Stitched Gifts)
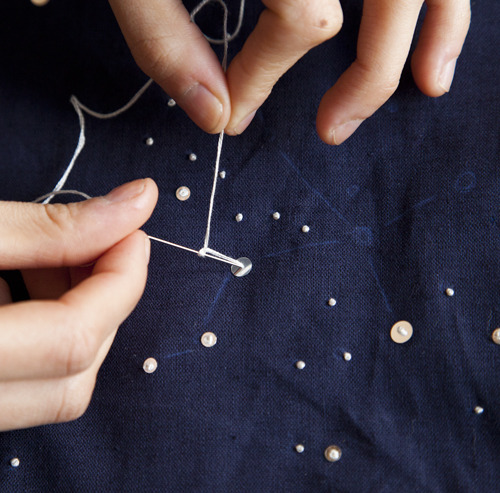
I used 3 ply thread for the entire piece varying between french knots with no sequins and small and large sequins to help create dimension. Adding sequins to the french knots it super easy. After coming up through the fabric with the needle slide a sequin over the needle and down to the fabric. Make a french knot as usual the knot will hold the sequin in place.
5. To finish, without a backing: Fold over edges toward the back of the piece with a .25” seam. Press and then fold over again and pin in place. Sew a straight stitch with your sewing machine around the piece through the center of the fold.
To finish, with a backing: Layer the finished embroidered piece face down over another 15 x 72” linen piece. Pin in place and sew a .5” straight stitch with your sewing machine around the piece leaving a 5” opening. Snip away a small portion of the corner tops above the sewing. Pull the piece inside out, so that the embroidery is now showing. Iron the edges flat and hand sew the gap closed with sewing thread using the slip stitch.


2 notes
·
View notes
Text
"Who has the time and patience to do this?"
Clearly it's someone who wants to embroider photorealistic animals. I'm impressed not only by the shading and "line art," but the SMALLNESS of the pieces! The largest "item for scale" is the embroidery scissors and those can already fit in your palm, so nothing is bigger than two/three inches!
THESE LITTLE DUDES ARE SO PRECIOUS!!!
Imagine how many breaks she needs to avoid carpal tunnel!

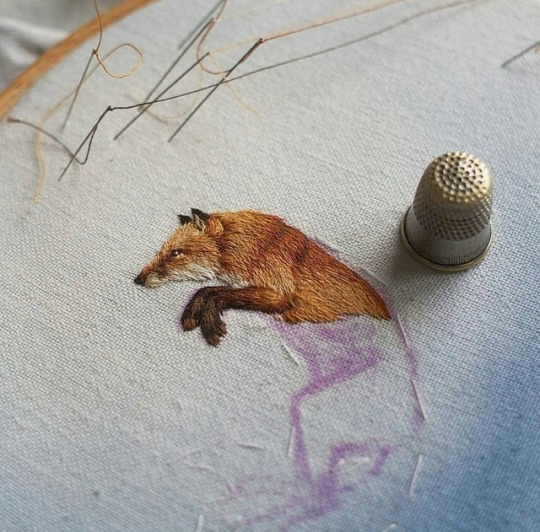
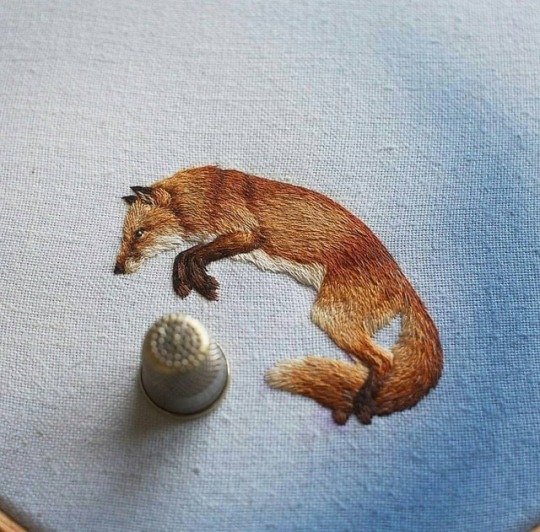


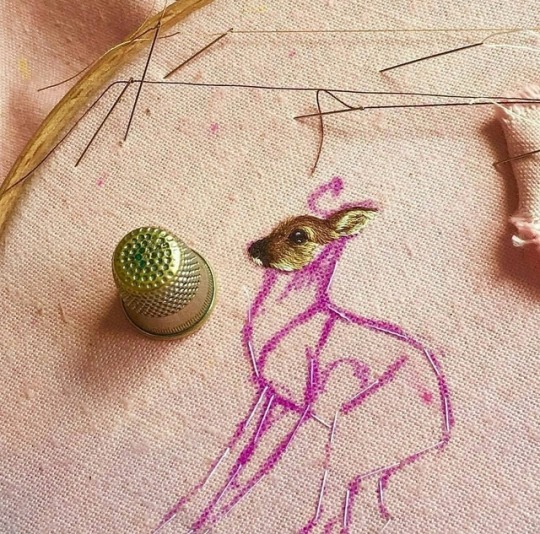


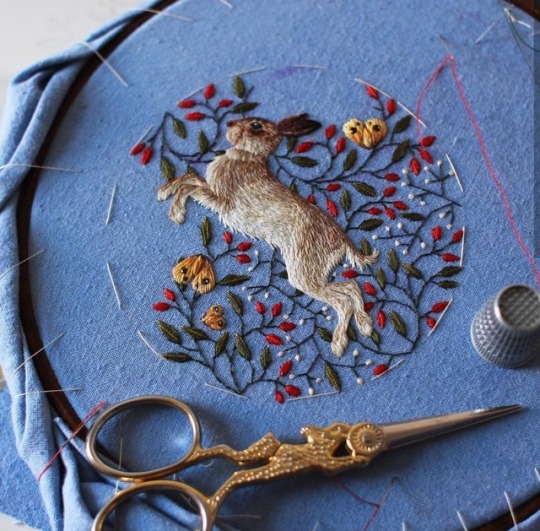
Art By IG: @chloegiordano_embroidery
Instagram: @artwoonz
137K notes
·
View notes
Text
Snake plush crochet pattern No sew do it yourself Amigurumi tutorial PDF
About This No-Sew Amigurumi Crochet Pattern

Welcome to the snake plush crochet tutorial! With this no-sew Amigurumi method, you’ll be able to craft a delightful plush snake, perfect as a gift or a cute decoration for your home.
Key Features:
No sewing required: Create a seamless and polished snake plush with this Amigurumi technique.
Beginner-friendly guide: Whether you're new to crochet or an experienced crafter, this pattern is easy to follow.
Customizable design: Adjust the colors and yarn to personalize your snake plush.
Getting Started: Materials You Will Need
Before you begin, gather the following materials:
Crochet Hook: 5 mm (or size appropriate for your yarn).
Yarn: Plush yarn (you can use cotton, acrylic, or blends based on your preference).
Scissors
Tapestry Needle for weaving in the ends.
Stuffing for the body.
Feel free to experiment with different yarn colors and textures to achieve the look you want for your snake.
Essential Crochet Techniques
To craft your snake plush, you’ll rely on a few key crochet techniques:
Single Crochet (sc): The basic stitch used to create a flat fabric.
Increase (inc): Adding stitches to widen the shape.
Invisible Decrease (dec): Reducing stitches to shape your plush.
Mastering these techniques will help you create a smooth and seamless snake body.
Step-by-Step Body Construction
A key aspect of this pattern is creating the snake’s long, spiraled body. Pay attention to maintaining consistent stitch tension for an even shape. When changing yarn colors, be sure to transition smoothly for a polished result.
Tips for a Perfect Spiral:
Use single crochet stitches to build the body.
Keep your tension tight for a defined spiral shape.
Crafting the Snake’s Features
Add character to your snake plush by carefully crafting its features, like the eyes and tongue. You can use safety eyes or crochet your own, and a simple yarn tongue will bring your snake to life. Pay attention to detail to create a cute and friendly expression.
Suggested Materials:
Safety Eyes (optional) or use yarn to crochet eyes.
Embroidery thread for additional facial details.
Special Stitch Techniques for a Unique Look
Enhance your snake plush by experimenting with special stitches for the eyes, scales, and other small features. These techniques can help create a more realistic or stylized look, depending on your preferences.
Customization Options
Make your snake plush truly unique by trying out different color schemes and yarn types. You can also adjust the size of your plush by using a different hook or thicker/thinner yarn.
Personalization Ideas:
Mix and match colors to create a vibrant snake.
Add embellishments like sequins or buttons for a decorative touch.
Troubleshooting Common Issues
Here are some common issues you may encounter and how to solve them:
Uneven stitches? Check your stitch tension or try using a smaller hook.
Loose ends? Make sure to securely weave in yarn tails with a tapestry needle.
Finishing Your Snake Plush
Congratulations on completing your snake plush! To give it a professional finish, make sure to weave in all yarn ends neatly. You can also block your plush by lightly misting it with water and reshaping it to set the form.
FAQ
What skill level is this pattern for? This pattern is beginner-friendly, but basic crochet knowledge is recommended.
Can I customize the size of the snake plush? Yes! You can adjust the size by using a different hook size or thicker yarn.
What materials are required? You’ll need a 5 mm crochet hook, plush yarn, scissors, a tapestry needle, and stuffing.
#zebra amigurumi crochet pattern#yoda amigurumi crochet pattern free#yoshi amigurumi crochet pattern free#whale amigurumi crochet pattern#white amigurumi crochet pattern#wolverine amigurumi crochet pattern#wolf amigurumi crochet pattern#wolf amigurumi crochet pattern free#winnie the pooh amigurumi crochet pattern#whale shark amigurumi crochet pattern#waffle amigurumi crochet pattern#what is amigurumi crochet pattern#amigurumi crochet patterns for free#unicorn amigurumi crochet pattern#tiger amigurumi crochet pattern#turtle amigurumi crochet pattern#toothless amigurumi crochet pattern#totoro amigurumi crochet pattern#teddy bear amigurumi crochet pattern#turkey amigurumi crochet pattern#t rex amigurumi crochet pattern#taylor swift amigurumi crochet pattern#turkey amigurumi crochet pattern free#tiny amigurumi crochet pattern#stitch amigurumi crochet pattern#stitch amigurumi crochet pattern free#sea turtle amigurumi crochet pattern free#sunflower amigurumi crochet pattern#spiderman amigurumi crochet pattern#snoopy amigurumi crochet pattern
1 note
·
View note
Text
Mastering Computerized Embroidery: Essential

Mastering Computerized Embroidery: Essential Tips and Expert Q&A
Introduction: Computerized embroidery has revolutionized the world of textile embellishment, allowing for intricate designs, consistent results, and increased productivity. Whether you're a hobbyist or a professional, understanding the ins and outs of computerized embroidery can elevate your craft to new heights. In this comprehensive guide, we'll explore the best tips for computerized embroidery and answer common questions to help you achieve stunning results. The Basics of Computerized Embroidery: Before we dive into the tips and Q&A, let's briefly cover what computerized embroidery entails: - Digital Design: Creating or importing designs using specialized software. - Machine Setup: Preparing your computerized embroidery machine with the right thread, needle, and stabilizer. - Hooping: Securing fabric in the embroidery hoop correctly. - Execution: Running the design on the machine, which follows the digital instructions to create the embroidery. Now, let's explore the best tips and answer common questions about computerized embroidery. Q&A: Best Tips for Computerized Embroidery Q1: What are the essential tools for computerized embroidery? A1: Essential tools include: - Computerized embroidery machine - Embroidery software - Quality threads in various colors - Appropriate needles for your fabric and thread - Stabilizers (cut-away, tear-away, water-soluble) - Hoops in various sizes - Small scissors or snips - Tweezers for threading and clean-up Tip: Invest in high-quality tools, especially your machine and software, as they form the foundation of your work. Q2: How do I choose the right embroidery design software? A2: Consider the following when choosing software: - Compatibility with your machine - User-friendliness - Design capabilities (digitizing, editing, etc.) - File format support - Customer support and updates Tip: Many brands offer free trials. Test a few options before making a decision. Q3: What's the best way to prepare fabric for computerized embroidery? A3: To prepare fabric: - Pre-wash to prevent shrinkage after embroidery. - Iron the fabric to ensure a smooth surface. - Apply appropriate stabilizer. - Use spray adhesive if needed for slippery fabrics. Tip: Always test your stabilizer and fabric combination on a scrap piece before starting your project. Q4: How do I ensure my computerized embroidery design is the right size? A4: To ensure correct sizing: - Use your software's sizing tools to adjust the design. - Print a template of the design at 100% scale. - Place the template on your item to visualize the size and placement. - Make adjustments in your software as needed. Tip: Consider the item's purpose and aesthetics when sizing. A design that looks great on a jacket might be too large for a pocket. Q5: What's the secret to achieving perfect stitch quality in computerized embroidery? A5: For optimal stitch quality: - Use the correct needle and thread for your fabric. - Ensure proper tension settings. - Choose appropriate stabilizer. - Maintain correct hooping tension - tight but not stretched. - Clean and oil your machine regularly. Tip: Keep a logbook of successful settings for different fabric types to replicate good results. Q6: How can I prevent thread breaks during computerized embroidery? A6: To minimize thread breaks: - Use high-quality thread appropriate for machine embroidery. - Ensure correct thread tension. - Clean the machine's thread path regularly. - Check for sharp edges on the needle plate or hoop that might catch the thread. - Slow down the machine speed for complex designs or delicate threads. Tip: If breaks persist, try a thread lubricant designed for machine embroidery. Q7: What's the best way to handle multi-color designs in computerized embroidery? A7: For multi-color designs: - Organize your threads in order of use before starting. - Use a thread chart to ensure color accuracy. - Consider using a thread stand for smooth feeding of multiple spools. - Take advantage of your machine's color sorting feature to minimize thread changes. Tip: Create a color sequence sheet to keep track of changes, especially for complex designs. Q8: How do I achieve perfect registration in computerized embroidery? A8: For accurate registration: - Use appropriate stabilizer to prevent fabric shifting. - Ensure your hoop is tight and properly attached to the machine. - Use your machine's basting feature to outline the design area before embroidering. - For multi-hoop designs, use registration marks in your design. Tip: Practice aligning multi-hoop designs on scrap fabric before attempting on your final project. Q9: What should I do if my computerized embroidery design isn't centering correctly? A9: If centering is off: - Double-check your hooping technique. - Verify that your machine's hoop is properly calibrated. - Use your machine's centering features or on-screen grid for alignment. - Create a physical template for consistent placement across multiple items. Tip: Some machines have built-in cameras or laser guides for precise positioning. Utilize these features if available. Q10: How can I optimize my workflow for computerized embroidery production? A10: To improve efficiency: - Organize your workspace with easy access to tools and supplies. - Prepare multiple hoops in advance for quick swapping. - Use design software to create production sheets with all necessary information. - Take advantage of your machine's programmable features for repeated tasks. - Consider investing in multi-needle machines for larger production runs. Tip: Time yourself on different tasks to identify areas for improvement in your workflow. Expert Tips for Computerized Embroidery Success: - Master Your Software: Spend time learning all the features of your embroidery software. Many offer tutorials or online courses. - Digitizing Skills: If you're creating your own designs, invest time in learning proper digitizing techniques. Poor digitizing can lead to poor stitch-outs. - Test, Test, Test: Always do a test stitch-out on scrap fabric similar to your final project. This helps identify potential issues before committing to the final piece. - Understand Fabric Behavior: Different fabrics require different approaches. Learn how various materials respond to embroidery and adjust your techniques accordingly. - Maintain Your Machine: Regular cleaning and maintenance of your embroidery machine is crucial for consistent, high-quality results. - Stay Organized: Keep your threads, bobbins, and supplies well-organized. This saves time and reduces frustration during projects. - Learn from Mistakes: Keep a record of your projects, including any issues encountered and how you resolved them. This creates a valuable personal resource. - Join Online Communities: Participate in forums or social media groups dedicated to computerized embroidery. These can be great sources of tips and troubleshooting advice. - Experiment with Specialty Threads: Once you're comfortable with basic threads, try metallic, variegated, or glow-in-the-dark threads for unique effects. - Understand Design Density: Learn how stitch density affects your embroidery. Too dense can lead to puckering, while too sparse may not provide adequate coverage. Troubleshooting Common Computerized Embroidery Issues: - Puckering: - Cause: Incorrect stabilizer or tension issues. - Solution: Use appropriate stabilizer for your fabric and adjust tension settings. - Gaps in Fill Areas: - Cause: Incorrect underlay or pull compensation settings. - Solution: Adjust these settings in your embroidery software before stitching. - Design Distortion: - Cause: Fabric shifting during embroidery. - Solution: Ensure proper hooping and stabilization techniques. - Thread Nesting on Underside: - Cause: Incorrect upper thread tension or bobbin issues. - Solution: Adjust upper thread tension and check bobbin case tension. - Machine Skipping Stitches: - Cause: Dull or incorrect needle, or tension issues. - Solution: Replace needle, ensure correct needle for fabric, and check tension. Conclusion: Computerized embroidery offers endless possibilities for creativity and precision in textile embellishment. By mastering your machine, software, and techniques, you can produce stunning embroidery projects with consistency and efficiency. Remember that every embroiderer, no matter how experienced, faces challenges from time to time. The key to success lies in continuous learning, experimentation, and practice. As you apply these tips and solutions to your computerized embroidery projects, you'll develop a deeper understanding of the craft and the confidence to tackle more complex designs. Don't be afraid to push the boundaries of what's possible with your machine and software. With patience and persistence, you'll be creating professional-quality embroidery that showcases your unique style and creativity. Whether you're embroidering for personal enjoyment, gifts, or as a business venture, the world of computerized embroidery is full of opportunities for growth and expression. Embrace the learning process, stay curious, and most importantly, enjoy the beautiful art you're creating stitch by stitch. Happy embroidering! Read the full article
0 notes
Text
Tips For Small Embroidery Fonts To Get The Best Results
Small embroidery fonts add a touch of elegance and sophistication to your embroidered projects. Whether you're monogramming a delicate handkerchief or adding text to a intricate design, achieving the best results with small fonts requires precision and finesse.
1. Choosing the Right Font
When working with small embroidery fonts, opt for fonts that are specifically designed for embroidery. Choose fonts with clean lines, minimal serifs, and adequate spacing between characters. Avoid overly intricate or decorative fonts that may be difficult to reproduce accurately at a small size.
2. Simplifying the Design
Keep your design simple and streamlined to ensure clarity and readability at small sizes. Avoid overly complex or detailed designs that may become muddled when scaled down. Focus on essential elements and prioritize legibility above all else.
3. Adjusting Stitch Density
Optimize stitch density to achieve crisp and defined lettering. Increase stitch density slightly for small fonts to ensure sufficient coverage and avoid gaps or distortion in the stitching. Experiment with different stitch densities to find the optimal balance between clarity and texture.
4. Using High-Quality Threads
Choose high-quality embroidery threads in a suitable weight and color for small embroidery fonts. Opt for threads that are smooth, strong, and colorfast to ensure consistent results. Avoid using cheap or low-quality threads that may break or fray during stitching.
5. Testing and Adjusting
Before embroidering your final design, conduct test runs on scrap fabric to evaluate the appearance and quality of the small embroidery fonts. Make any necessary adjustments to the font size, stitch settings, or thread tension to achieve the desired results. Take note of any issues or imperfections and address them before proceeding with the final embroidery.
6. Optimizing Machine Settings
Fine-tune your embroidery machine settings for optimal performance when stitching small fonts. Adjust the speed, tension, and needle settings to ensure smooth and precise stitching. Pay close attention to detail and monitor the stitching process carefully to catch any errors or inconsistencies.
7. Considering Fabric Type
Choose the right fabric for your embroidery project to ensure compatibility with small fonts. Opt for tightly woven fabrics with a smooth surface, such as cotton or polyester blends. Avoid textured or stretchy fabrics that may distort or obscure the small embroidery fonts. ZDigitizing specializes in providing top-notch services in both Embroidery Digitizing and Vector Art. With a commitment to excellence, our team ensures high-quality results that meet the diverse needs of our clients. Whether you require precise embroidery digitization for intricate designs or professional vector art services for a polished visual appeal, Zdigitizing is dedicated to delivering accurate and aesthetically pleasing outcomes.
8. Practicing Precision and Patience
Embroidering small fonts requires patience and precision. Take your time when positioning the embroidery hoop and aligning the design on the fabric. Use sharp embroidery scissors to trim any stray threads or excess stabilizer for clean and professional results.
Conclusion: Achieving Excellent Results with Small Embroidery Fonts
With the right techniques and attention to detail, you can achieve excellent results when embroidering small fonts. By choosing the right font, simplifying the design, adjusting stitch density, and optimizing machine settings, you can ensure crisp, clear, and legible stitching that enhances your embroidered projects.
FAQs (Frequently Asked Questions)
How small can embroidery fonts be?
What is the best stitch type for small embroidery fonts?
Can small embroidery fonts be used on different types of fabric?
Are there any special considerations for digitizing small embroidery fonts?
How can I improve the readability of small embroidery fonts?
1 note
·
View note
Text
Embroidered Regency Reticule
June 24, 2019
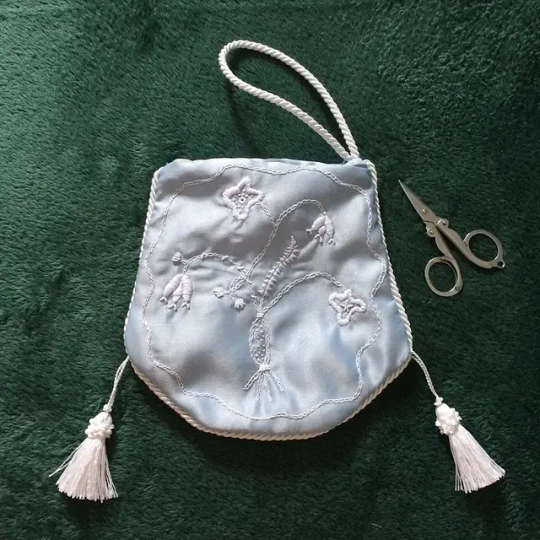
[Image ID: a photo of a blue satin bag with white embroidery, two white tassels, and a white cord drawstring]
A year or so ago, on a trip to JoAnn Fabrics, I stumbled upon some nice fabric in the softest classic-Disney-Cinerella blue. The fabric was 100% polyester, unfortunately, but I had already fallen deeply in love with the color, and it was a decent price, so I caved and bought some. I knew immediately that I was going to make pieces for my Regency wardrobe with it, since it was already shaping up to be a very blue wardrobe.
I knew I wanted to make a reticule with it, for sure. Using my Pinterest boards as a starting point, I looked at common shapes and decorations. I eventually settled on this late 1790s-early 1800s bag from the Museum of Fine Arts Boston as a guide (I can't download a decent image of it, so I'm afraid the link will have to do). I wasn’t looking to replicate it, just use it as inspiration. I decided over the winter that this would be one of my semester sewing projects, to work on during my desk shifts or during other down time.
Materials-wise, I used less that a quarter yard of the polyester fabric for the outside, roughly the same amount of white broadcloth from my stash, some white cotton thread, most of a yard of white spiral cording, and two white tassels (though i picked up six total, and may have lost one somewhere). For tools, I had scissors and needles, of course, and a small embroidery hoop and my awl.
I drafted a simple shape on graph paper to use as a “pattern,” based in part off the example bag, and scaled to make sure I could fit my hand through the opening. Once I had everything cut out (two in the blue and two in white for a lining), I sewed the lining up and used colored chalk to rough out the basic shapes of the embroidery on one of the blue panels.
Now, looking back, this was an ambitious bit of embroidery for someone who has never really embroidered before, but it would have been a boring project if I didn’t learn something! I used a chain stitch for the vines and stems, and everything else is bullion stitches, satin stitches, and some knots of some sort. I really love the texture the knots gave the bit in the middle!
The embroidery took me most of the semester, so it wasn’t until after I returned home (and unpacked) that I finished it. I ironed everything, sewed up the sides of the blue panels, added the cord and tassels into the seam, put in the lining (easier said than done - it took me awhile to figure out and now I’ve forgotten how I did it), and added the drawstring and casing.
Then I took lots of pretty pictures of it because it’s very pretty, and because I was terribly pleased with myself. It even matches with my copy of Sense & Sensibility, which I haven’t finished reading yet.
I’m hoping I have enough of the fabric left to make a spencer, but we’ll have to wait and see. In other Regency news, I’ll have a short post up soon about what I’ve affectionately dubbed my “portrait shawl,” and I’ll soon (hopefully) be re-remaking my chemise. I’d also like to draft (or pick out a pattern for) and mock up my quintessential white regency dress, so I may do a post on the research I’ve done, the patterns I’ve found, and what my plan for it is.
Stay warm, stay safe, stay dry.
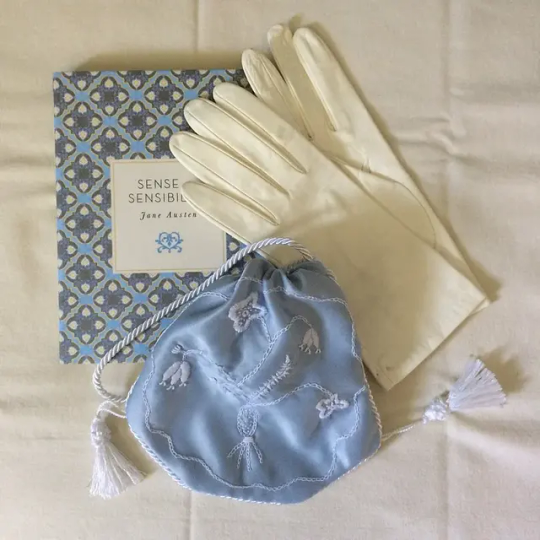
[Image ID: the same blue and white bag as above pictured with white leather gloves and a copy of "Persuasion" with a blue patterned cover]
0 notes
Text

Someone in the complaints department, presumably: I just got an email from a customer who ripped their package open and recreated the conception of Perseus in their kitchen. Now they’re complaining because ‘gold’s heavy it shouldn’t have done that.’
#polite little messages in the package from sellers are the best part of shopping online#embroidery scissors for scale#it’s almost impossible to get genuine gold leaf at art stores because ‘imitation gold is really good now’ but it TARNISHES#howEVER catering stores sell it because it has to be real gold if you want to eat it (!!!!)
3 notes
·
View notes
Text
diy skeleton pants !
Hello everyone !
Here are some skeleton pants I made. Inspired by an image off Pinterest (I will link the source if I can find it) I thought this idea was absolutely amazing. I have gradually fallen in love with customised pants as there is so much space for experimentation and creativity. These pants were my first attempt at at a real DIY fashion project.

On an old white t-shirt I sketched out the shapes for the bones, making sure they were wide enough to fill but not dominate the front of each pant leg. I then just cut them out with some scissors and hand-stitched them onto the pants with some white thread. This part of the process took me a little as it was my first time hand-stitching at this scale. But, I have had some previous experience with hand-embroidery so it was definitely manageable. The denim on these pants is also really soft so pushing the needle back and forth was rather smooth.


Overall, I think they turned out quite great! I am extremely happy with how they turned out and have found myself wearing them relatively often. They are a nice statement piece for my wardrobe.
Here is a picture of me wearing the pants. :)

#artists on tumblr#fashion#diy#diy fashion#skeleton pants#handmade#new artist#i made this#creative#halloween costumes
9 notes
·
View notes
Text

I am out of practice and it shows, but a tiny little moth is done! Embroidery scissors for scale
#embroidery#teeny tiny little moth#idk what I’ll add next#might be flowers? I do like embroidering flowers
56 notes
·
View notes
Photo

Today, I Choose Violence stitched and designed by katie-m-10315.
“Self-drafted 4x4 little baby, embroidery scissors for scale. Making them for the rest of my work team as we discuss teaming up against common enemies frequently.”
9 notes
·
View notes
Text
How use Mylar with your embroidery machine

Shining Bright: Embellishing Your Dreams with Mylar and Your Embroidery Machine
Embroidery machines bring creativity to life, transforming fabrics into vibrant masterpieces. But what if you want to add a touch of sparkle and shine? Enter Mylar, a versatile material that opens doors to dazzling embroidery possibilities. In this comprehensive guide, we'll embark on a journey, unlocking the secrets of how to use Mylar with your embroidery machine, from choosing the right materials to troubleshooting tips. So, get ready to add some pizzazz to your embroidery projects! Mylar: More Than Just Craft Foil Often known as "craft foil," Mylar is a thin, polyester film available in various colors, textures, and finishes. When incorporated into embroidery, it adds a stunning metallic sheen, dimension, and a unique iridescent effect. From simulating shimmering scales on a mermaid tail to adding dazzling stars to a nighttime scene, Mylar's versatility knows no bounds. Before You Begin: Gathering Your Toolkit While using Mylar with your embroidery machine is exciting, ensuring success requires the right tools: Embroidery machine compatible with Mylar: Check your machine's manual or consult the manufacturer to ensure it can handle Mylar's thickness and texture. Mylar sheets or rolls: Choose the desired color, texture, and finish based on your project. Stabilizer: A special stabilizer like tear-away or water-soluble is crucial for preventing puckering and tearing. Embroidery needles: Depending on the Mylar thickness, consider using metallic or specialty needles designed for delicate materials. Scissors or rotary cutter: Sharp tools ensure clean cuts and prevent fraying. Adhesive spray (optional): For certain techniques, a light adhesive spray can help secure Mylar in place. Embracing the Shine: Techniques for Using Mylar With your toolkit ready, let's explore different ways to incorporate Mylar into your embroidery: 1. Appliqué: Cut Mylar shapes using templates or freehand designs. Apply a light, even spray of adhesive to the back of the Mylar (if using). Secure the Mylar to your fabric with heat-resistant tape or pins. Use a satin stitch or decorative stitch to sew around the Mylar edges, attaching it firmly to the fabric. 2. Inlay: Cut out shapes from both Mylar and fabric, ensuring they match perfectly. Place the Mylar shape underneath the fabric cutout, aligning edges carefully. Use a satin stitch or decorative stitch to sew around the edges, securing both layers together. 3. Outlining: Cut thin strips of Mylar and lay them along your design outlines. Use a straight stitch or satin stitch to sew over the Mylar strips, incorporating them into the design. 4. Free-motion Embroidery: Experiment with free-motion embroidery techniques, incorporating small pieces of Mylar for accents or highlights. Use a slower stitching speed and adjust tension settings as needed. Beyond the Basics: Tips and Tricks Test on scrap fabric: Before diving into your project, experiment with different techniques and settings on scrap fabric to find the perfect combination for your chosen Mylar and machine. Adjust thread tension: Slightly loosen the thread tension to prevent pulling or puckering on the Mylar. Use the right needle: Fine-tipped needles like metallic or denim needles are ideal for Mylar's delicate nature. Minimize embroidery density: Mylar can be challenging to stitch through multiple layers. Opt for less dense designs or consider using it as an accent rather than covering large areas. Embrace imperfection: Mylar can sometimes shift slightly during embroidery. Embrace these minor variations as part of the unique handmade charm. Shining Examples: Project Inspiration Mylar opens doors to countless creative possibilities. Here are some project ideas to spark your imagination: Dazzling dress accents: Add shimmering details to dresses, jackets, or bags. Sparkling home décor: Embellish pillows, curtains, or tablecloths with a touch of shine. Personalized gifts: Create custom phone cases, wallets, or keychains with your signature Mylar touch. Magical costumes: Bring fairy tales and fantasy characters to life with shimmering scales, wings, or crowns. The Final Stitch: A World of Endless Shine With the right guidance and a touch of creativity, Mylar can transform your embroidery projects into dazzling masterpieces. So, embrace the shine, experiment with different techniques, and don't be afraid to push the boundaries! Remember, the most important ingredient is your own artistic vision. Now go forth and stitch your dreams into reality, one sparkly thread at a time! Read the full article
#embroidery#embroidery designs#embroidery machine#embroidery tips#How use Mylar withy our embroidery machine
0 notes
Text
A Guide to Medieval Childhood
Our popular imaginings and depictions of medieval childhood tend to be somehow both scarce and bleak. It’s often supposed that childhood as a category didn’t really exist until the twentieth century, and that even the highborn children before that blessed time were regarded as basically inconvenient mini-adults until they were old enough to fight or marry, respectively.
The sources we have tend to favour the royal families and the high aristocracy with some wealthy merchants thrown in the mix, so, unfortunately, the information below would mostly be concerned with these groups - although I’m going to do my best to include some facts about the lives of children from lower social strata, too.

Infantia, or infancy
As Maria von Trapp used to sing in technicolor meadows, let’s start at the very beginning - it is, after all, a very good place to start.
A mother rarely gave birth unattended - and I’m not talking about medical professionals; more often than not, these would be represented by a sole midwife. However, having a close friend or a relative with you as you are waiting for the baby to arrive was a practice well-established by the early fourteenth century even among royal women, whose births, marriages and deaths alike were always ruled by strict ceremony.
In their case, as in the case of all great families of the land, the practice also had a purely pragmatic side - additional companions mean additional witnesses who would be able to swear, should a scandal arise, that the little heir really arrived in the lawful way and had not been, say, smuggled into the bedroom in a pan. (In the case of the British royal family this precaution eventually led to the Home Secretary being obliged to attend all royal births, and was only done away with in 1930, when the late Princess Margaret was born).
Of course, for all the companionable support, the birth was not without its risks - for the child even more so than for the mother. It was for that reason that, uniquely, the Church allowed the midwives to baptize newborn - or unborn - babies in case they don’t survive by the time the sacrament in question could be performed properly by a priest.
If everything went well, it was the time to prepare the child for an ‘official’ baptism in the local church, which was going to not only save his soul for the world to come, but to help his standing in this one - after all, being baptized in a particular church meant being integrated into the larger community of the parish. The mother could rest - she was not required to attend the christening (or, rather, she couldn’t, as she would only be able to enter a place of worship again after being purified via a brief ‘churching’ ceremony on the fortieth day after giving birth). The child’s godparents would have been there to stand in her stead.
In fact, many contemporaries considered that a woman needs at least a month to properly recover after birth. Nor was it supposed to be a time of solitude - receiving female visitors was both allowed and encouraged.
Meanwhile, the child would be transferred into the care of a wet-nurse. Breastfeeding your baby yourself usually signified that you simply cannot afford wet-nurse of good character. The good character part of the job description concerned itself both with the purely physical characteristics - the wet-nurse had to be a little below thirty, to have white teeth, sweet breath, and a child of her own not above eight months of age, otherwise her milk could be considered stale - and the moral ones. It was believed that virtues and vices both could be transmitted through milk, and thus it was imperative to choose a wet-nurse both sensible and respectable.
Once hired, she rarely left the baby’s side - contemporary writers acknowledged that leaving an infant to cry is harmful for the child’s health, both mental and physical, and therefore a nurse should always be at hand with either her breast or a lullaby. In the highest households of the land, such as that of the royal children of Henry VII and Elizabeth of York, one or two women were also employed as specifically the child’s rockers, tasked with, well, rocking their little charge to sleep - though not too quickly or too harshly, ‘for fear of making the milk float in [her] stomach’.
Every medieval baby, regardless of his family’s income, was swaddled from birth and until he was about eight or nine months of age: not only would he be kept warm, the parents judged, but it’s also going to help his limbs grow straight. A ‘breechcloth’ – essentially, a premodern nappy - was a piece of easily-washable linen, doubled over and then fastened into place with pins. Then a linen shirt would be gently placed over the infant’s body, after which the swaddling bands proper – sometimes three yards long – would come out. They were long, narrow pieces of – you guessed it - linen.
This swaddling part was universal for everyone; however, even here, before the child could partake in any fashion proper, the class divides came out to play. Babies from wealthier families could sport crimson mantles and bands decorated with gold embroidery (sometimes coordinated with that on their mothers’ outfits, like on the famous Cholmondeley Ladies painting at the top of this post).
Another – perhaps, more familiar to us – sphere of baby-related conspicuous consumption was the cradle. When, in 1494, the son of Beatrice d’Este and Ludovico Sforza was born in Milan, the proud father presented his guests a four-poster cradle covered in white satin, where the little heir now lay. When Lucrezia Borgia gave the d’Este family an heir, she splashed out on the cradle for the little Ercole even more. According to contemporary witnesses, the cradle was located under tent-like Moorish-style silk draperies done in the Este colors. It was on a platform encased in a great carved and gilded canopy, six feet long and five feet wide. The cradle proper was curtained in white satin, with the sleeping baby covered with cloth-of-gold.
The weaning tended to come, by our standards, rather late: some contemporary arguments recommended three years for boys and two years for girls (the former, after all, were expected to lead more active lives, and thus needed their mother’s nutritious milk more). Even then, hard food was to be introduced gradually – starting, for instance, with a chicken leg the child could chew on.
Once out of swaddling, the boys were dressed in smocks, and the girls in gowns – not that there was much visual difference between the two, mind. Regardless of their parents’ social standing, they all also wore tight linen caps that bore the charmingly hobbit-y name of biggins.
Naturally, the higher one stood upon the social scale, the more ornamental these gowns and smocks tended to be. The toddler Princess Elizabeth, who was the daughter of Henry VII and thus the aunt of her much more famous namesake, was dressed on separate occasions in a green velvet gown edged with purple tinsel and lined with black buckram, a dress of black velvet edged with crimson, or a kirtle of tawny damask and black satin. Admittedly, these were mostly for ceremonial occasions, and in the privacy of her yellow ochre-coloured chambers even the princess probably tended to wear something more comfortable. In winter, she was kept warm with furred robes fastened with silver buttons and caps trimmed with peacock feathers, and, regardless of the time of the year, indulged with sweets made from sugars flavoured with rose and violet, as well as with fruits from sunnier climes like pomegranates, quinces, and almonds.
Royal families were never noted for modesty of consumption in any era, but even the middling merchants of Florence were often criticized for spoiling their children with fine clothes. Fra Dominici wrote scathingly about parents who dress their children in ‘fancy garments, stamped shoes, short waist-coats, tight and fine-knit hose’. Neither did he approve of toys like “little wooden horses, attractive cymbals, imitation birds, [and] gilded drums,” recommending instead more virtuous playthings like “a little altar or two, … little vestments … little candles … [and] little bells,”, so that the children could pretend they were acolytes or priests. Three guesses no prizes as to which category ended up being the more popular one.
Some types of toys would have been surprisingly familiar to us – for example, doll furniture. In Germany one could find whole doll kitchens with dishes, meat plates, cutlery and furniture since the 1550s at the latest. Wealthier girls were also bought so-called fashion dolls that showcased, you guessed it, the latest fashions in the land.
Of course, poorer children had to make do with dolls stuffed with straw, and play with such props as animal knucklebones or wooden wheels. However, it doesn’t mean that their lives were completely devoid of fun. Contemporary paintings, such as Peter Brueghel’ Children’s Games (1560), show children playing blind man’s bluff, ‘paper, scissors, stone’, roll hoops and rock barrels.

Pueritia, or childhood
A child’s education started with learning his (or, rarer, her) letters. A rather charming contemporary advice recommends the parents to do it by carving each letter on a piece of fruit, and reward the child with the fruit in question if the letter is correctly identified. These kinds of basics could be learned at home (though, if you decided to choose the method above, better do it specifically in the kitchen) – however, once the rudimentary parts were done with, the paths of learning could branch wildly.
The wealthiest families hired tutors for their children, and these posts, prestigious and coveted as they were, could sometimes become subjects of competition. For example, when the future Elizabeth I grew old enough for her first lessons, it was assumed that these are going to be provided by her aunt and godmother, Lady Troy. However, the less highborn, but more ambitious Katherine Champernowne had other ideas; Henry VIII ended up being impressed by reports of her as a woman of good education, and appointed her to be his daughter’s governess in 1536. She held that post until 1544, when her precocious charge overgrew the standard highborn lady’s curriculum that consisted of reading, embroidery, music, riding, falconry, and chess. After that, the scholar William Grindal became the princess’ tutor, introducing her to classical authors such as Plato.
Latin and, to a lesser extent, Greek literature was not exclusively the preserve of the upper-class education. The cathedral school of St. Paul’s, for instance, taught children from middling walks of life - such as one Geoffrey Chaucer, the son of a wine merchant - and placed a great emphasis on the learning of Latin. The recitation of the Latin alphabet started with the sign of the cross and ended with ‘Amen’: quite a sign of respect, coming from a religious institution. The school’s library was full of books on logic, law and medicine, as well as such still-popular classical hits as Aesop’s Fables.
The boys (unlike in the more flexible world of private education, school pupils were invariably male) also owned some books of their own: contrary to a common misconception, even before the invention of printing press books were not necessarily objects of luxury. For example, when in 1337 John Cobbledick left twenty-nine books to Oriel College, each of them was priced at about 6 shillings. Two centuries later, when William Chatsworth sent his beloved wife Bess of Hardwick gifts during his sojourn in London, he included some learning materials for their children: three French grammars, a copy of Cosmografie de Levant, and psalms in French.
Charitable institutions could sometimes take care of the education of poorer children: for instance, in 1542, the Alderman William Dauntsey of London directed in his will that his executors should build a charity school of eight chambers (one of them for the schoolmaster) in West Lavington, Wiltshire.
Boys who could boast some musical talent had an unusual route for both education and promotion: chapel choirs. Many noblemen - and noblewomen such as Margaret Beaufort, the mother of Henry VII - engaged in cultural patronage, supporting at times dozens of choristers. Margaret herself had hired a composer, Robert Cooper, who was entrusted with finding gifted boys for her chapel from ‘London, Wynesore and in the west country'. She also made sure that, apart from musical education, the boys in her choir received tuition in Latin: in January 1506 the same Cooper was responsible for purchasing five 'gramer bokes ... for the chyldryn of the chapell', costing 4s 3d. Their education ensured that, after growing out of their roles in the choir, the boys would be able to continue academic studies. One Thomas Freston left Margaret’s chapel at the age of 13 to attend Winchester College, while the 1460 statute of Tattershall College specified provision for ‘four poor boys’ who were 'teachable in song and reading, to help the choristers, each of whom is to have commons and clothing and all else that the choristers do'.
Girls could be educated in convent schools; some, though by no means all, later chose to enter these nunneries as actual novices (they couldn’t legally make such a decision until the age of twelve, however, just as they couldn’t legally consent to marriage). Within the convent walls, as outside them, their comforts depended a lot on their parents’ standing - if their entry fee was generous enough, the girls, whether they came as pupils or little novices, could count on having a bedroom to themselves, a generous provision of wood to burn in their fireplace, and rare foodstuffs for their tables. When Edward I’s daughter Mary entered the convent of Amesbury as a novice in 1285, at unusual (and frankly illegal) age of seven, her lifelong allowance included an annual provision of twenty tuns of wine from the Bordeaux claret merchants and forty oaks as kindling for her fireplace.
Convents were supposed to foster the life of prayer and quiet contemplation, which was even harder to get used to for her teenage novices than it were for the secular boarders, who weren’t, after all, handled as strictly. However, even in a nunnery, there was a certain softening of the rules when it came to young girls. For example, at the Feast of St Nicholas, the patron saint of children, the youngest novice was named the Girl Abbess and allowed to lead the community in dancing and revelry.
Adolescentia, or adolescence
This stage of life was thought to start at about fourteen and end in one’s early twenties. Highborn children of both sexes were usually sent to foster at the homes of friends or relatives of equal standing, both to finish their education and to establish useful connections. When the teenage Jan of Brabant was sent for foster at the English court, he devoted his years there to perfecting the arts of jousting and hunting with falcons, as well as the less official, but nonetheless useful skills of party planning, people-charming, and careful gambling. His future bride Margaret of England, meanwhile, was improving on her feminine arts of weaving and embroidery, often spending substantial sums on gold thread and silks of different colours.
The machinery of altar diplomacy was already in full swing by the time they reached that age, even though marriage proper - with the consummation implied - was usually still a few years in the future. The fate of Margaret Beaufort, who gave birth to her first husband’s son at age thirteen, was considered grotesque and frankly unsafe; after all, it’s no coincidence that she could have no children after. For instance, Thomas Aquinas cautioned in his Mirror for Princes that consummation should be delayed until the woman had reached the age of eighteen, and the man twenty-one.
The complicated diplomatic and legal negotiation process behind such agreements was left to the heads of the families and their respective employees, without the involvement of the betrothed ones themselves. After all, it included such charming tasks as drawing a complete summary of all villages, farms, rents, forests, and windmills belonging to the future groom’s family which would be able to provide the income for the bride’s dower, or widow portion, in case she outlives him - a pretty significant possibility, considering.
Lower down the social scale, marriage arrangements were not so pressing a concern - urban artisans, male or female, often married only in their mid-twenties. When their children reached adolescence, they usually worried about arranging an apprenticeship for them rather than a betrothal.
A child could be apprenticed to a master who practiced one of the trades regulated by the guilds of the town. These included mercers, grocers, fishmongers, drapers, tailors and even artists. The training usually took seven years, during which the master in question was obliged not only to educate the apprentice, but also to feed and clothe them and generally treat them like a member of their family (which usually also meant having them help around the house). This way, the future artisans spent their adolescence in a situation of indenture and completed their training in their early twenties. The ultimate dream after that was becoming a master in their own right and acquiring one’s own workshop; but, like people in their early twenties everywhere, most were too broke for that, and ended up working as journeymen in their master’s workshop for some more years - or sometimes for the rest of their lives.
Although the most prestigious trades, such as those of mercers or goldsmiths, only admitted men, others - the tailors, the bakers, the printers, the bakers, sometimes the painters - were open to apprentices of both sexes. Female artisans often ended up marrying their colleagues from the same guilds, and then keeping workshop together, but sometimes they kept their trade and conducted their business separately.
At this point, gaining the trappings of trade and marriage, they progressed into the adulthood, and thus beyond the scope of this post.
Sources:
Devices and Desires: Bess of Hardwick and the Building of Elizabethan England by Kate Hubbard
Daughters of Chivalry by Katie Wilson-Lee
The Lives of Tudor Women by Elizabeth Norton
Chaucer: A European Life by Marion Turner
Kisby, Fiona. “A Mirror of Monarchy: Music and Musicians in the Household Chapel of the Lady Margaret Beaufort, Mother of Henry VII.” Early Music History, vol. 16, 1997, pp. 203–234
The Early Modern Italian Domestic Interior, 1400–1700: Objects, Spaces, Domesticities by Erin J. Campbell et al.
#writing reference#writing advice#writing ref#writer#writeblr#writer's problems#fantasy guide#writing resources#writers resources#writers reference#middle ages#medieval#history#medieval history#historical guide#writing community#writeblr community
160 notes
·
View notes