#elastic tapes for garments
Explore tagged Tumblr posts
Visit Tumblr Blog
Explore Tumblr blogs with no restrictions, modern design and the best experience.
Last Seen Tumblr Blogs


Fun Fact
1,644 Tumblr posts in 1 second.
Text
How Elastic Tapes Improve the Fit of Maternity Wear
Maternity wear is designed to offer comfort and support while adapting to a woman’s changing body during pregnancy. One key component that makes maternity clothing flexible and comfortable is elastic tape. This small but essential feature helps garments stretch, fit snugly, and provide the necessary support throughout different pregnancy stages. Let’s explore how elastic tapes improve maternity wear and why they are a must-have in pregnancy fashion.

Adapting to a Growing Belly with Ease
During pregnancy, a woman’s belly expands significantly, making it essential for maternity clothing to cope with these changes. Elastic tapes allow garments to stretch without losing shape, ensuring they fit well from the first trimester to the last. These tapes are placed in waistbands, side panels, and belly bands to provide flexibility without restricting movement.
Providing Gentle Support without Tightness
Maternity wear should be supportive but never too tight. Unlike regular elastic bands that can feel constricting, elastic tapes distribute pressure evenly, offering a gentle yet secure fit. This is important in areas like the waist, under the bust, and around the hips, where extra support is needed without discomfort.
Ensuring a Secure Yet Adjustable Fit
Every pregnancy is unique, and women gain weight in different areas. Adjustable elastic tapes, commonly found in maternity jeans and leggings, help customize the fit. These tapes often come with buttonhole adjustments or soft drawstrings that allow women to loosen or tighten their clothing as needed. This feature ensures that maternity wear remains wearable even after childbirth.
Enhancing Stretch and Recovery for Longevity
One of the biggest challenges with maternity wear is ensuring it doesn’t become too loose over time. High-quality elastic tapes have excellent stretch and recovery properties, expanding when needed but returning to their original shape once the pressure is removed. This helps garments maintain fit and structure, making them suitable for extended use or a second pregnancy.
Boosting Comfort in Sensitive Areas
Pregnancy often makes women more sensitive to fabrics and tight clothing. Elastic tapes with soft-touch finishes reduce irritation and discomfort, especially in areas like the waistband and bust. Many maternity brands use seamless or ultra-soft elastic tapes to prevent itching or pressure marks on the skin, ensuring all-day comfort.
Supporting Postpartum Wear and Nursing Clothing
The benefits of elastic tapes extend beyond pregnancy. Many maternity clothes, such as nursing bras, postpartum leggings, and recovery belts, use elastic tapes to provide gentle compression and flexibility. These garments help new mothers transition comfortably while their bodies recover and adjust post-birth.
Conclusion
Elastic tapes might be a hidden element in maternity wear, but they ensure comfort, flexibility, and support. From adjusting to a growing belly to providing postpartum ease, these tapes make maternity clothing more functional and long-lasting. As fashion technology advances, we expect even more innovative uses of elastic tapes in pregnancy and postpartum wear.
0 notes
Text
my old binder was a constant hug and I miss it. unfortunately it was also a handsewn monstrosity of scrap denim and elastic panels and that means I have to go through all that again (including all the measuring and guesswork because guess who didn't take notes on the very experimental process). and all because [redacted just trust me that traditional binders don't work for me]
#maybe I'll feel more positive about the underworks binding sports bra once I've had a chance to lower my expectations#but shoutout to the handsewn denim monstrosity for getting me flatter more comfortably I guess??#if it were just a matter of it being slightly too small now OR the elastic wearing out I would just alter it. but alas.#I just looked it up and I first wore it out six years ago. it was a good day. it rained and I listened to folk music in a manorhouse.#yes I'm getting sentimental about a garment it's fine and normal#deep sigh I need to bite the bullet and resign myself to working on binder 2.0#that or cough up enough to try trans tape but friends when I tell you I get rashes from ''sensitive'' plaster adhesive--#this has been whinging with falderal when I should be asleep. thank you for attending.#falderal speaks#tomorrow. I will raid my scrap fabric box and see what the supplies are tomorrow.
6 notes
·
View notes
Text
🧵 Sewing 101: Essential Knowledgee
(Because every stitch counts!)
1️⃣ Must-Have Tools
Fabric scissors (never use them on paper!)
Seam ripper (your best friend for mistakes)
Pins & needles (sharp for wovens, ballpoint for knits)
Measuring tape (because "eyeballing it" leads to chaos)
Iron (pressing = professional results)
Pro Tip: Buy quality thread – cheap thread breaks and sheds!
2️⃣ Fabric Basics
TypeBest ForDifficultyCottonQuilts, bags, beginners★☆☆LinenSummer clothes, napkins★★☆KnitT-shirts, stretchy clothes★★★Silk/SatinLuxe garments, slips★★★★
Always prewash fabric – shrinkage ruins lives.
3️⃣ Stitch Savvy
Straight stitch: Your everyday workhorse
Zigzag: Stretchy fabrics & finishing edges
Backstitch: Secures seams (don’t skip this!)
French seam: Fancy hidden finish
4️⃣ Beginner Projects
Tote bag (master straight lines)
Pillowcase (learn corners & hems)
Scrunchie (10-minute win)
Elastic-waist skirt (intro to garment-making)
5️⃣ Pro Tips
✔ Press as you go – it’s the secret to polished pieces ✔ Change needles often (every 8-10 hours of sewing) ✔ Use the right foot (zipper foot = game changer)
💀 Common Mistakes
Not testing stitches on scrap fabric
Cutting without checking pattern direction
Skipping the iron (crimgey puckered seams)
Why Sew?
Save money (repair > replace)
Reduce waste (upcycle old clothes)
Boost creativity (wear your art!)
8 notes
·
View notes
Text
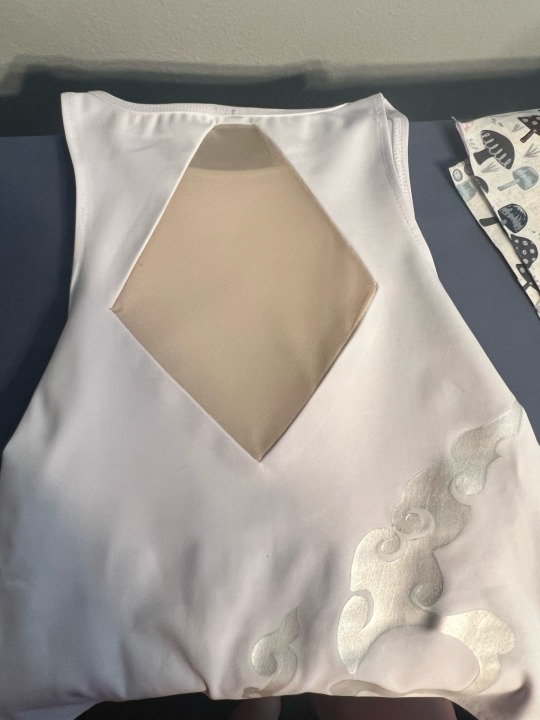
taking some time today to discuss xiao! specifically the upgrades i made to him for metrocon 2023. i did so much experimenting with new techniques and materials, so i wanted to share that here to document, and maybe inspire some of my fellow artists/cosplayers!

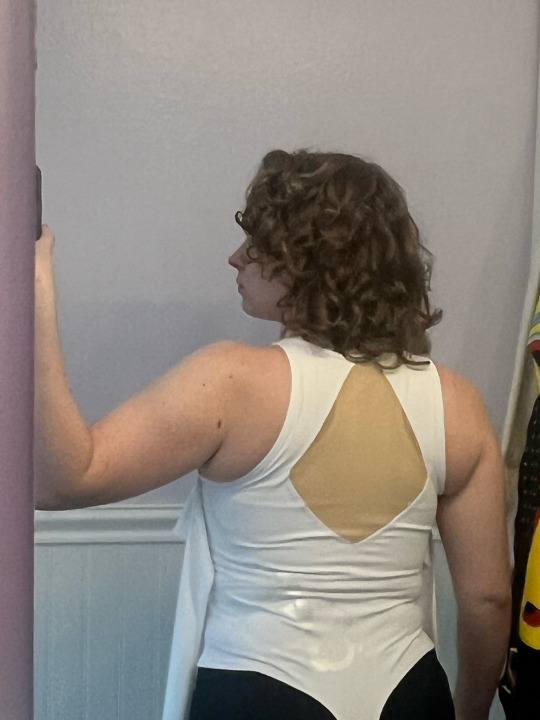
i don’t think i could ever properly explain how happy i was after remaking xiao’s shirt. the previous version (which was purchased) fit really poorly, and the fabric was not great. it constantly pulled out from the waist of the pants and it practically blocked any airflow. the solution was simple: remake it from a bodysuit. that way the shirt not only stayed in place but also already gave me a much better form-fitting base to start out with. the mesh panel in the back was the part i worried about the most but ended up being the part i’m happiest with! i used power mesh that i hand dyed to be close to my skin tone (though the color isn’t very clear due to my binder’s color).
the swirling pattern on the bodysuit is a metallic white fabric paint. i made a digital drawing of the pattern on procreate, then printed it onto freezer paper. after cutting it out with an exacto knife, you can actually iron freezer paper onto fabric (shiny side facing the fabric) and it creates a nearly seamless stencil for fabric paint! i see myself using this technique a lot in the future, it’s literally perfect!!
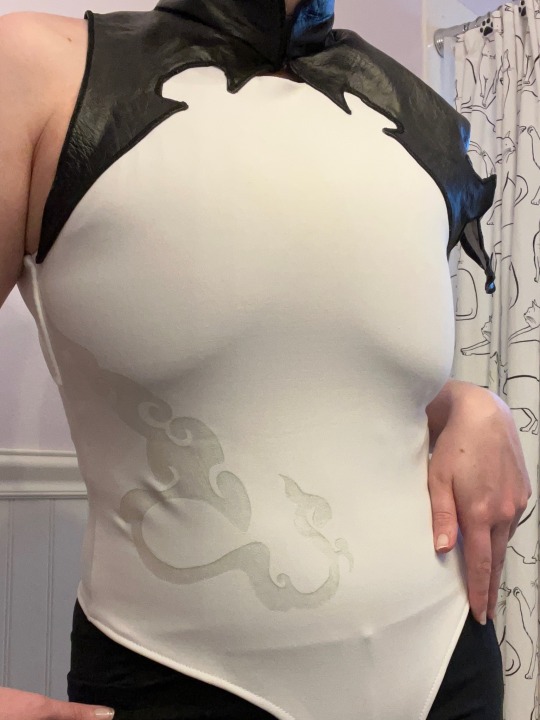
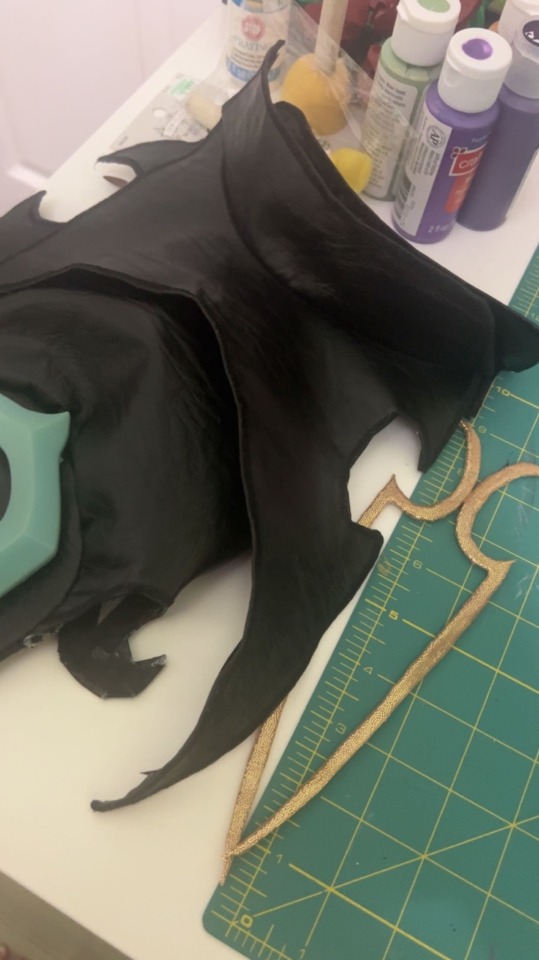
the black leather piece at the neck and shoulders was my biggest obstacle. not only have i never worked with leather, but it is also a non-stretch material i’d be attaching to the collar/neck portion that very much needed to be able to stretch to be pulled on. thankfully the design worked out that i could have 2 closure points, one on the back of the neck and one at the front of the neck. the entire piece is hemmed by folding over and gluing the raw edge to the inside, then i glued hem tape over those raw edges to cover them and make them softer on the skin (the entire leather piece is unlined, due to its complex shape). all the visible edges of the leather were satin stitched to give them a clean, crisp edge. the gold appliqués on the front and back are 2mm eva foam covered in a gold stretch fabric, then glued onto the bodysuit with e6000!
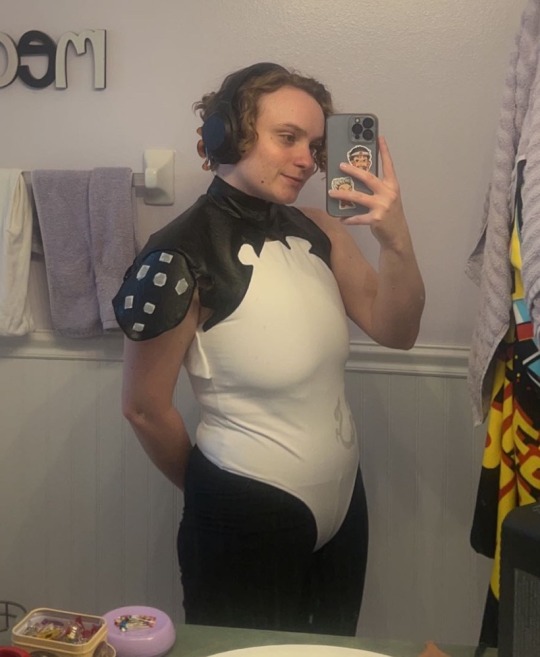

the two white pieces that frame the mesh panel on the back gave me more difficulty than i expected. their shape is a bit deceiving, and needing them to lie flat on my back without sacrificing the stretch of the main garment meant i couldn’t just top stitch them onto the back. and while i’m not super happy with how they ended up aligning (where they meet at the top is much further down than i was aiming for), i still think it came out really nice!
and that’s the finished top!
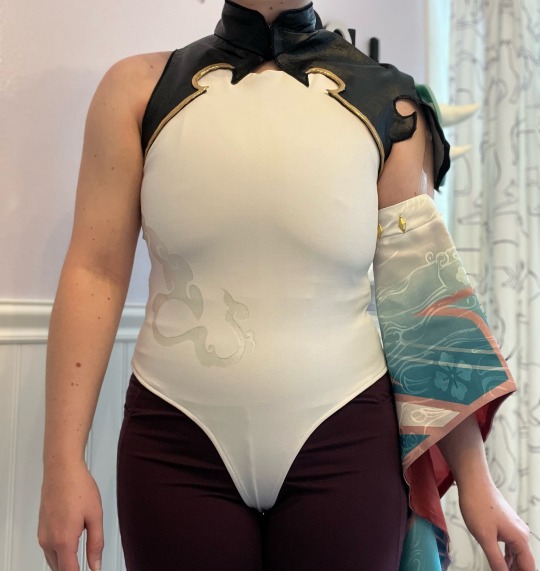
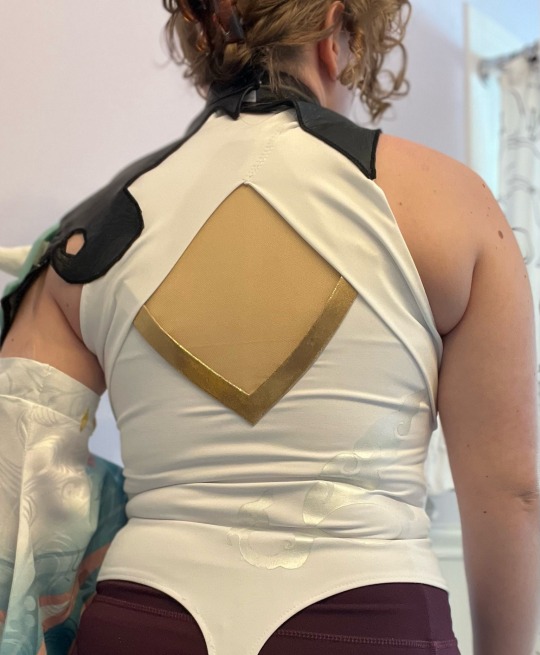
here’s a front and back of the finished top! the sleeve is held up with clear bra straps that hook onto the inside of the shirt at the shoulder. all in all, i absolutely love how this newer shirt came out.
besides the shirt/bodysuit, the boots also got an upgrade! i snagged some boots on sale on amazon for $20, which was an insane steal! this style is very universal for so many costumes, and it also helps that the boots are comfortable and flat too! all of the accessories on the boots are affixed temporarily or from the inside (velcro, snaps, and elastic) so that the integrity of the outer boot remains untouched and i can reuse them for several costumes and even everyday wear. i also replaced the gold piece around the neck that holds the “scarf.” just like the pieces on the shirt, it is 2mm foam covered in gold fabric. this not only helps the gold elements feel more cohesive but also lies a lot more comfortably on my neck!
#cosplay#cosplayer#tutorial#sewing#sewist#cosplay breakdown#cosplay tutorial#genshin impact xiao#xiao genshin impact#genshin xiao#genshin impact#genshin impact cosplay#genshin impact xiao cosplay#genshin xiao cosplay#xiao cosplay#genshin cosplay#cosplay wip#metrocon#metrocon 2023#xiao#adeptus xiao
110 notes
·
View notes
Text
Your Comprehensive Guide to Successful Sewing

Guide to Successful Sewing
Whether you're a beginner just starting your sewing journey or an experienced seamstress looking to refine your skills, the Guidelines offer a wealth of knowledge to help you succeed in your sewing projects. This comprehensive collection of educational articles covers all aspects of sewing, from basic techniques to advanced methods. Exploring the Guidelines The Guidelines are organized into various categories, each focusing on different aspects of sewing. Let's take a closer look at what you can find: 1 - Sewing Tools Basic Tools Sewing Tools More Sewing Tools Mats for Rotary Cutters Rotary Mat Q&A Scissors and Shears Rotary Cutters Measuring Tools Marking Tools Tube Turners Part 1 Tube Turners Part 2 2 - Equipment Setting Up a Sewing Room Sewing Machine Basics Buying a Sewing Machine Pressing Equipment Ironing Boards Sergers Presses & Home Pressing Systems Serger Stitches Computerized Sewing Machines 3 - Understanding Patterns Pattern Markings Part 1 Pattern Markings Part 2 4 - Fabric The Right Fabric Preparing to Sew - Fabric and Pattern Preparation Cotton Identifying Fibers & Fabrics Denim - More Than Just Jeans Napped Fabrics Unconventional Fabric Sources Straightening Fabric Grain Sewing with Knits Working with Napped Fabrics Wool Slick Tricks: Laminated Fabrics and Vinyls Sewing with Handwovens Identifying Plaids Sewing with Minkee-like Fabrics 5 -Linings & Interfacings Interfacing 101 6 - Notions Button, Button Pins Invisible Thread Elastic - the Notion that Gives Selecting Snaps Bindings & Tapes Using Bias Tape Rick Rack 7 - Home Dec Bed Coverings Drapery Types Table Treatments: Tablecloths Table Treatments: Placemats, Napkins and Runners Decorating with Quilts 8 - Home Dec How To Pillows Fabric Napkins Covering a Lampshade with Fabric Making Rod Pocket Curtains Tab Top Curtains Making a Shower Curtain Covering a Bench Top Tassels 9 - Quilting Quilting Tools Quilting Terms Notions for Quilters Pre-Cut Quilting Fabrics Quilting Rulers Quilting Designs Making Bias and Bias Binding Binding a Quilt Prairie Points Yo-Yos Seminole Piecing
10 - Fashion/Apparel
Body Types Clothing Care and Repair 11 - General How-To Pressing Pants Simple Seaming Techniques Seam Finishes Part 1 Fold-Down Casings Simple Hems Staystitching Easing, Gathering & Shirring Working with Fold-over Elastic Applied Casings Twin-Needle Sewing Seam Finishes Part 2 Ruffles Working with Stripes Piping Princess Seams Flat Fell Seams Bound and Hong Kong Seam Finishes Beading Part 1 Beading Part 2 12 - Garment How-To Attaching Buttons Easy Waistband Casings Centered Zipper Button Loops Covered Buttons Understitching Dart Basics Topstitching Shirt Collar Pointers Read the full article
12 notes
·
View notes
Text
Sewing Challenge ˖ ࣪⭑

Next year I am going to get better at sewing and garment construction. Here's a list for fun to check off as I make progress. i intentionally left some open-ended. I dont expect to check off everything, just using it for fun. Ill update with any new ones I think of.
⋆⋆☆⋆⋆
Techniques
- [ ] Pocket
- [✓] Invisible zipper
- [ ] Separating zipper
- [✓] Closed end zipper
- [ ] Zipper fly
- [ ] French seam
- [ ] Flatlock seam
- [ ] Flat felled seam
- [ ] Lettuce hem
- [ ] Rolled hem
- [ ] Double needle hem
- [ ] Gathers
- [ ] Shirring
- [ ] Pleats
- [✓] Bias tape
- [ ] Piping
- [ ] Elastic
- [ ] Belt loops
- [ ] Drawstring
- [ ] Adjustable straps
- [ ] Buttons
- [ ] Pankou
- [ ] Snap closure
- [ ] Magnetic snap closure
- [ ] Hook and eye closure
- [ ] Velcro
- [ ] Collar
- [ ] Dyeing
- [ ] Printing
- [ ] Grommet
- [ ] Lace
- [ ] Boning
- [✓] Quilting
⋆⋆☆⋆⋆
Garments
- [ ] Tank
- [ ] T-shirt
- [ ] Long sleeve shirt
- [ ] Button up shirt
- [ ] Knit top
- [ ] Short dress
- [ ] Long dress
- [ ] Skirt
- [ ] Shorts
- [ ] Skort
- [ ] Pants
- [ ] Jumpsuit
- [ ] One-piece bodysuit
- [ ] Bikini set
- [ ] Bra
- [ ] Underwear
- [ ] Robe
- [ ] Jacket
- [ ] Hoodie
- [ ] Vest
- [ ] Coat
⋆⋆☆⋆⋆
Awards 🏆
- [ /5] I completed 5! 🥉
- [ /10] I completed 10! 🥈
- [ /20] I completed 20! 🥇
⋆⋆☆⋆⋆
Wishlist
Some items id really like to have <3
- [ ] Dressform
- [ ] Rotary cutter
- [ ] Large cutting mat
- [✓] Lint brush
- [ ] Grommet punch
- [ ] More clips and pins
- [ ] Compass
- [ ] Loop turner
- [ ] thimble
- [ ] washi tape
banner edit by me
5 notes
·
View notes
Text
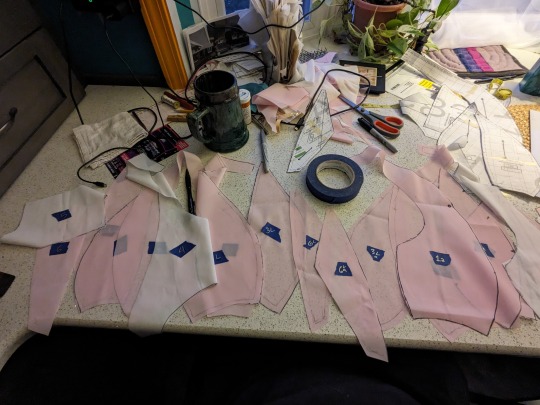
Loftus Bralette Sewing Journal: cutting out
LOL so I have started the project but not made a ton of progress, but I thought, well, I'll write it up anyway.
First thing I did was watch the sewalong. It's not the slickest, shiniest sewalong-- there's no jaunty theme song, there's no animated intro, there's no flashy graphics-- it's very much Old Youtubey, where it's someone actually doing the steps and showing you as she goes, not really sped up, with minimal intercuts. As it happens, the demonstrating sewist is the owner of Porcelynne, which is a lingerie supply company and pattern maker, and she also helped design this pattern and the previous Cashmerette bra because she is not only a bra specialist but also is a very busty woman herself, and so completely on the same wavelength. She has incredible technical knowledge, has clearly sewn very many bras, produces a lovely end product, and shows you several places where she either made a mistake or has made many mistakes in the past and has developed this trick to avoid the mistakes. So it's a good solid sewalong... just not the most short-attention-span-friendly thing in the world.
So I will say I watched the sewalong with closed captions on and at 1.5x speed, just for my first runthrough.
(I can't watch a sewalong or tutorial while I'm trying to sew a thing. I do best if I watch it first, so I know what to expect. Hopefully it relates well enough to the instruction manual that I can piece the two together and figure out what I'm supposed to do as I go.)
And now I've started my own sew-through.
I bought a bunch of stuff from Porcelynne-- a nice kit for once I've made it, but basic stuff to muslin it. There are several places on the Cashmerette website and also in the instruction book for the pattern that lays out exactly what fabric you need and what notions. I also then made a list in Sharpie on a scrap of paper, inventorying how many pieces of each pattern piece I needed, and how many inches of each type of elastic I needed, so that I could enclose that inventory along with this iteration of the garment, so that I could refer to the checklist.
I also labeled the elastic-- N for neckline, U for underarm-- as I cut it, so I would know what was supposed to go where.
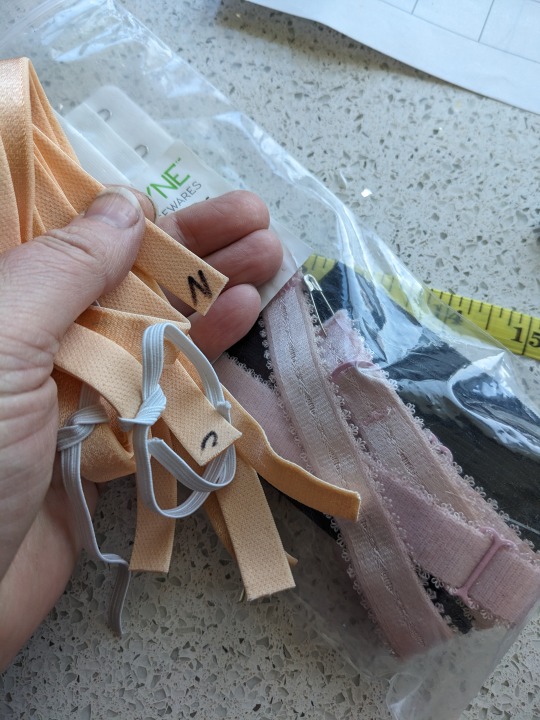
[img desc my hand holding several lengths of peach-colored elastic, one with a sharpie N and the other with a sharpie U which is sideways and looks like a C but I know what it means trust me. in the background is a baggie with other elastic in it including two pink straps I cut off an old bra to reuse the notions. This bra muslin is not going to be all one color or even going to match, that's just how it is.]
I forgot to order cup lining, it was in my cart but then the session refreshed and I didn't re-add it. So I'm making my muslin with two layers of the same fabric, which means I need to label which layers are the lining and which the outer. This is both easier and harder and I'll let you know whether I recommend this or not 😅.
I'm following Jen from Porcelynne's suggestion of marking the wrong side of the fabric with painter's tape, and i applied the tape immediately after cutting out each piece since there's not an obvious right or wrong side to this fabric, and I also used a felt-tipped marker to write on the painter's tape which 1) piece it was, which 2) layer it was, and 3) whether it was the pattern piece or the mirror image. (Given my specific brand of neurospicy I cannot reliably tell left from right so I'm just making One Half Of The Bra The Same Direction As The Paper Pattern And The Other Half Mirror-Imaged and I'll find out which is right and which is left once i put it on.)

I also immediately used a felt-tipped marker to trace the grainlines on the pattern pieces, then flipped them over and traced the marker line onto the other side, so that I could see how the grainline should be oriented while I had the pattern pieces in mirror-image mode, since the most accurate way to cut fabric is not to cut it while folded. And i know myself, I'd want to wiggle the odd-shaped pieces to fit best on the fabric, and I'd fuck up the grainlines, which are important especially as some of the pieces are cut from stretch fabric.
To add to the confusion, the lining is inside-out from the regular bra. So my first layer, everything mirror-imaged gets an A on the end. (Piece 1a, 2a, 3a on the painter's tape.) but for the lining, the A goes on everything NOT mirror imaged, because the lining and main pieces are cut from the same pattern piece. So the first half of my bra consists of pieces 1, 2, 3 in main fabric, and then mirror-imaged pices 1L, 2L, 3L, and 6L in the lining fabric, and then also 6 non-mirror-imaged in the lining fabric-- 6 is the center front bit and you cut both layers from your lining.
So then the opposite of that is the other half of my bra. Pieces 1A, 2A, 3A, and then lining 1LA, 2LA, 3LA, etc. And then there are two copies of pattern pieces 5 and 4 cut from the powermesh fabric-- the powerbar, and the back band.
L for lining appears in the written instructions, and that plus my own inability to distinguish left from right is why the bra is not labeled L for left or R for right. L for Lining would confuse me even if I just labeled the right half. So I did not, it is Side Unmarked and Side A.
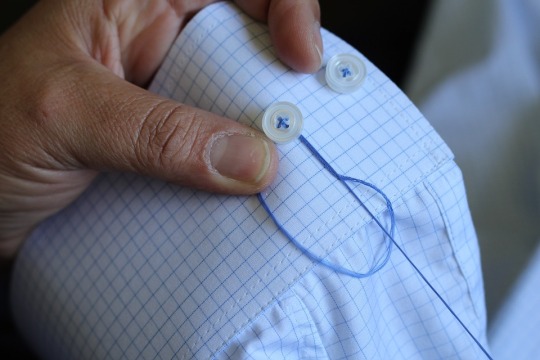
I traced the paper pattern in felt-tipped marker directly unerasably onto the fabric because this is my muslin. And then after I cut it out (with a rotary cutter and mat) I took a pencil, laid the translucent fabric over the paper pattern piece, and traced on every notch, every marking, and the entirety of the sewing lines. For the mirror-imaged pieces, I did this and then flipped them over and darkened the sewing lines onto the now-right side of the fabric. Because this is my muslin and it is far more important to me to sew it perfectly accurately than it is to have the marks erase for later when I maybe wear it and maybe never do.
Yes, this took forever. I did not do this at my usual cutting table I did it on the kitchen table where I could sit comfortably, because I only needed about 24x24" of space to work, and I needed good light and a very steady surface and to be comfortable and not rushed while I worked.
[image description: all my cut out pieces spread across my kitchen table/counter, labeled in silver metallic sharpie on blue painter's tape, with the roll of painter's tape and the paper pattern pieces and my cup of water and scissors all strewn around.]
As soon as I was done I lay everything out, compared it to my checklist, compared the checklist back to the instruction book, made sure the painter's tape was on the correct side of each piece, and then put everything neatly away. I have all my elastics and notions in one little plastic baggie, and then all of the second half of the bra (so, mirror-imaged main pieces, and then non-mirror-imaged lining pieces) in another little plastic baggie, and then the first half of the bra is just in the main baggie that i put the other baggies into.
I brought the whole thing down into my sewing room, and what I did was get the lid of a rubbermaid tote to use as a tray, and lay out half the bra on that, triple-checking the orientation of the pieces, and I did find one where the masking tape was on the wrong side somehow argh. But I've started off by sewing the outer layer and lining layer of the first half together, and I got like one seam in before I was interrupted, but everything inactive is still in the baggies and everything active is on that rubbermaid tote lid in its correct orientation, so I could walk away from it and know where to resume when I come back.

I also have the paper pattern pieces easily to hand to check that notches are correctly marked, because I have no faith in myself to have done that right consistently. Normally I put the pattern away but I'm not doing that here, and I think it makes sense to just print the pattern out numerous times and put any corrections on every instance of it, and then have several copies of it so that any project in-progress can still have the pattern pieces with it until it is complete.
This is my note to myself to do that, keep the pattern pieces there and make adjustments as necessary and then when I finish the muslin, print out another copy with adjustments included.
I also would like to print out a mirror-imaged copy, and potentially have separate pattern pieces for the left and right, as I expect some asymmetry to be a factor.
16 notes
·
View notes
Text
this is so important, thank you op for gathering up those links! i am an independent seamstress, and i would say the bulk of my work is putting in new zippers and elastics, hemming, and mending.
i want to describe putting in new elastic, because i do so so much of that, and the elastic waist always gives out long before the garment wears out. it's tedious, and you need good light, a seam ripper or tiny razor, and maybe some magnification. but you can do it, or at the very least prepare your garment for your friend with the sewing machine to finish it in a few minutes.
in the garment industry, waistband elastic is usually sewn to the edge of the garment before being folded to the inside and stitched again, so there is a lot of stitching to remove. so settle in with a podcast or something, and start. use your seam ripper or tiny olfa razor to slip in between the layers of material and just cut the thread. sometimes you have to do it this way all the way round, but some garments use chain stitching, which pulls out more easily if you can get it "unlocked". this is where magnification helps! think about which direction the seam was sewn by the machine, typically with the edge toward the right and the rest of the garment toward the left, and the looper threads underneath.
then the edge of the elastic is probably serged to the edge of the fabric. this looks like one or two rows of straight stitches (on top), and two looper threads going back and forth and interlocking over the edge. if you can get the tip of your seam ripper under one of the straight threads (start with the one in the middle of the seam if there are two) you may be able to draw out several inches of it at a time, which will be faster and neater than having to cut every stitch.
the worst is when the original elastic is also sewn with extra rows of stitching, but these are usually chain stitching. just be patient and pick it all out.
there may be a few other bits of stitching, like where a label is attached, so pick those out too. then tidy away as much of the bits of thread as you can. a bit of sticky tape can help. if you like having the label to help you tell where the back is, safety pin it to the center back seam, out of the way, for sewing in later.
now for the new elastic, which will be in a casing, so next time it will be easy to swap out! my rule of thumb is to measure the person's waist, subtract 10%, cut that much elastic, and usually that's the right amount to feel secure but not too sqeezy.
if the garment is a knit fabric, it may not need this, but a woven fabric will need that raw edge overcast in some way. so at least a zig zag stitch, or a serged edge if possible. by hand, you could overcast it. use your judgement to catch enough material that it won't just pull out, a quarter inch should be good. you might also press 1/4" under and straight or zig zag that on a lightweight woven.
next, fold that edge back to the inside on the original crease, or a little more: around 1.25" is good for 3/4" elastic. sew close to the edge but not so close that you fall off. straight is fine for wovens, zig zag for stretch fabrics. leave an opening of 1.5-2" to insert the elastic.
if you don't have a bodkin, just use a big safety pin to lead the elastic through the casing. pin the trailing end to the garment so a couple inches are still sticking out, you'll want that end! when you get all the way round, check that the elastic isn't twisted. sew the ends together firmly. close up that little opening in the casing seam, and reattach the label if you like.
presto, new life for a garment you already have and like!
Resources for Mending Clothes
We toss out over 80 pounds of textiles each year. These textiles are often made of plastic materials (polyester, nylon), made in unethical conditions, dyed with harsh dyes that often get put into the rivers, etc. Even a single cotton shirt releases carbon emissions and uses tons of water.
So the best thing to prevent the unsustainable growth of the fashion industry is to make sure that your clothing lasts as long as possible. To do so, mending clothing is a must. So here are some resources to help you learn how to do various things, such as sewing a button, to tailoring clothes, or even upcycling old clothing into new styles.
* How to sew on three different types of button
* How to hand sew on a patch on a torn pair of jeans
* How to sew up a hole in an old shirt
* How to sew a simple T-shirt
* How to upcycle old clothing into new clothing
* More upcycle and sewing techniques
* How to repair a damaged sock
* How to do an invisible stitch
* 3 different stitches to work with for different results
* How to make a T-shirt smaller so it fits you better
* How to make repairs to your shoes
These are just a few of the things that you can do in order to make sure that your clothing lasts for a long time. Nobody wants to keep buying new clothing, as it is expensive and wasteful.
So making alterations to your clothing, or fixing small holes hen you see them can be hugely beneficial to your wallet, to garment workers, and to the environment in the long term.
106K notes
·
View notes
Text
The Role of Elastic Manufacturers in the Fashion and Textile Industry

Elastic materials are fundamental components in the fashion and textile industries, particularly in products like activewear, lingerie, and other clothing that require flexibility, stretch, and comfort. Elastic tapes manufacturers play a crucial role in supplying these versatile materials, from elastic tapes to nylon tapes, which form the backbone of many fabric innovations. This blog delves into the importance of elastic manufacturers, highlighting their contributions to various sectors, especially in lingerie and garment production.
The Vital Role of Elastic Manufacturers
Elastic materials, especially those used in lingerie elastics and clothing accessories, are designed to provide stretchability and shape retention. These qualities make them essential in the production of garments that need to fit snugly while offering comfort and freedom of movement. Elastic manufacturers specialize in creating products that meet the specific demands of different industries, whether it’s for athletic wear, undergarments, or fashion items.
Elastic Tapes and Nylon Tapes: Key Components in Fashion Design
One of the most common products offered by elastic manufacturers is elastic tapes. These versatile tapes are used in various clothing items, from waistbands and cuffs to collars and hems. Elastic tapes are valued for their durability, stretch, and ability to maintain their shape over time, ensuring that garments fit comfortably while maintaining a smooth appearance.
Another essential material in fashion design is nylon tapes. These tapes, known for their strength and lightweight properties, are commonly used in both activewear and lingerie. Nylon is known for its resistance to abrasion, which makes it ideal for garments that undergo frequent wear and washing. Nylon tapes offer flexibility and softness, which is particularly important in lingerie elastics, where comfort against the skin is a priority.
Lingerie Elastics: A Growing Niche in Elastic Manufacturing
Lingerie elastics are a specialized product category within the broader elastic manufacturing industry. These elastics are designed to offer the right amount of stretch and comfort for intimate wear. Lingerie elastics need to be soft yet durable, providing support without compromising comfort. Elastic manufacturers catering to this niche focus on producing materials that are gentle on the skin, while still providing the necessary fit and structure required in lingerie designs.
Conclusion
Elastic manufacturers, including those specializing in elastic tapes and nylon tapes, are crucial to the fashion industry. Their contributions ensure that garments, especially lingerie, activewear, and other stretchable clothing, provide both function and comfort. As the demand for high-quality, durable, and comfortable materials continues to grow, elastic manufacturers will remain at the forefront of textile innovation, supporting the evolving needs of both designers and consumers alike.
0 notes
Text
The Role of Elastic Tapes in Children's Clothing: Safety and Comfort
Safety and comfort are crucial when it comes to children's clothing. One key component that helps with these features is the use of elastic tapes. These versatile materials ensure children's garments are comfortable and safe. Let's explore the various ways elastic tapes improve children's clothing.

Ensuring a Snug Fit without Restriction:
Elastic tapes provide a snug fit for children's clothing without hampering their movement. Whether in waistbands, cuffs, or hems, elastic tapes allow garments to fit securely while offering flexibility. This is important for active children who need the freedom to run, jump, and play without feeling restricted by their clothes.
Adapting to Growing Bodies:
Children grow quickly, and their clothing needs to adapt to these changes. Elastic tapes offer the perfect solution by providing stretchability. This means that garments with elastic tapes can be worn longer, saving parents the hassle and expense of frequently buying new clothes. The adaptability of elastic tapes ensures that clothes remain comfortable and well-fitting as children grow.
Improving Safety with Secure Fastenings:
Safety is a top priority in children's clothing, and elastic tapes help a lot in this. They provide secure fastenings that reduce the risk of loose parts. Such dangling parts pose a choking hazard. For example, elastic tapes in waistbands and cuffs ensure that garments stay in place, preventing them from slipping off or getting caught in objects. This added security gives parents peace of mind, knowing their children are safe wearing these clothes.
Providing Comfort for Sensitive Skin:
Children's skin is delicate and sensitive. They need clothing that is gentle and non-irritating. Elastic tapes used in children's garments are made from soft, hypoallergenic materials that provide comfort without causing irritation. This is important for children with sensitive skin or allergies. The softness of elastic tapes ensures that clothing feels comfortable against the skin, reducing the risk of rashes or discomfort.
Versatility in Design and Functionality:
Elastic tapes offer versatility in design and functionality, making them a popular choice in children's clothing. They can be used in various garment parts, from waistbands and cuffs to necklines and sleeves. This versatility allows designers to create clothes that are not only functional but also stylish. Elastic tapes can be added into different styles and designs, offering many options for parents and children.
Conclusion
In conclusion, elastic tapes for garments play a vital role in enhancing safety and comfort. They ensure a snug fit without restriction, adapt to growing bodies, and provide secure fastenings that improve safety. Elastic tapes also ensure easy dressing and undressing, offer comfort for sensitive skin, and provide versatility in design and functionality. By adding elastic tapes to children's garments, manufacturers can create clothes that are not only safe and comfortable but also stylish and flexible to the needs of growing children.
0 notes
Text
Garment Elastic Tape Manufacturers-Dinesh Enterprise
Dinesh Enterprise excels as a manufacturer of garment elastic tapes, offering a wide range of high-quality products. Their expertise includes elastic tapes for various garment applications, ensuring flexibility, durability, and superior performance. They cater to diverse industrial and commercial needs with reliable and innovative elastic solutions.
#garment elastic tape#nylon elastic tape#spandex elastic Tape#plain garment elastic tape manufacturers#garment elastic tape manufacturers#garment elastic tape suppliers#garment elastic tape manufacturers in gujarat#garment elastic tape manufacturers in india#garment elastic tape suppliers in india
0 notes
Text
Women's Golf Rainwear: Stay Dry, Comfortable, and Stylish on the Green
Introduction
Golf is a game to be played in all types of weather. Therefore, proper gear is the key for any serious player. Good rainwear, for women golfers, means being dry and comfortable, mobile, and nice-looking on the course. This is probably the reason why ladies' golf rainwear encompasses quite a lot of sophisticated fabrics, stylish cuts, and pragmatic designs addressing women's needs on the green. In this article, we shall be telling why rainwear is essential, what to look out for in rainwear garments, and give the best options for women's golf rainwear, among the answering of some questions from the people.
Why Rainwear in Women's Golf is Essential
When it gets a little unpredictable outside, a decent pair of rainwear can make all the difference between enjoyment and an abbreviated game. Quality rainwear will let female golfers:
Stay dry: Rain protection means protecting your body against rain, strong or light, and mist.
Comfort assured: It is not easy to keep comfort in the wet scenario; however, breathable rainwear helps your body temperature not get higher than normal and does not allow sweat to trap.
Optimize performance: Rainwear specialized does not retain bulk and is lightweight, which can easily facilitate the full range of motion.
Add Style to Function: The women's golf rainwear comes in a number of styles and smart colors, ensuring chic options across the board.
Key Features to Look for in Women's Golf Rainwear
The best rainwear is all about knowing a few features that are at the core of comfort and functionality:
Water-proofing/water resistance: Rainwear made from waterproof fabrics, including but not limited to Gore-Tex or nylon with a DWR (Durable Water Repellent) coating, can keep you dry even in heavy rain. Waterproofing is usually measured in millimeters; the higher the rating, the higher the water resistance.
Breathability - It is true that the best rainwear repels water, but it should allow heat and moisture to exit. Look out for garments that have breathability ratings and features offering ventilation for avoiding overheating.
Lightweight and Packable - Most brands nowadays offer rain jackets and rain pants that can be packed into small pouches or pockets due to convenience in carriage with no bulkiness.
Stretch and Flexibility: Golf is a game of full movement; look for rainwear that has stretch fabric or strategically placed stretch panels to offer uninhibited swings.
Wind Protection: More often than not, rainy weather brings wind into play, and wind-resistant rainwear offers another layer of comfort and protection on gusty days.
Seam Sealing and Zippers: Fully taped seams allow no access for water to penetrate in, while waterproof zippers further keep rain out-especially when heavy rain is experienced. And these are the minute details that matter most in keeping you dry.
Style and Fit: Women's golf rainwear was designed to bring out a feminine fit, marrying functionality with stylish cuts and color options.

Top Women's Golf Rainwear Picks
Following are a few popular brands and rainwear options highly rated by lady golfers:
FootJoy Women's HydroLite Rain Jacket: Popular for their waterproofing and breathability features, this jacket is lightweight and flexible to offer an excellent women's fit. It features a stretch fabric for full mobility and a 2.5-layer bonded construction that offers great weather protection.
Nike Women's Shield Full-Zip Jacket: Availed from technology named Shield by Nike, it can block the wind and is capable of water repulsion. Lightweight and packable, carrying it will not create a burden. Moreover, this fitted cut assures a stylish look. Besides, it has zippered pockets to keep some belongings safe.
Adidas Women's RAIN.RDY Jacket: Incorporating Adidas' RAIN.RDY technology for robust rain and wind protection, this jacket has been devised to enable breathability and comfort with a soft lining and elastic fabric. It is also available in bright colors for those fashion-conscious golfers.
Galvin Green Women's Alva GORE-TEX Paclite Pants: A fully waterproof golf pant with Gore-Tex to keep you perfectly dry in rainy conditions. They are lightweight, packable, and feature adjustable waistbands and hems for a tailored fit.
Under Armour Women's Storm Rain Pants: Made with Under Armour's Storm technology for highly water-resistant but breathable rain pants, these have a stretchy waistband that will definitely make them comfortable to wear while playing in rainy weather conditions.
Care for Women's Golf Rainwear
To maintain this rainwear and extend its life, good performance depends on the following care tips:
Washing Instructions: Follow the instructions on the label for washing to avoid damage to waterproof coatings.
Avoid using Fabric Softener: Fabric softener can break down the water-repellent properties of your rainwear.
Air Dry or Low Heat Dry: High heat may damage the fabric; air-drying or using low heat preserves the waterproof membrane.
Reapplication of DWR coating: With time, rainwear loses their water-repellent finish. Reapply DWR coating using DWR spray periodically.
Storage: Avoid folding or compressing rainwear for extended periods of time. Always hang the jackets and pants to retain shape and performance.
Frequently Asked Questions
What's the difference between waterproof and water-resistant rainwear?
Answer: Waterproof rainwear is fully sealed to take some heavy rain and not let any moisture come through. The materials are usually of Gore-Tex or treated nylon. Water-resistant rain gear offers little protection but is sufficient for light rain or mist. In heavy downpours, one should wear waterproof gear.
How am I to know how to select the right size of rainwear?
Answer: Golf rainwear should comfortably fit over your normal golf apparel and not be too tight. Always refer to the sizing chart provided by the brand, taking into consideration how much extra layering you will potentially need underneath. Most waterproof golf rain wear features adjustable cuffs, hem, and waist to give a closer fit.
Can I machine-wash my waterproof golf jacket?
Most waterproof jackets can be machine-washed, but of course, you have to consider the label regarding most decisions for proper care.Fabric softeners and high-heat drying can work horribly against the water-resistant coating. Always use a mild detergent, and for best results, consider a waterproofing detergent.
What's the benefit of a packable rain jacket?
The concept is lightweight and easy to carry with packable rain jackets. They can usually be folded into a pocket or small bag, which makes them handy to keep in your golf bag, taking no real weight or space.They are great for those days that the weather can get pretty indecisive, and one is not sure if they will need protection from rain.
Will rainwear affect my golf swing?
Answer: Good-quality ladies' golf rainwear is designed to not hinder your swing in any manner. Look for rainwear with some sort of stretch or flexible panels that offer full freedom of movement without restriction. Light, fitted jackets and pants offer unlimited performance out on the course.
Conclusion
Ladies' golf rainwear is a worthwhile investment to make for any golfer who enjoys playing come rain or shine. Rainwear today does have advanced technology in waterproofing, breathability, and flexibility to keep you comfortable and focused during the most challenging weather conditions. With a well-fitting rainwear that works under pressure and one that suits your style, you can be course-ready whatever the weather may be. Stylish and functional options from popular brands such as FootJoy, Nike, Adidas, Galvin Green, and Under Armour meet the specific needs of the female golfer.
0 notes
Text
Find Your Perfect Fit in Stylish Latex Wear

Finding the right fit is crucial to fashion. And even truer within the realm of latex clothing freely expressed through fashionable style, comfort, and bravery. Latex wear gives you a chance to express yourself on occasion or simply create an element of excitement in your daily attire. This article will help you in your search for the perfect fit in latex and why latex wear should become an indispensable article in any easy fancy wardrobe.
Understanding Latex Clothing
Latex clothing has developed in fame over the years on account of its tight-fitting and ultra-sexy nature. Made with natural or synthetic rubber, latex graces you with a particular shine that brings every exquisite outfit into sharp focus. The possibilities range from dresses to tops, from leggings to bodysuits. However, the sizing of latex wear is a tricky business since latex is a stretchy material. To look your best in latex clothing, understanding how to get the right size is crucial.
Tips for Finding the Right Fit
Know Your Measurements: Before shopping for latex clothing, measure your body. Using a soft measuring tape, measure the bust, waist, and hips. Most brands will have some sizing chart available, so compare your measurements to fit yourself well.
Think About Stretch and Compression: Featuring an odd elasticity, latex absorbs stretch to adhere to the body. However, with that should come some compression; a not quite comfortable feeling, in case one affects the size. Go for a size that has amenable breathing space while still uplifting your shape. In case of uncertainty about which size to buy, always select the one that is a size up.
Experiment: There is no such thing as standard latex wear. Several different designs can evoke quite different fits. For instance, a latex dress might fit quite differently from a latex bodysuit. Take your time experimenting with the different cuts and styles to see what best flatters the shape of your body.
Verify the Thickness: Latex comes in different thicknesses, which may directly affect how the garment fits and feels. Whereas thinner latex may cling to your skin more tightly, thicker latex will provide more structure. The choice of thickness should depend on your comfort level.
Know the Care Instructions: Latex is high-maintenance when it comes to upkeep; it only bugs some people. Regardless of the government policies, the makers must have placed some care instructions regarding the longevity of the latex apparel, which must be followed without fail, whether you want your clothes to last or not. Proper care will also continue the managing and delineating of the outfit.
The Invite of Latex Fashion
Wearing latex clothes is not just about how it fits, but it is also all about making a statement. Latex wear will inspire one with some empowerment and hence boost the courage to express a deft sense of style. The glossy finish of latex can reflect light magnificently which is one of the attractions for nightlife and parties. Then again, it is adaptable-yoke a latex top with your jeans and go casually out, or fully embraced in a latex outfit that is just en vogue for a night out.
Conclusion
Picking yotheight size in fashionably stylish latex wear very much is a matter of understanding your body, experimenting with the styles, and choosing the fine fit. Once you know the correct fit, you can embrace the boldness that latex fashion has to offer. So, what are you waiting for? Go take a plunge into the world of latex clothing, observe the effect of transformation it has on your wardrobe, and upgrade your style statement. Whether you are a veteran of latex attire or a curious first-timer, a perfect fit is just waiting for you!
0 notes
Text

Custom Woven Jacquard Elastic Webbing Band/Tape
0 notes
Text
Chemise/Peasnt Dress Journey Part 1
I want to post more, so I'm going to try and be better about documenting this adventure. I tired a bit with the last one, but that's being shelved, so off we go!
It has been HOT here and struggling with some body issues. Many of my clothes are packed away that are not t-shirts and lounge pants, and even if I were to be able to unpack them, I believe many of them would no longer fit due to weight gain.
So with that, I wanted a nice airy lined dress. Chemise de la reine sounds perfect! Modern day style peasant dresses are also what I want. I've spent days thinking about this thing.


FB has been giving me some very targeted ads. I have gotten a similar top to the black one before, but I actually hated the off the shoulder aspect and it was too much in my armpits. The best way to make something you want is to make it yourself!

After looking at some inspiration, I drew out what I want. Something flowy and open but has shirring at the waist.
After this, since my work was affected by the IT errors yesterday, I researched patterns on Chemises. Something Easy and Simple to work with.
Three sites I read their instructions. http://www.elizabethancostume.net/cheminst.html https://reconstructinghistory.com/blogs/blog/your-first-garb-the-chemise http://www.festiveattyre.com/p/how-to-make-easy-italian-chemise.html
Each one had slightly different patterns on how to make a chemise. They all seem pretty simple - except for Reconstructing History I could not figure out where one of the gusset edges get sewn down.
I'm going to go with the FestiveAttyre method after some thought. I haven't worked with gussets before, but between that and how you line up the pieces, I think it'll allow me the best ability to adjust arm holes and the size of the neck hole to what I'm comfortable with.
My next step is to find some fabric to make a mock with to confirm the measurements and feel. I won't be making a full dress, but something more like a top, akin to the black top in the first inspo picture.
For the shirring, I haven't fully committed to a way yet, but first planning to do channels either with bias tape for each one or a rectangle sewn to the garment and then the channels stitched into that. I don't really want to sew only the elastic to the garment and have it touching skin. It'll be easier to change if there's noticeable need doing it this way.
I've gone through my fabric stash and have some fabric, that while not light enough I think to be close to the fabric I'll use for the final (That I have not bought yet) I think it'll do well enough to give me an idea on the pattern sizing enough and not feel too overly bulky like the muslin I got right now.
I've also contemplated using some bedsheets for this, but I don't know if they are lone top sheets or for the King or Queen bed, so I thought against doing that this time.
0 notes
