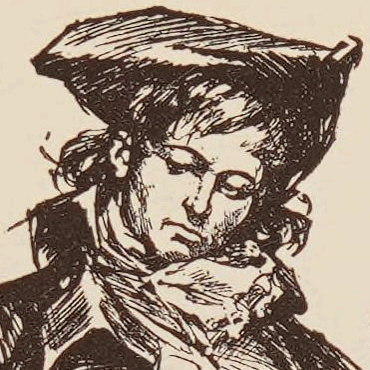
#edit: replaced with higher quality version
Explore tagged Tumblr posts
Visit Tumblr Blog
Explore Tumblr blogs with no restrictions, modern design and the best experience.
Last Seen Tumblr Blogs


Fun Fact
The “We are the 99%” Tumblr blog became the slogan for the Occupy Wall Street movement.
Text
BITE! from BITE! Lei Yuxin, Jacob Crooked, Peter Sierzput, Lei Sheng, Sān-Z, HOYO-MiX
#zenless zone zero#zzz#zzzero#ellen#ellen joe#victoria housekeeping co#bite#shark's gotta bite#vocal track#zzz:vocal track#zzz:character song#lei yuxin#lei sheng#jacob crooked#peter sierzput#from the ellen ep - “shark's gotta bite” featuring ellen#edit: replaced with higher quality version
22 notes
·
View notes
Text
Here’s a transparent png (500 x 500 px) of the new Wednesday emblem from the official Wednesday Netflix Insta. Enjoy!

Edit: Whoops. 😩 Looks like a higher quality version is already online. Get 'em at whatonnetflix @ twitter. Also replaced the above png with a higher quality version.
#I may try to remake a cleaner vector version#wednesday netflix#wednesday 2025#wednesday addams#enid sinclair#wednesday 2022#the addams family#wenclair
79 notes
·
View notes
Note
can i ask what tool you use to compress?
also could you perhaps compress this image :)
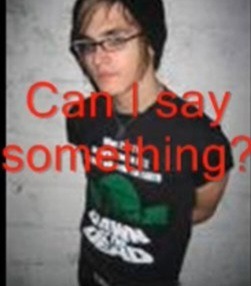
Compressed!
116KB -> 8KB ( 6.9% )
Sure. I'm going to be answering @slugcat-in-gundam's ask too because they sent it at a similar time with a similar question:

I use GIMP for all image editing, besides occasional Lunapic.com usage. I did an FAQ on this on another gimmick blog a while back but I do different things here sometimes so I'll redo it anyways.
I got a higher quality version of your picture so the compression will be more noticable:

All the compression done on this blog favors aesthetics over functions, which is why there's extreme dithering on everything: dithering isn't really something that's used at all anymore but I like how it looks.


The main process is really just scaling the image down with linear interpolation to something between 64-256 pixels on the short side, and using Gimp's feature of letting you clamp an image to indexed colors, specifically with Floyd-Steinberg dithering on. If there isn't dithering, the picture will look like this:

Then I just check the sizes they export at and post the image and that's it.
If I want to make the image comically small and impossible to discern, I'll keep it as a jpeg and turn the quality way down at a tiny size:

Which will end up looking like this.

There are other techniques used sometimes, mainly on the #win98 pictures and #gba pictures.
With the win98 pictures, I scale them down to 320x240 or 160x120 every time and clamp the colors to the windows base palette, usually saturating the image before since the dithering doesn't look great otherwise. Look how this picture looks without vs with extra saturated colors:

I forgot to mention before so I'm just jamming it here, but I'll also replace text in the font 3x3 mono if it's too small to be readable to keep the image legible sometimes. You'll notice this being done with fine print and watermarks sometimes:
Here's the runthrough of that:


Lastly, with the GBA pictures, it's about the same process but I just clamp the colors down to a number that the dithering is noticeable while the image is at the gba resolution. I never noticed until making this tutorial, but there's a positioned option for dithering too which I'll probably start using for these gba posts.


That's about it. Here's the big version of the image you sent by the way:
92 notes
·
View notes
Text
assorted mods for dragon age origins
making a list of origins mods that might be fun for brosca players :D
as asked about by @grifoncito.
keep in mind these might not all work together at the same time. they're just some of the ones i've played with for my custom origins rig. :) i've done a lot of manual file editing etc for my own game and these links are just to the base mods as intended/created by the original authors . also, these aren't all the mods i use. just ones i thought relevant to grifoncito.
please make sure to respect mod author's wishes and follow their instructions carefully when adding their mods to your game if not experienced in mod management
overhauls/changes:
dragon age redesigned by dracomies: changes npcs in base game and many of the DLCs to match their lore/circumstances better.
black hair is black by midnightvoyager: makes player character hair an actual shade of black rather than bluish brownish etc.
tsm vignette be gone by theskymoves: removes the black bars during conversations
natural lighting for the character creator by hoarous: makes it easier to see what your character's actual skin tone and hair color, etc looks like
qwinn's ultimate dao fixpack by qwinn; repairs various bugs in the game that went unfixed by bioware
sjc's patchy skin fix by sammyjc: makes skin look smoother and cleaner. very good for making darker skin tones look human
rls mabari madness by roguelass: provides alternate colors and armors for your mabari companion
of ferelden (improved atmosphere) by darthbdaman: a compilation of patches and changes for the improved atmosphere to make them work friendly
dahlialynn's sleep until dawn by dahlialynn: enables a cutscene for your player character sleeping peacefully alone, with their mabari or with a romantic partner
combat tweaks v323 by kend7510: aims to change combat to make progession smoother and to make some of the less popular skills more worthwhile for the player
no friendly fire for combat tweaks 323 by kanines: makes it so that you stop accidentally killing your companions while fighting
thedosian wardens arsenal by moonaerin: adds weapons unique to grey wardens to the game to match other mods that add inquisition's armors
environment overhaul by moonaerin: aims to add higher quality alternatives to many objects that make up environmental clutter
fine dwarven craftsmanship by shanamah: replaces dwarven clutter and objects with higher quality versions
cat project by moonaerin: high quality replacement for the in game cat models to make the cats look much cuter
gamblers of ferelden by drdrummie: adds npcs with gambling minigames to add some flavour to the world
rune of banter by cirosan: adds a useable item to make your companions yap
statues and totems - higher resolution textures by annabellya: makes religious statues look nicer
blood retexture by averagedilflover: makes the in game blood less ugly/weird
dragon age origins unofficial remaster by tepkunset: aims to make various textures and items in the game look higher quality while staying faithful to the original dev's vision
elven scenery by commanderstrawberry: high quality replacers for dalish and elven scenery items
real pigment - a skin tint fix by ashhawk: changes the way the game loads player character skin so that people who are interested in making black characters can have real looking skin
clear dreams - no blue in the fade by ashhawk: makes fade related scenes visually safer for those of us with eye sensitives (aka shania's eyeballs don't work and this mod saved my life)
dragon age bik improvement konversion by marcus22khaar: a high quality replacement for all pre-rendered cutscenes to make them more modern
immersion changes
dwarves are not mages by thesapphirequeen: makes dwarf characters that were wearing mage clothing, wear lore appropriate outfits instead
a nurse dressed for battle by thesapphirequeen: changes a nurse who was wearing a noble dress to be wearing an outfit more appropriate for a battlefield nurse
no staves in the assembly by shanamah: removes staves that the player character can have from the dwarf assembly npcs and gives them more unique options.
hardings in redcliffe by shanamah: adds lace harding and her family to redcliffe to support inquisition dialogue where she talks about living in ferelden during the blight
shields of orzammar by sorwaitte: makes the armoured dwarves of orzammar have lore appropriate shields instead alamarri ones
valos atredum by u31inked: changes the armour of npcs and guards in orzammar to be more dwarven inspired
warden daveth and jory in the fade by afremak: changes the random ghosts with duncan to be people the player character would actually know
updated halla by chaoticneuthrall: makes halla match their inquisition model
clouds retextured by iimaginary: makes the clouds in the sky look nicer
two moons circle by aisynia: makes both canon moons appear when you go to the circle
seasons overhaul by iimaginary: changes the camp and some of the trees in game to reflect a player selected season option. i.e. spring or fall
deep mushroom resources by shanamah: adds deep mushrooms to logical places in the game
brosca family redesign: adds a darker skin option for the brosca family to help match the player character
antivan and crow redux by wizzyrm: makes antivan characters match their lore and adds crow armours to crow npcs
no outsiders in orzammar by wizzyrm: changes non-dwarf characters in orzammar to dwarves to match stated lore
nug replacer by moonaerin: makes in game nugs match how they look in inquisition
lothering dwarves by suntheshattered: makes characters in lothering that are tagged as dwarves into actual dwarves
alistair at the gates by marawen: makes alistair enter denerim with you during the final battle
archdemon replacer by moonaerin: makes the archdemon look like the corrupted dragon we see in inquisition
horses of ferelden by moonaerin: adds horsies to the game. MUST HAVE!!!!!!!
valta in orzammar by pirateofrohan: adds the npc shaper valta from inquisition to orzammar but as a child to match stated lore
tranquil tattoo - origins by msbarrows: adds the mark of tranquility to npcs that are stated to be tranquil
diverse brosca family by anderswasright: adds options for players who might want their brosca to be asian, black, etc.
tsm more believable fade duncan by the skymoves: changes the weapons fade duncan has to match weapons we see him use at the battle of ostagar
tsm broken circle anders by the skymoves: replaces an npc voiced by anders' voice actor with anders' model as we know he's been in ferelden's circle
tsm anders at the pearl by theskymoves: adds anders to the pearl brothel to match dialogue in dragon age 2
casteless brand and dwarven tattoo restoration by skitra: adds tattoos to NPCs that were marked as supposing to have them
hawke and carver in ostagar by lakia1250: enables the player to see hawke, carver and aveline in ostagar as we know they participated in the battle. hawke can have custom hair and eyes from listed options
ser aaron hawthorne the wandering knight by lakia1250: adds one of the dragon age comic book characters to lore appropriate moments in the game and the awakening DLC as based on statements from the comics. it is recommended to use the heavy armour version as i could not get his lore appropriate armour to load in my game. i only got a floating head with his lore armour, but heavy armour appears appropriately
sera in denerim by balaurbondoc: adds sera from inquisition to denerim as we know from stated lore that she was a child in denerim during origin's timeline
edr hawke family in lothering by edriano: adds the members of the hawke family from dragon age 2 to lothering as we know they lived there before it was destroyed by the darkspawn
npc/companions
ser gilmore companion npc - fully voiced by immortality: adds ser gilmore from the cousland origin as a recruitable companion when you make it to ostagar. comes with his own storyline and epilogue slides. he can even banter with other companions. absolutely amazing mod that fits the game very well. very high recc. does come with his own romance and a selection of romance mods, but i think they might be for cousland-only so i will not link them here. very easy to find if you just put ser gilmore into the nexus origins page
ser gilmore companion npc - enhanced voice patch by kaivi: makes it so that ser gilmore's audio is easier to hear and understand
ser gilmore and dog companions in awakening - fully voiced by immortality: adds ser gilmore to the awakening expansion so that you can continue his story or his romance if you are playing as a cousland. he will also bring you your dog from the base game!
retconned cullen by nocheinmal: makes cullen look like his inquisition counterpart
practical morrigan robe by magpiedragon: a more concealing outfit for morrigan if you do not like her original robes or if you would like to try something new
a warden's sacrifice by kajana: a cutscene that plays for the player who makes the ultimate sacrifice against the archdemon
fare ye well duncan by kajana: a scene between alistair and duncan before the battle of ostagar to help the player see alistair's love for duncan
the rescue at ishal by marawen: a set of cutscenes to explain the devastation at the end of the battle of ostagar and the impact it has on alistair. mod creator says to not use if you have never played origins before, but i am assuming any who might read this guide are already familiar with the game and if not well i guess i just spoiled you for a 16 year old game lol.
lady of the forest hd retexture by catachr1sm: higher quality textures that play into her role as a creature of the forest
isabela by fialka: a retexture that aims to make isabela look closer to her dragon age 2 counterpart
zevran nights - a camp banter mod by marawen: makes it so that you can play zevran banters at camp with cutscenes to match
loghain - proper armor at ostagar by theskycloud: makes loghain wear his iconic armour during the battle of ostagar
wynne - proper red robes at ostagar by theskycloud: makes wynne's ostagar outfit match the outfit she wears when you recruit her
morrigan restoration patch by terraex: adds cut content related to morrigan and fixes bugs related to some of her dialogue trees
romance cutscenes/edits
cmessaz7's rendezvous at the tavern: adds a few romantic scenes at the gnawed noble tavern in denerim. check the modder's list of character/player race combo for compatibility with your interests.
cmessaz7's improved romance scenes and fixes - alistair: repairs broken dialogue trees and adds new scenes to be had with him if romancing
dahlialynn's - alistair's nightmare: a playable cutscene that seeks to explore alistair's insecurities and anxieties
lrs leliana romance scenes by nancyferg: adds new scenes for the player who is romancing leliana
alistair's revised romance by kajana: adds new romantic scenes and makes changes to his romance. be careful if interested in this one as it has many mods it is not compatible with
alistair romance attraction by andrastini: a sweet little cutscene for those interested in more alistair content
alistair romance appetite by andrastini: a light hearted romantic scene for players. make sure to read the description if you are playing a more stoic warden if you want to be strict with roleplay
alistair romance fear by andrastini: a cutscene relating to the archdemon for an alistair who is being romanced
alistair romance eavesdropping by andrastini: a cute cutscene with alistair that brings in the other companions for laughs
alistair's magical kiss by marawen: a romantic kiss with alistair for all races
intrigues of an antivan crow - zevran romance by marawen: a collection of romantic scenes for players interested in romancing zevran
alistair romance - hot water by andrastini: a romantic and intimate scene for players romancing alistair. beware, nudity! do not download if you are not comfortable with nude imagery in your game
alistair nights - moonlit bath by marawen: a sweet and romantic scene for wardens romancing alistair
leliana stories by marawen: a romantic scene between the warden and leliana which is compatible with most race and gender options
dahlialynn's alistair's first night love scene: a replacement cutscene for the first love scene with alistair to make it a bit more special
dahlialynn's alistair's visible kiss: inserts a repeatable kiss scene for the player to use
zevran kisses by ejoslin: aims to fix the kiss scene with zevran while adding some
zevran romance scenes by sanchia: adds more romantic options with him to enhance the romance
just some of the many character customization mods:
dao - anto hairstyles by iampizzapanda: adds a lot of hair options primarily for female character players.
lotc s eye textures by lastofthecouslands: adds new eye options to the character creator
hairstyle day vol. 2 by shepshy: many, many hair conversions
sjcs tints and textures by sammyjc: new eye colors and skin tones
sjc's vanilla hair colour replacements and pastel colours by sammyjc: new color options for the player
dalishious skin tints by tepkunset: real life inspired skin tones
sjc's skins by sammyjc: new facial complexion options
big brown eyes by tepkunset: adds more shades of brown and black for eyes
rak_dwarvenwarden by rak72: a new armour inspired by dwarf armour
barnzi face textures by barnzi88: facial complexions
hairstyle day by shepshy: adds many new hairs to the character creator
the seven dwarfs -face morphs by quincyrn: adds seven presets for male dwarves to the character creator
heavy dwarven armor retexture by vagrandreamer: makes heavy/massive dwarven armor look nicer
#miss shania talks too much#dragon age origins#dragon age#dragon age mods#i hope this list helps out friend!! :D
54 notes
·
View notes
Text
The fuck's a background? Anyway - here's some White Raven/Lennabel fanart I made!
Hope I did ya proud @your-decadent-madam
(Edit: for some reason it uploaded a pretty low quality version of the image! Replaced it with the higher quality one 🫡)
#nevermore#nevermore webtoon#annabel lee whitlock#lenore vandernacht#annabel lee x lenore#lenore nevermore#annabel lee nevermore#lennabel#white raven#fanart#temp-tats-art
208 notes
·
View notes
Text

Download: SFS / Mega
[Custom versions are here.]
I love @katsurinssims 's idea to replace the CM and TM private school uniforms with age conversions of ambodynehrujacket (see this post and this one). Since I just shared my edits of the custom versions in this big ambodynehrujacket-centric post, I thought I'd apply the same edits to Katsu's defaults in case someone is interested.
More details and previews under the cut.
I used the same files as Katsu's. What I edited:
• replaced the textures with higher quality ones (taken from the lifos - then my 'no wrist shadow' edit from the custom versions also applies) • removed blank bump maps to reduce file size • replaced the meshes with my versions (see comparison pictures on this post):
CM (replaces cmbodyopencoatlongpants_pvtschool) ↓
TM (replaces tmbodyopencoatlongpants_pvtschool) ↓

• edited the property sets - the outfits are still unhidden in CAS like Katsu's are but now instead of appearing at the front with a CC star, they're at the back with the other BG content:


[Mini tutorial: When you default-replace a BG outfit and need to extract its property set, your default replacement will appear at the front of CAS with the CC star as if it were custom clothing, unless you add these 2 lines in the property set: version (dtUInteger): 0x00000002 product (dtUInteger): 0x00000001 It's not a requirement to make the default replacement functional but it ensures the player isn't going to delete that piece of clothing from CAS thinking that it's custom and accidentally delete a game file. And it also looks cleaner imo.]
#sims 2#download#defaults#sims 2 maxis match#sims 2 cc#ts2cc#s2cc#s2cc historical fantasy#clothing:cu#clothing:tm
71 notes
·
View notes
Text
The Many Illustrators of A Tale of Two Cities 6: Max Cowper
...& some frustration from faulty sources...
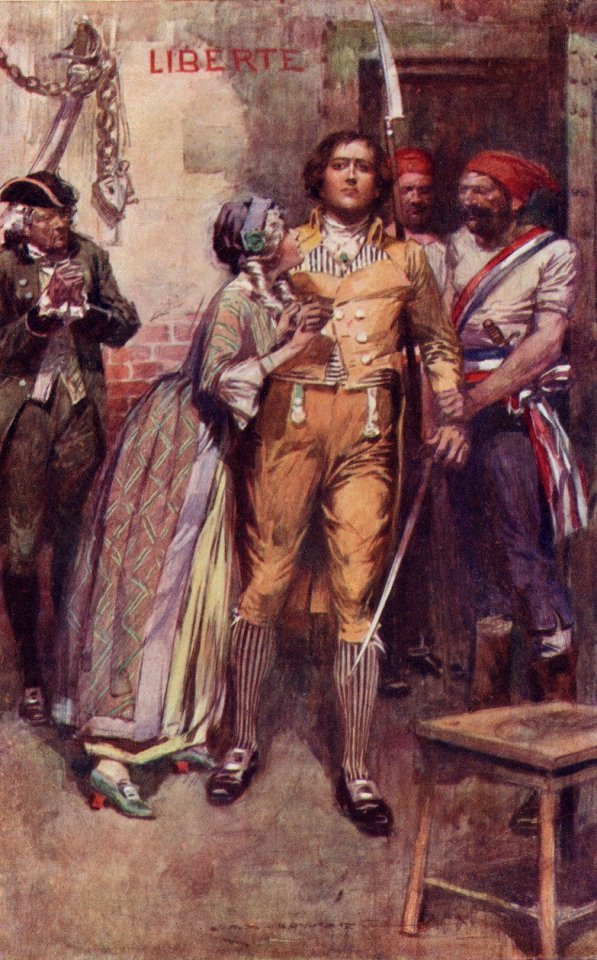
"Lucy (sic) Bids Farewell to Sydney Carton"
As we've come to see here, not all sources for these many illustrations are, put simply, all that great or reliable.
To start off, the ↑ above illustration is excellent example: A) Obviously, the name of this illustration doesn't match up with any scene in A Tale of Two Cities! My guess is that it's actually depicting Charles being taken away in "Dusk" (pretty major thing to get wrong!). Multiple online sources cite this as the name, but is that really what Max Cowper himself named it? B) I honestly didn't know until recently that this was, in fact, by Max Cowper! I've had this illustration stored in the archives for years and was only able to confirm it by - you guessed it - looking at that faint signature below the main character's feet and checking it off another color illustration by him (poetically, for Barnaby Rudge).


This is something that happens often in my research: Many illustrators for this novel will have a one-off piece not necessarily related to the work they did for the novel itself, and it's usually much more difficult to connect that piece to their book illustrations (when we get to Fred Barnard eventually...oof!). Oftentimes, the image just gets passed around over decades of republication - sometimes even traced / redrawn - and used as a cover or frontispiece without credit.
There are other forms of unreliability, though - including one I just encountered for the first time: Here are Cowper's eight 1902* illustrations for the novel. One of these is not like the others - see if you can tell which!
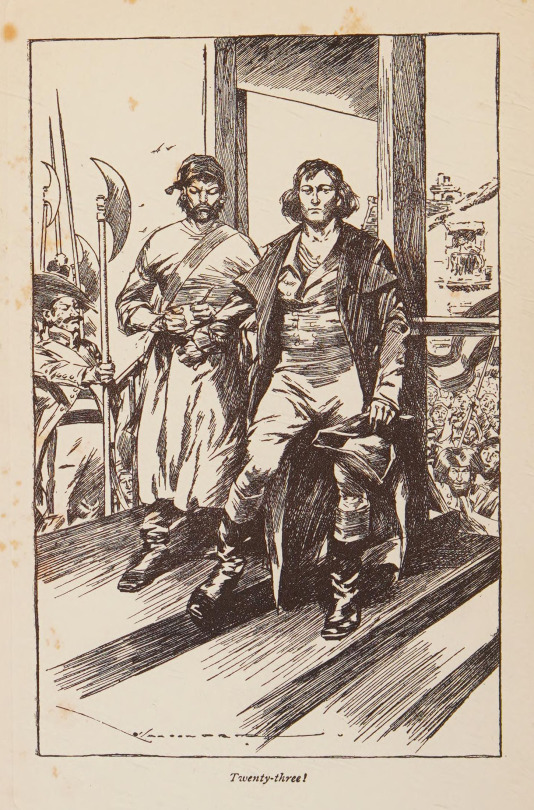
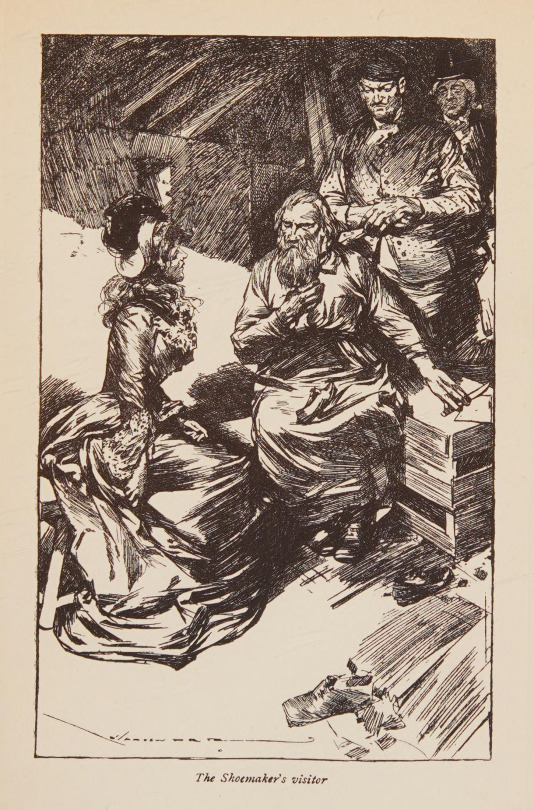


If you guessed the fourth ("Monsieur le Marquis"), you'd be correct!
Basically, when I originally downloaded this set from the Internet Archive, I hadn't downloaded them as individual images but rather the entire book as a PDF which I then picked the images off of - and what I hadn't realized until recently was that this compresses the images in a strange way.
Here is what the PDF compression looks like:
See how much beautiful linework and detail gets crunched?
And so, today, to make this post, I went out to that source again and downloaded each individually - only to find that this exact source no longer had the Marquis illustration! Basically, I think that someone working at the Internet Archive rescanned the exact same copy of the book - accidentally skipping one of the illustrations in the process - and then replaced the old scan with this new (honestly really nice) one. Human error strikes again, both on my part and on theirs!
Ultimately, I decided not to try to find these from any other source and to just include the one with the compression error that doesn't quite match the quality of the rest - which will tie in well with the next edition of this series anyway (you'll see)!
And regardless, I'm grateful we have access to these beautiful, humanistic character designs and illustrations at all, no matter the image quality🖼️
*To round it all out, the copy from which I downloaded these is from 1904, but I also read a source that said the first version of this edition was maybe from 1902, so, once again, ¯\_(ツ)_/¯
& the standard endnote for all posts in this series:
This post is intended to act as the start of a forum on the given illustrator, so if anyone has anything to add - requests to see certain drawings in higher definition (since Tumblr compresses images), corrections to factual errors, sources for better-quality versions of the illustrations, further reading, fun facts, any questions, or just general commentary - simply do so on this post, be it in a comment/tags or the replies!💫
#A Tale of Two Cities#AToTC#dickens#charles dickens#literature#classic literature#victorian literature#vintage illustration#illustration#illustrators#Max Cowper#1900s#obviously I have a favorite here#and god as much as i'm irritated that that happened with one of these so that it isn't a 'perfect' set#i'm. glad it's the marquis one. like whatever#(and also like I said it'll tie in with the next post in this series because there's a similar error in that one too)#for real though the more I look at Cowper's work the more I appreciate it. this is someone who cared about the work. you can feel it
13 notes
·
View notes
Text


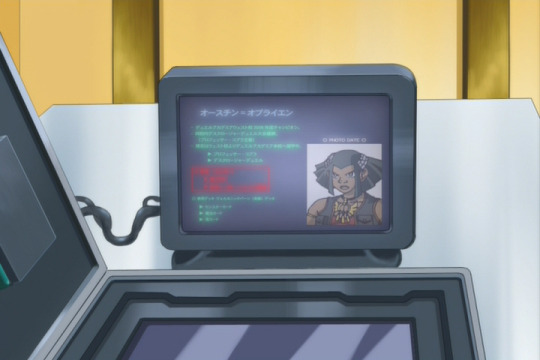
GX Finalized-Subs!113 (WIP): Digging Up Dirt
Working on stuff for 113 and 114 some more, and for 113, I wanted to go ahead and translate this more blink-and-you'll-miss-it bio on O'Brien that Echo sends to Amon early in the episode. It's a quick shot at 64 frames long as the map of Cobra's compound changes to this bio being transferred to Amon, with the bio transfer itself taking up 47 frames (or a quick 1.5-2 seconds), but with my penchant for thoroughness/consistency and what-have-you, I'd have been remiss not to translate it, lol. And since the dub decided to go with... random text (what language even is that lol (they at least go with something like [Latin?] come 5D's text replacements), I made a version for the dub as I've been doing with these text edits (which I may use for reasons later).
(Edit breakdown below; also, pro-tip if viewing in the tags or on the dash: click into the post on my blog, let the gifs load, and then refresh for simultaneous viewing~)
Although, I did worry initially about not being able to translate this because the shot in the Astral_Union DVDRip that I'm working with had the text decently blurry--but luckily, Zichs over on NAC (who's been working on encoding some clearer/higher visual quality DVDrips for GX as well as 5D's+) was able to shoot me a much clearer frame from the DVD footage itself, and while there are a handful of kanji that were still harder to make out, I was able to read much more of the text while making an educated guess or two at what the lines with the harder-to-read kanji were saying. That said, the text in the red box was still pretty unreadable, and it didn't seem any sharp-eyed Japanese fans transcribed any of this, so I had to leave that as-is unfortunately.

So, I worked on this over a few total hours between Thursday night and today, once I translated the text, and first used Photoshop to place the text over a frame of the blank screen (luckily didn't have to do any editing to make it blank, as there's a fair few frames of the blank screen before any of the text starts streaming in--though the dub for some reason places their random-language name-replacement text a few frames early over these blank frames). I gave the text a light outer glow blending to imitate the original light glow on the text, and applied a light Gaussian blur/noise effect.


Once I was happy with how the text looked, I threw the English edits into Sony Vegas, where I first used masking to recreate how the text gradually streams in frame-by-frame. I then masked in the original red box so that it and its text streamed in as it did originally, and masked O'Brien's photo separately over the screen so that I could then recreate the light screen flickering on top of everything. I also applied a very slight extra Gaussian blur on the text since I thought it was a bit too un-blurred, and then just copy/pasted the masking keyframes I applied on the subbed-English edit to the dub-English edit.
Overall, as the gifs above show, think it came out nicely for a quick shot like this!
Also, for reference, I've transcribed the text on this below, along with my initial translation which I had to tweak some to make my edits look nice; "X"s indicate where a kanji was unreadable:
[Japanese]
オースチン=オブライエン ・デュエルアカデミアウエスト校2006年度チャンピオン。 ・XXXデスクロージャーデュエル大会優勝。 (プロフェッサー・コブラ主催) ・XXはウエスト校よりデュエルアカデミア本校へ留学中。 ▶プロフェッサー・コブラ ▶デスクロージャーデュエル 「RED BOX UNREADABLE」 ◦XXデッキ ボルカニックバーン (XX) デッキ ▶モンスターカード ▶魔法カード ▶罠カード
[Initial Translation]
Austin O'Brien ・2006 champion at the Duel Academia's West Campus. ・Winner of the first Disclosure Duel tournament. (Organized by Professor Cobra) ・Has left the West Campus to study at the Duel Academia's Main Campus. ▶Professor Cobra ▶The Disclosure Duels [RED BOX UNREADABLE] ◦Primarily utilizes a Volcanic Burn deck ▶Monster Cards ▶Magic Cards ▶Trap Cards
#subbing rambling#GX#yugioh gx#yugioh#ygo#ygo gx#yu-gi-oh gx#Austin O'Brien#Axel Brodie#now to work on some card/animation errors~#between 113 and 114 i counted about... 28 [already fixed 3-4 of them] with the bulk of them in 113#mostly minor quality of watching stuff with some card errors mixed in#stay tuned~
3 notes
·
View notes
Text
As the sugar cube floats, fleeting in time from As the sugar cube floats, fleeting in time alan, Cream Kumako, Yang Wutao, Sān-Z, HOYO-MiX
#zzz#zenless zone zero#zzzero#as the sugar cube floats fleeting in time#zhu yuan#vocal track#zzz:vocal track#zzz:character song#alan#alan dawa dolma#Cream Kumako#yang wutao#zhu yuan ep/theme song#criminal investigation special response team#edit: replaced with higher quality version
8 notes
·
View notes
Text
Don Johnson Filmography - Free Links!
Instead of you spending countless joyful hours trawling the web for grainy old '70s flicks, I did it for you! Here's a list of FREE places to watch DJ's stuff.
This list will be in reverse chronological order as they appear on IMDb. Some are just placeholders until (if) better links can be found, and some are bootlegs from other countries. I'm excluding music videos since those aren't hard to find.
And if you want to skip boring/annoying plot but don't want to miss him, I've made a key:
MC (main character) - much of the story involves his character and he is onscreen often
SC (side character) - only part of the story involves his character, so he's onscreen far less often than other characters
C (cameo) - he's got one or two scenes and they're small, in which case I'll mark his appearances in 0:00:00 format
I'm leaving most content warnings to viewer discretion, but some I don't feel comfortable ignoring. Also, some of the YouTube vids may get taken down at any moment :( If you like something, back it up! I'm using KMPlayer to download my faves, but I've heard you can also use VLC.
>> Links below cut! <<
First, check out my list from Tubi which has the most high quality versions of his work and TV appearances. If it's on Tubi, it won't be on this post!
Home Movie: The Princess Bride - (C, 0:41:30) the entire film is hilarious, especially if you've seen the original; made by a bunch of celebs during quarantine.
Knives Out - (SC) ok, there's no link, but i'm begging you to go buy this movie on DVD it's like $5-$10 tops in stores these days.
Moondance Alexander - (SC, 0:18:20)
Just Legal - (MC, eight episodes)
Word of Honor - (MC) this vid has "helium" audio and other insufferable flaws.
Goodbye Lover - (SC, login req)
In Pursuit of Honor - (MC) WARNING: animal death/abuse
G.I. Joe: The Movie - (SC, voice only, 0:30:35...) spare yourself, skip this movie that he probably did for his kid.
Tales of the Unexpected - (SC; one episode)
Matt Houston - (SC; one episode)
Melanie - (SC)
Soggy Bottom, U.S.A. - (SC; German dub) clips of his character.
Elvis and the Beauty Queen - (MC; Portuguese subtitles)
Revenge of the Stepford Wives - (SC, 0:12:40, 0:25:15...) he has multiple scenes including one at the end, but these movies stress me out.
Beulah Land - (SC) only in part 1, but his character is replaced by a young Jonathan Frakes in part 2. WARNING: non-graphic rape
From Here to Eternity - (C, one episode, 0:07:10, 0:36:00)
The Rebels (MC, two-parts)
Amateur Night at the Dixie Bar and Grill - (SC, 0:13:39...)
First, You Cry - (SC, first scene, 0:24:20, 0:44:20, 0:57:07, 1:15:38, 1:32:16)
Katie: Portrait of a Centerfold - (C, 0:19:48, 0:32:19, 0:44:03...) can't stomach this film to find the rest of his scenes, he's a very minor character.
The American Girls - he's not in this! the main male character is played by the lovely Charles Haid from Hillstreet Blues, but it isn't listed on Haid's IMDb. Also, the character he plays does not go by the name DJ is listed under for that episode, so maybe DJ's in a different one? Regardless, I only found two episodes and DJ is in neither.
Ski Lift to Death - (SC) he shows up in the second video...don't make me watch this.
What Really Happened to the Class of '65? - TV spot w/ the only footage of him that I can find.
Cover Girls - (SC, 0:27:21, 0:40:40, 01:01:15...)
The City - (MC) costarring Mark Hamil
Barnaby Jones - (SC, one episode) I watched this and now it's missing...it sucked anyway. DJ plays an amateur arms dealer with a sickly son, a wife in jail, and a hideous mustache. He loses.
The Streets of San Francisco - (SC, one episode)
Law of the Land - (MC)
Return to Macon County - (MC) login to YT req but there is also a Spanish dub that doesn't req login. costarring Nick Nolte
A Boy and His Dog - (MC) this version has the nude scenes edited out, sign in to YT for the full cut; much higher quality than Tubi. WARNING: rape, etc.
The Rookies - (SC, one episode) costarring Nick Nolte
Kung Fu - making an executive decision here uhhh skip this one
The Harrad Experiment - (MC; two-parter w/ odd in-video ads that you can easily fast forward) WARNING: they all get naked
The Bold Ones: The New Doctors - (MC, one episode)
Lollipops, Roses and Talangka - (SC; some scenes in Tagalog) can't find the 1975 sequel or much information on English sites, but one Filipino fanblog implies the film may no longer exist.
Zachariah (MC)
Endlessly impressed by how much has been preserved and curated over the years. Even if a ton of it was junk, it's nice to save people's hard work and memories :)
........................................................................................................................
#don johnson#miami vice#70s movies#70s tv shows#nick nolte#mark hamil#jonathan frakes#fan resource#dnly rants#there's a character limit on posts??? since when??#*has never hit the limit before apparently*
8 notes
·
View notes
Text
A Guide to Seikos New Releases
Seiko introduced an abundance of new models in the past few months alone. Here is a look at those releases.

Seiko is known for barraging customers with releases. In the last year, the brand has updated several of its most admired collections and added entirely new models. The Japanese watchmaker also has a reputation for excellent quality at affordable prices. However, the increased retail prices of its new models threaten that status. Whether or not the marginal improvements in the releases' specifications justify the noticeable price hikes is up for debate. What is clear is that the brand is following the path of most established Swiss brands as they steadily move upmarket.
Propex 1965 Heritage Diver's Watch

The 62MAS is Seiko's first and most famous dive watch. In the last decade, the brand has released several recreations of the 1965 design, including the recent Prospex SPB143. In March, Seiko introduced three new references: the blue-dial SPB451, black-dial SPB453, and limited-edition gilt-dial SPB455. The updated models include several refinements to the SPB143. The case is now more compact, measuring 40 by 13mm instead of 40.5 by 13.3mm; the water resistance has risen from 200 to 300m; the date window is now color-matched to the dial and has been discreetly repositioned to 4:30; and the 6R55 caliber replaces the 6R35, providing an additional two hours of power. Of course, these improvements come at a cost: the two non-limited editions will retail for $1,300, $100 more than their predecessor. It will soon become clear that this sort of price increase accompanies all of Seiko's new releases.
Prospex Marinemaster

Seiko first released the Marinemaster in 1999 as a higher-end diver. The brand recently discontinued the model, only to reintroduce it in November 2023 with the release of three new versions: the limited-edition white-dial SJE097, light blue SJE099, and black SJE101. In June, Seiko added two more colors to the collection. The SJE117 features a greenish gray dial and black bezel while the SJE119 is fully blue. Like the Prospex 1965 divers, the design of the Marinemaster pays homage to Seiko's first dive watch from 1965. The dial features wide lume plots, an embossed horizontal stripe pattern, and a circular date-window at 4:30. The case is also more compact than historical models, measuring 39.5mm across, 12.3mm tall, and 47.2mm from lug to lug. With this decreased size, water resistance has fallen from 300m to 200. Thankfully, the box-shaped crystal is still made of sapphire.
All of the new models house the slimline caliber 6L37, whose thinness helps make the new Marinemaster the thinnest dive watch Seiko offers. The caliber has an accuracy of -10/+15 seconds per day and, unlike many of the brand's movements, features a refined finish. For the first time in a Seiko diver, the movement is exhibited through a see-through caseback. Seiko also claims the 6L37 is more shock resistant and durable than the caliber 6L35, making it more suitable for diving purposes. Of course, these specs come at a price. The new Marinemasters retail for $2,800, a significant amount to pay for a Seiko diver.
Prospex "Samurai"

The Prospex Samurai is one of Seiko's many fan-favorite divers. In June, Seiko released three new versions of the model with several refinements in line with the brand's updates to its other dive watches. The new references are the red SRPL11, black SRPL13, and fully blacked-out SRPL15. Seiko has significantly decreased the case dimensions from 43.8 by 14mm to 41.7 by 12.3mm, though the larger size is still available. The watches also feature a new bracelet with a slightly modified link design. The dial received several updates as well; the rectangular hour markers have been swapped for pentagonal ones and the cardinal markers have grown smaller. Like those of the new Marinemasters and 1965 Divers, the date window has shrunk, lost its corners, and migrated from 3:00 to 4:30. The angular case, crown guards, aluminum bezel insert, caliber 4R35, 200m of water resistance, and Hardlex crystal of previous Samurai iterations remain the same. The three new watches will be available in July for around $575, a very modest price increase over the previous model.
King Seiko KS1969 Series

Like Grand Seiko, the King Seiko sub-brand was created by Seiko to offer the best of Japanese watchmaking when it was originally active between 1961 and 1975. The Japanese watchmaker decided to reintroduce the label in 2022 with a series of 37mm reissues of the 1965 KSK. Those models have an MSRP of $1,700. Retailing for $3,100, the new King Seiko KS1969 ventures into an even higher price territory. As the model name suggests, the KS1969 is inspired by a King Seiko watch from 1969: the 45KCM. The reinterpretation retains much of the 45KCM's charm thanks to the designers' loyalty to the original design.
The case retains its distinctive tonneau shape, recessed crown, and box-style crystal (thankfully sapphire in the reissue). Measuring 39.4mm by 9.9mm, the case is very wearable, even more so thanks to its compact lug-to-lug dimension of 43.6mm. The slimline automatic caliber 6135 inside offers a power reserve of 45 hours and an accuracy of +15/-10 seconds per day. While better than much of Seiko's modern offerings, that's a far cry from the original King Seiko chronometers. The case flows into a multi-link bracelet. Seiko's bracelets are a common source of complaint from collectors. This one is characteristically unimpressive, lacking both microadjustment and a quick-release mechanism.
Four new models will be available in July of 2024. The limited-edition SJE115 features a light-blue dial with a scale-like texture and celebrates the 100th anniversary of Seiko. The SJE109 has a simple silver dial while the SJE111 features a purple dial inspired by washi. Lastly, the green-dial SJE113 is differentiated by a soft gradient and shares the paper texture of the 111.
Seiko 5 Sports SNXS Series

The Seiko 5 Sports family has offered highly affordable watches for over six decades. Watch enthusiasts have long held the SNX Series in high regard; the sub-collection offered stylish all-rounders which could be acquired for as little as $100. In April, the Japanese watchmaker updated the series, introducing three "SNXS" references: the blue-dial SRPK87, black-dial SRPK89, and ivory-dial SRPK91. The new models include several improvements over historical Seiko 5 Sports SNX watches. Most importantly, the updated references swap the caliber 7S26 for the 4R36. Although the movement's 41-hour power reserve and -35/+45 s/d accuracy are unsurprising for the price, the 4R36 offers a stop-seconds function and hand-winding unlike the 7S26. The case retains its sleek shape and embedded crown at four o'clock, though the lugs are now brushed instead of fully polished and the water resistance is 100m instead of 30. The bracelet is also better, featuring a redesigned triple-folding clasp with a push-button release.
The design heavily relies on vintage elements, including a modest 37.4mm case diameter and nostalgic color palette. All three references feature faux-patina lume and bright orange seconds hands inspired by 1970s Seiko 5s. Of course, the dial retains the day and date functions that are now synonymous with the collection. So, what's the catch? Disappointingly, the watch still uses a Hardlex mineral crystal, although that is hardly a surprise given past releases. The new price tag, however, verges on ludicrous; the models' $395 MSRP brings the historically ultra-affordable collection into uncharted territory. However, brand recognition and nostalgia have been sufficient for Seiko in the past.
Presage Classic Series
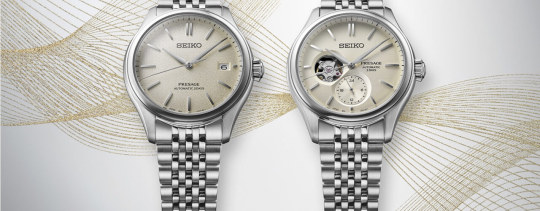
A new addition to the Presage lineup, the Classic Series uses the same design concept as the collection's many other successful models; all five releases are versatile dress watches with interesting dial patterns. Three of the five use a simple three-hand and date configuration. For these models, Seiko has opted to finish the dial with a grainy texture. According to Seiko, the pattern mimics Japanese textiles. The dial is also curved, and the indexes and hands are bent to match. Three colorways are on offer: the silver SPB463, green SPB465, and salmon SPB467. The remaining two releases feature a recessed small seconds sub-dial and an aperture revealing the movement. Both the silver-dial SPB469 and black-dial SPB471 feature a radial-brushed texture. All models share the same case. Made of hard-coated stainless steel, the case is water resistant to 100m and measures 40.2mm in diameter, 13mm thick, and 46mm from lug to lug.
Inside, the automatic caliber 6R55 (or 6R5J for the open-heart models) offers an impressive three-day power reserve and an accuracy of -15/+25 second per day. Unsurprisingly, the new series is significantly more expensive than the Cocktail Time watches in the collection; the three-handers retail for $950 while the open-heart references will set you back $1,125.
Presage Cocktail Time GMT

Seiko's Presage collection recently received another addition. The Cocktail GMT follows the familiar Cocktail Time formula, featuring a fully polished 40.5mm case, domed Hardlex crystal, and colorful, radial-patterned dial. In this case, there are three of these dials to choose from, each of which is inspired by a different cocktail. The dial of the SSK037 "Skydiving" is light blue, the SSK039 "Rusty Nail" features a gradient from brown to black, and the SSK041 "Acacia" uses a gradient from silver to pale yellow. Of course, the Cocktail Time is a dress watch, while the GMT function is more commonly associated with tool watches. Absent any rotating bezel to display a 24-hour scale, Seiko has nicely integrated 24-hour markers in between the large triangular indexes. The complication also adds height. The caliber 4R34 inside brings the thickness to 12.8mm. Built on Seiko's utilitarian 4R35, the movement features a power reserve of 41 hours and fairly crude finishing viewable through the display caseback. The 4R34 is an office GMT, meaning the 24-hour hand (and not the local hour hand) is set independently. The new models will be available in July for just under $600.
Six New Astron Models

Seiko's Astron collection houses solar-powered and GPS-enabled watches, meaning they charge themselves and can adjust to the local time zone at the push of a button. This year, Seiko introduced six new Astron models. All feature angular cases made of hard-coated titanium, integrated bracelets, and sapphire crystals.
The SSH151, SSH153, and limited-edition SSH157 are priced at $2,500, the black titanium SSH155 is $2,700, and the limited black-and-gold SSH156 will set you back $3,900. That's admittedly pretty steep for a quartz watch. However, for that money you receive an impressive amount of functionality. In addition to GPS technology, the models feature a chronograph, dual-time function, perpetual calendar, power reserve indication, and world time display. The case is fairly large, measuring 43.3mm in diameter and 13.4mm tall. The SSJ027, which only includes a perpetual calendar and power reserve indication, is slightly smaller at 41.2 by 12mm. The model is also less expensive, retailing for $2,200. The SSJ027 and SSH157 dual-time chronograph both feature striking light blue dials with a highly faceted pattern and are limited to 1,500 pieces. All will be available in July.
#used watches#luxury watches#buy watches online#luxury brands watches#luxury watches online#used luxury watches#sell used watch#used watches for sell#rolex luxury watches#luxury watch brands for men
0 notes
Text
How Generative AI is Revolutionizing Content Marketing Strategies
Content is still king in 2025—but now, Generative AI is the power behind the throne.
From writing blogs and social media posts to generating email campaigns and ad copy, generative AI tools like ChatGPT, Jasper, Copy.ai, and Google Gemini are transforming how brands create and deliver content. These tools aren’t just accelerating production—they’re enhancing personalization, improving SEO, and enabling marketers to scale like never before.
Whether you're a budding content creator or a business owner trying to stay relevant, enrolling in an online digital marketing course that covers AI-powered strategies is one of the smartest steps you can take today.
What Is Generative AI in Content Marketing?
Generative AI refers to a category of artificial intelligence capable of creating new content—text, images, video, and more—based on prompts and training data. In content marketing, this means machines can now:
Write high-quality articles
Generate ad copy that converts
Create social media captions
Draft email sequences
Produce SEO-friendly product descriptions
And it doesn’t stop there—AI can analyze data, learn from engagement patterns, and continuously improve content based on audience response.
Why Generative AI is a Game-Changer for Marketers
1. Faster Content Creation
What once took hours—brainstorming, drafting, and editing—can now be done in minutes. AI can help marketers generate full blog drafts, newsletters, or captions instantly. This reduces turnaround times and allows brands to publish content more frequently.
2. Hyper-Personalization at Scale
AI tools can personalize content based on user behavior, location, interests, or past interactions. This means your email campaign or landing page can dynamically change based on who is viewing it, improving engagement and conversion.
3. SEO-Optimized Content
Many generative AI tools are integrated with SEO platforms like SurferSEO or Semrush. They can recommend keywords, optimize headings, and format content for higher rankings—all while maintaining a natural, engaging tone.
4. A/B Testing Made Easy
Need to test different variations of headlines or CTAs? AI can generate dozens of versions quickly, helping you experiment and optimize with less effort.
5. Multilingual Marketing
Want to expand to a new region? Generative AI tools can translate and adapt your content into multiple languages while keeping the tone and message intact.
Real-World Examples of AI in Content Marketing
HubSpot uses generative AI to help users auto-generate blog ideas and marketing emails.
Coca-Cola launched "Create Real Magic," a generative AI campaign that let fans design personalized Coke-themed artwork using AI tools.
Amazon uses AI to auto-generate product titles and descriptions, optimizing for both user readability and search visibility.
These examples show that the biggest global brands are already leveraging AI—and smaller businesses and freelancers are doing the same to compete effectively.
Why You Should Enroll in an Online Digital Marketing Course
As AI reshapes content marketing, it’s not enough to rely on traditional methods. Marketers need to understand how to use generative AI tools responsibly, creatively, and strategically. That’s where a good online digital marketing course comes in.
Here’s what you’ll learn:
Fundamentals of content marketing and audience targeting
How to use ChatGPT, Jasper, and other AI tools for content generation
SEO strategies in the AI era
Personalization, automation, and campaign scaling
Ethics and limitations of AI-generated content
An online digital marketing course offers flexibility, real-world projects, and expert guidance—making it perfect for working professionals, students, and entrepreneurs.
The Human Touch Still Matters
It’s important to remember: AI is a tool, not a replacement. While AI can help generate content, it still requires human creativity, empathy, and strategy to resonate with readers. The best marketers will know when to use AI—and when to lean on their own voice, storytelling, and insights.
A high-quality online digital marketing course not only teaches you how to use AI but also how to balance automation with authenticity.
What the Future Holds
Looking ahead, generative AI will continue to evolve. Video content generation, voice synthesis, and real-time content adaptation are already on the horizon. Marketing teams that upskill now will be far ahead of the curve.
So, whether you're a content writer, SEO specialist, business owner, or aspiring marketer, learning AI-driven strategies through an online digital marketing course will be crucial for your growth and relevance in the industry.
Final Thoughts
Generative AI is revolutionizing content marketing—but only those who adapt, learn, and evolve with it will thrive. If you want to create smarter, faster, and more effective campaigns, now is the time to enroll in an online digital marketing course that equips you with the skills of tomorrow.
0 notes
Text
Backlinks in SEO: The Ultimate Guide to Building High-Quality Links from revtseo
What Are Backlinks?
Backlinks (also known as inbound links or incoming links) are links from one website to another. They act as votes of confidence, signaling to search engines that your content is valuable, credible, and worth ranking higher in search results.
For example, if a high-authority site like Forbes links to your article, search engines see this as a strong endorsement, which can boost your rankings.
Why Are Backlinks Important for SEO?
Backlinks are one of Google’s top-ranking factors. Here’s why they matter:
✅ Increase Website Authority – More quality backlinks = higher domain authority. ✅ Boost Search Rankings – Sites with strong backlinks rank higher on Google. ✅ Drive Referral Traffic – Links from high-traffic websites bring more visitors. ✅ Faster Indexing – Backlinks help search engines discover your content faster.
Types of Backlinks: Good vs. Bad
✅ High-Quality Backlinks (Good for SEO)
Editorial Backlinks – Earned naturally when websites cite your content.
Guest Post Backlinks – Placed in articles you contribute to other sites.
Niche-Relevant Backlinks – Links from websites in the same industry.
Dofollow Links – Pass SEO value and improve rankings.
❌ Low-Quality Backlinks (Harmful for SEO)
Spammy or Irrelevant Links – From unrelated or low-authority sites.
PBN Links – Links from Private Blog Networks (risky & penalized by Google).
Paid Links – Buying links violates Google’s guidelines and can lead to penalties.
Excessive Nofollow Links – While not harmful, they don’t pass SEO value.
How to Build High-Quality Backlinks?
1. Guest Posting
Write valuable articles for high-authority websites in your niche and get a backlink in return.
2. Broken Link Building
Find broken links on other websites, suggest your content as a replacement, and earn a backlink.
3. HARO (Help a Reporter Out)
Respond to journalist queries with expert insights and get backlinks from major media sites.
4. Skyscraper Technique
Find top-ranking content, create a better version, and reach out to sites linking to the original.
5. Niche Edits (Link Insertion)
Reach out to website owners and request a link placement in existing content.
6. Directory & Forum Backlinks
Submit your site to high-quality business directories and engage in niche forums with valuable contributions.
7. Internal Linking
Linking between your own pages improves SEO and helps distribute link equity.
How to Check Your Backlinks?
Use these tools to analyze your backlink profile: 🔹 Google Search Console – Free tool to see who links to your site. 🔹 Ahrefs – Provides detailed backlink analysis and competitor research. 🔹 SEMrush – Tracks backlinks and identifies toxic links. 🔹 Moz Link Explorer – Measures domain authority and link quality.
Final Thoughts
Backlinks are crucial for SEO success, but the focus should be on quality, not quantity. Building natural, high-authority, and relevant backlinks will improve your rankings, increase traffic, and strengthen your website’s credibility.
you can learn more here : https://revtseo.com/
0 notes
Text
How to Buy a Reliable Refurbished MacBook Pro: A Complete Guide

The Apple MacBook Pro is a coveted device known for its powerful performance, sleek design, and longevity. However, the premium price tag can make it a significant investment. For those looking to own this iconic laptop without breaking the bank, purchasing a Refurbished MacBook Pro is a smart choice. Refurbished devices offer the same premium features at a fraction of the cost, making them a practical option for students, professionals, and creatives alike.
In this guide, we’ll walk you through everything you need to know about buying a reliable Refurbished MacBook Pro from trusted sellers like Retechie, helping you make an informed decision while avoiding common pitfalls.
Why Choose a Refurbished MacBook Pro?
A Refurbished MacBook Pro is a pre-owned device that has been inspected, repaired, and restored to near-new condition. It provides excellent value without compromising on performance.
Key Benefits of a Refurbished MacBook Pro:
Cost-Effective: Save up to 30-50% compared to a new MacBook Pro.
High-Quality Assurance: Refurbished devices undergo rigorous testing to ensure reliability.
Eco-Friendly: Opting for a refurbished laptop reduces electronic waste and promotes sustainability.
Premium Performance: Enjoy the power of macOS and advanced Apple features at a reduced price.
What to Consider When Buying a Refurbished MacBook Pro
1. Choose a Trusted Seller
Purchasing from a reputable source is critical when buying a refurbished device. Look for platforms like Retechie, which specialize in Refurbished Apple Laptops and provide certified products with warranties.
2. Check for Certification and Warranty
Ensure the refurbished MacBook Pro is certified and comes with a warranty.
Certification: Indicates that the laptop has been tested and restored to factory standards.
Warranty: Provides coverage for potential issues, offering peace of mind.
3. Know the Specifications
Before buying, understand the specifications you need based on your usage:
Processor: Choose Intel Core i5 or i7 for multitasking and heavy workloads.
RAM: Opt for at least 8GB for smooth performance.
Storage: SSD storage (256GB or higher) ensures faster boot times and data access.
Graphics: Dedicated GPUs are essential for video editing, graphic design, and gaming.
4. Inspect the Condition
If possible, physically inspect the device or review detailed product images:
Look for visible scratches, dents, or wear.
Ensure the screen is free of cracks and dead pixels.
Test the keyboard, trackpad, and ports for functionality.
5. Battery Health
A common issue with used laptops is reduced battery life. Ask about the battery health and ensure it has been replaced or refurbished if necessary.
6. Check Software and Compatibility
Ensure the macOS is updated to the latest compatible version.
Verify that the device includes pre-installed software or a valid license for macOS.
7. Compare Prices
Compare prices across different sellers to ensure you’re getting a fair deal. Exceptionally cheap costs might be a sign of subpar quality.
Where to Buy a Reliable Refurbished MacBook Pro
1. Retechie
In India, Retechie is a reliable source for reconditioned computers, providing:
Certified Refurbished MacBook Pro and other Apple products.
Warranty-backed devices for peace of mind.
A wide range of options, including Refurbished MacBook Air and budget-friendly laptops.
2. Apple Certified Refurbished Store
Apple’s official refurbished store offers professionally restored MacBook Pros with a one-year warranty and free delivery.
3. Reputable Online Marketplaces
Platforms like Amazon and Flipkart feature refurbished Apple laptops sold by verified sellers. Verify product reviews and seller ratings at all times.
4. Local Electronics Stores
Visit local shops that specialize in refurbished laptops, allowing you to inspect the device physically before purchase.
Tips for a Successful Purchase
Research Thoroughly: Understand your requirements and read reviews of the seller.
Compare Models: Choose a model that meets your performance needs, such as the 13-inch or 15-inch MacBook Pro.
Verify Return Policies: Ensure the seller offers a flexible return policy in case the laptop doesn’t meet expectations.
Prioritize Warranty: Always opt for a refurbished MacBook Pro with a warranty to protect your investment.
Why Retechie is the Best Choice for Refurbished MacBook Pros
Retechie stands out as a trusted platform for purchasing refurbished laptops due to:
Certified Quality: Each device is thoroughly tested and restored.
Wide Range: From Refurbished MacBook Air to professional-grade MacBook Pros, there’s something for everyone.
Eco-Friendly Commitment: Supporting sustainable practices by reducing e-waste.
Customer Support: Reliable after-sales service and warranty coverage.
Conclusion
A Refurbished MacBook Pro is an excellent choice for anyone looking to own a premium laptop at an affordable price. By choosing a trusted seller like Retechie, verifying specifications, and ensuring a warranty, you can enjoy Apple’s legendary performance without overspending. Explore the best deals on Refurbished Apple Laptops today at Retechie. Upgrade your tech sustainably and affordably with certified refurbished devices!
#Refurbished Apple Laptops#Refurbished MacBook pro#Refurbished apple#Used laptop#Old laptop#Renewed laptop#Refurbished laptop#Refurbished laptops#refurbished laptops in India#Refurbished macbook air#Old laptops#renewed laptops#Second hand laptop#Retechie
0 notes
Text
Master Photo Editing: A Beginner’s Guide to Creating Stunning Images
Photo editing has become a must-have skill in today’s visually driven world. Whether you’re enhancing personal memories or refining professional visuals, learning to edit photos can elevate your content and help it stand out. This guide will walk you through simple, effective tips and techniques to transform your images into masterpieces, even if you're a beginner.
Why Photo Editing Matters
High-quality images are essential for everything from social media posts to online businesses. For e-commerce, sharp and appealing photos can increase sales, while polished portraits or creative visuals grab attention on social platforms. With the right tools and a little practice, you can create professional-looking images that match your vision.
Step 1: Start with a Quality Image
Great editing begins with a strong foundation. Aim for clear, sharp, and well-lit photos to minimize the need for heavy adjustments. For example, when working on product photos, such as jewelry or apparel, having a clean and focused image ensures editing looks seamless and natural.
Pro Tip: Always consider the resolution of your photo based on its intended use. For print, higher resolutions are a must, while web images can be optimized for faster loading.

Step 2: Crop and Straighten Your Image
Cropping removes distractions and centers attention on the main subject. Straightening ensures your image feels balanced and professional. Whether you’re working on a landscape or a product shot, these adjustments can drastically improve composition.
How-To:
Open your image in your editing software.
Use the Crop Tool to trim excess edges.
Rotate or straighten the horizon if needed.
Save the cropped version.
Leave a little breathing space around your subject—it’s easier to fine-tune later than to undo a tight crop.
Step 3: Adjust Brightness and Contrast
Balancing light and shadows makes your image more vibrant. Brightness enhances overall light, while contrast sharpens the distinction between highlights and shadows. This is especially important in product images for e-commerce, where clarity and detail are key.
Quick Tip: Avoid extreme adjustments that make your photo look unnatural or overexposed. Aim for subtle enhancements to maintain a polished finish.
Step 4: Remove Imperfections with Healing Tools
For portraits or product photos, eliminating flaws like blemishes or dust is crucial. The healing tool is your go-to for making seamless corrections without disturbing the image’s natural texture.
How-To:
Select the Healing Brush in your software.
Click on blemishes or unwanted elements to blend them with surrounding pixels.
For fine details, zoom in and make careful, precise edits.
Use this technique for everything from smoothing skin tones in portraits to removing wrinkles from apparel in ghost mannequin editing projects.
Step 5: Enhance Colors with Precision
Color correction can bring your photos to life. Adjusting hue and saturation helps set the tone or mood, whether you're making vibrant product images or artistic portraits.
Pro Tip: When editing jewelry photos, ensure colors are true to life. For example, gold should appear rich and warm, while diamonds should sparkle with clarity.
Step 6: Play with Backgrounds
Changing or removing backgrounds can dramatically improve the look of your images. This technique is especially useful for e-commerce, where clean, consistent backgrounds make products pop.
How-To:
Use the Quick Selection or Magic Wand Tool to outline your subject.
Apply a Layer Mask to isolate the subject.
Replace the background with a solid color or another image.
For detailed edges, like hair or intricate jewelry, spend extra time refining the selection for a professional result.

Step 7: Sharpen and Focus
If your image feels a bit soft, the sharpening tool can enhance details. Be mindful not to overdo it, as too much sharpening can add noise and look unnatural.
Best Use: Sharpening is highly effective in jewelry retouching, where intricate designs need to stand out.
Step 8: Add Text or Graphics
Adding text can make your images perfect for promotions, social media, or branding. Keep it simple and ensure it doesn’t overshadow the main subject.
Pro Tip: Choose clean, legible fonts and position the text in a way that complements, rather than dominates, the image.
Step 9: Save in the Right Format
After all your hard work, save your image in a format suited for its purpose:
JPEG: For web use or social media.
PNG: When transparency is needed.
TIFF: For print or high-quality projects.

Professional Services for a Polished Finish
While learning photo editing is rewarding, sometimes you need expert precision. Services like ecommerce image editing, photo retouching, jewelry retouching, and ghost mannequin service can save time and deliver flawless results.
At UK Clipping Path, we specialize in:
Removing imperfections from images with precision.
Highlighting intricate details in jewelry.
Creating ghost mannequin effects for apparel.
Perfecting product photos for e-commerce.
Final Thoughts
Photo editing is an art that improves with practice. Whether you’re tweaking brightness, enhancing colors, or experimenting with creative effects, a little effort can go a long way in elevating your visuals.
For more complex projects or professional-quality results, don’t hesitate to seek expert help. At UK Clipping Path, we’re here to transform your images with our photo editing expertise. Try our services today and take your visuals to the next level!
0 notes
Text
Top 1 Free Video Editing Software for 2024: Easy & Powerful Tools
When it comes to video editing in 2024, one of the top free tools that stands out is DaVinci Resolve. This powerful software, developed by Blackmagic Design, has gained free video edting software widespread recognition in the video editing community for its professional-grade features, making it an excellent choice for both beginners and seasoned editors alike. DaVinci Resolve offers an impressive array of editing tools, color grading options, audio post-production capabilities, and visual effects, all packed into a single, easy-to-use interface.
One of the most remarkable aspects of DaVinci Resolve is its robust color grading capabilities. It’s known for offering some of the best color correction and grading tools in the industry, allowing users to fine-tune every aspect of their video’s color balance, saturation, contrast, and more. For filmmakers and video creators who need to achieve cinematic quality, DaVinci Resolve’s color grading is a standout feature that is typically found in high-end software used by professionals in Hollywood.
Beyond color grading, DaVinci Resolve excels in video editing with its timeline-based editing workspace. The interface is designed to be intuitive, with a drag-and-drop method of editing that allows users to quickly assemble their footage. Whether you are working on a simple vlog or a complex multi-layered video project, DaVinci Resolve offers a comprehensive set of editing tools that cater to a wide range of needs. From trimming and cutting clips to adding transitions and special effects, the software allows for precise control over every element of your video.
Another impressive feature of DaVinci Resolve is its integrated audio post-production tools. The software includes Fairlight, a powerful audio suite that lets you mix and master your audio tracks with incredible precision. It provides tools for sound design, noise reduction, and even ADR (automated dialogue replacement). This makes DaVinci Resolve an all-in-one solution, eliminating the need for separate audio editing software.
DaVinci Resolve also comes with an impressive set of visual effects and motion graphics tools. With Fusion, the software’s built-in VFX toolset, users can create advanced visual effects and motion graphics without the need for third-party plugins. Fusion allows for the creation of everything from simple text animations to complex 3D effects, giving you the flexibility to enhance your videos with stunning visuals.
Despite its vast feature set, DaVinci Resolve is surprisingly accessible for new users. The free version of the software provides almost all of the features found in the paid Studio version, with only a few limitations such as support for higher-end resolutions and some advanced collaboration tools. This makes it an excellent choice for aspiring editors and creators on a budget, offering a professional-grade tool without the hefty price tag. Even so, users who wish to take their editing skills to the next level can easily upgrade to the paid version when they are ready.
In addition to its wide range of features, DaVinci Resolve is compatible with both Windows and macOS, making it a versatile option for users across different platforms. The software’s frequent updates and improvements ensure that users always have access to the latest tools and enhancements, which keeps it competitive in the fast-evolving world of video editing.
In conclusion, DaVinci Resolve stands out as the top free video editing software for 2024 due to its powerful editing features, professional-grade color grading, audio post-production tools, and visual effects capabilities. Whether you're a beginner just starting out or an experienced video editor looking for a comprehensive editing suite, DaVinci Resolve provides everything you need to create high-quality videos without the need for expensive software.
0 notes