#dry garlic chutney
Explore tagged Tumblr posts
Visit Tumblr Blog
Explore Tumblr blogs with no restrictions, modern design and the best experience.
Last Seen Tumblr Blogs


Fun Fact
Tumblr has a 66 index score for customer satisfaction in the US.
Text
Spicy Dry Garlic Chutney for Vada Pav: A Flavor Bomb!
Fiery garlic chutney elevates Vada Pav with bold, spicy flavor.
Hey foodies! If you’ve ever had a Vada Pav, you know that the magic lies in the chutneys. Today, we’re diving into the world of Dry Garlic Chutney—the fiery, flavorful powder that takes your Vada Pav from good to legendary. This condiment is super easy to make and packs a punch with every bite. Ready to spice up your life? Let’s get started! Ingredients 1/2 cup desiccated coconut: Adds a sweet…
#dry garlic chutney#easy chutney recipe#garlic powder chutney#homemade chutney#Indian street food#lasun chutney#Maharashtrian chutney#panvel#spicy garlic chutney#thepanvelite#vada pav chutney
0 notes
Text
Craving Worthy: A Deep Dive into the World of Garlic Chutney for Vada Pav Lovers
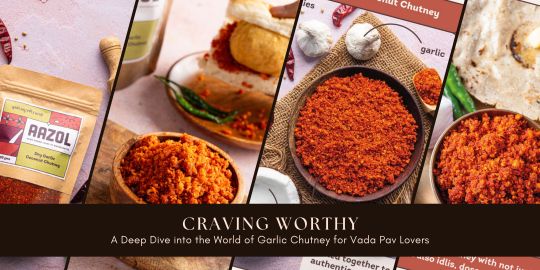
Vada Pav, the iconic street food of Mumbai, has won hearts across the globe for its irresistible combination of spiced potato fritters encased in a soft bun. Yet, the real magic lies in the accompaniments that elevate this snack to a culinary masterpiece. One such essential element is the Garlic Chutney, a flavorful and aromatic blend of dry garlic, spices, and sometimes coconut. In this deep dive, we will unravel the secrets behind crafting the perfect Garlic Chutney for Vada Pav aficionados.
The Essence of Garlic Chutney:
At the heart of every great Vada Pav is the piquant and robust flavour of Garlic Chutney. This condiment not only adds a kick to the overall taste but also introduces a depth that complements the mildness of the potato filling. Its dry texture and intense garlic aroma make it an integral part of the Vada Pav experience, creating a symphony of flavours that lingers on the taste buds.
Ingredients that Matter:
To embark on the journey of creating a sublime Garlic Chutney for Vada Pav, one must gather the following key ingredients:
Garlic Cloves: The star of the show, garlic, imparts its distinct flavour and aroma to the chutney. Use fresh, high-quality garlic for the best results.
Dry Coconut: Adding an element of richness, dry coconut enhances the texture and brings a subtle sweetness to balance the spice.
Red Chili Powder: The primary source of heat, red chilli powder, can be adjusted according to personal spice preferences.
Sesame Seeds: Roasted sesame seeds contribute a nutty undertone, enhancing the overall complexity of the chutney.
Peanuts: Providing a crunchy texture, peanuts add a delightful earthiness to the chutney.
Coriander Seeds: Coriander seeds bring a mild, citrusy flavour, complementing the other spices in the mix.
Salt: A pinch of salt not only seasons the chutney but also helps in balancing the various flavours.
Crafting the Perfect Garlic Chutney:
Now that we have our ingredients in place, let's delve into the step-by-step process of making the perfect Garlic Chutney for Vada Pav.
Step 1: Roasting the Ingredients
Begin by roasting the dry ingredients—dry coconut, sesame seeds, peanuts, and coriander seeds. Dry roast each ingredient separately to ensure they release their flavours without burning. The goal is to achieve a golden brown hue for the coconut and peanuts, while the sesame seeds should be lightly toasted.
Step 2: Sautéing Garlic
Once the dry ingredients are roasted, it's time to sauté the star of the show—garlic. Peel and finely chop the garlic cloves. In a pan, add a touch of oil and sauté the garlic until it turns golden brown. Be cautious not to overcook, as burnt garlic can impart a bitter taste.
Step 3: Blending the Mix
Allow all the roasted ingredients and sautéed garlic to cool before transferring them to a blender. Add red chilli powder and salt to the mix. Blend until you achieve a coarse, grainy texture. The goal is to retain some texture in the chutney rather than making it completely smooth.
Step 4: Final Touch - Adjusting Flavors
The garlic and some studies suggest that garlic may help reduce cholesterol levels and maintain a healthy heart. res and tastes. The chutney not only elevates the Vada Pav's flavour but also contributes to the sensory experience, turning a simple street snack into a culinary delight. savoury potato filling, creating a flavour explosion that dances on your taste buds.
Step 5: Storing for Later Use
Transfer the freshly made Garlic Chutney to an airtight container. It can be stored in the refrigerator for several weeks, ready to be used whenever the Vada Pav cravings strike.
Pairing Perfection - Vada Pav and Garlic Chutney:
Now that you have mastered the art of creating the perfect Garlic Chutney, let's explore the magic that happens when it meets its Vada Pav counterpart.
The warm, soft pav, stuffed with a golden-fried potato vada, is incomplete without a generous spread of Garlic Chutney. The dry texture of the chutney adds a delightful crunch, enhancing the overall mouthfeel. As you take that first bite, the spiciness of the chutney harmonizes with the savoury potato filling, creating a flavour explosion that dances on your taste buds.
The garlic undertones provide a depth that cuts through the richness of the vada, making each bite a journey of textures and tastes. The chutney not only elevates the Vada Pav's flavour but also contributes to the sensory experience, turning a simple street snack into a culinary delight.
Variations and Personalization:
The beauty of Garlic Chutney lies in its versatility. While the basic recipe provides a fantastic foundation, don't hesitate to get creative. Here are a few variations you might want to explore:
Fiery Red Chutney: Increase the quantity of red chilli powder for those who love an extra kick of heat.
Coconut Lover's Delight: Add more dry coconut for a creamier texture and a stronger coconut flavour.
Herb-Infused Twist: Incorporate fresh coriander leaves or mint for a herbal twist to your chutney.
Tamarind Tang: For a hint of tanginess, consider adding a small amount of tamarind paste during the blending process.
Health Benefits of Garlic Chutney:
Beyond its delectable taste, Garlic Chutney offers a range of health benefits:
Antibacterial Properties: Garlic is renowned for its antibacterial and antiviral properties, which can contribute to overall immune system health.
Heart Health: Some studies suggest that garlic may help reduce cholesterol levels and maintain a healthy heart.
Rich in Nutrients: The addition of peanuts, sesame seeds, and coconut brings a wealth of nutrients, including healthy fats, proteins, and essential minerals.
The garlic and some studies suggest that garlic may help reduce cholesterol levels and maintain a healthy heart. res and tastes. The chutney not only elevates the Vada Pav's flavour but also contributes to the sensory experience, turning a simple street snack into a culinary delight. savoury potato filling, creating a flavour explosion that dances on your taste buds....u crave the iconic street food, let your homemade chutney take centre stage, and savour each bite of the ultimate Vada Pav experience.
Conclusion:
In the world of Vada Pav Chutney stands as a testament to the power of condiments in transforming a humble snack into a gastronomic delight. With its bold flavours, aromatic profile, and crunchy texture, this chutney has become an integral part of the Vada Pav experience.
As you embark on your journey of mastering the art of Garlic Chutney for Vada Pav, remember that the real joy lies in experimentation. Adjust the spice levels, play with additional ingredients, and make it your own. The world of Vada Pav is vast, and with your homemade Garlic Chutney, you're now equipped to explore it in all its flavorful glory. So, the next time you crave the iconic street food, let your homemade chutney take center stage, and savor each bite of the ultimate Vada Pav experience.
1 note
·
View note
Text
Peanut Chutney Recipe: A Nutty Delight for Every Meal
About Peanut Chutney Recipe Peanut chutney Chuteny also known as Moongphali ki chutney, is a flavorful and versatile condiment cherished in Indian cuisine. This simple yet delicious accompaniment enhances the taste of various dishes, from South Indian breakfasts like idli and dosa to snacks such as pakoras and samosas. Its nutty richness, combined with the tangy and spicy notes, makes it a…
#chutney#chutney recipe#Cook#cooking#cooking show#cuisine#dry peanut chutney#dry peanut chutney recipe#dry peanut garlic chutney recipe#easy chutney recipe#food#groundnut chutney#HomeCooking#how to make dry peanut chutney#how to make peanut chutney south indian style#nutty chutney recipe#palli chutney#palli chutney recipe#Peanut#peanut chutney#peanut chutney for dosa#Peanut chutney recipe#peanut dip for dosa#South Indian chutney#south indian peanut chutney recipe#spicy peanut chutney#tasty#thick peanut chutney
0 notes
Text
Writing Notes: Herbs, Spices & Seasoning
Herbs and spices can add flavor and variety to your food.
Use a little at first, then add more when you are sure you like the flavor.
To substitute dry herbs for fresh, use ¼ teaspoon powder or 1 teaspoon crushed for 1 tablespoon fresh chopped herbs. Some herbs and spices are expensive.
You might want to buy only a few of the less expensive herbs and spices you will use.
Herbs and spices lose flavor and can spoil or get buggy if kept in the cupboard longer than a year.
If you use herbs and spices slowly, buy small containers, or store them in the freezer.
Uses of Herbs, Spices & Seasonings
Allspice - A mixture of cinnamon, nutmeg and cloves. Use in fruit desserts, pumpkin pie, apple cider, cakes, cookies, chicken, beef and fish dishes.
Basil - Tomato and egg dishes, stews, soups and salads
Bay leaves - Tomato dishes, fish and meat dishes
Celery seed - Juices, soups, salads, vegetables, pot roasts, poultry, rolls and biscuits
Chili powder - Chili, bean and rice dishes
Chives - Potato dishes, soups, dips and sauces
Cilantro - Latin American, Indian and Chinese dishes, salsa, stir fries, (Coriander leaves) legume or rice salads, hot cooked rice, grilled chicken or fish, or a dish of ripe tomatoes. Use fresh if possible.
Cinnamon - French toast, fruit and fruit salads, sweet potatoes, pumpkin and squash, puddings and apple desserts, ham or pork chops
Cloves - Whole cloves on ham or pork roast; ground cloves to season pear or apple desserts, beets, beans, tomatoes, squash and sweet potatoes
Coriander seed - Middle Eastern dishes, spice cakes and cookies, soups, roast pork and salad dressing
Cumin - Mexican, Middle Eastern and Indian dishes; beef and lamb, dry bean dishes, marinades, chili and tomato sauces; ingredient in curry powder
Dillweed - Tuna or salmon salad, potato salad, pickles, dips and sauces
Garlic - Mexican, Italian and Oriental dishes and in salad dressings; can be used fresh or dried, minced or powder
Ginger (fresh) - Oriental dishes, marinades for chicken or fish, fruit salad, dressings
Ginger (ground) - Gingerbread, spice cake, pumpkin pie, poultry or meat, soups, stews, stuffing, squash, sweet potatoes
Ground peppers: black, Cayenne & white pepper - Meats, casseroles, vegetables and soups
Italian seasoning - A mixture of marjoram, oregano, basil and rosemary; use in Italian dishes such as spaghetti
Marjoram - Egg and cheese dishes, meats, fish, poultry and vegetables
Mint - Fruit salads and fruit soups, melon, berries, cold fruit beverages, cooked carrots or peas, chilled yogurt soup, lamb, tabbouleh
Mustard - Sauces for meat and fish, in marinades, salad dressings, chutneys, pickles and relishes
Nutmeg - Cooked fruits, pies and desserts, baked items, spinach, sweet potatoes, eggnog and French toast
Onion - Any dish where onion flavor is desired; can be used fresh or dried (minced or powder)
Oregano - Italian dishes, chili, omelets, beef stew, meat loaf, pork and vegetables such as broccoli or tomatoes
Parsley - Meat, soup or vegetable dishes; adds color
Paprika - Stew, chicken, fish, potatoes, rice and hard-cooked eggs
Rosemary - Egg dishes, meats, fish, soups and stews, and vegetables
Thyme - Fish, poultry or meats, in soups or stews, vegetable salads
If these writing notes help with your poem/story, do tag me. Or send me a link. I'd love to read them!
More: On Food More: Word Lists
#word list#food#creative writing#writeblr#spilled ink#dark academia#writing prompt#poets on tumblr#writers on tumblr#literature#poetry#writing inspiration#writing inspo#writing ideas#light academia#langblr#linguistics#words#lit#writing reference#writing resources
297 notes
·
View notes
Note
Cooking as a listed interest? Ooh, any go to meals that you wanna share? :3
Absolutely!! :3
Low effort meal is pressure cooker risotto. The following makes about 3 meals worth for me.
Rinse 200g of arborio rice until the water runs clear, then dump it in the pressure cooker pot. Add 750ml of liquid. Usually this is just stock, although it's nice to put in a glug or two of wine. I'm aware this might look like a lot, but it's the right ratio, you gotta trust me :3
Put this on to pressure-cook for 7 minutes. I use my pressure cooker's high setting for this, so use your equivalent. Then, I let the steam release naturally for 10 minutes, before venting off the rest manually.
Open the lid once it's safe, and give it a good stir and mix, before placing the lid back on and letting it sit for 5 minutes, and then it's done!
Taste and adjust seasonings as necessary. Adding in fried mushrooms or powdered parmesan is really nice. It's a low effort meal and very good for it, though eating a full plain bowl of it can lead to it getting boring by the end, so little additions go a long way.
This is only low effort because of the pressure cooking, you can make this dish otherwise but it's not simple and requires a lot of time and attention 😅
Medium effort meal is slow cooker lentil dahl. The following makes about 3 meals worth for me.
Take split red lentils, and rinse them in water repeatedly until the water runs clear, like rice. I'd say maybe about half a bag, 250g? Depends how much you'd like to make but the ratios of ingredients are flexible.
Dump this into the slow cooker pot, and add a tin of chopped tomatoes. Slice up some veg of choice at a medium dice, and put that straight in too. Bell peppers, carrots and onions work particularly well. One large carrot, a bell pepper and an onion is a good amount, for reference. Then, add one thingy of stock in whatever form you like (stock cube, stock pot, etc.) mixing it with water to start breaking it up. Add seasonings (a good pinch of salt, and I usually go for a decent sprinkle of curry powder and a small sprinkle of paprika). Then, add water until it covers all the lentils and veg.
Turn the slow cooker onto high with the lid on for about 2-3 hours. Then give it a mix, make sure nothing is burning or stuck to the bottom, then set it on low with the lid on for a couple hours or until it starts looking really good. If you check and it looks dry, add water and make sure it's not burning on the bottom again. If it looks too wet, leave it on low with the lid off for an hour or so.
Taste and adjust seasonings as necessary, then serve up! It benefits quite a bit from little toppings, like yoghurt, mango chutney or crispy fried onions/garlic.
If you don't have a slow cooker, you should be able to do this with a pot on the stove, but you'd have to figure out how to adapt the temperature and all that.
High effort meal is homemade pizza! It's fun because people can make their own once you've made the basic pizza.
Basically I've poached this recipe from BBC Good Food, see here:
I have some notes for this though, so it's not all poached :3
Ignore the request for fancy italian flour, just use plain flour and it'll be fine. Pick the toppings you want, too.
Be careful with the temperature it recommends. Hottest is best for pizzas, I agree, but you definitely need to keep an eye on it for anything like 270°C, because it will just burn if you let it.
Since most of the time I'm making this for several people, and all the pizzas don't tend to fit in the oven at the same time, once you've got the little balls finished you might need to do them in batches.
You can prepare the pizzas in advance by cooking as the recipe says and doing tomato sauce plus mozzarella/cheddar topping to make a cooked Margarita pizza, and then leaving it until it's time to eat. Then, have each person choose a pizza, and top it with whatever additional toppings they'd like, then put it in the oven just to warm up and cook the toppings. Not 270°C for that though, just go for 200°C for about 10mins, or until it looks done.
#asked and answered#cooking#i have a multi cooker that i got as a gift which can pressure cook and slow cook and it's really nice :3
10 notes
·
View notes
Text
Hey don't cry ok? Mix flour and yogurt and a sprinkle of yeast and set aside cut up one large yellow onion fry until soft add garam masala salt pepper thai lime leaves garlic powder tandoori spice mix stir and let seasonings get toasty add edamame beans maggi sauce a can of whole tomatoes plus rinse the can out with water and add that when it's boiling mush up the tomatoes and add all the peanut butter in your house or as much as you want season to taste let simmer take out the bread dough punch down make little balls squish flat cook in a dry pan on medium high heat until they puff up don't worry about the little burnt bits they taste good serve with butter and mango chutney top with cashews if you want use use your hands to eat use the bread get messy enjoy home-cooked meal and feel the love and life in your belly and soul okay okay??
#culinary#ill write out the recipe proper if anyone wants#i made this yesterday and it was too good to not share
33 notes
·
View notes
Text
Ok so
I made that devilled pheasant recipe that was reported to be Anne's favorite in the issue of Country Life she guest edited (but with chicken rather than pheasant as it's a difficult bird to find around here out of season and expensive any time of year, and I didn't want to waste "shipping it in" money on something I might not even like)
Some thoughts:
I kinda had to guess my way through this because the recipe is super vague. No oven temperatures, very little indication of how long things should be allowed to cook, and based on the video I'm pretty sure the British are working with rather different definitions of "casserole" and "tender" than we are in the US
The spices the bird is boiled in smell divine by themselves, and I've saved the stock because I think it will make a great soup base. I about quintupled the garlic used because northern European recipes and especially British ones never use enough garlic. "One clove" is either a joke or like. Eating whole like a candy once it's dried or roasted amounts, not flavoring a dish to feed four amounts. I used three and also rubbed the meat in garlic powder before I did anything else with the recipe.
By the same token, I think it would materially improve the outcome if the meat were dry rubbed in all the spices (+extra garlic) and allowed to soak them in overnight before beginning the cooking process.
Included in the vagueness - it didn't say whether to keep or chuck the carrot and onions when you drain the meat. I chose to keep and I'm glad I did; the carrot in particular adds a lot to the final product
The only double cream available here comes already stiff... Not paying 15 fucking dollars for enough to have a full metric cup so I used one 6 oz jar and made up the difference with heavy whipping cream. They blended together quickly and easily.
The mango chutney-whipped cream-worcestershire mix used to dress it is... It tastes. It's very fruity and very strong. I think it would be more enjoyable if stood up against the gamey flavor of a pheasant; as it is it's very rich and rather overpowering. Definitely better evenly mixed in rather than slopped on top as the recipe asks, and I think it could stand either more heat or more time in the oven once the meat and cream are added together. (Due to the lack of a temperature in either real or fake units I assumed they meant to heat it in what Americans would call a "warm oven" - 175 to 200°F, not enough for further cooking to really occur just enough to get everything to a warm temperature.)
Overall thoughts: It's more positive than negative for me, but I don't think this is going to be the kind of dish just anyone would instantly fall in love with after the first bite. It's a very unique taste and uses fruit in a way I don't normally see it used with poultry. As I said already, I think the gamier taste of pheasant would probably help this considerably but I don't think that alone is going to make it a perennial favorite. The pheasant crumble pie in the issue Charles guest edited seems to have a more traditional flavor profile and I think that would fall more along my lines of preference - perhaps I shall make it later.
Uhhh, I don't know how to end this soooo
Bird

Frankly, it also looks more appealing mixed together. This has none of the darker more vibrant oranges showing in the picture of the finished dish on the website which is another reason I'm suspicious I didn't get the right idea of what "heat it in the oven for 10 minutes" was actually supposed to mean
18 notes
·
View notes
Text

**Mandia with Sukhua Poda**
Mandia is a wholesome breakfast dish that originates from the state of Odisha, India. It is typically made with ragi or finger millet flour and is a staple food in many households in the region. The flour is mixed with water and salt to form a batter, which is then cooked on a tawa or griddle to create a thin and crispy pancake. Mandia is usually served with a side of chutney, pickle, or curry.
*Ingredients:
4 tablespoons mandia (ragi) flour
Salt, as per your taste
1 cup cooked rice
Instructions:
Boil Water:
1 Start by boiling water in a saucepan. Add salt to the boiling water.
Add Ragi Flour:
2 Once the water reaches a boiling point, slowly add the mandia (ragi) flour to the boiling water. Stir continuously to avoid lumps.
3 Saute Ragi Flour:
Continue stirring the mixture to ensure the mandia flour is well combined with water. Saute the mandia flour until it's thoroughly cooked.
4 Add Cooked Rice:
Incorporate the cooked rice into the sauteed mandia mixture. Stir well to combine the rice with the mandia flour.
Check Consistency:
5 Monitor the consistency of the porridge. Aim for a thickness that is at least "2 string and higher." This refers to the consistency of the porridge when lifted with a spoon – it should form strings and not be too runny.
Continue Sauteing:
6 Keep sauteing the mixture until it reaches the desired consistency and doesn't stick to the bottom of the pan.
7 Transfer to Another Container:
Once the mandia mixture is well-cooked and has the right consistency, transfer it to another container.
Cover with Muslin Cloth:
Cover the container with a muslin cloth. This allows the mandia to cool and set properly.
8 Allow to Set:
Let the mandia (ragi) set with the muslin cloth cover. This is typically done overnight or for a few hours.
Consume in the Morning:
The next morning, your mandia (ragi) porridge should be ready to consume. Enjoy it as a healthy and nutritious breakfast. Remember, you can adjust the salt and consistency according to your taste preferences. Additionally, you can add other ingredients like dahi, jaggery, or fruits to enhance the flavor and nutritional value of the porridge.
Sukhua Poda, ( i have used patharmundy dry fish ) a delicacy hailing from the coastal region of Odisha, is a unique dish made from dry fish, specifically the variety named Patharmundi. The preparation involves a meticulous process of smoking and sun-drying the fish, followed by roasting it on a stove. The smoked and dried fish is skillfully mixed with a blend of spices ( smashed garlic and green chilies ), resulting in a dish bursting with flavor.
This culinary masterpiece offers a distinctive smoky taste that sets it apart. Sukhua Poda is commonly served as a delightful side dish, complementing rice, pakhala (fermented rice soaked in water), and mandia (ragi porridge). It also doubles as a savory snack, perfect for those moments when a quick and flavorful bite is desired.
Sukhua Poda stands as a testament to the rich culinary traditions of the region, providing a delectable experience for those who savor the flavors of coastal Odisha.
Combining the two dishes creates a delicious and unique flavor profile. Adding crushed garlic and chilies to the dish can give it an extra kick of flavor, making it a perfect breakfast or snack option. Whether served separately or together, Mandia and Sukhua Poda are both delicious and nutritious dishes that are worth trying.
pic: odiafoods.in
2 notes
·
View notes
Text

The Easiest Eggplant Parmesan Ever
It’s that time of year, when my garden has produced just about all it’s going to. Some leaves and stems are already wilting and yellowing.
We’ve been feasting on tomatoes and eggplants.
I’ve made my annual hoard of pepper jam.
I’ll make tomato chutney with some of the dark green tomatoes (and let the ones that have a vague pink color ripen on the vine for a few days).
Last night I made Eggplant Parmesan with one of the gorgeous eggplants and San Marzano tomatoes I planted this year. It was the easiest version I’ve ever prepared.
Also the most delicious.
And light — I roast the eggplant slices rather than bread and fry them.
Do you think this was so good because the produce was fresh from my garden?
Maybe. But I think this recipe — so easy and so simple — would also be wondrous with store-bought stuff.
THE EASIEST EGGPLANT PARMESAN EVER
1 medium eggplant
salt
4 tablespoons olive oil, approximately
1 onion, chopped
1 large clove garlic, chopped
8-10 plum tomatoes, sliced
1 tablespoon chopped fresh basil
1 cup ricotta cheese
1-1/2 cups shredded mozzarella cheese
2 tablespoons grated Parmesan
Preheat the oven to 400 degrees. Slice the eggplant about 1/8-inch thick, sprinkle with salt and let rest for 20-30 minutes. Wipe the eggplant slices dry and place them on a parchment-lined baking sheet. Brush each side of each slice of eggplant with a film of olive oil (you will need about 2 tablespoons of oil). Roast the slices for about 15 minutes, turning them once, or until they are softened. Remove from the oven. While the eggplant is roasting, heat 2 tablespoons of olive oil in a saute pan over medium heat. Add the onion and cook, stirring occasionally, for about 3 minutes, or until softened. Add the garlic and cook for another minute. Add the tomatoes and basil and cook, stirring occasionally, for 2-3 minutes, or until the tomatoes have softened. Place the eggplant slices on the bottom of a baking dish (overlap the slices slightly). Spread the ricotta cheese on top of the eggplant slices. Spoon the cooked tomato mixture over the cheese. Cover with the mozzarella cheese, then sprinkle with the Parmesan cheese. Bake for 20-25 minutes or until the cheese has melted and is beginning to turn lightly brown.
Makes 4 servings
3 notes
·
View notes
Note
Favorite food?
bestie that is an impossible question:') i'm a hardcore foodie so choosing feel like disemboweling a body part
but some of my comfort foods: my mom's pasta, kara bun, parotta, pachipindi, aloo tikki chaat, onion dosai with orange chutney and jalapeno cheese dip, the burgers from burger singh (NOT king), tedhe medhe, frozen frooti, dry yippee noodles, kodubele, garlic naan + malai kofta, paneer things in general, kachodis, luchi + choler daal, the zingy parcel and the tacos from dominos, thattai, veg biryani (shut up it's a thing), cookies and cream ice cream, this chinese samosa thing they'd give at our old school, cheesy potato nuggets, mangoes!!!
pretty much anything with lots of spice, garlic, masala, onions and cheese:D
#food#what should i tag you as bestie#i feel like im missing something i love too many things this is stressful
3 notes
·
View notes
Text
Trending Bun dosa by @chefkunal
Ingredients
For Batter
Semolina (सूजी) – 1 cup Curd (दही) – ½ cup Salt (नमक) – to taste Water (पानी) – 1 cup Oil (तेल) – 1½ tbsp Hing (हींग) – ½ tsp Mustard seeds (सरसों दाना) – 1 tsp Green chillies, chopped (हरि मिर्���) – 2 nos Chana dal (चना दाल) – 2 tsp Ginger, chopped (अदरक) – 2 tsp Onion, chopped (प्याज़) – ¼ cup Curry leaves (कड़ी पत्ता) – handful Coriander leaves (ताज़ा धनिया) – handful Baking soda – 1tsp – 1½tsp (approx) Oil (तेल) – for cooking
For Onion Tomato Chutney Oil (तेल) – 4-5 tbsp Heeng (हींग) – ¾ tsp Urad dal (उरद दाल) – 1 tbsp Dry red chilli (सूखी मिर्च) – 2 nos Mustard Seeds (सरसों दाना) – 2 tsp Cumin (जीरा) – 2 tsp Curry leaves (कड़ी पत्ता) – a sprig Ginger (अदरक) – a small piece Green chilli (हरी मिर्च) – 1-2 no Garlic cloves, large (लहसुन) – 7 nos Onion, roughly cut (प्याज़) – 1 cup Kashmiri chilli powder (कश्मीरी मिर्च पाउडर) – 2 tsp Tomato, roughly cut (टमाटर) – 2 cups Salt (नमक) – to taste Tamarind, seedless (इमली) – a small ball
0 notes
Text
Chicken Lollipop Recipe: A Crispy and Flavorful Appetizer You’ll Love
Chicken Lollipop is a show-stopping appetizer that’s perfect for any occasion. This Indo-Chinese fusion dish features crispy, juicy chicken drumettes marinated with spices and fried to golden perfection. It’s not just a treat for your taste buds but also a visual delight, with each piece resembling a lollipop.
Whether you're hosting a party, planning a family dinner, or simply craving a delicious snack, this easy Chicken Lollipop recipe will help you create restaurant-style magic at home.
Ingredients for Chicken Lollipop
For the Chicken Marinade:
12 chicken drumettes (lollipop style)
2 tablespoons ginger-garlic paste
1 teaspoon red chili powder
1 teaspoon turmeric powder
1 teaspoon garam masala
1 teaspoon soy sauce
1 tablespoon vinegar or lemon juice
Salt to taste
For the Batter:
½ cup all-purpose flour
¼ cup cornflour
1 teaspoon red chili powder
½ teaspoon black pepper powder
Water (as needed for a thick batter)
For Frying:
Oil (for deep frying)
For Garnish:
Spring onions (finely chopped)
Lemon wedges
Chili sauce or Schezwan sauce (for dipping)
How to Make Chicken Lollipop
Step 1: Prepare the Chicken
Clean the chicken drumettes and pat them dry.
If your chicken isn’t prepped, carefully push the meat down to one end of the bone to create the “lollipop” shape.
Step 2: Marinate the Chicken
In a bowl, mix ginger-garlic paste, red chili powder, turmeric powder, garam masala, soy sauce, vinegar, and salt.
Add the chicken drumettes and coat them evenly with the marinade.
Cover and let the chicken marinate for at least 1 hour (overnight marination for deeper flavor is even better).
Step 3: Prepare the Batter
In another bowl, mix all-purpose flour, cornflour, red chili powder, black pepper powder, and a pinch of salt.
Gradually add water to make a thick, smooth batter.
Step 4: Coat the Chicken
Dip each marinated chicken piece into the batter, ensuring it’s well-coated.
Step 5: Deep Fry the Chicken
Heat oil in a deep pan over medium heat.
Fry the chicken lollipops in batches, turning occasionally, until they are golden brown and crispy.
Remove and place them on a paper towel to drain excess oil.
Tips for Perfect Chicken Lollipop
Marination is Key: Longer marination enhances flavor and makes the chicken tender.
Oil Temperature: Ensure the oil is hot but not smoking. Medium heat is ideal for frying to ensure the chicken cooks through.
Crispier Coating: For extra crispiness, you can double-fry the chicken. First, fry until light golden, let them rest, and then fry again until crispy.
Serving Suggestions
Serve hot with Schezwan sauce, chili garlic sauce, or mint chutney for a flavor-packed experience.
Garnish with finely chopped spring onions and lemon wedges for a restaurant-style presentation.
Why Make Chicken Lollipop at Home?
Customization: Adjust the spice level and seasoning according to your preference.
Healthier Option: Use fresh ingredients and control the oil for a cleaner version of this dish.
Cost-Effective: Enjoy a large batch at home without breaking the bank.
Final Thoughts
Chicken Lollipop is a dish that brings smiles to every table. With its irresistible flavors and crunchy texture, it’s no wonder it’s a favorite for parties and family meals alike. This recipe ensures you can recreate the magic of restaurant-style Chicken Lollipop right in your kitchen.
So, gather your ingredients and give this recipe a try. Your family and friends will thank you for serving up this crispy, flavorful delight!
Happy Cooking!
0 notes
Text
The Art of Pairing Indian Meals with Perfect Sides and Breads
Indian cuisine is a beautiful medley of flavours, textures, and aromas, where every dish tells a story. Pairing the right sides and breads with Indian meals is an art that can elevate your dining experience. From creamy curries to fragrant rice dishes, the perfect accompaniments enhance not just the taste but also the authenticity of the meal. Let’s explore how to pair Indian meals with the ideal sides and breads to create a well-rounded culinary experience.
Why Pairing Matters in Indian Meals
Indian meals are a harmony of complex flavours, balancing spicy, tangy, and sweet notes. Adding the right sides and breads enhances the overall experience by complementing the primary dish and offering variety in texture and taste. A good pairing provides:
Textural contrast: Soft bread balances rich, thick curries.
Flavour enhancement: Sides like chutneys or pickles add bursts of flavour.
A complete meal: Balanced pairings ensure a nutritious, satisfying experience.
Perfect Sides for Indian Meals
1. Fragrant Rice Varieties
Rice is a staple in many Indian households and pairs beautifully with curries, dals, and dry dishes. Popular options include:
Basmati Rice: A long-grain rice known for its fragrant aroma, it pairs perfectly with rich curries like butter chicken or lamb rogan josh.
Jeera (Cumin) Rice: Flavoured with cumin seeds, this dish adds a mildly earthy flavour to meals.
Lemon Rice: A tangy South Indian rice dish that complements milder gravies or yoghurt-based curries.
2. Chutneys and Raitas
Chutneys and raitas are essential sides that add freshness and balance to Indian meals.
Mint Chutney: A refreshing condiment that pairs well with grilled dishes like tandoori chicken or kebabs.
Tamarind Chutney: Sweet and tangy, this chutney enhances the flavour of fried snacks and samosas.
Cucumber Raita: A cooling yoghurt-based side that tempers the heat of spicy dishes.
3. Pickles (Achaar)
Indian pickles bring a tangy, spicy punch to the table. Made with ingredients like mango, lime, or mixed vegetables, they are a delightful addition to rice dishes and flatbreads.
4. Papadums and Fritters
Papadums, thin and crispy lentil wafers, and fritters like onion pakoras add crunch to your meal. They are great as appetisers or to complement soft-textured curries.
Choosing the Right Indian Breads
Indian breads are incredibly diverse, each offering a unique texture and flavour. Choosing the right bread for your meal is crucial for a complete experience.
1. Naan: The Quintessential Choice
Naan is a soft, leavened bread cooked in a tandoor (clay oven). Its slightly chewy texture makes it perfect for scooping up thick curries like butter chicken or paneer tikka masala. Garlic naan or butter naan adds an extra layer of indulgence.
2. Roti: A Healthy, Everyday Option
Roti, also known as chapati, is an unleavened whole wheat bread. Its light texture makes it ideal for pairing with dry dishes like aloo gobi or lentil-based dals.
3. Paratha: Layered and Flaky
Parathas are pan-fried, layered flatbreads that can be stuffed with fillings like potato, paneer, or radish. They work well as a standalone meal or with yoghurt and pickles.
4. Puri: A Festive Favourite
Puri is a deep-fried bread that puffs up beautifully when cooked. It is often paired with dishes like chole (spiced chickpeas) or halwa for a celebratory meal.
5. Bhatura: Perfect for Hearty Dishes
Bhatura is a thicker, leavened bread that pairs exquisitely with chole. Its slightly tangy flavour from fermentation complements the spicy, rich curry.
Regional Pairing Suggestions
1. North Indian Meals
North Indian dishes like butter chicken, dal makhani, or palak paneer are rich and creamy. Pair these with naan, garlic roti, or jeera rice for a hearty meal. Add sides like cucumber raita or green chutney for freshness.
2. South Indian Meals
Coconut-based curries, sambhar (lentil stew), and rasam (spicy soup) dominate South Indian cuisine. Pair these with steamed rice, lemon rice, or flaky parathas. Accompany the meal with coconut chutney or fried papadums.
3. Coastal Indian Meals
Seafood curries like Goan fish curry or prawn masala shine with steamed rice or soft appams (rice hoppers). A tangy pickle or raw mango chutney enhances the coastal flavours.
Tips for a Balanced Indian Meal
Contrast textures: Combine soft breads with crunchy papadums or fritters.
Balance flavours: Pair spicy curries with cooling raitas or mild rice dishes.
Incorporate freshness: Add fresh salads or pickles for a tangy touch.
Mix and match: Explore regional combinations for a diverse culinary experience.

Pairing Indian meals with the perfect sides and breads is a delightful way to explore the depth of Indian cuisine. Whether you prefer soft naan with creamy curries or tangy chutneys with fragrant rice, the right accompaniments can transform your meal into a memorable experience. Embrace the art of pairing, and you’ll discover the magic of Indian meals in every bite.
0 notes
Text
Indian Vegetarian Cuisine in Brooklyn: A Flavorful Journey
Vegan Indian cuisine is gaining popularity in Brooklyn, offering a vibrant array of plant-based dishes that are rich in flavor and nutrients. From fragrant top Indian restaurant Brooklyn NY curries to hearty lentil stews, Indian cooking provides a wide variety of vegan options that cater to health-conscious eaters and those with dietary restrictions.
Vegan Lentil Dishes: Nutritious and Flavorful
Lentils are a cornerstone of vegan Indian cuisine. Dishes like dal tadka and masoor dal are made with spiced lentils cooked to perfection. These hearty stews are protein-rich, satisfying, and packed with flavor from ingredients like cumin, turmeric, garlic, and ginger. They pair perfectly with rice or flatbreads.
Chickpea Curries: Protein-Packed and Hearty
Chickpeas play an important role in vegan Indian dishes, offering a great source of plant-based protein. Chana masala, a spiced chickpea curry, is a popular vegan option in Brooklyn’s Indian restaurants. It’s made with onions, tomatoes, and spices like coriander and cumin, resulting in a rich, aromatic dish.
Aloo Gobi: Simple, Yet Delicious
Aloo Gobi, a combination of spiced potatoes and cauliflower, is a simple yet flavorful vegan dish. This dry curry is made with turmeric, cumin, and garam masala, offering a warm and comforting meal. It’s a go-to option for vegans in Brooklyn, showcasing the power of vegetables and spices.
Vegan Samosas: A Perfect Snack
Samosas, one of India’s most popular street foods, are often made with a vegan filling of spiced potatoes and peas. These crispy, deep-fried pockets are packed with flavor and make for an ideal snack or appetizer. Brooklyn’s Indian eateries serve vegan samosas with tangy chutneys for extra flavor.
Aloo Tikki: Crispy Potato Patties
Aloo Tikki is another vegan favorite found in Indian restaurants. These crispy, spiced potato patties are typically served with tangy chutneys or yogurt. Brooklyn’s vegan-friendly eateries make them with plant-based ingredients, ensuring that every bite is packed with flavors from cumin, coriander, and garam masala.
Vegan Biryani: Fragrant Rice and Vegetables
Vegan biryani is a fragrant rice dish that combines basmati rice with mixed vegetables and aromatic spices like saffron, cardamom, and cloves. In Brooklyn, you can find vegan versions of this classic dish, where the richness of the spices and the freshness of the vegetables come together in perfect harmony.
Vegan Curries: Flavorful and Rich
Indian curries are an ideal option for vegans, as they can be made without dairy. Coconut milk-based curries, like vegetable korma, are both creamy and delicious. The use of rich spices such as turmeric, cumin, and coriander provides depth of flavor. These curries are often paired with rice or naan.
Vegan Raita: A Cooling Side Dish
Raita is a cooling yogurt-based side dish often served alongside spicy Indian curries. Vegan versions of raita are made with plant-based yogurt and are flavored with cucumber, mint, or cilantro. It provides a refreshing contrast to the heat of spicy dishes and is commonly found at Brooklyn’s vegan-friendly Indian spots.
Vegan Desserts: Sweet Treats without Dairy
Indian vegan desserts are a delightful treat, using ingredients like coconut milk, jaggery, and fruit to replace dairy. Popular vegan options include coconut barfi and fruit-based desserts like mango sorbet. These sweet dishes provide a satisfying end to a meal, without compromising on flavor or texture.
0 notes
Text

How to Use Spices to Reduce Oil and Salt in Cooking Spices
Reducing oil and salt in your cooking doesn’t mean compromising on flavor. Spices are your best allies in creating dishes that are delicious and healthy. With their ability to enhance taste, aroma, and texture, spices make low-oil and low-salt meals exciting and satisfying.
Flavor Amplification with Spices:
Spices like cumin, coriander, and turmeric are natural flavor enhancers. Adding these to your recipes minimizes the need for excessive salt or oil. For example, cumin's warm, nutty taste can elevate soups and stir-fries, while turmeric's earthy flavor adds depth to curries and lentils.
Using Heat and Aromatics:
Dry roasting spices such as mustard seeds or fenugreek before adding them to your dish enhances their natural oils, making the flavors more pronounced without needing extra cooking oil. Similarly, spices like garlic and ginger can be sautéed in minimal oil to build a flavorful base.
Salt Alternatives in Spice Blends:
Blends like chaat masala or pani puri masala contain tangy ingredients such as amchur and black salt, which mimic the salty taste while using less sodium. This makes them a great choice for salads, snacks, and chutneys.
Why Choose Dilhar:
Dilhar Spices are designed to bring out the best in your dishes with minimal additives. Our pure and potent turmeric, cumin, and other spices deliver maximum flavor, helping you cook healthier meals without compromising on taste.
Conclusion:
Cooking with less oil and salt doesn’t have to be bland. By creatively using spices, you can prepare meals that are vibrant, flavorful, and nourishing. Trust Dilhar Spices to make your low-oil and low-salt dishes taste exceptional!
0 notes
Text
10 Creative Recipes Using Our Fresh Dairy Products
Dairy products have a unique ability to elevate the taste and texture of a dish, whether sweet or savory. With Made of Milk’s high-quality milk, paneer, and other dairy products, you can create meals that are not only delicious but also packed with nutrition. In this blog, we’ll share 10 creative recipes that make the most of our fresh dairy offerings.
1. Creamy Paneer Tikka
Ingredients: Made of Milk paneer, yogurt, spices, bell peppers, onions. Method:
Marinate paneer cubes with yogurt, spices, and a touch of lemon juice.
Skewer with bell peppers and onions, then grill or bake until golden.
Serve with mint chutney for a perfect appetizer.
2. Classic Malai Kulfi
Ingredients: Made of Milk’s fresh milk, sugar, cardamom, and pistachios. Method:
Simmer milk until it thickens, add sugar and cardamom.
Pour into molds and freeze overnight.
Garnish with crushed pistachios before serving.
3. Rich Milk Kheer
Ingredients: Milk, rice, sugar, and dry fruits. Method:
Cook rice in milk until tender.
Sweeten with sugar and add chopped almonds and raisins.
Enjoy warm or chilled as a dessert.
4. Paneer Butter Masala
Ingredients: Paneer, butter, tomato puree, cream, and spices. Method:
Sauté onions, garlic, and tomatoes in butter to create a base sauce.
Add paneer cubes and cream, simmering until the flavors meld.
Serve with naan or rice for a wholesome meal.
5. Refreshing Mango Lassi
Ingredients: Made of Milk yogurt, fresh mangoes, and a touch of honey. Method:
Blend yogurt with mango pulp and honey until smooth.
Chill and serve as a refreshing summer drink.
6. Cheesy Veggie Pasta
Ingredients: Milk, cheese, vegetables, and pasta. Method:
Create a creamy cheese sauce with Made of Milk’s fresh milk and cheese.
Toss with cooked pasta and sautéed vegetables.
Sprinkle with herbs for a delightful meal.
7. Spiced Turmeric Milk
Ingredients: Milk, turmeric, black pepper, and honey. Method:
Heat milk with a pinch of turmeric and black pepper.
Sweeten with honey and serve warm as a soothing bedtime drink.
8. Homemade Yogurt Popsicles
Ingredients: Yogurt, fresh fruits, and honey. Method:
Blend yogurt with your choice of fruits and a drizzle of honey.
Pour into molds and freeze.
Enjoy as a healthy, on-the-go treat.
9. Malai Kofta Curry
Ingredients: Paneer, potatoes, cream, and spices. Method:
Mix mashed paneer and potatoes, forming them into balls to fry into koftas.
Prepare a rich tomato and cream-based curry, adding the koftas before serving.
10. Chilled Rose Milk
Ingredients: Milk, rose syrup, and ice. Method:
Mix rose syrup into chilled milk.
Serve with ice cubes for a quick and refreshing drink.
These recipes are a testament to the versatility of dairy products. With Made of Milk’s farm-fresh dairy, you can create dishes that are rich in flavor and nutrition. Experiment with these recipes, and don’t forget to share your creations with us on social media!
0 notes