#dremelwork
Explore tagged Tumblr posts
Photo

#mossgreen #robinseggblue #pearl #freshwaterpearl #greenbluewhite #green #blue #white #resinflower #resinrose #roses #roseearrings postearrings #nickelfree #trio #triad #brass #solder #solderedbrass #lenk #Dremel #dremelwork #handmade #handmadejewelry #EverJustCurious #handmadeearring #dmtobuy Approx 1.25" long and 0.75" wide $34.99
#lenk#brass#green#roses#blue#mossgreen#resinflower#handmadeearring#nickelfree#dmtobuy#greenbluewhite#trio#pearl#dremel#white#handmade#triad#robinseggblue#dremelwork#roseearrings#resinrose#solder#freshwaterpearl#solderedbrass#handmadejewelry#everjustcurious
7 notes
·
View notes
Photo

New tutorial- Check out how to cut gemstones with Dremel. 👍 I didn’t think it could be done, but tried it and sure it can be done! Blog post is at basketofblue.com with video. #tutorial #jewelrytutorial #gemstonecutting #stonecutting #dremelwork #dremelcutting #diyjewelrymaking #jewelrymakingtools #jewelrymakingtutorial #handmadejewelrytutorial (at Philadelphia, Pennsylvania) https://www.instagram.com/p/B5X8QcWHNNI/?igshid=1c6lidsaxyeyh
#tutorial#jewelrytutorial#gemstonecutting#stonecutting#dremelwork#dremelcutting#diyjewelrymaking#jewelrymakingtools#jewelrymakingtutorial#handmadejewelrytutorial
0 notes
Photo

#wip #landrover #landroverdiscovery #discovery #matchbox #matchboxcustoms #custommade #dremel #dremelwork #dremel3000 #diecast #diecast_sam https://www.instagram.com/p/BpZi94NljoX/?utm_source=ig_tumblr_share&igshid=1c37xn33zllo9
#wip#landrover#landroverdiscovery#discovery#matchbox#matchboxcustoms#custommade#dremel#dremelwork#dremel3000#diecast#diecast_sam
0 notes
Video
. . ⚙️ Finer sanding with my @dremel 4300 . 🛠 Overall great tool for editing wood and other materials . . . . #knifelover #m9bayonet #barefootrun #fivefinger #naturalrunning #grinditout #Dremel #DremelMaker #dremeltools #dremelart #dremel3000 #dremel3d #dremellove #Dremelspitze #dremellover #dremelitalia #dremelfun #dremelwork #dremel4300 #sharemydremel #dremelmaker #missiontomake #bruchsal #karlsruhe #stuttgart #frankfurtammain #mannheim #heilbronn #heidelberg #StefanVonU (hier: Bruchsal)
#dremellover#dremel3d#dremeltools#dremelart#m9bayonet#bruchsal#naturalrunning#dremel3000#frankfurtammain#heidelberg#dremel4300#missiontomake#barefootrun#dremelfun#heilbronn#stuttgart#dremelmaker#dremelwork#dremelitalia#dremel#mannheim#sharemydremel#grinditout#stefanvonu#dremelspitze#knifelover#dremellove#fivefinger#karlsruhe
0 notes
Photo

Morning Sun Adornment #nofilter #newwork #handcrafted #amethyst #bangles #copperplated #statement #earrings #jewelrydesign #dremelwork
#statement#dremelwork#copperplated#jewelrydesign#amethyst#newwork#earrings#bangles#nofilter#handcrafted
0 notes
Photo

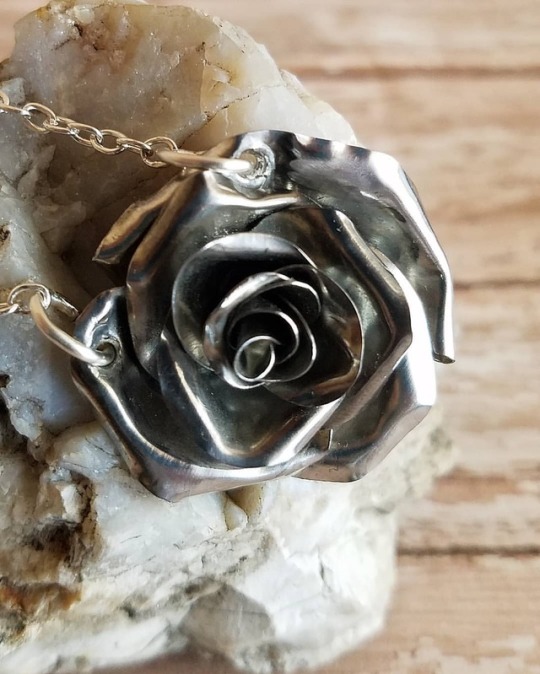
I haven't finalized the design of this piece, but I was too excited about how the rose turned out not to give y'all a sneak peek. I cut the individual petals from a sheet of tin, rolled and shaped them, and soldered them into the blossom. #tin #silvercolored #solder #lenk #lenksolder #dremel #dremelwork #rose #metalrose #rose #rosependant #sneakpeek #handmade #handmadejewelry #EverJustCurious
#rose#solder#dremelwork#tin#dremel#everjustcurious#lenk#lenksolder#metalrose#sneakpeek#handmade#rosependant#silvercolored#handmadejewelry
3 notes
·
View notes
Photo

#agate #pink #peachpink #pinkagate #dagger #daggergemstone #brass #brasssetting #brasscap #goldcoloredchain #solder #solderedmetal #lenksolderingtool #dremel #dremelwork #handmade #handmadejewelry #EverJustCurious #handmadenecklace #dmtobuy Length end-to-end approx 16" to 18" Pendant approx 1.5" long $34.99
#dmtobuy#solderedmetal#dagger#pinkagate#handmadejewelry#handmadenecklace#dremel#peachpink#brasssetting#goldcoloredchain#brass#brasscap#handmade#dremelwork#daggergemstone#everjustcurious#lenksolderingtool#agate#pink#solder
1 note
·
View note
Photo

#quartz #cherryquartz #pink #agate #pinkagate #brass #hammeredbrass #hammeredmetal #brassbracelet #openbangle #pinkandgold #solder #solderedmetal #lenk #lenksolder #dremel #dremelwork #handmade #handmadejewelry #handmadebracelet #EverJustCurious #dmtobuy Circumference approx 7" Slide over wrist, not the hand, to wear $49.99
#openbangle#agate#quartz#lenksolder#dremelwork#handmadebracelet#dmtobuy#pinkagate#hammeredbrass#handmadejewelry#brass#handmade#brassbracelet#solder#hammeredmetal#solderedmetal#cherryquartz#dremel#everjustcurious#lenk#pink#pinkandgold
1 note
·
View note
Video
instagram
So you Can cut a gemstone with Dremel 😃 It takes a while... I continued to hand sand the Labradorite piece with several grits of sandpaper. Also takes a looong time😄 It’s not a super great finish, but it could be taken further. I’ll be making a YouTube video of this whole process in case someone wants to try. Your triceps will be sore the next day...👍 #gemstones #gemstonecutting #dremelwork #dremelcutting #diygemstonejewelry #cutgemstones #dremeluses #dremel #cutyourowngems #labradorite #rawlabradorite #jewelrymaking #handmadejewelry #handmadegemstones #jewelrymaker (at Philadelphia, Pennsylvania) https://www.instagram.com/p/B1rYL_FhOuT/?igshid=1hi4yv7oozqpj
#gemstones#gemstonecutting#dremelwork#dremelcutting#diygemstonejewelry#cutgemstones#dremeluses#dremel#cutyourowngems#labradorite#rawlabradorite#jewelrymaking#handmadejewelry#handmadegemstones#jewelrymaker
0 notes
Photo

#beforeafter #wip #jadatoys #fordmustang #fordmustangGT #mustangGT #diecast_sam #diecast #custokemade #handmade #dremel3000 #Dremel #dremelwork #airbrushing #airbrushgun #iwataairbrush #iwata https://www.instagram.com/p/BpNXz0xl6sa/?utm_source=ig_tumblr_share&igshid=19xjjnzjrkwfd
#beforeafter#wip#jadatoys#fordmustang#fordmustanggt#mustanggt#diecast_sam#diecast#custokemade#handmade#dremel3000#dremel#dremelwork#airbrushing#airbrushgun#iwataairbrush#iwata
0 notes
Photo

#quartz #cherryquartz #pink #agate #pinkagate #brass #hammeredbrass #hammeredmetal #brassbracelet #openbangle #pinkandgold #solder #solderedmetal #lenk #lenksolder #dremel #dremelwork #handmade #handmadejewelry #handmadebracelet #EverJustCurious #dmtobuy Circumference approx 7" Slide over wrist, not the hand, to wear $49.99
#cherryquartz#dremelwork#pinkandgold#lenksolder#quartz#handmadebracelet#pinkagate#solder#brassbracelet#agate#everjustcurious#dmtobuy#handmadejewelry#lenk#hammeredbrass#dremel#pink#brass#handmade#hammeredmetal#solderedmetal#openbangle
0 notes
Photo

#lapis #lapislazuli #blue #royalblue #blueandgold #pyrite #pearl #freshwaterpearl #trio #three #threecircles #circles #brass #hammeredbrass #hammeredmetal #bluegraywhite #silvercolored #teardrop #teardroppendant #solder #solderedmetal #lenk #lenksolder #dremel #dremelwork #handmade #handmadejewelry #handmadenecklace #EverJustCurious #dmtobuy Length end-to-end approx 21.5" Pendant approx 1.5" lengthwise, 1.25" at widest $64.99
#lapis#lapislazuli#handmadejewelry#blue#dmtobuy#hammeredmetal#handmade#dremelwork#silvercolored#royalblue#pearl#threecircles#three#trio#handmadenecklace#pyrite#brass#lenk#teardroppendant#lenksolder#hammeredbrass#circles#solder#teardrop#solderedmetal#everjustcurious#bluegraywhite#dremel#blueandgold#freshwaterpearl
0 notes
Photo

Lost the label for this stone, but I'm 99.99% sure it's cherry quartz. It makes me think of pink lemonade and summertime. 😊 #cherrypink #cherryquartz #quartz #pink #brass #hammeredbrass #hammeredmetal #pinkandgold #solder #solderedmetal #lenk #lenksolder #dremel #dremelwork #brasschain #handmade #handmadejewelry #handmadenecklace #EverJustCurious #dmtobuy Length end-to-end approx 18" Pendant diameter approx 3/4" $58.99
#lenk#handmadejewelry#handmadenecklace#cherrypink#cherryquartz#solderedmetal#hammeredbrass#lenksolder#hammeredmetal#brasschain#everjustcurious#pink#solder#dmtobuy#dremelwork#brass#handmade#dremel#quartz#pinkandgold
0 notes
Photo

#brass #hammeredbrass #hammeredmetal #pearl #freshwaterpearl #seedpearl #solder #lenk #lenksolder #dremel #dremelwork #goldcolored #goldandpearl #teardrop #openteardrop #loop #handmade #handmadejewelry #handmadenecklace #EverJustCurious #dmtobuy Pendant measures approx 1.75 cm by 1.5 cm. Pearl is 2 mm Length end-to-end approx 16.5" to 19" $49.99
#freshwaterpearl#dremelwork#lenk#handmadenecklace#everjustcurious#hammeredbrass#seedpearl#goldandpearl#openteardrop#dremel#handmadejewelry#pearl#teardrop#goldcolored#dmtobuy#loop#brass#hammeredmetal#handmade#lenksolder#solder
0 notes
Photo

I love these stones because they look like mini planet Earths. #jasper #turquoiseblue #turquoiseblueandgold #turquoiseblueandbrown #earth #planet #brass #solder #solderedmetal #lenk #lenksolder #dremel #dremelwork #goldplated #nickelfree #handmade #handmadejewelry #handmadeearring #studearring #postearring #EverJustCurious #dmtobuy Diameter of studs approx 1 to 1.2 cm $39.99
#dmtobuy#handmadeearring#handmadejewelry#solderedmetal#dremelwork#turquoiseblueandgold#handmade#brass#jasper#studearring#dremel#solder#turquoiseblue#earth#nickelfree#lenk#everjustcurious#planet#goldplated#lenksolder#turquoiseblueandbrown#postearring
0 notes
Photo

Flattened the top of this amethyst stone and drilled a ways into it, soldered a brass loop into a hand-cut and -bent setting, and glued the stone and setting together. #amethyst #amethystnecklace #amethystandgold #brass #hammeredbrass #hammeredmetal #purpleandgold #dremel #dremelwork #solder #solderedmetal #lenk #lenksolder #handmade #handmadejewelry #handmadenecklace #EverJustCurious #dmtobuy Length end-to-end 16.5" to 19" $67.99
#solderedmetal#brass#hammeredmetal#purpleandgold#solder#everjustcurious#dremel#amethystnecklace#handmadejewelry#lenksolder#amethyst#amethystandgold#handmadenecklace#handmade#dmtobuy#dremelwork#lenk#hammeredbrass
0 notes