#dailycard sims 4
Explore tagged Tumblr posts
Text

The Sims 4 H2 Hummer project
Hummer project, awhile back a content creator asks me to look in to H2 for the sims 3. A long story short the excise left me with a headache, but later on I came across an old draft hummer project in my files that was never release. So l borrowed a chainsaw and screw it over. Here are the results, Ladies and gentlemen; l am pleased to announce H2 project release for your game VIP.
The H2 Hummer Limo for Sims 4


15 notes
·
View notes
Text

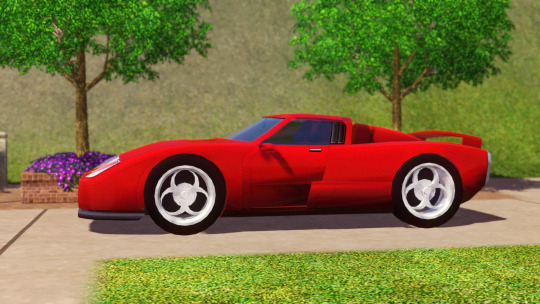
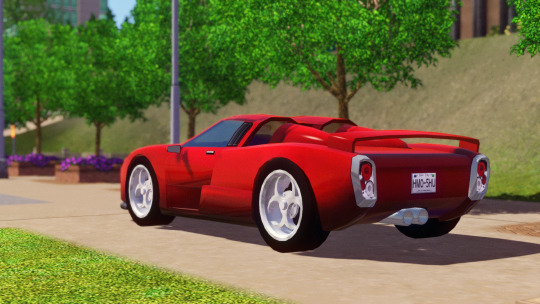
some thoughts on creating custom cars
i tried to give the hunka 711 a longer wheelbase (as pictured above) and it resulted in some trouble.
1: wheels
so the first thing i learned is: if cloning from an EA car, keep the meshes of the wheels in the same place, do not move them forward or backward along the z-axis. shifting them on the x-axis, such as making them wider/thinner, seems fine. you must keep the wheels of a custom car mesh in the same place as the ea car clone, or else the wheels will animate horribly when the car is in motion even if the bones are assigned correctly.
bloom says that if you're cloning from a Fast Lane SP car, it is possible to shorten/extend the wheelbase using his method, however i haven't tried this. i believe most cc cars (freshprince, dailycard, understrech) are not cloned from Fast Lane SP cars, but regular EA cars instead.
the joints are usually assigned this way: 1 for the car body, then 1 joint for each of the 4 wheels. you can look at an EA car for reference. it is probably best to assign the bones/joints manually as using Mesh Toolkit may assign bits of the car's body mesh to the wheel joint, causing that area to distort when the car is in motion.
2: rigs
as mentioned above, in bloom's forum post, he describes a way to edit the Fast Lane car's wheel placement by editing the RIG resource inside the car's package file.
the rig editor is an add-on to s3pe which can be downloaded here.
to edit a car's rig resource, you need to install the add-on. then: open the car's package in s3pe, right-click on the "rig" resource, then click on "rig editor".
the rig resource also controls where the sim sits inside the vehicle. if you want to edit the sim's position, this is what you need to edit in rig editor:
look for the resources with "IKtarget_seat" in the name. this controls the general seat placement of the sims in the vehicle. in the rig editor's screen on the right, you can edit the X Y and Z coordinates of the position. the X coordinate will move the sim left or right, Y will move the sim up or down, and Z will move the sim forward or backward. there are 4 "IKtarget_seat" resources, i don't know which controls the driver seat or passenger seats but you'll probably want to edit all the coordinates with the same changes to be consistent.
"IKtarget_foot": these resources control the placement of the sim's feet when sitting inside the car, like how stretched out or tucked in their legs are.
"IKtarget_SteeringWheel_01 and 02": these resources control the left and right hand placement on the steering wheel. if your sim's hands are misaligned with the steering wheel while driving, these are the resources to edit.
3: shadow meshes
in tsr workshop, each level of detail's mesh (high, medium, low) has a corresponding shadow mesh. if you've made significant changes to an existing car mesh, or if you've imported an entirely new car mesh over an EA car, you will also want to generate new shadow meshes so that the car's shadow looks correct in-game. if you do not generate new shadow meshes, you are likely to see weird misaligned shadows on the car's body, and the car's sun shadow on the ground will look off. so make sure to generate new ones for EVERY level of detail. tsr workshop has a one-click button that does it so it's pretty quick once you're satisfied with the actual car mesh. you can try generating high, medium and low LOD shadow meshes, or you can try generating shadow meshes using the high LOD mesh for the high, medium and low shadows to see if you get better quality shadows in-game.
--
ok so those are some not-so-obvious things i learned while working on my car projects... i hope it's useful to someone !!!
59 notes
·
View notes
Text
Conversion process/tutorial for freefall water wall
As inquired by @dailycard, I’m sharing the conversion process for my recent creation: Freefall Water Wall. This guide is NOT intended for beginners as I only show what I think the important steps. If this is the first time you tried to make a conversion, I suggest you try something like Pixel Jackpot’s 4to3 wall decor video tutorial first.
This tutorial will cover:
Using counter shader (part C step 9)
Using phong alpha shader and UV scroll parameter (part C step 6-8)
Making occluder shadow (Part D step 4-15)
This tutorial will NOT cover:
Setting up TSR Workshop (TSRW)
Making object mask
Tools used:
1. Older TSRW (I used the 2.0.86.0 version) for:
Cloning TS3 object base item you want to work on
Importing mesh, because sometimes you can get an error when doing this in the newer TSRW
Changing shader
Adding shader parameter
2. Newer TSRW (I used the latest 2.2.114 version) for:
Exporting TS4 mesh & maps
Changing footprint
Changing bones position
Changing occluder shadow
3. Milkshape & its plugin for TSR Workshop 4. Photoshop
Part A. Prepare the required resources.
A1. In NEWER TSRW:
1. Open the Sims 4 small freefall water wall object. Copy the object’s name, description & price information to a notepad txt file.
2. Export the object mesh. In my case, there is only hLOD available. Considering the mesh is quite low poly anyway, I believe it can be used for as the mLOD as well. The sunshadow is not necessary whatsoever.
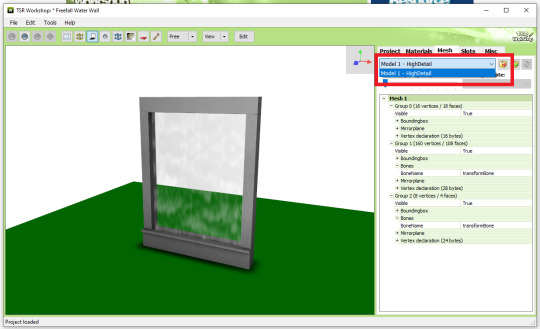
3. Export the diffuse map of material 1 (fountain body) & 2 (waterfall effect) as png. Material 0 diffuse map is not necessary because it’s just for drop shadow.

4. Open a similar looking object that has an occluder shadow. I used TS4 Romantic Garden’s Thriumphal Arch of Gluteus Maximus because it has an empty center & covered the upper part (I tested them in game first). Note the value for each of occluder entry (number 3). For this, I just took a photo each with my phone for convenience.

A2. In OLDER TSRW:
Open a Sims 3 object that fit perfectly against a wall. I used the bookshelf modern high 1x1. Export its hLOD mesh and name it along the line of “Wall Fit Reference Mesh”. I suggest using the older TSRW because sometimes I got an error when exporting in the newer version.
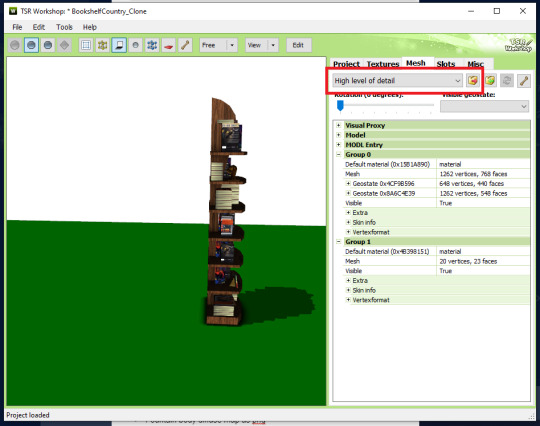
Part A check list:
Object’s name, description & price in a notepad txt file.
Small freefall water wall TS4 hLOD mesh as wso file.
Fountain body diffuse map as png file.
Waterfall effect diffuse map as png file.
EACH of occluder shadow entries value as notes/pictures.
Wall fit reference TS3 object mesh as wso file.
Part B. Editing the resources.
B1. In milkshape:
1. Import the small freefall water wall TS4 hLOD mesh. Then import the wall fit reference TS3 object mesh. Your workspace will looked like this:

2. Go to Groups tab. Double click each of the upper “Group 0″, “Group 1″, and “Group 2″ to select them.
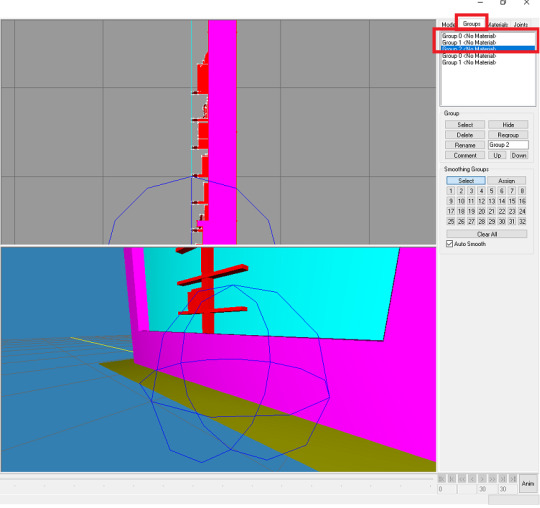
3. Go to Model tabs. Choose Move (Number 2). Change the Z value to 0.08 and click Move (Number 3). The waterfall should clip slightly through the reference bookshelf.
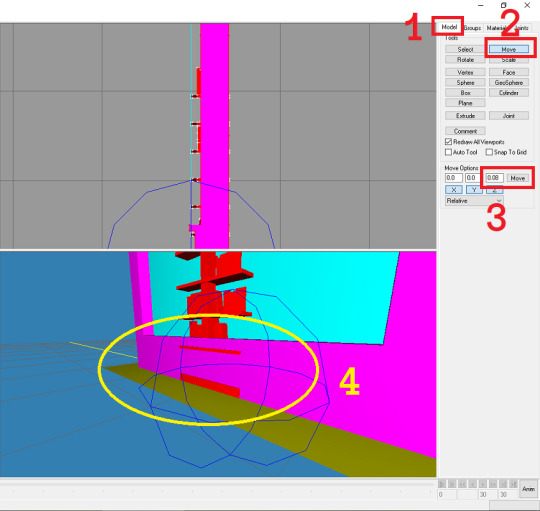
4. Go back to the groups tab. Double click each group again to deselect the upper group 0-2 (Number 1). Select the lower group 0 and click delete. Select the lower group 1 and click delete (Number 2&3).

5. Export as “hLOD edit”.
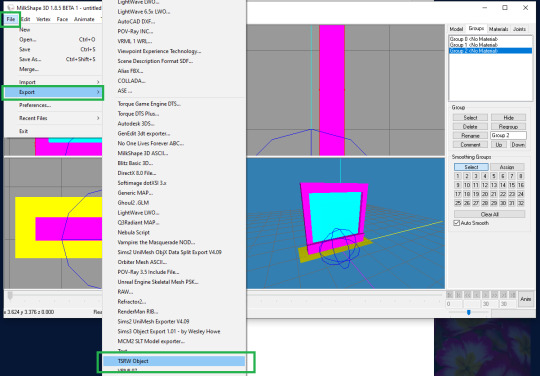
6. Delete the “Group 0″ (red box). Select “Group 1″, rename to “Group 0”. Select “Group 2″, rename to “Group 1” (green box). Export as “mLOD edit”.

B2. In photoshop:
1. Import your fountain body diffuse map png file. Your workspace should looked like this:

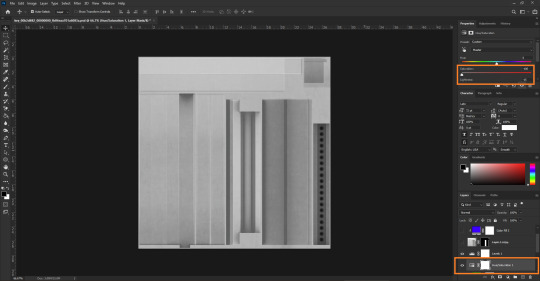
2. Add the hue/saturation & levels adjustment layer.

3. In the hue/saturation adjustment layer, under the master control I changed the saturation value to -100 and lightness to -15. Save as “multiplier map” in png format.
4. You can also use the level adjustment layer to tweak its brightness and make the (optional) “specular map” in png format. I didn’t do this step as the lion fountain I’m using as clone doesn’t require it.
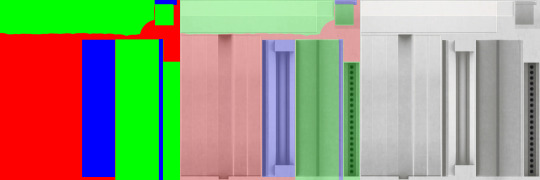
5. Make the masking map in png format. This is more of trial & error though, so I will not explain much. Here’s the mask map comparison I created as reference against the original diffuse map:
Part B check list:
1. Combined these item in milkshape:
Small freefall water wall TS4 hLOD mesh as wso file.
Wall fit reference TS3 object mesh as wso file.
To make:
hLOD edit mesh as wso file.
mLOD edit mesh as wso file.
2. Edited the “fountain body diffuse map as png file” in photoshop to make:
Multiplier map as png file.
Specular map as png file (optional).
Mask map as png file.
3. Unused part A items:
Object’s name, description & price in a notepad txt file.
Waterfall effect diffuse map as png file.
EACH of occluder shadow entries value as notes/pictures.
Part C. Building the object. In OLDER TSRW:
1. Clone the fountain france statue 2x2 TS3 object. Under the project tab, input the object’s name, description & price. Change the item flags. In my case, I do not change anything because I want the waterfall fountain to be found and placed similarly to the lion fountain. Save your project!
2. Go to textures. Choose the 2nd swatch dropdown option. Click on the smaller dropdown option on the left of it and choose delete.

3. Import your mask map. Do the same to your multiplier & (optional) specular map. Make sure your overlay & stencil maps is empty. You can also change the pattern now or just leave it the same as default. Save your file.
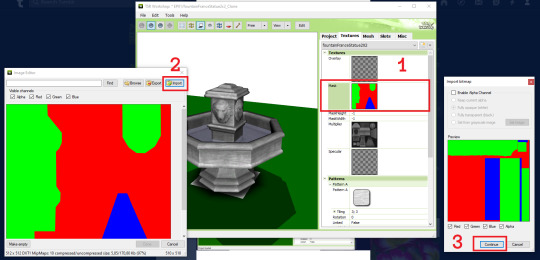
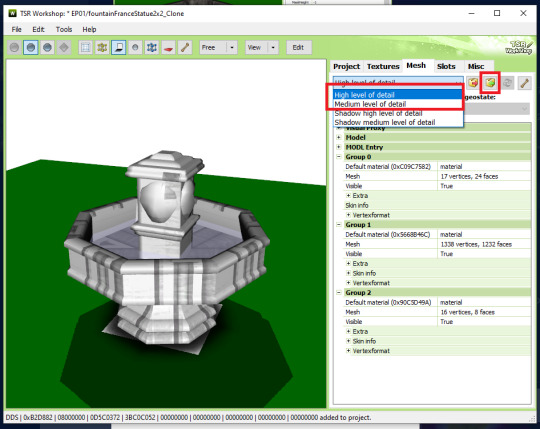
4. Go to mesh tab. Import your “hLOD edit” and “mLOD edit” mesh.
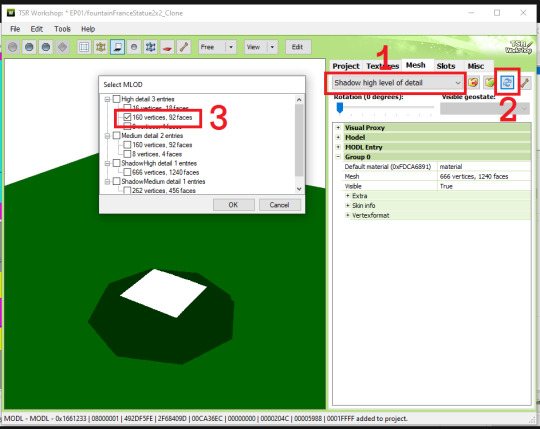
5. Select the “Shadow high level of detail”. Click on the generate shadow mesh. Choose the “160 vertices, 92 faces”. In my case, I can do the same for “Shadow medium level of detail”. Ignore the weird white square for now. We will remove it later. Save your file.
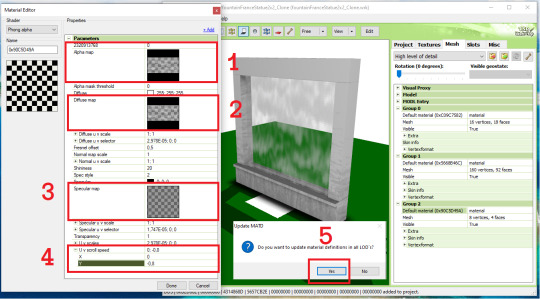
6. Select the “High level of detail” from the drop down menu again (Number 1). Edit the Group 2 material (Number 2). Choose the Phong alpha shader (Number 3). When prompted, choose YES! (Number 4)

7. Click the blue “+ Add” to show a new property window. Choose the UVScrollSpeed from the drop down menu. Click OK.

8. Replace the alpha map & diffuse map with “waterfall effect diffuse map” (Number 1&2). Make empty the Specular map (Number 3). Change the UV scroll speed parameter to 0 ; -0,8 (Number 4). When prompted to update the material definition to all LOD, choose YES (Number 5).
NOTE: If the object animation played in a different direction than intended here, change the UV Scroll Speed Parameter to positive or vice versa.
9. Go back to the main mesh tab, now choose to edit the group 1 material (number 1). Change the phong shader to counters shader (Number 2 & 3). If prompted to use the common values for this shader, choose NO! (Number 4). Click Done (Number 5). When prompted to update the material definition to all LOD, choose YES! (Number 6). Don’t forget to check if the changes has been made in the Medium Level of Detail. Save your file.

Part C check list:
1. In the “Project” tab: Edited the object’s name, description & price.
2. In the “Textures” tab:
Imported multiplier, specular (optional), and mask map.
Make sure your overlay & stencil maps is empty or disabled.
Change the pattern (optional).
3. In the “Mesh” tab:
Imported hLOD and mLOD edit mesh.
Generated the sunshadow in “Shadow High” and “Shadow Medium Level of Detail”.
Change the Group 2 Material to phong alpha shader, add the UV Scroll Speed parameter to 0 ; -0,8, import the alpha & diffuse map, and empty the specular map.
Change the Group 1 Material to counter shader.
Part D. Finishing the object. In NEWER TSRW:
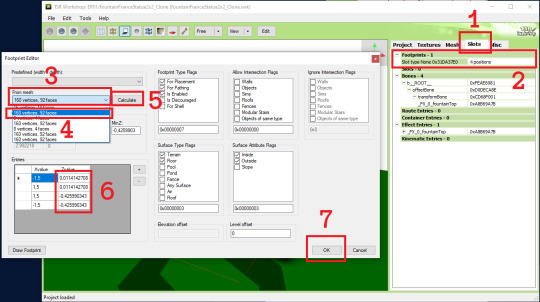
1. Open your saved project. Go to the Slots tab (Number 1). Edit the Footprints (Number 2). Select the first 160 vertices (Number 3&4) and click calculate (Number 5). Change the Z value of 0,0114142708 to exactly 0. Change the value of -0,425990343 to exactly -0,425 (Number 6). Click OK (Number 7).
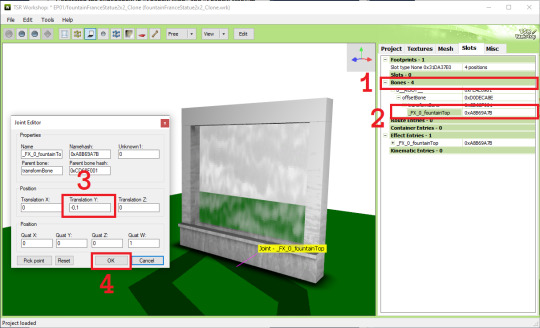
2. Expand the bones group (Number 1). Select the fountainTop entry to edit (Number 2). Change the Translation Y to -0,1 (Number 3). Click OK (Number 4). Save your project.
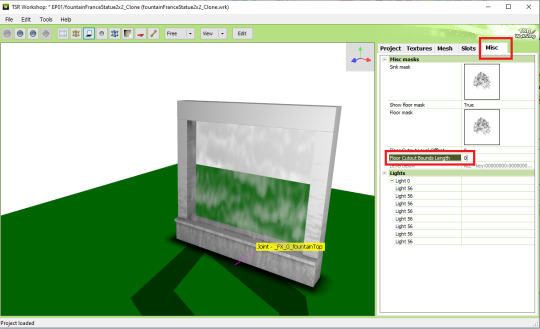
3. In the Misc tab, change the floor cutout bounds length to 0. This will remove the weird white square from before.
4. It’s recommended to create a new save file now as we will be editing the occulders. Expand the lights section and edit the Light 0 to show the Lite Editor Window (Number 1). Manually replace every occlusion entry value with the ones you noted/took photo of (Number 2). In my case the entry listed here is up to 8 occulders while the reference only had 6, so you can just delete the entry 7 & 8 using the - button.
NOTE: When manually inputing the value, use the tab key to quickly switch to the next value. You can also opt out the last zeroes from the value. If the original value was 1,51974000; you can just input 1,51974 and the zeroes will be automatically added after clicking OK.

5. The occluders should looked like this now. Try familiarizing yourself with each of the occluders by clicking on the light 56 entries one by one before we edit them to fit the object.

6. This is what I think how the occluder value works. Since I couldn’t find other sources, please let me know if I am incorrect. This is based on our occluder #1.
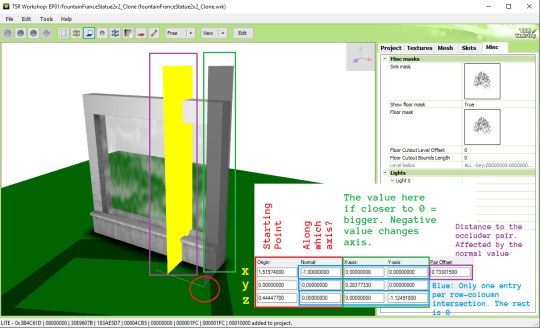
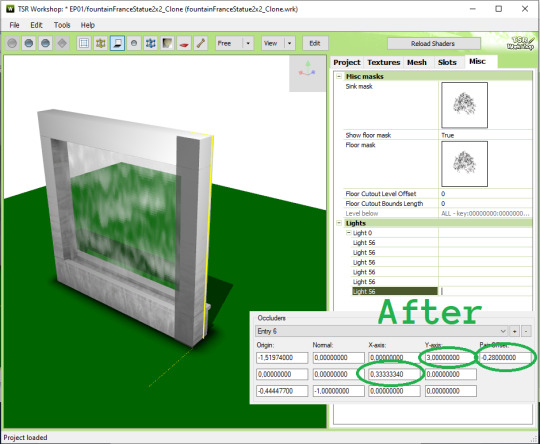
7. Now I want to change the starting point z value so it could fit much better. This whole part is a trial and error process. I changed the value from 0,444477 to -0,1.

8. Referencing to Pocci’s Blog, for the green note I wrote the value are more accurately called inversely proportional (as in 1/n). For example if I know the height of the object is exactly 3 tiles (n), equate 1/3 and I can input the value 0,3333333 to get the perfect height.
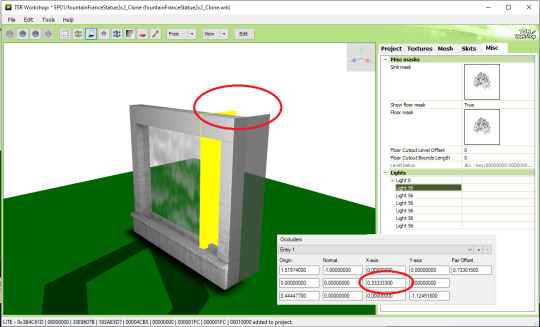
9. Next, I think the thickness of the object was 1/3 tiles, so using the equation 1/n and input 3 as the Y-axis z value without changing the - mark.

10. Lastly, I want the pair occluder to be closer, so I changed the pair offset value from 0,733... to just 0,28. Now we are finished with occluder #1.

11. Let’s jump to occluder #3 as it was the mirror of occluder #1. We can change the value similar to the occluder #1 while preserving the - value only for the orange circle shown below:
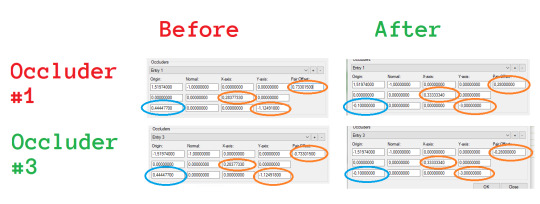
Occluder #3 result:
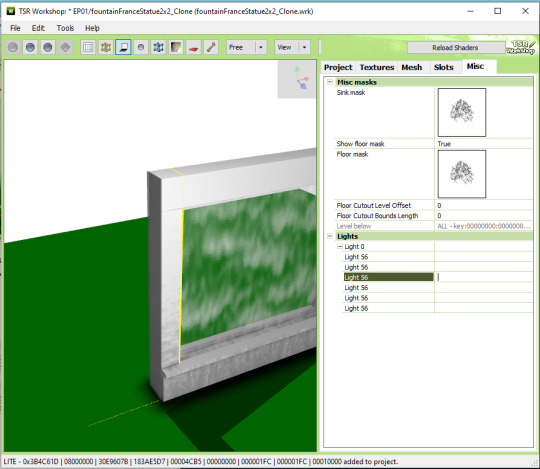
12.For occluder #6, the starting point is okay. We just need to change the plane size, shown red below:

13. Occluder #5 is similar to occluder #6, but with extra step fixing the starting point. Shown red below:


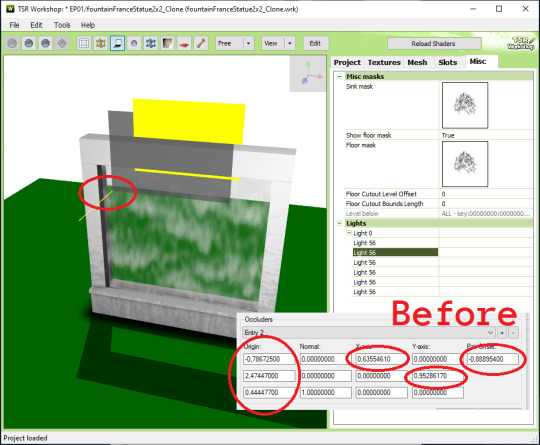
14. For occluder #2, I wanted to move it to the ground because when placed near the ceiling, the shadow they cast seemed less noticeable anyway. The values changed are shown red below:

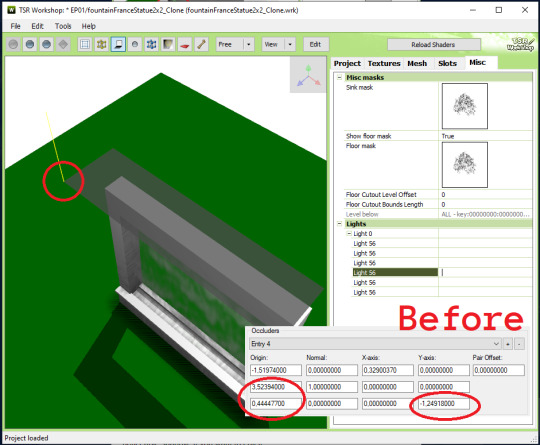
15. For the final occluder #4, you can either delete them or fixing a few value shown red below. They intersect with the ceiling anyway so they won’t be noticeable if you delete them.

16. DONE! Export your file & test in game :)
thanks for @sims3tutorialhub for a few initial references I used :3
PS: this tutorial does not fully reflect the final published version of the conversion object I made, i.e. it has 2 more variations than described here.
23 notes
·
View notes
Note
Hello, I was wondering if you could make the "Master Cycle" from Mario Kart 8, the one that is based off of Links Style in the Legend of Zelda, it could use the bicycle mechanics, I've seen people make motorcycles from the bike mechanics, like a Sims 4 CC creator called dailycard, who recently made a few motorcycles that are actually functionable using bike mechanics.
Hello🐹I'm sorry but I'm not familiar with Mario Kart or Legend of Zelda _(:3 」∠)_ I did google it though but I guess I won't be making it ...I um - ...sorry for being straightforward but I'm not interested in making (>_<) not just mario kart or Zelda, but just vehicles/transportation in general _(:з 」∠)_ sorry...
2 notes
·
View notes
Photo

HARAJUKU CROP TOP | TOMIOCHAN
DOWNLOAD - CROP TOP | WIX
DOWNLOAD - MONEY | WIX
need mesh : Crop Top | @nitropanic

Flying Money | @nataliaauditore

6 swatches - clothes
4 swatches - money
Do not re-upload, re-distribute.
不要重新打包上传。
Thanks to all the cc creators.
SHOES @savage-sims PANTS @shunga DECO CC @toskasims @pralinesims @dailycard
感谢所有的CC制作者。
Do not include my cc in sims sharing file.
Patreon Early Access | Become a Patron

#TS4#ts4cc#ts4cc clothing#ts4community#ts4ccfinds#ts4 cc download#ts4 custom objects#ts4 cc female#ts4customcontent#ts4 custom clothes#TheSims#thesims4#the sims 4 cc#thesims4cc#the sims 4 custom clothes#the sims 4 custom content#ts4 build#ts4deco
218 notes
·
View notes
Text


Hi guys, a while back I had brought you a H2 & H2r bikes but today, I want to bring you a bike that I did back in 2014, which I re-visited for your sims. Ladies and Gentlemen, I give you the Sims 4 2014 Kawasaki Z 1000 Sugomi deco by DailyCard. DL link above
18 notes
·
View notes
Text

A month ago, I brought you a Bajaj Pulsar, now it's time to head back to the motorcycle store to get the sims 4 2023 Yamaha XJ 600 by DailyCard download links is above.
15 notes
·
View notes
Text

Hi, you need another upgrade to your Husqvarna 701 vitpilen 2020 well lets add a small modification or just used parts form the KTM bikes and produce a KTM Husqvarna 701 vitpilen 2020 for sims 4 by DailyCard, side note Husqvarna tend to used KTM parts in their bikes.
10 notes
·
View notes
Text

Hello again, You say that the 401 is not up to it. You need something new well, lets upgrade your 401 Vitpilen to a 701 Vitpilen or lets have them both. Well, Ladies and Gentlemen I give you my second bike in Husqvarna brand the Husqvarna 701 Vitpilen 2020 motorcycle for sims 4 by DailyCard.
7 notes
·
View notes
Text


Hi guys, Today I bring you another motorcycle I give you the Bajaj Pulsar RS200 for the sims 4 by Dailycard.
14 notes
·
View notes
Text


AHPO/ Yacht This yacht was done in honor to my Godmother Betty Fenty who die during the Covid-19 time. This yacht was started this year in one of my side projects and I hope you like it. Side note, I do not want to see my yacht in any other game ,or placed behind a pay wall. I give you the AHPO Yacht by DailyCard.
25 notes
·
View notes
Text
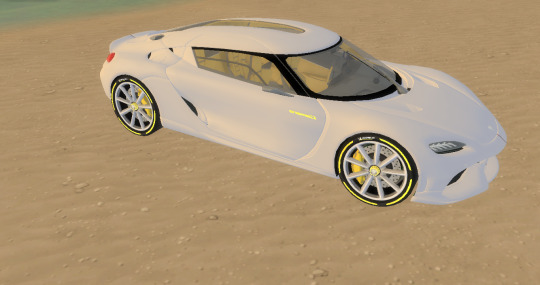
Hello again is it time for a family trip, why not used the sims 4 2020 koenigsegg Gemera by Dailycard, why not share the deadly speed with rest of your sims family. DL link above
9 notes
·
View notes
Text

The Devel Sixteen, was one of older cars, today I give you a upgrade.Ladies and Gentlemen, I give you a Devel Sixteen 2019 for the Sims 4 by DailyCard.The download link above
13 notes
·
View notes
Text

Good day to all, It has been awhile since I did a Harley for the sims 4. So, I will add another to your game. Ladies and Gentlemen and Harley. I give you the Harley Davidson's FXDR motorcycle.
5 notes
·
View notes
Text


For a while now, I wanted a wave runner in my game this is my second creation as the first one was not rig-able by the game standard, So I went back to draw board this was the best option for both games. So my first working jet ski for the game. Side note in the game there is control mod. I did not add lights or mask for the other stuff the only thing that I could be add is the radio/music. So Ladies and Gentlemen I give you the Audi Trimaran Concept Jet Ski at some point I might do the yacht and you have the complete set. Required the sims 4 island living
15 notes
·
View notes
Text

Another day, another motorcycle. Today, I add another two wheel to your sims 4 game. Ladies and Gentlemen. I bring you a Husqvarna brand of bike. I give you the Husqvarna 401 Vitpilen by DailyCard.
4 notes
·
View notes