#custom landscape layout
Explore tagged Tumblr posts
Visit Tumblr Blog
Explore Tumblr blogs with no restrictions, modern design and the best experience.
Last Seen Tumblr Blogs


Fun Fact
130K people were victims of a chain letter scam that affected Tumblr in May 2011.
Photo
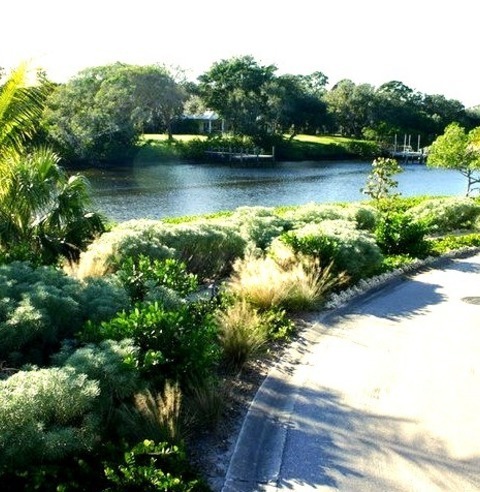
Front Yard Miami Inspiration for a large coastal drought-tolerant and partial sun front yard gravel garden path in summer.
#beige gravel walkway#custom landscape layout#palm tree landscaping#grey stone trim#custom tropical walkway#beige gravel path#natural stone trim
0 notes
Text
Thorough explanation of the first point of building a house!
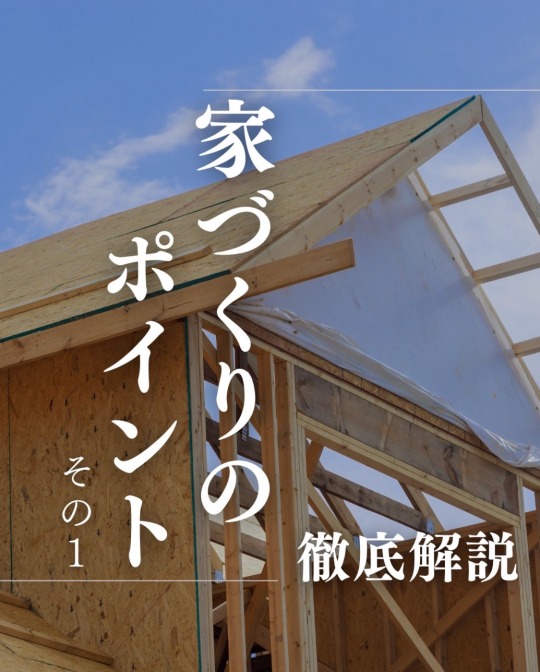
▶Thorough explanation of the first point of building a house. @aoisouken_official ←Other useful housing information is here!
You are longing for your dream home, aren't you? However, there are many things to worry about, such as budget, location, and design.
This time, we would like to share with you the first point of building a house! Please take a look at it as a reference for your own home building. Please take a look at it as a reference ✨.
Importance of Budget Management The first step in home building is to clarify the budget. Check your estimate in detail and plan accordingly to prepare for unexpected expenses. Plan accordingly.
Confirm the location conditions The surrounding environment is important for an ideal house. Confirm conditions such as transportation, sunlight, and convenience of nearby facilities, and choose a location with future living in mind.
Design to fit your lifestyle It is important to design a house that fits your family's lifestyle. Aim for a flexible design that can accommodate future lifestyle changes. Aim for a house that can accommodate future lifestyle changes. Consider energy efficiency A house with high energy efficiency is a cost-effective and environmentally friendly choice over the long term. Incorporate insulation and solar power generation to achieve both comfort and efficiency.
Choose a reliable partner Choosing a reliable construction company or architect is essential for a successful home construction project. Find a partner you can trust, based on solid track record and word of mouth. Conclusion House building requires careful judgment from planning to construction. Together with a reliable partner, let's make your ideal home a reality! with a partner you can trust!
We also provide other useful information on home building and construction examples, We also introduce other useful information for home building and construction case studies. ▶ @aoisouken_official Please feel free to take a look!
Aoi Souken for custom-built homes, remodeling, and renovations in Miyagi Prefecture, Japan!
instagram
▶家づくりのポイントその1を徹底解説 @aoisouken_official ←その他の役立つ住宅情報はこちら!
夢のマイホーム、憧れますよね。 しかし、そこに至るまでの予算、立地、設計など、悩むことはたくさんあります。
今回は、家づくりのポイントその1をお届けします! ぜひ皆様の家づくりの 参考にしてみてください✨ 1.予算管理の��切さ 家づくりの第一歩は、予算を明確にすることです。 見積りを詳細に確認し、予期せぬ出費に備えて余裕を持った 計画を立てましょう。 2.立地条件の確認 理想の家には、周辺環境が重要。交通の便、日当たり、周辺施設の利便性などの条件を確認し、将来の暮らしを見据えた立地を選びましょう。
3.ライフスタイルに合った設計 家族の生活スタイルに合った設計が大切です。 柔軟性のあるデザインで、将来のライフスタイルの変化にも 対応できる家を目指しましょう。 4.エネルギー効率を考慮 省エネ性能の高い家は、長期的にコストを抑え、環境にも優しい選択です。断熱材や太陽光発電を取り入れ、快適さと効率を両立させましょう。 5.信頼できるパートナーを選ぶ 家づくりの成功には、信頼できる工務店や建築士の選択が不可欠。しっかりとした実績や口コミを参考に、安心して任せられるパートナーを見つけましょう。 まとめ 家づくりは、計画から施工まで、慎重な判断が求められます。信頼できるパートナーと一緒に、理想の住まいを 実現しましょう!
他にも家づくりに役立つ情報や、 施工事例を紹介しています。 ▶ @aoisouken_officialから お気軽にご覧ください!
宮城県の注文住宅・リフォーム・リノベーションはあおい創建へ!
#宮城工務店#宮城注文住宅#石巻工務店#石巻注文住宅#注文住宅#新築#宮城新築#石巻新築#宮城リフォーム#石巻リフォーム#ZEH#家づくり#マイホーム#土地探し#間取り#Miyagi custom-built houses#Ishinomaki Custom-built Homes#Custom-built#Homes#New construction#Miyagi new construction#Ishinomaki new construction#Ishinomaki Remodeling#Home building#MyHome#Land Search#Layout#Landscaping#Instagram
1 note
·
View note
Photo
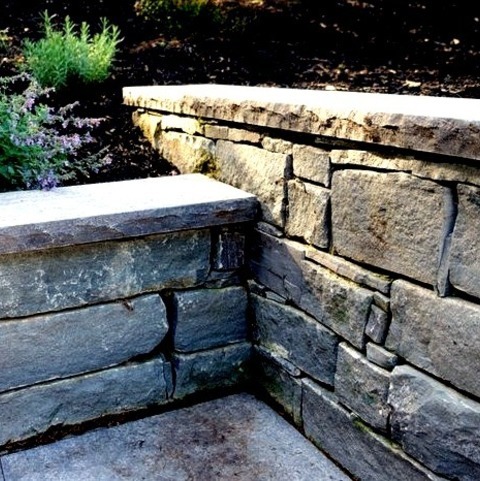
Stamped Concrete - Craftsman Patio Patio - mid-sized craftsman backyard stamped concrete patio idea with a fire pit and no cover
#custom firepit design#custom patio pathway#natural stepping stones#fire pit design#transitional patio design#backyard landscaping#custom patio layout
0 notes
Photo
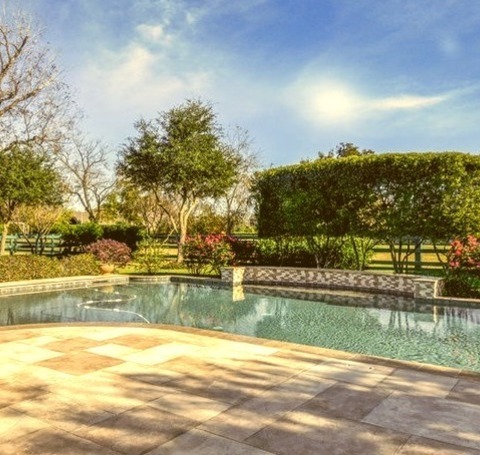
Austin Natural Pool Pool - large contemporary backyard pool idea with custom-shaped natural pool made of stamped concrete.
1 note
·
View note
Photo

Stamped Concrete Patio Mid-sized arts and crafts backyard stamped concrete patio photo with a fire pit and no cover
#backyard landscaping#fire pit design#custom patio entry#grey retatining wall#beige gravel landscape#custom patio layout#custom patio pathway
0 notes
Text
In just eight blocks of sidewalk in quiet neighborhood, walking through the not-quite-rain of a sunshower, today I encountered four missing shoe soles. Little pieces of plastic and rubber, detached from pedestrians' shoes, now lonely on the concrete, with the weeds.
No such thing, really, as a "weed", though. "Weed" is not a botanical term. Instead, describes perceived pests, at the discretion of the observer. At the discretion of the authority. Designated as weed by the one with power over that land. The agronomist, the rancher, the plantation manager. The weed wastes space that could otherwise be given to a monoculture cash crop, an "economically significant" plant. The weed interferes with the productivity of the plot of land. The weed interrupts the extraction. The weed diminishes the value. The weed doesn't belong in this place.
People are made to be weeds, too.
Some cities will designate you as a weed, and then they'll take action to pull you out. They'll uproot you. But it's not always explicit, like "we're outlawing loitering" or "we're outlawing taking a nap in the park" or "we're defunding the library". Sometimes it's quite clever, it's written into the physical landscape. Self-congratulatory "progressive" cities learn to co-opt language, to obscure the violence, to use and abuse space.
Thinking about things you might encounter, you might perceive, after you've been destitute, broken, lived at a homeless shelter, for years. Little signs of other peoples' misery. Indicators of desperation that some might overlook. And the way that environment shapes, and is shaped by, these miseries.
A friend asks "why is there always an unusual amount of scuffed detached missing shoe soles on this particular stretch of sidewalk? There are hardly any homes around here, it's all asphalt and empty lots, so where are all these be-shoed people coming from?" Because even though this is a wide expanse without either home residences or any kind of commercial or recreation space someone would want to visit, these blocks are the straight-line direct path between a low-income apartment complex and the cluster of corporate big box stores, and there's no bus line that runs between the two areas. "But don't the vast majority of customers of shopping malls and box stores drive vehicles, hence the obscenely massive parking lots?" Sure, customers drive, but guess who actually has to work at those places? An underclass of people living at that apartment complex with harsh restrictions and cheap amenities, who can't afford car insurance or who might be too physically disabled to bike. And so that apartment complex is a de facto "company town", the residents are essentially in confinement. It is written into that landscape. It can be read. "Why is there always debris, wrappers, coins, etc. in this particular quiet couple of blocks of the boulevard?" Because these blocks are between a thrift store and a same-day drop-in clinic, so many impoverished people will routinely be walking between these two locations. They attend their appointment, and then have forty-five minutes to kill before the bus comes back around, so why not check out the thrift store? The city and county collaborated and placed all the low-income assistance offices on the far side of town, which conveniently forces the poor and disabled to both stay away from the luxurious downtown district and also to waste their time making a four-hour commute, catching various connecting buses or else riding the bikepath, across the city just to attend a ten-minute-long appointment.
Then this spatial layout, this city's physical environment, will shape the physical body. This violence writes itself into the flesh. The way the denim is chafed and discolored on the left shoulder of someone's jacket from carrying a small backpack around by foot, day after day after day. The way someone's heart rate increases when they see a white and black vehicle in the periphery of their vision, subconsciously recollecting institutionalization and institutional abuse, or fearing what a ticket fee would mean for their budget (they might not be able to afford rent). The way someone develops a painful limp, maybe occasionally depends on a cane, because they had to walk great distances every day to get to work and their shoe sole fell off on the sidewalk, but they can't replace the shoes because their employer is underpaying them, and they're forced to stand all day at work anyway, and they already had some modest nerve damage in their foot because they've been rationing their insulin and can't afford their prescriptions, and federal medical insurance keeps denying them because their physical letters in the mail always show up too late or not at all, and groceries are too expensive so it's hard to get good nutrition to heal, but the diabetic nerve damage has by now damaged their digestive tract too so they have a strictly limited bland diet and can't enjoy the simple pleasure of a home-cooked meal (if they can even afford a home, at this point), and all those "little" miseries add up, and now they're hungry, and in pain, because they were forced to walk kinda funny for a long time over all those decaying sidewalks with all those other weeds.
642 notes
·
View notes
Note
As someone who might be interested to make their own webcomic one day: Why did you decide to put Aurora on its own dedicated website instead of a platform like Webtoon or Tapas?
Don't get me wrong, the site looks great but it gotta be a lot of work to maintain, right?
It was a couple week's worth of work to set up and polish, and I've had to do very minor adjustments every couple months. In return I don't need to deal with ads, I don't need to conform my story or layout to any sort of site standard, I haven't been locked into any publishing arrangements and I can customize the site however I want. For me, that's an easy trade.
When the channel started getting big several years back, we started getting approached by multichannel networks asking to absorb us in exchange for guaranteed clicks. We decided very early on that we weren't going to do that, in large part because even the multichannel networks that weren't scams were at all times one executive decision away from exploding and taking all their subsidiaries down with them. We saw it happen to Machinima, and recent years have seen even more cases where one boss's boss's boss who doesn't know what they're doing absolutely wrecks everyone's arrangement - like how Unity spontaneously destroyed everyone's trust in them by trying to retroactively charge game devs for user downloads of their game, or how the Escapist fired the one guy who was holding their channel together, or when CollegeHumor got corporate-mandatedly forced into pivoting to Facebook video and then everyone got fired when that turned out to be a terrible idea, or even the whole Channel Awesome thing. Big conglomerates of small indie creators tend to catastrophically explode on the regular, scattering those creators to the winds and potentially destroying the archive of their work.
We've even seen social media platforms thought of as solid staples of the online landscape start withering away because one idiot buys them out and starts chewing on cables. People whose entire professional networking presence is on Twitter have had a really rough year.
From my perspective, centralizing the world's webcomics into two or three baskets is a really good way to lose all of them at once. Also I put all this work into never having to deal with a boss, and it would be weird to go out of my way to change that.
690 notes
·
View notes
Text
A disgruntled Tumblrina (gender-neutral) made a website and why you should too.
Or "reject social media, return to personal websites".
PART 1: THE PART WHERE I CONVINCE YOU TO MOVE TO PERSONAL WEBSITES
So, the Web 2.0 social media infested landscape seems to be crumbling before our very eyes. Reddit's leadership is increasingly greedy, Twitter is sinking under the weight of Elon's massive, yet increasingly fragile ego, Tumblr is slowly turning into another lifeless corpo-fest, complete with the layout, Instagram continues to be vapid and soulless and Facebook seems to be going the way of MySpace.

(feel free to check the alt text on these, btw)
In these troubling times, where everything looks the same and you're expected to be milked for every dollar you're worth, what is a disgruntled Internet surfer such as yourself to do? Move to an untested alternative that's bound to get overrun by fascists thanks to poor moderation? Stay the course on the sinking ships you're used to?
Well, what if I told you that we've solved this problem way back in the 90's and early 2000's and were merely duped by the Big Zuck into forgetting our legacy? What if there was a cure for the sanitized, dull social media hellscape?

It takes a bit of work, when compared to just using a social media site, but even if your particular use case makes switching difficult (ex. an artist looking to promote their work), it's still a good secondary option to consider.
The core appeal is the ability to customize and individualize, make a corner of cyberspace unabashedly yours,
It can also be an exciting avenue of creative expression, giving whatever you want to say a unique coat of paint,
Most website hosting services are a bit more lax about what you can do on them, due to changes in the profit structure (rather than depending on advertisers and investors, they either have a premium option to give supporters perks, have another product, or, in the case of paid services, you renting that space IS the product),
If you want your website to be more accomodating and accessible, you don't have to file tons of feedback - do it yourself,
If you'd like to connect with other webmasters and promote each other's websites, we have webrings - sets of circular links that connect websites with something in common, be it a topic, aesthetic or friend group,
You're less likely to have your stuff purged by an ill-advised change in policy (especially if you have a backup of your files somewhere),
The more people do it, the less power those massive social media corpos have over the internet,
It can be a load of fun!
If I have you convinced, keep reading into part 2. If you just wanna see what I did, skip to part 3. If neither, feel free to continue scrolling. I won't hold it against you. You'll be missing out, that's all.
PART 2: SO, YOU WANNA MAKE A WEBSITE!
Good choice, here's some resources!
sadgrl's absolute beginner's guide to Neocities - what it says on the tin!
W3Schools - a more in-depth tutorial site, a learning resource so excellent it substituted for what I was supposed to learn in technical highschool (because our teacher just told us to go on W3Schools instead of teaching us shit)
A list of free layouts for your website - whether to use as a base to learn from or to simply take for yourself,
Neocities - the posterchild for free website hosting for personal websites. Doesn't allow video or audio, but you can get around that by linking those files from elsewhere. Beginner-friendly to a fault - once you have an account just drag and drop your files in,
Gitlab (& Gitlab Pages) - a more advanced option, but it has a few advantages of its own. Gitlab is a website hoster second and a version control service first - which is programmer speak for "keeps track of changes in your code and stores a backup of it online". it helps a lot when working on multiple devices or co-writing with a friend. And secondly, you can use Gitlab Actions to automate putting your website up (even on Neocities, like I do!)
My askbox - I am not joking, if you have any questions about any of this, I'd love nothing more than to help you out!
But with most of my indie web propaganda out of the way, it's time.
PART 3: Welcome to Timewatcher OS.
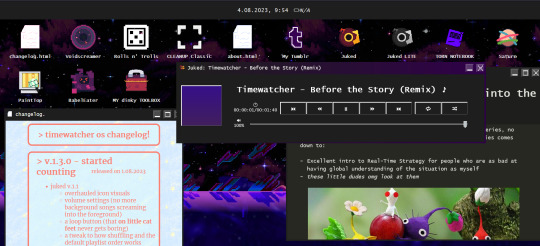
Of course, because I couldn't be normal when it comes to making a website, I had to turn it into a fake operating system. Each subpage is an "app", opened in a separate embed window. It has unlockable wallpapers (no pay2win, prommy). There's bideo games on it! I even made a music player for it so I can share my incongruent music tastes!
Like I said in my Tumblr bio, if I ever go radio silent for more than a month, it means I've gotten fed up with this hellsite and moved to my own homepage permamently. And I highly advise you make an option like this for yourself too! Lastly, if any of y'all would like to start a webring, do let me know in the askbox - I'm down to manage it if I'm not alone in there.
Anyways, I hope I convinced you to make a website, or at least check out some of the cool sites you've been missing out on! Hope to see you on the Old Web!
419 notes
·
View notes
Note
hey amelie! i just wanted to ask, how long did it take for you to learn how to build? did you watch youtube tutorials or anything like that? idk, i’ve always wanted to build a house for my own sims but it’s so hard for me to like what i’ve made. did you feel this way too? do you have any tips? sorry i’m such a yapper 😭 have a great day! <3
Hello! Watching simmers like bojanasims, lilsimsie and simlicy on youtube helped me a lot especially when I started building lots myself about one and a half years ago! I listed a few tips for you below!
I also received a similar message from another anon so I'll be answering both here. 🤍
'hiii i recently discovered your yt channel and i love your builds. how did you improve your building skills and how do you make your builds so realistic? 🩵'

Study Real Architecture: Look at real-life houses, apartments, and buildings to understand architectural styles, layouts, and details. This can give you inspiration and ideas for your own builds. My favorites are pinterest and real estate/architect websites.
Plan Your Build: Before starting, come up with a plan and layout for the build. Decide on the overall style (modern, traditional, etc.), number of rooms, color scheme and any special features you want to include.
Get Acquainted with The Basics: Understand the basic tools and controls in Build Mode. Practice using the wall tool, room tool, roof and terrain tools to create a solid foundation for all your builds. There are a lot of really informative tutorials on youtube! (important for beginners)
Pay Attention to Scale and Proportions: Ensure that rooms, windows, doors, and furniture are proportionate to each other. This helps in creating a realistic and cohesive look.
Use Realistic Colors and Textures: Choose colors and textures that are realistic and complement each other well. Consider the overall color scheme of the house and how different materials blend together.
Add Detailing: Pay attention to small details like trim around windows and doors, roof overhangs, and landscaping. These details can make a big difference in the overall appearance of your build.
Experiment with Roofing and Terrain: Roofs and landscaping can significantly impact the realism of your build. Experiment with different roof shapes, angles, and materials. Use terrain tools to create realistic slopes and landscaping features.
Furnish Thoughtfully: When furnishing your builds, think about how real people would use the space. Arrange furniture in a way that makes sense functionally and aesthetically.
Utilize Custom Content (CC): Explore custom content to expand your options for building, furniture and decorative items. This can often help to create a more realistic look as well.
Seek Feedback and Learn from Others: Share your builds in sims discord groups or on Simblr to ask for feedback and look for inspiration. Look at tutorials and speed builds by other players/creators to learn new techniques and tricks. (please don't copy or steal other people's builds to post online though)
Practice Regularly: Like any skill, building in The Sims 4 improves with practice. Experiment with different styles and challenge yourself with more complex builds over time.
Have Fun and Be Creative: Building in The Sims 4 is a creative outlet, so enjoy the process and don't be afraid to try new things in your designs.
136 notes
·
View notes
Text
here’s my guide to making typesets! I use Word to make my typesets, Canva for designs, and Adobe to insert the majority of my designs.
this is a ton of info and I tried to make it as readable as possible, but plz let me know if u need any clarification!
Word: always use the app, the online program doesn't have all of the options needed
paper size: US Letter Borderless
then i flip it landscape, do custom borders, and select book fold. I do 1 inch on top and bottom, .75 in inside, and .5 in outside. i leave the gutter option alone and leave it set to 0. You can choose how large you want your signatures to be (sheets in booklet option on the margins page): I normally do 40 page signatures, but if it's a smaller text you'll want to go smaller for stability. after that, you should have a half page to start your typeset!
Inserting your fic:
the next thing you’ll do is insert your fic; on ao3 click entire story, CTRL A to select all, CTRL C to copy it all. Paste it into your document. word automatically detects the headings, and you should be able to see all your chapters on the left side bar (if you can’t see it, click the page numbers on the bottom left to open the tab).
Formatting:
you can do the next few steps in any order, but we’re going to fix the formatting now. you’ll want to CTRL A everything, pick a font and a font size. I normally use georgia and size 10, going smaller or larger depending on the file size.
To have an indent on every line: CTRL A your work to select all, right click the “normal” style, on the home tab. go to the bottom left, open the drop-down menu, and select “paragraph”. next to special, hit first line. i like to do .3, you can do whatever you want. i then like to make sure the space after is set to 0, the line spacing to single, and then hit save. it should automatically adjust your lines to start at whatever indent you picked.
To fix the spacing: go into the layout tab, and go to spacing. There'll be a before and after option: write in 0, then click enter for both of them. Word is a little bit bitchy so you have to force it do things sometimes. after this you can choose if you want single spacing, or 1.5, or whatever you want.
*sometimes, the way the fic was formatted when posted to ao3 means that even after setting the line spacing to zero, there will still be a space in between each line. this is where you have to troubleshoot. you can either go line by line to delete the excess space (yes, for real. and yes, it's just as awful as it sounds) or, sometimes, not every-time but sometimes, you can highlight the chapter text, go into the home tab on top, click the A with the purple eraser to erase all formatting, and then do all the beginning steps again, and it will get rid of the extra space.*
Now that your format is mostly fixed, delete the archive of our own beta, and anything else you don't want. I normally delete everything up to the title of the work, and leave that for creating my copyright page. Remember to do the same for the end of the work!
Page Breaks and Section Breaks:
the next part is the most crucial. it's how we format both the chapters, but also how we format the headings and footer. this was the part that took me the longest to figure out: it's the page breaks and section breaks. page breaks mark the place where one page ends, and another begins. section breaks will create a new section in your document, so you can break the beginning few pages from the rest of your textblock. This will allow you to insert page numbers that start on page one, instead of at the first page of the document.
I like to go the end of the description, and then click on the first chapter. then I'll add a section break. you can find this in the layout tab, click breaks, and then click section break. so now our section 2 starts with chapter one. After this, add a blank page after the description and before your new section, and then click on the first chapter. (adding a blank page allows for smoother formatting later with headers and footers)
I then go to each chapter, delete the authors notes at the start and end of each chapter, and add a page break at the start of each chapter. i like to use the heading tab on the left to click each chapter, so I know I'm actually starting the new page right where I need to, and other formatting won't delete the page break.
when I create a compilation fic, where I have muitlple fics in one typeset, I use section breaks at the starts of each new fic. this will allow the page numbers to continue, but I can then edit each sectio to change the fic title and the authors name. if you're really fancy, you can do this for each chapter title as well, you would just hve to use a section break for each chapter instead of page break. *Remember to click link to previous to turn it off, so you are only editing that section, and not all the other sections. this can be found in the heading and footer tab on the top, which will automatically open when you click on the heading or footer.*
Adding page numbers, authors name, text name:
To add a page number, I click the footer, which automatically opens the header/footer tab on top. Then, I click page numbers, add page numbers. I turn on different odd and even pages, which is also found in the header/footer tab. you'll have to insert page numbers on both an even and odd age to get them to show up once you click that option. Page one should be an odd page, page two should be an even page. I like to put the page numbers on the outside of the page. Then you'll click format page numbers, click "start at" instead of "continue from previous section", and write in 1. now your typeset starts at 1 on chapter one instead of the start of your document! you'll need to go back and delete the numbers that showed up on the first section, but remember to deselect link to previous before you do that! or you'll end up deleting your page numbers again.
to add text on page numbers:
click into the header/footer again. double click directly on the page number, then start typing. You ca highlight the whole thing to change the font, font seize, etc. I normally do the same size as my text, and I'll either do georgia font or garamond font. I google "copy paste line for text" to get that line dividing the page number from whatever text I have next to it.
to add graphics on an entire work:
you can go into the header or footer, go to the insert tab, and insert a picture. Doing it in the header or footer will ensure it's on every single page that shares that header or footer. I have done this in the past, and find it's cute, but it's also tricky because it needs to be small enough to fit inside the header or footer, and won't really be able to interact with the text because it's different on each page, while the graphic will stay in the same position regardless.
Blank Pages:
you want blank pages at the start and end of your textblock: this is what you'll be glueing your end papers to. even more, you'll want to ensure your total page number is both divisible by 4 (each page of paper will have four pages of your text on it, two to each side) and fits into your signature count. If you're working with a 40 page signature, and you have 420 pages, that's fine. You'll end up having the last signature only be 5 regular pages instead of 10, which is plenty enough to sew. you really just want to try and avoid only having one of two pages in that last signature, as that won't be very strong in holding up your end page, or be very stable in sewing on to your book block.
to make sure they're blank, with no page numbers, you'll want to insert a section break on the last page of text. Deselect link to previous, delete the page numbers and you should be all good!
Printing/Saving:
I'm on a mac. I don't know how you would do this on anything but a mac. let that be a warning lmao. but I will CTRL A everything, ensure it's US Letter Borderless, and then hit print. if you don't tell the document it's the right size, it'll be funky when you go to print because of the margins. to insert images, i click save as pdf. it'll save it in the correct order to print for your signatures, and then I upload it into adobe to edit further. that'll have to be a different post bc this is entirely too long already.
If you want to print directly from here, ensure it's printing the right size, flip on short edge, double sided. and you're all done!
#tips and tricks#typesetting guide#i woke up at 630 am with a purpose and shat this out#it might not even be legible#apologies in advance#how to typeset#bookbinding#fanfiction#ao3 fanfic#typesetting#microsoft word#adobe#canva#signature#resource
119 notes
·
View notes
Text
AGARTHA Aİ - DEVASA+ (2)

In today’s digital landscape, a captivating and functional website is crucial for any business looking to thrive online. Full service web design encompasses a comprehensive approach, ensuring every aspect of your site is tailored to meet your unique needs. From the initial concept to the final launch, this service provides an array of offerings, including website service, responsive web design, and custom design services. Whether you’re a startup seeking to establish your brand or an established enterprise aiming to enhance your online presence, understanding the elements of full service web design is essential.
Full service web design
Full service web design encompasses all aspects of creating a website, from initial conceptualization to ongoing maintenance. This approach ensures that every detail is carefully considered to meet the specific needs of a business or individual. With a team of experienced designers and developers, full service web design offers a seamless experience that integrates aesthetics, functionality, and user experience.
One of the key advantages of opting for a full service web design is the cohesion of the website elements. Since all parts of the project are managed by a single team, there is less chance for miscommunication or inconsistency in design. This results in a more polished final product that reflects the brand’s identity while providing an engaging experience for visitors.
Additionally, full service web design allows for customized solutions tailored to unique requirements. Whether you need an e-commerce platform, a portfolio site, or a blog, a full service provider will offer dedicated support and expert advice throughout the entire process, ensuring your vision comes to life exactly as you imagined.
Website service
In today's digital landscape, website service is essential for businesses to thrive and maintain an online presence. A well-structured website serves as a powerful tool that encourages customer engagement and drives sales. By investing in a comprehensive website service, businesses can ensure that their website not only looks great but also functions seamlessly across all devices.
A key aspect of website service is the ability to optimize for search engines. By implementing SEO best practices, businesses can enhance their visibility and attract more organic traffic. This is where a reliable website service provider plays a crucial role, as they possess the expertise and techniques necessary to elevate your search engine rankings.
Furthermore, ongoing support and maintenance are vital components of a reliable website service. As technology evolves and user needs change, having a team that can promptly address issues or updates will keep your website relevant and effective in reaching target audiences. This ongoing relationship is instrumental in achieving long-term success in the digital realm.
Responsive web design
Responsive web design is an essential aspect of modern web development that ensures a seamless user experience across a variety of devices. With the increasing use of smartphones and tablets, having a website that adapts to different screen sizes is not just a luxury but a necessity.
The core principle of responsive web design is fluidity. This means that the layout of your website adjusts dynamically based on the screen width, ensuring that content remains accessible and visually appealing regardless of the device used. This approach improves usability and can significantly boost conversion rates.
Incorporating responsive web design techniques involves using flexible grids, images, and CSS media queries. These elements work together to create a layout that responds gracefully to changes in screen size, making your website not only functional but also competitive in the digital marketplace.
Custom design services
In today's digital landscape, custom design services have emerged as a vital component of creating a strong online presence. Businesses understand that a one-size-fits-all approach does not cater to their unique needs and branding. Therefore, opting for custom design services allows them to differentiate themselves in a crowded market.
These services offer tailored solutions that resonate with a company's specifics, from colors to typography and layout. By leveraging custom design services, businesses can ensure that their websites not only reflect their brand identity but also provide an intuitive user experience. This is crucial for keeping visitors engaged and encouraging them to take the desired actions.
Investing in custom design services ultimately contributes to better customer satisfaction and improved conversion rates. With a website designed specifically for their target audience, businesses can more effectively communicate their message and achieve their goals. This bespoke approach is invaluable in today's competitive environment.
43 notes
·
View notes
Text

At Inkwell Alchemy Design, we specialize in creating custom, professional, and eye-catching designs tailored to your needs. Whether you’re a small business owner, freelancer, or entrepreneur, our designs ensure your first impression is unforgettable.
✨WHAT’S INCLUDED:✨
Fully Custom Design: We work with your brand colors, logo, and style preferences to craft a design that’s uniquely yours. We can even create designs in either portrait or landscape orientations!
Double-Sided Option: Choose from a single or double-sided layout at no extra cost.
High-Resolution Files: Delivered in print-ready PDF and PNG formats.
✨ HOW IT WORKS: ✨
1. Place Your Order on Etsy: Click "Add to Cart" and complete your purchase.
2. Share Your Vision: After checkout, send us a message with the following details:
Your name, business name, and contact details (for the card)
Logo (if applicable)
Any specific colors, fonts, or styles you prefer
Examples of designs you like (optional)
3. Design & Review: Within 3–5 business days, we’ll send you a proof for approval. One round of minor revisions is included.
4. Final Delivery: Once approved, your high-resolution files will be emailed to you. You can then take these high quality print files to your favorite print-on-demand service or brick-and-mortar print shop to have your designs brought to life!
✨ WHY CHOOSE US? ✨
Professional, high-quality designs
Quick turnaround time
Personalized customer service
✨ ADDITIONAL INFO: ✨
This service is for DIGITAL FILES ONLY; no physical cards will be shipped.
Additional revisions or expedited service can be added for an extra fee (please contact us before purchasing).
- - -
Let Inkwell Alchemy Design transform your vision into a polished and professional business card that you’ll be proud to hand out!
Feel free to message us with any questions—we’re here to help! ✨
#graphic design#small business#business#digital artist#custom design#business card#business card design#small business support#brand identity#entrepeneur#entrepeneur life#digital design#creative business#freelancer#freelancer life#design inspiration#professional design#custom graphics#business branding#brand design#custom business cards#graphic designer for hire
10 notes
·
View notes
Text
youtube
Assassin's Creed Shadows: Official Cinematic World Premiere Trailer
youtube
Japanese version
youtube
Who Are Naoe and Yasuke?
Assassin’s Creed Shadows will launch for PlayStation 5, Xbox Series X|S, and PC via Epic Games Store and Ubisoft Store on November 15, 2024. Pre-orders are available now and include the bonus quest “Thrown to the Dogs.”
In addition to the standard edition, Gold and Ultimate Editions will also be available. Here are the details:
Gold Edition ($109.99)
The base game
Up to three days of early access to the game
The season pass including a bonus quest at launch and two upcoming expansions
Ultimate Edition ($129.99)
The base game
Up to three days of early access to the game
The season pass including a bonus quest at launch and two upcoming expansions
The Ultimate Pack containing the Sekiryu Character Pack, Hideout Pack, and five skill points, as well as the Red Dragon filter in Photo mode
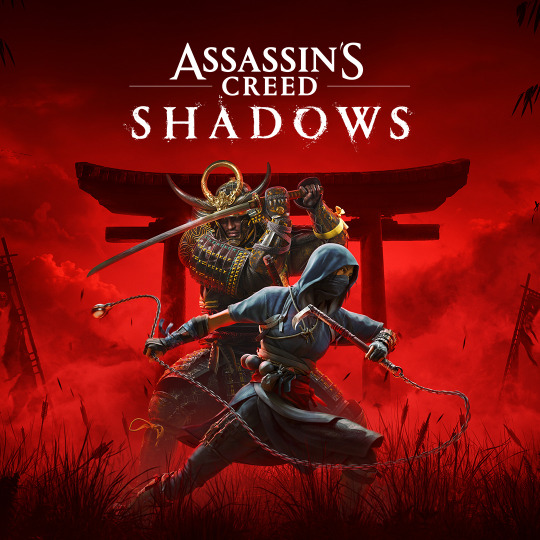
Key visual


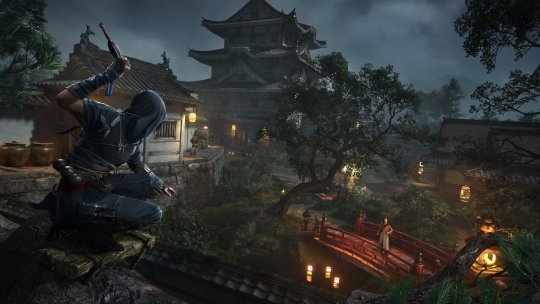
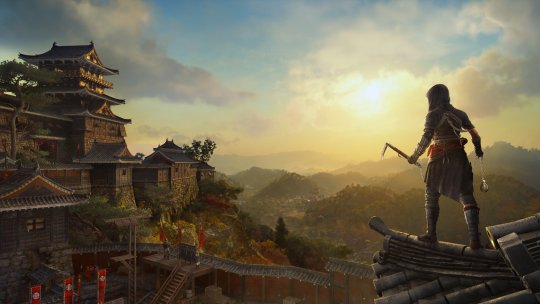

Screenshots
Overview
About
Experience an epic historical action-adventure story set in feudal Japan! Become a lethal shinobi Assassin and a powerful legendary samurai as you explore a beautiful open world in a time of chaos. Switch seamlessly between two unlikely allies as you discover their common destiny. Master complementary playstyles, create your shinobi league, customize your hideout, and usher in a new era for Japan.
Key Features
Explore the captivating open world of feudal Japan, from spectacular castle towns and bustling ports to peaceful shrines and war-ravaged landscapes. Adventure through unpredictable weather, changing seasons, and reactive environments.
Become Naoe, a shinobi Assassin, and Yasuke, a legendary samurai, as you experience their riveting stories and master their complementary playstyles. As Naoe, use stealth to avoid detection and agility to confound your enemies. As Yasuke, strike your foes with lethal precision and power. Unlock new skills, gear, and progression independently for each character.
Make information your weapon as you explore the world, and build your own network of spies to be your eyes and ears across locations to hunt down your next target. Along the way, recruit new allies with unique abilities to help accomplish your missions.
Create a fully customizable hideout for your growing shinobi league as you train your crew, craft new gear, interact with key characters, and choose your base’s layout, decorations, and accessories.
#Assassin's Creed Shadows#AC Shadows#Assassin's Creed#Ubisoft Quebec#Ubisoft#video game#PS5#Xbox Series#Xbox Series X#Xbox Series S#PC#Epic Games Store#Ubisoft Store#AC Codename Red#Assassin's Creed Codename Red
22 notes
·
View notes
Text

After some fine-tuning, I’ve finally landed on a color scheme for my Kaiju-themed game, #kaijuHexicutioner. While I have access to #HexKit and an array of tiles and tools, my iPad is my go-to these days, so installation is off the table. Instead, I embraced the budget-friendly route with my free Canva account. To piece it all together, the “Hex Kit Tile Snapping Template” from ATellingEllipsis on itch.io has been an absolute game-changer for laying down tiles in that perfect hex style.
I’ll probably keep all the art/layout/design in this scheme. What do you guys think?
Just to clarify, I’m currently working on two Kiaju related projects inspired by son, Monster Brains blog, Shojio Otomo, Lancer, Yokai Hunter, and a million other things.
1 - Kaiju Hexicutioner - for Roll Up Jam on itch.io. A simple flavor rich hex crawl with a bunch of dailed in d66 tables for worldbuilding
2. - Unnamed Kaiju and Yokai Game – This hybrid journaling and tactical combat game draws inspiration from the battle boards seen in RUNE and *Magnagothica: Maleghast.* It features a unique mechanic of yokai collecting through physical cards, where players can collect, kill, buy, sell, trade, or even set yokai free. With a nod to *Shin Megami Tensei*, player characters can also acquire yokai (and potentially Kami) powers.
The story follows a young boy or girl who forms an unexpected bond with a kaiju in a post-apocalyptic world inspired by medieval Japan. Set on a small island once decimated by ancient Kaiju wars, the landscape bears the scars of battles between colossal kaiju and mecha. Over time, the survivors rebuilt, forming small settlements and a single large city, each with its own unique culture, customs, and religion. After years of peace and restoration, the island’s fragile tranquility is shattered when a notorious and powerful kaiju reappears, laying waste to the capital city and plunging the island into collective mourning over the shared tragedy.
Embark on a journey across the land, where you'll explore diverse landscapes and capture monsters and yokai, with opportunities to harness their power for yourself. Salvage materials to craft and trade, and interact with various factions and influential figures, gaining insights into their communities. Most villages and settlements exude a peaceful, cozy atmosphere reminiscent of *Animal Crossing*, *Stardew Valley*, and *Zelda*. However, be prepared to encounter numerous evil, cursed, tainted, and haunted locations along the way.
I’ll probably tie them together with similar themes and design.
#ttrpg#ttrpg community#solo ttrpg#ttrpg art#indie ttrpg#ttrpg campaign#ttrpg design#lancer ttrpg#ttrpg character#kaiju monster#kaiju#monsters#imaginaryjapan#hexcrawl#hex map#hexkit#hex design#design and dev
8 notes
·
View notes
Text
The Role of User Experience (UX) in CRO: Why Design Matters
In today's competitive digital landscape, businesses are constantly seeking ways to enhance their websites and drive higher conversions. One of the most effective methods for achieving this is Conversion Rate Optimisation (CRO), and at the heart of any successful CRO strategy lies User Experience (UX) design. But why does UX matter so much when it comes to improving conversion rates? Let’s explore the critical role of UX in CRO and how focusing on design can make all the difference.
The Importance of User Experience
User Experience encompasses the entire interaction a user has with a website, from the moment they land on a page to the completion of a desired action, such as making a purchase or signing up for a newsletter. A seamless, intuitive, and pleasant experience ensures that users can navigate a site with ease, ultimately leading to higher conversions.
When the importance of user experience is overlooked, businesses run the risk of alienating potential customers through confusing layouts, slow load times, or poor mobile optimisation. In contrast, a well-designed website can dramatically enhance user satisfaction and increase the likelihood of conversions, making UX a vital element of any CRO strategy.
The Role of User Experience in CRO
So, what role does UX design play in CRO? At its core, UX design is about reducing friction points—those moments where users experience confusion or frustration. CRO aims to optimise these moments to increase the chances of users completing a desired action.
Here’s how UX directly impacts conversion rates:
Ease of Navigation: A clear and simple navigation structure enables users to find what they’re looking for quickly. If visitors have to dig through multiple pages to reach their goal, they're likely to abandon the site.
Mobile Responsiveness: With more users accessing websites through mobile devices, ensuring that your site is fully responsive across all devices is crucial. A mobile-friendly design enhances UX and can significantly boost conversions.
Visual Hierarchy: The way content is presented matters. By guiding users' eyes to key areas such as calls-to-action (CTAs) or important information through strategic design choices, you can improve user engagement and increase conversions.
Page Speed: Slow-loading websites lead to user frustration and higher bounce rates. Optimising UX involves reducing page load times to keep users engaged and on track to conversion.
Trust and Credibility: Well-designed websites build trust. Elements such as clear messaging, professional design, and easy-to-find contact information contribute to an overall positive user experience, which, in turn, increases conversion rates.
Design Matters for CRO Success
When CRO and UX come together, the results can be powerful. For instance, simply improving the placement and design of a CTA button or reducing form fields can result in a significant uptick in conversions. This is where the expertise of a specialised CRO agency in Australia comes into play, offering tailored strategies that combine data-driven insights with exceptional design to optimise user experience and drive business growth.
At a CRO agency, professionals understand that UX is not just about aesthetics; it’s about understanding user behaviour, analysing data, and implementing design changes that resonate with your audience. By partnering with experts, businesses can ensure that their website is optimised for both usability and conversions.
Conclusion
The importance of user experience in CRO cannot be overstated. Good UX design is essential for keeping users engaged, guiding them through the conversion funnel, and ensuring they leave your website with a positive impression. Whether you’re aiming to reduce bounce rates, increase sales, or grow your subscriber base, focusing on UX design is the key to unlocking higher conversion rates.
If you're ready to elevate your website’s performance through enhanced UX design, consider reaching out to a CRO agency in Australia that can help you optimise your digital strategy and drive meaningful results.
5 notes
·
View notes
Text
AC:NH Hardcore Rules
If you want to watch the OG creator's video going through the rules, here you go! If you want to read the rules typed up and see any alterations I'm making for my gameplay, read on! (under the cut b/c it's long)

Restarting:
You can have up to 1 re-roll on island layouts.
Island name must come from an AC island name generator (unlimited rolls).
Starting Villagers pick their house plot.

Villagers:
You must keep at least one starting villager until you get their photo. If you re-rolled your island layouts, you must keep and get BOTH starting villager photos before they can move.
All villagers with thought bubbles must be talked to.
You may only gift one villager per day.
If someone asks to leave, you must let them go (starting villager rules apply). If I absolutely fall in love with ONE SPECIFIC villager, I might overlook this rule for them only. But once I choose them, they're chosen, no one else can replace that permanent spot.
If you get a campsite visitor, they must be invited and you have to let the villager of their choosing move out to make room (starting villager rules apply. I am adding that if I fail to convince the campsite villager to move in due to failing the mini-games, then I lose my chance and they can't be invited again.
The max number of tickets you can use for hunts is 10. If you get to the 10th ticket you must take that villager or auto-fill.
You may only go to one mystery island per day (except on hunts).
No amiibo scans, Sanrio items cannot be sold.
Daily Rules:
You are able to TT within a 7 day period (M-Sun, example). No TT option for an extra challenge. I am assuming this means I can TT as many times as I want within 7 days and that's exactly what I'm going to do; I mostly play late at night so like, it's necessary, don't come @ me.
You must purchase at least one thing from Nook's Cranny and Able Sister's once per day. I will not be following this rule strictly until I actually have Nook's Cranny, obviously.
You must get a daily fortune read from Katrina. Once I unlock her, of course.
You must complete all 2x Nook Miles+ (supersedes economy rules). I will endeavor to do them all, but I'm not going to force myself to do ALL of them in a play session.
You must participate in daily stretching (1 per day).
Must complete daily NPC quests (Gulliver, Label, etc.)
All new bugs/fish/sea creatures/fossils/art must be donated before selling.
Design Rules:
Can only wear clothes you design or from another player's Able's. Must change outfit every week (hats/glasses/accessories you can purchase). I am NOT limiting myself to just custom design clothing. Making outfits out of Able Sister's items is one of my favorite things to do. However, I will try to make a new clothing design once a week or so.
You must post your designs in Able's.
You can ONLY use custom codes you design.
You must design your own flag.
Can only move villager houses once you can gift to them.
I'm not seeing it on the infographics but I feel like I have seen somewhere that HHP is prohibited. But nah fam. I paid for that shit, I'm playing it. However, I will NOT sell any of the items I get; they will strictly be for decorating.
Economy Rules:
You can only have four 3x3 plots for selling crops (crops can only be harvested in bunches of 3).
Can only harvest and sell fruit of 9 fruit trees, and 4 coconut trees. If I'm landscaping and need to remove a fruit tree, I am going to harvest the fruit and keep it just to eat or give to villagers, I guess.
Turnips are allowed, but you can only sell them on your island. You can buy them from other player's on Sunday.
Sunday Flea Markets. You are allowed to visit other Hardcore mode players to buy and sell goods.
Each flea market seller can only have 10 items for sale. You must pay 2,000 bells in their donation box when you arrive to their island.
You can only have a max of 5 flea market customers per Sunday (this includes turnip sellers).
OKAY SO this challenge is like 2 years old and idk anyone else who's doing it, so the whole Sunday Flea Market thing - while super cute sounding - is not going to work for me. Since it doesn't look like you can sell furniture outside of this, I'm going to make it a rule that I can only sell up to 10 furniture items to Nook's Cranny on Sunday (Real World Sunday, not game Sunday if I TT).
No treasure islands, no Nookazon. I am going to follow this rule as much as possible, but since the flea markets aren't gonna be an option for me, I may allow myself to visit Treasure Islands just to get furniture or Island specific items in different colors. I'll probably give myself a limit or a requirement to have access to a TL though.
ONLY sell bugs to Flick, Fish to CJ, Weeds to Leif, and materials and crafted items to Nook's.
Crops/fruit/sea creatures/foragables (mushrooms, sea shells, acorns, flowers, etc.) can only be sold in the Nook Deposit Box (Harvestmoon style).
Money trees: Can only plant what you dig up.
No trading flowers, no selling fossils. I really don't want to end up with a bunch of excess fossils filling up my storage, so I'm either going to allow fossil selling as part of my 10 Sunday items, or I'll just toss them in a trash can.
I'm very excited to play like this! I don't really have an end goal in mind, but I think it'd be lovely if I could build, decorate, and create a "final" dream address for this island by following these rules entirely. If at any point I decide I've had my fun but I want to stop following these rules and just focus on decorating, using bells and items from treasure islands, etc... well then I guess that'll be the end!
If I think of or see any extra rules/restrictions/ideas for this, I'll edit this post and add them down here!

5 notes
·
View notes