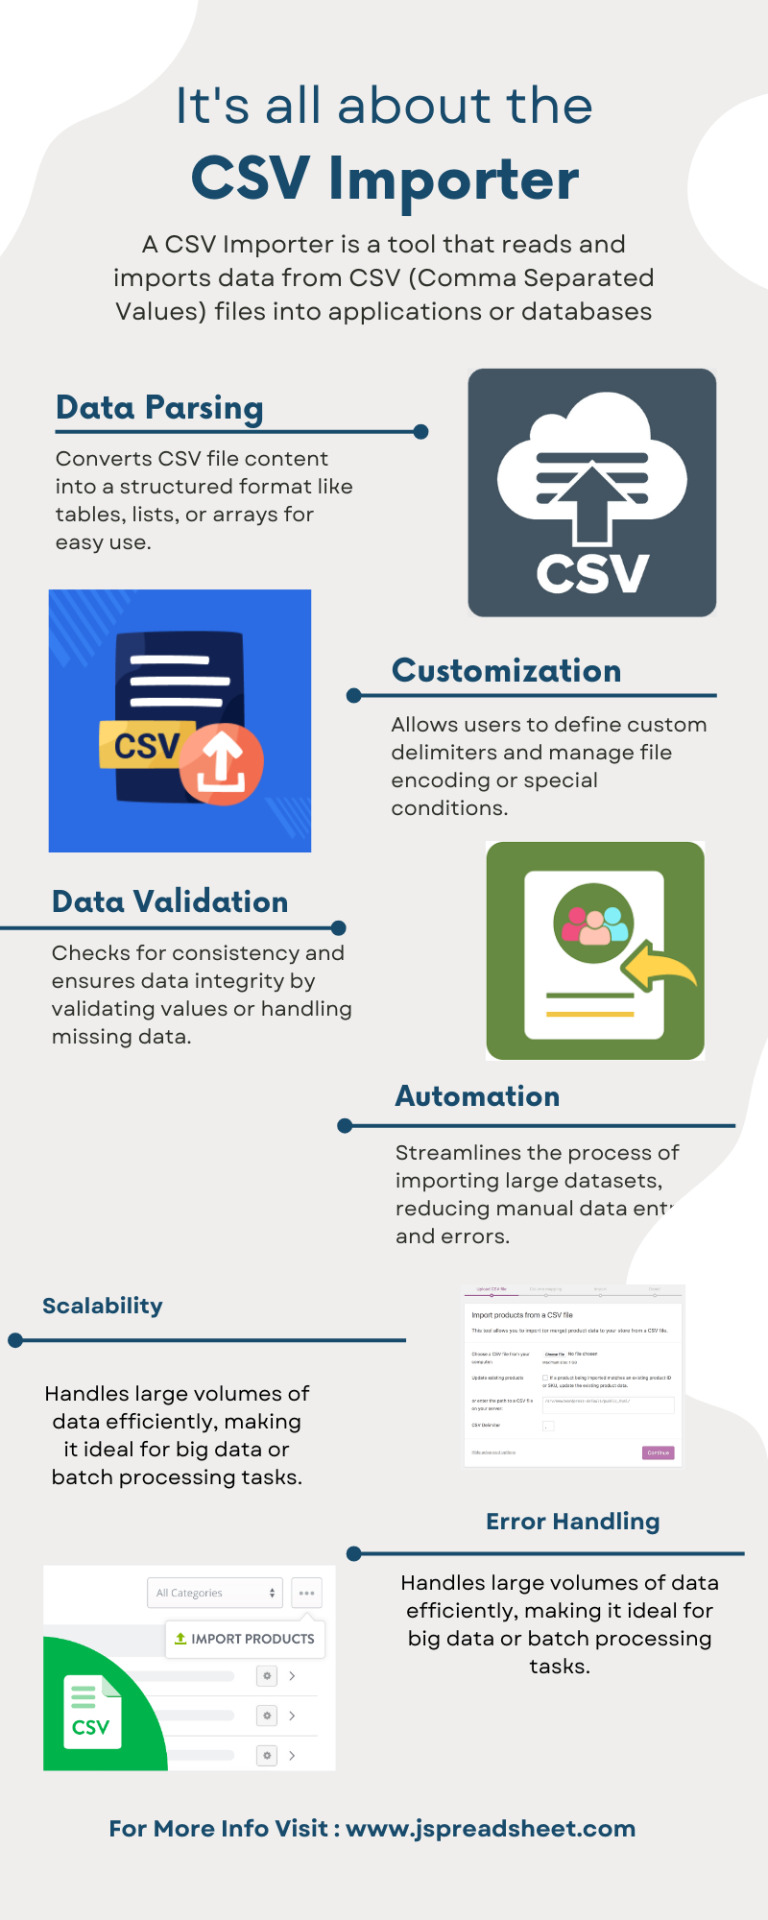
#csv importer
Explore tagged Tumblr posts
Visit Tumblr Blog
Explore Tumblr blogs with no restrictions, modern design and the best experience.
Last Seen Tumblr Blogs


Fun Fact
The Tumblr app for Google Glass was released on May 16, 2013.
Text
Step-by-Step Tutorial: Migrating Translated Posts and Custom Posts in Multilingual Site with Polylang Using CSV Importer

Introduction
Multilingual websites are becoming increasingly common as businesses and individuals aim to reach a global audience. Polylang is a popular WordPress plugin that facilitates the creation of multilingual websites. In this guide, we’ll explore the process of Polylang import translations for various content types, including posts, pages, custom posts, and custom fields.
What is Polylang?
Before diving into the import process, it’s essential to have a basic understanding of how Polylang works. Polylang allows you to create and manage multilingual content by associating different language versions of a post, page, or custom post type. It also supports translations for custom fields.
For efficient content translations install and activate the Polylang plugin in your WordPress website.
How do you set up languages on a WordPress site using Polylang?
Once you install the Polylang plugin, it is time to set up the language to translate your WordPress site content into your preferred languages.
To set up languages in Polylang,
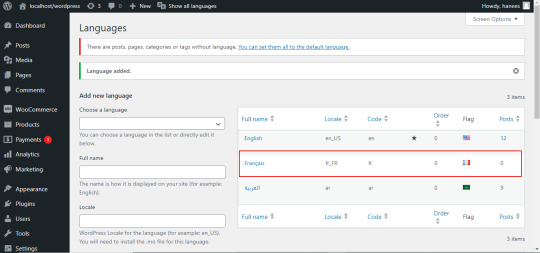
Login to your WordPress website and navigate to the Language tab from the left-side menu

Choose the language from the drop-down menu. Once you select the language, all the other fields like the Full name, locale, and language code have been updated automatically.
Then click on Add Language.

Now your language has been updated in the right side table.
How to Import Polylang translated content in your Multilingual Websites?
Before Importing the Translated content of Polylang, let us understand the basic reasons and benefits of importing translated content in WordPress.
Key reasons to import translated content in WordPress
Importing translated content into WordPress can be essential for several reasons, particularly when managing a multilingual website. Here are some key reasons why importing translated content is crucial:
Global Reach and Audience Engagement: Importing translated content allows you to reach a wider global audience. By offering your website in multiple languages, you increase accessibility and engage users who prefer to consume content in their native language.
Enhanced User Experience: Providing content in the user’s preferred language enhances the overall user experience. Visitors are more likely to stay on your site and explore its offerings when they can easily understand and navigate the content.
SEO Benefits: Translating content helps improve your website’s search engine optimization (SEO). Search engines recognize and index content in different languages, making it more likely for your site to appear in search results for users searching in those languages.
Catering to Diverse Markets: If your business operates in or targets diverse markets, importing translated content is crucial for effectively communicating with customers from different linguistic backgrounds. It demonstrates cultural sensitivity and a commitment to serving a global clientele.
Compliance with Local Regulations: In some regions, there may be legal requirements or industry standards that mandate providing information in specific languages. Importing translated content ensures compliance with such regulations and helps you avoid legal issues.
Multilingual Content Management: WordPress plugins like Polylang make it easier to manage multilingual content. Importing translations allows you to efficiently handle posts, pages, custom posts, and custom fields in multiple languages within a unified content management system.
Consistency Across Languages: Importing translations helps maintain consistency in messaging and branding across different language versions of your website. It ensures that the translated content aligns with the original message and intent.
Efficient Content Localization: Instead of manually translating and inputting content for each language, importing translations streamlines the localization process. It saves time and resources, allowing you to focus on creating high-quality content rather than duplicating efforts for each language.
Adaptation to Regional Preferences: Different regions may have specific language nuances or preferences. Importing translated content enables you to tailor your messaging to resonate better with audiences in various geographic locations.
Facilitates Regular Updates: As your website evolves, regularly importing translated content ensures that the latest updates and changes are reflected across all language versions. This is crucial for keeping the information current and relevant for all users.
CSV Importer for Polylang- WP Ultimate CSV Importer Plugin
The WP Ultimate CSV importer is an all-in-one import tool that helps to import, update, and export your WordPress content in their desired file format.
With WP CSV importer, it is easy to import the Polylang translations with few clicks. The translated content will be imported into your WordPress Website in the languages that we have set up in the Languages section.
In this blog, we will have step-by-step instructions on how to import posts, pages, custom posts, and custom fields in Multiple languages.
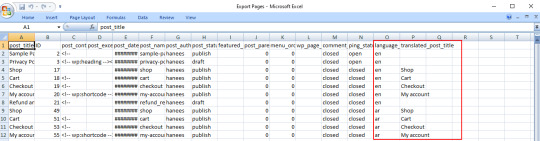
How to prepare a CSV to import the content of Polylang translations?
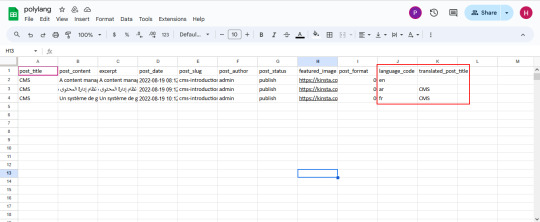
Every content import includes the CSV files with the translated content. Whether it is posts, pages, custom post types, etc it is important to prepare a csv file with the original content and the translated content
To import the content into the Multilingual website, add two additional columns in the csv file called language_code, and translated_post_title.
Provide the language code with respect to its related content.
Leave the translated_post_title field of the original content as empty.
Enter the post title of the original content in the translated_post_title fields of the translated content
Save and download the CSV file
How to Import Posts, and Pages in Polylang Translation?
The WP CSV importer plugin will make the job easy to import the posts, and pages in the polylang translations.
To import translated posts, and pages in Multilingual Website,
Navigate to the WP CSV importer Plugin from the left side menu.
Click on Import/Update from the top sidebar

Browse the prepared CSV (posts, or pages) from your downloads.

Select the content type that you want to import in the “Import each record as” field
Then click on continue for mapping.

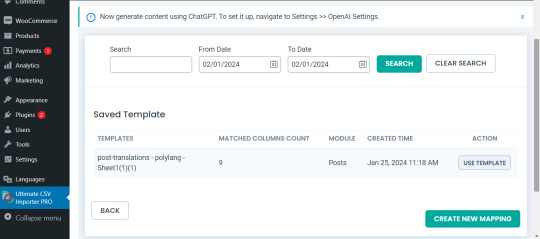
Now click on Create New Mapping. Or If you want to use the existing mapping template, you can click on the saved templates.
In the mapping section, you can map the CSV header field with its related WP fields by means of the drag-and-drop method or advanced method( Mapping the fields by means of selecting the desired field from the drop-down)

Verify the mapping of the polylang settings field. That is language_code and translated_post_title.
You can also add mapping for the custom fields. Once done with the mapping save the mapping template with the unique name.

Click on Continue for featured media handling.
Here you can enable the desired field for handling media files.
Here you can have all the options to import your featured image based on your business needs.
You can enable the download of external images to media while importing the posts
Also, you can select your desired image handling and image size.
You can map the media SEO and Advanced Options
Click on Continue

Then configure the Import configuration settings and Click on Import.
Now your post/page has been successfully imported in the desired languages that have been set on polylang.

You can click on the view log to view the successful post/page import on Multiple languages

This is how your translated post content mentioned on your csv has been imported into Multilingual Websites.

How to import Custom Post types and custom fields in Multilingual Websites?
Before diving into the topic of how to import custom post types and custom fields in polylang translation, let us have a basic understanding of What custom post types (CPT) and Custom fields are.
What are Custom Post Types and Custom fields?
WordPress comes with two primary content types: posts and pages. However, in many cases, websites require additional content types that may have distinct characteristics and purposes. This is where custom post types come into play. Whereas custom fields provide a way to store and display specific information related to the content.
For example, if you are building a real estate website, you might create a custom post type for “Properties” with specific custom fields such as price, location, and number of bedrooms. This ensures that the content is structured in a way that suits the website’s needs.
Things to remember before importing custom posts and custom fields
Ensure that you have created your custom post types and have assigned the custom fields to the desired post types.
Ensure you have prepared a csv for the custom post types and all the fields included in that custom post type have been properly assigned to the respective post type.
Ensure you have included the language_code and translated_post_title in the prepared CSV.
Steps to import Custom post types in Polylang translations
Importing translated custom post types is now efficient and effective with WP CSV Importer Pro. You can easily import the translated custom post types of any third-party plugins such as ACF, Jet engine, Metabox, etc.
However, the WP CSV importer Pro will provide support to all the ACF custom fields except that of the layouts sections.
The supported ACF fields for Translated custom field Import are listed below:
Basic: Text, Text area, Number, Range, Email, URL, Password
Content: Image, File, WYSIWYG Editor, oEmbed, Gallery.
Choice: Select, CheckBoxes, Radio Button, Button Group, True/False.
Relational: Link, Post object, Page Link, Relationships, Taxonomy, User.
Advanced: Google Maps, Date Picker, Date Time Picker, Time Picker, Color Picker
The Import steps are the same for all the content types in the WP CSV importer Pro plugin.
Prepare the CSV File:

Importing Translations:
Now that you have a CSV file containing your Polylang translations, it’s time to import them back into your WordPress site. Follow these steps:
Navigate to “WP Ultimate CSV Importer Pro” in the WordPress dashboard and select “Import/Update”
Upload the CSV file you prepared earlier and follow the on-screen instructions.
Choose the content type you want to import translations for. On the ”Import Each record as” field all the custom post types of ACF, Jet engine, Metabox or any plugin and the ACF custom fields are displayed on the drop-down.
All your custom post types and the ACF custom fields have been listed in the drop-down

Select the desired Custom Post types or custom field that you would like to import
Click on Continue. Map the WP fields with respect to their corresponding CSV headers.
Importing translations for custom fields might require additional steps. If your CSV file includes custom field translations, you may need to ensure that the custom field names match those in your WordPress setup.
Map the Custom field Suite and all the desired fields.

You can also add Mapping for the custom fields by simply clicking on the Add Custom Fields.
Ensure that the Polylang settings field is mapped correctly.
Save the mapping template with the unique name and click on continue
Enable the desired field in the Feature Image Media Handling section, and click on Continue.
Configure the Import Section and click on Import.
Now your CPT/ custom fields have been successfully imported into the Multilingual Website.

You can also view the log by clicking on View log-> admin view to verify the imported posts.

How to import taxonomies in Polylang translations?
Importing polylang translations with WP Ultimate CSV importer includes the same steps for all the content types. You can refer to the Importing steps explained above to import your taxonomies into Multilingual Websites.
WP CSV importer has smartly designed to import your translated post/page along with its taxonomies. That is if you import a post, then its related taxonomies like post_categories and post_tag (need to be included in the csv) have been imported with the post itself.
However, you can also provided with an option to import taxonomies alone without a post.
Steps to Import translated Post categories and Post tags
Prepare a csv with the translated content of (post_categories/ post_tags)
Add language_code and translated_post_title.
Navigate to CSV importer -> Import/update-> Browse the CSV
Select the content type as categories or tags
Map all the desired fields like post_categories/ post_tags.

Ensure the polylang settings field is mapped correctly
Save the Mapping template
Configure the Import process and click on Import.
Now the categories has been imported into the Multiple languages
Post Importing Steps
Once you successfully imported your polylang translations, there are few things to consider. That are listed below:
Verification and Troubleshooting
After the import process is complete, it’s crucial to verify that the translations have been applied correctly.
Regular Maintenance
Keep in mind that website content evolves over time. Periodically export and import translations as you update your content. This ensures that your multilingual website remains up-to-date and provides a seamless experience for users across different language preferences.
How to export translated content in WP Ultimate CSV Importer?
Like importing, the export process of Polylang translation is quiet easy with WP ultimate CSV importer plugin. Moreover, this plugin is an all-in-one tool that smartly import and export your translated content from/to the multilingual websites.
The export process is same for all the content types. Let see an example of how to export pages in Multiple languages.
For that, navigate to WP ultimate CSV importer
Select Export from the top side menu and choose the content type that you want to export
Here I select pages. It displays the number of pages including the polylang translation has been displayed. Now click on continue

Provide the File name and File type. Here I select CSV.
You can also Export your translated content with advanced filters.
Now click on Export.

Your WordPress pages with polylang translations has been exported. Now click on download to download the exported file in your local computer.
The exported pages with polylang translation will now be downloaded as desired file type.
Conclusion
Importing and Exporting Polylang translations for posts, pages, custom posts, and custom fields is a crucial step in maintaining a dynamic and effective multilingual website. By following the steps outlined in this guide, you can streamline the translation import & export process and provide a seamless experience for your global audience.
Refer to our user guide for step-by-step instruction to migrate Polylang Translations for WooCommerce Products, Variations and Orders
#wordpress#cms#wordpress tutorial#plugins#polylang#csv importer#custom post type#posts#import export data
0 notes
Text
everything sucks forever, yes, but ALSO i discovered the app ManaBox today, which lets me use my phone to scan MtG cards and log them in a database instead of me having to enter them all manually into archidekt. this is going to save me so much time.....
#anime life#i can export all the scanned cards in a csv file and import that to archidekt.... and vice versa.....#this is a GAME CHANGER for me
11 notes
·
View notes
Text
i think it is once again time for me to write a little python script to deal with this exam score nonsense
#too technologically incompetent to figure out how to import an assignment from one canvas site to another#so instead i am gonna parse a csv file and output another csv file to upload with the grades#poast.txt
3 notes
·
View notes
Text
I need a better system for keeping track of why I'm not following/blocked someone because my brain is no longer cutting it
Was [blogger] mostly posting about things that don't interest me, so its better to get things that filter through my mutuals? Or where they annoying at some point? Did [other blogger] say something that made me uncomfortable and I don't want to be around that? If, so; what was it and do I still care? Did [so and so] do something racist or transmisogynistic?
And so forth
#maybe ill update my blocklist exporter to return a csv file and then start taking notes there#i do still need to figure out how to get the importer working at some point...
2 notes
·
View notes
Text
Mastering CHIRP: The Ultimate Guide to Programming Your Amateur Radio Like a Pro
If you’re an amateur radio operator looking for a faster, easier way to program your radio, CHIRP is the game-changing software you need. Whether you’re managing emergency frequencies, repeater channels, or simplex contacts, CHIRP radio programming simplifies the process for radios like Baofeng UV-5R, Yaesu FT-60R, Kenwood TH-F6A, and dozens more This ultimate guide to CHIRP software will walk…
#amateur radio#ARRL ham radio#Baofeng UV-5R#CHIRP compatible radios#CHIRP CSV import#CHIRP error fix#CHIRP radio programming#CHIRP software#CHIRP tutorial#emergency radio setup#ham radio guide#ham radio software#how to use CHIRP#Kenwood radio programming#Yaesu FT-60R
0 notes
Text
i was not born in the wrong era i was born in the exact right era to be too lazy to type in all 101 french départements one by one for my dataset and happen to find a csv someone uploaded to github 5 years ago thats just a list of all the départements of france #yaass
#oh ok i opened it and all the diacritics are fucked up oh ok i shouldve remembered that about csv files..........#given part of my job used to be just correcting the diacritic imports in csv files hahah live laugh love........
0 notes
Note
do you have an account for firefox? it should save your data and sync it across when you have to reinstall. thats shit though that firefox is giving you grief
maybe I'm stupid, because yes I do. and it even gives me a folder with old firefox data when I reinstall. but it does not work in a sense that I still need to relog into everything...
#theres the feature to import the passwords file but it needs to be in csv or html and there's no file like that in this folder...#pancakesanswers
1 note
·
View note
Text

Easily display tables on your digital signage by importing a CSV file with NoviSign! No need for editing software—simplify your workflow in just a few steps.
0 notes
Text
CoPilot in MS Word
I opened Word yesterday to discover that it now contains CoPilot. It follows you as you type and if you have a personal Microsoft 365 account, you can't turn it off. You will be given 60 AI credits per month and you can't opt out of it.
The only way to banish it is to revert to an earlier version of Office. There is lot of conflicting information and overly complex guides out there, so I thought I'd share the simplest way I found.
How to revert back to an old version of Office that does not have CoPilot
This is fairly simple, thankfully, presuming everything is in the default locations. If not you'll need to adjust the below for where you have things saved.
Click the Windows Button and S to bring up the search box, then type cmd. It will bring up the command prompt as an option. Run it as an administrator.
Paste this into the box at the cursor: cd "\Program Files\Common Files\microsoft shared\ClickToRun"
Hit Enter
Then paste this into the box at the cursor: officec2rclient.exe /update user updatetoversion=16.0.17726.20160
Hit enter and wait while it downloads and installs.
VERY IMPORTANT. Once it's done, open Word, go to File, Account (bottom left), and you'll see a box on the right that says Microsoft 365 updates. Click the box and change the drop down to Disable Updates.
This will roll you back to build 17726.20160, from July 2024, which does not have CoPilot, and prevent it from being installed.
If you want a different build, you can see them all listed here. You will need to change the 17726.20160 at step 4 to whatever build number you want.
This is not a perfect fix, because while it removes CoPilot, it also stops you receiving security updates and bug fixes.
Switching from Office to LibreOffice
At this point, I'm giving up on Microsoft Office/Word. After trying a few different options, I've switched to LibreOffice.
You can download it here for free: https://www.libreoffice.org/
If you like the look of Word, these tutorials show you how to get that look:
www.howtogeek.com/788591/how-to-make-libreoffice-look-like-microsoft-office/
www.debugpoint.com/libreoffice-like-microsoft-office/
If you've been using Word for awhile, chances are you have a significant custom dictionary. You can add it to LibreOffice following these steps.
First, get your dictionary from Microsoft
Go to Manage your Microsoft 365 account: account.microsoft.com.
One you're logged in, scroll down to Privacy, click it and go to the Privacy dashboard.
Scroll down to Spelling and Text. Click into it and scroll past all the words to download your custom dictionary. It will save it as a CSV file.
Open the file you just downloaded and copy the words.
Open Notepad and paste in the words. Save it as a text file and give it a meaningful name (I went with FromWord).
Next, add it to LibreOffice
Open LibreOffice.
Go to Tools in the menu bar, then Options. It will open a new window.
Find Languages and Locales in the left menu, click it, then click on Writing aids.
You'll see User-defined dictionaries. Click New to the right of the box and give it a meaningful name (mine is FromWord).
Hit Apply, then Okay, then exit LibreOffice.
Open Windows Explorer and go to C:\Users\[YourUserName]\AppData\Roaming\LibreOffice\4\user\wordbook and you will see the new dictionary you created. (If you can't see the AppData folder, you will need to show hidden files by ticking the box in the View menu.)
Open it in Notepad by right clicking and choosing 'open with', then pick Notepad from the options.
Open the text file you created at step 5 in 'get your dictionary from Microsoft', copy the words and paste them into your new custom dictionary UNDER the dotted line.
Save and close.
Reopen LibreOffice. Go to Tools, Options, Languages and Locales, Writing aids and make sure the box next to the new dictionary is ticked.
If you use LIbreOffice on multiple machines, you'll need to do this for each machine.
Please note: this worked for me. If it doesn't work for you, check you've followed each step correctly, and try restarting your computer. If it still doesn't work, I can't provide tech support (sorry).
#fuck AI#fuck copilot#fuck Microsoft#Word#Microsoft Word#Libre Office#LibreOffice#fanfic#fic#enshittification#AI#copilot#microsoft copilot#writing#yesterday was a very frustrating day
3K notes
·
View notes
Text
Yet Another Major Revamp: Semi-Realism Edition + make-your-own toolkit!🥳
🐸 DOWNLOAD: SFS / MIRROR
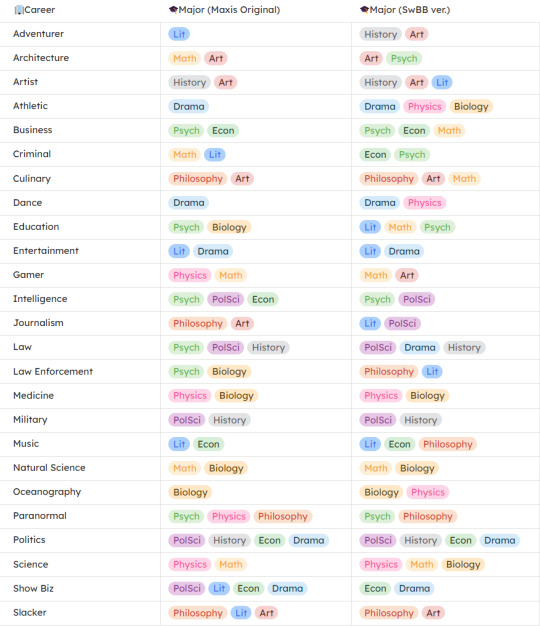
This is an edit of Phaenoh' Realistic Major to Career Linking BUT with the following BENEFITS:
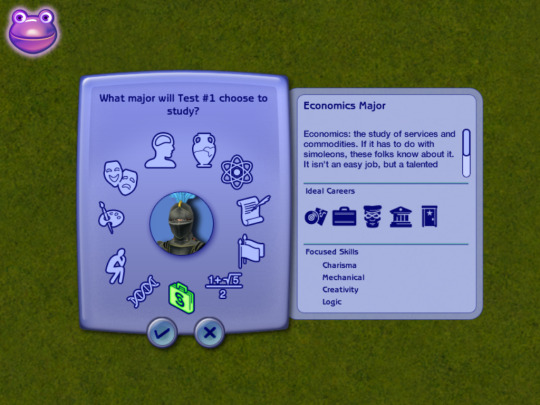
🌟 NOT REALISTIC... BUT MAXIS-REALISM: this edit made the ideal careers for each major somewhat logical and coherent (consult the table below for the changes) yet respects the internal logic of the game because Maxis' humor is underrated, slacker and criminal are treated as serious career pathways in this game so why not 🤩
🌟 ALL MAJORS BALANCED ⚖️: frustrated with the lack of benefits that some majors offer compared to others? want an easier time being a job-hopper?? what do you mean my skills aren't transferable in this market??? WELL:
All majors are now supporting at least 5 or more careers
Art [6]: Adventurer, Architecture, Artist, Culinary, Gamer, Slacker
Bio [5]: Athletic, Medicine, Natural Sci, Ocean, Science
Drama [6]: Athletic, Dance, Entertainment, Law, Politics, ShowBiz
Econ [5]: Business, Criminal, Music, Politics, Show Biz
History [5]: Adventurer, Artist, Law, Military, Politics
Lit [6]: Artist, Edu, Entertainment, Journalism, Law Enf, Music
Math [6]: Business, Culinary, Edu, Gamer, Natural Sci, Science
Philo [5]: Culinary, Law Enf, Music, Paranormal, Slacker
Physics [5]: Athletic, Dance, Medicine, Ocean, Science
PolSci [5]: Intelligence, Journalism, Law, Military, Politics
Psych [6]: Architecture, Business, Criminal, Edu, Intelligence, Paranormal
All careers are now supported by 2 or more majors, only the Politics career is supported by 4 (cause Maxis' choice was so good I didn't want to touch it!)
8 careers that require degree (only available for graduate): Architecture, Education, Intelligence, Law, Medicine, Nat Sci, Oceanography, Science.
🌟 OTHER INFOS:
🎓 You'll need UNI EP 🎓
Credits: Phaenoh (for the base mod I edited and the tutorial!), SimPE
Conflicts:
mods that lock/unlock degree requirement like Lamare's getUniCareerWithoutEducation
any mods do the same thing (Belladovah's, Phaenoh's & Cyjon's) which you might want to consider shopping around first before picking mine so look below 🛍️🛒👀
also conflicts with lauratje86's but their mod works with default replacement majors so it can't be covered here, check it out though!
note: Cyjon altered some majors' names and skill requirements (he also hates Philosophy methinks), Phaenoh offers a different version that changes which career requires degree (just like mine but ADDED Business), Belladovah offers Education version in which every major benefits the Education career.
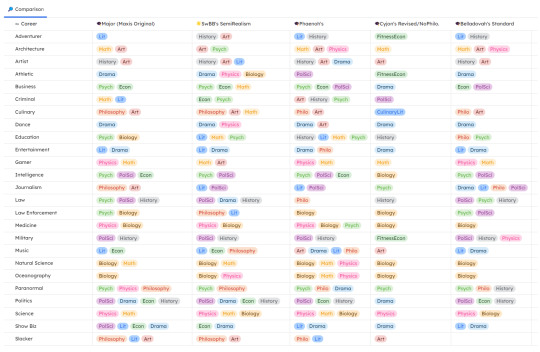
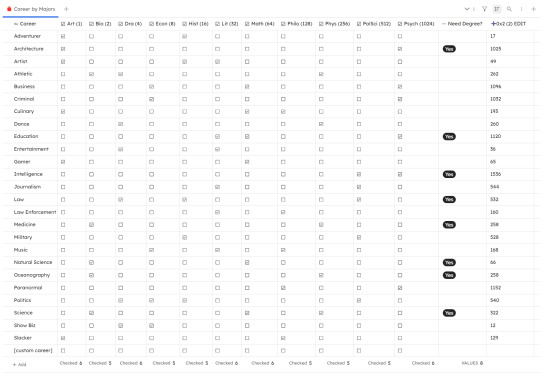
📁 MOD RESOURCE: Linking Maxis Majors & Degrees to Maxis Career Toolkit 🥳
🎯 Difficulty: EASY (no modding experience needed)
It's easier to customize own or track which majors your career is linked to with a bunch pre-made templates right???
Download my edited mod as a base & start making edits 📝 Have these templates to easily cross-reference 0x2(2) values you need to change in SimPE following PHAENOH'S TUTORIAL.
The templates will look like the 2 tables you see above, they are available in:
odt (highly recommended, easy to use word doc file with Phaenoh's tutorial included)
md (markdown file)
csv (for both of the tables you see above)
Comparison Table - use to compare your edits to MAXIS original Career By Major Table - work out which major supports your career and calculate 0x2(2) values
4. zip (for SiYuan users to import, highly rec because I used that program to make the tables, it's Notion but ✨uglier and offline✨)
🐸 DOWNLOAD (browse what you need): SFS / MIRROR
405 notes
·
View notes
Text
hello my beloved followers does anyone know if there is any way to save a google sheets file as a csv in a specific folder, and replace the current file that is already there
i know there is a download button. this puts it in "downloads" and does not replace the last copy
edit: my personal problem has been solved as i found a unity import-from-google-sheets plugin https://github.com/ssmasrour/Google-Sheets-to-Unity?tab=readme-ov-file thank you everyone
38 notes
·
View notes
Text
Simplifying the Star Trek Tumblr experience by taking the pulse and seeing what the general population's feelings are for that character.
List of Tumblr's top 10 most strongly liked characters
List of Tumblr's top 10 most strongly disliked characters
List of Tumblr's top 10 most strongly liked Star Trek Enterprise characters
These lists will change. They will be kept up to date as I will be editing the posts.
GitHub link with spreadsheet csv
I invite you and encourage you to use the spreadsheet. It's there for you to use and if you want to make posts with that data (like my most strongly liked and disliked posts) you can. And please tag me if you do.
You can submit your beloved or submit your behated or anyone you're curious about. I'll post approximately two polls at approximately the same time each day.
Being totally honest, I've been chosing which characters I make polls for a little differently recently (wrote this Jun 11th). I've been ignoring some requests because I had too many that no one seemed to care about, and I've been pushing more important characters and characters where the requester seems genuinely interested to the front of the queue. That being said, if you notice I skipped over a character you really care about, message me and let me know.
I made this blog because I often heard takes people had that made me think "well, that can't be a common opinion. I want to know if people really think that." For example, I had always heard about Keiko haters, but her poll resulted in 53.4% strongly like, and only 1.8% and 1% of voters disliked and strongly disliked her, respectively.
I will delete comments made in bad faith because I don't want people being gross in my notes. You can be a hater to the character as long as you're not being a dick to real people. I haven't noticed anyone being too mean yet, so just keep it that way.
23 notes
·
View notes
Text
okay i love her too much to keep her away from yall so here's one of the ocs for CSV!! She has an EXTREMELY important role in the story

#carmen sandiego#carmen sandiego 2019#carmen sandiego season 5#csv#cs5#carmen sandiego ocs#carmen sandiego oc#cs powercut#powercut cs#carmen sandiego powercut
16 notes
·
View notes
Text
The Ultimate Guide to Gimkit: Unlocking the Power of Game-Based Learning
In today’s classrooms, student engagement can be one of the biggest challenges teachers face. Enter Gimkit—a game-changing platform that transforms traditional quizzes into fast-paced, competitive, and fun learning games. Whether you’re a seasoned educator or just hearing about Gimkit for the first time, this guide will walk you through everything you need to know.
1. What Is Gimkit?
Origins of Gimkit
Gimkit was developed in 2017 by high school student Josh Feinsilber as part of a project for a business class. Frustrated with boring review methods, he created a more interactive and exciting way for students to study.
Purpose and Vision
Gimkit blends gamification and formative assessment, allowing students to answer questions in a live or asynchronous environment while earning virtual money to upgrade their gameplay. The vision is to keep learning fun, personalized, and data-rich.
2. How Gimkit Works
Core Gameplay Mechanics
Teachers create “Kits”—question sets tailored to any subject or skill level. During the game, students answer questions to earn virtual money, which they can use to buy power-ups or upgrades that impact gameplay.
Reinforcement Through Repetition
Gimkit is structured so that students see incorrect questions again and again until they answer correctly, helping to reinforce knowledge through strategic repetition.
3. Creating a Gimkit Account
Signing Up as a Teacher or Student
To get started, visit gimkit.com. Teachers and students can sign up using their Google accounts or a standard email address.
Account Types and Roles
Teachers can create Kits, host games, and access reports.
Students can join games via a code—no account is required to play but having one allows them to track their progress over time.
4. Building Your First Kit
Creating Custom Questions
You can build Kits from scratch, including multiple choice, short answer, or flashcard-style questions. Add images, mathematical expressions, or audio to make questions more engaging.
Importing Existing Content
Gimkit lets you import question sets from Quizlet or upload CSV files, which is perfect for busy teachers looking to reuse or adapt existing materials.
5. Hosting a Live Game
What Is Live Mode?
Live mode turns the classroom into a game show. Students use a join code to enter, then race to earn virtual cash by answering questions.
Customizing the Game
Teachers can set game length, question repetition rules, and determine whether students play solo or in teams. You can also enable or disable upgrades and power-ups.
6. Assigning Homework with Gimkit
What Is Assignment Mode?
Unlike live games, Assignments allow students to complete a game at their own pace. This mode is ideal for remote learning, homework, or asynchronous reviews.
Monitoring Student Progress
Teachers receive detailed reports including:
Completion rates
Time spent on each question
Accuracy and improvement over time
7. Exploring Gimkit Game Modes
Classic Mode
The original game format—fast-paced, competitive, and familiar. Great for quick classroom reviews.
Creative Game Modes
Gimkit frequently introduces new modes like:
The Floor Is Lava: Avoid “lava” as it rises while answering questions.
Trust No One (Among Us-style): Combines social deduction with academic review.
Draw That!: A drawing-based mode ideal for vocabulary or concepts. These modes are rotated to keep the gameplay fresh and exciting.
8. Power-Ups and In-Game Strategy
What Are Power-Ups?
Using the money earned from correct answers, students can purchase power-ups such as:
Increased earnings per correct answer
Insurance (no money loss for wrong answers)
Multipliers This adds a strategic element beyond just knowing the right answers.
Why They Matter
Power-ups mimic gaming logic and keep students engaged longer. Students begin thinking about risk-reward, which encourages deeper thinking and planning.
9. Analytics and Student Reports
Real-Time Data
During live games, teachers can see who’s answering questions correctly and who might be struggling—instantly.
Post-Game Reports
Gimkit generates downloadable reports showing:
Individual and class-wide accuracy
Top performers
Time spent per question
Growth metrics over multiple games These insights help teachers fine-tune instruction and provide targeted support.
10. Classroom Management and Engagement
Boosting Participation
Gamification appeals to students who may otherwise be disengaged. The reward system provides instant feedback and motivation.
Encouraging Teamwork and Collaboration
Team modes allow for collaborative play, helping to build peer relationships and social-emotional skills in the classroom setting.
11. Integrating Gimkit into Your Curriculum
Applicability Across Subjects
Gimkit isn’t just for trivia. It works well with:
Math (problem-solving, computation drills)
Science (vocab, processes, diagrams)
Language Arts (grammar, reading comprehension)
Foreign Languages (vocab practice)
Social Studies (dates, terms, historical context)
Lesson Plan Alignment
With careful planning, you can align Kits to state standards or learning outcomes, making Gimkit not just a review tool, but a core instructional resource.
12. Pricing, Plans, and Gimkit Pro
Free Plan
Includes basic features like:
Live games
Creating Kits
Access to a limited number of modes However, it comes with some restrictions on assignments and advanced game types.
Gimkit Pro
For a monthly or annual fee, Gimkit Pro unlocks:
Unlimited Kits and assignments
Access to all game modes
Deeper analytics and reporting
Collaborative Kit building
Priority support There’s also Gimkit for Schools, allowing districts to purchase access for all teachers.
Conclusion: Why Gimkit Is Changing the Classroom
Gimkit isn’t just a game—it's a learning revolution. With its intuitive interface, powerful analytics, and engaging gameplay, Gimkit helps students master material while having fun. It supports a student-centered learning environment where motivation and mastery go hand in hand.
Whether you’re using it to reinforce vocabulary, prep for tests, or differentiate instruction, Gimkit empowers both teachers and students to take ownership of learning.
3 notes
·
View notes
Text
HATEHATEHATE microsoft edge and how it and google are just getting in the way of anything web legacy
So there is this device at work. its called an EPD. the name is not important. all you need to know is that it has an IP address 192.168.X.XXX that you need to connect to it in order to get data.
for whatever reason the company that makes it just hasnt updated the UI or interface since 2005 because this thing does NOT work on modern browsers.
well.... it works mostly that is. except for the chart. it can display a realtime graph of Important Data that i need to look at in order to calibrate it. the chart does not work in edge. it does not work in chrome
it needs java
AND NOT ONLY THAT
it needs ActiveX Controls
BUT NOT ANY NORMAL ONES.
Noooooo it has to pretend to be a website to download you an unsigned ActiveX Control driver? extension? IDK what it is but you need to install it.
but we are getting ahead of ourselves here. suffice it to say, the computer that would NORMALLY display this chart got reformatted and now it cant. so i used my laptop
so i opened Interet Explorer because that is the program that works
Edge opens the MSN homepage instead.
thats not what i want. i tried Edge. it cant display the graph. I open Internet Explorer again
edge opens another MSN homepage window
i install google chrome. it also doesnt work. they are both chromium after all. i try to install firefox. its blocked on the network. i need to prevent edge from closing IE
with a little google-fu i rename my BMO or whatever folder in my edge folder to prevent it from openening Edge when i want IE
it doesnt work
i do some more google-fu and disable my extension settings to prevent the BMO thing
another MSN homepage opens
I start digging into the forums on HVAC websites because these guys are having the same problem only with AC units. I find it. I have to create a VSB file that force opens the website with edge. cool.
whats a VSB file?
after an hour of fucking around just TRYING to OPEN IE so i can use the browser that can display the chart i have created a VSB file that OPENS IE ON THE IP ADDRESS OF THE EPD UNIT
the graph doesnt work. i need java
the java webpage doesnt load on ie
i download it with chrome
still doent work. i have to enable it in my extensions from IE
THE GRAPH DOES SOMETHING!
it asks me to download something. i say yes
edge tells me it blocked an unsighed ActiveX Controls program from running.
what the fuck is ActiveX Controls? can i download it somewhere else?
NOPE! its backed into IE. you gotta go into your internet settings and basically turn off all your security or add the website to your list of trusted websites
my trusted website list is controlled by IT. i cant change it. the weakest settings i can enable still result in the program being halted.
i have apparently generated several dozen automatic support alerts as every time i try and run it it sends a warning to IT that i am accessing a potentially dangerous site
its taken me 2 hours and i have not even started calibration.
i am forced to do the backup method of just blindly assuming everything is working and downloading the CSV file later. this too ends up not working but for reasons i will have to figure out tomorrow. the data is there but the math is wrong.
fucking hate edge and its backwards incompatiblity
7 notes
·
View notes