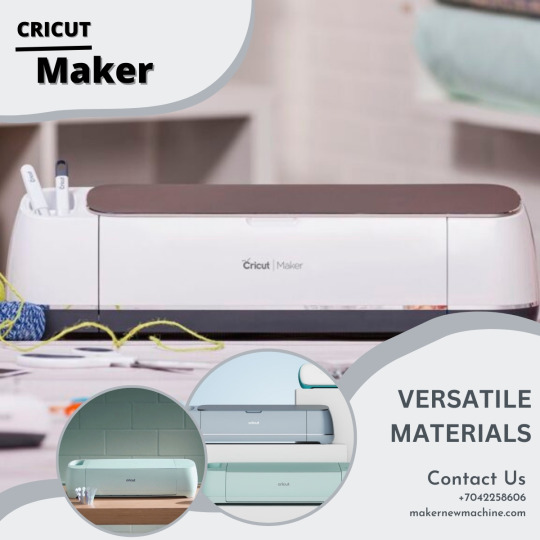
#cricut maker software download
Text
Cricut Maker Software Download: Easy Guide for Beginners
Hey, Cricut folks! Are you looking for a guide on Cricut Maker software download? If so, then you have come to the right page! Do you know when I have to download Cricut Maker software? I get very excited. I don’t know why, but I love easy steps that I can perform again and again. Downloading is quite satisfying for me. Sounds weird, right? I can understand, but it is what it is.
In this write-up, I will explain how to download Cricut Design Space on Windows, Mac, iOS, and Android. This post will be helpful for new crafters who want to get started with their Cricut Maker machine!
Cricut Maker Software Download on Windows
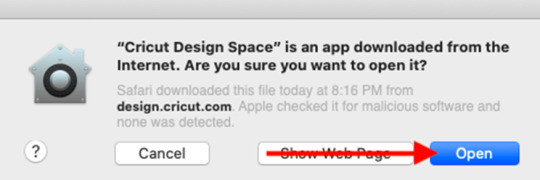
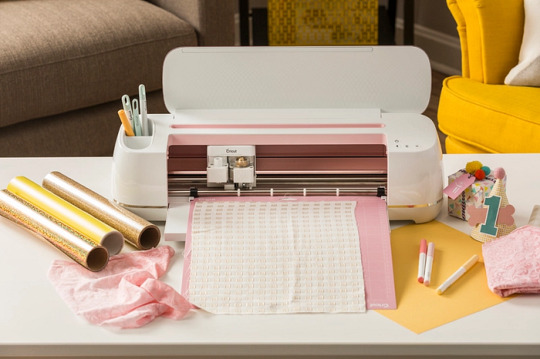
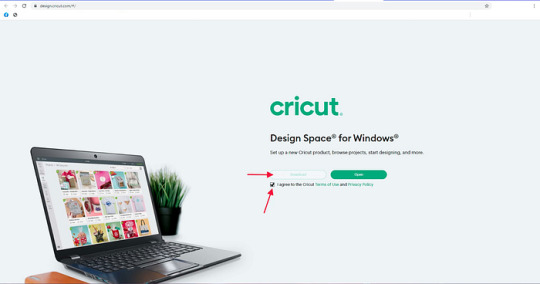
Cricut Design Space is the best software to create, modify, and personalize your projects. However, if you are a Windows user and want to download Cricut Maker software, then you need to follow the steps described below:
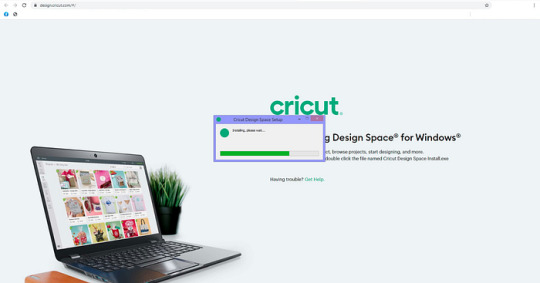
Open your browser on your PC and type the URL design.cricut.com on the search bar.
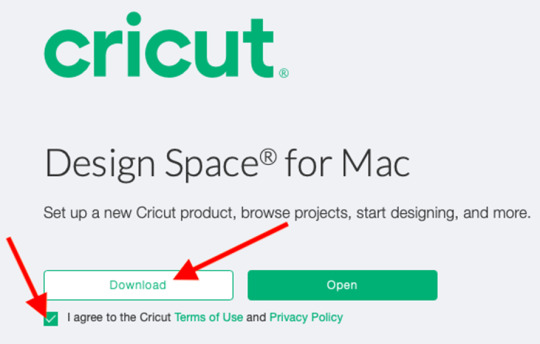
Then, click a checkbox saying, “I agree to Cricut Terms of Use and Privacy Policy.”

After that, the Download control will be clickable to download.
Once you finish the download, navigate to the Downloads folder.
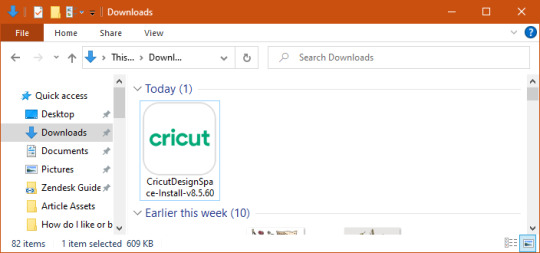
Get the file you downloaded.
Then, double-click on it to install the Cricut Design app.
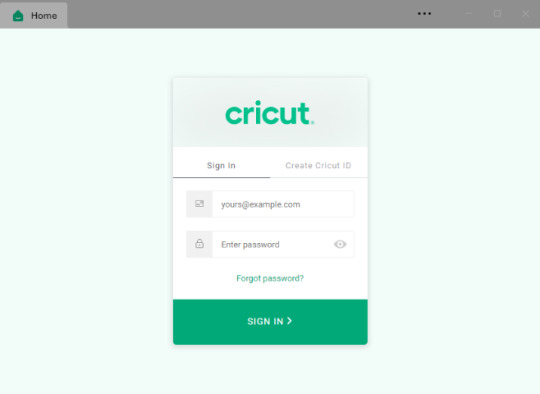
Once you complete the installation, you need to register to a Cricut account.
Cricut Maker Software Download on Mac
Okay, here comes the other computer, i.e., a Mac. Downloading from the browser is completely the same as downloading from the Windows computer, but the only difference you will notice is in installation. Let’s see how to download and install the software below:
Enter the URL — design.cricut.com on your browser and check the box to accept Cricut’s Terms & Conditions.

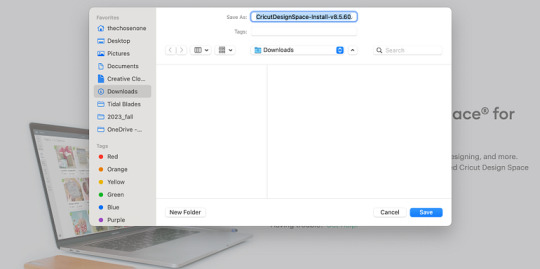
Second, you will be asked to go to a page where to select the location to save the file.
After saving, you will see that the download has started.
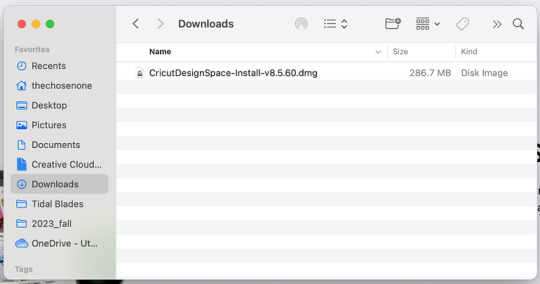
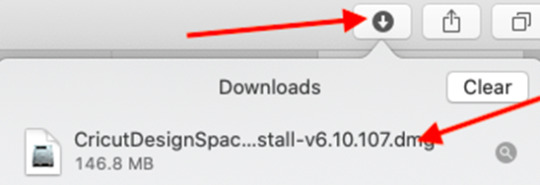
Then, head to the Downloads folder to discover the .dmg file.
Double-click on it to install.
When installing, drag the Cricut icon to the Applications folder.
Finally, your Cricut software will be added to your folder.
To open the app, you have to double-click on the app and then start creating what you love.
Cricut Maker Software Download on Your iOS Device
Now, let me show you the steps to download the Cricut app on your iOS devices. The app is fully compatible with your iOS device, and you don’t need to download it using your browser. All you need is a pre-installed App Store app. So, without giving it a second thought, let’s begin downloading:
Launch the App Store app.
On the App Store, enter Cricut Design Space on the search bar.
Now, hit the Get button to download the app and verify your download with your iTunes password (if prompted).

When you have the application on your device, you need to open it.
Afterward, you can start a Machine Setup or Sign In to proceed with crafting.

Cricut Maker Software Download on Android
Last but not least, we are going to download the Cricut app on an Android machine. To download the software, head to the Google Play Store. Now, follow the steps described below to install the software:
Go to your Android phone’s home screen.
And find the Google Play Store icon on your device.
On the Play Store, search for Cricut Design Space.
You will find a Cricut app in the suggested apps below.
Select the app from the suggested results.
Then, press the Install button given below to begin installing the app.

After installation, the Cricut software will be added to your phone’s home screen.
Open the application and set up your machine right away.
FAQs
Question 1: Which software does Cricut Maker use?
Answer: The Cricut Maker is a robust machine in the Cricut lineup that cuts more than 300 materials in no time. However, the software used with this machine is the same as that used with others. This is nothing but a Cricut Design Space, which is a companion app to all Cricut cutting machines.
Question 2: What are the Windows system requirements for Cricut?
Answer: In order to run the Cricut software on a Windows computer, you will need to meet the following needs:
● Windows 10 or later (64-bit) operating system
● Disk: 2 GB free
● A USB port/Bluetooth
● Minimum 4 GB RAM
● CPU with Intel Dual Core or equivalent to AMD processor
● The display should have a minimum 1024px x 768px screen resolution
Question 3: How to use the Cricut software to setup the machine?
Answer: To set up your Cricut machine on your computer, you have to follow the steps below:
Plug in the machine and power it on.
Then, you need to connect your Cricut to the computer via Bluetooth.
Now, download and install the Cricut Design app.
After that, open the Cricut app and sign in to your Cricut account.
Select the Menu and select Machine Setup.
Finally, choose the model and follow the instructions on your screen.
Read more: Cricut New Machine Setup
install cricut design space app
cricut.com/setup mac
Cricut Design Space
Source: cricut maker software download
#design space signin#cricut maker software download#install cricut design space app#install cricut explore air 2#cricut.com/setup#cricut explore 3#how to setup cricut maker#cricut design space
0 notes
Text
Why Won’t My Cricut Design Space Open (Easy Steps)
Why won’t my Cricut Design Space open? This is a question that I frequently receive from many readers. Finally, I got a chance to write something about it. Recently, I experienced the same issue, and it was not opening on my PC at all. At that time, I had to use the Cricut software on my mobile device; thanks to Cricut, it is compatible with smartphones, too.
install cricut design space app
www.cricut.com setup login
cricut.com setup mac
#setting up your cricut maker#cricut setup#cricut design space#cricut setup explore air 2 setup#cricut setup create account#cricut setup for pc#cricut setup maker#cricut software app#cricut setup on computer#cricut setup log in#cricut software download#www.cricut.com/setup login#www.cricut.com setup login
0 notes
Text
How to Connect the Cricut Maker via Bluetooth: Easy Steps
Are you a beginner who wants to learn how to connect the Cricut Maker via Bluetooth? I am writing this blog especially for all of you. Since I’ve been a Cricut user for a long time, I can tell you how useful it is. Its hundreds of remarkable features have made my regular DIY so damn easy.
However, you need to connect your machine to a device using a suitable connection. Let’s learn how to set up the Bluetooth connection.
How to Connect the Cricut Maker via Bluetooth to a Computer?
If you’re a desktop user, you might have either a Windows or a Mac computer. So, let’s check the steps for both of these systems.
Windows
If you’re a Windows user, go through these detailed steps to learn the connection between your machine and your computer.
Finally, your cutting machine is connected to your Windows PC. Now, you can carry on with your projects.
Mac
When you’re a Mac user, the steps slightly change when connecting a machine to it. Let’s check out the steps given below to get started.
This is how you can connect your crafting machine to a desktop computer.
How to Connect the Cricut Maker via Bluetooth to Mobile Device?
As you know, you can connect your machine to mobile devices via Bluetooth. Let’s learn how to connect the Cricut Maker via Bluetooth to phone.
Android
If you’re an Android user, follow the steps given below to connect your cutting machine to it.
That’s how you can connect your all-in-one Cricut Maker machine to your Android phone.
iOS
For all iPhone users, here are all the steps. Check them out once and try them for your devices.
Finally, your devices are connected to each other. You can now use your machine to create anything.
FAQs
Why Is Cricut Maker Bluetooth Not Working?
If you observe that your machine’s Bluetooth is not working, it can be due to various reasons. For instance, your machine or device is not ON. It can also arise when your machine or device is experiencing technical trouble.
How to Connect Cricut Maker to a USB Cable?
If you want to connect your machine to a device via a USB cable, it’s an easy step. To start, get a USB cable and connect one end to your machine’s USB interface and another end to your device’s USB interface.
How Do I Download Cricut Software on My Mobile Device?
To download the Design Space on your mobile device, follow these steps:
Visit: cricut.com/setup
www.cricut.com setup login
Source: https://cricricutdesigncut.wordpress.com/2024/09/06/how-to-connect-the-cricut-maker-via-bluetooth
#design space setup#digital design#cricut.com/setup#cricut setup#www.cricut.com/setup#cricut.com setup mac#www.cricut.com/setup login#cricut explore air 2#cricut explore#cricut maker machine setup#cricut crafts#cricut design space app#cricut design space login#cricut joy xtra#cricutprojects#cricut venture#cricut setup on computer#cricut setup for pc#cricut setup explore air 2#cricut setup explore air 2#cricut design space download#cricut design space software#cricut design space setup#www.cricut.com/setup\cricut explore air 2 setup#www.cricut.com setup#www.cricut.com setup login
0 notes
Text
Cricut Joy Setup: A Step-by-Step Guide for Beginners

Are you looking for an easy Cricut Joy setup tutorial? I’ve got you covered! Cricut Joy is a cutting tool that is great for beginners and anyone who wants to craft occasionally just for fun.
I also have it, and recently, I bought one of its new versions, the Cricut Joy Xtra, but I will only talk about the Cricut Joy machine. I understand some new users find it difficult to setup their Cricut machine. Therefore, I came up with this blog. Here, I will talk in a stepwise manner to make it easier for everyone to understand my points.
The Cricut setup includes various things, such as connecting Cricut to Bluetooth and downloading the Cricut app. However, I will only discuss the Cricut setup for Windows users. So, let’s get started now.
Minimum System Requirements for Cricut Joy Setup
Before you dive into the setup process of the Cricut machine, let’s understand whether your system meets the basic requirements for using Cricut Design Space software. In order to ensure the smooth functioning of the software, I advise you to check the system needs once and then proceed. Once you have checked it, you can move to the next steps, which I have answered: How do I setup my Cricut Joy?
Here is what you need to check on your Windows PC:
Operating System – Windows 10 or later (64-bit)
RAM – 4 GB
Disk – 2 GB free
CPU – Intel Dual Core or equivalent to AMD processor
Display – Minimum 1024px x 768px screen resolution
Connection Type: Bluetooth connection
Cricut Joy Setup Guide: 4 Quick and Easy Steps
Have you checked the above system requirements before proceeding with this step? If so, then GREAT!! Now, you are ready to setup your Cricut without any hassle. In it, we will connect the Cricut and download the software from scratch. If you have bought a new Cricut Joy and haven’t unboxed it yet, then don’t worry. You can join me on this journey. Let’s unbox it and finally set it up together.
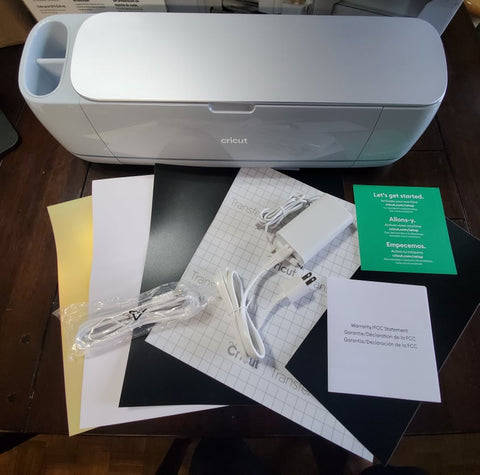
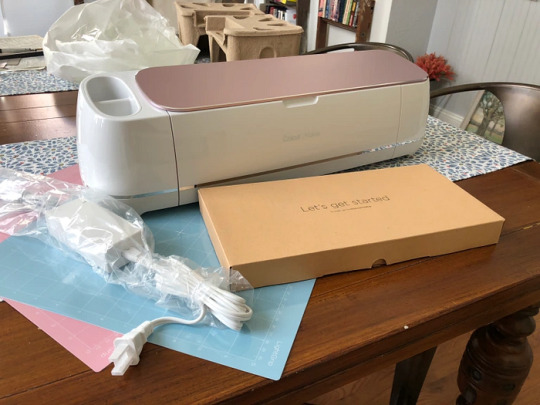
Step 1: Unbox the Cricut Cutting Machine
In the first step of the Cricut Joy setup, you will need to unbox the machine.
Here’s the picture of my Cricut machine setup unboxing! Now, let me tell you what I got in the box of the Cricut machine. Let’s take a look below:
Cricut Joy machine
Fine Point Pen (0.4mm)
StandardGrip Mat, 4.5″ x 6.5″
Powder Adapter
Welcome Card
Blade + Housing
Free trial membership to Cricut Access
50 ready-to-make projects online
Materials for a practice cut
Step 2: Connect Cricut to Your Windows Computer
This second step is crucial in the Cricut Joy setup. In it, we are going to connect our Cricut to our PC using Bluetooth. Before that, make sure your Cricut machine is placed on a flat surface, and the distance should not be more than 10 – 15 between the PC and the machine.
Here’s what you need to do to connect your Cricut to your PC via Bluetooth:
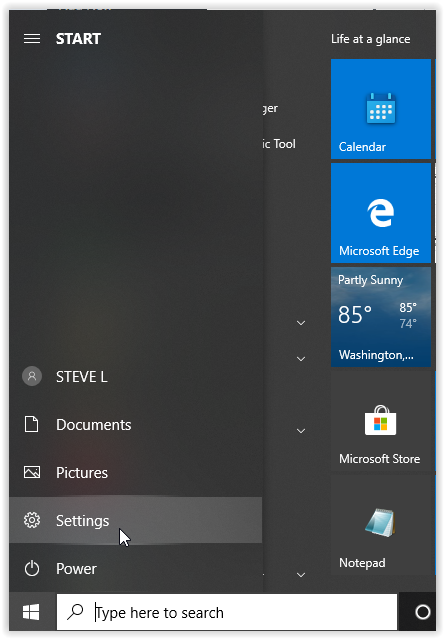
Navigate to the Start menu and then tap the gear-like icon in your settings.
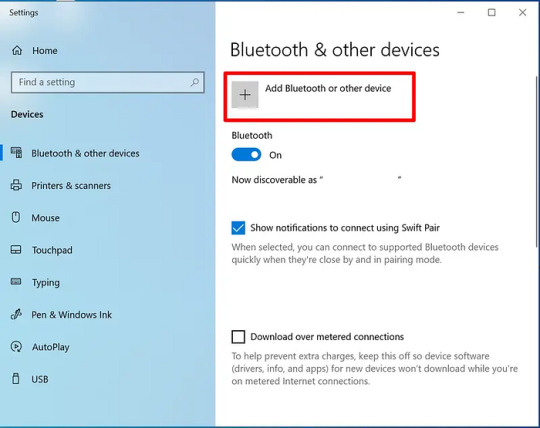
Then, you will need to choose Devices on the next screen.
Now, check whether you have turned on your Bluetooth. If not, please turn it on. Once done, click on the Add Bluetooth or other device.
On the next screen, you have to select the Bluetooth option.
After that, wait for a while for your PC to check your Cricut machine.
As you can see in the available list, you have to select your Cricut model.
Step 3: Download Cricut Design Space
Here’s how to download Cricut software on Windows 10:
Launch the Internet browser on your desktop.
Search design.cricut.com is on your browser search bar.
On the displayed screen, click the I agree checkbox and then hit the Download button.
Now, you have to hit the Download tab to start downloading the Cricut Design Space.
Once you have downloaded the Cricut app, double-click on your file from the Downloads folder.
Afterward, the installation will start.
Step 4: Complete Cricut Joy Setup Steps
Launch your Cricut software on your PC.
Then, you need to select Cricut New Product Setup.
After that, you will need to sign in to your Cricut IS using your username and password.
Next, select the Smart Cutting Machine.
Now, you will need to choose the Cricut model.
Finally, follow the on-screen instructions to complete the steps. Although you will find many steps that you have already taken, it is okay to follow them.
FAQs
Which software do I need for Cricut Joy setup?
You will need the Cricut Design Space app to setup your new Cricut Joy machine. Cricut Joy is smaller in size and made portable to carry anywhere. Just because it is different from the rest of the machine, it doesn’t mean it will use different Cricut software. The app is indeed the same, and you don’t need to worry about anything. Simply download the app and start making DIY projects like a pro.
Can I setup Cricut Joy without connecting to Bluetooth?
No, there is no other way to connect your Cricut machine to your computer, as Joy comes with built-in Bluetooth. Unlike Cricut Maker and Explore models, Cricut Joy doesn’t come with a USB port, and hence, you can’t connect it using a USB cord if your Bluetooth is not working due to some reasons. In short, Bluetooth is a must for connecting your Cricut to any device.
Is Cricut Joy worth the investment?
It depends on your needs and the type of materials that you want to cut on it. Since Cricut Joy can cut only up to 50 materials, you should know that you will not be able to do all kinds of projects on it. There will always be some materials that you can’t cut on it. Cricut Joy can be worth the investment only for those who are novice crafters and have less budget. In addition, it is the perfect choice for occasional crafters.
Source: Cricut Joy Setup
#cricut joy setup#how do I setup my cricut joy#cricut joy xtra#cricut joy app#Cricut design space download#cricut design space app#cricut design space software#cricut maker setup#cricut machine set up
1 note
·
View note
Text
How to Connect Cricut to App: A Stepwise Setup Guide
So, here you will learn how to connect Cricut to app. Right? But before I dive further into this blog, I would like to clarify one thing. This blog talks about how to connect your Cricut machine to an app (Cricut Design Space), but I don’t think it is the same as connecting Cricut to your computer or mobile phone.
Connecting a Cricut to an app and connecting Cricut to a compatible device are two different things. Don’t get confused! The question is, if both are different, then what are we going to learn from this blog? In this blog, I will teach you how to connect a Cricut machine to an app. However, it is also called a Cricut setup. We will be learning about machine setup on Windows computers. Let’s dive into it without any further ado!
Step 1: Unboxing a Cricut Product
Okay, so to get to the exciting part of the Cricut machine setup, we will first need to unbox the machine. However, if you have already unboxed it, enjoy🥳and move to the second step in order to learn how to connect Cricut to app.
Here, let me share my experience of unboxing my Cricut.
I opened the box’s lid and saw a matted folder over the top surface of the Cricut machine. Here I am, actually, opening my Cricut Explore Air 2 machine. It came with a blue LightGrip mat. Those who got the Cricut Maker machine then will receive a green StandardGrip mat.
The list is long; let me show you what else I got with my Cricut Explore:
Step 2: Open Your Cricut Cutting Machine
To open the Cricut machine, I pressed the Open button (on the left side). As I pressed the button, the rest of the doors opened on their own. Here, Cricut Maker users need to lift the top lid. After that, the front door will open on its own (automatically).
Note: Do not open the doors that open automatically. Just wait and let them open slowly on their own.
When your Cricut is opened, you need to remove the foam and other tape on the side.
Step 3: Plug Into a Cricut Machine
Plugging the power cable into the Cricut cutting machine is the first step in learning how to connect Cricut to app. Now, it’s time to turn it on. Yes! So, let’s grab the power cords that come with our Cricut machine.
You can just plug the main plug into the wall outlet and insert the other into the back of your Cricut machine. But, here, you have to plug in the machine; you don’t need to turn it on the machine here. We’ll do it later.
As the machine is turned on, you need to move to the next step, where we will start setting up our machine.
Step 4: Pair Cricut to a Computer via Bluetooth
I have connected my Cricut using a USB cable, too. Currently, I am using a Bluetooth wireless connection. So, let me show you how to connect Cricut to PC via Bluetooth:
Now, let’s download a Cricut app so that you can understand how to connect Cricut to app, i.e., how to setup Cricut.
Step 5: Download Cricut Design Space
The machine setup requires software called the Cricut Design app. To download the software, you need to go through the steps given below:
Next, follow the prompts until your installation is done. Once done, move to the last steps to learn how to connect Cricut to app.
Step 6: Finish the Cricut Setup
Launch the Cricut Design Space software, and you will see the option to select your Cricut cutting machine on the app. Select the type of machine you want to setup. Next, sign in to your Cricut account. If you don’t have an account, sign up to create one.
Once you have created an account, you need to sign in and then start connecting your Cricut to your app. Although you will get screen prompts to setup the machine, I will explain it briefly.
First, turn on the machine by pressing the power button, and then you need to connect your machine. After that, your setup is done!
HURRAY!!!!!!!!! 😍 YOU DID IT!
FAQs
Question 1: Can I connect my Cricut to an app on my mobile phone?
Answer: Yes, absolutely! Connecting Cricut to the app or setting it up is the same. For this, you will need a Cricut app that you can download from an online app store where you can download the app. For example, if you want to install the Cricut software on iOS, then you can get the application from the App Store, and for Android, you need to go to the Google Play Store. In short, you can easily connect your Cricut machine to an app.
Question 2: Is Cricut machine setup difficult or time-consuming?
Answer: Setting up the Cricut machine is easy and not that time-consuming if you have the right software. The simple-to-use interface of Cricut Design Space will walk you through the easy directions to setup the Cricut cutting machine, which will take you a few minutes. So, install the right software on a compatible device, and then you will be ready to go.
Question 3: Is Bluetooth compulsory for Cricut machine setup?
Answer: No, it is not necessary if your Cricut has a USB cable. Except for the Cricut Joy machine, all the Cricut models have USB ports so that they can be connected via USB cords, too. However, for Cricut Joy users, Bluetooth is compulsory when setting up the machine. In short, Bluetooth is compulsory only for machines for which Bluetooth is not available.
Source: https://desincricut.wordpress.com/2024/04/16/how-to-connect-cricut-to-app-a-stepwise-setup-guide/
#cricut.com/setup#cricut.com setup download#cricut.com setup#cricut.com setup mac#cricut.com setup windows#cricut.com/create#cricut.com sign in#cricut.com/register#cricut.com design space#www.cricut.com setup mac#install cricut printer#install cricut design space app#install cricut explore air 2#cricut explore air 2#cricut create connect to computer#connecting cricut maker to computer#cricut com setup#cricut setup#setting up my cricut maker#setting up your cricut maker#cricut new product setup#cricut design space app#cricut design space#cricut new machine setup#cricut software app#cricut explore 3#cricut account on setup#cricut setup on account#cricut
0 notes
Text
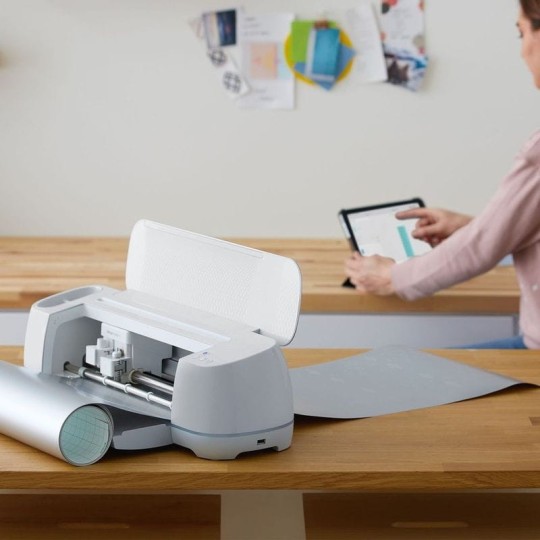
How to Download Cricut Design Space for Desktop: Full Guide
Hey, are you looking for Cricut Design Space for desktop? Don’t worry — you can easily get it on your Windows or Mac. But the question is, how much time will it take to download the app? Well, depending on your internet speed, it will take less than a minute or a maximum of 5 minutes.
The time is not too much, and that’s fine, but what about the system requirements? Can you download the app to your Chromebook, Linux, or any other device? Well, the answer is a big no. However, you can only get the Design Space on Windows and Mac. You can’t get it on other operating systems. Plus, you can download the app on Android/iOS devices without any hassle.
In this blog, I am going to explain the system needs that must be met before downloading the app. Then, you can easily install it on your desktop. Let’s get into it without much delay!
Minimum System Requirements for Using Cricut Software
Do you know why we need to check system requirements? We need to do this because we will need to download Cricut Design Space for desktop. Whether you are installing it on your computer or mobile, you must ensure the basic needs of your devices.
So let’s start with Windows computers first, and then we will move to Mac.
For Windows
I started my crafting journey with a Windows computer. Thankfully, my computer met all the requirements. Whatever, I have switched to a Mac now. The experience of using it on Mac is superb😍. Let’s see what we need to download the Cricut software on Mac.
For Mac
Download Cricut Design Space for Desktop (Windows)
Below, I have explained the steps to download the Cricut app on a Windows computer. Make sure you have checked the system requirements before downloading it.
Download Cricut Design Space for Desktop (Mac)
So, here you go! Below, I have already covered the steps to teach you how to download Cricut Design Space on Mac. Perform the steps to download the Design Space on a Mac.
If you follow the above steps carefully, you will easily be able to download Cricut Design Space for desktop. Good luck!
FAQs
Question 1: How to download Cricut Design Space on Chromebook?
Answer: Unfortunately, you can’t download the Cricut app on your Chromebook. Since Chromebooks are not supported, you can’t use them on this particular operating system, which also doesn’t support Unix/Linux computers. For more info, you can check the system requirements on Cricut’s official website. There, you will find all the information about compatible operating systems that can run the Design Space.
Question 2: How to find the latest version of Cricut Design Space on a computer?
Answer: To find the latest version of the Cricut Design app, follow the points mentioned below:
Question 3: Why can’t I find my installed Cricut Design Space on my desktop?
Answer: In most cases, when you download and install the Cricut software, it will show up in the same location where you downloaded it. But if you still do not find it for any reason, press the Windows button on your keyboard and type Cricut Design Space. After this, you can find the app.
Visit: cricut.com/setup
www.cricut.com setup login
Install cricut design space app
Source: https://desigcricut.wordpress.com/2024/03/19/how-to-download-cricut-design-space-for-desktop-full-guide/
#cricut.com setup download#cricut.com/setup#cricut.com sign in#cricut.com/create#cricut.com design space#cricut.com/register#www.cricut.com/setup login#cricut install setup#install cricut design space#install cricut design space app#install cricut explore air 2#cricut new product setup#cricut new product device#cricut explore air 2#cricut design space#cricut new machine setup#cricut software app#setting up your cricut maker#cricut create connect to computer#cricut#cricut setup for pc#cricut.com setup mac#cricut design space download#cricut.com setup windows#design.cricut.com/setup#cricut design space login#cricut setup maker#install cricut printer
0 notes
Text
How to Create Wall Arts With Silhouette Cameo for Home?
You have come to the right blog if you want to make Silhouette Cameo wall art for your home. My name is Manny Koshbin, and I have been working as a professional crafter for 2 years. Also, I help crafters learn and create projects through my blogs. As a result, I have curated it to provide all the fundamental guides to making wall art hassle-free.
In this blog, I will share a step-by-step guide to creating a wall art project with the Silhouette Cameo machine. Also, you learn the process of setting up the machine and supply requirements. So, keep reading this blog till the end to gain in-depth knowledge of the full procedure.
The Process to Setup a Silhouette Cameo on Your Device
If you want to learn the process of creating Silhouette Cameo wall art for your home, you have to set up the machine first. I am sharing the guide below for setting up Silhouette Cameo 4. You can use this guide to set up the Cameo machine you are using.
Step 1: Register Your Cameo Machine
Step 2: Downloading and Installing the Silhouette Studio App
Step 3: Connect the Cameo Machine
Tools and Supplies You Need for Making a Wall Art
To make this Silhouette Cameo wall art for your home, you have to gather some essential supplies. Below are the supplies that you will need to complete this project.
The Process of Creating a Silhouette Cameo Wall Art
If your Cameo machine setup process is complete and you have all the essential supplies for this machine, then move forward with the process to complete your art project. These are the steps you need to follow.
Step 1: Create a Design on the Silhouette Software
Step 2: Cut the Design on Your Cameo Cutting Machine
Step 3: Complete Your Design
FAQs
How Do You Make Silhouette Wall Art as a Beginner?
To create the wall art with the Silhouette machine then follow the below guide.
What Do You Need to Make Silhouette Art?
These are the supplies you should have to make the SilhouetteCameo wall artproject.
● Any Silhouette Cameo cutting machine
● Silhouette Studio software
● Silhouette Adhesive Stencil Material
● Transfer paper
● A piece of plywood to create your art
● Weeding tools
● Scissors, and others.
However, the supplies can change depending on the type, size, shape, and other aspects of the projects.
Which Silhouette Cameo Is Best for Making Wall Art?
All the Silhouette Cameo machines are suitable for creating any type of wall art design. However, if you are looking for more profound results while creating the project, then you can go for the Silhouette Cameo 4. Plus, this machine comes with a plethora of amazing features and premium results while making projects. Also, it can help you create pro-level projects even if you are a complete beginner.
Visit: cricut.com/setup
cricut setup explore air 2
cricut.com setup mac
design.cricut.com/setup
cricut design space setup
Source: https://mannyexplore.com/silhouette-designs/how-to-create-wall-arts-with-silhouette-cameo-for-home
#Arts With Silhouette Cameo#cricut.com/setup#cricut.com/setup login#cricut maker 3 bundle#cricut project ideas#cricut explore 3#cricut design space download#cricut software app#cricut.com setup#cricut.com setup mac#design.cricut.com/setup#cricut.com setup download#cricut.com design space#cricut.com/register#cricut.com sign in#cricut design space setup#install cricut design space app#cricut create connect to computer#cricut new product setup#setting up your cricut maker#cricut explore air 2#cricut setup explore air 2 setup#install cricut explore air 2#cricut setup new device#cricut install setup#cricut setup maker#cricut setup
0 notes
Text
How to Use Infusible Ink Pens With Cricut: A Complete Guide
Cricut infusible ink pens and markers are just awesome. I use them to create my iron-on projects like custom T-shirts for myself and my sweet little child. Well, you can make multiple things with these Cricut products. It’s very easy to use and gives a well-finished project in the end. Its color never fades and always provides shiny, vibrant, and colorful crafts. If you are also a crafter and want to learn how to use infusible ink pens with Cricut, then stay with me till the end of this blog to learn in depth.
I have done dozens of iron-on projects with my tiny Cricut Joy machine and infusible ink. The ink is so permanent that it won’t fade after washing. I am really excited to share my way of using infusible ink pens and creating lovely projects.
In this blog, you will get everything about Cricut’s infusible products, like how to use them, what type of projects you can make with them, and even some of my tips. So, let’s get started to learn everything.
What Are Infusible Ink Pens and Markers?
Basically, Cricut’s infusible ink pens and markers are simple pens with infusible ink intended to make various heat projects such as designing aT-shirt, tote bag, or any apparel where ink is necessary.
These products can be easily loaded into the clamp of your Cricut machine and draw your favorite designs. You can draw it with your hands, too.
How Do Cricut Infusible Ink Products Work?
Before learning how to use infusible ink pens with Cricut, you should know how it works. Infusible ink works on the principle of sublimation. It sounds a bit complex, but it’s so simple. When you use the infusible ink or marker on a paper, it’s in a solid state, which is its original state.
But, the moment you apply heat to it, it gets transformed into gas. During this process, it infuses your material, and when you remove the heat, it cools down again. And then, after cooling, it will again become solid.
One thing to note here is that these products only work on specific materials, such as poly-based materials, polyester fabric, coasters, and mugs with a poly-coated ceramic coating.
So, if you want to make such projects, Cricut infusible ink pens and markers will be a must-have. Luckily, these amazing accessories are compatible with all types of Cricut machines, including Cricut Maker, Explore, and Cricut Joy.
How to Use Infusible Ink Pens With Cricut Machine?
Here comes the final part of the blog, which I was excited about. You already understand why we use it. And now, you are going to learn the exact procedure through the steps that I am sharing with you now. Before moving to the final steps, let’s see the materials you will need while making your project.
Step 1: Tools and Supplies Required
Here are some of the essential materials and tools you will need for your project.
When you are done with all the materials, it’s time to start the project. So, let’s start the step-by-step guide and learn how to use infusible ink pens with Cricut.
Step 2: Create Your Design
In the first step, you need to put a sheet of laser copy on your cutting mat and then put it into the Cricut machine.
Now, move to your Design Space and choose the size of your design to fit onto your blank. After that, adjust your Linetype to draw and select a Cricut infusible pen or marker. Don’t forget to mirror the design before the cutting procedure.
Step 3: Load Infusible Ink Pens
Now, select your material. In the case of an older Cricut machine, set the Smart Set Dial to Custom. Once done, put your infusible Cricut pen or marker into Clamp A and then hit the Go button to load different colors.
Step 4: Unload the Cricut Cutting Mat
When your design is ready, you can unload your mat and then take out the design from the mat.
When your design is ready, you are ready to apply heat to your apparel using the Cricut EasyPress mat. To get started, first place the sheet of cardstock inside your apparel blank to keep it protected from wrinkles and damage.
Moreover, use a fresh and clean lint roller to remove the lint from the surface of your apparel blank. It will also remove the fiber particles to create a perfect apparel for heat transfer.
Step 5: Preheat Your T-shirt
Then, cover your apparel with the butcher paper. In the next step, you need to preheat your apparel to remove unwanted moisture from it. Also, you need to check the Cricut Heat Guide from time to time to follow the instructions correctly. Apply the heat with a light pressure.
After that, take off the butcher paper and let the apparel cool down. Now, put the design pieces on your apparel facing down. Then, apply the tape on each corner of your design with a Heat Resistant Tape, which will keep your design free from moving.
Step 6: Apply Heat to the Design
Next, put the butcher paper on top of your design. Afterward, select the correct temperature and time settings for your project from the Cricut Heat Guide. Once set, apply heat with the optimum pressure, and when you hear a beep sound, lift away the press and slowly remove the butcher paper.
In the end, let your project cool completely and enjoy it. Finally, you learned how to use infusible ink pens with Cricut, and hopefully, you will try it on your own.
Conclusion
The process was extremely easy, wasn’t it? All you need to do is to gather some accessories and get started with the project. I used an example of a T-shirt, but you can make use of any apparel like a tote bag or anything where ink pens can be used. You can make beautiful creations with your Cricut infusible ink pens and an EasyPress machine. So, get ready to create something and use the Design Space software to make things beautiful and unique.
Visit: cricut.com/setup
design.cricut.com/setup
install cricut design space app
cricut.com setup mac
www.cricut.com/setup login
Source: https://cricuthelp.wordpress.com/2024/02/21/how-to-use-infusible-ink-pens-with-cricut-a-complete-guide/
#cricut.com/setup#www.cricut.com/setup login#www.cricut.com/setup#cricut design space download#cricut project ideas#cricut explore air 2#cricut software app#cricut new machine setup#install cricut design space app#install cricut explore air 2#cricut new product setup#setting up your cricut maker#cricut create connect to computer
0 notes
Text
Try your hands on paper, vinyl, HTV, fabric, and other materials this time. Working with different types of materials has become efficient and effortless in the presence of a Cricut machine setup. You can start making personalized keychains, stunning home decor, custom doormats, eye-catching labels and stickers, and more. The best part about making the Cricut project is that you can use the Cricut Design Space app. Visit cricut.com/setup and download and install the application on your systems to browse through fonts and images present in the library. There are many possibilities with a Cricut explore air 2 software and its compatible application.
#cricut maker setup#cricut machine set up#cricut maker 3#cricut explore air 2#cricut machine#cricut new machine setup#cricut design space login#cricut mug press#cricut crafts#cricut design space download#cricut software app#Cricut
1 note
·
View note
Text
How to Make Christmas Cards With Cricut Maker? [Beginner's Guide]

Well, Thanksgiving is over, but Christmas is in full effect! If you are also excited about Christmas, then you can learn how to make Christmas cards with Cricut with me. Creating handmade cards for various occasions is an old tradition that everyone loves to follow. But this year, I decided to come out of my shell and try to make cards out of my craft machine. Greetings! To all my enthusiastic DIYers, I am Stephan, an investor and part-time crafter.
Being an owner of a Cricut machine, I’ve made tons of projects that not only upgraded my crafting skills but also helped me in starting my own business. As a business person, I made and sold various kinds of Xmas cards in all these years. But this year, I am going to design not only for business but also for my loved ones.
What Supplies Are Needed to Make Cricut Christmas Cards?
Being an expert in creating customized cards, I must make you aware of every detail that comes under how to make Christmas cards with Cricut. All DIYers must come across the supplies that will play a vital role in transforming their idea into reality. To ease your work, I have made a list of the supplies that will be required while forming the card for this festival.
Cricut machine
StandardGrip cutting mat
Cricut Scoring Wheel/Scoring Stylus
Cardstock
Cricut Pen
Scraper Tool
Tape
After discovering the final list of materials, let’s come directly to the point and come across the most critical part. While going through the coming section of the blog, you will get to learn about the complete guide to designing a personalized Christmas card this year.
How to Make Christmas Cards With Cricut?
Equally important, this segment is going to play an essential role for each of you. As a blogger, I guide you to go through the content mentioned here very carefully. For a better understanding of how to make Christmas cards with Cricut, have a look at the below-shared details.
Step 1: Cricut Design Space Sign-In & Draw Design
Initiate the process of creating a customized card by signing into the Cricut app.
After the app is open, press the Upload icon given under the Menu panel.
Following this, click Browse and upload your image from your system folder.
Now, press the Insert Image button and tick the Ungroup icon given under the Layers panel.
Next, I will select the design and then choose the Draw option appearing under the Linetype layer.
Further, I can also change the color of the design by choosing the color from the color tab.
Afterward, I am going to select the fold line and change it to the Score line from the Linetype box.
Now, I will choose the whole card and then press the Attach option visible at the bottom of the screen.
Next, I will head upto the Make It option to take a step towards the next step.
Step 2: Insert Cricut Mat & Cut Material
On the new project page, I am going to hit the Continue button and then load my material into the machine.
After doing this, I will place my cardstock into a StandardGrip cutting mat using a scraper tool.
Next, I am going to insert the mat into the machine and then add the scoring wheel and fine point pen into both Clamps.
After the cutting and drawing process comes to an end, I am going to unload the mat and shape my card.
Step 3: Design Your Merry Christmas Card
In this last step of how to make Christmas cards with Cricut, I will gently fold the card from the score line area.
Now, I will use my scraper tool and press the fold area for the crisp fold line area.
Next, I can also add the message inside the card or slip the card inside the envelope.
Are you on board for designing handmade Christmas cards this year? If you’ve made up your mind, then I wish you luck and pay special attention while forming it with this crafting machine.
Frequently Asked Questions
Can I Make Business by Selling My Custom-Made Christmas Cards?
It doesn’t matter whether you are a beginner or a professional crafter; you can surely start your business by selling customized Christmas cards. However, to make your identity in the business, you need to know about your customer’s needs and how to access the craft machine. Besides, you should also buy the tools that will help you in forming the craft as per your choice.
Is It Necessary to Use Design Space While Making Cards?
Yes, all DIYers need to get Design Space on their respective devices. It is a digital app that works together with the cutting machine and helps the crafters draw designs by using images, fonts, and ready-to-use projects. Without the app, the user won’t be able to turn their DIY idea into reality. Apart from that, Design Space keeps adding new features, allowing you to improve your crafting skills.
How Can I Make My Christmas Cards With My Cricut Machine?
Get to know about how you can make Xmas cards with your craft machine:
First, you need to open the Cricut app and log in with your Cricut ID & password.
Second, start creating your design by using the tools given under the Menu bar.
After making the design, make the relevant changes and press the Make It option.
Next, insert your material and start your craft machine by pressing the Go button.
After the process is complete, unload your card and properly fold it.
Finally, gift it to your friends or family members as a Christmas gift.
For more information visit: Cricut.com setup mac
cricut new product setup
Cricut Design Space Software
www.cricut.com/setup login
cricut explore air 2 setup
Source: How to Make Christmas Cards With Cricut Maker
#how to make christmas cards with cricut#Cricut Maker Setup#Cricut Machine Setup#cricut design space download#cricut machine set up#Cricut Design Space Software#how to setup cricut maker 3#cricut maker 3 setup#Cricut Design Space software
0 notes
Text
8 Best Cricut Kits for Your Crafting Needs: Ultimate Guide
Getting a proper Cricut kit somewhere helps the crafter come out of their comfort zone. A cut-die machine can create any project, whether greeting or home decor items. However, each item available inside the kit has its duty to give the finest form to the craft.
It is a small deal whether you are a fresher or experienced DIYer; what's important is your knowledge of the importance of the kit during the crafting process. If you need clarification about which pack of tools will be best for you, go on by studying the post divided into various paragraphs.
1. Cricut Kit: Paper
Learn to do all kinds of paper crafts with this Cricut paper kit. Get step-by-step lessons on the Cricut Design Space app. Inside this kit, all the essential tools and materials are provided to users before crafting. You can revise lessons, make mistakes and enjoy the fun while creating a project with all the materials.

2. Cricut Learning Kit: Iron-On
However, learn how to create different kinds of crafts using the Iron-on Cricut kit. Composed within a wide zone of materials, it helps sharpen your skills. Apart from that, all the step–by–steps instructions are available on the Cricut app. The kit allows the buyers to make errors, repeat the lessons and enjoy while creating the project.

3. Sewing Kit Set
Further, with the Sewing Tools Cricut kit set, you can get professional sewing and quilting projects by getting crisp, clean cuts through different materials. This 7-piece sewing tool set includes every item necessary for sewing and quilting projects. With the Thread Snips, one can pick off the threads and swiftly stop the small stitches with Seam Ripper.

4. Cricut Tools Craft Kit
On the contrary, this Cricut kit contains different items that will play an important role during the process. Further, it can be expected from all the users to use all the items available inside the kit equally and properly while creating a DIY project. Apart from that, the user needs to install the Cricut software to create the project on it.

5. Cricut Truecontrol Knife Kit, Mint
With the Truecontrol Knife kit, users can experience unforgettable precise and accurate cutting on various materials. Due to its free-blade changing system, one needs to get the chance to replace the blade manually. A huge round of applause for the anti-roll design ensures that the knife stays in its place when not in use.

6. Cricut Foil, Transfer Kit
Equally important, this 3-in-1 tool Cricut kit is preferred for adding eye-catchy foil effects on different ranges of ongoing projects. One of the special features of this foil is that the foil easily gets embellished. Apart from that, it also gives long-lasting results and polished results to the users.

7. Cricut Basic Weeding Tool Kit
Learning about the basic Weeding Tool Set is much more fun than other electric cutting machine kits. This weeding tool kit contains five different tools specially designed to craft projects with speed, precision & accuracy. The tips of each tool help the user comfortably complete the project without damaging it.

8. Cricut Pens & Variety Pack Mats Kit
Lastly, this basic Cricut kit assists the DIYer in giving beautiful results by creating greeting cards, banners, and many more for various occasions. The pens are water-proof, acid-free, and permanent once dried. Additionally, the pack of Adhesive cutting mats 12 x12in-3/Pkg contain LightGrip, Standard & Strong Grip Mat. Other than that, all these materials must be used by an adult.

Summing up this blog post, the user should choose the correct Cricut kit before commencing the cutting process. Moreover, they must also know how to utilize the provided supplies to receive the desired result.
Frequently Asked Questions
Question: Is It a Good Decision to Buy Cricut Supplies?
Answer: To get the standard project, purchasing Cricut supplies will be a good decision. The best quality of items will help the user give proper form to the project by sticking the material and design on the loaded mat. Apart from that, the material cutting will also get completed within a few minutes.
Question: What Are the Common Equipment that Comes Inside the Cricut Box?
Answer: While unboxing any module of the cutting machine, there will be some types of equipment that come inside every box, which include:
● Cricut machine.
● Blades+ Housings.
● Quick Start Guide.
● Welcome Book.
● USB cable.
● Power adapter/Power cord.
● Materials for a test cut.
● Bonus materials.
Question: Do I’ve to Purchase Cricut Kit Separately for DIY Projects?
Answer: Some of the Cricut supplies and the electric cutting machine will be provided to the users. Apart from that, the Cricut Access subscribers will get some sort of discount while buying from the Cricut official portal. Moreover, some of the separate supplies are available on different shopping portals.
#Cricut Kit#Cricut#cricut explore air 2#cricut download#cricut setup#cricut software#cricut design space#cricut crafts#cricut maker setup#trending#cricut projects#cricut.com/setup#design cricut.com download#cricut design space login#cricut machine set up
0 notes
Text
How to Engrave Acrylic With Cricut Maker: Easy Guide
How to engrave acrylic with Cricut Maker is the most frequently asked question I get in the comment section of my blog. Finally, I have time to answer it briefly in my write-up today.
But what is the easiest way to learn the engraving process? Many of you might be trying engraving for the first time. And for beginners, everything should be explained in detail in this tutorial to avoid any confusion. However, you don’t have to worry about it; I will make it simple for you all as I have a project idea that I created a month ago. Throughout the blog, I will unfold my entire journey of engraving a circular piece of acrylic.
Thus, I will first give you step-by-step instructions for making or choosing a design. Then, I will explain how to set up the materials and make the essential settings before cutting. Finally, you will learn to engrave the acrylic. Are you excited to learn about engraving acrylic with Cricut Maker? Let’s get into it to learn!
What Materials Will You Need for Making a Cricut Project?
As always, I am again telling you that having the right tool or machine with materials is a must for creating an exciting project. So, let’s first gather the supplies, and then we will move on to learning how to engrave acrylic with Cricut Maker.
Here are the supplies you will need to gather:
StrongGrip mat
Masking tape
Engraving tip
Cricut Maker
Acrylic blank (I am using a 4-inch circle blank with 3.176-inch thickness)
Knife blade
Brayer
Now, let’s shift our focus to the steps to learning about engraving acrylic with Cricut Maker.
How to Engrave Acrylic With Cricut Maker to Create a Keychain?
A month ago, I made a keychain. I used a 4-inch circular acrylic blank, which I engraved using my Cricut Maker. When it was finally done, I couldn’t believe my eyes as it looked really enticing. Yes, the intricate designs that were engraved on the blank can make your jaw drop. Those fine cuts were amazing when cut on a robust machine like Cricut Maker.
Don’t worry. You can also learn to engrave acrylic with Cricut in a few minutes. So, let me take you to the steps that thoroughly explain everything:
Step 1: Create or Choose a Design on Design Space
When picking a design to engrave, I specifically looked for intricate, fine-line designs without solid areas. However, these fine lines should also not be so close. Otherwise, it will look blurry after engraving.


Step 2: Prepare Your Acrylic

Make sure you have pre-cut your acrylic blank. You can easily get them from various online e-commerce or craft stores. Since they are available in different shapes and sizes, you can buy them as per your needs.


Step 3: Load the Mat and Start Engraving


Now, you might have understood how to engrave acrylic with Cricut Maker. Now, you can easily engrave any material you want.
FAQs
Question 1: How can I engrave acrylic plastic?
Answer: To engrave the glass, follow the following points:
Choose the design and upload it to the canvas.
Choose Engrave in the operation menu.
Then, hit the Make It button.
Now, load the engraving tip into Cricut.
After that, insert the cutting mat.
Press the arrow button to load and hit the C button to start the cutting.
Once the engraving is finished, you must unload the mat and remove the blank.
Question 2: Can I cut the acrylic with Cricut?
Answer: You can easily cut the acrylic with your Cricut-cutting machine if it is the right type. The Cricut machine is capable of cutting materials up to 2.4 mm. Also, when you are using the Cricut Maker, it works faster than another machine, providing top-notch quality. So, yes, you can cut the acrylic with a Cricut without any problem.
Question 3: What thickness should my acrylic be to cut it on Cricut?
Answer: An acrylic sheet that measures .007 mm deep and .020 mm deep is the most widely used with Cricut. This is the thickness compatible with cutting acrylic on your Cricut cutting machine. Also, you can use the knife blade on your Cricut Maker to cut the sheets intricately.
Final Words
Overall, you might have a basic idea about how to engrave acrylic with Cricut Maker. As I have explained all the points thoroughly in this blog, I am confident you can engrave using this guide. Whether you want to make a key chain or something for decorations, this tutorial will surely help you there. So what are you waiting for? Learn the instructions and get your design ready in a couple of minutes.
Read more: cricut.com/setup
cricut.com/setup mac
Cricut design space
install cricut design space app
how to setup cricut explore
Source: how to engrave acrylic with Cricut Maker
#how to engrave acrylic with Cricut Maker#how to setup cricut explore#Cricut design space#cricut design space login#cricut design space download#cricut.com/setup#cricut design space setup#cricut design space for mac#cricut design space app#cricut software app#cricut new machine setup#cricutdesignspace#Engraving Acrylic With Cricut Maker
0 notes
Text
“How to Connect Cricut Create to Computer Easy Setup Guide”
To set up your Cricut machine on a Mac, start by visiting cricut.com setup mac and downloading Cricut Design Space for Mac. After downloading, open the installer and follow the prompts to complete the installation. Launch Cricut Design Space, then sign in or create a new account. Connect your Cricut machine to your Mac using a USB cable or Bluetooth, and follow the instructions to pair it. Ensure your machine’s firmware is updated through Cricut Design Space. With these steps, you’ve completed the cricut.com setup mac process and are ready to start crafting.
cricut.com setup mac
www.cricut.com/setup login
install cricut design space app
cricut.com/setup
cricut create connect to computer
setting up your cricut maker
cricut setup on computer
cricut setup download
cricut setup log in
cricut install setup
cricut setup new device
cricut setup website
connecting cricut maker to computer
Cricut Design Space setup
cricut new product setup
cricut maker software
Cricut Design Space setup
cricut setup for pc
cricut design space login
cricut maker new machine setup
how to setup cricut maker
how to setup cricut explore
cricut maker new machine setup
cricut maker machine set up
cricut download laptop install
cricut setup maker
install cricut printer
cricut new product setup
cricut design space for windows
cricut device setup
setup cricut maker machine
#cricut.com/setup#cricut#cricut setup#install cricut design space app#cricut create connect to computer
0 notes
Text
How to Setup Cricut Joy: A Stepwise Guide for Beginners
Cricut Joy is a very cute and handy cutting machine. It is the latest tool in the Cricut family and is great for small projects. If you want to use this little machine, you need to learn how to set up Cricut Joy. Here in the blog, I will explain the procedure for setting up the Cricut machine.
To set up the Cricut Joy, you have to connect Cricut to your device. The device is Bluetooth-enabled, so you can connect it to your computer or phone wirelessly. However, you can also use a USB cable to connect. To finish the setup, you should download the Cricut Design Space app on your device. So, let’s start with the unpacking machine.
Unboxing the Cricut Joy Machine
Before you learn how to set up Cricut Joy, it is very important to know what comes in the box. Unbox your Cricut cutting machine and check for the following materials:
This will help you ensure that you have everything you need to get started with the Cricut setup process.
How to Set up Cricut Joy: 6 Basic Instructions
Once you unbox the Cricut cutting machine, you should prepare it for the setup procedure. Begin by connecting the machine to your operating system and downloading the Cricut Design Space app. Here is the complete process for the machine setup:
Finally, you have successfully set up the Cricut cutting machine. Now, it is time to continue with the connection process. Let’s jump into the next steps.
Connecting Cricut Joy to Your Computer
Once you have learned how to set up Cricut Joy, you should proceed with the connection. Here is how you can connect the machine and your desktop computer with Bluetooth:
That’s it. You have finally connected your Cricut to your computer with the help of Bluetooth. Now, move on to the downloading process.
How to Download Cricut Design Space?
Now that you have set up the Cricut cutting machine and connected it to your computer, it is time to download and install the Cricut software. Perform these easy steps to download the app:
Conclusion
If you have read the blog till the end, then you now know how to set up Cricut Joy. This small but smart machine is the latest in the Cricut family. To use the Cricut machine, prepare it for setup and connect it to your computer or mobile. Download the Cricut Design Space app on your device to start any Cricut project. Once you log in with your account, your Cricut machine setup is complete.
FAQs
Do I Need a Computer for My Cricut Joy?
No, it doesn’t! Your Cricut Joy or any other machine does not require a specific type of device to work on DIY projects. You can use an Android or iPhone to download the Cricut Design Space app or work on any Cricut project. However, if you have a computer, you can also use it with Cricut machines.
Does Cricut Joy Have Its Own App?
Yes, it does! Cricut Joy has its own app that you can download to your device and start making your projects. You can sign into the app with your Cricut account. Or you can also use the Cricut Design app for your Cricut cutting machine. Cricut has actually discontinued the separate Cricut Joy app, so you will need to use older versions if you prefer it.
Can I Use Cricut Joy for Free?
Yes, you can! The Cricut Joy machine requires Cricut software to start making projects. Cricut offers two software options. Cricut Design Space is free software available for download on your device that offers over 50,000 free designs to choose from for your projects on the machine. Alternatively, you can subscribe to the premium Cricut Access for enhanced Cricut services.
Visit: www.cricut.com/setup login
Source: https://cricricutdesigncut.wordpress.com/2024/08/07/how-to-setup-cricut-joy-a-stepwise-guide-for-beginners/
#design space setup#digital design#cricut.com setup windows#cricut.com/setup#cricut.com/create#cricut.com sign in#cricut.com/register#cricut.com design space#cricut.com setup download#cricut.com/setup windows#cricut.com setup#cricut setup#cricut design space login#cricut design space software#cricut design space app#design space cricut#cricut maker#cricut crafts#cricut design space#cricut new machine setup#cricut explore air 2#cricutprojects#cutfilesforcricut#cricut venture#cricut#www.cricut.com/setup login#cricut setup explore air 2 setup#cricut setup for pc
0 notes
Text
How to Setup Cricut Maker 3: A Complete Guide for Beginners
Have you purchased a Cricut Maker 3 and want to learn how to setup Cricut Maker 3? In this case, you have reached the right place. Here, you will learn about the basic procedure for your machine setup. To start using the machine, you should follow the steps below and set your machine up accordingly.
This machine has advanced features since it is the latest tool in the Cricut family. It can cut more than 300+ materials, including smart materials that do not need a mat. In this blog, I will discuss how to connect your machine to a computer and then download the Design Space software. So, let’s get started.
Preparing Your Cricut Machine for Setup
To begin learning how to setup Cricut Maker 3, you should start by preparing the machine. Before you go on to the setup process, you need to do the following things.
First, unpack the machine and remove all the items inside the box.
Next, you should check them all and ensure that all the materials are there and nothing is missing.
Then, you have to place the machine in a safe place on a flat surface.
Now, the machine is ready to setup. You can start the process by following these steps.
The first thing you need to do is plug the machine into a socket using the power adapter.
After that, press the power button on the machine and hold it for a while. When the machine is on, it will be ready to connect.
Now, connect the machine to your computer using Bluetooth. Although you can connect them using USB as well.
Also, download the Design Space software on your computer and sign in.
If you are a new user, you may have to create a new account.
How to Connect Cricut Maker 3 to Computer via Bluetooth?
When you want to learn how to setup Cricut Maker 3, one of the most important things you need to do is connect the machine to your computer, either a Windows or Mac. Here, you will see the connection process for a Mac computer.
To initiate the connection, plug the machine’s power adapter into the wall socket and press the power button of the machine.
Next, the distance between the machine and your system does not have to exceed 10-15 feet so that your computer can easily detect the machine.
Then, go to the Apple menu, System Preferences, and Bluetooth.
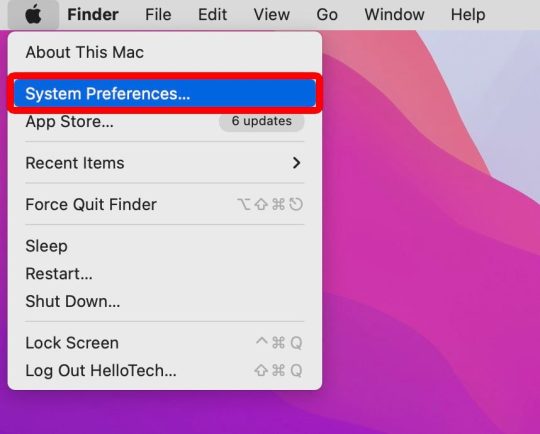
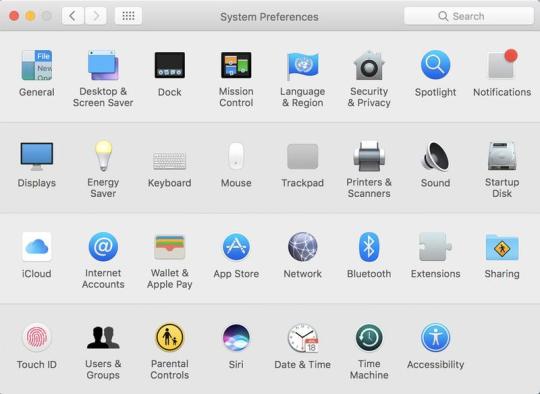
After that, turn on Bluetooth and start searching for your machine’s name.
Now, you will find the machine on your screen; you have to select it and wait.
The machine will be paired to your computer in no time.
In the end, you should go to the app and check New Product Setup. The machine will appear to be connected.
How to Download Cricut Design Space on Computer?
The final step in learning how to setup Cricut Maker 3 is downloading the app. The app is a must for your machine as it operates on your computer. It is also important to start creating projects. To download this software on your Mac, follow the steps below:
To begin, open your Mac computer and go to cricut.com/setup.
Then, you should look for the Design Space app and click Download. Before downloading the file, you will have to agree to Cricut’s Terms and Conditions.
Next, the file will be saved in the Downloads folder, although you can choose a folder where you would like to download it.
After that, you have to go to the folder and double-click on the file.
Now, a new window will pop up on the computer screen. The window has two icons: the Cricut icon and the Applications icon. You have to drag the app icon into the Applications icon.
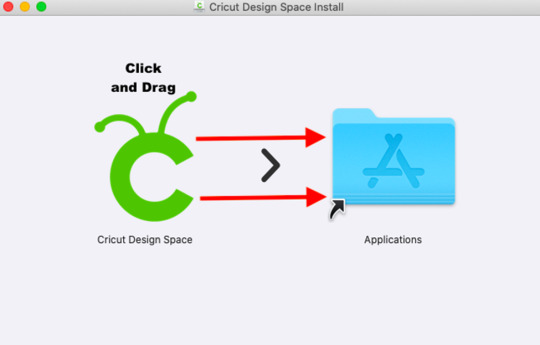
Also, you need to open the Applications folder and click on the software to launch it.
Click on Open,and the Design Space will be installed on your computer.
Log into your account, and the app will be ready to use.
Finally, you learn the full process of how-to setup Cricut Maker 3. Now, you can easily setup your machine and work on your projects.
0 notes
Text
How to Set up Cricut Maker: A Step-by-Step Guide
Setting up the machine requires you to do a few steps, like preparing the machine, downloading Design Space, and connecting the machine to your device. Once you have completed these things, your setup process will be complete. So, follow along with the blog and get your machine ready to use!
Unboxing and Preparing Cricut Cutting Machine
In the process of learning how to set up Cricut Maker, you have to start with unboxing the new machine. After unboxing and checking for all the items, you will need to prepare your machine for the setup.
To begin with the process, unbox the machine, remove the safety tapes, and check the materials inside. You will need the items shown in the picture below to set up and use the machine. You will get some of the things along with the machine, and the others must be purchased by yourself.
The tools that you will get inside the box are:
USB cable
Power adapter
Fine-point blade
LightGrip mat
FabricGrip mat
Rotary blade
Welcome Book,
Start guide
Some materials for the test cut and other tools.
The tools that you will have to purchase from the outside are:
Scissors
Tweezers
Weeder
Scraper
Spatula
Trimmer
Scoring stylus
Download Cricut Design Space on a Computer
In the process of learning , downloading Design Space is essential. It is the necessary app for using your machine to start crafting. You can download it on any device you are using with Cricut. Here, you will learn how to do it on a Windows computer.
On an internet browser, open cricut.com/setup and navigate through the Design Space app.
Next, agree to the terms & conditions and then click on Download. The app will start to download on your computer.
Then, the app will be downloaded very soon.
Now, visit the Downloads folder and look for the downloaded file.
When you find the file, click on it twice and start to install.
After the app is installed on your computer, create an account and log in.
Connect Cricut Maker to Your PC Using Bluetooth
In the process of learning how to set up Cricut Maker, you finally have to connect your machine to a device. Although you can use both USB and Bluetooth to connect your machine to your computer, you will see the Bluetooth connection below.
Turn on your machine and make sure the distance does not exceed the limit of 10–15 ft from your computer.
After that, open Settings from the Start menu and go to Bluetooth settings.
Then, enable Bluetooth and then click on Add Bluetooth or other device.
Next, select Bluetooth and let the computer detect the machine.
Click on the machine upon seeing it, and it will be connected.
To ensure the connection, check it on the Design Space app.
Conclusion
After reading the blog, you learned how to set up Cricut Maker on your Windows computer. With its versatility, it is a great machine for making projects, and the knowledge of how to set it up is important. Now, you know that you need to unbox the machine and prepare it for the setup. Downloading the Design Space app and connecting your operating system to Cricut are the final steps for the setup procedure.
FAQs
Does Cricut Maker Work with a Phone?
Yes, it does! If you want to use this machine and you just have a phone instead of a computer, that’s fine! You can use your cutting machine on a mobile, so you just have to connect it to the machine either via Bluetooth or a USB cable. Once your device is connected to the machine, you have to download the Design Space software, and then you will easily be able to use the machine with your smartphone.
What Materials Can I Cut With Cricut Maker?
You can use more than 300 materials on this cutting machine. The Cricut Maker is a powerful machine, so you can cut various materials like leather, wood, plastic, and metal. With this machine, you can also cut materials like paper, foil, and cards. Other materials include cardstock, art board, foam, felt, and fabric.
What Tools Do I Need to Work With Cricut Maker?
The Cricut Maker, like other machines, works with multiple tools. You will get some of these things along with the machine when you purchase it. But you will have to buy other tools separately to use the machine. The tools you will get inside the machine are an adapter, a USB cable, a fine-point blade, and some test materials. The other materials you will have to buy from outside are scissors, a weeder, a scraper, a machine mat, and a spatula.
Source: how to set up Cricut Maker
Visit here to Know More: Cricut.com/setup
Pinterest
0 notes
Last Seen Blogs

angst99
Angst99

goldenspeaker
Oh No

cindy-roston
Love for pretty things

angie-minja
~Angie~

dropproject
Depresso