#compact flash card case
Explore tagged Tumblr posts
Text
Johnny Martyr's Camera Bag Essentials
By Johnny Martyr We tend to take them for granted but camera bags and what we put in them, besides our actual cameras, can make or break a shoot. Regardless of if you’re a hobbyist or a professional photographer, film or digital, or both, you never know when some small item might just save your ass! Below I want to share some specific product recommendations that have gotten me through…

View On WordPress
#1/3n battery#120 film case#357 battery#35mm film case#a76 battery#air tag holder#Amazon#apple air tag#belkin air tag holder#brass luggage tag#camera air tag#camera bag essentials#camera bag recommendations#compact flash card case#domke f-1x#film cases#film storage#Fuji film case#international travel#jch film case#johnny martyr camera bag#kodak film case#media storage#memory card storage#ONA#ONA Prince Street#pelican memory card case#pelican sd card case#professional camera bag
0 notes
Text
DIY: Marauder with Screen and GPS For Flipper Zero
Many of you would have seen the humongous ESP32 add-on module with touch screen and GPS for Flipper Zero shared in discussion groups, forums, etc. Well, this tutorial will provide you with all the information you need to build one yourself.
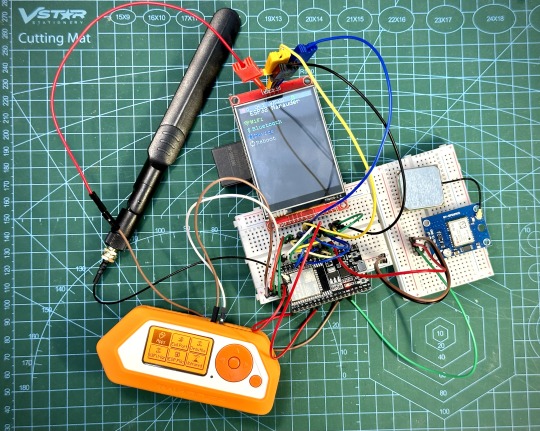
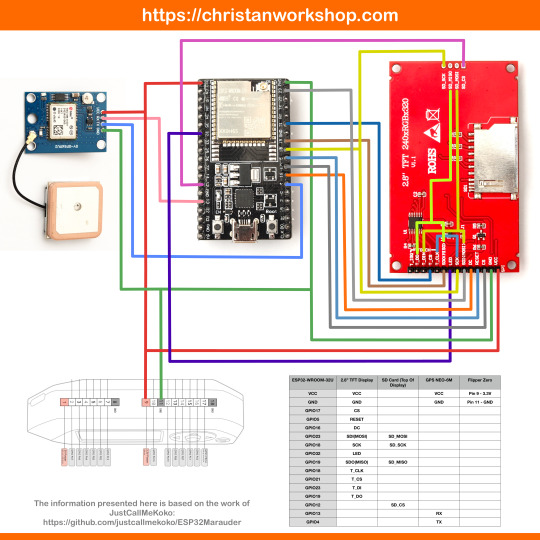
This build consists of mainly 4 parts. The TFT LCD 2.8" 240x320 SPI ILI9341 Touch Display cost me around US$5.50, the ESP32-WROOM-32U module cost around US$3, the NEO-6M GPS module cost around US$2.20 and an 8dbi 2.4GHz Wifi Antenna which cost around US$2. All of these parts can be easily found in online marketplaces like Aliexpress, Amazon, etc. Here is how you need to wire them up together. How you wish to lay this out or mount on a prototyping board is entirely up to you. As long as the connections are correct, you are good to go. The GPS module is optional, and mainly, it's used for the war driving functionality.
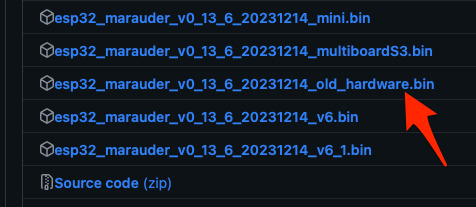
Next, you need to download all the firmware needed from here. Please download the Bootloader, Partitions, Boot App and Firmware files for v4 (Yes, v4 files, not any others) and save it on your computer.
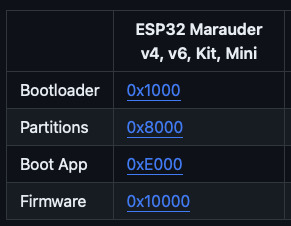
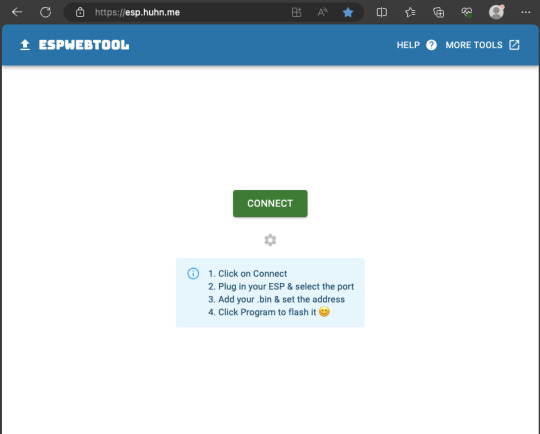
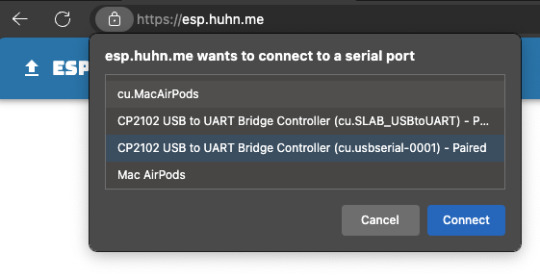
Now, press and hold the BOOT button on your ESP32-WROOM-32U module and connect it to your computer using a data-capable USB cable (some USB cables can only charge), then let go the BOOT button. Open Google Chrome or Microsoft Edge browser and go to ESPWebTool. Click the CONNECT button, then select the ESP32 usb serial connection. It should look something like below but can vary a little between different computers and operating systems.
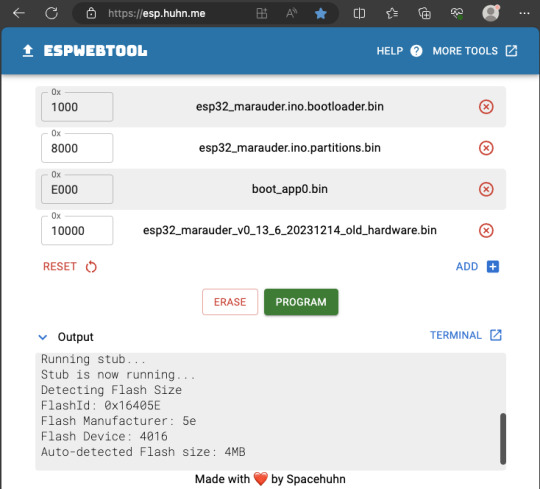
Select the firmware files for each slot exactly like below (take note of the 0x1000, 0x8000, etc. and their corresponding .bin files), then hit the PROGRAM button.
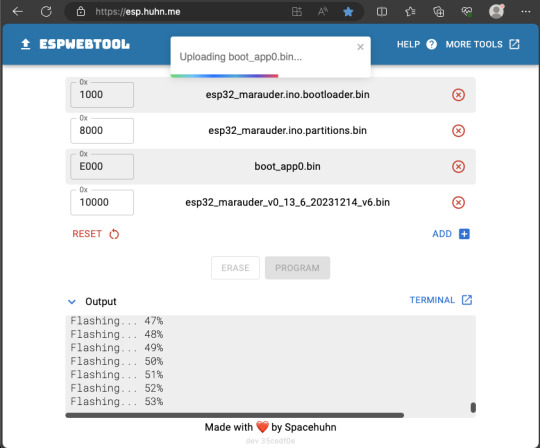
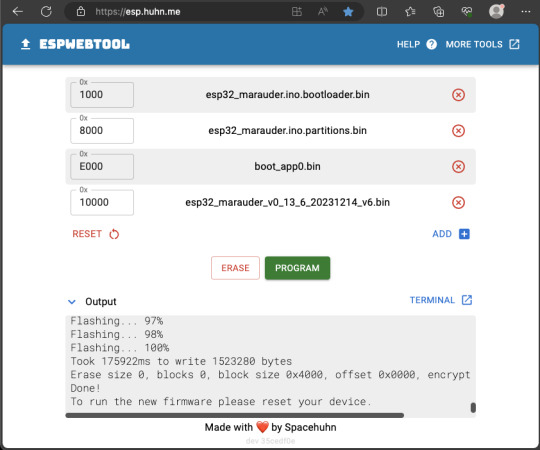
When completed successfully, you can unplug the USB cable from the ESP32 module and now you can connect your Marauder module to your Flipper Zero. Please ensure that your Flipper Zero is turned off before you connect it, and also turn off your Flipper Zero before disconnecting it. The 3.3V pin is also used by your Flipper Zero's SD card reader and connecting/disconnecting external modules that use this pin while the Flipper Zero is on can potentially corrupt the SD card. So, if everything went according to plan, your Marauder module should boot up and everything should look like below.
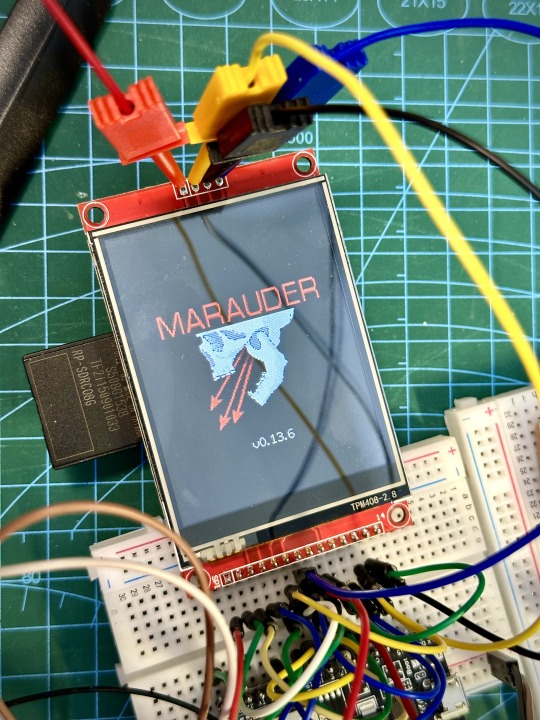
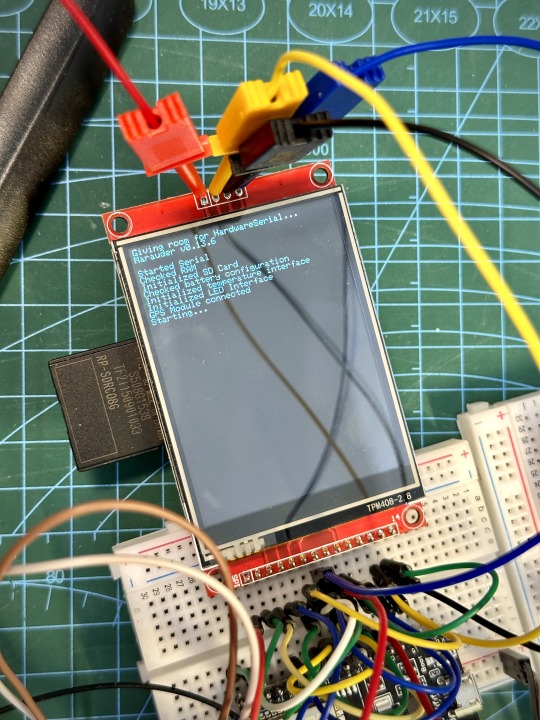
NOTE: If your Marauder boots up, but when you try to touch the screen and get no response, try tapping around the bottom part of your screen and see if the touch panel seems to be in inverted position from the actual display. Should this happen to you, just flash your ESP32 module again following the steps above, but use the v6 firmware. This should resolve the issue.
In this build, I just prototyped this on breadboard, but you can of course make it permanent by soldering it on to a prototype board and 3D print a case for it. This setup is essentially just using the Flipper Zero as a battery pack, instead of using the Flipper Zero to control Marauder. The large screen does make some things easier to do, compared to the small screen of the Flipper Zero, and there may be some functionality (not much) that is not currently in the Flipper Zero Marauder companion app. Here is a video showing the different menus in Marauder.
Personally, I don't think I will actually want to bring something so big around with me, along with my Flipper Zero. I think what makes Flipper Zero special is just how compact it is and all the different functionality cramped into it. This would probably be better off as a standalone unit by just hooking up a battery, but that's just me. Well, that's it for this tutorial. I hope you found this helpful. If you haven’t already done so, check out my Makers & Hackers Exchange Facebook group to learn more from other Flipper Zero users.
Here's a good intro to Marauder if you are unfamiliar.
youtube
15 notes
·
View notes
Text
Project Link Up Transformation Sequences (Part 1):
Because my Poll from yesterday did really well, Have Some Transformation Sequences for Project Link Up! (They’re mostly of the main protagonists.)
Shonen Jump Power Linkage (Aaron Shelby):
Inspired By: Cure Sky’s Transformation (Hirogaru Sky PreCure)
Aaron: Power Linkage… Activation!
(Aaron scans his Linkage Card into his Watch, and the transformation begins)
Goku: Aaron, let’s do this!
Aaron: You said it!
Aaron: Heroic Hop! (His dark teal undershirt pops on, and so do his shoes and belt)
Goku: Extreme Step! (The orange part of Aaron’s Gi appears)
Both: Sparking Jump! (Aaron’s wristbands pop on, and his hair gets golden tips)
Goku: The linker of the Super Saiyan…
Aaron: …I’m Aaron Shelby!
Super Smash Bros. Power Linkage (Celestia Haruno):
Celestia: Power Linkage… Activation!
(Celestia scans her Linkage Card into her Watch, and the transformation begins)
Kirby: Poyo, Poyo Poi! (Let’s do this, Celestia!)
Celestia: That’s what I’m talking about, Kirby!
(Celestia begins creating her outfit to replace her old one. Her t shirt changes into a pink t shirt with a yellow star; with her overalls becoming fluffy pink casual shorts. She then gets red high top sneakers with stars on them. She also gains socks- one long pink one with stars and one short white. Her hair comes last; with it being dip dyed pink and bunched into pigtails- with the hair ties becoming shooting stars.)
Kirby: Poyo Poyo Poyo Poi… (The Linker of the Hero of Dreamland…)
Celestia: …I’m Celestia Haruno!
Genshin Impact Elemental Linkage (Terry and Tara Wilkins):
Terry and Tara: Elemental Linkage, Go! (They insert the Linkage Charms into their Elemental Amulets)
Aether and Lumine: Let the elements of Tevyat flow through you two!
(Terry and Tara do as their partners say and allow their clothes to melt away and their hair to change their style. The siblings’ brown hair gets blonde tips and their outfits begin to take shape- Terry gets Aether’s shirt and pants, while Tara gets Lumine’s dress and Lily hair accessories. Finally, after their shoes come into being, they allow themselves to take up their swords and finish the transformation.)
Aether: The linker of the male traveler…
Terry: I’m Terry Wilkins!
Lumine: The linker of the female Traveller…
Tara: I’m Tara Wilkins!
Both: The Elemental Linkage… is here to save the day!
Cookie Run Sugar Linkage (Cedric Grimsley):
Inspired by: Cure Whip’s Transformation (KiraKira PreCure Ala Mode)
Cedric: Sugar Linkage… Decoration! Gingerbread!
(He places his Linkage Treat in his Tasty Compact)
Cedric; With Bravery…
Gingerbrave: …and Sweetness…
Both: …It’s time to mix it up!
(Cedric lets his normal clothing disintegrate as he does a backflip onto the cookie, allowing his auburn hair to get white streaks. He also allows his new sneakers to become Gingerbrave themed, and draws out his outfit- a gingerbread colored t shirt with skull candy buttons and shorts. He then puts his Tasty Compact into its carrying case, then takes his Candy Cane in hand.)
Gingerbrave: The linker of Crispy Bravery…
Cedric: …I’m Cedric Grimsley!
Overwatch Power Linkage (Hannah Smith):
Hannah: Power Linkage, Activation! (Scans the Linkage Card into the Overwatch Connector and the Transformation Begins)
Tracer: Let’s get started, Hannah!
Hannah: You bet, Tracer!
(Hannah does something akin to a street dance, allowing her current outfit to disintegrate. Tracer helps launch her into the air, and Hannah gets an outfit similar to that of her partner’s. As flashes of blue light fill the air, her hair also styles itself up and she gets a visor like Tracer’s. Finally, as she gains her partner’s signature pistols, she lands on the ground feet first, but not before she puts the Connector into its carrying case.)
Tracer: The Linker of a heroic time jumper…
Hannah: …I’m Hannah Smith!
Brawl Stars Battle Linkage (Devon Starling):
Devon: Battle Linkage, Engage! (Inserts the Brawl Gem into the Battle Compact)
Colt: Ready for action, Devon?
Devon: Heck yeah, Colt!
(Devon allows his normal clothes to fade away into light. As he uses the Battle Compact, he allows his new clothing to form- a pale blue shirt and jeans + belt, purple cowboy boots, a denim vest, and then his hair gains a pinkish-red dip dye exactly like his partner. He then turns two orbs of light into his revolvers, and places the Battle Compact into its carrying case)
Colt: The Linker of an unlikely Brawler…
Devon: …I’m Devon Starling!
Sanrio Dream Linkage (Hanami Tanaka):
Hanami: Dream Linkage, Awaken! (Inserts the Dream Crystal into the Dream SmartPhone)
Hello Kitty: Let’s do this, Hanami!
Hanami: You said it, Kitty!
(Hanami allows her clothing to fade away and for her hair to come undone. Once she does that, she allows her long black hair to bunch itself up in girly pigtails and to gain a gorgeous red Hairbow, which also turns the lower half of her hair white. Then, she creates a striped t shirt and cute overalls-with apple and bumblebee patches. She then creates her sneakers- white with red bows. After this, she places the Dream Smartphone in its carrying case.)
Hello Kitty: The linker of sweetness and bows…
Hanami: …I’m Hanami Tanaka!
Transformers LinkSpark (Mateo Driver):
Mateo: LinkSpark, Roll Out! (Inserts the Energon Gear into the Auto-Gauntlet)
Optimus: Mateo, it’s time.
Mateo: Here we go, Optimus!
(Mateo allows his normal clothes to turn into light. With his Auto-Gauntlet he begins to create his armor that looks exactly like Optimus Prime. As he lets his armor come into being, he also makes sure to get his shoes- Warrior ready boots. He also adorns himself with a visor and face mask so as to protect him from any dust in battle. The finishing touch is the headpiece, and with that marks the end of his changes.)
Optimus: The linker of the Autobot leader…
Mateo: …I’m Mateo Driver!
More will be coming in Part 2, so look out for that!
#project link up#Plu#livi’s rambles#Shonen jump Power linkage#SJPL#super smash bros Power linkage#SSBPL#Genshin impact elemental linkage#GIEL#cookie run sugar linkage#CRSL#brawl stars battle linkage#BSBL#Overwatch Power linkage#OWPL#Sanrio dream linkage#SDL#transformers LinkSpark#TLS
23 notes
·
View notes
Text
Price: [price_with_discount] (as of [price_update_date] - Details) [ad_1] Product Description Compatible size Compact (4.3"L x 2.5"W x 1.3"H) and functional hard case keeps items safe and extremely portable. Uses Good for iPod Shuffle, Charging Cable, Earphones, Memory Cards, USB Flash Drive ,lens filter, Keys and Coins Premium Quality Made of Supreme Quality, Durable EVA Crush Resistant, Anti-Shock, Weather Resistant Material Portable Lightweight and good size for handhold Case is sturdy which are good for organizing headphones and keeping earphone, earbuds, USB cable and other accessories safe Works for any small things , perfect mini storage case can be put anywhere to keep them safe while traveling or get them tidy in home. NEFABLE Brings to you the highly acclaimed Premium Earphone Carrying Case , Multipurpose Pocket Storage Travel Organizer Case, Really POWERFUL EARPHONES PROTECTOR. Internal mesh can protect your earphone from rocking damage. Bowl shape design Both functional and stylish, the bag is impact resistant to protect your earphone from damages with a mesh bag for some small accessories easy. Lightweight and good size for handhold Case is sturdy which are good for organizing headphones and keeping earphone, earbuds, USB cable and other accessories safe Made of Supreme Quality, Durable EVA Crush Resistant, Anti-Shock, Weather Resistant Material Good for iPod Shuffle, Charging Cable, Earphones, Memory Cards, USB Flash Drive ,lens filter, Keys and Coins Mesh Style with Zipper Enclosure, Inner Pocket secures item from movement, soft cloth lined interior to safeguard your earphones and Durable Exterior Compact (4.3"L x 2.5"W x 1.3"H) and functional hard case keeps items safe and extremely portable. [ad_2]
0 notes
Text
Buy TWS Earbuds Online: Top Picks for the Affordable Price
True Wireless Stereo (TWS) earbuds have taken audio global through a typhoon, combining comfort, compactness, and pleasant sound in a swish package deal. TWS earbuds are available at several charges, however you don’t need to interrupt the bank to find exquisite alternatives. Here’s a guide to locating the super rate TWS earbuds to be had online, whole with pinnacle alternatives for each finances and vital features to notthrough forget. Buy TWS Earbuds Online

Why TWS Earbuds?
TWS earbuds, in contrast to conventional Bluetooth headphones, don’t have any wires in the least bit — no longer even a wire connecting the 2 earpieces. This permits for max consolation and portability, making them a top desire for sporting events, commuting, or genuinely enjoying tune at the bypass. Affordable TWS earbuds now offer functions like lively noise cancellation (ANC), touch controls, or even voice assistant integration, which have been as soon as handy to be had in pinnacle fee fashions.
How to Find Affordable TWS Earbuds Online
Finding the best deals on TWS earbuds requires a bit of research and patience. Here are some tips to make your search easier:
Shop During Sales: Keep an eye on festive sales, clearance events, and flash deals on major e-commerce platforms. These often offer deep discounts on popular models.
Compare Prices: Use price comparison tools or apps to find the best deals across websites.
Check Reviews: Customer reviews and expert ratings can give you insights into the earbuds’ sound quality, durability, and overall performance.
Leverage Offers: Use credit card discounts, cashback offers, or UPI deals to lower your total cost.
What to Look for in Affordable TWS Earbuds
To make the most of your investment, focus on these key features:
Sound Quality
Battery Life
Comfort and Fit
Connectivity
Extra Features:
Touch Controls
Noise Isolation
Water Resistance
Advantages of TWS Earbuds Over Other Audio Devices
Portability: Unlike neckbands or over-ear headphones, TWS earbuds come with compact cases that double as chargers.
Versatility: They’re suitable for calls, music, gaming, and even virtual meetings.
Style and Convenience: Their sleek design and ease of use make them a trendy accessory for everyday life.
Tips for First-Time Buyers
Define Your Needs: If you value features like bass-heavy audio or noise cancellation, prioritize those in your search.
Set a Budget: Affordable TWS earbuds typically range from ₹1,500 to ₹3,500, offering plenty of great options.
Check Warranty: Ensure the product comes with a reliable warranty for added peace of mind.
Test Comfort: If possible, try the earbuds to confirm they fit securely and comfortably.
Conclusion
Affordable TWS earbuds are a game-changer for those seeking high-quality audio on a budget. By focusing on key features such as sound quality, battery life, and fit, you can find a pair that meets your needs without overspending. Whether you’re enjoying music, taking calls, or immersing yourself in a podcast, the right earbuds will elevate your experience.
0 notes
Text
Inefable® Earphone Headphone Case Pouch Cover Carrying Case for Earphones, Headset, Pen Drives, SD Cards, All Mobile Accessories (Black) (Pack of 2)
Price: (as of – Details) Product Description Compatible size Compact (4.3″L x 2.5″W x 1.3″H) and functional hard case keeps items safe and extremely portable. Uses Good for iPod Shuffle, Charging Cable, Earphones, Memory Cards, USB Flash Drive ,lens filter, Keys and Coins Premium Quality Made of Supreme Quality, Durable EVA Crush Resistant, Anti-Shock, Weather Resistant…

View On WordPress
#Accessories#Black#Cards#Carrying#Case#Cover#Drives#Earphone#Earphones#Headphone#headphones pouch#Headset#Inefable#Mobile#Pack#Pen#Pouch
0 notes
Text
Raspberry Pi AI Camera - Affordable AI Review
Join the newsletter: https://avocode.digital/newsletter/ **Raspberry Pi AI Camera - Affordable AI Review** **Getting Started with Raspberry Pi AI Camera** The era of artificial intelligence (AI) is upon us, and with the advent of accessible and affordable technology, the possibilities are endless. One such game-changer is the **Raspberry Pi AI Camera**. Today, we will dive deep into this innovative tool and explore why it stands out as a top choice for tech enthusiasts and DIY creators. **What is the Raspberry Pi AI Camera?** The Raspberry Pi AI Camera is a powerful yet budget-friendly combination of the Raspberry Pi board and a camera module embedded with AI capabilities. It empowers users to create and experiment with AI-driven projects without breaking the bank. Below are some key components that make this setup a potent tool: - **Raspberry Pi Board**: This compact computer can be programmed to perform a myriad of tasks, from controlling devices to processing data. - **Camera Module**: A high-quality camera that captures images and videos to feed into the AI system. - **AI Software**: Typically involves open-source frameworks like TensorFlow Lite or other machine learning libraries. **Unboxing and Components:** When you open the Raspberry Pi AI Camera package, you’ll find:
Raspberry Pi Board
Camera Module
Cables and Connectors
MicroSD Card (usually pre-loaded with software)
Power Supply Unit
Enclosure or Case for the setup
Each component plays a critical role in making this setup functional and efficient. **Setting Up Your Raspberry Pi AI Camera** Setting up the Raspberry Pi AI Camera is straightforward. Here’s a step-by-step guide to get you started: **Step 1: Assemble the Hardware** 1. **Connect the Camera Module**: Attach the camera flex cable to the CSI port on the Raspberry Pi board. Make sure the connection is secure and the pins are aligned properly. 2. **Insert the MicroSD Card**: This card contains the operating system and necessary software. Insert it into the corresponding slot on the Raspberry Pi. 3. **Power Up**: Plug the power supply into your Raspberry Pi. **Step 2: Install the Software** 1. **Download the OS**: If not pre-loaded, download the Raspberry Pi OS from the official website and flash it onto your MicroSD card. 2. **Install AI Libraries**: Use terminal commands to install TensorFlow Lite or other AI libraries. This could look something like: ``` bash sudo apt-get update sudo apt-get install libatlas-base-dev pip3 install tensorflow ``` **Step 3: Configure the Camera** 1. **Enable Camera Support**: Go into the Raspberry Pi configuration settings and enable the camera. 2. **Test Installation**: Run a test script to see if the camera is properly set up and capturing images. **Exploring AI Capabilities** Once your hardware is set up and your software is installed, the real fun begins with exploring AI capabilities. Here are some exciting projects you can kickstart to understand the potential of your new AI camera: ### **Face Recognition** Utilize machine learning algorithms to recognize and track faces. This type of project could have applications in security systems or automated customer service kiosks. ### **Object Detection** Write code to detect and classify objects within the camera’s field of view. Imagine a smart home setup where your system can identify and keep track of different objects' locations. ### **Motion Detection** Another fascinating application is to set up your AI camera for motion detection. This can be used for surveillance or even interactive art installations. **Why Choose the Raspberry Pi AI Camera?** When it comes to affordability and functionality, the Raspberry Pi AI Camera stands out. Here are some compelling reasons to choose this setup: **Affordable**: Compared to other AI solutions, the Raspberry Pi setup is extremely cost-effective, making it accessible to a wider audience. **Compact and Portable**: The small form factor of the Raspberry Pi board and camera module makes it ideal for portable use cases. **Customizable**: The open nature of the platform means you can tailor it to your specific needs, whether for personal projects, educational purposes, or even small-scale commercial applications. **Rich Community Support**: The Raspberry Pi community is vast and active. You'll find an abundance of tutorials, forums, and resources to help you troubleshoot and expand your projects. **Challenges and Considerations** While the Raspberry Pi AI Camera is a fantastic tool, there are some challenges and considerations to keep in mind:
**Performance Limitations**
: Raspberry Pi may not be as powerful as high-end AI systems. Complex neural networks might require longer processing times.
**Power Requirements**
: A stable power supply is essential for uninterrupted operations.
**Learning Curve**
: For beginners, there might be a learning curve related to setting up and programming the system. **Conclusion** To wrap up, the Raspberry Pi AI Camera is a revolutionary tool that brings the power of AI to the masses. Whether you are a hobbyist looking to tinker with new technology, an educator aiming to inspire your students, or a developer prototyping the next big thing, this setup offers a perfect blend of affordability, flexibility, and capability. Dive in, get creative, and transform your ideas into reality with the Raspberry Pi AI Camera. Want more? Join the newsletter: https://avocode.digital/newsletter/
0 notes
Text
How to Choose the Best Laptop Accessories for 2024: Must-Have Add-Ons for Every User

Choosing the right laptop is just the beginning of enhancing your computing experience. If you're still in the process of selecting the perfect device, be sure to check out our Ultimate Laptop Buying Guide 2024 for expert advice. Equally important are the accessories you select to complement and optimize your device. In 2024, a wide range of laptop accessories is available, each designed to cater to different needs, whether you're a student, professional, or gamer. In this beginner's guide, we'll walk you through how to choose the best laptop accessories to elevate your productivity, protect your device, and improve your overall user experience. From ergonomic essentials to tech upgrades, we'll cover everything you need to know to make informed decisions.
1. Protective Cases and Sleeves
One of the first accessories you should consider is a protective case or sleeve. These accessories are crucial for safeguarding your laptop from scratches, dings, and other potential damages. When choosing a case or sleeve, consider factors like material, size, and design. A well-fitted case ensures your laptop is protected without adding unnecessary bulk. Materials like neoprene or hard-shell plastics offer good protection, while leather or fabric sleeves provide a more stylish look.
In 2024, eco-friendly materials are gaining popularity, so you might want to opt for cases made from recycled materials. Additionally, cases with built-in compartments for accessories like chargers or external drives can help you stay organized while on the go.
2. External Storage Solutions
As laptops continue to become slimmer and more portable, many models sacrifice internal storage for portability. This is where external storage solutions come into play. Whether you're dealing with large files or simply need more space, an external hard drive or SSD is an essential accessory.
When selecting an external storage device, consider the storage capacity, speed, and durability. SSDs are faster and more durable than traditional hard drives, making them an excellent choice for those who need quick access to data. For a more portable option, consider USB flash drives or microSD cards, which are convenient for transferring files between devices. Remember to check the compatibility of your laptop’s ports (such as USB-C) to ensure your storage solution works seamlessly.
3. Ergonomic Laptop Stands
Long hours of working on a laptop can strain your neck, back, and wrists. To combat this, an ergonomic laptop stand is a must-have accessory. Laptop stands elevate your device to eye level, promoting better posture and reducing the risk of discomfort or injury.
When choosing a laptop stand, look for one that is adjustable, sturdy, and portable. Some stands also come with built-in cooling fans to prevent your laptop from overheating, which can be a significant benefit if you use your device for resource-intensive tasks. Ergonomic accessories like these are especially important in 2024, as more people continue to work and study from home.
4. Wireless Mice and Keyboards
While laptop trackpads and built-in keyboards are convenient, they often lack the precision and comfort needed for extended use. This is where wireless mice and keyboards come in. A wireless mouse offers better control and precision, making it ideal for tasks like graphic design or gaming. Meanwhile, a wireless keyboard provides a more comfortable typing experience, especially if your laptop's keyboard is compact or lacks tactile feedback.
When selecting a wireless mouse and keyboard, consider factors like battery life, connectivity (Bluetooth or USB), and ergonomic design. For those who frequently travel or work remotely, a compact, portable option may be preferable. In 2024, many wireless peripherals also offer customizable buttons and backlighting, allowing you to tailor your setup to your specific needs.
5. Laptop Cooling Pads
Overheating can be a significant issue, especially when using your laptop for gaming, video editing, or other demanding tasks. A laptop cooling pad is an excellent accessory to help manage your device's temperature. These pads typically feature built-in fans that increase airflow around your laptop, preventing overheating and potential damage to internal components.
When choosing a cooling pad, look for one that is compatible with your laptop's size and offers adjustable fan speeds. Additionally, some cooling pads come with added features like USB hubs, which can be particularly useful if your laptop has limited ports. Keeping your laptop cool ensures it runs efficiently and extends its lifespan, making this accessory a smart investment for 2024.
6. USB-C Hubs and Docking Stations
As laptops become more streamlined, many models have reduced the number of available ports. This trend can limit your ability to connect multiple devices simultaneously. To overcome this limitation, a USB-C hub or docking station is essential. These accessories expand your laptop's connectivity options, allowing you to connect additional peripherals like monitors, external drives, and more.
When selecting a USB-C hub or docking station, consider the types and number of ports you need. Some hubs offer a wide range of connectivity options, including HDMI, Ethernet, and SD card slots, making them versatile for various tasks. Additionally, look for hubs that support fast charging, so you can power your devices while using them.
Conclusion
Choosing the best laptop accessories for 2024 can significantly enhance your computing experience, whether you're focused on productivity, comfort, or entertainment. By investing in the right protective cases, external storage solutions, ergonomic stands, wireless peripherals, cooling pads, and USB-C hubs, you'll be well-equipped to make the most of your laptop. As technology continues to evolve, staying updated on the latest accessories will help you keep your setup efficient, stylish, and ready for anything.
#Best Laptop Accessories 2024#Laptop Add-Ons Guide#Top Laptop Accessories#USB-C Hubs for Laptops#Protective Cases for Laptops#Laptop Cooling Pads 2024#Wireless Mice and Keyboards#External Storage for Laptops
0 notes
Text
[ad_1] Are you able to unlock the ability of Flashata? In immediately’s digital age, knowledge storage and processing have change into extra crucial than ever. Enter a cutting-edge know-how that's revolutionizing the way in which we deal with knowledge. In the event you’re interested in how this game-changing instrument works and the limitless potentialities it affords, you’ve come to the precise place! How Flashata Works Flashata operates by using a mix of flash reminiscence and knowledge compression know-how. When knowledge is inputted into the system, it will get compressed to scale back its dimension, permitting for extra environment friendly storage and quicker retrieval. The compressed knowledge is then saved within the flash reminiscence modules, the place it may be accessed swiftly when wanted. The method entails breaking down the data into smaller chunks, compressing them utilizing algorithms that get rid of redundant or pointless bits, and organizing them throughout the flash storage items. This streamlined method not solely saves house but in addition enhances efficiency by decreasing latency throughout learn/write operations. By harnessing the ability of flash reminiscence and revolutionary compression methods, optimizes knowledge administration processes throughout numerous purposes. Its seamless integration with current programs ensures easy operation with out compromising on pace or reliability. Benefits of Utilizing Flashata Flashata affords a plethora of benefits that make it a game-changer on this planet of knowledge storage. One key profit is its lightning-fast pace, permitting for fast entry to data with none lag time. This will considerably improve productiveness and effectivity in numerous industries. One other benefit of utilizing Flashata is its sturdiness and reliability. In contrast to conventional onerous drives, flash reminiscence has no transferring elements, making it much less liable to mechanical failures. This implies your knowledge is safer and safer. Moreover, is extremely versatile and adaptable to totally different units and purposes. Whether or not you’re storing pictures in your smartphone or working complicated algorithms on a server, can deal with all of it with ease. Furthermore, the compact dimension of makes it ideally suited for transportable units the place house is restricted. You possibly can carry giant quantities of knowledge in a tiny USB drive or microSD card effortlessly. Completely different Methods to Use Flashata Are you seeking to harness the ability of Flashata in numerous methods? Let’s discover the totally different potentialities this cutting-edge know-how affords. One method to make the most of Flashata is for high-speed knowledge transfers. Whether or not you’re backing up giant recordsdata or transferring knowledge between units, can considerably scale back switch occasions in comparison with conventional strategies. One other use case is in enhancing gaming experiences. By storing recreation knowledge on a flash reminiscence gadget, players can get pleasure from quicker loading occasions and seamless gameplay with out lags or delays. Companies also can profit from utilizing Flashata for fast entry to crucial data. With its speedy learn and write speeds, workers can retrieve vital recordsdata swiftly, boosting productiveness and effectivity. Moreover, integrating into IoT units allows real-time knowledge processing and evaluation, paving the way in which for revolutionary options in numerous industries. Actual-Life Functions of Flashata Actual-Life Functions of Flashata are numerous and impactful. One frequent use is within the healthcare trade, the place it helps retailer and entry affected person information shortly and securely. Within the monetary sector, is utilized for high-speed buying and selling platforms that require real-time knowledge processing. Furthermore, within the leisure trade, allows seamless streaming providers by storing giant quantities of multimedia content material effectively.
Retailers profit from its quick knowledge retrieval capabilities for stock administration programs to trace merchandise precisely. Moreover, researchers depend on Flashata for dealing with huge datasets in fields like genomics and astronomy. Its pace and reliability make it ideally suited for powering good metropolis initiatives that enhance city infrastructure. The true-life purposes of proceed to increase throughout numerous industries as organizations search quicker, extra environment friendly methods to handle and analyze their knowledge. Potential Limitations and Options As highly effective as Flashata is, it’s important to acknowledge that like every know-how, it comes with its limitations. One frequent situation customers might encounter is the potential for knowledge corruption or loss if not correctly managed. Moreover, the price of implementing options generally is a concern for some organizations, particularly smaller companies with restricted budgets. To deal with these challenges, it’s essential to frequently again up knowledge saved on Flashata units to forestall any potential loss. Implementing strong safety measures akin to encryption and entry controls also can assist mitigate the chance of knowledge breaches or unauthorized entry. One other resolution is to rigorously assess your group’s wants and go for a tailor-made resolution that aligns along with your funds constraints with out compromising on efficiency. Frequently updating software program and firmware also can assist resolve any compatibility points that will come up over time. By understanding these limitations and proactively in search of out options, companies can totally leverage the ability of whereas minimizing dangers and maximizing advantages of their operations. Suggestions for Maximizing the Advantages of Flashata Ensure to frequently replace your software program. This can guarantee that you've got entry to the most recent options and safety patches. Think about using compression methods when storing. Compressing recordsdata may also help save space for storing and enhance total efficiency. Implement encryption protocols to guard delicate data saved on Flashata. This further layer of safety can stop unauthorized entry to your knowledge. Moreover, arrange your knowledge effectively by creating folders and categorizing recordsdata correctly. This can make it simpler so that you can find particular data when wanted. Think about integrating with different appropriate units or platforms for seamless knowledge switch and synchronization throughout a number of units. By following the following tips, you'll be able to improve your expertise with and luxuriate in its full potential. Conclusion: As we wrap up our exploration of Flashata, it’s clear that this revolutionary know-how is revolutionizing knowledge storage and switch. The limitless potentialities it affords are simply ready to be harnessed by companies and people alike. From its lightning-fast pace to its flexibility in numerous purposes, Flashata is actually a game-changer within the digital world. By understanding how Flashata works and the benefits it brings, customers can faucet into its energy to streamline processes and improve effectivity. Whether or not you’re seeking to enhance productiveness within the office or simplify your private knowledge administration, Flashata has one thing for everybody. In contemplating the real-life purposes of Flashata, one can envision a future the place knowledge entry is seamless and instantaneous. The potential limitations are being addressed by way of ongoing improvements, guaranteeing that continues to be on the forefront of technological developments. FAQ’s What's Flashata? Flashata is a cutting-edge know-how that enables for high-speed knowledge switch and storage utilizing flash reminiscence. How can I exploit Flashata in my enterprise? You possibly can make the most of Flashata in numerous methods akin to bettering knowledge processing speeds, enhancing system efficiency, and optimizing knowledge storage options.
[ad_2] Supply hyperlink
0 notes
Text
Frankz Male to 3.0 USB A Female Metal OTG Adapter Compatible with IPad, iPhone 14,13,12,12 Pro,12 Mini,11 Pro,XS Max,XR,X,8,7,6s Plus and All Series - (Multi-Colored)
About this item
✅【Plug and Play Convenience】: No app required and no need to remove the camera's memory card. Simply connect the USB 3.0 camera adapter to read photos and videos directly on your iOS device.
✅【Wide Compatibility】: Compatible with iOS 14 and later, the Lightning OTG adapter supports iPhone 14/13/12/11/X and SE series, as well as iPad Air, Mini, Pro, and more.
✅【Supports USB Devices】: Upgrade your iPhone/iPad with this Lightning OTG USB adapter to connect digital cameras, USB flash drives, keyboards, mice, gamepads, microphones, mixers, sound cards, electronic drums, etc. (Each peripheral's maximum current should not exceed 200 mA). Note: SSDs are not supported.
✅【Enhanced Efficiency and Time Savings】: Featuring an upgraded USB 3.0 Female adapter, achieving theoretical speeds of up to 5Gbps (625MB/s). Connect a keyboard or mouse to your iPad for increased home office productivity. Additionally, without requiring additional power, charge your AirPods case using this camera adapter if your iPhone/iPad has sufficient power.
✅【Compact and Durable Design】: This USB adapter, designed without a cable, is as portable as a key. Its sturdy aluminum casing ensures durability, offering greater resilience compared to plastic adapters.
Buy On This Link
0 notes
Link
0 notes
Text
Star Wars Outlaws Preview - Exclusive Hands-On Impressions - Game Informer
New Post has been published on https://thedigitalinsider.com/star-wars-outlaws-preview-exclusive-hands-on-impressions-game-informer/
Star Wars Outlaws Preview - Exclusive Hands-On Impressions - Game Informer

As one of the main components of our trip out to Malmö, Sweden, for this issue’s cover story, we were the first to get our hands on Star Wars Outlaws, the highly anticipated open-world action game from Massive Entertainment, the studio behind The Division and last year’s Avatar: Frontiers of Pandora. Taking place between Star Wars Episode V: The Empire Strikes Back and Star Wars Episode VI: Return of the Jedi, Outlaws puts you in the shoes of Kay Vess, a common pickpocket-turned-thief who gets in over her head and becomes a player in the thriving underworld during this dark period in the Star Wars timeline.
Mirogana
Star Wars Outlaws features several planets and moons for players to explore, including iconic and well-known locales like Tatooine, Kijimi, and Akiva, but my hands-on demo takes place entirely on Toshara, a new moon created by Massive Entertainment in collaboration with Lucasfilm Games. Given the timeline placement of Star Wars Outlaws, the Empire’s presence is immediately felt and consistently present. After landing on Toshara following an unfortunate turn of events, Kay heads to the moon’s capital city, Mirogana.
Mirogana is dense and multi-leveled, but it was intentionally designed to not be a sprawling city like in other open-world games. “If you open up the map, the location that we’ve built for Mirogana is quite compact,” creative director Julian Gerighty says. “What we wanted to do is to have something that is very dense in activities rather than super expansive where you get lost, and there’s not much to do. It’s very, very focused on providing a dense, busy city experience.”

Following an encounter with a Stormtrooper at the entrance to the city, Kay flashes a fake identification and is allowed through. This exchange is a reminder of the state of the galaxy in this space between the two classic films. Making her way through Mirogana, Kay ignores the beckoning shopkeeps, arcade games, betting areas, and a table hosting the in-universe card game Sabacc to find her way to the cantina. In each city you visit, the cantina is always a central location for getting the lay of the land, gathering intel, and finding work. Toshara – and Mirogana in particular – is primarily a Pyke enclave despite being home to other syndicates as well.
To gain some ground with the Pyke Syndicate, Kay wants to speak with their leader, Gorak. Sadly, he’s in a private VIP section of the cantina, so Kay needs to find a backdoor. Luckily, Kay’s hairpin is a dataspike, so I can lockpick a side door using a rhythm-based minigame. After entering the backroom of the cantina, I see a blue icon in the distance. These icons demonstrate that Kay can send her companion, Nix, to interact with it. In this case, he fetches the item and brings it back. Nix is a merqaal, a new species created in collaboration with Lucasfilm Games. Gerighty describes him as having two sides: Nix is very cute and friendly but also extremely protective of Kay, even to the point of aggression.
Kay reaches Gorak’s suite and is immediately picked out by the Pyke Syndicate leader as an intruder. Kay gets a chance at face time, but after making a joke that lands with a thud and name-dropping the wrong person, Gorak has his guards toss her out. So much for making headway with the Pyke Syndicate. As Kay dusts herself off, Nix reveals he stole Gorak’s ring during the scuffle. A voice tells her that might be an unwise move given the Pyke’s power.
Pyke Infiltration

The voice comes from Danka, a Mirogana broker. She gives Kay a rundown of the syndicates operating on Toshara, then offers her a job from an unknown client. The job? Steal a file from a heavily guarded Pyke stronghold.
This mission surfaces one of the defining elements of Star Wars Outlaws: the Reputation System. Kay must navigate the criminal underworld through four syndicates, each with its own leader. Jabba the Hutt, leader of the Hutt Cartel, stands out as the most recognizable underworld boss Kay crosses paths with, but she’ll also deal with Lady Qi’ra (who many know from Emilia Clarke’s portrayal in Solo: A Star Wars Story) of Crimson Dawn, Queen Ashiga of the Ashiga Clan (a new syndicate created for Outlaws), and Gorak of the Pyke Syndicate.
The Reputation System represents your standing with these four syndicates, ranging from Terrible to Excellent for each individual group. Your reputation with each syndicate determines how that criminal organization treats you. Having a good reputation may mean they let you walk freely in their hideouts, offer you special stock or discounts at shops in their territories, and even help you out if you get into a hairy situation with another syndicate or even the Empire.
In my case, my introduction to the system starts with the mission of stealing from the Pyke Syndicate. I take Kay to the front entrance of Pyke territory, but the organization isn’t exactly eager to roll out the red carpet, even though I just met with their boss. Since my standing with them is firmly in the “Poor” section of the meter, I’ll need to sneak in. I loop down a back alley, climb a ledge, and emerge in a restricted Pyke area.
Star Wars Outlaws strives to provide player agency, but in early portions of a hideout infiltration, you need to be stealthy. As such, Kay’s blaster is off-limits until she can get deeper into the territory. However, you can perform stealthy takedowns to clear the path to her destination. This is where Nix really comes in handy, as you can guide him from the shadows to either distract or attack guards. In this instance, I go the slightly louder route of having Nix run up the guard’s leg and latch onto his head. This way may be a bit louder, but it also means I can have Kay sprint up and take the guard out without being detected.
After taking out and sneaking past a few guards, I find a door that Kay can lockpick. After completing the rhythm minigame, Kay finds herself in what appears to be a maintenance room. Using Nix’s senses, Kay can spot the electrical circuits in the walls, which tell you which buttons to press to call the elevator needed to reach the next area. Sadly, the first elevator doesn’t raise high enough, and the second elevator’s button is out of reach for Kay – but not for Nix. By directing Nix to press the button, Kay lowers the second elevator, creating a makeshift staircase to climb onto a grated wall to reach a ledge. Continuing into the ventilation shafts, a whirling fan impedes Kay’s path, but by telling Nix to pull down the shutter, Kay can blast the power supply and get past the fan.

I use Kay’s grapple hook to swing across a gap, and she reaches the area with the file. Unfortunately, it’s protected by an energy shield with two generators. Even worse, the area is heavily guarded. Since I’ve entered fully hostile territory, I’m able to choose my approach to the generators: Do I continue my stealthy approach, or do I pull Kay’s blaster out of her holster and go in guns blazing? I decide to try the path of least resistance and continue operating in the shadows. Using Kay’s binoculars, I mark enemies to keep track of them once I descend to ground level.
I take out a few enemies using a combination of Nix’s distractions and the “stun” setting on Kay’s blaster, but it doesn’t take long for a guard to spot me, and a shootout begins. Unfortunately, I did not think to disable the alarm system, so it’s triggered. Even if I had taken down the alarm system, it wouldn’t have made a difference, as I accidentally walk past the sightline of a security camera.
I dig in and try my best to keep the Pykes at bay. As I take out more and more Pykes, stronger enemy types emerge with shields and more advanced weaponry. Thankfully, I have healing items, and the fallen enemies drop better weapons than Kay’s blaster that she can use until they run out of ammo. Since I triggered an alarm, my reputation with the Pykes drops; had I made it through without being spotted, my reputation with them would not have taken a hit.
Sadly, that’s not how this played out, as the bodies are piling up, and the enemies are closing in on my location with an increased intensity. At the risk of exposing myself and doing something rash, I make a break for it. In breaking the line of sight with the guards, a blue silhouette shows my last-known location; that’s the first place they’ll look before fanning out to try and find me. I use this temporary de-escalation to make a break for the generators. After quietly taking down the guards stationed by them, I deactivate both generators and go to retrieve what I came for.
The Reputation Game

Kay accesses the terminal and easily finds the file the mysterious client wanted, but she finds something even juicier: video footage of one of Gorak’s underlings plotting against him. Ever the opportunist, Kay knows that someone would pay a pretty penny for this information – maybe even Gorak. That’s right; even after the violence I just took part in with the Pykes – my face on camera and everything – Kay still considered going to their leader. That’s because there’s somewhat of an understanding in the criminal underworld that these relationships aren’t about making friends. They’re about mutual benefit.
It seems like Kay is set on giving it to Gorak to curry favor, but after returning to the Mirogana cantina with the file for the client, she spots another opportunity. It turns out the anonymous client was a member of Crimson Dawn, and this file retrieval was a test to see if the syndicate could rely on Kay for more important jobs. With a foot now in the door, Kay thinks fast, wondering if she should give the extra file regarding the Pyke Syndicate coup to Crimson Dawn instead. At this moment, the player has a choice: Do you provide it to the Pyke Syndicate as initially planned or your new associates in Crimson Dawn? I opt to give it to Crimson Dawn, causing my reputation with them to increase.
After Stealth Mission
After taking an optional job with another quest giver in the cantina, I return to Danka for more work. She tells me to go to a particular merchant to retrieve a part for Kay’s blaster. Sadly, when I arrive, I learn he doesn’t have it, but I can probably steal the part from a nearby syndicate. Player agency and the Reputation System again pop up in my playthrough, as I can choose if I want to steal it from the Pyke Syndicate or Crimson Dawn. Both of them have a presence in Mirogana, but since I have a better reputation with Crimson Dawn, they let me walk right in without resistance.
However, even with my decent reputation with them, they’ll only let me get so close. My reputation isn’t good enough to get into the guarded heart of Crimson Dawn territory, so it’s back to the stealth mechanics. Like the earlier Pyke encounter, if I can get in and get out without raising the alarm, Kay’s reputation with Crimson Dawn won’t take a hit, so I make that my goal. After some close calls and last-second takedowns, I reach the part without making Crimson Dawn skittish about trusting me.
Outside the City Walls

Before wrapping up my demo, I get a brief chance to explore the open world of Toshara outside of Mirogana. With a press of a button, I summon a speeder, which Massive designed with inspiration from a Swedish motorbike manufacturer. The vehicle feels excellent in action – smooth, quick, and agile like a speeder should. After some brief navigation that includes hearing radio chatter for some activities I could pursue, I arrive at a small town called Jaunta’s Hope, which is the current location of Kay’s ship, the Trailblazer.
I need to go to a nearby building and grab an item from it, but the door is locked. After a quick modification to Kay’s blaster, her weapon gains the Ion Blast ability, which gives her an advantage over droid enemies and allows her to solve environmental puzzles like this one. Kay can access the building and loot all the goodies by shooting the two transformers for the lock with the Ion Blast.
Unfortunately, just as I was starting to get a true feel for the gameplay loop of Star Wars Outlaws, my session ended. I didn’t have an opportunity to explore the Reputation System truly, but I love the notion of keeping up appearances with the various syndicates, not to mention making sure not to annoy the Empire too much.
After spending my afternoon taking in the sights and sounds of Toshara, I came away excited about how far you can manipulate the various systems at play in Star Wars Outlaws. Massive Entertainment came into the project wanting to create the ultimate scoundrel experience set in the Star Wars galaxy, and from what I’ve seen and played, it has a lot of important elements in place to accomplish that goal. I’m more excited than ever to get my hands on the final product when it arrives on PlayStation 5, Xbox Series X/S, and PC on August 30.
#2024#agile#approach#avatar#backdoor#betting#Blue#Building#buttons#Collaboration#Cute#Dark#deal#Developer#directing#energy#entertainment#Environmental#Events#Features#Galaxy#game#games#gap#generators#Giving#guns#hands-on#headway#healing
0 notes
Text
Day-15
First of all, I have this bag since 2017. I bought this because many people asked me to buy a new one. My old backpack lasted for four years since high school. It was still well-functioned, but the fake leather on the front peeled off. Also, I couldn't fix the broken zipper on the front. I always postponed purchasing until my friend told me to do so. I bought my new backpack worth only one hundred fifty thousand rupiahs.
It's been more than five years, longer than the last one and still in good condition.
So, what's in my Bag?
It has one main compartment. There is a space for a 14" laptop and other stuff. A pocket on the front side and another pocket with a zipper on the cover slide.
Currently, I bring three different types of notebooks.
One Dietetic module for lab practicum and study case.
A Nutrition Diagnose book.
A mint pencil case filled with stationery. There are pens, a tiny pencil, correction tape, erasers, a 15 cm ruler, a pencil sharpener, a body measuring tape, highlighters, glue, a flash disk, and cutters, all in one package.
I have a mouse for my laptop, but it ran out of batteries.
An umbrella, just in case it's rainy weather.
A mini wallet with a small amount of cash, ID Card, driver's license, and debit card.
Also, there is an attached rain cover on the bottom side. It's transparent, so you can see what's inside the cover.
On some special occasions, I can carry this bag with many more items. I never weigh the bag, but I know it's heavy enough to carry on. It is shaped rectangle and looks compact with not many details. The colour is dark grey with some orange lines, making it neutral to any outfit.
Overall, it works for me. I'm satisfied with my own and will not shop for another bag.
#30haribercerita
0 notes
Link
Check out this listing I just added to my Poshmark closet: 👉$ ↓👈CANON ELPH IX240 Vtg. Camera 24-48mm, Battery, 2 Rolls Film, Manual Case.
0 notes
Text
Price: [price_with_discount] (as of [price_update_date] - Details) [ad_1] The mini digital gadget has four different ports for conversion, charging, transmission and more. Contains USB C cable with 3 USB adapters got all you need to charge and transfer data for Android/IOS devices. All the adapters are made of a scratch resistant aluminum alloy. The internal copper wire is larger and thicker than normal cables, which helps increase charging speed and transfer data for cell phones, tablets, laptops and other devices. No fumbling for the right connector through a tangled mess. This portable storage box has all you need to charge and sync your device. The storage case protects the ends of the cables and prevents them from getting tangled in your bag. This cable kit iis3.2*0.4 inches, it is easy to take in pocket, wallet and handbag. The digital travel kit with 3 storage slots, 2 for nano SIM cards, 1 for micro-SIM card storage (SIM card is not included) and a SIM eject tool, help you swap and store your SIM cards easily. The carry case is also a phone holder. 【All-in-One Charging Solution】: Onlinenest’s Small Round Multi-Functional Travel Cable Kit which can help to make all combination of cables. Type C to Type - C Cable, Type C to USB A Cable, Type C to Lightening Cable, Type C to Micro Cable, USB A to Lightening Cable. 【Multi-Functional Storage Case】: The travel kit comes with a SIM ejector Pin, 3 storage slots, 2 for Nano SIM cards, 1 for Micro SIM card storage which help you to swap and store your SIM cards easily. This case can also be used as Phone Holder. 【Fast Charging & Data Transfer】: Attach the converters to the Type C to Type C Cable (supports up to 60W Fast charging), Data Transfer speed 480Mbps (depending on data),. Besides this, the USB C to USB A OTG Adapter can help you connect mouse, keyboard, flash drive, etc. 【Compact and Portable】: With small size of 8.5 cm x 8.5 cm x 1 cm and weighing only 65g, it is easy & convenient to be store in pocket, wallet, handbag and also great for on-the-go & travelling. 【Box Contains】: 1x Type C to Type C Cable, 1x Type C to USB A Adapter/Converter, 1x Type C to Lightening Converter,1x Type C to Micro USB Converter, 1x Sim Ejector Pin, Round Case can also be used as mobile stand/holder, It also has 2 Storage Space for Nano Sim Card & 1 Storage Space for Micro Sim Card & 6 Months Warranty. Please Note : (SIM card is not included). 【Compatible Devices】: Samsung Galaxy S24, S24 Ultra, S24 Plus, S23, S22, S21, S20, S10, Note 20, Note10, A, S, M, F Series, iPhone 14, 14 Pro, 14 Pro Max, 14 Plus, 13, 13 Pro, 13 Pro Max, 13 Mini, 12, 12 Mini, 12 Pro, 12 Pro Max, 11, 11 Plus, 11 Pro Max, X, XR, XS, XS Max, 8, 7, 6, 5, SE Series, Nothing Phone (2), Nothing Phone (1), Xiaomi Redmi Note 12, 11, 10, 9, 8 7 Series, Google Pixel 7, 6, 5, 4, 3, 2, OnePlus Nord CE 3 Lite, CE 2 Lite, 9, 8, 7, 6, 5 Series, iQOO Z7, Z6, Z5, Z3 Series. [ad_2]
0 notes
Text
Lenovo ThinkPad X13 Gen 2: The compact 13-inch enterprise laptop computer also sports activities a 512GB SSD and a good Full-HD IPS show with 300 nits and 72% NTSC protection. At an enormous low cost of 74% relative to the unique listing value, the Lenovo ThinkPad X13 Gen 2 from 2021 nonetheless is a superb workplace machine that doesn't break the financial institution. [content-egg-block template=offers_logo_groups] Lenovo ThinkPad X13 Gen 2 Laptop Some budget-conscious Lenovo followers may already pay attention to the steep reductions the Chinese language PC maker provides at its official online retailer occasionally. Older mannequin variants of high-end enterprise laptops, like the ThinkPad X13, usually obtain sky-high reductions of greater than 70 %, as is now the case with the AMD-equipped Gen 2 mannequin of the glossy 13-inch machine. To be extra particular, the Lenovo ThinkPad X13 Gen 2 configuration with an AMD Ryzen 5 Pro 5650U hexacore processor and 16GB of soldered LPDDR4 reminiscence can now be ordered for simply US$549 after an enormous low cost of US$1,590 or 74 % compared to Lenovo's unrealistic MSRP. This model of the ThinkPad X13 additionally comes with a 512GB SSD, and 300-nits show with a sensible 16:10 facet ratio. Sadly, the optionally available LTE modem is just not included. Deal hunters must use the coupon code "THINKBTSDEALS2" within the purchasing cart to make the most of this sale. Specifications Brand Lenovo Series ThinkPad X13 Gen 2 Item model number 20XH0057US Hardware Platform PC Operating System Windows 10 Pro Item Weight 3.04 pounds Product Dimensions 8.6 x 12 x 0.71 inches Item Dimensions LxWxH 8.6 x 12 x 0.71 inches Color Storm Gray Processor Brand AMD Number of Processors 1 Computer Memory Type DDR4 SDRAM Flash Memory Size 256 GB Optical Drive Type No Power Source Battery Powered Voltage 230 Volts Batteries 1 Lithium Ion batteries required. Please consult our complete overview for extra particulars on the AMD-powered configuration of the Lenovo ThinkPad X13. For example, we praised the high-quality chassis and colour accuracy of the matte IPS show. Moreover, the enterprise laptop computer has an extended battery life and good connectivity. However, it lacks Thunderbolt 4 and an SD card reader. We also criticized the soldered RAM and that the keyboard has taken a few steps again through the years. Nonetheless, this deal provides a well-equipped pocket book for a fraction of its authentic value, which leads to a formidable price-performance ratio that could be excellent for frugal workplace customers who're available in the market for an inexpensive 13-inch machine. [content-egg-block template=offers_logo_groups]
0 notes