#clay leca balls
Explore tagged Tumblr posts
Text
guy at the plant store has convinced me to try hydroponics so time to buy a bunch of leca and see how many plants die before i figure it out
3 notes
·
View notes
Text

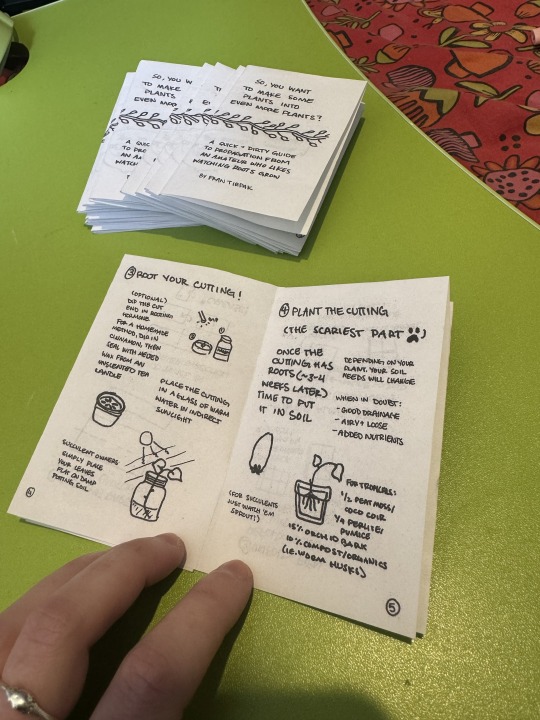

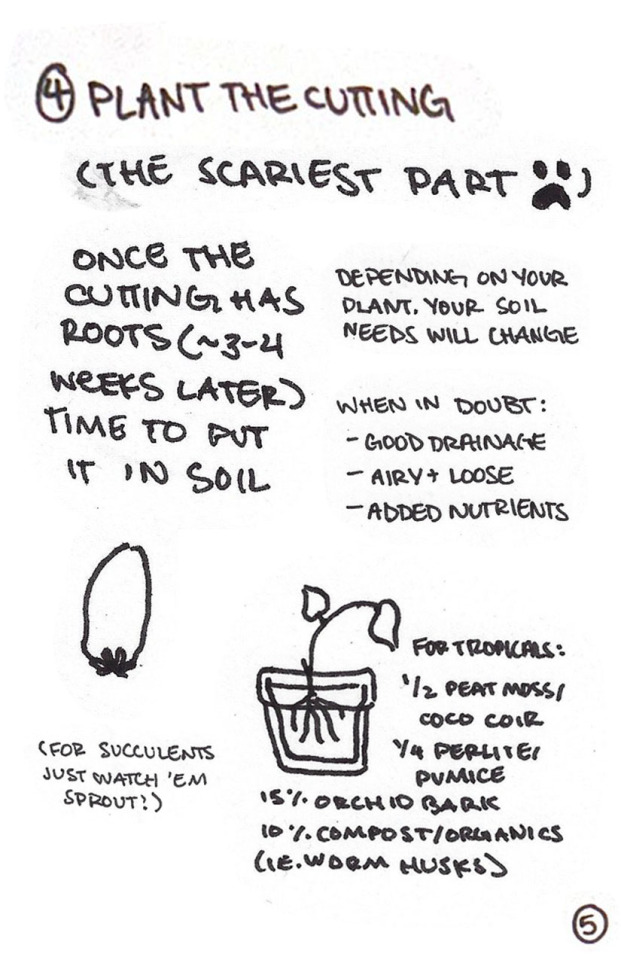
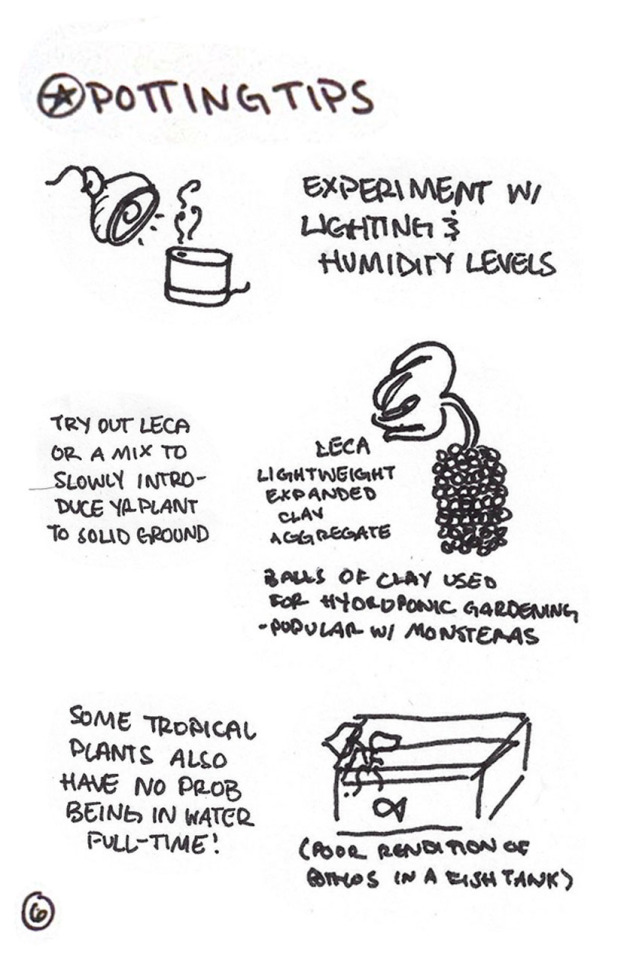


24-hour minizine (8 pages) about DIY propagation from leaf and stem cuttings (free to copy and distribute!! pls just take my name out if you change any content)
EDIT: thank you for all the love! check out @contentsunderpressurezine (instagram) for more of our stuff!
pdf download for print and read friendly versions on this ko-fi I just set up! pay what you wish, free to print and distribute
plaintext under the cut:
So You Want to Make Some Plants Into Even More Plants?
A Quick + Dirty Guide to Propagation from An Amateur Who Likes Watching Roots Grow. (by Fran Tirpak)
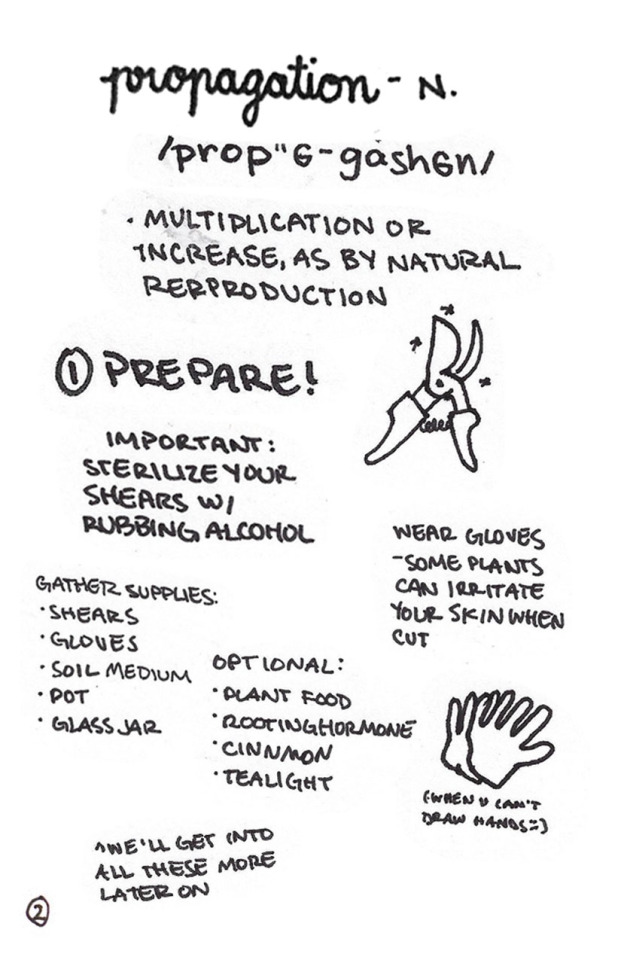
propagation - n.
"multiplication or increase, as by natural reproduction."
1. Prepare!
Important: Sterilize your shears w/ rubbing alcohol.
Wear gloves -- some plants can irritate your skin when cut.
Gather supplies: shears, gloves, soil medium, pot, glass jar.
Optional: plant food, rooting hormone, cinnamon, tealight.
^ we'll talk about these all more later on.
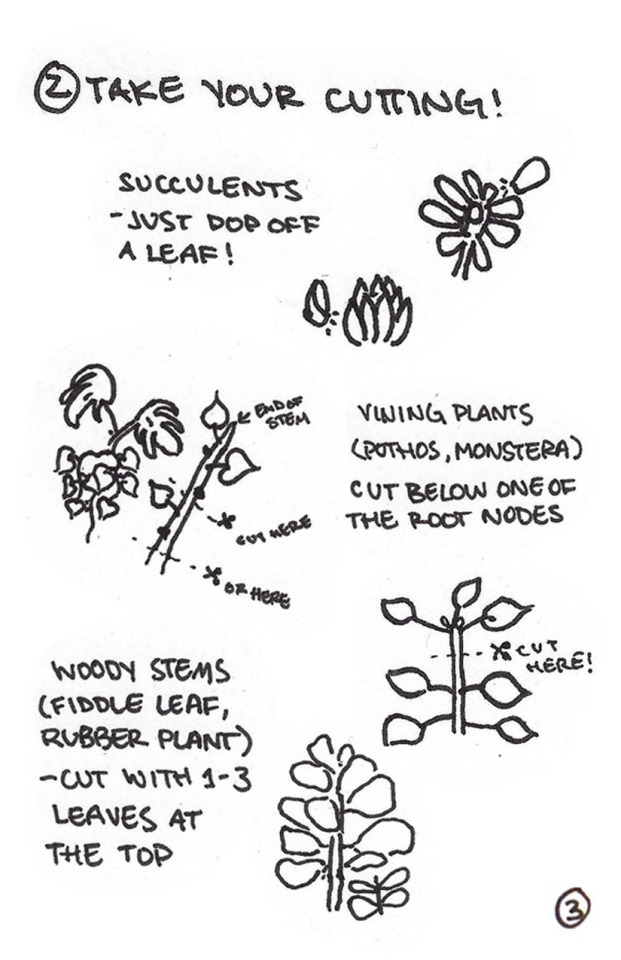
2. Take your cutting!
Succulents -- just pop off a leaf!
Vining plants (Pothos, Monstera), cut below one of the root nodes.
Woody stems (fiddle leaf, rubber plant) -- cut with 1-3 leaves at the top
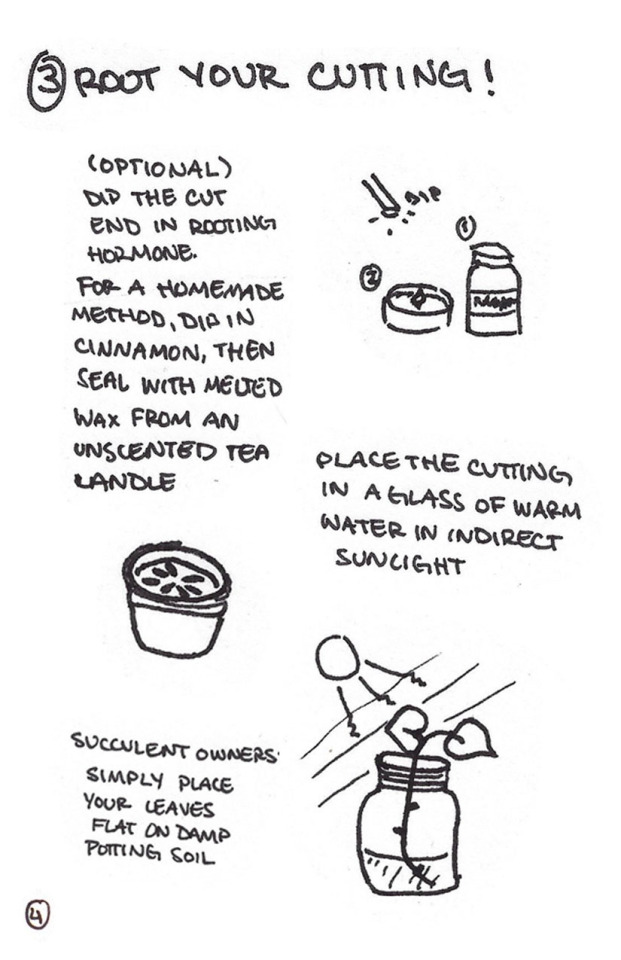
3. Root your cutting!
(Optional) Dip the cut end in rooting hormone. For a homemade method, dip in cinnamon, then seal with melted wax from an unscented tea candle.
Place the cutting in a glass of warm water in indirect sunlight.
Succulent owners: simply place your leaves flat on damp potting soil.
4. Plant the cutting
(the scariest part)
Once the cutting has roots (~3-4 weeks later) time to put it in soil.
Depending on your plant, your soil needs will change.
When in doubt: good drainage, airy & loose, added nutrients.
For tropicals: 1/2 peat moss or coco coir, 1/4 perlite or pumice, 15% orchid bark, 10% compost/organics (i.e. worm husks).
(For succulents, just watch 'em sprout!)
* Potting Tips
Experiment with lighting and humidity levels.
Try out LECA or a mix to slowly introduce your plant to solid ground.
LECA: Lightweight Expanded Clay Aggregate. Balls of clay used in hydroponic gardening - popular with Monsteras
Some tropical plants also have no prob being in water full-time!
5. Now you have a friend!
Pro tips: You can take props from anywhere (as long as you're responsible -- and sneaky).
There's no one way to care for a plant. Do your research, go with your gut, & have fun!
134 notes
·
View notes
Text
Because I like to spend money and diy projects, I’ve decided to try to dupe sol soil’s houseplant chunky potting mix. The ingredient list has coconut coir, coconut husk chips, horticultural pumice, calcined clay, perlite, and leca balls. So I think I’ll start off with equal parts of each (by volume) and see how close the mix looks from there.
18 notes
·
View notes
Text
ROOT BEER ROBYN!!!

Long roots! Ready for the semi hydro set up I got for them!

Stabbed a cup, don't pay for net cups when you can spend an excruciating hour stabbing a diner chai cup because your glue gun doesn't get hot enough to melt through

Boil the clay leca balls, then bake in the oven to dry!
Proceed to fill the stein about 1/3 of the way up, put the Pothos in the net cup with the Leca, and then place in the filled stein!!


And that's it!! Oh there's also some mild fertilizer in the water. Now let's all keep Robyn in our prayers that they take to the new set up 🙏
6 notes
·
View notes
Text
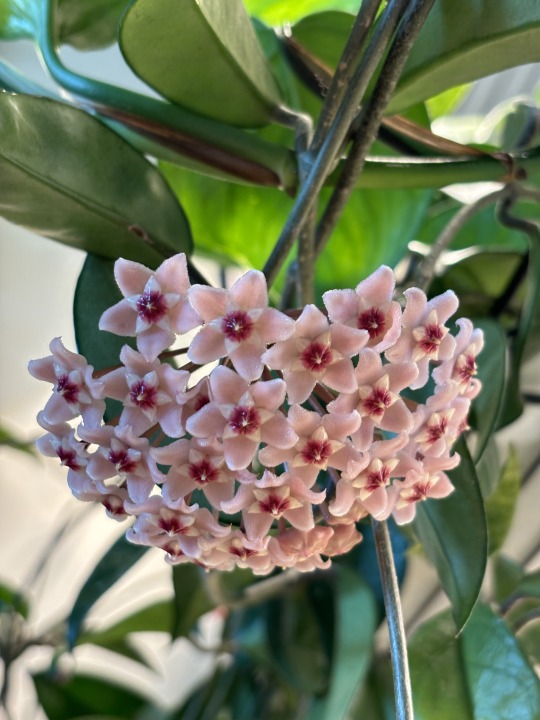
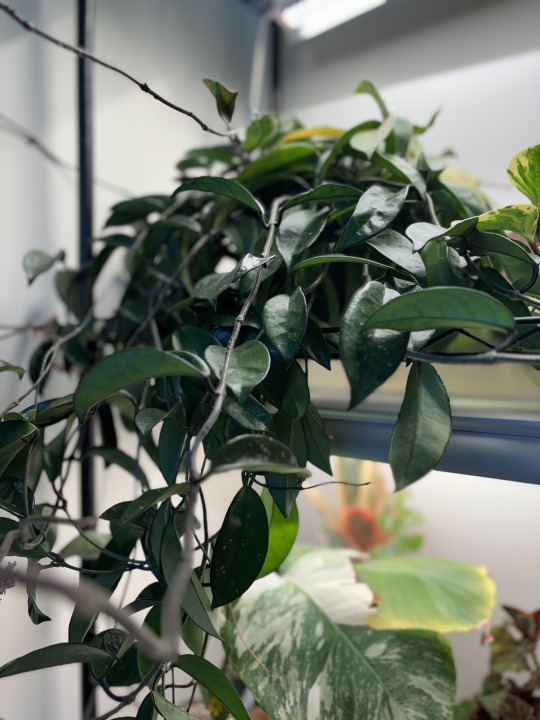
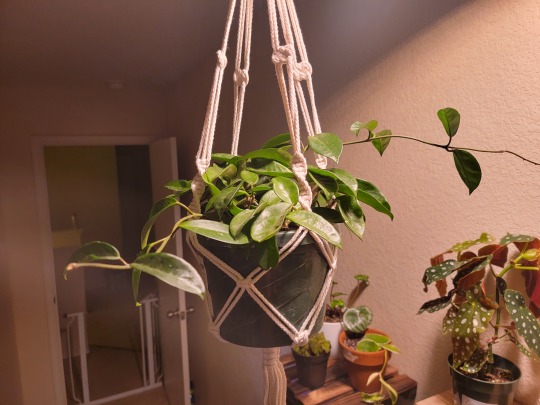
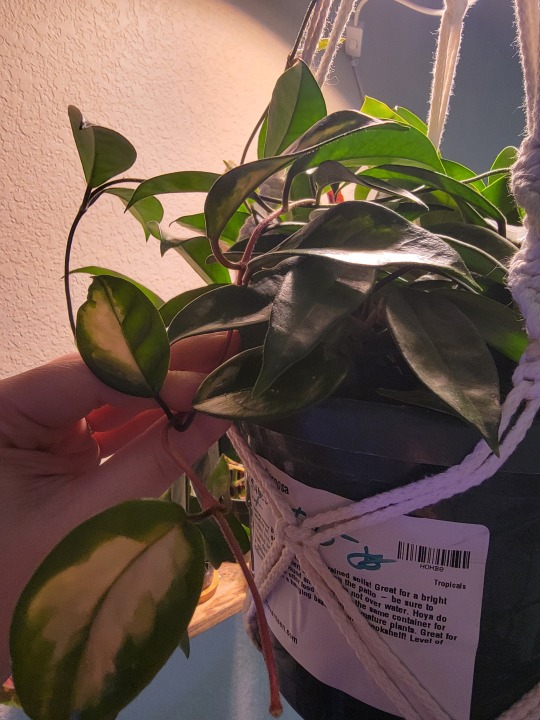
Hoya Carnosa, jade variety, after and before.
So this is my favorite plant, if you can't tell (it's the one in my avatar).
2 years ago, while I was walking through a houseplant store in Austin (that's sadly now closed), I saw this guy in the "needs TLC" section. I had no idea why -- it looked like an extremely healthy, large plant. It was around $35, and I figured I'd take it home. I didn't really have a plant this large and wanted to figure out whatever was wrong with it.
To this day I don't know why it was discounted, and it's not like I can ask them anymore. The current theory is that this plant was once a krimson princess/tricolor variety that had lost its variegation due to a lack of light. The only reason I suspect that is because it actually grew out a tricolor stem (shown in the last image) despite the rest of it being entirely jade. Normally plants don't re-variegate after losing their white, but apparently this type of carnosa can.
(Side note: this means don't buy monstera albos that have lost their variegation for ridiculously high prices. They're probably not going to grow their variegation back, and you've likely just been scammed).
Back when I lived in Austin, the plant never really loomed. Since moving to Massachusetts? I don't know if it's the water or what, but this plant has started blooming like crazy. It almost always has some kind of bloom. Last I counted it's grown about 10 peduncles since moving here (in the span of about 8 months). The blooms don't really smell at all but hey, they look nice.
Care below.
Hoya carnosas are one of the most common varieties of hoyas. They often have a lot of variety just within the plant type itself -- there's hindu ropes/compacta, krimson queens/rubras, krimson princesses/tricolor, argentea picta, argentea princess, krinkle, freckles, nova ghost, wilbur graves... The list goes on.
Generally the difference between them is how variegated they are, whether the variegation is on the edges of the leaves or in the middle, how scrunky their leaves are, and the amount of splash on them. And the rarer ones can get expensive. Jades, rubras, tricolors and compactas are all pretty cheap and common, but argentea princesses and wilbur graves can get EXPENSIVE.
Care for the plant is moderate compared to your standard houseplants. They require indirect light, but high filtered light or an artificial light encourages splash -- little white dots that form on the leaves. Do not put them in direct sunlight. They will burn.
For soil, you want something light and airy. Hoyas traditionally grow in trees, and so they do NOT like having their roots remain continuously wet. While you can grow it in your basic bitch traditional soil from any gardening store, you want to be extremely careful with watering, leaving the soil dry until the plant's thick leaves become thin and pliable before watering again. I heard it referred to as the 'taco test' -- when you can bend the leaves closer to the base like a taco, that generally means they're ready to water.
What's better for them is orchid potting mixes. Orchids are similar -- they also grow in trees, and since orchids are a little more common than hoyas their potting mixes are more common in gardening stores. What I personally do is plant mine in either long-fibered sphagnum moss or lechuza pon. Leca balls (i.e. clay balls) also apparently work. Just remember to fertilize them every now and again, and water them when the material gets dry. Really, if you just treat them like orchids, you'll probably be okay. Except don't use the ice cube method (for hoyas OR orchids).
Watering is mentioned above -- they like their roots to get air and dry out. You can water them more frequently if you plant them in airy material like sphagnum moss or pon, but err on the side of leaving the material dry. They'll live.
Hoyas don't really need a lot in the way of repotting, and you can leave them in their pots for years. Their root system is not that big. I've heard advice that hoyas won't really grow until their roots fill out the pot, but I've also heard this is bullshit. I've had mixed experiences.
Hoyas like higher humidity (around 70-80) but they can grow at standard household humidity. Lower humidity takes longer for them to grow, and chances are they won't form as many blooms, if any. They grow very nice in a greenhouse.
Speaking of blooms -- these plants grow blooms from peduncles, little nodes that grow off of the plant. Do NOT remove these. The hoya will bloom repeatedly from the same peduncle. So leave them on.
They are propagated extremely easily, with just your standard "throw it in a cup of water, done" method. That said, they do take MUCH longer to root than standard houseplants, and their roots are very fragile. I have knocked their roots off while moving them in the cup, requiring them to restart.
Overall, hoyas are a very slow-growing and yet rewarding plant. They can take months to grow, and years to get anywhere to fullness. If you can't tell, they are my favorite type of plant.
3 notes
·
View notes
Text


So. Made a terrarium for the first time, as a proof of concept for a much bigger bioactive. Me and my wife took a bunch of pictures of the process, and I want to show them off somewhere so y'all get them!
The first step was applying and carving a bunch of spray foam -- well, the first step was actually to find, bake, cut, and arrange the cool sticks, but we're starting at spray foam.
(I somewhat miscalculated branch placement, forgetting to account for like 5 inches of substrate at the bottom, and ended up with some of the cool arrangement under dirt. Boo.)


Next was to mix up a bunch of dirt and coco coir into a texturally interesting mess, and then apply black 100% silicone to the carved foam.
We spread it out before mashing the dirt mix all over it, mounding it up a bunch. We worked in small areas to avoid the silicone setting before the substrate could adhere, and let it set for like 3 hours before shaking off the excess.
The silicone has to set for 48-72 hours, so now... we wait.


The next step, purely aesthetic, was Gorilla Gluing down a bunch of dry sphagnum moss. Honestly this really made the thing look great by the end, though here it looks a bit jank.


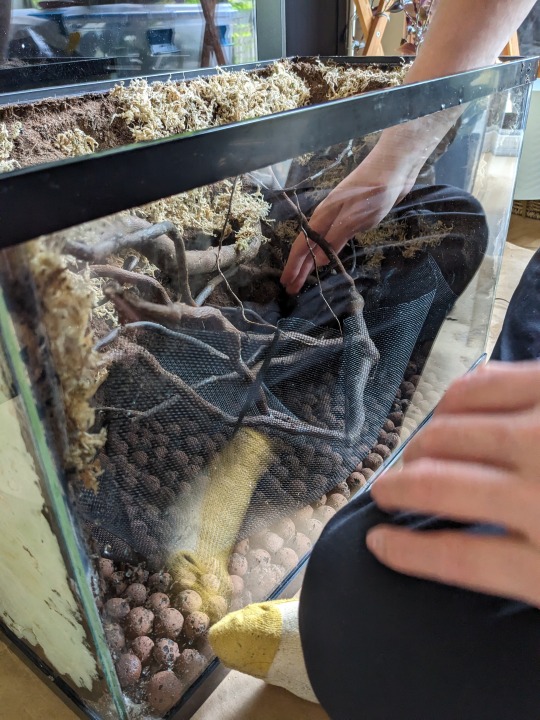
Next! Leca! Clay balls that serve as a drainage layer for the dirt: very necessary to keep down mold issues over time. Then a sheet of cut-to-size window screen, to keep the dirt from getting in the leca.
We had to cut it smaller than we thought, after all that spray foam, and it was a pain to get in flat between all the cool sticks. (also, ear jumpscare.)


Next! Processing the plants! (Technically it's best to do this a couple weeks ahead of time and quarantine them in a drylock bin, but yolo.) We used SerpaDesign's method -- rinse off substrate, soak for ~15, 5 minute very diluted bleach bath, soak for another ~10, then plant. I am nervous some of the more delicate plants will have some trouble after this, but we'll see.
We ended up using a spider plant, some wandering dude, a persian shield, an aluminum plant, a spider plant and some backyard moss.

(whispers) secret moss


Planting!! A huge pain around all those teeny branches, and I broke a few in the process, ough
We added springtails, too. Didn't snap a shot of that.


LOOK at this thing!!! These isopods are gonna be the happiest damn isopods!
#terrarium#process#terrarium build#bioactive terrarium#plants#botanical#spider plant#persian shield#moss#aluminum plant#OOGH I'M SO PROUD OF THIS
0 notes
Text
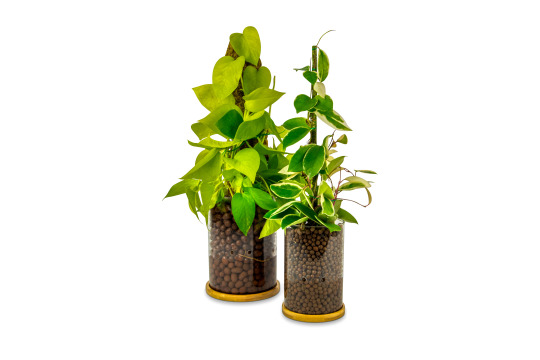
How to Use Leca, A Beginner's Guide to Semi-Hydro Plants
Semi-hydroponic gardening with leca is an innovative and rewarding approach to indoor gardening. This method offers numerous benefits, including improved plant health, efficient nutrient absorption, and simplified watering. If you're new to semi-hydroponics and eager to explore this exciting indoor gardening technique, this beginner's guide will provide you with the essential knowledge and steps to get started.
1: Understanding Semi-Hydroponics and Leca
Semi-hydroponics is a method of growing plants using a soilless medium while providing water and nutrients in a controlled manner. Leca, or lightweight expanded clay aggregate, is a popular choice for the medium in semi-hydroponic gardening. As the name suggests, Leca is lightweight, porous clay balls that retain moisture and provide aeration to plant's roots.
2: Selecting Suitable Plants
Most plants can thrive in semi-hydroponic setup. Choose plants that thrive in well-draining conditions and are adaptable to different growing mediums. To increase chances of success, pair plants with smaller or larger leca balls depending on the size of their roots. Research and select plants that align with your preferences and the conditions of your indoor space. To get personalized tips on what plants to use, contact us at www.planthappyproducts.com
3: Acquiring the Necessary Supplies
To get started, gather the essential supplies for your semi-hydroponic grow setup. This includes self-watering planters or containers, leca, and a nutrient solution specifically formulated for hydroponic or semi-hydroponic gardening. We specialize in providing the simplest leca setup around called our "Hydro-Friendly Planter," available on our website. You'll also find our recommendation for effective and affordable fertilizer.
4: Planting in Leca
Rinse the leca thoroughly to remove dust and debris, and (optionally) soak it in water to hydrate the clay balls. Gently remove the plants from their current containers, wash off all excess soil, and place them in the planters filled with leca. Ensure that the roots and stems sit above the water line and make contact with the leca. Provide stability and avoid gaps by adding more leca around the plants if necessary.
5: Watering and Nutrient Management
Fill the water reservoir in the self-watering planters with water mixed with the appropriate concentration of nutrient solution. The leca will absorb the water and nutrients, providing them to the plants' roots as needed. It's easy to visually monitor the water level and refill the reservoir when necessary. Adjust the nutrient solution concentration according to the plant's growth stage and requirements.
6: Maintenance and Care
Regularly inspect the health of your plants and check for any signs of nutrient deficiencies, pests, or diseases. Prune and remove any dead or yellowing leaves to maintain plant vitality. Clean the leca periodically by rinsing it with water and hydrogen peroxide to remove accumulated salts or debris. Add hydrogen peroxide to the water to avoid algae growth. Additionally, follow a regular fertilization schedule based on the specific needs of your plants.
Embarking on a semi-hydroponic gardening journey with leca opens up a world of possibilities for indoor plant enthusiasts. By following this beginner's guide, you'll gain the foundational knowledge to set up and maintain a successful semi-hydroponic garden. Watch as your plants thrive in this innovative system, providing you with a beautiful and rewarding indoor garden experience.
1 note
·
View note
Text
#best leca balls#best leca balls for plants#buy leca balls#buy leca balls near me#clay leca balls#how to plant in leca balls#how to use leca clay balls#leca balls#leca balls amazon#leca balls as mulch#leca balls benefits#leca balls bulk#leca balls buy#leca balls fertilizer#leca balls for bonsai#leca balls for cactus#leca balls for drainage#leca balls for houseplants#leca balls for orchids#leca balls for plants#leca balls for succulents#leca balls hydroponics#leca balls indoor plants#leca balls mixed with soil#leca balls online#leca balls plants#leca balls to buy#leca balls use
0 notes
Text
a weird thing I noticd with the plant community is people saying how much better it is to put your plants in leca rather than dirt but then they also say that you have to do all this special care to make sure the plant is cared for correctly since it doesn't have an organic substrate. and all I can think is "so is the leca what's good here or is your plant just doing better because you are now providing it constant maintenance?"
#leca is expanded kild dried clay balls that are super airy and wick moisture#stands for lightweight expanded clay aggregate
15 notes
·
View notes
Photo

Hydroton Clay Pebbles
Need expanded clay aggregate? Expandedclayaggregate.com is the leading expanded clay aggregate supplier & manufacturer and in India to get quality ECA. More Details visit : https://www.expandedclayaggregate.com/get-details/eca-hydroponics.html
0 notes
Text
youtube
Tammy visits a couple who have turned their home into a hydroponic house for aroids. Subscribe 🔔 http://ab.co/GA-subscribe
We often think that gardening needs to involve good soil, compost, and lots of sunlight but there are less traditional methods growing in popularity.
Alicia Qian and Nigel Rannard met through their love of plants and have since created a home and business centred on growing wild and wonderful tropical plants powered by hydroponic systems. Alicia’s background in science and research combined with Nigel’s engineering experience allowed them to turn their large collection and hobby into a full-time job.
Hydroponic systems:
The system starts with a reservoir of water that is pumped up into a tray that the plants are sitting in. The system is set up on a timer so that the water is pumped up 5 times a day and stays in the tray for 5 minutes before completely draining away back into the reservoir. This is to ensure the plants are never getting soggy. Nutrients and a pH adjusting chemical are added every month to the reservoir as well.
The plants grow in clay balls, or ‘leca’ that are great for drainage. “They hold moisture inside them, but they allow any moisture that’s held between the balls to just release and allow air into the root zone.”
Lighting:
Plants inside the house are growing with natural light and flood lights. In the grow tents, they have set up specialised grow lights - “a full spectrum light including ultra-violet and infrared wavelengths. It brings out more colour, it brings out better health in the plant.”
Hybridising:
Whilst Nigel is tinkering with the systems, Alicia is painting with pollen to create new hybrid anthuriums. “Hydroponics provide the optimum conditions for plants to go through more life cycles more quicky. They reach maturity faster, the flower more and therefore [we] have more opportunities to create more hybrids.”
A hybrid is created when two genetically different parents are bred together. The aim is to create a bigger gene pool along with plants that have new, unique traits such as size, shape, colours, and textures. Whilst she sometimes knows what species will or won’t cross well together, Alicia says “it’s really still trial and error though which is part of the fun and experimentation.”
The hybridisation process starts with an inflorescence – for anthuriums this looks like a long spike which is covered in many tiny flowers. The flowers start off as female and produce a sticky wet substance that indicates it is receptive to pollen. After a few days the flowers go through the male phase and produce pollen. “By having the phases separately, the flower usually cannot pollinate itself.”
Alicia collects pollen as it appears, bags and labels it and stores it in a freezer until a suitable mate is in the receptive female phase. Then she simply dabs it on with a paintbrush! If fertilisation has been successful, red berries containing seeds will form and then the cycle starts again.
Some of the outcomes include beautiful anthuriums with large textured leaves or some have shiny crystalline patterns. Once shared and sold online they get lots of feedback and progress photos that help to understand how the new plants develop over time and which hybrid crosses have been most successful.
Featured Plants:
PHILODENDRON ‘GLORIOUS’ - Philodendron gloriosum x melanochrysum
MANJULA POTHOS - Epipremnum aureum ‘Manjula’
HYBRID CRYSTAL ANTHURIUM - Anthurium crystallinum cv.
- Anthurium forgetii ‘Dark Bullet’
- Anthurium forgetii ‘Hungry Uncle’
#gardening australia#Australia#solarpunk#hydroponics#plants#gardening#garden#Alicia Qian#Nigel Rannard#growing plants#water#Youtube
4 notes
·
View notes
Text
Semi Hydroponics Fertilizer Growth Without Soil
Semi Hydroponics Fertilizer Growth Without Soil Semi Hydroponics Fertilizer. Semi-hydroponics may be the answer you've been looking for if you love houseplants but find them difficult to maintain or the soil too messy to handle indoors. Most houseplants can be easily transformed into "semi-ponic" plants using semi hydroponics, which are simpler to maintain and don't require any soil at all. image of Semi Hydroponics Fertilizer How does semi-hydroponics work? A growing method called semi-hydroponics, also referred to as semi-hydro, semi-ponics, or LECA, involves replacing soil with inorganic mediums like clay balls, LECA, and other absorbent mediums that are typically found in hydroponic growing systems. The trend among fans of houseplants is to move plants from soil to semi-hydro. To learn more about semi-hydroponics and how it functions specifically, continue reading. The Workings of Semi-Hydroponics A passive growing technique called semi hydroponics allows you to take common houseplants and transform them into easier-to-care-for plants without the use of soil. Plants grown using this method are referred to as semi-hydroponically and are placed into "double" containers. Inorganic components are kept in one container, where they serve as a plant's anchor and aid in water absorption. A reservoir, similar to those typically found in hydroponic systems, serves as the second container. The bottom of the top container has tiny drain holes that allow the two containers to fit together like a glove. Watering the plants causes the water to drain into the second container after the plants have absorbed what they require. Plant roots may act as wicks, drawing water from the reserve as necessary. Semi-ponic plants are incredibly simple to take care of if set up correctly and kept in good condition. Furthermore, there is a significant decrease in pests, soil-borne bacteria, and diseases. Pots & Containers for Semi Hydroponic Plants Self-watering pots and containers are ideal for semi-hydroponic growing. You've probably seen them in the gardening section of your neighborhood department store or while browsing Amazon online. The ideal container for semi-hydroponic growing is one that not only has room for the plant of your choice, but also, at the very least, a shallow reservoir in a second, lower section of the container. I'm using these pots for my indoor plants, and they're doing a great job. Even the nursery pots you use to transport plants home can be placed inside a cache pot that has been filled with nutrient water as a less expensive option. The DIY aspect of making one's own pots and containers is something that many semi-hydroponic enthusiasts appreciate. There are countless options. Semi-Hydroponic Environments Many different growing media are effective for semi-hydroponics. Despite this, they all have the same qualities: they are inorganic, absorbent, and frequently used in hydroponics. Popular options include: LECA / Clay balls (I’m currently using these) Pumice Loose gravel River rock Sand Foam Rockwool Vermiculite Perlite Other soilless mixes In LECA, can any plant grow? Since most plants can grow in it, lightweight expanded clay aggregate, or LECA for short, is the ideal medium for semi-hydroponics. The most suggested medium for semi-hydroponics is LECA. Because of this, many semi-hydroponic gardeners refer to the actual growing technique as LECA. Almost all plants thrive in LECA after being adjusted. The only distinction is that some plants require less watering while others require more frequent watering. However, using soil accomplishes the same thing, so there is no real drawback. Taking Care of Semi-Hydroponic Plants Once converted to semi-hydroponics, the majority of plants only need to be watered once every two to three weeks. Naturally, as with any growing technique, there are always exceptions. Regardless of the growing medium they are in, some plants will always require more watering than others. In general, plants grown in semi-hydroponic systems can go up to two to three times longer between waterings than the same plants grown in soil. Semi-hydroponic nutrients and fertilizer Semi-hydro plants require fertilizer and/or nutrients, which is a key distinction between plants grown in soil and those grown using semi-hydroponic techniques. Plants can extract all the nutrients they require from soil and solid fertilizers. You'll have to make up for lost nutrients if you use LECA or clay balls to replace their growing medium. The water you use to feed them is the best way to add nutrients to your semi-hydroponic system. Alternatively, you could fill the reservoir with your liquid fertilizer and let the plants draw it up as needed. The same macronutrients that hydroponic plants need are also needed by semi-hydroponic plants: Nitrogen Potassium Phosphorus Calcium Magnesium Additionally, they require some micronutrients: Sulphur Iron Manganese Copper Zinc Molybdate Boron Chlorine This video was a huge help when I first started converting my soil-based indoor plants to passive hydro because it explains nutrients, pH, and the precise requirements. Soil versus semi-hydroponics Semi-hydronic gardening has many advantages over traditional soil-based gardening. In comparison to semi-hydroponics, soil has more bugs, bacteria, diseases, messes, and requires much more frequent watering. Additionally, soil has a limited lifespan and must be fertilized, recycled, or entirely replaced. With semi-ponics, the inorganic medium lasts significantly longer and only needs occasional cleaning. All things considered, growing plants in semi-hydronics is always simpler than growing them in soil. This includes putting them in the ground, growing more of them, caring for them, and watering them. Hydroponics versus Semi-Hydroponics Although hydroponics is a great way to grow plants, semi hydroponics is far more practical for growing houseplants, flowers, and herbs. why not There are a few reasons, though: - Hydroponics requires more room and takes longer. - Hydroponics requires various components, including water pumps, air pumps, and others. - The upkeep and monitoring requirements for hydroponics are much higher. - Because of hydroponics, your electricity bill is higher. - The learning curve for hydroponics is steeper. In comparison to hydroponics, semi hydroponics is simpler, requires fewer resources, and requires less skill. In comparison to the latter, it also saves you time and space. Pros and Cons of Semi Hydroponics Anyone can learn Requires less water Easy to convert plants from soil to semi-ponics Cost less than hydroponics Takes less time to care for than soil, hydroponics, and other grow methods Plants are free to drink and feed as they need No mess from soil No complicated components Plants require nutrients or fertilizer Plants may go into shock while being converted to semi-ponics There are a few initial costs to converting from soil to semi-ponics Best Plants For Semi-Hydroponic Growing Technically, the semi-hydroponic method can be used to grow just about any plant that grows indoors. However, some plants can be converted to semi-ponics much more easily than others. The following are some of the best plants to grow using semi-hydroponic methods: Alocasia (like Alocasia Tiny Dancer) Anthurium Calathea (like Calathea White Star) Chinese Evergreen Croton (like Mammy Croton) Desert Rose Dracaena Euphorbia Prayer Plant Ficus Hoya (like Hoya Publicalyx) Ivy Monstera Money Tree Peace Lily Philodendron (like Birkin Philodendron) Schefflera Sansevieria How to: Semi-Hydroponic Plant Conversion Semi-hydroponics is not as difficult to learn as it first appears. When you get going, you'll question why you put off starting. Materials required: A tote or trash can for old dirt A large solid pot with no drain holes and a slightly smaller pot with drain holes in the bottom (I highly recommend this 6-pack on Amazon) An inert growing medium (such as LECA or clay balls, like these) A pH meter or test strips kit pH adjuster (this kit has the test strips AND pH adjuster) Liquid nutrients A plant 1. Take the plant out of its current container and clean the soil Get on top of an old plastic bag or trash can, take the plant out of its current container, and start gently shaking the dirt loose. 2. Wash the plant roots After getting rid of all the dirt you can, thoroughly rinse the roots in water. TIP: If at all possible, carry out this task outside to avoid clogging your sink. If you don't remove all of the organic material (soil, peat, bark, etc.) from the roots, issues will arise. During this process, it's normal for a few roots to break off, but proceed with caution. When you're done, the roots ought to primarily be white. Check the firmness of the roots if they are yellow or brown in color. They shouldn't be potted again if they are smooshy because they might have root rot. 3. Prepare new medium and pots by rinsing them. Insert your plant into a glass or mason jar full of fresh water, and then give it a few more minutes to soak. Prepare the new medium (hydroton/leca) at this time by rinsing it in the sink or a bucket. Until the water is clear, rinse. (Once more, I advise outdoor rinsing to keep clay dust out of your drains.) The new medium shouldn't be added until you've thoroughly cleaned and dried the new containers with soapy water. It's time to move on after these tasks have been finished. Set the smaller pot with holes in the bottom inside the larger solid pot, adding 1/3 to 1/2 of your medium to it. 4. Prepare and test your nutrient water I make use of these General Hydroponics hydroponic nutrients. To make your nutrient water, follow the directions on the back of the label. I gave my plants 1ml of each nutrient per gallon of water when I started them. Additionally, I use distilled water. As your plants become accustomed to the new conditions, you can increase. Once more, I urge you to watch this video on semi-hydro nutrients. 5. Examine and adjust pH as necessary Check the pH of your nutrients right away. Grab your pH adjuster and test strips. For instructions on testing your water, refer to them. The pH should, in general, range from 5.5 to 6.0. There are numerous exceptions, though, so be sure you are aware of the appropriate pH for the species you are cultivating. Add pH UP or pH DOWN right away to balance the pH level if it is not as balanced as it should be. Every time you adjust the water, keep testing it. 6. Move the Plant to a New Media Remove your plant from the water-filled jar once the new pots are prepared, then spread its roots out. It should be placed in the container with its main roots pointing in different directions. Make sure the roots are as widely separated as you can. Fill the remaining space in the container with the new growing medium slowly and carefully. You can call this step done once your plant is securely anchored. 7. Regularly water the plant and top off the reservoir Feed your plant for the first time after combining your liquid nutrients with water. You should hear water dripping into the larger solid container from the drainage holes. The reservoir is full when you can no longer hear this. A third of the way up the net pot should be covered in water. 8. Top-Off and Re-Fills with Nutrients When the water level drops, top it off with nutrient-free, pH-balanced water (topping-off with nutrient water messes up the nutrient levels and can harm the plant). Your pH will have risen (to 7.0 or higher) after 1-2 weeks, at which point it's time to completely replace your nutrients and refill each plant's reservoir. You should also wash your plants in the sink at this time to get rid of any mineral buildup (white staining on leca). View this video to get a good idea of how this schedule will look. Optional Step For Plants Suffering From Pest Issues Changing a plant in the soil that has a pest issue? Think about first giving your plant a bath. This optional step would follow Step 1, as described above. Prepare a soapy water mixture in your sink or an empty tote (I'd suggest this vegan, organic, unscented soap). Just a few drops per gallon of water will be sufficient. Put the entire plant, container included, in the soapy water. Allow it to soak there for at least 15 minutes (longer is even better). As a result, the soap and water have enough time to work. All pests and bacteria should have been eliminated by the time you return. It's time to slowly remove the plant from its container at this point. This procedure can be carried out in a variety of ways. The simplest method is to remove the container from the water, let it drain, and then carefully lift the plant from the base and move it up and away from the container. Process finished; move on to Step 1 above. Potential Problems to Look Out For Semi-hydroponics is generally awesome, but there are a few potential problems you should be aware of when you first begin. These issues consist of: Overwatering Over-fertilizing Not soaking your plants and preparing them for the conversion from soil to an inert growing medium Not giving your plants proper time to adjust to their new environment before setting your new watering schedule Are Semi Hydroponics and Passive Hydroponics the Same? Semi-hydroponic and passive hydroponic systems are identical. They are just two different names for the same thing: a straightforward technique for growing plants without soil, using an inorganic medium, water, and liquid nutrients. Four Tips for Semi-Hydroponic Growing Success 1. For higher success rates, use younger plants Your plants' chances of making the switch to semi-hydro with little to no stress are better the younger they are. Older plants could die or lose more leaves. 2. Think About Utilizing a Water Gauge If possible, place a water gauge inside the semi-ponic system's reservoir. This eliminates all uncertainty regarding the water levels. Top them off when they fall. 3. Prepare Your Plants Gradually An alternative method of transitioning your plants is to soak them each day, remove some soil, and replace it with an inert medium for a few days at a time. Your plant will be residing in a medium that is more inert than actual soil after four to five days. 4. Allow Your Plants Some Adjustment Time Give your plants some time to adjust after removing them from the soil and placing them in semi-ponic containers. Don't panic and toss them back into the ground if they are shedding leaves or seem a little droopy (which would likely kill them). Last Words on Semi-Hydroponics Semi-hydroponics, also known as LECA or semi-ponics by proponents of the growing technique, is an excellent way to transform houseplants from untidy soil-based plants into thriving plants that thrive in an inert medium. Another great way to make the switch from soil-based gardening to hydroponic gardening is through semi-hydroponics. Whatever way you look at it, soil-based plant cultivation is clearly outclassed by semi-hydronics! Semi Hydroponics Fertilizer What fertilizer is best for LECA? The best fertilizers to use are those designed for hydroponics. I recommend Flora Grow and have seen great results when using it. I also recommend SUPERthrive in your water changes and when rooting plants in LECA. Can you use regular fertilizer for semi hydroponics? Yes. First you need to completely avoid products that contain N mainly as urea or ammonium. Useful products to get for your hydroponic grow will be fully water soluble and will either contain nitrogen solely as nitrate or no nitrogen at all. What is the best fertilizer for hydroponics? Best Hydroponic Nutrients 2019: Reviews and Buying Guide Top Pick. General Hydroponics Flora Grow, Runner-up. FoxFarm FX14050 Big Bloom, Top Powder Hydroponic Nutrient. General Hydroponics Maxigro, Top Organic Hydroponic Nutrient. General Hydroponics General Organics. Great Supplement. General Hydroponics. How do you add fertilizer to LECA? Take a gallon jug and fill it with tap water, then add any fertilizer you currently use but dilute it to 1/4 - 1/2 of the recommended amount. That is now your nutrient solution. You can also scroll down to the bottom to see an ingredients list and measurements if you want to skip the sciency stuff. Can I use regular fertilizer in LECA? When your plant grows in Leca, you have to fertilize it every time you water it. You need to use special hydroponics fertilizer for this, as normal plant fertilizer is a supplement to the nutrients in the soil. Can I use LECA without nutrients? You don't need to get everything straight away Yes, you will need nutrients designed for hydroponic set ups BUT your plants will survive for a few weeks in LECA with no nutrients. Is NPK enough for hydroponics? NPK is even more important in hydroponic gardens because plants don't have access to natural nutrients in the water. NPK provides all of the nutrients that plants need to grow big and strong! Without NPK, plants will not be able to grow healthy and strong. Can I use Miracle Gro for hydroponics? Miracle-Gro can be used in your hydroponics system. However, it isn't highly recommended because some Miracle-Gro fertilizers don't always break down well enough or supply all required nutrients. If you do opt to use Miracle-Gro for hydroponics, it's suggested to avoid the traditional types. How do you use NPK 20 20 20 hydroponics? NPK fertilizers are water-soluble and can be taken up by the plant almost immediately. An all-purpose, 20-20-20 fertilizer will provide the nutrients all plants need for healthy growth. DOSAGES For seeds and seedlings- use 1/4 tsp. to 1 liter water. After 3-4 true leaves come out - use 1/2 tsp. to 1 liter water. What is the best organic fertilizer for hydroponics? A few of the best types of common organic fertilizer used for hydroponics are: Manure based. Fish meal. Gypsum based. Bone meal. Guano. Blood meal. Compost based. Plant based. How do you make hydroponic fertilizer? How do you make organic hydroponic fertilizer? How often should you flush LECA? You should clean your plant in LECA about once every 1-2 weeks. This is a great time to check the root system and adjust the plant's placement in the pot as necessary. If you're planning on reusing the LECA, make sure to clean (or at least rinse) the clay before repotting your plant. Should roots touch water in LECA? Never pot in to very dry Leca, as Leca wicks water really well. If the only water available is in the roots, it could suck water out of the roots, instead of the other way around. Pro tips: Pot up so roots are well spread out instead of clumped together, touching each other. How often do you water with LECA? Regularly watering LECA plants is super easy. Most plants that are 6-inches or less require watering just once every 2 to 3 weeks. Simply add the water directly to the reservoir/bottom container. Read the full article
0 notes
Text
How to Use LECA for Plants? Getting Started With LECA Clay Balls
How to Use LECA for Plants? Getting Started With LECA Clay Balls
View On WordPress
0 notes
Text

New leaves growing on the Phalaenopsis orchid I almost killed! I am 2 for 2 on rescues so far. Setting the plant in sphagnum moss on top of leca clay balls has been amazing.
0 notes
Text
Leca: Everything You Need to Know About Leca
Leca: Everything You Need to Know About Leca
The word Leca is an acronym for Lightweight expanded clay aggregate. It’s a mouth full, and it might seem complicated however it’s quite simple once you understand what it is. In essence, LECA is a soil-like growing medium that you can use to cultivate your plants. LECA is a set of baked clay balls that swell when submerged in water. Clay is cooked to around 1,200 °C in a rotary kiln. Numerous…

View On WordPress
0 notes
Photo

Plant Nutrition Available for Sale! Cocopeat 35 Rs.KG Vermiculite 100 Rs.KG LECA Clay Balls 100 Rs.KG Perlite 110 Rs.KG Vermicompost 20 Rs.KG +Shipping COD not available WhatsApp or Call - 8687369040 Interested buyers plz dm me.. (at Houseplants) https://www.instagram.com/p/CS60WJuFFyC/?utm_medium=tumblr
0 notes