#chrome.//net-internals/dns
Explore tagged Tumblr posts
Visit Tumblr Blog
Explore Tumblr blogs with no restrictions, modern design and the best experience.
Last Seen Tumblr Blogs


Fun Fact
In Q3 of 2020, 31% of US users access the Tumblr app daily.
Text
#chrome.//net-internals/dns#chrome //net-internals/#dns#chrome://net-internals/#dns clear#www.chrome //net-internals/
0 notes
Text
How Chrome DNS Cache Interacts with VPN and Proxy Settings
If you ever have used VPN or proxy service while surfing the internet, you may have noticed sometimes that the websites still load up from their original locations or somehow redirect unexpectedly. The reason behind this could be lurking in the browser's DNS cache. Specifically, in Google Chrome, the Chrome Net Internals DNS tool provides a unique window into how cached DNS data works — especially when paired with VPNs and proxy servers.
Let's deconstruct it all here in this tutorial, delving into how DNS caching operates, how it gets along with VPNs/proxies, and how to properly control it using Chrome Net Internals DNS in 2025.
What Is DNS Caching in Chrome? DNS (Domain Name System) works like the internet phonebook — converting domain names (such as example.com) into IP addresses your computer can use. To preserve time, your browser caches these lookups temporarily in what's a DNS cache.
In Google Chrome, the browsing cache can be tracked and controlled via the Chrome Net Internals DNS page. Using this tool will allow you to list the DNS entries in the cache, track DNS history, and eventually flush the DNS cache when necessary.
What happens when you use a VPN or proxy? A VPN or a proxy server redirects your internet traffic to another server, hiding your original IP address and location. Still, even with the traffic stream redirected through a VPN or proxy, your browser could use an old DNS cache, so websites might resolve to the old IP instead of the new route, and region-locked content might not come in.
Some websites may load slowly or incorrectly.
This is where the Chrome Net Internals DNS tool becomes critical. It helps clear out outdated DNS entries that are no longer valid when you're switching between VPNs, proxy servers, or even networks.
Why DNS Cache and VPN/Proxy Settings Can Clash Here’s why the combination of DNS caching and VPN/proxy settings can be problematic:
Cached IPs Don't Match VPN Routing When you go to a site without booting up a VPN, Chrome stores its DNS record on your local network. But when you enable a VPN, the path is altered — and the DNS entry may no longer be valid. This inconsistency can lead to problems or forward you to the wrong versions of the site.
Proxy Servers May Not Force a Fresh DNS Lookup Not all proxies override local DNS lookups. That means Chrome may still use its old cache unless you go into the Chrome Net Internals DNS interface and manually clear it.
Privacy Leaks A stale DNS cache may leak your actual location or ISP to websites even when you seem to be using a VPN. This defeats one of the main reasons for privacy-focused browsing.
How to Clear DNS Cache with Chrome Net Internals DNS (2025) To ensure your VPN or proxy works properly with Chrome, it’s a good idea to clear the DNS cache. Here’s how you do it using the Chrome Net Internals DNS tool:
✅ Step-by-Step Guide: Open Google Chrome.
In the address bar, type: chrome://net-internals/#dns Press Enter.
You’ll land on the Chrome Net Internals DNS dashboard.
Click the “Clear host cache” button.
Boom! Chrome now clears your DNS cache. Any time you go to a website from now on, Chrome is going to automatically resolve the domain name via your VPN or proxy, rather than your previous network configuration:
Optional: Flush Sockets for Even More Clean-Up Sometimes, active connections might still be using outdated network data. To flush even deeper: chrome://net-internals/#sockets Click "Flush socket pools." This fully cleans your network connections and re-establishes all of them through your current VPN or proxy route.
Best Practices When Using VPN or Proxy with Chrome To prevent problems, the following are a couple of best practices:
Always clear the DNS cache using Chrome Net Internals DNS when going online or offline with a VPN.
Reboot your browser to terminate any long-lived connections that won't reset automatically.
Use safe DNS settings (such as Cloudflare or Google DNS) if you're not depending on the DNS provider of your VPN.
Try setting Chrome to always use secure DNS over HTTPS (in Chrome settings).
Real-World Use Case Let's say you're a digital marketer and are trying to see how your site looks in various locations. You use a VPN to pretend you're from various places — but no matter how often you switch, the page loads the same. That's likely because Chrome is using cached DNS information.
By purging your DNS cache with Chrome Net Internals DNS, you guarantee your browser fetches new DNS data that corresponds with your new VPN location. It's a little thing that can save you a lot of heartache.
Final Thoughts Browsing the web securely and quickly in 2025 is more crucial than ever before. Though VPNs and proxies keep your privacy intact and allow access to geographically restricted content, they sometimes don't get along well with your browser's DNS cache.
Thankfully, Chrome Net Internals DNS gives you control over such matters. Flushing the DNS cache every time you switch networks or VPN routes will ensure you always browse in accuracy, in privacy, and in severance.
Next time you feel things "just" aren't "quite" right about using a VPN in Chrome, just recall: open up Chrome Net Internals DNS, hit that "Clear host cache" button, and you're good to go.
#Chrome Net Internals DNS#flush DNS cache#DNS lookup#Chrome browser tools#fix DNS errors#VPN browsing fix#browser speed boost#network troubleshooting#clear host cache#Chrome DNS 2025#web troubleshooting#Google Chrome tools
0 notes
Text
Resolve Slow Browsing with Chrome-Net-Internals-DNS: Here’s How (2025)
Why Your Internet Might Be Sluggish
Is it taking an eternity to load a website or it's not opening at all? Before blaming your internet connection, consider clearing your DNS cache using a little-known hidden tool that Chrome has called chrome-net-internals-dns.
This is one of the easiest ways to speed up your browser and eliminate irritating connection failures—without downloading additional software.
Browsing Issues in 2025 Are More Common Than You Think
As of 2025, issues around browsing a website are more common than ever because the browser you may be using could have a stale or corrupted DNS entry cached.
Don't be surprised! DNS is designed to simplify your surfing behavior, but sometimes things get confusing, and the browser is simply protecting you from clicking something crazy.
What is Chrome-Net-Internals-DNS and How It Works
In Google Chrome, you can check, manage and flush your DNS cache using the built-in tool located at chrome://net-internals/#dns.
This guide will cover everything you need to know about chrome-net-internals-dns, including:
What it is
How it works
Step-by-step instructions for both desktop and mobile
We’ve also included how to clear socket pools to fix recurring issues related to unstable connections or failed loading.
Advanced Methods Beyond Chrome-Net-Internals-DNS
If you tried clearing the cache but still have no relief, do not worry. We provide advanced methods for:
Flushing DNS on Windows, macOS, and Linux
Resetting Chrome flags
Changing your DNS provider to Google DNS or Cloudflare DNS
Troubleshooting Common DNS Problems
Also included is a list of general DNS problems and how to troubleshoot them effectively.
Whether you’re a casual user or a tech-savvy browser, learning to use chrome-net-internals-dns can greatly enhance your browsing experience.
Take Full Control of Chrome’s DNS Settings
Don't accept a slow internet or broken sites without discovering how to optimize Chrome like a pro!
Read the full guide now and take control of your DNS settings today using chrome-net-internals-dns!
#Chrome Net Internals DNS#chrome-net-internals-dns#clear DNS cache#speed up Chrome#DNS fix 2025#network troubleshooting#Chrome flush DNS
0 notes
Text
Chrome Net Internals DNS Tool – Complete 2025 Guide to Clear DNS Cache

If you've ever had trouble loading websites or seeing updates after changing DNS settings, you’re not alone. Your browser may occasionally store DNS information that is incorrect or out-of-date. That’s where the Chrome Net Internals DNS tool comes in handy.
We will explain what the tool is, how it works, and, most importantly, how to use it to clear your DNS cache in 2025 in this straightforward guide. Whether you're a beginner or a tech-savvy user, this article will help you fix DNS-related issues quickly.
What is Chrome Net Internals DNS?
The Google Chrome browser includes a built-in tool called Chrome Net Internals DNS that enables users to view and manage DNS information. DNS stands for Domain Name System, which is the system your browser uses to translate web addresses (like google.com) into IP addresses (like 142.250.190.78).
When Chrome loads a site, it often stores the DNS results to speed up future visits. However, these saved records can become outdated or incorrect. Knowing how to use Chrome's internal tools to access and clear your DNS cache is crucial because of this.
Why Should You Clear the DNS Cache?
You may wonder, why would anyone need to clear the DNS cache?
Here are a few common reasons:
A website has moved to a new server, and you're seeing the old version
You're facing “site not found” errors for sites that work fine for others
You're switching between different network setups or VPNs
A web developer has changed the DNS settings, and you need the updated results
Clearing the cache resets the stored DNS records, forcing Chrome to fetch new ones. That way, you can avoid connection problems and get the latest content.
How Do You Access the Chrome Net Internals DNS Tool in 2025?
The tool lives inside Chrome’s advanced debugging section. Here's how to access it:
Open Chrome.
In the address bar, type: bash CopyEdit chrome://net-internals/#dns
Hit Enter.
This will take you directly to the Chrome Net Internals DNS interface, where you can view the list of cached DNS entries and take further actions.
Note: Google may update the design or layout in future Chrome versions, but the core features usually remain the same.
How Can You View Your Current DNS Cache Entries?
Once you’re inside the DNS section, you'll see a list of Host Resolver Cache entries. These are domain names your browser has resolved recently.
Each entry shows:
The hostname (website address)
The resolved IP address
Expiration times for each cached entry
This list gives you insight into what your browser remembers—and what may be causing a problem.
How Do You Clear the DNS Cache Using Chrome Net Internals DNS?
The process is very straightforward. Here’s what you do:
Open chrome://net-internals/#dns.
Look for the "Clear host cache" button.
Click it.
That’s it! Your DNS cache is now cleared.
After doing this, Chrome will reload DNS entries when you revisit websites. This action often solves strange errors or outdated content loading issues.
What Happens After Clearing the DNS Cache?
After clearing the cache:
Chrome will forget all stored IP addresses linked to domain names.
The next time you visit a website, Chrome will request fresh DNS information.
You might experience slightly slower loading times on the first visit—but that’s normal.
This is like giving your browser a clean slate. It helps ensure you’re accessing the most up-to-date version of websites.
Is It Safe to Use Chrome Net Internals DNS Tool?
Yes, it's completely safe.
You’re not modifying system-wide settings or affecting your entire device. You're only clearing cached records that Chrome itself stores. This tool doesn’t delete browsing history or saved passwords. It just clears temporary DNS lookups from Chrome’s memory.
It’s a good habit to use the Chrome Net Internals DNS tool every so often, especially if you browse many websites or switch networks frequently.
How Often Should You Clear the DNS Cache?
There’s no fixed rule, but here are a few guidelines:
Clear it if you face website loading errors
Clear it after DNS changes or switching to a new host
Clear it once every few weeks if you work in web development or networking
For most casual users, you won’t need to clear it regularly unless you're facing problems.
Frequently Asked Questions (FAQs)
1. Will clearing the DNS cache log me out of websites?
No. DNS cache and login sessions are separate. Clearing DNS won’t affect your saved passwords or logins.
2. Is Chrome Net Internals DNS available in all versions of Chrome?
Yes, it has been part of Chrome for years. However, its appearance and location may change with future updates.
3. Do I need admin rights to clear Chrome’s DNS cache?
No. Any user can clear Chrome’s internal DNS cache without needing administrator access.
4. Does this affect my entire computer’s DNS settings?
No. This only affects Google Chrome’s DNS cache. It won’t touch the system DNS cache used by Windows or macOS.
5. Will clearing the cache fix every website issue?
No, but it’s a good first step. If a site doesn’t load correctly after clearing DNS, the issue may be on the server side or with your ISP.
Conclusion
The Chrome Net Internals DNS tool is a simple yet powerful way to solve common web browsing issues. With just a few clicks, you can clear your DNS cache and ensure you're seeing the most current version of the web.
Whether you’re a web developer, digital marketer, or casual user, learning to use this tool will save you time and frustration. It's safe, easy, and effective.
So the next time a website won’t load or looks outdated, remember this guide and give Chrome’s DNS tool a try!
0 notes
Text

Chrome Net Internals DNS Tool – Complete 2025 Guide to Clear DNS Cache https://oragetechnologies.com/chrome-net-internals-dns/
0 notes
Text
How to Use Chrome’s Net Internals DNS Tool on Mobile Devices for Better Network Management
Chrome’s chrome://net-internals/dns tool is an invaluable feature for diagnosing and managing DNS settings, especially when facing connectivity issues. While most users know this tool on desktops, it’s equally beneficial on mobile devices. In this article, we'll cover how to use chrome://net-internals/dns on mobile devices, why it’s helpful for DNS troubleshooting, and tips to optimize Chrome's performance on Android and iOS.
What is chrome://net-internals/dns?
1.1 Understanding Chrome’s Net Internals Tool
1.2 The Importance of DNS Caching and Flushing
How to Access chrome://net-internals/dns on Mobile
2.1 Compatibility on Android and iOS
2.2 Step-by-Step Guide to Using Net Internals DNS on Mobile
2.3 Troubleshooting Common Access Issues
Why Clear DNS Cache on Mobile Devices?
3.1 Benefits of Clearing DNS Cache for Network Performance
3.2 How DNS Cache Affects Page Loading Speeds and Connectivity
Best Practices for Using Chrome’s DNS Tool on Mobile
4.1 Optimizing Chrome’s Network Performance with DNS Settings
4.2 Regular Maintenance Tips for Better Browsing on Mobile
Key Differences Between Desktop and Mobile Chrome DNS Management
5.1 Accessing Advanced Chrome Features on Mobile
5.2 Limitations and Workarounds for Mobile Devices
FAQs
Q1. What is the purpose of chrome://net-internals/dns? chrome://net-internals/dns is a Chrome feature that allows users to view and manage DNS settings, clear DNS cache, and troubleshoot connectivity issues, offering more control over their network performance.
Q2. Can I use chrome://net-internals/dns on Android and iOS? Yes, you can access this feature on Android. However, it’s more limited on iOS due to system restrictions.
Q3. Why would I need to clear my DNS cache? Clearing DNS cache can help resolve connectivity issues, speed up browsing, and ensure the latest DNS records are used, especially after changing network settings.
Q4. How often should I clear the DNS cache on Chrome mobile? Clearing the DNS cache periodically can help maintain optimal network performance. Doing it once a month or when facing connectivity issues is generally sufficient.
Conclusion
The chrome://net-internals/dns tool in Chrome is a powerful feature for mobile users to improve their network performance by managing DNS settings. Although primarily used on desktop, this tool can also be accessed on Android devices, allowing users to troubleshoot and optimize browsing speed effectively. By understanding how to access and utilize Chrome's Net Internals DNS tool on mobile, you can keep your connection stable, reduce load times, and avoid common browsing interruptions.
#technology#advanced technologies#google#chrome#internet#online work#dns#tools#ai tools#technews#technically
0 notes
Link
Está com a internet lenta? Limpar o cache DNS do Chrome pode resolver esse problema! O comando chrome://net-internals/#dns te leva direto para a ferramenta de limpeza de cache DNS do Chrome. Veja como acelerar sua navegação agora mesmo!
0 notes
Photo
Learn how to flush the DNS cache in Chrome with our ultimate guide to chrome://net-internals/#dns. Clear DNS cache to fix website loading issues now.
#chrome#chrome net internals#dns#DNS Issues#dns server#dns solution#dns lookup#dns cache#dns issue#dns query#ip address#flush dns cache#chrome://net-internals/dns
0 notes
Text
Always Clear Downloads Chrome

Always Clear Downloads Chrome Cache
Always Clear Downloads Chrome
In general, Google Chrome will store the webpages you have browsed into your computer. Such files, we called cache. When you go back to visit a website for twice, Google Chrome always extract the original content from the cache, instead of downloading it from the Internet. However, the cache can also slow your browser down if you don't clean it up. To solve the problem, we will show you how to clear or disable Chrome cache manually on Windows 10.
Part 1: Clear Chrome Cache Manually on Windows 10
Always Clear Downloads is a free to use browser tool that helps people automatically clean their browser’s downloading history. The tool comes as a browser extension for Google Chrome. After you have installed the extension, a new icon is placed in the browser’s address bar.
When a webpage update, the old cache won‘t work anymore. Clear cache and download anew to prevent your browser from delaying. To renew the data, we provide three ways to clear Chrome cache step by step.
At the top right, click More Downloads. To open a file, click its name. It will open in your computer's default application for the file type. To remove a download from your history, to the right of the file, click Remove. The file will be removed from your Downloads page on Chrome, not from your computer. Download an edited PDF. Always Clear Downloads. This extensions fixes the original Always Clear Downloads that can no longer be installed since Google discontinued support for extensions using manifest.json version 1. Version 2.1 - This version modernizes the code to use the most recent Chrome APIs. Should also prevent the extension from going inactive. Follow the steps below to make Google Chrome Automatically clear browsing history when you exit the Chrome Browser. Open Google Chrome Browser on your Mac or Windows Computer. Click on the 3-dots menu icon and select Settings option in the drop-down menu.
Way 1: Clear Chrome cache in 'Clear browsing data' page
Step 1: Open Chrome, click on 'More' icon at the top-right and select More tools> Clear browsing data.
Tips: You can also go to the Clear browsing data page by using Ctrl+ Shift+ Delete shortcut.
Step 2: In the Clear browsing data window, click the Down arrow to select the beginning of time. Check Cached images and files box, and then tap on CLEAR BROWSER DATA button.

Way 2: Clear Chrome cache by changing the system hosts
Step 1: In the address bar, input 'chrome://net-internals/#dns' and Enter.
Step 2: In the capturing events page, tap on the Down arrow at the top-right corner then click on the Clear cache and Flush sockets. Click on Clear host cache button.

Part 2: Disable Chrome Cache Manually on Windows 10
Considering the safety of your account information, you need to disable Chrome cache when you use a public computer. Follow the two steps below to disable cache easily.
Always Clear Downloads Chrome Cache
Clear Chrome cache through 'Developer tools' option
Step 1: Click on More icon, choose 'More tools' from the list and then select Developer tools.
Tips: You can use the keyboard shortcut Ctrl+ Shift+ I directly.
Always Clear Downloads Chrome
Step 2: There will pop up a window to the right of the page. Click on Network tab and tick the Disable cache box.
Related Articles:
1 note
·
View note
Text
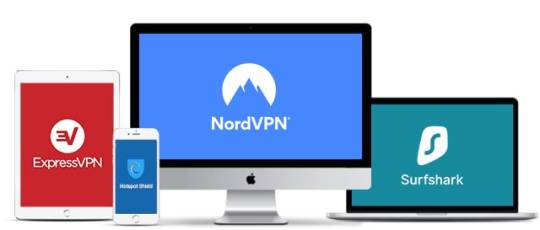
Best VPNs in 2020 for PC, Mac, & Phone – a hundred% SECURE
Best VPNs in 2020 for PC, Mac, & Phone – a hundred% SECURE
Finding the first-class VPN to maintain you secure on-line feels not possible. There are loads of VPNs out there, and every one claims it’s the great.
Our experts have spent months cautiously testing over three hundred services to decide which of them do what they promise—and do it nicely. We linked to these VPNs from everywhere in the international, with what is a vpn researchers jogging exams in internet-confined international locations, including China and Russia, testing their safety, their reliability, and the speed of their connections.
We even made a few calls to Google and PayPal to analyze rumors surrounding some VPNs. We additionally delisted numerous shady VPNs: While they hadn’t but been caught sharing consumer information, we’re involved that quickly, they'll.
Our honest, comprehensive evaluations will help you choose the proper VPN for you, whether you need to stream Netflix, get around government censorship, or stay completely anonymous on line.
It’s no longer all about size—some smaller VPNs outperformed a number of the largest manufacturers, despite the fact that they lack the advertising finances. And, whilst we placed them to the check, we discovered that some of the popular VPNs had been essentially nugatory—a few even dangerous!
We can genuinely say that once our rigorous trying out and reviewing, our top 10 VPNs will hold you secure, shield your records, and provide you with lightning-rapid streaming speeds.
The Best VPNs – Full Analysis (Updated October 2020) Our group is spread throughout more than forty nations round the world, and we conducted masses of exams over numerous months to discover which VPNs presented the excellent speeds, protection, and reliability. We browsed, downloaded, streamed, and torrented for weeks on end to convey you those confirmed consequences.
1. NordVPN – Great Balance of Price and Performance
Dedicated torrenting profile: Yes, P2P distinctiveness servers available Works with: Netflix (a couple of libraries), Hulu, BBC iPlayer, Vudu, Amazon Prime Video, SkyTV, Disney+, and plenty of others Available on: Windows, macOS, Android, iOS, Linux, Chrome, Firefox, and routers Data logging: Strict no-logs coverage Money-again guarantee: 30 days NordVPN is our #1 VPN recommendation. It provides splendid all-round cost, with exquisite capabilities and overall performance at a charge few can beat.
AES-256 encryption and help for OpenVPN and IKEv2/IPSec protocols hold your visitors comfortable and hidden. Since it’s registered in Panama, NordVPN is likewise some distance faraway from 14 Eyes surveillance and troubling information retention laws. This permits it to accumulate zero sensitive consumer logs—first-rate news for the privacy-conscious.
NordVPN’s CyberSec suite characteristic affords adblocking and additional malware protection. The VPN’s obfuscated servers can help you get admission to all components of the net, even in closely-censored international locations. Two of our researchers placed those servers to the check from Beijing and Shenzhen in China, and they had been capable of get entry to Netflix, Facebook, Gmail, and each other website online they attempted. With NordVPN, you furthermore mght don’t need to worry approximately VPN leaks as it gives specific kill switches and custom DNS settings to prevent them.
The massive NordVPN network has over 5390 servers in over 55 countries, with ordinary new additions. It offers uniqueness servers for P2P, double encryption, and devoted IPs. This offers this VPN the flexibility to get round geoblocks, get servers tailored to any use case, and have better speeds. We examined it in 12 areas against the restrictions of Netflix, Disney+, Hulu, and numerous other services; it broke every block.
The VPN additionally constantly confirmed first rate speeds in each usa we tested. When we related to a nearby server, our speeds fell simply five%—that’s not anything! We experienced the best velocity loss while connecting to Australia from the United Kingdom. However, it become best a 30% loss, and we were still at nearly 38 Mbps down load.
Secure streaming and torrenting are one-click on tasks with NordVPN. Thanks to proprietary SmartPlay DNS settings, the NordVPN patron robotically provides reliable get entry to and rapid speeds while you open Netflix and different streaming services. Best yet, it can unblock over 400 exclusive offerings—no different VPN comes near.
If you ever want assistance, you may anticipate the 24/7 stay chat customer service to help you out. We related several instances over some weeks to test the representatives, and we got here away with beneficial answers to all of our questions. What’s greater, NordVPN has a massive information base complete of beneficial data on setups and servers.
Don’t Use If:
You need to pay with PayPal. It does that to shield your privacy, however a few humans nonetheless like PayPal.
The backside line? We think NordVPN is the ultimate multi-purpose VPN, but we were disappointed that you may’t pay with PayPal—although it does have its very own secure charge platform. You can test its intuitive apps and outstanding features on six devices with a chance-loose 30-day cash-returned assure.
Heads up—NordVPN is walking some wonderful offers! Save to your NordVPN plan with these splendid coupons.
ExpressVPN – Speedy, Safe, and Reliable
Dedicated torrenting profile: No (but all servers guide P2P hobby) Works with: Netflix, BBC iPlayer, Hulu, Disney+, HBO NOW, Spotify, Amazon Prime Video, and lots of others Available on: Windows, Mac, Android, iOS, Chromebook, Kindle Fire, browsers, and routers Data logging: Strict no-logs coverage Money-back assure: 30 days ExpressVPN’s state-of-the-art deal October 2020: Get 3 months absolutely loose on your annual subscription with this modern-day provide! It’s no longer for positive while this deal will end so it’s high-quality to test the deals web page to see if it’s nevertheless available. ExpressVPN may be our second desire standard, however don’t permit that idiot you. It’s taken a pinnacle spot in lots of assessments, together with first-rate VPN for iOS gadgets, torrenting, and routers, because it’s a strong, reliable option.
ExpressVPN has three,000+ high-pace servers at one hundred sixty global places. It’s additionally one of the fastest VPNs we’ve tested. We performed lots of velocity checks to verify this, and we’ve protected our UK consequences underneath in your evaluation. As predicted, connecting to close by servers yielded the satisfactory consequences. But we were also impressed with the fact that our connections to the US and Australia were also proper—simply 22% and 35% drops, respectively. This is terrific information for streamers and torrenters round the sector.
The cut up tunneling function allows you to tailor ExpressVPN on your needs by using deciding on which apps and services are encrypted. I tested it through streaming my nearby Netflix library in my browser at the same time as making sure BitTorrent was installation to run thru the VPN. It took handiest a second to installation and worked flawlessly.
There’s more: ExpressVPN will let you get right of entry to your preferred content, even on platforms that don’t support VPNs. Thanks to the MediaStreamer characteristic and the VPN’s ability to blast via geoblocks, our researchers had been capable to look at Netflix, Hulu, and BBC iPlayer from six one of a kind countries on smart TVs, Amazon Fire TV sticks, Apple TV, gaming consoles, and other gadgets
ExpressVPN helps P2P connections on all servers, so you don’t need a torrenting profile. The app’s Smart Location feature chooses the pleasant server for you. It took me just 15 mins to torrent a movie, so it became rapid and easy manner.
ExpressVPN offers 256-bit encryption and OpenVPN aid throughout all systems, offering strong protection. Additionally, you get DNS leak protection and a Network Lock placing—in different words, a kill transfer to your connection.
ExpressVPN’s revolutionary TrustedServer era guarantees that every ExpressVPN server constantly masses the exact identical comfortable, up-to-date software, greatly reducing safety risks. TrustedServer also allows ExpressVPN servers to operate the usage of best RAM. Because the servers by no means write to the tough force, it's miles impossible for any records to be stored on the server after a reboot—even by accident. This gives extraordinary tiers of safety.
We turned to our researchers in Asia once more to check out ExpressVPN’s ability to bypass censorship. We’re happy to report that it continuously bypassed the Great Firewall of China, so it’s a pinnacle select for areas with heavy censorship, too.
Customer provider is also on factor, with helpful 24/7 stay chat support and specific setup guides for the various supported platforms. Every time I tested the stay chat function, I changed into talking to a beneficial consultant in under mins.
1 note
·
View note
Text
Okay, so, Tumblr wasn't loading images for me, the past few days.
It took me a while to figure out the reason of the problem that stayed persistent on every device and browser. And no solution (except VPN) worked...
The fix that worked for me was clearing the DNS cache. Simply open a browser and type chrome://net-internals/#dns and click on Clear host cache button.
There are other ways to do it, via command prompt or terminal, or settings on your phone, and there are caution paragraphs you might need to read, as well.
The reason I'm sharing this is because I did not find this solution in the articles I read about Tumblr images not loading (I might have missed the rare ones). I kinda took a long way around because I'm no expert to solving these issues.
But, I hope it helps and works for someone out there, too, as it worked for me. But please read the cautions.
And, VPN and/or proxy, is always the to go solution... so I guess we're always good 🙈.
- Oshine
#Tumblr images not loading#fix that worked for me#Tumblr#anyone who might need help with this#please don't be triggered if I've used wrong words#I'm no techie#is techie the right word???#when oshine is proud of herself for solving her issues almost by herself!!!
4 notes
·
View notes
Text

Chrome Net Internals DNS Tool – Complete 2025 Guide to Clear DNS Cache
If websites are taking forever to load or you're getting annoying error messages in Google Chrome, your DNS cache might be to blame. One of the fastest ways to fix this issue is by using the Chrome Net Internals DNS Tool. This powerful built-in Chrome feature helps clear outdated or corrupted DNS entries that may be slowing down your browsing. In this 2025 step-by-step guide, we’ll show you exactly how to use the Chrome Net Internals DNS Tool to clear your DNS cache quickly and effectively—complete with screenshots and expert tips.
Say goodbye to frustrating browser delays and connection problems with this simple fix!
0 notes
Text
0 notes
Link
Err… “DNS server could not be found” errors are most common when you try to visit some websites on Google Chrome. Don’t worry! You are not alone here!
More than 80% of internet users may have faced the issue with “DNS server could not be found” message which occurs when the Domain Name Server is not available.
So, why do we call it Unavailable?
There are a few possibilities that one of three things causing the error to pop up every time you try to reach some websites.
Either, the DNS address is not configured properly in your PC or it’s Invalid
The server at the address might be defective for some reason.
Or, it happens that the address is unreachable.
Without having more information about the particular “DNS server could not be found” error. We only assume the following methods mentioned in this article may help you to get rid of the disaster.
For instance, when you visit some websites the first that happens in the backend is the browser contacts the DNS server. Henceforth, the DNS lookup gets failed which results in nasty “DNS server could not be found” error messages.
When you pay a visit to a website, of course the website know about your visit but do you know you are also observable by the third party trackers used by the website.
You may be surprised to know that the majority of websites uses third-party trackers in order to collect information of the users such as geographical location, devices used to view the website and so on.
Although these trackers are somehow responsible for taking out your personal information. Moreover, these trackers cover millions of websites and the company behind them create massive data by combining data trackers collects from each site.
Now, you must be thinking why should we tell you that?
Unlike every other website you pay a visit, it keeps all your sessions during the visits. This is done through the use of “Cookies”. Although Google Chrome allows most of the website to load trackers or a few websites asks the user consent before it uses the cookies.
The “DNS server could not be found” issue might arise from here. This is due to because most trackers do not have an effective mechanism to opt out, therefore, when you visit a website that blocks the trackers and third-party trackers will eventually get blocked showing you “DNS server could not be found “errors.
Look at the below screenshot to know what we’re talking about.

In this article, we’ll find the fixes to the problems so that you do not have to worry about the “DNS server could not be found” again.
Or, there are two possible reasons
The DNS server is working but network connection can’t reach it
The DNS server is not working even if your network can reach it
If it happens to be any one of the following then, there might be a physical problem with the network, even a software problem with the interface causing this. A configuration problem with the network or a firewall blocking access.
Usually, you need to check the network configuration and later check the automatic repair function by clicking at the network icon.
If it isn’t helpful. Please read the entire post for resolving the “DNS server could not be found” error in a more advanced way.
Ensure you have updated the drivers
The reason why you are seeing “DNS server could not be found” error messages on your browser is due to the incorrect, outdated or corrupt drivers. Ensure that you have the latest driver installed in your system.
Manual driver update
In order to manually update your drivers, visit your hardware manufacturers website and search for the most updated version from the list. If you have a problem finding the correct drivers then, you can simply contact the manufacturers and get everything you need.
Automatic driver update
You can find tons of the easy to use automatic driver updater tool that scans your Pc and download the missing or outdated drivers for you. This is defiantly a better option for them who are not willing to download each driver. Plus, most of them you find them on the web are free!
Clear Chrome’s Host Cache
Apart from outdated driver issues chrome host cache corruption will prevent you from accessing the websites. Though you can make an easy fix to it you will need to follow some steps.
Step 1 Open Google chrome type in an address bar “chrome://net-internals/#dns
Step 2 Now press the enter key and message will be displayed on the screen stating something below in the screenshot.
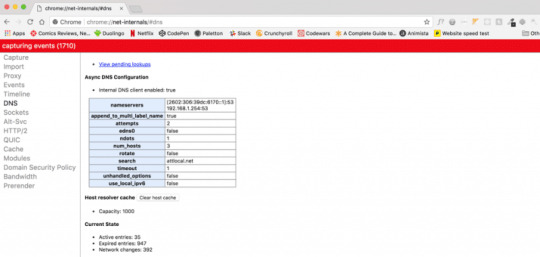
Step 3 Now you need to click at the button saying “Clear host cache” next to host resolver cache.
Step 5 Assuming that you have completed the above steps now refresh the page and see if the issues are still persisting.
Delete the files in your ‘etc’ folder
Though this is another fix to the “DNS address could not be found” issue. Follow the below steps to make a fix to it.
Step 1 Browse through your ‘etc’ folder found in C:\Windows\System32\drivers\etc.
Step 2 Once you have found the exact folder. Attempt to delete all the files in it.
Step 3 Ensure that Google Chrome is closed down before performing the operation
Step 4 Now, open the Google chrome after you have finished with the following steps.
Step 5 Check the websites to see if the problem is resolved or not.
More Findings
If the error messages appear stating the “DNS address could not be found” means the browser is not able to find the Domain Name System. There is a lot of fix to it such as changing your DNS server.
The issue to “Server DNS address could not be found—3300” is due to the misconfiguration. In order to make a fix to this. Follow the below steps.
Step 1 Press the Windows logo + R (for the run command) from the keyboard.
Step 2 Go to the control panel
Step 3 Select the “Network and Sharing Center”
Step 4 Click on “Change adapter settings” from the left side of the screen.
Step 5 Right-click on the Local Area or Wireless Network Connection icon and Visit the properties.
Step 6 Now, you will come to know about the list of connection is using.
Step 7 Click on the “Internet Protocol Version 4” (TCP/IPv4)
Step 8 Once selected ‘Click on the properties” button.
Step 9 You will get a “General tab” then
Step 10 If “obtain DNS server Address automatically is not selected” then, check the box to select it. And click on the “Ok” button.
In case, if it is already selected then, select to use the following DNS server address instead and click on done.
Note: The Preferred DNS server should contain 8.8.8.8 along with than the Alternate DNS server should be 8.8.4.4
Know how to renew and clear your DNS
If you use a windows computer, windows stores the IP address of the websites you pay a visit. This is done for faster loading of the website you visit more frequently. The cache present is either corrupt or outdated but you can renew and clear it using the following steps mentioned below.
Step 1 Press the Windows + R key to bring out the Run box. Now, open “Command Prompt” using the combination of keys CTRL + SHIFT + Enter to open the command prompt in administrator mode.
Step 2 It may look a little tricky especially for non-tech savvy users but here, you have to type in ipconfig /flushdsns and hit the “Enter” key. This will allow wiping out the cache if it’s outdated or corrupt.
Step 3 Well, you’re done with flushing the DNS. Reboot the system in order to see the new affected changes.
Make use of a VPN (Virtual Private Network)
If you still have the server DNS addresses could not be found the error with some websites then, download and use a VPN service to resolve the issue. It is done to make access to some website forbidden by your ISP (Internet Service Provider).
If you are not sure which VPS service you should choose, you can always go for NordVPN used by millions of users on the web to make access to the blocked websites from the ISPs.
FAQs: –
What does it mean when you have a DNS error?
DNS error refers to as the connection to the network or internet access has been abandoned. Usually it the DNS error depicts that it is unable to look up the IP address for the domain you are accessing.
How do you fix a DNS error?
Flushing the DNS cache is the best solution to make a fix to the DNS error. If you are not sure how to do it. Please refer to the steps mentioned in the article.
What is a DNS address error?
DNS refers to the Domain Name System that translates the website address into IP address to connect. The DNS address error might be occurring due to DNS cache. Although flushing it using the command prompt may help. Or it could be the issue arising from your ISP. One possibility is that you’re trying to access an already downed server.
The post DNS server could not be found appeared first on Letohost.
https://ift.tt/2LTeul3
1 note
·
View note