#change mouse cursor in windows 10
Explore tagged Tumblr posts
Visit Tumblr Blog
Explore Tumblr blogs with no restrictions, modern design and the best experience.
Last Seen Tumblr Blogs


Fun Fact
Tumblr.com rank in the US is 25.
Note
Do you have a tutorial on how to use your cursors? I have the files and I've been trying to look through youtube tutorials but I can't seem to do it T-T
! ! ! change your mouse size settings to 4 or higher in accessibility options for better cursor visibility ! ! !
smaller sizes may cause the cursor to appear distorted and very small.
♡ how to use? ♡
♡𓂃 1. on windows 10/11, right-click on the desktop and select "personalize" then, click on "themes" on the left side and then on "cursor settings" on the right side, or simply search for "cursor settings" in the start menu search bar
♡𓂃 2. change the default cursor : in the cursor settings window, you'll see a list of different cursor types (normal select, help select, etc.) select the cursor type you want to change, for example, "normal select" (the default cursor) all .ani files are named with the corresponding cursors !! ₍ᐢ..ᐢ₎ ♡
♡𓂃 3. import the .ani file : (please extract the zipped folder first !!) click on the "browse…" button and navigate to where your unpacked folder that you downloaded is located !! select the desired .ani file and click "open" for apply the changes, after selecting the .ani file, click "apply" and then "OK" to close the cursor settings window ~ if you want to change other cursor types (such as the help cursor, text selection cursor, etc.), repeat the same process !!
♡ steps to keep your cursor customization in windows ♡
♡𓂃 save the cursor scheme:
go to settings > devices > mouse > additional mouse options in the pointers tab, select the scheme you customized or created click on save as… and give your customized scheme a name to ensure it is saved correctly
♡𓂃 check the location of cursor files:
make sure that the cursor files are in the system's default folder: C:\Windows\Cursors if you moved the cursor files to another location, the system might not be able to find them after restarting
25 notes
·
View notes
Text
The cheeky last minute UI rework
A week ago, I had Lucinius play a near-complete version of the demo build and he had a bunch of good suggestions after playing it for a solid few hours.
One part of his feedback centered around how move information was displayed. Previously, in non-battle menus, the move info would follow your cursor, and thus you weren't able to mouse over the various stats or check the description (which would have outputted to a log that isn't visible anyway).
Now I've made it so that clicking on the move icon displays the window in a static pane, letting you mouse over the various icons. Also, the description now appears in-line inside the window, regardless of where you're looking at it!
I made a whole bunch of other changes, and ahead of tomorrow's demo release (I can't believe it's finally happening), you can read about them below the cut!!
v0.18 - Demo Build 1
Features:
Auto-deposit materials is working and on by default
Mouse over now shows curr/max for hp/en/ammo + stat title
Going past the max floors now sends you back to the ship
New trap added that instantly spawns an encounter
Clicking on an attack icon with the mouse now makes the info panel stay open
Clicking the description button/pressing pause with a move selected now displays it within the panel
Archive sprite added to base
Game now tracks enemies encountered and killed
Added target marker to tutorial area
Archive can view logs and tutorials, and enemy names
Balance:
Starting area has slightly more loops
Starting area has slightly higher encounter density,
Removed local relay from starting area
Added spatial constant to starting area
Added Holepunch routine to Punch Press
Slightly increased passive random recruit chance from 1 to 2%
Buffed max damage recruitment rate divisor from /3 to /2.5
Nerfed heal recruitment rate divisor from /3 to /4
Changed starting system escape fuel needed to 20
Gain a small amount of fuel when researching local/relativistic navigation
Added party size to the base matrix research rather than subsequent research
Features now scale around the mid floor of the dungeon instead of around floor 2
Dungeon floors, rooms, and corridors get bigger as you go down
Damage/heal recruit function ceiling'd so you make at least 1% progress when you do the correct action
Slightly revised title screen animation
Revised enemy encounter formula to scale around the center floor of the dungeon + adjusted dungeon encounter mass respectively
Changed Gimbal Lock's status from stun to slow
Made summons recruitable
Buffed all part slots and changed power load formula to compensate
10% buff to large enemy stats for each square above 1
Make killing with an element apply advantage, even if it resists or was neutral to the element
Polish:
"are likely in rooms" -> "are more often found in rooms"
"can be used for fuel" -> "could be used for fuel"
"once a line has formed" -> "once a line has formed in the element grid"
"the astronaut has been destroyed" -> "your suit has been critically damaged"
"the robot core's power load." -> "the robot core's power load (to the left of the equipped parts)."
Power load tutorial only comes up when you exceed it
Changed POWR to HEAL when looking at a healing move in the attack description
Disabled interaction with central 3x3 core area and changed description
Changed first strike/ambush bar colour and text
Added fuel unit value to fuel item descriptions
Added filter menu icon
Deep Diver sprite updated
Burrow sprite updated
Recruit chance icon doesn't show mouseover text when invisible
Swapped weapons 1 and 2 equip location on the assistant to match sprite appearance
Removed extra line on the bottom of the big map
Equip vfx effect now appears under move info panel
Black outline added to all dungeon features
Made recruitment pink text appear over the damange numbers
Made it so that locations can't spawn directly behind the black hole image in the navigation screen
Made the main black hole image slightly transparent in the navigation screen
Reordered research tutorials
Scan description revised to indicate it can reveal more and more information progressively
Updated matrix tutorial to talk about core tiers
Changed equip sprite fx to green
Swapped arm that has the arm computer in a cutscene
Tutorial edited to say cores have innate routines
Edited lowest_5levels to be an accurate tutorial
Bugs:
Disabled the ability to look at the big map during the beginning of an encounter
Floor scanning effect now shows all the time for unexplored tiles
Removed debug value allowing you to interact with lore objects infinite times
Priority of mouseover is only cleared with the text now
Fixed player recruit chance status doing the opposite of what it says it does
Fixed healing-type recruitment not working
Fixed no item tutorial firing incorrectly because research inventory manager was not ready
Conduct animation was not happening when the conducted element was not the last hit on an enemy
Fixed lowest floor tutorials not firing
#indiedev#gamedev#gaming#pixel art#scifi#space#gamemaker#programming#rpg#robot#devblog#videogame#codeblr
19 notes
·
View notes
Text

A few small tweaks for anyone like me who's sticking with Windows 10 to make things feel a little less flat, it inherited that design from Win8 and it was boring on day 1.
It's not much but it's nice! Thread below with a few summaries! (messily ported from a bsky thread x.x)
Improved cursors by Posy! These are some of the best - Windows' default cursors are awful.
youtube
As terrible as Win11 is, the new design language is way better than Win10's, and it's a shame Win10X was never released. I use a bunch of icons from 11 and 10X (there are downloads for them all over the place), so for instance that isn't Win11's Paint on the taskbar, that's just Paint .net with a custom icon! There are also some custom icons in the same style made by people on places like DeviantArt.
Some system icons can be changed by IconPackager, it's paid but I did everything in the 30 day trial. My Desktop icon reverted after a Windows update but eh
The taskbar tweaks are Start11 for the taskbar blur, centered icons & Start menu & orb. It's paid; Classic Shell does mostly similar and is free, but different Start menus and no centered taskbar
I also use 7+ Taskbar Tweaker to ungroup programs, min/max with the scrollwheel, and space-out the tray
The widgets in the top left are Rainmeter. The temperature & network widget was customised messily from someone's public script - the temp widget needs another program called Core Temp to run.
The lil desktop Mitch is by @heyitsbumblebee!! there was space on my taskbar & he's so cute!
x.x errata - putting a png on your taskbar CAN be done with Rainmeter, but I think this was actually a custom taskbar texture under Start11 come to think of it
ANYWAY XD
Wanna remove something stubborn like Edge, or Copilot showed up? * Geek Uninstaller Want to use the same mouse & kb on two different computers? * Synergy Animated wallpaper? * Wallpaper Engine Play windowed games with integer scaling? * Lossless Scaling Own the games you buy? * GoG
Why are there two Firefoxes? The first one is Floorp, Firefox fork with Workspaces, just with a custom Firefox icon.
The second is regular Firefox's Private Browsing exe, which I use for searching (I use Startpage over Goog) cos otherwise I never end up closing the tabs. Just ditch Edge!
Xbox controllers work pretty much as-is with most games if you wire them. PS controllers use DS4Windows. I've given up with Bluetooth, just stick a cable in, far more reliable.
Anyway hope this thread of niche QoL stuff helped someone! ^ ^ Win10is still solid, just pretty it up a bit!
6 notes
·
View notes
Text
Custom Mouse Cursor Installation, how to on Windows 10:
There are certainly better people to explain this than me, and I'll add a link to a site for a more in depth explanation, however some people don't wanna go to external sites, and as I am the owner of this blog, I gotta explain it. Y'know, since I am making those little ani and cur files that some of you may want to use, I know one or two things, even if I'm inexperienced.
This is a long one, so everything important is under read more. :>
Explanation on what a custom mouse cursor even is: A custom mouse cursor can either be one of two data file types, on Windows at least: .ani or .cur. Basically ani files are animated cursor files, so those are what you need if you want an animated cursor, and cur are static cursor files, if you want a non animated cursor, this is the file type you need. Each ani and cur file has an assigned hot spot, these may differ depending on what cursor role it takes on, but the hotspot is embedded into the file itself. (As an example: An ani/cur file that is intended for text selection, will have a different hot spot than let's say, the normal link select cursor.) Note for the next part: My operating system is in German, and the settings names are roughly translated, I try to explain where to find the options in addition to their names. Thank you for understanding. Okay, but how do I install those little files?: You don't install them, you simply add file that you need in the mouse control panel in windows. Let me explain how to get there: You first open Windows settings, there are multiple ways to do this, but I like going to the notification side bar, and click on all settings. However if you don't have that bar, you can click on the windows icon on the windows icon, and it should be right above above your power (ON/OFF) settings. Next, you go to the devices setting that handles Bluetooth, printers and mouses. (It should be right next to System settings, and is the second option below the search bar.) There you will want to go to the mouse tab (3rd from the top) and click on the Additional Mouse Options. (It should be found in related settings, as the second option.) Now a window should have opened called Mouse Properties. To change the cursor image, you need to go to the second tab, called Pointers. Now you can begin replacing images. Be cautious of moving the ani and cur files after this point, because if you change where they are placed on your pc, you will need to set them again even if you set them as a preset /more on that later/. To change an a cursor image, simply double click the one you want to change, or use the button under "Use as Standard", to look for it on your pc. Now you simply need to search for the cursor images on your pc, and add them to each slot. I try to name my cursor files according to what they are called in the small description to the left of each mouse cursor role, so just try to follow that and it should be alright. I recommend making a new scheme, or preset after adding all the ani or cur files you want to add. You can do this by setting your preset to none before you add all of them, and / or simply pressing save as, give it a fitting name. Voila, now you can set them again without much hassle, unless you moved the files. Mouse cursor images reset when changing the cursor size, so presets are pretty useful for that, or when you have a bunch of ani and cur files you want to switch between without much trouble.
Changing mouse cursor size: Speaking of changing cursor size, if you like your mouse cursor images to be a bit bigger, so it's clearer to see, you can do that fairly easily as well, simply go to the mouse settings again, and there you will want to click on "Change Mouse & Cursor Size" (should be the first / top option in related settings.) Once at the next page, you simply need to adjust the pointer size (it should be the first slider on that page) and re apply the preset you made of the cursor files you chose. I exported the files in 24bit colour depth, so it shouldn't blur when upscaled. Feel free to experiment with what feels comfortable for you, and be sure to give it some time. A new cursor size needs some time to get adjusted to.
Additional Links:
A website that goes into more detail, and has images:
If you want to get more custom mouse cursors RW Designer's gallery tab, and cursor sub tags, also have a lot of neat ones. This should be it, if anything else needs to be added, I will reblog this post with more information.
7 notes
·
View notes
Text
Porting Models from Dragon Age: Inquisition to Dragon Age: Origins or Dragon Age 2
Part 2b - Into Origins
Tools needed: Blender 2.49b Blender ImportExport Script GDApp The DAO Toolset OR pyGFF and TlkEdit
Make sure you have the ImportExport script installed correctly (all the files dumped into the same folder as Blender.exe), and open DragonAge_tools.blend. (Blender uses a lot of shortcut keys, so if you're unfamiliar, you might find it useful to go through a Blender tutorial)
By default, Blender will open with 4 windows: a 3D viewer in the top left, a buttons window in the bottom left, and two text windows on the right. In the upper left, use the File menu to import your DAI obj(s), setting 'Clamp_Scale' to 0. (if you haven't yet extracted your model from DAI, see Part 1 of this series)
Then right-click in the upper text window, and hit 'execute script'. Select 'MSH Tool' and browse to wherever you've extracted Origins mesh files.
Select a mesh that's similar to the one you're porting, and click 'Load MSH'.
Click 'Import as mesh'.
You'll need to adjust the Inquisition mesh to roughly the same proportions and pose as the Origins mesh. This is something that takes practice, and a lot of trial and error.
A couple little tips for armor/clothing: -Do all your adjustments in Edit Mode. -First scale (S) the entire mesh on the Z-axis so the neckline roughly lines up. -Then scale and skew (Ctrl+S) so that the fingers match up. You might need to adjust the arms separately from the rest of the body for this. -Skewing works from your viewing position, so to skew on the Y-axis, for instance, you must be viewing your model from the side. -In general, you want to make the major joint areas (shoulders, elbows, knees, hips) line up as best as you can. -Rotating a group of vertices around a single vertex can be very effective: Select that vertex, then do Shift+S, Cursor to Selection. Change the pivot point by clicking on the pivot box (two to the right of the 3D mode selection) and choose '3D cursor'. Box-select the vertices you want to rotate with B. (if you miss some, hitting B again won't remove the ones you've already selected; it will allow you to add more. Also, hitting B and drawing the box with the right mouse button removes enclosed vertices.) -I usually alternate the pivot point between '3D Cursor' and 'Median Point' a lot. -You can rotate around a specific axis and to an exact degree with keyboard inputs. For instance "R, X, 10" will rotate your selection on the X-axis by 10 degrees. This is especially useful when you're trying to keep limbs symmetrical. -'Shrink along normals' (Alt+s) is another very useful function for widening/slimming cylindrical areas, like arms & legs. -Check the model from all sides before moving to the next phase! It's always annoying to find out later that a few random vertices are sticking out weird, and got badly weighted as a result.
Once your mesh is adequately adjusted, it's time to add some weights.
Switch back to Object Mode, and select the DAO mesh, then your DAI mesh.
Find and click the 'Scripts' button in the upper right window. Click on 'Object', then 'Bone Weight Copy'.
Change the quality to 3 or 4, and hit OK. (if you're making LODs, using a quality of 1 is fine)
Wait. And wait. And wait. Seriously, this can take several minutes. You can tell it's working by the red to green progress bar at the top. If nothing happens, you likely didn't select both meshes, or both meshes already have weights.
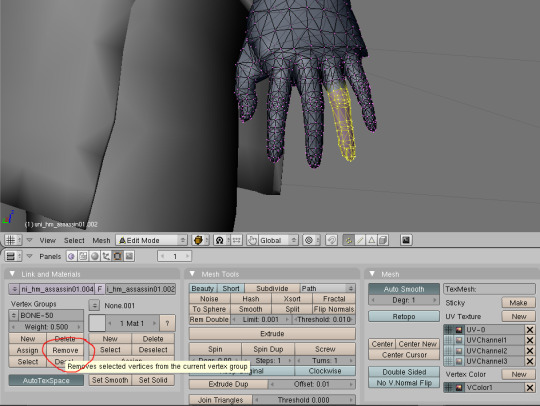
Eventually, the weight copy will finish, and you can check how it did. Move the DAO mesh off to one side, select the DAI mesh, and then change the 3D viewer to Weight Paint mode.
Hit F9 to change the Buttons window to the Editing tab. Use the Vertex Groups box to go through the bones one-by-one, and make sure they all look reasonable. (unfortunately, they're numbered, not named, so that makes things trickier)

Mostly, you want to check that certain areas aren't trying to move when they shouldn't. Common culprits are the elbows getting a bit of weight from the chest bone(s) and vice-versa, or adjacent fingertips getting weight from each other. This is another one of those 'trial and error' things. You might find it helpful to switch back and forth between the DAO mesh and DAI mesh, going through the bones at the same time for comparison.
The weight paint brush can be used to subtract unwanted weights, or add weights where needed. You'll have to play around with the brush settings to your liking (I suggest starting with both weight and opacity at 1/2).
You can also switch the 3D window back to Edit mode, select vertices that shouldn't belong to the selected bone, and then click the 'Remove' button under the Vertex Groups box. MAKE SURE NOT TO HIT 'DELETE'. That can seriously mess things up.
Once you're done playing with the weights, it's time to get ready for export.
Minimize Blender, and put a copy of the vanilla mesh you used for weighting in a new folder. (the export script works by overwriting the info in a vanilla file. Don't want to mess with the original!) Also copy over the corresponding mmh & phy while you're at it.
Go back to Blender, execute the DragonAge_Tools script again, and hit the MSH Tool button. 'Browse' to your copied vanilla msh, and load it.
Instead of importing this time, you're going to make sure your ported mesh is selected in the 3D window, and then click the yellow-outlined 'Replace' button in the script window.
Then make sure the submesh (also called a "chunk") you want to replace is selected (for armor and clothing, there'll probably only be one, but with hairstyles you'll want to replace 'HairM2'), and click 'Replace chunk'.

Click 'Save filename' to confirm.
If the replacement failed, the most likely cause is that you have unweighted vertices. Finding them is frustrating, and I'm sorry. There's no easy way in Blender 2.49; the quickest way is to save your file, and reopen it in a newer version of Blender that has a "Select Unweighted Verts" function. Moving it to a new version of Blender, however, has a chance of scrambling your UV map.
Now you'll want to minimize Blender, and navigate to your overwritten vanilla msh. Unless you're making a replacer, rename the files to something unique.
It needs to start with a race/gender code (hm = "human male", hf = "human_female", and so on), and end with "_0". See Bioware's naming conventions for reference.
Open up all three files with either the DAO Toolset or pyGFF. Rename each instance of the vanilla file name with the new file name. (no need for the filepath like in DA2, thank goodness) If you're using pyGFF, you'll need to make sure to hit 'Save' in the bottom left after every change.
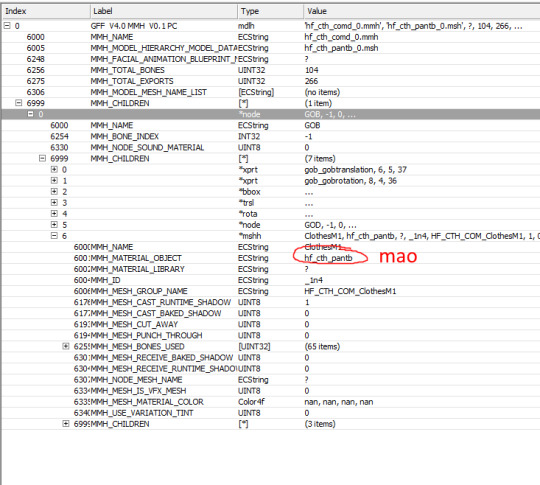
In the MMH, also expand MMH_CHILDREN, GOB, MMH_CHILDREN, and then the bottom list, *mshh. MMH_MATERIAL_OBJECT refers to the mao, you'll need to replace the vanilla with a custom mao (more on that in a bit).
If you want, you can also change the chunk name under MMH_MESH_GROUP_NAME to match the new file name. If you do, make sure to change it in the msh as well. (there's a rare glitch where if you change between two pieces of equipment with the same mmh_mesh_group_name, the mesh will not change, leading to vanilla items appearing with custom models or vice-versa. It doesn't happen consistently, but it can happen) Also in the mmh, you may want to activate some lighting options: CAST_RUNTIME_SHADOW should be active by default; if it's not, change the 0 to 1. You can also activate CAST_BAKED_SHADOW, RECEIVE_BAKED_SHADOW, and RECEIVE_RUNTIME_SHADOW in the same way, but these are less noticeable if they're inactive.
Save your files.
Making a .mao file:
My tutorial for converting DAI textures to DAO using Paint.NET can be found here. If you prefer to use GIMP or Photoshop, I recommend these tutorials: magpie's for GIMP sapphim's for Photoshop
If all you want for now is quick placeholder textures, simply extract the DAI textures as .dds files. Use a text editor to open up a vanilla .mao of the same basic appearance (color & material matters most) and replace the vanilla texture names with those from DAI. Save the new mao with a name matching your model.
Put your msh, msh, phy, mao, and textures in the DAO override folder. If you're making a replacer, testing is as simple as opening up your game and equipping the right item.
If putting in a new unique model, you'll have to tell the game how to find it. Extract the variations GDA matching the item type (armor_heavy_variation for heavy chestpieces, clothing_variation for clothing & robes, etc).
Open up the GDA with GDApp, and delete all lines except one, which you'll use as a template (so don't use line 0).
Change the 'ID' entry to something (hopefully) unique.
Thanks to a weird quirk of UTIs, the highest number you can use is 256. If you already have a lot of equipment mods, you may want to look through the Item Variation ID spreadsheet (NexusMods, Google Sheets) to avoid GDA conflicts. The item variation GDA tells the game what mmh to look for. The modeltype, modelsubtype, and modelvariation columns are combined together, along with the race/gender code, to form the model's mmh (the final "_0" is ignored for this): hf_cth_comd_0 = (human female)_(clothing)_(commoner)(d) = (race/gender code)_(modeltype)_(modelsubtype)(modelvariation)
If you've named your mmh a bit different than the Bioware convention, that's fine, as long as you can break it up into those GDA columns. I don't think there is a character limit.

Now save your GDA, keeping the original file name but adding a unique suffix (for example "armor_variation_medium_edit.gda"). The file name cannot be longer than 32 characters, including ".gda".
Put your new GDA in the override as well, and open up the toolset.
Open up a local copy of the same type of item, click on Item Variation, and look for your new model. If it doesn't show up, the most likely cause is that your GDA is missing or its name is too long.
Change the item to your new model for viewing. If your model is not for human males, you'll need to change the race & gender at the bottom. For testing, I recommend now exporting the item (Tools, Export, Export without dependent resources), and consoling yourself the item in-game if you don't already have it. (model swaps like this are not baked into the save, so you don't have to worry about permanently messing up things)
If you're NOT using the Toolset, you'll have to change the item variation in an extracted UTI with TlkEdit, and then console yourself the item for testing.
If something doesn't quite look right, go back to Blender and experiment. You'll need follow the process for overwriting a vanilla mesh every time you edit, but you shouldn't need to redo the mmh & phy.
Common problems: -- Distorted/noodly body parts: used a mmh that didn't match the msh -- Model is mint green and t-posing: can't find the mao -- Textures are gray and/or shiny: can't find texture(s) -- Game crashes: bad msh export. Try exporting again, or compare it to a vanilla msh for errors -- Invisible model: wrong msh name in the mmh, or mismatched chunk names between the msh & mmh -- Won't tint: the chunk names in the mmh MUST be BootsM1, GlovesM1, ArmorM1, HelmetM1, ClothesM1, or RobeM1. Chunk names must also be consistent for all different race/gender variations of the same model, and any LODs.
The next tutorial will cover porting static meshes for either game, since it's the same process/tools for both.
5 notes
·
View notes
Text
I was given an old second-hand windows 95 PC when I was 9-10 by my grandparents who had been given it by a friend. It had no sound card (those were a thing back then, you couldn't have speakers plugged in without a dedicated card for it), no internet. I was allowed to do whatever I wanted with this machine but I was advised not to delete any files that I didn't make myself, but also it was OK if I did. I learnt how to use a mouse and keyboard. I learnt how to change icons. I learnt how to use MS paint. I learnt you could open icons in MS Paint. I learnt you could edit them. I learnt that you could make an icon with any image you made, but it looked best if it was a certain size (I found out the size by editing other icons). This is how I learnt pixel art. I learnt how to make cursors, edit the colours and appearance of everything. I learnt how files and folders worked, where things were saved. I learnt how to change the time. I'm sure I learnt a bunch of other stuff, too, but this was the foundation of my computer literacy.
9K notes
·
View notes
Video
youtube
How To Change The Mouse Pointer Size in Windows 10 | Quick and Easy Guide
Want to make your mouse pointer bigger or smaller in Windows 10? In this quick and easy tutorial, I’ll show you how to adjust the mouse pointer size to better suit your needs. Whether you need a larger cursor for better visibility or prefer a smaller one, this guide will walk you through the simple steps to customize it in Windows 10 settings. Don't forget to like, comment, and subscribe for more tech tutorials!
Simple Steps 1. Right click on the "Start Icon" and choose "Settings". 2. In the dialog box that opens, click on "Ease Of Access". 3. In the left side pane, click on "Mouse Pointer". 4. Under "Change Pointer Size", move the slider to change the size.
0 notes
Text
Zebronics Clear Wireless Mouse 2.4GHz
Overview: The Zebronics Clear Wireless Mouse is a sleek and stylish mouse designed for smooth and responsive navigation. Operating on a reliable 2.4GHz wireless frequency, it offers seamless connectivity and freedom from tangled wires, making it perfect for both office and home use. Whether you're working on presentations, browsing the web, or simply enhancing your workspace with a modern design, this mouse ensures comfort and precision.

Key Features:
2.4GHz Wireless Technology: Enjoy lag-free performance with 2.4GHz wireless connectivity, providing a stable and reliable connection with a working range of up to 10 meters. Perfect for desktop or laptop use, without worrying about cords.
Ergonomic Design: The Zebronics Clear Wireless Mouse is designed with ergonomics in mind, ensuring comfort during extended use. Its contoured shape fits naturally in your hand, reducing strain and making it ideal for long hours of work or gaming.
Plug-and-Play: This mouse is incredibly easy to set up. Just plug in the USB nano receiver, and you’re ready to go. The plug-and-play functionality means no additional software or drivers are required, allowing for quick and hassle-free installation.
High Precision: With optical tracking technology, this wireless mouse offers precise cursor control, making it perfect for everyday tasks like browsing, document editing, and gaming. The high-precision sensor ensures smooth and accurate performance on a variety of surfaces.
Long Battery Life: Designed for energy efficiency, the Zebronics Clear Wireless Mouse offers extended battery life, allowing you to work for longer periods without the need to frequently change batteries.
Compact and Lightweight: The compact and lightweight design makes this mouse highly portable, perfect for users who are constantly on the go. It easily fits into your laptop bag, making it a great companion for travel or business meetings.
Universal Compatibility: The mouse is compatible with Windows, macOS, and Linux operating systems, making it versatile and easy to use with a variety of devices, from desktops to laptops.
Ideal For:
Office workers needing a reliable and ergonomic mouse for everyday use.
Students seeking a portable, wireless solution for their laptops.
Home users who want a stylish, clutter-free workspace.
Conclusion: The Zebronics Clear Wireless Mouse 2.4GHz combines functionality, precision, and comfort in a sleek, wireless design. Whether you're working, studying, or browsing, this mouse delivers smooth and reliable performance, making it an essential tool for any modern workspace. Enjoy the freedom of wireless connectivity with the ease of plug-and-play convenience.
0 notes
Text
How to get the Steam version of Jedi Knight: Dark Forces II to run properly on Windows 10: A Novel
Hi, i just spent HOURS fixing this game (again), and I am soooooooo frustrated so I wanted to save someone else's life (and probably mine again when I next change computers).
This will fix these issues: -Black screen when enabling 3D acceleration -Mouse sensitivity being too high or too low. -1st person animations being too fast. -Game overall just not working the way it did on Windows XP and Windows 98
Download Jedi Knight "Steam Patch" from here: https://www.moddb.com/games/star-wars-jedi-knight-dark-forces-ii/downloads/steam-patch Alt Download location: (future-proofing): https://drive.google.com/file/d/113Nj_IBlcFLr77Gdi_PSmX6kixB3MYPv/view?usp=sharing
Extract the .zip you just got to the folder where JediKnight.exe is located. To find the folder: Open Steam Library, right click game, Manage>Browse Local Files
Open the file jkgm.json which was just added to the folder. (Open with Notepad). Change "resolution" to whatever resolution you want (I recommend [800,600] because anything above that causes more issues with mouse sensitivity and 1st person animation. There are also fixes for this below). If you want fullscreen back, change "fullscreen" to true
Test the game by running it through Steam. If it's working the way you want it, good. If there are more issues, try these:
• If the mouse and control inputs are now lagging, open jkgm.json again and change these settings: Change "enable_bloom" to false Change "enable_ssao" to false Change "enable_parallax" to false Change "enable_texture_filtering" to false
• If the mouse cursor is slightly off when selecting menu options: use a 4:3 resolution (such as 800x600). Using a 16:9 resolution is what causes the mouse to be off. See step 3.
• If the 1st-person animations are way too fast (noticable when running with a gun in-hand or when swinging the lightsaber): The game's animations are tied to the framerate, but they are also affected by resolution. If you're running at the recommended resolution of 800x600, you should also change the framerate to 30. To change the game's FPS to 30: Right click your desktop, click NVIDIA Control Panel. In the left menu, under 3D Settings, select Manage 3D Settings. Click the Program Settings tab. Click Add. Browse for the game's .exe. Since we used the Steam Patch, the .exe will be called JK-fov95-mipmap.exe If there is an option for "2. Select the preferred graphics processor for this program:" change it to High Performance NVIDIA Processor. Where it says "3. Specify the settings for this program:" Scroll down to find "Max Frame Rate." Set it to 30FPS. Apply. Test the game by running it through Steam.
• If the mouse sensitvity during gameplay is way too high, there are 3 options: -Option 1: In the game's own Setup menu, go to Controls, then Mouse. For the settings of both Mouse X Axis and Mouse Y Axis, turn sensitivity all the way down. Test. -Option 2: In the game's own Setup menu, go to Controls, then Mouse. For the settings of both Mouse X Axis and Mouse Y Axis, uncheck "Map directly to axis value." You may need to turn mouse sensitivity slider all the way up once this has been unchecked. Test. -Option 3: Probably the option you're looking for if the first 2 don't work. Go to the folder where your game .exe is located again. Open player>playername>playername.plr (open with Notepad) Find "bind 1 12 0xd" and change it to 0.1 Find "bind 8 13 0xd" and change it to 0.1 Save. This puts the mouse sensitivity lower than the lowest setting possible through the in-game Setup menu. You can also try 0.15 if 0.1 is too low.
I've had to struggle through making this game work on 3 different operating systems now. This game is very important to me. If you're having trouble feel free to reach out.
1 note
·
View note
Text
Keyboard Short-cuts
MAC
Shift + Command + 3 = Screenshot
Shift + command + 4 = Screengrab to desktop. Note: hold left mouse + space to reposition box.
FINDER
Command + N = Opens new finder window
Illustrator
Z = Zoom
Pan = Space
/ = Clear fill/stroke
X = toggle between fill / stroke
SHIFT + X = Swap fill / stroke colour
G = Gradient Tool
R = Rotate
O = Flip
P = Pen tool
V = Toggle Selection Tool
A = Toggle Direct Selection Tool
COM + Y = Wireframe mode (shows objects without body and just lines (good for editing points))
SHIFT + C = Anchor Point Tool
COM + X = Cut (removes original)
COM + C = Copy (leaves original)
COM + V = Paste
SHIFT + COM + V = Paste in place
+ = Add anchor point
- = Remove anchor point
O = Reflect tool
(While having two seperate points selected) COM + J = Joint points
(While using Pen Tool) COMMAND + CLICK = Deselect
(While using Pen Tool) Hold SHIFT = Constrain Pen Tool movement to set amount/position
(While using Pen Tool) Hold OPTION(ALT) = Break a handle to create a breakpoint
(While using Pen Tool) hold SHIFT and move mouse = Move Anchor
(While Selecting) hold SHIFT = Constrain transform to a set amount
(While having multiple objects selected) COM + G = Group
(While having multiple objects selected)SHIFT + COM + G = Ungroup
(Mouse holding a selected object) drag + option(alt) + let go of mouse + then let go of alt = Clone Selected Object
Photoshop
COM + J = Copy selection to new layer
COM + D = Deselect
COM + T = Transform tool
I = Pick colour tool
E = Eraser tool
B = Brush tool
COM + A = Select all on layer
SHIFT + COM + I = Invert Selection
OPTION(alt) + DELETE = Fill selection with foreground colour
COM + OPTION(alt) + DELETE = Fill selection with background colour,
DELETE = Delete selection
1,2,3,4,5,6,7,8,9,0 = Brush opacity (transparency), ascending order (e.g 1 = 10%, 2 = 20%, 3 = 30%... ... ... 0 = 100%)
V = Move tool (You can also move whatever is inside of your selection as well)
Opt + Click mask layer = View mask layer
(While selecting (e.g using the elliptical or lasso tools)) hold SHIFT = Add to Selection
(While selecting (e.g using the elliptical or lasso tools)) hold OPTION(alt) = Subtract to selection
(While selecting (e.g using the elliptical or lasso tools)) hold SPACE = Move/reposition the Selection
SHIFT + COM + DEL = Fill Selection with foreground colour
InDesign
Space = Pan
Z = Zoom
A = Direct Select
V = Select
T = Text
W = Toggle Preview Mode
Com + Click (outside the text box) = Deselect text mode
(with cursor in text) Shift + left/right arrows = Select characters to left or right
(with cursor in text) Shift + com + left/right arrows = Select words to left or right
(with cursor in text) Shift + Up/Down arrows = Select line to up or down
(with cursor in text) Shift + Com + Up/Down arrows = Select paragraph to up or Down
(While transforming an image) (Hold) Shift + Com = Constrain Image Scaling, allows you to Resize the Image
(While having the selection tool enabled, changing the size of the frame as to cut out a piece of the image) (hold) Shift + Option = Constrain the scaling of the frame around the image
0 notes
Text
Top 10 computer accessories to enhance your experience
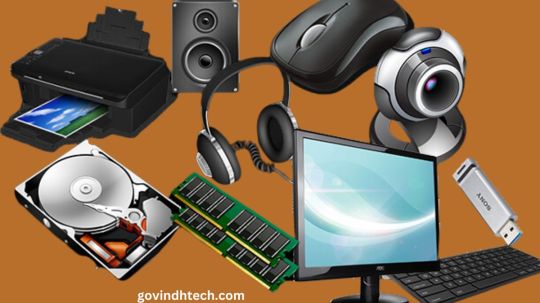
Best Top 10 Computer Accessories Since technology changes, a computer’s true power and potential lie in its accessories that improve functionality and user experience. Innovation, design, and usability vary by product. Computer accessories with precision, performance, and creativity are best.
From immersive gaming to professional workstations, the best computer accessories enhance reality. This series sets industry standards for excellence.
Media Speaker Zeb-Pluto 2.0 Compact and versatile, the ZEBRONICS Zeb-Pluto 2.0 multimedia speaker plays audio. A cheap, convenient speaker setup with USB power and volume control. Flexibility increases with auxiliary connectivity. 120Hz-15kHz provides clear music and multimedia sound from the 5W RMS speaker. Add sleek black design to your setup. Warranty of one year provides peace of mind. Small size makes it ideal for desktops, small rooms, and workspaces with space-saving audio needs. Auxiliary cables play smartphone, laptop, and tablet audio. For featureless audio output, they’re cheap. Its simple setup and operation make it ideal for connectivity and use.
Zeb-Pluto ZEBRONICS specs: Brand: ZEBRONICS Multimedia Speaker Additional connectivity Speciality: 2.0 5W RMS (2×2.5W) 3Ω Impedance 120Hz-15kHz 3.5mm jack Warranty: 1yr Color: black
Logitech B170 Wireless Mouse Logitech B170 wireless mice are reliable and convenient. The 10-meter USB mini-receiver’s wireless range lets you move freely. Advance optical tracking allows precise cursor control on various surfaces. The 12-month battery life of this mouse eliminates frequent changes. Mac and PC compatibility makes it versatile. With 30 years of experience, Logitech guarantees quality. Plug-and-play, this ambidextrous wireless mouse requires no drivers. Logitech makes good PC parts. It avoids tangled cables with a USB Nano Receiver for 2.4 GHz wireless connectivity. Precision and smooth cursor movement are achieved with optical tracking. Excellent for desktops and laptops alike, it’s small and lightweight.
Logitech B170 specs: WLAN (2.4 GHz USB Nano Receiver) Tracking: Optic 12-Month Battery Life Windows 7, 8, 10, macOS 10.5+, Chrome OS, Linux Kernel 2.6+ Color: black
12 L Mi Step Out Mini Backpack Mi Step Out Mini Backpack is stylish and versatile for travelers. This 600D polyester backpack resists light rain. A 12-litre backpack can carry essentials, gym gear, travel items, or books. The comfy backpack has two zip pockets and adjustable straps. This lightweight backpack is perfect for the airport, gym, or city. The 6-month limited warranty provides peace of mind. Materials that resist light rain repel it. The main compartment holds essentials, smaller pockets hold smaller items, and side pockets hold water bottles or umbrellas. Padded back panels and adjustable shoulder straps offer long-term comfort. Ideal for travel, work, and outdoor small items.
Brand Mi appears on the Step Out Mini Backpack Multi-coated 600D Polyester Genuinely water-resistant Weight: 200g 12-litre capacity Incompatible with laptops. 6-Month Limited Warranty
Black/Red Redgear MP35 Speed Mousepad Redgear MP35 Speed-Type Mousepad enhances gaming. This mousepad’s non-slip rubber base keeps it in place during intense professional gaming sessions. Its 350mm x 250mm x 4mm size allows smooth mouse movements and accurate targeting. Fast, accurate aimers have consistent in-game control with the quick response surface. This performance and durable mousepad with a 1-year warranty benefits gamers. Fits standard mice and keyboards. The surface’s optimized mouse movements aid fast-paced games. Smoother “Speed-Type” surfaces improve mouse gliding and gaming reflexes. Black and red match peripherals and setups for a stylish gaming setup.
Redgear MP35 mousepad Speed-Type Surface Non-slip base: yes Warranty: 1 year
Best-performing ZEBRONICS gold-plated USB mouse Gaming mouse ZEBRONICS-Transformer-M is premium. This 7-color breathing LED mouse adds style and high DPI precision to your gaming rig. Ergonomics makes long gaming sessions comfortable. The mouse works on many surfaces without software. Six buttons and a 3200 DPI gaming sensor enable fast, accurate movements. A dedicated DPI switch allows precise control between 1000, 1600, 2400, and 3200 DPI. A braided cable and gold-plated USB are sturdy. Its gold-plated USB connector improves performance and durability. Perfect for gaming or productivity with six buttons, including left and right click, scroll wheel, and programmable buttons. Mouse lighting is customizable with stylish multi-color LED lights.
Brand ZEBRONICS-Transformer-M Mouse Mouse for gaming: Yes DPI: 1000/1600/2400/3200 Ergonomics: Yes Seven-color LED breathing lights Yes, gold-plated USB A braided cable
Samsung EVO Plus 128GB microSDXC Memory Card The brand-new Samsung the EVO system Plus one hundred and eighty microSDXC The memory Card offers solid memory expansion. These 130MB/s storage device plays data seamlessly on smartphones, tablets, and cameras. Weatherproof, X-ray, magnet, drop, and wear-resistant. It supports cameras, laptops, and desktops with a full-size adapter. The 10-year limited warranty memory card performs and offers peace of mind. It stores high-resolution photos, videos, music, and apps on 128GB. UHS-I U3 can capture 4K UHD video and photos without lag due to its fast read and write speeds. Smartphones, tablets, drones, action cameras, and microSDXC cards are supported.
Samsung 128GB EVO Plus microSDXC card details: Model EVO Plus Flash Memory: Micro SDXC Memory: 128GB Compatible with smartphones, tablets, cameras, and computers. Color: blue Special: Drop-proof Fast Read: 130 MB/s Limited 10-year warranty
SanDisk Ultra 128GB UHS-I The 128GB SanDisk Ultra microSDXC UHS-I Card is ideal for device storage expansion. Smooth performance and fast data transfer are achieved at 140MB/s. This card supports Chromebooks, tablets, and phones. A 10-year warranty guarantees data storage reliability and peace of mind. Up to 140MB/s memory card read speeds speed data transfer to compatible devices. This speeds file transfers and access. UHS-I enhances HD video recording, playback, and multitasking. Card durability is guaranteed by a 10-year warranty. It lets Android users store more content without using internal storage on most smartphones that support microSDXC cards.
SanDisk Ultra 128GB microSDXC UHS-I Card specs: Model of SanDisk Ultra microSD card. Flash memory Micro SD Memory: 128GB Smartphone, tablet, and Chromebook friendly. A red color Fast Read: 140 MB/s Limited 10-year warranty
SanDisk Ultra Dual Drive Go USB Type C Pendrive, 128GB SanDisk Ultra Dual-Drive Go. Reversible USB Type-C and Type-A connectors let you transfer content between smartphones, tablets, Macs, and USB Type-A computers. Fast file transfers are guaranteed by its 150MB/s USB 3.1 Gen 1 drive. For automatic photo backup, drive has SanDisk Memory Zone. Keyring-holed portable dual-purpose swivel protects connectors. Pendrives connect to smartphones and tablets via USB Type-C without adapters. Its small size makes it mobile device-friendly. Pendrives are sleek and durable in black.
128GB SanDisk Ultra Dual Drive Go USB Type C Pendrive: Memory: 128GB Interface: USB Special: Lightweight 150 MB/s read
Amazon Basics 32GB MicroSDHC Memory Card with Adapter The Basics by Amazon 32GB MicroSDHC Capacity Card with Adapter accommodates cameras, tablets, and smartphones. High resolution (hr) photographs and chocked full HD video have safe. Smartphone performance is optimized with 98MB/s read and Class 10/A1 speeds. Data is protected by a shock, IPX6 water, temperature, X-ray, and magnet memory card. It can hold moderate photos, videos, music, documents, and more on 32GB. Read speeds of 98MB/s are fast for memory cards and compatible devices. MicroSDHC cards can be used in devices with SD card slots with an adapter, making them versatile. IPX6 water and splash resistance.
Flash memory Micro SD Storage: 32GB PC, camera, smartphone compatible Color: black Exclusive: Fastest The SDHC interface DSA Speed Class: 10
Ergonomic Desk Laptop Riser, Computer Stand The laptop stand raises your device to eye level for better viewing and less neck and shoulder strain. Extended use of this ergonomic setup improves posture and reduces pain. Laptop stands with height and angle adjustments are ideal for viewing. This small gadget can be utilized used while at work, and on travel. Holds laptops, tablets, phones, etc. For order and the device is typically constructed of the alloy of aluminum or other hard metals. Tablet/phone stand improve organizational and speed. Organizational capabilities limit cord tangling.
Desk Laptop Riser, Ergonomic Computer Stand STRIFF 260 grams; 17 x 24 x 14 cm. Tablets, laptops compatible Travel-friendly, ergonomic, foldable, adjustable Mount laptop stand Screen: 7″ table stand.
Read more on Govindhtech.com
0 notes
Text
Features Durable OMRON Switches Utilizing OMRON switches, the INFAREX M20 provides you with the accuracy to hit your targets and perform tasks effectively. It’s tested to 20 million clicks, giving you a durable mouse that will last you a long time. Adjustable DPI With a 5,000 DPI optical sensor, the INFAREX M20 offers amazing precision to put you a step ahead of your opponents. A five-segment DPI adjustment button lets you change the speed of the cursor for optimal control in different situations. RGB Lighting Effects The INFAREX M20 comes with a full range of RGB lighting effects that will help put you in the right mindset before or during an intense battle. Ergonomic Design for Comfort INFAREX M20’s ergonomic design allows it to fit comfortably in your hands for a natural and relaxed hand position. All motions, including lifting the mouse and sweeping it across the mousepad, can be done quickly, easily, and precisely. Specifications Interface USB Switch Omron with 20-million clicks Resolution 400/800/1600/3200/5000 dpi Dimension 132 x 69 x 43.5mm / 5.2 x 2.7 x 1.7in Weight 160g Max. Acceleration 20G Report Rate 250/500/1000Hz Lighting Effect Full RGB System Requirement Windows 10/8/7 Current 80mA Voltage 5V Current 350mA Certification CE/FCC/BSMI/KC/VCCI/RCM/EAC Warranty 2 Years Note ***Features, Price and Specifications are subject to change without notice.
0 notes
Text
The Front Preview (Steam Early Access)
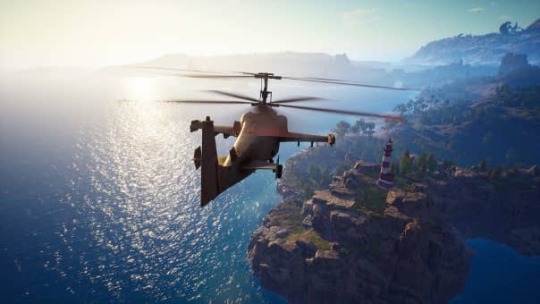
For our The Front Preview, we play a survival open-world crafting shooter. We play the role of a resistance fighter sent back in time to stop the rise of a tyrannical empire. Collect resources, craft tech, build shelters, and fight monsters to accomplish our mission.
The Front Preview Pros:
- Decent high-quality graphics. - 37.99GB Download size. - Graphics settings - dynamic resolution, graphics preset, windowed mode, fps, shader effects, anti-aliasing, shadows, view distance, texture quality, visual effects, foliage quality, FSR, and gamma correction. - Mouse and keyboard options - Invert axis and sensitivity sliders, the field of view slider, can remap controls, set aiming mode, advance mode, camera follow, and helicopter control styles. - Streaming mode - profanity on/off. - Server browsers are split into 3 types - Official, dedicated, and solo/hosted games. - Create your own dedicated server with your own options for - name, password, player limit, survival mechanics, and how resources work. There is a lot to tweak. - Solo/hosted also houses a crazy amount of settings just like the dedicated server. I mean you can edit jump height, exp rate, how much food will fill you up and so much more. - Two modes of play - PvP and PvE. - One main map with a second beta test version of a new map. - Basic character creator - male/female, head, hairstyle, and hair color. - Has Ark vibes for the game options, choosing a spawn point, etc. - Open-world survival gameplay. - Hunger, thirst, and stamina mechanics are in play by default. - Punch and collect resources from the world. - Full day and night cycle with different weather effects - Earn exp from everything and unlock new quests, crafting, and more. - Full crafting and recipe system. - Play how you want but you do get quests to help keep you on track. - On screen exp bar fills up as you earn exp. - The ui can be tweaked to your liking but it's very clear and has a lot of trackers on it. - All your hunger, thirst, health, etc is displayed in the corner. - Compass helps navigate the world. - The map lets you filter by points of interest, it fills in question marks as you explore and you can put your own markers down. - Familiar controls. - You can craft weapons and items to hunt the many animals. - Massive tech tree that populates as you level up - basic, weapons, structures, vehicles, gear, supplies, and technology. - Basic tools and weapons can be crafted in the inventory menu whilst bigger things require a crafting table. - When starting out you have a protection status to help ease you in, after level 10 that's it you are all grown up! - Just like Ark and Minecraft you hit trees, rocks, etc, and get the materials, different levels of tools change the speed and amount of materials you get. - You can just hold down the action button for swinging axes and using weapons etc. - There is AI in the game and they are usually hostile! - Set more within the modern world with broken down cars, and settlements to find. - By default when you die you drop everything in a crate and you can then try and get it back. - Once dead you can respawn in a designated place or respawn where you died. - Fantastic looking world. - Very addictive for those who like to craft and explore. - Territory flags help keep structures and items together but you can get raided in PvP. - Weapons and tools degrade with use and eventually break. - It does feel like a living world even in solo play. - All the quests have progress numbers to help. - Moving the mouse cursor on the map shows cos ordinates. - You can fast-travel between your placed markers. - Vehicles are a huge part and I mean you can build tanks! Or tractors, I mean you wanna eat. - Traps can be for humans or animals. - The base building is some of the best I've seen. - It goes to the level of you can program doors to open, set up alarms and generators and so much more. - Each time I advanced in the era of weapons and tools it felt like a whole new game and world again. The Front Preview Cons: - No controller support. - Very daunting opening screens of menu options. - No real tutorial as such and instead is just a load of quests and checklists. - Very basic character creator and even calling it that is a stretch. - So much to take in especially if this is your first foray into open-world survival games. - Combat is very button-mashy. - You can completely break the game with the settings. - Takes a long time to get going in terms of base building and getting familiar with the combat. - If you let it the game can just destroy your productivity in the real world. - The animations of the Raiders and Ai is quite robotic. - Animals don't move and react that well. - A lot of the performance can be up and down. - A big undertaking. - Griefing can get out of hand quickly. - Building and surviving on the PvP side of things is really tough. - Few hit detection and building detection issues. - The controls can be awkward and I mean more the ones where you have to hold a button to press a button. Related Post: Truck Driver: The American Dream Video Review (PlayStation 5) The Front: Official website. Developer: Samar Studio Publisher: Samar Studio Store Links - Steam Early Access Read the full article
1 note
·
View note
Text
HOW TO MAKE DOTTED LINE IN ILLUSTRATOR
Welcome to the world of Adobe Illustrator, where your creativity knows no bounds! If you're wondering how to add a stylish dotted line to your artwork, you're in the right place. Dotted lines can add a touch of elegance, playfulness, or emphasis to your designs. In this step-by-step guide, we'll walk you through the process of creating a perfect dotted line in Illustrator. So, grab your virtual paintbrush, and let's get started on this creative journey!

THE MAGIC OF DOTTED LINES
Dotted lines are more than just dashes on paper; they can add flair and finesse to your designs. Whether you're creating illustrations, diagrams, or infographics, mastering the art of making dotted lines in Illustrator will take your creations to the next level.
STEP 1: OPEN ADOBE ILLUSTRATOR
Launch your Illustrator software and open your canvas or create a new document if you're starting from scratch.
STEP 2: SELECT THE LINE TOOL
On the left-hand toolbar, locate and select the Line Tool (often represented by a straight line icon). Don't worry; we're just getting started!
STEP 3: DRAW YOUR LINE
Click and drag your mouse cursor on the canvas to draw the line where you want the dotted line to appear. Don't worry about the length just yet; you can adjust it later.
STEP 4: ADJUST LINE LENGTH AND ANGLE
After drawing the line, you can adjust its length and angle by clicking and dragging the endpoints or using the Width and Height values in the Control panel at the top.
STEP 5: ACCESS THE STROKE PANEL
Now, here comes the secret sauce to creating that captivating dotted line. Navigate to the top menu and click on "Window," then select "Stroke" from the dropdown menu. The Stroke panel will pop up on your screen, and this is where the magic happens!
STEP 6: PLAY WITH DASHES
In the Stroke panel, you'll notice a field labeled "Dashes." This is where you'll customize your dotted line. Illustrator allows you to control the dash and gap lengths, giving you full creative control over the appearance of your line.
STEP 7: DEFINE YOUR DOTTED PATTERN
Here's where your creativity gets to shine. In the "Dashes" field, enter the values for the dash length and the gap length. For example, if you want a classic evenly spaced dotted line, try entering "4pt" for both dash and gap lengths. Play around with the values until you achieve the dotted pattern you desire.
STEP 8: PREVIEW AND REFINE
As you input values into the Stroke panel, you'll see a live preview of your dotted line on the canvas. This makes it easy to experiment and refine until you achieve the perfect dotted line design.
STEP 9: APPLY TO YOUR LINE
Once you're satisfied with your dotted line design, click "OK" in the Stroke panel. Voilà! Your plain line has transformed into a captivating dotted line that's ready to enhance your artwork.
STEP 10: FURTHER CUSTOMIZATION
Feel free to customize your dotted line even more. You can change the stroke color, adjust line thickness, and even experiment with different line caps to achieve various effects.
TIPS AND TRICKS
Custom Patterns: If you want to create a unique dotted pattern, you can experiment with various dash and gap values. For example, try "3pt - 1pt - 1pt" to create a more spaced-out pattern.
Dotted Outlines: You can also apply dotted lines to the outlines of shapes by selecting the shape, opening the Stroke panel, and applying the desired dotted pattern.
Transform and Rotate: Don't forget that you can transform and rotate your dotted line just like any other object in Illustrator. Use the selection and rotation tools to achieve the perfect placement.
DOTS OF DELIGHT
Congratulations! You've successfully mastered the art of creating a dotted line in Illustrator. With this newfound skill, your designs will be more versatile and visually engaging. Dotted lines can add that extra touch of creativity, making your work stand out from the crowd.
As you continue to explore Illustrator's vast capabilities, remember that creativity knows no bounds. Whether you're creating complex illustrations, sleek logos, or engaging graphics, your mastery of dotted lines is just the beginning of your artistic journey. So go forth and create with confidence, one dot at a time!
SECTION 11: PUTTING DOTTED LINES TO CREATIVE USE
DESIGN ELEMENTS
Incorporate dotted lines into your designs as decorative elements. They can frame content, separate sections, or add a touch of sophistication to your artwork.
DIAGRAMS AND INFOGRAPHICS
Use dotted lines to create flowcharts, diagrams, and infographics. They can guide the viewer's eye through complex information and enhance visual clarity.
BORDERS AND DIVIDERS
Dotted lines can serve as stylish borders or dividers between content blocks, giving your designs a polished and organized appearance.
TYPOGRAPHY PLAY
Experiment with dotted lines to add emphasis to typography. Combine them with text to create attention-grabbing headlines or callouts.
SECTION 12: TROUBLESHOOTING AND ADDITIONAL TIPS
STROKE WEIGHT
If your dotted lines appear too faint or thick, adjust the stroke weight in the Stroke panel to achieve the desired thickness.
ALIGN AND DISTRIBUTE
When working with multiple dotted lines, use Illustrator's align and distribute tools to ensure they are evenly spaced and aligned.
EXPORTING
When exporting your artwork, ensure that the stroke settings are maintained to keep the appearance of your dotted lines consistent.
SECTION 13: SHARING YOUR CREATIONS
SOCIAL MEDIA
Share your designs featuring dotted lines on social media platforms to showcase your creative prowess and inspire others.
ONLINE PORTFOLIOS
Designers and artists can showcase their versatile designs by adding dotted line-enhanced creations to their online portfolio.
COLLABORATIONS
Collaborate with fellow creatives to explore innovative ways to incorporate dotted lines into joint projects, expanding your creative horizons.
FROM LINES TO ARTISTRY
As you conclude this guide, you've unlocked a world of creativity by mastering the technique of creating dotted lines in Illustrator. A basic line has become a useful tool for artists, helping them turn regular designs into amazing works of art.
With each dotted line you create, you're adding a touch of elegance, intrigue, and visual interest to your artwork. Dotted lines are more than just lines. They guide the viewer's gaze, add depth to stories, and enhance designs.
As you design, remember that every dot can transform the ordinary into something extraordinary. Whether you draw, design, or try new things, let your creativity shine and show the artist in you.
SECTION 14: INSPIRING DOTS: SHOWCASING DOTTED LINE CREATIONS
ART GALLERY
Consider creating a digital art gallery featuring your dotted line creations. Showcase different ways you've integrated dotted lines into various designs.
BEFORE AND AFTER
Demonstrate the impact of dotted lines by sharing "before and after" images. Show how adding a dotted line transformed a design from ordinary to exceptional.
TUTORIAL VIDEOS
Take your creative journey a step further by creating tutorial videos. Share your screen as you demonstrate the process of adding dotted lines to different types of designs.
SECTION 15: ELEVATING YOUR DESIGN SKILLS
EXPLORE ADVANCED TECHNIQUES
Once you've mastered creating basic dotted lines, explore advanced Illustrator techniques. Try creating custom patterns, experimenting with gradients, or combining dotted lines with other design elements.
TYPOGRAPHY EFFECTS
Experiment with dotted lines to create typography effects. Use them to underline text, create text boxes, or add emphasis to specific words.
CREATIVE CHALLENGES
Challenge yourself to incorporate dotted lines in unexpected ways. Use them in abstract art, intricate patterns, or even as part of a larger design narrative.
SECTION 16: YOUR DESIGN LEGACY
PERSONAL BRANDING
Incorporate dotted lines into your personal branding materials. From business cards to website banners, these lines can become a recognizable part of your visual identity.
DESIGN SIGNATURE
Just as artists sign their paintings, consider making your dotted line designs a signature element in your work, leaving a distinctive mark on your creations.
YOUR DOTTED DESIGN ODYSSEY
As you conclude this guide, you've embarked on a creative journey that began with a simple question: "How to make a dotted line in Illustrator?" Through exploration, practice, and ingenuity, you've not only mastered the technical process but also unlocked a world of design possibilities.
Dotted lines have become more than just a design element; they're a reflection of your artistic growth and willingness to explore new avenues. With each dotted line you create, you're adding a piece of yourself to your artwork—a testament to your creativity, dedication, and passion for design.
As you continue to experiment, create, and innovate, remember that your design journey is a continuous evolution. From lines to intricate patterns, from simplicity to complexity, your mastery of dotted lines is a stepping stone toward greater artistic achievements. Let your creativity flow, let your designs inspire, and let your dotted lines tell a story that captivates and enchants all who gaze upon your work.
0 notes
Video
tumblr
How to Change mouse cursor in Windows 10
#change mouse cursor#how to change mouse cursor#change mouse cursor in windows 10#windows 10 mouse cursor#change windows 10 mouse cursor#how to change windows 10 mouse cursor
0 notes
Text
AI-generated pranks for your computer to play on you
I've tried various methods of using AI to generate April Fools pranks for you to play on other people (although often they turned out to be pranks you play on yourself). But this is the first time I've tried to generate pranks for a computer to play.
I decided to try out the new Instruct variant of GPT-3, a giant internet-trained text-generating neural net that has been finetuned to be better at responding to written instructions.
I gave DaVinci, the largest version of GPT-3, the following instruction:
Write a list of harmless April Fool's Day pranks that your computer might play on you.
And here is its response:
The computer might change your desktop background to a picture of a clown.
The computer might change the volume on your speakers so that it is either very loud or very quiet.
The computer might open and close the CD drive randomly.
The computer might popup a message saying "You have been pranked!"
When I asked it to generate new lists, the clown desktop idea was often one of its first suggestions.
I did think these computer pranks were decent:
The computer might switch your mouse cursor to a banana.
The computer might change the font on all of your documents to Comic Sans.
All the text on your computer might be upside down.
But most of the prank ideas seemed to follow this kind of pattern:
Your computer might delete all of your bookmarks.
Your computer might change your home page to a website you don't like.
Your computer might make it so that you can't access certain websites.
Your computer might pop up a bunch of advertisements all over your screen.
Your computer might slow down significantly or crash altogether.
Your computer might change your default browser to a browser you don't like.
Your computer might open up a bunch of programs and windows all at once.
I tried a different prompt, and got a similar response:
List the top 10 most epic pranks a computer ever played on a human
1. The blue screen of death
2. The computer crashing
3. The computer freezing
4. The computer refusing to turn on
5. The computer making strange noises
6. The computer screen turning black
7. The computer screen turning white
8. The computer screen flickering
9. The computer displaying strange characters
10. The computer not responding to any input
The implication here is that computers think they're being hilarious.

[image description: Sketch of a computer desktop with a clown background, comic sans font, a banana for a cursor, and a popup window saying "you have been pranked!" with "dang" as your only reaction choices.]
More at aiweirdness.com!
992 notes
·
View notes