#camshaft measurement
Explore tagged Tumblr posts
Photo
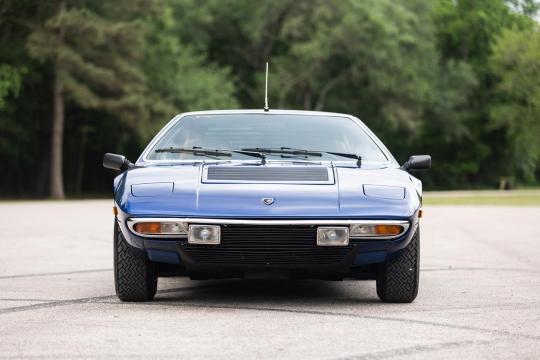
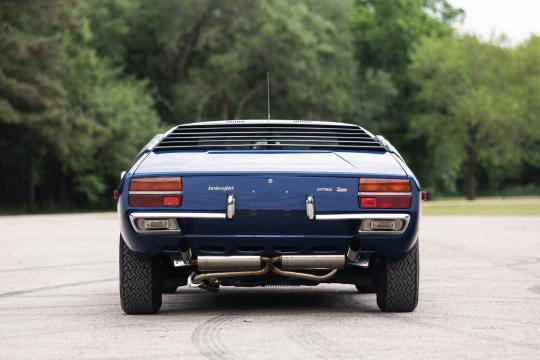
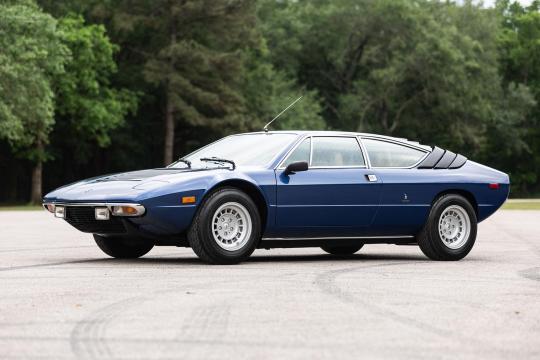
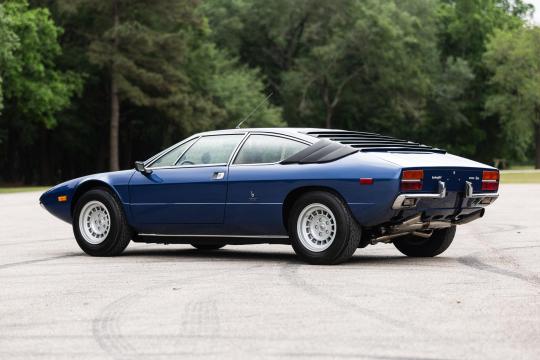
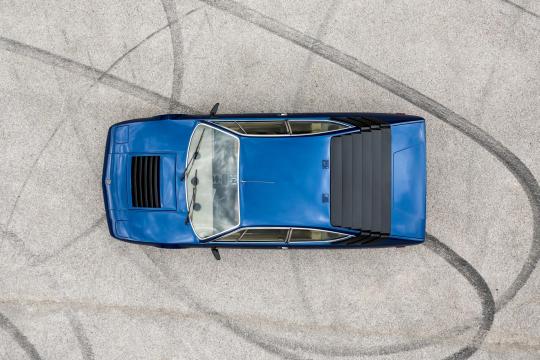
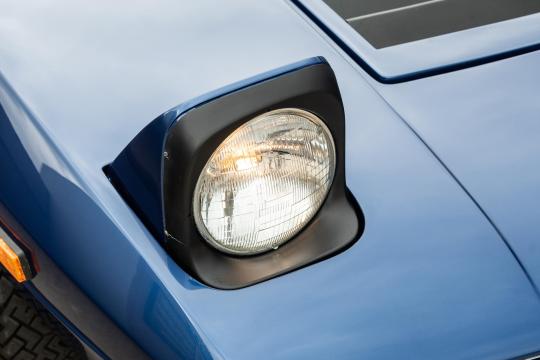
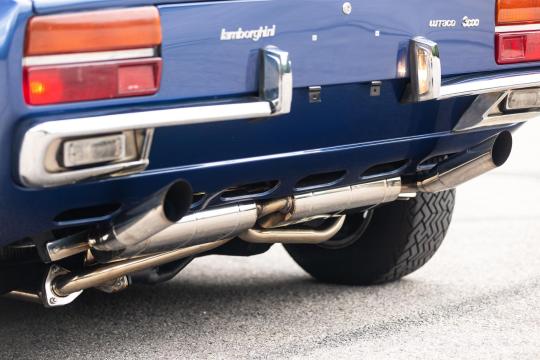
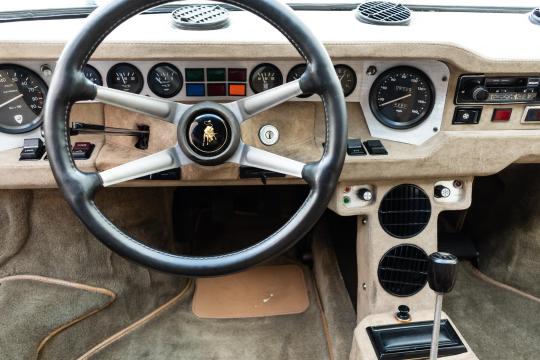
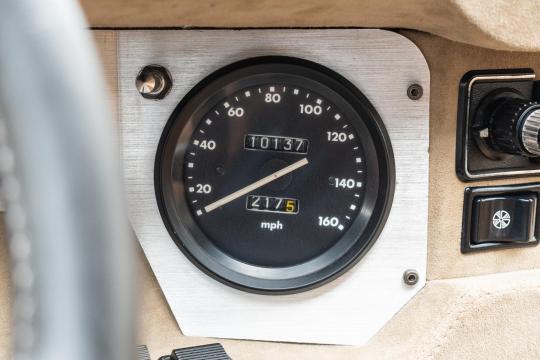
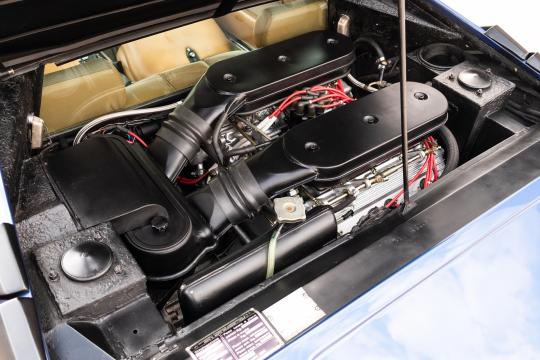
Lamborghini Urraco P300
Despite having been conceptualised as the model to dramatically increase sales and bring Lamborghini greater financial stability, the Urraco P250 proved a commercial flop. Production started in late 1972 following major equipment and floorspace investment. However, by late 1974, less than 500 had been delivered. The Urraco should have gone into production two years earlier than it eventually did. Lamborghini had originally conceived the model with a view to selling over 1000 examples every year.
The disappointing reality left Lamborghini deep in the red, but the Urraco was only partly responsible for a difficult few years.
Compounding the firm’s troubles had been delays for the Countach, a worldwide recession, problems at Lamborghini Trattori and unionised labour, all of which contrived to take their toll on the company founder. In 1972, Ferruccio Lamborghini had sold his tractor company along with 51% of his motor car business. He cashed out of the final 49% in 1974 when the world was in the midst of an energy crisis that slashed demand for gas guzzling machinery.
Throughout this tumultuous period, development work continued on the Urraco. It mainly focused on the Paolo Stanzani-designed V8 engine that had been created especially for the new model at considerable expense. In November 1974, an uprated Urraco P300 was launched at the Turin Motor Show. It immediately went into production alongside the Countach LP400, Espada Series 3 and Jarama S.
Most significantly, the Urraco P300 came with an enlarged three-litre engine. Equally importantly, the power unit now incorporated dual instead of single overhead camshafts.
To take capacity up to three-litres, Paolo Stanzani’s all-alloy 90° V8 was stroked from 53mm to 64.5mm. Bore went unchanged at 86mm for an overall displacement of 2997cc (an increase of 534cc). Compression was dropped from 10.5:1 to 10.0:1. Four new Weber 40 DCNF twin-choke downdraught carburettors were installed to replace the old 40 IDF 1s used previously.
The consequence of these improvements was a dramatic jump in output. Peak power was up 40bhp to 260bhp at an otherwise unchanged 7500rpm. The torque rating also rose considerably; 195lb-ft was now on tap at 3500rpm compared to 166lb-ft at 5750rpm for the P250.
As before, ignition was via two Marelli coils and a single Marelli distributor.
Lamborghini’s five-speed manual gearbox was beefed up to cope with the increased power and torque. Transmission was via a single dry-plate clutch and Lamborghini differential. New damper settings improved the ride, but otherwise little was changed to the existing platform The P300 was based on the same steel monocoque body shell as its predecessor. The engine was housed transversely like the Miura.
Suspension was independent all-round with MacPherson struts, coil springs and telescopic shocks. Anti-roll bars were fitted at either end The twin circuit brake system incorporated unchanged 278mm ventilated Girling discs. Campagnolo’s handsome five-bolt cast magnesium wheels were retained. They measured 7.5 x 14-inches and originally came shod with Michelin XWX tyres.
An 80-litre fuel tank was fitted in the engine bay.
Visually, the only change made to the P300 Urraco was a switch from a two-bank to six-bank radiator cooling vent on the front lid. The rest of Marcello Gandini’s soft wedge creation was unaltered.In a decade not exactly renowned for design longevity, the Urraco proved somewhat timeless. Compared to Bertone’s other mid-engined 2+2, the Ferrari Dino 308 GT4, the baby Lamborghini aged very well, even though it was ultimately outsold by the Maranello product by five to one.Build quality was considerably improved over earlier examples and nowhere was this more apparent than in the cockpit.Bertone had originally been responsible for furnishing the bodyshells, but by the time the P300 was on stream, this work had been taken in-house.
Lamborghini used better quality materials and ensured a higher standard of fit and finish.To this end, P300s were generally equipped with full leather interiors instead of the often garish two-tone leather and fabric combinations seen earlier.
The full width dash layout was still just as haphazard though. The rev counter and speedometer were located at either end of the instrument binnacle and angled in towards the driver. Supplementary gauges and various rocker switches were housed in between.
Lamborghini’s unusual deep dish steering wheel with its four arced horizontal spokes and leather rim was also retained. Like the P250 (which remained in production for a few months longer to use up an overstock of parts), the only update was the gradual shift to anodised black bumpers, wipers and window frames. A more conventional three-spoke steering wheel was also introduced towards the end of production.
#Lamborghini Urraco P300#Ferruccio Lamborghini#Countach LP400#Espada#Jarama S#Miura#Ferrari Dino 308 GT4#Bertone
176 notes
·
View notes
Note
OMG I'm such a dumbass I knew you did one on the GR Yaris before too, and I love her ALSO, but I actually meant the GR Supra 😳🫣 (slip of the tongue)
Gotcha.
Since I managed to take some two weeks to answer this (got distracted both by real life obligations and other posts that were meant to be very quick to make. Meant to.) y'all may have forgotten, but our dear friend of the blog had asked for opinions on the GR Yaris, hinting to its controversial status. Turns out the GR Supra is what that request, and thus that hint, was actually about - so let's talk about the car and the controversy that engulfs it.
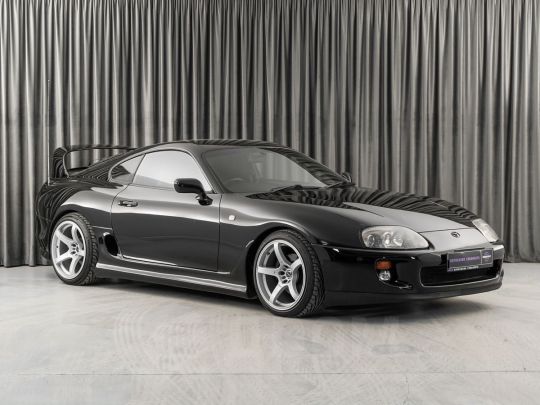
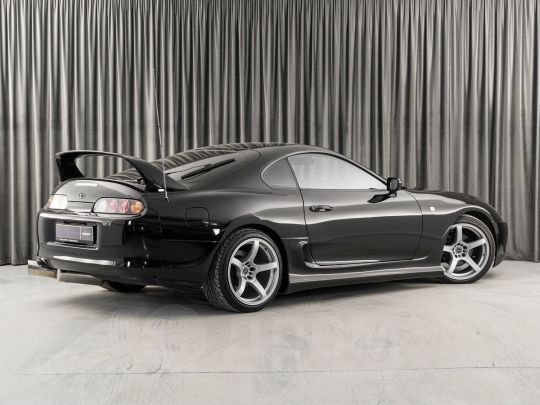
In 1993, Toyota launched the fourth generation of its rear wheel drive sportscar (well, arguably a bit of a Grand Tourer, i.e. something more oriented to cruising than a sportscar) the Supra - which was born a quarter century earlier as a more upmarket, six cylinder version of the Celica, graduating from Celica Supra to its own dignified name with the third generation I talked about that one time I forgot to check what blog I was reblogging with.

But this time, things would be different. Most notably because the inline six the Mk4 Supra came out with was an absolute MONSTER.
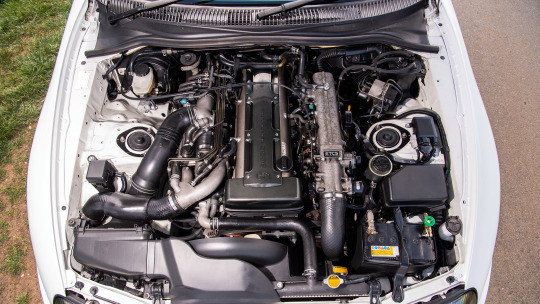
Remember how I talked about the GT-R's RB26 engine being one of the greatest, most coveted production engines to ever come out of Japan? Well, the 2JZ-GTE is the other.
It was larger at 3 liters, no less powerful, and to reduce turbocharger lag it used two of them sequentially: first air goes in the smaller, more responsive turbo, then gradually some of it gets sent to the bigger turbo to make it start spinning, then when it gets going the two are finally used in conjunction. (Imagine the big turbo as a hung husband that takes a while to get it up and the small turbo as an eager stepson ready to take over until the hung one can join in for a spitroast. Or something. I don't watch porn with real people, but from what I gather the plots seem to resemble how sequential turbos work.) It even at one point got Variable Valve Timing, i.e. the ability to vary the time in which the valves open depending on engine speed, which allows to optimize tuning for performance and efficiency! (Cool thing to go over in detail if y'all want me to.) And also, the kind of things that engine is able to take make me wish I hadn't used up my porn analogy quota.
See, to chop off eons of nuance, an engine is just a big block of metal with a lot of bits attached, and the two main measures of an engine's potential are the slope of the line in the Bits Fiddled With / Power Output graph and how far up (It's up, right? The second axis you specify is the vertical one, right?) you can take it before the block becomes the weakest link - with another important point being when you need to start messing with internals, i.e. the components inside the engine, e.g. pistons (the things the boom pushes down), camshaft (the thing the pistons spin) and connecting rods (you can guess).
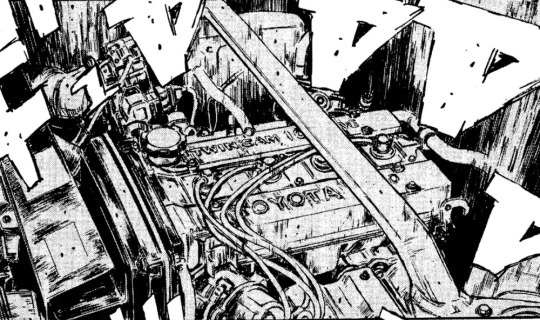
So for instance, just to make the point that an engine can be beloved without having much overall tuning potential, in one of Toyota's most beloved engines, the 4A-GE four cylinder illustrated above (yes, the one from that white and black car in all the eurobeat videos), some pin the block's limit as low as 250hp. The 2JZ, tho? It can take 800hp without even messing with the internals, and once you get your grubby hands on those you can keep pushing the line to some 2000hp. That is two Bugattis. That is 40 times my car. That is well above the power level where "tires that will at any point grip" and "tires that are in any way road legal" stop intersecting.
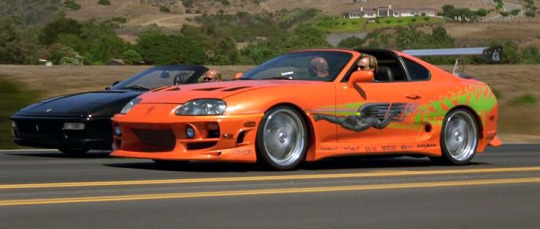
I am not in the slightest exaggerating when I say that this and the Skyline GT-R are widely regarded as the top of Japan's 20th century automotive production. The Messi & Ronaldo of the Japanese Domestic Market. It is absolutely no coincidence this was the hero car in The Fast And The Furious.
And then in 2002, as all things, its production ended, and given the abysmal sales and catastrophic recession, Toyota decided that would be that.
And then, years later, The Teasening began.
I want to stress, almost half of my conscious life (I choose to believe the stretch from birth to kindergarten is just run-up) the world was in some state of getting teased with talk of a new Supra. The trademark on the name was renewed in 2010. In 2014 they dropped the FT-1 concept, and of course that became speculation about what the production version would look like.

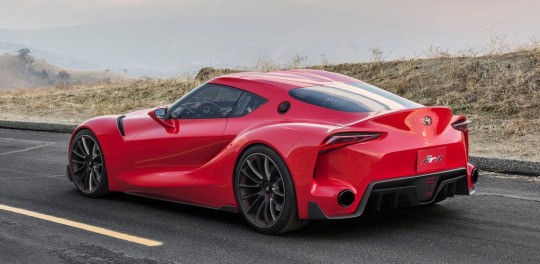
Because come the fuck on, it's not gonna look like that.
Or was it?
Only five entire years and much more teasing later would we officially get an answer, when after seventeen years, the Toyota GR Supra (and for those wondering what GR means, y'all should've clicked the Yaris link >:C) hit the streets.
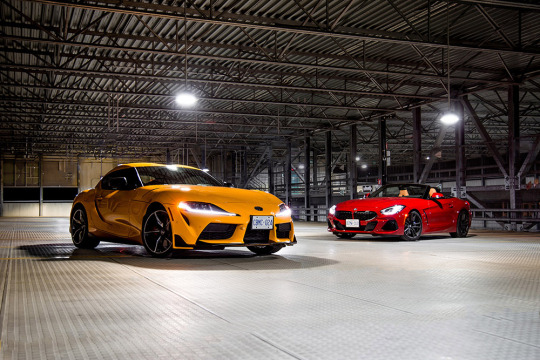
You know what, good enough.
Good enough to earn itself a sea of words of praise, Jason Cammisa's "The most punch-above-its-weight sportscar ever made" just some among them.
It did have its share of problems at the start, like its power being 335hp and not 382, a lack of manual transmission, and the inability to spec it with a less powerful 4 cylinder engine - well, I don't know who considered that last one a problem, but Toyota's updates solved that one too.
The Supra has a much bigger problem than those though, one no little update can solve. That red car in the background.

See, the new Supra is actually a joint venture with BMW, who made a new model of its Z4 roadster out of the platform. And unlike with the other joint-venture sportscar Toyota sells, people are big mad about that. Why?
See, the interior is engulfed in BMW switchgear and the drivetrain is all BMW (the manual gearbox took until this year to come out because BMW did not have one for that engine so Toyota had to modify another BMW transmission to fit), giving people the impression that this was less of a joint venture and more of a BMW project that Toyota tacked its design on top of, which is a problem whether true or not.
See, a range-topping sportscar is supposed to represent what the brand is capable of - having it done by someone else (or so the criticism goes) is a bit like performing Hallelujah in playback.
Actually, a better musical analogy: You know "I'm back bitch" singles? When a humongous artist drops a new record with a humongous lead single about absolutely nothing but reaffirming they're the biggest fucking deal in the universe? Without Me, Bad, Gimme More, so on. Well, think of SexyBack - one of the most monumental phenomenons of its decade, most incontrovertibly proving Justin Timberlake sat atop the goddamn world. Now, imagine if, after all the years that went by between that record and the next, when he finally came out with Suit And Tie all the verses were Jay-Z. Going from a humongous statement about having the power to reach the top of the game and stay there to having to get absolutely carried by what in this logic is essentially a competitor. Basically, that's the critics' complaint: the supra went from 2JZ to too much Jay-Z.
And therein lies the other problem of the Supra: the Supra.
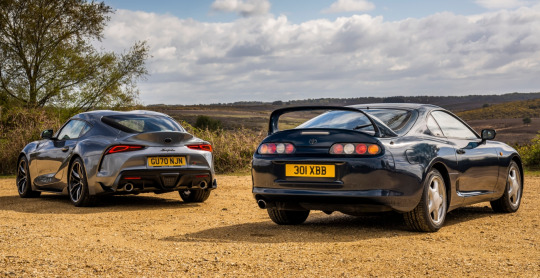
See, any time you evaluate something, you do so relative to its context - and when you give it a nameplate, you make that context include where else that nameplate has been. An undeserved name may not just be stupid, but even outright kill the car in some's eyes, see the case of the Dodge Dart, or get me to talk about the Ford Capri prototype recently spotted if you want to find out what I'm like when I lose my cool. (I'd liken this phenomenon to undeserved Grammies but I already used my music analogy quota too.) So the Toyota Supra does not just need to be good, it needs to deserve the name. And some argue it doesn't. But why? This thing is no less powerful, no slower, hell it's not even any bigger or heavier and we've gone over how rare that is these days! So is it the lack of backseats and a targa version? No, no one gives a crap about those. It's something deeper.
Sometimes, the problem with a revival is people base their expectation not on what the original was like in the context of its time but what it's like in the context of today (for example, I've heard people call the latest GT-R "too computerized, too assisted, far from the pure driving experience of its predecessors", when its predecessors had some of the most technologically advanced driving assists of their time and could only be called "pure" and "analog" by comparison with cars decades newer). But of course, that'll only be some people - so if what the original car looks like to modern eyes and what the original car represented at its time are two different enough concepts, any revival will receive some criticism for not being one of the two.
But for the Supra, this compounds with another problem: the original Supra (as in the previous generation, since no one gives a crap about the first three), to modern eyes, looks like a thousand-horsepower flame-spitting beast, because that's what all Supras have been turned into, and that's why you know of Supras in the first place (it sure isn't because people bought it!), and that, consciously or not, exacerbates the problem of misplaced expectations to a level akin to hearing an NBA player is about to have a brother and expecting the baby to be a 6'4" three-shooter.
But I wasn't asked about the controversies, I was asked about my take. And my take is: no realistic expectation of what a Supra would look like today was disappointed - at least not by where the car stands today. Well, unless the expectation involved backseats.
"But it was made by BMW" and so? This is a new Supra, and a good one - what does it matter how it got here? Especially when this is an upgrade over the Z4 in every way - looks way better, drives better, and now has a manual that the Z4 doesn't.
Okay, almost every way: the Supra's roof won't get out of the way. If only though, if only. Could you imagine a Toyota product that looks this good, sounds this good, goes this fast, and has a drop top? ...and maybe backseats?
Well, I can.
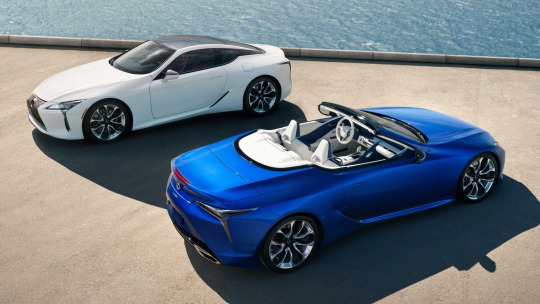

Yes, the badge and core concept may have some people consider it from midlife crisis mobile to old man's car. (though we know it's not a car bought by old men because if that was the case someone would be buying these). But just try to imagine sitting in this thing.
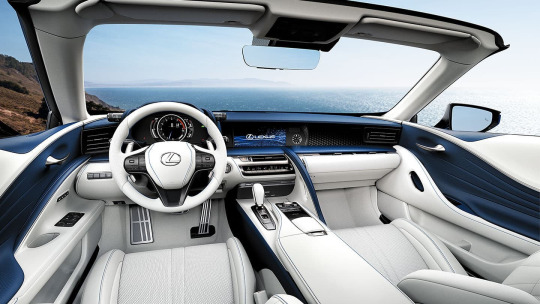
Take a couple of seconds to take in that picture and truly immerse yourself. You're in a Lexus LC500 Convertible, with a V8 at your right foot's command, its spectacular sound ready to battle the perfect sound system serenading you with your fanciest CD, because of course Lexuses still come with CD players.
Are you immersed? Okay: Someone just called your Lexus a midlife crisis car. See? You don't give a shit either, do ya.
Automatic only though. The pain. Oh, and it kind of costs as much as two Supras. But, you know, neither of those Supras will be convertibles!
Links in blue are posts of mine about the topic in question - if you liked this post, you might like those!
52 notes
·
View notes
Text
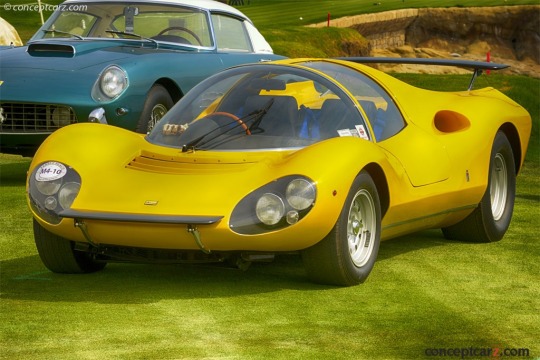
1967 Ferrari Dino 206 Competizione Competition Berlinetta
Alfredo 'Dino' Ferrari was credited with the design of the Ferrari V6 engine. With help from the legendary engineer Vittorio Jano, Dino influenced Enzo Ferrari's decision to produce racing cars in the 1950s powered by V6 and V8 engines.
Enzo Ferrari was hesitant to adapt the mid-engine layout for his customer cars, fearing they might be unsafe. He eventually relented and Sergio Pininfarina was tasked with designing a mid-engined concept for the 1965 Paris Motor Show, but demanded that it wear the Dino badge alone. At the Turin car show in 1966, the Dino 203S was well receipted and production soon followed.
The production Dino 206GT had many updates, modifications and changes such as softer edges and curving lines typical of earlier Italian cars. The 2-liter all-aluminum engine was transversely-mounted mid-ship and offered 160 horsepower. The V-6 engine featured dual overhead camshafts and 9.7:1 compression ratio. The crankshaft featured four main bearings with induction via three Weber 40 DCN/4 2-barrel carburetors. The frame of the 206GT was made from lightweight aluminum and fitted with full independent suspension. Disc brakes could be found at all four corners. The wheelbase of the car measured a short 90-inches. Top speed was a very impressive 146 mph. In total, there were only 152 examples built during 1968 and 1969.
This unique prototype followed the Dino 206 racing cars that raced at Le Mans and were powered by the Dino V6 engine. First seen at a 1966 Ferrari press conference, the standard 206 was bodied at Piero Drogo's Carrozzeria and featured light alloy bodywork and a semi-monocoque chassis. Only 18 were built, so the model was restricted to the Group 6 prototype class. This one-off 206 chassis, built by Ferrari, then went to Pininfarina to receive a new custom body. The plan was to use race-car engineering in a road-going supercar; it used an engine from one of three Dinos that raced at Le Mans in 1966. Designed by Paolo Martin, the car was shown at the 1967 Frankfurt Auto Show as a 'Dino' Berlinetta Prototype Competition, to much acclaim. Pininfarina preserved the car in their private museum until 2006, when they offered the current owner the opportunity to purchase the car and become its first owner.
#Ferrari Dino 206 Competizione Competition Berlinetta#car#cars#Ferrari Dino 206#berlinetta#ferrari dino#dino#ferrari
30 notes
·
View notes
Text
At Waiting's End - 6 Safe Landing
Though his originator had commed Prowl when he had boarded the last shuttle, Prowl waited on the tarmac as it came into land. Camshaft was no in anyway an impulsive mech but he was one with a deep sense of duty. If in the last moment he spotted a straggle, an unknown survivor of the carnage, Prowl knew his originator would go after them, even if that meant ordering the shuttle to leave without him. There had been no contact but there may not be due to the continued threat of the Decepticons to the transports. It had taken five mega-cycles to evacuate the ten thousand plus survivors, largely due to the need to ward off not only ground but air attacks against the transports. To Prowl’s great relief, not a single transport had been lost and this was the last one. His spark had not stopped racing for joors.
“Don’t worry, Prowl,” Bluestreak said, giving his servo a squeeze as he stood beside him. “The transport will land soon.”
The mechling had served as a good distraction. He was traumatized, how could he not be, but he was still the sweetest young mech. His entire family had been murdered, procreators, grandprocreators, uncles, aunts and cousins. There was no next of kin to contact to take custody of him. Bluestreak’s family had farmed that simple plot of land for millennia and none in their history had ever seen reason to leave. Prowl had taken formal custody of him, alongside Jazz. He was comfortable with them, both of them, but when someone spooked him, he always ran to hide behind Prowl’s doorwings, as Praxians sparklings were coded to do. Autobots, as they learned of him, wanted to spoil the war orphan but as a whole, they scared him, but none more than the Seekerkin. For now, Prowl guarded Bluestreak from the well-intention-ed and noisy with equal measure. He had heard himself called broody, as though there was something wrong with how he guarded Bluestreak and Smokescreen. It did not matter at all to him what they thought. Though, it seemed to matter to Jazz. No one raised a glyph of criticism against Prowl when Jazz was in hearing, not after Jazz had made an example of the first few.
Prowl smiled as he turned his optics to the sky. The transport was just a speck among the clouds but with each nanoklik, it came closer and clearer into view. They were not the only ones waiting on the tarmac. The youngest, the oldest and the weakest had arrived on the first transport. Still, Fixit was there to do triage and a quick visual exam of this final transport. Autobots would remain in the ruins of Praxus for another quartex or so, if they could maintain control of the area, to continue searching for survivors. There would not be many, if any. It was incredible how complete the destruction of Praxus had been but Prime would keep searchers there until his spark told him it was time to lay Praxus to rest. Perhaps it would be the wisdom of the Primes, or simply reality setting in, Prowl was not prepared to debate the legitimacy of the Matrix at this point.
The pilot landed the transport perfectly smoothly. Prowl watched the ramp descended and stared without ventilating as Autobots guided the last of his grim and resolute compatriots off the vessel. Finally, finally, Prowl saw his originator at the same moment as Camshaft saw him. He broke from the Autobots’ gentle corral in a blink. They would not know how he had done it, how they had not even one of them raised an arm to stop him. He bypassed Fixit and his medical team and the administrators in place to direct these mechanisms to their new homes. Prowl clasped his servo around his originator’s elbow as Camshaft stopped in front of him and cupped Prowl’s helm with both servos as he brought their crests together. They did not speak. For both of them, losing Smokescreen or losing each other had been the fear that had followed them with every step. Finally, they could ventilate. Camshaft lowered his helm to brush his crest against Smokescreen’s tiny helm before he looked over to Bluestreak. He knelt.
“You’re Bluestreak?” Camshaft asked.
“Uh huh,” the mechling replied. “You’re Camshaft, Prowl’s ori. I’m very pleased to meet you.”
“You are a treasure,” Camshaft replied and he brushed his crest against Bluestreak’s. “You won’t find cause with us to forget it.”
“Do you wish to wait for Fixit to finish with the others before you see him?” Prowl asked. His originator scoffed and Prowl smiled over at Jazz who gave him a questioning look.
“I know when I need a medic,” Camshaft replied.
“So that’s somethin’ ya got in common,” Jazz said and Camshaft smiled.
“If anything,” he said. “I am worse than Prowl.”
There was not much space in Jazz’s habsuite but Camshaft but there was a sofa berth in the living room. Jazz tried, he tried hard to convince Camshaft as they made their way home, that he could take the sofa berth, originator and creation could share for now. Camshaft had refused, insisting the sofa berth would be perfectly fine for him and that Jazz should be close to Prowl and Smokescreen in case they needed him. Prowl did not tell Jazz it was a losing battle from the beginning, they needed to learn each other’s quirks and Prowl knew his originator had a few. He, as Prowl had known he would, preferred to leave the emergency housing to those who really needed it. Iacon was a large territory but finding homes for ten thousand was still a strain. Temporary accommodations were being provided by the Academy, permanent housing would take longer.
Prowl was in no hurry to chase his originator away. In the stellar-cycles they had spent sabotaging Nightstalker’s purge and hiding from his security forces, they had become that much closer than they had ever been and they had always been close, as close as an originator and creation could sanely be. At least Prowl knew that Jazz would understand this attachment; he was very close to his originator and twin. Their habsuite, as Jazz insisted he should think of it as theirs, would be extra crowded when Punch arrived in the coming mega-cycles. But Prowl absolutely did not begrudge Jazz’s originator his excitement. He was thrilled to know he had a grand creation and desperate to meet not only Smokescreen but also the foundling Bluestreak. Cramped as the catacombs had been, Prowl thought the crowd would be even a little comforting.
#anon-e-miss writes#at waiting's end#valveplug#maccadams#tf prowl#tf jazz#tf bluestreak#mechpreg#bamf camshaft#bitty smokescreen
72 notes
·
View notes
Text
Ford Mustang
Second Generation (1973-1978)


Iacocca, creator of the first Mustang, became president of the Ford Motor Company in 1979 and ordered that the new Mustang be smaller and more efficient. It was initially supposed to be based on the Ford Maverick, but was later made by the Ford Pinto.
The new model, called "Mustang II", was introduced on September 21, 1973, two months before the first oil crisis of 1973, and its small size allowed it to compete with Japanese imported sports coupes such as the Datsun 240Z and Toyota Celica. It was produced until 1978.

At the end of 1973, coinciding with the energy crisis that occurred that year, the Mustang II was introduced, a car that was short-lived but which won Ford another award as car of the year . This model brought the Mustang back to the 1964 model in size, shape and overall styling. The car proved to be smaller than previous models as well as slower and heavier even though the company placed great emphasis on the quality of its finishing, which was defined as the highest ever made in the US automotive industry. Regarding dimensions, the Mustang II was 50 cm shorter, 10 cm narrower and 2.5 cm lower than the previous version.
The Mustang II was available in a 3-door hardtop body style. The basic version was equipped with a 2.3 liter (146 in3) inline four-cylinder engine with a single overhead camshaft. This engine was the first to be built using the metric system instead of the American measurement system. The 2.8-litre V6 (170in3), produced in Europe for the Capri, was available as an option. This meant that the V8 engine disappeared, albeit only for 1974, from the Mustang range. This absence was subject to several criticisms from fans of the car who wrote many letters to trade magazines.
Ford reintroduced the V8 engine with the 1975 model year but since the car was not designed to accommodate a similar engine it was necessary to proceed with a significant redesign of the vehicle. The basic model from which to create the Mustang II was the Ford Pinto. The engine chosen was the 4.9 liter (302in3) V8.

In 1976 the special version Cobra II was launched. This car was inspired by the Shelby Mustang, and for this reason it was equipped with a large air intake on the hood, the Shelby emblem on the radiator grille, a rear spoiler and racing stripes in different shades. Only the appearance was sporty, as the engine was within the standards of the Mustang II.
In any case, the car was a good commercial success and 400,000 examples were produced in the first year. The success was due more than to the innovations introduced to the fact that this model was able to regain the affection of the public as had happened with the 1964 model.
Even the oil crisis, which practically eliminated the most powerful range of cars from the price lists of almost all car manufacturers, did not interrupt the success of the Mustang II.
#ford mustang#mustang#ford shelby#Ford Mustang ‘70#mustang second generation#fast cars#vintage#vintage cars
7 notes
·
View notes
Text
SAF300 Trailier Parts European Brake Shoe
The SAF300 European Brake Shoe, designed to meet the high standards of the European market. Measuring 300mm x 200mm, this brake shoe is engineered for reliability and effectiveness, ensuring that your braking system operates at peak performance. In operation, the SAF300 Brake Shoe plays a crucial role in the drum brake system by pushing outward against the brake drum through the camshaft and adjustment arm. This process creates the optimal friction needed between the lining and the drum to achieve reliable and efficient braking. Our SAF300 Brake Shoes are crafted with high-strength welding, precise dimensions, and a local quenching treatment to enhance durability and stability. Rigorous fatigue testing confirms that these brake shoes deliver exceptional support and long-lasting performance, even under the challenging road conditions found throughout Europe. Choose the SAF300 Trailer Parts European Brake Shoe for a dependable, high-performance braking solution that ensures safety and reliability on every journey.
CONTACT US ADDRESS No. 518, Nanhu Road, Tianzihu Town, Anji County, Zhejiang Province, China
PHONE +86-158-6900-2386 / +86-0571-61075636
E-MAIL [email protected]

0 notes
Text
Japanese Design at Its Finest: A Consider the Toyota GTR
Introduction
When it comes to automotive superiority, few titles reverberate as strongly as Toyota. Popular for its own commitment to quality, integrity, and also advancement, Toyota has made surges in the auto industry with automobiles that mixture advanced modern technology with impressive functionality. Among these amazing makers is the famed Toyota GTR. This article will delve into the ins and outs of Japanese engineering via the lens of this renowned vehicle, discovering its own descent, layout ideology, and also what makes it a measure in performance racing.
Japanese Design at Its own Finest: A Take A Look At the Toyota GTR
The Toyota GTR is not simply any type of automobile; it is actually a testament to Asia's engineering prowess and also devotion to making high-performance lorries. With its origins soaked in dashing culture as well as advanced technologies, the GTR has gotten its own place one of cream of the crop in auto history.
The Heritage of Toyota GTR A Brief History of Performance Cars
Since its own inception, Japan has been a goliath in creating some of the best adored efficiency automobiles internationally. Along with companies like Honda and Toyota leading the fee, enthusiasts have actually been actually handled to a range of autos designed for rate and also speed. The birth of the GTR could be outlined back to a culture that commemorated velocity, accuracy, and competition.
youtube
The Birth of the GTR Design Line Go to this site
The original GTR style debuted in 1969 along with the Nissan Horizon GT-R. However, it had not been till 1989 that Toyota introduced its own variation of high-performance automobiles along with designs like the Supra Super. The development carried on in to the modern-day age where modern technology fulfilled tradition.
Understanding Performance: What Produces a Car Stand Up Out? Factors Affecting Automotive Performance
Engine Power: At the soul of every high-performance automobile exists its own motor. The GTR flaunts advanced DOHC (Twin Expenses Camshaft) motors that deliver unmatched power.
Aerodynamics: The style components of a cars and truck play a crucial role in exactly how effectively it performs at broadband. The smooth contours of the GTR reduce drag while improving stability.
Weight Distribution: Strategic placement of parts makes sure ideal body weight ordering which supports improved dealing with as well as speed on tracks.


Tires and Suspension: High-grade tires joined state-of-the-art suspension systems offer far better grasp as well as management during velocity as well as cornering.
Performance Upgrades for Your Toyota GTR Aftermarket Components Options
For those looking to enhance their steering experience better, aftermarket upgrades are actually important. Listed here is actually a break down:
High-Performance Exhaust Systems: Enhances engine performance through boosting airflow. ECU Tuning: Fine-tunes motor parameters for enhanced horsepower. Suspension Kits: Enriches dealing with by reduci
0 notes
Text
ROWE Car Additives – Boost Performance & Protection for Your Vehicle
Your vehicle deserves more than just basic maintenance – it needs ROWE car additives to perform at its best. These German-engineered automotive additives from Safety Impexin deliver unmatched cleaning power and protection for every critical system in your car. Whether you're fighting engine sludge, improving fuel economy, or preventing wear, ROWE car additives provide scientifically-proven solutions that keep your vehicle running like new.
Why Your Vehicle Needs ROWE Automotive Additives
Complete Engine Protection Modern engines face constant stress from heat, friction, and contamination. ROWE car additives combat these challenges with advanced formulations that clean injectors, dissolve carbon deposits, and prevent harmful sludge buildup. Unlike cheap alternatives, these automotive additives use premium detergents and dispersants that maintain cleanliness between oil changes, ensuring optimal compression and power output.
Enhanced Fuel System Performance Dirty fuel systems rob your engine of efficiency. ROWE automotive additives contain specialized cleaners that remove varnish from injectors and eliminate water contamination. This restores proper fuel atomization for better combustion, giving you noticeable improvements in throttle response and fuel economy – often within just one tank of treated fuel.
Superior Wear Prevention The advanced friction modifiers in ROWE car additives create a protective molecular layer on metal surfaces. This revolutionary technology reduces wear on critical components like camshafts, bearings, and piston rings by up to 60% compared to untreated oil. For high-mileage vehicles, this means quieter operation and extended engine life.
ROWE's Complete Additive Solutions
Safety Impexin offers the full range of ROWE automotive additives for every need:
Fuel System Cleaner: Removes deposits from injectors and combustion chambers
Engine Treatment: Reduces friction and extends oil life
DPF Cleaner: Maintains diesel particulate filter efficiency
Octane Boost: Improves performance in high-compression engines
Each product is formulated to meet strict German engineering standards, ensuring compatibility with all modern vehicles. Visit Safety Impexin's website for detailed technical specifications and application guides.
The Smart Choice for Discerning Car Owners
Choosing ROWE car additives means investing in your vehicle's long-term health and performance. These automotive additives provide benefits you can both feel and measure:
Restored horsepower in older engines
Improved fuel efficiency (3-5% typical gains)
Reduced maintenance costs over time
Extended component life
Available exclusively through Safety Impexin's authorized network, you can trust you're getting genuine ROWE automotive additives formulated for Indian driving conditions.
Final Conclusion: Elevate Your Vehicle's Care with ROWE
After examining the advanced technology behind ROWE car additives, the choice becomes clear. These aren't just ordinary treatments – they're essential maintenance products that actively protect your investment. By using ROWE automotive additives regularly, you're not just maintaining your vehicle; you're enhancing its performance and extending its service life. The combination of German engineering and Safety Impexin's expert distribution ensures every product delivers on its promises.
Make the smart choice today – your vehicle will thank you with years of reliable, efficient performance. Visit Safety Impexin's website now to find the perfect ROWE car additives for your vehicle's needs.
0 notes
Text
Essential IVECO Specialty Tools: Must-Have Equipment for Precision Maintenance
Introduction
For professionals working with IVECO trucks and heavy-duty vehicles, having the right tools is essential for efficient maintenance and repairs. At Tillman Tools, LLC, we understand the importance of precision and reliability when servicing commercial and industrial vehicles. That’s why we offer a comprehensive selection of IVECO Tools, including IVECO Truck Specialty Tools and IVECO Specialty Tools to meet the highest industry standards.
Why Choose IVECO Specialty Tools?
When it comes to servicing IVECO trucks, standard tools often fall short. IVECO Specialty Tools are specifically designed to work seamlessly with IVECO’s unique components, ensuring precision, safety, and efficiency in every task. Whether it’s engine calibration, transmission servicing, or electrical diagnostics, IVECO Truck Specialty Tools provide the specialized solutions needed for optimal vehicle performance.
Must-Have IVECO Specialty Tools for Precision Maintenance
1. Engine and Transmission Tools
Proper engine and transmission maintenance is critical for vehicle longevity and performance. Key IVECO Tools in this category include:
Timing Tool Kits – Designed to accurately set the camshaft and crankshaft timing for peak engine performance.
Clutch Alignment Tools – Essential for precise clutch installation and alignment, preventing premature wear and tear.
Transmission Lifting Brackets – Facilitate safe and efficient removal and installation of heavy transmission components.
2. Electrical and Diagnostic Tools
Modern IVECO trucks rely on advanced electronic systems, making electrical diagnostics an integral part of maintenance. IVECO Truck Specialty Tools for electrical work include:
Diagnostic Scanners – Allow for real-time troubleshooting and performance monitoring of IVECO’s electronic systems.
Multimeters and Circuit Testers – Help detect electrical faults, ensuring all connections function properly.
ECU Programming Tools – Enable software updates and parameter adjustments to enhance vehicle performance.
3. Brake and Suspension Tools
For safety and stability, a well-maintained braking and suspension system is essential. Key IVECO Specialty Tools for these systems include:
Brake Caliper Tools – Ensure proper installation and adjustment of brake components.
Suspension Bushing Removal Kits – Simplify the process of replacing worn-out bushings without damaging surrounding components.
Wheel Alignment Tools – Help maintain precise alignment for improved handling and tire longevity.
4. Fuel System and Exhaust Tools
IVECO’s fuel and exhaust systems require specialized tools for maintenance and repairs. Important tools in this category include:
Injector Removal Tools – Prevent injector damage while facilitating smooth removal and installation.
DPF Cleaning and Reset Tools – Ensure optimal diesel particulate filter performance, reducing emissions and maintaining efficiency.
Fuel Line Disconnect Tools – Simplify the removal of fuel lines while minimizing spills and damage.
How IVECO Specialty Tools Enhance Efficiency
1. Precision and Accuracy
IVECO vehicles have specialized components that require exacting standards. IVECO Tools are engineered for precise fittings, measurements, and torque applications, ensuring optimal maintenance.
2. Increased Safety
Using IVECO Truck Specialty Tools reduces the risk of workplace accidents and injuries. Their ergonomic designs and specialized applications enhance user safety and efficiency.
3. Time and Cost Savings
Specialized tools help technicians complete repairs faster and more accurately, reducing downtime and operational costs. Investing in IVECO Specialty Tools leads to long-term savings by minimizing mistakes and unnecessary part replacements.
4. Compatibility with IVECO Vehicles
Unlike generic tools, IVECO Tools are designed specifically for IVECO trucks, ensuring seamless integration with vehicle components and enhancing overall service quality.
Where to Buy Authentic IVECO Specialty Tools?
For high-quality IVECO Truck Specialty Tools and IVECO Specialty Tools, trust Tillman Tools, LLC. We offer a premium selection of tools tailored to the unique demands of IVECO vehicle maintenance. With our expert support and durable products, we help professionals maximize efficiency and precision in every repair.
Conclusion
Maintaining IVECO trucks requires specialized tools that ensure accuracy, safety, and efficiency. IVECO Specialty Tools provide the reliability and precision needed for complex repairs and maintenance. At Tillman Tools, LLC, we are committed to supplying top-tier IVECO Tools to help mechanics and fleet managers keep their vehicles in optimal condition.
0 notes
Text
Porsche IMS Bearing Issues: How to Detect, Prevent, and Fix Problems

The Intermediate Shaft (IMS) bearing issue in Porsche models, particularly in the 996 and 997 generations of the Porsche 911, as well as the Porsche Boxster and Cayman, is a well-known problem that can have devastating consequences for the engine. Understanding the function of the IMS bearing, how to detect potential issues early, and the best ways to prevent or repair the problem is crucial for maintaining the health and longevity of your Porsche engine.
What is the IMS Bearing and Why is it Important?
The IMS (Intermediate Shaft) bearing is a component of the engine that supports the intermediate shaft, which drives the camshafts and ensures the proper timing of the engine’s valves. In certain Porsche models, particularly those with M96 and M97 engines, the IMS bearing has shown a tendency to fail prematurely, often due to poor lubrication. When the IMS bearing fails, it can lead to catastrophic engine damage, requiring a complete engine rebuild or replacement.
Common Causes of IMS Bearing Failure
Understanding the reasons behind IMS bearing failure can help you take proactive steps to avoid it. Here are the primary causes:
Insufficient Lubrication: Many IMS bearings are sealed and rely on lifetime lubrication that can degrade over time, leading to metal-on-metal contact and wear.
Bearing Design Flaws: Early Porsche engines used a single-row bearing in certain models, which has been found to be more prone to failure compared to the later dual-row bearings.
Aging and Wear: As the bearing ages, it can begin to deteriorate due to regular engine operation, leading to the risk of failure over time.
Symptoms of IMS Bearing Problems
Detecting IMS bearing issues early can potentially save you from costly repairs. Be alert to these common warning signs:
1. Metal Shavings in the Oil
One of the earliest and most common indicators of IMS bearing failure is the presence of metal shavings in the engine oil. Regular oil changes and the use of magnetic drain plugs can help capture these metal particles, giving you an early warning of potential problems.
2. Unusual Engine Noise
If you hear grinding, rattling, or knocking noises from the rear of the engine, it could indicate a failing IMS bearing. These sounds are due to the internal components moving out of sync due to bearing wear.
3. Oil Leaks
A failing IMS bearing may lead to oil leaks around the rear of the engine. While oil leaks can have various causes, it’s essential to investigate any leaks in Porsche models prone to IMS bearing issues.
4. Check Engine Light
In some cases, a failing IMS bearing might cause the engine's timing to go off, leading to a check engine light. If the light comes on and there are no other obvious reasons, it’s worth having the IMS bearing checked.
Preventive Measures to Avoid IMS Bearing Failure
While IMS bearing failure cannot be entirely avoided, there are steps Porsche owners can take to minimize the risk:
1. Regular Oil Changes
Frequent oil changes help ensure that your engine stays well-lubricated and reduce the likelihood of metal particles building up. This is especially important for models with sealed IMS bearings, which rely on oil around the bearing housing to prevent excessive wear.
2. Upgrading the IMS Bearing
One of the most effective preventative measures is to upgrade the IMS bearing with a more durable replacement. Many aftermarket solutions, such as ceramic bearings or oil-fed bearings, are designed to handle higher stress and provide better lubrication than the original parts.
3. Magnetic Drain Plug Installation
Installing a magnetic drain plug during your oil change can help capture any metal particles in the oil. This provides an early detection method, as the metal debris collected on the plug can indicate bearing wear.
4. Regular Inspections
Routine inspections by a certified Porsche technician can help identify early signs of IMS bearing wear. They can inspect the oil for metal particles, check for oil leaks, and evaluate any unusual engine noises.
Repair Solutions for IMS Bearing Failure
If your IMS bearing shows signs of failure, prompt action is essential to avoid severe engine damage. Here are the primary repair solutions:
1. IMS Retrofit Kit
A popular solution for resolving IMS issues is the installation of an IMS retrofit kit. These kits typically include a redesigned bearing with better durability and lubrication, allowing for a more reliable performance compared to the original part. Aftermarket kits are available from several reputable suppliers and offer various options, such as ceramic bearings or oil-fed systems.
2. Oil-Fed IMS Bearing Conversion
Another advanced solution involves converting the sealed bearing system into an oil-fed system. This modification allows engine oil to flow directly into the bearing, providing continuous lubrication. Oil-fed systems are generally more resistant to wear and have a longer lifespan.
3. Full Engine Rebuild
In cases where IMS bearing failure has already caused significant engine damage, a full engine rebuild may be required. This option is costly but ensures that any damage from bearing debris or misaligned engine components is addressed, restoring the engine to peak performance.
Final Thoughts
Porsche IMS bearing issues are a serious concern for owners of affected models, but with proactive care and the right preventive measures, you can significantly reduce the risk. Regular maintenance, monitoring for signs of wear, and upgrading the bearing if necessary are essential steps to ensure the longevity of your Porsche engine. Consulting with a certified Porsche technician and staying on top of maintenance will help keep your vehicle performing at its best, allowing you to enjoy the legendary driving experience Porsche is known for.
#porsche car#porsche ims bearing service#porsche service center#porsche car maintenance#porsche car mechanic
1 note
·
View note
Photo


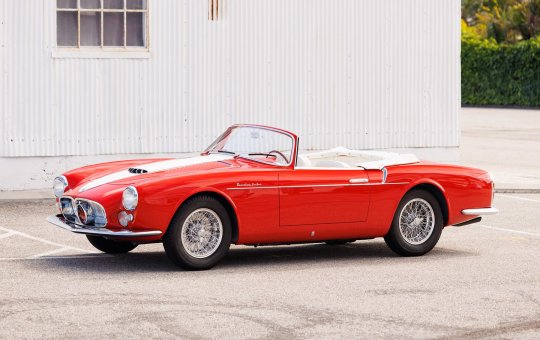


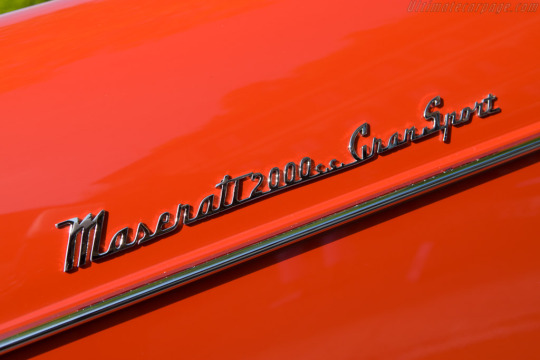
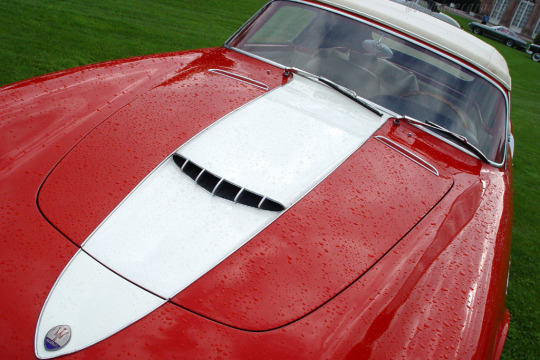
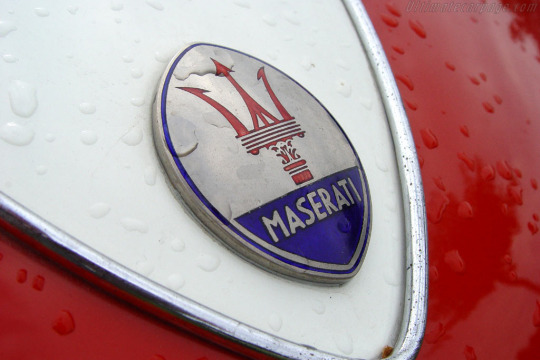
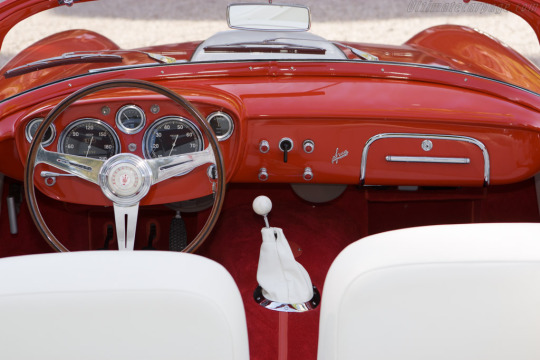

Maserati A6G/54 Spider by Frua (1 of 10).
From 1954 Maserati offered the final edition of the A6G sports car. As with its predecessor, the sales designation 2000 GT was frequently used in brochures and advertisements. On the race tracks of the World Sports Car Championship, the corresponding offshoots were called A6GCS. By 1957, only 60 Maserati A6G/54 cars had been built, with the bodies being exclusively built by external coachbuilders such as Allemano, Zagato and Frua.
So the A6G/54 presented at the Paris Motor Show in October 1954 had to meet high expectations. On the one hand, its driving performance was to clearly exceed that of its direct predecessor. On the other hand, Maserati naturally also wanted to increase its production figures again. And last but not least, there was direct competition with Ferrari, an up-and-coming company that had been enticing customers by building sports cars in the immediate vicinity since 1947. Accordingly, the engineers under Gioacchino Colombo began to thorougly rework the two-liter inline six-cylinder engine. Compared to the A6G, the ratio of bore to stroke was changed, turning a long stroke engine into a short stroke engine with two overhead camshafts. Compared to the A6GCS, Maserati used a chain instead of sprockets to drive the camshafts in the A6G/54 to improve reliability in everyday use. These measures increased the revs and thus the power output, which in this case was around 50 percent higher than that of the predecessor. Expressed in figures, 110 kW/150 hp was initially available, later even 118 kW/160 hp thanks to dual ignition.
As already mentioned at the beginning, Maserati at that time only produced the engines, transmissions and the tubular frame made of steel tubes including suspensions for the A6G/54. Then they sent the components to the coachbuilder selected by the individual customer. The official brochures offered a choice of four bodies. Tipo A and Tipo B came from Frua, Tipo C from Allemano and Tipo D from Zagato. Pinin Farina had previously fitted various A6 and A6G chassis, but then fell out of favour with Maserati when they entered into close cooperation with Ferrari. Only for the A6GCS, a few bodies were still being built there at the request of Maserati dealer Mimmo Dei.
This dealer was also the one who started the ball rolling for the A6G/54 Frua Spider. After a Spider based on a A6GCS chassis with the engine of the A6G/54 was completed in Pietro Frua’s workshop in the spring of 1955, Mimmo Dei ordered a small series of ten vehicles. However, only the first one was given the same design as the original model. The other nine were given an extended front and other modifications in detail. Different bumpers and small fake air intakes on the rear fenders for example.
68 notes
·
View notes
Text
Maruti Suzuki Original Parts Online - Smart Parts Exports
The Importance of Using Maruti Suzuki Original Parts
Using original parts for your Maruti Suzuki vehicle ensures that it continues to perform optimally. Genuine Maruti Suzuki Spare parts are engineered to fit precisely and function seamlessly with Maruti Suzuki vehicles. These parts undergo strict quality control measures, ensuring they meet the manufacturer’s standards for safety and performance.
Why Choose Genuine Parts Over Aftermarket Alternatives
Aftermarket parts may be cheaper, but they can compromise your vehicle's performance and safety. Original parts from Maruti Suzuki are designed specifically for each model, offering better durability and compatibility. Investing in genuine parts ensures you maintain your vehicle’s warranty and enjoy peace of mind.
Smart Parts Exports: Your Trusted Source for Maruti Suzuki Parts
Smart Parts Exports is a reputable supplier specializing in high-quality automotive parts for all major brands, including Maruti Suzuki. With a commitment to authenticity, the company makes and distributes all brand spare parts wholesale worldwide, ensuring customers receive the best products at competitive prices.
Extensive Range of Maruti Suzuki Original Parts
From engine components to suspension parts, Smart Parts Exports offers an extensive range of Maruti Suzuki genuine parts. Whether you need parts for popular models like the Swift, Baleno, or Alto, Smart Parts Exports has you covered with an inventory that meets diverse needs?

Easy Online Access to Maruti Suzuki Spare Parts
Smart Parts Exports provides a convenient online platform to browse, select, and purchase Maruti Suzuki original parts. This accessibility makes it easier for vehicle owners and repair shops to find specific parts without the hassle of visiting a store physically.
Benefits of Choosing Smart Parts Exports for Wholesale Orders
Smart Parts Exports specializes in wholesale distribution, making it an ideal partner for businesses. With a streamlined supply chain and competitive pricing, customers can expect fast delivery and excellent service, no matter where they are located.
Engine Parts for Maruti Suzuki
The engine is the heart of any vehicle, and Smart Parts Exports offers genuine engine parts, including pistons, crankshafts, camshafts, and timing belts for Maruti Suzuki models. Using authentic engine components enhances the performance and lifespan of your vehicle.
Transmission Parts Available for Maruti Suzuki Vehicles
Transmission components are crucial for smooth gear shifting and optimal fuel efficiency. Smart Parts Exports offers high-quality transmission parts, ensuring that your Maruti Suzuki vehicle functions as intended by the manufacturer.
Electrical Components for Enhanced Performance
Smart Parts Exports provides an extensive selection of electrical components, such as starters, alternators, and wiring harnesses. These genuine parts are vital for maintaining reliable electrical functions in Maruti Suzuki vehicles.
Body Parts to Maintain Your Car’s Aesthetic
From bumpers to side mirrors and doors, Smart Parts Exports stocks a wide range of body parts for Maruti Suzuki cars. These genuine parts help maintain the aesthetics of your vehicle and ensure safety by meeting all regulatory standards.
Cooling System Parts for Optimal Engine Temperature
Overheating can cause serious engine damage, but with genuine cooling system parts, you can keep your Maruti Suzuki's engine temperature in check. Smart Parts Exports offers radiators, water pumps, and cooling fans that meet the original specifications.
Suspension and Steering Parts for Smooth Handling
To ensure a comfortable and safe ride, it’s essential to have a reliable suspension system. Smart Parts Exports provides genuine suspension and steering parts for Maruti Suzuki vehicles, which help maintain ride quality and handling precision.
Brake Components for Maruti Suzuki
Brakes are one of the most critical safety features in a vehicle. Smart Parts Exports supplies high-quality brake pads, discs, and calipers for Maruti Suzuki models, ensuring that you have the stopping power you need in any driving condition.
Fuel System Parts for Efficient Performance
Fuel efficiency is a major consideration for Maruti Suzuki owners, and Smart Parts Exports offers authentic fuel system parts to maintain this efficiency. From fuel pumps to injectors, these parts help optimize fuel usage for cost-effective driving.
Genuine Accessories to Customize Your Maruti Suzuki
Apart from essential parts, Smart Parts Exports also offers genuine Maruti Suzuki accessories. These range from seat covers to roof racks, enabling you to personalize your vehicle while ensuring compatibility and quality.
Worldwide Wholesale Distribution of Maruti Suzuki Parts
As a global supplier, Smart Parts Exports serves clients worldwide. By offering wholesale distribution of Maruti Suzuki parts, the company caters to automotive businesses, repair shops, and individual customers who need reliable parts at competitive prices.
0 notes
Text
Harley Pushrod Adjustment Chart: A Comprehensive Guide
Maintaining your Harley-Davidson motorcycle is crucial for ensuring optimal performance and longevity. One important aspect of this maintenance is adjusting the pushrods.
Proper pushrod adjustment ensures that the engine operates smoothly, minimizes valve train noise, and improves overall performance. This article provides a detailed Harley pushrod adjustment chart to guide you through the process.

Understanding Pushrod Adjustment
Pushrods play a critical role in the engine’s valve train system. They transfer the movement from the camshaft to the valves, allowing for proper engine breathing. Correct adjustment of pushrods ensures that the valves open and close at the correct times, which is essential for engine efficiency and longevity.
Why Adjust Pushrods?
Compensate for Engine Wear: Over time, engine components can wear down, affecting pushrod length and valve clearance.
Improve Performance: Proper adjustment can enhance engine performance and efficiency.
Reduce Noise: Incorrectly adjusted pushrods can lead to excessive valve train noise.
Pushrod Adjustment Basics
Before diving into the adjustment chart, here’s a quick overview of the process:
Warm Up the Engine: Start your bike and let it reach operating temperature. This ensures that the engine is warm, and the pushrods are expanded to their operating length.
Turn Off the Engine: Allow the engine to cool slightly before making adjustments.
Locate the Pushrods: Identify the pushrods and the rocker arms in your Harley-Davidson engine.
Harley Pushrod Adjustment Chart
The following chart provides general pushrod adjustment specifications for various Harley-Davidson models. Always refer to your specific model’s service manual for precise measurements.

Adjustment Procedure
Remove the Pushrod Covers: Carefully remove the pushrod covers to access the pushrods.
Rotate the Engine: Rotate the engine to align the pushrod you want to adjust with the correct position (usually TDC – Top Dead Center).
Adjust the Pushrod: Using a pushrod adjustment tool or a similar device, adjust the pushrod length to the specifications provided in the chart.
Recheck Clearance: Once adjusted, recheck the clearance to ensure it meets the recommended specifications.
Reassemble: Replace the pushrod covers and ensure all fasteners are securely tightened.
Tips for Successful Adjustment
Double-Check Measurements: Always recheck your measurements before finalizing the adjustment.
Consult the Service Manual: For model-specific instructions, refer to your Harley-Davidson service manual.
Seek Professional Help: If unsure or uncomfortable performing the adjustment yourself, consider seeking help from a professional mechanic.
Conclusion
Proper pushrod adjustment is a crucial part of Harley-Davidson motorcycle maintenance. By following the guidelines and specifications provided in the Harley pushrod adjustment chart, you can ensure your bike runs smoothly and efficiently.
Regular maintenance and timely adjustments will not only improve performance but also extend the life of your engine. Ride safely and keep your Harley-Davidson in top shape with proper pushrod care.
0 notes
Text
How Can You Verify The Quality Of A Used Range Rover 2.0 Engine?

When considering the purchase of a used Range Rover 2.0 engine, it's crucial to verify its quality to ensure reliability and performance. Understanding the key factors to look for can save you time and money while providing peace of mind. We explores the essential steps in assessing a used Range Rover 2.0 engine's condition, including visual inspections, history checks, and professional evaluations. Additionally, we’ll discuss the benefits of engine replacement and the advantages of opting for reconditioned engines, including supply and fit services.
Visual Inspection
A thorough visual inspection is the first step in verifying the quality of a used Range Rover 2.0 engine. Look for any signs of damage, corrosion, or wear and tear. Check for oil leaks, as they can indicate underlying issues such as worn seals or gaskets. Inspect the engine block and cylinder head for cracks or warping, which could compromise the engine's structural integrity. Pay attention to the condition of the belts, hoses, and wiring, as these components can give clues about how well the engine has been maintained. Additionally, examine the oil and coolant levels and their condition. Dirty oil or coolant can signal neglect or potential internal problems. Look for any unusual smells or discoloration, which might indicate contamination. Performing a visual inspection can help you identify obvious red flags and determine if further evaluation is necessary.
Engine History and Documentation
Reviewing the engine's history and documentation is vital in verifying its quality. Request maintenance records, service history, and any previous repair documentation. These records can provide insights into how well the engine has been cared for and if it has undergone any significant repairs or replacements. Consistent maintenance and timely repairs often indicate a well-maintained engine. Additionally, check the engine’s mileage. Lower mileage generally suggests less wear and tear, but it’s essential to consider how the vehicle was used. Highway miles are less taxing on an engine compared to city driving. Verify if the engine has been involved in any accidents or has undergone major overhauls. A transparent history can help you make an informed decision about the engine's quality and reliability.
Compression Test
A compression test is a crucial diagnostic tool for assessing the health of a used Range Rover 2.0 engine. This test measures the pressure in the engine's cylinders, indicating the condition of the pistons, rings, and valves. Low compression in one or more cylinders can signal significant internal problems, such as worn piston rings or leaking valves. Performing a compression test involves removing the spark plugs and using a compression gauge to measure the pressure in each cylinder. Compare the readings to the manufacturer’s specifications. Consistent and within-specification readings across all cylinders indicate a healthy engine. Significant variations or low compression readings necessitate further investigation and may be a sign to avoid the engine.
Professional Mechanical Inspection
Engaging a professional mechanic for a detailed inspection is a crucial step in verifying a used engine's quality. A trained mechanic can perform various diagnostic tests, including a compression test, leak-down test, and computer diagnostics. They can also inspect the engine's internal components, such as the timing chain or belt, camshaft, and crankshaft, for wear and damage. A professional inspection provides an expert opinion on the engine's condition and potential future issues. The mechanic can identify problems that might not be evident during a visual inspection or history check. Investing in a professional inspection can save you from costly repairs down the road and ensure you are purchasing a high-quality used engine.
Engine Replacement Options
When considering the purchase of a used Range Rover Engine, it's worth exploring engine replacement options. Sometimes, replacing the engine might be more cost-effective and reliable than repairing or rebuilding an existing one. Engine replacement involves installing a new or reconditioned engine into your vehicle, which can enhance performance and extend the vehicle's lifespan. Reconditioned engines are a popular choice for replacements. These engines have undergone a thorough refurbishment process, including cleaning, machining, and replacing worn components. Opting for a reconditioned engine ensures you are getting a unit that meets or exceeds factory specifications, providing peace of mind and reliability.
Benefits of Reconditioned Engines
Reconditioned engines offer several benefits, making them an excellent option for those seeking a quality replacement. Firstly, they undergo a rigorous reconditioning process, including disassembly, cleaning, inspection, and replacement of worn or damaged parts. This ensures the engine performs like new, meeting manufacturer specifications. Secondly, reconditioned engines are often more cost-effective than brand-new ones, providing significant savings without compromising quality. They also come with warranties, offering protection against potential issues. Additionally, opting for a reconditioned engine is an environmentally friendly choice, as it reduces waste and promotes recycling of engine components.
Supply and Fit Services
Choosing supply and fit services for your used Range Rover 2.0 engine replacement can simplify the process and ensure a seamless installation. These services provide both the engine and the installation, performed by experienced technicians. This eliminates the need to find a separate mechanic, reducing the risk of errors and ensuring the engine is installed correctly. Supply and fit services often include warranties, covering both the engine and the installation. This provides peace of mind, knowing that any issues arising from the engine or installation will be addressed. Additionally, these services can save you time and effort, as they handle all aspects of the replacement process, from sourcing the engine to fitting it into your vehicle.
Conclusion
Verifying the quality of a used Range Rover 2.0 engine involves several critical steps, including visual inspections, history checks, compression tests, and professional mechanical evaluations. Exploring engine replacement options and understanding the benefits of reconditioned engines can provide reliable and cost-effective solutions. Opting for supply and fit services ensures a seamless and hassle-free installation process. By following these guidelines, you can make an informed decision and ensure the longevity and performance of your Range Rover 2.0 engine. Read the full article
0 notes
Text
Automotive Genuine Spare Parts Quality and Reliability with Smart Parts Exports
In today's rapidly evolving automotive industry, the demand for genuine automotive spare parts has never been higher. Whether you own a personal vehicle or manage a fleet, ensuring the longevity and performance of your vehicles relies heavily on the quality of the parts used for maintenance and repairs. This is where Smart Parts Exports comes in. Specializing in the manufacture and wholesale export of spare parts for all car brands, Smart Parts Exports is your trusted partner for automotive genuine spare parts.
Why Choose Genuine Spare Parts?
Genuine spare parts are designed and manufactured to meet the exact specifications of your vehicle. Unlike aftermarket parts, which can vary in quality and compatibility, genuine parts ensure a perfect fit and optimal performance. Here are some key benefits of using genuine spare parts:
Quality Assurance: Genuine parts undergo rigorous testing and quality control measures to meet the highest industry standards.
Longevity: Using authentic parts can significantly extend the lifespan of your vehicle, reducing the frequency of repairs.
Safety: Genuine parts are designed to work seamlessly with your vehicle’s systems, ensuring safe and reliable operation.
Warranty: Many vehicle manufacturers offer warranties that are only valid if genuine parts are used.

Smart Parts Exports: Your Global Partner
At Smart Parts Exports, we understand the critical role that genuine spare parts play in maintaining vehicle performance and safety. That’s why we are committed to providing high-quality parts for all major car brands. Here’s why you should choose Smart Parts Exports:
Comprehensive Product Range
Smart Parts Exports manufactures a wide range of spare parts for various car brands, ensuring that you can find the exact parts you need. From engine components and transmission parts to filters and brake systems, our extensive catalog covers every aspect of vehicle maintenance and repair.
Worldwide Distribution
With a strong global presence, Smart Parts Exports exports automotive genuine spare parts to over 80 countries. Our efficient logistics network ensures timely delivery, no matter where you are located. We cater to wholesalers and distributors, ensuring that you receive bulk quantities at competitive prices.
Commitment to Quality
Quality is at the heart of everything we do. Our manufacturing processes adhere to the highest standards, ensuring that every part we produce meets OEM specifications. Our dedicated quality control team conducts thorough inspections to guarantee the reliability and performance of our products.
Customer Support
We believe in building long-term relationships with our clients. Our dedicated customer support team is always ready to assist you with product inquiries, order tracking, and after-sales service. At Smart Parts Exports, customer satisfaction is our top priority.
Our Key Offerings
Engine Components: Pistons, crankshafts, camshafts, valves, and more.
Transmission Parts: Clutches, gearboxes, transmission filters, etc.
Brake Systems: Brake pads, rotors, calipers, and hydraulic components.
Filters: Oil filters, air filters, fuel filters, and cabin filters.
Electrical Parts: Alternators, starters, sensors, and ignition components.
Suspension and Steering: Shock absorbers, struts, control arms, and tie rods.
Conclusion
When it comes to automotive genuine spare parts, Smart Parts Exports stands out as a reliable and trusted partner. Our commitment to quality, extensive product range, and global distribution network make us the go-to choice for wholesalers and distributors worldwide. Ensure the longevity and performance of your vehicles by choosing Smart Parts Exports for all your spare parts needs.
1 note
·
View note
Text
How Does the Reconditioning Process Ensure the Reliability of Ford Ranger Engines?

The Ford Ranger, known for its robust performance and reliability, has been a favorite among truck enthusiasts for years. However, like all engines, the Ranger’s engine can face wear and tear over time. This is where the reconditioning process plays a crucial role. Reconditioning, also known as engine rebuilding, involves restoring an engine to its original condition or even improving it. This process not only extends the life of the engine but also enhances its performance and reliability. In this article, we will delve into the various stages of the reconditioning process and how each step contributes to the overall reliability of Ford Ranger engines.
Initial Inspection and Disassembly
The first step in the reconditioning process is a thorough inspection and disassembly of the engine. Technicians begin by examining the engine for any visible signs of damage or wear. This includes checking for cracks, leaks, and worn-out components. Once the initial inspection is complete, the engine is carefully disassembled. Each part is meticulously cataloged and inspected for wear and damage. This step is crucial as it helps identify the components that need replacement or reconditioning. The initial inspection and disassembly ensure that no issue goes unnoticed, setting the stage for a comprehensive reconditioning process.
Cleaning and Degreasing
After disassembly, the engine components undergo a thorough cleaning and degreasing process. Over time, engine parts accumulate dirt, grease, and other contaminants that can affect performance. Technicians use specialized cleaning solutions and equipment to remove all traces of dirt and grease. This step is vital as it prepares the components for detailed inspection and reconditioning. Clean parts allow for a more accurate assessment of their condition and ensure that reassembly is free from contaminants that could cause future issues. The cleaning and degreasing process is a cornerstone of engine reconditioning, ensuring that all parts are in optimal condition for the subsequent steps.
Detailed Inspection and Measurement
Once the components are clean, a detailed inspection and measurement phase follows. Technicians use precision tools to measure each part against the manufacturer's specifications. This includes checking the cylinder bores, crankshaft, camshaft, and other critical components. Any part that does not meet the specifications is either reconditioned or replaced. This meticulous inspection ensures that only parts that meet the stringent criteria are used in the reassembly process. By adhering to these high standards, the reliability and performance of the reconditioned Ford Ranger engine are significantly enhanced.
Machining and Reconditioning
Machining is a critical phase in the reconditioning process. This step involves restoring worn or damaged parts to their original specifications. For instance, the cylinder bores may be honed, the crankshaft may be reground, and the valve seats may be recut. Advanced machinery and skilled technicians are essential in this phase to ensure precision and accuracy. The goal is to bring all components back to or better than their original condition. By doing so, the reconditioned engine can perform reliably under various conditions, ensuring the longevity and dependability of the Ford Ranger.
Replacement of Worn Parts
In addition to reconditioning existing parts, the process often involves replacing components that are beyond repair. Common replacements include pistons, rings, bearings, gaskets, and seals. These new parts must meet or exceed the original equipment manufacturer (OEM) standards. The replacement of worn parts is crucial for restoring the engine's integrity and performance. By integrating high-quality components, the reconditioned engine achieves a level of reliability that matches or surpasses a new engine. This step ensures that the engine will perform efficiently and reliably for an extended period.
Reassembly and Testing
Reassembly is a meticulous process that involves putting all the cleaned, inspected, and reconditioned parts back together. Technicians follow a precise sequence to ensure that each component is correctly installed. During reassembly, torque specifications and clearances are strictly adhered to. Once the engine is reassembled, it undergoes a series of tests to verify its performance. These tests include pressure testing, compression testing, and running the engine on a test bench. The goal is to ensure that the engine operates smoothly and efficiently. Reassembly and testing are critical in confirming that the reconditioned engine meets all reliability and performance standards.
Quality Control and Final Inspection
Quality control is an integral part of the reconditioning process. After testing, the engine undergoes a final inspection to ensure that it meets all specifications and performance criteria. This involves a detailed review of all components and a verification of the test results. Any discrepancies are addressed, and the engine is fine-tuned to ensure optimal performance. The final inspection acts as a safeguard, ensuring that the reconditioned engine is ready for reliable operation. By maintaining strict quality control standards, the reliability of the Ford Ranger engine is assured.
Documentation and Warranty
The final step in the reconditioning process is documentation and warranty provision. Detailed records of the reconditioning process, including parts replaced and tests conducted, are maintained. This documentation is crucial for future reference and for ensuring transparency. Additionally, reconditioned engines typically come with a warranty that covers potential defects and issues. This warranty provides peace of mind to the vehicle owner, knowing that the engine has been thoroughly reconditioned and is backed by a guarantee of reliability. Documentation and warranty are essential in building trust and confidence in the reconditioned Ford Ranger engines.
Conclusion
The reconditioning process is a comprehensive and meticulous procedure that ensures the reliability of Ford Ranger engines. From initial inspection to final testing and documentation, each step is designed to restore the engine to its optimal condition. By addressing wear and damage, replacing worn parts, and adhering to stringent quality control standards, the reconditioned engine achieves a level of performance and reliability that rivals new engines. For Ford Ranger owners, a reconditioned engine offers a cost-effective solution that extends the life of their vehicle while ensuring dependable performance. Through the reconditioning process, the enduring reliability of the Ford Ranger engine is preserved, providing confidence and peace of mind for its owners. Read the full article
#FordRangerEngines#FordRangerEnginesforsale#FordRangerEnginesreplacement#RECONDITIONEDENGINES#reconditionedFordRangerEngines
0 notes