#but i should be sewing lining on my end of the year project
Explore tagged Tumblr posts
Text
feels like i've been very active and posting bits but to be entirely honest i feel like i've been slogging through cheese, it's just that i NEEDED to be distracted from 1) end of the year exam stuff 2) important papers for moving out 3) dumb fucking drama happening to my friends this week
and i don't know how much my posting is actually managing to be creative or just gritting my teeth and blurting something out before i pass out from exhaustion. might be both
#anyway. i'm sewing up some crocheted squares right now#but i should be sewing lining on my end of the year project#haha#i'll be all right! once i get on it i just know i'll get it done in One afternoon#and i just have to iron + sew on the sleeves after that#which means i'm bringing the costume to class#lol#we're almost there#it's then the written bit. writing and making it look good and printing.#i know i can do that reasonably fast but it's just#basically i want to do my best with the costume this weekend and next week ? just to avoid having the#the usual ADHD panic.#but i also would like to Fucking Rest#this brain that's full of bees all the time#so this morning is crochet squares. this afternoon is serious stuff.#idk what i'll do this evening maybe i'll get drunk or something#(i won't because that costs money!)#(and also because it's not a habit i want to form !)#(and i don't want to worry my partner by randomly doing that sometimes.)
0 notes
Text
YEAR OF THE GRUB: JANUARY
Project: Needle Felting with Wire Armature
CRAFT STORE RUNS: 2
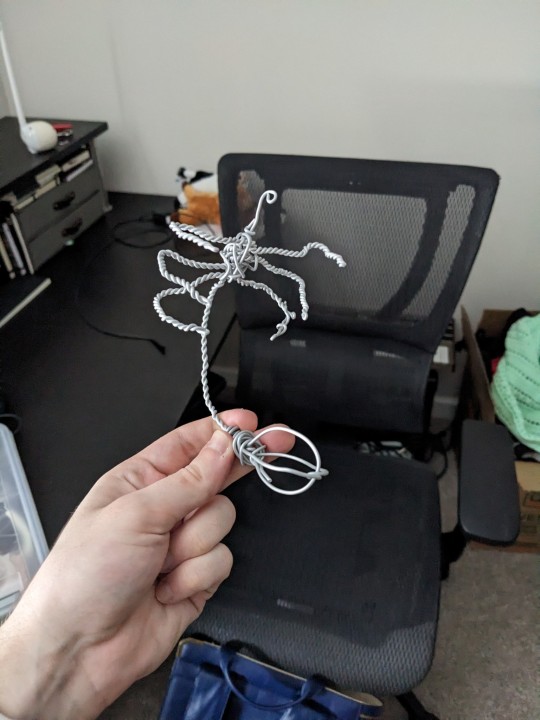
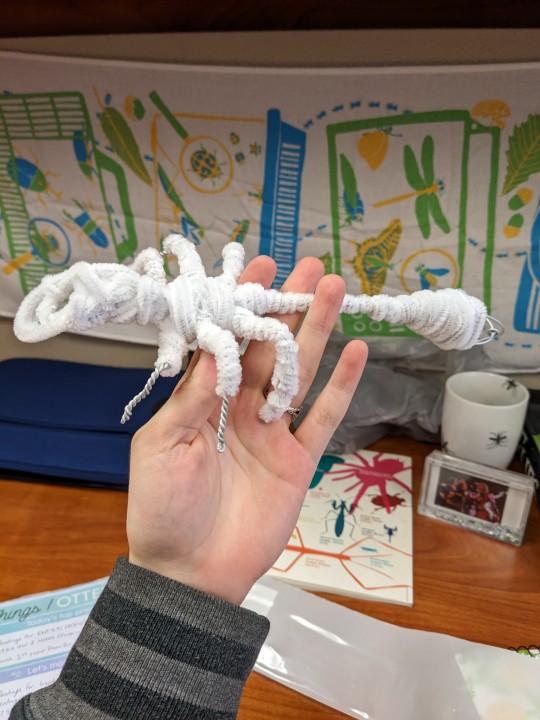
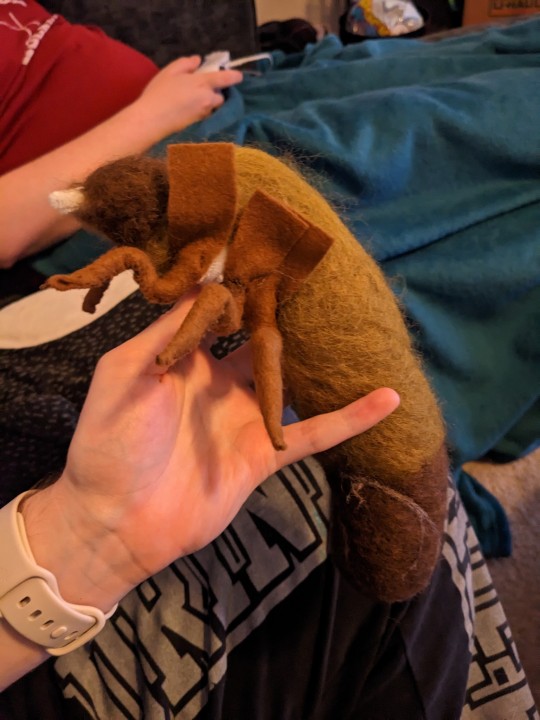
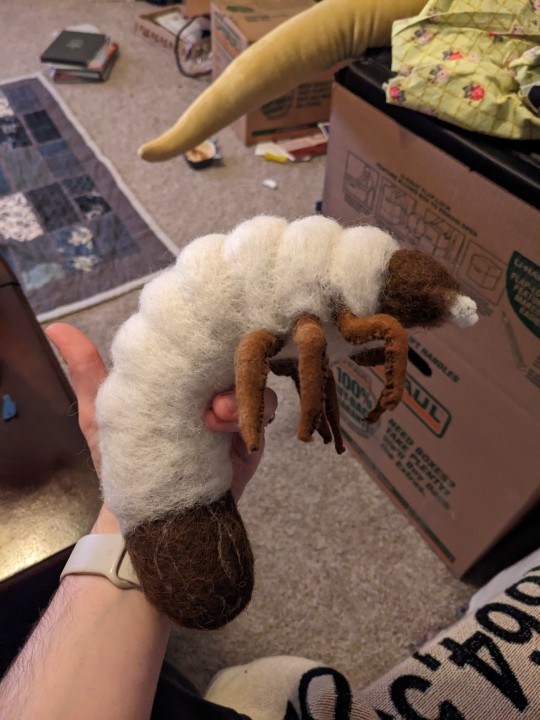


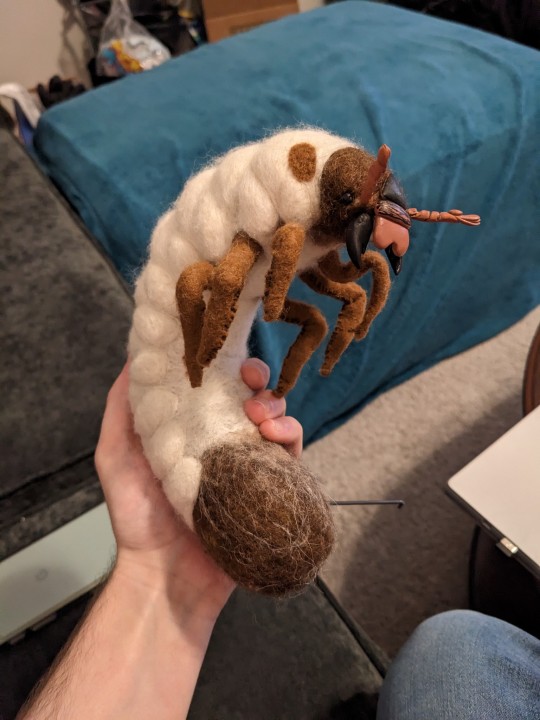
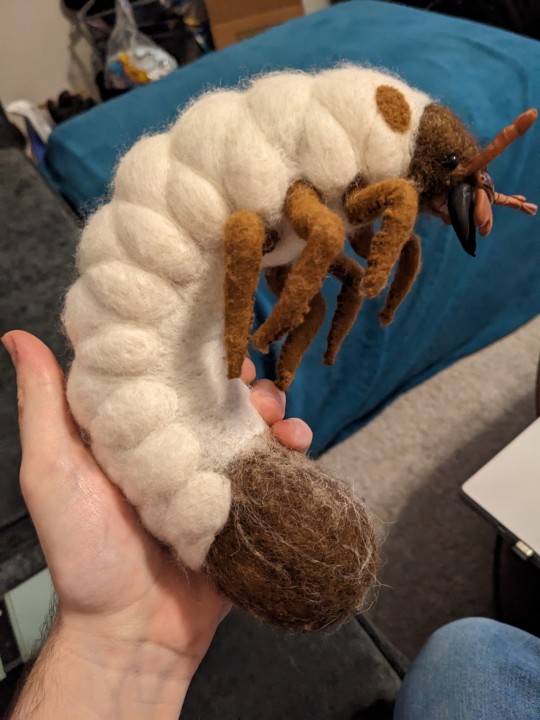

(The sleepy but patient Lt. for scale)
This year I started a Master's Degree program in Entomology. I wanted to make sure I was still making fun things while I'm so busy (mostly reading papers and books), so I arranged a set of media-based projects centered around my favorite insect (scarab grubs), trying to complete the project by the end of the month.
I didn't quite make it this time because I ran out of supplies a couple times and made the project a good deal harder for myself than I thought, but I think that's okay. This is just for me, after all.
STEP BY STEP:
First, I used sculpting wire and a pair of pliers to twist the skeleton of the grub. I wanted to be able to move all the legs and the main line of the body. I thought I'd be able to get an easier anchor in on the felt if I covered the hard wires with pipe cleaners, but I was pretty much wrong about that.
Next, I felted a bunch of spare roving into the general shape I wanted, and felted the head and the back end of the grub on in brown. I also hand-sewed six little socks to cover the wires on the legs and secured them as well as I could to the rest of the body so they won't fall off at random. This came out messier than I'd have liked, but I think also that I should cut myself some slack for having designed and patterned most of this on the fly.
Next came felting on the bulk of the fatty, cream colored body of the grub. Part of the reason I didn't end up making my deadline was that I ran out of white/off-white wool roving, and was unable to find it in stock at any stores, so I had to order it online and wait for it to arrive in the mail (it absolutely did and honestly, the new stuff from Shepswool.com is way softer than the wool I was using and a softer color, so it was well worth the wait).
From here, mainly all that was left was detail work. I didn't get a ton of photos of this because all these steps ended up being my Sunday (day of posting), but I used a finer wire, the same pliers, and super sculpey to make gently posable antennae, mandibles, a clypeus and labrum (as well as a pair of maxillae that absolutely did not show up in the end, just much too small), baked the clay on the wires and then affixed them to the existing framework I'd set up on the head for most of the face. The mandibles are attached to the antennae, so they move together, and the clypeus/labrum and maxillae are held on by the wires supporting the mandibles. I also glued on some cute little eyes that came standard with my felting gear.
All that was left at this point was final detail work-- I didn't feel like embroidering on a ton of hairs in the end, but I embroidered on some spiracles and felted those little sclerotized buts near the head.
And voila! A needle-felted beetle grub about the size of a small ferret. Wouldn't it be nice if we had more grubs around this size?
Further notes:
1) it's nice to be making something big enough for once while felting that I didn't stab my fingers constantly! I only stabbed myself like twice.
2) I bought a multi-needle felting tool for this, but I didn't really find it helped much beyond having a safety cover. It was also super noisy to work with, so I ended up going back to using a single felting needle halfway through.
Catch you at the end of this month, hopefully having completed my February project: WATERCOLOR ILLUSTRATION!
#i get excited about bugs#year of the grub#YEAR OF THE GRUB 2023#escherbug art#needle felting#felting#soft sculpture#beetle#coleoptera#scarabaeidae
1K notes
·
View notes
Text
Progress Pride Flag Quilt Block Pattern & Tutorial
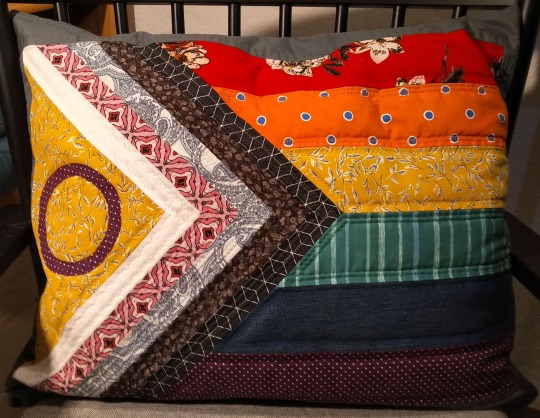
Don't you just love the flag of our people? Do you have an inner grandma that years to make stuff? Do you want to combine these two things and make a queer quilt?
Well, I've got you.
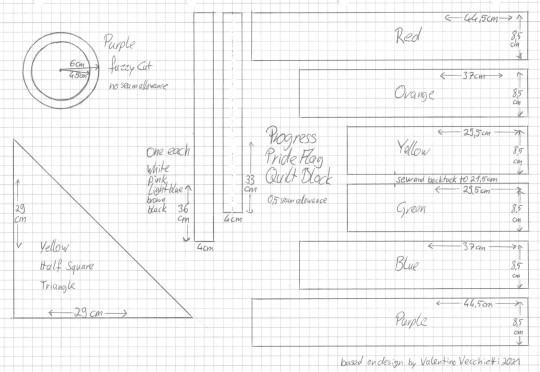
Behold the pattern! And my lack of graphic skills, so I drew it on paper!
Basically it's a bunch of rectangles, one half square triangle and a fuzzy cut circle. I don't know shit about quilting and I was able to come up with it. Why centimeter, you ask? Because I'm German and that's what I'm familiar with. Why weird measurements and not jelly rolls and layer cakes and stuff? Because I'm German and quilting is not really a thing here.
Onto the tutorial!
You'll need:
A scrap of fabric of red, orange, yellow, green, blue, purple, black, brown, light blue, pink, white each
additional fabric for the border
Cutting mat, quilting ruler, roll cutter
sewing machine
thread
pins
double sided interfacing
iron and ironing board
fabric sheers
compasses
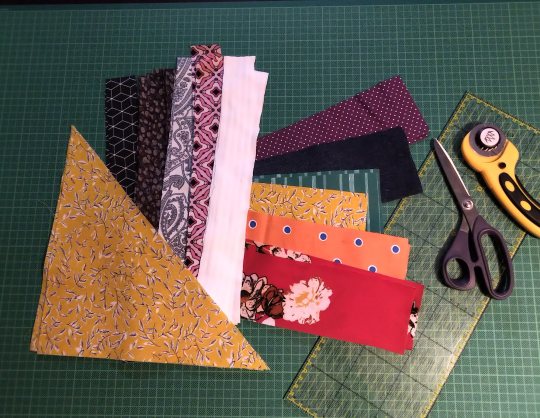
Step 1: Cut everything. Duh. We'll take care of the circle later, don't worry about that now. The half square triangle is exactly what it sounds like. A square and then you cut it diagonally. That's why I didn't give the length of the hypotenuse.
(Note: I'm making two blocks at the same time, that's why there's so much fabric. Also this is a middle of the night project, hence the lighting.)
I'm using all kinds of different fabrics, different weights and drapes, some stretchy, some transparent, so I needed to interface some of them.
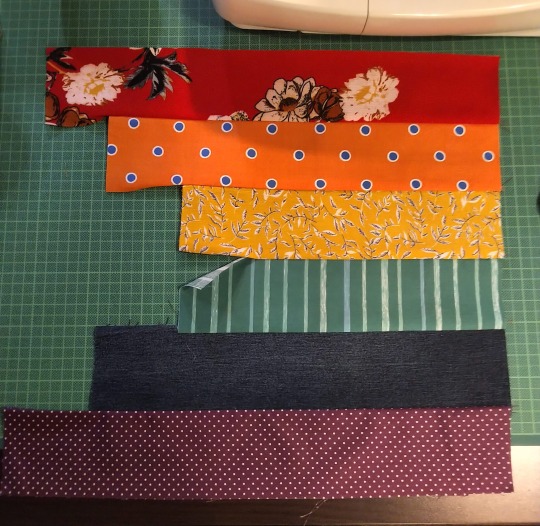
Step 2: Sew the rainbow together. 0,5cm seam allowance on everything, that's exactly the edge of the foot on your machine. Double and triple check that everything is facing the right direction before sewing. The seam of yellow and green does not get sewn fully, only 21,5 cm! That's important later! Also backtack there. Don't forget to iron.
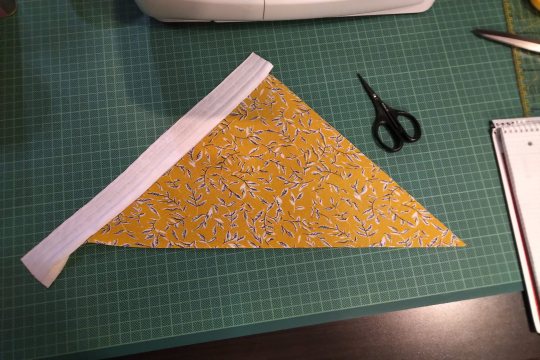
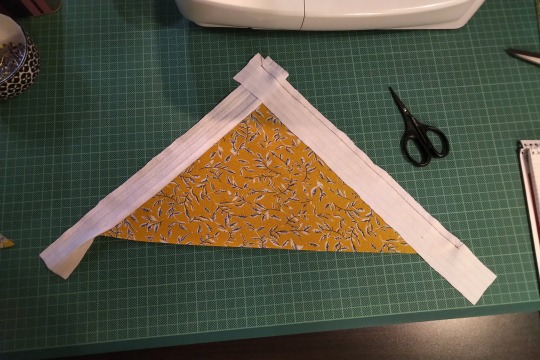
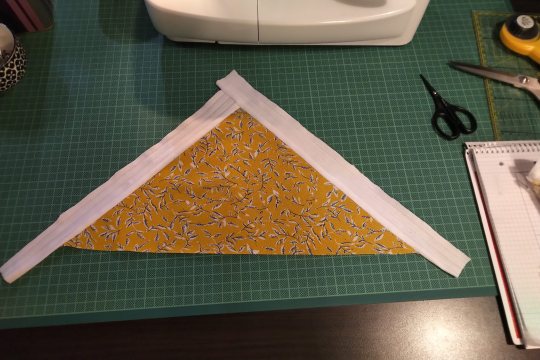
Step 3: Sew the strips to the half square triangle. For this you have to switch between the sewing machine and the ironing board constantly. Attach the shorter strip diretly to one side of the HST, iron it open. The second strip of the same colour gets attatched to the other side of the HST and the first strip. Look at the pictures closely if you're unsure how that works. Also the strips are longer than the triangle. We'll square that up later.
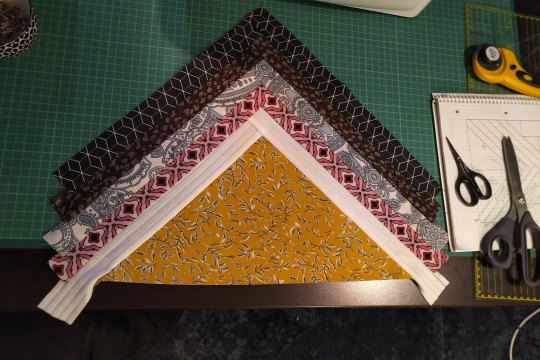
All strips attatched will look like this. See how the two strips meet at the tip!
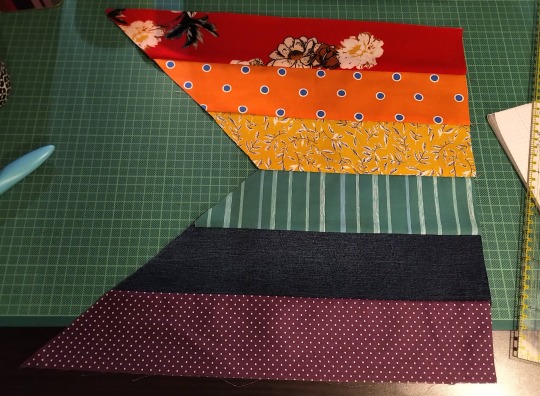
Step 4: Cut the rainbow part to size. The length between yellow and green is 22cm long. The shorter seam from before plus some seam allowance. The outsides of red and purple are 44,5cm long. These two points are the beginning and end of your cutting line. You will cut a little triangle from every single colour. Do this slowly and carefully. Maybe your fabrics have stretched a bit (mine did). Don't worry, it will be ok.
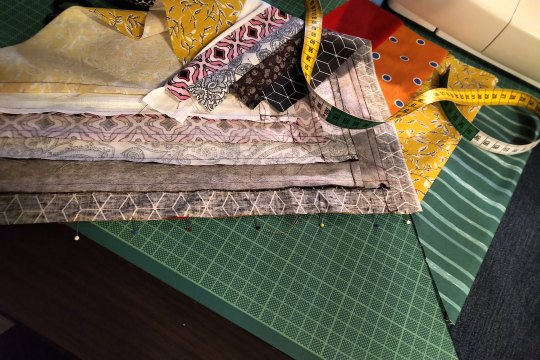
Step 5: The Y seam, part one. Y seams are tricky, but there's only one for this block. So put your strips part on your rainbow part and line them up so that the tip of the strip part overhangs the seam between yellow and green by about half a centimeter. Remember that it's not about the edges of the fabric, but where the seam will be. But don't sew all the way! Leave 0,5cm at the tip!
You can also mark on your strip piece two lines 0,5cm from the edges of the black. They should form a little square at the tip. There they meet is where the actual tip on the finished block will be. So place this spot directly on the seem between yellow and green and only sew right up to it. Not beyond.
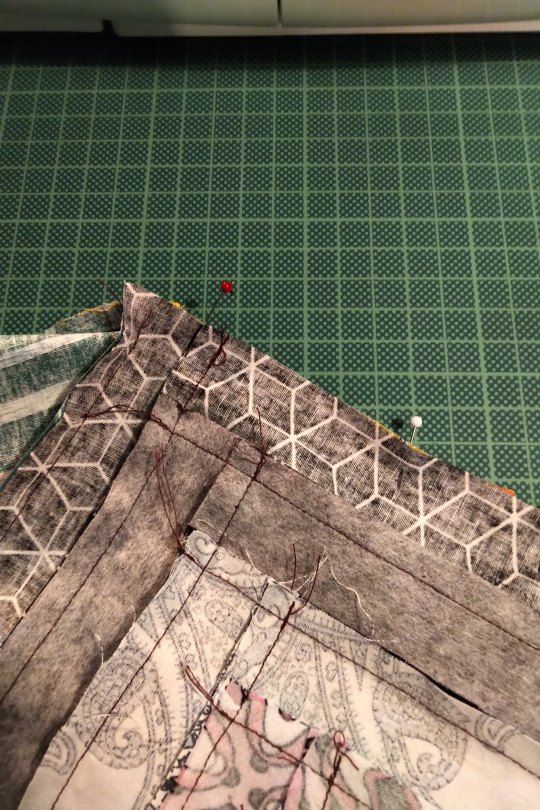
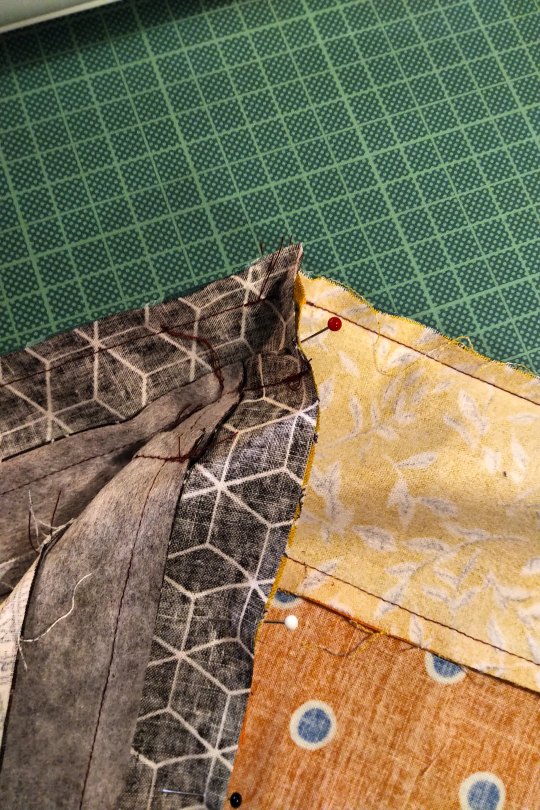
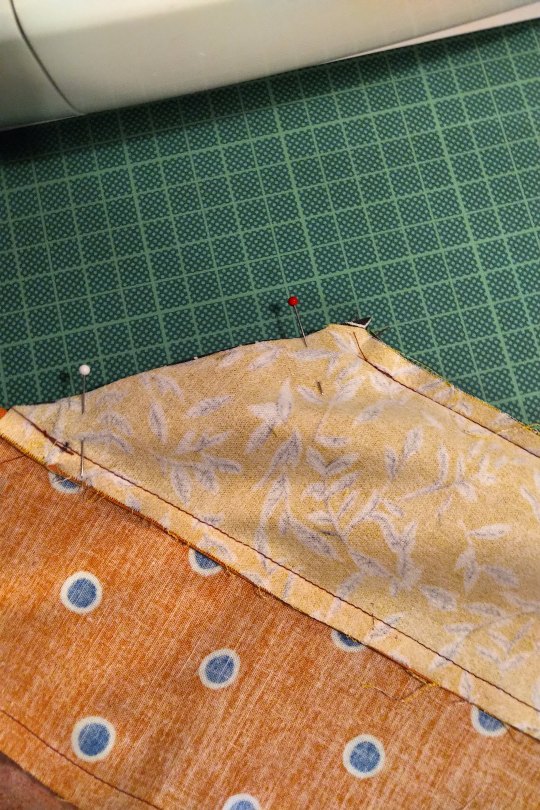
Step 6: The Y seam, part two. Now, fold both the rainbow part and the strips part in half and if you've done the last step correctly, the remaining two edges will allign. Pin and sew.
I can't explain it better than I've done here, I'm sure there are tutorias out there. Good luck!
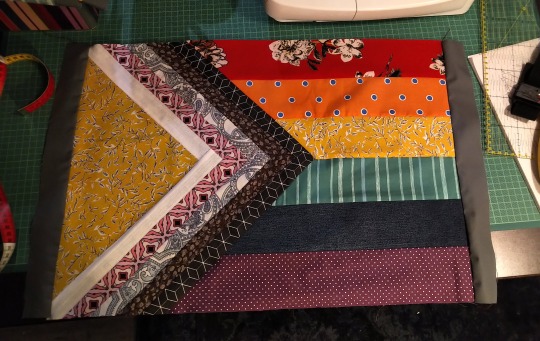
Step 7: Square up. Iron your block to that everything is nice and straight and flat. Then use the fabric edges of the red and purple to cut the remaining ends of the strips. Use the HST to cut the white. Be careful, the long side of the triangle is on the bias and likely stretched a bit.
I already added borders here. I'm making a pillow case.
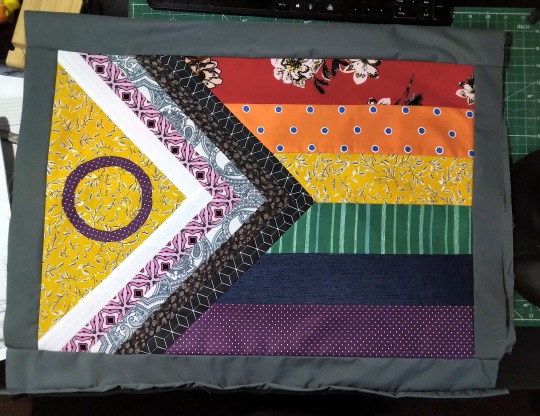
Step 8: Fuzzy cut and raw edge applique. Double sided iron on interfacing is essentially double sided tape. It has two types of glue, one gets activated by 2 seconds of heat, the other by 5 or so (depends on the product). The second side is also covered with a paper that needs to be removed before the second gluing. Read the instructions of the product you are using!
Use your compasses to draw a circle on the protective paper side of the interfacing. It's actually two circles from the same middle point, see pattern. Cut it out roughly. Then place it with the rougher side on the backside of your purple fabric and iron for 2 seconds on middle heat. If you've just ironed your fabric before and the ironing board is still hot, wait for it to cool down. Also let the fabric cool down after applying. Then cut out your circle. The interfacing will have stiffened the fabric, so that shouldn't be a problem. Then remove the protective paper, place the circle on the yellow triangle where you want it and iron for 5 seconds. Let cool.
And you're done! The applique at this point is only secured with the interfacing, but it should hold fairly well. The quilting will secure it further.
And that's it. BTW, did you know that this design was made by Valentino Vecchietti for Intersex Equality Rights UK in 2021? Now you do. Happy quilting!
#lgbt+#lgbtq+#lgbtq community#pride flag#progress pride flag#valentino vecchietti#quilting#quilt#quilt block#quilt pattern#quilt tutorial#sewing#sewing machine#sewing tutorial#sewing pattern
171 notes
·
View notes
Text

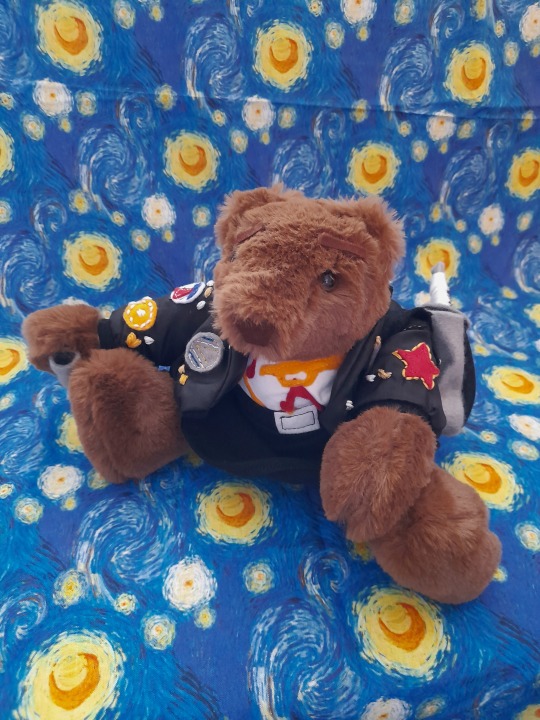
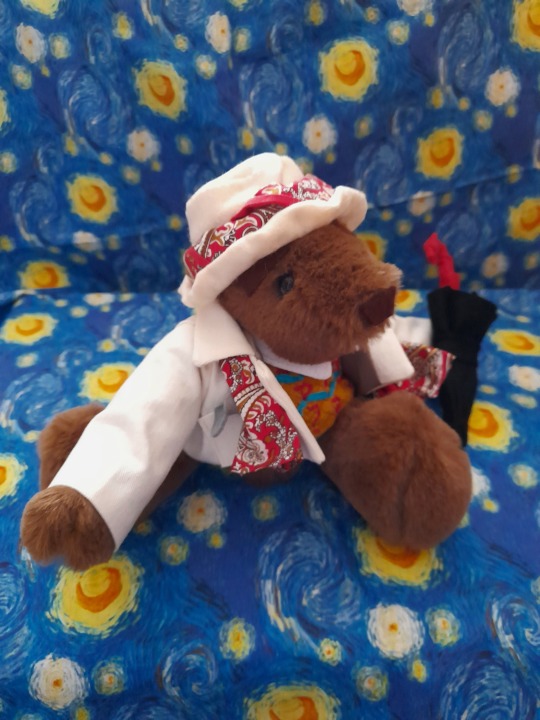
Bears, bears, bears! Bears everywhere! And Doctor Who bears at that, made specially for and presented by me to Paul McGann, Sophie Aldred and Sylvester McCoy at Portsmouth Comic Con.
As most of you probably know, I document my bear-making activities on here and I made an Eighth Doctor bear a couple of years ago, followed by a Seventh Doctor last summer. Ace was a new one, and because of that I ended up making two, the first as a prototype that I kept for myself, working out the details of the costume, particularly the jacket, and the second for Sophie.
Back in February when I decided to make Anne Bearleyn I found that my usual type of fur was unavailable so I had to go looking for another, ending up with something that while it looked lovely was fairly hellish to sew as it shed everywhere. It was all I had when it came to making the first Ace bear, however, and so I went with that. Afterwards, having got covered in fluff again, I tried to find something similar to the fur I’d used for most of my previous bears, but when it arrived and I started putting one together decided that when compared to the bear I’d just made it looked cheap and nasty, which was definitely not what I wanted for this particular project. Consequently that fabric went on a one way trip to the bin and I ordered more of the other stuff, resulting in what I’ve termed a ‘furpocalypse’ when I decided to cut and sew three more bears in one day:
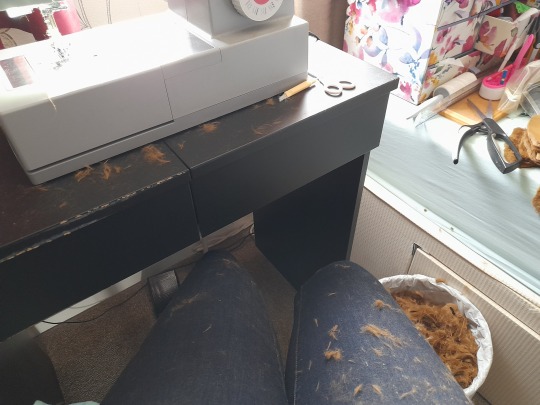
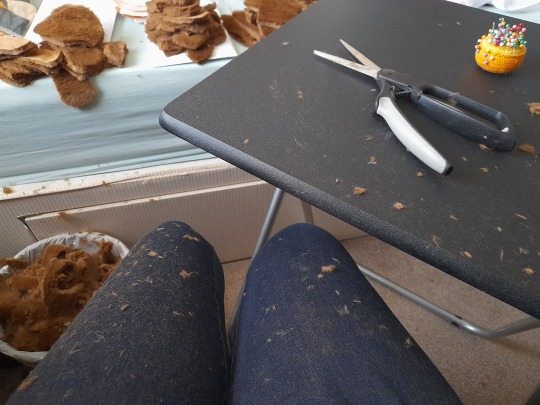
I had to vacuum both the room and myself four times, and clean out the sewing machine twice! That fluff gets everywhere, even up your nose! It was worth it in the end, though, as the result looks so nice. As the pile is quite thick I had to glue on the noses and use felt for eyebrows as thread just vanishes, but I think that actually looks better and allows for more expression.
I made a second set of Ace clothes while I was waiting for the fur to arrive; the first jacket had been a bit too small and I’d only had satin to use for the lining which disintegrates as it’s sewn, not something I wanted to give someone as a gift. It was a painstaking job to replicate the badges and decoration on the jacket with felt and embroidery thread, but I was pleased with how it turned out:
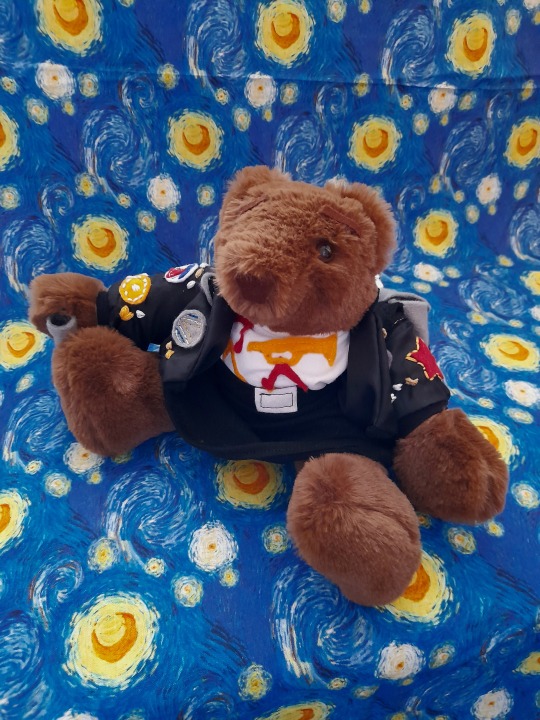
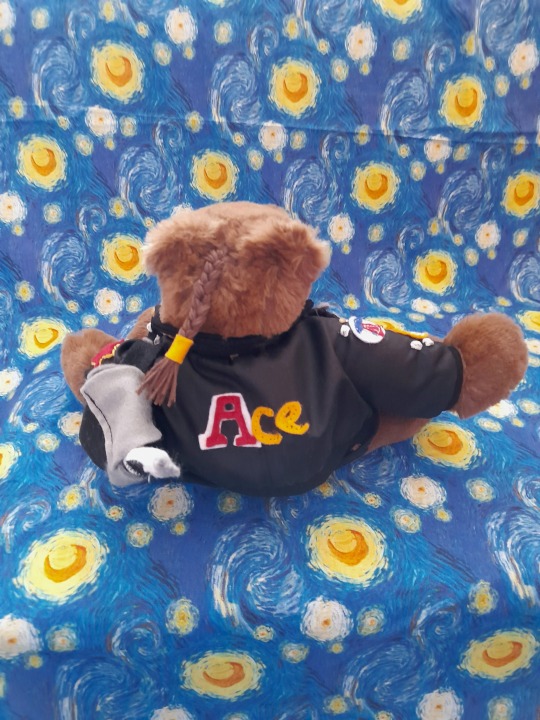
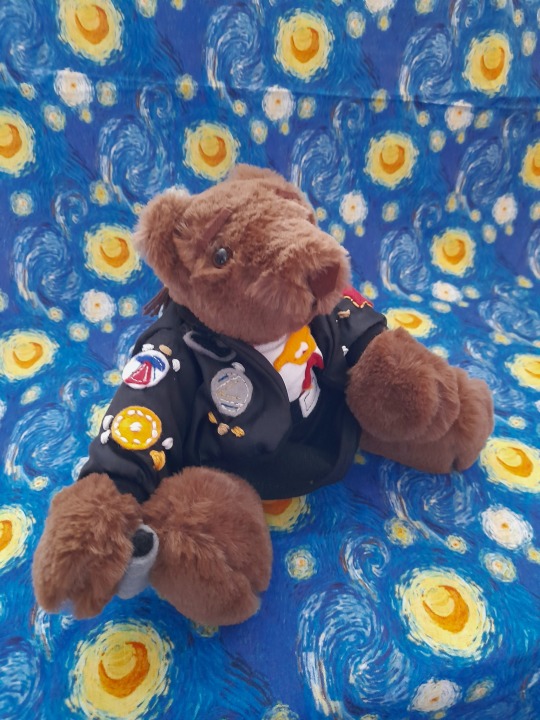
The costume is based on one from Remembrance of the Daleks, the skirt and t-shirt made from jersey and the decorations on the latter also of felt. She has a plait, rucksack and baseball bat, as well as a nitro 9 canister in her hand/paw (which I actually swapped out for a better one on Friday but didn’t take any pictures of it). The nitro is attached with velcro and can be exchanged for the bat. My only tiny niggle is that I made the jacket lining the wrong colour, only realising it should be orange when I started rewatching Sophie’s episodes last week, but that’s just my perfectionist side at work and her new owner didn’t mind.
“Aaaaaace!” You can see my original Seventh Doctor bear here; I changed a few things working on the new one, this time using blue eyes and making the jacket in cream rather than brown, mainly as a contrast with the darker fur but also so he would match season 25 Ace. I decided to use red paisley for scarf, tie, hatband and handkerchief, adding a red trim to the last two. The jumper once again took a couple of hours’ work, and as this was a present for Sylvester this time I did embroider question marks and chevrons all the way round!
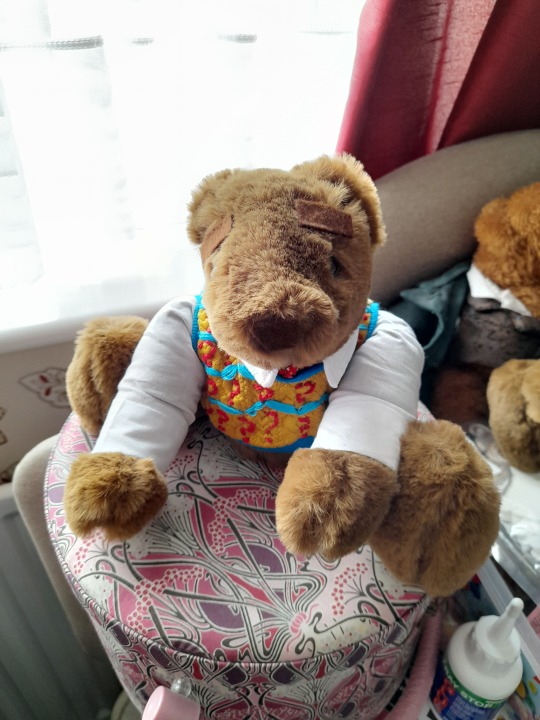
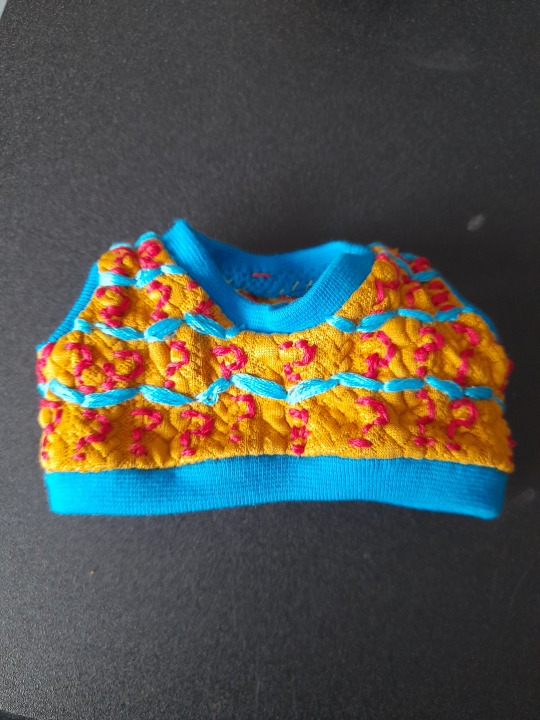
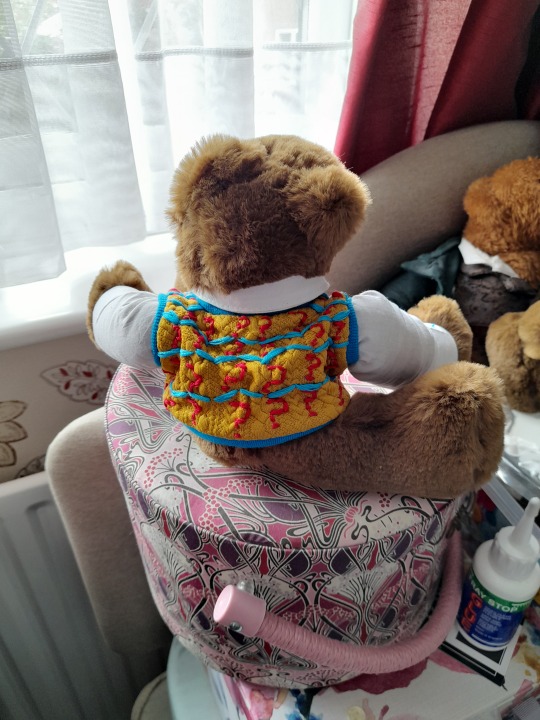
For the umbrella I cut out several long triangles and stitched them together in imitation of a real brolly, using a bit of a skewer covered in felt for the pole (that’s not the word but I can’t think what to call the middle of a umbrella for the life of me!), to which I attached some jewellery wire pinched from my sister (shh!) twisted into the shape of a question mark. That was then covered in yet more felt. I’ve made a lot of things from felt lately!
And voila: one finished Seventh Doc bear:
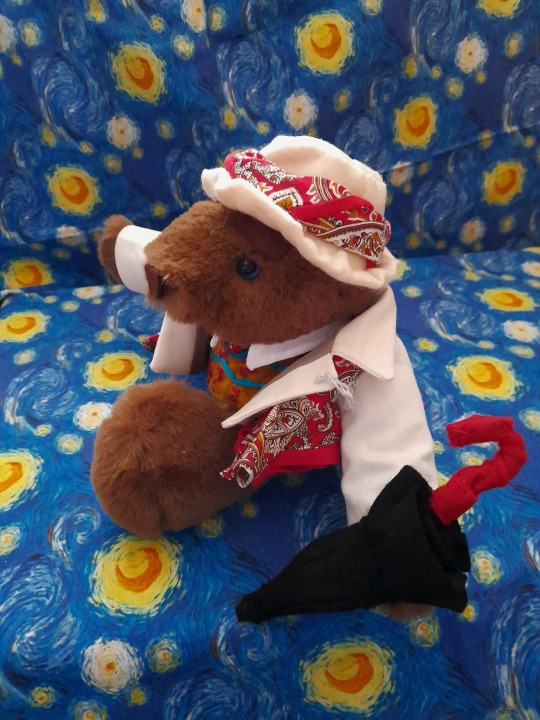
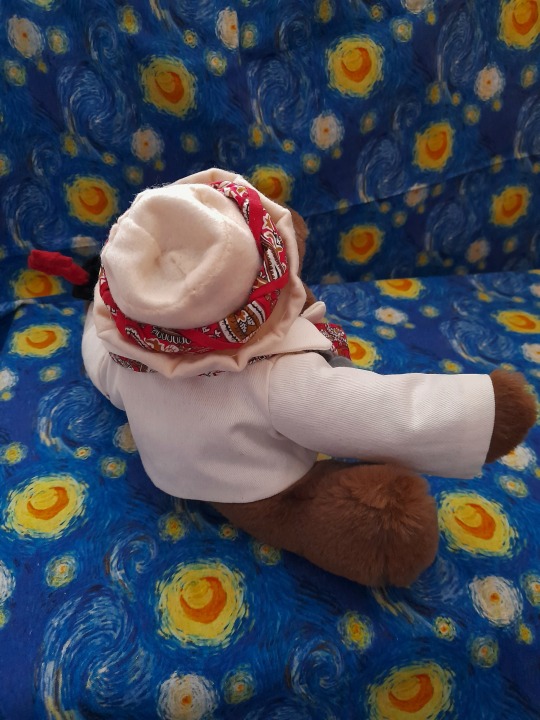
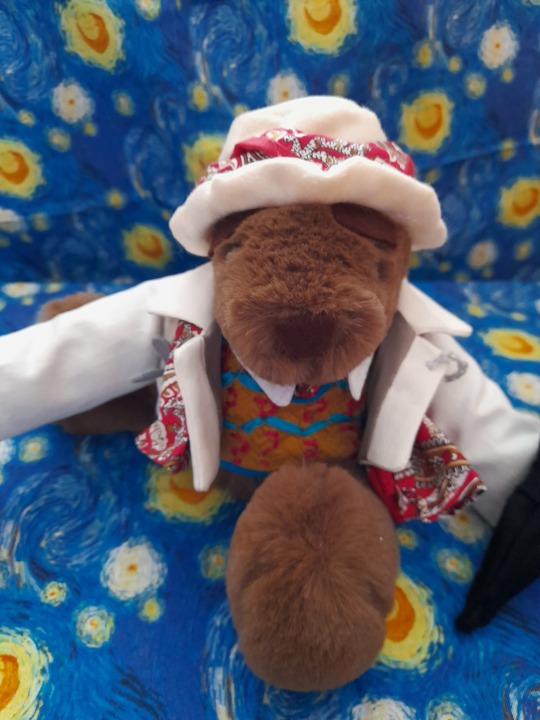
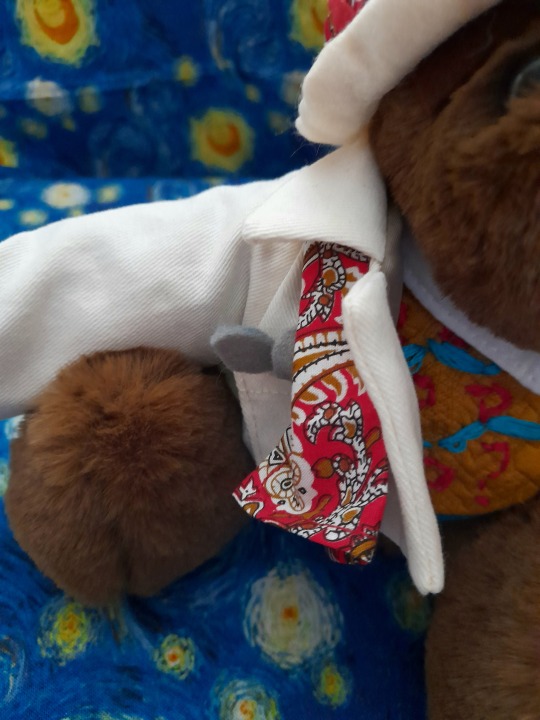
I do hope Sylvester spots that he even has spoons in his pocket. 😁
Last but not least, we have Eighth Doctor bear, which I actually started first but I didn’t have enough fabric for his coat so he had to sit and wait while I worked on the others. My original is here; he’s gone through a few costume tweaks as I’ve tried to improve on things and this time I mainly used scraps left over from my own cosplay and made them up in the same way: shirt, scarf, waistcoat, belt and gailters are all the same as mine, and the coat is identical material but from a different source.
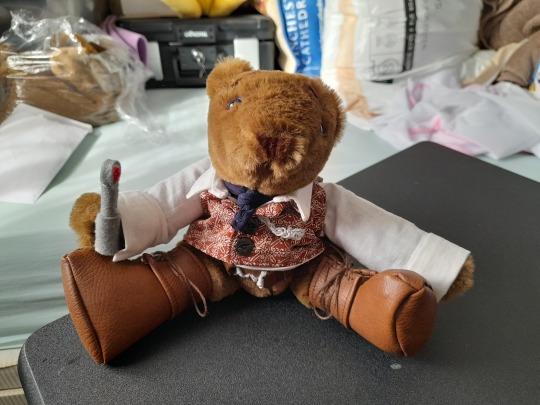
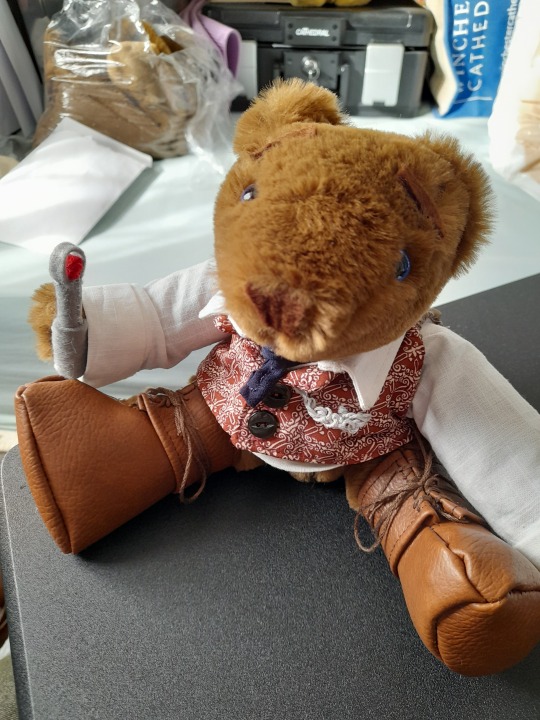
His shirt and waistcoat both fasten with buttons, and I made the watch chain and belt buckle from embroidery thread. It took several attempts to get the boots and gaiters right, and I went from having quite a large piece of faux leather to something about a quarter of the size, most of it ending up in the bin! Unlike my Eight bear he has a sonic screwdriver, made from - yes, you guessed it! - felt. Fortunately the TVM sonic is quite a simple design, unlike the other one I made which can be swapped with this one to go with the Dark Eyes outfit I ran up on an impulse because I had scraps left from my own jacket and put in the bag with him; hopefully Paul will find it as that DE sonic took me two attempts to get (somewhat) right!
I changed the shape of the lapels on this new coat so that they were more like the real one, and I also took some pics of him in his Dark Eyes gear:
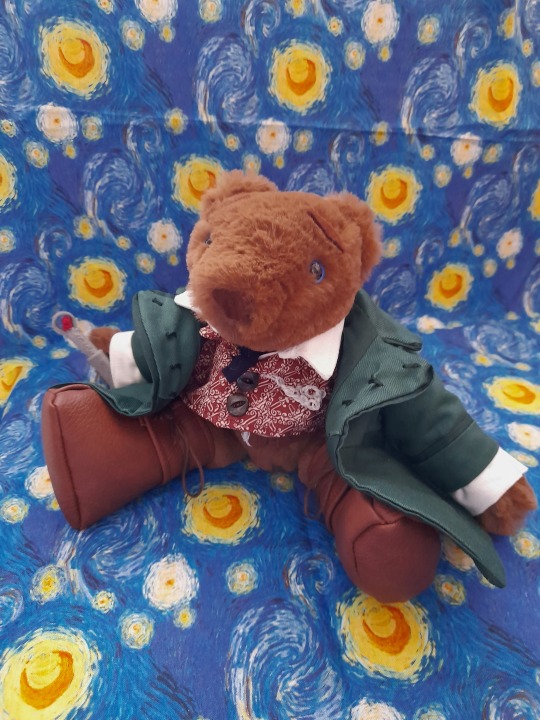
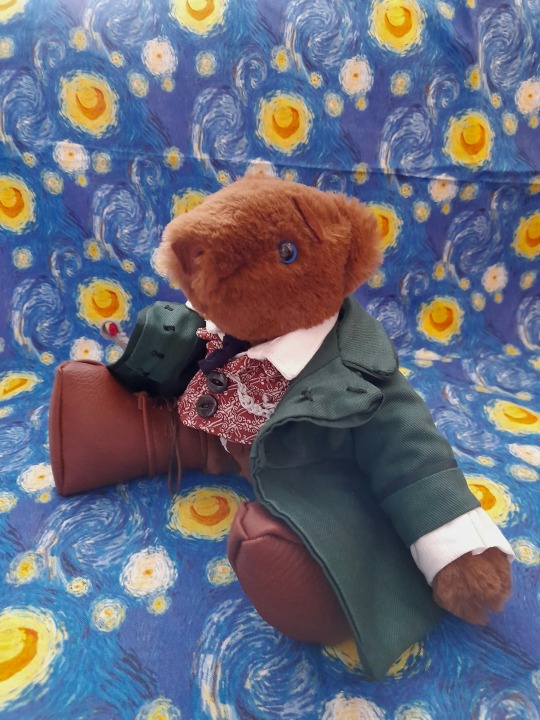
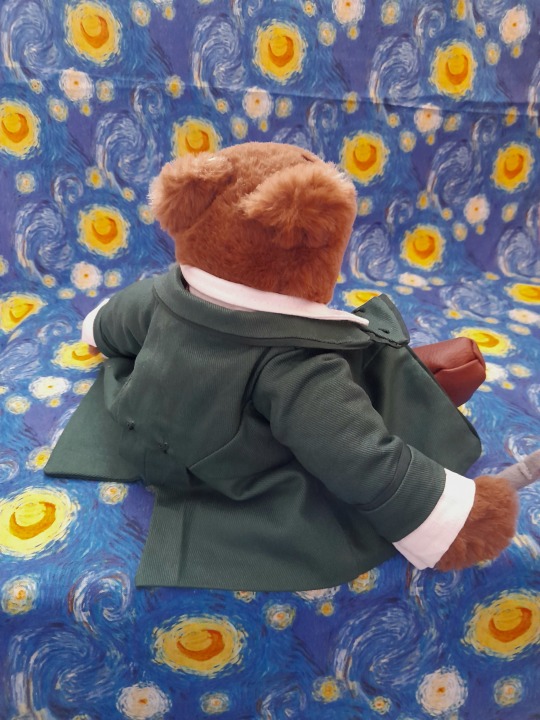
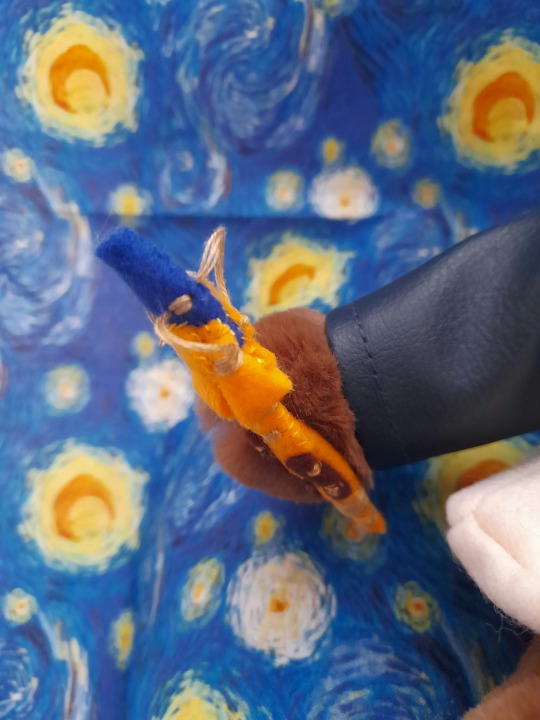
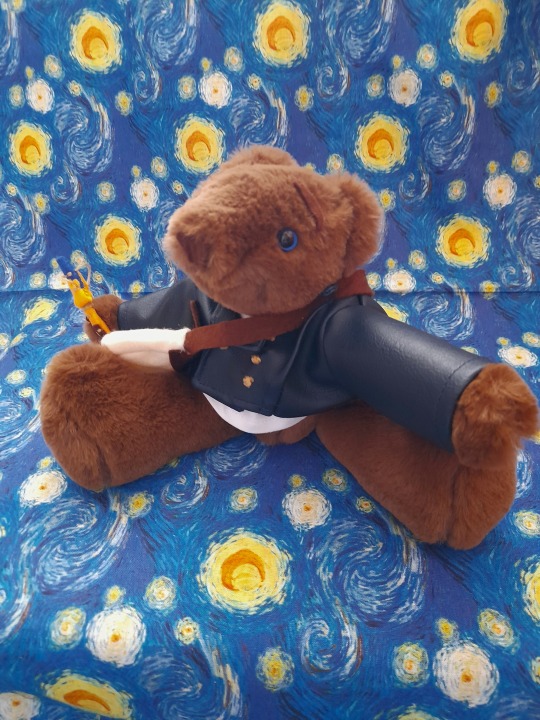
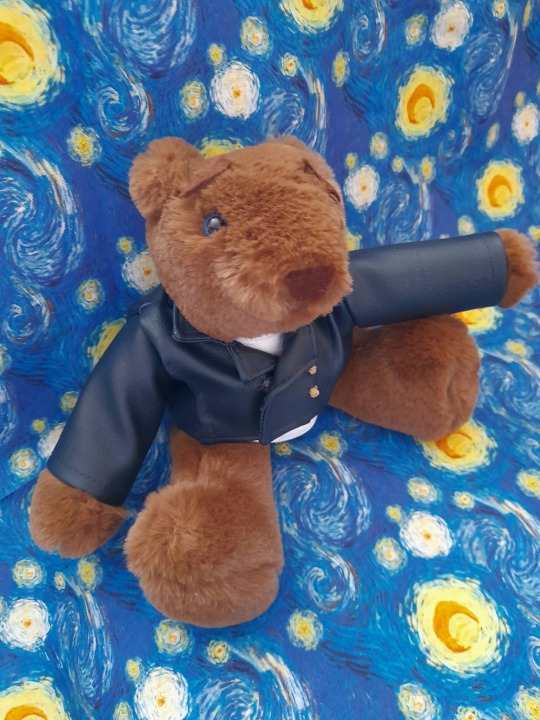
I confess that he was the one I found it hardest to give up. Look at him:
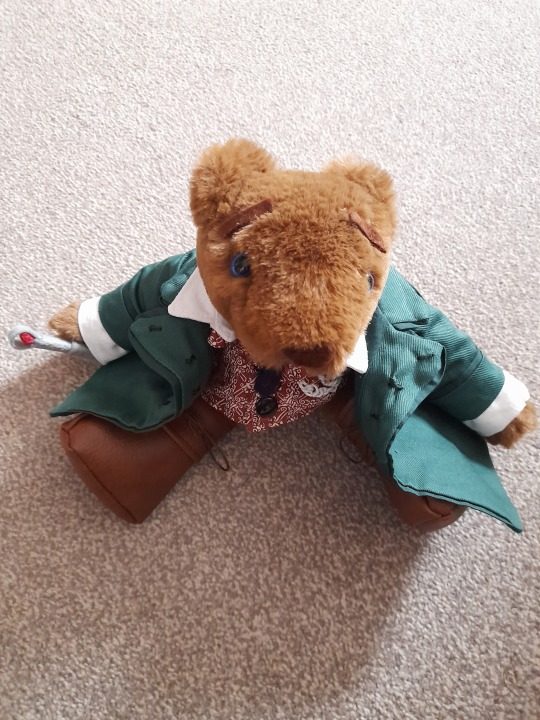
And he matches me!
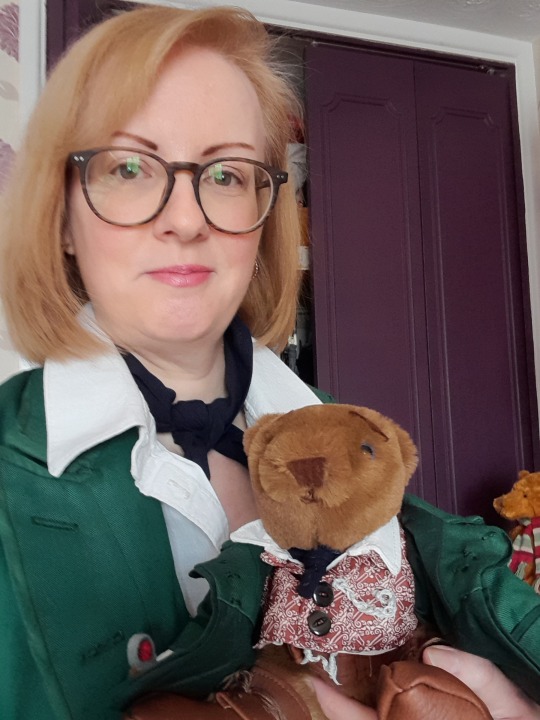
I had to keep telling myself that I couldn’t keep him, I’d made him for Paul, but it wasn’t easy!
Finally, a few pics of them together:
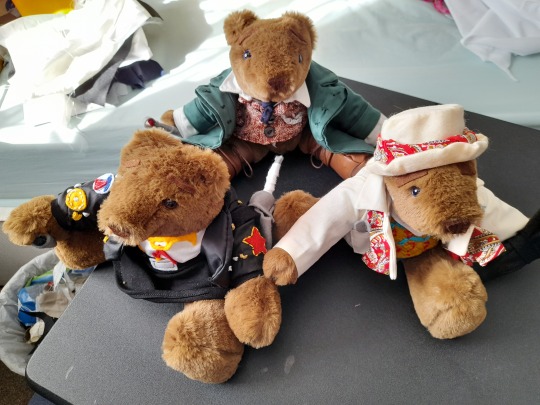
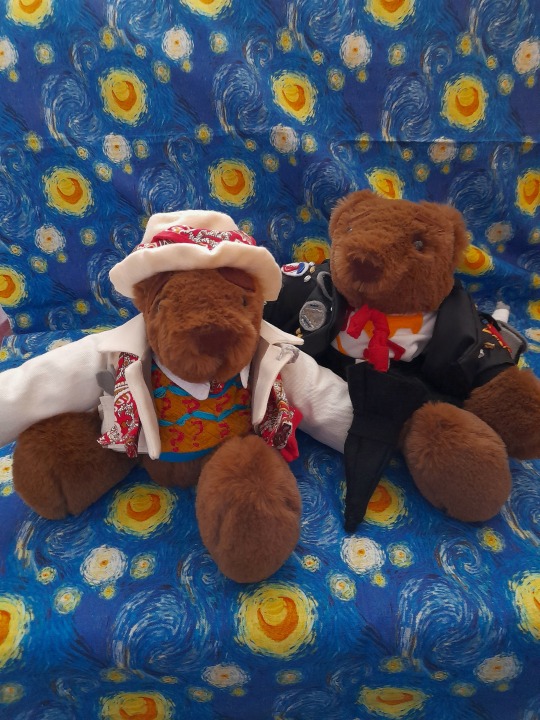
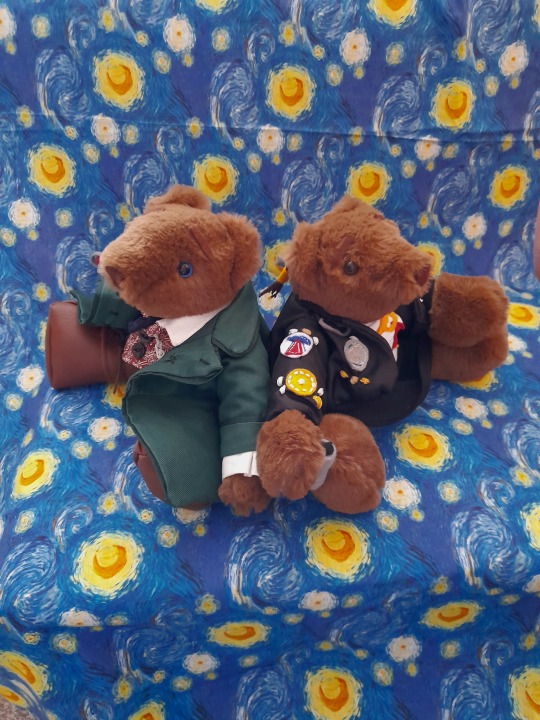
I was so, so pleased with the way these turned out. Along with Bush (about whom I’ll post separately), these are the best bears I’ve made so far, and I’m glad that Paul, Sophie and Sylvester were just as happy with them!
#long post#sorry#sfs’s adventures in sewing#my bears#doctor who bears#eight bear#seven bear#ace bear#doctor who#eighth doctor#8th doctor#seventh doctor#7th doctor#ace mcshane#paul mcgann#sylvester mccoy#sophie aldred#i do wish i’d been able to get some pics of them with the bears but never mind#maybe another time
39 notes
·
View notes
Note
Hello, I wrote in a while ago about my son, and I think you should be made aware of everything that has happened since our letters aired, as you aided him in opening up about his true troubles at the time.
I did give him the privacy of not listening to his letter as it came on that night, which he probably would have quizzed me about if he’d still been awake when I got home. He’s still my son and several of my more, let’s say family oriented former colleagues, did heavily impress on me that I should respect whatever boundaries he draws, no matter how silly. That did partially lend me to think his sullenness was a new boundary that I didn’t dare directly cross.
I did also say former colleagues, as I took your advice and left my old line of work, completely severing any ties to it and giving up any nemesis statuses I might’ve racked up over the years,and opened up a small Etsy shop where I sell custom hand sewn clothing items. The patterns I remember from my youth are actually quite popular amongst longer lived genuses who are nostalgic about late 18th and early 19th century fashion, and sapio historical reenactors and fashion history enthusiasts. And who knew that the sleight of hand I developed during my old job would lend itself so well to hand sewing!
My son is also doing well. His bully issues have been solved with minor feather loss on her end (mostly due the stress from her actions making its way back to her convocation), and the school councillor has regular meet ups with her last I heard. I’ve also met my son’s boyfriend! A lovely young merman, who’s so very sweet. I’m glad he found someone nice and only begrudgingly understand why he kept them a secret from me. I do agree that I have the potential to be very intimidating to new people, especially those who have a real way of hurting my son.
I still listen to your broadcasts, especially the agonies section, but nowadays it’ll be when I’m up late felling the edges of my projects rather than hunting down whoever was on my list for the night.
May you have a wonderful week. Good night.
I'm so glad to hear you and your son are seeing eye to eye once more! I remember both your initial letter and his own, and recall how evident it was that both of you cared very much for one another, even as you struggled to find a way to communicate.
Well done on leaving your old job. I know it couldn't have been easy for you, but I admire your willingness to make difficult choices for the safety and happiness of your family.
As I said in my response, I never wished to shame or blame you for your son's forcible turning. That responsibilty lies firmly with the individual who attacked him.
But that individual was acting in response to your chosen career, and I am very glad you took my advice and have taken up a less dangerous profession - for yourself, and your loved ones.
You've demonstrated real care and consideration for him during this difficult period, and it's good to see that paying off in his newfound trust in you. I wish you all the best in your historical costuming endeavours.
It is always difficult as a parent to discern the line between respecting your child's privacy, and keeping them safe. But just as it was inappropriate for you to expect your son to defend himself against an attacked, it would have been inappropriate to disrespect his autonomy and independence.
I can't pretend I don't feel some small satisfaction at hearing his school bully has been suffering from the consequences of her behaviour. May her suffering be short-lived - but educational.
It sounds as if you've done a very good job of walking that line, making sure your son feels supported while also demonstrating that you can be trusted not to cross his boundaries – even those you may consider “silly”. You have more than risen to the challenge, and I wish you and your son all the best in the future.
[For more creaturely advice, check out Monstrous Agonies on your podcast platform of choice, or visit monstrousproductions.org for more info]
#answered#the nightfolk network#monstrous agonies#Episode Ninety Eight#Episode One Hundred and One#for anyone who wants to relisten!
12 notes
·
View notes
Text

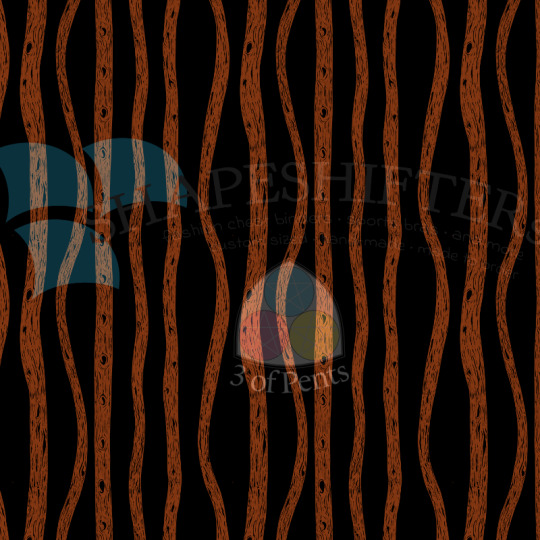


The Jersey Devil & The Pine Barrens Pin Stripe // Fabric design for @shapeshiftersvt and The Cryptid Collection
Oh it's time for my favorite cryptid, the Jersey Devil.
We've reached the first fabric design that was a direct adaptation from its coordinating travel poster. Here, let me show you, I think it's pretty obvious.
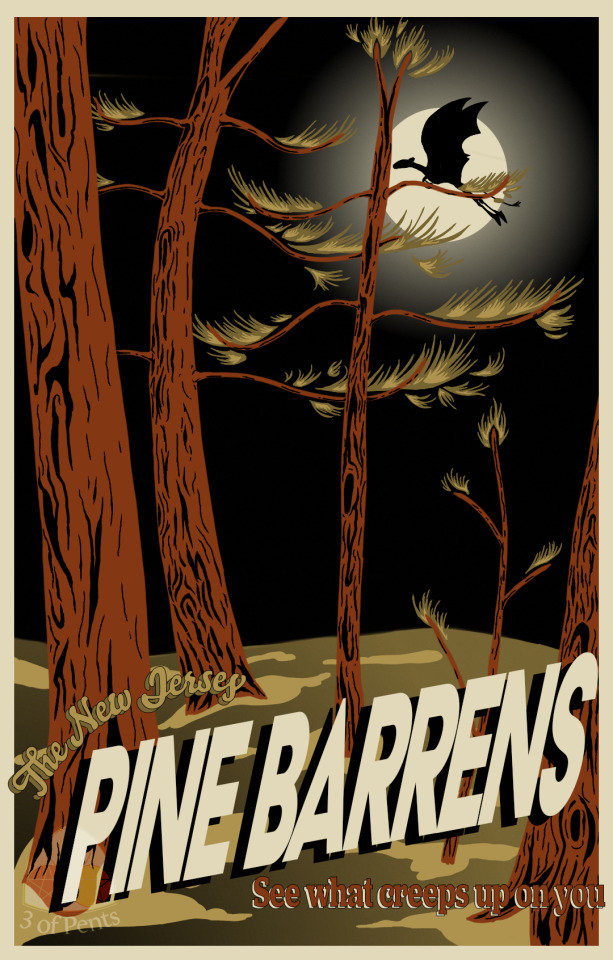
This wasn't the first based-on-the-poster design that I did, but it was the very first poster that I did. I mean obviously. I grew up in New Jersey and, save for a 9 month stretch in Brooklyn after I was born, and a 2 year stint also in Brooklyn in my late 20's, I lived there for about 30 years. The Jersey Devil has always and will always hold a special place in my heart.
So why on earth is there a version of this pattern without it???????
Easy! Remember when I said that some of the fabric designs were created with Eli's runway looks in mind? Well here's the concept sketch for the Jersey Devil design:
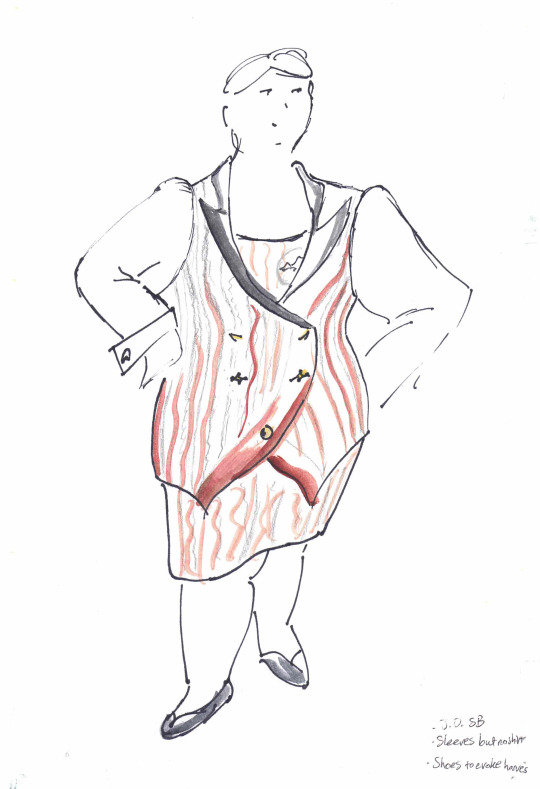
The initial concept while we were brainstorming and finalizing the fabric designs was to create a skirt suit with the trees-only design (Pine Barrens), with a binder or sports bra in the Jersey Devil design peeking out from underneath. I can't speak entirely to Eli's thought process, but I believe part of this decision was made with the photobombing idea behind the posters in mind, where the cryptids are sort of semi-hidden, or at least not the focus of the image. And part of it was aesthetic, not wanting to have multiple moons all over the outfit that might even get cut off and such.
I want to say I had a decent time with this one, and I think I did in the end. But I have to admit that it ended up being a little frustrating because it took a lot longer than I expected it to. Or that I thought it should, considering I was just recreating a slightly altered version of an illustration that I'd already done. It took a while to get the trees right, especially because for some reason that I kept getting a single pixel wide line across my horizontal seams that, like. The only way I can explain it is that it was as if the canvas was a single pixel shorter on the bottom than the image, so every time I smoothed out the seams and moved the tile back, that single pixel line would come out of hiding and break up the whole image because it didn't get edited, so the colors were in the wrong places.
This was NOT the case, for the record. I expanded the canvas multiple times in my attempts to fix this thinking that was what was happening. And yet it kept happening. I don't remember if restarting my computer fixed the problem (I often have issues with things on my screen not appearing properly when I need to restart to free up some memory); if I confirmed that it was just a weird visual glitch in Clip and that it wasn't visible anywhere else; or if it just stopped happening because I stopped moving the tile multiple times to double or triple check it and it was happening at the point of moving it. But I got it fixed, obviously.
And I'm pleased with it! I think if I'd put this one further down the list and so had more experience under my belt, I would've done it a little differently. Really mainly the tree repeat. I think I would've done a larger tile to get more trees, for more trunk shape variation; and to have more room to get a more gentle curve back and forth.
But the essence of the thing is still there, and I still think it's a cool concept (one that Eli came up with, I forgot to mention!) with the trees being stripes. And of course I love my flying Jersey Devil. I need draw more Jersey Devil art.
As always, if you'd like to order your own binder or sports bra with either of these fabric designs, you can find them (and the poster print) here, on the Shapeshifters website. If you do, we'll finally be able to get a photo instead of the mockups I made up there.
If you want to purchase the fabric for your own sewing projects, you can do so through our Spoonflower shop. Important to note that the Pine Barrens stripe runs vertically along the length of the yard; and the Jersey Devil stripe runs horizontally, and the pattern repeat is a full yard, so there's only one moon on each yard.
16 notes
·
View notes
Text
ALRIGHT MY FRIENDS ARE WE READY FOR
A BIG CROCHET PROJECT UPDATE!!!!
I keep putting off posting about everything on here and instead of making a bunch of separate posts, I figured I might as well just get it all done in one shot!!
So first off, an update on the baby blanket I had been making!! As a refresher, my coworker and his fiance had a baby a few months ago in July, and I was asked to make a baby blanket for the lil one even though it was late into the pregnancy at the time. I took on this task with DEDICATION and it is NOW DONE
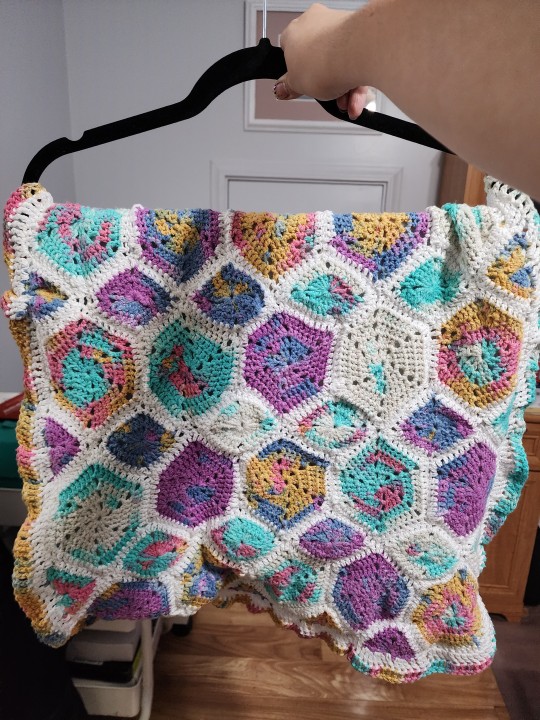
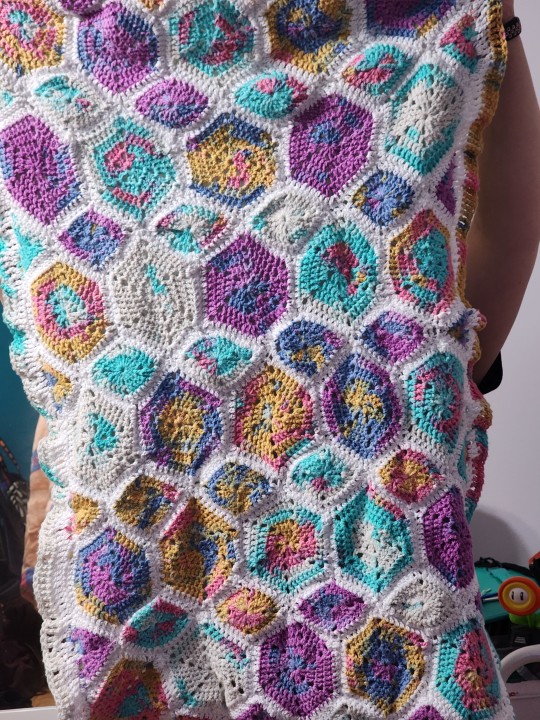
I used TL Yarn Crafts' Hexis in Springtime blanket pattern and Hobbii's Frutta + Lion Brand's 24/7 Cotton and I'm very very pleased with how VIBRANT it ended up being. I was initially afraid that the white borders would really wash everything out, but I think the Frutta yarn matched its energy and held its own. and it's all 100% cotton, so it should hold up over time and many washes!! I also made my own ruffly edges rather than using the pattern's, and I also sewed on a standard baby blanket fabric on the "wrong" side of the crochet (with my mom's help!)
honest to God I'm so proud of this one, and even though it's not perfect I am sooooo excited to have done it!! it's a blankie a baby can grow up with and I'm so happy to give them that 😭 I can't wait for the baby pictures I've been promised
AND THEN
this one is a bit of an oldie, but I made my best friend Madison a mushroom purse for her birthday gift this year!! I hadn't posted about it on here because she follows me on umblr and it was supposed to be a surprise, but she's now had it for a few months so it's free real estate
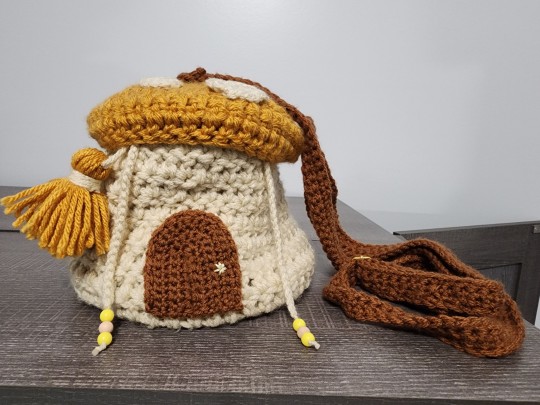
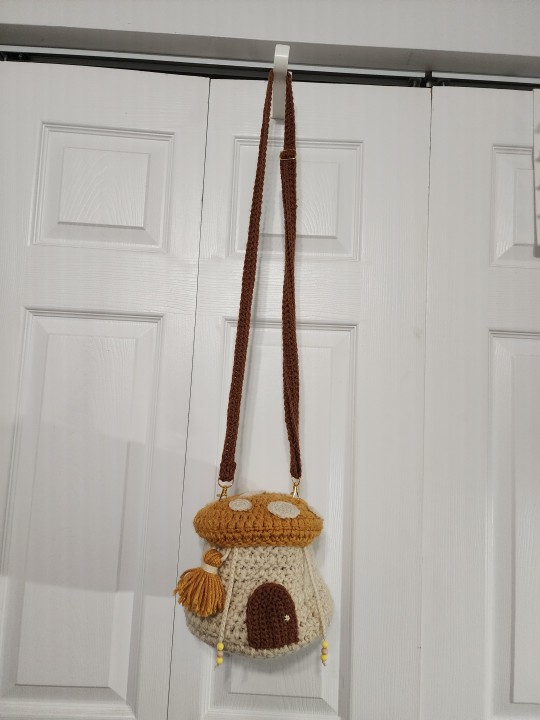
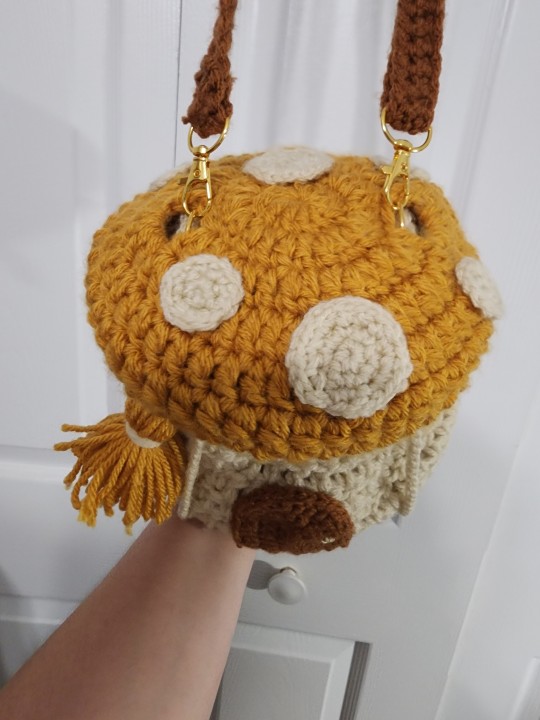
the pattern is this one from Bayou Self Creations on etsy, and I used Big Twist Value yarn in the colors cream, mustard, and toffee!! this pattern was SO fantastic and well detailed, and I found that I was comfortable enough w it to make some adjustments, so I did! For one, I bought purse hardware and introduced lobster clasps and a strap adjuster ring so that the bag can be easily taken off the strap, and the strap adjusted. I made a little tassel for some extra decoration and used a bead to create the little door knob, and I even lined the inside of the bag with white liner to make sure it can hold anything without the item slipping through the holes always created in crochet
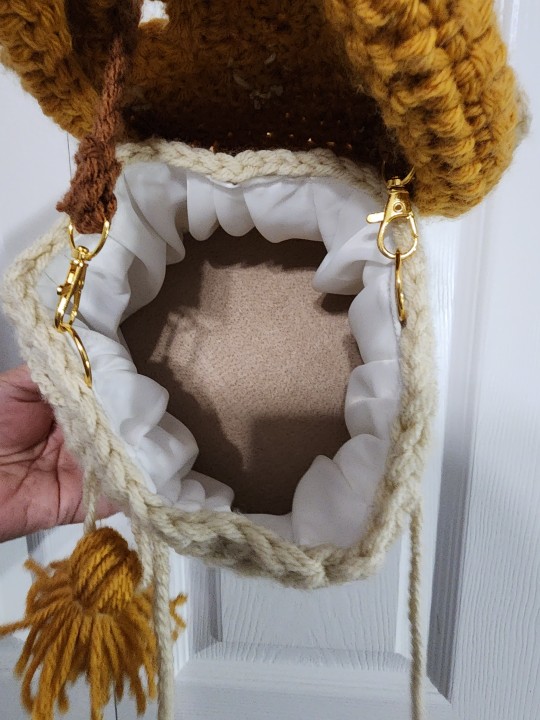
this pattern was SO much fun to make and it really worked up so fast since most of it was done with worsted weight yarn held double. highly recommend!!
BUT WAIT, THERE'S MORE
one of my dear coworkers has always caught me crocheting and asked if I'd be willing to make him something small. after some pestering, he said he'd like mushroom boy keychains, and I delivered!!
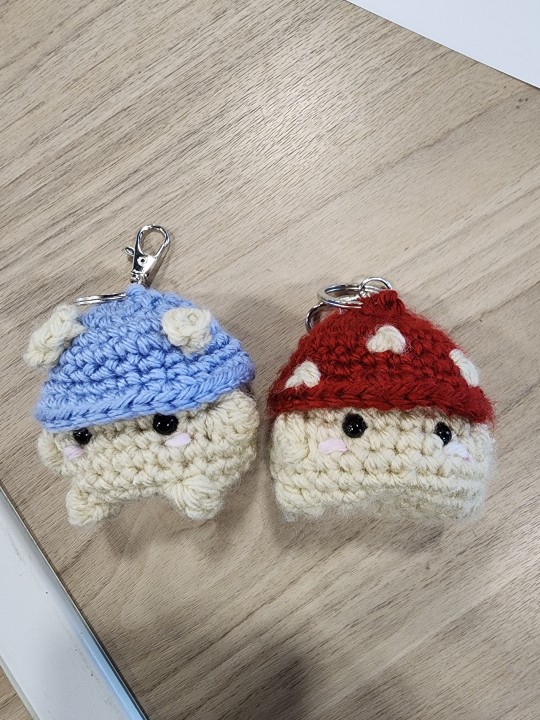
I used the Chonky Mushroom Boi pattern by Chonky.Crochet on ribblr (which, tangentially related, is quite honestly the WORST app I've ever used ui/ux related. It is so HORRID). the pattern is super thorough and these little guys worked up very quickly and were a great way to use up some scrap yarn! unfortunately, they did get a little damaged already and I have to find a better way to fasten them to the keychain thing. I WILL though
AND LAST BUT NOT LEAST
another baby crochet project!! this time for my very sweet neighbor who is 6 months along. I really wanted to make her something without committing to the scope of something like another baby blanket, so I did some digging around until I found this pattern for baby loveys by theodoreandrose (hosted on the Bella Coco Crochet website). I made some adjustments (see: packing in more crochet stitches towards the last few rows in order to make the bottom ruffley, adding two extra rows otherwise, crocheting extra ear details), but otherwise the pattern itself was incredible (ESPECIALLY considering it's free!) and I managed to knock this one out in about half a month working on it here and there. It was also the first time I had completely 100% freehand embroidered a face onto a plushie I've made, and I kinda thing I killed it tbh. it looks so much like an old school toy and I love it!!
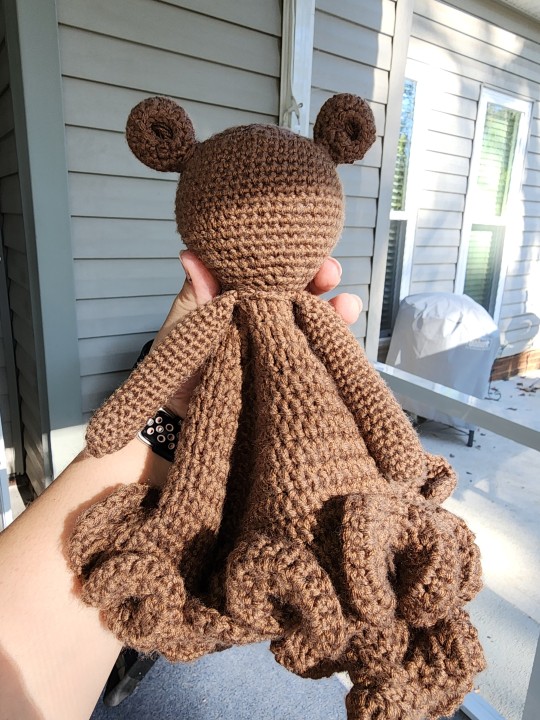
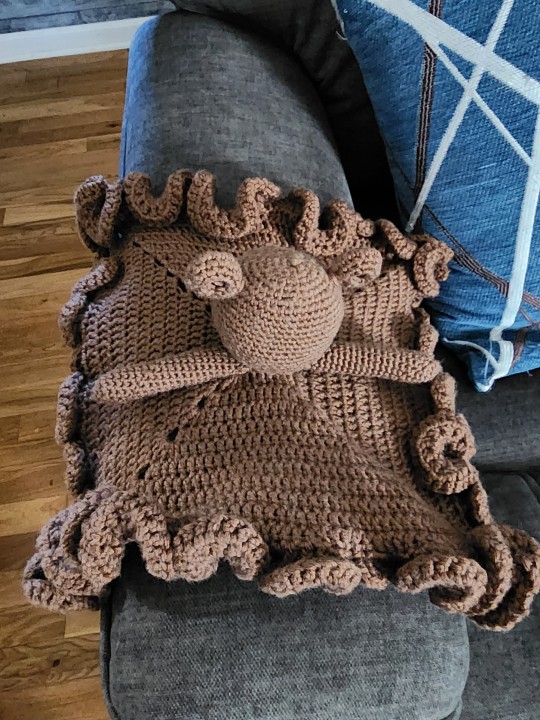
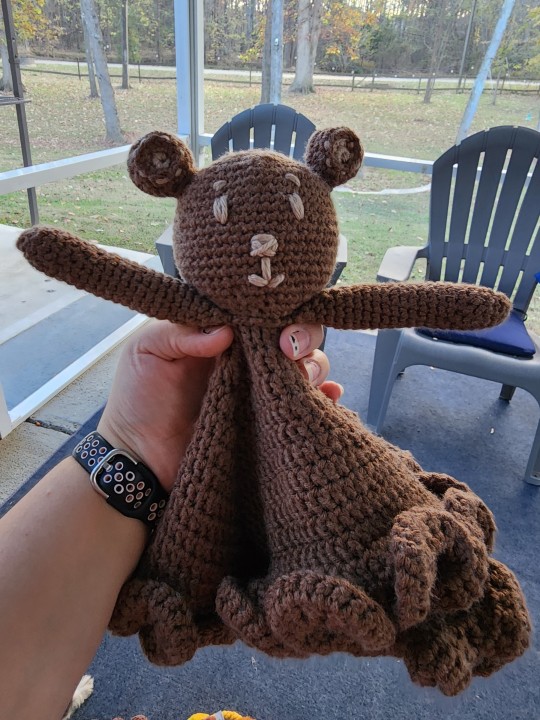
I used Berroco's Comfort yarn in the color Falseberry Heather. I wish I could have gone for something a lil more colorful, but the baby nursery follows a forest theme and I didn't want to stray from it. in any case, I think the tan yarn (scraps from WeCrochet's Comfy yarn, throwback to that monkey amigurumi I posted about ages ago) did a good enough job of breaking things up!!
And now we're all caught up!! I've got a few projects I wanna get done as Christmas gifts and I've already started on my next one, so 👀 I'll see y'all again soon!!
3 notes
·
View notes
Text
cast off!!!! cast! off!!!

greetings from hell. Let's call it Finishing School. I have been working hard to finish old projects so I can start something new. (And also... and mainly... just... for the sake of it.) Both pictured are from 2019.
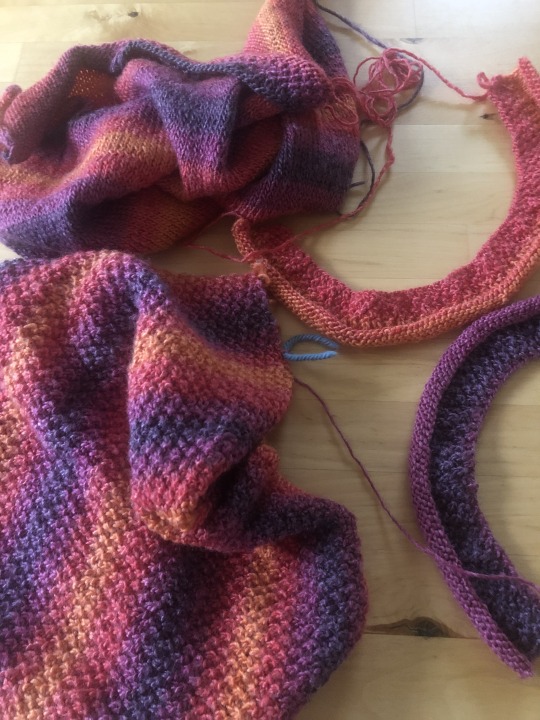
Finishing School reminds me why I started gravitating only to projects in the round. This sucks. I hate it! Sewing knitwear sucks, I never remember to do selvedge, I joined this whole twist crop front thing with a crochet slip stitch because, I don't know, it just seemed more doable (emotionally) even though it doesn't look greeeeat.
About the first pic: I got too ambitious with blocking yesterday and ran out of t-pins and almost ran out of straight pins! Having the dehumidifier going downstairs (we're in a split-level) is great because things dry very fast. The baby sweater should be totally dry tomorrow and then the armpits will be kitchenered together (good, easy, looks tidy) and then it's just button bands which, whatever, seems fine.
Anyway, this varigated thing -- when we lived in LA we used to do Thanksgiving in Big Bear, where my sister's in-laws lived. It was always a really nice time. My sister's mother-in-law and I bonded over knitting and one year went to a great local yarn store up there, where I picked up this project for something to do.
Mostly I remember working on it in bed while chatting with my parents for hours at a time when COVID hit and we were all isolating. The yarn (Queensland Sunshine Coast) is a really pleasing bamboo/merino blend that feels surprisingly plush in this Irish moss stitch. It's single-ply and so the weight varied WILDLY but the pattern - which came from one of those brand print outs you get for free when you buy the yarn - is pretty loosey-goosey so that was ok.
After joining everything up I have two problems. One, I don't like the "sleeves", which seem incredibly unnecessary to begin with. So I can either take them out and re-sew them NOT using slip stitch, or take them out and instead do a separate edge and keep it sleeveless. Or just live with it, which is of course what I will do to begin with because path of least resistance.
The other issue is it's just... it's way too big. Way too much positive ease (a first for me so I am mostly amused?). This is as a result of blocking. The pattern says "block". It provides ZERO measurements. Could I have deduced the measurements? Probably! Did I? ABSOLUTELY NOT!!!!!!!!!!!!!!!! So I ended up overstretching the back (the front, which twists, did not get blocked) and the shoulders didn't quite line up and... it's weird.
What I'm going to do is add buttons to the sides so I can sort of cinch the bottom at my waist and according to my mirror that will look good. I will enlist my mom to help with this. That's the plan. It's meant to go over a black long-sleeved shirt. It doesn't have to be perfect, but it does have to be better than it currently is.
As far as the baby sweater goes, that's a story for another day (it isn't finished yet!!!!) or never. I'm hard pressed to think of another object that has brought as much shame or clarity to my life. But soon I shall be rid of it. And in the meantime it is so frikkin cute :')
6 notes
·
View notes
Text
Mystery chickens arrive Wednesday and I'm so fucking hyyyyyyyype. I'm also nearly done with my week (especially since I have a short day tomorrow) and while I do have some paperwork and cleaning and henhouse set up this weekend (plus birthday shenanigans) I am hoping to relax a little and maybe get myself in order.
I pruned the seed lists down a bit as well so that the initial purchases are more affordable, and hopefully that means I will be able to buy a round with each of the next two pay periods. That should let me sow just in time for the end of the month and the beginning of summer (perfect timing for veggies given our long growing season here). That means we'll be able to have the hens and the garden up and running by the end of the summer, and I can finally start to relax about groceries. I do still need to find a good place to buy our bulk shelf stable goods, but once I do we can buy those monthly, gather our produce and eggs daily with a little biweekly supplement from the farmer's market, and have a weekly butcher trip, and we should be back to an affordable grocery budget again.
The bills are back to being manageable, and are all paid off except for the insurance which I called about today and nearly had a heart attack about but should be able to get paid off next month. I need to find about $400 for it that I'm not totally sure about right now, but I will make that happen.
I want to be able to keep up with my work as best I can, and I also want to start trying to be more proactive about my non-work time so I'm not feeling so overwhelmed and burnt out. We're mostly settled into the house now, and while we're behind schedule (understandably lol) of where I'd hoped to be by now, I think I can make our life plans keep working on a reasonable timeline if I just keep chipping away. For one, I want to get a clothesline so I can start handwashing our and line drying our clothes rather than continuing to spend our money and time at the laundromat. I did pick up septic safe laundry powder I can use in the upstairs bathtub. All I have to do now is buy and run a clothesline. Pretty sure I know where I want to run it too, as wifey and I have discussed that previously. Might look into a vintage washing board too if I can find one, as I HATE having to scrub and spin in the tub by hand. That should keep us until we can save up for our combo unit, or at least a washing machine.
I know wifey wants to look for a couch and a dining table with chairs for us. And I'd like to snag a buikt in sewing table for my office, maybe a small loom if I can find an affordable one. I might even set up a lace making station in my lil alcove I think, it has great lighting for the fine motor work.
The yard still needs trees and bushes planted, but honestly that may just be a next year project. I may have to accept that. That's okay though. Gives me time to better clear out the invasive jasmine and see how the rhizomatics alter the soil composition. Maybe this year we focus on the soil, the chickens, and the basic functions like the couch and sewing machine and clothesline. And then next year we can focus more on trees and bushes, washing machine, and creek rehab. Things that are likely to be more expensive or time consuming/complex.
I am really looking forward to digging into creek rehabilitation when we get to that point. The creek has visibly slowed it's momentum as time passes, and I can see the debris crowding out the water flow, but as we shore up the creek walls, add native water plants to filter and aerate the water, and reinvigorate the ecosystem, I'm hoping that we'll start seeing amphibians and salamanders more often. Right now we get large animals and some wild birds, so I think there must be at least some insect populations, but I know the dynamics of the creek are pretty limited at the moment. With luck that'll change quickly once the right natives are in place. There's an existing creek restoration project in the city I'm hoping to volunteer with and get some tips from on how to implement ours.
Anyway, I'm just really feeling optimistic, even if I know that there's still a lot of work ahead of us. It feels like the work is actually happening. Fingers crossed we're able to keep making headway.
3 notes
·
View notes
Text
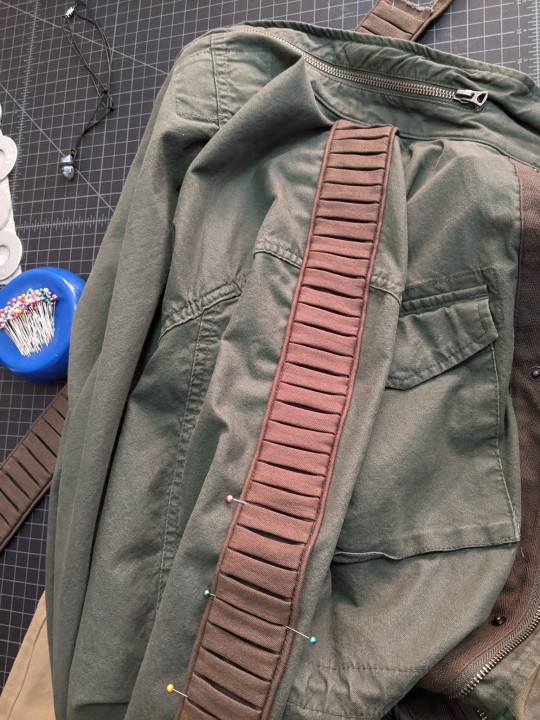
Top third or so of the pleated panel is sewn down!
I tried out a couple of different methods for handsewing this to the shoulder and sleeve, but after a few inches of each, the 'stitch in the ditch' method was the clear winner. It's basically invisible, and lets the piping stand up as it ought to. I'm doing a stitch about every 1/8th inch, and keeping most of the distance on the top so that the stitches inside the sleeve are as small as possible, and won't get caught on things. I'm getting faster with the technique, so I'm hoping to buzz through the rest of this sleeve and the other one over the next few days.
But I'm also going to be interspersing this sewing with starting on my vest scratch build. I was able to find the pattern I made for my vest for The Moment way back in 2014 (it was exactly where I thought it would be, hurrah for keeping old patterns), and I spent some time staring at the existing vest in the mirror and pin-marking the changes I would like to make.
There are enough small changes that I'm going to just draft a new version of the pattern using the old one as a guide. But there are only the four main body pieces that really need re-drafting, and once it's something I can try on then I'll figure out how I'm doing the new collar (so it doesn't look so much like a motorcycle jacket), and I might just drape the new collar on me while I'm wearing the in-progress vest.
Over the weekend I also went though my stash looking for fabrics that have enough yardage (or at least big pieces) to cut out the body of the vest, and after comparing all those to the pieces I know I'll definitely be wearing as part of my Batuu Bound -- gray hooded wrap, brown leather belt/bag/gloves, and black leather-look leggings -- with Jack's help I decided on some lovely dark navy linen that I've had in my stash for years, left over from a dress project. It's on the heavier side for linens, but not quite as stiff as the canvas the Moment vest is made from, but I think it'll work nicely.
I'm going to stick with the basic lines from the Moment vest, including the diagonal cross-body closure. After noodling on this for a week or more, what I've decided to do is a shorter zipper that ends around underbust level or just slightly higher, and then a flap over that with either no visible closures, or some cool looking Star Wars-y buckles or something. I have a few ideas for that, but I won't make any decisions until I can try the new vest on. The separating zipper and the thread for this project have been ordered and should arrive before I'm anywhere close to needing them. Pics on this whole vest project as it develops.
Beyond that, I need to add a tiny dot of glue to a pendant that I made (in the upper left of the photo -- it looks a bit like Jyn Erso's kyber crystal necklace, but smaller with more of a blue tone to it) to make sure the wrappings stay attached. I still want to figure out something to cover the lacings of my big Doc Martens, either wraps over the whole boot or a suede panel that snaps onto the lacings or something of that sort. I've started to gather other accessories, and there are a couple of things I want to order (in particular my Captain's License, once I can settle on a name and spelling for my OC, lol).
I have a long sleeve shirt to go under the vest that works with my color pallet, and an idea (and fabric) for another shirt I could sew, but the weather has been so all over the place lately (80 degrees and sunny! no wait, 60 degrees and rainy!) that I don't want to put too much effort into the shirt until I've got a better idea of the weather we'll have 4 weeks from now. Finishing Jack's jacket and making my vest are definitely the priorities.
4 weeks to go! Hokay, I've got a pile of linen scraps to go iron.
3 notes
·
View notes
Note
6, 7, 12, 13, 20 for bookbinding asks! (Literally would ask all of them but that feels like too much lol)
20 questions about bookbinding
6. What is a binding by another binder you really love?
celestial-sphere-press’s gorgeous cover for sanren. look at the cutout. look at the BRUSHWORK.
i love this binding of the hobbit that uses a clever cover cutout to incorporate bag end’s green door
also queercore-curriculum has done some absolutely gorgeous sewn spines
and finally, the absolute delight that is the crowd-produced my immortal. look at this thing. it should be in a museum. i love it.
7. What’s your favourite type of binding? (coptic, stab, fine, Bradel, etc.)
i’m in a committed relationship with sew-only bindings, so i’m a big fan of english longstitch, japanese stab bindings, and the secret belgian binding! examples below, left to right.
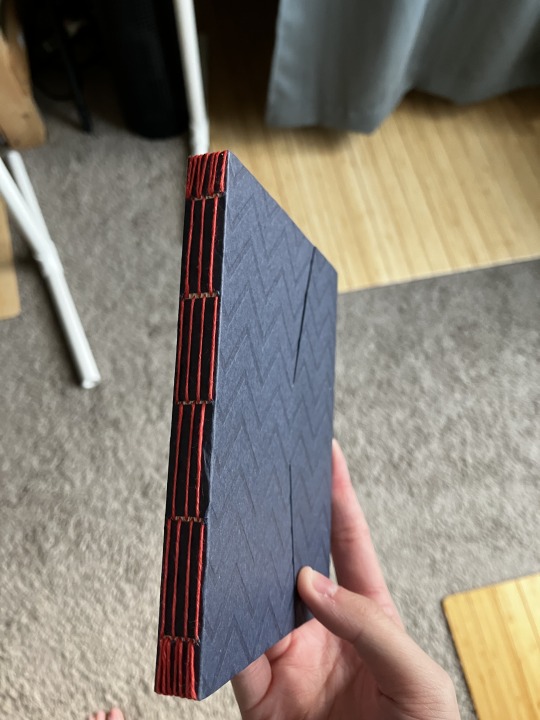
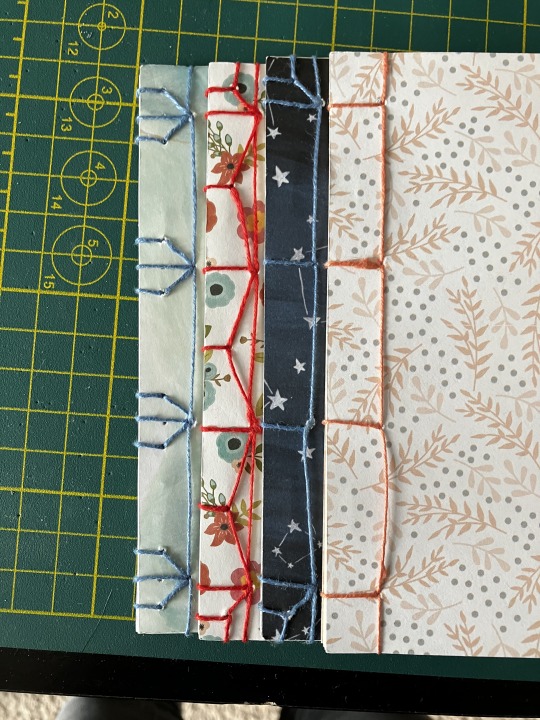
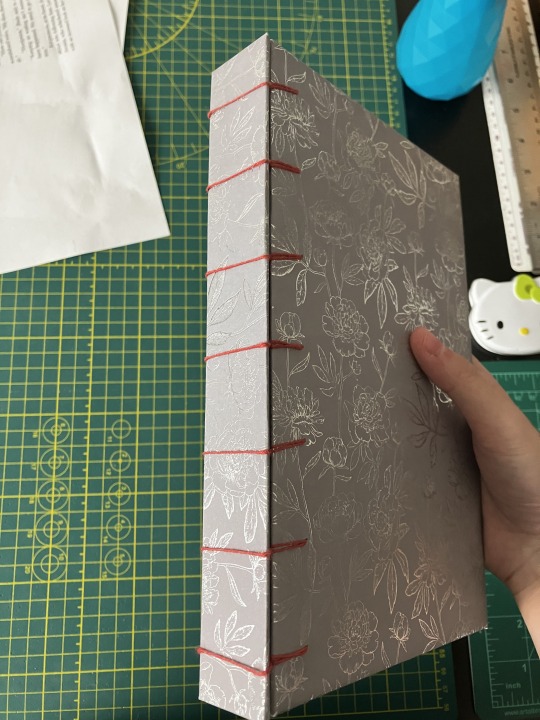
the first two are from the projects i did for a bookbinding class in college (so far the only class where i’ve put the knowledge to practical use); then when i got into full-size books i taught myself secret belgian binding because I couldn’t shake the feeling that it’s not a proper book unless it has a spine.
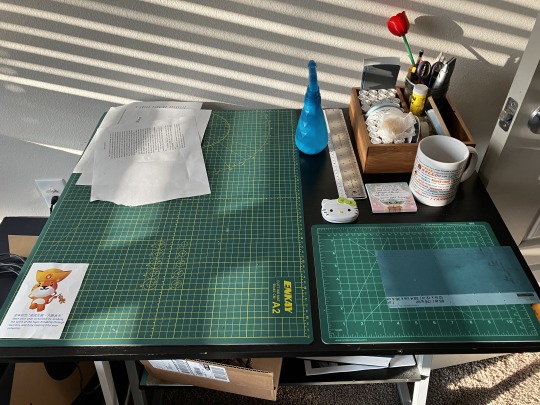
12. What is your workspace like? I have a desk! Though lately i’ve been putting everything on it in front of the tv so i can work and watch something at the same time. (I was binding a book when we did the void gang watch of And Then There Were None.) (the hello kitty tin contains sewing needles!)
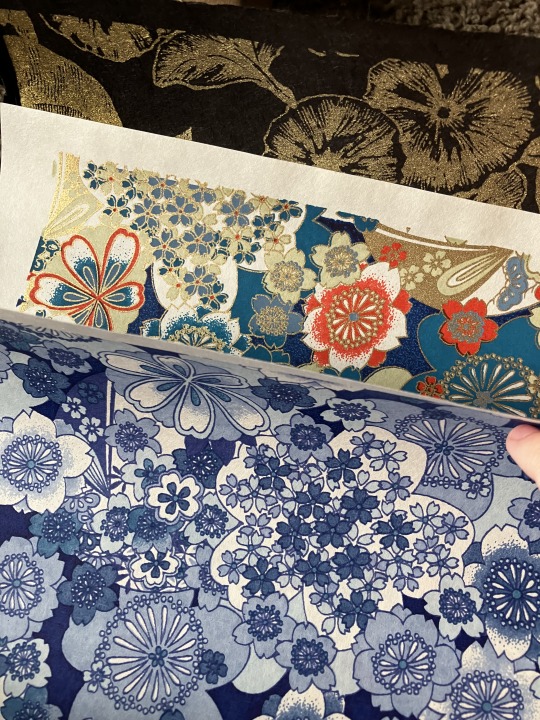
13. Do you have a favourite cover material? i’ve only recently let myself level up from michael’s normal patterned scrapbook paper to michael’s fancy gilded scrapbook paper and am otherwise just making grabby envious hands in the general direction of bookcloth. @thenightdayblogger also sent me some absolutely gorgeous, actually art-worthy paper for my birthday, so hopefully by the time i find a fic worthy of it i’ll have finally worked up the courage to use it.
20. If you had to give past!you one advice about bookbinding what would it be, and is it the same advice you give newbies? this is wrt typesetting but microsoft word’s margins on the booklet setting are awful horrible liesssssssssssss they don’t flip “inside” and “outside” to account for the first page of a booklet being outward-facing on the right-hand side, and therefore the outer margin and spine gutter are reversed for the entire book. and that is why the centerfolds will seem narrow and the margins bizarrely generous. definitely made noises of incoherent rage when i figured that one out, as i’d already bound (and sent off!) several volumes at that point and could have saved some pages. learn from the sins of my carefree youth.
3 notes
·
View notes
Text
Late 1890s Corset Part 4 - Flossing and Wrap Up
July 22, 2021
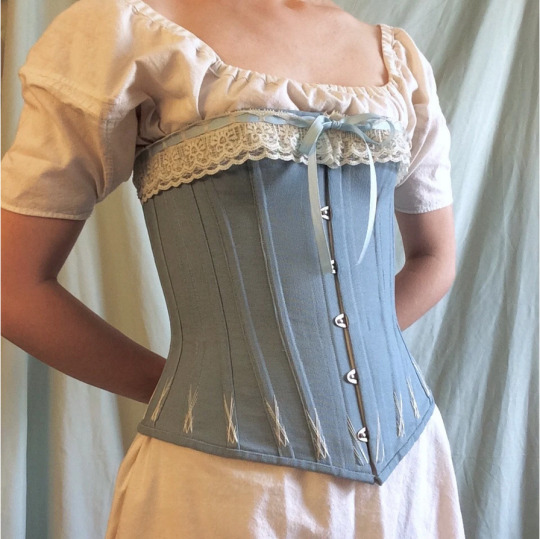
[Image ID: a neck-to-hips photo of Alex wearing a blue and ivory corset over a muslin shift.]
Part 1 - Research
Part 2 - Mockups
Part 3 - Construction
My 1890s corset is finally constructed and wearable, but it's not quite complete yet. It's time for some finishing touches!
Flossing
For the flossing, I used a silk buttonhole twist from B&T in a cream color that matches the lacing in the back and the lace I'll use to decorate the top edge of the corset later.
I started along the top edge of the boning with a simple crossed pattern, like these instructions from Sidney Eileen, but only doing two threads in each direction and... not going in the correct order. It turned out the same, so whatever I guess. My flossing here isn't perfect, but I wanted to get a feel for it in a place where I could cover my mistakes.
Should I have just done a test on some scrap fabric? Yes! Did I just jump in with no practice instead? Also yes!
While I do like the simplicity of the flossing design I used along the top, I wanted something a bit prettier for the bottom edge, since it'll be exposed.
I found this flossing design from 'Bridges on the Body,' a corset-sewing blog, and fell in love with it. (Seen on the far right in the photo at the end of the post.) I was afraid the design would be difficult, but it's really deceptively easy. I even followed the directions this time! It took a few attempts to get it perfect - figuring out the spacing and whathaveyou - but I had really nailed it by bone #5. (I have to say that it also looks really nice with fewer crisscrosses, too.)
I used a slightly altered version for the bones on either side of the lacing, and yet another variation on the busk. (The left two and second-to-right designs in the photo at the bottom.)
Lace
With the flossing done, I could attach some lace! In my stash I had a cream-colored, two-layered lace that had holes for ribbon along the top. I attached it using small, spaced-out stitches, with the more solid part of the lace (under the lacing holes) lined up right under the edge of the binding.
I found quarter-inch grosgrain ribbon in a similar shade of blue to the corset and threaded it through the lace. I secured the end to the binding at the lacing panels, and tacked the ribbon at a few more points to keep it upright. I left ribbon tails at the busk so I can tie a bow at the center front when I'm wearing the corset.
And then I was done! Completely, finally, 100% done.
Final Thoughts
I thought sewing a corset would be really difficult and take me all year to do, but it didn't. I started back in January and finished in June, and that includes long periods of inactivity. It's not perfect by a long shot, but I'm proud of my work and I've learned a lot.
This project was kind of expensive, though (at least by my standards). All told, I spent about $77 on this project. I could have saved a few dollars if I didn't buy way too much fabric (3 yards when I could have gotten 1.5 yards and still had extra) and an extra spool of thread, or if I opted for cotton embroidery floss instead of silk buttonhole thread. But I also could have spent a lot more if I had splurged on coutil instead of canvas. I'm doing a lot of stash-bushing this year, so I had room in my sewing budget.
So, what's next? While I do have some more late-Victorian projects planned (like combinations, a corset cover, padding/"enhancers", etc...), I'm headed back into the Regency for a while to do some stash busting and expand my wardrobe a bit. I also have a few small one-off, non-historical projects that need my attention too.
Stay warm. Stay safe. Stay healthy.

[Image ID: a detail photo of four flossed areas of the corset, done in ivory silk thread on dusty blue canvas. The two on the right are on either side of the lacing, the third one is the bottom of the busk, and the last one on the left is an example of the flossing at the bottom of most bones.]
2 notes
·
View notes
Text
a meme!
Thanks for tagging me @notasapleasure
1. Are you named after anyone?
Not after a real person. My mom said it was a name of a doll in some kind of fairy tale that she watched (or read?) and she just liked that name.
2. When was the last time you cried?
A week ago. Well, I guess I asked for it: after all those years I just should have known better than dwell on that kind of stuff from the past and in this part of my hormone cycle. (You know stuff like one of these few extremally rare moments in your life someone from your closest family said sth that made you feel like shit but thinking about it years after still never fails to make you feel like shit all over again?)
3. Do you have kids?
No. Surprisingly no. If asked ten years ago I would most surely say I'm going to. Not that I ever really desired it so much. More that not wanting was always considered as something that is worthy of condemnation. So it was just that "normal thing to do" with no deeper thinking involved nor required, you know?
4. Do you use sarcasm a lot?
It depends but sometimes it feels like the last thing that is left to defence my mental stability. And I'd rather be commenting an absurdish situation (especially in my job) than a person.
5. What sports do you play/have you played?
Table tennis my love!❤ Any other I ever tried playing is not even worth mentioning (I played field hockey two or three times and football once or twice and I remember really enjoying it. But unfortunately girls were let to play it extremally rarely, we were expected to play volleyball or basketball - none of which I ever liked😑)
6. What's the first thing you notice about other people?
I'm not sure what kind of situation I'm expected to consider... So in the place where I am just a random person in the crowd (railway station and such) I would probably first notice if anyone looked angry or impatient or irritated - to make sure I can avoid getting on their way (e.g. being a patient in a waiting room it's about sitting quietly with your head low and ignoring any possible evil comments about healthcare and politics). As for when I'm feeling safe or even going to meet someone new - I will pay attention to people's face expression and eyes, I also like to see someone smiling or doing or wearing something that make me think we have something in common. Also I notice their clothes sometimes if I liked the colour or the pattern (I can't help it, my brain is of visual artist😅 It doesn't mean I judge ppl by their look. Many times I find something ugly in objectively pretty person that I did not liked and in somebody I liked I'd always find some beautiful detail, regardless their look)
7. What's your eyes colour?
Yellow on the inside with blue ring on the outside. I like to think it makes them look a bit green from a distance.
8. Scary movies or happy endings?
If only two options avaliable I'd rather choose happy ending. Life is scary enough😅
9. Any special talents?
Drawing I guess. I am able to project a picture from my brain to a flat paper with a piece of charcoal and it's like freaking magic. It never stopped to amaze me.
10. Where were you born?
In a town in north Poland.
11. What are your hobbies?
Drawing most of all. Also creating short stories on my head I then illustrate or longer stories I sometimes write down. Given more free time I also like to engage into pyrography, sewing stuffed toys or crocheting. From time to time I like to travel, most usually to one of Polish towns but traveling abroad I like too.
12. Do you have any pets?
Cat for the last 4 years. Before that I was having syrian hamsters for almost 20 years (16 hamsters).
13. How tall are you?
165 centimeters.
14. Favorite subject in school?
Mathemathics above everything else! Also liked Polish, biology and chemistry. Most hated was always sports, while geography, history and physics were dangerously close to "hate" line.
15. Dream job?
Dream as "daydream"? I sometimes fantasize if I was born again I'd like to be one of the graphics making animated movie, like those of a Pixar studio. Or a pastor officiating weddings of gay couples
Dream as what I wish or plan: creating art on request or design prints for t-shirt, cushions and children blankets, maybe designing playing cards too - just enough for me to be satisfied that I can do it and my client to have a personalized gift. At the same time working other job 2-3 days a week to earn just enough for a comfortable life.
Tag fifteen mutuals - that's the worst part, how do I get so much?😑 Okey, everybody, feel invited but not pressed: @figuringthengsout , @chrisoels , @morulezopelforever , @sharp-lines-in-charcoal , @parttimereptile , @greenbloodedskink , @krejong , @theflyingrhubarb , @sunlightismydestroyer-blog , @asteeee , @bylercultism , @princesspink48484 , @elephant-reincarnation , @angleshades , @sweetlullabyebye
3 notes
·
View notes
Text
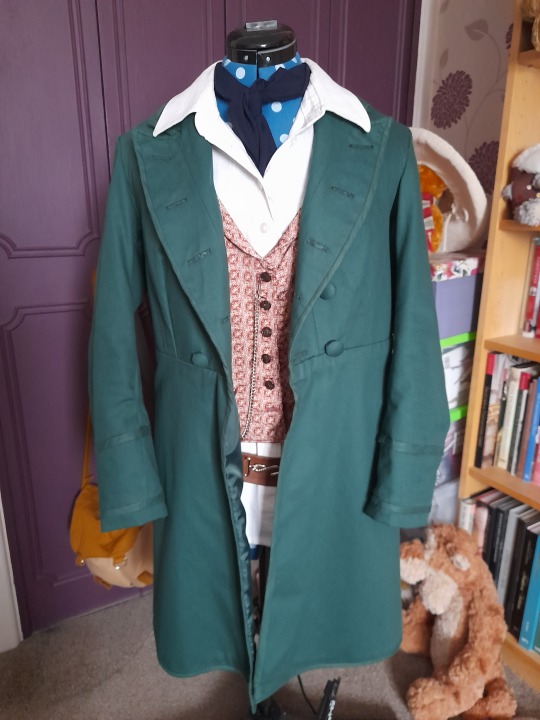
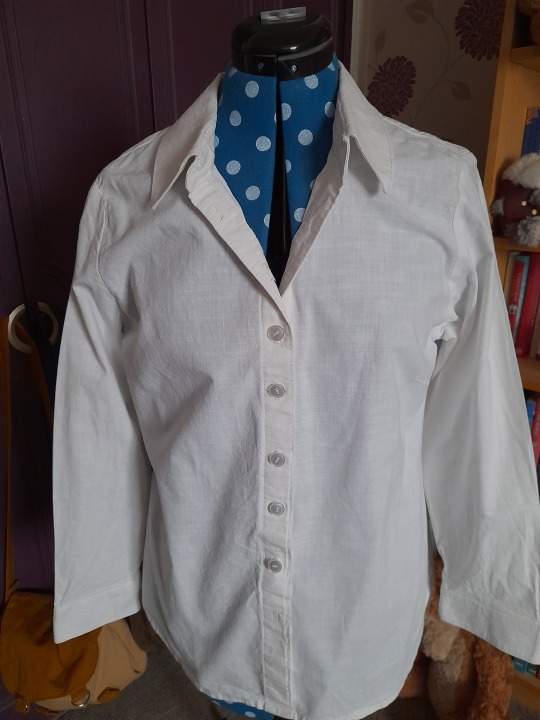
In need of a project a couple of months ago I decided to finish/improve my NotD cosplay.
For starters, I made a new shirt as the other one was very light fabric and the sleeves and body could have done with being a bit longer. Previously I’d used lawn but this time I chose a linen-look cotton in ivory:
Then, as this fabric is bulkier and the waistcoat I’d already made didn’t fasten comfortably over it I opted to make yet another one (number four!). It’s impossible to find a fabric similar to what was used on screen (not at my budget, at least), but I thought this dull satin I found on Etsy didn’t look bad and is faintly reminiscent of the silk Steven Ricks used for Paul’s remade costume last year (if you squint and use your imagination. A lot):
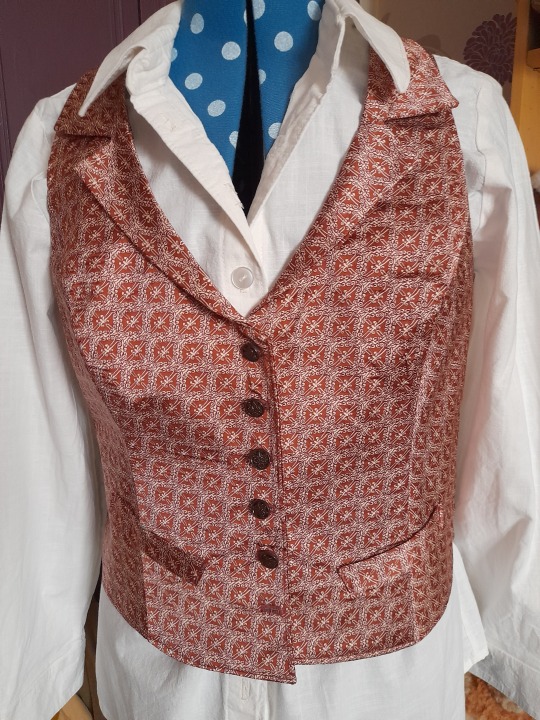
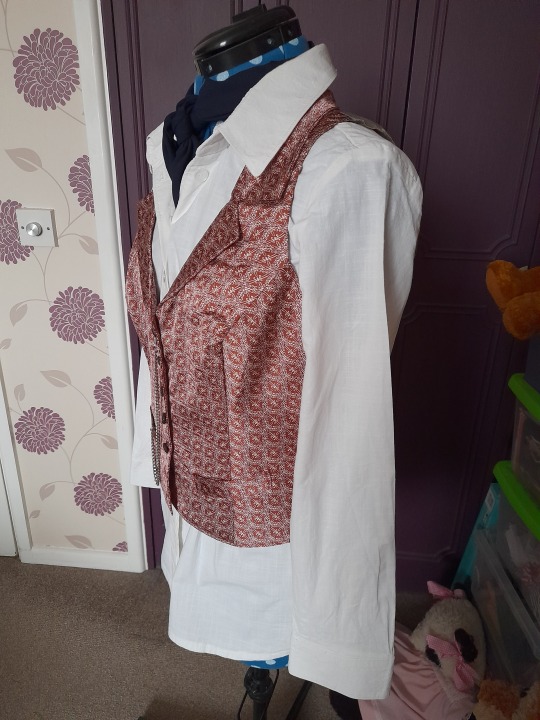
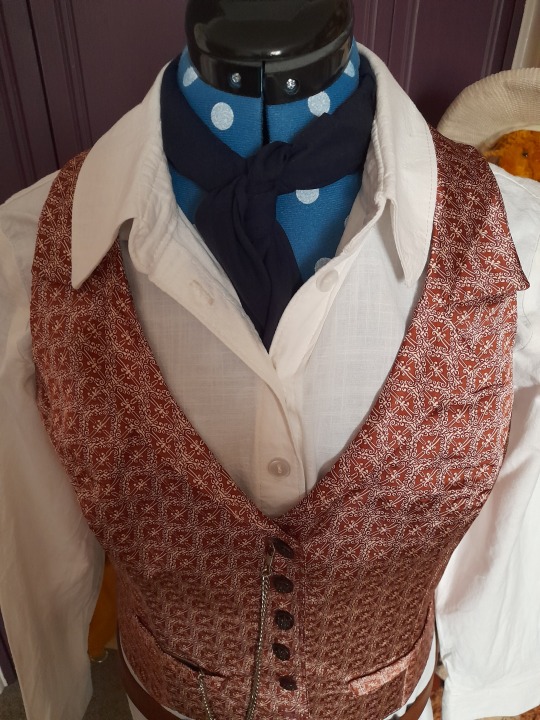
I paired it with some vintage glass buttons. Fortunately this satin didn’t disintegrate when sewn but I did have to interface all the pieces as it’s very thin, something that wasn’t totally successful as there are a couple of wrinkles here and there but I can live with it. I used lining fabric for the back again as it sews well and there’s minimal fraying. I’ve sewn my own scarf, too, from navy viscose challis; it’s just a square of fabric that I hemmed by hand.
When it comes to the coat I confess I would really like to remake it from scratch in a darker green but I can’t justify the expense at the moment. After wearing it out a couple of times before Christmas I decided that the sleeves actually were too short (I’m fairly sure I was a gibbon in a previous life) so I let them down, using the facing I’d added. That of course meant I ended up with an extra seam so there is now an additional strip of binding to cover it. Not accurate, but there wasn’t much else I could have done beyond making entirely new sleeves, While I was at it I let down the hem of the coat and bound it too, as I realised I should have made it a couple of inches longer.
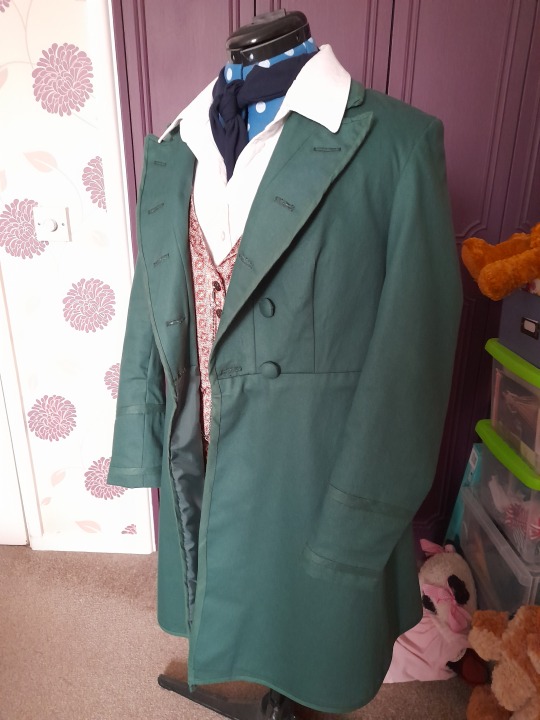
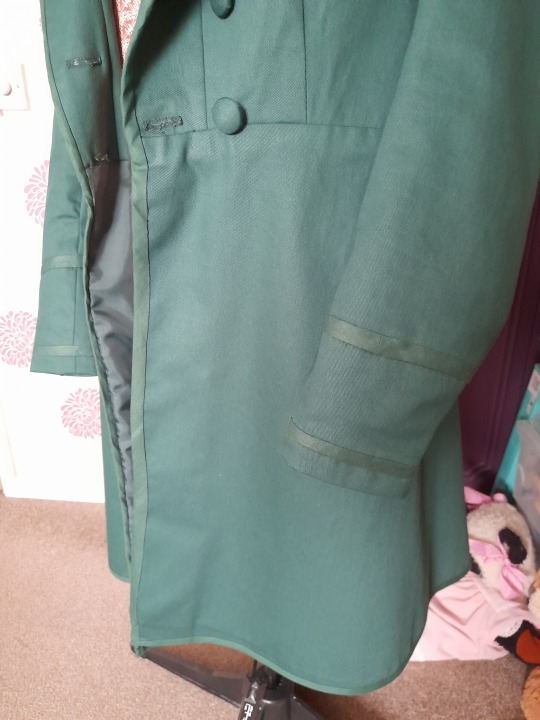
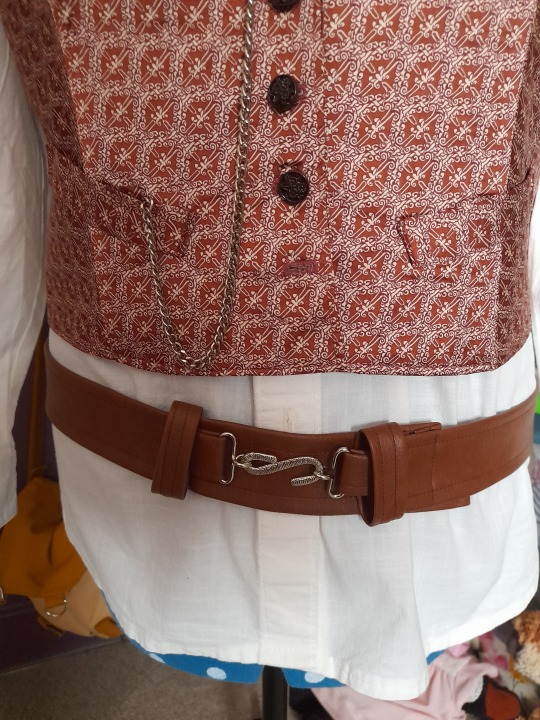
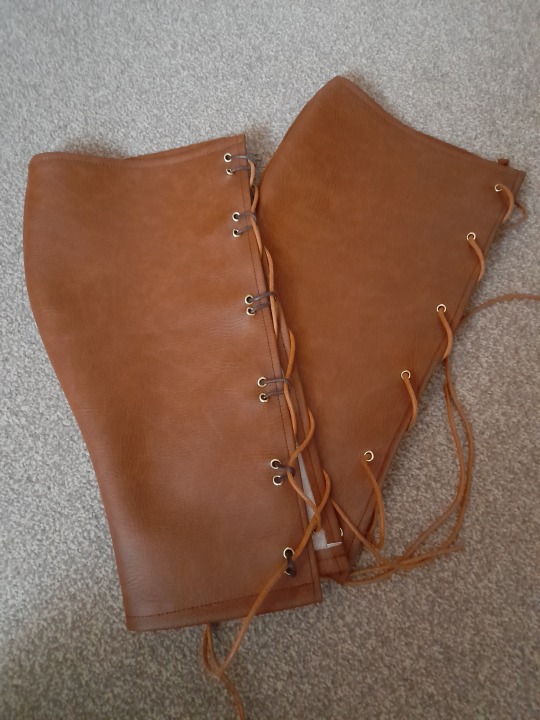
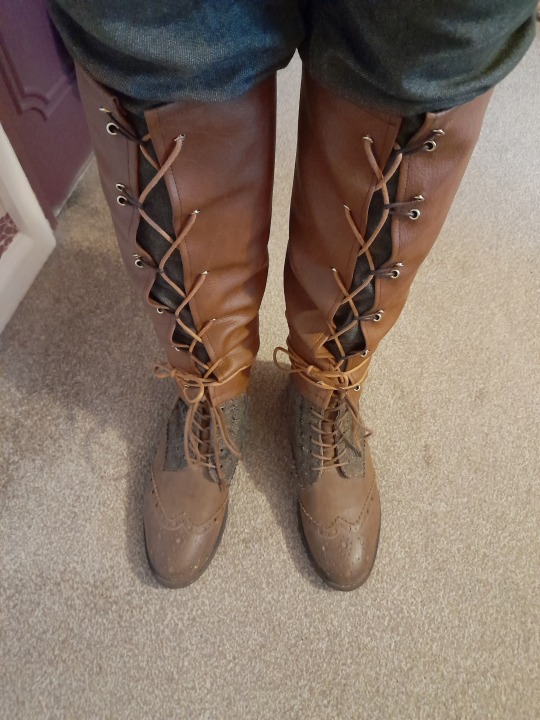
To finish things off I managed to source a snake buckle and put together a belt, and also ran up a pair of gaiters, both from heavy faux leather. The belt was simple enough; I looked at pictures of WW1 belts and worked out how the pieces would fit together on paper before I cut them out. I had to try two or three times to get a fairly decent fit with the gaiters, measuring round my calves at regular intervals and adjusting as required. They’re not perfect but I don’t think they turned out too badly. I cut the holes for the eyelets slightly too big, which resulted in having to apply copious amounts of fabric glue to (hopefully!) stop them popping out. The laces should really be darker but I chose tan to match the ones in the boots I put with them.

And this is how it all looks put together with a new pair of jeans:
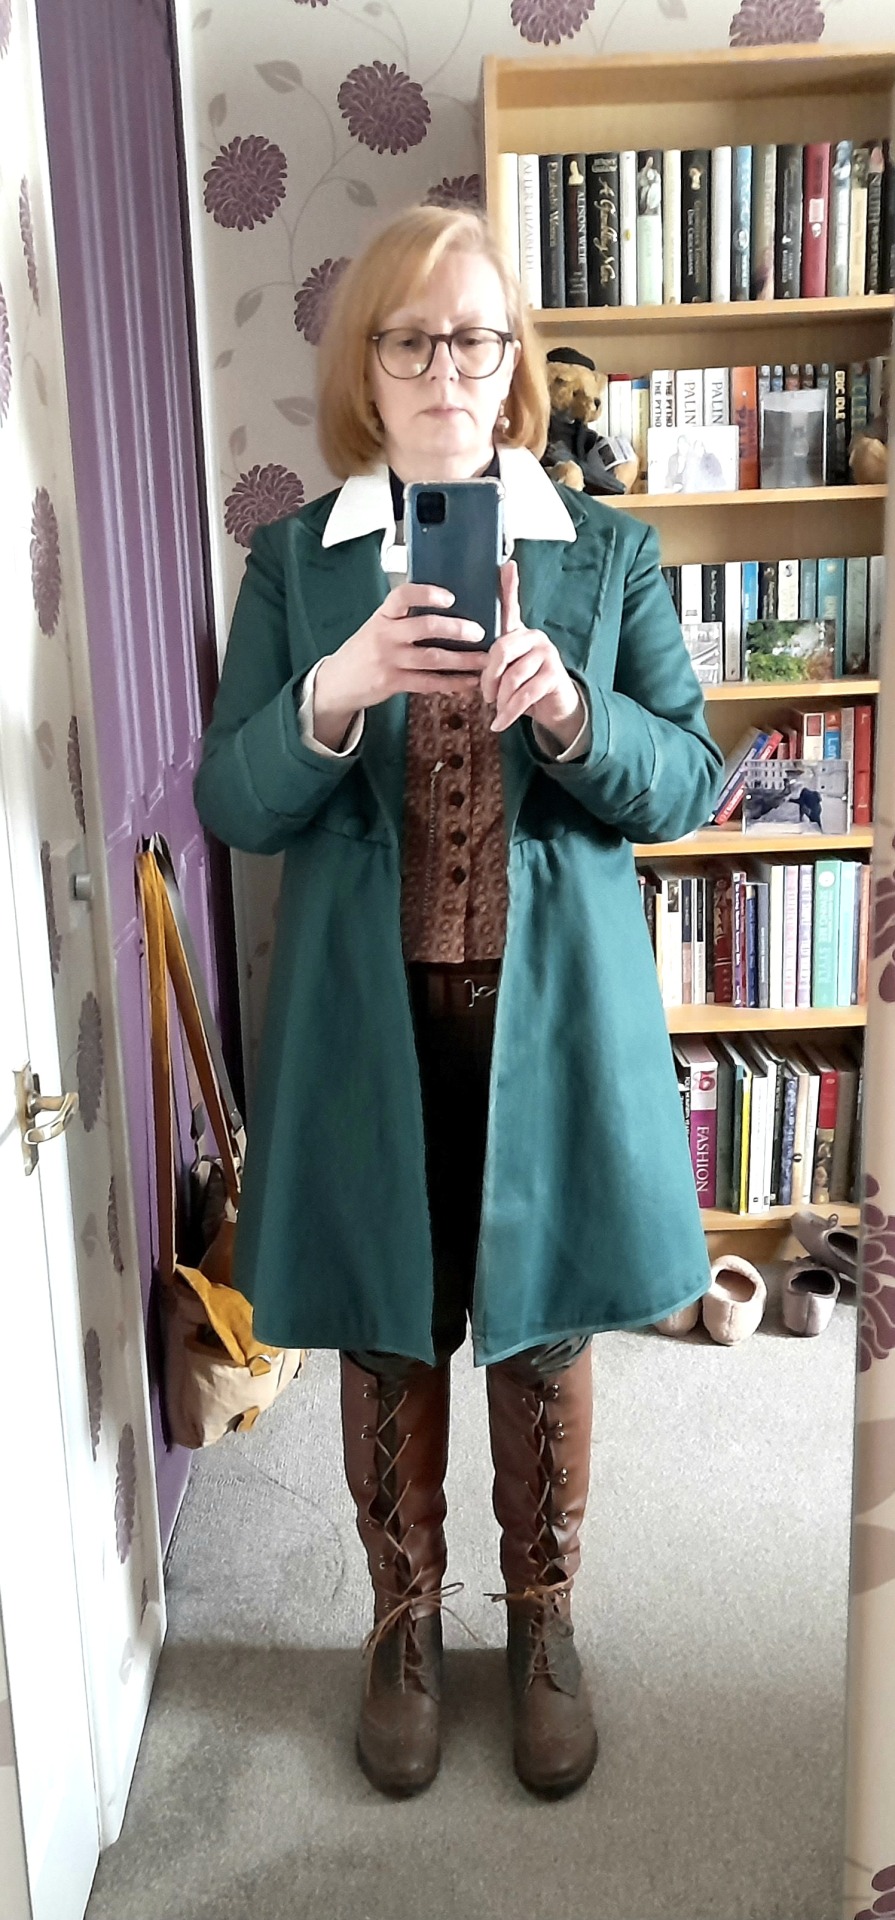
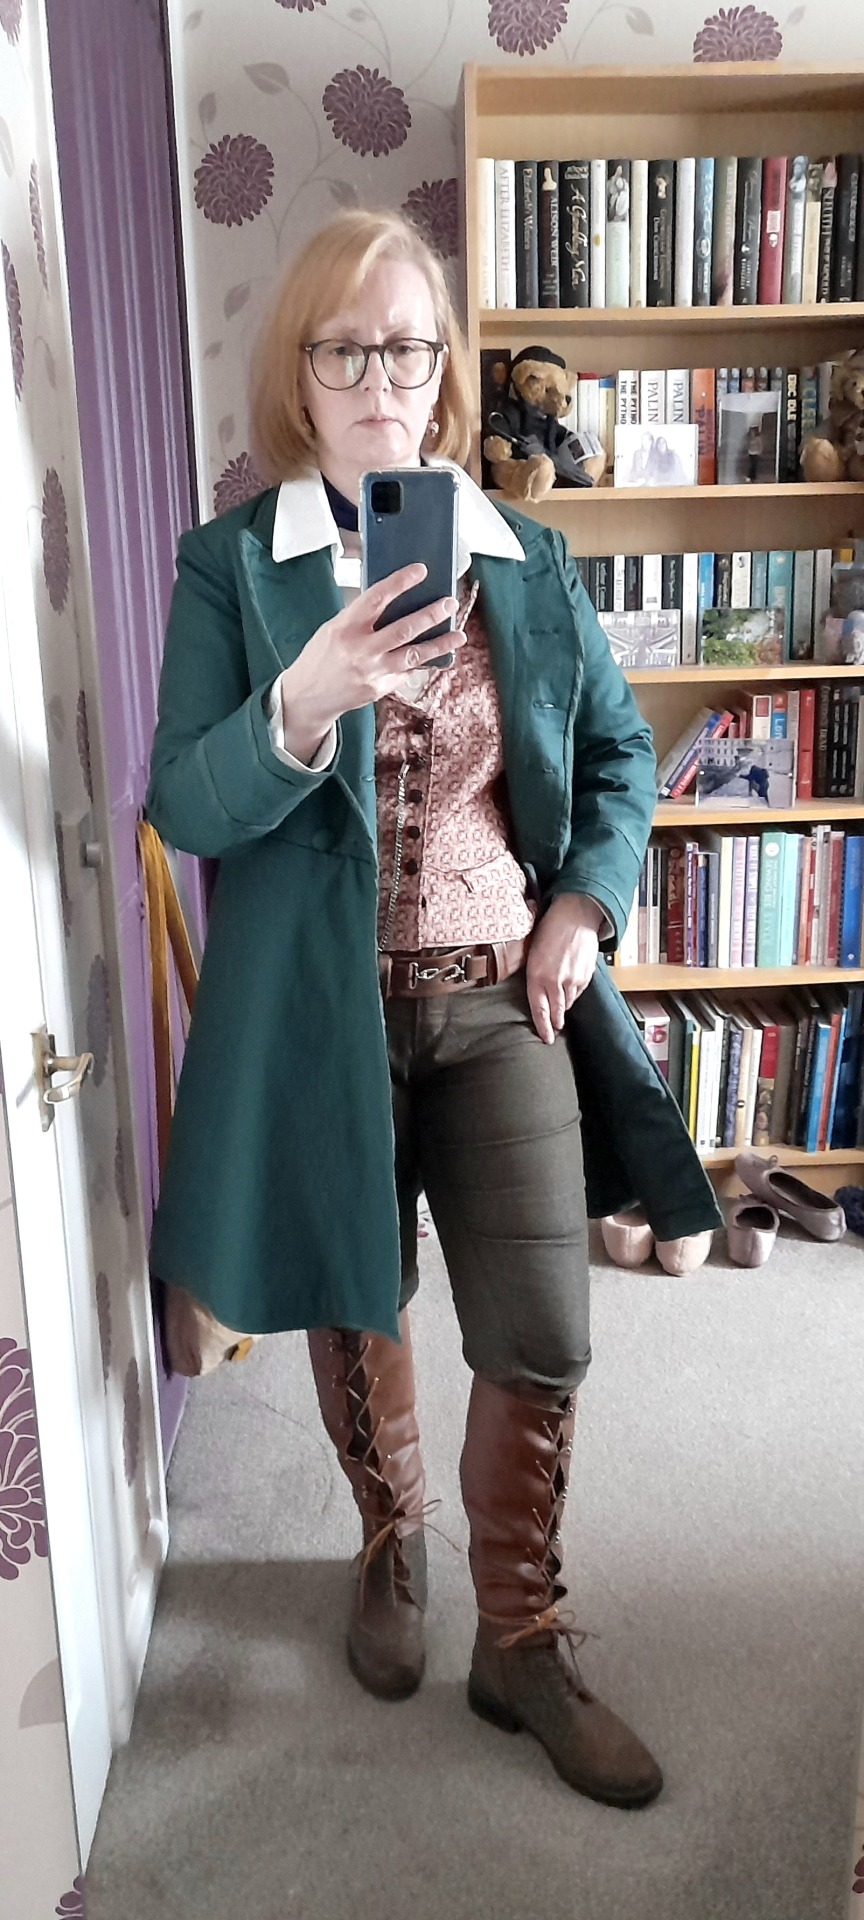
After putting it all on I came to the conclusion that it must take the Doctor an age to get dressed in the morning!
#now all i’m missing is a sonic screwdriver but that’s something i unfortunately can’t make myself and fifty quid is a bit steep to buy one#sfs’s adventures in sewing#doctor who#eighth doctor#cosplay#i’m unlikely to wear it out with all the accessories#but they were fun to make and finish the whole thing off
19 notes
·
View notes
Text
I'm adding this story to my myriad of sage advice for budding artists and artisans. I have like a decade and a half of formal fine art training, a little less than a decade of fiber arts training but informal, and between 3 and 5 years of various other arts and trades that I pick up as it catches my interest.
I'm not a good sculptor, though I think that's down to my using cheap air dry clay meant for children because I can't afford the artist grade, and I can definitely whittle well enough, I know how to remove material to get to my desired shape, so by all accounts I should be able to do masonry and sculpting, and I won't know if I'm actually any good until I can afford better materials.
Every time I sculpt something with my cheap children's airdry clay I get people asking me for a sculpture, and I have to tell them it's a craft that, for me, takes way too long to accurately price with the quality of materials I have. I'm not giving someone a sculpture made of paper pulp air dry clay meant for children and pricing it according to my skill and the hours worked, because they will not get value for money. I have no guarantee that the sculpture will last.
When I make clothes for myself I'm pretty lazy about it, I construct it well enough that it won't fall apart, and if I alter the pattern I don't pay attention and end up with wonky seams and strange panels. I can block patterns, I know how they work, and I love draping to bits, I just don't bother with those steps because I'm lazy as fuck.
Part of it is down to the fact that when I sew I either have to sew completely uninterrupted for at least 6 hours, or not at all, because I can't get distracted halfway through or I lose my mental calculations and geometry. So the few times I've made apparel for someone else, I did it when I had uninterrupted sewing time, and it turned out pretty much perfect. Three of the 7 times I did it in the last decade people ended up paying me more just because they loved the final product. I saw all the flaws and hours of mistakes that went into it and that I wasn't able to fix. My last client 3 years ago told me they've never seen a skirt that neatly constructed. I glowed about it for a good while.
Sketching has always been easy enough for me, I have been drawing since I could hold a crayon and understand shapes. My sketching output, 20 years into the practice, still wildly varies. I can do chuck close level hyperrealism, and I can fuck up a stylistic Mr potato head doodle. It's all down to my energy, focus, level of inspiration and hyperfixation, and desire to get an idea down accurately VS quickly.
It's for this reason that I learned very quickly on that a sketchbook is not meant to all be perfect masterpieces. Sketches are doodles to get ideas down and practice techniques, not art works. My sketch book is an amalgamation of the most disproportionate mermaids and beautifully shaded hyperpigmented hands, they're never consistent, and I feel no obligation for it to be high quality.
Painting is a different beast. I paint tiny detail by tiny detail, in Neverending layers. I don't see the finished product until months after completing it. It's a collection of specific shading and highlighting techniques and brush strokes and all the mistakes where I couldn't get the line just right or the color vibrant enough. When I paint I can't just stand back and look at my painting to see how it's going, I have to take a picture of it, send it to someone and have them respond before looking at the picture again before I can see the whole.
I frequently go back to old projects that I deemed complete at the time and redo parts of it better than before, because my art is constantly improving the more I do it, but a lot of the time I go back to an old project, fully seeing it in my mind's eye as terrible, because I can't believe I was able to do what I did when I did it, and I find that I'm much more skilled at the craft than I remember. I get flooded with the question "I did that? How?" and I have to immediately try it again to prove to myself that I'm actually skilled and it wasn't just a fluke or a possession by an ancient master of that art.
My high school art teacher always insisted that a work of art is never complete, and it contradicted everything I've been taught about not adding more to a piece after it feels complete because you'll ruin it, so I didn't believe it, and then I revisited my high school final exam piece 3 years after making it to touch it up, fix some proportion and shading issues, because I wanted to enter it into a competition. I never did because you had to have created the entire thing within that year and I'm too honest to pretend that I did.
I feverishly repainted the gold handle on the tea cup at 4am after getting back from a performance, and I woke up the next day at 2pm wondering how the fuck I managed to do that quality of work. I'm capable of it, it's not a question of skill, I just have this mental disconnect between what my skill level actually is and what I think it is, and it's much higher than what I've convinced myself of.
Your art may be better now than it was before, but you might be surprised at how good it was in the past if you revisit old pieces, and if you redo certain aspects of those pieces you'll find that you're probably better now than you thought you were. And sometimes you're lazy and don't follow the right processes, relying on a sense of experience that can be distorted, and you'll churn out something much worse than your actual skill level could make, and that's okay too. Whatever isn't perfect is inspiration for the perfect piece. Keep going, give yourself grace, try again and again and again and you will see improvement.
When I was 19 or 20, I sewed myself a wool dress for medieval re-enactments. I hated it almost as soon as I put it on. The bodice was cut wrong; the lacing was uneven; the colour was garish; the front closure was historically inaccurate; the embellishments were sewn on with terrible thread. Wearing it, I was constantly aware of its myriad flaws.
Then in my twenties I hit my adult metabolism and didn’t fit into any of my old clothes anymore. I gave my old dresses to my foster mother, who sells costumes for a living, and the green dress sold. It entered the local medieval re-enactment secondhand economy.
Every time I go to an event, someone different is wearing my green dress. It draws my eyes because it’s a lovely colour and the fabric—real wool and enough of it—moves beautifully with the wearer’s body. I never recognize it at first, because every wearer has worn it a different way; it can be mixed and matched, dressed up and down, moved around a good century of history. From ten feet away its lacing looks elegant, its embellishments beautiful gracenotes. I think: Oh my god, that dress looks beautiful. Wait a minute, that’s MY DRESS.
That dress teaches me, every time I see it, to stop looking at myself through such critical eyes. That dress doesn’t just look good, it looks better than most other dresses in its category, because I put in the time and the effort (including using pliers to force a needle through six layers of wool) to make sure it was done right.
It’s my reminder that sometimes the things I do are actually good, and if I indulge my natural tendency to criticize myself in everything, I’ll end up missing when I’m actually awesome.
52K notes
·
View notes
Text
By Starlight
I've never been exactly romantic, or rather, I haven't allowed myself to be. At the same time, I long for romance, for an overwhelming passionate affair, with such intensity that is almost painful. I feel like pulling my hair out, screaming at the top of my lungs until my chest hurts, crying until I'm hoarse and with no voice left. “By starlight I know you As lovely as a wish granted true My life has been empty My life has been untrue”
Original work |Part VI of the "A girl by the sea"|Also published in Portuguese and on AO3
It’s Saturday night, and I’m home. I’m always at home. I’m watching some romantic comedy for the thousandth time — I’ve seen this same movie so many times that I’ve memorized every line, I know every scene intimately, and I consider the characters so close to me, so familiar, as if they were real people, childhood friends who I’ve watched grow up and mature. The movie ends, and I feel an emptiness that’s hard to describe.
Lately, it’s become increasingly difficult to shake this feeling off, to pretend it doesn’t exist, to close my eyes to it as I’ve done so many times until it’s become a habit. Old habits die hard, after all: as I’m writing this text, I notice that the Google Docs page is automatically replacing certain typos; It's just that many years ago, when I was still a teenager, I wrote so much that I broke the "z" key on my old laptop — which I've replaced twice now, considering how much time has gone by since then — and I got used to writing incorrectly for a while, putting an "x" where there should be a "z", and manually saving each new spelling correction so that it would be automatically replaced the next time. Even today, when I type "fix", by accident, the word is transformed into "fiz" ( done ), and even when I write the correct spelling, a line of gray dots underlines it, indicating the word that would have been fixed, as a reminder.
Once things get better, after spending so much time at rock bottom, you start to consider each little joy a new miracle. Waking up early and going to a job that I don't hate. Having a decent salary deposited in my account at the end of the month. Being able to have something to do during the day, a routine. Buying little knick-knacks that distract me: fabric, makeup, books. Over the first few months, the dopamine rush of seeing my life get back on track was enough to numb me from my usual worries, to bury that worm that whispers in my ear when I’m alone. But like an addict, soon the dose is no longer enough. I bought fabric for a new sewing project, and it wasn’t enough. I read a fascinating new book this week, but it wasn’t enough to banish that ghost away from me. The shadow continues to hover over me. When I’m alone — which happens more often than I’d like to admit — I think about love, about romance.
I was listening, for the thousandth time, to “Mellon Collie and the Infinite Sadness,” now in preparation for the Smashing Pumpkins concert. Every time I listen to that album, I discover a new favorite track. I’ve been thinking about “By Starlight” and listening to it over and over recently.
“By starlight I'll kiss you And promise to be your one and only I'll make you feel happy And leave you to be lost in mine”
I've never been exactly romantic, or rather, I haven't allowed myself to be. I didn’t have time for it when I was younger, and my inexperience has left its mark on me. I’m clumsy, raw, sharp around the edges, and I hurt more than I comfort anyone I get close to. At the same time, I long for romance, for an overwhelming passionate affair, with such intensity that is almost painful. I feel like pulling my hair out, screaming at the top of my lungs until my chest hurts, crying until I'm hoarse and with no voice left. I just save it all for later, and let it go. I devour novels about misunderstood protagonists who find someone who can correctly perceive their intensity, and appreciate that. But in real life, there’s no Mr. Darcy or Mr. Knightley. There’s no Patrick Verona in the world out there. I’m getting old. I’m too old for high school romances and fantasies like that. Most people my age are on dating apps and websites, and I’m horrified by that prospect. I am terrified of being perceived incorrectly. The idea of a stranger touching me makes me feel sick, repulsed. People have always described me as “eccentric,” as a gentle euphemism, and manic pixie dream girls are only funny in fiction. In real life, no one found me funny or charming with my peculiar mannerisms and quirks; I just was and am weird. That girl who sits in the back of the classroom. The one who spends all of her time reading, headphones on like an appendage of her own body. The one who doesn’t go to parties or events. Lonely.
I listen to “By Starlight” over and over. I close my eyes and imagine that I’m dancing with someone, like I always do before going to sleep. A friend once suggested that I take a vow to Saint Anthony — or was it Saint Joseph? — to make it happen. But I’m skeptical as always. At the same time, in a comically contradictory way, I have daydreams before going to sleep of things I wish would happen. I dream of how I would like to be treated. Of how I would like that person to be, to act like. Not that I am not enough on my own, I am, in fact, I am too much, I overflow, I pour myself into everything, and I would like to have someone with me to soak in that excess from time to time, someone who could let themselves be filled by me and vice versa. Even so, I dream. I make wishes on shooting stars, imagining that one day I might be granted my wish.
“By starlight I know you As lovely as a wish granted true My life has been empty My life has been untrue”
I should have left “13 Going on 30” alone and watched “Scream” like I had originally planned, because then I wouldn’t be writing this. Too late to cry over spilled milk.
#fanfiction#fanfic#writing#ao3#original work#original writing#poetry#musings#biblical references#smashing pumpkins#by starlight#romance#love#reflection
0 notes