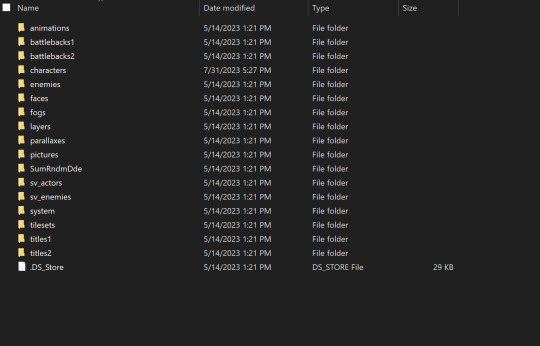
#but i found a png in another folder
Explore tagged Tumblr posts
Visit Tumblr Blog
Explore Tumblr blogs with no restrictions, modern design and the best experience.
Last Seen Tumblr Blogs


Fun Fact
Tumblr Inc. is using 66 technologies for its website.
Text

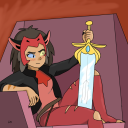
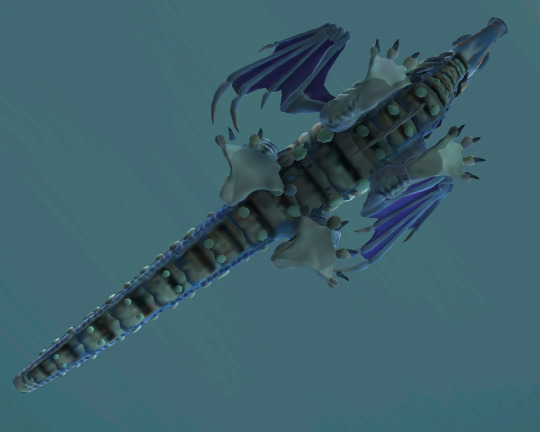
this is a couple years old now and i still love it and its the most effort ive ever put into something but i never posted it because i was worried it would reverse search to the contest i made it for, but seems to check out so nobody try to hard
#hey#i never posted my the poster design i made for English class a couple years ago!#so i was thinking...#and i was looking through my files and apparently i never#which freaked me out a bit#so i was digging around in my google drive for a while and i couldn't find the no-text version which really freaked me out because...#the the desktop i made it on has been having tech issues and im pretty sure everything is gone maybe#but i found a png in another folder#no original but good quality so crisis averted#my art#digital art#original character#oc art#art#artists on tumblr#sci fi art#sci
2 notes
·
View notes
Text

^ iterator projection tutorial!! ^
this post follows on from this one made by @prismsoup, intended to cover my slightly more extended process (including post-processing)
step -1 : pre-requisites
this tutorial is designed around clip studio paint for PC because its what i work with. its probable that whatever other program / platform you're using has these features but under different names
i use a rainworld typography font for text. find it here (or do it yourself)
i use scanline textures as a part of this. find them here
step 0 : select a base image

maps, blueprints and diagrams are favourable due to lots of detail without it derailing into noise. get experimental though, my favourite one came out from a picture of a nebula, and another from a friends factorio screenshot
step 1 : binarise & flip
this command can be found under edit > tonal correction (D) > binarization. this forces every pixel in the image to be either black or white. adjust its sensitivity to your liking
step 2 : remove background

add in a black layer below (not just paper layer, as will become important later). wand select the background colour and delete it. if the remaining colour is black, CTRL+I to invert it to white
step 3 : add details

replace any text with rainworld font or simply remove it. add in blueprints or other complex decals (drawingdatabase is a decent source). during importing remember to binarise (after resizing). for "lower layer" elements such as contour lines create outlines for higher layers to retain clarity
step 4 : add multiply layer(s)
if you want to have multiple colours, put everything in the "higher" layer into a folder and set the top multiply to clipping above it
step 6 : post processing setup

copy all existing layers, create a new folder on top, and paste into that folder. right click the folder and "merge selected layers" set the resultant layer to add(glow). copy+paste and hide duplicate for now. from filters > blur apply a guassian blur with a strength of 130-170 (this creates the base bloom layer). set opacity to ~50%
step 7 : chromatic abberation
unhide not-blurred layer. guassian blur with a strength of 2. duplicate again. select top layer and move 1px up and 1px left (with arrow keys). CTRL+U then change the hue by 30. select bottom layer and move 1px down and 1px right, CTRL+U then change hue by -30.
stronger chromatic abberation can come from stronger gaussian blur and more change in hue
step 8 : scanlines
add the scan lines on top, invert so that they're white and set to add(glow). copy a multiply layer over it and make sure clipping is on. decrease layer opacity to ~10%. if it does not cover the whole image initially, paste more in and merge them together into one layer
tada! you now have one iterator projection. if you want to give it an extra affect, re-import the final PNG and filter > distort > convert to panorama. set distortion to 10 and scale to 101 (note that this drastically blurs the image)
259 notes
·
View notes
Text
Tsunami in Spore | DOWNLOADABLE
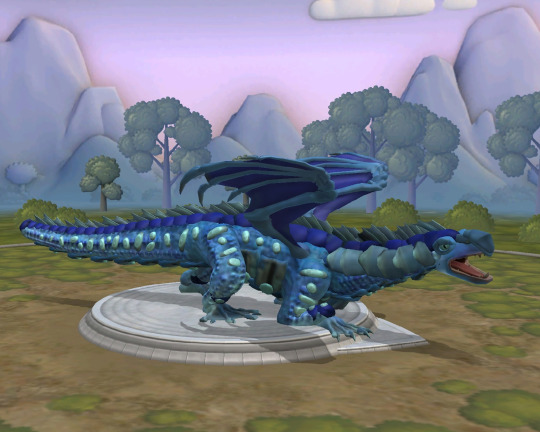
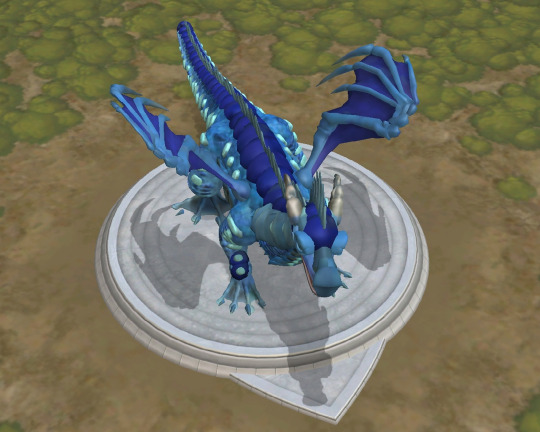
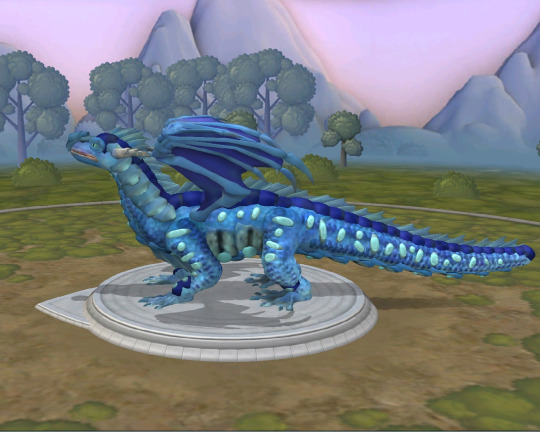
And so, I decided to make another tribe in Spore - Seawing! This time I painted the dragon like Tsunami. You can also add her to your game, see the instructions below. Which tribe will be next?
You can also visit the post below, where I made a Rainwing, which you can also install.
Tribe version
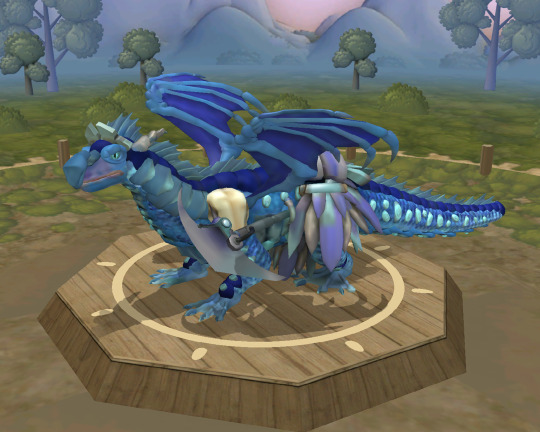
How to add a creature to your game:
Install the "Dark Injection" modification (version 9.r public Beta 2.3.2) (+ Spore should contain "Galactic Adventures", "Creepy and Cute")
Download a PNG below and place it in the folder "My Creations" > "Creatures" (usually found in Documents) If after placing in folder the creature does not appear, then open Spore in window mode, open the creature editor, and just drag the PNG there.
#wings of fire#wings of fire art#dragon#wof#wof art#dragon art#spore#spore creature#tsunami wof#tsunami wings of fire#seawing
164 notes
·
View notes
Text
Making Gifs Part 2: Photopea
This is part 2 of my own personal gifmaking guide. Please read Part 1 to learn about how I capture the sequential screencaps to make my gifs.
Once you have your screencaps, open Photopea. They have a very simple guide on how to make animations in their help guide. I will be going into much more detail.
Note: ***Tumblr has a limit of 10mb for the filesize of each gif, and recommends no wider than 540 pixels. If your gif is wider than 540 pixels Tumblr will resize it, and it will cause the quality to be reduced, and also take much longer for the gif to load in your post.***
1. RENAME CAPS:
First things first. Rename all of your caps that you will be using for a gif to have the prefix _a_ on your computer. Select all and right-click on the FIRST file and select Rename (windows) and type _a_. Windows will add the numbers.
For most gifs, try not to have more than 60 frames as it will make the gif too large to upload to Tumblr. I usually aim for 45-50 frames max for most of my gifs.
2. IMPORT FRAME #1:
Drag and Drop _a_ (1).png into Photopea. Rename the layer from Background to _a_ (1)
3. IMPORT IMAGES:
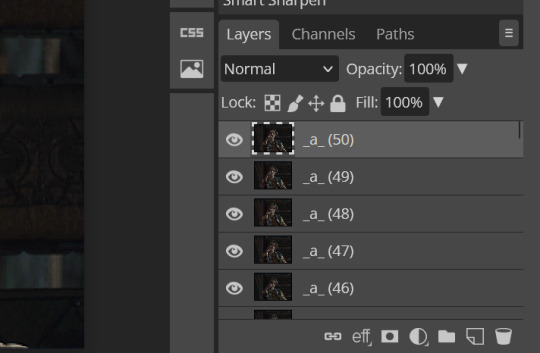
Select all the rest of your images from the folder on your computer, and drag and drop ON TOP OF the image (not the layers section). Make sure the file you grab to drag/drop is the next one in the sequence (so _a_ (2).png in this case. Otherwise they will be out of order. If you do it right, you will see the layers section on the right get populated with your caps in reverse order, with 1 at the bottom and the last one at the top.
4. RASTERIZE:
Next, select all of the layers (on the right, by holding CTRL and clicking on each layer), go to Layer > Rasterize. They are currently Smart Layers, and if you keep them this way the sharpening will not apply (for some reason, I have no idea why that is)
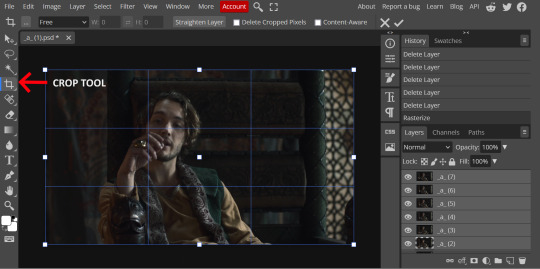
5. CROP:
Next, crop your gif. This tool is on the left menu. You do not have to have all the layers selected for this, it will crop all layers together. Move the blue lines at the edges until the frame is cropped how you like. Be mindful of the character moving in other frames; you may want to check your other layers to make sure nothing important gets cropped off in another frame. Once the blue lines are where you want them, click the checkmark at the top right to finish the crop.
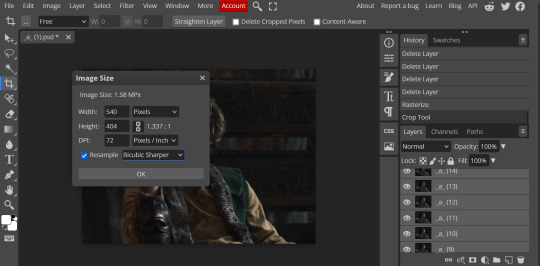
6. RESIZE:
Resize your gif so that it is 540 pixels wide. Go to Image > Image Size in the top menu. Make sure you choose "Bicubic Sharper" as the resample mode. Once this is done, you will see your image is tiny, so go to the Zoom tool (on the left menu, the magnifying glass near the bottom) and select Fit the Area at the top of the screen so you can see what you are doing.
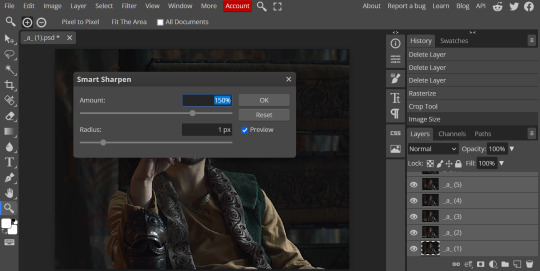
7. SHARPEN:
Next is sharpen. Select all your layers again (on the right), then go to the top menu: Filter > Sharpen > Smart Sharpen. The default settings here are for 150%, and that is good for most things.
8. ADJUSTMENTS
This is the tricky part. You now need to adjust the brightness, contrast, exposure, color balance, and saturation. This will vary from gif to gif how much to adjust these values. I will show how I adjusted this one and you can apply that to whatever gif you are making.
For starters, since this show is SO DARK, you will need to brighten it. There are many ways to do this, but I found the method that works best for me is adjusting the Levels.
First off, in order to make adjustments, make sure you scroll all the way to the top of your Layers panel and make sure only the TOP LAYER is selected. Otherwise the adjustments will only be applied to whatever is BELOW the selected layer. You want all of them.
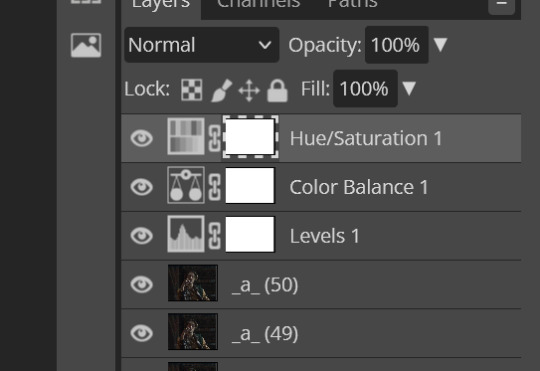
8a. ADJUST LEVELS
Next, go to Layer > New Adjustment Layer to pull up all your adjustments. For this first example we will use Levels, which is the second from the top.

You will see a histogram like this one:
This is a lot of information about the image, but pay attention to where the curve starts and stops. On the left, you see a "0". That is your dark point. This image is slightly washed out so I need to move that adjustment to the right so that the little square is just below where the curve starts. The third number is "255" and this is your bright point. The images are very dark so most of the graph is shifted to the left (dark) so in order to brighten, move the third square (the white one) so that the second square (grey one) is just at the edge of where the curve drops off on the right.
You can now see the numbers changed. Moving the first dark square will enhance your contrast, and moving the THIRD square will enhance your brightness. It is usually not necessary to move the second square, but you can experiment with this by moving things around and seeing how it affects your image. After this, it may be necessary to also increase the Exposure and Brightness if it is still not bright enough, but most of that can be done here.
8b. ADJUST COLOR BALANCE
Again go to your Layer > New Adjustment Layer > Color Balance to get this tool. This is a neat one with A LOT of variables, so play around with it to get the colors to look how you want. A lot of the raw video tends to have a bluish or greenish cast to it, so you just move the sliders to get rid of the cast and make the colors look how they are SUPPOSED to.
In this case there is a very slight greenish cast to the pictures so I will adjust that slider to compensate. The Range (at the top) you can select Shadows, Midtones, or Highlights, depending on where the color cast is located. Usually I stick to Shadows but sometimes will use Midtones if the color cast is really bad. Make sure Preserve Luminosity is checked.
8c: ADJUST SATURATION
Layer > New Adjustment Layer > Hue/Saturation. This will brighten up your colors. This tool is VERY COOL in that you can select color families to selectively increase or decrease the saturation of. Under Range you can choose Master, which is all colors, or choose only Red, Yellow, Green, Cyan, Blue or Magenta. The slider at the very bottom (when a single color is selected) allows you to set the range of colors to. I chose Master and increased the saturation of all colors, but be careful as this can make skintones look VERY orange. So select other colors in the Range to adjust single colors only.
With this tool you can also change the HUE (which is changing the overall colors to a different color, like shifting all the reds to orange) and Lightness (which may or may not be necessary if you did the Levels correctly)
If you need to go back and change something in your adjustment layers, you can do so by clicking on the white box in the Layers section next to whatever you need to adjust.
There are many other Adjustment Layers you can play with, so have fun and experiment!
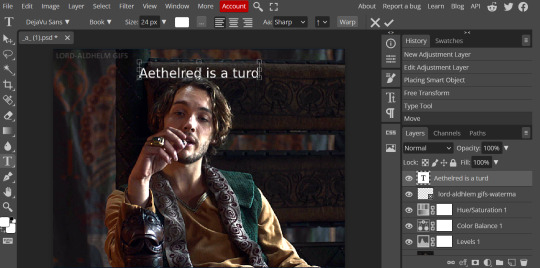
9. ADD YOUR WATERMARK AND TEXT
Next, you can add a watermark if you have a premade file, by dragging and dropping it on the image. Then move it around to where you want it, resize it if needed, and change the opacity if it is too bright. Make sure this layer is the TOP layer.
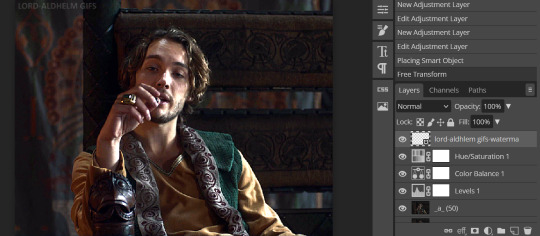
To add text (for subtitles or effects) simply click on the Text icon in the left menu (the T) and click anywhere on the image and start typing. You can change the font, color, size, and style in the menu on the top. Move the text around by using the Select tool (arrow on the left) Again make sure this is the TOP LAYER so that it will be present over the entire gif.
10: EXPORT YOUR GIF
File > Export as > GIF
A pop up dialog will appear and you can change some settings here if you want. I usually don't. Pay close attention to the filesize (at the bottom) and make sure it is under 10mb. Keep the quality at 100%. And most importantly MAKE SURE DITHER is checked! This will prevent compression artifacts from ruining your gif.
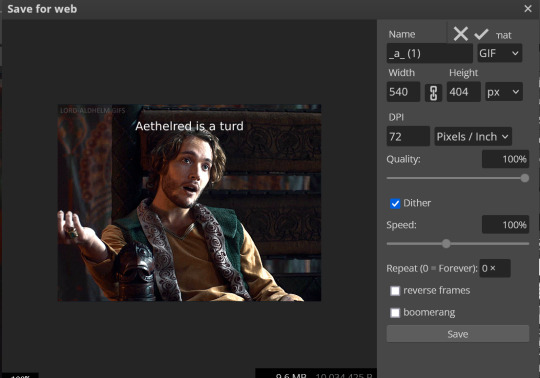
Save the file to your computer and VIOLA! Gif!
Have fun!
#gifmaking#gifs#gif makers#gif making resource#gifmakers#gif making#gif#gifmaking resources#gif making resources#my guides#giffing tutorial#gif making tutorial#photopea#photopea tutorial#photopea resources#photopeablr#photopea gifs#long post
45 notes
·
View notes
Text
Coding A Simple Firefox Extension
Hiya! Today I want to share my experience creating a simple Firefox extension. I was a bit intimidated by the idea of creating an extension, but I was determined to give it a try! Been on my 'projects to-do' list for a long time! 😅
I found that the process was actually quite straightforward, and with some guidance from a couple of YouTube videos, I was able to create a working (temporary) extension in just an hour. My hope is that this post will serve as a helpful guide for anyone who is interested in creating their own Firefox extension~!

What exactly are we making?
We will be making a simple temporary extension - an extension that only you have access to e.g. end-users will not be able to use the extension. This is a way to test if your extension works and find issues. I might make another post on how to actually upload it for other people to use, but for now, this method is for you to use the extension.
This is the link to the official Mozilla Firefox 'Temporary installation' Guide' for extenisions - LINK
Now, for the steps into making the extension:
Setting up the development environment
Creating a manifest file
Adding a pop-up window
Attaching JavaScript functionality to a button
Load your extension in Firefox
Let's get started~!
Step 1 - Setting up the development environment
Obviously, you will need to have Firefox installed on your computer. You will also need a code editor, such as Visual Studio Code or Sublime Text, to write your code. I'm going to use VS Code.
In your code editor, create a new folder where you will store your extension files. You can name this folder whatever you like. For this example, I will call it 'Firefox Extension'. I also recommend adding the following files in the folder:
index.html (or in this case popup.html file)
icon image in .png or .jpg or similar formats
manifest.json - talked about in the next step
script.js
Step 2 - Creating a manifest file
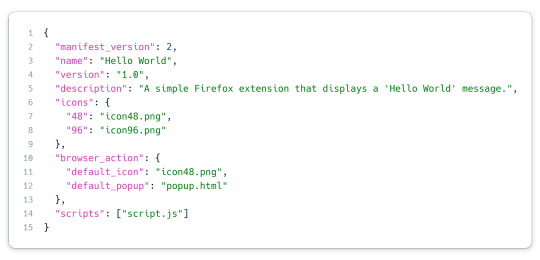
The most important file I believe when creating an extension is the manifest JSON file. This file will contain metadata about your extension, including its name, version, and permissions. In your new folder, create a new file called "manifest.json".
This is the general structure of the file. The icon size you need to have is 48x48 pixel size image and then you can have others to be responsive to screensizes, I just added one extra. The 'browser_action' part includes the default icon image that will display an icon in the Firefox toolbar and the popup html file. In 'scripts', that is where we will add the JavaScript code to run.
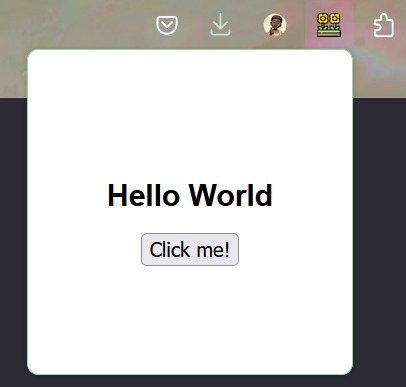
Step 3 - Adding a pop-up window
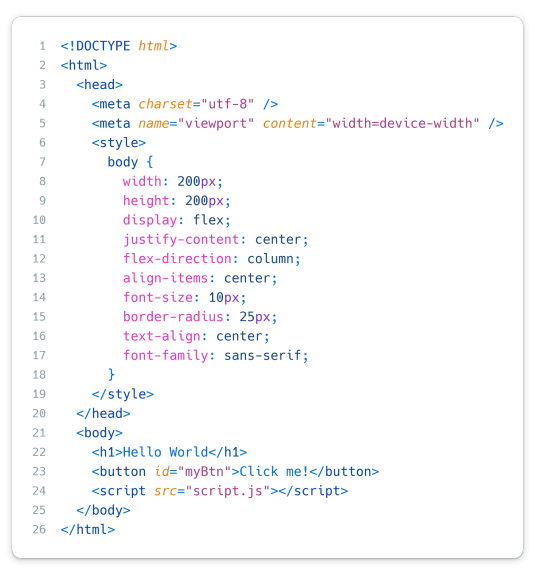
The code simply displays the text "Hello World" and a button in the center of the window. I assume you're good at your HTML and CSS so I won't go into too much detail here but the CSS is in the style tags within the head tags and what we can see also is what is between the body tags - the 'Hello World' and the 'Click me!' button.
Don't forget to include the script tag at the end of the body tag so it'll link to the script.js file in your folder AND include "scripts": ["script.js"] in the manifest.json for the javascript code.
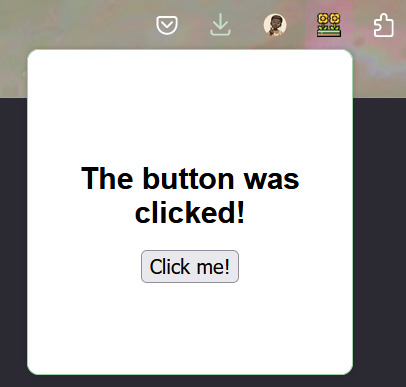
Step 4 - Attaching JavaScript functionality to a button

Again, I hope you very basic JavaScript. This code basically adds an event listener to the button with the ID "myBtn" (which is the button with 'Click me!' on it). When the button is clicked, it changes the heading 1 text from 'Hello World' to 'The button was clicked!'.
And that it! Done with all the coding part and now to upload it for you to use~!
Step 5 - Load your extension in Firefox
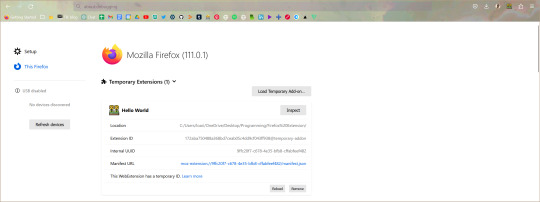
Open Firefox and type "about:debugging" in the address bar. This will open the Firefox Developer Tools page. Click the "This Firefox" section to the left of the page, then click "Load Temporary Add-on". Navigate to your extension folder and select the manifest.json file.
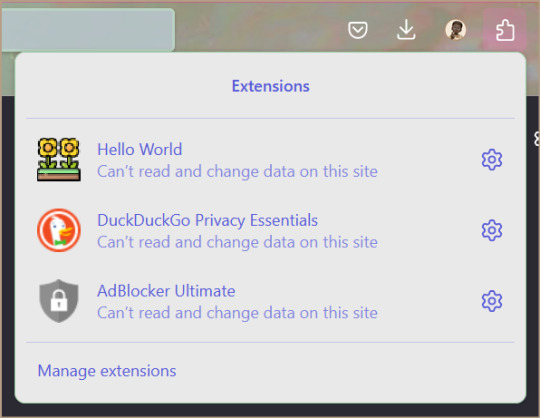
The extension is now loaded in Firefox! Click the icon in the toolbar to see your pop-up window!
Whenever you make changes to the extension, back on the Firefox Developer Tools page, click the 'Reload' button on your extension section and changes should show up!
I hope that this post has been helpful to you and that it has inspired you to create your own Firefox extension! 👩🏾💻💗 Remember, the most important thing is to have fun and experiment with different ideas - play with the colours or sizes or the javascript code! Don't be afraid to try new things and explore!!
Extra links that helped me learn:
How to build an extension for Firefox in less than 5 minutes [video]
Temporary installation in Firefox [webpage]
Thanks for reading 🥰💗
#xc: programming blog post#programming project#coding#programming#studying#studyblr#codeblr#progblr#firefox#extensions#computer science#project#tech#developer#web dev#add ons#comp sci#html5 tutorial#tutorial#learn how to code#my resources
168 notes
·
View notes
Text
hi ^_^ so someone recently left some tags on a post i made about modding funger sprites wondering how i did it and i want to explain how because it is actually incredibly incredibly easy and literally anyone could do it. to start im gonna say im going to explain like every process in detail just so its very clear EXACTLY what youre supposed to do for people that arent computer savvy so it might look daunting but in reality i cant express enough how simple it really is. anyway. its pretty long but INCREDIBLY SIMPLE AND EASY TO DO (and understand i hope)
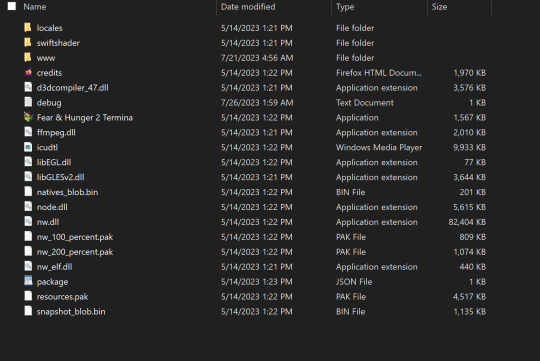
to start youre going to want to find the local files for termina, which if you bought the game off itch.io they should be immediately available to you, however if you bought it off steam youre going to want to find them using steam by finding them in the games settings in your library:

Here ^ (using another game as an example because i dont actually have termina on steam)
you should be here, and from here you want to go into the WWW folder ->

which will take you here, you can just as easily replace any of the movie cutscenes in the game or sound effects like the sprites but im not going to focus on that. for now by this point you want to go into the IMG folder
which looks like this, and its in here, in the CHARACTERS folder where all of the character overworld sprites are stored.
in the files, each character is listed as:
daan = doctor abella = mechanic o'saa = yellow_mage olivia = botanist karin = journalist pav = lieutenant marcoh = thug levi = mercenary marina = occultist samarie = apprentice tanaka = salaryman henryk = chef caligura = mobster august = hunter black kalev = black_kalev ghoul = soldier ghoul is just listed as ghoul, villager ghoul is listed as villager
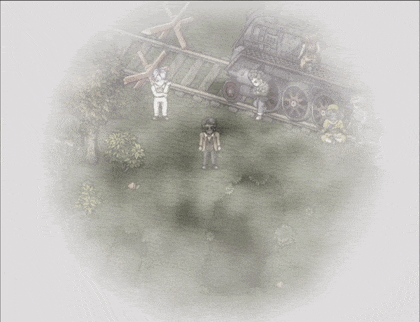
with this you now decide which character you want to replace with your own, I chose Karin so I'm now going through every file named JOURNALIST until i find the spritesheet im looking for (that being her overworld walking sprite, which looks like this)

every characters overworld spritesheet should look like THIS. no smaller. however other characters (like samarie or august) will have less detailed sheets than playable characters because they dont need to walk diagonally or get their arms chopped off like the players do.

these are the files im looking for, NOW i need to actually LOOK at them (you can not typically just VIEW RPGMVP files so we are going to use a website to do so. that website being
Petschkos RPG-Maker MV & MZ-File Decrypter
which you will need to do all of this. its going to allow you to view files and also turn your own PNGs into RPGMV files to replace the ones here with your own.

it looks like this. as you can see i put the %JOURNALIST.RPGMVP file from the game files in here. this is how you will be able to look at and download the spritesheets (like karins i posted above) at their native resolution (whihc you need) its also how you know which file youre replacing. to do this put a file in (i put in the %journalist file, click RESTORE ORIGINAL IMAGES, the green button in the corner, and then your file will appear in the FILE-LIST on the right, once it does click VIEW and you should be able to see the spritesheet and download it.
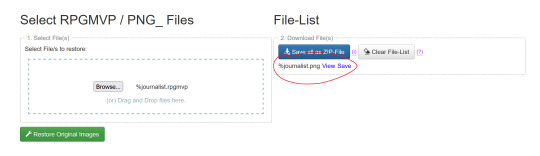

and upon clicking view ive found that this file is exactly the one i was looking for ^_^ (the spritesheets youre looking for should all look like this, as in they should include the characters diagonal movement, lost limbs and crawling animations. that means youve found the FULL sprite sheet which affects your IN GAME PLAYABLE CHARACTER as well as how they behave as their NPC/Party member sprites. ive found that most/all of these specific spritesheets are just the characters name (not %doctor1 or $doctor1 JUST %doctor) and they usually start with a % at the beginning, so if youre wanting to change olivia's sprites you want to find %BOTANIST or if you're changing daan you want to find %DOCTOR. ETC.)
NOW that youve got the file and images youre going to edit. we move on to our art or image editing program of choice and get to work.
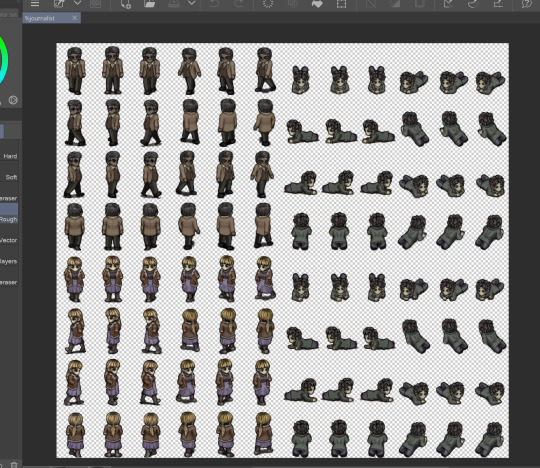
i use clip studio paint, but you can use any program at all as long as you keep the image resolution just as it is. (you CAN NOT make the canvas LARGER or SMALLER. you can not UPSCALE the sprites or change the resolution. you have to edit/draw over anything THE WAY IT IS) here i have the spritesheet ive been editing, that being karins %journalist file (with added marcoh, i put that there) who im replacing with my funger oc enright. unfortunately theres no secret hack for drawing your sprites easily, it took me weeks to have what i have because i had to draw everything myself. its like animation. i cant teach you to draw good but i can teach you to replace files on ur computer. either way as you can see the sprites i made are in the exact same positions that all of karin's were, youre basically wanting to use the originals as a foundation or "trace over them" so theyre EXACTLY where they should be. if theyre in the wrong spots they'll look a little wonky. i hope i explained this concept well enough. its a sprite sheet if you know how those work then itll work out. (ALSO MAKE SURE YOU SAVE THE PICTURE WITH A TRANSPARENT BACKGROUND.)
NOW THAT YOU HAVE YOUR OWN PERSONALIZED SPRITES we're going to save it as a PNG. and name it the same thing as the file youre replacing so its easier. im replacing %journalist.RPGMVP so i name my image %journalist.png
now we're gonna go back to that website we were at and move to En and De-Encrypt

it looks like this. NOW. first what youre going to do is click the browse button in the green circle, then go back to the CHARACTERS FOLDER in F&H2:T. grab your %JOURNALIST.RPGMV file (or whichever file youre replacing) and SELECT that file. then click DETECT, and you'll get a pop up that you got the code
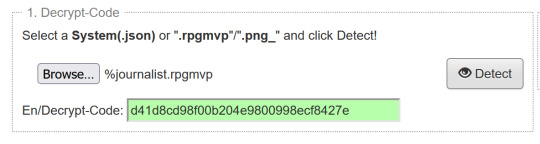
NOW WITH YOUR CODE, you are going to use this to turn your PNG that you made INTO THE .RPGMVP file that youre replacing, except it'll have the sprites you made and not the other ones.

now put your PNG that you made in the 2nd box, which you can see i did, its also named %journalist, and then click (RE)-ENCRYPT MV

it will appear on the side, and now you can save/download your rpgmvp file that you made yaaaaay! youre in the final stretch.
its very important that the file is named exactly the same as the one you're replacing, im replacing %journalist so the file i make is named the same
NOW. GO BACK TO THE CHARACTERS FOLDER IN F&H2:T WHERE OUR ORIGINAL %JOURNALIST FILE IS LOCATED. you should not have moved it or anything it should still be in there but if you do it doesnt matter. what youre going to do is take *YOUR* file that YOU JUST MADE (the %journalist.rpgmvp file that you just made on that website) and youre going to put it in the folder that you found the original file, the file we're replacing is in the CHARACTERS folder so we're putting it in there. your computer will ask you if you want to replace the original file if its still in there, you can do this. now YOUR NEW FILE is in the game
boot up fear and hunger termina, start a new game as the character you replaced, walk around and see your guy :] there are alot of sprites you'd have to replace to have a fully immersive experience with your replacement character, special anims like sleeping, specific skills, sitting in the train etc. but you can replace ANY spritesheet using the exact method i described. have fun. ill also say im fairly confident you can mod the first game in the same way described as this one but im not sure because i dont have it, its up to you to rummage around the files and find out
if you encountered any problems of any kind along the way feel free to ask me about it, but hopefully this should all be described clearly enough that anyone can get into it and do what they want easily. dont be afraid to fuck with the game files they cant hurt you
63 notes
·
View notes
Text
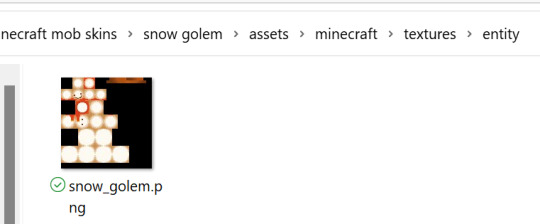
♡ how to make mob skins into resource packs minecraft java ♡
here's a super easy tutorial on how to add mob skins to ur game just like any other texture pack! (for java) (❀❛ ֊ ❛„)
first, open ur minecraft launcher. press on installations and find the game version you're using, (for example I'm using forge 1.18.2-forge-40.2.9). if you hover over it, next to the green play button should be a folder icon.
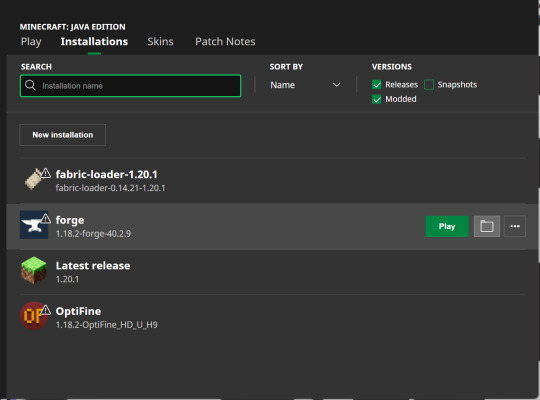
click the icon and find the folder titled 'versions'. click on your version of minecraft, (for example mine would say forge 1.18.2-forge-40.2.9). and click on it! inside should be a .jar file with your minecraft version.
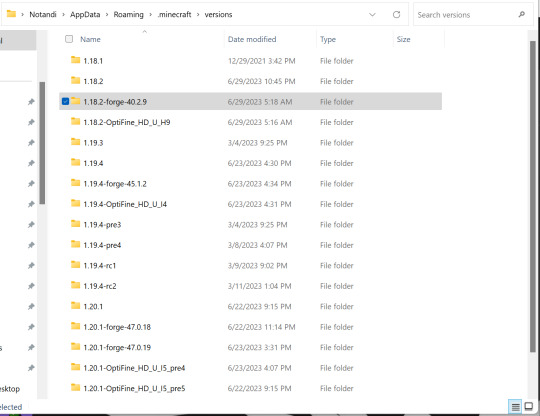
while keeping this tab open, create a folder on your desktop called minecraft mob skins and COPY and paste the .jar file inside. rename and change the .jar to .zip (you can now close the versions window).

open the zip file, it'll be easier in a new window (right click and press open in new window) and type pack in the search bar, find the file named pack.png (keep the tab open).
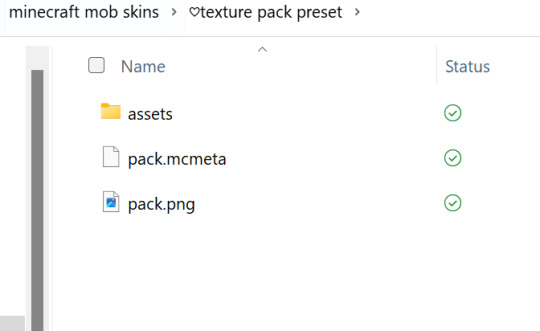
now going back to the minecraft mob skins folder we made, create a new folder called texture pack preset, open this folder and copy and paste the pack.png file inside.
we now have our resource pack icon that will show up in game ! ♡₊˚ 🦢・₊✧
next we need the pack.mcmeta file with our minecraft version so download that here!
once downloaded, drag and drop into your texture pack preset folder.
now, still inside the texture pack preset folder, create a folder called assets. inside that make a folder called minecraft then inside that textures and inside that entity. like this, assets > minecraft > textures > entity
YAYY we now have a preset folder that can be used for every mob!! *:・゚
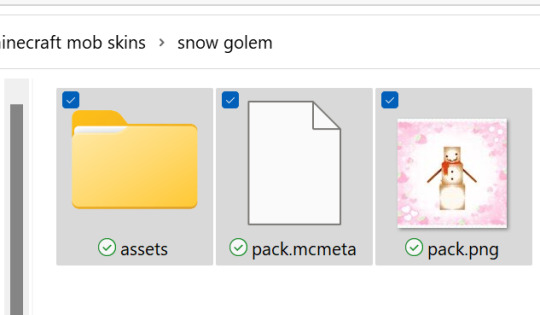
now back out of that and create another folder inside minecraft mob skins. name it after the mob you want to re-skin. (for example, cow, enderman, axolotl etc…)
inside of that create a folder and name it whatever you want. i always name mine the same name as the skin i want to use. for example 'toasted marshmallow golem'. (this is a super cute skin for your snow golems btw!) to make things easier I'll refer to this folder as the skin folder.
leaving the skin folder we just created open, go back to your desktop and click on minecraft mob skins. open up the texture pack preset folder and copy all the files inside, (assets, pack.mcmeta and pack.png should be highlighted). go back to the folder you have open and paste. (you can now close texture pack preset but keep still keep the skins folder open).
go back to your desktop and open minecraft mob skins again. click on the zip folder we pasted earlier with your game version, (open as a new window), and press on assets > minecraft > textures > entity, and find the mob you want.
at the top you'll notice the file path is exactly the same as our assets folder! that's because literally all you're doing is copying the exact file path so that minecraft can read it!
this means that if your mob has a folder with it's name on it, (for example assets > minecraft > textures > entity > goat) you'd create another folder named goat inside the entity folder YOU created
once you've found your mob or mob folder you should see one or multiple .png files.
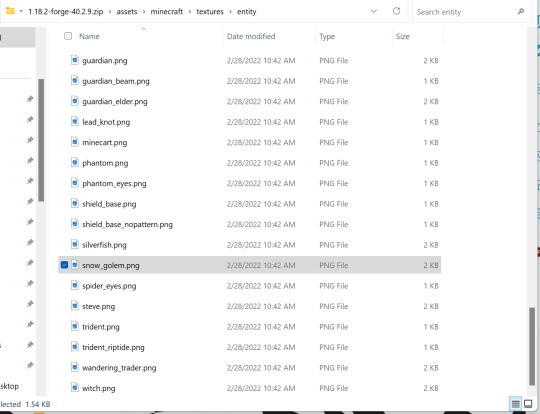
if you only have one .png file (for example goat.png), then all you're going to do is rename the skin you want to use to goat.png and move it into the entity or mob folder YOU created.
(you can also keep a copy of the skin and keep it in your skins folder).
if you have two or more .png files (for example strider.png, strider_cold and strider_saddle or skeleton.png, stray.png, stray_overlay.png and wither_skeleton.png) then it's very simple.
with the strider example, strider.png would be your default strider when it's in lava. the strider_cold would be when it's on land and as the name implies 'cold', (which gives it a paler complexion). and strider_saddle.png is where a saddle has literally been pixel painted onto it.
if the skin you wanted to use only had one default .png file available yet you want for example the strider_saddle version, then you could open up the skin image in planetminecraft's PMCSkin3D or novaskin (which are both on browser) and to make it yourself!
if the skins resolution isnt too high it shouldn't take long, just search on google images, for example 'minecraft strider saddle' and try to copy it!
on the other hand, the skeleton example shows the different types of skeletons found, with stray_overlay refrencing the armour/apparel it wears.
if you come across a folder like rabbit which has black.png and brown.png etc… then all you have to do is name the skin you want to use as one of those file names, (for example black.png or brown.png), and it will replace that colour rabbit.
once you've renamed your skin to the file or files shown and made sure you've used the correct file path you're 80% done!!!
you can close the zip and back out of entity/your mob name folder till you can see assets, packmcmeta and pack.png
you'll need to download Notepad++ so you can edit the code in pack.mcmeta
once that's downloaded right click on pack.mcmeta and press edit with Notepad++ where it says description in quotation marks, type whatever description you want, (for example, "mossy axolotl by MeNylo"), and make sure pack_format is correct for your version. the pack_format for my version 1.18.2 is 8. it should be correct but just in case!
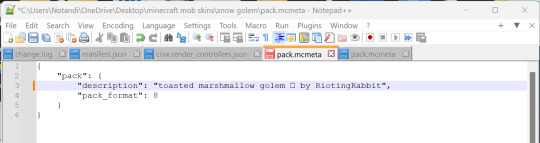
check here!
now press file and save!
if you'd like the resource pack to have a different icon I'd recommend downloading paint.net
click where it says, Get it now (free download):paint.net 5.0.7or whatever version it says.
now right click pack.png and press open with paint.net to make a quick icon I use the snipping tool to cut an image of the mob, remove the background with
and paste that image to
where i made the pic cuter.
then going back to pack.png, open it up in paint.net and press on file then open the image you made. this will put it in a new tab which you then press edit and copy onto your pack.png image. make sure to paste into new layer and press keep canvas size!!!
zoom out a little as pack.png is quite small and scale the image you made so it lines up with the pack.png image. now press save as and save to your skin folder. make sure it's .png!!!, (when it asks you if you want to replace the previous pack.png file say yes).
press OK and it will ask if you want to flatten which you say yes to. and your folder is all done!!!!!!!!!
the resource pack now has a custom image.
finally you just highlight all three files, assets, pack.mcmeta, pack.png, right click and press send to compressed zip folder. (i usually name it the name of the skin).
if you can't see the zip option just press show more options and it'll be there. ˶ᵔ ᵕ ᵔ˶
LAST STEP, copy and paste the zip folder into your minecraft resource pack folder (don't unzip) and load up your game!!! now just do the usual, open your game world > esc > options > resource packs and if it worked you should see the resource pack with the description and icon you set. add it and you're all done!<3 if this was helpful please save this for reference ♡

/ᐢ⑅ᐢ\ ♡ ₊˚ ꒰ ˶• ༝ •˶꒱ ♡‧₊˚ ♡ ./づ~ :¨·.·¨: ₊˚ `·..·‘ ₊˚ ♡ also i use
& for my snow golem/pumpkins
♡‧₊˚🍓
♡‧₊˚🍓thanks for reading!! good luck 🍵 ⋅* ‧₊
#minecraft#modded minecraft#minecraft skin#minecraft java#minecraft mobs#minecraft tutorial#minecraft texture pack#minecraft resource pack#tutorial#guide#cute
24 notes
·
View notes
Note
Hiiii I was wondering if you might have access to transparent/clean enemy sprites from the first game, or know where they might be found? Thank you !
Hi hi, most of the game's sprites can be found on the fandom wiki under their respective enemy page! Only downside to it is that when you try to save the files, they save as webp. I've uploaded in the wiki gifs for all the enemies' combat animations, if you want easy access to them, you can download them from my dropbox here!
Now for the static pngs, if you don't want to go through the whole wiki and you have the game, you can try and look in the files themselves (copying the next paragraphs from a previous ask) it's probably a similar process for GoG and Epic versions in PCs, Macs are different, can't help you there.
Go to where you installed Steam in your PC (usually the disk C: on your computer, unless you installed in another drive) and open the “Steam” folder, then find the “steamapps” folder, then the “common” folder and finally “DarkestDungeon”, like so:
C:\Programs\Steam\steamapps\common\DarkestDungeon
Now in the search bar, type .png and press enter! And there you have it, after a few moments you should find all the images used in game! If you want to look at it better, I recommend copying all of it in to a folder someplace else, just so you won’t risk accidentally messing with the game files.
So yeah, you can sift from there! Have Vvulf as a freebie, just because I already had those saved and because I still find this mean old man gorgeous:
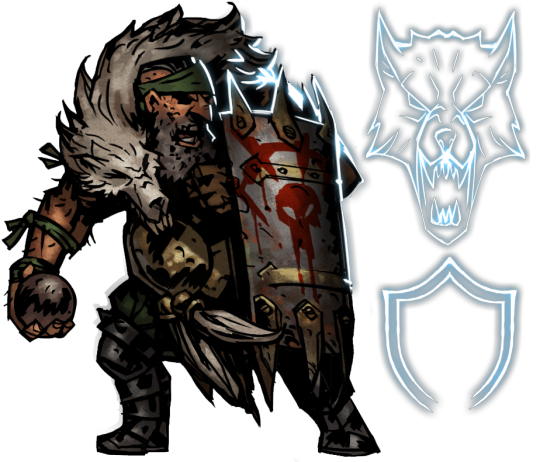
#darnest answers#I looove his big broad shoulders and strong hairy arms#nasty and cruel old man <3#(can you tell I miss drawing him?)#if I weren't broke AND Brazilian I'd commission so much vvulf fanart... :(
27 notes
·
View notes
Text
my journey in DST modding: day 6
these are the last few days of making character art for this mod. im pretty hopeful that the "Tale of Tails" will finally come to an end! . but first, there's some stuff i need to tweak. when i tossed her into the game, i noticed the game itself adds a filter that makes her hair way too light. i did desaturate it a little but with the filter on, it looked almost white. then i just darkened and saturated it a little more just so see if that would fix it. here's the before and after:


it's not a BIIIG change, but to me it looks much better. excuse the difference in the tail, i remade the tip so it wasnt curved. from the front, she looks perfect. but today is the day we conquer this damn tail layer.
. i tried to look for the animation template in the Klei forums (again), but the files werent available for download, then i added it to the game via steam workshop....but the game said it was crashed and it was disabled. . i found another one in the workshop that i was able to download and look inside its files, but god fucking damn it, there was NO layer in the place i needed, and if i have to rearrange layers again, id rather just stick to what im already doing. . but now ive got an idea and that will be my last ditch effort. i just made a backup for the entire folder and here i go. . i redrew the tail in a way that mimicked the back of the coat. but i had to make it so the tail is coming out of it. it looks a little weird but it's what i got.

time to jump back into the game! im sure it's gonna look a little fucked up when the torso animates from the back and distorts a little. but whatever i just want this to be over. . the first screen looked really promising, but i fucked up the pivot points for the hair and tail again. but that's absolutely fixable.

i think i have to make the braids even shorter and get the pivot points working again, but hey, that wont take too long. and things are looking up. . eventually i fixed it, but there are two things left still. . the ghost, and the big portrait. . it was hard to mimic the art style but i think i managed:

(the watermark wont be present in game) . theres only the ghost left, i think i'll have to resize the png and straight up paste the elements i need. but its getting kinda late. tomorrow will be the last art day, actually. have her page in character selection as an extra:
#don't starve together#don't starve together mod#dst modding#dst oc#original character#oc#sunny speaking
4 notes
·
View notes
Text
some light existential under the cut
last month i was so high and like i dont even remember what this memory was about at this point but i experienced something or other and then was suddenly made very aware of my brain actively changing my memory of what i experienced immediately after. Like i was fully aware that the memory of it that stuck was actually not what really happened, i just couldn't remember what did really happen, because my brain rewrote it in noticeably fast real time.
And it just made me realize how imperfect brains are and human memory is shit and is always changing what really happened and literally rewriting memories sometimes!!
and anyway just now because of that other post i was thinking about how i remembered when i was little like 4 i saw a lizard in the bathtub while i was in it and i got so scared and anyway the memory of it ive always had was it was really fucked up and disturbing looking. And i just suddenly was made aware with that last post of, like.. the distinct linear progression that mustve happened every time i recalled the mental image of that lizard, the memory got a little bit more corrupted and incorrect, so like. Ok this is fucking complicated hang on
It feels like, i remember that the way i remembered it looking when i was a teenager, is the same way i remember it looking when i think about it now, like... it feels like memory would be like opening an old png file on an old computer folder that hasnt been accessed in a long time but is still exactly the same unchanged file. but memory is actually more like an image file hosted on a webpage: in theory you might think it'd be exactly the same (because the url hasn't changed any), but in reality, the actual source image could've been updated at some point and you'd have no way to access the old version of that file, unless you found a cached version of it (aka describing your memories as you remember them in a tangible, unchanging way, like writing them down) or a screenshot of the old version (verbally describing them to (or just experiencing it in the first place with) another person, but you wouldn't actually have any way of knowing for sure that it hasn't been altered since the last time you saw it*
And its just like. Human memory is literally so fucked up and imperfect and scary IDK i know none of this makes sense im just saying fucking words right now. sorry
#unreality#not quite but. yeah i have no clue how to tag this one lads#ask me to tag#also *yes i know there are actually ways to tell if a screenshot was edited but that literally just doesnt matter for the comparison#go be computer nerds somewhere else [<- speaking 2 myself ig because im the one bringing it up ahead of time in the first place]#whatwver man im.so tired
2 notes
·
View notes
Text
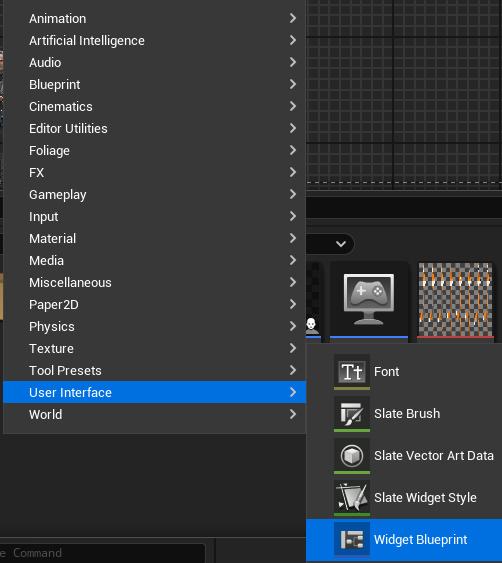
Making a HUD
I needed to start making a HUD in my game, but it will just be a basic, quick one with small details, until later on when I add more and improve it altogether. The first thing that I did to make the HUD was open the content drawer and right click inside, this opened a list of options and I clicked on user interface. This then opened up another list, and from these options I clicked on widget blueprint.
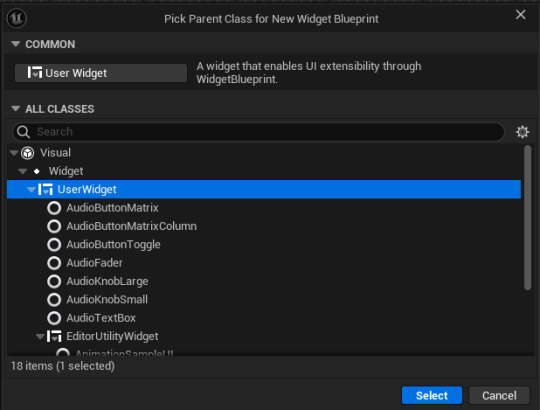
After I had clicked on that, it opened up a tab that made me pick a parent class for the widget blueprint, but I just had to click on 'UserWidget' and select it.
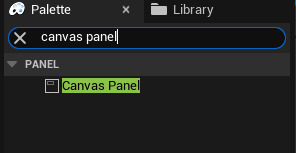
This then saved into the content drawer and I renamed it HUD and I decided to make a new folder for this to keep it separate and organized from the other blueprints. Once I had done this, I opened it up and it was viewport screen like with other blueprints, but it was empty and I had to add a canvas panel. To do this I searched it up in the top left under search panel, and I dragged it into the main area.
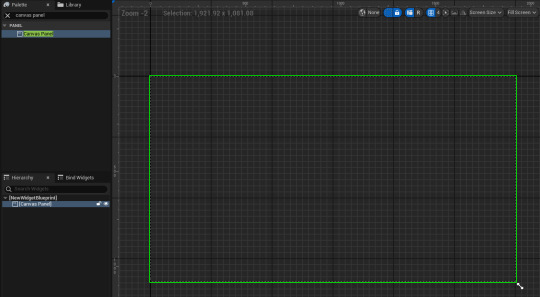
This is what it looks like and it represents the main screen you have when playing the game. From here, I added text by clicking on the text option in the top left of the screen in the list and added it in.

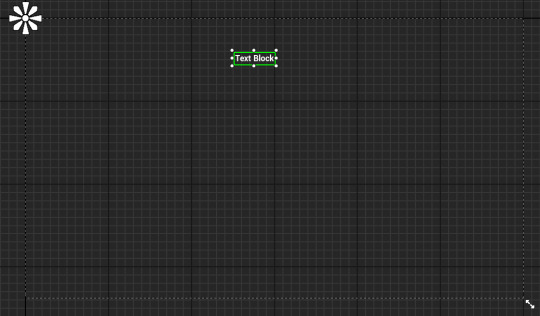
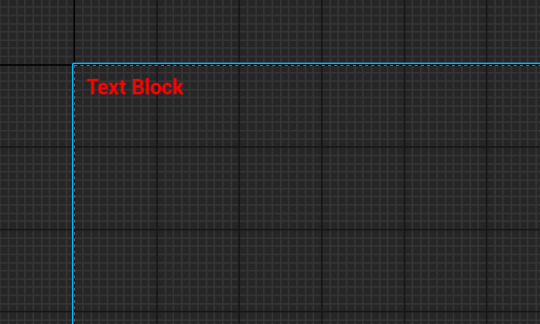
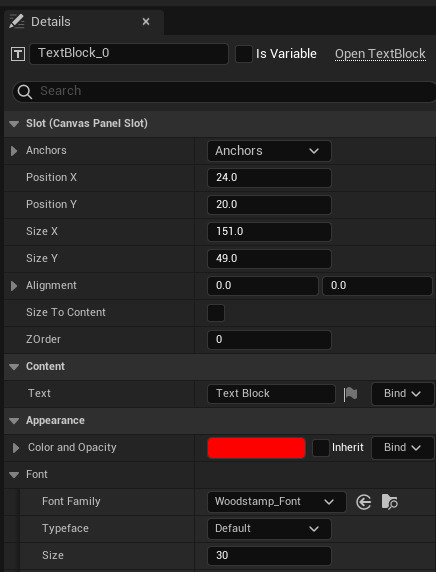
After I had dragged this in I wanted to change the position of it, so I moved it over to top left of the canvas. I also wanted to change the size and colour of it, so I looked on the right hand side of the screen for the appearance tab, and on there I went onto the colour and opacity option, and I changed the text to red. I then went beneath that to font option list, and I changed the font size from 24 to 30.
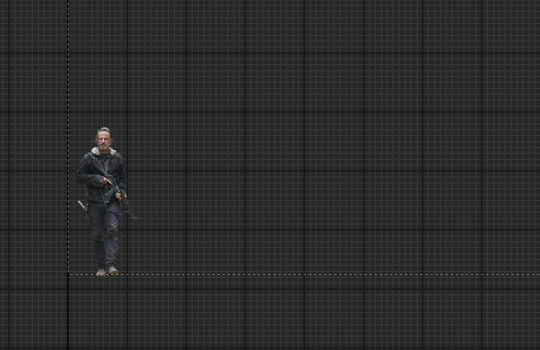
Now after I finished with the position, size and colour, I needed to add a quick photo into the canvas to get an understanding of what making a proper HUD for a game would be like. So I just quickly just grabbed a PNG image of Rick Grimes and put him into the bottom left hand side of the canvas. This was easy to import and was just like how I would import other files, like from photoshop. So after I had downloaded the PNG file and imported it into the content drawer, I just changed the size and put it into position.
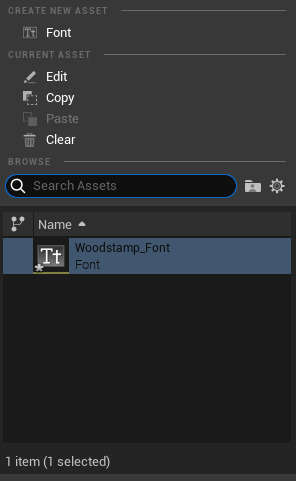
Now after this , I needed to get a font and change what the text says, so I went onto Dafont and just quickly picked a font as this is only a first draft and doesn't need much time spent on it. I downloaded a font called Woodstamp and extracted it in files, after I had done this I imported it into the content drawer and this made it so it was an option to pick when opening the font list in the HUD widget blueprint.

As this is the first font that I have imported into unreal, it was the only option other than default. I'm pleased with my font choice as it was only a quick decision, and I think that it works well in the position. The next thing I had to do was to make sure it worked when playing the game, so to make this happen I went into the third person character event graph and found the 'Event BeginPlay' node in the 'Add Input Mapping' area.
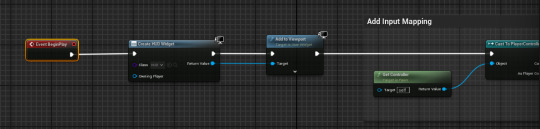
The 'Event BeginPlay' node is to make sure as soon as the game is started, it runs whatever is put into it and keeps it there until the game has ended. So I added the create HUD widget node from there and this made it so the HUD widget that I have just made will be used when playing my game.
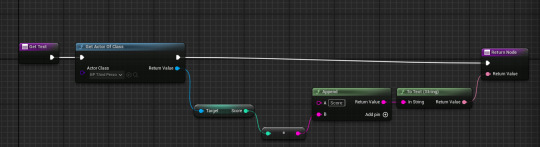
I then added this piece of code into the graph for the HUD widget. The first node detects how much score the character has and applies it to the top of the screen, the next node helps with this as it uses the nodes in the third person character event graph, which is where I keep my score, and it tells the first node how much is in there. The next pieces of code are just for appearance, as it just changes it from just showing a single number as the score, to 'score:' then showing a number after. Another thing that I had to do before it would work well was remove the print strings from the score event graph. This print string was the thing that was telling me how much score I had before I made the HUD, but now the HUD tells me how much score I have all game, but the print string pops up for about 5 seconds every time I pick up a coin and it gets in the way. So I went into the coin event graph and removed it.
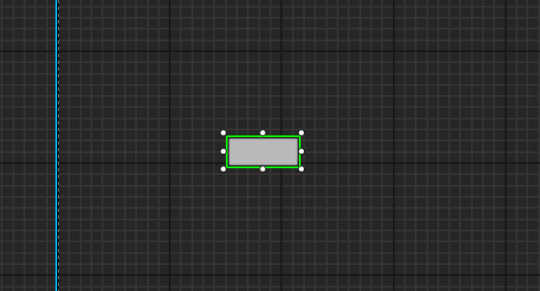
A little bit later I added a health bar to make it easier to see what health the character has, this was really easy and in the exact same area where my current HUD is. I went back onto the search bar on the top left and searched progress bar and dragged it onto the canvas, which gave me a basic grey rectangle, so I adjusted the size of it by just dragging the points, which is something that I couldn't do with the text.
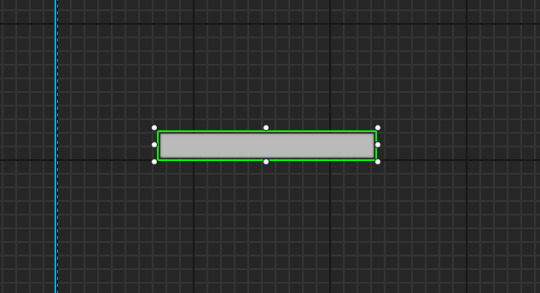
I then moved this into the top left of the canvas, as when I've researched and looked through some game HUDs, I like that position of the health bar in the top left in side scrollers. I also moved the score to the top right of the canvas, but that might be temporary as I think it might look nice below the health bar, but I'll move it around and test what might be better. So in the top left now I have text that says 'lives' so the health bar is really recognizable.

On the right hand side of the screen, on the details panel, there is an appearance option that has a fill colour and opacity bar inside of it, this bar uses 0-1 to adjust how full it is. Next to this I clicked on the bind but button like I did with the text score and it opened up the graph for this progress bar.

After I opened the graph, there were two nodes already inside, 'get percent' and 'return node'. I needed to use both of these nodes, so I kept them in, but I moved 'return node' further left as it was the last one needed in the sequence. Now after I moved the original two nodes, I added more that made sure the progress bar was connected to the character's health, so to do this I did a very similar piece of code like I did with the score.
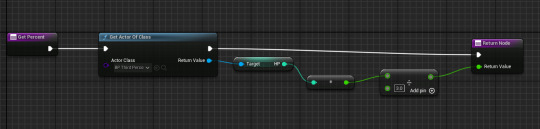
The first node is 'get percent' and this wants to find out what percentage of the bar should be full according the character's health, so I connected this to 'get actor of class' and selected the actor class as the third person character. From there, I dragged the return value off the node and added 'Get HP' from the target. The next part was the only thing that was different for everyone and needed changing, as the next node I added was divide, and for this you needed to change the amount inside to the max amount of lives your character has, mine has 3 so I divided the health bar into 3 parts. Then the final node, which I connected 'get actor of class' and 'divide' into, was return node, which would send the amount of health into the health bar.


The health bar works all good when I tested it in game, and it has no issues overall. The only thing that I want to change is the design, which I'm sure I'll be able to soon, when I go more in depth, but as this is only the first game made in this course, it obviously would be simple and doesn't have to be much more than it currently is.
0 notes
Text
Compuper Chronicles
So I've been a user of computers for some time now, and the hard drives of my laptop are almost full. For a good while I thought it's just because I have so many games installed on it, but after a bit of searching my hard drive issue seems to be more than just a lot of games.
I have a C: and D: drive, with 585gb and 346gb respectively (each standing for 'Computer' and 'Data' I imagine). C is where I have most of my documents and such, as well as where Windows is installed. D is where I store most of my games.
I learned that in steam's (the software I use to install games) settings it gives you a readout of how much of your drive is taken up by installed games. According to steam, I have 248gb of installed games on my D: drive (the largest being Destiny 2 at 100gb), and 96gb of games on my C: drive (the largest on that one being Elden Ring at 48gb). Those numbers come as no surprise, but Steam also reads any non-steam installations and lumps them into the category of 'other'. On my C: drive I have 349 Gigabytes of 'other'. Accounting for Documents (64gb), Pictures (10gb), Downloads(8gb) and Videos (47gb) +~10gb total in ART, GAMER SECTOR, 3d Objects, and music, that leaves nearly 207 gigabytes of unknown files on my C: drive.
The D: drive isn't much better. On D: is 97 gigabytes of 'other' according to steam. The only non-steam file on D: is Fortnite, which comes to 26.5 gigs. That leaves ~71 gigabytes of who knows what on D: drive.
Now, I've already done some housekeeping before writing this. I uninstalled the game Elite Dangerous off my D: drive ages ago, but when I went looking in the D: steam folder the whole chunk of the game was still in there! I could boot it up and everything. That was ~50 gigabytes of stuff.
Going back to the C: drive steam folder, I found some pretty interesting stuff. Firstly, in C:\Program Files (x86)\Steam\music_database\covers, I found a bunch of random pngs? Like this bone:

There is also a fern, greek column, and what I presume is the cover art for a bunch of games' osts. Some of these games I don't own though, like A hat in time, Spooky's jumpscare mansion, and WarioWare smooth moves (that game isn't even on steam!? why is it in here). There's also the cover for Minecraft's volume 1 ost.

^There's some of the covers. I have never downloaded Neil Cicirega's Mouth Moods, but I'm not surprised seeing him in there cuz if anyone would infiltrate the random corners of my computer it would be him. This isn't a storage issue, so I may as well leave them there.
I had also found more game files in steam's Common folder which come up as 'uninstalled' in steam itself but never actually uninstalled, such as all of the old Garry's Mod addons that I unsubscribed from, but were never deleted from C:. Luckily, Gmod has a factory reset button in it's installation folder so I just used that. I found more workshop addons in the SteamVR folder that amounted to 34 gigabytes of stuff that I haven't used or interacted with in any form in years, so that went out the window and into the dumper.
I also decided to uninstall some tf2 mods that I haven't played like ever, and with that I could uninstall the Source 2013 multiplayer SDK (but not before looking through the SDK's files), and for whatever gosh darn reason I found smell.jpg in there:
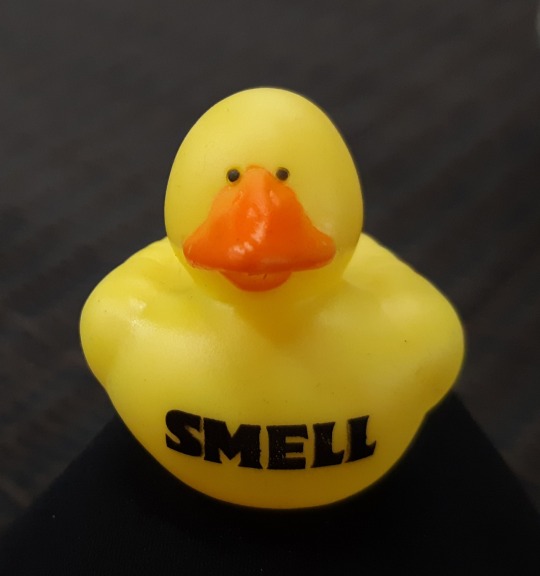
There he is!! I have no idea how he ended up in the folder, but he was there ¯\_(ツ)_/¯ (I moved him into /steamapps before I deleted the SDK so he's safe inside steam's folder, dont worry).
Alrighty! Writing these as I find them now. Apparently, Gmod is installed on my D: drive! and all of the freaking addons as well! Thats 25 gigabytes of game that I don't even use because the Gmod I play is on my C: drive.
Found another 1.29gb in Kerbal Space Program, which is also not installed. Easy peasy. 1.67 gigabytes in Portal 2, which, you guessed it, is not actually installed. 3 more gigs freed because I had a copy of the Rain World level editor in Rain World's folder.
Alright. I've reduced D: drive's 'other' to 56 gigabytes. Minus Fortnite that is 30 gigs unaccounted for, which I'll go look for later. For now, it's late so I'm gonna sign off. I will update this tomorrow when I tackle the mystery of C: drive.
1 note
·
View note
Note
hi im really sorry about this, i have no idea how to use this site. i am @hiddencatpaws from twitter and my friend and i are creating an archive of utaite and vocap and vtuber tweets. i found a way to get a few thousand tweets from an acc into a google spreadsheet but after that its all we can do. if you wouldnt mind, please tell us how you got all of them dowloaded in order for your amazing siinamota archive!!! thank you!!
It’s no problem at all! I’m glad to see other people archiving tweets from inactive accounts. I used the Twitter Media Downloader extension for Google Chrome in order to download all of the tweets onto my computer without limit. I went month by month instead of downloading everything at once because 1. It was taking Way Too Long and 2. I could organize it way easier by month. Even going month by month takes a little while, so depending on the account you might be there for a while. The extension is also great for getting gifs or videos off Twitter, so that's a nice little bonus! The downloaded tweets go into a Microsoft Excel document within a zipped folder. Any images are put into the folders as pngs. From there, I upload the documents onto Google Drive so I can convert them to Google Sheets. I personally forget to open the zipped folders a lot, so make sure you're only uploading the Microsoft Excel document and not the whole folder. Another tip is to Name Your Folders Accordingly, no matter how tedious it is. I would be very lost if I hadn't added the month and year right away. I think that's everything? I'm a beginner myself, and there's probably a lot more helpful information out there on the Internet. Anyways, good luck with your archives and death to Elon 🎉 (also feel free to use my siinamota archives in your collection, just as long as you credit me)
1 note
·
View note
Text
Capturing the ambience of Army Men: Sarge's Heroes
While straightforward from a gameplay standpoint, AMSH offers a memorable cast of characters and a unique perspective on everyday settings. Its taxonomy of releases starts with very different PlayStation and Nintendo 64 games, which were then improved upon with PC and Dreamcast versions respectively.
Capturing footage
The Dreamcast version as it features the most technically advanced graphics*. We can use Flycast to render the game with widescreen aspect ratios and high resolutions.
*That said, I prefer the N64 version's aesthetics! To capture it, we can set the display mode to High-Resolution + Letterbox, and follow similar steps below, but for N64 texture modding. Keep in mind that Letterbox mode still renders at a 4:3 FoV; its output should not be stretched to 16:9 unless you are also using GlideN64's "Adjusted" widescreen option (beware of culling issues if you decide to use this).


Hiding Sarge
The main challenge capturing AMSH's visuals is hiding the player-character and HUD. We can try to hide Sarge with the STLTHMD cheat, but it only gets us so far:

Instead, we can aim down sights to hide our character. Of course, this draws crosshair elements on-screen.
Hiding the HUD
The HUD disappears while you are dead, but we only get a couple of seconds to record that state before the mission restarts - making this an infeasible method for capturing animated level elements e.g. skies and rivers.
While paused, the game has a hidden button combination (hold X + Y) to hide the menu UI. This is nice for full screenshots but still displays the HUD. Besides, this obviously suffers from the same inability to capture animated elements.
Flycast's capability has a capability to override textures at run time. We can use this to hide most HUD elements, by supplying invisible (transparent) versions of the game's assets.
Part 1: Overriding textures
To override HUD textures, you'll first enable Flycast's ability to dump textures. Now play AMSH game for a bit, and trawl the resulting texdump\T-9715N folder for fonts, crosshairs, Sarge's face, and weapon icons afterwards.


Once identified, place fully transparent PNGs with the same filenames into TEXTURES\T-9715N. Enable Flycast's setting to Load Custom Textures and start the game.
Part 2: Hiding the health bar
Sarge's red health bar is not drawn as a texture, so we'll need another way to hide it. I found that when Sarge's health drops to very low levels, the bar disappears (this happens surprisingly often - perhaps the game has a "last chance" mechanic?). I attempted using Cheat Engine to reduce health in an automated fashion but got stuck, so I ended up bringing Sarge to very low health in-game with grenades and mortars.

Part 3: Hiding the map
The mini-map can be toggled off using normal in-game controls.
Extracting sounds
Only the PS1 and PC versions include ambient streams. Of these, PS1 offers superior audio quality. Use a tool like jPSXdec or PSmplay to extract the XA streams.
Putting it all together
Overlay PS1's ambient streams onto HUD-less Dreamcast footage from the corresponding missions.
youtube
1 note
·
View note
Text
Why I don't like Unity
There's three reasons, basically, besides my personal inability to get any custom character assets into Unity, Unreal, or Godot.
Let me tell you below the readmore.
Reason #1: it managed to fucking bluescreen my system just trying to start.
How do you fuck that up? I download an installer and run it. This gives me a launcher. From there, I'm supposed to install the actual product I wanted to begin with. That's bad enough, to be honest. But then the fucking launcher managed to break so badly, I had my first BSOD in several months. With all I do to my poor laptops, I so very rarely got crashes like that it honestly threw me the fuck off.
If the launcher is gonna play like that, forget about installing the actual product.
Reason #2: CPU pegging up the ass.
On my previous laptop, attempting to run basically any Unity-based game would peg the CPU, all cores, until the poor thing ran so hot within mere minutes, it'd commit preventative sudoku. Maybe if I was lucky, I'd get a chance to set all the things to "lowest", and that might let me, I dunno, play long enough to get through the goddamn tutorial?
And I'm not even talking about state-of-the-art 3D games, but simple 2D games with low-resolution pixel art. Why would those run a dual-core at 200% until it fucking kills itself? Makes no sense.
Now, Phil Fortier of Icefall Games is an acquaintance of mine via SCI shenanigans, and when he released Snow Spirit (soon to be rereleased as part of Chronicles of Cascadia), I lamented to him about how his use of Unity would mean I couldn't run any of his stuff. So Phil looked into it and found a Big Fucking Thing to optimize. This basically makes Phil's SCI games the only things made in Unity that I can personally trust won't Do That.
Reason #3: About those 2D games...
I'm gonna dip into my Twitter archives for a bit and repost some stuff for this part.
*wavy flashback effect*
This is Angel Jump, a simple little arcade jumping game that's available on itch.io:
It's delightfully low resolution and has like four seconds of audio all added up. Can't be more than a few MB, depending on which sane development framework they used, right?
33 MB, actually. Because Unity. Let's see how it breaks down:
Unity main exe: 623 KB
Main game assets file: 1.19 MB together
A folder full of support DLLs like terrain and cloth: 7.17 MB, 90% or more of them never called because this is a 2D pixel-art game.
Unity's default resources: 3.41 MB. Mind that of these, only the splash logo is actually used because Angel Jump was made in the free edition.
Mono embedded runtime: 2.61 MB, and each game gets its own copy, much like how Electron apps each have their own copies of Chromium.
And another 17 MB for the Unity Player.
All in all, 33 MB of files for a game like that. Why? Because Unity is a bloated crapsack, I'd conclude from a cursory study like that. Let's compare that to some other games.
This is Elevator Girl, which is not on itch.io.
It has a lot of different animations and three fairly long background music tracks. It's only one file, 18.7 MB. I'm willing to bet most of that is the BGM, but I can't confirm it because it's just the one file.
And just for some historical perspective, the entire Crystal Caves trilogy is 1.31 MB, including some chaff. Commander Keen 4 on its own is 740 KB. Now, Keen and Elevator Girl both have OPL soundtracks, but the latter's is probably streamed.
Noxico is only 1.25 MB to download as a .7z file. Its only optimization that I myself actively apply is that I crunch the PNG files. The rest is text, and since the game uses a .zip file by another name as a game data source... yeah. That's a cheap win.
Now, back to Angel Jump. I went through the game's own resources to see what size it could conceivably have if it was not made in Unity. 54 textures, ten of them actually used. Tiny font stored in a weird way, possibly for distance field trickery which has no business in a 2D pixel game if you ask me. 921 KB of WAV files, high-quality bleepity-bloops, two of them jingles. 4.22 KB of PNG files, crunched like Noxico, for all but the creator's logo and the font. 973 KB for a copy of SDL, and I'd estimate at worst two MB for the main EXE.
The entire Angel Jump game could be no more than 4 MB and a half-dozen files, It's actually 33.2 MB, 92 files.
There's a more general computer programming issue that this reliance on Unity for even the simplest, smallest games seems to spring from: the bigger and better the computers get, the more lazy the developers get. Only have like four MHz, 640 KB of RAM and, what, 720 KB of diskette space, and no guarantee of an HDD? Better make the most of it, developers! But now the pressure's off and there's no more reason to exert any effort into keeping small games actually small.
*sigh*
214 notes
·
View notes
Note
I’m having trouble finding anything to help but how do you go about putting pictures in your game on twine? Like chapter title images? For twine sugarcube? I haven’t found anything to really help me out
Hi!
Because Twine games are web-based, inserting any image (backgrounds, headers, character portraits, inventory images, etc) has less to do with Twine and the SugarCube language and more with CSS and HTML. This tutorial should be applicable to all Twine languages, but regardless of what language you're using, there are a few important things to keep in mind about images and displaying them in both your game and the Twine editor itself.
I. Adding Images
If you want to add an image directly into a passage, you can do so like so:
<img src="image name.png">
The "src" is the image source. It's the path that tells your game where your image file is located and will insert it into your game. There are a few different methods you may end up using depending on your game's requirements.
1. From Online
If you are sourcing your images from an online hosting site (like imgur), your file path may end up looking like this:
<img src="https://i.imgur.com/BL7LMvb.jpeg">
While this is the easiest way to add images to your game, it's not really recommended. By outsourcing to another site, you are reliant on that site to stay functional. If it goes down at any point, you'll lose your image. Furthermore, if you want to run your game file locally (meaning directly from your computer or phone and not on a site like itch.io), you will need to have an internet connection for your image to show up.
2. From a Local Folder
If you are only ever going to run your game from your personal computer, you can use a local file path. You could put all your game's image assets in one folder and then reference that specific location in your image source. For example:
<img src="C:/game/images/logo.png">
In this example, I want to use the PNG file named "logo" in my game. I've put it on my C: drive in a main folder called "game" and a subfolder called "images". I use the file path C:/game/images/logo.png in order to insert it into my game.
If you're not sure what the file path for a specific image is, you can find out by right clicking on the image and opening its Properties.
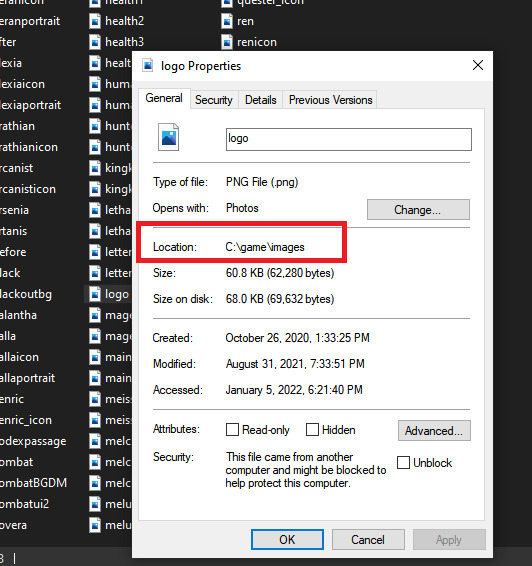
Under the General tab, you'll find something called Location, which will give you the image's path.
IMPORTANT: Windows uses backslashes ( \ ) in its file paths. Twine uses forward slashes ( / ) like in all web URLs. If you're copy/pasting the file location from the Properties menu in Windows, you need to replace the backslashes with forward slashes in order for your image to show up.
Using a local file path will only ever work on YOUR personal computer. If you use this path and then give your game to someone else, it will not work unless they have exactly the same folder set up as you. For this reason, you should not use local paths as your image sources if you intend to publish your game publicly. It should only be used for personal use.
3. From a Relative Path
This is the recommended way to insert images into your game, particularly if you intend to have a lot of assets. If you make an "images" directory, you can use relative paths to source your game's assets and this will work for both online publishing on a hosting site (like itch.io) and offline use. However, there are a few extra steps involved.
Like in the local folder example, you MUST use forward slashes. Backslashes will not work.
"Relative paths" in this context essentially means that the image source will look for your image in a directory relative to where your game is located.
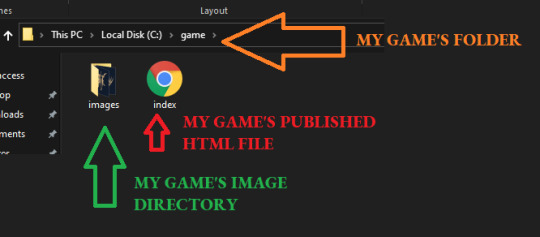
Twine publishes to HTML, so if you make a folder called "game", then put your published Twine HTML file in that folder, you can create a subfolder/directory to store all your images. For example, this is what my game's directory looks like on my computer:
C:/game/
My game folder located on my C drive. I put my game's published HTML file here.
C:/game/images/
The folder for my image assets, located as a subfolder. I put all of the images for my game here.
If I open the game's HTML file from the "game" folder, then the images directory is relative to the folder where my game is located. That means that I can use just the relative part of the file path, rather than the entire path on my C: drive.
For example:
<img src="images/logo.png">
This means that if I move my game's HTML file to another location on my computer, my images will not load because they are no longer relative to the image directory. The game HAS to be launched from this location for the images to show up.
FOR DOWNLOADS/OFFLINE GAMES:
If you're making an offline version to be downloaded by your players, you can handle this easily by zipping your game's folder together with all your assets in their appropriate subfolders.
When the player downloads your game and unzips it, they will have all the assets in the right place and can launch the game from that folder.
FOR ONLINE BROWSER GAMES:
If you intend to host your game on itch.io as a browser-based game, you can do the same thing by zipping your game's contents together and uploading the ZIP file. Itch.io will host your images internally, so as long as all your relative paths are correct, your images will show up your game without you having to source from an outside site.
If you're uploading onto itch.io, you HAVE to rename your HTML file to index, otherwise this will not work. You should also scrub any personal information from your file paths.
For example, if your file path is called "adam's pc/game/images/logo.png", I would move things around so that the relative path becomes "game/images/logo.png".
II. Relative Paths & the Twine Editor
IMPORTANT: Because of how the Twine editor functions, using relative paths to source your images will make your images fail to show in the editor. They will show in the published version of your game, but not in the editor itself. If you hit test/play, you WILL NOT see your images in your game's preview.
There are a few work arounds.
If you are using a version of Twine 2 that opens its test/play previews in its own mini-browser (Twine 2.2.1 and before will do this), then you will need to use local file paths or online paths for your images while in the editor. You will then have to switch them out for the appropriate relative path when you go to publish.
If you are using a version of Twine 2.3.x that opens its test/play preview in your actual browser, you can use HiEv's "Displaying Images in Twine" code. Add it to your game's JavaScript section and adjust the directory names to the ones you are using. You will probably want to delete this code before you publish your game since this is solely a workaround to get images to display in the Twine editor.
III. Styling Images
You can control what your image looks like with a bit of simple CSS. Here are some basics:
Adding the img class to your Story Stylesheet will target all imgs in your game and give them the same properties. If you want to style different images in different ways, you'll want to create multiple img classes.
img {
max-width: 100%;
height: auto;
}
This targets all imgs in your game and make them responsive (i.e. automatically adjust to fit the size of the viewer's screen). If you wanted to make them smaller than the maximum, you could change it to 80% or another percentage until it fits what you want.
img.title {
border: 1px solid #808080;
}
This adds a 1px border in the hexcode #808080 to an img with the title class.
You can add classes to your images with the class selector:
<img src="images/example.png" class="title">
You may want to look at this guide here to get started with the various different styles you can add (border styles, colours, and thickness; using the border-radius property to make the image circular, etc).
IV. Alt Text
Alt text is an invisible image description that is read aloud by screen readers. It also displays if your image fails to load. Adding alt text to your images is important for accessibility, particularly if your image provides some kind of important functionality in your game.
For example, if you're using a fancy graphic as an chapter title, you will want to include alt text that states the chapter title. You can add alt text to any image with the alt selector.
<img src="images/chapter_one.png" alt="Chapter One: Title" class="title">
V. Adding Background Images
If you want to add background images to your game, you cannot use the <img src> to do so. I covered some of that in this post here on making main menu screens, so that should be a good place to start if you want to use backgrounds.
Hope that helps! 💕
119 notes
·
View notes