#both of their proportions are all wonky and their heads keep falling off
Explore tagged Tumblr posts
Visit Tumblr Blog
Explore Tumblr blogs with no restrictions, modern design and the best experience.
Last Seen Tumblr Blogs


Fun Fact
Post activity is at the highest at 4:00 pm EDT; notes peak at 10:00 pm EDT.
Text
also on the list of future doll projects are possibly a second iteration of jack and stephen... I very much like the previous ones but they could stand to have some Improvement...
#both of their proportions are all wonky and their heads keep falling off#and also I want to improve the Multimedia Experience (as it were) of tha boys in the new iteration#I want to start dissecting dog toys for the squeakers and installing them in dolls... these are guys that squeak when squished!#and also at some point I want to do an openable chest cavity on a doll... I've seen it done before and I think I could do it!#also I don't think I could settle on a particular era for bush and hornblower so I think I could pull off something with magnets#so that you could hypothetically set them at different places in the timeline....#I really do want to get alan and davie built before my style changes too much but there's not a lot of Exploration I can do there#they are just normal men innocent men if you will#and so I also do the Big Ponderments...#[guy who has so many assignments voice] let's plan a project that I am not going to be able to do for many months!
10 notes
·
View notes
Text
All right, there are quite a few things that come to mind with a question as broad as this, so here’s my best attempt to sum up what character design means to me in like 5 minutes :,D. I’m going to start with a few very quick sketches that talk about more my general approach to drawing, but I’m going to build up to how it all connects with character.
Step 1) Find reference! Whenever you can, use reference, it will always make your character’s posing look 100 times more genuine than anything you can pull from your brain, and that’s nothing to feel bad about. It’s not cheating because we’re not stopping at Step 2 either, which is where the misnomer comes in that you’re just ‘copying’ (protip: even step 2 isn’t a straight Copy; as long as you’re not tracing, you’re not copying, and even tracing has its uses for personal studies). I could do a whole answer of it’s own about picking your reference, but I’ll keep it short by saying: not every reference will fit every character. Keep in mind your character’s attitude when choosing your ref. Some poses are so generic they’re one size fits all, but even this very simple pose has unique character to it. The way the legs are posed, to me, gives it a young and girlish feeling, and depending how you played with the expression, you could even make it come off shy. An overbearingly confident character, while also taking an arms crossed pose, will likely position their legs differently, assuming a stance that takes up more space, etc.
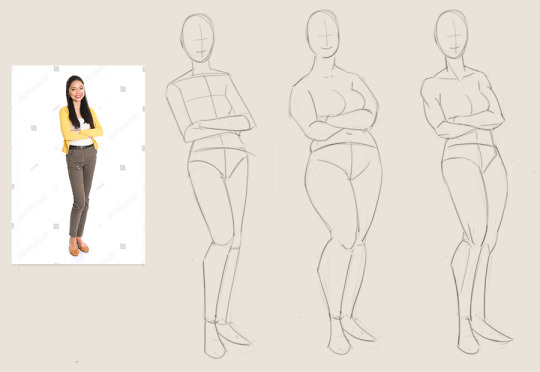
Step 2) Draw pretty much exactly what you see first, but keep it simple. Think of the body like individual shapes; anatomy is not the focus right now, and you’ll actually hinder yourself if you hone in on that first. What you want to do at this stage is capture what the pose is generally doing; character isn’t involved yet Step 3) Now, working off 2′s framework, start considering body type. If you skip the previous step, you might have a hard time capturing the gesture correctly, since it’s a lot for your brain to juggle at once. When I sketched these two different body types, I built it straight off the first drawing, erasing lines as needed.
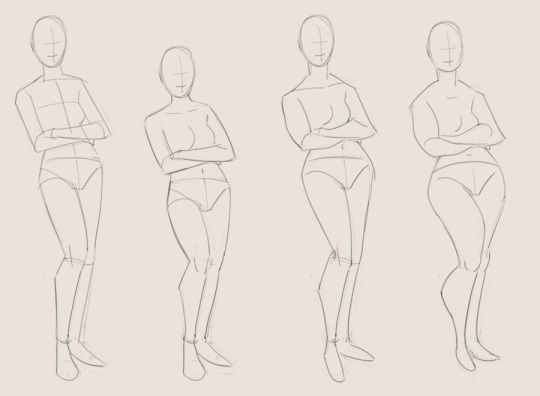
So the first image includes some extremely basic body type variations, this one pushes that idea further. 1 is the basic frame from the last image, while 2 is about playing with proportions. There are a lot of ways you can play with proportions, and as I’ll come to sound like a broken record about: make those decisions thoughtfully. For example, when I made this version shorter than the reference base, I had to consider exactly where I wanted her to lose that height. Here, I made her shorter waisted, took a little length from the legs, and gave her a squatter neck as well. You can do one of these or all of them. Just keep in mind those are all individual options. Letting your train of thought stop at ‘this character is short/tall so I’m just going to generally shrink/stretch their body’ means you’ll run out of variety pretty fast, and sometimes the overall proportions can end up looking wonky (though there’s always exceptions to the rule, remember that the individual body parts should remain correctly scaled in relation to each other). Image 3 is another approach to proportional manipulation, except rather than focusing on height, it focuses on fat distribution and to a lesser extent bone structure. Again, there’s so many individual places you can focus on here, make sure to mix them up. Arm size, shoulder broadness, chest and hip size, leg thickness and musculature, foot and hand size and so forth. Image 4 is a further exaggeration of image 3 and the lines have started to get a little more stylized. While image 3 is still reasonably realistic, 4 is just starting to cross into cartoon territory. Advantage of 4 is that when you are able to push the proportions further due to the leniency of style, you can sell a clearer idea and a clearer character. Downside is, well, it looks more cartoonish now, and depending on the needs of your image that might not be what you want ie: it can look like a mistake rather than a purposeful choice if everyone else around the character is drawn more realistically.
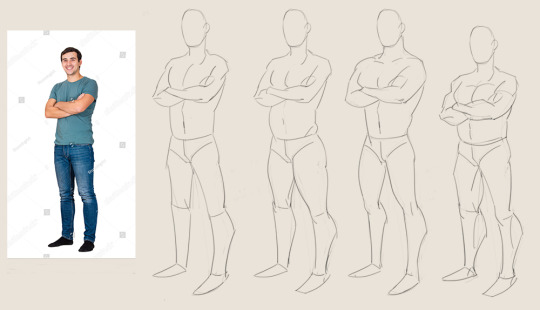
Also… I see variations on this general advice quite a lot for women, but don’t forget about doing the same for men. It’s great to see how eager a lot of artists are to experiment with the female form that is simply absent in a lot of mainstream media, but I find that men really tend to fall by the wayside here even though they often get equally shallow treatment in the mainstream. There’s usually like 2-3 ‘go-to’ body types for men and that’s it. Men’s bodies can have the exact same amount of variety as a woman’s, including the individual ways the fat can be distributed on it, and the assorted ways their proportions can be played with. Whenever I find an artist that does this it’s like striking gold to me tbh.
So there’s some very rough hows. But, perhaps even more importantly than any of that, is WHY you make these choices. This is going to get a little stream of consciousness, but with a question this broad, I tried to hit on as many general points I could think of in regard to my own process.
-When I start to design a character, I really need to have an understanding of them first. This includes things like backstory, personality, habits, so and so forth… Yes, all of this stuff shows up in their design, even if it’s just a drawing of them standing straight up. This isn’t just like ‘this character got this scar at age 7 so I need to know where it goes′, I mean in depth info about them. I touched on this a little bit earlier, bringing up the different ways a character would assume the same general pose, but let me expand on that. -What do I mean by personality? So there’s the most obvious answer, which is that a bubbly character will assume bubbly poses, a sullen character will slouch more, etc… But let’s take it further than that. This is a concept I’ve touched on in past tutorials, but here’s a quick recap. A character’s personality involves their opinions, for one; how do you make that show up in their design? Well, one of the most obvious questions I always ask myself is: what is their opinion on their own appearance (the thing we are drawing)/how do they want to be perceived by others? Consider a strong character. I see a lot of artists who take this thought as far as: okay, this character is strong, so I’m gonna throw a 6 pack on him, maybe a nice pair of guns, and call it a day. Which leads to like, nice art, but also...kind of bland? I think that’s because this is a rather half-baked approach. How can we take it further? Ask yourself more specific questions. Is your strong character concerned with being perceived as an ‘ideal’ sort of fit by others (the type you give that showy 6 pack to) or does that not matter to them? (more likely to look ‘chubby’ if not outright fat, though probably is just as if not more capable of actually doing some real heavy lifting than saran wrapped abs man). If they’re some kind of mystical being that can look like whatever they want (ie: the anime waif that can also lift 1000 lbs-trope), you should still take into account their personal perspective on appearance. Don’t just stop at ‘this guy/girl is strong so they’ll look super shredded’ or ‘they’re magic so I’ll do whatever’. Doing this, you’ve instantly lost a chance to inform the audience more about the individual there beyond ‘they’re strong’ -Break it down further with their habits. What is their daily life like? If they’re running ten miles every day they should probably have some strong looking legs. If their job involves a lot of lifting, maybe focus on the upper body more and leave the legs less defined. Do they eat a lot? Or drink? The way the fat distributes in both these cases will be noticeably different (and this isn’t even taking into account points like an endomorph vs an ectomorphs body, which I always suggest reading up on). I’d definitely recommend drawing as many different body types as you can just as studies, in order to add these variations to your mental library. I’m sure every artist has seen this popular athlete line up by now, but really study images like this. Don’t just mindlessly copy what you see when you create your own characters though; think about why those athletes have the bodies they have, what they specifically did to get them like that, and how that can apply to your character’s own life. -One thing that has always bothered me is how often artists are afraid to use the head (not the features; I’ll get to that in a second) as an extension of the body when it comes to imbuing it with variety and character. While it is absolutely possible to have a thin face and a fat body (as is any combo), it’s another missed opportunity not to experiment with chubby cheeks, a soft jawline, etc. It’s a cliche to mention him at this point as an inspiration, but one of my very favorite things about Mucha’s art was how he was able to make fuller faces look so beautiful despite being a rather nontraditional approach (so many art books try to tell you this is a big NO). example, example. These faces actually look like real individuals to me than a drawing that focuses too hard on being generically aesthetically pleasing. -So, facial features. A face with less traditional features isn’t just going to be more memorable than Stock Beautiful Face #73, but it’s basically a more zoomed in version of informing the audience about the character in the same way the body does. -Know tropes, play with tropes, do not rely on tropes. Sunken bone structure, long features-guy will always pretty much read like a villain (or at least someone off-putting), but find somewhere to make the formula your own. Give him thicker eyebrows or big ears. Give the girl with the standard doll-face a nose that sticks out a little more prominently or a crooked smile. -Speaking of are so many different ways to draw a smile, do not underestimate the mileage you can get out of this one feature alone. Artists tend to have a favorite way to draw smiles, in my experience, but remember your character. Would they have a big toothy grin, a handsome ‘cool’ looking smile, a small shy lopsided one, ones that touch the eyes, ones that don’t… This is probably a repetitive point by now but just do whatever you can not to draw the exact same feature on two different characters, and make sure to think through your reasoning for every choice you make. To me, it’s always immediately evident if an artist really knows their character or if they’re just trying to make something aesthetically pleasing. The former is always more attention grabbing in my opinion. -One of my favorite things to consider when designing a character who’s part of a family: genetics and how you can play with them to inform the audience more about the character’s story. Does this character take after their mother or father? How? Why? Why why, you might ask? This isn’t a photo of a real person, this is an illustration that you should be making deliberate choices about every step along the way. It’s one thing to draw a character that looks like their parent simply because logic dictates they should, another to make meaningful decisions as to where and why they do. Some examples: He has his father’s eyes because they carry the same intensity and other characters are a little put off by him because it (conversely, maybe he’s such a gentle character that this detail stands out twice as strongly). He has the same hair as his father, but he styles it differently to avoid the association. She has her mother’s nose which everyone compliments her on so shes happy to be seen in profile. She has her father’s broad shoulders and she’s a little self conscious about it so she tends to wear baggier clothing. Etc etc! In all these cases, you can communicate these details through even a simple drawing of the character standing alone, and should try to as often as you can. -In the end, the only way you’re going to know how to draw all these different details, whether they be different body types or different facial features, is by studying real people. Draw as many different kinds as you can, add them to your mental library. Your reference will never give you everything you need to work it, and I’m not sure if that’s maybe what this question as getting at-- if I have a reference folder of go-to ‘types’ or something. I don’t. I have a folder of poses labeled with characters I think they’d fit, and that’s about it. If you’re just imitating what you see in a photo, you’ll always be drawing That Person, not Your Character. So you are going to have to pull some of it out of your brain. Note, however, the important difference between just ‘making it up’ and recalling information you’ve studied in the past. That said, while on this last topic of expanding your mental library, that includes not just doing studies, but also learning and observing the ways other accomplished artists work. Here are some of my book recommendations when it comes to those which have most helped me in regard to this particular subject. This includes books that specifically tell you how to vary your body types, but also ones that just have a lot of examples of different kinds: Morpho: Anatomy for Artists Morpho: Fat and Skin Folds Famous Artists School Course in Illustration and Design (If anyone is interested in this one and has trouble finding a non $500 copy, hit me up and I’ll help you out) Spirit of the Pose Anatomy Lessons from the Great Masters Drawing People: How to Portray the Clothed Figure Figures from Life (my favorite currently; not the most varied array of figures but he goes in depth on how to successfully grow an academic study of a model into an illustration influenced by your own ideas and personal style) If you found this answer helpful, although it isn’t specifically about character design, I go a little more in depth about some of the topics I briefly covered here (such as choosing the right reference, good vs bad reference in general, honing in on shapes, pushing the pose, etc) in this short book of mine :>
#tumblr messed up the coding on the original ask so I had to repost this!#art tutorial#hope this helps!!#not sure if got a little too rambly#i wonder if it's hashtag justintpthings to spend 3/4ths of a post talking about how to draw by talking about thinking lol
117 notes
·
View notes
Photo
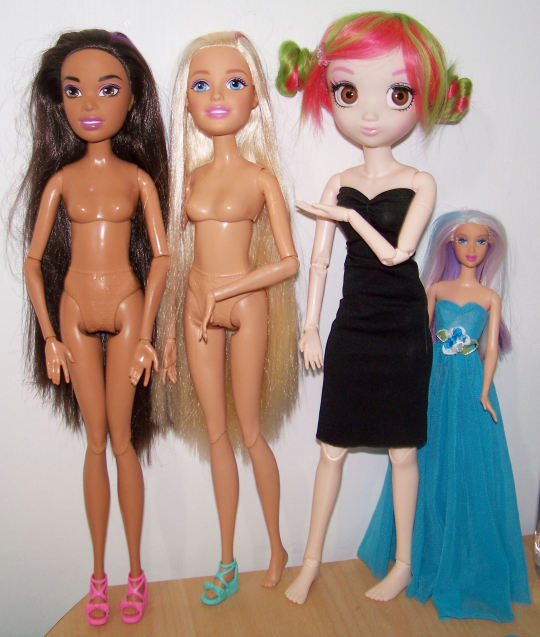


I’d been stalking ebay for barbie + endless hair/dreamtopia/hair play/large/17inch/43cm/45cm and variations for ages and this $20 with shipping bundle came up so I put in a bid thinking there was a very slim chance I’d actually win... and what do you know? within hours of placing the bid 1/4th Wonderwoman was available on aliexpress so I smashed buy. But hey, as Tiffy can attest, bidding on stuff you definitely don’t expect to win kind of makes the universe decide to mess with the odds. So I had two very large dolls turn up and no clue what to do with them.
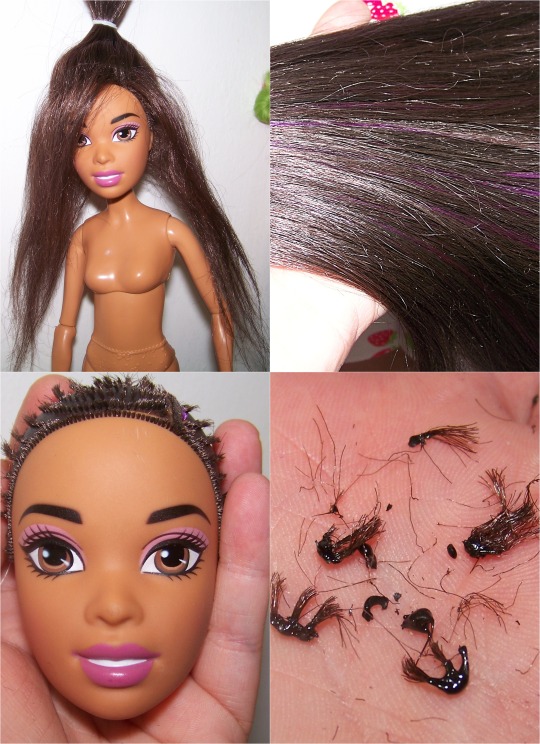
First off, a couple of design flaws IMHO: the feet are not flat, they can stand in their shoes but it would have been smarter to design flat feet and shoes that make them even more stable. The neck slumps forward, this is probably to counter balance the weight of the hair. In larger doll design (BJDs for example) you put the neck hole futher back but Mattel has chosen to simply upsize Millie and Asha right down to their copyright dates printed on the back of their necks 2013 for Millie, 1990 for Asha. The bodies are 2015. The neck anchor is just overkill, it’s hard enough to get out given the extra lip on the heads and the hardness of the anchor. Both have lovely saran hair.
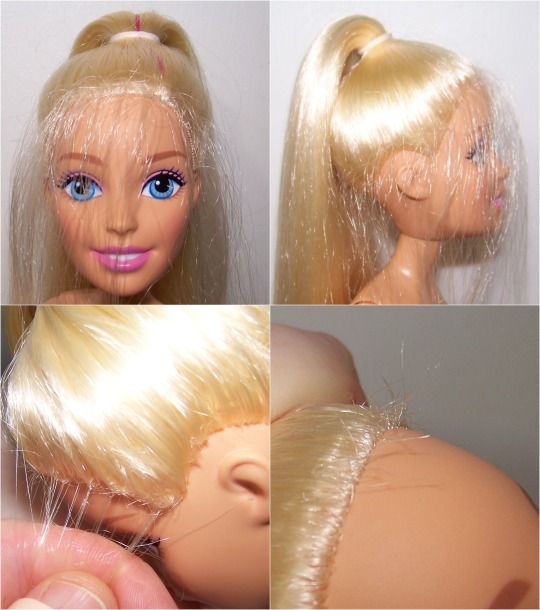
Asha’s hair is shredded, I “pruned” the hair but the damage runs deep, especially in the back there’s stripped hair four rooting lines in, probably due to the head ties still being in there and the stupid plastic brush. The hair is melted inside to seal it, I salvaged 36g of 26cm saran in chocolate and gothic purple which is probably about 60% of the original hair. Her face is a lil wonky too. Millie will be restored to like new condition as her hair damage extends to the frontline, 2 rows in back and the parting. She has champagne blonde and pink shock saran. I have plenty of long champagne blonde in stock if she looks sparse after pruning:
First you pull the hair up and brush it with a metal comb and let the small pieces fall, stroke the hair backwards with your hand until you have pulled out all the broken bits then cut them but not close to the head. Now redo the pony tail and use your hand to pull the litle spikey bits up, you can go in close to the head now that other long hair won’t get caught up in your scissors.
I’ll be keeping large Asha’s body until Wondie arrives as a backup for Azul the Rainbow Surprise #2. The neck will need bulking up if I go with this body. I’m not a fan of Barbie’s proportions which I why I really liked the clone night lolita bod, since it’s a downsize of a 1/3rd body it’s chunky and rounded. Endless Hair bodies work for a model-esque body but Rainbow Surprise are stylized cartoony round faces which is why Skye looks so good on a 1/6th curvy.
So uh I need to decide what on earth to do with these two. I’m not using saran to reroot Asha as I’d never recoup the cost in hair/time. I could mess around with PE hair though if her body ends up not being of use. Millie can be made new but I feel like she should/could be spiced up a little and she needs something to compensate for that missing shoe.
Any european doll collectors interested?
8 notes
·
View notes
Text
take two.
@lgcmiso between classes, practice rooms. week 2, latata !
it’s strange to be in practice rooms at lgc that are unfamiliar to her. they sprawl around her new and modern, shining smooth floors and fresh papered walls. not a smudge or scratch to speak of on the mirrors. it’s unfamiliar, and that in itself seems as if it’s been impossible. the walls of lgc practice rooms have been her home for almost five years now, after all. but there’s a quiet understanding here, that they’ll all upgraded a step for the purposes of the show, allowed onto a new floor, between new walls. another new proving ground to challenge.
it’s a strange feeling. with dance practice winding down, soho is content to take a breather, coating her throat in the eska water they’ve been provided, groaning low in the back of her throat as she sinks down to kneel next to the familiar face nearby, squatting on flattened feet and balancing her hand on her knees. “no, don’t get up,” she scolds the other, who seems to shift as if she might stand. “your legs are eight miles long and i’m trying to look like my proportions are okay.” she informs her sagely, pointing at the little camera not-so-surreptitiously in front of them. “in fact if you could just angle your chin down as far as possible and really press back until you’ve got a half a double chin going that would be fantastic.” she adds brightly, lips blooming to a heart shaped smile, too gummy, with bunny rabbit teeth on full display. maybe she should have had them shaved down like her mother had suggested. now everyone will see them and it’s too late to get rid of them without clear plastic surgery speculations. her heart flutters in her chest. no use worrying about it now. but of course, she will anyway. it’s what soho does- suppress worries with jokes at her own expense, endearing to a fault.
she shifts slightly, thunking into the other’s shoulder lightly and passing off the extra bottle she’s brought over. “it’s a good choreography right? you look so pretty doing it.” she sighs, pouting as she rolls her head slightly to regard the other, faux scolding, “stop stealing the spotlight and share some with me instead.” she teases, a playful pout on her lips. “everyone’s gonna fall in love with you like that,” she says, accenting the final word with a snap and an exaggerated gesture, before clasping her hands together, batting her lashes. “i know i did.” she dissolves into rough-around-the-edges laughter, taking a sip from the bottle once more.
what do you think of the choreography for latata?
the choreography? she repeats, taps a finger against her thin as she formulates a thought. it’s funny, she gets a lot of questions like this from them, about the technicalities of things. maybe becasue they realized she’ll ramble about the musicality and composition at any given opportunity regardless. are they going to paint her as some kind of song surgeon, picking it all apart carefully? it’s not entirely untruthful. part of her prior studies and her backup plan has meant a specific focus on marketability and likeability, both of songs and of herself. “it’s great, honestly.” she admits, grinning slightly as she does, her gaze slightly distant, as if she’s currently visualizing it, isolating moves to express her appreciation for. “when you look at the overall picture, it seems very fluid and powerful, but in an understated way. unlike some choreography it lacks that intense and powerful shoe-squeaking and stomping sharpness, “ she kind of misses that, enjoys that powerful engagement with a song, “and while that may make it look simple, and indeed, makes it a bit easier to sing - or rap- stably alongside it, it’s definitely got it’s own challenges. when you restrict the movements to something more restrained like that, you have to be much more technical about each one. when it leaves you s much room for personal feeling and interpretation, you really have to make sure that your performance can shine with your personality, and with the mood of the song.” do you think the choreography suits you? what about the other girls? “i think this is the kind of choreography that can suit anyone who is able to embody the mood of the song. it leaves a lot of space to integrate your own personal details while still looking like part of the cohesive flow, and it’s one that’s easy to communicate with one another and augment in little ways that can leave an impressive impact. because the song itself has such a driving but restrained intensity, it’s important to capture the mood and energy of it. i think this group of trainees is really excellent at that, honestly, so i hope we can continue to improve. i think personally i’ve been keeping an eye on miso as we practice. she has such a gift for putting emotion into her features as she dances - probably because she’s such a skilled actress and model, you know? i hope i can learn from her a little bit on how to channel the song not only in my movements but in my features as well. there’s always room for improvement when it comes to performance. “ she cuts off the ramble with a little nod, pushing her hand back through her hair and then dropping it abruptly, fingers flying up to the strands. “oh, i forgot about the hairspray, did it get all wonky?” she questions, looking worriedly at the pd. weren’t you recently noted for your performance abilities, though?
she bursts into a quick, rough twinge of laughter, slightly too loud and covered up just a moment too late. “yes, and i’m incredibly thankful for that. but that doesn’t mean i have nothing to learn. besides, i was only practicing one or two songs obsessively back then. now there’s much more to do in much less time. i need all the tips i can get.”
2 notes
·
View notes
Text
Technique Tuesdays: Mixed-Media Faces Made Easy
Creating mixed-media faces is fun and inspiring, and portraits add so much to art journal pages, collages–even stitched projects. But rendering a face can be daunting–how to make features look realistic? What’s the best way to play with proportion and positioning? These 10 artist’s tips and techniques are designed to help you get started creating faces, or refine your skills. With a little practice, you’ll be making faces come to life in no time.
The key to drawing a lifelike face is in the details, and Dina Wakley lists those in her book, Art Journal Courage. Tip #1: If drawing a face with a thick pencil, skip the eyelashes—drawing them in can make them look unnatural. Instead, use a darker stroke on the lash line to give the look of eyelashes. Tip #2: Don’t draw a straight line between the top and bottom lip; this can make the lips look clown-like. Include a small dip in the middle of the line, and make the bottom lip rounded or a little square. Tip #3: Don’t draw in too much hair. Trying to draw every strand is a common mistake. Just draw in the suggestion or overall shape of a hairstyle.
No need to draw every strand of hair; drawing the shape and adding color is all it takes. (Art by Dina Wakley, photo by Christine Polomsky)
To render mixed-media faces in fabric, start with a photo printed on printable fabric, converting the image to black and white and adjusting the contrast and exposure so the image is very faint. In her article “Girl With Blue Arms” in the Fall 2015 issue of Faces magazine, Karin Winter says that after printing the photo, she cut it around the edges and pin it to a fabric collage background. Create hair by making straight stitches, starting with the darkest shade and adding lighter thread. Stitch in details around the eyes, nose, and lips, enlarging the photo if necessary to see fine details. Use fabric pieces to define areas of the face that are highlighted. Karen incorporated regular fabric, pink tulle, and sheers to create a face with depth and dimension.
Add dimension and texture to mixed-media faces with fabric and stitch. (Art by Karin Winter, photo by Sharon White Photography)
Classic face proportion finds the eyeline in the middle of the face, and the nose and mouth in the lower quarter. But in her book Imaginary Characters, Karen O’Brien says it’s okay to break the rules and play with proportion to develop your own unique mixed-media faces. Draw face shapes that are round, oval, elongated, or pear shaped. Draw a classic guideline grid for the features, but play with the shape, size, and distance of the eyes, nose, and mouth. For example, keep the nose and mouth on the correct guidelines, but move the eyes up or down, or make them more narrow or wide. Make the features oversized, petite, or a combination of both.
Changing the proportions and positioning of facial features results in unique faces. (Art by Karen O’Brien)
Carve a portrait stamp and you’ll have that face forever to use on art journal pages, cards, tags, and invitations. Start with a photo (ones with strong shadows work well) and prepare it for transferring, says Julie Fei-Fan Balzer in her book Carve, Stamp, Play. Convert the photo to black and white, erase the background, darken the photo if necessary, and, if using Photoshop, choose the Cutout filter in the Filter Gallery. Transfer the image to a carving block, mark the parts you’ll be carving away (Julie covers those areas with colored marker), and carve, using the smallest blade first. Bonus tip: Trust the transfer; don’t try to correct what seems wrong or weird with the image.
Transform a photo into a hand-carved stamp portrait to use on art journal pages, tags, and more. (Art by Julie Fei-Fan Balzer, photo by Joe Coca)
Not crazy about your portrait drawing skills? Kari McKnight Holbrook has a solution, and she revealed it in her article “Faux Faces” in the January/February 2015 issue of Cloth Paper Scissors magazine. She started with a photograph, then colored it, using pastels and other mediums. Choose a photo with a plain background and a subject with a strong definition. Turn the photo to grayscale, increase the contrast, and create a toner-based copy. Choose light, medium and dark shades of PanPastel skin tones, and lay a sheer layer of the medium tone over the entire face. Massage the darker tone into the shaded areas of the face, and then apply the lightest color to the highlighted areas. Add color to the lips, cheeks, and hair, and use pastel pencils to color the eyes. Bonus tip: Once the pupil is colored in, use a slightly dampened paintbrush to deepen the black color.
A photograph can be transformed into a painterly portrait by layering pastels. (Art by Kari McKnight Holbrook, photo by Sharon White Photography)
Sculpting a face is much easier than you might think. In the article “Stick Figures” in the September/October 2015 issue of Cloth Paper Scissors magazine, Rebecca Ruegger used air-dry clay to create ethereal mixed-media faces for her twig assemblages. To create a realistic head, form a solid egg shape from the clay, making sure the size is in proportion to the body. Create slight indentations for the eyes, and taper the chin. Create a nose and ears from clay and attach them to the head, using wet fingers to make sure the pieces stick to the surface. Make basic shapes; they can be refined later on. When the clay is dry, remove any bumps with sandpaper, and fill in any holes or depressions with clay. Draw the eyes and mouth with pencil, and paint the face with oils or acrylics.
Mixed-media faces can easily be rendered in sculpted air-dry clay and painted with acrylics or oils. (Art by Rebecca Ruegger, photo by Sharon White Photography)
Eyes can often make or break a portrait—if they look unnatural or off, they can affect the entire piece. Take some tips from Jane Davenport from her article “A Whimsical Face” in the Fall 2015 issue of Faces magazine. Draw some eyes in the same scale as your portrait; these will be for practice. Create irises with black pupil centers, adding color at the center of the iris and working out to the edge, like the spokes of a bicycle. Cut out the irises and place them on your drawn face. You may notice that showing the entire iris makes the face look startled; trimming the top quarter of the iris can make it look more natural. Play with the position of the eyes, making sure they’re always aligned. Once you’ve decided how the eyes will appear, draw them in the piece the same way.
Changing the position of the irises can dramatically alter a face. (Art and photo by Jane Davenport)
Much of the guesswork when creating a face can be eliminated by mapping it. Pam Carriker shows how simple this process is in her book Creating Art at the Speed of Life. Create a basic head shape, and follow these tips for drawing the features: The eyes are at about the vertical halfway point of the face, and there should be one eye width between the eyes (the entire face is about five eyes wide). The bottom of the nose is halfway between the eye line and the chin, and the nostrils should align with the inside corners of the eyes. The ears are about the same height as the distance from the midpoint of the eyes to the bottom of the nose. And the corners of the mouth extend to the middle of the eyes. Use these guidelines, and you’ll have a well-proportioned face.
Mapping the features helps to create perfectly proportioned mixed-media faces. (Art by Pam Carriker, photo by Joe Coca)
Melissa Averinos loves creating self-portraits: “Each one tells the story of who I was at the time I created it,” she says. Her article “Mixed-Media Self Portrait” in the March/April 2015 issue of Cloth Paper Scissors magazine offers great tips for recreating your own features for a self portrait. First, release the pressure to make the piece look exactly like you; think of it as a symbolic representation of your face. Look in a mirror and think about these questions: Are your eyes almond shaped or round? Close together or far apart? Do you have thin or bold eyebrows? Is your nose short, long, or crooked? Is your mouth wide or narrow, and are your lips thin or plump? The key is to not overthink it, and to use simple shapes—rectangles, triangles, and wonky circles—for the facial features.
Examining your own features helps to create a successful self-portrait. (Art by Melissa Averinos, photo by Sharon White Photography)
Funky faces are fun faces, as Denise White proved in her article “Festive, Funky Art Dolls” in the September/October 2014 issue of Cloth Paper Scissors magazine. Create a whimsical doll face with exaggerated features by first sketching the face, then adding color. She drew oversized eyes and a faux stitched line for the mouth, then added blush to the cheeks with acrylic paint and a big, scruffy brush. Next, block in large areas of paint; she painted the large oval eyes white, then added light brown irises and black pupils. Add more details, such as lines around the eyes and freckles. She drew a simple triangle for a nose and painted it dark brown. A number of mediums can be used to add color: colored pencils, fabric markers, paint crayons—even coffee. To finish, sand the painted areas when dry to soften the color and give the doll an aged appearance.
For funky mixed-media doll faces, exaggerate the features and use paint for bold, opaque color. (Art by Denise White, photo by Sharon White Photography)
Go on, make a face! Take your skills up a notch with these resources from the North Light Shop!
Learn how to create mixed-media faces with paint, stitch, found objects, and more, in this Fall 2015 issue of Faces magazine.
No drawing skills necessary to create painterly mixed-media portraits; this Mixed-Media Faces Made Easy video with Kari McKnight Holbrook will show you how.
Let Jane Davenport show you how easy it is to create lovely mixed-media faces in this video, The Whimsical Face.
Start with a stencil to create unique faces; Pam Carriker shows how in this video, Art Journaling Live: Face Mask.
The post Technique Tuesdays: Mixed-Media Faces Made Easy appeared first on Artist's Network.
from Artist’s Network http://ift.tt/2jYvc5u
http://ift.tt/2jYyntS
0 notes