#bc it was doing that before i even edited the frame delay so i know its not me
Explore tagged Tumblr posts
Visit Tumblr Blog
Explore Tumblr blogs with no restrictions, modern design and the best experience.
Last Seen Tumblr Blogs


Fun Fact
Premium Tumblr themes are available from anywhere between $9 to $49.
Note
Hi! I hope I'm not bothering you, but I love your mood board edits and was wondering if you could explain how you go about making/colouring them? I see lots of places to find gifs but turning them into a set is so hard. Thank you in advance!
hi! first of all thank you so much and second of all it’s not a bother at all! i am happy to give some of my own tips even if my explanation probably isn’t super helpful. i won’t give like a ps tutorial but below the cut (since i included example gifs, it’s VERY long) is my process for my latest jily aesthetic:
i keep track of all my ideas/sets in a spreadsheet (which i won’t show bc there’s a lot of info i’d have to blur/black out) but i always have a list of what scenes i need to gif/what gifs i’m editing and where i’m getting them from. i also include a couple extra ideas in case the gifs i have planned end up being too hard to color or don’t fit in the set. i’ve found it’s best/easiest to start w the list bc there is literally nothing worse than spending hours on a set and then not being able to complete it.
as for actually finding the material, i have a pretty healthy number of scene packs saved in my giffing folder, esp. for things i know i will gif frequently. most of the time i will peruse youtube, vimeo, and instagram for any aesthetic scenes. i also have a lot of gif packs saved specifically for the purpose of making mbs (usually i mix my own gifs w gif packs), if you msg me i’m happy to direct you to some gif packs i use regularly or you can check my #resources tag. a couple tips for finding material:
always opt for download when possible, i used to screen record and the difference when i switched to downloading was astronomical. (it’s easy to lose quality and esp if you’re on mac, quicktime duplicates frames so either you have to manually delete those extras or you get sort of choppy gifs when you load them into ps.)
always use 1080p or better, 720p will work in a pinch for 268px or 177px gifs since you can make up some of that resolution loss with sharpening, but don’t go any lower than that, just love yourself.
for pale sets, look for the right colors. i tend to look for scenes w high color contrast especially if it features poc so it’s easier to color without whitewashing, ie if the subject is a person then i look for light colored or blue/green/violet/white backgrounds. it’ll make your life wayyyyy easier. this also means if you’re making a set try to find scenes with already similar lighting bc you won’t have to work so hard to make it look cohesive.
here’s a quick rundown of what i do before coloring:
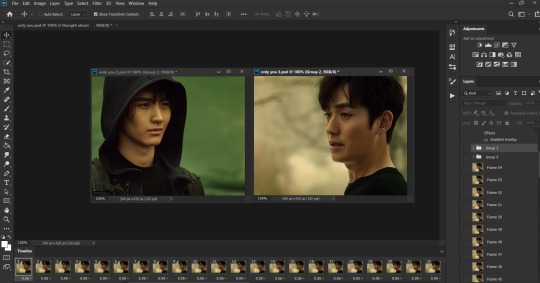
import all frames and save all the files in a folder together!!
play around with frame delay so all the gifs are moving at about the same speed, usually keep it between 0.03-0.05s
crop and resize gifs (i use 268x145 most of the time)
convert to timeline
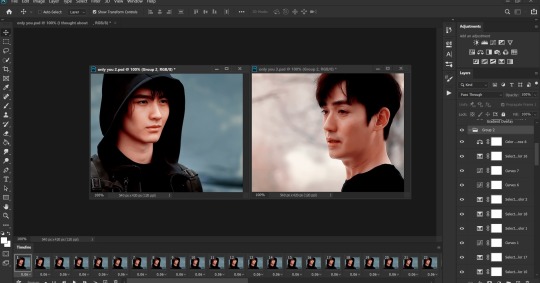
when it comes to coloring it can be really hit or miss, i’ve recently gotten back into my groove but i was having sooo much trouble earlier this year. in general, don’t stress yourself out!! sometimes it’s easier to just find a new scene/gif (hence my list of extras!) than to try too hard to fit a gif into your set. i color all my gifs by scratch (ie no psds) but i tend to follow the same pattern, i’ll explain using these gifs/psd as an example since then i can also explain how to fix white-washing:
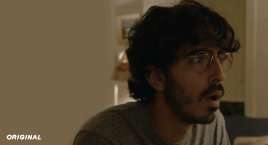
first off when you’re coloring gifs with poc always always always make a layer mask so you can compare the edited and unedited skin tones directly! i use the marquee tool to make a selection in the middle of the character’s face, select the folder of my adjustment layers, and hit ‘add vector mask’ (the third button from the left on the layers panel, it’s a white rectangle with a circle in it).
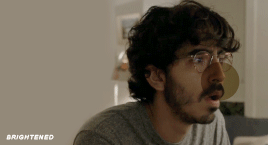
i almost always begin by using hue/saturation layers to highlight and delete certain colors. here i highlighted red and raised the lightness on yellow by a lot since it’s a very yellow scene. then i use a combination of brightness/contrast, levels, and curves layers to brighten the scene. here’s what i have now:
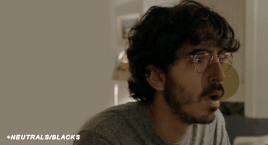
i add a gradient map set to black/white, change the blending to exclusion, and lower the opacity to between 5-10% (depending on the scene) to lighten the contrast further:

then i add back a little depth with selective color in neutrals and blacks:
now i have two main goals: 1. add contrast between the background and the subject, and 2. brighten the scene into a pale gif. to do this, i use color balance to tweak the color of the background, taking out the yellows. this step works best if there’s at least some shade difference between your subject and background, otherwise isolating the two will be impossible. here’s what i have after adding color balance:

i use hue/saturation to selectively highlight the background color. in this case i chose to adjust magenta and used the color picker (the first eyedropper on the left) to identify the exact shade i wanted to lighten. now i have a fairly neutral background and a colorful subject, which gives a sort of pale effect:
and now i use a curves layer and a selective color (white) layer to brighten further:

before i go further, i start fixing white-washing. keep in mind that some variance is normal since you are naturally changing the lighting of the scene; this gif shows it rlly clearly bc of how yellow and dim the lighting is, so some lightening is to be expected. however, both because the vector mask shows a lot of whitening and because i’ve giffed dev patel before and have a general idea of what he looks like in this type of lighting, i know what needs to be fixed, so i go back in under the psd/adjustment layers with a combination of selective color (red and neutral) and hue/saturation layers to darken his skin again:

now that some more contrast has been added in, i can go back to working on the psd and use curves and selective color to play around with the background again:

i use another hue/saturation layer and a black/white gradient to tone down oversaturation:


usually i leave those layers on top, so if i want to make any adjustments (like lightening the background more), i go in under those two. in this case i tweaked the whites and reduced the contrast a little to get this:
again, you can see his skin tone has changed from the original, but variation is to be expected given how much brighter the room is, the fact that i took out a lot of yellow lighting, and the brightening effect of the computer screen in front of him. some other things to keep in mind when coloring:
when you add layers to correct white-washing, you’re likely to end up with overly red/orange skin tones (red-washing). this can be fixed by upping cyans in the reds, desaturating/darkening the reds, or adding b/w or desaturation later on.
when in doubt, it’s better to be darker than lighter (the issue with white-washing is that it promotes colorism, and there is nothing inherently wrong with a darker skin tone) but really. just put in the effort to color poc correctly.
when changing the lighting a lot it helps to look at pictures of the subject in natural/bright lighting, since you get a better idea of what their normal skin tone is.
don’t try to squeeze all your selective color layers into one. you’ll get less grainy gifs if you separate them out and work one by one.
TURN OFF NIGHT SHIFT/NIGHT MODE! yes i KNOW it’s bad for your eyes (especially if you’re like me and gif at night, when the lighting outside isn’t changing every 20 seconds) but your gifs will look VERY different under f.lux or night mode compared to daytime screens. especially if you’re giffing at different times of day, blue light filters can really change the way your coloring appears. best to keep it consistent.
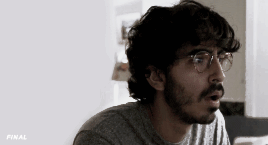
my sharpening settings vary depending on what i’m giffing but in general i do two layers of smart sharpen (500% with radius between 0.2-0.4, 10% with radius at 10px) and then gaussian blur at 2.5px and adjust the opacity so it’s somewhere between 15-20%. i try to strike a balance between smoothing out the graininess from selective color, and sharpening details like clothes and hair. here’s what i ended up with for the gif above:

then i rinse and repeat for the rest of the gifs in the set! i tend to start with the gifs that i know will be hardest to color, which is usually the darker ones (coloring is limited by how much i can brighten the scene) and those that include poc (again, limited by how much i can brighten and adjust the scene’s lighting without white-washing). then i check set cohesion as i go, using those first few gifs as benchmarks. once i have all 8 (or 9 or 10) gifs, i play around with composition and try to balance and vary the subject, colors, and composition of gifs next to each other. i go back and make a couple of adjustments here and there according to what i observe and what i think might improve the overall appearance.
and that’s pretty much it! i hope this was helpful, if you have other questions feel free to message me and i’d be happy to help/troubleshoot. happy giffing!
#Anonymous#*#resources#answered#sorry this was sO long but i hope it helped on the coloring end#tbh i exceeded my own expectations with the dev gif lol#yeahps#completeresources#chaoticresources#tutorial#coloring tutorial
55 notes
·
View notes
Note
I’m sure you’ve answered this before but how do you make gifs? I want to start making them and I was wondering if you have any tips or software that you use?
hey! i have answered this vaguely before but i’m gonna put a mini tutorial here under the cut, plssss know i’m not an expert in Anything so i’m sure there are better ways of doing literally everything listed here lol but i have gotten this question multiple times so i’m just gonna walk y’all through it 😅
programs i use in this:
photoshop cc 2020
vlc media player
so i’ll go through my process in two steps: 1) creating a simple gif and 2) sharpening and coloring
(this is all also mac-based bc i make gifs on a macbook... idk windows equivalents i’m sorry)
creating a simple gif
(pls note that i have 0 idea how to make gifs from series of images so you might want to look elsewhere for that 😅)
in most cases, you’ll be making a gif from a video file that’s much longer than the part you actually want to gif. to make life easier, i use vlc media player to record select parts of the video i want to use. this makes it easier to narrow down your selection in photoshop later (you’ll see how)
for the sake of this tutorial let’s use the butter mv as an example. i want to gif hobi towards the end, so i’ll open the video in vlc media player, forward it so it’s 5-10 seconds before the part i want, and then open the “playback” menu across the top and click “record”

once i’ve gotten the part i want recorded, i’ll go back into the “playback” menu and hit “record” again so that the recording ends
you should end up with a much smaller clip that will likely automatically save in your “movies” or “videos” folder.
now it’s time to open up photoshop. once you’ve opened it up, go to “file” -> “import” -> “video frames to layers”
find your video file. photoshop will then open a mini window where you can narrow down your selection even more
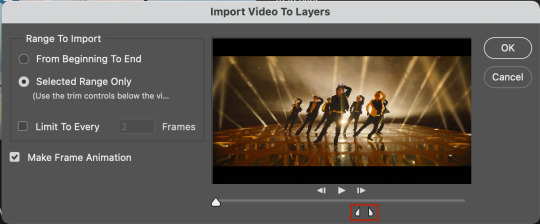
use the little sliders to select the part of the video you want. you can use the big slider all the way on the left to scrub through the video (it will show you a little preview). make sure “make frame animation” is selected.
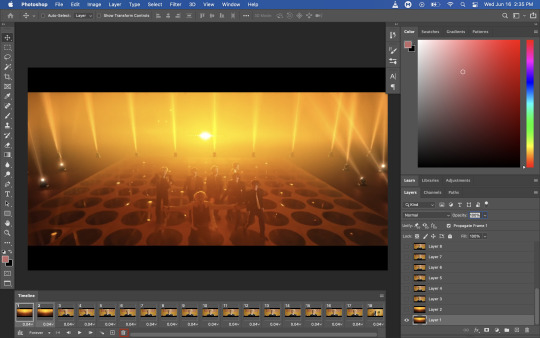
you should end up with something that looks like this (specific to the scene you choose to gif of course)

the series of images along the bottom are called “frames” and the ones in the little box to the bottom-right are called “layers”. honestly don’t ask me what the difference is bc idk but what matters is that you delete the frames that you don’t want as a part of your gif. you can do this by selecting the extra frames and clicking on the little trash can under the timeline:
you can delete the layers, too, but that doesn’t have any effect on your gif.
now this is where i’ll figure out the length and timing of my gif. see where it says “0.04“ under each frame? that’s called the “frame delay.” it’s essentially just how much time each frame will linger when you save your gif. this all depends on your personal preferences, but i almost always add 0.02 or 0.01 seconds, depending on the video.
to change the frame delay, select all the frames (the easiest way is to select the first frame and then hold shift down as you select the last frame) and click on the little arrow next to the number. then hit “other” and you can manually type in what you want your frame delay to be.

once that’s done, leave all your frames “selected” and then select all your layers (the same way you selected the frames). once you’ve done that, click on the last button all the way on the bottom-left of the timeline “convert to video timeline”

then, hit the button with three lines above the “layers” panel (outlined in red below) and select “convert to smart object”


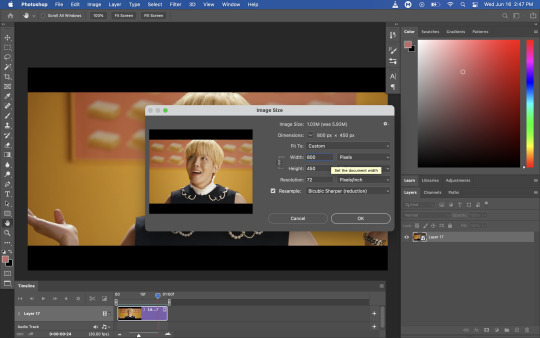
now that your layers have been converted to a smart object (i.e. one layer that you can edit in it’s entirety as opposed to editing every individual layer), this is where i crop and size my gif. general tumblr guidelines are: 1 gif per row: 540px width, 2 gifs per row: 268px width, 3 gifs per row: 177px width.
to size your gif, first go to the “image” menu and then “image size.” you have to do a little thinking here as you want to make sure that your image remains proportional - so take into account the height you want your gif to be. i generally make larger gifs around 350-450px in height, so i left myself some room for error by setting the width to 800px:

you should be left with a much smaller image:

now you’re going to crop it to the size you want. for this, go back to the image menu and select “canvas size.”

i ended up using a canvas size of 540px x 300px for this gif. it’s really down to your personal preference, but make sure you adhere to tumblr’s sizing limits
you’ll notice that your canvas size will have reduced, but your image is still there under it at this stage. at this point, you can readjust your image if you want to by hitting ctrl + t

i’m okay with how it looks so i’ll leave it like this. and that’s how you make a simple gif! all you need to do now is to export it. to do that, go to file -> export -> save for web (legacy)
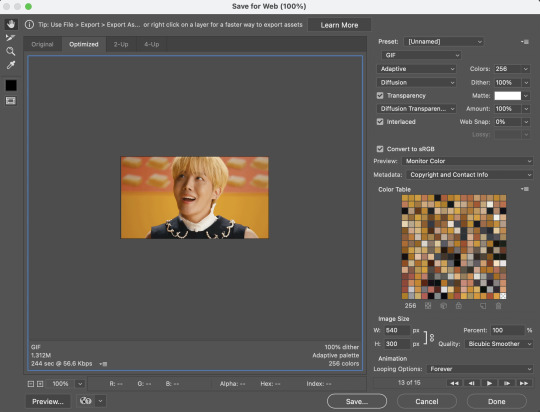
this is what my settings usually look like, but you can play around and see what works best for you. just make sure that under where it says “animation” your “looping options” have been set to “forever.” you should end up with something like this after you save it.

looks pretty good, right? it’ll look even better if you sharpen and color it! to do that, you can just use the file you’ve been working off of already. i start with sharpening by making sure my layer is selected and then using the menu “filter” -> “sharpen” -> “smart sharpen”

this is what my settings usually look like, but again, play around and see what looks good to you! it will also depend on the quality of video you use - i always try to gif from 1080p resolution videos as it’s easiest to make sure your gif will be clear.

now the next step is optional, but it’s helpful when your video is more noisy or blurry. right-click the layer you just applied “smart sharpen” to and duplicate it:

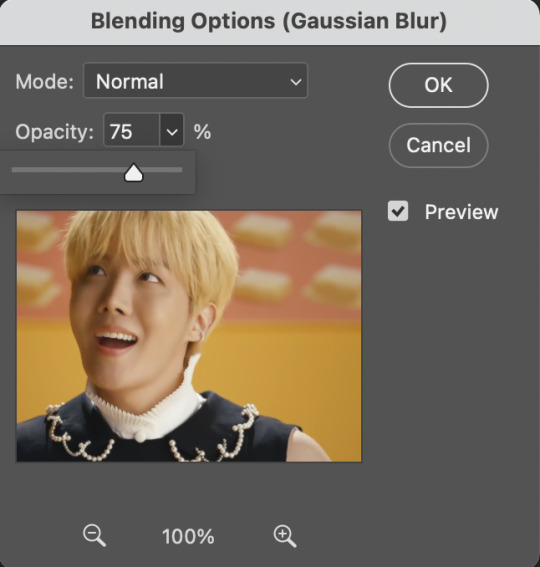
select ONLY the new layer, leave the smart sharpen filter as is, and open up the “filter” menu again. this time, you’re going to go to “blur” -> “gaussian blur”

the default radius will be 1.0 pixels. leave it like that! after you’ve hit ok, right-click on the gaussian blur filter and click “edit smart filter blending options”
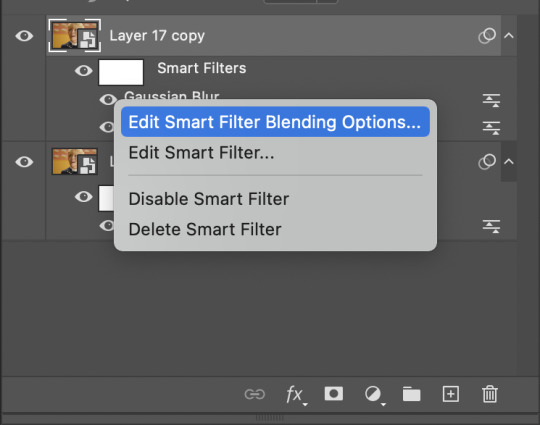
set the opacity to around 75-80%
then select the whole layer again and using the “opacity” drop down above the layer menu, set the opacity of the whole layer to around 45-50%.

again, you should just play around with it and see what looks best to you.
now you’re done sharpening! some people like to mess around with noise levels as well but i don’t because i don’t know how. lmao
i always convert these separate layers to a smart object after i’m done. i don’t think it makes a difference, but it makes the layer panel look neater to me lol
now the fun part: coloring!
this will depend on your individual taste. there are many adjustment layers available in photoshop - i haven’t even played around with all of them. i’ll go through some of the basic ones that i use in almost all my gifs here:
1) curves
idk how to explain it tbh. you can just click auto as a good starting point. you can also use the little eyedroppers to set black, white, and grey reference points in your image for more accurate “curving” lol

this is what it looks like after you’ve applied the adjustment:

2) vibrance
i like colors. i like a good vibrant gif. so i will almost always adjust the vibrance before i do anything else. play around here and do what you want with it lol
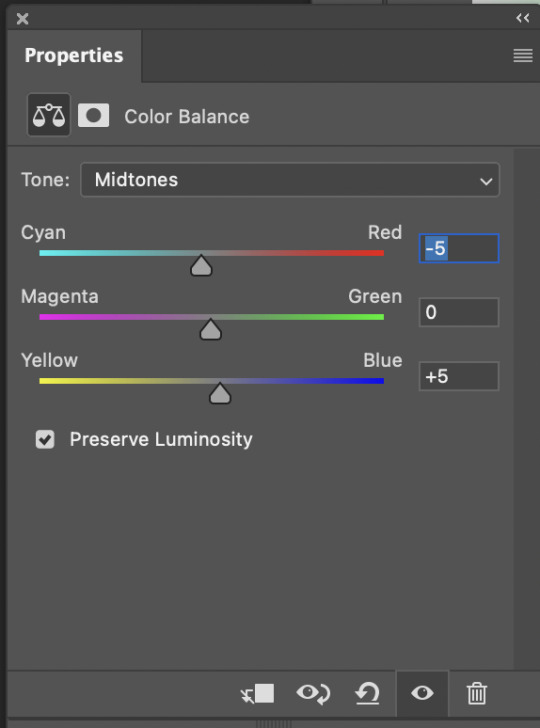
3) color balance
again, this will all be based on what looks good to you. butter mv is a little heavy on yellows and reds for my taste, so i color corrected slightly by moving the sliders towards “cyan” and “blue”
4) brightness/contrast
self explanatory i think!
5) selective color
now here is where you can get really fancy and personalize your gif. just mess around with all the color levels to your liking until you figure out a style you’re into.
6) gradient map
now this is a layer i almost always use. it just adds depth to your gif by giving it some “shadows” and “highlights”. here’s how you use the gradient map:
select the gradient map layer and check the box next to “reverse.” your gif should look like you applied a black and white filter:
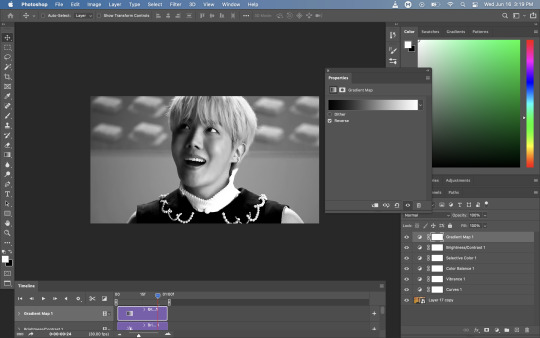
next, making sure the gradient map layer is still selected, click the menu above the layer panel to the left of “opacity” (the default selection in that menu is “normal”). i usually set this to “soft light”

you’ll end up with something like this. it’s a little harsher than i would like, so i’m going to adjust the opacity this time using the same opacity adjuster thing on top of the layer panel. i usually set this layer to about 20%

it may not seem like it but trust me this makes a difference 😭
here’s the gif before sharpening/coloring and after:

looks way better, right??? (at least i hope you think so lol)
okay that’s the end of this very wacky and disorganized gif tutorial! i hope this was at all helpful and if you have any questions pls lmk and i’ll do my best to answer them 😭
#long post#idk who i think i am like i didn't just start giffing like a couple months ago sdflkjglksjgklg#anyways.#gif making#anon#ask#this took way too long and there are SO many screenshots it's so long i'm sorry
12 notes
·
View notes
Text
#showyourprocess
From planning to posting, share your process for making creative content!
To continue supporting content makers, this tag game is meant to show the entire process of making creative content: this can be for any creation.
RULES — When your work is tagged, show the process of its creation from planning to posting, then tag 5 people with a specific link to one of their creative works you’d like to see the process of. Use the tag #showyourprocess so we can find yours!
Tagged by @leonzhng and @baoshan-sanren. Thank you for tagging me! ♡ I’ll do both of them in the same post. In the order I was tagged
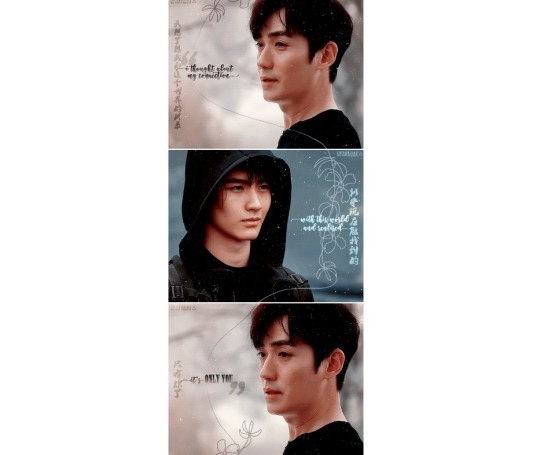
PART 1 (the TLTR set)
0. Software
KMPlayer - to take screenshots
Photoshop 2020 - to upload, crop, resize, sharpen, frame delay, add text, etc.
Topaz DeNoise 6 - to reduce noise
1. Planning
I don’t remember what planning I did for this one lol. I just thought to myself: Hey what if I gif that sad scene from TLTR and add that quote from the book to make it even sadder? Yep that sounds cool!
Then it took me a while to find the quote in Chinese bc I only had the English translation and I wanted to write both. I got inspired by Hanyi on this. She has the most beautiful sets, with quotes written in such creative ways. All those pretty fonts!!
Then I took the screenshots of the scenes I wanted to use and I imported them in Photoshop
2. Creation
When the screenshots were done importing, I cropped the gifs and resized them, then I selected all the layers, converted to timeline and converted them to smart object
After doing that I used Topaz DeNoise to remove the noise from the gifs and then I sharpened them
At the end I added the coloring over them and done! I used lot of Selective Color and Curves layers for this coloring. Like 20 layers in total
Actually I always do the coloring at the beginning, after I crop the gif, before I do the sharpening and using Topaz bc if the coloring doesn’t turn out nice then I give up and don’t make the gif anymore
After that it took me a while to figure out what font to use for the text, in what position to put it, what effect to give it. I ended up just using overlay
Then I also thought to add something else bc it was too simple. I added the flowers on the middle gif. And I used the pen tool to connect the flowers with lines connecting the other gifs
Then I also put a falling snow gif over them
And last, I added my watermark
3. Posting
I always post my gifsets in the drafts first to see how they look. If I don’t like something I go back and change it
I also added the quote in the caption and used fiddle to color the text with colors found in the gifs
And that’s it!
PART 2 (the Vincenzo set)
0. Software
KMPlayer - to take screenshots
Photoshop 2020 - to upload, crop, resize, sharpen, frame delay, add text, etc.
Topaz DeNoise 6 - to reduce noise
1. Planning
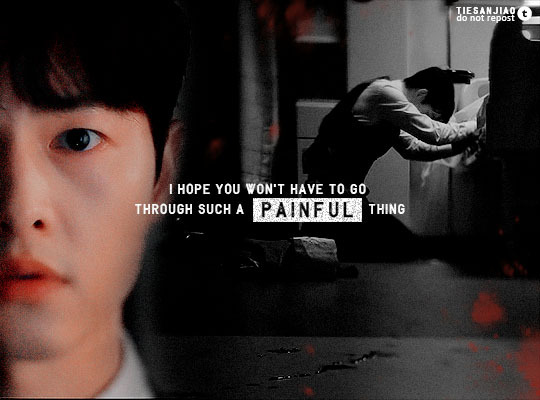
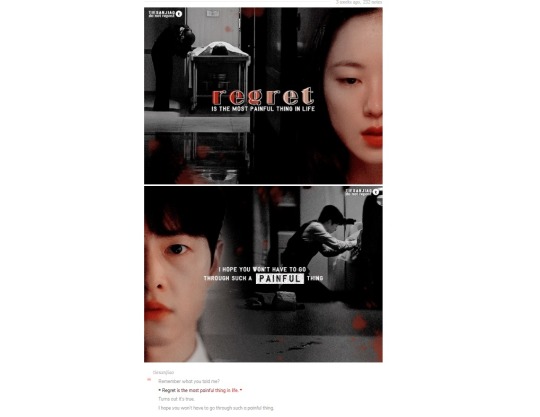
I thought about making this edit after watching the episode and seeing a post with both of them near their parents’ bodies at the morgue
I thought about using those scenes and then also the scenes where they both saw what happened bc they had the same expressions there
2. Creation
I did the same as with the gifs above. I imported the screenshots, cropped and resized them
I don’t have the psds with the gifs anymore so I took some screenshots rn to show you
So I had these 2 separate gifs with Vincenzo and I copied the frames and pasted them over the other gif like this
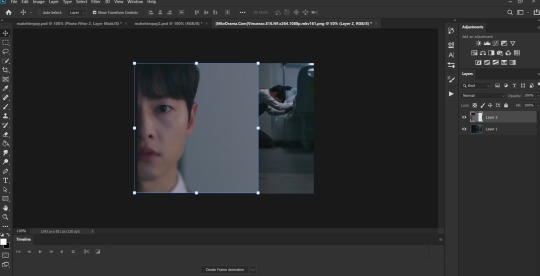
I moved the gif on top on the left side. Then applied a layer mask. With the brush tool I erased the background behind Vincenzo
Then I converted to timeline and smart object. I sharpened and used Topaz. But then I thought it’ll look better with noise so I added a little
Then I colored it. Again I used a lot of Selective Color and Curves layers
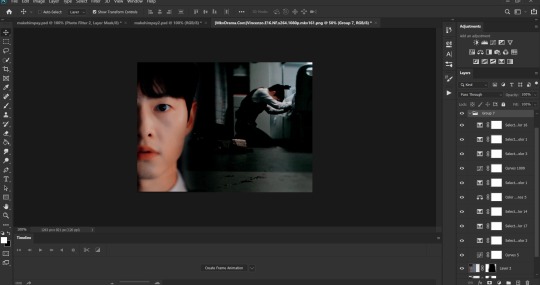
I decided to make it black and white and only leave Vincenzo’s face colored. So I added a layer mask and used the brush tool again to paint over the layer removing the black and white
Then I added the text and I used the brush tool to leave some red drops over it bc they kinda look like blood
I also added my watermark
3. Posting
Once again I posted it first in drafts to see how it looks
Then I wrote the caption and tags and done!
If you want me to explain something better just let me know and I will. I forgot to talk about some things.
12 notes
·
View notes
Note
Hello! Hi! Your stuff is AMAZING! I have been using photoshop my entire life and have always been deathly afraid of trying GIFs. Is it hard? It seems so & when i start to try and google Im like hmm nah lol. I notice on tumblr people comment stuff like “wow your smoothness is great” or the quality & also I see some say the coloring of a certain scene made the GiF edit hard for them. Do you have any pointers for this stuff or some resource where I can pick up and learn to make nice gif sets :) TY
awww, thank you, that’s so sweet!
no, i don’t think making gifs is hard at all :) especially once you get it down it’s just basically following steps. i could do it in my sleep lol.
one of my internet friends actually taught me how to make them via text/videos a few years ago! so i was able to ask her about certain things i was confused about as i was learning. it probably only took an afternoon to really get it down! and once i got the basic structure down i could learn more about sharpening, coloring, text, etc. on my own.
i can teach you some basics, but there are tons of good tutorials on here you can follow as well :) under the cut cause it’s gonna be long
To answer your questions: 1. some scenes/shows are really hard to color. sometimes that’s due to the lighting of the scene itself (i.e. dark/bright lights, etc.) or just due to the color palette the show itself uses. 2. i’m assuming you’re talking about sharpness when you say smoothness, but correct me if i’m wrong. gifs will look the best when they are taken from high quality content (netflix/hulu, HQ youtube videos) and you can sharpen them in photoshop itself (much like you would a picture). i have a sharpening action presaved in photoshop that is the first thing i do when opening up the video i want to gif in photoshop.
Now for some giffing basics! 1. I typically screen record whatever it is i want to gif unless i can find a hq youtube video to download, but i find screen recording works best for quality. i use QuickTime Player for this. once i have what i want captured i export it in 4k and save it to a folder i have designated for videos i want to gif. 2. moving to photoshop the first step is opening the video you want to edit. to do this you go to file -> import -> video frames to layers once you do that a window will pop up asking for you to pick a range. you do not want to import the entire video bc you’d end up with way too much and if it’s too large ps won’t be able to process it. you’ll pick ‘selected range only’ and ‘limit to every 2 frames’. then i typically move the middle slider to the part of the clip i want to use and use the first and last sliders to pick the beginning and end of the clip you want (it’s okay if you get stuff in the beginning or end you don’t want as you can delete it later) 3. once i do that the first thing i do before messing with anything is use my sharpening action shortcut i have programmed in photoshop and wait for it to do it’s thing (this step you’ll have to skip until you can learn more about that and i really don’t remember how i actually set it up) 4. after that i’ll use the timeline and delete the frames i absolutely don’t want in my gif (i.e. if you got any extra stuff from the beginning/end). never never never delete from the middle as it won’t look right in the end. 5. after that i click on the three little lines on the far right of the timeline and click ‘select all frames’ then i click the three lines again and choose ‘flatten frames into layers’. then on the layers panel you’ll have frames that were just added on top of the layers. you want to then delete all the layers so you’re just left with frames 1-X. 6. after that i use the timeline to time delay the clips. It’ll usually say 0.02, but that’s much too fast so we want to slow it down. I usually change it to 0.07, but if i am working with something where i have fewer frames (like 25 or less) i will use anything from 0.07-0.11, just depends what looks right. 7. now comes cropping! you should know what you want your gif to look like before even making it (probably even before you start gathering clips). With my new Brio edit I had to figure out which lyrics i wanted to use, how many gifs i was going to use, what size i wanted them to be, and what scenes i wanted to use. the size i used for that one was 540 x 280 (you want to make sure your sizes are in pixels, not inches). For the smaller gifs that are side by side i usually use 245 x 160 and you can put up to 12 of those in your set. 8. since i suck at coloring i use pre-saved psds for my coloring. i have some basic ones saved, but also some more fun ones as well. these are pretty easy to find around tumblr and all you have to do is save them to your computer and then just open then in photoshop! you’ll want to select all the layers on the psd then drag it over on top of all the layers on your gif. note that not all psds work for everything and you may have to do some adjustments on different layers to get it to look right. 9. after editing it’s time to save! tumblr has some size restriction so if you pass them your gif won’t move or might just be a blank space. all gifs must be under 3 MB and i think your whole set has to be under 10 MB for it to work correctly. When saving I select those 3 little lines on the far right of the timeline again, make sure all layers are selected, then again flatten all frames into layers. after that you go to file -> export -> save for web. after that you’ll just hit save in the next window then you’ll be able to save it in .gif format and it’s ready for tumblr!
there are tons of different ways to gif, this is just how i do it :) the more you practice the more you’ll learn
#i am no ps expert#and i haven't been giffing much the past year#but i hope this helps#xenalovesoq#ask
5 notes
·
View notes
Text
Big Sorry #2
Who would have thought I would ever need to write that? Me definitely not.
Seriously though guys, I’m so very sorry about this lack of communication. I’m not trying to come up with empty excuses for why things are as they are because however many words, in the end they’re just that: words. They won’t change anything and I apologise for that. Let me try to explain anyway as good as I can and once I’m done I’ll tell you what we decided to do to make up for it.
So first of all, I’m a full time student working part time. I tried to finish the zine in October, but as I’m a writer and not an artist I needed time and feedback to deal with the zine-designing. As I worked on the issues that were brought up, a couple of co-workers got sick and I had to work extra shifts that made it difficult to balance the zine and university. I thought it would be solved quickly (I mean how long are people sick in general? 2 weeks? Sounds easy enough). Well, let’s say I was wrong.
I didn’t want to post another empty lip service either, though, so I thought, I’d finish it in December and post about its completion as a Christmas gift. With the difference that my in-law went crazy bc of christmas and her 30th birthday on new years and then I had essays to write and shifts to work and, to make matters worse, my dad was hospitalised a week before christmas. He was released a few days later but even now he’s still on pain meds (his spine is drilling into his hip bone, leaving indents, which apparently only happened/was only noticeable recently and he was advised against surgery). I’m sure I don’t have to tell you how difficult the holidays were afterwards.
To make up for my break of schedule, I ordered the merch a day before new years and didn’t get to check the process of the order until two weeks later (we celebrated my in-laws birthday with a ~one~ week vacation on an island not too far away and the wifi was really bad). One of the orders had a delay of shipment as it crossed borders and I needed to get in contact with the people in charge to get the shipment from the border to my home. The other... well. Let’s just say I’m an idiot. (I didn’t know they needed me to approve of a draft okay).
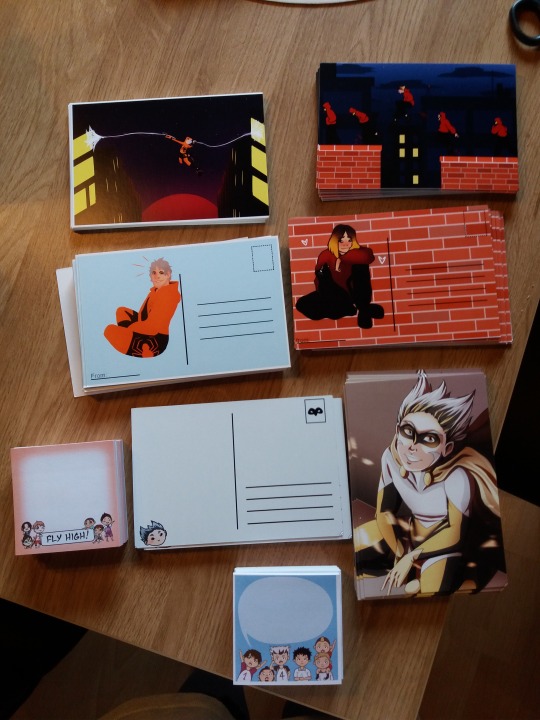
(Look at all the postcards and sticky notes!!! <3)
And then there was the zine itself. During the time frame I couldn’t work on it, my trial versions ran out of time and I couldn’t figure out how to deal with the still open issues without getting a full version that I’d have to pay monthly throughout the next half year for when I’d only need it for another month. I was saved though by the amazing @macbeth-macdeath who not only dealt with my mistakes but also made it 100x more beautiful than I could have ever imagined!!! THANK YOU SO SO MUCH COREY!!!!
WHICH LEADS ME TO THE CONCLUSION OF THIS ESSAY:
THE ZINE IS DONE: F-U-L-L-Y DONE! NO PROOFCHECKS LEFT, NO FEEDBACK TO GIVE, NO PAGES TO EDIT: D-O-N-E! THE COPIES ARE ORDERED AND ON THEIR WAY TO ME!!!
SO SORRY FOR THE DELAY GUYS BUT WE DID IT!!! THANK YOU FOR ALL YOUR PATIENCE UP TILL NOW, I KNOW IT WASN’T EASY WITH US. <3
Everyone who ordered from our shop, please check your mails! We sent the PDF to you. If you didn’t receive it, please leave a message in our inbox or email us with the name you put on the order.
#Apology 2#The Hero Within#the hero within zine#please continue to#retribution and solution#for our plans for the coming weeks
3 notes
·
View notes
Note
hi! do you have a gif tutorial by any chance? yours are absolutely stunning 💓
Hey, thanks buddy! You’re hecka sweet. I can give you a little preview into my own process, but keep in mind that I’m sure there’s a heck of a lot of better tutorials (I’ll link them in the tutorial, they’ll be under part 2 coloring section). But this is how I go about it:
Part 1: Prep
Believe it or not, this is where most of my time goes. I’ll assume that you have some kind of photoshop that can make gifs at this point (I personally use Photoshop CC 2015) as well as the video files for whatever you want to gif.
First thing after having the video files for what’cha want to gif, we’ll have to upload the frames to photoshop. My method depends on how short the video files actually is.
If it’s a short mp4 files (e.g. a trailer from yt), I can just upload the part I want to gif by directly opening photoshop and clicking on the top menu: file >> import >> video to frames. Click on the video file and select the range you want to gif.

Easy peasy, you can now skip to step 2 in that case!
Unfortunately, the file is usually a large, 2-3 hr long, mkv file so that won’t cut it. Instead, you’ll need create a file that contains each frame as a screenshot (don’t worry, it’s not as tedious as it sounds!). There’s several ways to go about this, but I personally use a combination of Adapter and VLC.
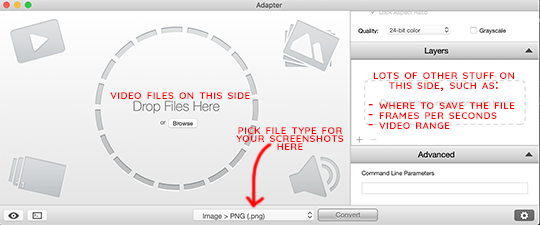
Adapter will allow you to input a range and create a file to save your frames. Makes sure to pick a custom place to save your files (under directory) and your export frame rate to be ~24 images per second. At the bottom of the screen, you can also pick the file type of your screenshots - I personally will save them as PNG. I use VLC to find the range (since it’s the only video player I can find that opens mkv files AND works on mac) since unfortunately Adapter won’t let you preview the actual video, unlike when uploading to photoshop.
Here’s another tutorial on Adapter that is a lot better written >.>
Once that’s all done, we can finally upload to photoshop. To do this, you’ll go to the top menu like you would to directly download the video file, but instead click file >> scripts >> load files into stack. Click “Browse” and select all the screenshots in your file. Click okay.
Give it a few moments (or in my case, 15 minutes or so bc it’s slow for me for some reason ;_;) until the upload is complete. Once it’s complete, you click “create frame animation” at the bottom (if you don’t see the timeline, go to the top menu and select window >> timeline).

You’ll see only one frame so far. No worries, select the 4 little lines at the top right of the timeline and select “make frames from layers”.

So close! Now we need to reverse the frames and the layers. This does get a little tedious, so bear with me. Select all the frames and go down to the same drop down menu (with the 4 little lines) and click reverse frames. To reverse the layers select all except the bottom one (for some reason it’ll give me an error if I try to select all of them) and go to the top menu: layer >> arrange >> reverse. Then click that bottom, troublesome layer and click layer >> arrange >> bring to the top.
A tedious method indeed, but you can make it easier by memorizing the hot keys or, better yet, creating an action (which allows you to save numerous steps).
Tutorial on actions here.
Finally (I swear there’s light at the end of this tunnel), go to the bottom of the timeline and click “once” and select “forever” to the gif will loop once you save it.

OKIE DOKIE, FINALLY READY TO ACTUALLY MAKE THE GIF.
Part 2: Coloring + Sharpening + etc
There are loads of methods on coloring, which heavily depends on your preferences. No matter what, I usually start with levels to up the contrast. Add a little bit of darkness (leftmost slider…thing - don’t go too crazy, I stay within the 5-15 range unless I’m doing something special), and up the brightness by sliding the other two sliders to the left.
Now it all depends on you. Do you want vibrant? Single color specific? Pale? Whatever you might want, I tend to use the following the most: levels, selective color, color balance, hue/saturation, brightness/contrast, vibrance, and occasionally gradient map.

Check out specific blogs below for more information on that (or if you want to know how color a specific way, let me know).
Blog recs for tutorials:
@chaoticresources || @itsphotoshop || @completeresources
+ their recommended/affiliates (on the side of each blog)
Okie dokie, before moving forward, we’ll need to resize the gif if you haven’t already. Tumblr specifically allows for only different three widths: 540 px (one gif across), 268 px (two gifs per row), and 177 px/178 px/177 px (three gifs per row, yes the middle is 1 px more). The height has less limitations, but all your gifs should generally be the same within one gifset (unless you’re going for something interesting); each gif in a row specifically has to be the same height, however, or else you’re gonna get some funky results.
Note: my most generic sets tend to be 8 gifs, 2 per row. These tend to have a height of 154 px. But all up to you, my dude.
Once you’re all done coloring and resizing, it’s time to sharpen. The quickest way to sharpen is to convert your timeline to “video timeline”. But I personally dislike that method for various reasons (mostly bc saving a gif while in that mode takes like 700 years for my poor computer and I have less control over each individual frame), so I’ll show you my tedious as heck way (hint: once again, I use actions to do this).
To sharpen each frame, you have the frame and corresponding layer selected. Then in the top menu, select filter >> sharpen >> smart sharpen. My settings are as follows: amount ranges between 250-400%, radius is 0.3-0.4 px, reduce noise is 10%, and remove gaussian blur. You’ll have to do this for each frame/layer, so again I suggest either learning/downloading actions or learn the video timeline method.
Lastly, make sure your gif delay is around 0.5 secs - or at least that’s what I use. Sometimes I’ll go up 0.7 or even 0.9 secs if I have a really really small amount of frames and I want to make the gif look like it lasts longer ^^;.
Part 3: Saving and Posting
Okie dokie, so this should be the easy part, right? Maybe? All depends on your gif. You see, when you save (top menu: file >> export >> save for web), you gotta make sure your gif is under 3M…but I usually try to get under 2.87 M to be safe (I’ve saved at 2.9M before and the file ended up being bumped up to over 3M when I checked the file itself….very rude).
Anywho, the best way to cut down size is deleting frames. Other methods include playing around with the coloring (less vibrant, for instance) and height (especially for 540 px gifs).
So once you get a decent size, click “preview” to see how your spiffy gif will be looking. Once you’re satisfied, you can finally save! Upload those bad boys to tumblr and tag them with appropriate tags (e.g. the fandom edit tags or tagging blogs if that’s your sort of thing). Finally done to show the world :’D
Hopefully that was someone helpful? ish? If you need any specifics, let me know.
7 notes
·
View notes
Note
4, 22, 35, and for 42, how do u come up with such fitting quotes for your ships bc omg they always fit?!
4. What do you enjoy about making graphics / gifs?
so like for the longest time I used to give my ideas to a friend of mine, @blacksiren, because I didn’t have photoshop and didn’t know the first thing about making gifs and hers were tip top and still are, even if she doesn’t post as much anymore. but I always loved seeing parallels side-by-side, esp compelling ones that I had noticed that gave me a lot of feels and especially those with laurel in them. and so when my brother downloaded photoshop on the sly and gave it to me, I figured I could start dabbling in the world of giffing and it’s just really satisfying hearing a song lyric or seeing a quote and then putting it on gifs. or if I see a certain parallel - like this iris and dawn one - and then see it in gif form and marvel over how perfect a casting is. also it’s just fun taking the time to do things with my energy lol, whether it’s positive or negative - like I might be feeling kinda down and then I’ll make a sad gifset which is kind of an outlet for me, or maybe I’m stuck in a rut and then I make an inspirational or uplifting set and that makes me feel better. creativity is how I deal with a lot of stuff, so making gifs helps a lot. :)
22. answered here
35. Gif makers, what is your go to frame delay? (And why!)
0.06 or 0.07, usually, because when I click save for web on photoshop, it previews the gif as a certain speed, but then when I upload on tumblr it shows it to be a lot faster? and I prefer gifs that are at least three seconds in length (kind of an ocd thing possibly idk I just am not a fan of really short gifs) which is why I tend to go with 50 frames at 0.06 or 38 frames at 0.07. but if I have say 30 frames then I’ll make my frame delay 0.1, for the three second thing. I always try and use three seconds as my base total, and then adjust frame delay from there, if that makes sense.
42. Anything you’re curious about graphic/gif related!
okay! ahhh it is really nice to hear that you think I pick fitting quotes. :D I follow @wordsnquotes which has some good ones, and what I tend to do is reblog the quotes I like with “inspiration” and sometimes the ship or character it reminds me of (usually laurel or lauryssa). but also I have this thing about using quotes for multiple ships or characters - like I used a laurel quote for a dutch set, and I’ve probably overused mouthful of forevers, a poem by clementine von radics, given I used it for dutchjohnny, canarrow, lauryssa (twice) AND zamaya. I’ve used i carry your heart with me(i carry it in my heart) by ee cummings for a shoot edit and a lauryssa one. and don’t even get me started on the songs I’ve used for multiple pairings lmao because we’d be here all day. insp for those tends to come with my walk to the bus stop to and from work because I’m always listening to something on my headphones and usually I’m thinking of a certain pairing. then I usually plan the gifset during my bus journey lmao if I can remember the episode numbers, then when I come home I just have to screencap and make the gifs and I usually colour them the morning after. :)
also I have friends who reblog and/or send me quotes, which helps a lot. @therewas-a-girl reblogs a lot of great poetry and quotes and @sophiainspace just yesterday sent me a really powerful poem about fridging. but yeah generally I think it’s because I studied english lit a-level and a lot of the stuff I studied stuck with me? OOOOOOH speaking of, zomg, I just got an idea for my next gifset. I can’t believe I didn’t think of this before. watch this space, friend :DDDDD and thank you!
ask a graphic/gifmaker
#I can't remember how much you ship this particular ship so I won't bore you with the details#but yessss I just got the best idea whooooooooo#me.txt#replies#ask meme#giffing tag#tchallaserik
3 notes
·
View notes