#basically i wanted val to have a dps class
Explore tagged Tumblr posts
Visit Tumblr Blog
Explore Tumblr blogs with no restrictions, modern design and the best experience.
Last Seen Tumblr Blogs


Fun Fact
After the announcement of the deal with Yahoo!, there were 170K signatures of unhappy Tumblr users petitioning to prevent the sale in 2013.
Text
okay so i went to sleep too early and now im wide awake at 2 am what this means is that i have free time in this limbo of existence that is 2 - 5 am. i could write out that sparring scene that ive been thinking of ever since i let my alt pick up red mage. as practice. because i suck at action scenes. i could also rewrite a different scene that im unhappy with since i wrote it a few months ago and ive changed how i write some of these characters. might just turn on my switch.
#in theory i could also study but like. no#personal#the red mage thing#basically i wanted val to have a dps class#bc hes originally a scholar but i SUCK at scholar and i mean to make him a sage at lv70 but obviously. he isnt there yet#hes a lv58 scholar for reference#so i went through all lf the classes in my head like 'what would fit him'#because hes an au version of a pre-existing character?? he has a personality and while his original self is garlean & incapable of magic.#viera valerian isnt.#i thought about gunbreaker but thats a tank class and i am not tanking thok ast thok i do not have a death wish#(nothing personal towards tanks i just panic doing things ive never done before. like tanking most trials.)#(i have 2 tanking classes at 90 on my main character)#reaper came up bc it is a garlean thing. you get taught reaper by a garlean! ...but thats just. not him#i dont think hes opposed to it i just think he very much Does Not Trust the voidsent. (also hes scared but sshhh)#i thought about unlocking summoner but that?? also felt wrong????#the other 2 healer classes. despite his canon version being a scientist whos really into healing items specifically. nope#black mage is one of my least favorite classes so that was an immediate no#nothing suits him!! it drove me insane but then. red mage.#it just?? made sense???#i think hed get along with x'rhun i think the combo black & white magic makes so much more sense than picking one (for him)#i also think he looks good in red (matches with his eyes <3)#and then i had sparring thoughts. because back when i thought about making him gnb i had those thoughts#i have those thoughts the moment i see anything sword-shaped. it always ends with people kissing. its my specialty#and thennn i remembered the Tip of a Sword at Another's Throat image#and immediately teleported to ul'dah to pick up rdm. like a normal person#anywya that ramble took 20 minutes#also the uh. other scene. is valerian's reunion with his husband. didndt feel emotional enough for all the shit they went through#its like. he spends the better part of their marriage literally losing it. corruption arc dragged out over multiple decades.#and then he just leaves. he just walks away and they dont talk for 3 years and at some point they both think the other to be dead#thats not. thats a lot to fix. and i touched on it a LITTLE in scenes set after this. the way they have to rebuild trust. but ough
0 notes
Text
How to Create a Custom API From Any Website Using Puppeteer
It often happens that you come across a website and are forced to perform a set of actions to finally avail some data. You are then faced with a dilemma as to how do you make this data, which you see in front of you, available in a form which can easily be consumed by your application.
Scraping comes to the rescue in such a case and it is at this very juncture that selecting the right tool for the job pays dividend.

API is just a way to look at a Website after all (Source: XKCD Comics)
Puppeteer: Not Just Another Scraping Library
Puppeteer is a Node.js library, maintained by the Chrome Devtools Team at Google, which basically runs a Chromium or Chrome (as most of us recognize the popular browser by) instance in a headless (configurable) manner and exposes a set of high-level APIs.
From its official documentation, puppeteer is normally leveraged to be utilized for multiple processes which are not limited to the following:
Generating screenshots and PDFs
Crawling a SPA and generating pre-rendered content (i.e. Server Side Rendering)
Testing Chrome extensions
Automation testing of Web Interfaces
Diagnosis of performance issue through techniques like capturing the timeline trace of a website
For our case, we need to be able to access a website and map the data we need in a form so that it can be easily consumed by our application.
Sounds simple? The implementation is not that complex either. Let's start.
Stringing The Code Along
My fondness for Amazon products brings me back to using one of their product listing page as a sample here. We would be implementing our use case in two steps:
Extract data from the page and map it in an easily consumable JSON form
Add a little sprinkle of automation to make our lives a little more easier
You can find the complete code in this repository.
We would be extracting the data from the link: https://www.amazon.in/s?k=Shirts&ref=nb_sb_noss_2 (shows a listing of the top searched shirts as shown in the image) in an API servable form.
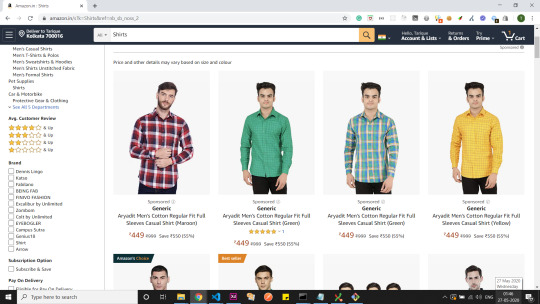
Amazon India - Shirts Listing Page
Before we get started with using puppeteer extensively in this section, it is necessary for one to understand the two primary classes provided by it.
Browser: Launches a Chrome instance when we use puppeteer.launch or puppeteer.connect . This works as a simple browser emulation.
Page: Page resembles a single tab on a Chrome browser. It provides an exhaustive set of methods you can use with a particular page instance and is invoked when we call browser.newPage. Just like you can create multiple tabs in the browser, you can similarly create multiple page instances at a single time in puppeteer.
Setting Up Puppeteer and Navigating to the Target URL
We start setting up puppeteer by using the npm module provided. After having puppeteer installed, we create an instance of the browser and the page class and navigate to the target URL.
const puppeteer = require('puppeteer'); const url = 'https://www.amazon.in/s?k=Shirts&ref=nb_sb_noss_2'; async function fetchProductList(url) { const browser = await puppeteer.launch({ headless: true, // false: enables one to view the Chrome instance in action defaultViewport: null, // (optional) useful only in non-headless mode }); const page = await browser.newPage(); await page.goto(url, { waitUntil: 'networkidle2' }); ... } fetchProductList(url);
Launching the Browser and Navigating to the Target URL (index.js)
We use networkidle2 as the value for the waitUntil option while navigating to the URL. Since it ensures that the page load state is considered final when it has no more than 2 connections running for at least 500ms or half a second.
Note: You do not need to have Chrome or an instance of it installed on your system for puppeteer to work. It already ships with a lite version of it bundled with the library.
Page Methods to Extract and Map Data
The DOM has already loaded in the page instance created. We would go ahead and leverage page.evaluate() method to query the DOM.
Before we start, we need to ascertain what are the exact data-points we need to extract. In the current sample, I would envision each of the product object to look something like this.
{ brand: 'Diverse', product: 'Printed Regular fit Cotton Formal Shirt', url: 'https://www.amazon.in/Diverse-Printed-Regular-Cotton-DVF01F2L01-263-42_Navy_42/dp/B075KKF5XL/ref=sr_1_33?dchild=1&keywords=Shirts&qid=1590526248&sr=8-33', image: 'https://www.amazon.in/images/I/71jnFDXHAYL._AC_UL320_.jpg', price: '₹599', }
Product Object Structure
We have laid out the structure we wish to achieve. Time to start inspecting the DOM for the identifiers. We check for the selectors that occur throughout the items to be mapped. We would be using document.querySelector and document.querySelectorAll predominantly for traversing the DOM.
... async function fetchProductList(url) { ... await page.waitFor('div[data-cel-widget^="search_result_"]'); const result = await page.evaluate(() => { let totalSearchResults = Array.from(document.querySelectorAll('div[data-cel-widget^="search_result_"]')).length; let productsList = []; for (let i = 1; i < totalSearchResults - 1; i++) { let product = { brand: '', product: '', }; let onlyProduct = false; let emptyProductMeta = false; let productNodes = Array.from(document.querySelectorAll(`div[data-cel-widget="search_result_${i}"] .a-size-base-plus.a-color-base`)); if (productNodes.length === 0) { productNodes = Array.from(document.querySelectorAll(`div[data-cel-widget="search_result_${i}"] .a-size-medium.a-color-base.a-text-normal`)); productNodes.length > 0 ? onlyProduct = true : emptyProductMeta = true; } let productsDetails = productNodes.map(el => el.innerText); if (!emptyProductMeta) { product.brand = onlyProduct ? '' : productsDetails[0]; product.product = onlyProduct ? productsDetails[0] : productsDetails[1]; } let rawImage = document.querySelector(`div[data-cel-widget="search_result_${i}"] .s-image`); product.image =rawImage ? rawImage.src : ''; let rawUrl = document.querySelector(`div[data-cel-widget="search_result_${i}"] a[target="_blank"].a-link-normal`); product.url = rawUrl ? rawUrl.href : ''; let rawPrice = document.querySelector(`div[data-cel-widget="search_result_${i}"] span.a-offscreen`); product.price = rawPrice ? rawPrice.innerText : ''; if (typeof product.product !== 'undefined') { !product.product.trim() ? null : productsList = productsList.concat(product); } } return productsList; }); ... } ...
DOM Traversal and Data Mapping Logic (index.js)
After investigating the DOM, we could see that each listed item is enclosed under an element with the selector div[data-cel-widget^="search_result_"] . This particular selector seeks out all div tags with attribute data-cel-widget having a value starting with search_result_.
Similarly, we map out the selectors for the parameters we require as listed. If you want to learn more about DOM traversal, you can check out this informative article by Zell.
total listed items: div[data-cel-widget^="search_result_"]
brand: div[data-cel-widget="search_result_${i}"] .a-size-base-plus.a-color-base (i stands for the node number in total listed items)
product: div[data-cel-widget="search_result_${i}"] .a-size-base-plus.a-color-base or div[data-cel-widget="search_result_${i}"] .a-size-medium.a-color-base.a-text-normal (i stands for the node number in total listed items)
url: div[data-cel-widget="search_result_${i}"] a[target="_blank"].a-link-normal (i stands for the node number in total listed items)
image: div[data-cel-widget="search_result_${i}"] .s-image (i stands for the node number in total listed items)
price: div[data-cel-widget="search_result_${i}"] span.a-offscreen (i stands for the node number in total listed items)
Note: We wait for div[data-cel-widget^="search_result_"] selector named elements to be available on the page by using the page.waitFor method
Once the page.evaluate method is invoked, we could see the data we require logged.
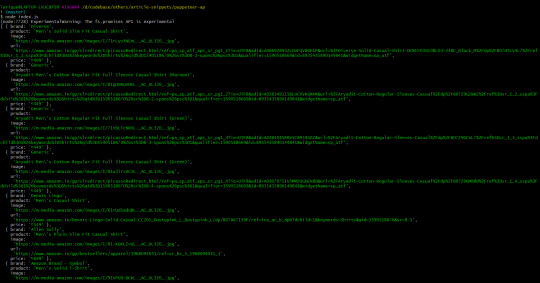
It works! We have our API data ready to serve what we require
Adding Automation to Ease Flow
So far we are able to navigate to a page, extract the data we need and transform it into an API-ready form. That sounds all hunky-dory.
However, consider for a moment, if there is a case where you have to navigate to another URL from a given URL by performing some actions and then try to extract the data you need. Would that make your life a little trickier? Not at all. Puppeteer can easily imitate user behavior. Time to add some automation to our existing use case to ascertain my point.
Unlike in the previous example, we would go to the amazon.in homepage and search for 'Shirts'. It would take us to the products listing page and we can extract the data required from the DOM available. Easy peasy. Let's look at the code.
... async function fetchProductList(url, searchTerm) { ... await page.goto(url, { waitUntil: 'networkidle2' }); await page.waitFor('input[name="field-keywords"]'); await page.evaluate(val => document.querySelector('input[name="field-keywords"]').value = val, searchTerm); await page.click('div.nav-search-submit.nav-sprite'); // DOM traversal and data mapping logic // returns a productsList array ... } fetchProductList('https://amazon.in', 'Shirts');
Automating Search Operation and Navigation to Products Page (index.js)
We can see that we wait for the search box to be available and then we add the searchTerm passed using page.evaluate. We then navigate to the products listing page by emulating the 'search button' click action and expose the DOM.
The complexity of automation varies from use case to use case.
Some Notable Gotchas: A Minor Heads Up
Puppeteer's API is pretty comprehensive but there are a few gotchas I had come across while working with it. Remember, not all of these gotchas are directly related to puppeteer but tend to work better along with it.
Puppeteer creates a Chrome browser instance as already mentioned. However, it is likely to happen that some existing websites might block access due to suspicion of bot activity. There is this package called user-agents which can be used with puppeteer to randomize the user-agent for the browser.
Note: Scraping a website lies somewhere in the grey areas of legal acceptance. I would recommend using it with caution.
const puppeteer = require('puppeteer'); const userAgent = require('user-agents'); ... const browser = await puppeteer.launch({ headless: true, defaultViewport: null }); const page = await browser.newPage(); await page.setUserAgent(userAgent.toString()); ...
user-agents usage
We had come across defaultViewport: null when launching our Chrome instance and I had listed it as optional. The reason it is listed as optional is that it comes handy only when you are viewing the Chrome instance being launched. It prevents the website's width and height from being affected when it is rendered.
Puppeteer is not the ultimate solution when it comes to performance. You, as a developer, will have to optimize it to increase its performance efficiency through actions like throlling animations on the site, allowing only essential network calls, etc.
Remember to always end a puppeteer session by closing the Browser instance by using browser.close. (I happened to miss out on it in the first try) It helps end a running Browser Session.
It is necessary to understand that certain common JavaScript operations like console.log() will not work within the scope of the page methods. The reason being that the page context/browser context differs from the node context in which your application is running.
These are some of the gotchas I had noticed. If you have more, feel free to reach out to me with them. I would love to learn more.
Done? Let's run the application.
Website to Your API: Bringing it All Together
The application is run in non-headless mode so you can witness what exactly happens. We would be automating the navigation to product listing page from which we obtain the data.
There. You have your own API consumable data setup from the website of your choice. All you need to do now is to wire this up with a server side framework like express and you are good to go.
Conclusion
There is so much one can do with Puppeteer. This is just one particular use case. I would recommend you spend sometime to read the official documentation. I would be doing the same.
Puppeteer is used extensively in some of the largest organizations for automation tasks like testing and server side rendering, among others.
There is no better time to get started with Puppeteer than now.
If you have any questions or comments, you can reach out to me on LinkedIn or Twitter.
In the meantime, keep coding.
via freeCodeCamp.org https://ift.tt/2XyL1ku
0 notes
Text
What’s New in Android Studio 3
At I/O 2017, Google announced first-party support of the Kotlin programming language for Android Development, with Kotlin tools built right-in to an upcoming version of Android Studio.
Almost every Android developer around the world was excited for this change. Many have wanted an alternative to Java for several reasons, but until now had to use external plugins to achieve such a task.
On October 27, 2017, Android Studio 3.0 went to a stable version and many Android developers began to develop completely in Kotlin. We at raywenderlich.com are no exception, and most of our Android tutorials are now written in this great programming language.
But Kotlin support is only one of the changes in Android Studio 3. In this tutorial, you will learn about some of the other improvements that Android Studio 3 has to offer.
You will also learn about some of the best movies ever made thanks to our sample app: Color Movies.
Grab some popcorn and let’s code!
Note: For this project, I assume that you know the basics of Android development with Kotlin. You should also know how to set up and run Android Studio and the Android Emulator. If you need some help with that, check out our Beginning Android Development with Kotlin tutorial.
Getting Started
To kick things off, start by downloading the materials for this tutorial (you can find a link at the top or bottom of the page). The sample project has everything you need to try the new features in Android Studio 3.
Launch Android Studio 3.0.1 or greater, and in the Welcome to Android Studio window select Import Project (Eclipse, ADT, etc).
Select the high-level project directory and click OK.
If you explore the project, you will find a folder with models, a folder for the API services, a Kotlin extension file, an activity and a layout file. It is not necessary that you analyze them in detail since you won’t be heavily editing these files. Instead, we are going to focus on the advantages that Android Studio 3.0 provides to work with them.
Build and Run the app on an emulator or device. You should see this:
The screen of our activity contains a button and some text. Don’t press the button just yet. First, you will need to obtain an API Key.
Obtaining the NY Times API Key
For this tutorial you will use the NY Times Open API, a popular web service for retrieving movie and book reviews.
Fortunately, getting an API Key is as easy as going to https://developer.nytimes.com/signup
Note: You will be asked to select an API. Choose Movie Reviews API.
Once you have acquired your API key, open the NYTimesApi.kt file under the models folder and replace the part that says <key> with your own.
@GET("svc/movies/v2/reviews/search.json?api-key=<key>") fun getReviews(): Call<MovieResponse>
Build and Run:
Press the New Movie button to get an awesome movie suggestion:
Now we are ready to try all the new features in Android Studio 3! :]
Development
Kotlin
The newest and most anticipated feature is app development in Kotlin. One of the best parts of Kotlin is that this language is 100% interoperable with Java. Therefore, the most popular libraries that you know and love will work without any issue with the help of Gradle.
This project uses Retrofit, one of the most popular Android Networking libraries written in Java.
To see how libraries are implemented in Android Studio 3, open the build.gradle file of the app:
Android Studio 3 Gradle configuration has changed since the last version, due to changes in the Android Studio Gradle plugin version 3.0.0+. Among other changes, we now typically use implementation instead of compile:
dependencies { implementation fileTree(dir: 'libs', include: ['*.jar']) implementation"org.jetbrains.kotlin:kotlin-stdlib-jre7:$kotlin_version" implementation 'com.android.support:appcompat-v7:26.1.0' implementation 'com.android.support.constraint:constraint-layout:1.0.2' implementation 'com.squareup.retrofit2:converter-moshi:2.3.0' implementation "com.android.support:design:$supportVersion" testImplementation 'junit:junit:4.12' androidTestImplementation 'com.android.support.test:runner:1.0.1' androidTestImplementation }
Also, you no longer need to specify the Android build tools version in build.gradle. The plugin will use the minimum required version by default. So, you can now omit the android.buildToolsVersion property.
Note: We are not going to cover all the changes in the Gradle plugin because that would be beyond the scope of this tutorial. If you want more information, you can check out the official documentation or our Gradle Tutorial for Android. :]
Navigate to the models package and open the Link.kt file.
This class consists of a single statement thanks to the power of the data classes in Kotlin:
data class Link(val type: String, val url: String, val suggested_link_text: String)
To give you an idea of how much code you were saved, this would be the Java counterpart:
public class Link { private String type; private String url; private String suggested_link_text; public Link(String type, String url, String suggested_link_text) { this.type = type; this.url = url; this.suggested_link_text = suggested_link_text; } public String getType() { return type; } public String getUrl() { return url; } public String getSuggested_link_text() { return suggested_link_text; } }
Cool right?
You are not going to learn all ins and outs of Android Development with Kotlin in this project. I invite you to explore our Kotlin for Android tutorial if you want to learn more.
Custom and Downloadable Fonts
Beginning with Android Studio 3, we can let the system request fonts from a provider application instead of bundling them into our APKs, or let our APK download fonts. Custom font support in your app is provided on older Android devices via support library 26 and above.
Custom and downloadable fonts have several benefits including:
Android Studio 3 design editor support
Increased app installation success rate
Reduced APK size
Less memory and data usage since they are only fetched over the network when needed.
To try this new feature you are going to modify the Color Movies app to use a custom font from Google Fonts.
Open activity_main.xml in the res/layout folder.
In the Android Studio design editor preview, you will notice that the font is the usual sans serif:
Select the TextView that displays the movie review:
Go to the fontFamily dropdown menu, scroll down and select More Fonts…
A menu will show up that lets you select between Android’s native fonts or custom Downloadable fonts from Google Fonts:
Look for the Aldrich font either by scrolling down or by using the search field, and select it:
To use the custom font we have two options: Create downloadable font or Add font to the project.
Downloadable fonts are usually the best choice since they let Android download it only when necessary, saving memory and mobile data usage.
Make sure that Create downloadable font is selected and click OK.
Your layout preview should now look like this:
There is also a new file under your resfolder: The aldrich.xml file contains all the information needed by Android devices to download your font when needed.
Now you need to add the same font to the remaining TextViews. Fortunately, now that you have added it to your res folder all you have to do is select it in the fontFamily dropdown menu:
The little clip-shaped icon indicates that it is a downloadable font instead of a native font.
After you have finished changing the font for both TextViews your layout should look like this:
Build and Run the app:
Now your app has a nice custom font that Android will automatically download when needed!
Click on New Movie to see your new font in action:
Wow, Maze Runner has a great review! We should head to the movies right now! :]
There is a lot more to learn about custom fonts in Android. If you want to learn more, please make sure to check out our Custom and Downloadable Fonts tutorial.
Adaptive Icons
A long time ago, smartphones were the only devices running Android. But as Android’s popularity grew, so did the variety of devices using the operating system. Nowadays, there are gadgets ranging from small watches to huge Ultra HD wide screen TV’s.
This is changing the way we approach our app designs, including our app icons.
Android Studio 3 and Android 8.0 (API level 26) introduce the possibility to create Adaptive icons, which can display a variety of shapes and sizes across different devices.
Adaptive icons consist of 2 fundamental pieces:
Foreground Layer: The image or logo that represents your app.
Background Layer: Your background color or gradient.
In Android 7.1 and earlier, icons measured 48 x 48 dp. Now you must size your icon according to the following guidelines:
Both layers must measure 108 x 108 dp.
The inner 72 x 72 dp of the icon appears within the masked viewport.
The system reserves the outer 18 dp on each of the 4 sides to create interesting visual effects, such as parallax or pulsing.
In the next section I will show you how to create adaptive icons using the new and improved Asset Studio in Android Studio 3.
Note: It is highly recommended that you get a custom icon created by a professional designer if you plan to release your app in Google’s Play Store.
Asset Studio
Go back to your emulator’s home screen and look for your app’s icon. You will notice that it is the default one provided by Android Studio:
Back in Android Studio 3, right click on your res folder and select New/Image Asset
The Asset Studio will pop up, which allows you to create all kinds of icons and assets for your app.
In Icon Type you can choose between Launcher Icons (Adaptive and Legacy), Launcher Icons (Legacy only), Action Bar and Tab Icons and Notification Icons. Leave the default option Launcher Icons (Adaptive and Legacy) selected and leave the name as ic_launcher.
Below you have 3 tabs: Foreground Layer, Background Layer and Legacy.
In Foreground Layer you will choose the image that best represents your app. This could be any image that your trusted designer provides you. But for the moment you will use the material icons included with Android.
In Asset Type select Clip Art. Note how the preview is automatically updated:
Click on Clip Art
A dialog will appear with a large variety of icons to choose from:
Type moviein the search field and select the one named movie filter:
Click OK. Your icon should look like this:
Now let’s change the color. Click on the hexadecimal code in front of Color:
You can choose a color for your image, either with the Eyedropper, RGB Code, hexadecimal or the color palette.
Choose white by typing FFFFFF in the hexadecimal field:
Click Choose. Your design should look like this:
The foreground is completed, now you are going to work on the background.
In the tabs, select Background Layer:
We can choose a background image or a solid color. In our case we are going to select Color:
Click on the color’s hexadecimal code. A dialog will show up just like the one you used to modify the clip art image:
Here you can choose the background color for your app’s icon. I’m going to select purple (4E00A6) because it is my favorite color, but you can choose the one you like the most:
Click Choose. Your icon should look like this:
Finally, select the Legacy tab:
Here you can specify if you are going to generate an icon for APIs lower than 25 and what it will look like. Leave the default settings and click Next.
A dialog will ask you to confirm the output directory for your resources. It will also warn you that some files will be overwritten:
Do not worry about the warning. We want the previous files to be overwritten. Click Finish.
Your res/mipmap folder now contains your own design:
Build and Run and check out your brand-new icon:
You just created your first adaptive icon using the Asset Studio in Android Studio 3!
Android Emulator
Google Play System Images in Android Oreo
Just like for previous API levels, the Android Oreo system image now contains Play Store services. This is very useful to test your apps that make use of several Google APIs like maps and localization.
To create an AVD with Play Store services installed just make sure that you have Google APIs in the device’s target:
Quick Boot
In the early days of Android development, the emulator could take more than an hour to load. Therefore, you had to resort to several hacks or third-party emulators to speed up your development process.
But things are changing. If you have a modern computer, an Android emulator created using Android Studio 3 should take less than a minute to first load. And it should run fast thanks to virtualization technology such as HAXM from Intel on macOS and Windows and KVM on Linux.
The developers at Google have decided to go even further and introduced a new and powerful feature called Quick Boot. Once enabled, when you initiate an AVD for the first time, a cold boot will occur (like powering on a device), but all other times the previous state will be restored (like waking your phone), unless you manually ask for a cold boot.
You’ll need Android Emulator 27.0.2 or greater to use Quick Boot.
New AVD’s you create will use Quick Boot by default. To use this feature on an existing AVD, go to your AVD’s configuration (the pencil icon):
Click Show Advanced Settings:
Scroll down to Emulated Performance and make sure that Quick Boot is checked.
Start your virtual device and select More in the left menu:
Go to the Settings menu and select Yes on Save quick-boot state on exit:
And that’s it!
Every time you close your emulator the state will be saved.
And when you start your emulator again, the previous session will be restored:
Android Profiler
A very important aspect of an app’s development process is testing. In Android Studio 3, the Android Profiler replaces the old Android Monitor.
You can use the new the Android Profiler to measure CPU usage, Memory and Data usage, and even certain parts of your code execution thanks to the Event Timeline.
In this tutorial you will explore the Network Profiler and the Event Timeline since they are the easiest to understand if you have previous experience with web services.
Network Profiler
Build and Run your app and go to the View/Tool Windows menu and click on Android Profiler.
You can also access it from the toolbar at the bottom of Android Studio 3:
The Android Profiler will appear at the bottom, where Logcat was showing:
The Android Profiler has 3 main sections:
(1) CPU Profiler: Helps you to monitor your device’s CPU usage by triggering a sample or instrumented CPU trace.
(2) Memory Profiler: Helps you to measure your app’s current memory usage by identifying memory leaks that can lead to freezes or app crashes.
(3) Network Profiler: Allows you to monitor the network activity of your app such as web requests or mobile data usage
Select your current emulator in the device dropdown:
Click on Network to open the Network Profiler:
In your app, click on the New Movie button and see what happens in the Network Profiler: We are going to analyze in detail what happened when you made a request to the NY Times API.
Stop live monitoring by pressing the Live button:
Use the lower scrolling bar to make the request’s graph easier to see in your network profiler:
Select the graph by clicking and dragging:
A panel will appear with the request’s Name, Size, Type, Status code, Time and its respective Timeline details.
Select the request. Another panel will appear with detailed information about the request sent and the data received:
Thanks to the Network Profiler you can analyze very deeply what happens when you make a web request. You don’t even need to use external applications to analyze the JSON response.
Take a moment to explore the response data such as the status code, size, json, url, etc.
Isn’t it wonderful how easy it is to analyze web requests with the network profiler?
Press the Live button and click on the back arrow to return to the the Android Profiler:
Timeline
The top part of the Android Profiler is the Event Timeline:
As the name suggests, it helps you to monitor the events that happen during the execution of your app such as touches, rotations, activity states, etc.
Rotate your emulator’s screen using the side controls or by pressing Ctrl + L to rotate left or Ctrl + R to rotate to right. You will notice how your profiler immediately begins to display several changes:
First, you will see the lifecycle states of your MainActivity: saved – stopped – destroyed:
Then, the name of the new activity that is currently in the foreground, along with an icon indicating the type of event that triggered its creation(rotation):
Thanks to the Event Timeline it is very easy to know what’s going on behind the scenes. But you are not only limited to rotation events, let’s try a couple more:
Press the New Movie button to trigger a touch event:
Change the emultor’s volume to trigger a sound event:
Exploring all the different events would take way too much time, but I invite you to play around with the emulator to get familiar with them.
If you want to learn more about the Android Profiler, Google has a great article about the subject.
I don’t know about you, but I want to watch a movie before diving into this new Android Development with Kotlin world! :]
Build and Run your app one last time to get a movie suggestion:
24 Frames? Sounds like fun!
Let me know which movie you got in the comments below : ]
Where to go from Here
You can download the completed project using the download button at the top or bottom of this tutorial.
If you want to learn more about all the changes in Android Studio 3, I encourage you to read Google’s Official Documentation about the release. It has all you need to know about the new Android development tools at your disposal.
There are many topics that we covered on a high-level like Custom and Downloadable Fonts, Gradle Changes and Adaptive Icons, in order to keep things short and sweet. But remember that you can always refer to our Android Development Tutorials to dig deeper into those subjects
I hope you enjoyed this tutorial, and if you have any questions or comments, please join the forum discussion below!
The post What’s New in Android Studio 3 appeared first on Ray Wenderlich.
What’s New in Android Studio 3 published first on https://medium.com/@koresol
0 notes