#backdrop mockup
Explore tagged Tumblr posts
Visit Tumblr Blog
Explore Tumblr blogs with no restrictions, modern design and the best experience.
Last Seen Tumblr Blogs


Fun Fact
12.7% of mobile users access Tumblr.
Text


Led Screen Mockup
Download Here : https://www.behance.net/gallery/223566749/LED-Screen-Mockup
Modern LED Screen Mockup A modern LED screen mockup featuring human elements and light reflections that add a realistic touch. Easy to use and customize with smart objects, making it simple to adapt to your design.
Included in the download:
3 PSD Scenes
Resolution: 3000x2000px / 300 dpi
Easy Editing: Smart Object feature
Well-Organized: Layered and structured files
Help file (.txt Notepad)
#led mockup#screen mockup#display mockup#digital mockup#billboard mockup#advertising mockup#signage mockup#banner mockup#video wall mockup#lightbox mockup#wall mockup#large format mockup#urban mockup#outdoor mockup#indoor mockup#expo mockup#exhibition mockup#event mockup#convention mockup#stage mockup#backdrop mockup#projection mockup#media screen mockup#front view mockup#perspective mockup#realistic mockup#clean mockup#modern mockup#minimal mockup#professional mockup
2 notes
·
View notes
Text


Long time no see 😭. Trying to get back in the swing of making build logs!
Here’s my progress on my Wei Wuxian bracers!! I’m still embroidering the eyelets on one of them but don’t tell anyone- I got too excited and wanted to take pics of the one I’d finished lol.
Explanation of pics/steps below the cut!
Pics 1-2: reference art from donghua official art of Wei wuxians bracers.
Pic 3: making a duct tape and plastic wrap pattern for the hand cover part of my bracers.
Pic 4: making a mockup to check the fit (really glad I did it was entirely too big for my arm initially b/c the base pattern I used was one size).
Pic 5: After ironing on interfacing and sewing right sides together so I can have neat seams on the outside before sewing on my bias tape on the remaining raw edges.
Pic 6: bias tape pinning hell
Pic 7: punching the holes for the eyelets
Pic 8: adding the eyelets
Pic 9: finished “front”/over view of my bracers (using mo’s LWJ fabric as a backdrop lol)
Pic 10: finished back view of bracers after hand embroidering every eyelet 😭 ft the chenqing I made!
35 notes
·
View notes
Text

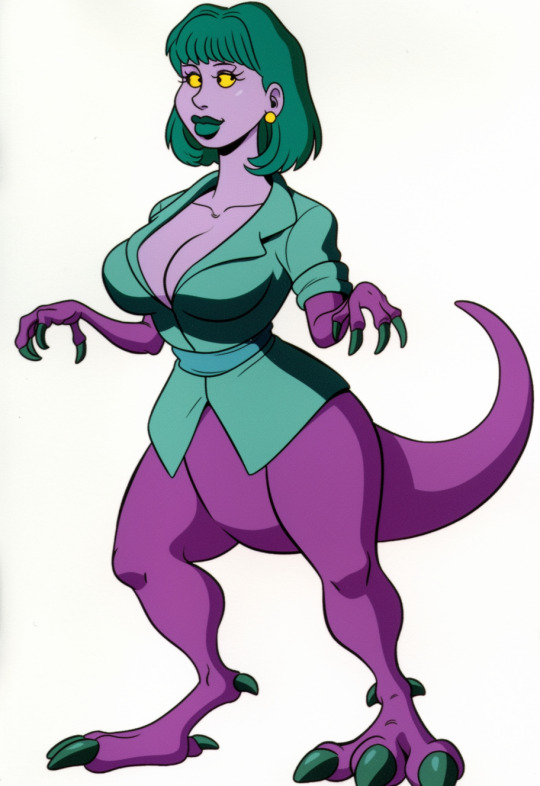
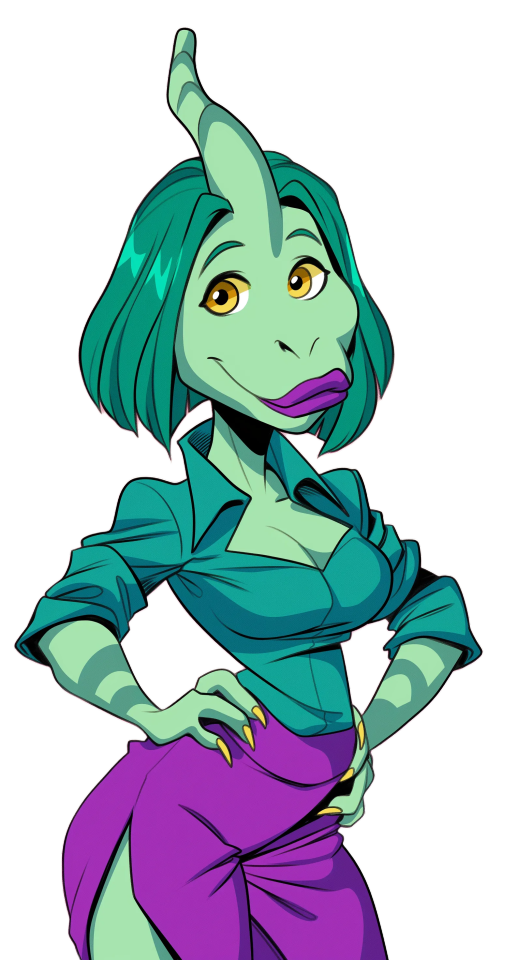
Making a Monster - A Midjourney/Photoshop Tutorial
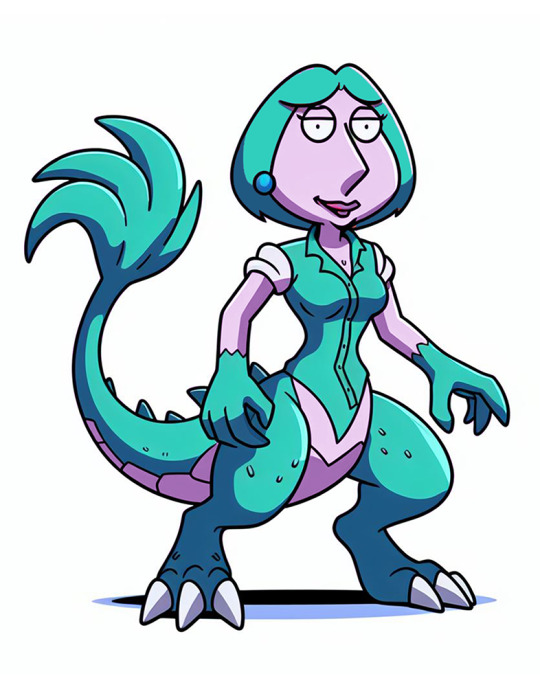

Today, I'm going to be breaking down how I use Midjourney for character design.
I've recently figured out what I want to do with my joust at the Poke/Digi/Rancher-of- Mon type concept. A lot will be coming from that soon, I don't have a name yet, but the mathematical formula is:
"oops, all Gardevoirs" multiplied by LadyDeviMon + the square root of MOTU over Bluth.
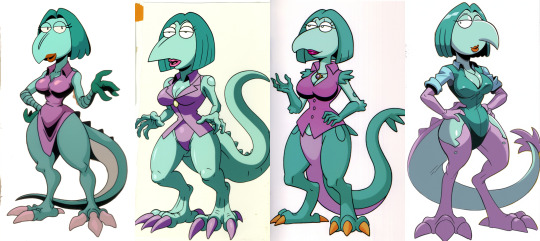
A couple of BioCritters are getting ported over to this new concept, specifically the Waifusaurus evolution branch:

Which was itself a parody of pokemon that are essentially just ladies anyhow, so its probably more accurate to say Waifusaurus spawned unnamed LadyMon Project.
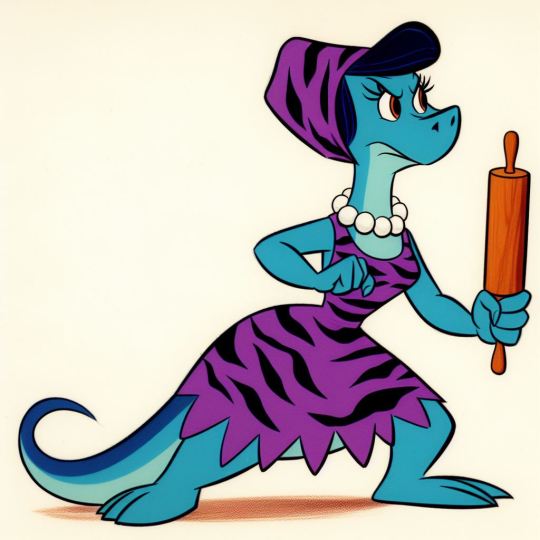
I made most of the first BioCritters in Dall-E3 through Bing Image creator, and Bing makes finding old prompts a pain, and while Straifu, the Lois Griffin parody form, is the subject of today's process, they followed the same prompt format I used with the Flintstones-inspired base Waifusaurus form:
vintage animation cell, a slender dinosaur-anthro housewife on flinstones, resembles humanoid dino the dinosaur, blue dinosaur-lady, purple tigerskin housedress, holding rolling-pin-made-of-rock 1963, in the style of 1960s hanna-barbera TV animation, character cel on white background, posed in a determined ready fighting stance
However, I have a specific look for this new project in mind, so its time to evolve the design.
Step one was to start with basic prompting. I built a new prompt that described what I wanted:
fullbody original production cel, white border all around, vintage animation cel, lavender humanoid woman-creature with large t-rex legs and tail, fan of feathers at the end, wearing teal button up blouse, bob haircut, clawed hands, lois griffin as a pokemon, female character design vintage cartoon screen capture (1993) by AKOM and TOEI , white background, beautiful variable-width black line art with cel shaded vintage cartoon color, painted backdrop, official media, UHQ 1996, official media, UHQ
I ran this in Niji 6, using the style moodboard I'd made for the purpose: --p m7298241701452185637 - largely a mix of full body character designs I'd generated in the style I wanted and 1980s animation model sheets. Moodboards are an expanded version of style prompting, which I outline here.

Examples from runs that produced nothing remotely like what I wanted. I could spend some time tinkering with the prompt to get closer but character prompting is right there, why not just load the original design in?
Yeah, Midjourney/NijiJourney cannot, as of v6, grok abstract cartoony art styles, and character reference always pulls at least a bit of art style as one of its limitations, so the general grotesqueness of its interpretations of these designs leak through.
Now, there's still several things I could do here. The easiest would be to take the straifu on the right and use a combination of in-painting and gradually swapping out the character prompt for a mix of "closer" options over a series of variations until it became something relatively close.
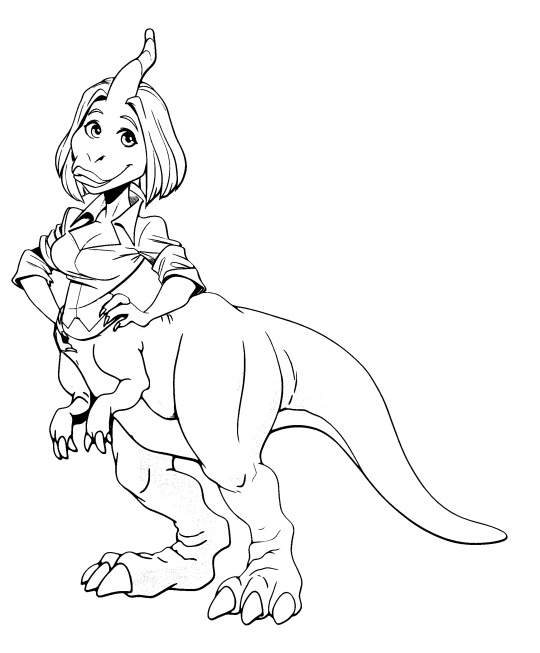
But around about now, I started getting ideas on how I wanted her to look. I liked the idea of a sort of "dinotaur", so I rendered up a regular rex, and combined it with one of the first-wave prompt-only failures and a recolored head in the style I was going for in photoshop.
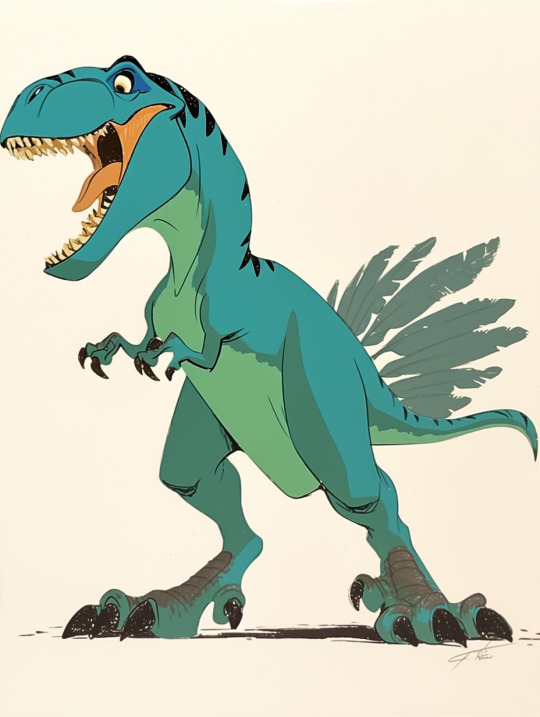

This was a Q&D mockup, only intended for prompting purposes.


Using a combination of the mockups, the original design, and various results from their iteration-chain, I was able to get very close to the basic concept, only to run into two major issues: One, the huge lower body effect wasn't coming across as intentional (either disappearing into standard thicc-cartoon milfness or looking like AI screwups) and two: the design was boring when divorced from its bug-eyed cartoon aesthetics.
Now, you can do a lot with a flawed design, but a boring one means you need to start re-conceptualizing.
Which begins under the fold:
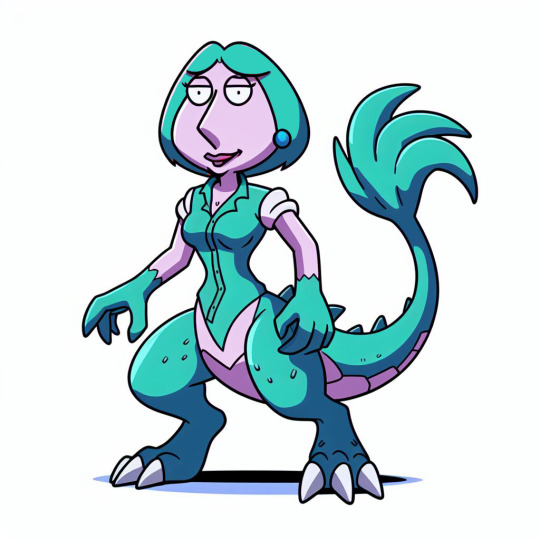
Straifu is a parody of Lois Griffin. In the broadest sense, that brings to mind the nasal voice, and in a battle-monster genre setting that means sonic attacks. Sonic + dinosaur means parasaurolophus to me.

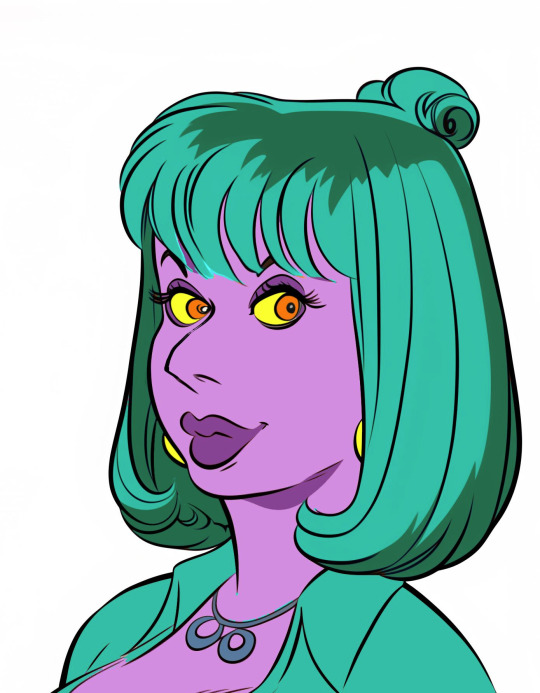
Above, I mentioned I could have in-painted one of the cartoony results. I had actually done that, using the mockup face as a character prompt, and one of its results was interesting, so I started refining based on that:

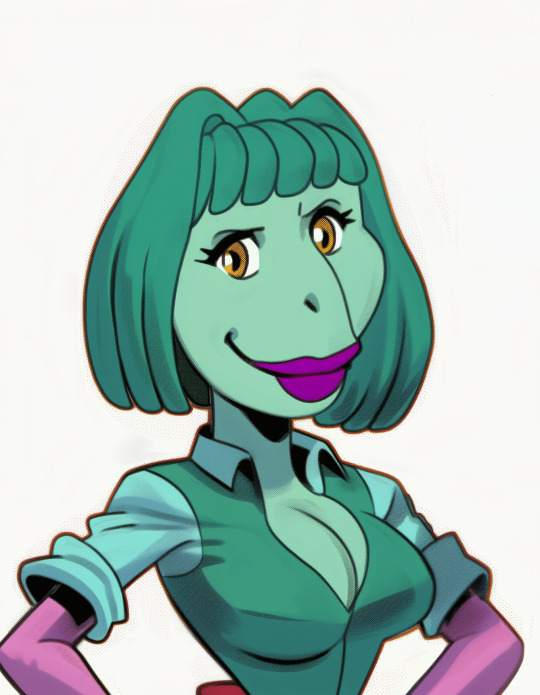
You can use edit to zoom in with Midjourney, it's just you can only do it horizontally or vertically in any given go. I zoomed in using this method, and redid her eyes in the process.
I did another mockup of her with a crest and in-painted, then iterated in the in-painting result.


I did a lot of iterations at this stage, some as basic variations, some as full strong variations, but eventually by combining various results into the character prompt, I got the variation I liked best.


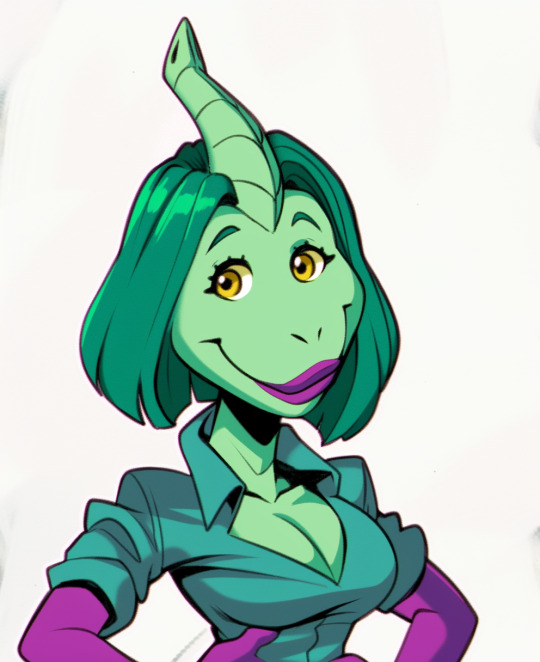
My initial thought was to restore the "beak" from those earlier versions but her duckbill face was too perfect to pass up.
I then attempted to get her a full body via outpainting.

I didn't have much luck, once again the results were either too ai-fuckup-like or too basic.
The idea that came to me to solve the problem was to make her a full on parasaurolopus-taur, forelimbs and all. Midjourney wasn't going to cooperate on that, really weird designs aren't well understood by the current character reference.
Omnireference is supposed to fix that, but to paraphrase 'Oh Brother, Where Art Thou': Well ain't version 7 a temporal miracle? Two weeks from everywhen!
Now, it was time to do things the old fashioned way. With editing.
I went through a lot of attempts to make a base dinosaur:

Eventually landing on this fellow, and this torso forming this rough-cut:


Now, there's one thing to note, the line quality on the two is completely different. Fixing that means getting at the lines.
The best way to do this in photoshop is by upscaling the image 200%, and using a fill bucket set to around 10-25% (anti-aliasing on) and white to make any dark colors gradually lighter so threshold can drop them to pure lines.
From there, I selected individual sections of thin lines and duplicated them, using a combination of 1 px strokes and nuding sections a pixel in any given direction to match the line width without it looking like a coloring book.
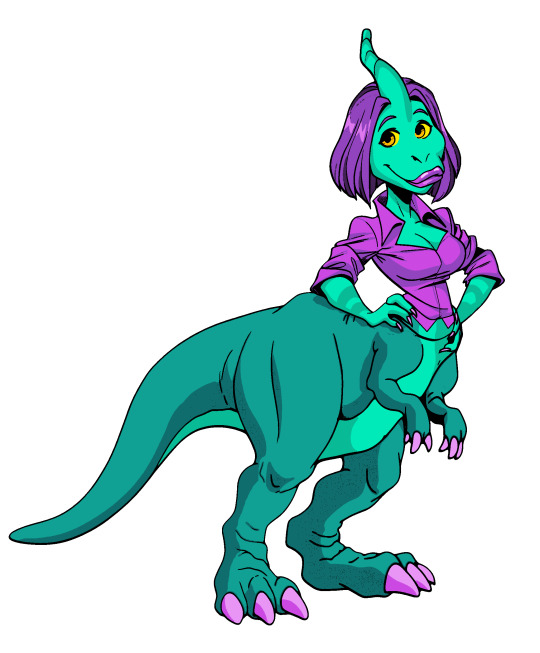
Which I then re-colored using your basic comic coloring process. I went with what is largely an inverse of the original colors because I already have a purple/lavender parasaurolophus character in DynoGuard.
Then, I started doing this tutorial, and realized one of the early versions shirt had formed a sort of plastron, and I went in and painted all that over on top.
I could go into more detail, but I'm out of images and this is already novel-length.
-
The gif at the start was made in Vidu, using the subject reference feature, the final image of Straifu, a background image, and this prompt:
a green creature with a purple shirt, she takes a deep breath and screams, the scream lasting 2 full seconds, Sakuga animation, eyecatch animation. Vintage traditional cel animation, TOEI, disney, don bluth, filmation productions, scene from Masters of the Universe (1983), ultra-high quality flawless animation sequence, Blu-Ray remaster. Every frame in focus and sharply detailed. Animated on 2s matte background painting.
#ai tutorial#midjourney#midjourney v6#nijijourney#character design#dinosaur#dinosaur-anthro#fakemon#waifu#lois griffin#family guy#parody#dinosaurs#parasaurolophus#vidu#vidu CCP#vidu AI#ai art#ai assisted art#multimedia art#art tutorial#photoshop#long post#do you like the color of the AI
11 notes
·
View notes
Text
Artist Research: - UN Climate Change Conference
UK 2021 by Johnson Banks
‘hope with a sense of urgency’.


Each of the globes used in the design are unique, representing a constantly-changing planet. It's intentionally without identifiable countries as this is a global, borderless issue needed to be solved united globally. The animation below was created by The Mill creative content studio. Key stills from the animation were used for the literature and backdrops.


There is a lot of irony in the "2020 Year of Climate Action" poster as unfortunately COVID-19 took center stage but this must've been designed before the pandemic. I also find "The World Is Watching" to be very Orwellian or like "Big Brother is Watching". However it serves as a necessary peer pressure to take action and a reminder of the importance of this event on the global stage.

I really like the slogan "HOPE IS AN RENEWABLE RESOURCE" as it is a positive message


These digital mockups for what the design would look like on their website or on a mobile phone is a typical expectation from design companies for clients. The phone designs are clearly intended for an Instagram story or social media marketing. I think the web design works well and I quite enjoy the more pixelated earth.


Above is a sample logo alongside some of the merchandise created using this design work, they also created t-shirts and bags for this event.

These display some of the iterations of the logo all intended to be unique also work as backdrops for the event for screens, etc.

This is my initial moodboard I made in microsoft whiteboard using photos I found from the campaign on pinterest.
2 notes
·
View notes
Text
🍃 NEW! Lush Branding Mockups
31 branding mockup templates, crafted from genuine photographs, feature a variety of branding elements set amidst the lush backdrop of tropical nature environments.
⚡ Download
#mockup#branding#psd#template#mockupcloud#free#stationery#download#jungle#greenery#tshirt#paper cup#tote bag#poster#box#packaging#business cards#bali#tropical#leafs#plants#garden
4 notes
·
View notes
Text
Hi all!
Welcome back! Let's cut to the chase. Lots of new things. 😸
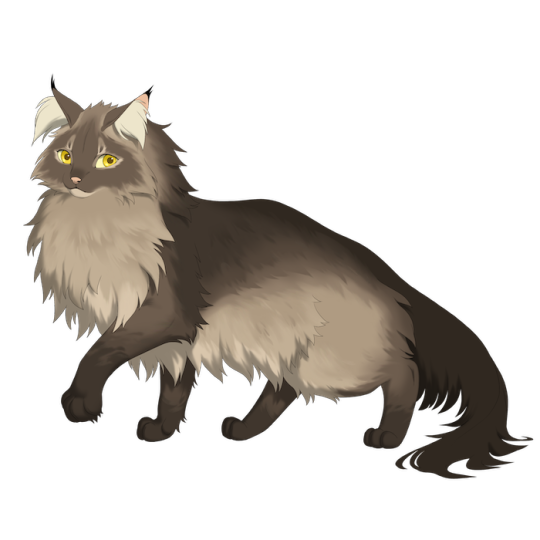
New Fauna
A bunch of new Fauna! This last month we welcomed Hydde (@nettlenest on Twitter) to our Fauna team. She's made great strides in working together with our artists to help develop and refine our style. Let’s see some new and improved Fauna!
Note, titles may not be final and are subject to change!
Flitaya

Design and illustration by Hydde
Lupiné

Design and illustration by Hydde
The Lupiné saw a few different iterations as we used it to help the team discuss and jump off which design methods and tactics we could improve to keep cat and Fauna consistent. I'm happy where we landed!
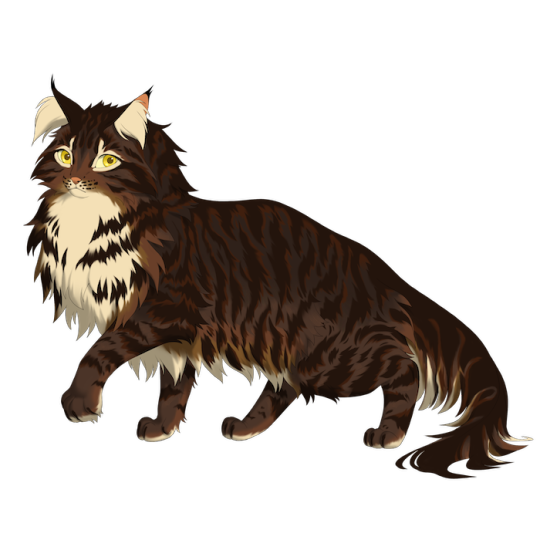
Romanovtsa

Design and illustration by Hydde
Next, see what backer designed Fauna we’ve completed!
Pixiebell
Sponsored and concepted by Sprigatito, designed and illustrated by Remmie
Adorvid
Sponsored and concepted by Mayumi, designed and illustrated by Hydde
Kodahiru

Sponsored and concepted by Markoth, designed and illustrated by Remmie
Our art team has really found its groove. Myself and the artists have all dedicated large efforts this past month to style development and consistency, and we could not be prouder of the outcome. Artists now work closely with one another on poking and prodding at design elements, rendering tactics, color choices, linework, and everything in between. After we had gotten a better, more cohesive idea of the direction to go, everyone got onboard with developing a tight-knit space of feedback and agile asset creation.
The results have been stellar! A big hand to the art team for their amazing care, skill, and diligence. The PB art style has become something I truly love and deeply appreciate, and we couldn't get here without this vital work!
Moving forward, we want to update all older, out-of-style Fauna and assets to more cleanly fit this better defined direction. I want to thank everyone for sticking by the project while we refined our artistic development and saw initial growing pains.
Accessories will also be retooled to better fit these style parameters. Backdrop style development and its synergy with the character art is still in the works by our backdrop artists. But I must say, based on what the artists are doing, good things are to come…
Our team, both art and development, has never been more confident in the visual strength of PB!
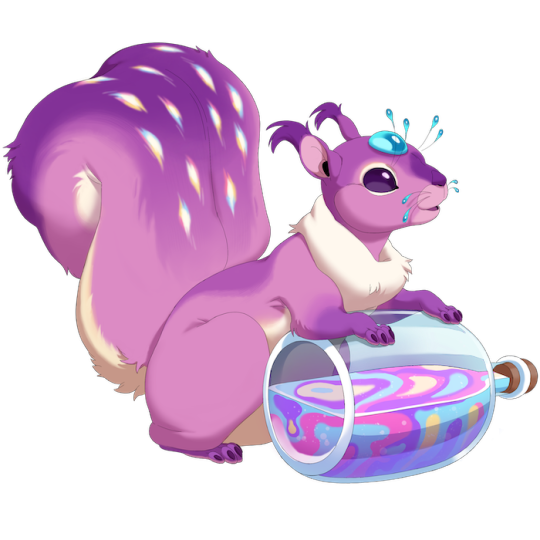
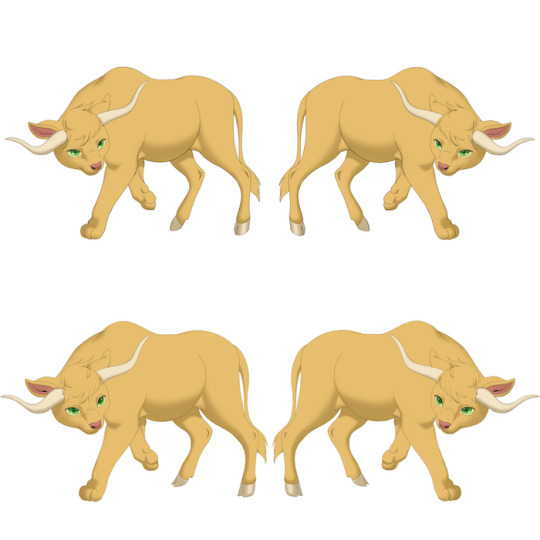
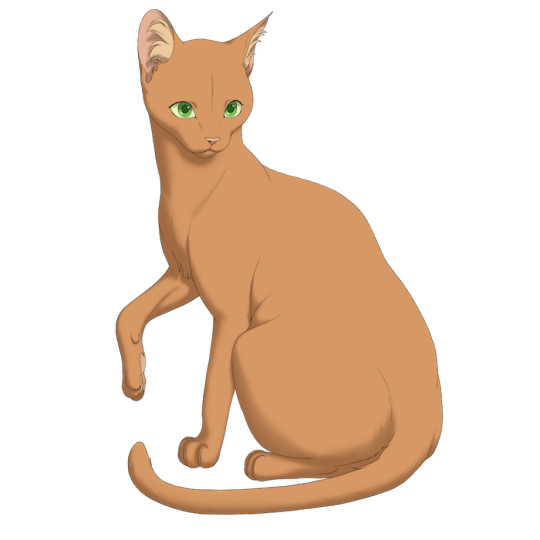
Updated Assets - Bovine


Icons
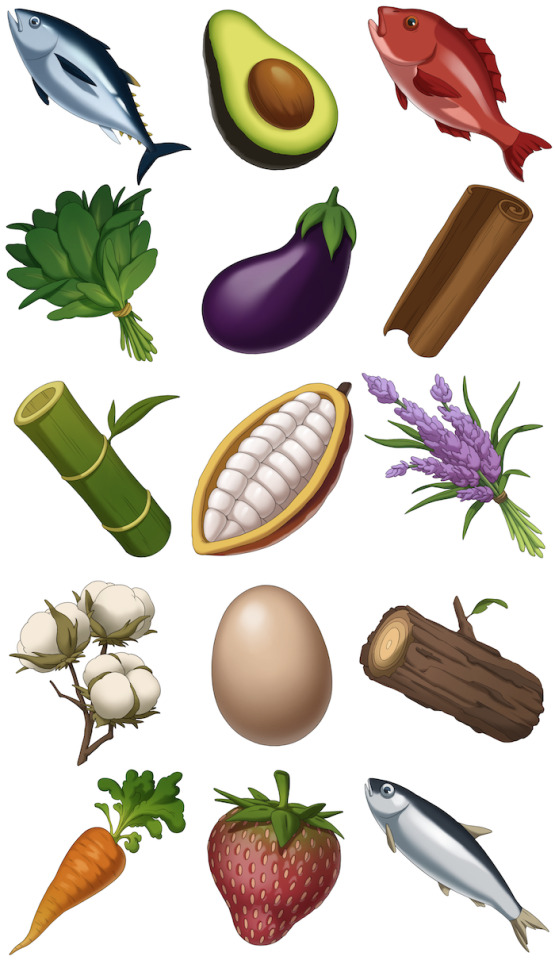
Tuna, Avocado, Red Snapper, Spinach, Eggplant, Cinnamon, Bamboo, Cacao, Lavender, Cotton, Egg, Wood, Carrot, Strawberry, and Sardine all illustrated by Remmie
Regarding icons, I’ve been experimenting with a new icon layout and design which I believe will vastly improve a player’s quality of life for item management.

This modal or “card” will be replacing a “tooltips” system. The goal in mind is to make things easier for mobile users. These cards will be available via button for any small icon view-- seen in the above mockup.
Important gameplay details about an item can now be at a player’s fingertips quickly. And, it's completely mobile friendly!

Icon cards open a wealth of opportunity for including far more information and user accessibility in a very easy, streamlined way.
Within these cards, I can also add varying “flipside” QoL information, such as accessory previews and a display of which of your cats have the item equipped.
Note that these are low fidelity wireframes of what icon cards will look like, but I'm intent on keeping the card design clean and simple to better accentuate its elements. This gives for a more refined aesthetic which better highlights our wonderful icon art. Overall, this approach intends to give more visual reverence to the items a player manages gameplay with, creating a more immersive vibe.
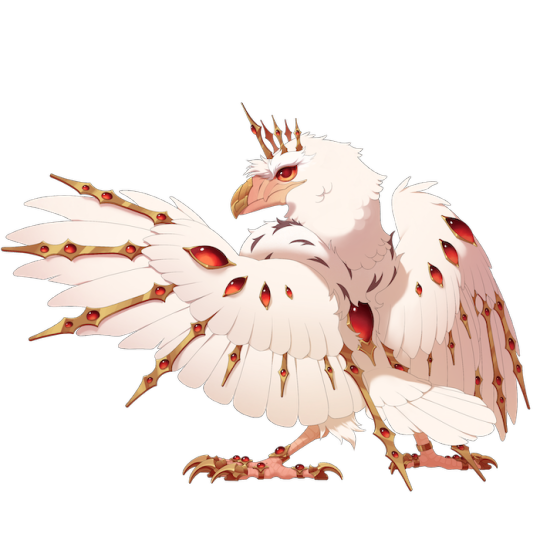
Updated Asset - Cardinal
Last month, we shared a new Tiger pattern which marked the start of a newfound art direction for pattern assets. Here is another to share, the Cardinal pattern!
Design and illustration by Fulemy
In addition, after refining the cardinal pattern, we took another pass at the Tiger pattern.
Not much to note, but we refined some style nitpicks.
White Coverage
Next, I am sharing something I feel very, very excited by!
Two things I most want to prioritize in PB’s gameplay are:
Cats looking good the majority of the time
Opportunity to bond with an individual cat, while viewing your cats as special and unique to your gameplay experience.
These priorities feed into one another when designing the aesthetics. New cats must be rarer, and the genetic/breeding/generation 1 system must be designed to consistently produce good looking cats as easily and consistently as possible.
But what about making them unique…?
Introducing White Coverage

Designed and illustrated by Hydde, refined by Runeowl
Inspired heavily by the concept behind Spinda the Pokémon, white coverage consists of several illustrations of white shapes which can be layered during cat creation to produce completely unique outcomes. Shapes are calculated and chosen by a cat’s coverage “percentage” of 0-100%.
Myself and the team collectively worked together to refine this mechanic and create a dummy test to prove the concept worked. Hydde illustrated 48 different white patterns on a single cat base, and we plugged them into a basic generator with a basic algorithm… results were exciting!
We're still tooling the algorithm behind generating breeding outcomes, but white coverage percentages and shapes already on the parents will be factored.
After our proof of concept promised success, the artists took to creating a consistent ��map” of all shapes which will be available on each cat. We have over 100 shapes which theoretically equal several billion combinations!
Above are just a few examples of the different shapes which we are currently tooling with.
The benefit of a genetic slot like this includes repurposing the “calico” pattern! Calico can now be checked off by white coverage, and include many, many different calico cat options that weren't ever possible before this mechanic. It should be easier than ever to create differing, unique, fantastical yet realistic cat patterns.
Now your run-of-the-mill everyday cat which you worked to earn will have something entirely unique to it, at least in theory. If not entirely unique, pretty dang close! This concept should also never aesthetically destroy a cat, unlike what piling on a mess of patterns and colors can equal. Your character, which you take on adventures, dress up, and create stories for can now easily be a design which is not and never will be anywhere else on the site!
While the exact layout of the shapes won't be entirely customizable, rerolling and breeding for them will allow for changing them. I do plan to have some leeway for customizability of the percentages while maintaining that unique aspect. Myself and the team can't wait to further refine this mechanic!
Asset Previews - Cobblestone Clearing

Design and illustration by Skazinbud
Here is a sketch of one of the backdrops, and I feel it really encompasses and impresses this new direction. Could not be happier with the skill and progress!
New Breed - The Prowler


Based off the Bengal cat, the Prowler is meant to resemble a normal, typical, run of the mill cat! Among all the wacky shapes and magical variations, a normal domestic feline is much needed.
It also caught my attention just how little shape and breed variance there is in the original three starter breeds; Shorthair, Snowfoot, and Ragdoll. This is a criticism we have received several times, and it is one I agree with.
The Prowler will be replacing Snowfoots as a starter breed.
This means that the Snowfoot/Prancer duo will not be immediately available at launch, but will be available at a later release post-launch. Sooner, rather than later.
It is my hope that this change will not only serve to better separate the Prancers and Bovines, but to give the domestic starter breeds some much needed variation!
As far as the Prowler mystic is concerned… all shall be revealed in due time! :)
Functionality Update?
To maintain transparency, last month I brought aboard a new dev team, CKCollab, as our long term partners in crime. They're here to see it through, maintain the game’s vision, and are as invested in the game’s long term success as I am!
As explained previously, restructuring has been for the good of the project, and of no ill will! We want this to be the best it can be.
My goal was to find developers who could take a more agile development approach to the building, as an agile process saves vital time, resources, and if something like a planned mechanic needs to change during the building process, it can be done in an agile environment without much pain or waste.
So, we threw the old cat creator algorithm out (a painstakingly not optimized application) and started from scratch on making something efficient and optimized.
None of this is easy to display, but how the generator has been built on the backend got a huge upgrade, including optimization which allows us to vastly scale up our current resolution (3000x3000) and still generate cats quickly. With some cutting edge optimization, our current numbers show that we can easily generate 12 million cats a day, which is frankly mind blowing. It currently takes 7 milliseconds for the system to generate a cat and 300 milliseconds to call the image up from the server. Current focus is on bringing that 300 down further. Speed wise, we did this all during a two week sprint. So… we're feeling confident!
We also refined the algorithm in this new architecture to allow for more freedom with how assets are placed. It sounds simple, but things like line breaking accents and transparent wings on a Moontail can now be done much easier.
All very important groundwork, but the frontend display is a bit of a mess, so it's difficult to show in its current state. From here though, the backend foundation and database is there to start building out system accounts, breeding, item collection, and fun battle mechanics, all of which we are working on one sprint at a time. Current goal for closed beta is still somewhere between late 2023 to early 2024.
Videos on functionality soon! A half-baked product can look very sloppy, so we want to be sure it's presentable first.
That all being said, PB has frankly never looked better with these new directions, and I'm so, so excited for its future.
To Summarize: We shared new many Fauna with a hone in on stylization, the updated cardinal gene, updated Bovines, white coverage, icon art and early UX/UI icon cards, the Prowler breed, and an update on the state of the backend.
What to expect next month: Any polished functionality displays, further development of front-end UI designs, and further asset updates.
11 notes
·
View notes
Text
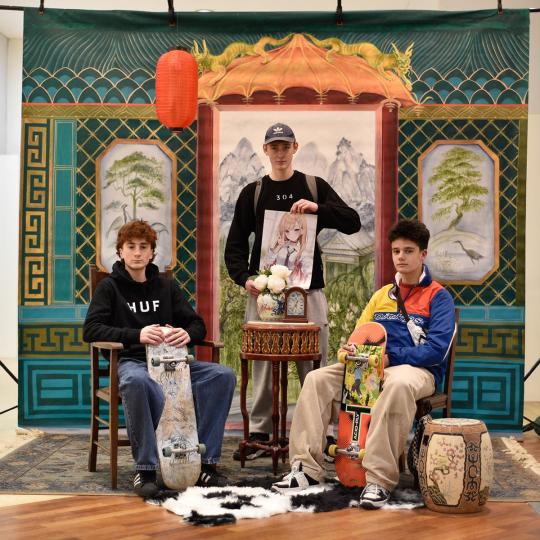
Grace Lau's Portraits In a Chinese Studio
I walked into the gallery a couple of days ago. One singular painting caught my eye immediately. There were two dogs. They were sat on chairs. They were looking directly into the camera as if they were little divas who wanted to be seen. They were placed on these two seats with an entire traditional Chinese portrait background behind them. I couldn't look away.


During the Victorian times, western people would often include Chinese people in their portraits, presenting them as 'exotic beings' and unusual creatures. Lau's project Portraits In a Chinese Studio is something that portrays the narrative, but also reverses the roles for 21st Century subjects.
The project has been something of major interest to Lau for years. It all began in the turn of the 21st Century where Lau was studying archival images and documents of a variation of different cultures in East Asia as well as the West to figure out the way in which people communicated with each other through images during the 19th Century as well as the early 20th Century. Lau teamed up with art historian Lynn Pan to publish the book Picturing The Chinese: Early Western Photographs and Postcards of China.
Below are two images taken from Lau's website, highlighting some of the images she found in the archives.

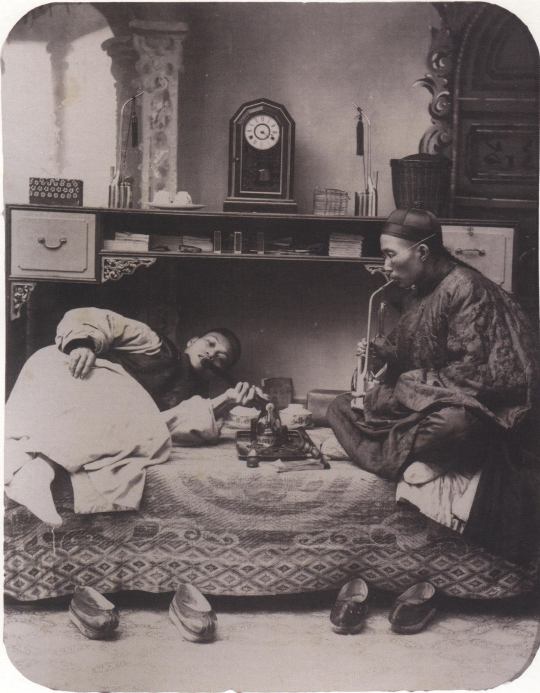
In terms of times when the camera was first invented, many Westerners would travel to the East, places such as Shanghai, Beijing and Nanjing where they would take photos of these people, displaying them as exotic creatures. These photographers did not capture someone from the East the same way that a painting of the Royal Family would portray. Instead they hyperfocused on elements such as bound feet, opium smokers, beggars' things that would make these people appear different and exotic.
The photographic project launched in the summer of 2005 when Lau arrived in Hastings, setting up a backdrop and inviting people to come along to have their portrait made. It blended all of the research created for the book and put everything on a practical scale. It brought in a huge selection of people. Families, friends, lovers, all who have walked the planet and created so many of their own stories. It was made like a celebration of culture, but asked so many questions simultaneously. What were we all doing in these images posing in front of very traditional Chinese backdrops? The whole project is essentially parodying how ethnic minorities were captured in historic paintings and wanted this to be shown the other way in these portraits. The way in which people don't really think about things unless the role is directly reversed and suddenly they are the people finding themselves in that particular place. The studio space is created as a 'mock' which features a selection of traditional Chinese furniture from its choice of chairs to the stuffed panda toy which is later replaced with a cow print rug on its rerun of the project. The original project was named '21st Century Types' in which it was focused mainly on the artists research into 19th Century and early 20th Century photographers.
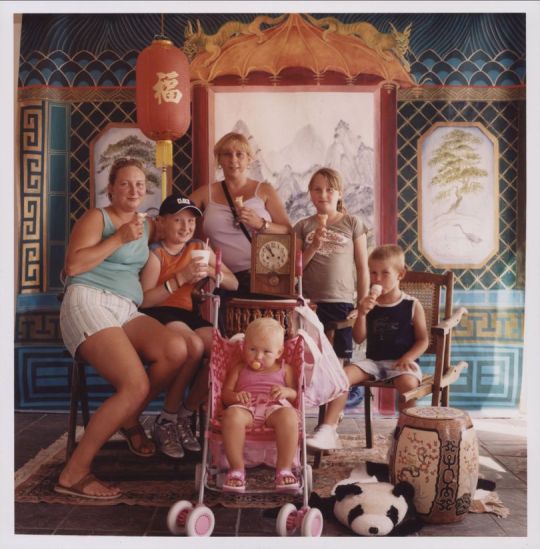
In 2023 Lau once again set up a reboot of the project, this time basing it in Southampton. She once again had people book in to have their free portrait made and that everyone would have their image emailed to them. She encouraged people partaking in the project to bring their modern contemporary items with them into the space such as their iPhones or Prime fidget spinners. In one of the images, a bubble tea was perfectly placed in the centre of the table to add a layer of confusion over initial first look.
The project itself is also something that feels personal to her. Lau frequently speaks of her past and how people find it unbelievable that she speaks English and how many of these people will ask her where she learned the language. She studied at a girls grammar school in Highgate. It was these situations that also influenced Lau to create the mockup of a Chinese studio, in which she would be able to spin it the other way round, that it would be a concept which would make for conversation among others.
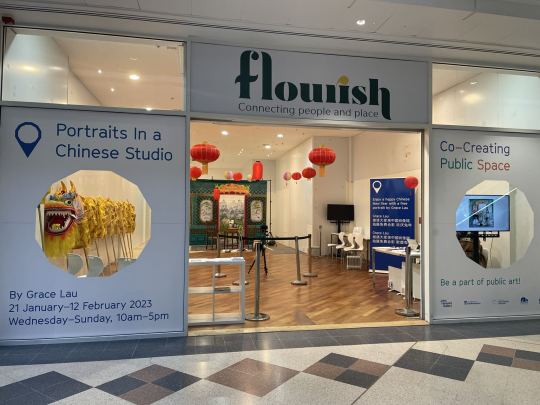
The project went live to the public for the Lunar New Year with a new collection on show at John Hansard Gallery in Southampton. I think the project is fantastic and a deeper dive into the history of it is even better. It's something which is easy to understand, but can easily be enjoyed from every aspect. I really love this set of work, I love the rich colours of the studio used for the 2023 images. The second I saw them on what would otherwise be a dull gallery wall, I couldn't look away. I wanted to be stood there for hours viewing the images across that wall.
As an extra little footnote for this piece, I found a really interesting interview with Lau where she discusses that project, but also some of her background in more detail here

2 notes
·
View notes
Text
Plan - Construction of the set
First we showed the reference pictures of our location to our guest lecturer/architect and with his help started scaling the set.
We used the 1:20 scale and wrote all the measurements down and started drawing the mockup in paper.
The set/model will have two sides; the base and the backdrop.
We first started mapping the backdrop which has the staircase and door.
Then started cutting out the sides of the 3 dimensional staircase.
The sky shall be printed out and pasted on the backdrop and on the staircase as per the location/space in the movie.
A flipped print of the sky will be pasted on the base, to imitate the reflection of the sky in water.
Then the finished staircase and the cutout of the door can be attached to the backdrop.
For the ocean, silicone will be used to achieve the watery effect.
Chipboard shall be used for the base as we will be needing a thick and strong board to pour silicone on.
A simple structured boat shall be modeled according to the measurements given by the lecturer.
2 notes
·
View notes
Text
Tattoo Font Generator

You're not the only one who has thought about testing out different typefaces or is thinking about having a tattoo. The most thrilling and frightening step in tattoo design is selecting the ideal typeface. Having the wrong font can bring up regrets since the tattoo may lose its entire look and feel. Fortunately, you can try many different styles and easily see how the letters might look on your body using PhotoCut's Tattoo Font Generator. The tool helps you find the perfect font to suit your style, whether you are designing for a tattoo or adding to digital art.
What is a Tattoo Font Generator?
Any word, phrase, or text may be entered into a tattoo font generator, which is an online program that lets you preview the text in the great majority of popular tattoo fonts. If you plan to have a phrase or word inked, you may utilize it to see how it will appear. Because tattoo fonts sometimes have distinctive creative designs that give them a more individualized or styled feel, they typically differ from standard typefaces.
It is easy with PhotoCut's tattoo font generator. Simply type in your text and select your preferred font, and you can see how your design will seem right away. This enables you to try out a wide variety of typefaces and see how each complements your style and message.
You can also use PhotoCut to create digital art with its AI Painter.
Why Use a Tattoo Font Generator?
Using a tattoo font generator such as PhotoCut is a terrific idea for many reasons.
Explore Multiple Font Styles: There is a wide variety of tattoo font styles, from aggressive, gothic writing to graceful script fonts. Our tattoo font generator will show you how your text will appear in several ways.
Visualize Your Tattoo: This is how you see how the text will look on your skin. Since digital mockups may look drastically different from how the font will appear as a tattoo, it's always good to test a few fonts. You can see how your words will read in different fonts.
Convenience: This method is convenient compared to spending all your time on font catalogs and also with a tattoo artist. In your free time, you can generate an array of your desired fonts easily. It allows you to kick-start the design of your tattoo within the comfort of your home.
Quick Copy and Paste: Once you have selected the font you like for your tattoo, you can copy and paste it into your digital designs, messaging applications, or posts on social media. This is how you would easily incorporate tattoo-style text into your graphic design or online presence.
Integrating Tattoo Fonts into Graphic Design
In addition to producing tattoos, PhotoCut's tattoo font generator is a useful tool for all of your creative endeavors. If you are a passionate digital artist or graphic designer, you can use these tattoo fonts to add a fashionable touch to your work. Take the tattoo style of the fonts and use them together with PhotoCut templates to create an eye-catching poster, banner, social media graphic, and more.
For instance, in case you are working on designing a mysterious poster or a banner for a gothic-themed event, you can add drama to it through the tattoo font generator. Now that you have selected your tattoo font, you can include it in your design and add decorative features to it, change its colors, or try different layouts.
You can also create custom emojis for your designs using PhotoCut’s Emoji Maker.
Transparent Tattoo Fonts for Flexible Designs
Making transparent PNG files is one of PhotoCut's special features as a tattoo font maker. You may mix your tattoo text with other design components or copy and paste it onto different canvases once it has been made. When dealing with other visuals, pictures, or designs, the PNG function makes sure the typeface merges perfectly.
The transparent backdrop makes it possible for the tattoo words to overlay seamlessly, which is very helpful when making a tattoo design with other images. For designers who wish to include tattoo typefaces in their digital works, this feature's adaptability makes it a great tool.
Tattoo Font Generator for Messaging, Social Media, and More
Tattoo fonts are not just limited to tattoos. They can make social media posts, captions, or chat messages more exciting. Adding tattoo-style text to online communication is the easiest way to stand out and show personality.
People using social media are constantly searching for alternate means of expressing themselves, and tattoo fonts may help in adding an artistic feel to posts. Whether posting a motivational quote, a funny saying, or your mantra, using a tattoo font may make the message pop in your followers' feeds.
You can surprise your friends on social media with a virtual makeover. Get a digital haircut using PhotoCut’s Bangs Filter.
Tattoo Simulator: Visualizing Your Tattoo Design
Sometimes it is not possible to think about exactly what the tattoo will look like. So luck has it for you. There is PhotoCut's innovative tool, Tattoo Simulator powered by AI. It enables the generation of the text of your tattoo, and simulating how it might look on pictures of a realistic human body. If it is your wrist or arm, the back, or a place that isn't in the common sphere of imagination you can try different sizes and orientations to be sure of your tattoo.
This eliminates the guessing game and provides a better idea of the final design before committing to the actual one. It's an effective tool for anyone who wants to make sure their tattoo looks the way they want it to.
How to Use the Tattoo Font Generator
Using the Tattoo Font Generator of PhotoCut is quite easy. We shall guide you on how you can make the most out of the tool step-by-step:
You should first type in the word, phrase, name, or quote that you would like to convert into a tattoo. Once this text is typed, you will be able to continue with your selection of a font.
You can get a range of tattoo fonts for your needs. Browse through them and find the one that fits your style and message best. Numerous styles are available for perusing, including gothic, script, cursive, and many more.
Finding a font that you like makes it simple to copy and paste the text into your digital creations, communications, and posts on social media. It's that simple!
If you are still unsure, don't stop trying different fonts and text combinations. The more you try, the higher your chances of finding the ideal tattoo font.
Conclusion
A tattoo font generator may be an awesome way to get an idea of how various styles of text look as tattoos. It gives the possibility of easy and quick testing of fonts before implementing them in the final version. Whether it is an idea for designing a tattoo, working on a graphic design project, or adding excitement to your social media posts, a tattoo font generator will help you reach the perfect look. However, consult a professional tattoo artist to make the final call on the design and ensure that it is right for your body and style. Happy designing!
PhotoCut can also help you recolor your dull images using its AI Color Changer.
FAQs
Q1. What is a Tattoo Font Generator?
Ans. It is an online tool, such as a font generator, used to input whatever text you are interested in, giving you a presentation of what such words or phrases would look like when tattooed upon your body.
Q2. Can tattoo font generators be used by tattoo artists?
Ans. Tattoo font generators have been used by tattoo artists to develop their designs or gain inspiration. However, an innovative tattoo artist will design his or her fonts or original works, according to the client's concept and how it will go on the skin.
Q3. Are tattoo font generators free to use?
Ans. Most of the free tattoo font generators are free to use for personal usage, while the others can be used if licensed for commercial usage. Ensure to check each generator's term of use as well as each font before applying them.
Q4. Can I get the exact font from the generator tattooed?
Ans. A nearly exact replica of a font may be obtained using a tattoo font generator, but your tattoo artist will still adjust the design to your body's contours and the tattoo's measurements. Not all fonts that are available from the generator will work on the skin.
Q5. Should I use a tattoo font generator or consult a tattoo artist?
Ans. Though tattoo font generators are good starting points, it is better to talk with a licensed tattoo artist who ensures that the design is well created, executed, and suitable for a specific body part.
0 notes
Text
Free iMac Mockup

In the realm of digital design and branding, mockups play a crucial role in presenting creative work in a realistic and professional manner. Whether you’re a graphic designer, web developer, or business owner looking to showcase your projects, an iMac mockup offers a sleek and elegant way to visualize your designs in a real-world setting. The Free iMac Mockup by Mockupdaddy.com is an exceptional resource that allows you to display your work on an Apple iMac screen with a high-quality presentation.
This free iMac mockup is crafted with precision, ensuring that your designs stand out with clarity and realism. It is perfect for displaying website designs, app interfaces, branding concepts, digital artwork, and more. With an easy-to-edit PSD file and smart object layers, this mockup simplifies the process of integrating your design into a professional-looking presentation.

Features of the Free iMac Mockup
1. High-Resolution Quality
The Free iMac Mockup boasts a high-resolution quality that ensures your designs appear crisp and detailed. With a resolution of 4000x3000 pixels, this mockup provides sharp visuals, making it suitable for presentations, portfolios, and client showcases.
2. Realistic iMac Display
This mockup features an ultra-realistic Apple iMac, set in a clean and minimalistic environment. The mockup perfectly mimics the sleek and professional aesthetics of an actual iMac, making it ideal for demonstrating tech-related projects.
3. Smart Object Layer Integration
Editing the Free iMac Mockup is seamless, thanks to its smart object layers. Simply double-click the smart object layer, insert your design, save the file, and your artwork will be perfectly placed on the iMac screen with realistic shadows and reflections.
4. Customizable Background and Shadows
The mockup allows users to tweak the background color and shadow effects, providing flexibility to match different branding themes. Whether you prefer a bright, modern setup or a dark, sophisticated backdrop, customization is effortless.
5. Free for Personal and Commercial Use
Mockupdaddy.com offers this iMac mockup as a free resource, allowing both personal and commercial use. Whether you’re a freelancer, student, or business owner, you can incorporate this mockup into your presentations, client projects, and marketing materials without any cost.

Why Choose the Free iMac Mockup by Mockupdaddy.com?
Professional Presentation
Using a high-quality mockup enhances the professionalism of your design presentations. This Free iMac Mockup is designed to highlight your work in a sleek, contemporary setting, ensuring that your projects make a lasting impression.
Versatile Applications
This iMac mockup is suitable for a variety of uses, including:
Website design showcases
UI/UX presentations
Branding projects
Portfolio displays
Marketing campaigns
User-Friendly Editing
Even if you’re not an expert in Photoshop, the smart object layers make customization easy. Simply drag and drop your design into the provided layer, adjust any elements if needed, and save your work.

How to Download and Use the Free iMac Mockup
Step 1: Download the Mockup File
Visit Mockupdaddy.com and download the free iMac mockup file. The mockup is available in a well-organized PSD format.
Step 2: Open the File in Photoshop
Once the file is downloaded, open it in Adobe Photoshop. Ensure that your version of Photoshop supports smart object layers for an easy editing experience.
Step 3: Insert Your Design
Find the smart object layer in the PSD file, double-click it, and insert your design. Adjust the size and positioning to fit the iMac screen perfectly.
Step 4: Customize Background and Shadows
If desired, modify the background color and adjust the shadow settings to better suit your project’s theme.
Step 5: Save and Export
After finalizing your design placement and adjustments, save the file and export it in your desired format (JPEG, PNG, etc.). Your presentation-ready mockup is now complete!
The Free iMac Mockup by Mockupdaddy.com is an invaluable resource for designers and businesses looking to showcase their work with elegance and professionalism. With its high-resolution quality, realistic display, easy editing features, and free availability, this mockup is a must-have for anyone in the creative industry.
1 note
·
View note
Text
Free Signage Mockup

In today’s competitive branding landscape, having visually appealing signage is crucial for businesses, events, and organizations. A well-designed sign not only enhances brand visibility but also attracts potential customers and creates a professional image. To help designers, marketers, and business owners showcase their signage designs effectively, Mockupdaddy.com offers a high-quality free signage mockup that allows users to visualize their graphics in a realistic environment.
Why Use a Free Signage Mockup?
A signage mockup is an essential tool for designers looking to present their work in a polished and professional manner. Instead of relying on flat, 2D designs, a free signage mockup provides a realistic preview of how the signage will appear in real-world settings. This is especially useful for:
Client Presentations: Impress clients by showcasing your signage concepts in real-world scenarios.
Portfolio Building: Enhance your portfolio with high-quality mockups to attract potential employers or clients.
Marketing Materials: Create promotional content that highlights your design work in a professional way.
Design Validation: Check how colors, fonts, and elements appear in an actual signage format before finalizing production.

Features of the Free Signage Mockup
The free signage mockup provided by Mockupdaddy.com is designed to meet the needs of both beginner and professional designers. Some of the key features include:
1. High-Resolution Quality
The mockup is created with high-resolution graphics to ensure that the details of your design remain sharp and clear. This is crucial for print and digital presentations where clarity matters the most.
2. Easy-to-Use Smart Objects
Thanks to Photoshop’s smart object layers, adding your design is quick and hassle-free. Simply double-click on the designated smart layer, paste your design, and save the file. Your artwork will automatically blend with the mockup’s realistic shadows, textures, and lighting.
3. Realistic Lighting and Shadows
A key advantage of this free signage mockup is its attention to realistic lighting and shadows. Whether you’re designing for an indoor or outdoor setting, the mockup ensures that your signage looks natural and believable.
4. Multiple Perspectives and Angles
Different signage placements require different perspectives. This mockup includes multiple angles to give you a variety of options to showcase your designs effectively.
5. Customizable Backgrounds
Easily adjust the background to fit the context of your design. Whether you want a plain, minimalistic backdrop or a busy street setting, you have the flexibility to modify the background according to your needs.
6. Compatible with Various Signage Types
From storefront signage to billboard advertisements, this mockup is versatile enough to accommodate different types of signage, making it a valuable resource for designers in multiple industries.

How to Use the Free Signage Mockup
Using the free signage mockup is incredibly simple, even for those with minimal Photoshop experience. Here’s a step-by-step guide:
Download the Mockup
Visit Mockupdaddy.com and navigate to the signage mockup section.
Click the download button and save the file to your computer.
Open the Mockup in Photoshop
Ensure that you have Adobe Photoshop installed on your system.
Open the downloaded PSD file in Photoshop.
Insert Your Design
Locate the smart object layer labeled “Your Design Here.”
Double-click on it to open a new window.
Paste or create your design in this new window.
Save and close the window to see your design applied to the mockup.
Adjust as Needed
Modify brightness, contrast, and shadows to ensure your design integrates seamlessly with the environment.
Customize the background if needed.
Export Your Final Image
Once satisfied, save your mockup as a high-resolution PNG or JPEG file.
Use it for client presentations, portfolio showcases, or marketing materials.

Who Can Benefit from This Free Signage Mockup?
The free signage mockup is a valuable resource for a wide range of professionals, including:
Graphic Designers: Ideal for presenting signage concepts in a realistic setting.
Marketing Professionals: Helps in creating compelling promotional materials.
Business Owners: Aids in visualizing how signage will look before committing to production.
Event Planners: Useful for showcasing event branding and directional signs.
Architects and Interior Designers: Assists in planning signage placements in commercial spaces.

Why Choose Mockupdaddy.com?
Mockupdaddy.com is a trusted provider of high-quality mockups tailored for designers and creatives. Here’s why thousands of users rely on Mockupdaddy for their mockup needs:
Free and Premium Options: Access a wide range of free and premium mockups to suit various design needs.
User-Friendly Files: All mockups are easy to use, even for beginners.
High-Quality Graphics: Each mockup is crafted with attention to detail to ensure realistic presentations.
Regular Updates: New mockups are frequently added to keep up with design trends.
Customer Support: A dedicated support team is available to assist with any inquiries.
A free signage mockup is an indispensable tool for designers, marketers, and business owners looking to showcase their signage designs professionally. Whether you’re working on branding, advertising, or wayfinding projects, the free signage mockup from Mockupdaddy.com offers an excellent way to visualize your concepts in a realistic environment. With its high-resolution quality, smart object functionality, and customizable features, this mockup is a must-have for anyone in the design industry.
1 note
·
View note
Text
Top 10 Wedding Decorators in Coimbatore: Experts Who Can Make Your Dream Wedding Come True

A wedding is one of the most cherished moments in life, and the right decoration can transform it into a fairy-tale celebration. Whether you dream of a royal, traditional wedding or a chic, modern event, choosing the right wedding decorators in Coimbatore can make all the difference. From elegant floral arrangements to breathtaking mandaps, the city has some of the best decorators who specialize in crafting stunning wedding setups. In this blog, we bring you the top 10 wedding decorators in Coimbatore who can make your big day truly magical.
Why Choosing the Right Wedding Decorator Matters
Wedding decoration is more than just aesthetics; it sets the mood, enhances the venue, and creates unforgettable memories. The best wedding decorators in Coimbatore understand this and offer customized themes, stunning visuals, and seamless execution to bring your vision to life.
Top 10 Wedding Decorators in Coimbatore
1. Dream Day Wedding Planners
Specialties: Grand mandap setups, floral arrangements, and luxury wedding themes
Notable Work: Have decorated over 500 weddings in Coimbatore with unique, Instagram-worthy designs
2. Shiv Shakti Wedding Decorators
Specialties: Traditional South Indian wedding decorations, temple-style mandaps, and intricate floral work
Customer Review: "Their traditional decor transformed our wedding into a divine experience."
3. Elite Wedding Creators
Specialties: Theme-based decorations, including Bollywood, vintage, and royal wedding themes
Unique Feature: Offers 3D mockups before finalizing designs
4. Golden Petals Event Planners
Specialties: Custom floral décor, elegant stage setups, and luxury wedding concepts
Customer Praise: "They turned our simple venue into a floral paradise!"
5. The Wedding Story
Specialties: Destination wedding decoration, beachside and garden-themed setups
Unique Feature: Uses eco-friendly and sustainable decor options
6. Magic Touch Wedding Planners
Specialties: Drapery, lighting effects, and fusion wedding decor
Industry Experience: Over 15 years of expertise in wedding design
7. Jasmine Weddings & Events
Specialties: Contemporary minimalistic designs and budget-friendly wedding decorations
Budget Range: Offers packages for all wedding scales, from intimate ceremonies to grand affairs
8. Aashirwad Wedding Designers
Specialties: Grand North Indian and destination wedding themes
Popularity: Known for their breathtaking stage setups
9. Sree Wedding & Event Decorators
Specialties: Temple-style wedding decorations and traditional floral mandaps
Customer Rating: 4.9/5 based on hundreds of satisfied clients
10. Ever After Wedding Decorators
Specialties: Contemporary floral backdrops, pastel-themed decor, and LED lighting setups
Best For: Couples looking for modern, chic wedding styles
What to Consider When Choosing Wedding Decorators in Coimbatore
Before selecting a decorator, consider the following:
Budget: Know how much you’re willing to spend and ask for customized packages.
Theme: Decide on your wedding theme (traditional, modern, fusion, etc.).
Experience & Portfolio: Check their previous work, online reviews, and testimonials.
Customization Options: Choose decorators who can tailor their work to your vision.
Logistics & Execution: Ensure they have a seamless execution plan, especially for large venues.
Real-World Impact: How Good Decor Makes a Difference
According to wedding industry experts, 85% of couples believe that decor plays a crucial role in setting the ambiance of their wedding. A well-decorated wedding venue not only creates a breathtaking experience but also makes the event more memorable for guests. Many couples in Coimbatore opt for a mix of traditional floral setups and modern lighting techniques to achieve the perfect look.
Conclusion: Make Your Dream Wedding a Reality
Finding the right wedding decorators in Coimbatore can make all the difference in turning your wedding into an enchanting celebration. Whether you prefer grand floral arrangements or an intimate rustic setting, these top 10 decorators can bring your vision to life.
Ready to Plan Your Wedding?
Don’t leave your wedding decor to chance! Reach out to one of these expert wedding decorators in Coimbatore and make your big day truly unforgettable. Contact them today to discuss themes, packages, and ideas that match your vision!
0 notes
Text
Top 5 Challenges in Event Decoration and How to Overcome Them

Event decoration is one of the most important aspects of any celebration. A well-decorated venue sets the mood, creates a lasting impression, and enhances the overall experience. However, event decorators face several challenges while transforming spaces into beautiful and functional setups. In this blog, we will discuss the top five challenges in event decoration and practical ways to overcome them.
1. Budget Limitations
One of the biggest challenges in event decoration is managing a tight budget. Clients often have high expectations but limited funds, making it difficult to achieve the desired look.
How to Overcome It:
Prioritize essentials: Focus on key decor elements that create maximum impact, such as entrance decor, stage setup, and table centerpieces.
Use cost-effective materials: Opt for budget-friendly alternatives like fabric drapes, artificial flowers, and LED lighting instead of fresh flowers and expensive decor pieces.
DIY elements: Simple handmade decorations can add a personal touch while saving costs.
2. Venue Restrictions
Many venues have strict rules regarding decoration. Some do not allow drilling, hanging items on walls, or using open flames, which can limit creative ideas.
How to Overcome It:
Use non-damaging materials: Opt for removable hooks, adhesive tapes, and lightweight structures that do not require drilling.
Choose adaptable decor: Freestanding floral arrangements, LED candles, and fabric backdrops can create a stunning look without violating venue rules.
Communicate with the venue: Discuss decoration limitations in advance and plan accordingly to avoid last-minute issues.
3. Time Constraints
Event decorators often work under tight schedules, especially when venues have limited setup time. Setting up elaborate decorations in a short period can be stressful.
How to Overcome It:
Plan ahead: Have a detailed plan, including layout, material checklist, and team assignments, to ensure a smooth workflow.
Use pre-assembled decor: Ready-made floral arrangements, pre-lit structures, and foldable props can save a lot of time during setup.
Increase manpower: If the setup time is too short, hiring extra hands can speed up the process.
4. Weather Uncertainty for Outdoor Events
Outdoor events are highly affected by unpredictable weather conditions like rain, wind, and extreme temperatures, which can damage decorations.
How to Overcome It:
Choose weather-resistant materials: Use waterproof fabrics, sturdy structures, and weighted decor to withstand wind and rain.
Have a backup plan: Arrange for tents, indoor alternatives, or covered spaces in case of sudden weather changes.
Monitor weather forecasts: Keeping track of weather updates can help in making last-minute adjustments.
5. Meeting Client Expectations
Clients often have a vision for their event, but it may not always be practical due to budget, venue, or time constraints.
How to Overcome It:
Set realistic expectations: Have open discussions with clients about what is achievable within their budget and venue limitations.
Provide visual references: Show previous work, sketches, or digital mockups to help clients understand the final outcome.
Offer creative alternatives: If a client’s idea is impractical, suggest a similar but feasible alternative that still meets their expectations.
Conclusion
Event decoration comes with its own set of challenges, but with proper planning, creativity, and flexibility, these issues can be effectively managed. Whether it is budget constraints, venue restrictions, or last-minute surprises, professional event decorators can always find innovative solutions to deliver a stunning and memorable setup. If you are looking for expert decorators, Event Planners in Hyderabad can help bring your vision to life with ease and elegance.
0 notes
Text
Where to Find Premium MacBook Mockups Online
MacBook mockups are essential tools for designers looking to present their work in a realistic and polished way. Whether you're designing a website, app, or branding concept, showcasing your designs on a MacBook screen can elevate your presentation. Luckily, there are many places online where you can find premium MacBook mockups, which allow you to display your designs in the most professional light.
Top Platforms for Premium MacBook Mockups
When searching for premium MacBook mockups, it's important to find platforms that offer high-quality files with customization options. A few standout websites provide a range of mockups suitable for various design projects.
Mockey.ai Mockey is one of the best places to find free and premium MacBook mockups. The platform offers a diverse range of MacBook templates, from minimalist designs to more sophisticated, high-tech setups. Whether you're designing a website or showcasing a logo, Mockey allows you to easily upload your design, adjust it to fit the screen, and export a high-quality image.
Placeit Placeit is a widely used platform for mockups, offering numerous premium MacBook templates. Placeit offers mockups that feature clean backgrounds, workspace settings, and other professional environments, making it easier for you to find the right backdrop for your design. They also allow users to customize the mockups with a drag-and-drop editor, making it perfect for beginners and professionals alike.
Envato Elements Envato Elements is another great option for premium MacBook mockups. Their vast library includes thousands of mockups across different categories, including MacBook mockups. You’ll find everything from sleek desk setups to more intricate scene mockups, all available for download with a subscription. The platform’s premium resources are perfect for high-end presentations.
Pixeden Pixeden is a go-to site for high-quality, professional mockups, and their MacBook mockup collection is no exception. The website offers both free and premium mockups in various resolutions. Pixeden also features mockups with different angles and settings, which is perfect if you need variety for your design presentations.
MacBook Mockup Generator Tools
If you're looking for more control over your MacBook mockups, a MacBook mockup generator can be an excellent option. These online tools provide templates that you can customize to suit your design’s needs. You can upload your artwork, change the background, adjust the lighting, and modify the device angle, all in a matter of minutes. Most mockup generators offer a free version, but premium versions typically unlock additional customization features and higher-quality results.
Renderforest Renderforest is known for its user-friendly design tools, including mockup generators for MacBooks. With a variety of templates available, this platform lets you easily insert your designs and adjust the mockup to your liking. Whether you're working on a digital portfolio or a marketing campaign, Renderforest can help create stunning visuals in just a few clicks.
Mockdrop Mockdrop is a simple tool that allows you to drag and drop your MacBook designs into their templates. The website offers a wide range of free and premium mockups that are customizable to fit your project. The platform is easy to use, with options for quick editing and exporting high-quality images.
Conclusion
Finding premium MacBook mockups online doesn’t have to be a challenge. With platforms like Mockey, Placeit, Envato Elements, and Pixeden, designers can access high-quality resources for their projects. Whether you choose to use a MacBook mockup generator or select a template directly, these tools will help you present your work in the most impressive way possible. By using these resources, you can ensure your designs are showcased with a professional touch.
0 notes
Text
🍃 Lush Branding Mockups
31 branding mockup templates, crafted from genuine photographs, feature a variety of branding elements set amidst the lush backdrop of tropical nature environments.
⚡ DOWNLOAD
#mockup#branding#psd#template#showcase#mockupcloud#brand#inspiration#stationery#download#free#freebie#mockup cloud#tropical#jungle#box#packaging#thisrt#poster#book#coffee#floral#bottle#bali#tote bag
3 notes
·
View notes
Text

Solid Red Painted Wall This design features a solid red painted wall, offering a bold and vibrant visual effect. The rich red color creates a striking backdrop, ideal for adding a dramatic touch to any space. Suitable for use in interior design mockups, promotional materials, or as a design element in various creative projects. The simplicity of the solid color allows it to complement a range of styles and themes. The overall effect is both powerful and eye-catching.
#wallpaper#aestethic#nature photos#nature images#dreamy#phone wallpaper#aesthetic#background#wallpaperdesigns#aestheticwallpapers#hdwallpapers#phonewallpapers#desktopbackgrounds#beautifulwallpapers#minimalistwallpaper#naturewallpapers#abstractwallpapers#cutewallpapers
0 notes