#back when I first got my first DSLR
Explore tagged Tumblr posts
Visit Tumblr Blog
Explore Tumblr blogs with no restrictions, modern design and the best experience.
Last Seen Tumblr Blogs


Fun Fact
Tumblr Inc. is funded by 13 investors.
Text
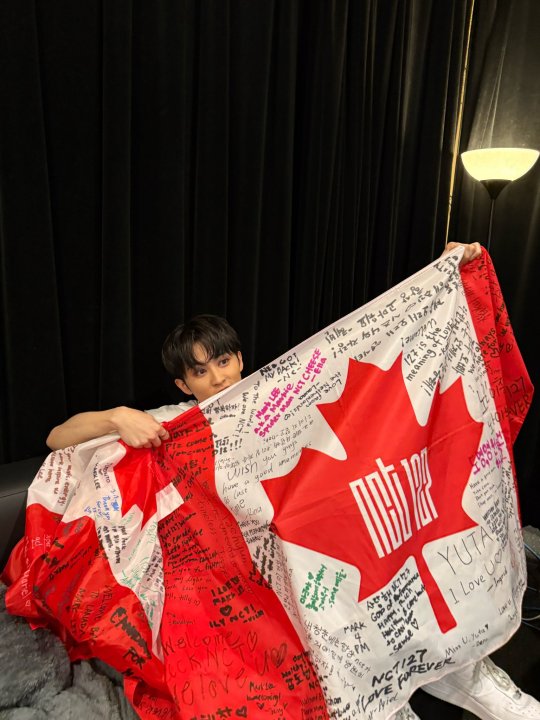

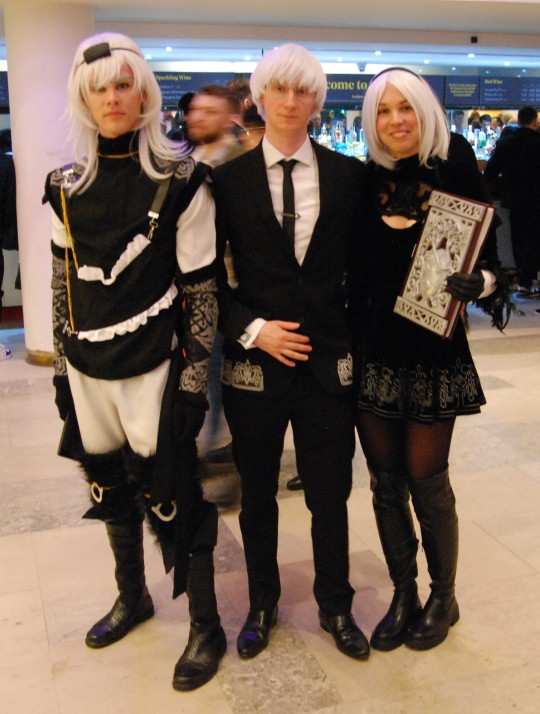
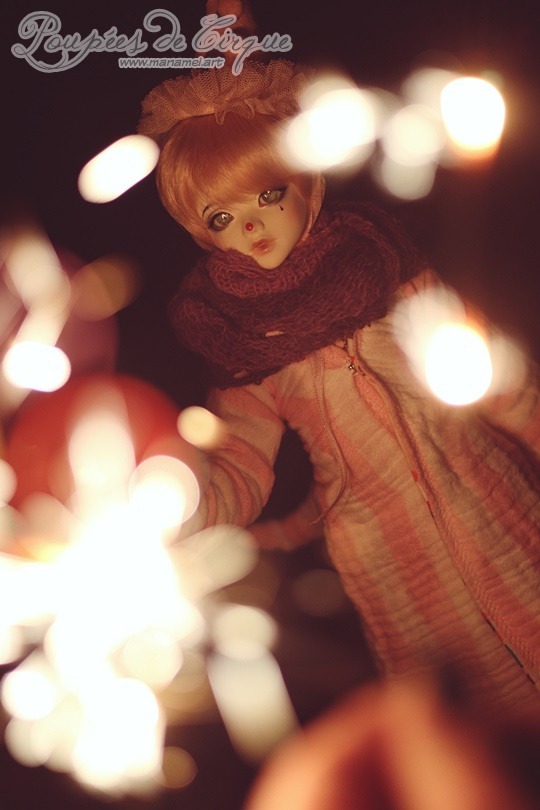
#o yea i was the neo got my back in chicken scratch font <3 clearly didnt know he was gonna pick it up i wouldve wrote anything else lol but#also the placement (it was the only available spot heh W) why did i use such a thick marker idfk but ily mark <3#ive never seen a man radiate so much happy energy#not just him also doyoung he was so proud of mk the entire show and had to mention it every time he spoke#mk and dy parents there from the other side of the world like. thats love#also the way nothing abt canada is special so they talked abt timmies the entire time exactlyyyyyy#minhyung#nct#incredible energy from a venue that was p empty.. the rows in front of me were company sponsored or smth bc ppl were filing in an hour late#looking so confused lmao . also i didnt want to stand but its hard when youre lvl w 127 and the songs make u want to jam ur head into a wal#also i was trying to scooch a lil forward when they were main stage bc ykno. its empty and it was fine but for some reason the lady behind#had to disrupt me only during hc whiplash ... i forgot it was hc whiplash bc i was trying to go the right way she was trying to direct me h#anywho the first time i glanced back i thought she was holding a toddler in her lap so i was half panicking#then after i looked back again to ask if everything was ok she showed me her huge ass dslr and I freaked tf out#but she wasnt rude at all. ive heard countless stories abt fansites being offensive the entire show#tbh idek if shes a fansite but it was interesting
2 notes
·
View notes
Note
hi hiii :D
i was hoping you’d take in this request of the lads men at reader’s graduation ceremony/party after she completes a hard degree she’s been studying for all this time :3
like what would the boys reaction be as they see her name being called out to get her degree on stage, and their interaction after the ceremony is over :D pretty pleaseeee
i’m gonna use this as motivation to study hard for my upcoming exam week hahaha
thank you take care <333
ughh tbh i skipped my graduation so i just made stuff up LMAO also i didnt define a degree bc hard degree is v v subjective lolol
He would clear his entire schedule to be there with you. It doesn't matter what he's doing that day - it doesn't matter. You can argue with him all you want, especially if he has an event that comes up you perceive as being more important. Rafayel and Sylus basically make up their own schedules so they've made sure that nothing is planned. Zayne and Xavier have booked the day off months in advance, knowing that they wanted absolutely nothing to get in the way.
He's also got his camera - phone or DSLR in Rafayel's case - to take a bunch of photos. He's going to commemorate this special occasion of course and is more than happy to either stage some photos, or just take dozens of photos of you. He also got a special bouquet just for you.

You can see Zayne in the audience clapping and smiling at you proudly. He doesn't do super big displays of affection, especially since this is an event for you, not him. When you walk the stage he's taking a bunch of photos, both for your reference and his.
He gives you the flowers he bought out to the event, passersby looking a little jealously at how extravagant and luscious they look. You don't notice at all considering all you can focus entirely on his little speeches about how proud he is of you.

Xavier's incredibly excited to be present at your graduation. He's smiling and clapping for you, also not a big cheerer but the happiness in his eyes is pretty obvious. When you finally step off of the stage he opens his arms to you, letting you run at him and hugging you tightly. His bouquet for you is super cute, a slight mess but still adorable. He put together a bouquet of treats - whatever it is you may like - as well as little plush or trinkets that you adore. It's not traditional but the grin you give him is more than worth it.

Rafayel's your personal photographer, nobody questioning the guy with the giant camera as he comes closer to the stage. You're a little embarrassed by how happy he is but you also can see that he's trying to keep things lowkey as much as possible. He showers you in affection once you step off the stage, taking you back to his car where he's got a giant bouquet hiding in the trunk. You stare at it, wide mouth and slack jawed as he just shrugs it off, telling you it's still in there because he couldn't carry it to the auditorium without destroying it.

Sylus sits in the audience, absolutely bored until your name is called. As soon as he hears the first syllable he brings his fingers to his mouth, letting out a sharp whistle that startles everyone, including you. He heard other people doing it and he wanted to outshine them all for the love of his life. His bouquet is very fancy and he's decided not to take it out in public just in case, presenting you with a lavish bouquet of flowers made of hundred dollar bills.
#love and deepspace x reader#lad x reader#l&ds x reader#zayne x reader#lads zayne x reader#l&ds zayne x reader#lads xavier x reader#xavier x reader#l&ds xavier x reader#rafayel x reader#l&ds rafayel x reader#lads rafayel x reader#sylus x reader#l&ds sylus x reader#lads sylus x reader
341 notes
·
View notes
Text
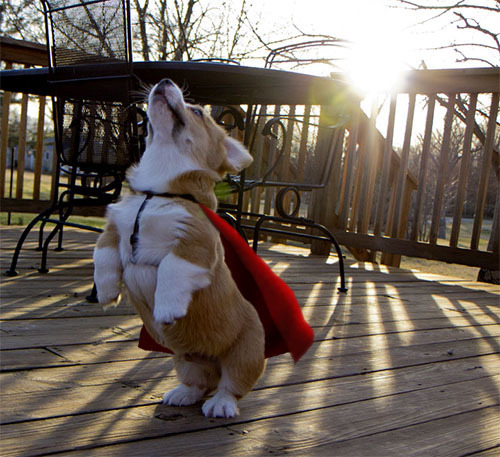
This was one of the first photos I took of Otis after I got my DSLR 12 years ago. I had been studying photography for months before I got that camera. I wanted to make sure I would be able to take cool pictures of my new furry pal. And while all of that study helped, I was still a novice when it came to photography. I wasn't even a photographer at that point.
Otis is the reason I picked up a camera in the first place. Perhaps you could even say my passion for photography was his gift to me.
I took this photo with a shutter speed of 1/1000 and an ISO of 500. That is a low ISO by today's standards, but on the Canon 60D that was still enough to get a little noisy. I definitely could have done 1/500 at ISO 250 and captured this moment a little cleaner. And my current lens is about 50% sharper too. But it's still a great photo and I was proud I captured it at the time.
I was good at photoshop, but I wasn't great at photo editing. I didn't realize those were two different things at the time. So adding the cape was easier than processing the RAW photo. His patch of white fur is nearly blue.
Eventually I started over and re-processed the photo and added a new cape. I had a few years of photography under my belt and I think I made some improvements.
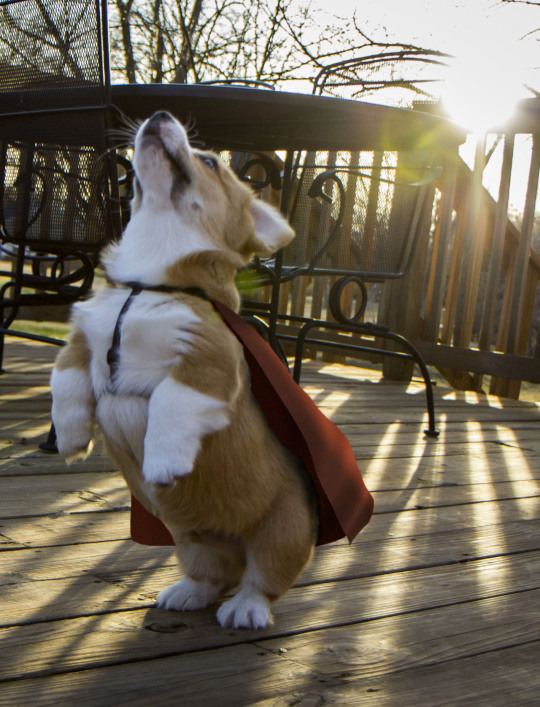
This edit is probably one of my most shared photos of all time.
So what could I do with this photo in present day with everything I've learned in the last 12 years?
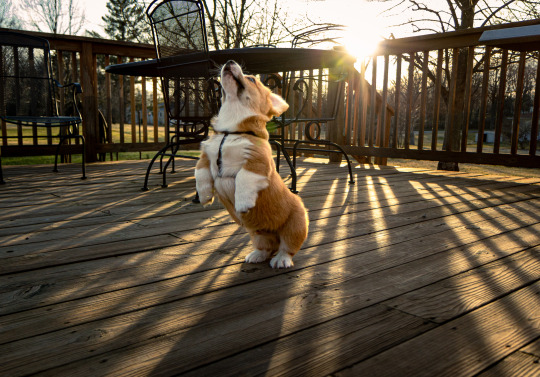
And could I do a better job at adding a cape?
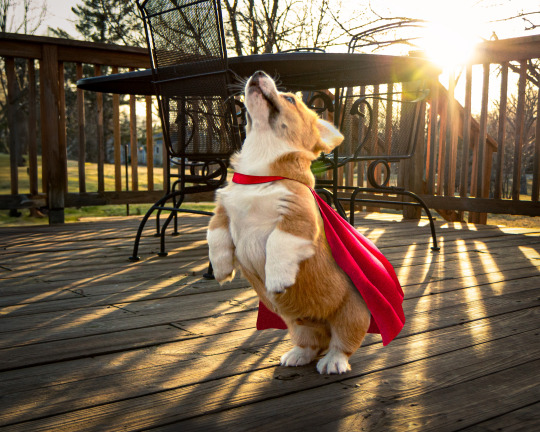
I think maybe I could.
I'd like to thank donlad for inspiring me to go back and redo this photo. It was a lot of fun seeing how I've progressed. I didn't care for him claiming Otis as his own, but I feel some good came out of all of that.
I miss you, Otis.
You were always super, with or without the cape.
412 notes
·
View notes
Text
chapter twelve


pairing- bang chan x OC (Chi Nakamura) genre- angst, hurt/comfort, slow burn romance word count- ~1.4k warnings- media harassment, emotional distress, invasive paparazzi, brief mention of internet hate, self-doubt a/n- sorry that this chapter is such a punch to the gut 😔💔
Chi woke to buzzing.
Not the lazy, harmless kind that blended into dreams and passed unnoticed. This was urgent. Violent. Her phone skittered across the nightstand like it was trying to throw itself off the edge.
She groaned, eyes still heavy, and reached for it with a clumsy hand. Her fingers grazed the screen before she managed to trap it beneath her palm, pressing it to her face.
The glare made her squint. She blinked blearily at the screen.
47 unread texts 19 missed calls Instagram: +3,841 followers Twitter: You’re trending.
She sat up too fast. Her stomach lurched. For a second, her vision swam.
Her thumb hovered over the Twitter notification, hesitant. Her pulse thrummed, each beat louder than the last.
A string of texts loaded in next, lighting up the screen. All from Mina.
MINA: CHI WAKE UP MINA: DO NOT OPEN TWITTER MINA: I REPEAT. MINA: DO. NOT. OPEN. TWITTER. MINA: (you opened it didn’t you)
Chi’s breath caught.
She hesitated.
Then she opened Twitter anyway.
Big mistake.
The first tweet in her feed had nearly 200k retweets. A low-res screenshot. The café’s soft lighting. Her and Chris behind the counter. He was leaning in. Her head tilted. The moment mid-kiss. Her eyes closed. His hoodie pushed just far enough back to expose the curve of his jaw—the one fans would recognize anywhere.
The caption was brutal in its simplicity: “Bang Chan and mystery girl caught in full PDA at café in Seoul. Is this his secret girlfriend?”
There was a video, too. It autoplayed.
Her laugh. His hand on her hip. The kiss, from a slightly different angle.
It spread through the screen like a slow burn. Something deeply personal turned into public fodder.
The hashtags were worse: #BangChan #CoffeeGirl #BangChanGirlfriend
It wasn’t just trending. It was viral.
Chi didn’t move. Her limbs felt like they belonged to someone else.
Her gaze drifted from tweet to tweet, unable to look away. Her heart kept hammering. Faster. Louder. Like a countdown.
She sank back against the headboard, her fingers wrapped tight around the phone.
The blood rushed from her ears. Everything sounded far away.
A notification lit up again.
8:52 AM – Messages Chris ☕: Hey. Chris ☕: I’m so sorry. Chris ☕: Are you okay? Chris ☕: Please text me back.
She stared at it for a long time. The words looked real, but they didn’t feel it.
She started to type. Something sharp, something honest. Paused. Backspaced. Typed again. Deleted it all.
Her hands wouldn’t stop shaking.
What was she even supposed to say? Hey, thanks for ruining my life overnight? She wanted to scream. Or disappear. Or both. But instead, she was going back to work. To the place where it all happened. Where everything used to feel safe. Her café. Her corner of the world.
When she got to Mochi & Bean, she knew something was wrong before she even reached the door.
There were people. Too many. Standing in clusters outside the café like it was a pop-up concert. But they weren’t customers.
Tripods. DSLRs. Phones held high on gimbals.
Teenagers with laminated signs that said “Bang Chan’s Mystery Girl 💕” in glitter pen. Middle-aged bloggers speaking directly to their livestreams. A girl crying. A man shouting questions into the crowd.
Someone had brought merch.
Chi’s breath hitched.
This wasn’t her café anymore.
She took the long way around, slipping through the alley. Her steps were light, cautious, like she was doing something illegal. She ducked behind the trash bins, heart thudding as she unlocked the back door with shaking hands.
Inside, the light was too bright. The walls too quiet.
Mina was already there, pacing behind the counter like she’d been waiting for hours. Her hair was pulled into a rushed bun. She looked like she hadn’t blinked in a while.
“Chi,” she said the moment their eyes met. “Don’t panic.”
Too late.
Chi let the door close behind her and leaned against it for support. Her legs felt hollow.
“Why are they here?” she asked, voice paper-thin.
Mina’s face softened. “They want a picture. Of you. They want to know if it’s real.”
Chi swallowed, throat tight. “Oh. Okay."
Mina’s jaw clenched. “He better be sorry”
The silence stretched.
"I hope hes writing a full apology on parchment paper,” Mina muttered. “With calligraphy. In his blood.”
11:17 AM – Messages Chris ☕: I didn’t think it would blow up this fast. Chris ☕: I’m so sorry. Chris ☕: I’m trying to fix it. Chris ☕: I’m meeting with management later. Chris ☕: I’ll protect you. I promise. Chris ☕: Please talk to me. Chris ☕: Are you at the café? Chris ☕: Don’t go out front. There are people there. Chris ☕: I didn’t know someone was recording. Chris ☕: I should’ve been smarter. I’m so fucking sorry. Chris ☕: I never wanted this for you. Chris ☕: If I could take it back, I would. Chris ☕: Say something. Anything. Please. Chris ☕: I don’t care what happens to me. Just say you’re okay.
Read 12:06 PM
Chris ☕: Chi? Chris ☕: Are you mad? Chris ☕: Actually… no, don’t answer that. You have every right. Chris ☕: I just want to fix it. Chris ☕: I don’t even know how to yet. But I will. Chris ☕: Just… please don’t disappear on me.
Chi typed: You should’ve protected me before the kiss.
She stared at it. Her thumb hovered over Send.
Then she hit backspace. One press at a time.
She sent nothing.
The café was chaos.
People came in—but not for coffee. Not for the usual croissants or oat milk lattes. They came with wide eyes and zoom lenses. Some just hovered. Others treated her like a tourist attraction.
A woman leaned across the counter and tried to take a picture of Chi’s name tag.
A man asked, “So, what’s it like dating a celebrity? Is he good in bed?”
Someone livestreamed her from the corner booth. Another whispered, not so quietly, “She doesn’t even look like a celeb. I don’t get it.”
By noon, Chi flipped the sign to Closed, locked the door, and sank behind the register. She sat on the cold tile floor, legs tucked in, arms around her knees.
She didn’t cry. Not yet. She just felt—gone.
Later that night, long after the café had gone still, Chi heard voices from the back hallway.
Two staff members. Whispering. They didn’t know she was nearby.
“She’s not built for this.”
“I mean, she’s sweet, but come on. This won’t last. He’ll get over it.”
Chi didn’t move. She didn’t say anything.
Because the thing was—they weren’t being cruel.
They were being honest.
And somehow, that hurt worse.
Maybe they were right. Maybe she really wasn’t built for this. She made lattes. She liked quiet. She wasn’t supposed to be famous for someone else’s kiss.
9:43 PM – Messages Chi: I don’t think I can do this. [Delivered.]
The typing bubble appeared.
Then disappeared.
Then nothing.
©sunshineangel0 𖹭 if you liked this work, please consider reblogging, commenting or liking! xoxo franzi 💋

skz general: @velvetmoonlght @scarlet789 @estella-novella @nightmarenyxx @pixie-felix
Mochi and Bean: @offl-ine @missvanjii @watchingover-hypegirl @namchanhyung @d0nnie---dark0 @queenofdumbfuckery
(if you wanna be added to the taglist comment below!)
#stray kids imagines#skz imagines#stray kids fanfic#stray kids scenarios#skz scenarios#bang chan imagines#bang chan scenarios#bang chan fanfic#bang chan#stray kids#skz#skz fanfic#stray kids fake texts#Skz texts#stray kids texts#skz fluff#skz au#christopher bang#bangchan stray kids#bang chan x oc#bang chan stray kids#bang chan skz#franzi writes ✰
42 notes
·
View notes
Text
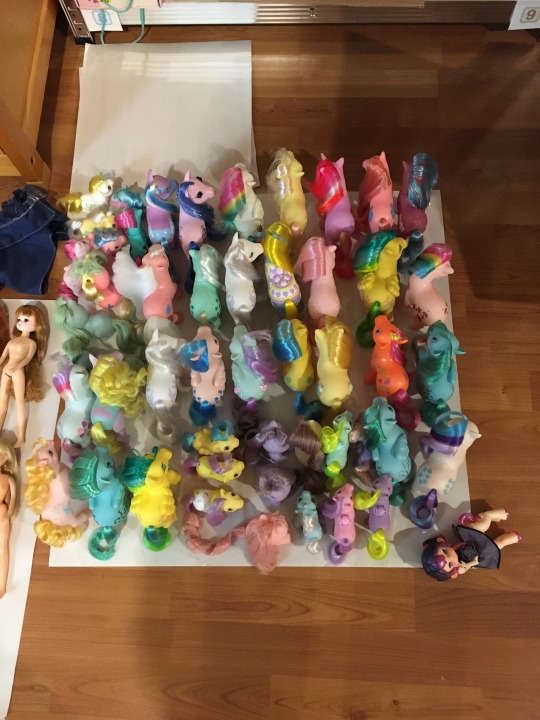
State of the Pone Address
I usually post these kinds of things to my main, but obviously, things have changed around here in the past 8 or so months.
My now defunct doll and pony salon is set up in stations so that I can remember what each pony needs without too much mental effort.
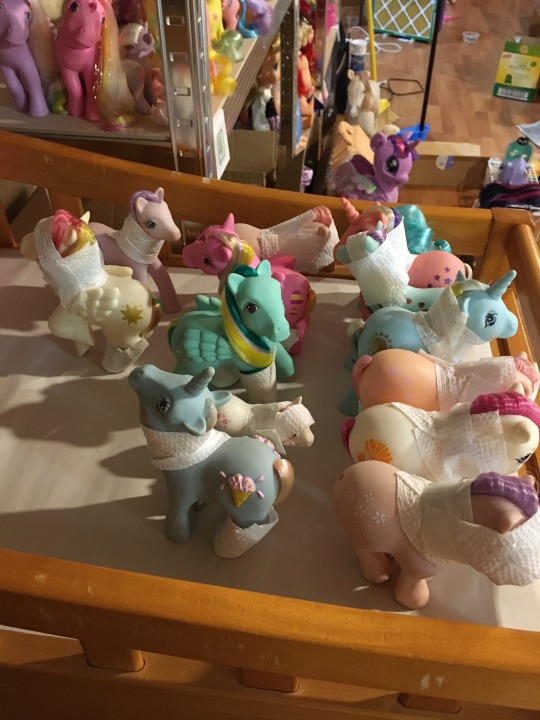
These were waiting to be photographed. I took care of that this morning.
These are all waiting to be wrapped up and sent back home. They have to wait for everyone else to be done, first.
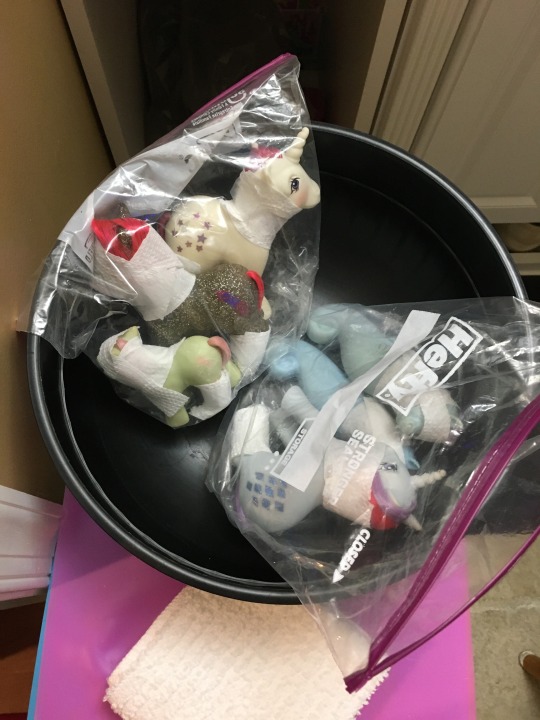
These were ensoupened (hot hair setting).
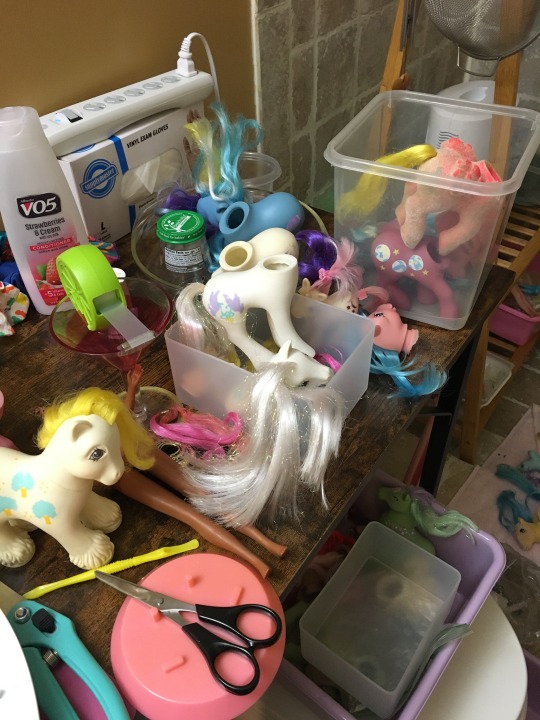
These are all rustbutts waiting to be cleaned out. I'd been dragging my feet on that because getting Daddy Apple Delight's head off had been a STRUGGLE. I got him beheaded this morning and can get everyone cleaned out next time I have the energy to work on ponies again.
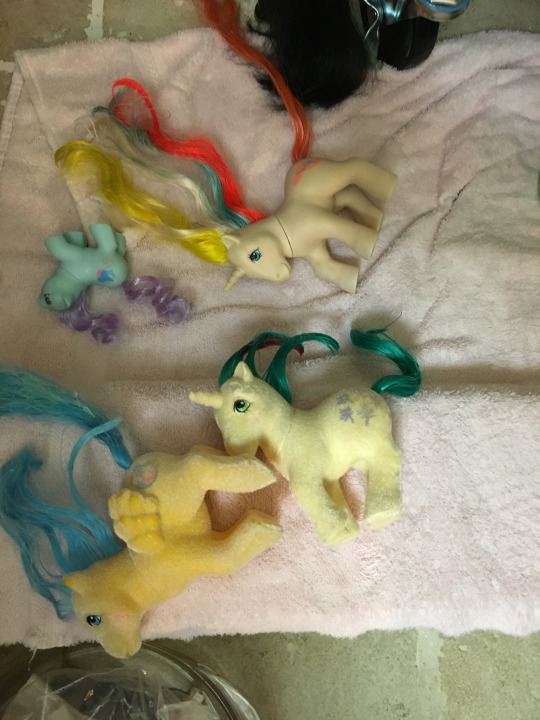
These are waiting to be rinsed, combed, and flat ironed if needed.
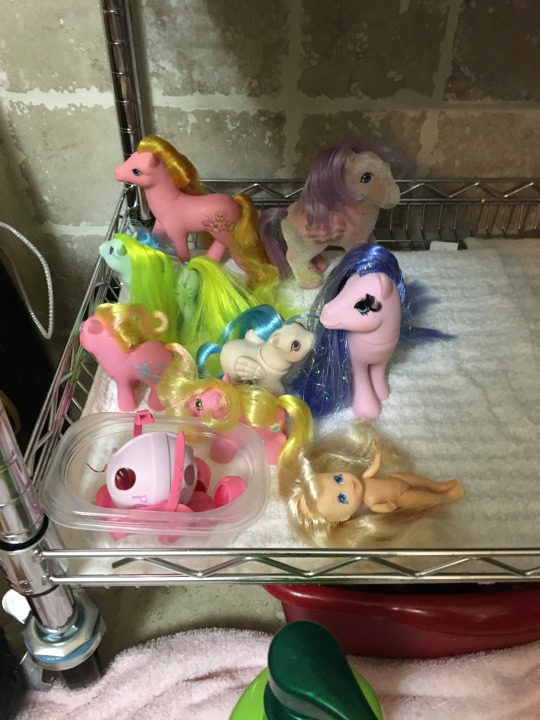
And these are waiting to be soup.
A more personal post
I've mentioned before that I got a job last August and it's wrecking me, physically. I barely have energy to survive anymore, let alone any left to work on toys. What little energy I do have is spent trying (and failing) to keep up on the same housework I was struggling to get done before I had a job, and any extra time is spent doing low-physical-effort crafts like crochet.
Working in the salon actually has me on my feet and moving around quite a lot. I walk a little over a mile to work, stand on my feet/move around lifting and carrying things (yesterday I had to lift 6ct boxes of 1 gallon automotive fluids jugs... ow...), then walk home again. I am old and disabled. When I get home I sit down, my whole body cramps up, and I'm done for the day. I can't get to the salon after work, I need to rest.
That's frustrating because I felt like I was finally really nailing the whole salon down.
I had my photo naming process figured out, got a cute, relatively consistent photo backdrop and camera setup, starting (poorly) using a DSLR instead of my phone to finally get more consistent results between before and after photos, was spending money on the salon upgrading storage and supplies and tools, planning more lighting and things to make the entire process easier...
And right then it was all over.
I had some ongoing health issues that cost a lot of money and my "partner" demanded I get a job assuming I could just go do that easily and snag an office job somewhere that was full time with full benefits with a nearly 20-year employment gap, no higher education, and only prior experience being retail and low-ranking military.
If you've looked for work in the last decade or so you know how uninformed his assumption was, especially living somewhere a car is necessary to get anywhere and not having a car.
I finally found a part-time job working at a gas station in walking distance. It doesn't pay much and wears me out. The salon died almost immediately.
I miss the salon. That was certainly more fun but it doesn't pay the bills, not that my gas station job does.
Either way, I'm still picking away at this commission which also came last August, bit by bit as I can.
I'll get there and might occasionally have something to talk about doll/pony related, but this may be the last batch of ponies.
47 notes
·
View notes
Text
Camera Gear for the Low-Spoons Photographer
YOU DON'T HAVE TO TAKE MY WORD FOR IT, but I have rheumatoid arthritis, chronic vertigo, and a host of less-related autoimmune situationships that I've learned to work with and around over the years. When I first got my telephoto lens, holding the camera long enough to find and photograph owls would leave my hands swollen for hours. I do a lot better now.
A few notes: I'm leaving out my various lenses and filters and such, since those aren't directly related to coping with chronic pain. But if there's any interest, I can share those another time. + Nothing I recommend below is an affiliate link. Not that there's anything wrong with that, but this is just me sharing hopefully helpful things.
And: some of this stuff is expensive. I've been accumulating gear for many years. Prioritize what you need most for health and joy, and build out your kit as you go along, upgrading down the line if needed.
under the cut: PERSONAL GEAR, CAMERA GEAR, BONUS GEAR
✱ PERSONAL GEAR
Compression gloves. The MVP of hanging on to a camera without swelling/pain. I don't find that I need gloves with grips, but you might prefer it.
Photography gloves. But if you're going out in really serious winter weather, you'll want glove liners or compression gloves + fold-back mittens, instead.
Wrist wraps (over the top of the compression gloves works great). I guess mine are discontinued, but for what its worth, this is what I use.
Rechargeable hand warmers. Again, mine doesn't seem to exist anymore, but this looks like its successor. Get one for each pocket unless you have...
A heated vest
And this goes without saying, but find really good boots that don't bother your ankles. These are my go-to; YMMV. (Pair them with really good socks.)
✱ CAMERA GEAR
Panasonic Lumix GH7. Micro four-thirds cameras and their lenses are smaller and lighter than full frame mirrorless/DSLRs, which is better for my RA needs. It's also less expensive.
But, note that I started out (post-film) with the Canon M-series, a smaller, more affordable option which you can still buy used. Great for beginners. (I'm not sure what Canon replaced the M50s with.)
Camera strap. Personally, I like a cross-body setup. It doesn't bother my collar bones as much, and doesn't bother my neck at all. You can get cheaper ones than mine. I use it often enough that I wanted to be as comfortable as possible, and I want to be able to quickly switch between a strap and a tripod (otherwise I don't use my tripod enough). I've given away a lot of bad camera straps, so I chose to upgrade.
Camera bag. I won't link to mine (though I love it), because it was wildly self-indulgent and I don't want to suggest you have to buy something expensive to make it work! For daily use, I use a medium-sized sling bag because I change lenses often, and this lets me swap without setting all of my gear down on the ground.
Camera backpack. If I'm going further afield, I'll switch to a backpack for shoulder pain, but I don't love mine for how inaccessible my gear is. I do have to set everything down with this one. I've been reliably recommended this bag, but I'm still looking for something that will fit my camera with the telephoto lens mounted. I'll let you know what I find!
Travel backpack. My collar bones get swollen and tender pretty easily, so for hiking I'll slide a camera cube into a proper backpack. This isn't my exact bag, but I think it's what replaced mine; my cube came with my camera backpack, but here's the kind of thing I mean. My smaller lenses fit (with soft cases) into the side pockets for easy access; you could use carabiners, but I don't prefer how insecure that feels.
(If I'm hiking, I've got walking sticks and knee compression sleeves, just for the record. In which case I tend not to also bring a tripod.)
Travel Tripod. Lightweight, super easy to use. Not heavy enough to withstand much wind, though.
Heavy Tripod. Harder to travel with, but worth it when conditions call for a more heavy-duty tripod, or one with a ball head (for better camera maneuverability). I keep mine in my coat closet for the owls. My travel tripod lives in the trunk of my car.
✱ BONUS GEAR: drones x accessibility
I really do recommend that if you have certain kinds of mobility or health issues, you consider getting a small drone (sUAV). I have a DJI Air 2S (which is being replaced by the 3S) which fits into a neat little pack for easy carrying. And to support this recommendation, a story:
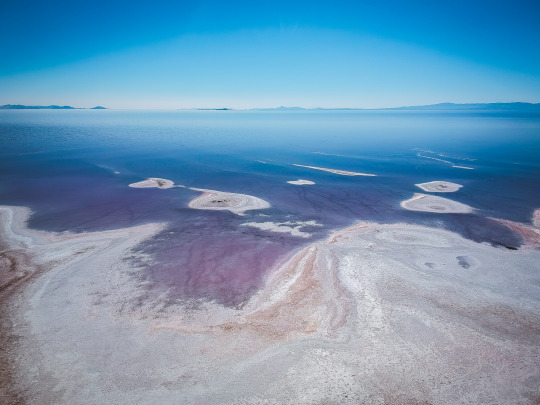
For our honeymoon, my spouse and I roadtripped to the Spiral Jetty at the Great Salt Lake (en route to the 2017 solar eclipse). It was August. It was hot. And my joints were bent out of shape from coming down from a week in Tahoe, and I have history of seizures which can be triggered by heat, and as we walked further and further out I started feeling quite ill.
Since I did not want to have a Problem out there in the middle of nowhere, I walked back up to the parking lot and launched my small, quiet, unobtrusive DJI Spark from the tailgate of my car. I am one of those photographers who is very self-conscious about flying around people who may be bothered by it, which is why I'm clarifying small and quiet. There were very few people anyway, but at elevation, no one even knew it was there.
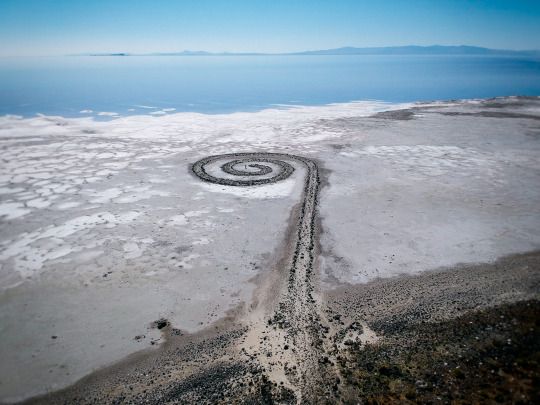
(The person in the center of the spiral is my spouse!)
Of course, if you're a National Parks nerd, you know that you can't fly in the parks. But, as with the Spiral Jetty, there are many beautiful places you can still go. And if you get out there and can't go very far, or you're just having a bad day, with a drone you still have options. And that means so much to me that my company is trying to form a nonprofit to help people like me get set up with non-commercial sUAVs. We'll see where that goes.
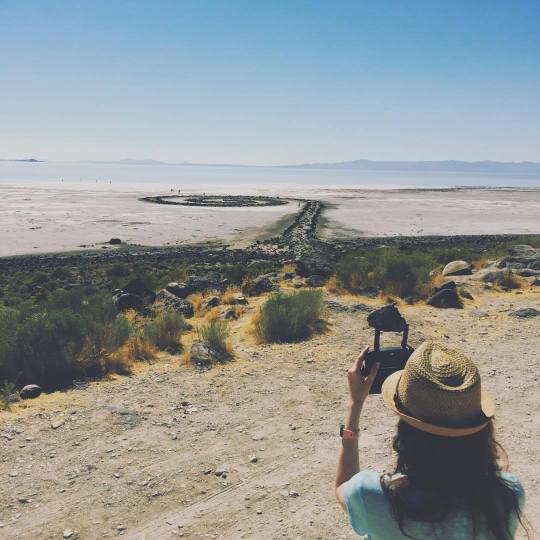
Don't worry, you don't have to hold the controller aloft like this. I was still setting up, didn't know I was being photographed.
These were taken a million years ago with an old, now-discontinued drone that only shot in JPG, because of how small it was. I've flown FPV drones since then, which does tend to trigger my vertigo, but I can see the incredible possibilities for being able to experience a place you can't physically get to, or only in limited ways -- because you could at least have these immersive goggles and a small aircraft to get you there. You know? It's not nothing. (But, of course, it's not for everyone.)
That's it! As always, feel free to drop a note in my ask box. And if anyone is interested in my editing gear, I can make a separate post for that, too. ✌
#photography#photographers on tumblr#lensblr#on photography#accessible photography#chronic pain#chronic fatigue#invisible illness#rheumatoid arthritis#camera gear#nature photography
21 notes
·
View notes
Text
Lets talk about Wildlife Photography
I think social media makes it a hard thing to get into. Amazing locations are shown, awesome gear, and fit people that go on crazy long hikes.
I would like to share my perspective from someone that is far from well off. I feel it's easy to look at something online and wish for that life. I do it to often myself.
I started fully getting into wildlife photography myself around two years. I have both autoimmune and neurological issues so my hikes are often limited. When I do get out on hikes (usually only up to 2 miles at most) I can't do much else for a week. My gear is either pre owned or was financed over small payments. 95% of my photos were taken from my car.
Good places to look and when
(Some things may vary from state to state all of my opinions are formed from my experiences)
First off timing, dusk and dawn. Timing it out where the animals are out and you still have good lighting is rough. Preferably, you would like every animal to be out during golden hour, but that often doesn't happen.
Try finding Facebook groups for any refuge or park to get an idea of where and when the animals may be at your local parks.
Wildlife refuges are a great place to look for animals, but can be limited on access and be a bit more seasonal. You'll almost always see atleast one animal, but timing out when the animals you are looking for tend to hangout here may take a bit. For instance the elk at my local refuge winter here but are basically non-existent in the summer.
County roads are a great place to cruise around looking for wildlife. The farms tend to hold deer. Especially if your in an area that grows alot of corn 🌽. They can also have a ton of pronghorn if you live in the prairie.
Neighborhood parks. Especially with mule deer, I find more bucks wandering neighborhoods than the back country. These parks tend to be great for some of the more common birds as well.
National parks, State Parks, and National Forests are always wonderful places to find wildlife. Depending on location, they can be far and few. There's usually more info about animal locations for these. Whether that be social media groups or large groups of stopped cars when your in the park.
You'll probably have to drive a bit unless your in a prime location. My favorite place to see wildlife is 2 hours away.
Frequency
You will have amazing days that feel like pure magic with a bounty of awesome opportunities. Then you will have a week or weeks where you don't see anything. Maybe you do see an animal, but they are in a junkyard, too far away, or the lighting is just too bad and they aren't there the next morning. You will be frustrated, and no matter how much you think you know these animals and their habitats. They are still wild animals. Maybe it was a warmer winter or the hunting pressure that year was higher? Either way, there are times you just don't get lucky.
Gear
Start with something beginner friendly don't jump into a super high end DSLR. They are complicated and can be very confusing. I would recommend a D3300 or something from that series. You can find some on eBay with lenses for around $300. The 55-200mm kit lens it often comes with is a wonderful lens to start off with.
Practice
It's good to practice on domestic animals. Whether that be your pet cat or a horse alongside the road. I did horse photography for years before I got into wildlife photography. Going to horse shows can be a great way to practice motion shots and get a feel for your settings. Oftentimes, with wildlife the opportunity window for a shot is only seconds.
There's a ton of wonderful camera specific help if you look up your camera model with the word "guide" "help" or "tips" on YouTube.
Nikon Teaching Photography on Facebook is an abundant resource. There's many wonderful camera help groups on Facebook.
Random tips
Write down everything and try to put an answer to these questions in the summary. What animal did you see? what time was it? what day? how cold was it?
Some animals are creatures of habitat, and others tend to be more random. For me, my local elk tend to generally stick to more of a schedule, and the mule deer are pure chaos lol.
Bring basic survival items in your car if you plan on heading out into the back country. Extra food, water, battery packs, jumper cables, a shovel, first aid kit.
It's better to turn around than to be stuck miles back into the forest without service. The super muddy or snowy trail isn't worth it unless you plan on walking it.
13 notes
·
View notes
Text
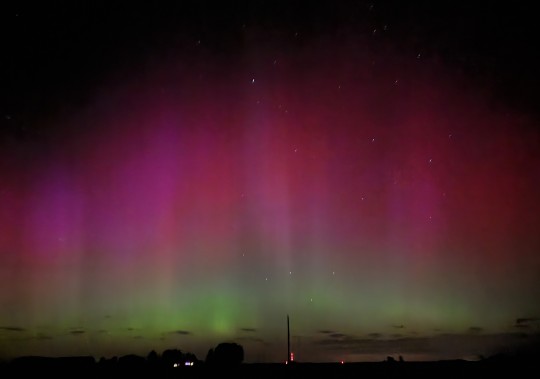
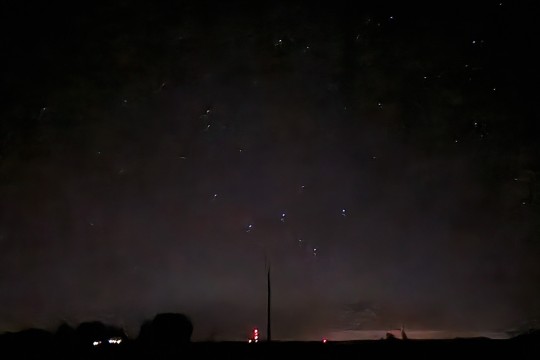
Aurora deep into southern Midwest!
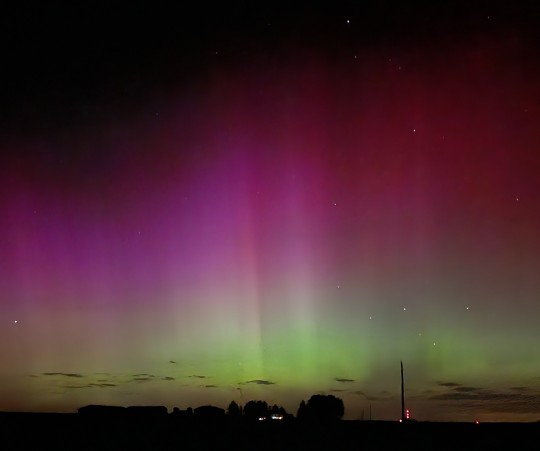
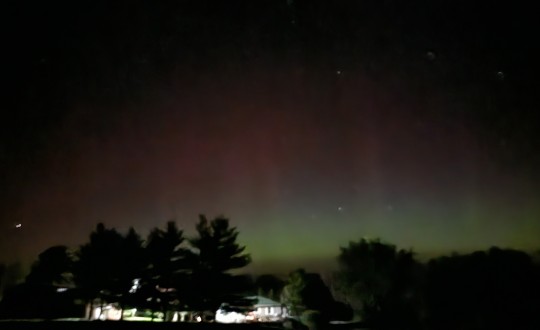
After Friday night's less-than-stellar experience hunting for a good spot to watch the aurora near LFK (short answer: there is none), tonight we decided to drive north a couple hours to get deeper into the aurora zone, and a little east to reach truly dark skies and skirt the clouds creeping across Kansas and Nebraska. Still pretty far south in the grand scheme of things (northern Missouri), but the darkest skies we've seen in a long time.
At first we parked as planned near a nature preserve in what is billed as a town (really just a handful of houses), but the northern view from there looked over a house that sits beside Loud Frog Land:
So when the sky began to dance (see this image), we drove a bit farther along hilly, winding country blacktop until finding a little gravel turn-around.
Just as we set out our folding chaise lounges, the sky really heated up, and for about 20 minutes it was amazing:
This image and the top one (by @bugs-are-buddies using her Android S22 Ultra) are much better than from mine (Note9); thanks, darlin'.
My tripod-mounted DSLR was a bust, though I managed to snap the below Moon image once I got the telephoto lens working - had to turn the autofocus on and off again to manually focus at all (always the same story with tech), so we missed imaging the burst of aurora action with that machine.
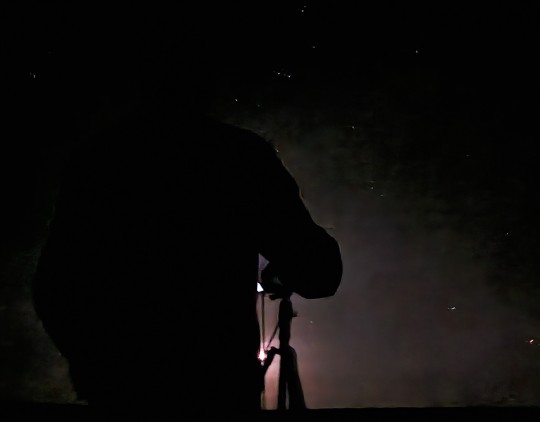
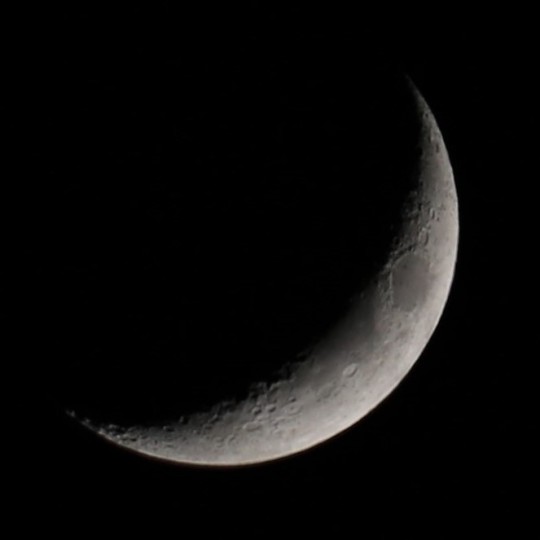
(Left image is me fiddling with the camera by the light of the Moon and the aurora's fading glow.)
We stuck around for a while after the dramatically waving red-pink-green curtains diminished from their peak, hoping the huge Coronal Mass Ejection had more to offer, but things tapered off around Cassiopeia. And it was getting cold. So home we went.
The drive back was dinner of nut bars and pears, and introducing my sweetheart to some 1990s bangers on le Wedding Trip Jag's awesome speaker setup.
Two nights of dramatic aurorae - visible as far south as Kansas! Wow!
I hope you got a chance to catch some of the Sun's beautiful assault against Earth's skies. Ad Astra!
#aurora#northern lights#space weather#geomagnetic storms#coronal mass ejections#astronomy#our photos
35 notes
·
View notes
Text
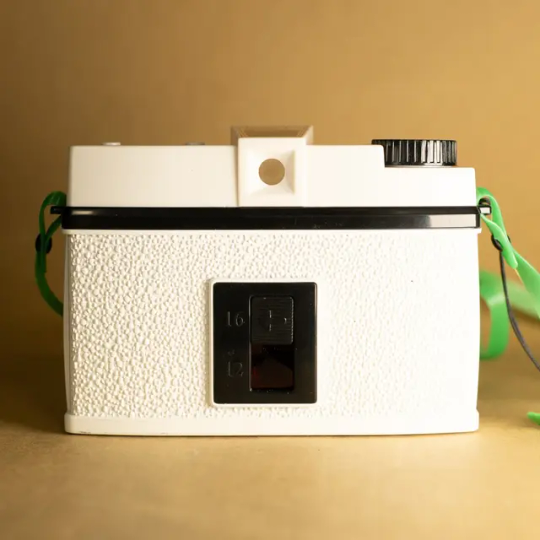
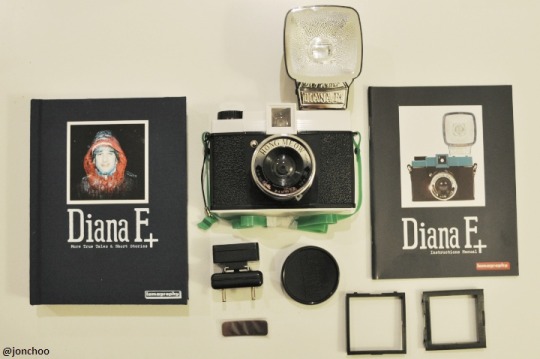
My Journey with the Lomography Diana 🎞️ 📷
Today, I’d like to share my experience with one of my earliest lomo cameras: the Lomography Diana.
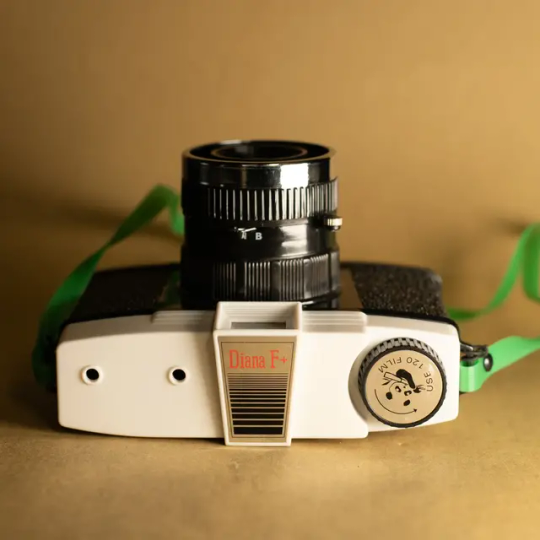
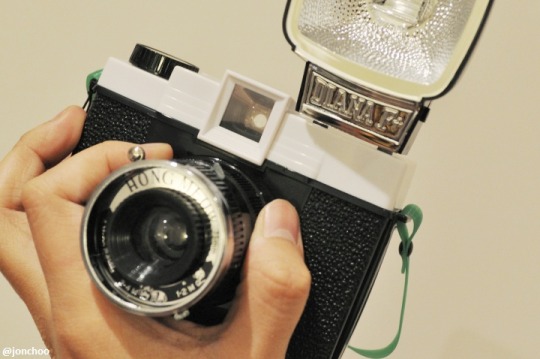
I don’t remember exactly when I got my hands on it, but it wasn’t my first lomo camera. However, it was the first true Lomography-branded camera I owned—complete with its iconic toy-like design and 1960s vintage vibe. Mine was the Diana Hong Meow edition 🐼, styled in black and white with a panda on the film dial and a signature bamboo-green strap.
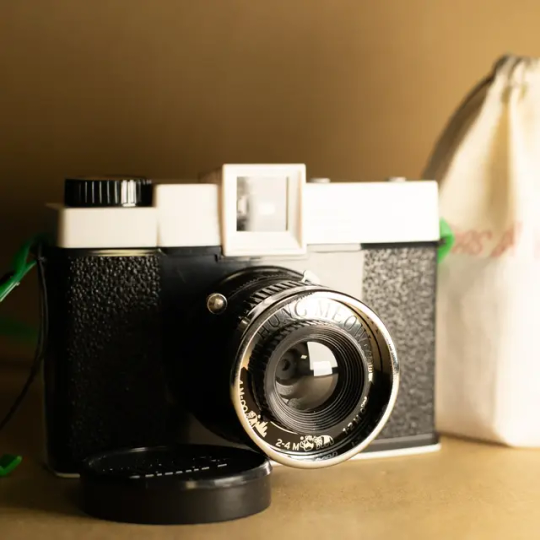
The Diana’s Unique Features ✨
This fully mechanical camera offers a lot of creative potential, especially for those who enjoy experimenting with analog photography:
Aperture Options: Choose between apertures for cloudy or sunny days—or even a pinhole setting!
Lens Focal Positions: 75mm lens focal length options include portrait, group photo, and landscape.
Signature Lens: The single plastic lens creates a dreamy, blurry effect that remains one of my favorite features to this day.
The spirit of experimentation is exciting, but the results are often unexpected—which is one of the reasons I eventually sold the camera.
Medium Format Film and Flexibility 🎞️
The Diana uses 120 medium format roll film, producing 12 square 6x6 negatives. However, by using a special bracket, you can switch to 16 smaller 6x4.5 negatives, maximizing the number of shots per roll. The film advancement is manually controlled and monitored through a small, red-filtered window on the back of the camera.
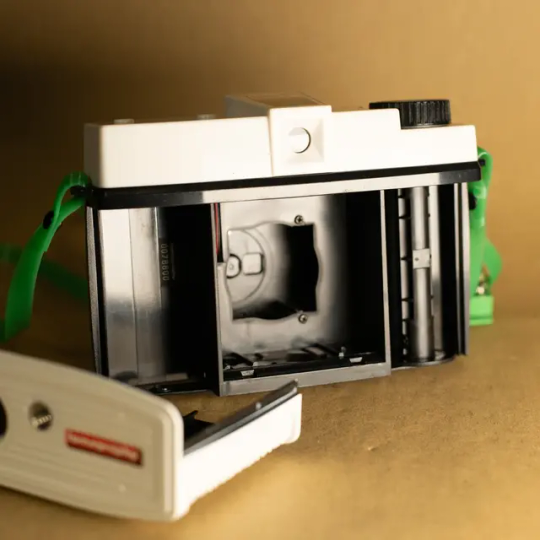
Flash and Accessories 💡
One of the standout features is the vintage-looking flash, powered by 2 AA batteries. It is versatile enough to use with other cameras, including modern DSLRs, thanks to the included hot shoe adapter. A set of colored filters for the flash adds to the camera’s experimental potential, allowing for creative lighting effects.
The Diana is also compatible with a variety of accessories. One of my favorites was a lens attachment that exposed fractions of the film, creating kaleidoscopic effects in a single shot.
The Diana Experience 🎨
The Diana offers endless opportunities for experimentation, both intentional and accidental. With full manual control over aperture, focus, and film advancement, it isn't uncommon to end up with underexposed, overexposed, or double-exposed shots. This unpredictability, combined with the limitations of roll film, made the Diana less versatile and reliable for me than other cameras.
Today, the Diana is available in both 120 and 135 (35mm) film formats 🎞️. If I were to shoot with a Diana again, I’d likely opt for the 135 version or use a 120-to-135 adapter. The camera is surprisingly sharp in the center of the frame but heavily dependent on good lighting, so I’d recommend shooting with the flash (something I regret not doing enough).
For those looking for a similar aesthetic with added practicality, I’d suggest considering the 135mm Holga, which offers comparable creative potential with greater versatility.

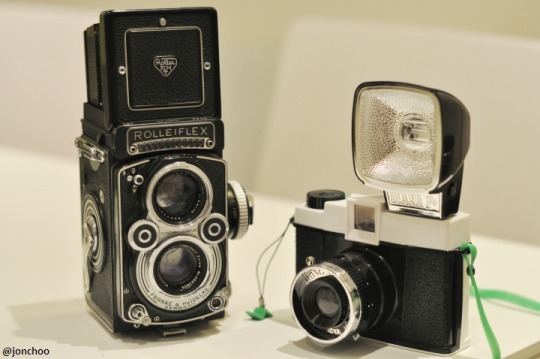
Final Thoughts
The Lomography Diana was a wonderful introduction to experimental analog photography, and it taught me a lot about embracing imperfections and surprises. If you’ve used a Diana—or are thinking about trying one—feel free to share your experiences in the comments 💬.
📢 This post was created for the Lomography Community on Tumblr. If you love experimental photography, we’d love to have you join us! 🌟
📸 Photo Credits: Images of the Lomography Diana Hong Meow Edition featured in this article are courtesy of Cameras by Max and jinchoo.
#photographers on tumblr#photography#lomography#ishootfilm#film photography#analog photography#film#filmisnotdead#analogue#expired film#original photographers#vintage#lomo#kodak#medium format#diana f+#120 film#kodak portra 400#film is not dead#kodak portra
10 notes
·
View notes
Text
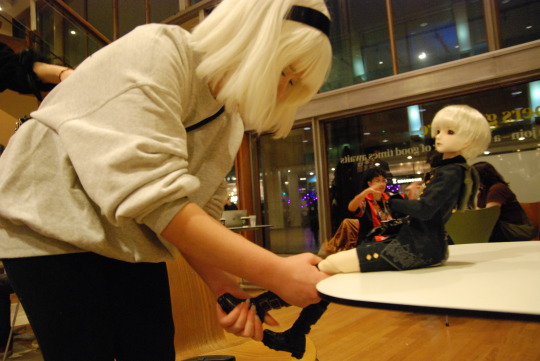
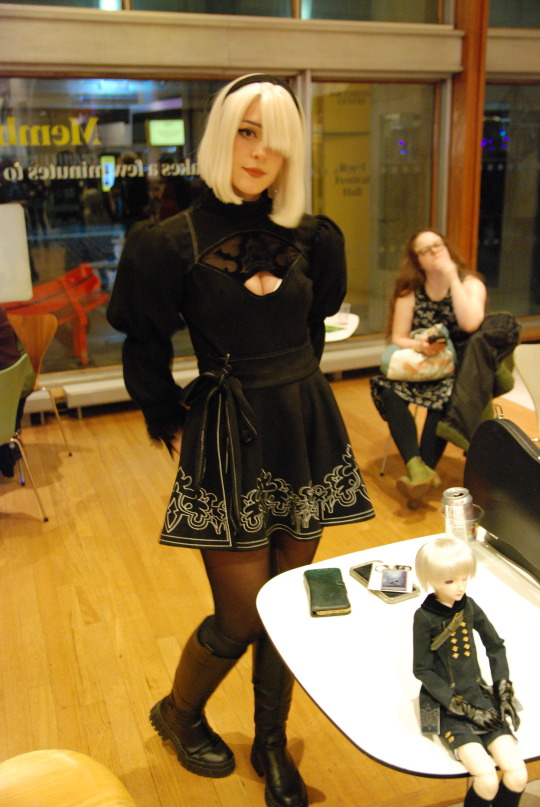
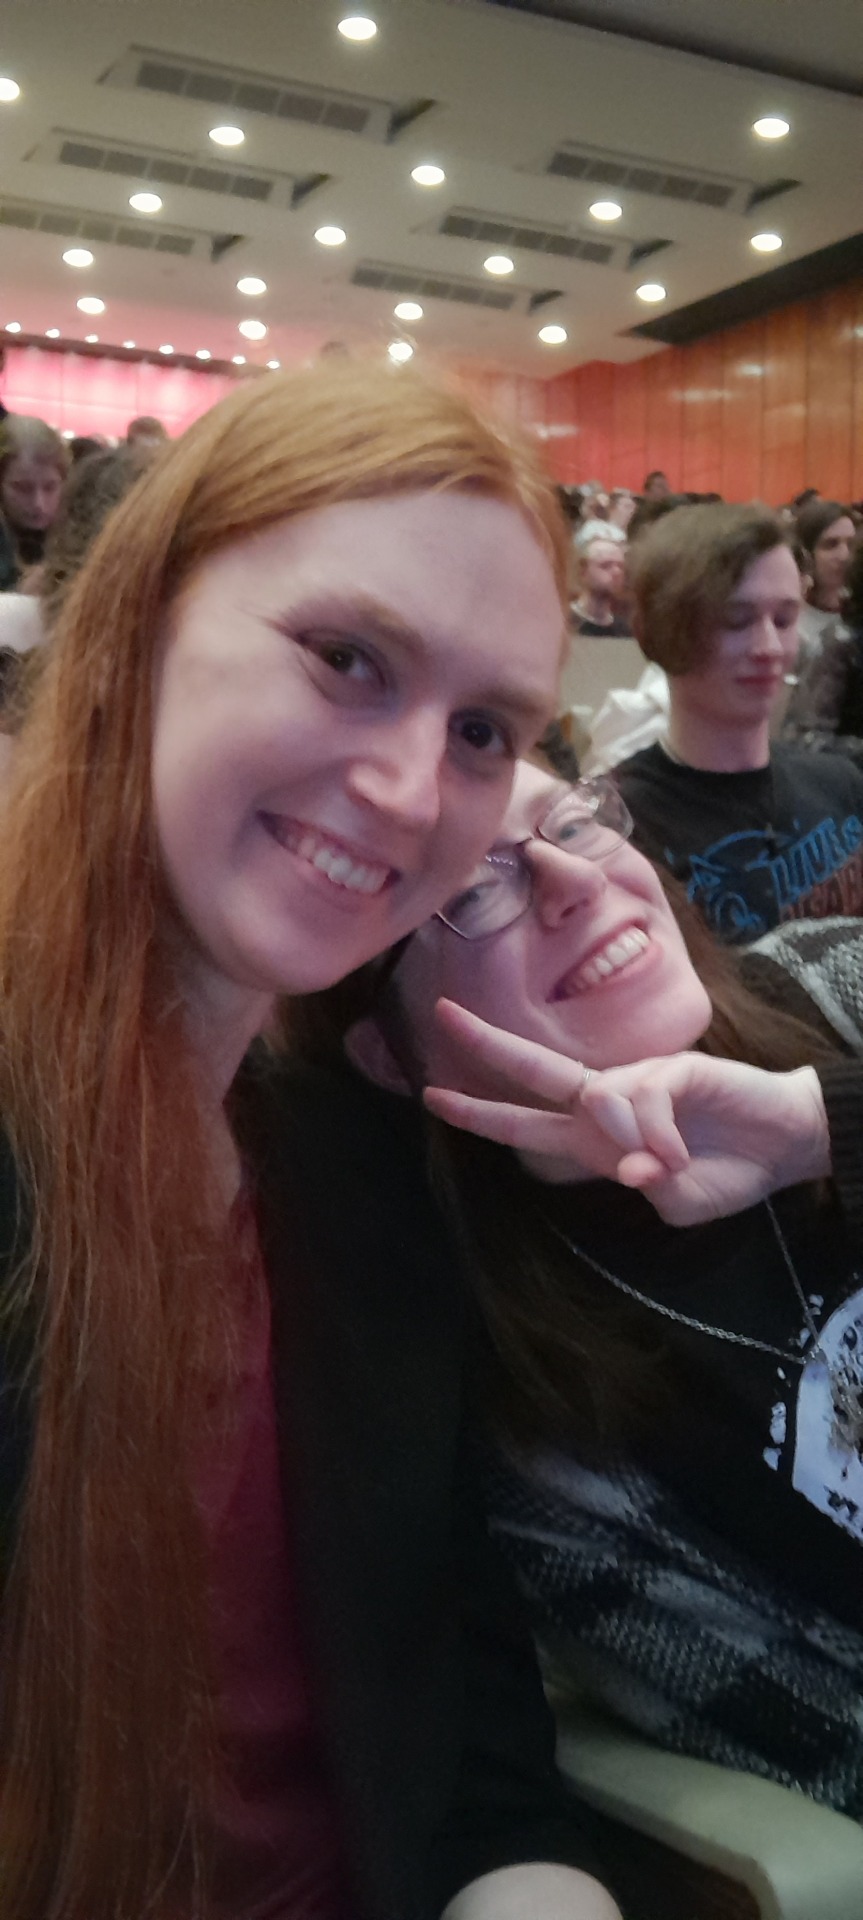
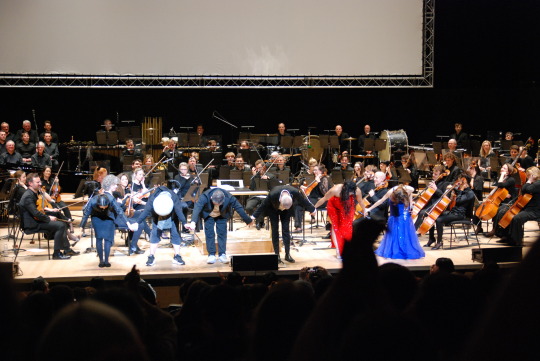
NieR Orchestra Concert 12024 [the end of data] (London, 15/2/2024)

NieR concert was incredible just as expected. Honestly, from the moment I got there - the cosplayers, the general atmosphere, it was just a good place to be surrounded by NieR nerds lmao. So many people happy to chat with the stranger next to them, kind of a con vibe.
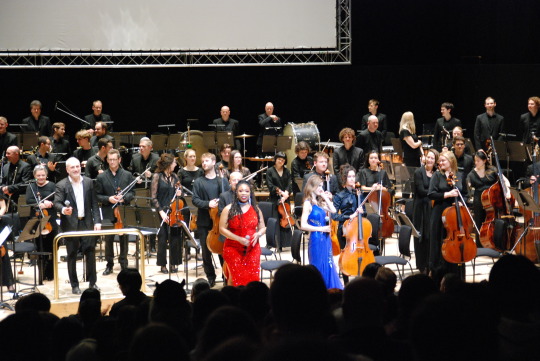
But of course we were there for the music! And it was fuckin amazing. The emi evans/j'nique nicole duets😭These were special orchestral arrangements specifically for this concert, and the way the sound of the orchestra fills the space, how you can see a phrase physically ripple across the orchestra... I don't get to go to a lot of concerts but I really should try to go more often, because it's something else to hear orchestral music.
below: further comments on the concert, lots of cosplay photos.
The multimedia elements also worked really well - every piece was accompanied with backing videos using either demosceney abstract visuals or images from the games, along with text that told a short story over the course of the concert, with some segments voice acted by the English voices of 2B and 9S (Kira Buckland and Kyle McCarley, who have previously made their own performances of the original Japan-only concert readings). I won't spoil the story in this post since there are still concerts to come, but it was... not that substantial I'll admit, but sweet, and a nice framing device to create a flow through the songs and various moments from the games.
Hearing J'nique Nicole's voice live though, that was incredible. Emi Evans was there just as last time, and just as amazing as always - but this time we had both of them on stage together, and it was absolutely sublime. We all went wild. They performed duets in several songs, with the standouts naturally being A Beautiful Song, Ashes of Dreams, and of course Weight of the World. I think we all thought that was the end because we gave it a standing ovation but then Emi came back out to perform Kainé. After that we got into the groove of standing up and stood up again like three more times lol.

Yoko Taro and Yosuke Saito showed up at the end and made a bunch of rapidfire jokes in Japanese that the translator couldn't keep up with, bless her. But we got to give them like the fourth standing ovation of the night, and made a lot of noise when Yoko Taro suggested it would persuade the president of Squeenix to fund a sequel. I'm sure they appreciated it lmao. I think it must be so weird for Yoko Taro to go from someone with a career of niche, unsuccessful games to being internationally renowned to the point that a massive auditorium full of people in multiple countries will go absolutely nuts just to hear him speak a language we mostly don't speak.
Good mix of people who were at a NieR concert for the first time and people who'd been to the last one. There was a guy near me who had apparently been to the Berlin concert just a few days before, and snagged a ticket for this one literally yesterday just to get it again with better acoustics. I respect it lol. Everyone I spoke to was remarkably friendly - last time I went to one of these things I felt really nervous about approaching anyone but it seems I've gotten better about that kind of thing in the last few years. Anyway, people had come from all over - I chatted with a pair of Americans from Boston all the way down the merch line.
Here are some pictures, mostly of cosplayers. I am still getting used to shooting with the DSLR my friend gave me, so not all of these came out perfectly steady and some of them the exposure wasn't right,, but there are some nice ones in here...
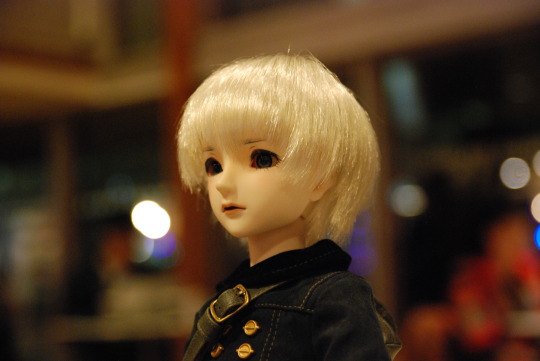
bokeeeeehhhhhhhhh... I spoke a bit to the owner of this 9S doll. Her mum was there too, and it turns out she's a haberdasher who makes cosplays for her daughters and has now done over 70. That's a legendary mum right there.
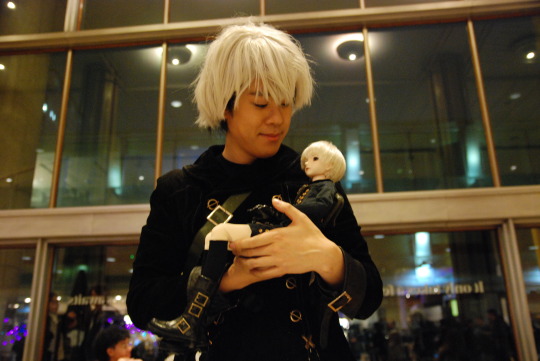
The 9S cosplayer here gave me his instagram. he's a pro photographer so I feel a little embarassed at the quality of the photos I took of him ^^'


I got some merch too, since I understand it's the main way events like this support themselves.
That Kainé thing isn't a print, it's a vinyl record with a few arrangements of Kainé. Though I was totally prepared to buy it as a print because it's a lovely drawing. I don't actually own a record player, but one day I'll surely listen to it ^^'
I was too fatigued to make a cosplay this time, but I'm sure there will be another concert and next time, for sure, I will go as Devola or Popola. Unless Yoko Taro comes up with another redhead character in the meantime lmao.
#nier#nier automata#nier replicant#nier reincarnation#nier orchestra concert#if you're in any of those photos please let me know! i'm gonna post them on instagram and twitter too
43 notes
·
View notes
Text
Artist Statement (Story)
Back when I was younger, my parents and I had a Kodak camera where we used to take photos on special occasions, birthday parties, and even special events. I had too much fun taking photos with it making silly moments and eventually videos from school musicals, and orchestra events.
I was in high school in my Sophomore and Junior years when I first took Photography and I didn't have a top-of-the-line or DSLR camera to get started, so I used an old tablet or my phone to take photos and I had to upload to an online drive (such as my school Google Drive) to download on a computer and practice editing on Photoshop. I didn’t know how to take apertures, or adjust shutter speeds and it was just a beginning in my photography life. In high school, I learned different photography compositions like negative space, rule of thirds, leading lines, and forced perspective, it was a little struggling with forced perspectives because sometimes I couldn’t get it perfect for my teacher but no one’s perfect in photography.
Between junior photography to intro to photography, I took pictures on my new phones and the colors have improved due to the quality and effects on my phone and mostly, it’s the shapes of the clouds in the sky and the colors. You could think of it as a hallucination but mostly, they’re real in different occasions if we see clearly.
And here came the 2025 spring semester, it was when I started intro to photography. I still didn’t have a camera for class and I needed one to pass. I couldn’t just use my phone to take pictures because I needed a camera to change the settings for best shots. So, I met with Laura Hurcomb in person to get information and invited my mom to talk with her so that we can get as much info we needed to get the right camera for the class. Over the weekend, we went camera searching until we went to a Best Buy and got a Canon EOS Rebel T7. I was angry with the price because a lot of DSLR cameras are expensive, especially before the school semesters start. I went to not only set up but did some test shots and sent a photo of the camera to Laura for approval. After some tests and patience, she accepted the camera for photography.
Throughout class, I learned so many different aspects including more compositions, taking photos on a film camera and printing them in a darkroom, and especially learning to use the aperture more. In one photo album, I called myself Aperture Girl because of the adjustments and fun. I had the most fun taking photos on a film camera and developing film even when I couldn’t see myself in the darkroom reeling film in a tank because if a film is reeled in the tank in the light, it gets exposed and it’s not great. So, if we want to see a film, we use chemistry. I did two tries on the film because my first try wasn’t great. And my first mistake was when I accidently rolled the film back in the canister and it was a struggle getting it out. Not only a film was exposed but the camera wasn’t in good shape. So, I tried again the second time and succeeded. And in another darkroom, I learned how to print my photos, but had several failed shots and suddenly, after a lot of learning, I realized my mistakes: it wasn’t the developer, it was me adjusting the photo on the paper which made the image go pitch black. Finally, I fixed my mistake and came up with clear images; not only I had fun in photography, but also made friends and I was really happy to keep learning photography outside class that I would love to become a photographer in the future.
Alana Anderson
3 notes
·
View notes
Text
I suppose I ought to introduce myself
I like taking photos with odd cameras. I am by no means a professional. I just have loads of cameras I've picked up second hand from various places, and like mucking about with them in different ways.
Right off the bat, I don't care about taking the perfect shot. That's boring to me. While I don't go out with the goal of intentionally taking wonky shots – I do actually try to make sure each shot is focused and exposed properly – quite a lot of my cameras are broken or weird in some way. My main film camera technically works, in that the lens attached to it is in good nick, and when I push the shutter button, it goes click. But the shutter fires inconsistently, and will often misfire at the lightest touch, it doesn't really fire at the speeds it's set to, the ISO dial is loose as hell and is always changing itself, and even if it wasn't doing that, the light meter really has no idea what light is in the first place.
It really only gets better from here. All of my cameras have some sort of physical malady by dint of being second hand, and in many cases, straight up antique, or because they're Holgas and have a deliberately imperfect design. I've got a couple of "toy cameras" as well, with cheap plastic lenses that make any given shot look a bit weird. None of these categories are mutually exclusive either.
But I also just like to do terrible things to both my cameras and the film I shoot on. My favourite thing to do is shove the wrong format film into the cameras. Sometimes I don't feel like cutting down film to fit into my 127 cameras, so I'll cram a 35mm roll in there. Or I'll stick one into one of my 120 or 620 cameras just for the hell of it. I like to redscale film, soup it, and just generally fuck it up before and after shooting. When I develop the film here at home, I don't put a lot of attention into making sure everything is perfect down to the tenth of a degree and to the second. I am not that fussed about any of it, frankly. As long as the roll comes out of the tank with photos on it, I'm happy. If they're messed up, whatever. That's part of the fun.
Right now, I'm slowly working through uploading my backlog over here. I've got even more photos on deviantART, and I post them to Patreon a month before I put them anywhere else. I also try to remember to put prints up, but that's a whole process on its own. In addition to uploading my backlog, I've been spending much of my time just working on scanning and editing a whole other backlog of negatives.
And according to Lightroom, right now that comes down to nearly 400 photos that I've yet to post, and a further 5,000-odd that I've not even looked at for editing. Plus the five or six rolls sitting on my printer waiting to be scanned.
You'll find a mix of birdwatching and urban photography, along with some random other things. I have favourite subjects I like to go back to again and again, and you'll get used to seeing them through a variety of lenses.
TL;DR, I take a lot of photos, many of them odd or wonky, and I'm never going to be done with this backlog. And the photos I have in Lightroom are only from the last few years. Multiple hard drive crashes have caused me to lose all of my digital photos a few times over.
Current Gear:
Canon EOS Elan II E (35mm)
Canon EOS Rebel XT (dSLR)
Fujifilm Instax Mini 90 (instant film)
Holga 135BC (35mm)
Holga 120 WPC Panoramic Pinhole (120)
Kodak Jiffy Six-20 (620)
Kodak Brownie Target Six-20 (620)
Kodak Brownie Starmatic II (127)
Kodak Brownie Starflex (127)
Kodak Ektar H35 (35mm)
Kodak Ektar H35N (35mm)
Minolta Maxxum 3000i (35mm)
Minolta Maxxum 8000i (35mm)
Pentax MG (35mm)
Ricoh KR-5 Super II (35mm)
Sawyer's Nomad 620 (120/620)
Super Ricohflex (120/127/35mm)
Plus photos from a variety of iPhones
4 notes
·
View notes
Text

Photo Challenges - Why I do them & why I do them alone
Time for a new blog, my topic this time: Photo Challenges!
With the new year a lot of people attempt to do the "A Doll A Week" a weekly photo challenge, some are even that ambitious to do the 365-Challenge, a photo for each day.
Back in 2014 I started my very first attempt to do a photo challenge, I got a DSLR as gift 1 1/2 years in before and kinda wanted to do more with it than just taking photos here and there. The weekly challenge of the ADAW seemed fun. On the top of this entry you can see my very first entrance for it. As you can see it started with a quite random photo.
I can tell I didn't make the full 2014 according to the ADAW but as I checked my files I noticed I indeed took photos each week?! Therefore I failed but .. also did not. It was somehow weirdly motivating for me to see that I can do it.
2015 was the first true attempt for me to finish the ADAW, this time with more effort. Because just taking photos is boring right? Aside taking more photos I wanted to feature each doll I had, around that time that was still very much possible with 52 photos for the 52 weeks of the year.

I was prepared, this was the first pic of 2015 .. well.. no. It wasn't I took it in advance and this is one of the points I later on disliked how I approached the whole thing. I was in a flickr group for some time and the same theme was going against my own liking, that people just took 20 photos at a time, posted them (all looking alike) and were finished with the whole challenge within half of the time.
I asked myself if this was what I wanted? The whole thing started to frustrate me, as I tried to come up with cool ideas and I saw other people half-assed their entries. Of course each to their own but no passion for the project, 'cheating' with multiple photos from one photoshoot just to make it "full" that seemed wrong for me.
But I managed to finish 2015! My first year with 52 weekly photos taken. The next year started with a photoshoot as well but I didn't use it for the ADAW.
Instead I took a break to regain and started with another idea:
Names! Like this one was named "ADAW 01 - Frost Pattern" I made it into an own challenge to add creative titles to go with the photos, also I added more and more photos, not just one but multiple. This was to challenge myself more and more. Still I tried to be motivated by others and motivate them but somehow... it still was turning me off that people approached the whole thing less .. uhm.. strict? I can't really put it into words, I just can tell as I later on within the years tried to build up a guide how to do the ADAW I got so demotivated seeing others doing it that I had to put the thread in the forum on full ignore and do my own instead? It's super weird.
What really got me going though was that I started to print my photos. 2 Photobooks for one year, having my photos printed made them more precious to me. I still make photobooks and last year I reached the maximum page count for the books and uhm.. might need to do three a year if that continues.
I can tell I got hooked by photos. Sometimes it felt hard to start over though, to start with "nothing" all over again, as I tend to null & void my own progress in my mind and well.. "new year, nothing done" got me hard sometimes, that's why the first days of the new years were hard for me to find ideas.
Also the fact that I still tried not to feature a doll twice got harder and harder even given I had more than enough dolls. But you know how it is, right? When you restrict yourself you want to do exactly that what is restricted.
Did I feel drained in the process of taking photos weekly? Oh yes, I did. Especially because I decided I have to take WHOLE PHOTOSHOOTS and sometimes even posts with outtakes to share fact about the characters. Some weeks I was so demotivated.
But a thing that helped me going was ... routine. And the photobooks. I picked a day during the week I was taking photos, which for me is Saturday, and it's still mainly Saturday to be honest.
It was 2019 already and you can see I returned to taking new year's photos, 2020 was similar. But I got tired of the ADAW thing, because it was kind of still setting to close borders for me. Taking photos weekly was becoming easy for me because I did it for so long. I still kinda tried to keep up with other hobbyists but in 2020 with the pandemic I cut ties with my local community and decided that 2021 would be the first year of me not doing a 'A Doll A Week'
Wait? What? Yes, you read that correctly.
Welcome to my own challenge the ... Weekly Photo!
This might seem not much of a difference but allows me to take photos, not just of dolls but of landscapes, people, animals and that was important to me. I still mainly use it for dolls but I wanted to do an own challenge, without any link back to the 'rules' of the ADAW and without the mental connection to the community I had left behind.
With the Weekly Photo I started to thrive. No more (own set) boundaries, every doll could be featured, even 20 times in a row, no rules, no titles, no themes, just me and my camera. For the sake of being creative.
And that's what I can tell you about my challenges... do it for the creativity, do it to challenge yourself. Don't be that dumb like I was and think you have to stick to what everyone else does or that you have to do it a certain way.
Now taking photos became so easy for me I see it as challenge to use the seasons as canvas to come up with something, to learn what light/time is the best.
I can tell my photography has envolved because I dared and tried, I challenged myself, revisted ideas but didn't try to set boundaries to my own creativity.
To be honest I now see photo ideas everywhere and almost have to stop myself from taking TOO MANY PHOTOS because .. I still need to sort them out :')
Oh a little thing that still is a rule for me ... I didn't bury them all: the first photo has to be taken in the actual year. Yes, I stayed up super late to take Tamani's photos as the first set of 2024 just to be sure I have that done.
I'm not sure if this entry is helpful for someone, for me looking up the old photos (I put in one for each year of a challenge) was super interesting and with a super busy week and weekend behind me I wanted to do a lighter topic for once.
I can tell writing down really helps me to reflect the hobby and to think through some decisions.
11 notes
·
View notes
Text
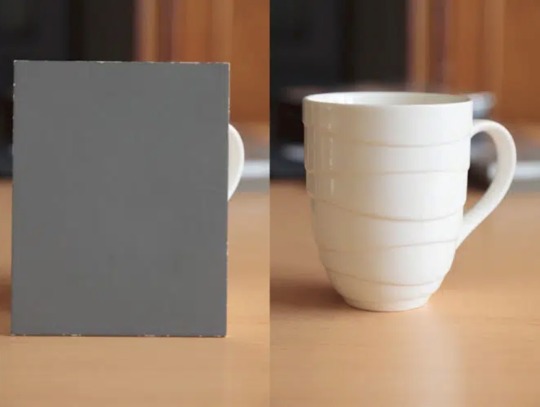
Amazon-Style Product Photography Tips
I got this message from a lovely follower.
Now, a fairly large part of my new steady job is product photography. Not glamour shots, more documentation. The company I work for makes, among other things, licensed drinkware (think water bottles, mugs, tumblers, etc.). Part of my team's duties is to photograph a mockup or finished product both for our records and to submit to the license holder.
The routine typically goes: put item facing forward in lightbox. Click. Rotate to the left. Click, etc. for the back and right. Then a closeup of the copyright info.
Here, finally, is my question: one of the license holders decreed that all of our photographs must be taken at f/8 and shutter time (?) of 1/25s. This strikes me as… not always optimal, considering the range of colors of objects as well as different materials: polypropylene both transparent and opaque, stainless steel, and lacquered cardboard for packaging. I would love to hear your thoughts on how I might better (while being consistent!) adjust camera settings to account for these kinds of factors
As an added bonus, we let the camera decide white balance/color correction. But I don't think I'm knowledgeable enough to try and correct myself, considering none of the monitors/printers I use are color-correct in the first place. I just know there have been many times where I've submitted photos only for the license holders to be like, "Hmmmm, that green doesn't seem like the right kind of green…RESUBMIT!"
First, I'm going to answer this specific question, but at the end I'm going to recommend a full setup for taking these type of rapid fire product shots.
My answer:
f/8 makes sense. Outside of macro photography, this allows a deep depth of field assuring the photo is sharp and in focus for the entire depth of the product. It is usually the sharpest part of the lens and it is not so small of an aperture that you risk diffraction effects softening your image. They probably were told this by a photographer and thought it applied to all of the camera settings.
The shutter speed is problematic. By forcing it to a fixed setting, your camera is going to choose whichever ISO gives a good exposure. And if you don't have enough light, it will choose a high ISO that will possibly add a great deal of noise to your photo. Noise can corrupt the colors of your photo and it just looks bad.
If your camera is on a tripod and they want the sharpness and depth of field f/8 grants you, then I would set your camera to aperture priority mode (usually Av), lock your ISO to it's lowest number (usually 100) and then your camera will choose the best shutter speed on its own.
So… Camera on tripod Av mode f/8 ISO 100 Camera chooses shutter speed
This is all assuming you are using a tripod and continuous lighting. If you are handholding the camera or using flash, I can rewrite the recipe. Otherwise this will get you very sharp photos with minimal noise.
I'd also recommend getting a shutter release cable so you don't shake the camera when taking the picture. Just search your camera brand and “shutter release” and get the cheap wired version unless you really need wireless.
This is the Canon DSLR one, just to give you an idea.
Be warned, if you do not have powerful lighting, you may get some long shutter speeds. That is perfectly okay as long as it is on the tripod and you aren't shaking the camera when taking the picture.
As far as white balance goes, if you really want it to be accurate, you can order a cheap photography “gray white balance card”. They are as cheap as 10 dollars.
This is the one I use.
There are a couple of ways to utilize the gray card.
Option 1:
You put the gray card in the exact lighting as the product or just hold it directly in front of the product.
You take all your photos in RAW format (JPEG will not work) and adjust the white balance in Lightroom, Photoshop, or any RAW editing software. Use the white balance picker tool (looks like an eyedropper) and click on the gray card.
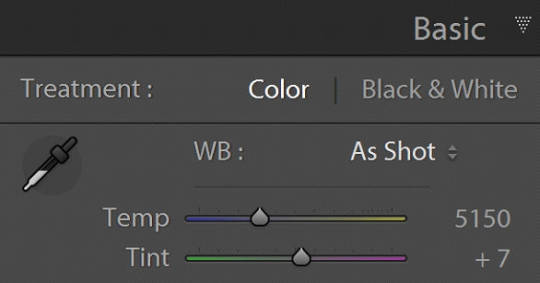
This will give you an exact white balance for that lighting environment. You can synchronize those white balance numbers across all of your photos. Lightroom has a copy and paste function or a "sync" button that will change adjustments in all selected photos as you go.
This is the most accurate option because it allows for “tint” adjustments for extra color accuracy.
youtube
Option 2:
Do the same as above and remember the white balance value. Then set your camera to a custom white balance matching that value. It will probably be around 3200K or 5500K depending on your lights.
Pro tip: If you have any ambient lighting from overhead or other room lights, it could contaminate the photo and skew the white balance into a weird color temperature. Try to make the room as dark as possible aside from your photo lights to avoid this. If you are using flash or have really bright photo lights, this isn't a huge concern.
Option 3:
Use your camera's built in custom white balance tool. It's different for every brand, so you will need to search for a tutorial. But the basic idea is the same. You put the gray card in the lighting of the products, take a picture, the camera analyzes it, and then sets a custom white balance. This can also be done with a white sheet of paper in a pinch.
Here is a video demonstrating the process. Remember every camera brand mau have a slightly different method.
youtube
Good white balance means accurate colors. That is important with product photography and a good value add for your clients. Just be warned, if you change the lighting even a little bit, you have to redo this process. If you bump a light or switch it out for a different one, redo your white balance calibration.
Also, some continuous lights have white balance drift, especially if they allow you to adjust the color temperature manually. Not only will the white balance change depending on the power setting, but it can also change over time. Especially if the lights are used frequently.
Move the lights, redo white balance. Change the power, redo white balance.
And if your lights are stable and on the same power all the time, I’d still redo the white balance every week or so. Personally I would do it before every shoot, but you’ll have to decide if that is worth it depending on how fast you need to turn things around. I usually do it as my first photo in the series so I can set the white balance, select all the photos, and copy the settings to all of them at once.
The nice thing about doing white balance with a gray card is that the results are display agnostic. Even if your monitor is poorly calibrated, you can be assured the white balance is accurate. And if someone says your photos are green, it will be their monitor and not your problem.
You just have to avoid doing any color specific adjustments to the images. Trust the gray card and white balance tool more than your eyeballs and display.
You can boost saturation a tad, but that is all I would mess with unless you know what you are doing. Even if the photos look a little drab or not very colorful, I would leave it alone. It sounds like the importance for this task is accuracy of color rather than making them as pretty as possible.
------------------------------
Okay, that is the question answered. Now I'd like to go through how I would build a setup to do this kind of work.
In the product photography world, this workflow is referred to as "pack shots." The idea is to create a consistent setup so you can just swap out the product one by one and speed through the shoot. It is best to control as many variables as possible so all you need to do is set the product down, take the shot, and repeat.
I'm going to show you my ideal pack shot setup with a light cube. I think it will be similar to what my follower is using. And, if not, it might help him streamline his process a bit.
A light cube is just a box made of diffusion material.

You drape a background with the color of your choice. White is usually preferred for Amazon-style pure white background photos. Though I prefer dark gray for aesthetic reasons. You just want to make sure the backdrop has that natural gravity curve so there isn't a hard line or wrinkles.
For lighting, you should get two *identical* lights. They can be desk lamps as long as they are the same and have the same light bulb inside. Then you just place them on either side of the cube. You want the ball of light on the cube to be in front of your subject.

Remember, your light source isn't your actual lights. It's the ball of light on the sides of the cube.
If you want to make it a little fancier, you can get a black or white acrylic sheet to create a reflective surface. You want it as far forward as possible and a little elevated. Here are some things I did in a simple light cube with the setup above.
Here is what the white acrylic looks like.
I placed a big book under the acrylic sheet like this.
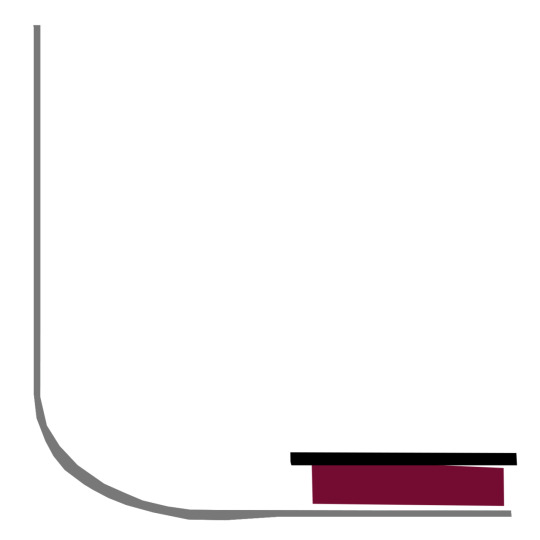
This allowed me to hide the curve of the background and get a nice crisp transition between the acrylic and the background.
And if you do white acrylic, you can get the background to seamlessly blend.

As I said, two desk lamps will work, but if this is for a business and you want something fast, convenient, and reliable, I would suggest something more robust.
I'd probably get two daylight balanced COB (chip-on-board) LED video lights that have a Bowens mount attachment.
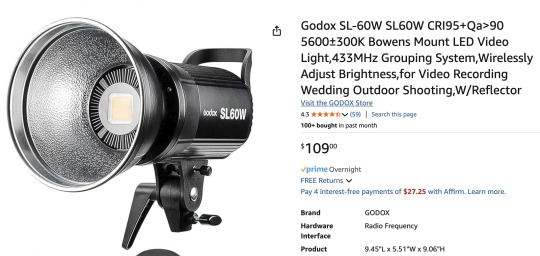
This Godox light is very reasonably priced for its features.
Daylight balanced means one consistent color temperature, so less chance of drift. These are very bright so you can use a quick shutter speed and you won't even need a shutter release cable (still a good idea). You also don't *need* a tripod, but you should still use one. The main advantage of bright lights is they can't be overpowered by room lights. You can be assured any overhead lights or window light will not contaminate your photo. A darker room is always preferable, but if you crank these it won't matter.
The Bowens mount allows you to place any modifier you wish on the light from softboxes to reflectors. But the standard reflector should be fine for the light cube. But if you are taking photos of tall cylinders, a couple of strip boxes might help.
Don't worry about putting the grids on. You just line them up towards the front of the light cube so you have even light from the top to the bottom of your cylinder. Again, this is optional.
Since these lights are so versatile, you can do any kind of lighting for any other photographic needs. Slap on a white umbrella and take company portraits if you want. Or you can use them as video lights to film a worker safety video.
So, here is my recommended ingredient list for a pack shot light cube setup.
Light Cube COB video light Black Plexiglass Seamless paper (color of your choice)
Colored poster board also works if you keep it from getting dinged up. And the light cube also comes with some cloth backgrounds, but watch out for wrinkles.
BONUS TIP: If you want that pure white background like in Amazon shots, add a third light from behind with no background paper. Make the light cube material your background and shine a light through it. You have to make sure it is bright enough to give you pure white, but not too bright that the light blasts your subject from the rear.
Otherwise just use a white backdrop and use Photoshop to brighten it to pure white.
Karl Taylor shows a pack shot setup without a cube, but the same principles apply. He shows you how to dial in that white but not too white background. Just imagine instead of shining a light onto a background, you are shining a light through the background (the back of the cube).
youtube
13 notes
·
View notes
Text
I just discovered that my $1700 camera lens is broken and I am NOT the one who did it... more rant below
I want to preface this by saying I am very VERY careful with my shit. I never break my phones, I've had a DSLR camera since 2012 and bought a new one just last year and I am always careful and have never dropped or bumped or broken my camera equipment. Last year I decided to finally spend some money on a new camera and a nicer lens (because better glass is where it's at, so I've read). I used this lens on my trip to Europe back in March, and really haven't touched my camera since. (I wish I would - story for another time I suppose).
I've just picked it up to go take an on the whim photo of a road and some trees because fall is pretty and I'm standing on the street corner and my lens WILL NOT WORK. It no longer zooms when I move the ring. I look around at it, and I can tell based on the white marks around the edge of my lens protector filter (thank god for that) that this lens seems to have been dropped.
Read that first paragraph again. I DON'T DROP MY SHIT. I haven't touched this thing since March but once to take some photos of my cousins art. I would have a clear and precise memory of dropping this expensive and still kinda new to me lens.
So either I have literally lost my memory and do not remember doing something like this to my lens. My husband is lying to me when he says he didn't drop it when he randomly decided to use it this summer on a tripod. Or his brother is lying to me, and he used it at some point and dropped it. Based on the last photos on the camera, vote goes towards my husband, or vote goes towards me and having absolutely lost my fucking mind that I can't remember this happening to me.
If the zoom just didn't work I would think it got fucked in my bag on my trip home from Europe. I would think it fell off the shelf it sits on onto the carpeted floor of my office. Its those damn white little marks and the inability to remove the lens filter from it that make me believe it was dropped and on CONCRETE. (I have concrete in my backyard around my pool where my husband was taking photos).
I am just LIVID. this has ruined an otherwise lovely day that included beautiful weather, lunch outside, buying books, and a lovely coffee. I was going to go off and take a nice photo, something which I haven't really done in years outside travel, and it was going to be nice.
And now I'm looking at Canon's repair website quoting me $539 to repair it. And my husband just says "you can take it out of savings" thats NOT THE POINT. Thats $539 on christmas presents, on travel costs because we have to go see your family for christmas, thats new clothes, thats a new winter coat that I want so badly, thats a new bookshelf to fit all these fucking books we keep buying, thats a renovated bathroom, thats the feeling of financial security and having a backup because we spend too much money as it is. THAT IS $539 I HAD NO INTENTION OF EVER SPENDING TO REPAIR MY CAMERA I NEVER DROP.
so I am livid and pissed and on the verge of tears and I don't know what to do. And I truly don't know where to put my anger because it's either on myself (but how the fuck could it be because I DONT DROP MY SHIT) or on someone who has decided to not tell me the truth, or worse, used my expensive shit and doesn't even remember fucking it up.
If you read this far, bravo. I feel like I'm going to cry and throw up. I had hopes maybe it wouldn't be that expensive to repair. but of course it isn't cheap. I would honestly have better luck just buying a new different lens to use instead of repairing this. I am gutted.
5 notes
·
View notes
Text
When I was fifteen I told my mom that I had an idea for a music video. It was for a song by one of my favorite bands. (I had weird taste in music so this was an extremely underground band that I wouldn't even call indie cause "indie band" implies more press and attention than they ever got.) When I finished telling her about the idea I guess I said something like "it's too bad I'll never get to make it." She was horrified.
In a lot of ways what happened next was insanely lucky and only worked out because despite the fact that we were dirt poor, my mom's band had actually played a few shows with the lead singer of that band years earlier. She sent him a message and he agreed to let me come film stuff around the bands new album release.
So my mom bought me a cheap dslr, we packed up a car full of whatever lighting gear we could piece together from thrift stores and an old wheelchair we'd found to do dolly shots and she drove me 400 miles out to Denver for a weekend of filming. Then when a hard drive crash meant we lost 80% of that footage she took me back to reshoot it all.
That weird little idea for a video wound up being my first paid job. I went on to make a lot of other music videos, some for that same artist and some for other musicians. The connections and skills I got from doing that got me gigs doing photography for magazines and working on short films that wound up in festivals. All of that because my mom didn't want to let me sink into that cynical view of the world. She put in the effort to make me see that I could make whatever I wanted if I put in the work and asked for the help I needed.
I don't think many people realize how much they've been turned into a bunch of casually cynical jerks.
Someone may come to their parents and say "I want to write a book" and their parents will say "it's really hard to get published".
Someone might confide in their sibling and say "I want to sell my art on "x" platform" and that sibling will say "do you know how many people you'd be competing with? Do you know how many shops are even on that platform?"
I know a kid who once told his best friend "I think I wanna start a dnd podcast" and the friend was like "do you know what the word "oversaturation" means?"
Personally, I don't know why any of that matters? And even if it did, perhaps your response should be "Do it! Do it and see where it goes!"
82K notes
·
View notes