#axceleration
Explore tagged Tumblr posts
Visit Tumblr Blog
Explore Tumblr blogs with no restrictions, modern design and the best experience.
Last Seen Tumblr Blogs


Fun Fact
Tumblr is used by 21% of adults online aged 18-29 years.
Text
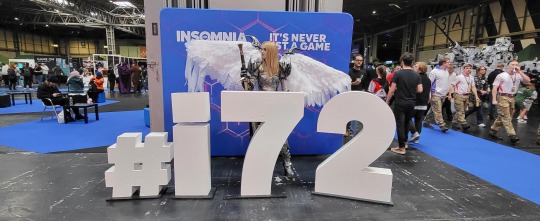
How to Make: Electronic Wings for Cosplay
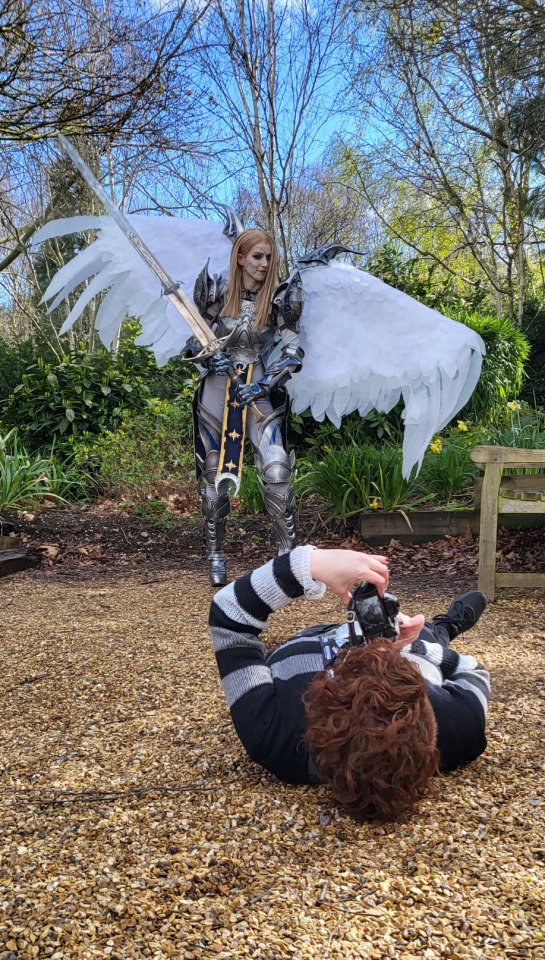
Hello Everyone! It's been a while since I last uploaded a written tutorial on here and since I just finished and wore my Dame Aylin cosplay this last weekend it seemed appropriate to jump back in with a tutorial on one of the costume pieces!
Her wings were the star of the show this weekend and I know a lot of people were curious about how I made them! A huge source of knowledge and inspiration behind these wings was this video by Axceleration, I made a few changes to the frame shape and electrical circuitry for mine but her tutorial was a huge stepping stone to give me the confidence to tackle them myself!
Health and Safety:
When working with Sintraboard (as well as other thermoplastics) it is incredibly important you wear a respirator as well as goggles when heating, moulding and cutting it. The fumes this plastic will give off when heated up are no joke! Make sure you're in a well-ventilated space!
Basic tool safety knowledge is also really important! wearing gloves when using power tools can be more dangerous in most situations, so always be aware of where your hands are vs where the tools are. Always cut away from yourself and take things slowly, don't panic.
Electrical safety! You're working with live wires and circuitry! make sure your hands are dry, you aren't touching the bare wires at any point when they are connected to a power source, and if you choose to solder anything, make sure you're wearing heat-proof gloves and a mask in a ventilated space!
Tools
Wire stripper
Screwdriver and wrench
Dremel - I recommend the Dremel 3000 rotary tool personally! Some essential Dremel bits you'll need for this include, a sanding bit, drill bit (smaller or same size as your screws/bolts), and a small/narrow cutting bit. These will usually come with the Dremel!
Heat Gun (A hairdryer will not get hot enough to heat the Sintraboard!!)
Pipe cutter (alternatively you can use a hacksaw for this!)
Hacksaw
Ruler
Scissors (for cutting fabric straps)
Materials
Heat shrink Tubing
2 core electrical wire
switch (you want a three position, six pin switch, like this one, even better if it has the Screws on the pins! otherwise you'll need a soldering kits to solder the wires to the pins.
2x 8AA 12v Battery Holders
2x 12v Linear Actuators (Mine had a stroke length of 100mm)
21.5mm PVC Pipes (I got 2x 3m Lengths)
2x 21.5mm PVC Pipe straight couplers
6mm 8"x12" Sintraboard
Nuts/Bolts/Screws (I used M5 bolts for the base & Actuator connectors and M6 screws to attach the hinges to the pipes! You'll need Washers for every Nut & Bolt!)
Hinges (I used 2.5cm wide hinges that were skinny but long so they would just about fit along the PVC pipe! 3" gate hinges would work!)
50 metre Polythene Jiffy foam roll (in retrospect this was ALOT of foam, you could definitely get away with maybe a 20-30 metre roll! I now have a load leftover XD)
16 AA Batteries (I used 16 and had enough for the whole day with them on, I think They'd probably be enough for another half a day-full day too! but have spares just in case!)
Webbing strap ( I went for grey to match my base suit colour!)
Buckle - as wide as the webbing strap you use!
3 metres of white cotton fabric (or whatever colour wings youre going for!)
Optional
Zipties (for cleaning up the wires)
Lets Go!
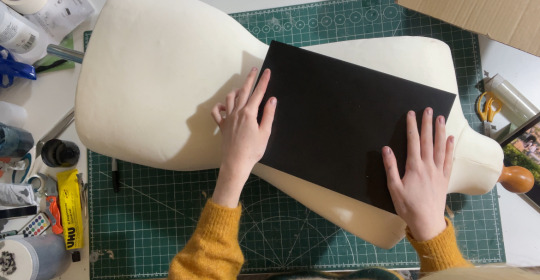
Sintraboard is this wonderfully stable thermoplastic that is relatively easy to cut into (with the right tools) and when heated allows you to mould its shape! I started by using a mannequin and heating the Sintraboard with a heat gun for a few minutes to make it pliable, I recommend using gloves for this part as the materials gets VERY HOT! Press the board into the shape of the mannequin's back, taking note of the edges especially! you want this board to sit as comfortably to your body shape as possible as it makes a huge difference to how long you can wearing the wings for in this backplate is comfy!
Once shaped, I placed it against my back to make sure it was a good fit, heating again and making any alterations I needed (again don't place bright hot plastic to your bare skin! wear protective clothes and wait till its slightly cooler to do this, with the help of a friend!). I then took a hacksaw and rounded the corners, before sanding the edges with my Dremel! Try to avoid cutting off loads, just enough to make things less likely to snag.
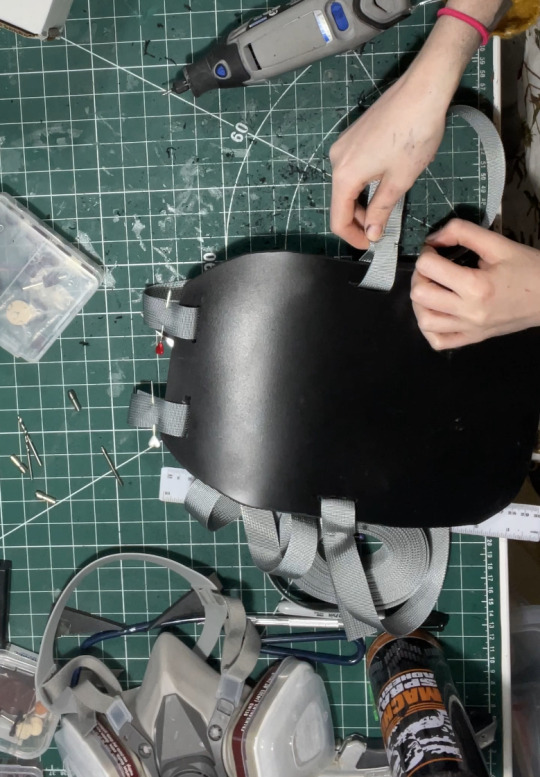
3. I then cut in four holes, wide enough to feed my webbing strap through, two at the top and one on either side below where my arms would sit! I measured the webbing strap by firstly feeding them through the top holes and pinning them, and then bring the strap over my should to everything sits where it should and seeing where the strap hits the side hole and cutting the length there! you'll also want a strap that attaches across the chest, meeting in the centre with a buckle!
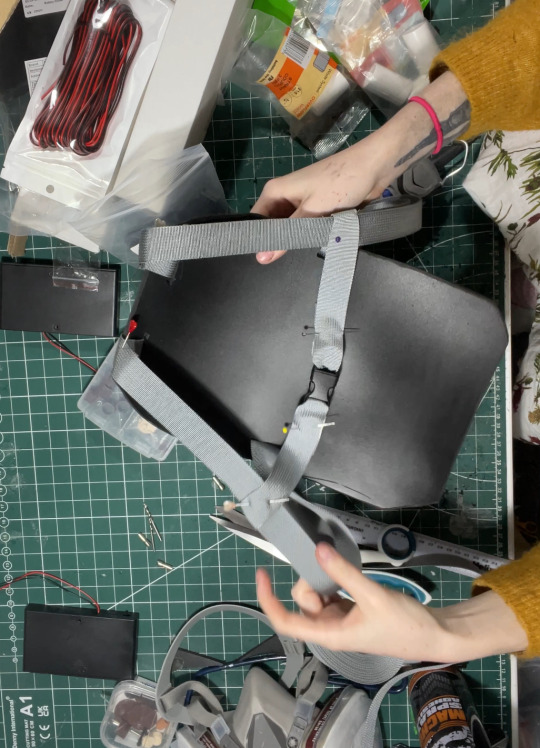
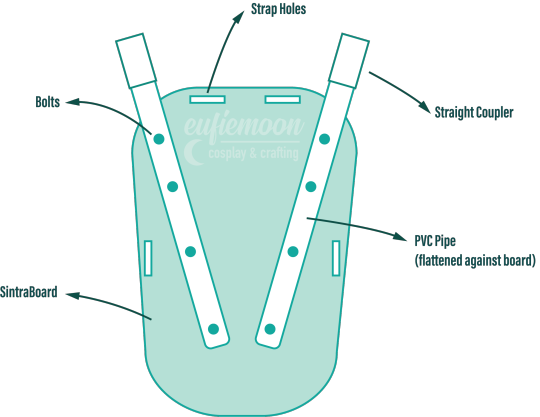
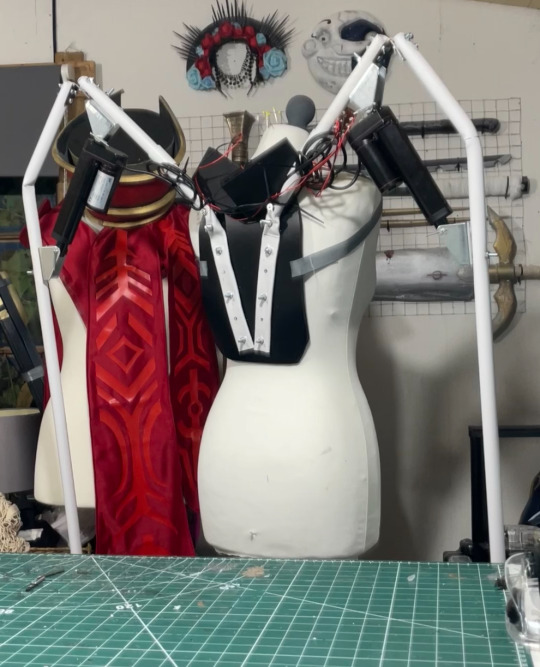
4. After sewing the straps closed I was able to move onto the PVC pipe structure! This may change slightly depending on the finished shape you want but I needed the PVC pipes to come out from inside a breastplate so had a particularly angle as well as character references to work with! I began by heating the pipe over my heat gun and flattening a portion of it under a heavy object so it would sit much more flush against the backboard and sit better underneath my breastplate before moving onto securing the first portion of the structure to the backplate. This mainly involved lots of try-ons and measuring to make sure the angles were correct and symmetrical and was quite fiddly but well-worth the effort! I'll include a diagram of the general shape I went with below:
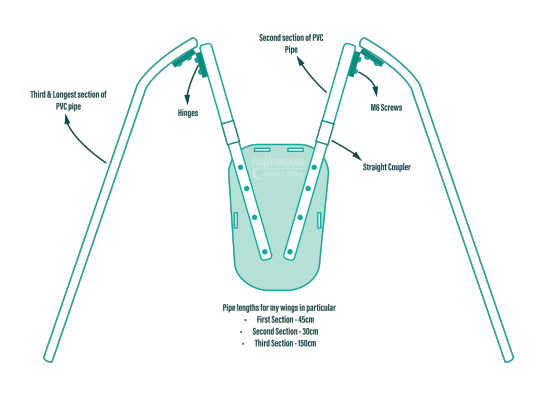
5. I wanted my wings to be relatively modular for ease of travel so I needed to make sure certain portions of them could come away from other parts easily, so I popped a straight coupler on the top of the pipes that were attach to the breastplate, this also meant I could slot the breastplate over these shorter pipes and wear everything correctly! Then these second pipes slot on and at the other end they are attached via hinges to the longest portion of the pipe 'skeleton', Diagram below:
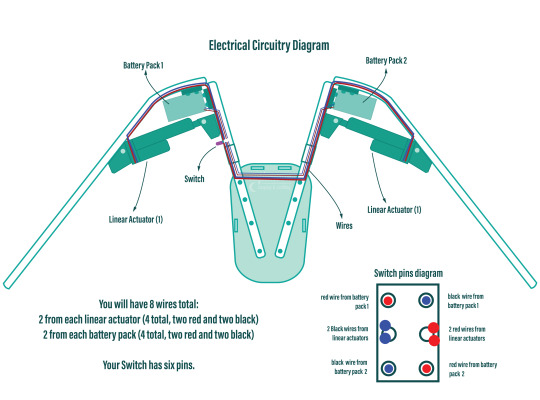
6. Now that the skeleton was put together, it's time for the electrical stuff! It's a good idea to figure out where your circuit is going to lay on the skeleton - consider if you want the battery packs mounted the the backplate or, like me, put them inside the actual wings in removeable pockets for easy access and removal for battery changes. all your wires will go through the switch so deciding where you want to place that is very important! Mine was placed just over my shoulder on the front side, mounted to the PVC pipe with a metal cover I drilled a hole into to slip the switch through and then drill through the pipe.
I've included another diagram below that explains all the electrical circuitry, including which wires go on which pins on the switch!
Important to note: The linear actuators need to be placed and bolted into the PVC pipes at *exactly* the same angle on each side, any slight deviation will lead to the wings going up wonkily! So take your time and make as many adjustments as necessary.
7. You can extend your wires by adding on the electrical wire, just match the colours, and put heat shrink tubing over the connections to hide the live wires! I ended up zip-tying the wires into organised bundles once the wings were done to help keep everything safe from snags.
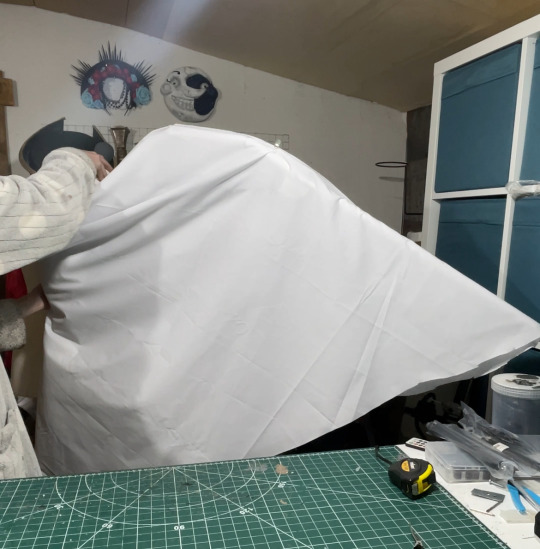
8. Now its time for the Wings themselves! I drafted my base pattern by just draping the white cotton fabric I had over the wing when it was fully extended. I then pinned the wings to the shape I wanted them to be along the bottom before cutting along the pins. I ran the fabric through my sewing machine to close the bottom edge, leaving a gap wide enough by the wing base so I could slip the wing on and off, closing it with velcro. I also added little fabric pockets inside of these to hold my battery packs, which also connected via velcro for easy removal!
9. Now that I had a wing base I was able to begin making feathers! I cut out a total of 800 feathers out of polythene jiffy roll for these wings, in 6 different styles and using real life bird wings to dictate the shapes I used and where I placed them. I ended up hot gluing every individual feather onto the white fabric base, going row by row until every side was covered, the wing covers themselves are super light because of the foam feathers and they shine light through them in a really magical way!
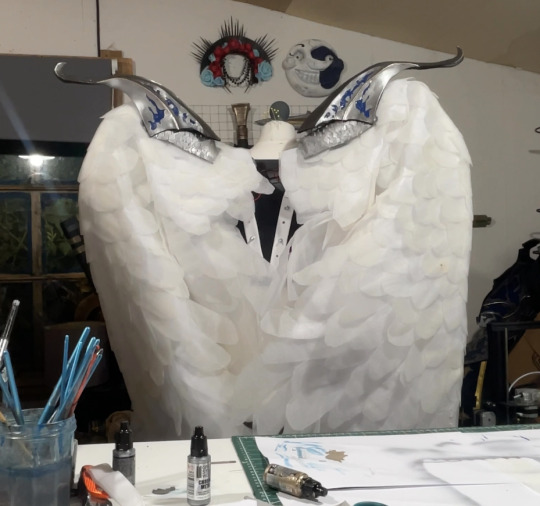
Optional: I also ended up going over these feathers with my airbrush and some super light beige paint to help darken the shadows, this is entirely optional and may change depending on the wings you're looking to make!
When in neutral position and in extended position the wings looks like this:

Mine had a wingspan of about 7ft total when fully extended but when in neutral position they were fairly close to my own proportions! mainly staying behind me and weren't much of a problem in a packed con hall!
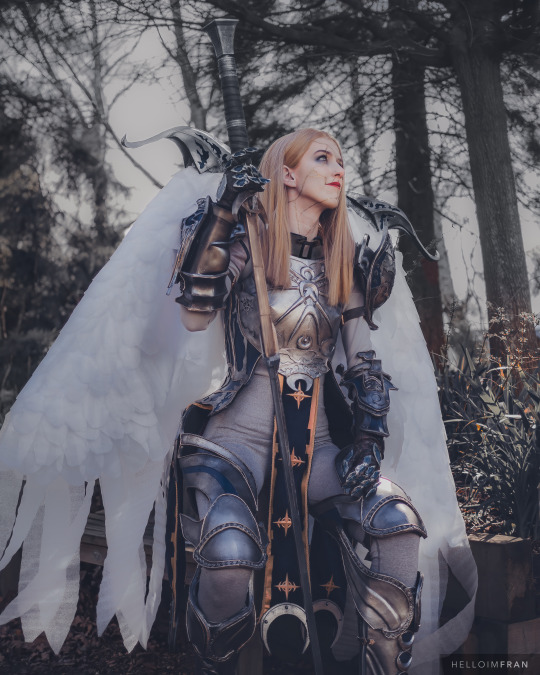
Photo by: Helloimfran (on Instagram and Twitter)
I hope this tutorial helped and if there are any questions about anything in specific don't hesitate to reach out at [email protected] or on my instagram or twitter (@eufiemoon)
Happy Crafting!

#cosplay#cosplayer#cosplaying#baldurs gate iii#baldur’s gate 3#baldurs gate 3#bg3#dame aylin#aylin x isobel#bg3 aylin#cosplay tutorial#Wings#fantasy#tutorial#cosplay help#cosplay tips
160 notes
·
View notes
Text
A second update today! It's a long one. Let me not bury the lede and start with the result!


To make this, I copied the upper third of my body piece, then transferred the pattern from this morning to the drafting paper. Experimentally, I found that the pentagon should be about 4 inches on a side before adding seam allowance.

I initially tried measuring the 20-degree angle I'd determined earlier, and found that this had the black part ending way below the underarm corner of the raglan sleeve, so I just marked a point a couple inches down from that corner before connecting that point to the upper corner of the pentagon.
Revised strategy:
measure the altitude of the pentagon and mark its bottom point draw the (half-)base of the pentagon at a side length that looks nice
draw in the sides using math, checking that the top points are placed nicely below the collar at about the neck width (struck out because this is now step 1)
extend the upper corners out to the side lines to make the 20-degree points mark a point a couple inches down from the raglan sleeve corner at the sideline (the middle, horizontally, of this pattern piece)
connect that point to the upper corner of the pentagon to make the front pointy bit an angle that's close-ish to 20 degrees
Putting that point a couple inches down also allowed me to measure the rising 60-degree line for the back as I'd initially planned, and mark the top triangle dip. The pointy triangle bit was all right to draft but a nightmare to sew (more on this later). I marked two spots about 3 and 4 inches in from the peak of the 60-degree line, then drew that 55-degree line down from the 4-inch spot until it was directly below the peak of the 60-degree line.
Revised strategy: basically the same as the planned one! Hooray!
Draw a 60-degree line in from the sideline until collar width
Add the triangle dip at the top
Measure about halfway (4 inches, for me) along the 60-degree line from step 1, then draw a line inwards about 55 degrees from horizontal, extending until vertically below the top black point
Complete the white triangle by drawing another line about 20 degrees above the last one until you hit the line from step 1. (alternately connect to a point about an inch closer to the peak of the 60 degree line. Whatever looks good)
After drafting out this rather complicated set of lines, I cut the paper into two pieces, saving both, and added about a half inch seam allowance to both pieces. The result looks like this:

Using the method suggested by Axceleration on YouTube, I carefully cut the black suit to fit the bottom curve and cut new pieces from the white fabric to fit the top curve, then stitched along to make the interface between the black and white parts.
A lot of turning fabric and snipping corners was involved in attaching these pieces of fabric. I probably should have waited to sew up the front seam on the black part of the suit, since this meant that I had to sew the white bits together in the front too. If I were doing this again, I would suggest making each half of the suit (i.e. cutting the left and right black pieces and left and right white pieces, then attaching left black piece to left white piece and the same on the right) before sewing up the front seam and the legs.
Instead, rather than undo the front seam on the black fabric, I overlaid my bottom pattern piece on the black fabric, pinned it to both layers, and cut out the pattern.
The pointy bit on the back also led to what I've decided to call the nightmare maneuver. You see, when you're attaching the pattern pieces along this windy curve, you have to turn the top fabric in the opposite direction of the bottom fabric. This is mostly fine, except that when you're at the vertex of that sharp 20-degree point, you have to rotate your top fabric by 340 degrees clockwise while also rotating your bottom fabric 340 degrees counterclockwise. This is the nightmare maneuver, and I had to do it twice. Actually, three times because I (wisely) did a test first to figure out if there were going to be any surprises in attaching the black and white fabrics.

Here's the result of cutting those two pattern pieces and then stitching them together-- this was my proof of concept to check that everything looked okay and would still fit together as expected. Two nightmare maneuvers and a lot of fiddly stitching later, and I had a mostly complete body piece!

Next time I'll attach the sleeves (I cut these out already) and collar, then add the zipper and sew up/sew on the hood (I'm thinking sew it to the suit in the front, then attach it by a button in the back to cover where the zip ends. Got the idea from RandomTuesday's Spider-Gwen tutorial.). Oh, and the little hip accents... I also need to adjust the gloves a little bit to make the fingers shorter.
I'm also entertaining the possibility of making some sort of small bag out of the same fabrics I used for the suit, as something to carry my wallet and phone in (spider-suits don't really come with pockets).
I'm not going for the face shell this time, since I'll be wearing a KN95 anyway, but I did get a wig for the unmasked Gwen look! I have to figure out how to style it, though. But the costume will for sure be recognizable! Looking forward to getting this thing on my body.
(previously) (next)
4 notes
·
View notes
Text
Top 5 Tips to Ace Your Commercial Cookery Assignments at Nova Institute
Top 5 Tips to Ace Your Commercial Cookery Assignments at Nova Institute

Do you attend to Nova Institute and pursue your passion in commercial cookery? Commercial Cookery assignments of Nova Institute are focused to develop the initial as well as the advance level competencies that are required for the growing professional kitchens. Food hygiene, technique documentation of recipes, portion control and presentation are the main practical and theoretical assignments explored by students. These assignments help in developing/detail orientation, consistency and quality, all valuable attributes in the culinary field.
Here are 5 tips to ensure a pass in your commercial cookery assignments to help you do just that!
1. To grasp the fundamental aspects of food safety and sanitation you should aim at:
Sanitation is basic in any commercial kitchen, and tasks usually cover topics in this category. Ensure that you conform with safe cooking methods of avoiding cross-contamination in storage, handling and preparation. This knowledge does not only help you as a food hero on paper but also fosters habits that will be useful all through the culinary journey. When not thoroughly understood, these may cause misunderstandings that are clarified by reviewing resources from your coursework and government food safety guidelines.
2. Fine Tune Your Recipe Documentation Process
This detail entails precise documentation of recipes that is very important. The assignments will also involve cooking and presenting recipes so when writing make sure you are very clear on your measurements, duration you will take while cooking and movement around when organizing your foods. Remember to make them consistent and clear, as this will make the recipes simple to read, and therefore professional. Perhaps writing a draft first should be advised, paying attention to structure similarity across all recipes and language used.
3. Emphasis on Standard and Quality in workplace Assessments
Practical assessments, like preparation of meals and preparation of certain kinds of food, must have good technique but they should also be consistent. First way: Serve in smaller amounts on plates, or portion control and presentation, and seasoning changes with presentation. Play with spices and ornaments to make sure the dish complies with calorie dietary guideline. In̂ consistent results show focus towards details an important attribute within the food preparation business.
4. Be Organized Division and Develop a Good Time Allocation Plan
This is especially so because most commercial cookery assignments have several parts that have to be undertaken systematically. Make your assignments into smaller parts, create timelines for each part, and complete them strictly on time. For example, planning of time for researching, writing the proposal, testing of recipes and reviewing the proposal. It saves you from writing your work at the eleventh hour, and you always turn in quality work to meet the set deadlines.
5. Ask Others and Review
Your instructor’s feedback for the most part is constructive and this is a good thing. It does not matter how unclear or confusing a specific section might be to you, do not hesitate to ask the teacher questions. Try to work on areas that you were scolded on or changes that were suggested and then think about it to consider it well like planning or something. The process makes it possible for you to improve your skills and prove your willingness to learn, something valued in the culinary business.
Step-by-Step Guide to Accessing Axcelerate to Submit Assignments
Handing in assignments at Nova Institute is easy with Axcelerate, a strong learning management that allows students stay on course. Below is the broad guide to walking through the Axcelerate student portal and ensuring a smooth process on your submission.
Visit the Axcelerate Portal: Start with going to the main site and finding out where the Axcelerate login is situated. This page can also be reached from our course materials by selecting it from the resource list.
Log in with Your Credentials: Use operating login details for an Axcelerate student. These were given during registration; if you have lost them, just contact the support team and they will resend them to you.
Navigate the Axcelerate Learner Dashboard: After you log in the learner’s dashboard of the Axcelerate, it shows the courses that you are enrolled in, the assignment and the grades of the completed ones, along with the due dates. Many a times it becomes a one stop center for all your study requirements.
Locate Your Assignment: To find the specific assignment you are required to complete under the course section of the course choose the assignment section. Assuming your instructor provided instructions you should make sure that you follow them to the later.
Submit Your Work: Also, submit your completed assignment in the specified section. After it has been uploaded, ensure that it landed correctly in the Axcelerate portal not in the download section but in the uploaded docs folder.
Why is Cookery Assignments the Best Choice for Nova Institute of Technology Assignments?
It is not quite easy to do a Commercial Cookery Assignment for the Nova Institute of Technology if one lacks some valuable assistance. This is where Cookery Assignment Help comes into the picture so as to provide particular and special assistance. Meant for various clients, their assignment help services help students receive the targeted kind of assistance they require in the form of online assignment help assignment assistance services or one-on-one help.
For all university students, who look for assignment help Australia or Melbourne assignment help, Cookery Assignments are a perfect choice. Their assignment writers are well-versed in passing down practical knowledge which makes them good most suited for the students. Apart from simple homework help, Cookery Assignments covers all aspects from simple tutoring to offering comprehensive writing solutions.
The use of the help tools makes it possible for the students to get assignment help from any location, thus meeting the needs of Nova. The service is available for the key Australian cities with specialization on the services such as Assignment Help Melbourne Assignment Help Sydney and Assignment Help Adelaide. Famous for providing the best assignment writing help in Australia, they respond to calls such as “do my assignment,” and “university assignment help.”
If students need top quality online assignment help that is available in Australia, Cookery Assignments is an ideal destination to look as it offers timely and top-notch services throughout any assignment.
Some of the Subjects for which Cookery Assignments provide assignment help Services are following:-
Certificate III in Commercial Cookery SIT30821
SITHCCC023- Use food preparation equipment
SITHCCC027- Prepare dishes using basic methods of cookery
SITHCCC028- Prepare appetisers and salads
SITHCCC029- Prepare stocks, sauces and soups
SITHCCC030- Prepare vegetable, fruit, eggs and farinaceous dishes
SITHCCC031- Prepare vegetarian and vegan dishes
SITHCCC035- Prepare poultry dishes
SITHCCC036- Prepare meat dishes
SITHCCC037- Prepare seafood dishes
SITHCCC041- Produce cakes, pastries and breads
SITHCCC042- Prepare food to meet special dietary requirements
SITHCCC043- Work effectively as a cook
SITHKOP009- Clean kitchen premises and equipment
SITHKOP010- Plan and cost recipes
SITHPAT016- Produce desserts
Give 5 FAQ Questions:-
Are your assignment help services tailored to Nova Institute of Technology’s academic standards?
Absolutely! Whenever students turn to our Commercial Cookery Assignment Help or Cookery Assignment Help ,every assignment is designed to match Nova Institute’s guidelines and standards.
How do you ensure the assignments are plagiarism-free?
Professional assignment writers and assignment helpers at our service involve reliable plagiarism-checking tools, and every order is written from scratch. Originality is something which is given top importance in all Gessays assignment services that are offer for assignments.
3 . Can you help with urgent assignments for Nova Institute courses?
Yes we do provide the option of expedited assignment help Australia services. If you need Melbourne assignment help or Assignment Help Sydney, it does not matter how quickly you want the work done, we can offer quality work completed on time.
4 . Which subjects do you cover for Nova Institute of Technology assignment help?
In addition to cookery we offer assistance in homework for any subject and university assignment help for all fields available at Nova.
5. What types of assignments do you help with for Nova Institute of Technology courses?
Our services encompass writing of essays, reports, project works amongst others making us the perfect place for the best assignment help Australia and Adelaide Assignment Help request.
0 notes
Link
Check out this listing I just added to my Poshmark closet: NWT Axcelerate Triangle Bikini Top - Orange - M Speedo.
0 notes
Photo

It was such an honor to have Yvette approach me and complement my Harley cosplay. Thank you so very very much!!! ♥️♥️ also thank you to the random bypasser I asked to take this photo for me. And thank you to the group of people around me that I fangirled to. It was a very happy moment for me. Thank you all!!!!!! . . . #cosplay #costume #cosplaymelee #costumer #cosplayer #costumedesign #yvettenicolebrown #sdcc #sdcc2017 #sdcccosplay #comiccon #axceleration #axcelerationdesigns #cosplaygirl #harley #harleyquinn #harleyquinncosplay #batman #gothamcitysirens (at San Diego Convention Center)
#harleyquinn#batman#costume#cosplay#cosplayer#costumedesign#sdcc2017#sdcccosplay#axcelerationdesigns#cosplaygirl#sdcc#harleyquinncosplay#axceleration#gothamcitysirens#comiccon#harley#costumer#cosplaymelee#yvettenicolebrown
9 notes
·
View notes
Photo

✨💕 ❤️❄️🍎 new video tutorial is finally out teaching you how i made my Snow White collar. Link in bio 📽❤️ Photo: @mykosplay Costume made & worn by: @axcelerationdesigns Convention: Wondercon 2016 #costume #cosplay #snowwhite #princess #disney #disneyprincess #disneycosplay #princesscosplay #snowwhitecosplay #dress #ballgown #rufflecollar #collar #youtube #youtuber #video #mykosplay #axcelerationdesigns #axceleration ™@axcelerationdesigns
#disneyprincess#cosplay#snowwhitecosplay#mykosplay#axceleration#youtube#rufflecollar#axcelerationdesigns#collar#ballgown#video#costume#disneycosplay#princesscosplay#youtuber#dress#princess#disney#snowwhite
1 note
·
View note
Note
I'm looking to get into making costumes, mostly for cosplay and convention kind of stuff, but I only have a basic understanding of sewing (some clothing repair, not even tricky stuff in that category) but I have trouble finding stuff to help me get started.
Hi @ venatus, thanks for asking a question today! I answered a question earlier which dealt with pattern-making in general so I would refer to that. However, cosplay is its own beast so here are some resources specifically for that:
Websites
Kamui Cosplay
This website is run by a duo with 15 years of cosplay experience. It includes a blog, ebooks, and youtube videos. The books cost around $5 for download. That’s not too bad although my goal is to find free resources. I would contact your local library because they likely have cosplay books available or will be able to access them. If you are comfortably sharing your location with me, I can see what resources are in your local area.
XO Mia
XO Mia is a great blog because Mia blogs about geek life and mental health in addition to cosplay tutorials. She also is not trying to sell products, unlike the blog Kamui Cosplay.
The Geeky Seamstress
I am including this blog because the blogger goes into a good amount of detail about the costumes she creates. It was a fun blog to go through!
Youtube Channels
Blogs are great but it is important to be able to see the process. Here are some cosplay Youtube channels.
Axceleration
This blog has over 70,000 followers. The Youtuber, Ax, has over 10 years of experience and it really shows in the costumes on this channel.
MangoSerene
MangoSerene vlogs at conventions, makes tutorials, and behind-the-scene videos.
Library Resources
Many libraries subscribe to craft and hobby databases. The library near you likely has access to some if it has decent funding. If nothing else, they likely have some helpful books about sewing.
Hope this helps! Feel free to ask me more questions - the more questions, the better.
Search queries:
Search these terms for more resources
cosplay sewing
cosplay patterns
cosplay costumes
cosplay
4 notes
·
View notes
Photo

"Come and get it!" So in the coming weeks I might be a bit off the grid. Nothing bad of course! I'm just getting ready to move. Then right after that I'll be getting ready for ColossalCon. Things will be a bit crazy for the next month and a half. Toph - Me Costume By - Axceleration Photo By - Amelia Irene Photography
#cosplay#mycosplays#cosplayer#toph#toph beifong#Toph cosplay#toph avatar#toph avatar cosplay#toph beifong cosplay#Avatar The Last Airbender#avatar cosplay#avatar#avatar the last airbender cosplay#toph avatar the last airbender#ATLA Cosplay#atla#toph atla#cartoon characters#cartoon nostalgia#cartoon cosplay
1 note
·
View note
Video
youtube
Hawkgirl Cosplay Tutorial - Worbla Painting
Tutorial by: Axceleration Tutorial Link: https://www.youtube.com/watch?v=djQX_zNoIrw
102 notes
·
View notes
Text
Company Accountant - Brisbane At The AXcelerate Brisbane
Company Accountant – Brisbane At The AXcelerate Brisbane
Newly created and working within our corporate team, this role will see you involved in the transactional, compliance and commercial aspects of our business. This is a unique opportunity to make your mark in a highly entrepreneurial and thriving business. We offer our staff an inclusive work environment, where you will have the opportunity to make your mark and work with the team to improve…
View On WordPress
0 notes
Photo

Hello all you new followers! Apparently my Hawkgirl wing videos were popular 🙃so here's some Snow White because I don't have any more pics of Hawkgirl. Anyone see any pics of me from SDCC please tag me! I need more photos of my precious wings 🐥 Photo by: @magicstarfire Taken at: Herritage Park At the cosplay photography meetup hosted by: @cosplayphotographeralliance Costume made and modeled by: @axcelerationdesigns . . . #costume #cosplay #cosplayer #photography #cosplayphotography #cosplayer #cosplayer #nerdlife #disney #disneycosplay #snowwhite #snowwhitecosplay #originaldesign #costumedesign #costumedesigner #axceleration #axcelerationdesigns #disneyprincess #princess #princesscosplay
#costumedesigner#princesscosplay#photography#costume#snowwhitecosplay#cosplayer#disney#originaldesign#princess#cosplay#axcelerationdesigns#cosplayphotography#disneycosplay#costumedesign#axceleration#disneyprincess#nerdlife#snowwhite
3 notes
·
View notes
Photo

Omg so much Hawkgirl love yesterday. Thank you all so much! SDCC was a blast even though I was only there for 3 hours ♥️♥️♥️ . . . #sdcc #sdcc2017 #comiccon #sandiegocomiccon #hawkgirl #dc #hawkgirlcosplay #dccosplay #costume #cosplay #cosplayer #cosplaygirl #axceleration #axcelerationdesigns #wings #angelwings #armor (at San Diego Convention Center)
#sdcc#sdcc2017#sandiegocomiccon#hawkgirlcosplay#comiccon#cosplay#costume#cosplaygirl#dc#dccosplay#axcelerationdesigns#angelwings#armor#wings#axceleration#hawkgirl#cosplayer
7 notes
·
View notes
Photo

Hawkgirl. I will be wearing this for the first time today at SDCC. I won't be at the chin tool around 1 but if you run into me please say hi! PS. My wings are HUGE so idk how much I will actually be able to walk around. I might not fit around the con floor 😅 . . . #cosplay #costume #cosplaygirl #costumer #costumedesign #costumedesigner #cosplayer #nerdlife #sdcc #sdcc2017 #sandiegocomiccon #comiccon #axceleration #axcelerationdesigns #hawkgirl #hawkgirlcosplay #newcosplay
#costumedesign#costumer#nerdlife#cosplay#comiccon#costumedesigner#axceleration#cosplaygirl#axcelerationdesigns#hawkgirlcosplay#newcosplay#sdcc2017#costume#sandiegocomiccon#hawkgirl#cosplayer#sdcc
6 notes
·
View notes
Photo

How's everyone weekend been? Ready to take on Monday!!! Photo by: @magicstarfire Taken at: Herritage Park At the cosplay photography meetup hosted by: @cosplayphotographeralliance Costume made and modeled by: @axcelerationdesigns . . . #costume #cosplay #cosplayer #photography #cosplayphotography #cosplayer #cosplayer #nerdlife #disney #disneycosplay #snowwhite #snowwhitecosplay #originaldesign #costumedesign #costumedesigner #axceleration #axcelerationdesigns #disneyprincess #princess #princesscosplay
#princesscosplay#cosplayphotography#snowwhitecosplay#nerdlife#cosplayer#snowwhite#photography#costumedesigner#cosplay#axceleration#originaldesign#disney#disneyprincess#disneycosplay#axcelerationdesigns#costumedesign#princess#costume
2 notes
·
View notes
Photo

The horse was also named Finn so we had to get a pic. Ps- test run of the SU shirt I made Finn and the Stevonnie dress were a success! . . . #disneystyle #disney #disneyland #disneylove #disneyphoto #disneylife #disneylifestyle #pincollection #pincollector #customclothing #axceleration #axcelerationdesigns #stevenuniverse #su #stevonnie #finnandphasma #thatsmynephew
#thatsmynephew#customclothing#disneyland#axceleration#disneyphoto#disney#disneylife#finnandphasma#disneystyle#pincollection#stevenuniverse#disneylifestyle#pincollector#axcelerationdesigns#stevonnie#disneylove#su
4 notes
·
View notes
Photo

Best new addition to the con floor this year at #sdcc . . . #sdcc #sdcc2017 #sandiegocomiccon #comiccon #cosplay #costume #costumer #cosplayer #cosplaygirl #axceleration #axcelerationdesigns #harleyquinn #harley #classicharleyquinn #harleyquinncosplay #dc #dccosplay #batman #batmantheanimatedseries
#cosplay#costume#batmantheanimatedseries#cosplaygirl#comiccon#sdcc#axceleration#batman#cosplayer#dc#axcelerationdesigns#harleyquinn#dccosplay#sandiegocomiccon#costumer#harleyquinncosplay#sdcc2017#harley#classicharleyquinn
4 notes
·
View notes