#are any of u dressing up!?
Text
happy halloween everyone!!!(o `▽´ )oΨ i hope you all have a lovely day filled with all treats and no tricks <333
uhhh my dad fell again this morning, i literally just woke up to this news (some of the worst news to wake up to on halloween ._.) i have no further information right now so i don’t know how serious it is or if he’s okay or if he hit his head or what, but if i end up suddenly disappearing for a few days, you know why!!! please be safe out there my friends, i am sending you all so much love and health <3
#one thing after another with this family i swear to god we cannot catch a fucking break#but anyway#are any of u dressing up!?#/did you dress up over halloweekend!?#i did not :((((((#i just wrote and slept and watched my boyfriend play persona 5 LMAO#please be safe today my friends <333#treat yourselves to something nice!!!!!!!!! you deserve it!!!!!#if u can’t treat urself on halloween then when *can* you treat urself tbh#hahahaha#i love u lots <33#happy halloween 🎃 <33#i was gonna make this all pretty and aesthetic with the gradient words but our internet is out due to the rain so :(( i have to use my phone#& i can’t do html on the tumblr app obv hehe
13 notes
·
View notes
Text
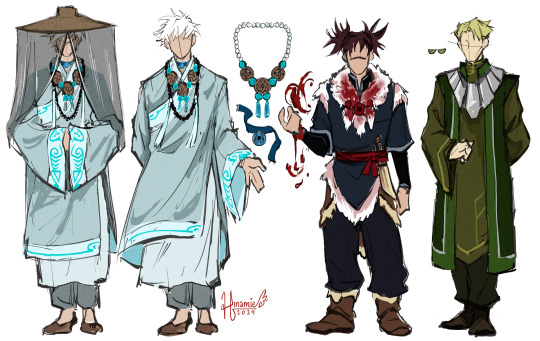
round 2 of prelim designs for @philosophiums n my lovechild of an au
first year trio
#my art#jujutsu kaisen#jjk#fanart#jjk fanart#jjk atla!au#gojo satoru#nanami kento#choso kamo#atla!au: design#atla!au: art#STILL NOT SHUTTING UP ABT THIS AU NOT SORRY#shoves more concept art in ur face but make it the Adults#spent entirely too much time figuring out how on earth to dress gojo#bc i knew i wanted him air nomad monk-esque#but the LAST thing i want is to put this man in orange. in fact i wld rather die#so i yoinked raava's whole Vibe every1 say thank u raavaaaaaaa#debated the hat also but im so happy i went fr it it brings the whole thing tgt so well#every1 say thank u painted lady kataraaaaaa#and the fit as a whole turned out SO good im ????? do i LIKE gojo in this ???????? hina like gojo challenge???????????#who knew all it took was billowy robes and twice as many necklaces as any one man has the right to wear#as fr the others#iv never Drawn choso period so i ws neutral on his design until i had th idea 2 make his furs bloody#now i think its pretty metal GHFHJS#n then theres nanami......not a Bad design i dont think but definitely pales next to th others gomen......#reffed the lok metalbenders pretty heavily n didnt do much else.....might workshop it probably definitely bc i refuse to let him flop >:(#lmhs
2K notes
·
View notes
Text
NO MORE ASSOCIATING THINGS WITH FEMMES ONLY BECAUSE THEY ARE PINK!HYPERFEM FEMMES ARE GREAT AND I LOVE YOU CAMPY FEMMES WHO EMBODY PINK BUT ALSO JESUS CHRIST CAN YOU GUYS NOT GO MORE THAN ONE DAY W/O TRYING TO SHOEHORN FEMMES INTO BEING ONLY PINK UWU BABIES. I AM FEMME AS IN GRASS AS IN DIRT AS IN TREE BARK AS IN WEEDS SPROUTING THROUGH THE SIDEWALK CEMENT. FEMME AS IN GENDER NONCONFORMITY AS IN FUCK YOU MY FEMININITY IS WHAT *I* SAY IT IS. FEMME AS IN DEPTH AND DARKNESS AND WARMTH AND TERROR. FEMME AS IN CAVES. FEMME AS IN LIGHTNING. FEMME AS IN AN AMALGAMATION OF TRAITS THAT I HAVE DECIDED ARE FEMININE REGARDLESS OF WHAT SOCIETY SAYS. FUCK IS IT THAT HARD TO UNDERSTAND?!???
#personal#i am emotional yes#over the years ive had this blog I've made a few posts abt being femme#nd whether they're serious or jokey..... inevitably someone in the tags goes “ohhh yeah bc pink”#or in the case of what inspired this post: someone going “what about the pink ones” on my praying mantis post#and im just.#sick of it. im sick of femme being equated to pink and frilly girlie behaviors.#im sick of femme being equated to skirts and heels. to makeup. to skincare. to pristine nails exactly almond shaped.#im sick of ppl acting like All femmes aspire to this shit. im sick of femms being reduced to this shit.#and i love pink! i love pink! my phone theme is quite literally just black and pink all over.#im just. so tired of any expression of Femme identity being shoehorned into being a Specific type of femininity#especially as someone who DOES get dysphoric wearing skirts. wearing dresses. embodying the femme aesthetic yall are so set on making#if u guys wanna rb this i truly dont care#i just needed to scream#and this is one small thing#but the 2nd largest category of anon hate i have gotten since making this blog is str8 up homophobia from other “queer” folks#saying i cant be femme bc of how i present. calling me slurs (and using them as such) bc they cant understand femme as anything but that#my wife and i have our users in our personal discord server set as 2 different things of anon hate ive gotten#i have had OTHER FEMMES tell me i am not femme. femmes who Know im femme who still call me butch. femmes who ive corrected and been blocked#-by bc of it. the number 1 largest demographic of queerfolk who have me blocked rn is TME femmes who embody pink also#and i dont think its a coincidence at all. (and i know this bc i go to try and follow these ppl bc they get rbed on my dash & i cant)#and ik their blogs arent deleted bc some of them don't block my wife (tall. white. butch) and it cant be politics cause her and i rb#a lot of the same political shit (fuck. i think she rbs More than i do even. this is genuinely mainly a nsft blog)#and usually i don't say anything but im having a bad day so i get to be angry about this and if anyone fucking tries me i will block u#idc if we've been mutuals 4ever. im judt so tired of feeling like i am not Enough as a femme bc i dont embody this shit#im sick of this lameass lip service to he/him gnc femmes etc when the thin white 50s housewife femme is still what is preferred and loved#im sick of this lamesss lip service when y'all feel entitled to theorizing on other femmes genders bc u cant conceptualize a femme who does#wanna be hypetfeminine. im sick of it. im sick of it. im sick of it.#celebrity bun
413 notes
·
View notes
Text
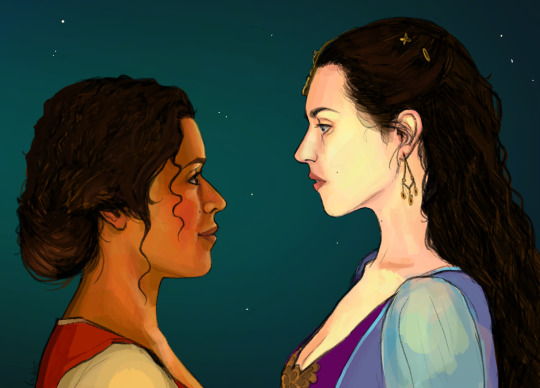
i haven’t finished the show yet but they totally are gay and run away together and live happily ever after right? guys ? right? guys?
#s1 Morgwen#morgwen#this is my third time posting this but also my last bc I’m done tweaking it#it had some major contrast issues as well as the fact that they weren’t even looking each other in the eye before#Merlin bbc#Merlin#Morgana#guinevere#morgana x gwen#Morgana pendragon#morgana le fay#Merlin fanart#merlin bbc fanart#merlin art#morgwen art#lesbians#procreate#digital art#fanart#queen guinevere#artists on tumblr#lord why didn’t Gwen say she was loyal to Morgana and mean it#Morgana they could never make me hate u#Morgana stop trying to kill or ruin Gwen’s life ur gay for her okay#when she woke up from a nightmare of Gwen being married to Arthur i almost audibly laughed#Morgana u big homo#I’m gonna draw Gwen in one of her pretty purple/pink dresses but i wanted to do specifically season 1 and I don’t remember her wearing any
820 notes
·
View notes
Text

dey're like his wingmen
#bucchigiri?!#bucchigiri#bucchigiri fanart#matakara asamine#tomoshibi arajin#zabu#komao#idk how to draw any of them#trying to draw anime hair makes me feel like throwing up + also throwing myself in a ditch#help meeee#guys. guys. guys. g#hello my brain. can i hyperfixcate on like anything else#i'm like actually going bonkers insane i'm tweaking#i've had work every day since it aired and im losing it every break i have i just be searching up bucchigiri on every site istg#I FORGOT TO VCOLOR THEIR ARMBANDS 👎#and i realizing somehow only now i drew komao's skirt too short he is oging to get dress coded i fear#matakara is sooo cute he looks so ouppy#I DIDNT KNOW SENYA WAOULD BE SO SILLY BILLYYYY EITHER#LIKE WHAT R U BEING A CUTIE PATOOTIE MAKING :3 FACES FOR!!!#me actting shocked that an original anime that literally came out 4 days ago doesnt have a million billion fans 😨😱???#thair heights are messed up my bad whatever#zabu kakeru#sakigake komao
801 notes
·
View notes
Text
hey it's nanowrimo. i have tips bc i've done it about 34 times.
Don't edit. Ever. Stop it. If you just decide to start a new project half thru this one with all new characters, no problem. pick up and keep writing as if you'd already written the first half of that.
"but i spelled it wrong" whatever. "but the grammar" whatever. make it exist first. no time for sense. think like you're working on a typewriter. no backspace. only forward go.
Don't re-read further than a paragraph or two backwards. "did i mention the gun before?" listen - it doesn't matter. if you need there to be a gun there, the gun is there. put it back in once you finish the book.
"i forgot the specifics of X thing i already wrote" whatever. change it, make a note/comment to figure it out later, and just write what makes sense for the moment. "no raquel it's legit the characters name and origin" idc that character is now reborn as Claudius from Elsewhere. it's fine.
only you see your mistakes. nobody else knows. one of the ways writing and dance overlap - only you know the choreography. nobody else will know if you miss a step, so just keep dancing and pretend you meant to do it like that.
it's an illusion that you need to write linearly - from point A to point B to point C. Nah; that's just timeline propaganda. I've written a LOT of books out of order and just reordered them once i've finished. if you have a scene you'd LOVE to write but can't get there yet because of plot, just fuckin write the scene. I've always found its easier to establish "point F" "point J" and "Point A" and then wiggle my way between those scenes.
write what you WANT to write. 230 pages of smut? of well-researched discussion on bread? whatever. the point is to strengthen muscles however you can.
if you miss a day, a week, whatever. not the end of the world. we all have dry days. also time is a myth so u can do this challenge whenever u want.
as soon as you try to write for a specific audience, you kill your voice. you are writing for yourself. stop thinking about how people will take ur book. it don't matter. what matter is u, enjoying writing. i luv u.
play to your strengths. i have characters talk so much because i don't know how to write a plot if it kills me but i'm really good at dialogue so.
i love a flight of fancy. write a poem in there. shift tactics and write in code. keep it fun for yourself.
see what happens if you shift something major about ur main characters - gender, wealth, superpowers. or if you change point-of-view. or if you kill everyone in a big explosion. do NOT edit anything before this or after it. often these little weird one-off exercises teach me what interests me about what i'm working on. it is never what i thought. plus it is a fun way to add like 1k words.
stretch.
it's for fun and for practice. stop doing that project if it's giving you anxiety. once my nano was literally 50k words of half-started stories. just things i tried and tried and tried and wasn't able to flesh out. oops. but i am now 50k words of a better writer.
add dragons?
read books/listen to books on tape/etc. people often make the mistake of "buckling down" to just write. you need inspiration. you need to like. fill up on words. you need to remember how it feels to lose yourself in a story.
i don't have the time or space to really talk about this in this post but a lot of creative people turn to drugs/alcohol because it can help you be more creative. this is harmful, and walking a blade that only cuts deep. if you notice you and your loved ones are turning more to substances, please know i love you and i hope you are able to get help soon. i feel like this almost never gets mentioned because it's kind of a hazy underbelly to art. you are always more important than the work.
on that note. drink your fukin. water.
don't talk about a story until you've finished it. once you tell the story, it exists already, and isn't about discovery. i usually have a very canned "haha we'll see" response.
grapes :) tasty snack.
i love you be free.
#edit: the command not to talk about it is from personal experience!#i have heard Otherwise in the tags so i will edit to say:#if you've noticed that you tend to like Talk A Lot about ur piece but never WRITE it -#consider voice-to-text#also#u might be like me and ... need to figure it out on the PAGE and not OUT LOUD#i am often an auditory processor so i wont tell people specifics but i'll be like#huh. so i have a character who is in love .... and they don't know it#and my friend will be like ''oh they should kiss' and meanwhile#somehow#saying it out loud im like#yeah thank u ur right the dress SHOULD be purple that's what the problem has been <3#idk!!! it's up to you!!! my suggestion is to say LESS until you know for a FACT that saying MORE works better for you#-- always better to slowly unspool in ur exploration of that#than to accidentally talk too much and get Bored Of Project#idk idk idk#i have adhd so every book surprises me bc im like#wait where did any of this even COME FROM#and whatever little gremlin in my brain that writes is like :)#''heyyy girlie.......''#WHICH IS A LONG WAY TO SAY:#i didn't know about Not Talking About It as an option until i'd ruined a few projects!!#but there are people who need to do the other thing!!! and i love us both!!!!#wow brains are so funny!!!!
2K notes
·
View notes
Text

whats ur fucking deal
#GGGRRRRRRGRRRR GGRGAGGHHH#despicable me#maxime le mal#felonious gru#gruxime#spread the word.#pre transition maxime if anyone gaffffffff#realising i can just draw shit and not have to explain myself or provide full context. awesome (provides anyway)#non descript minion. i like the idea that they go to school w gru in like shifts each week#maxime has a cokcroach ☝️ on his shoulder#they look so fucking stupid next to each other i cant get them to look normal. sorry gru ur built so weird#i need to do more kinda doodly stuff and not alwayssss full pieces#this uniform is pretty cute btw but strange that the trousers and skirt colours r different?#i mean actually. my school did that at one point but its still odd to me#btwwwwww design notes.#was torn abt giving gru his scarf but i thought it wld clash too much. for me i feel the tie serves the same purpose#looking at the One scene we see the uniform it seems the dress code is… not soooo tight? but this is also 30/40 yrs prior soooo idk#(also yeah debatably the uniform wld have been different. but fuckkkk that shit)#forrrrr maxime i like to think his glasses r like actually prescription but he uses tinted ones bc 1. he saw nefario once and was like#‘FUCKKK THATS KINDA CRAZY COOL’ and stole the idea#and also 2. he is light sensitiveeeeeee. :3#gloves r again mostly cus of sensory issues but also this kinda body dysmorphia thing he has going on#samew the socks.#was considering tights buttttt i didnt see any of the students wearing them and also booooo tights suck. so just knee length socks#so he can get around dress code andddd still cover up more#plusssss it lets him not have to shave his legs :T#shoes i didnt see any pattern i assume u can just wear whatever lollll#i give him a hairclip toooooo just cus theyre cute. and put some greeeeen in itttt#btw drew the minion w the gay flag then realised it wldnt make sense w maxime being pre transition but#i think its funnier to imply the minion just sees right thru him immediately
72 notes
·
View notes
Text
pspspsps... woy fandom.....
i have some sillay new designs on my redbubble shop that i hope might interest a few people <3 👇👇👇👇👇


(ALSO THERE'S A 25% OFF SALE GOING ON RIGHT NOW!! ✨)


#Wander Over Yonder#Wander woy#Sylvia the Zbornak#Lord Hater#Commander Peepers#Lord Dominator#i just now added the wander & peepers design just to pander to wandering eye shippers so if i missed any products i'll add more later!#anyway the sale is kinda tempting me to snatch up the hater & peepers dress for myself auauahgagahhgds#even if you don't buy anything if u take the time to browse through what i have on there iluuu mwah 💓💓💓💓💓💓
68 notes
·
View notes
Text
allison chronic divorcee until renee confesses and they live happily ever after but this trope is not for the angst...its for the idea of putting the foxes in multiple weddings just andreil watching allison walk down the aisle and going "five months" "i say three" and renee being the only one who's super upset over these weddings but doesn't realize she has a chance (she's the only one who has a chance)
#allison loooooves having a wedding#its her vibe exactly#fun times cool dress up friends tgt#etc etc#the guy is just an accessory#r u getting me she's barbie he's just ken#she's like whatever ten months max maybe a year then im getting a divorce I don't like any of them for a lifelong settlement#and lowkey the dudes she marries know this also she's in it for the funsies#except some of them who are dumb and stupid and are actually heartbroken#anyway how many weddings do you think it will take for renee to either object#physically REPLACE the groom#or help alli plan their wedding for the last time#feel like this could eaasily be a 5+1 AU#oh i could write this#it could be so good#renee walker#allison reynolds#aftg#tfc#renison#neil josten#andrew minyard
506 notes
·
View notes
Text
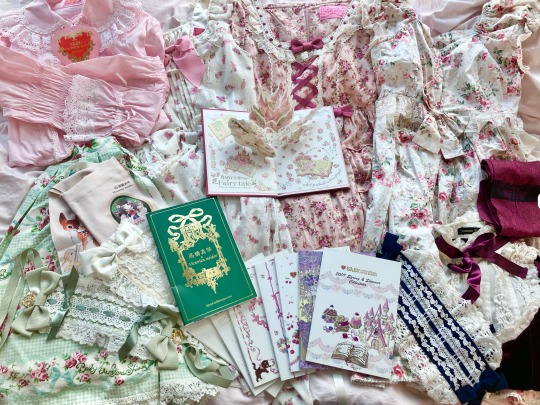
package arrived ૮ ෆ ´ ˕ ` ෆ ა ♡
#lolita fashion#baby the stars shine bright#oldschool lolita#sweet lolita#victorian maiden#classic lolita#egl fashion#mine#actually two packages lol but they arrived close together so I’m doing one photo#thank u melon I love the dresses and will be taking the vm one on my trip <3#the baby pop-up book is honestly one of the prettiest things I’ve seen it’s so gorgeous#the seller of the vm macoto tights included the maroon tights for free!! not something I would have picked for myself#but it’s a very sweet gift and I’ll probably wear them#since I wear a lot of red/darks in the autumn/winter#very excited to go through the baby catalogues! will check if there’s any I should scan and upload to lolita archive#very happy to have new colors of headdresses! and am eagerly anticipating washing the green skirt…#it is SO yellowed rn it’s going to be a completely different color I bet lol
112 notes
·
View notes
Note
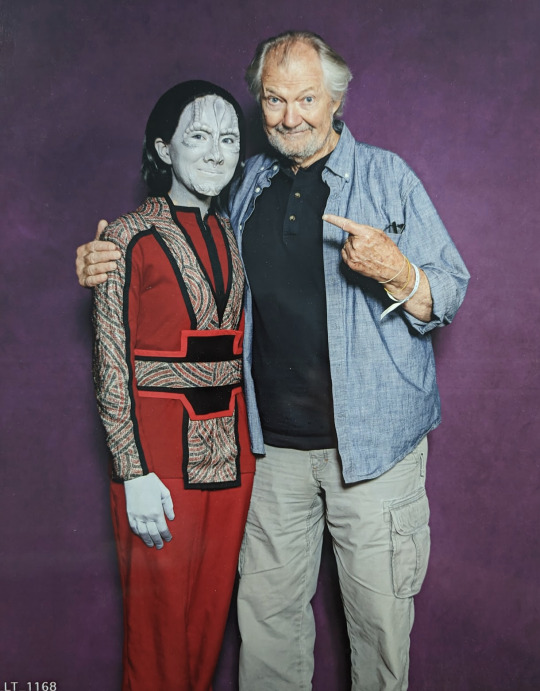
how did you make those holy shit!!!
jfjskdk okay I'll take any excuse I get to talk abt this more
How I made my Cardassian prosthetics
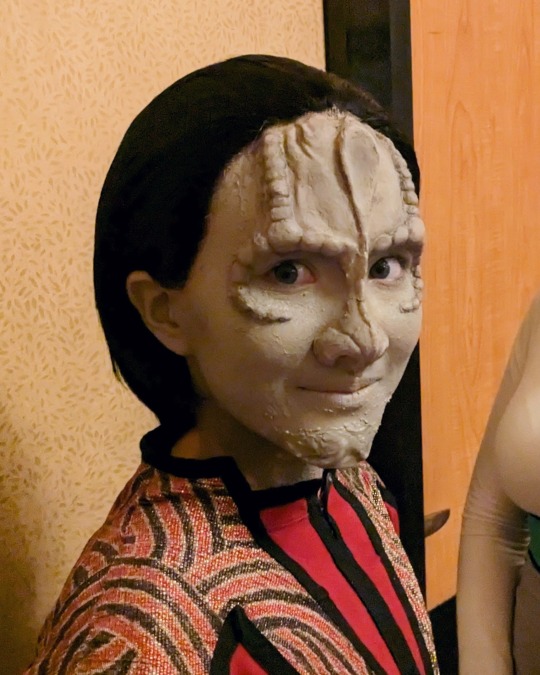
Disclaimer: I'm no expert, it's my first time doing this!! All the resources I used can be found online. In fact, here's a playlist of all the youtube videos I followed, in case you don't want to read the whole post. You can pretty much make any facial prosthetics following these steps, not just Cardassian ones.
What you'll need:

Plaster bandages, plaster of Paris (a lot more than is pictured here), modeling clay, and liquid latex. You'll also need some things you probably already have around the house, like vaseline (or cooking oil), plastic wrap, wood glue, rubbing alcohol, q-tips, cotton balls, and setting powder (or baby powder).
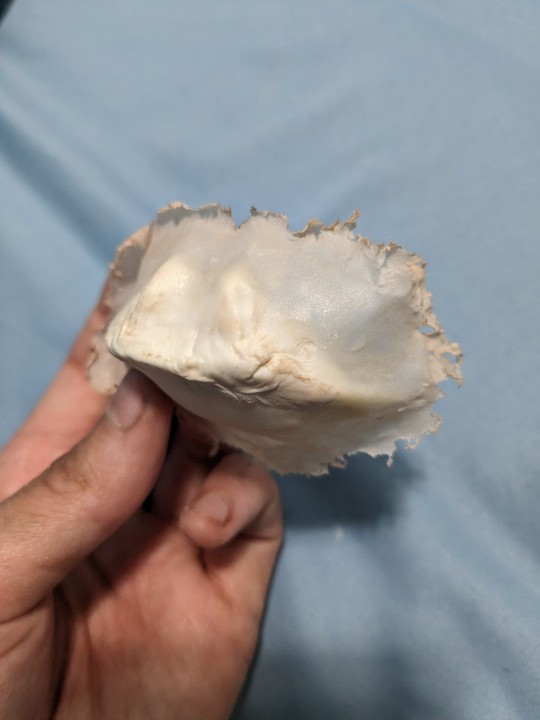
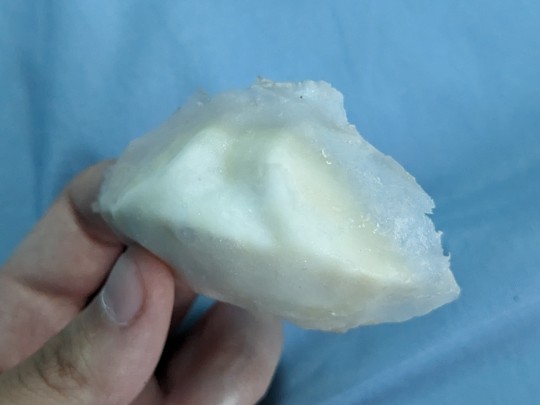
Step 1: Face cast
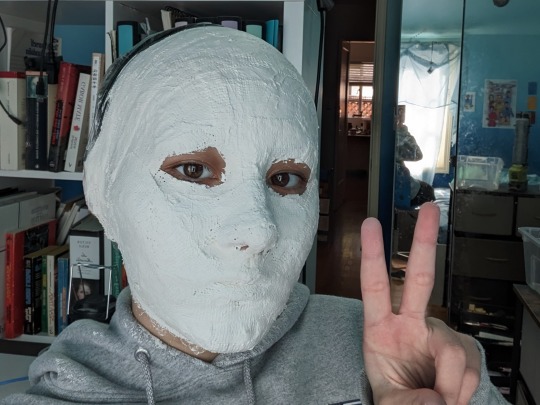
The goal here is to make a plaster copy of your face that you can sculpt your prosthetics on, by covering your face with plaster bandages and then casting that in plaster of Paris. This is the video tutorial I followed for this step. There are many methods, and you'll find tutorials for all of them on youtube, but this is the easiest way if you're doing it by yourself, and it results in a perfectly useable face cast for our purposes. And, if you're cosplaying Garak like me, it's a great way to get into character by experiencing claustrophobia for the first time in your life!! (Jk it's not actually that bad. I lived.)
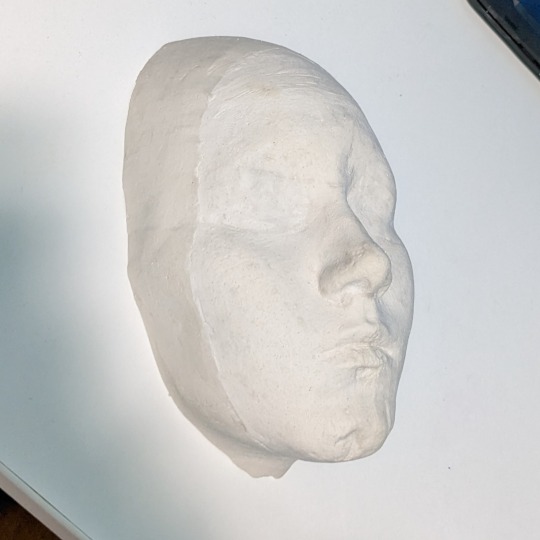
The video explains the process better than I could, but here's some tips I learned from doing it! Wear a shirt that you don't mind ruining. Go a bit closer to your eyes than I did here. When you're propping up your mask in a bowl, make sure you're not squishing any parts of it or tilting it! I ended up with a dent in the chin of my face cast because I accidentally dented the mask while I was casting it. And make sure you have enough plaster of Paris! I probably used 2-3 pounds for this part. Here's what I ended up with, before sanding or sealing it with wood glue:
Step 2: Sculpting
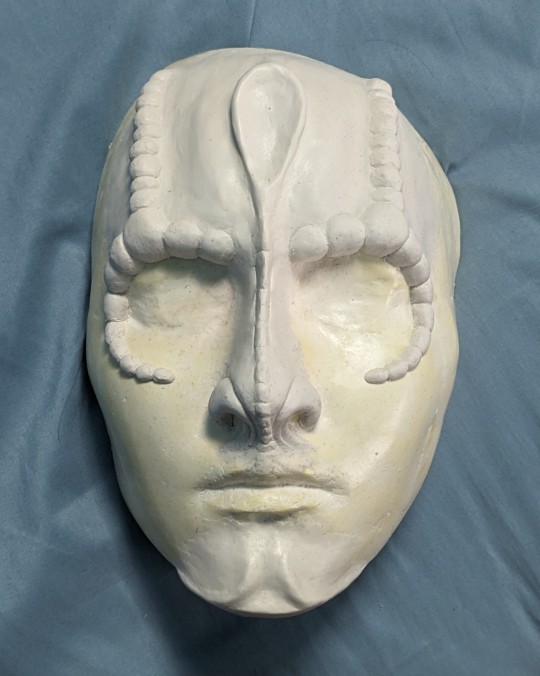
This is pretty self explanatory, but also probably the hardest part. Just use lots and lots of reference photos. I've got a pretty good stash for Garak, if anyone's interested hdjkfhk. I found that gifs made better references than still photos, since they give you a better sense of the 3D shape. You want to make sure you're using modeling clay that doesn't dry. You don't need any fancy sculpting tools! I used my trusty palette knife to get the small details, but you could probably accomplish the same thing with, like, a spoon and a toothpick. It depends on what kind of clay you're using, but you can dip your finger in a solvent to smooth out the surface of the clay and blend the edges into the face cast. I used rubbing alcohol, but I also heard people recommend acetone. Once you're happy with your sculpt, you can move onto the next step!
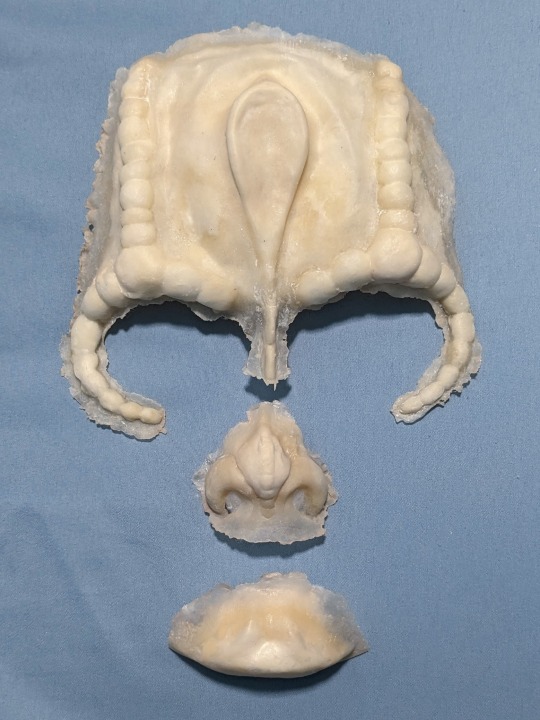
Step 3: Casting negatives
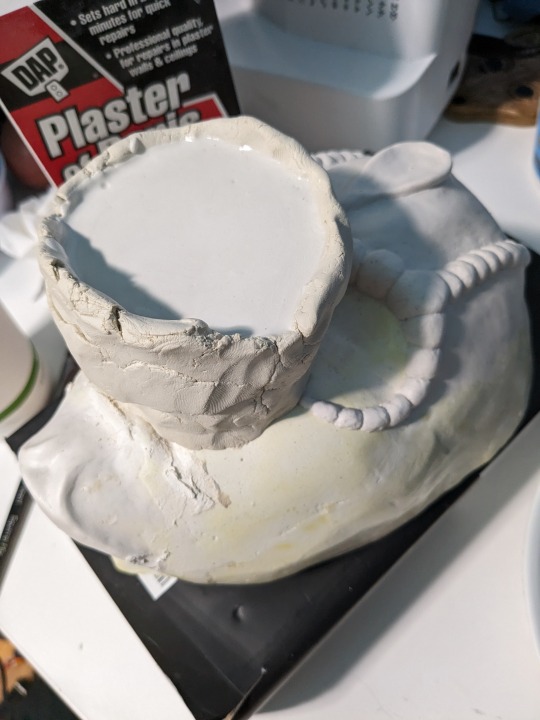
This step is technically optional. The video I followed also outlines an easier way that skips this step, by simply building your prosthetics directly on the sculpt. But casting negatives allows you to get a lot more fine detail, and a smoother finish on the final prosthetics, so that's what I chose to do. Basically, you pour plaster of Paris over your sculpt, and it hardens into a mold you can use to build your prosthetics on.
Again, the video explains it better, but some tips! If it's possible with your sculpt, do it in small pieces instead of the whole face at once. I did the chin, nose, and forehead separately. If you try to do the whole face, there's a greater chance of it getting stuck or breaking. Of course, if you were doing, say, Odo, then it might not be possible to do it in multiple pieces. Another thing to watch out for:

If your underlying face cast has any "undercuts," or places where it's, like, concave, then if plaster gets into those areas and hardens, your face cast and your negatives will lock together, and you won't be able to use either of them. For me I was worried about the sides of my nose and under my bottom lip. As long as those parts are filled in with clay, then you should be fine. It's okay if your clay sculpt has undercuts! You can see in the (shamelessly stolen) diagram that their sculpt has a lot of undercuts, but that's okay because the clay is soft and won't lock with the plaster, it'll just come off. The video I got the diagram from was also pretty helpful, even if it's meant for casting with different materials than I used. Here are the completed negatives:
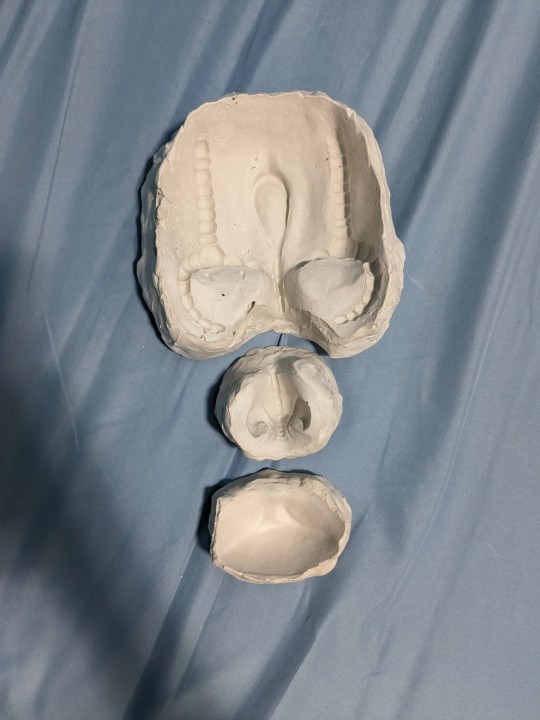
Step 4: Making the prosthetics!
Now you have negatives! Your sculpt may or may not be intact, but if your negatives turned out okay then that's fine. This step is also covered in the video for step 3. Using a stippling sponge, foam brush, or q-tip, stipple thin layers of liquid latex onto your negatives. I found that a q-tip worked best, even if it took longer to cover larger areas. Make sure the edges are very thin, so you can blend them into your skin when you apply the prosthetics. Wait for a layer to dry before adding more latex on top of it, or you'll end up with fucked up results like I had:
(Left: first draft, where I didn't let it dry enough before layering more. Right: second draft. Much better!)
Build up bulky areas with pieces of cotton balls, then cover the cotton with a thin layer of latex. Emphasis on thin! It'll take forever to dry if you saturate your cotton with too much latex. This step mostly involves a LOT of waiting. When the latex is fully dry, brush everything with a liberal amount of setting powder or baby powder to prevent the latex from sticking to itself as you peel it out of the mold.
And now you have your prosthetics! You can tear away some of the excess latex at the edges to make it fit your face better. I ended up tearing away almost all of the edges around the eye ridges, so it would blend better and I wouldn't have to get adhesive so close to my eyes. Tear, don't cut! It'll result in a more natural edge that's easier to blend. This video shows how to apply prosthetics. Use whatever prosthetic adhesive you want! I used spirit gum because it's what I had on hand.
Now you can go forth and live out your lizard alien dreams!!
#IDs in alt text#garak prosthetics tutorial is finally here :))#u guys better not let this flop. this is more effort than I put into my entire high school career (which is a low bar tbh)#sorry to my friend I cropped out of the first pic 😭😭 I rly didn't get any good solo shots jdlkjhf#narcissus's echoes#narcissus plays dress up#ds9#elim garak#star trek#garashir#andy robinson#cardassians#star trek ds9#star trek cosplay#deep space nine#star trek deep space 9#garak cosplay
356 notes
·
View notes
Text
jake as the main chambelan at ur quince and hes so bossy at practices cos hes really excited for it and he gets mad when people mess up cos this is literally about his gfs day
#ㅤㅤ — 𝒹ear 𝒹iary ㅤ#and then u break up and watch the videos from ur quince and cry cos wtf#then when ur both in ur twenties u meet again at a party#and tells u he missrd u and how stupid he was at 15#then u start dating again and he tells u that even at 15 he knew the next time he wanted to see u in a pretty dress was at ur wedding#sorry#this is race specific so ill never write it probably but im mexican OKAYYYYY and i want him 😢#any latinas in chat.#why am i thinking about jake so much......#also i never had a quince so i am so sad I WANT IT AND I WANT HIM
41 notes
·
View notes
Text
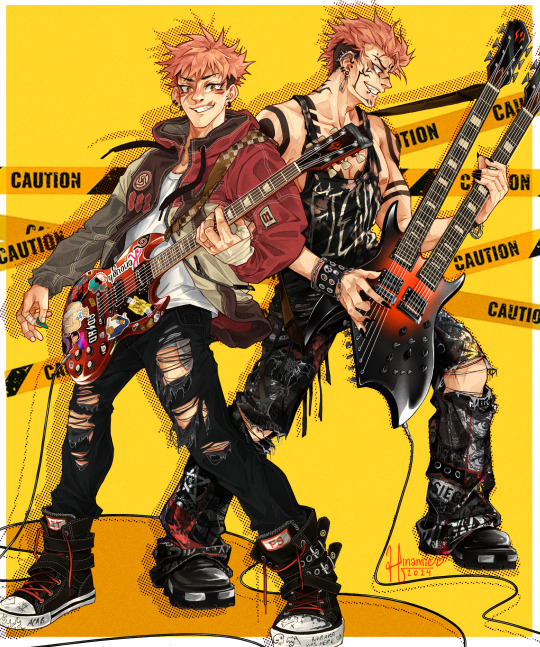
i have so much band!au content in the pipeline my brain is Rotting but enjoy these two for now
jjk band!au
#my art#jujutsu kaisen#jjk#itadori yuuji#yuuji#ryoumen sukuna#sukuna#fanart#jjk fanart#jjk band!au#every time i dress sukuna i stray further from gods light. what is that. what did i do why did i do that.#the pants...the mullet mohawk..the tanktop that might as well be Off...am i cooking or committing a cardinal sin who can say#i realized that i probably couldnt give him rings bc the priss wouldnt want to scuff his guitar#which goes directly against my religion that says that any modern au sukuna has to b iced up#that being said the bracelets r probably pushing it but he needed /something/ so he can deal.#but oh my god the guitars like dont get me wrong im thrilled w how they turned out but god i wished for death#looks around accusingly whose idea was this >:c (me it was mine)#anyway i am feeding myself on this au this will not be the last u see of it :)#HARD pivot from emo yoi content oops
1K notes
·
View notes
Text
I need people to realize how horrible 'stalking/constant surveillance/breaking into each other's homes is how the Batfamily show love' is. Like i really need someone to just acknowledge how horrific saying this bullshit is.
Like even fics where they're shown as happy and healthy and with good ties, you've always got this thing where none of them have privacy or any boundaries with each other. Which is directly antithetical to actually having good relationships. And this invasion via hacking and stalking and breaking into homes is portrayed as a positive, good thing; it's just how they show love and care to each other, after all. But for some reason I just personally don't find stalking, lack of privacy or boundaries, and emotional manipulation funny, endearing, or healthy, and just end up disgusted at the attempt to sweep it all under the rug.
#my dc posting#dc#batman#batfamily#jason todd#barbara gordon#bruce wayne#dick grayson#tim drake#damian wayne#listen i can only take so much of it before i just breakdown okay#apparently controversial opinion but a family where its normal to vreak into each others homes and manipulate each other and stalk and#invade boundaries and autonomy and privacy can NOT be healthy#no matter how much you try to dress it up all cute w 'this is just how they are' 'its how they show their love' its never not gonna be#unhealthy and bad and toxic#like yeah they do do that. they are like that. either acknowledge it or stop trying to justify it#god this actually irks me so much#i try to idk. suspend my disblief but theres only so much i can actuallt fucking take before just#its just. im trying to read happy fluffy fics. but i cant be comforted by a family that normalizes breaking boundaries n invading privacy#and its specifically that the author aleays disregards it. instead of fixing it or making it better they opt to keep it and come up w excuse#s for it#and thats what actually triggers me#'i broke into ur house cus if i asked if i could come over ud say no' is actuallt fucking horrifying stop trying to make it seem loving???#im writing this while having a panic attack dont mind me 👍#but its like. if you can write the batfam w/o bruce hitting his kids or any other horrific thing that they do#then why must you keep the boundary&privacy breaking? why cant anyone even seemingly try to write a batfam#where theyve worked their issues abt this out best they can n have healthy established boundaries w each other??#like if u can write them all hanging out together 24/7 n bruce being s good dad why is this one simple thing the One Thing#nobody even tries to address properly???#'aw dick broke into jason's saehouse bc he wanted to hangout but jason would say no if he asked' aw. maybe dick should learn 'no means no'
51 notes
·
View notes
Text
spend 12% of life feeling like me and 88% feeling like im playing a role
#what do u mean u like me?#im not even real#like#im a dress up bratz doll#pop any personality you want on me#bpd#bpd shit#actually bpd#bpd thoughts
88 notes
·
View notes
Text


companion art to my own fic sorry i had to draw them in prom outfits god herself told me too <3
taglist: @wheelsupin-azarathmetrionzinthos @starstruckodysseys @socialtomcat @incorrect-play-it-by-ear @dapper-nahrwhale @leelovessharks @blueskiesandstarrynights @thedragonemperess @depressedtransguy @starchaserbaby @genuine-possum @joshkiszkashusband (lemme know if u wanna be added or removed)
#this took my blood sweat and tears to finisg#im v proud of their outfits tho#i realized dylans outfit was the only one i described in the fic#but it was so fun to come up with theirs#i did debate giving vanessa a suit but i saw the flowy dress and it was perfect for her#eli draws#mallapalooza#polypalooza#play it by ear#pibe fanart#play it by ear fanart#pibe#mallapalooza fanart#queer#fanart#my art#polyam#based on fanfic#if u see any continuity issues NO U DONT
19 notes
·
View notes
Last Seen Blogs

geceninkendisioldum
gecelerdebuluşuruz
geceninkendisioldum
gecelerdebuluşuruz

kingofallthedescendants
Rotten To The Core!
kingofallthedescendants
Rotten To The Core!

watchoutforthosecutegirls
I'm Just Impressed With Your Face Not Your Dress