#and relatively athletic for comfort and flexibility
Explore tagged Tumblr posts
Visit Tumblr Blog
Explore Tumblr blogs with no restrictions, modern design and the best experience.
Last Seen Tumblr Blogs


Fun Fact
Tumblr has been banned in Indonesia for providing people with access to pornographic content.
Text
hiei and I basically dress the same so I have no complaints there lest I be called a hypocrite 😂

#it’s just all black#sometimes with a little bit of white#and relatively athletic for comfort and flexibility#let’s not judge 😂#top tier imo#a more style savvy person could dress him up and make it look awesome but I don’t think he knows fashion or even cares for it#& neither do I tbh#sadisticyouko rants#not writing
1 note
·
View note
Text
How to Make Your Own Binder that Fits Well and Looks Good
A while back I was in need of some new binders and thought hey, I bet I can make one way cheaper than buying it from somewhere (especially cus some of the ones I’ve bought in the past didn’t really fit right). Except when I started looking for a binder patterns online, I was very surprised that I really… couldn’t find many that looked very nice lol. Most of them had really wrinkled necklines, or didn't bind well, or just overall looked weird. A lot of the patterns also required a serger, which I don't have.
So I just said fuck it and made my own pattern! And it ended up being relatively easy! And the binders fit REALLY WELL and are comfortable to wear, even for long periods. The neckline doesn't show under shirts with loose collars, and the bottom hem doesn't gap or stick out. Here's me wearing one:
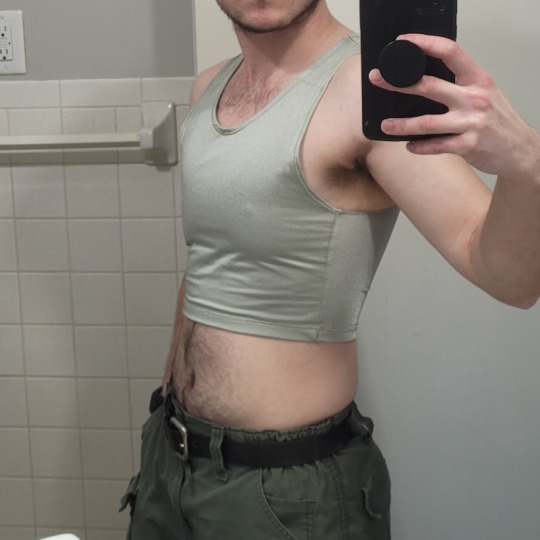
(plus I was able to make myself 5 of them for a total of like ~$50.)
So I figured I could throw together a guide to help out anyone else who wanted to make their own binder but was dissatisfied with the patterns available!
Disclaimer: This tutorial is going to assume a baseline level of sewing experience, and also will require access to a sewing machine. It is not a complicated pattern, but it will most likely require some tweaking and adjustments after you make the first one. Don’t be afraid to make alterations to make it fit better!
This tutorial is for a gc2b-style half-tank binder. It could be altered to be a full-tank binder, but all instructions will be for the half-tank design.
Materials needed:
Stretchy fabric, probably listed as 'athletic fabric' (I use this kind from Joann’s. Most athletic stretch fabrics should work, look for around 80% nylon/20% spandex blends)
Stiff fabric (I use this shirting cotton because I like how lightweight it is. If you want something a little stiffer with more structure, you can use a cotton or cotton/poly blend twill like this. gc2b binders use twill for theirs.)
Lightweight fusible interfacing (I use this kind) (get FUSIBLE not sew-in)
Fusible webbing like Pellon Wonder-Web (this is technically optional but it WILL make your life easier when you’re sewing - just make sure to get the kind with the paper backing!!!)
“But kiwisoap thats 4 whole kinds of materials, surely I don’t need that many!” Ok sure, you can probably get by without the fusible web and interfacing, but consider: they are both dirt cheap (im talking like $1-2/yard), they will make it much easier to sew the final product, and will give you an overall better-looking result. This tutorial is written with the assumption that you’ll use them.
"How much fabric will I need?" Measure the circumference of your chest below your armpits. Add 6 inches just to be safe. This is the yardage of stretch fabric you’ll need, and should give you enough material to make at least 3 binders without much excess left over. You will need around half as much stiff fabric.
Other supplies:
Big Paper (for drawing the pattern)
Flexible measuring tape
Sewing machine
Iron
Pins
Step 1: Measuring
You will need 4 main measurements for this pattern.

A) Measure the circumference of your chest just below your armpits, then divide the number in half. This will be the widest part of the pattern.
B) Measure from the top of your shoulder down to where you want the binder to end. For most folks, this will usually be around the natural waist (narrowest part of the torso), about 3-6 inches above the belly button. This will be the overall height of the pattern.
C) Measure the distance from below your armpit to where you want the binder to end. This will determine where the arm hole starts.
D) Measure the circumference of your waist where you want the binder to end, then divide the number in half.
So for example, after dividing A and D in half, my measurements are 17", 15", 7", and 14.5".
Next:
Subtract one inch from measurement A - This will help provide some compression. You might need to take it in even further depending on how it fits, but one inch is a safe starting point. I take mine in around 1.5 inches.
Subtract half an inch from measurement D. This will help prevent the bottom edge of the binder from gapping. Again, you may need to take it in more or less, depending on your own body.
Add 1.5 inches to measurement B and one inch to measurement C. This is to account for the hems and armhole placement.
This makes my final measurements
A = 16"
B = 16.5"
C = 8"
D = 13.5"
From here on out, we are only going to be working with the measurements that we have added/subtracted to, NOT the ones we initially took.
Step 2: Drawing the Pattern
You will need a piece of paper large enough to accommodate the entire pattern. This may involve taping multiple pieces together, or using a piece of newsprint, etc.
I recommend folding the paper in half to ensure that you get a symmetrical pattern. However, this means you will need to divide measurements A and D in half again, or else you’ll end up with a pattern that’s twice as wide as it should be!
Also note: the pattern is drawn with the seam allowance built in! You don’t need to add any seam allowance.
To draw the pattern:
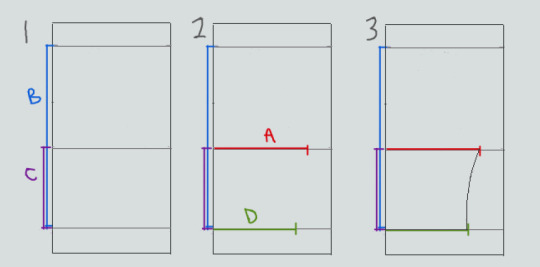

Begin with your folded paper. Measure and mark B and C on the paper, and draw a line extending across the paper. These will be your guidelines.
Measure and mark A and D along the middle and bottom guidelines, respectively. Remember, the paper is folded, so you only use half of the measurement for A and D.
Draw a loose curve connecting the endpoints of A and D. If needed, you can also just draw a straight line between the two.
Mark the opening for the neck hole. Depending on your size, it will measure around 6-8 inches across at the top (remember to divide this in half for the folded paper) and about 5-6.5 inches deep. (mine is 6.5" across and 5.5" deep) Draw a curve to connect the two points. This part will take some tweaking and adjusting to get it to look right lol.
Measure the width of the strap - this should be somewhere between 2.5 - 4 inches wide. They will end up about 1/2” to 3/4” narrower once you sew them. Draw the line at a slight angle, as shown.
Connect the endpoint of the strap to the endpoint of line A with a curve like in the diagram.
This will be the pattern for the front piece.
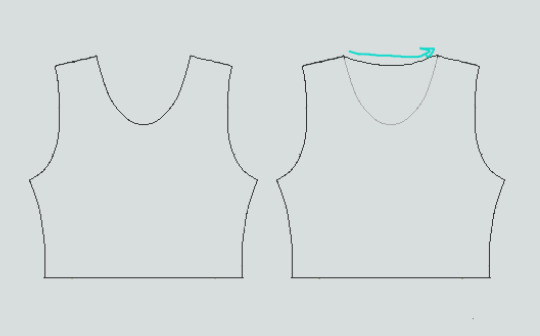
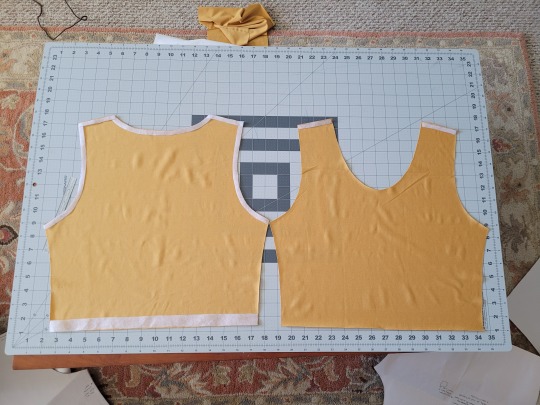
To make the back piece, trace the front pattern, but make a very shallow curve for the neckline instead of a steep one, as shown:
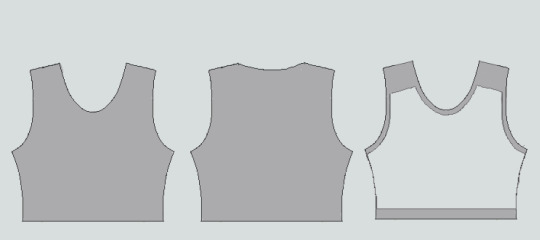
The last piece is the stiff front panel. This is what provides the flattening effect of the binder. To make the pattern, trace the front pattern again. Trim 3/8” in on the sleeves and neckline, and 3/4” to 1” along the bottom. This gives a flatter hem. Then trim the straps shorter by a few inches. This helps the binder lay flatter along the shoulders.
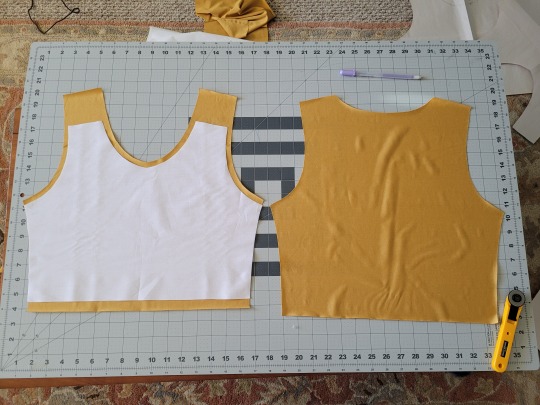
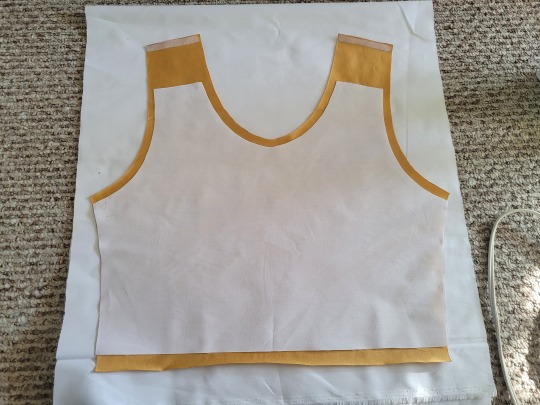
When you're done, you should have 3 pattern pieces that look approximately like this (stiff panel shown overlaid on the stretch fabric to show how it fits together).
NOTE: If you want more compression or just want to make it a bit sturdier, you can add a second panel of stretch fabric to the back piece. Just use the bottom half of the back pattern (from the widest part down to the bottom hem) to cut out another piece of stretch fabric. Attach it to the back piece with a strip of fusible webbing and a zig-zag stitch along the top.
Step 3: Putting It All Together
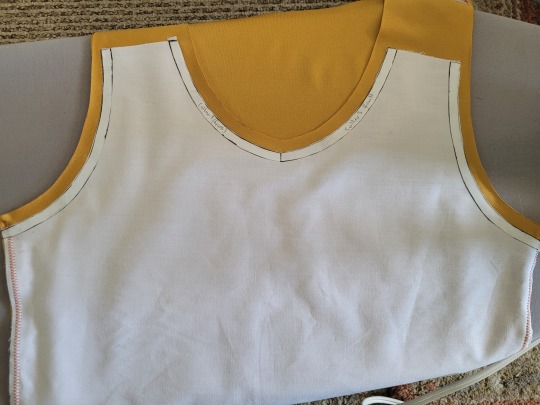
Once you’ve made the patterns and cut out the pieces of fabric, you should have something that looks like this:
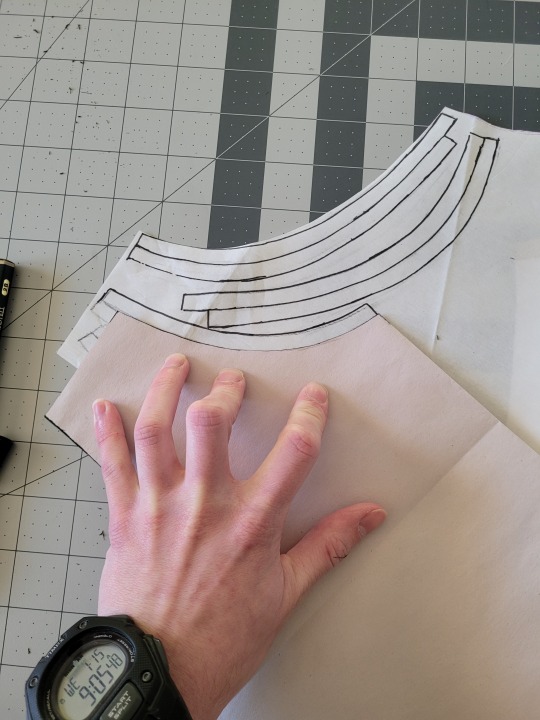
The next step is adding interfacing and fusible webbing. Use your pattern to cut out 3/8" strips to fit on the top of the straps for both pieces, and to the neckline, sleeves, and bottom hem of the back piece, as shown:
If you want to add it to the bottom hem of the front piece, it will help keep that hem flat when sewing it down later, but it's not essential.
If you choose to also use fusible webbing (WHICH I RECOMMEND), you will apply it to the stiff front panel similarly to how the interfacing was applied, ~3/8” strips along the neckline, sleeves, and top of the straps. Cut out two strips for the neckline and sleeves, because we'll use those later too.
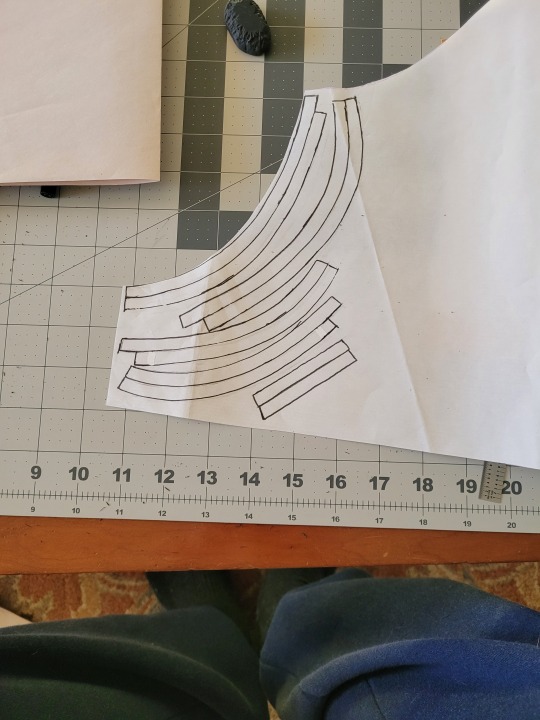
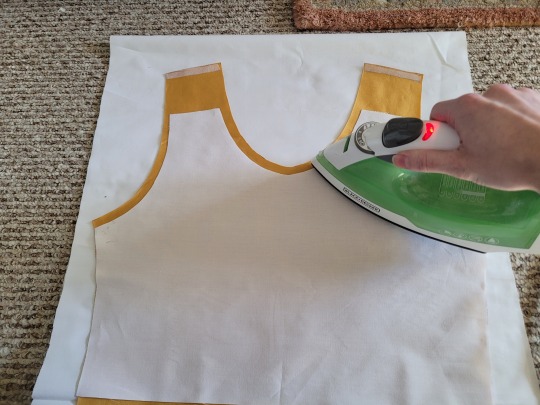
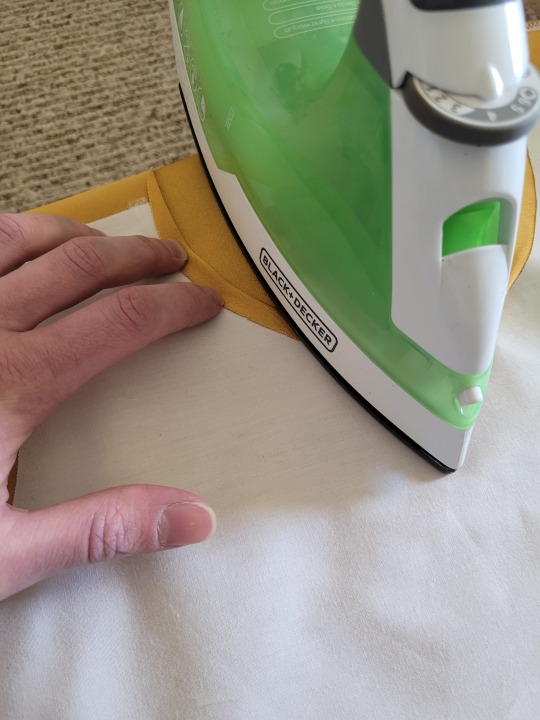
Iron the strips onto the front panel as shown:

Once it's on, just peel off the paper, position it webbing-side down on the stretch fabric, and iron it to fuse the two pieces together so everything stays in place while you sew. THIS MAKES IT WAY EASIER TO SEW.
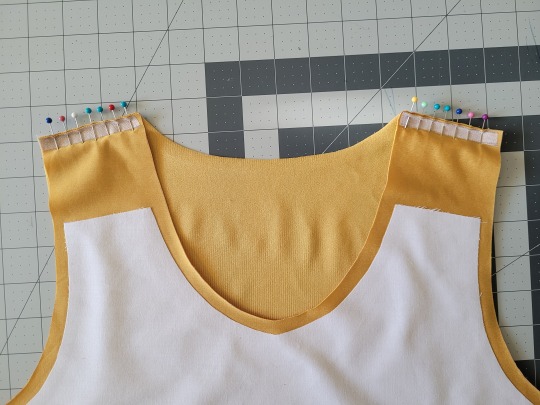
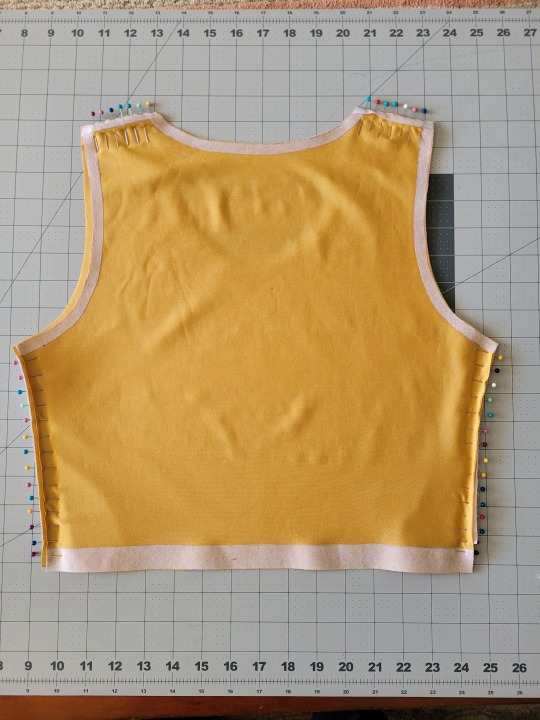
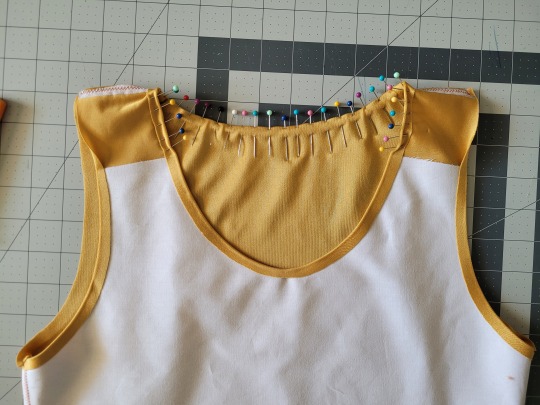
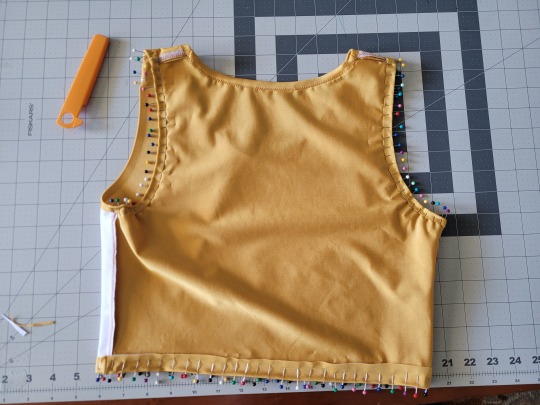
After the stiff front panel is fused to the stretch fabric, you’ll sew the straps of the front and back pieces together, then join the pieces along the sides. Pin the hell out of it to keep everything in place -this type of material is VERY prone to puckering.
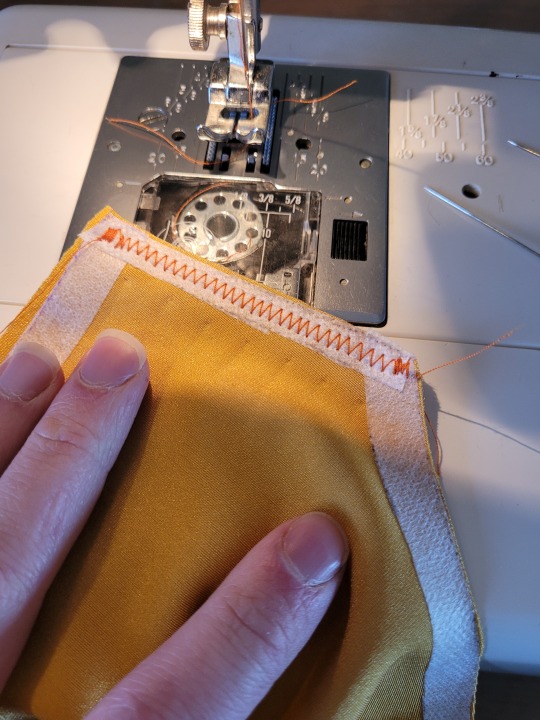
When sewing, USE A ZIGZAG STITCH. A straight stitch will NOT WORK for stretch fabric. I adjust mine to 1.3mm long and 3.5mm wide which has worked well. If your machine doesn’t let you adjust stitch length or width, well. That sucks, I don’t really have any advice.
After you sew the front and back pieces together, you can add more fusible webbing to the front panel to help hold the hem down flat and prevent it from puckering while you sew it. Just add the strip, peel the paper off, then fold the hem over and iron it down. This part isn’t really necessary, but it does make the hems look nicer. If nothing else, I would recommend adding it to the neckline.
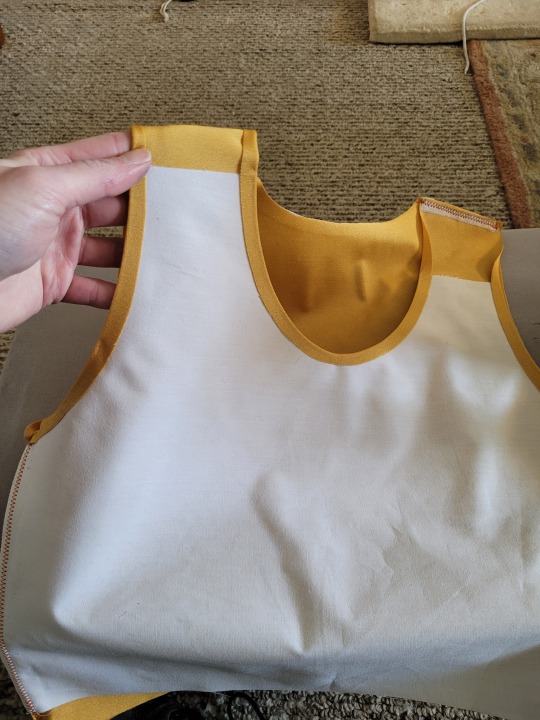
After that, you just fold & pin all the hems and sew them up with a zigzag stitch, then go over the raw edge at the top of the stiff panel (where we cut the straps shorter).
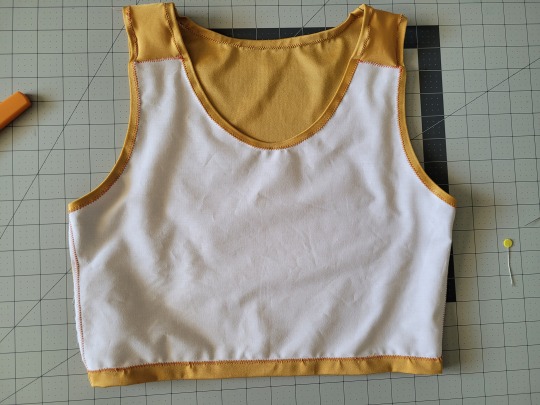
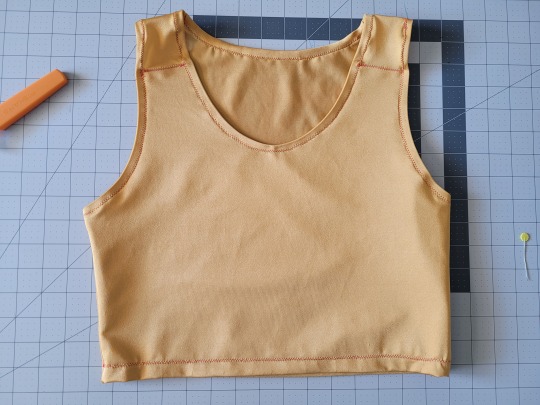
And that’s it! You’re done! And now you can make your own binders whenever you want!
And hey! If you used this tutorial and wanna throw me a dollar or two on ko-fi, I wouldn't complain.
2K notes
·
View notes
Note
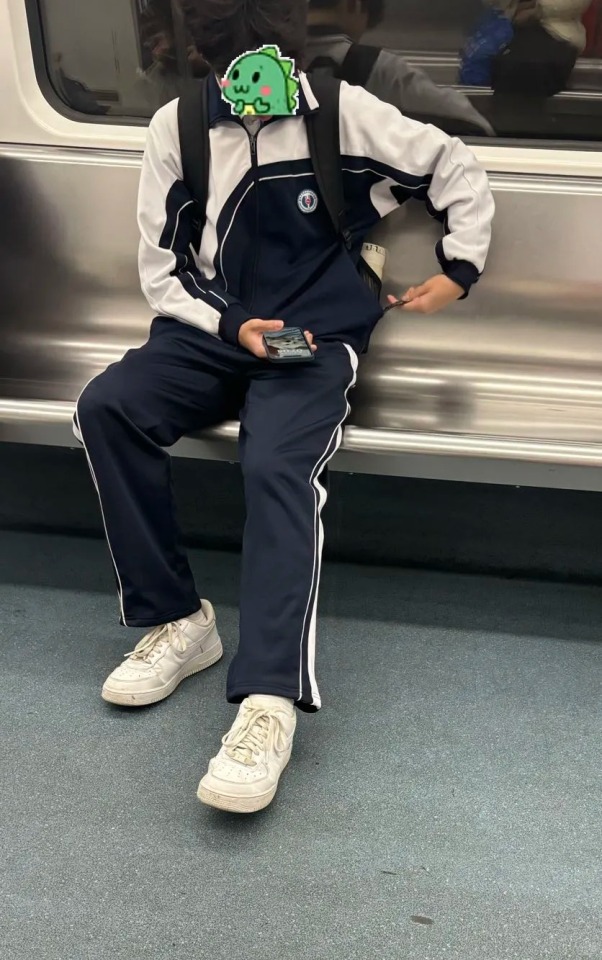
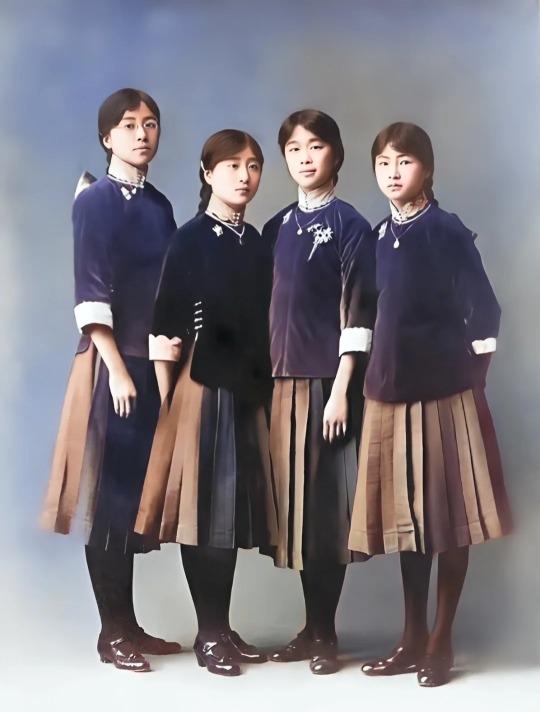
Question: do Chinese school uniforms also have specific shoes you must buy, down to brand/style? Where I am (in the west, Texas) uniform schools just give you a general guide (i.e. brown loafers) and you can get whatever is available.
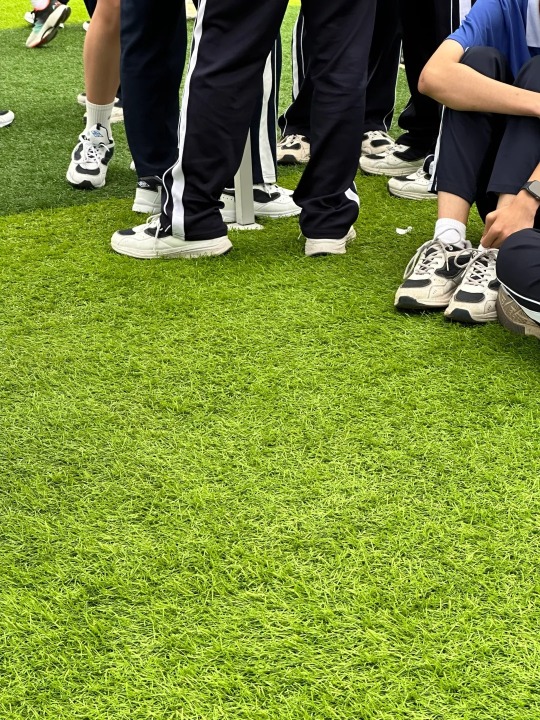
Hello there thank you for the question, it's an interesting one! In China, public schools are relatively lenient when it comes to shoe requirements. They usually don’t specify particular brands or styles, just basic guidelines like "sneakers"(canvas shoes included) or "running shoes," and students can buy them on their own. School rules don’t explicitly state that students must wear sneakers daily, but since school uniforms are typically sportswear, sneakers are just the natural choice. So yeah that's pretty much exactly how it is, just like you said. If a student showed up in high heels with their tracksuit, people would probably wonder if they were, emm, under too much academic stress and there’s no way they are allowed to attend the flag-raising ceremony on monday like that, right...the homeroom teacher would definitely show concern. (High heels would only be allowed for special events, like ceremonies where the etiquette team needs to dress formally - say, with a prom dress or qipao but no one wears them normally.)
That said, some public, private and international schools might have more detailed rules, e.g. requiring dress shoes if they have blazers and pleated skirts, but these schools include them in the uniform package, no need for parents to buy specific brands separately. Overall, China’s uniform policies tend to be more flexible with footwear than with clothing. Of course, for certain occasions like ceremonies they might require black or brown loafers or solid white athletic shoes without any markings. During military training, some schools might mandate wearing the issued camouflage shoes, but most just ask for sneakers.
As for sneaker styles, most students opt for affordable, comfortable, and practical brands, though a few wealthier families might buy their kids expensive sneakers but that’s the exception. Homeroom teachers discourage material competition (like over shoes or electronics) to maintain a healthy class atmosphere. Also it would be absolutely unthinkable in China for parents to spend hundreds of pounds on a full school uniform set, like what's required by private schools in the UK.
I've seen international netizens getting curious about the military training itself on xiaohongshu, however many of them end up with some odd notions about high school and college military training in China. (Just a random thought, my brain jumps around haha)
Tbh military training is kind of just a standard procedure? School administrators and education bureau officials(they are basically politicians) need to look like they’re doing something impressive, so they came up with this thing. Nowadays, it’s mostly just making students march in formation, stand at attention, practice goose-stepping, and then do a final performance where they parade past a stage, kinda mimicking an actual military review. It's essentially a perfunctory, performative routine. Some even incorporate synchronized formations like those wave patterns you saw at the Beijing Olympics, just for show.
The higher-ups are scared of accidents and don’t wanna take responsibility, so they usually don’t make students do anything beyond that. But, of course, there are always some overzealous leaders who might have the instructors teach basic military stuff, like handling rifles(no bullets of course), though that’s pretty rare now.
In high school they actually dragged us to a real military base. We stayed in this camp next to the barracks, in the middle of freaking nowhere. The showers were those open public ones, no doors or anything, and the bunk beds were so vertical, I was scared I’d roll off in my sleep. And then they took us to a shooting range to fire guns??? I can't?? Though later we discovered that unmarked complex across the street from our high school with zero signage was actually one of the broad regional theater command HQ. Hehe funny how things turn out... but let's not dwell on that because that shit isn't shown on any map or social media. Ignore my ramble so our high school was in some kind of "quality education" pilot program, and the higher-ups were probably just showing off for their superiors.
In college, though, the training was all on campus -just the usual marching and formations. No way they’d make us attend classes on top of that, we’d have died from exhaustion. So the rest of the time was basically free, and somehow my friend and I ended up giving fortune-telling sessions to girls with I Ching Divination lmao?? (Since the guys and girls were separated -different squads and all.) Also if someone have pre-existing conditions, they're exempt from military training.
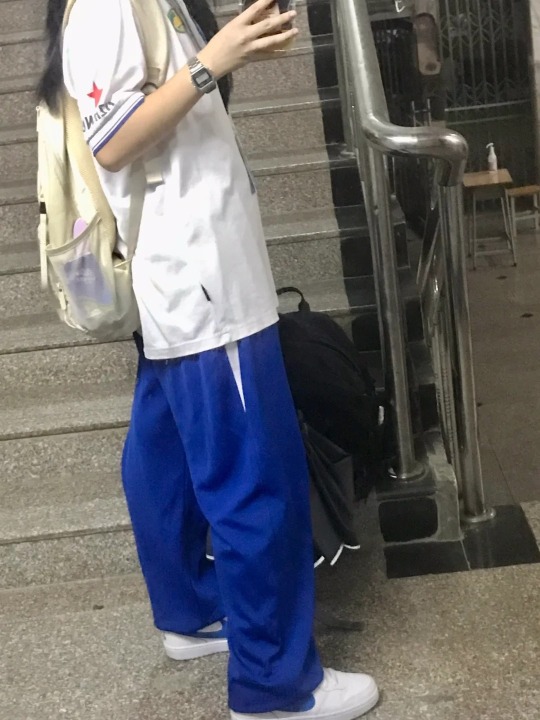
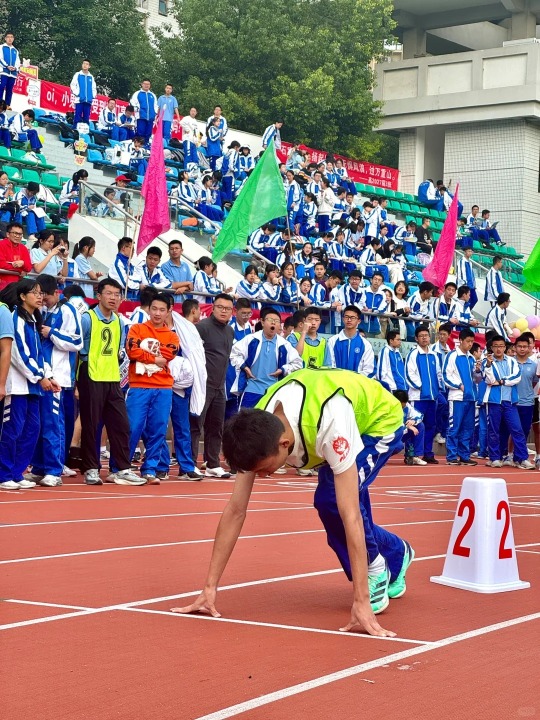
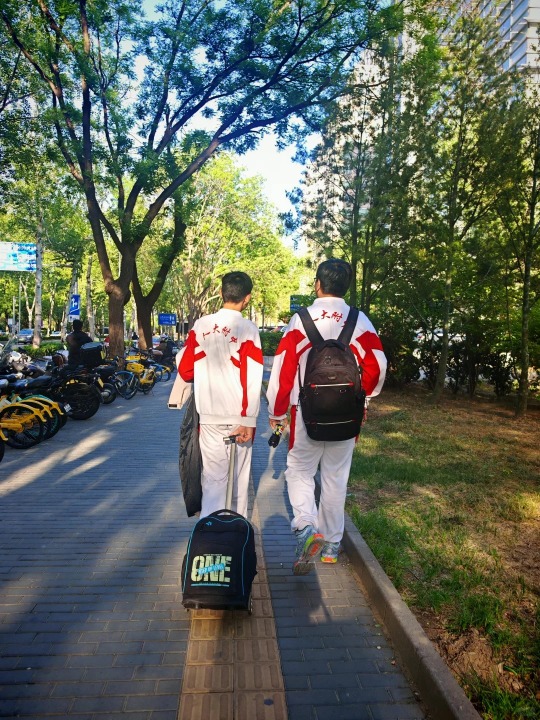
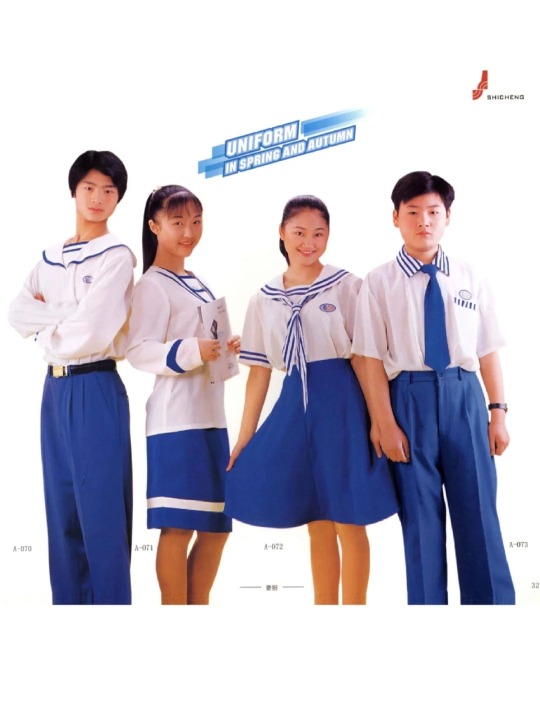
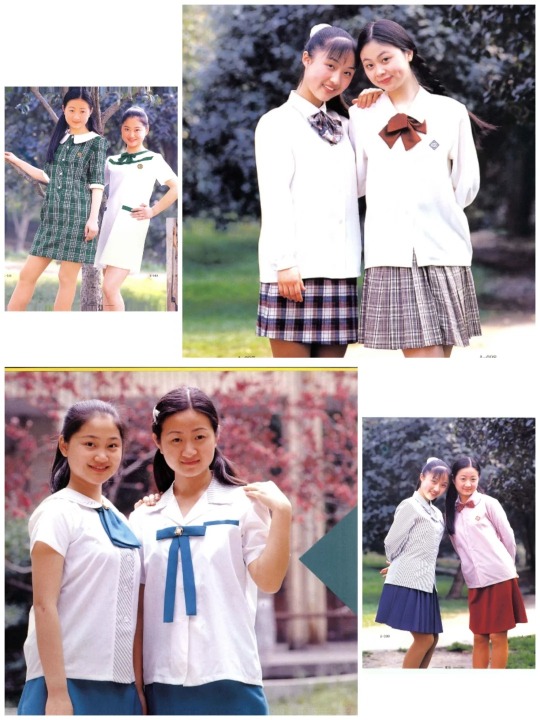
Tangent over sorry. Many top-tier schools in big cities have adopted a more comprehensive uniform system over the last 10-15 years, i.e., formal wear for official occasions paired with sportswear (with summer/winter variations and layered combinations). It's increasingly common to see students wearing blazers trousers and skirts for formal occasions. There are many photos as visual references: most of them are current uniforms. Third and second to last row are 2000s designs from uniform factories -back then, sailor-style uniforms were common. As physical fitness tests got stricter and academic pressure increased, schools switched to sportswear; last row shows a girls' school uniform from the Republic of China era, a classic hybrid style.


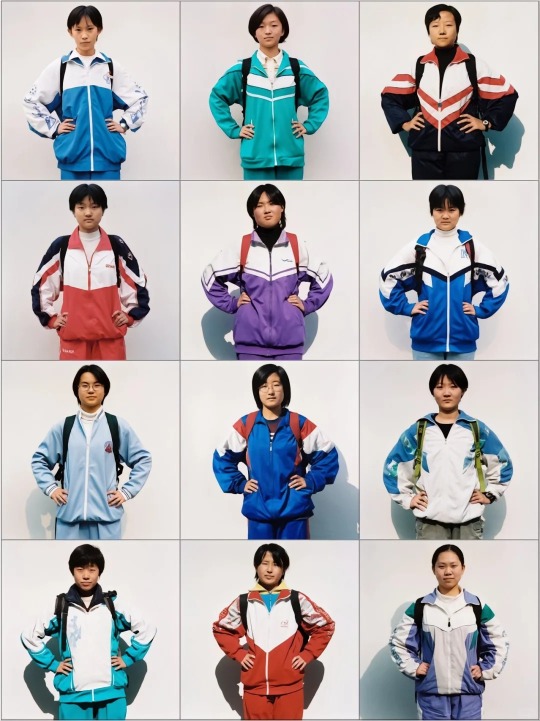

#china#fashion#chinese fashion#fun#fourth to last row are actors in campus cdramas#tumblr you are crazy#it's a fashion how is that mature?#your mind are nasty
210 notes
·
View notes
Text
How to Test Your Own Balance Before a Physical Therapy Appointment

Maintaining good balance is essential for daily activities, injury prevention, and overall well-being. Before attending a physical therapy appointment, assessing your own balance can provide valuable insights into your strengths and weaknesses. This self-assessment helps you understand what areas need improvement and gives your therapist a baseline to work from. Here’s a step-by-step guide on how to test your own balance effectively.
Why Balance Matters
Balance is crucial for movement, coordination, and stability. Poor balance can lead to falls, injuries, and difficulties in performing everyday tasks. Whether recovering from an injury, managing a condition like vertigo, or improving athletic performance, assessing your balance can help track progress and set goals for improvement.
Preparing for a Balance Test
Before testing your balance, ensure you are in a safe environment. Stand near a sturdy surface, such as a wall or chair, for support if needed. Wear comfortable clothing and perform the tests on a flat, non-slippery surface. If you experience dizziness or discomfort, stop immediately.
Simple Balance Tests You Can Do at Home
1. Single-Leg Stand Test
This test helps assess your ability to maintain stability on one leg.
Steps:
Stand with feet hip-width apart.
Lift one foot off the ground while keeping your hands on your hips.
Try to hold this position for 10-30 seconds without swaying.
Repeat on the other leg.
Results:
If you can hold the position for at least 20 seconds without support, your balance is relatively strong.
Struggling to maintain balance may indicate weak stabilizing muscles or coordination issues.
2. Heel-to-Toe Walk (Tandem Walking)
This test evaluates coordination and stability while moving.
Steps:
Walk in a straight line, placing the heel of one foot directly in front of the toes of the other foot.
Keep your arms relaxed at your sides and look straight ahead.
Walk 10-15 steps forward, then turn around and repeat.
Results:
A steady walk indicates good dynamic balance.
If you struggle or step off the line, you may need balance training.
3. Sit-to-Stand Test
This test measures lower-body strength and control.
Steps:
Sit on a sturdy chair with your feet flat on the ground.
Cross your arms over your chest and stand up without using your hands.
Sit back down and repeat 5-10 times.
Results:
Completing multiple repetitions smoothly suggests strong balance and leg muscles.
Difficulty rising may indicate weakness or stability issues.
Interpreting Your Results
After performing these tests, note any difficulties or imbalances. If you struggle with one or more exercises, share these findings at your physical therapy appointment. Your therapist can use this information to tailor exercises that target your specific needs.
Improving Your Balance
If you notice balance challenges, incorporate simple exercises into your routine:
Strength Training – Focus on core and leg muscles.
Flexibility Exercises – Stretching improves coordination.
Proprioception Training – Activities like yoga or tai chi enhance body awareness.
Conclusion
Understanding how to test your own balance allows you to track progress and prepare for your therapy sessions. Regular self-assessment helps identify areas for improvement and ensures you get the most out of your physical therapy appointment. By taking proactive steps, you can enhance stability, prevent falls, and improve overall mobility.
1 note
·
View note
Note
Just spent the night reading your fics and I already love everyone so much, I can’t wait to read more from you!
I was wondering if you have face claims or any additional physical descriptions for your OCs? I find it a little hard to get a mental picture based off drawings, so I’m just curious.
Keep up the fantastic work! ❤️
Hi! This is so nice to hear! :)
Um, I do not have any face claims for my OCs, because I would be incredibly bad at that lol. Honestly, I don't have much physical description for my characters beyond the picrews of them, since that's what I base everything off of.
What I can do is give some more relative information...
Tallest -> shortest:
Jayden (but he doesn’t look it), Julie, Colin, Leo, Rowyn, Keegan, Max, Jamie, Alix, Charlie
Who's the most fit? I guess is how I would phrase that? from left -> right:
Julie, Alix, Colin, Jayden, Charlie, Keegan, Max, Rowyn, Jamie, Leo
And I can add some stuff about their styles...
Colin: Lots of athletic wear, especially with working at the pool, since he's generally warm he wears a lot of thin athletic shirts and shorts around there, but at home he's a sweatpants and hoodies kind of guy, basically never dresses up, and his idea of that would be a t-shirt and jeans
Rowyn: Very much grew up in a house where to go in public you had to look presentable, so he always wears nicer pants, and typically a white t-shirt under a button up collared shirt, he does have some fun patterns and things mostly influenced by Colin, but he's a very clean and pristine kind of guy, at home he takes off the button up and wears a sweater/jacket over the t-shirt, only really wears comfy clothes if he's not feeling well
Jamie: Has a rainbow of sweaters in all prints and weights, but no hoodies, just those sweaters that can be worn as shirts, and comfortable pants, never jeans, he has some loose fitting t-shirts for the summer, but he's comfiest in his sweaters, either in bright jewel tones, or earthy neutrals
Keegan: Wears a button-up long-sleeve every single day, but he has quite the variety of shirts, ranging from pastels to bright colours, he doesn't wear a lot of patterns, but definitely has some options, you will never see this man in shorts
Alix: Bright colours, fun t-shirts with weird pictures/sayings, really flexible (capri pants, shorts, leggings), has a couple really loose hoodies, crop tops, loves unique outfits, as an artist appreciates the creative opportunities of outfits so is not afraid to play around with gender norms or different style choices
Jayden: Gives zero thought to his appearance, he wears what makes him comfortable, usually hoodies or plain coloured t-shirts, he's the kind of person who's been wearing the same socks for years and will never buy a different kind, he wears almost exclusively jeans
Charlie: She does care about her appearance but it doesn't really matter since she works in a daycare so she wears lots of fun bright colours and patterns, and lots of skirts and flowy dresses, she's definitely my girly-girl, who likes wearing flowers in her hair, and she would definitely wear a tutu to work
Max: Wears a lot of baggy shirts and loose pants when they want to be comfortable, but they also possess a skill for creating outfits that are delightfully androgynous so they have a lot of fun playing with skirts and overalls and crop tops, and tank tops, but they don't usually care about their outfit, because their job is virtual they wear lots of differently styled shirts (one-shoulder tops, tank tops, sweatery things, lacy-topped shirts, off shoulder shirts)
Julie: She is like a chic athletic girl, her outfits are basically all colour coordinated and cohesive, she doesn't wear skirts, but she will sometimes wear short dresses over leggings or shorts, she likes layers, loves leggings, and wears cardigans/shawls in the winter, she cares about her outfits but not in a "i want to look good" way, in a "i want to look like me" way so she really doesn't care what other people think
I hope that helps? If there was something else you were hoping for, please let me know! :)
1 note
·
View note
Text
From Beginner to Pro: Pickleball for All Levels at Blue Zone Courts
Pickleball is an exciting paddle sport that combines elements of badminton, tennis, and table tennis. It has gained immense popularity due to its accessibility and the enjoyment it brings to players of all ages and skill levels. With easy-to-learn rules and a relatively low-impact nature, it is an excellent choice for beginners and veterans alike.
Why Choose Blue Zone Courts?
Blue Zone Courts is a premier facility dedicated to providing an excellent environment for pickleball enthusiasts. Located in a convenient area, it offers state-of-the-art courts and amenities tailored for players at various levels. The courts are designed for optimal play, ensuring a delightful experience for everyone involved.

The Basics of Pickleball for Beginners
For those new to the sport, understanding the basics is crucial. Pickleball is played with a paddle and a plastic ball with holes. The game can be played as singles or doubles. The objective is to hit the ball over the net and land it within the opponent's court boundaries. Getting familiar with the serving rules, scoring system, and court dimensions is vital for beginners.
Developing Skills at Blue Zone Courts
At Blue Zone Courts, beginners pickleball Burlington attend skill development classes tailored to new players. These lessons focus on fundamental skills such as serving, volleying, and court positioning. Professional instructors guide participants through practical drills and gameplay, ensuring a steady progression toward proficiency.
Intermediate Training Programs
Once players grasp the basics, they can advance to intermediate training programs. These classes emphasize strategy, shot selection, and positioning while playing. The experienced coaches at Blue Zone Courts encourage players to improve their techniques and become more confident in their game.
The Competitive Edge
For those aiming to transition from recreational play to competitive sports, Blue Zone Courts offers advanced training and competitive leagues. Players can challenge themselves and compete against others with similar skill levels. This environment fosters improvement and builds camaraderie among participants.
Community and Social Interaction
Pickleball at Blue Zone Courts is not just about competition; it fosters community and social interaction. Regular social events provide players with opportunities to engage, make friends, and share experiences. The friendly atmosphere encourages players to support each other, creating lasting connections.
Benefits of Playing Pickleball
Playing pickleball offers numerous benefits, including physical fitness, improved coordination, and social engagement. It is a great way to stay active and healthy while enjoying the thrill of sports. The nature of the game promotes cardiovascular health, agility, and flexibility, making it an excellent option for individuals seeking to improve their fitness levels.
Pickleball Gear and Equipment
For a fulfilling pickleball experience, selecting proper gear is vital. Players need a reliable paddle, appropriate footwear for court play, and comfortable athletic wear. Blue Zone Courts provides recommendations for quality equipment, and players can also find gear on-site to get started easily.

Upcoming Events and Tournaments
Blue Zone Courts regularly hosts events and tournaments for players of all levels. These gatherings provide a platform for players to showcase their skills and enjoy the spirit of competition. Participating in tournaments can be a thrilling way to measure progress and challenge oneself against varying abilities.
Conclusion
Pickleball is a sport for everyone, providing a vibrant community for players at different skill levels. Blue Zone Courts serves as an ideal location for beginners and advanced players to enhance their skills and engage with others who share a passion for the game. Whether looking to play recreationally or competitively, players can find opportunities to grow and enjoy pickleball
0 notes
Text
Portable Hyperbaric Chamber: A Complete Guide

HBOT is that treatment method in which the effect of oxygen healing is enhanced as well as achieved. HBOT was initially and traditionally available only within specialized medical hospitals. However, with the arrival of portable hyperbaric chambers, it's now accessible and available to everybody. These portable units are compact, comfortable, and super easy to handle. This blog covers everything that you want to know about portable hyperbaric chambers, their benefits, applications, and considerations.
What are Portable Hyperbaric Chambers?
A portable hyperbaric chamber is a medical-grade tool used to provide hyperbaric oxygen therapy in a nonclinical environment. Unlike conventional hyperbaric chambers, these are typically light in weight, flexible, and more economical. Such chambers are also constructed of heavy materials such as reinforced fabric, together with airtight zippers for pressure control.
The user enters the chamber during a session and breathes in oxygen-rich air at a pressure higher than the atmospheric pressure. This increases oxygen levels in the blood, promoting faster healing and improved cellular function.
Advantages of a Portable Hyperbaric Chamber
Portable hyperbaric chambers offer numerous benefits, making them an attractive option for individuals seeking the advantages of HBOT without visiting a medical facility:
Healing and Recovery
Increased oxygen delivery accelerates the healing processes of wounds and injuries and, consequently, any post-surgery recovery through the promotion of cell reproduction.
Enhancing Athletic Performance Recovery:
Athletes apply HBOT techniques to reduce exhaustion, increase vitality, and aid in faster rehabilitation from injuries.
Aiding Long-term Conditions
Long-term chronic conditions such as Fibromyalgia Chronic Fatigue, and Migraine can be healed by increasing their oxygen levels alongside the reduction in inflammation.
Venice
Portable chambers give patients the luxury of carrying out treatment sessions in their comfortable homes, hence saving time and offering flexibility.
Cost-Effective
The cost of buying a portable chamber is relatively higher, but the difference in terms of expenses comes at a much lower cost than a series of clinical visits within a short period.
Non-Invasive Treatment
HBOT is non-invasive with minimal side effects, hence suitable for nearly everybody
Portable hyperbaric chambers are applied for multiple uses in health, wellness, and sports:
Wound Healing
These portable hyperbaric chambers heal chronic wounds, diabetic ulcers, and radiation injuries by ensuring adequate oxygenation to tissues.
Neurological Conditions
Scientific studies prove efficacy in conditions like traumatic brain injury, stroke, and autism spectrum disorders.
Anti-Aging and Skin Rejuvenation
High oxygenation leads to elastic skin, wrinkles removal, and a complete rejuvenation of the body.
Immune System Strength
HBOT has the strength to boost immunity due to lessened inflammation and increased cellular repair.
Altitude Sickness
Portable hyperbaric chambers help reduce altitude sickness by enriching oxygen levels.
How Does a Portable Hyperbaric Chamber Work?
A portable hyperbaric chamber operates through controlled high atmospheric pressure greater than normal conditions. Here's a step-by-step account of how it works:
Setup: It is pumped up by an air compressor with oxygen concentrators or cylinders attached to it.
Pressurization: The pressure inside is elevated to the prescribed level (which is typically in the range of 1.3 to 1.5 ATA) once the user has sealed the chamber.
Oxygen delivery: Oxygen-enriched air is breathed through, and its dissolved components penetrate the bloodstream for better tissue oxygenation.
Duration of a Session: A typical session usually takes 60-90 minutes. Duration depends on an individual's requirements as well as the medical condition being treated.
Depressurization: After the session, the chamber is slowly depressurized to normal atmospheric levels before the user exits.
Considerations for Selecting a Portable Hyperbaric Chamber
Choosing the right portable hyperbaric chamber requires considering several factors to ensure safety, effectiveness, and suitability:
Pressure Range: Choose a chamber with a pressure range appropriate for your therapy needs.
Size and Portability: Ensure the chamber's dimensions accommodate the intended user and that it is easy to transport and store.
Material Quality: Opt for chambers made of durable, medical-grade materials with reliable seals and zippers.
Certification: Look for products approved by regulatory bodies to guarantee safety and quality.
Ease of Use: User-friendly designs with clear instructions and automated features enhance the overall experience.
Maintenance and Support: Check for warranty, maintenance requirements, and customer support services offered by the manufacturer.
Safety Considerations: While portable hyperbaric chambers are relatively safe, it is important to follow proper usage guidelines and consult a healthcare professional before starting therapy:
Medical Supervision: Consult a qualified professional, especially if you have pre-existing conditions or are pregnant.
Avoid Overuse: Follow recommended session durations and frequencies to avoid potential side effects.
Proper Ventilation: Place the chamber in a well-ventilated area and avoid using flammable materials nearby.
Regular Maintenance: Keep the chamber clean and inspect it regularly for signs of wear and tear.
Portable Hyperbaric Chambers of the Future
As technology advances, so does the functionality and usability of portable hyperbaric chambers. Smart monitoring systems, a more compact design, and integration into health apps with real-time data will be some of the expected developments. HBOT's popularity will only keep increasing, and so will these portable hyperbaric chambers as people include them in their home health and wellness programs.
Conclusion
Atlanta Hyperbaric: Your resource for top portable hyperbaric chambers that facilitate recovery, wellness, and maximum well-being. Through innovative hyperbaric oxygen therapy technologies, Atlanta Hyperbaric manufactures lightweight, durable, easy-to-use portable hyperbaric chambers for personal use and professional implementation. Enjoy faster recovery, higher oxygen flow circulation, and restoration with our premium portable hyperbaric chambers manufactured for comfort and convenience. Look forward to unlocking a new aspect of wellness by Atlanta Hyperbaric.
#portable hyperbaric chambers#portable hyperbaric chamber#hyperbaric chambers#hbot chamber for sale#buy a hyperbaric chamber
0 notes
Text
The Ultimate Guide to Resistance Bands for Working Out
In recent years, resistance bands for working out have surged in popularity among fitness enthusiasts of all levels. These versatile, portable, and affordable tools offer a myriad of benefits, making them a staple in both home and gym settings. Whether you're a beginner looking to start your fitness journey or an experienced athlete aiming to enhance your workouts, resistance bands can be a game-changer. This guide delves into the features, benefits, and effective ways to incorporate resistance bands into your fitness routine.
What Are Resistance Bands?
Resistance bands are elastic bands used to provide resistance during strength training and physical therapy exercises. They come in various shapes, sizes, and resistance levels, allowing users to tailor their workouts to their specific needs and goals. Made from durable materials like latex or fabric, these bands can withstand repeated stretching and are designed to target different muscle groups effectively.
Key Features of Resistance Bands
1. Versatility
Resistance bands can be used for a wide range of exercises, including strength training, flexibility exercises, rehabilitation, and even cardio workouts. From squats and lunges to bicep curls and shoulder presses, the possibilities are endless.
2. Portability
One of the standout features of resistance bands is their lightweight and compact nature. They are easy to carry, making them ideal for workouts on the go, whether you're traveling, at the office, or enjoying the great outdoors.
3. Adjustable Resistance Levels
Resistance bands come in different thicknesses and colors, each representing a specific resistance level. This allows users to gradually increase the intensity of their workouts as they build strength and endurance.
4. Affordability
Compared to traditional gym equipment, resistance bands are relatively inexpensive. This makes them an accessible option for individuals looking to set up a home gym without breaking the bank.
5. Durability
High-quality resistance bands are built to last, with materials that can withstand constant stretching and tension without snapping or losing elasticity.
Benefits of Incorporating Resistance Bands into Your Workouts
1. Enhanced Muscle Strength and Tone
Resistance bands provide constant tension throughout the entire range of motion, which helps in building muscle strength and toning muscles effectively.
2. Improved Flexibility and Mobility
Using resistance bands can aid in stretching exercises, enhancing flexibility, and improving joint mobility. This is particularly beneficial for injury prevention and recovery.
3. Injury Rehabilitation
Physical therapists often use resistance bands to help patients regain strength and mobility after injuries. They offer controlled resistance, allowing for safe and effective rehabilitation exercises.
4. Increased Range of Motion
Resistance bands encourage full range of motion during exercises, which can lead to better muscle development and joint health.
5. Convenient Home Workouts
With resistance bands, you can perform a comprehensive workout at home without the need for bulky equipment. This convenience makes it easier to stay consistent with your fitness routine.
How to Choose the Right Resistance Band
Selecting the appropriate resistance band depends on your fitness level and the type of exercises you intend to perform. Here are some factors to consider:
Resistance Level: Bands typically come in light, medium, heavy, and extra-heavy resistance levels. Beginners may start with lighter bands and gradually progress to higher resistance as they build strength.
Length and Width: Longer bands are suitable for lower body exercises, while shorter bands are ideal for upper body workouts.
Material: Latex bands are more elastic and durable, whereas fabric bands are comfortable and less likely to roll or snap.
Handles and Anchors: Some resistance bands come with built-in handles or anchors, providing additional versatility and ease of use.
Top Exercises with Resistance Bands
1. Squats
Enhance your lower body workout by adding resistance bands to your squats. Place the band around your thighs just above the knees to engage your glutes and thighs more effectively.
2. Bicep Curls
Stand on the band with feet shoulder-width apart, holding the handles with palms facing forward. Curl your hands toward your shoulders, keeping your elbows stationary to target your biceps.
3. Shoulder Press
Secure the band under your feet and hold the handles at shoulder height. Press upward until your arms are fully extended, then slowly lower back to the starting position to work your shoulders.
4. Lateral Band Walks
Place the band around your ankles and take small steps to the side, maintaining tension on the band. This exercise targets the hip abductors and helps improve hip stability.
5. Chest Press
Anchor the band behind you at chest level. Hold the handles and press forward until your arms are fully extended, then return to the starting position to work your chest muscles.
Tips for Effective Resistance Band Workouts
Warm-Up Properly: Always begin your workout with a proper warm-up to prepare your muscles and prevent injuries.
Maintain Proper Form: Focus on maintaining correct posture and technique to maximize the benefits and minimize the risk of injury.
Progress Gradually: Start with lighter resistance bands and gradually increase the resistance as your strength improves.
Incorporate Variety: Mix different exercises and resistance levels to keep your workouts challenging and engaging.
Stay Consistent: Regular use of resistance bands will yield the best results. Aim for at least three sessions per week to build and maintain muscle strength.
Conclusion
Resistance bands are a versatile, effective, and affordable tool that can significantly enhance your workout routine. Whether you're aiming to build muscle, improve flexibility, or rehabilitate an injury, these bands offer a range of benefits suitable for all fitness levels. By incorporating resistance bands into your training regimen, you can achieve a comprehensive and balanced workout that aligns with your personal fitness goals.
Ready to elevate your fitness journey? Explore a wide selection of high-quality resistance bands for working out and find the perfect set to meet your needs today!
0 notes
Text
Say Goodbye to Joint Pain with Nutriherbs Joint Pain Oil Supplements

Joint pain is a common problem that affects people of all ages, from athletes pushing their bodies to the limit to older adults experiencing the natural wear and tear of their joints. Whether it's due to arthritis, injury, or general wear, joint discomfort can significantly impact your quality of life. If you’re looking for a natural and effective solution to ease joint pain, Nutriherbs Joint Pain Oil supplements might be just what you need.
In this blog, we'll explore how Nutriherbs’ Joint Pain Oil can provide relief, promote joint health, and help you regain mobility and comfort.
Understanding Joint Pain: The Basics
Joints are the connections between bones, allowing movement and flexibility. However, they are susceptible to various issues, including inflammation, wear and tear, and injury. Common causes of joint pain include:
Arthritis: Inflammation of the joints, often caused by wear and tear (osteoarthritis) or immune system disorders (rheumatoid arthritis).
Injury: Sprains, strains, and fractures can lead to pain and discomfort in the joints.
Overuse: Repeated motions from activities like running, lifting, or certain types of manual labor can stress the joints over time.
Age: As we age, the cartilage that cushions our joints naturally wears down, leading to discomfort and stiffness.
Whether mild or severe, joint pain can have a significant impact on mobility, making even simple tasks feel challenging. This is where Nutriherbs Joint Pain Oil supplements come into play.
What is Nutriherbs Joint Pain Oil Supplement?
Nutriherbs Joint Pain Oil is a specially formulated supplement designed to promote joint health and provide relief from pain and stiffness. The oil is made using a blend of powerful natural ingredients known for their anti-inflammatory and pain-relieving properties. When used regularly, Nutriherbs Joint Pain Oil can help improve joint mobility, reduce discomfort, and support long-term joint health.
Key Ingredients in Nutriherbs Joint Pain Oil
Nutriherbs’ Joint Pain Oil is crafted with a unique blend of natural ingredients that work synergistically to provide quick and effective relief. Some of the key ingredients include:
1. Eucalyptus Oil
Eucalyptus oil is well-known for its anti-inflammatory properties, making it an excellent ingredient for joint pain relief. It helps soothe sore muscles and reduces swelling and inflammation, which are common causes of joint pain. The cooling sensation that eucalyptus provides also works as a natural pain reliever, helping to alleviate discomfort and improve mobility.
2. Wintergreen Oil
Wintergreen oil contains methyl salicylate, which has similar properties to aspirin. It helps to relieve pain and inflammation in the joints. Wintergreen oil is widely used for soothing muscle and joint pain, making it an essential component of Nutriherbs Joint Pain Oil. Its analgesic properties provide fast relief from pain, making movement easier.
3. Turmeric Oil
Turmeric is famous for its potent anti-inflammatory and antioxidant properties. It contains curcumin, which helps reduce inflammation and ease pain in the joints. By promoting the healing of damaged tissues and reducing oxidative stress, turmeric oil supports joint health and provides long-term relief from joint discomfort.
4. Ginger Oil
Ginger is a powerful anti-inflammatory agent that helps relieve pain and stiffness. It improves blood circulation, which helps to deliver oxygen and nutrients to the joints, promoting healing. Ginger oil also helps reduce swelling and alleviates the pain caused by arthritis and other joint issues.
5. Menthol
Menthol has a soothing and cooling effect on the skin, which can help reduce the sensation of pain and inflammation. It provides temporary relief and helps enhance the absorption of other beneficial ingredients, allowing them to work more effectively.
6. Camphor
Camphor is another ingredient that is often used in topical pain-relief products. It provides a cooling effect that helps to numb pain and reduce swelling. Camphor helps stimulate blood circulation, promoting faster healing of sore and inflamed joints.
Benefits of Nutriherbs Joint Pain Oil Supplement
Nutriherbs Joint Pain Oil provides numerous benefits for those dealing with joint discomfort. Here’s how it can help:
1. Relieves Joint Pain and Inflammation
The blend of eucalyptus, wintergreen, turmeric, and ginger oils offers powerful anti-inflammatory effects that target the root causes of joint pain. These ingredients work together to reduce swelling and inflammation, providing fast and effective relief from discomfort.
2. Improves Joint Mobility
Regular use of Nutriherbs Joint Pain Oil can improve flexibility and mobility in stiff joints. By reducing inflammation and providing nourishment to the joints, the oil helps restore fluid movement, making it easier to perform daily tasks and engage in physical activities.
3. Supports Long-Term Joint Health
In addition to providing short-term relief, Nutriherbs Joint Pain Oil helps improve the long-term health of your joints. The anti-inflammatory ingredients promote healing, reduce cartilage damage, and prevent further wear and tear, contributing to healthier joints over time.
4. Natural and Safe Pain Relief
Unlike over-the-counter medications that may come with side effects or risks, Nutriherbs Joint Pain Oil uses only natural ingredients, making it a safe and effective option for pain relief. The essential oils in this supplement are gentle on the skin and can be applied directly to the affected area for targeted relief.
5. Soothes Sore Muscles and Tissues
Whether you’re experiencing pain due to overuse, a recent injury, or chronic conditions like arthritis, Nutriherbs Joint Pain Oil helps soothe sore muscles and tissues. It accelerates recovery and provides a comforting sensation that relaxes the affected areas.
How to Use Nutriherbs Joint Pain Oil
Using Nutriherbs Joint Pain Oil is easy and straightforward:
Apply directly to the affected joint(s): Massage a small amount of oil gently onto the painful or inflamed joint.
Massage thoroughly: Rub the oil into the skin in circular motions to ensure absorption. You can also apply a gentle compress after massaging to enhance the oil's effects.
Use regularly: For the best results, use Nutriherbs Joint Pain Oil daily, especially after physical activity or during flare-ups of pain and inflammation.
Why Choose Nutriherbs Joint Pain Oil?
100% Natural Ingredients: Nutriherbs Joint Pain Oil is made from high-quality, natural essential oils that are carefully selected for their healing properties.
Safe and Effective: The supplement is free from harmful chemicals, artificial additives, and preservatives, making it a safe alternative to traditional pain relievers.
Fast-Acting Relief: Nutriherbs Joint Pain Oil provides quick relief from pain and inflammation, allowing you to regain mobility and comfort without delay.
Trusted Brand: Nutriherbs is known for its commitment to quality and customer satisfaction, ensuring that each product is effective and reliable.
Final Thoughts
If joint pain is affecting your daily life, Nutriherbs Joint Pain Oil supplements can provide the relief you need. With a potent combination of natural ingredients like eucalyptus, wintergreen, turmeric, and ginger oils, this supplement works to reduce inflammation, alleviate pain, and support long-term joint health. Whether you’re dealing with arthritis, injury, or general joint discomfort, Nutriherbs Joint Pain Oil offers a natural, safe, and effective solution.
Link - https://www.flipkart.com/nutriherbs-joint-pain-relief-oil-knee-back-pain-support-flexibility-100-ml-liquid/p/itm8807801b6c917
#joint pain oil#ayurvedic oil for joint pain#joint pain relief oil#oil for joint pain#pain relief oil
0 notes
Text
What Are The Benefits Of Using Nylon Yarn In Textiles And Fashion?

Nylon yarn is one of the most popular synthetic fibers used in the textile and fashion industries due to its remarkable qualities and versatility. First developed in the 1930s, nylon yarn has continued to evolve, providing numerous benefits that make it a preferred choice for a wide range of applications, from everyday garments to high-performance fabrics. In this article, we will explore the many advantages of using nylon yarn in textiles and fashion.
1. Strength and Durability
One of the most prominent features of nylon yarn is its exceptional strength. It is one of the strongest synthetic fibers, which makes it highly resistant to wear and tear. Nylon yarn can withstand heavy use, making it ideal for products that need to endure daily stress, such as sportswear, stockings, and outdoor gear.
Key Benefits: 1. Resistant to abrasion 2. Durable and long-lasting 3. Ideal for high-stress fabrics like upholstery, carpets, and activewear
This superior strength also means that nylon yarn is less likely to stretch or break under pressure, which enhances the longevity of the fabrics made from it. Whether used in fine hosiery or durable outdoor fabrics, nylon yarn can maintain its integrity over time, providing consumers with products that stand up to frequent wear.
2. Elasticity and Stretchability
Nylon yarn has excellent elasticity, allowing it to stretch and return to its original shape without losing its form. This makes it an ideal material for garments that require flexibility and comfort. For example, nylon yarn is often blended with other fibers to create fabrics that stretch, such as in leggings, swimwear, and activewear.
Key Benefits: 1. Excellent stretchability without losing shape 2. Ideal for form-fitting garments 3. Offers comfort and flexibility in clothing
The ability to stretch and retain its shape also makes nylon yarn a great choice for products like socks, tights, and performance fabrics, which need to adapt to the body’s movements while maintaining a snug fit. This property contributes to the overall comfort of nylon yarn-based textiles, enhancing their usability in both fashion and functionality.
3. Lightweight and Soft Texture
Despite its strength, nylon yarn is relatively lightweight, which makes it a popular choice for designing light, breathable fabrics. This characteristic makes nylon yarn suitable for a wide range of fashion products, from summer garments to scarves and lightweight jackets. Additionally, nylon’s smooth texture gives fabrics a soft, luxurious feel.
Key Benefits: 1. Soft and comfortable against the skin 2. Light and breathable, making it suitable for warm weather clothing 3. Versatile for use in different fashion designs
The lightweight nature of nylon yarn allows designers to create comfortable, non-bulky clothing while still maintaining durability. For instance, nylon yarn is commonly used in the production of soft, lightweight scarves, hosiery, and loungewear, where both comfort and style are essential.
4. Moisture-Wicking and Quick-Drying
One of the standout qualities of nylon yarn is its ability to wick away moisture. It naturally pulls moisture from the skin and disperses it across the surface of the fabric, helping to keep the wearer dry. This property makes it especially useful for activewear, workout clothing, and swimwear.
Key Benefits: 1. Moisture-wicking, keeping the body dry during physical activity 2. Quick-drying, preventing discomfort from wet fabrics 3.Ideal for sportswear and outerwear
Nylon yarn is often used in garments like sports bras, running shoes, and athletic pants, where moisture control is crucial. Its quick-drying capabilities also make it an excellent choice for products like swimwear, as it dries faster than many other fabrics, allowing wearers to feel comfortable even after leaving the water.
5. Resistant to Stains and Mildew
Nylon is naturally resistant to stains and mildew, which makes it an excellent choice for fabrics that need to maintain their appearance over time. Nylon yarn does not absorb moisture as easily as natural fibers like cotton, which helps prevent the growth of mildew and mold, particularly in humid environments. This quality also contributes to its easy maintenance.
Key Benefits: 1. Resistant to mildew, mold, and odors 2. Stain-resistant and easy to clean 3. Great for travel or outdoor wear
The resistance to staining and mildew makes nylon yarn a popular choice for outdoor apparel, backpacks, tents, and luggage, as well as indoor upholstery. Fabrics made from nylon yarn require less frequent washing and are more resistant to unpleasant odors, ensuring that they stay fresh longer.
6. Affordable and Easy to Work With
Compared to natural fibers, nylon yarn is relatively affordable and easy to work with. It is less expensive than fibers like silk or wool, making it a cost-effective option for both manufacturers and consumers. Additionally, nylon yarn can be easily blended with other fibers to enhance specific qualities, such as elasticity or texture.
Key Benefits: 1. More affordable than many natural fibers 2. Can be easily blended with other materials for customized properties 3. Ideal for mass production of textiles
This cost-effectiveness, combined with its ease of processing, allows nylon yarn to be used in a wide range of textile applications, from high-end fashion to mass-market products. Whether used alone or in combination with other materials, nylon yarn offers excellent value for money, making it accessible for a wide range of consumers.
Conclusion
Nylon yarn has become a staple in the textile and fashion industries due to its numerous advantages. From its strength and durability to its elasticity, lightweight texture, and resistance to stains, nylon provides unmatched benefits for a variety of applications. Whether used in activewear, swimwear, accessories, or home furnishings, nylon yarn continues to be a versatile and reliable material for designers and manufacturers. Its combination of performance and aesthetic qualities makes it a go-to choice for both functional and fashionable textiles.
0 notes
Photo

Understanding Rotator Cuff Injuries and the Benefits of Class IV Laser Therapy Hey there! If you’ve ever dealt with a rotator cuff injury, you know how debilitating shoulder pain can be. It can impact everything from lifting groceries to throwing a ball. Traditional treatments can help, but there's an advanced option that’s making waves: Class IV laser therapy. Today, we’ll dive into what rotator cuff injuries are and how Class IV laser therapy can provide significant relief, especially if you’re in East Brunswick, NJ. What is a Rotator Cuff Injury? Your rotator cuff is a group of muscles and tendons that stabilize the shoulder and enable a wide range of movements. Injuries to this area are common, especially among athletes and those involved in repetitive overhead activities. Rotator cuff injuries can include: Tendinitis: Inflammation of the tendons. Bursitis: Inflammation of the bursa, a fluid-filled sac that cushions the tendons. Tears: Partial or complete tears of the tendons. Symptoms often include a dull ache deep in the shoulder, weakness, and difficulty lifting the arm. These symptoms can significantly limit your daily activities and overall quality of life. Traditional Treatments for Rotator Cuff Injuries Conventional treatments for rotator cuff injuries typically include: Rest and Ice: Reducing activity and applying ice to minimize inflammation. Physical Therapy: Exercises to strengthen the shoulder muscles and improve flexibility. Medications: Nonsteroidal anti-inflammatory drugs (NSAIDs) to reduce pain and swelling. Corticosteroid Injections: To reduce inflammation. Surgery: In severe cases, to repair torn tendons. While these treatments can be effective, they often require a long recovery time and may not fully address the pain and inflammation. This is where Class IV laser therapy steps in. The Role of Class IV Laser Therapy in Treating Rotator Cuff Injuries Class IV laser therapy, also known as photobiomodulation, is a non-invasive treatment that uses high-powered lasers to deliver therapeutic wavelengths of light deep into the tissues. This process stimulates cellular activity, promoting healing through several mechanisms: Increased Circulation: Enhancing blood flow to deliver oxygen and nutrients necessary for tissue repair. Reduced Inflammation: Decreasing swelling and inflammation, alleviating pressure on the affected area. Accelerated Tissue Repair: Stimulating cellular activity to speed up the healing process. Pain Relief: Promoting the release of endorphins, the body’s natural painkillers. Benefits of Class IV Laser Therapy for Rotator Cuff Injuries 1. Non-Invasive and Painless Class IV laser therapy is a non-invasive option, meaning no incisions or injections are required. Patients typically feel only a mild warming sensation during the treatment, making it a comfortable and pain-free experience. 2. Quick Treatment Sessions Each session is relatively short, usually lasting between 5 to 15 minutes, depending on the area being treated. This makes it easy to fit into a busy schedule. 3. Rapid Relief and Recovery Many patients experience noticeable pain relief after just one or two sessions. The cumulative effects of the treatment lead to accelerated healing and long-term relief from rotator cuff symptoms. 4. Reduced Dependence on Medications With its pain-relieving and anti-inflammatory effects, Class IV laser therapy can reduce the need for medications, minimizing the risk of side effects associated with long-term NSAID use. 5. Improved Mobility and Quality of Life By addressing the underlying inflammation and promoting tissue repair, Class IV laser therapy helps restore mobility and function, allowing patients to return to their normal activities with less discomfort. Why Choose Rotator Cuff Laser Relief East Brunswick NJ? If you’re in East Brunswick, NJ, you have access to some of the best laser therapy available. Rotator Cuff Laser Relief East Brunswick NJ offers top-notch Class IV la
0 notes
Text
Seamless Transitions: How Turf Flooring Unites Sports and Office Spaces

Introduction
In today's fast-paced world, creating versatile spaces that can serve multiple functions is becoming increasingly important. One innovative solution that is gaining popularity is turf flooring. Known primarily for its use in sports fields, turf flooring is now being recognized for its versatility and aesthetic appeal in office environments as well. This blog will explore how innovative turf design and seamless flooring solutions are uniting sports and office spaces, offering a unique blend of functionality and style.
The Rise of Turf Flooring
Traditionally, turf has been associated with athletic fields, providing a durable and low-maintenance surface for sports activities. However, advancements in turf technology have made it a viable option for indoor applications. The benefits of turf flooring extend beyond its initial purpose, making it an attractive choice for modern offices seeking to create dynamic and engaging work environments.
Innovative Turf Design
Innovative turf design has revolutionized the way we perceive and utilize flooring solutions. Today's turf options come in various textures, colors, and styles, allowing for customization that suits both athletic and professional settings. Here are some key features of innovative turf design:
Realistic Appearance: Modern turf mimics the look and feel of natural grass, creating a visually appealing and comfortable surface.
Durability: Designed to withstand heavy use, turf flooring is resilient and long-lasting, making it ideal for high-traffic areas.
Low Maintenance: Unlike natural grass, turf requires minimal upkeep, saving time and resources on maintenance.
Eco-Friendly: Many turf options are made from recycled materials, contributing to sustainable building practices.
Seamless Flooring Solutions
One of the standout benefits of turf flooring is its ability to create seamless transitions between different areas within a space. Seamless flooring solutions are essential for spaces that serve multiple purposes, such as multi-sport facilities and modern offices. Here’s how turf flooring achieves this:
Unified Aesthetic: Turf flooring provides a consistent look across different zones, whether it’s an indoor soccer field or an office break area. This creates a cohesive environment that is both functional and visually pleasing.
Comfort and Safety: Turf offers a cushioned surface that reduces the risk of injuries in sports settings and provides comfort underfoot in office areas.
Versatility: Turf can be used in various applications, from workout areas and recreational zones to collaborative workspaces and conference rooms.
Easy Installation: Turf flooring is relatively easy to install, and its modular nature allows for quick adjustments and reconfigurations as needed.
Benefits of Turf in Office Spaces
Integrating turf flooring into office environments offers numerous benefits that enhance employee well-being and productivity. Here’s why turf is a game-changer for modern offices:
Basophilic Design: Incorporating natural elements like turf into office design promotes a connection to nature, which has been shown to reduce stress and increase productivity.
Acoustic Control: Turf helps absorb sound, reducing noise levels in open office layouts and creating a quieter, more focused work environment.
Creativity and Collaboration: The unique look and feel of turf can inspire creativity and encourage collaboration among team members.
Flexibility: Turf flooring can easily accommodate changes in office layout, supporting the evolving needs of dynamic workspaces.
Practical Applications
The practical applications of turf flooring in sports and office spaces are vast. Here are a few examples of how turf can be utilized:
Indoor Sports Facilities: Turf provides a durable and safe surface for activities like soccer, baseball, and agility training.
Office Recreational Areas: Create a relaxing break area or an indoor mini-golf course to promote employee wellness and engagement.
Conference and Meeting Rooms: Use turf to design unique, comfortable meeting spaces that foster creativity and out-of-the-box thinking.
Event Spaces: Turf flooring is perfect for transforming spaces for corporate events, trade shows, and team-building activities.
Conclusion
Turf flooring is no longer confined to sports fields; its innovative design and seamless flooring solutions make it an excellent choice for modern office environments as well. By uniting the functionality of athletic spaces with the aesthetic appeal of professional settings, turf flooring offers a versatile and sustainable option for creating dynamic, multi-use spaces. Whether you're looking to enhance a sports facility or redesign your office, turf flooring provides the perfect blend of durability, comfort, and style.
0 notes
Text
Allbirds vs Cole Haan: A Comprehensive Footwear Face-off

In the world of footwear, two brands have been making waves with their innovative approaches to design and sustainability: Allbirds vs Cole Haan. While Allbirds has carved a niche for itself with eco-friendly materials and a commitment to comfort, Cole Haan brings a legacy of quality and a recent foray into athletic shoes. Let’s dive into a detailed comparison of these two brands to help you decide which might be the right fit for your feet. Join Now
History and Brand Philosophy

Allbirds, a relatively new player in the market, was founded in 2014 with a mission to create environmentally friendly footwear. The brand has quickly gained popularity for its simple, comfortable, and sustainable shoes made from natural materials like merino wool and eucalyptus tree fiber.

Cole Haan, on the other hand, has a rich history dating back to 1928. Known for its timeless style and craftsmanship, Cole Haan has expanded its range to include more casual and athletic options, adapting to the modern consumer’s needs without compromising on quality.
Material and Sustainability
Allbirds stands out for its use of eco-friendly materials. The uppers of their shoes are crafted from renewable resources such as eucalyptus trees or merino wool, offering breathability and comfort. The midsoles are made from sugarcane-based SweetFoam™ or eco-friendly foam, aligning with the brand’s sustainability ethos. Cole Haan offers a variety of materials across its product lines. Their athletic shoes feature breathable mesh tongues and water-resistant uppers, providing durability and protection against the elements. The foam-based midsoles ensure comfort during extended wear.
Allbirds vs Cole Haan: Which Brand Offers the Best Comfort, Durability, and Style? 2024
Comfort and Fit
When it comes to comfort, both brands excel. Allbirds’ sneakers, like the Tree Dasher and Wool Flyer, are known for their lightweight, flexible, and cushioned design, making them ideal for everyday wear and light exercise. Cole Haan’s shoes are equally comfortable, with knit uppers that allow for proper ventilation and easy on-and-off wear. Their shoes are designed with a focus on comfort, making them suitable for people who are on their feet for long periods.
Style and Versatility
Allbirds offers a minimalist aesthetic that appeals to those who prefer a clean and understated look. Their shoes are versatile enough to pair with a variety of outfits, from casual to smart-casual. Cole Haan provides a broader range of styles, including dress shoes, boots, and now athletic shoes. Their designs blend traditional craftsmanship with modern elements, catering to a wider audience looking for both classic and contemporary options.
Durability and Maintenance
In terms of durability, Allbirds sneakers are designed for frequent wear and can last around two years with proper care. They are also low-maintenance, which is a bonus for those with a busy lifestyle. Cole Haan’s footwear is known for its longevity, with shoes lasting 3-4 years on average. The higher price point reflects the quality and durability of their products.
Price Point
Allbirds’ pricing is competitive, with most models ranging from $110 to $170. This makes them an accessible option for those looking for sustainable and comfortable footwear without breaking the bank. Cole Haan’s prices start at $140 and can go up to $200, especially for specialized options like golf shoes. While slightly more expensive, the brand’s reputation for quality and durability justifies the investment.
Conclusion
Choosing between Allbirds and Cole Haan ultimately comes down to personal preference and priorities. If sustainability and comfort are at the top of your list, Allbirds is a clear choice. However, if you’re looking for a blend of traditional style, versatility, and durability, Cole Haan might be the way to go. Both brands offer excellent performance and have carved out their own unique spaces in the footwear industry. Whether you’re an eco-conscious consumer or a fan of classic craftsmanship, there’s something for everyone in the Allbirds and Cole Haan collections. Feel free to expand upon this comparison with your insights or customer testimonials to reach the desired word count for your blog article. Remember to highlight the unique selling points of each brand to provide value to your readers. Happy writing! Read the full article
#allbirdssoles#allbirds#allbirdscolehaanwear-with-forhim#allbirdsgolfshoes#allbirdsjacket#allbirdsreview#allbirdsshirt#allbirdsshoes#allbirdssolecleaning#allbirdssolewashing#allbirdswoolrunners#bettercolehaanzerogrands#cleanallbirds#cleanallbirdssole#cleansolesallbirds#colehaan#colehaanalternatives#colehaanpromocode#colehaanreview#kidsallbirds#washallbirds#zerograndcolehaan
0 notes
Text
Embracing Excellence: The Allure and Performance of Maple Wood Court Flooring
In the realm of sports flooring, maple wood stands as a symbol of excellence, revered for its unparalleled performance and timeless elegance. Among its many applications, maple wood court flooring holds a special place, particularly in sports like basketball and badminton. In this article, we delve into the characteristics, benefits, and enduring appeal of maple wood court flooring.

Unmatched Durability and Resilience: Maple wood is renowned for its exceptional durability and resilience, making it an ideal choice for sports flooring. Its dense grain structure and tight, uniform fibers lend strength and stability to the surface, ensuring that it can withstand the rigors of intense athletic activities. Whether subjected to the pounding of basketball shoes or the rapid movements of badminton players, maple wood flooring maintains its integrity, delivering consistent performance year after year.
Enhanced Shock Absorption: One of the standout features of maple wood court flooring is its superior shock absorption properties. The natural flexibility and elasticity of maple wood help dissipate impact forces, reducing strain on athletes’ joints and muscles. This attribute is particularly crucial in sports like basketball, where players engage in frequent jumping and landing. By providing a forgiving surface, maple wood flooring minimizes the risk of injuries and promotes player safety and comfort.
Optimal Ball Response and Consistency: Maple wood’s smooth surface and uniform grain structure contribute to optimal ball response and consistency on the court. Basketballs bounce predictably and accurately, allowing players to execute precise passes, shots, and dribbles with confidence. In badminton, shuttlecocks glide effortlessly across the surface, ensuring fair and consistent gameplay. The reliable performance of maple wood flooring enhances the overall quality of the sporting experience, fostering fair competition and skill development.
Exceptional Aesthetic Appeal: Beyond its functional attributes, maple wood court flooring exudes a timeless elegance and aesthetic appeal. The rich, natural hues of maple wood add warmth and sophistication to any sports facility, creating a welcoming atmosphere for players and spectators alike. Whether in a local gymnasium or a professional arena, maple wood flooring enhances the visual appeal of the space, elevating the overall ambiance and prestige of the venue.
Sustainability and Environmental Responsibility: In addition to its performance and aesthetic qualities, maple wood court flooring is celebrated for its sustainability and environmental responsibility. Maple trees are a rapidly renewable resource, with relatively short growth cycles compared to other hardwood species. Furthermore, responsible forestry practices ensure that maple wood is harvested in a manner that promotes forest health and biodiversity, minimizing its ecological footprint.
Conclusion: Maple wood court flooring embodies a perfect marriage of performance, beauty, and sustainability. Its unmatched durability, shock absorption, ball response, and aesthetic appeal make it the preferred choice for sports facilities around the world. Whether in basketball arenas, badminton courts, or multipurpose gyms, maple wood flooring sets the standard for excellence, enhancing the sporting experience and inspiring athletes to reach new heights of achievement.
0 notes