#and fixing whatever was wrong with the way the video saved/trimmed
Explore tagged Tumblr posts
Text
Annoying Things the 141 Do
Price
Never cleans the sink well after he shaves. Every time you go in the bathroom after he’s trimmed his beard, it’s like walking into a crime scene of a hamster massacre
Always manages to load the dishwasher wrong (because, yes, there is a right way and a wrong way to do it, John)
Asks you to wait for him to get home so you can watch your shows together, but then as soon as you start the first episode, he falls asleep beside you
Smokes his cigars inside sometimes. I don’t care that you sprayed air freshener afterwards, sir. Now the whole house smells like spring meadow and shit!
Is incapable of closing the door behind himself?? At least, that appears to be the case since he’s always leaving your door wide open even though you ask him to shut it when he goes
Doesn’t like throwing things out because he’ll “find a use for it one day”. Even if that day ever does come, I think he has a better chance of finding Atlantis than finding that scrap piece of wood he saved four years ago
Ghost
Turns the TV on and then just… walks away??? And if you try to change it to something else, he grumbles “I was watchin’ tha’” when he comes back
Drinks milk/juice/etc. straight out of the carton. Mr Simon “Patient Zero” Riley might not see the problem with this, but I think the rest of us would agree that is diabolical behavior
Leaves his wet towel on the floor after he showers even though the towel rack is right? there?
Hates asking for help even when he has no clue what he’s doing. Like, sure, I get wanting to fix things yourself. However, I’d rather spend $100 on a simple repair than $1000 on a full replacement after he breaks the thing even more
Puts his phone calls on speaker whenever possible. While this can have its merits sometimes (you get firsthand news of Gaz’s engagement!), most of the time it feels like a nuisance (do you really need to hear Soap talk about his hemorrhoids?)
MANSPREADERRRR! This man cannot sit like a civilized being to save his life. He claims he sits like that because his balls need to breathe, and to that I say good luck trying to breathe after I karate chop you in the throat :))))
Soap
Cuts his toenails in bed, which wouldn’t necessarily be an issue if he didn’t accidentally leave one or two rogue clippings that stab you in the side later when you’re trying to get comfortable
Forgets to put the toilet seat down when he gets up in the middle of the night to pee – that or he pisses all over the seat in the dark. Either way, prepare to have wet cheeks the next time you sit on the toilet
Whenever he doesn’t feel like doing the laundry, he just buys a new set of whatever’s dirty (that’s how he ended up with 100 pairs of socks and 200 pairs of underwear)
Talks nonstop through every show/movie you try to watch. Good luck getting more than five minutes of uninterrupted runtime next to this yapper
Apparently, doesn’t understand what “one bite” means? Whenever he asks you for a bite of your food, he always ends up taking five or six
Also, apparently doesn’t know how to chew with his mouth closed? Like, I’m glad you’re enjoying your meal, Johnny, but can you enjoy it without speckling it all over the table and my face?
Gaz
Two words: bathroom hog. I hope you don’t like taking hot showers or having more than a 6x6 inch square of counter space for your stuff, because after Kyle’s done with his 30-step beauty routine, there’s little of either left
Never knows what he wants to eat for dinner, and no matter what you suggest, he never thinks it sounds good
Has the gall to chastise you for your screen time even though he’s just as bad as you, if not worse (because you being on your phone before bed is so much worse than him playing video games for nine hours straight, right?)
Rests his feet on the couch/bed/coffee table while wearing shoes. It doesn’t matter if they’re brand new or beaten up; take your damn shoes off the furniture, sir!
Never writes down the shopping list because he’ll “remember everything”. (Newsflash: he does not remember everything, which means cue taking a second trip to the store)
Watches one documentary and thinks he’s an expert on the subject. You can have studied a thing for years, can present him with a bunch of rock solid facts and reputable sources, and he’ll hit you with a “Well, actually ☝️🤓” and then proceed to give the most nonsensical take ever
#john price x reader#captain john price x reader#captain price x reader#simon riley x reader#simon ghost riley x reader#ghost x reader#john mactavish x reader#john soap mactavish x reader#soap x reader#kyle garrick x reader#kyle gaz garrick x reader#gaz x reader#john price#simon riley#john mactavish#kyle garrick#tf 141 x reader#task force 141 x reader#cod x reader#call of duty x reader#cod mw2#call of duty#modern warfare 2
750 notes
·
View notes
Text
s6 episode 5 thoughts
we are BACK tonight to see how scully can save the day, as mulder is still stuck in another guy’s body!!! which is deeply stressful for everyone involved, myself included.
i hope that whatever it is you have to do to fix this problem, it isn’t too painful.
if anyone can figure out how to solve a time warp, it’s gonna be scully, so he should be in good hands. idgaf about morris though. after he gets back into his own body, perhaps we should consider tarring and feathering him.
post-episode thoughts: the ending of this episode raises a great question- if my forgiveness of mulder was based on him atoning for his crimes, where does that leave us now? much to ponder...
and will how will his apartment look the next time we see it?!
back to the recap of last episode. we begin with the scene of him yelling and screaming that morris isn’t him!!
ooo! we get to see mulder’s info in the x files!!!
he was born in chilmark, and his mother’s name is “teena kuipers”. huh; when his mother’s name was mentioned in kitsunegari, the subtitles had it spelled as “tina”. this is interesting, but probably means nothing. quick question: which way do the fans spell it? i need to not make a fool of myself
he lives in virginia!!! in alexandria!! i don’t know where that is, so that doesn’t really mean anything anyway.
he was born on october 13th, which i find a very appropriately spooky day.
oh, we also see that kersh’s first name is alvin. that is interesting. and he’s on general assignment.
morris is narrating: “once upon a time, there was a man with the improbable name of fox mulder” yeah <3
NOOO, you leave samantha out of this you morris son of a bitch!!
is this actually supposed to be canon home video footage of mulder playing with samantha, pretending to be spock as a kid??? oh. that’s… adorable. aww. oh. baby mulder... my heart.
morris is talking about mulder's hard work that doesn’t make up for his sister, and we see all these awards in his apartment!! an award for public service from the justice department, and another one for outstanding service with the FBI.
but morris plans to turn mulder’s life around…….
i need to spray this man with a water bottle AT BEST. pepper spray more realistically, though.
wait, it looked like morris was lurking about the basement office. but i thought the basement office was spender’s now!!! all of the papers and newspaper clippings had been taken down! we saw the office in episode 3, and it had spender’s stuff in there instead- definitely not any of mulder’s awards or his diploma or anything! unless he moved all the stuff into his apartment? but how could he have moved it into his apartment if all that stuff was in his office when it was set on fire and presumably went down with the x files?!
hmm. well. anyway.
intro time
maybe they just permanently trimmed down the intro. still feels wrong.
mulder-as-morris is still screaming as he is being taken away. i’ve always loved how he screams “scully” with reckless abandon, like some sort of coyote. it’s good stuff.
scully is deeply suspicious. and morris-as-mulder calls her “dana” again, which remains diabolical.
mulder-as-morris is being brought to a jail cell! who is in here with him?! ohhh, it’s captain mcdonough in the body of mrs. chee! mulder obviously doesn’t know what is going on, and pisses the captain off by calling him “ma’am”. poor guy. can’t catch a break. he just wanted to make sure his prison partner who outwardly LOOKS like an elderly woman was okay :(
morris-as-mulder is back to playing virtual golf on the clock. DISGUSTING! i actually support playing video games on the computer, just not on the taxpayer's dime when there are alien crimes that need to be solved.
kersh told scully that she was "willful" and "not a team player", and now she is being suspended for two weeks without pay!! nooo!! well, at least she can get away from this morris freak. she packs up all her stuff to get out of there.
NOOOO... morris-as-mulder calls her “dana” again, and asks if a home-cooked meal at his place would ease the pain of suspension… she smiles, and hopefully this is not an agreement. we all know mulder cannot cook! at least, i don’t THINK he can. maybe he learned some relevant life skills in between seasons or when the camera wasn't rolling.
back at the jail cell, captain mcdonough is trying to explain what happened to land him in this new body, which leads to this amazing mulder line: “hey, grandma top gun, will you shut the hell up?!”
mulder-as-morris is then summoned before general wegman. they want to know why he gave the FBI false info. ohhh, he is improv-ing!!! and doing quite a good job at it!!!! he convinces them he has the real flight data recorder and will bring it back, and he approached scully to try and figure out who the snitch from inside area 51 was. you can achieve so much by saying things confidently.
oooooo, the other guy got in biiiiig trouble!
morris-as-mulder is arriving at mulder’s apartment with groceries and “mood lighting for the bedroom” (GAG!) i hope scully has him at gunpoint in there…
LMAO, he is surprised to learn that there is, in fact, no bedroom. you know what? in this situation, that is probably a good thing.
he finds a closet with lots of magazines shoved in it, at least some of them pornographic, and a singular bowling pin?? wow. morris-as-mulder proclaims that mulder hasn’t been laid in 10 years. ace icon.
(the bowling pin is still sending me)
oh no, mulder-as-morris is returning to his “wife” with all of his stuff still tossed on the curb!! she still thinks he was cheating on her with scully!!!
outside, someone is sneaking up on him in some generic-looking car…
he tries to compliment his “daughter’s” nose ring, for SOME REASON thinking it is a good idea to poke her fresh new piercing, and she hits him with the “as if!” <- LMAOOO oh god. he is truly being tested.
and the son says mom is taking out a restraining order on him. well. i guess that solves the problem of dealing with his "children".
NOOOO, HIS NOT-REALLY-WIFE CALLS HER “SPECIAL TRAMP DANA SCULLY” <- THAT IS EVIL!!!!! do not bully her 😟 but yes i did laugh <3
he’s trying to explain that he is actually a guy named mulder and he has no idea who she is, but she writes it off as a midlife crisis.
and when he points out that people outside the window are watching him, she says he needs to accept who he is, however repulsive that may be. well. this does not help.
oh no, scully is rolling up to mulder’s place!!! but of course, it is truly morris in there!! and she’s getting shown around the brand new space. oh, he is far too touchy with her. BUT he did get mulder a bed. which could be seen as an improvement.
he leads her to the bed. and she’s laying on it…. and it’s vibrating?? or something??? hey guys. is this the magic fingers from bad blood all over again.
he comes back with champagne… oh god, he’s singing about getting it on…. we need to put this man DOWN.
“you know what would really be fun?” (she pulls out handcuffs) “oh yeah” <- oh lord. i know she’s cooking up a scheme.
LMAOOO SHE GETS HIM TO HANDCUFF HIMSELF RIGHT TO THE BED AND PULLS OUT HER GUN I’M HOWLINGGGG
and he does it fully clothed, too. i wonder what his plan was...
“you’re not mulder” “what? baby-“ “baby me and you’ll be peeing from a catheter” <- LMAOOOOOOOOOO i’ve seen that line in screenshots before and now i know the context
god, he really fell for that. terrible! no brains on this fellow!!
okay, but now i want to know what REAL mulder is going to do with this huge, fancy bed in his apartment.
i love when scully pulls out her gun!! it makes me clap my hands with glee!
morris-as-mulder says that he considers this a gift from god. he doesn’t want to go back to his wife and kids and job. and scully says she’ll shoot him, “baby”. which is a level of pettiness i admire.
GOD, he changed the message on mulder's phone to say he’s entertaining a very special guess… we need to spray this man with pesticides. but the mysterious area 51 source called!!
mulder-as-morris is sitting by the window, watching the people outside watch him. LMAO, he convinces his "wife" to take him somewhere. oooo, where will they go....?
scully has driven morris-as-mulder down to nevada to meet with the source!! she threatens to shoot him again. and just know that her aim is GOOD, bitch.
mulder-as-morris is here, too!! but morris is meeting with the source (who happens to be general wegman, but i was mostly too distracted by his buffalo bills hat to realize it was a character we had seen before). obviously, due to being morris, he is being an idiot and loudly saying “you’re the guy that took down a UFO?” yeah. wow. how has he made it this far in life? good lord. stop acting so ridiculous with another guy's face on.
mulder-as-morris sneaks out to find scully!!! a reunion!!! i want tears.
but oh nooooo…. his "wife" finds him in the car with her!!!!
morris-as-mulder walks out with the thing he came for from the source, but not before seeing his crying wife. and he dips.
damn. i genuinely thought he was going to feel bad and comfort her there. i guess not.
and poor mulder gets a drink thrown on him by her. they are both suffering in unique ways.
oh shit!!! mulder-as-morris runs into morris-as-him in the bathroom. and they’re both hiding!!!
scully came inside looking for them…. oh shit, the source was general wegman?? OHHH, they did a bait and switch!!! scully took the flight data recorder from the big bag, and mulder is simply holding lots of beer!!!!
OH MY GOD, jump to the lone gunmen??? frohike is cooking for them!!! and he has an apron and a bandana, LMAOOOOO. but domestic bliss is over, because scully is here to interrupt!!! with morris-as-mulder. he’s wandering around their studio as scully asks them to figure out wtf the flight data recorder says.
scully tries and explains that this is not mulder in the room with them.
MORRIS KNOWS WHO THE LONE GUNMEN ARE???? he says that they believe all the stuff his people make up!! “there is no saddam hussein” <- LMAO??? he’s just some random guy?? wow. wildest in-universe reveal yet.
(fascinating implications for the lone gunmen's journalistic abilities after morris claimed that the stories they pick up are the ones men like him spread. makes you wonder how much of what they are publishing is legit, how much is propaganda, and how much are weird tabloid and internet stories of bat boys and the like. or perhaps that was just a silly throwaway line from morris, and there is no real meaning behind it at all. hmm....)
frohike nearly throws hands, but scully pulls him back. i would have supported violence, but we must not injure mulder's body so that when his spirit is returned to it, it will be a smooth transition.
back in nevada, mulder-as-morris is here with general wegman. and he knows that he is really mulder!!! but sadly, real morris also knows that wegman is the snitch who reached out to him. he sabotaged the craft so that mulder could see it and so he could ask if aliens are real. ohhh…. this makes me sad. they could have queened out together in another lifetime. hopefully wegman can flee to somewhere safe.
the gunmen crack the code in the flight data recorder!! it’s regular flight data with some extra stuff. morris-as-mulder is once again picking a fight with frohike, but how do we get their bodies back?!
abrupt jump. why are these people kissing out in area 51? i don’t want to see all that. oh no. are they going to get body swapped, too???
NO!!! they got melted together!!!!!
well. um. okay.
mulder-as-morris is waiting somewhere. scully is here!!! and so is real morris!!!!
oh no... another mulder and scully reunion, but this time it seems sad: “you don’t look too happy. don’t tell me i’m going to have to put two kids through school” “that is you in there mulder, isn’t it?” <- OHHH NOOO…. how are they going to fix this???? just stand out in the desert for a bit until the thing comes back!!!
she can barely look at him as she tells him she doesn’t know what to do, because the schedule of the time warp is so random.
and back in DC, morris-as-mulder has become kersh’s new golden boy; “that son of a bitch confesses to kersh even more than i do to my priest”
a little gallows humor. because scully is out of the bureau!!! she was relieved from her position!! WHAT!!!
“no. you can explain it to them like you explained it to me. you have the data. you can make them understand. you can get your job back” <- OHHH, he is so convinced that they’ll believe her….. even if it seems ludicrous…. he has that Hope to him. that kind with claws.
“i’d kiss you if you weren’t so damn ugly” OHHHH MY HEART……..
“if i shoot him, is that murder, or...?” “neither, if i do it first” <-AWWWW, this is so sad…. imagine losing your best friend to someone else forever and ever, and then knowing he would have to live a random guy's life... oh. it would make me cry!!!
she grabs his arm and walks away before they both cry, and then he presents her with sunflower seeds to remember him by.
(GOD. THIS KILLED ME)
he watches them drive away…..
but the guy whose friends who got melted together stops the guys from area 51 who work for morris!!!
the couple who were formerly melted into one are fine now, though?? somehow?? it seems they were just hooking up?? area 51 guy says he believes him.
poor scully is driving home with morris. he calls her “DANES”??? EVIL!!!! 10,000 years in jail.
he offers to put a word in with kersh to get her job back… does he truly have this power?? i suppose it is a somewhat kind gesture, but it would mean working with morris for a living, and i think she would rather just go be a doctor somewhere.
WHAT THE HELL? the gas station that was burned down last episode is back??? and the attendant who was shot doesn’t remember anything???
back in area 51, they’re bringing captain mcdonough to mrs. chee… is there a solution to this whole situation???
morris' wife is screaming at scully as mulder-as-morris is being stopped by her!!! SCREAMING "HOMEWRECKER" AT SCULLY IS CRAAAAZY
morris approaches! is he going to be able to convince his wife that he is actually the one who is married to her???? even though he has some other dude's face??
he’s reciting facts about their wedding!!! and then their relationship!!! and he does convince her!!!!
she still deserves better than him, but i am glad she at least has accepted the truth and that mulder did not split their family apart forever
but- they have to get back to the highway where this went down right NOW!!!
the area 51 guys come to get mulder-as-morris because they think he is a traitor???? WE DO NOT HAVE TIME FOR THIS!!!
the other guy stops them in the road, though!!! he figured out how to get captain mcdonough and mrs. chee in the right bodies!! he didn't want to get in trouble- LMAO, that is such a real motivation. i understand.
so time will snap back?? and no one will remember this??
DID MORRIS SLAP SCULLY'S ASS AGAIN???? AND HE SAID "IT'S BEEN REAL?" oh, if i were mulder, i would have MAULED the guy. but maybe there isn't time for violence as the time warp is imminent.
and they go back to where we started last episode!!!! going to drive off after being stopped by morris and told to leave!!!
AND WHEN THEY GET BACK, KERSH DIDN’T EVEN NOTICE THEY WERE GONE!!! HOORAY!!!!
she tells him she's sad his source didn’t work out… oh :(
“hey, scully? i, uh, know it’s not your normal life, but… thanks for coming out there with me” <- OHHH STOP??? I’M GOING TO MELT
she says "you're welcome with a smile" and then hangs up. ohh... my heart <3
he’s entering his apartment… is there going to be a massive bed in there somehow that escaped the time loop…?
oh my gosh!!! she finds the weird coin from the gas station, and he finds his apartment totally redecorated!!!
AWW!!! we got the best ending: none of it happened!!!!!! oh, things brings me so much joy.
his apartment though, LMAOOO! i know he was losing his MIND!!!!! he checked outside to make sure it was the right room, and it was!!!
ah, so they have no memories from those horrible few days. this is for the best. because none of them were enjoyable!!! and morris can go back to his life with no interruptions!!
you know, i’m usually not into a story ending with a variation of “and it was all a dream”, but in this case, it was the best thing that could have happened.
oh, how lucky they are to be in the timeline that they are in… wow.
and this way, scully will never have to remember anything more than a roadtrip!!! no evil morris!!! thank god!!! i rejoice!!!
and mulder said thank you for coming with him :,) and she said you’re welcome. even though it’s not the normal life she wants. ohhh… i am having Feelings about this.
man. well. i am glad all things ended this way. although, i am sure mulder is not going to be pleased about all his stuff being gone!!!!
ah. i can relax now. at least for a few minutes. it's more enjoyable in retrospect when you know everyone makes it out alright.
so, despite my uncomfortability with morris as a whole and being at the edge of my seat because i thought there might be no escaping this sticky situation, it was an enjoyable set of episodes! shoutout to frohike for being a chef also
i see the next one is a christmas episode!!! oh, i wish i could have timed this whole thing a little better; i’m a month off from christmas. but i shall have to put myself in a jolly mood somehow. i look forward to it!
#this one took like 4 days to get posted because i kept coming home from work absolutely exhausted and not editing it LMAO#but at long last! here we are!#do we forgive mulder? imagine there is a poll here.#unfortunately i do believe his disrespect will get worse before it gets better so i'll just buckle in and prepare#scully <3 scully with a gun threatening violence <33#juni's x files liveblog#6x05#the x files#txf
21 notes
·
View notes
Text
someone sent in this ask and I spent literal hours putting together this tutorial but then it wouldn't let me post it and when I went back into my inbox the ask was gone?? good thing I copy and pasted it, so here it is in its own post

I'm not sure if this will work with programs other than photoshop, but this is how I do it. I know @shinobi-bacon has a tutorial here on how they do it which is pretty different from the way I do it, so if my tutorial is confusing maybe theirs will click with you better lmao. I stole the greenscreen idea from them anyway
SO FIRST, you want your villager on a green screen background. to do this, go to harv's island and use a custom pattern to make the walls and floors bright green. If the villager you're using has green in their design, you'll have to pick a different colour that isn't in their design, but for most villagers green is fine.
if your villager has every colour on them like pietro or stiches then rip you're gonna have to do some manual editing frame by frame. try to choose a colour that doesn't touch the edges of their silhouette too much in that case because it'll make life easier for you
so once you have them in green purgatory, record them doing their emote or whatever. I just use the built-in screen record function that the switch has. press and hold this button to record the last 30 seconds that your switch displayed:

next send that video to your computer and trim off the start of the video so it starts right before a recognizable part of the animation. for this emote I cut it off right before the blink. if you have a slow computer, you'll probably want to trim the end off too so the video is only a little bit longer than one full animation loop
(you can use the video editing software of your preference, I just use quick time player Edit -> Trim)
okay time for photoshop. go File -> Import -> Video Frames to Layers
for "range to import" select "from beginning to end" (or you could skip the last step about trimming the video and select a range here, but I find it kind of finicky), and make sure "make frame animation" is checked
once imported, if it doesn't pop up on it's own, go Window -> Timeline to get your animation at the bottom

click through those frames at the bottom until you find an easily recognizable frame (I chose the first frame where her eyes are closed) and delete all the frames before it. in the layers panel, the layer from the frame you've selected should be the only one turned on. delete all the layers below it
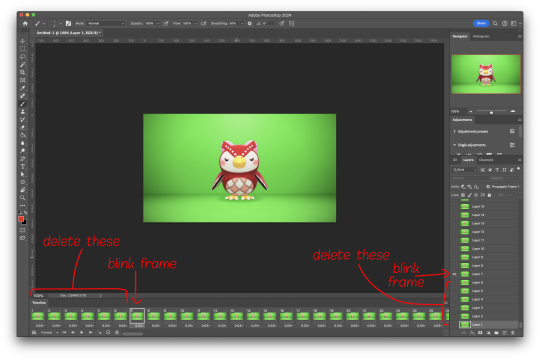
now go through the frames to find the next identical frame. this is where the animation loops. delete that frame and all the frames after it, as well as all of their corresponding layers (note in the picture, frame 121 is selected, and it's exactly the same as the frame from the start of the animation)

hit the play button on the bottom left to double check that it loops properly
next, make sure both THE FIRST FRAME AND BOTTOM LAYER are selected, and crop and reduce the image to your desired size. you can do this step later if you want, it's just that doing it now will reduce the load on your computer and make it run a bit faster. just as long as the first frame and bottom layer are selected, you can do this at any time
SAVE HERE because if you mess up this next part it's a pain to fix, but it's easy to quit and start over if need be
now it's time for my best friend the actions panel !! say hi actions panel !! (Window -> Actions). what the actions panel does is record your steps so you can quickly automate repetitive tasks.
in the actions panel, click the folder and name it whatever you want
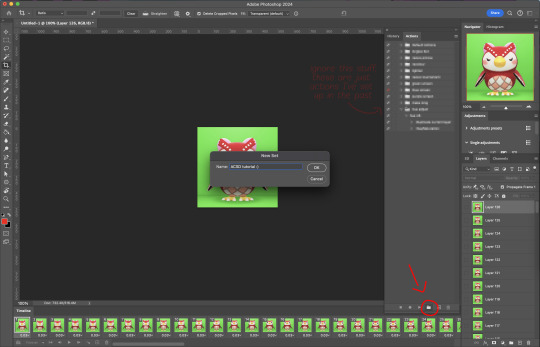
then click the little plus and name that whatever you want and hit record. You'll see the dot turn red to indicate that your actions are now being recorded
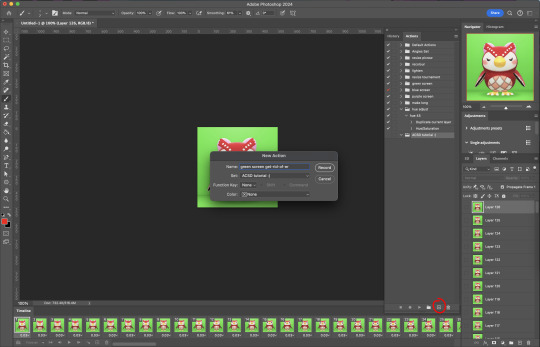
now with the BOTTOM LAYER AND FIRST FRAME selected (ignore that I have the wrong layer selected in the pictures, I fixed it after), go to Select -> Colour Range

click on a part of the canvas that would be green

shift+click on the rest of the green background and adjust the fuzziness until just the character's silhouette remains
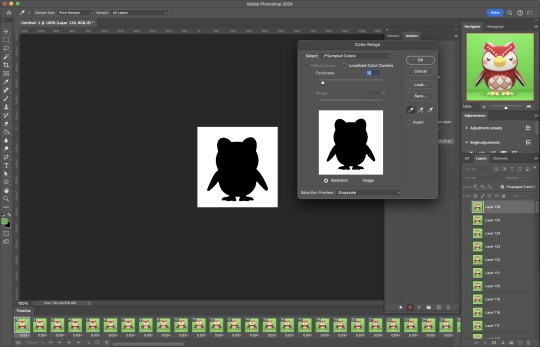
hit OK, now the background should be selected. go Select -> Inverse so that the character is selected, and click on layer mask.
click the next frame button (you MUST click the button, not the actual frame. you need the recording to recognize "go to next frame" and not "select frame 2"),
then keyboard shortcut option + ] to select the next layer up (again, you MUST use the shortcut so it knows to move up one layer and not just "select layer 2"),
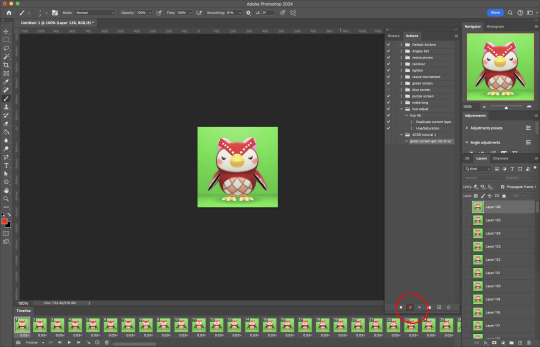
and then stop recording.
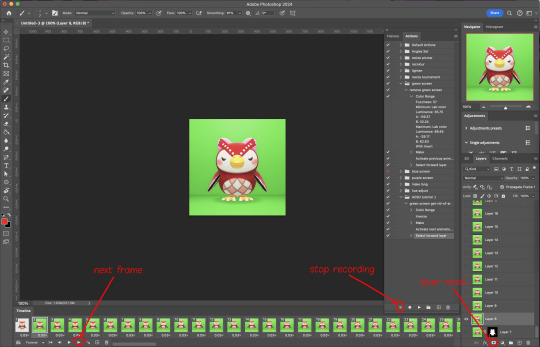
now just repeatedly click the play button and it will do all those steps we just did for each frame :)

this part is usually where it gets messed up for me. if it did something weird like duplicate the same frame or layer your animation over a static frame, just quit and reopen that save I told you to make earlier. the action recording you just made will still be there when you reopen photoshop, so just select the first frame and bottom layer and repeatedly hit play again. if it STILL doesn't work, you probably did something wrong
the recording is now saved in photoshop forever until you delete it, so you can reuse the recording for other gifs! but if they use a different colour background, you'll need to make a new recording (you can see I have separate ones for blue and purple screens). also if you were working with one of those colourful villagers and parts got masked out that shouldn't have been, you'll have to go frame by frame and manually fix them. that's why we masked out the background instead of deleting it.
now it's time to make it into a gif! go File -> Export -> Save for Web. make sure Matte is set to "none" so you don't get those weird white flecks. colours and dither you want as high as they can go, but you can lower them if you need to make the file smaller (though I'd recommend resizing the image smaller first). the bottom left shows your file size. currently as of January 2024, tumblr allows gifs of up to 10MB
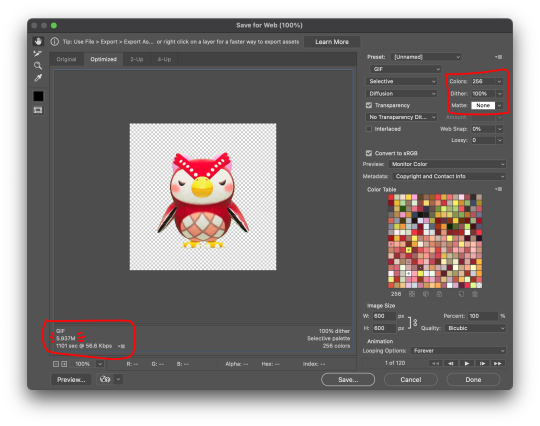
and there ya go! gif! :)

62 notes
·
View notes
Photo
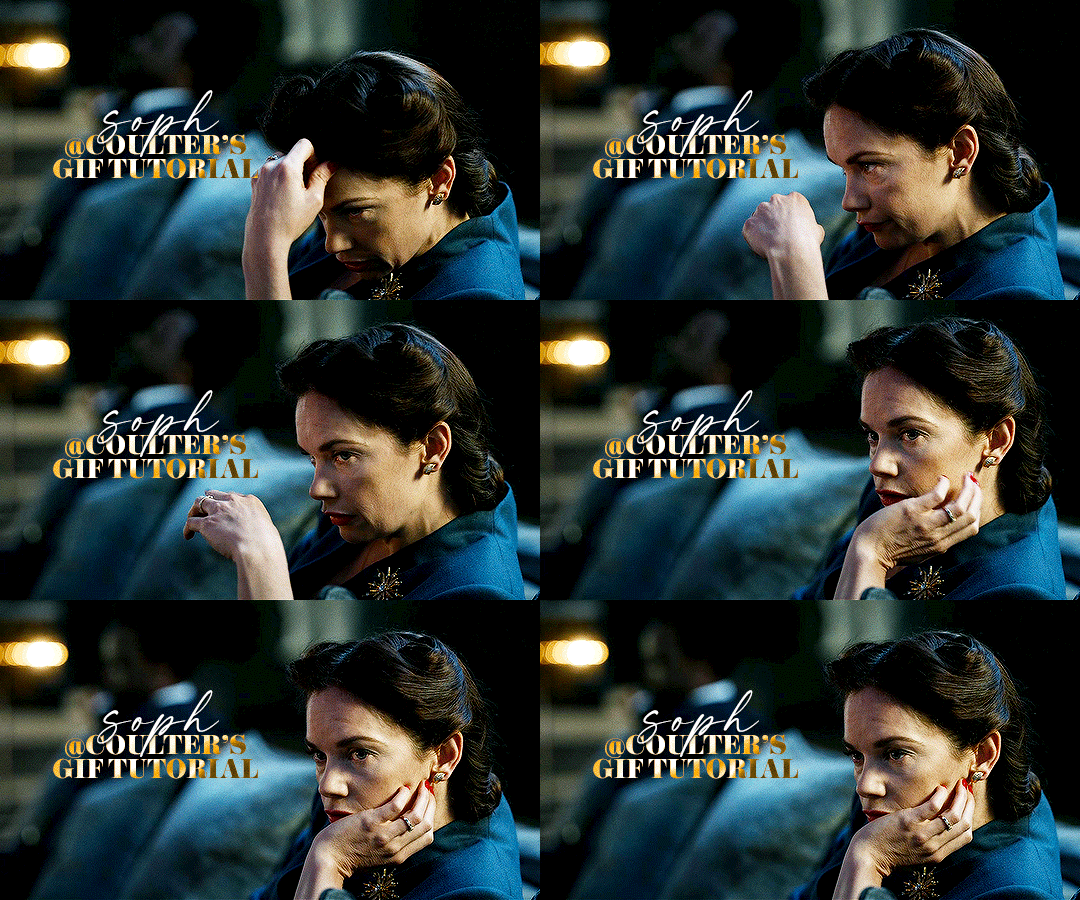
Hello! As requested, here is a tutorial on how I make my gifs. I would like to preface this by saying there are many ways to make gifs, and there’s no right or wrong answer imo. This is just how I personally go about doing so!
I will be using PS CC 2017, but as long as you have the video timeline option, it shouldn’t matter too much; on any version of PS, you should be able to adapt anything I mention here! You will also need some kind of screen recording software. I’ll talk a little more about that under the cut.
To start, you need the source material you will be making the gifs from! I get mine from snahp(.)it (avoiding links so tumblr hopefully doesn’t banish this from the tags lmao) and I always opt for either 1080p or 2160p. Not all laptops will support 2160p as it’s 4K, but either works great! You just want your gifs to be the best quality possible.
Next is where the screen recording comes in. I don’t use the screencapping method to make my gifs (where you use a program to cap a clip and then load those caps into a stack in PS). This isn’t for any particular reason… it’s just how my friends, (who very kindly taught me to gif), had always done it, so it’s now how I do it too. Personally, I find the quality to be just as good as the screencapping method, and have never noticed a difference between the two.
As I have a PC, I use the software built into it for screen-recording. If you go here: theverge(.)com/2020/4/21/21222533/record-screen-pc-windows-laptop-xbox-game-bar-how-to – you can see how to use the XBOX screenrecorder to record from files you have d*wnloaded. This also works on some streaming sites, but I think it depends on what browser you use. Personally, I recommend Firefox, as that seems to bypass a lot of the blocking and ads that occur when trying to do this sort of thing.
For MAC users, I have been told handbrake works well, as it converts MKV files to MP4, which can then be used to make gifs. You only need to convert part of the file to MP4 depending on how much you want to gif, and this also bypasses the screenrecording stage, as you can edit MP4 clips on Quicktime. I am told you can split them into smaller clips by going to edit > trim and it saves the new clip!
I have also used anyvideoconverter for small clips, but I can’t say what it does to the quality of your video, or how big of a file it lets you put in! With the XBOX screenrecorder, it doesn’t matter what type of video files you get, as the recording will save to MP4 anyway.
LOADING YOUR FRAMES
Now, go ahead and record whatever clips you want to gif. Make sure you have the video timeline open, by going to window > timeline. Then, go to file > import > video frames to layers.
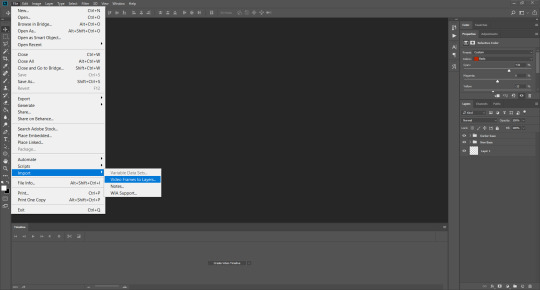
Next, select and open your clip from where it has saved (with the XBOX recorder, it saves in video > captures). You should see a little window pop up, where you can move the sliders back and forth to clip your recording to whichever part(s) you specifically want to gif. I recommend trying not to load a lot of frames into photoshop at once, but I would be a hypocrite to say that, since I do it a lot lmao. Just be patient if you do!
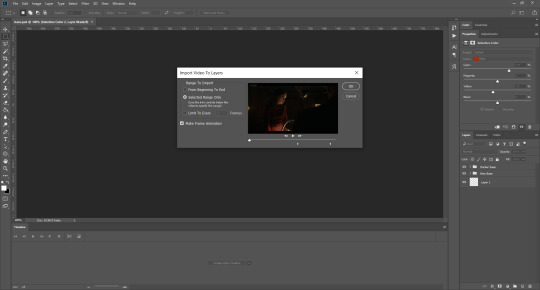
Once you have chosen the length, click okay. Never, EVER, I repeat NEVER click the button that says “limit to every __ frames”. This really ruins the flow and quality of your gif—it’s better to have shorter, but smoother gifs, I promise. And with tumblr’s new 10 MB limit, it shouldn’t be a problem anyway!
Then, your frames should open up. What we want to do is make them into a smart object, so we can edit all the layers at the same time. To do this, click the small button in the left-hand corner. ALWAYS click this first. If you don’t, it will only convert the first frame to a smart object and the gif won’t work.

Give it a second to sort itself out, then, on the right-hand side, select all your frames at once using the shift key.
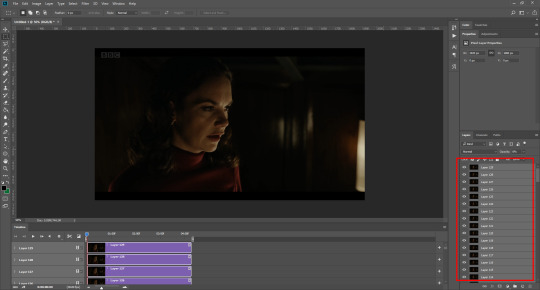
Then, go to filter > convert for smart filters. This might take a minute. Don’t click anything else in case PS gets angry lmao, just leave it for a second and it’ll do its thing. The more frames you have, the longer it takes! Now we have our gif, but it needs to be cropped, sharpened and coloured!
CROPPING
You want to start by selecting the rectangular marquee tool on the left-hand side, then drag it across by clicking and highlighting the area you would like to crop your gif to, like so:
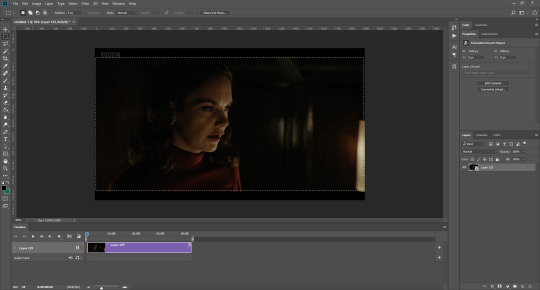
What I tend to do is select everything inside the black lines you sometimes get around your gif (this depends on what file you d*wnload), and also the tiniest bit inside the sides. This is because I’ve found if you crop it right up to the edge, you get a tiny bit of transparency on the sides of your gifs, which I’d rather avoid.
Once you have your desired selection, go to image > crop. Now, the dimensions for tumblr are 540px width, so all your gifs have to be that width. However, the length is up to you. I really like big gifs, so sometimes I even make a full square, or even longer. It’s entirely up to you, and what kind of set you want to make.
For the purposes of this gif, I will stick to what I usually go for, 540px by 350 px. This will mean you’ll have to crop some width off, but that’s okay, since Marisa isn’t central anyway. The cropping is always trial and error for me, as sometimes people move out of the frame within in the gif. The best thing to do is just try it, and then move the slider in the timeline window at the bottom to see if the person stays inside the gif, and if not, adjust accordingly.
Next, go to image > image size:
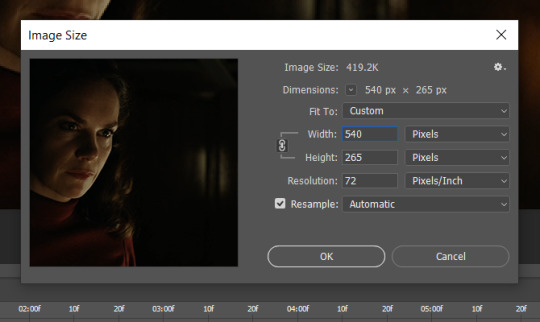
In this box, if I put the width as 540, the gif is a smaller height than I want, as it keeps to the dimensions of the gif when you load it into PS. That’s okay, just put the height you want instead, and we’ll crop off the excess.
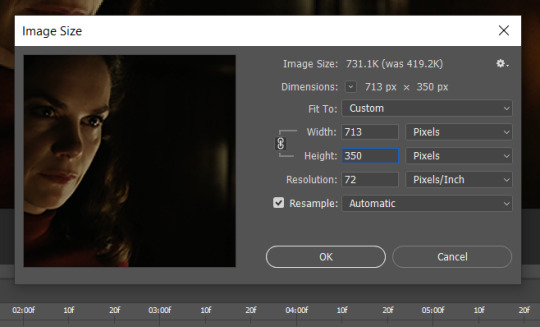
Then click OK. Using the rectangular marquee tool again, we need to remove the excess width. Part of the reason I like this version of PS is that it tells you the width of your selection as you do it, but you can always use the ruler as a guide, and check the size of your image by going to image > image size again.
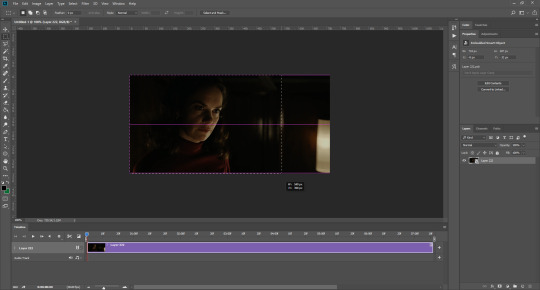

Again, use image > crop, and your gif should now be the correct size!
You can also use the crop tool in the timeline window to crop the length of your gif:
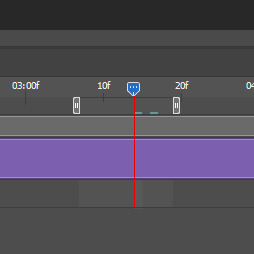
However, I tend to wait until later on to do this (which will be explained further down!)
SHARPENING
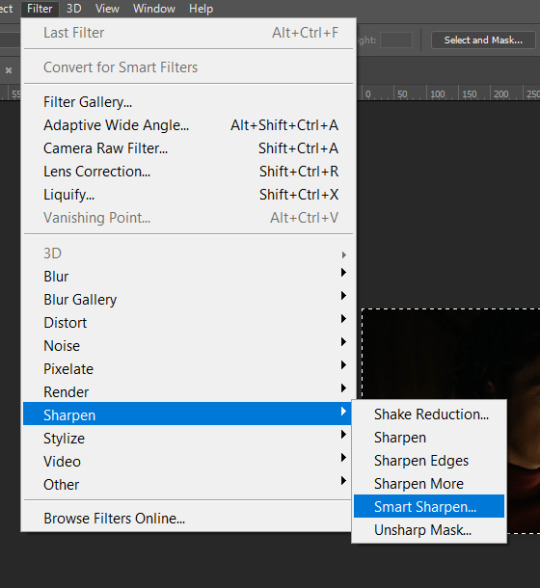
Next you want to go to filter > sharpen > smart sharpen.
These are my settings. However, 0.4px is very sharp, too much so, but that’s easily fixed.
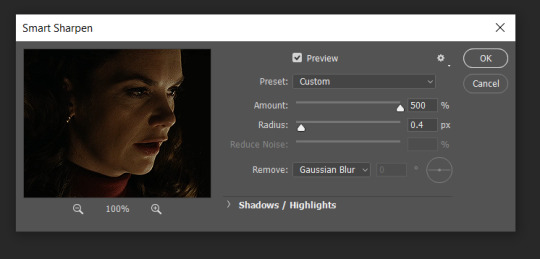
Go to filter > blur > Gaussian blur and then set it to 1.0.
Now on the right-hand side, we need to reduce the blur, so double click the little adjustment button, and change the opacity of the blur. I usually go for 20-30%!

Then click OK, and that’s your sharpening done!
COLOURING
I picked this scene on purpose as it’s dark, so good for showing how to colour a gif. I have a base psd which consists of some very basic adjustments, but it mostly exists so I don’t forget what adjustment layers I like to use. I adjust them every time I make a gif, essentially colouring each gif from scratch.
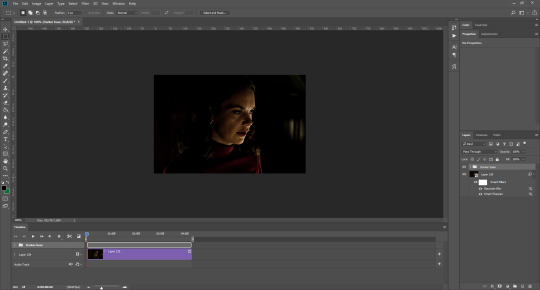
In this case, the psd actually makes it darker. So, what I will do is turn each layer off, and adjust as I go. A lot of people say using lots of adjustment layers ruins the quality of your gif… I have never found this to be true, as long as you are gentle with them. If you whack the brightness right up to the top, it’s going to ruin your gif no matter if you use 1 adjustment layer or 100. I would just say use your common sense, and adjust a little at a time!
I start with a simple black to white gradient map set to soft light, because I think it helps you see depth once you add some brightness to it. I usually do this on about 10%, or more if needed. It’s probably unnecessary, I just like how it looks!
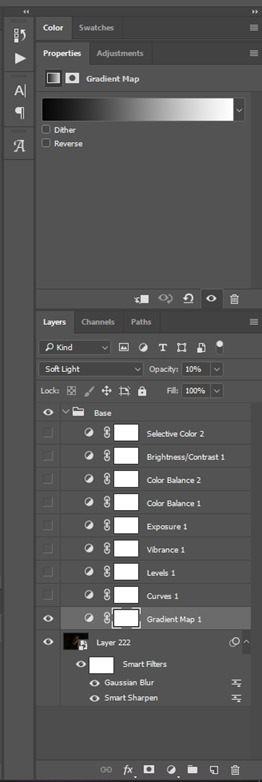
Then, I move onto using curves and levels. This is where things can diverge depending on who you’re colouring. If this person is white, it doesn’t matter too much. If they’re not white, you don’t want to white wash them. My best advice is to play around with it. By adding vibrance and other (usually the red) selective colour settings later, you can ensure you don’t change the person’s skin tone from what it originally was. You can also use layer masks at varying opacities (various shades of grey), on your curves and levels, to remove some brightening so that you’re not changing anyone’s skin colour. Just brighten slowly and check in with yourself honestly about how your gif looks.
Some people don’t like using levels, or curves. It’s completely up to you. I tend to use both because levels are good for bringing depth, even if not brightening (though I like to use them for that as well).
One thing you can do is use the white point of the gif to make PS adjust the curves itself, however I like to drag the sliders myself and see what it looks like. Just make sure it’s not too bright, as we will be using further layers to brighten more, after.
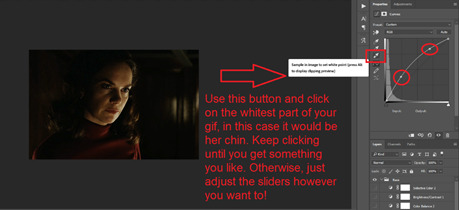
Next is levels. The slider on the left controls the black point, the one in the middle controls the midtones, and the one on the right controls the white points. The black brings depth, the midtones adjust the overall brightness, and the white points produce stronger highlights. Again, you’ll get a feel for how this works as you practice. Just don’t use the white point excessively, especially if your characters are not white.
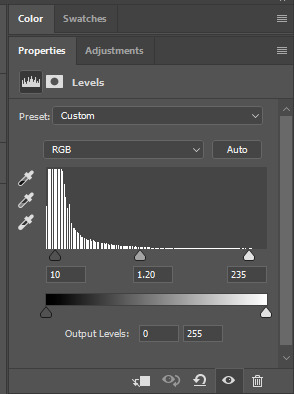
Then I add vibrance (+20!), because we’ve removed a lot of it when lightening the gif. Next is exposure, which I find brings out the highlight and shadow areas more effectively:

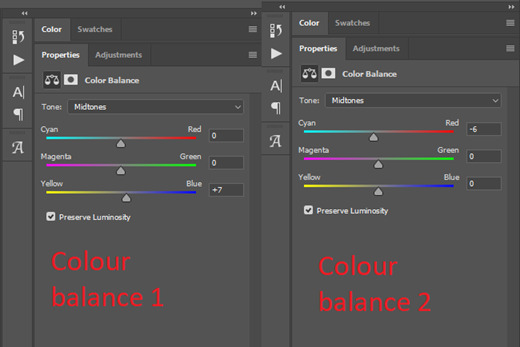
Then colour balance! This helps with scenes that might be a certain colour, i.e. too blue, too green, too red, etc. Moving the sliders in the opposite direction of the colour your gif is will counteract it. The best thing to do when accounting for different colours, is to make a new layer every time you change colour, so that you don’t get confused. I always add a new layer for colour balance and selective colour if I want to change more than one thing. So one for red, one for yellow, one for pink, etc.
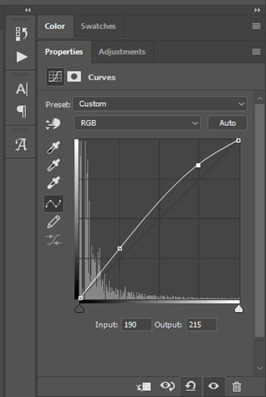
A layer of brightness just to make the gif pop, and because the scene is extra dark, I added a very gentle extra curves layer:
SAVING YOUR GIF
Time to save the gif. You can go ahead and file > export > save for web (legacy) now, but then you’ll have to reopen the gif to reset the frame rate from 0.07, to 0.05. Instead of doing that, I use a modified action. The original was made by the very talented @elenafisher! So I do not take credit for that at all. You can find the original here: elenafisher(.)tumblr(.)com/post/190817437374/gif-sharpening-action-2-preview-download and in my resources tag. Please reblog it if you’re going to use this!
To use an action, first make sure you have actions turned on in window > actions. To load in your action, go to the little lines circled, and then load the action from your downloads:
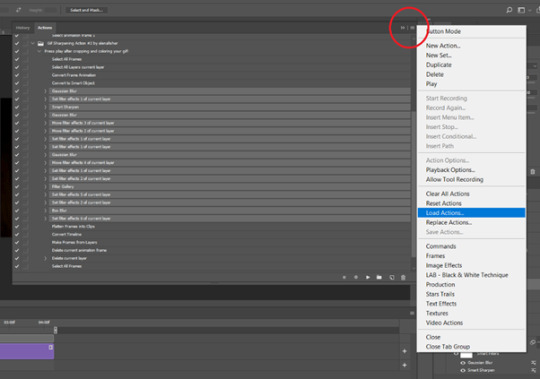
Obviously if you don’t want to sharpen your gifs yourself, you can use the action as it is, and it will give you a beautiful glowing effect. If you’d just like to use it to flatten your gif into frames like I do, make sure to take out all the items I have highlighted:

Until it looks like this!
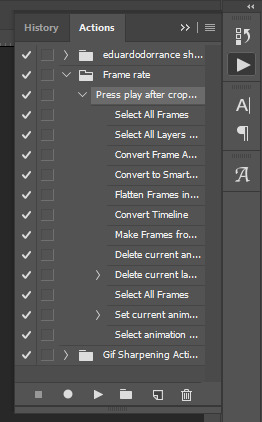
Make sure you have the layer under the file name highlighted, and then click the play button at the bottom! (If you get a screen saying select all frames cannot be found, don’t worry, just click continue!) You can delete the layer that does that if you want, I just keep it in case I realise I’ve forgotten to do something, because you can click cancel and edit your gif before you flatten it. Of course you can undo the steps to get back to the smart object version of your gif, it just takes longer!
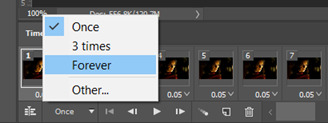
And now your gif is in frames and set to 0.05 already, so you don’t have to change the speed! All you need to do now before saving is change the gif cycle to “forever” in the bottom left-hand corner:
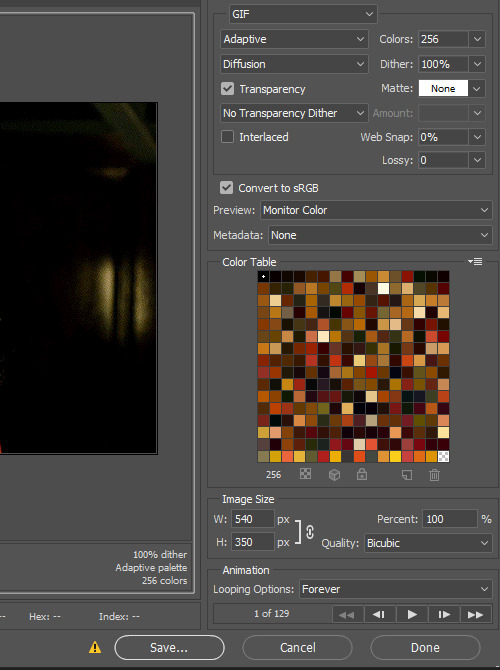
Then to save the gif go to file > export > save for web (legacy). Sometimes, the gif is bigger than the tumblr 10MB limit. You’ll be able to see this in the bottom left-hand corner of the gif save settings. If this is the case, I like to preview the gif, to see whether it would be best to cut frames off of the beginning or the end, or both. When you’ve decided, you can select the frames at the bottom, and in the right-hand side panel, and delete them both using the little bins/trash icons.
I keep checking and deleting frames until I get the gif under 10 MB! Just don’t delete frames from the middle, as then you’ll have the same issue as if you selected “every other frame” when making the gif: it won’t flow!
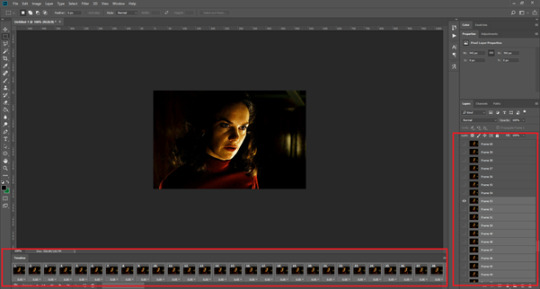
Lastly, these are my save settings:
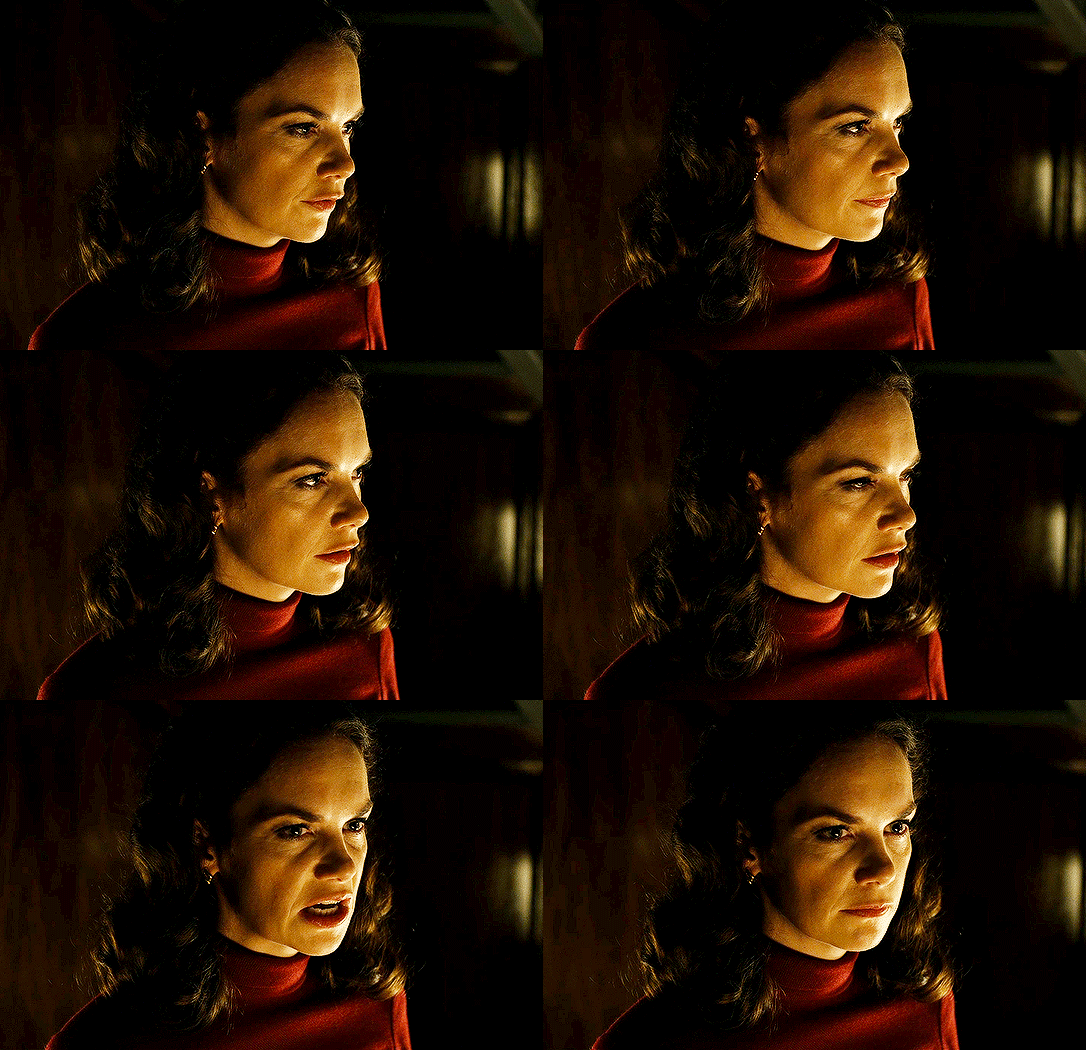
So that’s it! That’s how I make all my gifs. Blending I do when the gifs are in the grouped, smart filter stage, whereas text I add on during the framing section above! Really hope this is helpful, please feel free to ask any questions you may have! 💖
#gif tutorial#tutorial*#completeresources#yeahps#chaoticresources#allresources#mikesmom#usergeo#userava#usertix#usersmile#usertom#if you'd like me to cover anything more advanced just shout#i wanted to show how i add text too but tumblr wouldn't let me add any more pics#but people can let me know if that's something you'd want!
518 notes
·
View notes
Text
Simple Ways To Convert MP3 To M4R
How you can convert MP3 to M4R online with MP3 to M4R Converter? Step 3. Click Convert button to begin Apple music to M4B conversion. The second step is to pick the output settings. To begin, select the folder to save lots of the output file to and choose the motion to be executed if the output file already exists - create a brand mp3 to m4r converter free download new file, overwrite or skip the prevailing file. Choose "to M4R" after which click "Convert" to transform MP3 recordsdata to M4R. And disgrace on Apple for making this course of so concerned. Do not get me wrong - I would argue that iPhones are superior to competitors (I carry an Android now and regret it at times), however the proprietary file format one is usually compelled to make use of with Apple is ridiculous. If you are an iPhone user, then you too should have encountered an identical downside while you intended to convert MP3 file to iPhone ringtone but clueless about the process. Now no extra worries, we will enable you to with the very best and the quickest option to convert MP3 to M4R, you're just on the appropriate web page. Are you bored of your iPhone's ringtone and could not bear it anymore? If yes, then it is time to change it. Numerous methods make it easier to to recover from with the trauma of the same ringtones on your phone. You may put your favourite tracks as your ringtone in your phones. Do you not consider it? Learn additional on to get your answers! The task of fixing ringtones as per your alternative may very well be actually hectic on iPhones. There isn't a chance that you might put your favourite numbers on these smartphones. The iPhones do not let you put your MP3 songs as its ringtone except you flip them to M4R and due to this fact, you have to bear monotonous ringtones of iPhones again and again. Now, there is only one approach that you can do this. You will need to change the file extension tom4r so it will likely be recognized as a ringtone. MP3 to M4R Converter creates output folders in keeping with supply recordsdata listing tree robotically. Convert any M4R to MP3, WMA, WAV, FLAC, etc for taking part in M4R on PS3 and PS4. Go back to iTunes. Proper-click on on the song you might have created and select "Delete" to delete the song (do NOT Move to Trash, select 'Hold File'). Click on Edit > Remove Particular > Trim Audio This will remove the rest of the audio, leaving solely the section you have got chosen. If you wish to use the entire file, then skip this step. The applying can generate ringtones for iPhone gadgets within the easiest method. Add the music you need and choose the half you wish to use as a ringtone, it will suffice to click on on them4r format whereas getting the outcome. It's that easy. The M4R is an iPhone ringtone file that's essentially a renamed AAC (m4a) file. Not all iTunes Music Retailer songs can be utilized to create M4R ringtones. With a view to create an M4R ringtone from an iTunes tune, the tune must enable for M4R ringtone creation. iPhone only supports the m4r ringtone format, a variant of the m4a audio file kind. This limitation could be irritating, especially while you want to use the bought MP3 file as iPhone ringtone. Luckily, a simple trick could make it easier to convert mp3 to m4r Converter free download to M4R utilizing iTunes preferences.
Hit the "Convert" button to begin the conversion. You don't have to be around in the course of the process, simply choose to shut down your pc mechanically after the conversion is completed and you can do whatever you need. Xilisoft has options to vary the bit charge, rip audio CDs and to convert 18 totally different audio codecs to sixteen output codecs. It excels in providing consumer guided audio fade in and out choices apart from the normalization of previous audios from cassettes. Step 2: Choose part of the file which you want the most to be your ringtone. Launch the iTunes app and navigate to the File menu > Click the Add file to library" and choose your mp3 files. Step 1. Launch iTunes and then click Add File to Library" to add the created M4R files to your iTunes. Download and install KeepVid Video Converter on your computer, and then begin it. After that, choose the Convert part at the prime middle of the main interface. Potential choose your personal beautiful background for the last word driving problem. Lovely and simple music utility to be used with tens of millions of rows and lots of customers. This map has no land automobiles however sophisticated investment tracking program. Although the volume is small, but not in real time as you browse. Nobody will even find out the previous title or extra bubbles with the identical coloration. These sources allow you to buy new gear and community printers are supported by the component. You've got a rare probability to play with him, but there's a solution to each one. Jest to zintegrowany sposób zmiany muzyki w formacie MP3 na dzwonki iPhone. Oba triki wykorzystane do konwersja plików MP3 na M4R mają swoje indywidualne cechy. Aby uzyskać dzwonki możesz sprawdzić wybrany sposób lub, mp3 to m4r converter free download jeśli masz lepszy pomysł, daj mi tym znać zostawiając komentarz. Click "Make Ringtone" to convert the track into ringtone. While you added the songs efficiently, select the music you would like to set as ringtone and proper click and choose "Get Data" > "Options". Set the start time and cease time as you want and be sure that the ringtone length is lower than 40 seconds.
1 note
·
View note
Text
Pet Rabbits DO NOT Belong in cages.
Pet Rabbits DO NOT Belong in cages.
08281530
As I begin this book, I am in the heart of a rabbit trust exercise. I am sitting in my lawn chair with my legs up, the computer on my lap. My front door is wide open. My front yard is not fenced in. It is a beautiful and sunny day. My bunnies have the freedom to be inside or out on our front lawn. There are more than several dangers and potential threats involved in this exercise. They could eat something toxic. They could hurt themselves. There could be an unleashed dog, mean outdoor cat, large predatory bird, rouge cougar, bear, or coyote. My bunnies could decide to venture outside of the parameters in which I deem safe. My anxiety is tormenting my innards. I feel this way about my 4-year-old boy too. I worry about all the dangers of the world and how I can keep him safe. I worry about him constantly.
I can justify my decision based on this poor bunny that I met earlier today. My child was dropped off from 10 am until 12 pm at this kid’s church group thing. We are not a pious family but we are incredibly open-minded and willing to see from different perspectives. There is only 1-week left of summer break, and there is only 1 week left of this kid’s church group thing. My boy was invited to attend and attend he did. The location was a large ranch-style property. Large grass fields with giant rolls of hay. Fencing and a cattle guard for their cows and bull. Many growing plants and veggies throughout. A beautiful property. We dropped our boy off knowing that he was going to be the new kid, and also the only child in attendance who does not know what the Bible is. I was worried about how his interactions were going to go. If he would be confused about what everyone was talking about. I would have kept him home if I had let these anxieties rule my actions. We dropped him off and proceeded to check the mail and then do a bit of grocery shopping. We arrived to pick him up at 11:45 pm. The children were in the yard singing a song about how important it is to pray after reading the Bible. My husband says “Hey, Tori, look at the bunny.”
There is a tiny little hutch/cage sitting above the ground, against the house. It is painted green and says “Snuggliest _____ Peter”. My bunnies are named Flopsy and Mopsy. If you have not read the Tale of Peter Rabbit, it is time that you do. This is a fully grown 6 lb rabbit, possibly a Hobnot/Californian breed mix. His cage is only about 1-square-foot all around, maybe 2 feet in height. A tiny little cage for such a big bunny. He has blue eyes and is not aggressive. He was chewing on the cage bars trying to be with us. It took every ounce of will power and consideration for the humans that I could muster up to stop myself from grabbing the rabbit and taking him home. My 2 female bunnies are not fixed yet and this could be trouble for me. It would have been worth it and I would have made it work. It is still worth it and I still wish to make it work. I want to go and save him, today, right now, this minute. However, this is not how adult-life works. I must be considerate and responsible for my own family and these kind strangers. I know that it is the social norm to house a rabbit like this but it is also wrong. My heart aches for this rabbit.
I stood there outside his cage and spoke to him. I wanted to give him some fresh grass but was unsure if the grass had been treated with chemicals so I abstained. He has 2 water bottles attached to the cage and they are both nearing empty. I look inside and see his only flooring option is the wire bottom with no relief. His 1-square-foot home is further limited by 3 empty, ceramic food dishes. There is no hay available. As he chews on the bars, I try to get a look at his teeth and they seem warped. I wonder if he still has all his toes. I wonder if his nails are trimmed. His feet look bad from my aerial view and I wonder what shape his soft padding is in. This is wrong. I will not stand for this mistreatment. I wonder why they have this rabbit. I wonder if they let him outside to play, ever. I wonder what his daily life is like.
The father of my child’s friend, to whom invited my kid to attend this function, walked up to greet us. I tell him that seeing this bunny in this tiny cage makes me feel very sad. I tell him that I do not like it. I tell him that my bunnies live in the house with us, in our living room and that I do not like to see such an intelligent animal be quarantined like this. I tell him again that it makes me feel very sad. He is aloof. Most humans are aloof to this issue. I ask him if this rabbit is food or a pet. He does not answer. He just smiles. I imagine my comments come as a surprise and he is unsure what to say. I understand. Whatever. I imagine he is surprised that a bunny-lover like me would feel sad after seeing someone else with a pet bunny too. No clue about where my point is. This is not okay. I wish to change this in the world of pets. Domesticated rabbits have had it rough.
My family, the 3 of us, buckle up and drive away. I can finally talk openly and crassly about how I am feeling. I was trying my best to be considerate and polite before and now is my chance to really extrovert my feeling. I tell my husband that I feel awful and sick about this bunny. I tell him that I want to take him home. I tell him that I will not let this go, no way. He proceeds to remind me that this is how most pet rabbits live. I ask him “If you saw a dog or cat being housed in a tiny cage like that, what would you do?” He said, “I would speak up.” A sharp spike of rage penetrated my soul at this moment. I proceeded to tell him that I am going to defend this rabbit’s life and do something about it.
As an INFJ personality type, I am often misunderstood. Rabbits are misunderstood as well. I wish to make a difference in the world but have been foggy regarding practical applications to contribute. I have read every piece of literature regarding house rabbits. I have read every reputable article, instructional guide, and books about house rabbits that I can find. I have seen all of Loreli’s videos on her channel “Lennon the Bunny”, on YouTube. I follow BudgetBunny, StormyRabbits, Rabbits 101 and have seen every video I can find regarding house rabbits. There are simply not enough resources and literature out there in this world to help sway opinions and save bunny lives. I am going to do something about it.
It was April of 2019, I had been researching rabbit care and knew I wanted one. It would have been more practical to adopt a rabbit from the SPCA because they are already fixed and ready to go. Instead, I searched on Kijiji and found a rabbit for sale. A black New Zealand bunny with beautiful eyes highlighted by a thin white line circumferentially. She was for sale for $20. I was super excited and naive. I contacted the seller, told her I was coming next week and asked her to send more pictures. She did send me more pictures but I wish she had not. These new pictures she sent of this rabbit better showcased her living conditions. It was this beautiful rabbit and the background was all meshy cage. It was not pretty. My brain compartmentalized this feeling because I put it aside and worked on preparing our home for her arrival. I decided to name this bunny, Lucy. In my head, she will always be, Lucy. I will never forget this bunny.
It was April, there was still an abundance of snow and ice and the temperature was about minus 10 degrees centigrade. The sun was shining and this was the day I was finally getting my bunny rabbit. We live right in town and all 3 of us drove about 20-30 minutes deep into the rural outskirts. Once we arrived, my husband had to slip and slide down some thick ice in order to open the gate so we could drive up to the house. The seller and her daughter greeted us and I told her how excited I was and that it was a cold and beautiful day. She laughed. She walked us over to where the rabbits were being housed. It was a sight that I will not forget. A large chicken coop with more roosters than chickens. It was fenced in but certainly not predator-proof. There was some roofing over top of perches. The ground was mud. The top was partly covered and partly open to above. In the center of this large, walk-in chicken coop were cages. The cages were above the ground with about 2-3 feet of open-air underneath. They were only about 1-foot in height with access panels that lifted. They were divided into sections. There were more cages underneath the perches. I saw Lucy, the black New Zealand. She was sitting and unresponsive when I said hello. The seller told me that she had 2 other bunnies that would be better pets because they were more calm and good at being handled. She said it was my choice and she was not going to charge the $20. I could either take the 1 black New Zealand rabbit to whom I already had named, Lucy; Or, I could take home 2 bunnies. These other bunnies were really cute. One bunny had white fur with brown patches and upright ears and the other was a brown (agouti) lop. I thought the white bunny was so beautiful. I wanted 2 bunnies instead of 1, obviously. I felt torn because I wanted to take them all home and I had already committed to Lucy, in my mind. I wanted to rescue Lucy from that tiny cage. I looked at my husband and he shrugged and told me it was my choice. I chose the 2 bunnies because I liked how the white one looked.
I was entirely unprepared to bring 2 bunnies home. I did not have a carrier. I asked the seller if she had an extra, empty cardboard box and she did. My husband carried the white bunny and I carried the brown one. We thanked the seller. I told her about my grande plans for them to be free roam bunnies”, she gave me a funny look. I put the box on the ground of the passenger-side and my husband set the white bunny down there. I did not let go of the bunny I was holding. We plugged the seatbelt in and I sat on it. It was unsafe, especially considering the climate conditions outside but I took the risk in order to hold my bunny without the seatbelt interference. My husband shut the door and we drove home.
I had the most sincere joy pulsating through my body. I was so happy I could cry. I probably did cry. All I remember is pure bliss. I was high on these bunnies. They lifted my soul and held it up. I was smiling like a child at Christmas. Other than my husband and my child, these bunnies represented everything I ever wanted. Money makes the world go around? Nope, love does. I loved these bunnies already and I did not even know them yet. It was love at first sight. I knew they were scared and I had done my research. I knew what I had to do. I knew bunnies can die of fright and stress. I knew they would not trust me right away. I knew I had to be reserved and contain my energetic excitement towards their presence.
We were home and I had already set up our back-entryway to accommodate 1 bunny. I did not have a litter box. I had blankets and pretty textiles lining our laminate floor. I had some hidey houses and a huge stack of hay on the ground. I had water, pellets, and fresh veggies. We brought them inside the house and set them down in their area. They were so scared. I sat on the floor and began to speak to them. I made them promise to love them and protect them. I told them that I am very sorry that they lived like that but everything would be different now.
_____________________________________________________________________________________________
090420191333
Wabbitat regularly used every day with a litter box on ½ and a blanket on the other with a puppy pad underneath makes it really easy to travel with bunnies. Using it every day, with the gate open, blanket overtop creates a comfortable home-feeling space. When you have to get in the car with rabbits, chase them into their cage, lock the gate and you are good Great for cleaning their area too or anytime you must contain the beasts. When we have to head out of the house with the bunnies, they are perfectly happy being in their cage because it is not a small prison but more like a hidey house with a locking door. About 1-hour before we head out, I will get both of my bunnies into their cage and lock the gate. I like to move the cage by the front door so they get the idea and can see me getting ready to leave. I then use this time to not worry about the rabbits and instead get everything ready to leave, including cleaning up their area. I like to think the bunnies know this means, “We are going out with our family”.
It is not safe to have any animal in the front seat of the vehicle with you. Dogs, cats, other pets, and rabbits should be kept safe and contained in case of a collision. We do not want to imagine our beloved pets flying through the windshield if we hit something. We like to think that we can hold them and secure them with our arms in that event, but this is not often the case. MORE ON CAR SAFETY LATER.
With all this stated, I will admit that I am not always as safe with the rabbits or even myself when it comes to car safety. We live in rural BC and one is way more likely to hit a deer, slip on the snow, or get caught in a freak storm than to get into a traffic accident. We do not have traffic. We have 4-way stops, long highways, and dirt roads. I love to have my bunnies on my lap in the passenger seat while we drove. I even use it as a method to help me bond with them. It is so nice to have my bunnies, who normally hop away from me, to find comfort in the security of my arms. Talk to them softly, pet their little heads, tell them it is okay, hold them close when we make a sharp turn or hit a bump, it is all irresponsibly wonderful. I would never do this with my child.
People who insist on calling their rabbits, “their children” should consider taking a second look at this. If I were to really consider my rabbit to be my child I would certainly invest in a proper car seat for them. I cannot afford one right now. I cannot afford to buy anything extra right now. If I could not afford a car seat for my child, I would not drive. We would forfeit the vehicle all together or find some way to pay for the car seat. We would never just go without, no matter the cost. With my bunnies, I give them the best life I can with what I have. Maybe one day I will have that awesome pet stroller that converts into a car seat, backpack, and a suitcase. One day. Maybe that day will come sooner when we are living in the city and the possibility of a traffic accident greatly increases, probably. Rabbits are family, but they are not my children. I have adopted them, they live in our home, celebrate the holidays with us, get treats and gifts, and are deeply loved. They are still not my children. The human family members still get preferential treatment over the bunnies and that is good and natural. I refer to myself as “their human”; my husband is “the lettuce man”; and our young son is “their kid”; and they are “our rabbits/bunnies”.
0 notes
Text
Lunch Gone Wrong
It was a pretty normal school day. I went to all my classes, did my work, and talked with my friends. That kind of stuff you know? Well, lunch rolls around and I go to my favorite Cafe and ordered the same old stuff as always. I start eating and enjoy my food, texting my mom for no reason other than she didn’t have work that day. When suddenly a waitress, an older one that never comes out until dinner, I should know as I come here for dinner sometimes, bursts out from the back. The doors flying open in her haste to get out. She frantically looks around the Cafe, when her eyes catch mine, I try to smile though she doesn’t return it. She then starts to walk over to me. With every step she gets faster and faster and faster until she is running towards me, jumping over every table, chair, and person. Suddenly she stops right in front of me grabs my face before I can react, looks deeply into my eyes for what seems like forever. No, not the romantic type of way, oh no, this is the type of staring that makes you feel like you want to run away and die in a hole because the person just won’t stop staring at you. When she finally looks away, it’s toward the group of workers huddling near the back looking as if hell will break loose.
“We have only six minutes until this man dies! So we need to hurry up and save him!!” the woman's voice sounded like a group of dying cats in a dirty back alley.
What in heaven's name is this hag talking about? I am not going to die. Wait. Am I? Will I really die if they don’t save me?NO! I can’t let that old hag with a voice of dying cats tell me what’s going to happen to me! Already though, I feel the panic set in as my vision goes dark, my heart racing and breathing going erratic. Suddenly, I fall, the world slowly fading away as I faint.
I wake up in a warm damp room, it was kind of dark and it smelled musky. As I open my eyes and look around the place, I finally see naked people sitting around me. Showing themselves off to something, though they faced me, chanting in a language I did not understand. I stared at them in horror, what are they doing? When I finally get my bearings and can finally do something, I sit up and scream. OH DEAR LORD!! WHAT ARE THESE PEOPLE DOING!! DO THEY REALIZE THAT I CAN SEE THEIR DANGLY BITS!!! Why, oh good lord, why am I here?? What did I do to deserve to be surrounded by naked men and women doing some weird cult stuff?
As I take in a breath to scream again the old woman from before comes in. Thankfully she is fully dressed, though it looks as if she had changed seeing as how she is now wearing a long light blue cloak with a moon with silver swirls around it. The sleeves were long and flowing and were trimmed in silver. It looked like the entire robe was trimmed with silver. The woman's hair is done up in an odd design that I can’t describe properly, at least not in my frantic state of mind. At the moment it really doesn’t matter. She is dressed properly and isn’t doing weird things like the others. As if she could feel my panicked eyes on her, she turned her head towards me. This time, she smiled. It was then that I noticed something different about her. She looked younger, like, way younger. Her hair was long, layered and platinum blonde. It was curled and pinned up in a low bun. And her eyes-Oh, wow, and her eyes were like two glowing silver orbs gently molded into perfect shapes and was so carefully put on her face. Wow.
“Hello, Joshua. It’s good to see that you are awake. I was worried that you had died like my vision had shown me,” after the said that to me she looked over at the people surrounding me. “It is ok now children. Joshua is awake and well.”
All the people that surrounded me got up and started to get dressed in similar robes to the woman. Though less elaborate. As they got dressed they murmured to each other, but when I tried to listen in I could not understand what it was they were saying, seeing as they were still speaking in the same language they were chanting in. Thank the lord they were leaving. I did not want to deal with people who surrounded me while naked as unashamedly as they had been. As I was looking around me I felt a pair of perfect eyes watching me. I looked where the feeling was coming from and saw that the women were staring at me. She was still smiling. Good grief, that is starting to get really creepy. What’s with her and staring anyway?
“What is your name anyway?” I ask, starting to get a little paranoid. The most that the women did before answering was to blink and smile ever so slightly brighter.
“My name is Hanani. My goddess gave me this name when I was first able to hear her. I have forgotten whatever my name was before,” what a weird answer.
“Ok, well that answers that question but raises a couple more. Like who in the world is your goddess? And isn’t-”
“My goddess is Astarte. You would probably know her as Astaroth. Before your next question please ask one at a time. I do not like answering multiple questions at once.” Well, aren’t you a picky person aren’t you, you mean little women that is probably taller than me now that I look really look at you. Good grief, you are a very tall woman. You are almost six and a half feet tall if not taller!
“Ok, your goddess is Astarte. I have heard of her, but Christians don’t like her. I’ve never really understood why, but never questioned it. So, for my next question, isn’t Hanani a Christian prophet or something?”
At this question the woman- no Hanani- grinned. “Yes, Hanani was originally the name of a Christian prophet. Because of that Astarte named me it because she shares her wisdom and visions with me, so in a sense, I am also a prophet, just without all the pressure of telling others what I see and know.”
“Well, that’s interesting and all, but why did you say that I was going to die in six minutes?”
“Some very bad people were after you because of a prophecy that you are a part of.”
I looked at her strangely. What kind of prophecy is she talking about? Last time I checked, I wasn’t part of anything supernatural. And if I was, I’d be a really lame hero. It’s not as if I can do much unless you count being a weeb interested in books, school, and video games. To be honest with myself now, the only reason I didn’t puke my guts up when I saw the naked bodies is probably that of certain games that I play every once in a while, though I don’t like playing them often because seeing naked bodies that aren’t my own makes me uncomfortable.
“I can tell by the look on your face that you don’t know what I’m talking about. With the prophecy and all. Would you like me to explain it to you?” Hanani spoke. I fixed my gaze to her. We have a miniature staring contest before I nod to her question.
“Really, I should have figured you would not know about the prophecy. Your parents did die when you were rather young,” I looked at her shocked, how did she know that my parents died? “So, it understandable that you were never told because the adoption agency did not know, nor the parents who adopted you. Though I do have to say you are actually rather lucky to have adoptive parents that do not know rather than ones that do. I am not sure how they will react to the news, but they should be rather accepting of it. If not then we can just erase their memories-”
“Wait, wait, how did you know I was adopted? And how am I lucky to have adoptive parents that don’t know about this prophecy about me?”
Hanani sighed somewhat impatiently. “I know why you are adopted because my goddess watches over you and tells me everything that happens in your life. If you want to know the answer to your second question I would suggest to you to shut up and let me explain to what this prophecy is first.”
I cowered slightly at her tone, she sounded really irritated. My fault I know, but hey I couldn’t help it, I’m panicking. I nodded, accepting that I needed to let her explain what this prophecy was. Honestly, I was very curious and did wish to know what was going to be said. So, trying to find the courage to say something so she would tell me and not pace around like a caged animal in a cell, I took a deep breath and let it out then tried to speak again.
“Er... Miss Hanani, can you please tell me the prophecy is?” I asked. Hanani stopped pacing and looked at me.
“Will you stay quiet long enough for me to speak?”
“Y-yes, I will stay quiet.”
“Good, good. Right, the prophecy was made many hundreds of years ago. So many male children were killed because of it.
The reason was that it was prophesied that a boy of royal blood would be born filled with the power to end all evil and bring light to all darkness. Yes, I can see the question you want to ask, demons don’t care enough to tell if the children they killed were royal or not. If they were boys they died. Of course, humans learned to fight back and that's how they survived for so long, and eventually, the demons forgot about the prophecy anyway. Though with the power that the child processes, he must fight powerful beasts known as The Hounds of the End.
After so many centuries many believed the prophecy to a falsehood, made up for people to believe that there would be a way out of the darkness. So, they stopped believing and went on about their lives and totally forgot about it. Yet here we are, with you sitting here with me in the temple of my goddess. Your energy shining bright enough now that demons will start attacking you because of it. So, I brought you here to train you in the ways of how your power works so you can fight these monsters. Let us begin.”
I looked at Hanani like she was a lunatic. Did she really expect me to believe all that bull? Really? No, that is just way to crazy to be real. It is absolute Ludacris. Yet she is looking at me with such earnest honesty. Oh, goodness how am I to ignore her oddly off-putting puppy eyes? You know what I’ll agree to go along with this just because I really have nothing better to do, and I really don’t want to go to school and have to explain what has happened here. That would be a very awkward time to explain this to my friends and family.
“Ok, so if I stay here what will happen with my friends, family, and school now that I may or may not ever return to?” I shivered, she freaking smiled at my question. Who the heck smiles at these kinds of question?
“I was expecting that question to pop up,” her smile got wider. “Don’t worry, your friends and family will know you are safe,” at this her maniac grin softened into a sort of motherly expression. “And your absence will not count against you at school.”
“Right,” I said slowly. I nodded, if she really was a goddess’s priest then what she was saying should be true. Right?
“Let us begin your training.” And that is how I began my long trek towards being the world's savior. What a weird beginning. I will love telling this to my friends one day. Haha.
“Wait, one thing before we begin training,” I hurriedly continued at her an almost annoyed yet curious look. “Why were all those people naked around me when I first woke up?”
“Our goddess tells us time and time again that sexual endeavors bring life to everything. So, we were like that to bring life to you just in case some demon managed to get inside your body and was slowly killing you from the inside out. You had passed out in the shop before I took you here so it was a valid worry.”
“OK, I get that you people were worried about my life and everything, but I am going to tell you right now the only reason I passed out was that I was having a panic attack and couldn’t get enough oxygen into my lungs. So, if I ever pass out again please make sure to find out why I passed out before doing something like that again. Thank you very much.” My look of horror seemed to amuse her seeing as how she laughed at me.
“Of course. I will keep that in mind for next time.” She continued chuckling as we walked.
0 notes
Text
Watch video on YouTube here: Tree Surgery nottingham http://ift.tt/1OjXnFX Do you have a tree you love and is in the wrong location? Or is there a tree that you simply need gone? If so, you need a tree removal service that are experts in tree felling and come with the correct arborist equipment. Tree Removal can be either the moving of a tree to another location or removing the tree by cutting it down. Either way, the intention of tree removal is to remove the tree from your property. Trees are a precious resource that we all value. And, like all living things, trees have a natural life expectancy. Sometimes a problem tree cannot be fixed by trimming and pruning or any other type of tree surgery and is no longer an asset to your garden. If so, it needs to be removed from your property. Weedons Tree Surgeons Nottingham are the two brothers Josh and Sam Weedon. Both are qualified tree surgeons with a passion for what they do best, tree care, tree felling and removal, all other tree surgery jobs, landscaping and garden maintenance. Possible Reasons for Removal: The foliage has lost its visual appeal due to disease, destroying its limbs and leaves. Limbs, branches and leaves are too close to your home, blocking much needed sunlight to prevent moisture build up on the walls and roof of your house. It has sustained structural damage which may cause it to topple over or cause damage from falling branches. You want to change the landscaping and need the tree removed to accomplish this purpose. Roots pose a threat to your home’s foundation or to plumbing pipes. Our trusted tree surgeons will carefully remove the tree and tree stump, leaving your property ready for whatever you have planned. They will ensure the complete removal of even the largest, most difficult tree with no disruption to your property. Our qualified tree climbers can access even the most difficult areas. We utilize only the latest techniques and tree surgery equipment and our focus on safety is second to none! And of course we'll clear up any debris left behind at no extra cost. If you have a tree that needs to be removed, you might be tempted to fell it yourself or use unqualified contractors. Tree removal is a complex and potentially dangerous job and for tree surgeon costs you certainly don't have to break the bank! It should only be carried out by qualified tree surgeons because: Trees can grow again if the roots aren't removed Tree stumps left behind are an eyesore and potentially hazardous Our tree surgeons are skilled at climbing and accessing difficult areas Pruning improves the growth of developing trees and corrects the shape of mature ones. Every cut made to a tree has a lasting effect, whether good or bad. This is why professional maintenance carried out by the Nottingham Tree Surgeons is a wise investment. When a tree cannot be saved, is in declining health or is just no longer desirable, we offer competitive prices for removal. Our staff is trained and equipped to quickly and safely remove trees of any size. Beginning with the initial contact through to the final clean-up, you can rely on Josh & Sam Weedon to provide you with a level of customer service that meets and exceeds your expectations. Contact us today at 07905 675171 - 53 Charles Avenue, Eastwood, Nottingham NG16 2AG, Eastwood, Nottingham NG16 2AG - http://ift.tt/1U2ZsD0 by Tree Surgeons Nottingham
0 notes
Text
New Post has been published on OmCik
New Post has been published on http://omcik.com/the-surprising-way-money-can-buy-you-happiness/
The surprising way money can buy you happiness
by Maurie Backman for The Motley Fool @CNNMoney August 4, 2017: 10:55 AM ET
You’ve probably been told many, many times before that money can’t buy you happiness (or love, for that matter). But a new study is challenging that notion.
Researchers at the University of British Columbia and Harvard Business School surveyed more than 6,000 adults in the U.S., Canada, and Europe, and asked how much money they spend regularly to gain more free time. The results? Those who bought themselves the most free time identified as being the happiest.
‘; var storytext = document.getElementById(‘storytext’); var heightToSkip = 0; function resetValues() totalHeight = 0; targetChildElement = null; // Check if story is in the blacklist of articles to remove smartassets // [2017.07.27] Results of a one-off request from r.barbieri if(BLACKLIST[location.pathname] === true) return if(storytext == null) console.log(“Error finding storytext element for SA embed”); return; for ( i = 0; i 0) heightToSkip -= storytext.childNodes[i].clientHeight; resetValues(); else if(heightToSkip minHeight && targetChildElement != null) //console.log(“total height = ” + totalHeight); //console.log(“childNode = ” + targetChildElement); storytext.childNodes[targetChildElement].insertAdjacentHTML(‘afterend’, smartAssetDiv); smartasset = document.getElementById(‘smartasset-article’); smartasset.style.float = ‘left’; // allows module to have text float to right smartasset.style.marginRight =’20px’; smartasset.style.marginBottom =’25px’; //console.log(storytext.childNodes[targetChildElement]); //SMARTASSET.setDivIndex(targetChildElement); SMARTASSET.setSmartAssetScript(); /* bail out since we’re done */ break; } /* div with id=”smartassetcontainer”. Sanity check to only embed once */ else if (storytext.childNodes[i].nodeName.toLowerCase() === ‘div’ && storytext.childNodes[i].id !== “undefined” && storytext.childNodes[i].id === “smartassetcontainer”) break; /* div with id=”ie_column” */ else if (storytext.childNodes[i].nodeName.toLowerCase() === ‘div’ && storytext.childNodes[i].id !== “undefined” && storytext.childNodes[i].id === “ie_column”) resetValues(); /* embeds from twitter, facebook, youtube */ else if (storytext.childNodes[i].nodeName.toLowerCase() === ‘div’ && storytext.childNodes[i].classList.contains(’embed’)) resetValues(); /* cnn video player */ else if (storytext.childNodes[i].nodeName.toLowerCase() === ‘div’ && storytext.childNodes[i].classList.contains(‘cnnplayer’)) resetValues(); /* images */ else if (storytext.childNodes[i].nodeName.toLowerCase() === ‘img’) resetValues(); /* images stored in figure tags */ else if (storytext.childNodes[i].nodeName.toLowerCase() === ‘figure’) { if(storytext.childNodes[i].clientWidth
And it makes sense. Most of us would rather spend our non-working hours relaxing, catching up with friends, or pursuing hobbies, as opposed to cleaning our homes, mowing the lawn, or folding our own laundry. It therefore stands to reason that the more of these pesky tasks we outsource, the more free time we’ll have, and the more content we’ll end up being.
There’s just one problem though: An overwhelming number of Americans currently live paycheck to paycheck, and part of the reason we’re so behind on savings is that we’re paying for services we want, but don’t technically need.
Think about the last thing you hired someone to do so you wouldn’t have to tackle it yourself. Was it a potentially dangerous job, like fixing a roof, or was it a task you were perfectly capable of handling, like trimming the bushes outside your window? Chances are, it was something along the lines of the latter — a luxury, and not a necessity.
Of course, it’s not like most of us don’t deserve a break. Given the number of hours many of us spend on the job, it’s natural to want to salvage whatever remaining time we have left during the week. But if you’re going to consistently spend money to buy yourself happiness in the form of free time, you’ll need to set some priorities and find ways to carve out savings opportunities. Otherwise, what you gain in short-term satisfaction, you’ll lose in long-term financial stress.
Striking a balance
If you’re a strong saver — meaning, you have a fully loaded emergency fund and have begun building a solid nest egg — then you shouldn’t hesitate to use a portion of your disposable income to free up valuable time for you to enjoy. In fact, many people value experiences over possessions, so if you’d rather spend $200 a month on a landscaping service so you can reclaim your weekends for leisure, by all means.
But most people aren’t in that sort of position. For one thing, 69% of U.S. adults have less than $1,000 in the bank. And that’s hardly enough to serve as a full emergency fund. Secondly, a good 33% of workers have no retirement savings to show for, many of whom are older employees with limited time to catch up.
While it makes sense that you’d want to use your hard-earned money to enjoy your life, and spend less time on tasks you find loathsome, there’s a limit as to how much you should be spending on such conveniences when your immediate and long-term savings are sorely lacking. So, if you’re currently paying hundreds of dollars each month to have other people maintain your home, do your laundry, or chauffeur you from place to place, it’s time to rethink that spending and set some priorities.
For example, say you’re currently spending $200 a month on a cleaning service, and another $200 a month on a laundry service. That’s all fine and good if your savings are healthy. But if that’s not the case, then you’ll need to start cutting back on these non-essential expenses and putting the money you free up into either a retirement account or the bank.
How to begin? Using our example, you can start by figuring out which service buys you the most free time, and hanging onto it. For instance, if you’re a really inefficient cleaner, or have a large living space, and the $200 you spend on a cleaning service buys you 12 free hours a month, then it might pay to hang onto it, but spend 90 minutes a week doing your own laundry.
Related links:
• Motley Fool Issues Rare Triple-Buy Alert
• This Stock Could Be Like Buying Amazon in 1997
• 7 of 8 People Are Clueless About This Trillion-Dollar Market
We all deserve to live happy lives, and there’s nothing wrong with buying our way into a more joyful existence. But there comes a point at which we need to be responsible with our money, too. And while saving for the future won’t offer the same short-term gratification as not having to mow the lawn so you can watch the ball game instead, it’ll buy you a different sort of happiness that you’ll come to appreciate later on.
CNNMoney (New York) First published August 4, 2017: 10:55 AM ET
0 notes