#also need to fix reshade to work w my screenshots but the fix is such a pain im 2 lazy plus my only reshade effect is sharpening it anyways
Explore tagged Tumblr posts
Visit Tumblr Blog
Explore Tumblr blogs with no restrictions, modern design and the best experience.
Last Seen Tumblr Blogs


Fun Fact
Tumblr was named as a finalist in Lead411’s New York City Hot 125 in Aug 2010.
Text
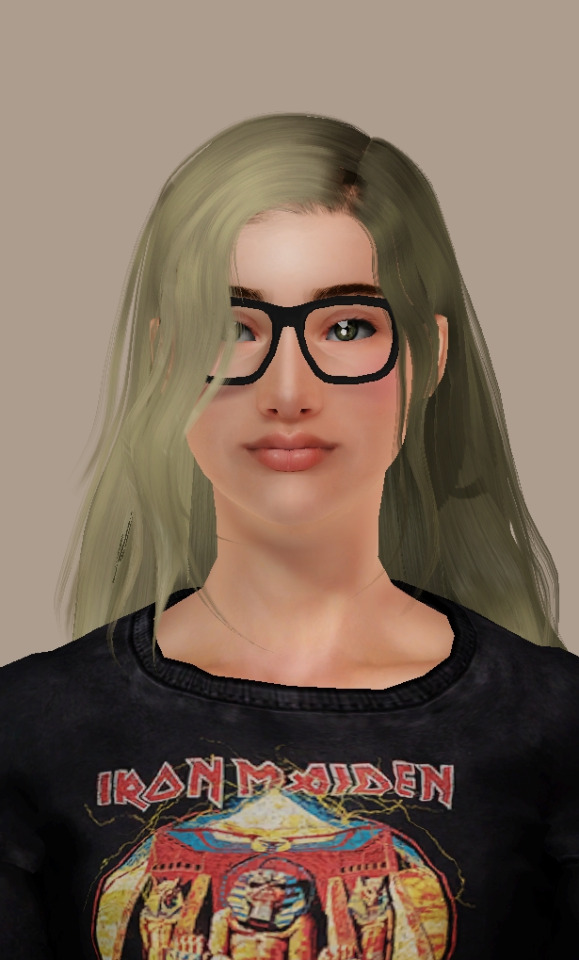

i clearly need to work on my sim making skills in ts3 but i think my game looks decent graphically wise considering ts3 is butt ugly normally
#something seems so off about her though idk i suck with ts3 sliders and their lips always look so off to me they're too wide or too high idk#the sims 3#ts3#simblr#sims 3#i kinda wanna make her in 2 and 4 just for funsies i recently went through and redid all my ts2 defaults i still need to do men and childre#also need to fix reshade to work w my screenshots but the fix is such a pain im 2 lazy plus my only reshade effect is sharpening it anyways
5 notes
·
View notes
Note
Hi, I love building in my game and only recently starting doing it within the past 8 months but for some reason I find them quite lacking, like for some reason I don’t understand layouts, idk they always seem awkward to me. What do you use as references and how can I improve? Also if you don’t mind how do you take such great photos? Taking screenshots in my game have never seemed that impactful like yours do even with my reshade preset.
Hello Nonny,
Here comes a really long-winded answer because I'm overly procedural and detail oriented, lol. To improve your understanding of how to design layouts, I would recommend a combination of the following:
Before you build, figure out what architectural style you're going for, and then study some floorplans online to get a sense of how those homes are typically laid out. Here is a website that has thousands of floorplans for homes of many different sizes and architectural styles that you can familiarize yourself with.
Spend some time planning what rooms you know you want to include before you build. Decide if this home would suit an open concept, or a more traditional home layout when you are choosing which rooms need to be included.
Once you know how many rooms, then decide how large these need to be (I tend to think in terms of furniture placement). I always design my houses around the kitchen, living, and foyer/entrance space. These are the key areas that I enjoy decorating and are the focal points of the home, and once I have figured out the placement and footprint for these, the rest of the rooms come naturally. For example, it makes sense that a panty is located right next to the kitchen. It makes sense to put a formal dining area near the kitchen too, etc.
Always think about the way that rooms connect to each other in real life. Hallways. I was so terrible when I first started building at accepting that some of my floorplan is there just to connect sims to other areas of the home. Hallways are now some of my favorite things to make beautiful.
If you can, for fun, go to some open houses in your area. This is one of my favorite 'hobbies' — I'm lucky to live somewhere that has an annual parade of homes from high-end luxury builders, and I adore walking through and learning about the spaces they designed.
Practice makes progress. Don't be afraid to save your lot, name it version one, then start over and fix what isn't working. Saving an earlier version gets rid of the fear that you'll make things worse and not be able to get the original back!
Regarding Part II of your Question
Reshade aside, I pay a lot of attention to building to capitalize in-game lighting situations because this gives shots that extra umph of atmosphere. Then, I use the in-game camera the same way that I would a real camera. Focusing on details that would catch my eye if I were there in person, and using tab mode and the w, e, s, d keys to 'walk through' builds in a more first person perspective. This will help you see different and more interesting compositions for your screenshots.
35 notes
·
View notes
Note
Storytelling asks 12, 13 and 14 ❤️
𝐒𝐓𝐎𝐑𝐘𝐓𝐄𝐋𝐋𝐈𝐍𝐆 𝐀𝐒𝐊𝐒 / accepting !
these were fantastic questions !! thank you !! ❤️❤️❤️
12. do you actually play the game or do you just use it as a storytelling medium?
lately, it’s been 100% storytelling, but i am so eager to actually play the game soon. i’ve been working on my historical legacy for ........ geez, like five years or so? i guess it began as my bastard version of the decades challenge, lmao. anyway, long story short, i haven’t finished it, and i need to so i can replay the parts i miss. additionally, my plan is to finally get the cottage one when i finish part ii of the story !!!!!!! and do some legacy gameplay (haven’t decided if it’ll be canon yet but it will, as i’ve said, be jered circa 2007).
13. from basic planning to a finished post, how long does that take you?
OOF. it varies? here are the steps u didn’t ask for
get an idea, scribble some notes in my journal or on scraps of paper i then stuff into the journal. draw diagrams as needed.
scour the internet for poses (detour to make my own sometimes)
build a set (this is what i do 65% of the time. sometimes it takes half an hour, sometimes it takes a few hours. depends on if i need to download cc, build an exterior, spend 45 minutes arranging deco items NO ONE WILL SEE ssdjflksgfs)
occasionally, a detour to recolor / convert objects (not often but often enough that i know how to do these things now djfshgkjsg)
dress up my sims !!! make sure they have different versions with accessories as needed, etc. (ex. for the bachelor party, alf & his friends each had six outfits. nightmare.)
take screenshots !!!!! i do this... based on the mental script in my head. so 60% “i know what happens,” and 40% “vibes only.” takes longer if i have to mess around with lighting (using reshade and/or by ... breaking everyone’s poses to adjust the light fixtures. usually for night scenes.)
pick max of 10 screenshots from the 1287398494 i took. i just upload them to photoshop & click around until i’ve got the best of the bunch. sometimes i post the rejects as previews or outtakes.
upload screenshots to tumblr drafts & let them marinate.....
add captions !!!! i’ve started writing them in photoshop, aka the most cursed approach. i just revise & rearrange until it reads well & hits all the marks i had in mind for the scene. i’m WORDY so seeing the text on the image helps them ... not be giving a monologue in every episode. just most. then, replace drafted shots w/ captions screenshots.
potentially, after marinating, i decided i hate the screenshots & redo them !!!!!!!!! not all the time, but maybe 3-4/10 times.
write the scene. this varies wildly bc sometimes i slap two sentences & call it a day, but other times i pull out my writing laptop & pour over it for ... anywhere from a week to twenty minutes.
ideally, the draft marinates again, then i queue it at least 10 minutes before midnight
SO ........ overall, i would say this process can take anywhere between 2-3 hours to a few days. the longest i’ll have an average draft waiting is a week ??
14. do you have any regrets about your story so far? if you could go back in time, how would you fix these?
my number one regret is ... not realizing how invested in this hobby i would be, so therefore not bothering to properly plan things !!! winging it was fun and easy, but now i’ve learned so much—from both trial and error & the amazing storytellers i’ve met. still, rather than going back in time, i’m excited to apply all of this to the upcoming parts. hopefully the story will be much tighter, richer, and visually pleasing as a result !!!! also. wish i’d known about the tool mod sooner ......... sigh. lastly, i wish i’d learned how to make my own cc any of the previous times over the years i’ve attempted it. sure would come in handy, what with all the period specific fashion i want >:^( maybe next time.
11 notes
·
View notes
Photo

late ass replies but this time i have so much stuff to reply to that i actually need to split things up into categories :))))
also i apologize if any of this is no longer relevant / i am of absolutely no help :)))
otherwise, if you’ve asked a reshade related question...uh... sometime between christmas and now LMAO then it’s probably here!
nonny :
Hello Mikayla, I hope you're having a lovely year so far. I just wanted to ask this about the dove preshade (1st question here) kindlespice/tumblr/com/post/632163463099269120/ft-reshade-questions-a-theme-question-nonny i'm having the same problem, i have a new computer and after installing the game and it's last 3 updates and then the reshade it's not looking the same and it sucks bc i know how it's supposed to look (1)
the shadows are not as noticeable, the transparency between the walls is not there and the blur is gone (i have miiko´s ghibli's cloud override but i had that on my old computer and the reshade still looked normal) idk if it's the game or the reshade but it sucks bc i love how the original looks like anyways it would be really helpfull if you could answer. Take care and stay safe :))!!! (2/2)
hi hi! thanks for the kind message and i hope your year is going well! if I had to take a guess, I would say that maybe some of your settings in-game have changed? I would double check and make sure you’ve got edge smoothing off, and you could try turning off post-processing as well (im not ACTUALLY sure if turning off post processing does anything but it’s worth a shot!) otherwise i would try removing the preset and redownloading it? maybe the settings of the preset got jacked up and you can fix it by re-installing. let me know if this helps! if not, then you can always dm me so i can see pics of your situation!
nonny:
Hi! Sorry if this is worded odd but I just downloaded your Leif reshade and have completed all the steps, however there is still this blur over the screen which isn't the best for game play. If you could help explain how to toggle it for gameplay/cas that would be great :)
hi hi! the blur is the DoF (depth-of-field). it’s used for taking screenshots and is supposed to make the background all blurry. to disable it, you can use the hotkey shift-2 or open the reshade menu and manually untick the DoF option!
nonny:
Hi, i just installed the latest version of the dove preset and my game is dark. It is the MXAO that is doing it but i don't have the preprocessor definitions box. How do i fix it?
hello! im assuming you have a 4.0 version of reshade if you can’t find the box. in this version, it’s a blue tab called “Edit Global Preprocessor Definitions” beneath all the toggleable effects. if you have an earlier version, it should be under the “settings” tab at the top though.
nonny:
Hello!! Thank you so much for your work! I have a really quick question - so I am trying to work with the reshade and got it all set but when I play around with it, my objects don’t look “rounded”. If that makes sense. Other people who use it, their objects look rounded and smooth and just different (I have an image for reference) but mine just looks like the normal objects just different colors. Is there something I’m missing or doing something wrong? I have all the settings correct. :)
hi hi! hmm, im not really sure what that could be... probably something to do with mxao bc it’s always something to do with mxao lol. I would double check to make sure you have this line in your preprocessor definitions: RESHADE_DEPTH_INPUT_IS_REVERSED = 0 this line should equal 0 for the mxao to work properly. that might give you the “rounded” look. if this doesn’t fix it for you then you should go ahead and dm me so i can see what the game looks like!
nonny:
Hey, I tried your Dove preset but my game just can't handle it, it's pretty old and I just have to uninstall the reshade (even though I really loved the effect) but I'm scared to do anything in the Game folder or delete anything. Could you please help me with what to remove? I'm scared to break my game if I delete something that souldn't be deleted :( I tried searching for this in your WCIF and reshade questions and couldn't find an answear. Please help
hello! sorry to hear that your game can’t handle the preset :( here’s to hoping you can get an upgrade in the future! anyhow, to uninstall; i believe you only need to remove
ReShade - config settings (it’ll have a little paper w/ gear next to it)
d3d9.dll - application extension (it’ll have a little paper w/ gears ON it)
d3d9 - text document (little paper w/ lines icon)
reshade-shaders - folder
your reshade presets - config settings (if you remove the files above first though, you won’t be able to use/see these in-game)
that should uninstall reshade from your game! and don’t worry, if you accidentally remove something you didn’t want to, you can “verify your game files” through origin and that should restore any missing files. unless you.. *ahem*... acquired your game through other means... in which case be careful XD
@maddybarbz
Omg I don't know if you are active or not but I'm having some problems. So I downloaded the 3.0.8 and it was going smoothly but I loaded the game it said that magic bloom had issues.
i don’t know if im active either. probably not tbh XD but im here now so here ya go! i would recommend deleting the shaders you’re having problems with and then putting back the 3.0.8 shaders you downloaded. it’s really easy for things to break / be incompatible during the install so your best bet is always to delete the ones giving you trouble and put the new ones in.
@kaiamikulka
hi! I’ve been jealously stalking your page for a while, because I’m in love with the dove preset, but I’m very confused about how to download it. My computer keeps marking it as a virus, so i was kinda scared to download it. and when i finally did, it didn’t show up in my game. could you walk me through how to download it?(i have a pc laptop)
Thank you so much,
Kaia☺️☺️❤️❤️❤️
hi hi! lol im flattered for the jealousy stalk! anyway im not sure why it wouldn’t be showing up in game? unless you were so excited that you forgot to install reshade with it? i have a video here explaining how to install a recent version of reshade and set up dove with it so you can check that out here !
@bojanastarcevic
Hello, I've been trying to fix the dove reshade for a long time, but the new version just doesn't support it, and the old version spoils the game and sometimes it won't even start ... Would you consider trying to make the same preset version for the latest reshade version? I'll be very grateful because your preset is the most beautiful I have ever seen?! 😘😂Don't know if you still play of work on your game but like I said if you have time to try make new one couse everyone was looking for it!!! 😉😘😘😘
hi hi! i totally understand not using the earlier versions--these later ones are soo much more user friendly!--but i’ve been able to get the preset to work with later versions (4.7.0 is the latest i’ve tried though) and it looks, if not the same, then very close to the original. I have a video here explaining how i did it if you’re really eager to have it
in the future i guess i could try to re-release the preset? i can’t give you an eta bc im lazy and i fall off the face of the earth regularly, but i do think it would help to have updated instructions right on the face of the download.
#i think i might make another reshade video#one that's not an hour long and is more put together LMAO#like#i should actually go IN GAME to show people how busted reshade really is#XDD#rereleasing dove is probably the play too...#god i really wish i had put a read more on that post#:((((#asks#reshade
13 notes
·
View notes
Photo

HELLO EVERYONE ok i’m finally doing this after like 84 years lmao
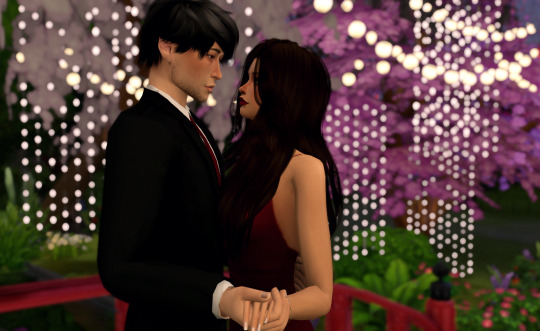
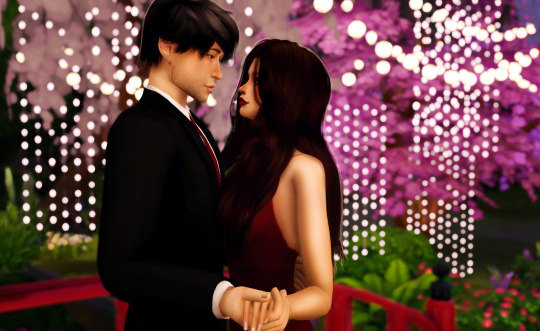
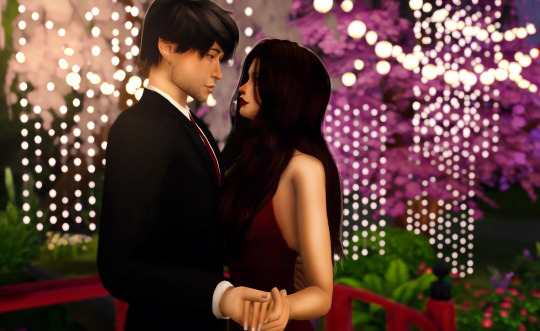
SO yeah several people in the past few months have asked me about my editing process and i said that i’d hopefully do it after gen 2 stuff and since i’m taking a break from gen 2 and wanna stall bc returning to gen 1 will be painful, ya girl got her ass to go through with it. keep in mind, this tutorial is for people who already know the basics of photoshop. if you don’t there’s many tutorials online that’ll help beginners. i’m gonna be editing a pic of val and chance all dressed up and ready to crash a prom to get lit with their homies maggie and eli
*rosanna pansino voice* LET’S GET STARTED
so i use reshade and i believe the version i have is 3.0.7 or something idk but it’s 3.0 and i switch between 3 presets that are my own. the one i use the most started with pickypikachu’s cinematic preset as a base.
now, i know not everyone has reshade, but there’s still a way you can mimic the DOF effect with photoshop. when my stubborn ass edited everything myself all i did was duplicate the photo, apply field blur and adjust the bokeh lighting, added a layer mask and with a brush using the color black, i “colored” in what i didn’t want to be blurry and BOOM ya got that DOF goodness
so for DOF i use either the marty mcfly shader or the matso shader and even both, like in this case. i also love that sweet mxao bc ooh yess them SHADOWS. but unfortunately bc i’ll never ever let go of alpha hair and you’ll have to rip them away from my cold dead hands, ya get this shit.

the dof and shadows cutting through the hair making it look ugly and blurry and just all around BLECH

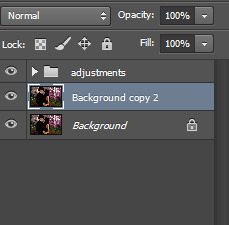
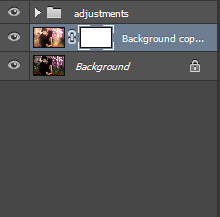
so when taking screenshots, i take two photos. one with the dof and mxao and another without those shaders
now i open both pics in photoshop and layer the photo with the effects over the one without
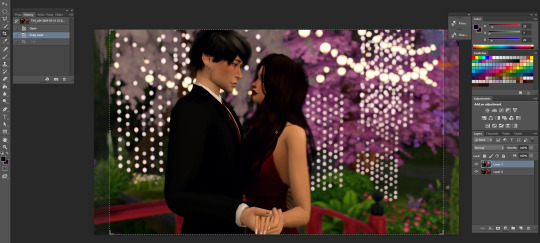
ok this is totally optional and you don’t have to do it but i like to crop my photos and the preset for my cropping dimensions is 1150 x 705 bc that’s what i’m going to resize my photos to (w/ 300 resolution). again, totally optional, you don’t have to do this part but i do.
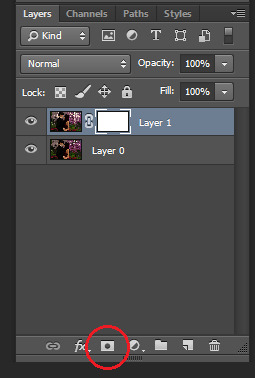
so now i add a layer mask to the top layer
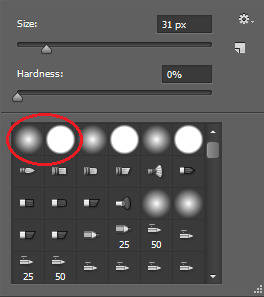
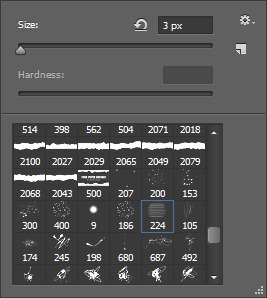
next i select the brush tool and choose whatever brush i wanna use. i usually switch between these two brushes depending on what i need at the moment. and make sure the color you’re painting with is black.
and now just “paint” over the ugly parts to erase them. depending on your photo this can sometimes take a while, but hey ya get that dof and beautiful alpha hair. i also take this time to erase some of the blurriness that forms around my sims from the dof effect


right click on the layer and select “merge down” and i’m left with this. obviously, you see some parts that aren’t blurred anymore but i just fix it with the blur tool at 100% opacity, zoom in on the unblurred edges and blur them in with whatever brush i choose. i personally choose the one with hard edges and i make sure the brush size is very very small. this part’s also a lil time consuming so ya gotta be patient.
doesn’t that look better? now it’s time to get to the actual editing lmao. first, click layer > background layer to make it a background. this is necessary for me bc of the photoshop action i use.
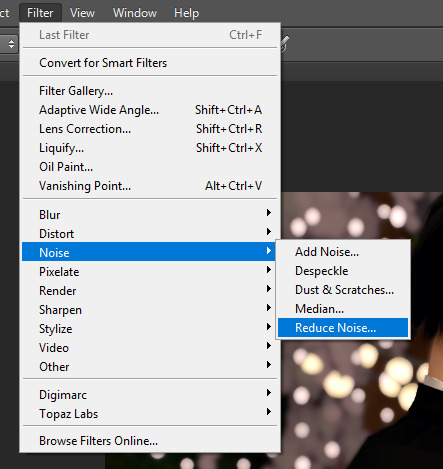
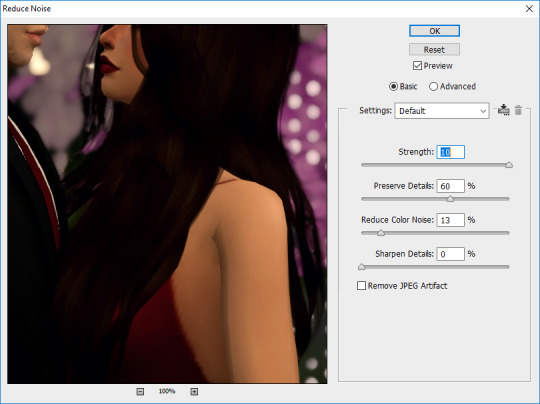
so in order to give my pics that “crisp” look, i first reduce noise and these are my default settings

then i do topaz clean
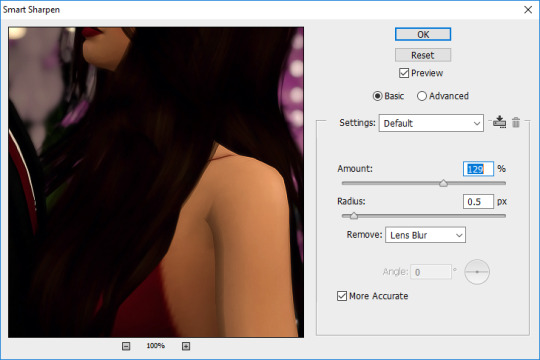
then smart sharpen
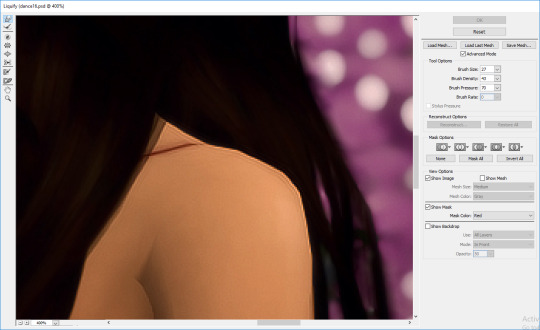
then i use the liquify tool bc sometimes there’s jagged edges on the shoulders, elbows, chins, etc. that i wanna smooth out. i also use this to adjust facial expressions, like for this i wanna make the smiles curve up a lil bit more bc chalerie are in love and happy

now this is the part where i kinda nitpick bc i’m a perfectionist lmao like i clean up some lines on val’s arms and fix that weird spot on the collar of chance’s shirt, all that small stuff people wouldn’t notice but I DO so i fix it

alright now it’s time for me to draw hair! again, this is optional and i understand not everyone has a tablet or likes drawing hair so skip this if it ain’t your thang. first add a new layer for the hair.
i like to add extra hair to make it more full or fix clipping and “highlights” to kinda emphasize the lighting effects i’ll do later and i usually go with a lighter color of the hair for the highlights OR i do the color of the lighting. in this case i’m just going with a very light brown color. this brush is from this set by castrochew and i have the opacity at 100% and size at 3 px.

this is what it looks like after i draw all the hair. and for the highlights i always reduce the layer opacity to 50-60% or even less than that depending on how subtle i want them to be. after that, i merge them all down.

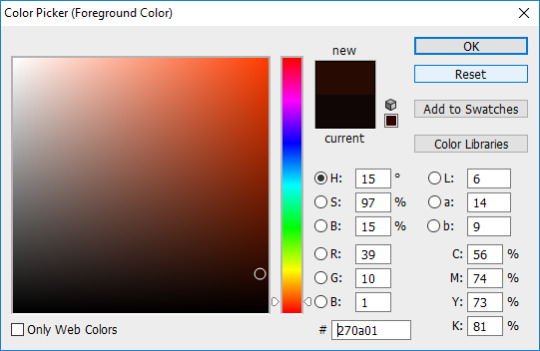
now it’s time to do all the shading and highlighting. make sure you do it all as separate layers, too. even tho i use mxao it still doesn’t do enough for me, so i always add shadows and i recommend you use dark brown for the shadows as black is a a bit too dark especially when you’re adding shadows around the faces. like y’all don’t want it to look like your sims put mud on their face. trust me guys i contour my face.

now take a hard edge brush and draw where you wanna add shadows

apply gaussian blur and erase any excess “shadows” then reduce the layer opacity to your liking. now keep doing that in other areas where you wanna add shadows. it all depends on the picture and i really just use my general knowledge of how lighting and shadows work. remember, make sure each shadow and highlight you add is a separate layer!
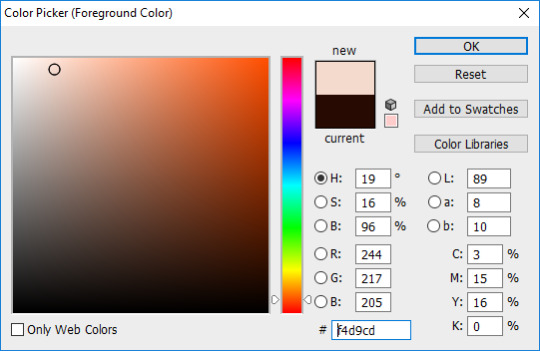

for highlights, use a light color, a soft edge brush, change the brush opacity to 60% and change the layer mode to “soft light”. like with the shadows, just paint whatever you wanna highlight, gaussian blur, reduce layer opacity, etc. then after you’re done shading and highlighting, merge all the layers down.

then to enhance the highlights even more i use the dodge tool with the exposure at 25% and paint over all the highlighted areas

so this is how it looks after i did all the time consuming stuff and now it’s time to play with COLOR YEAHHHHHH
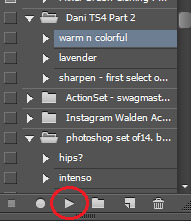
this is the action i’ve been using forever and it’s a ride or die, always got my back, never fails me, always there when i need it. all i gotta do is click on that and press the “play” button and everything’s beautiful and colorful and all my problems seem to go away and suddenly the your lie in april soundtrack is playing the background
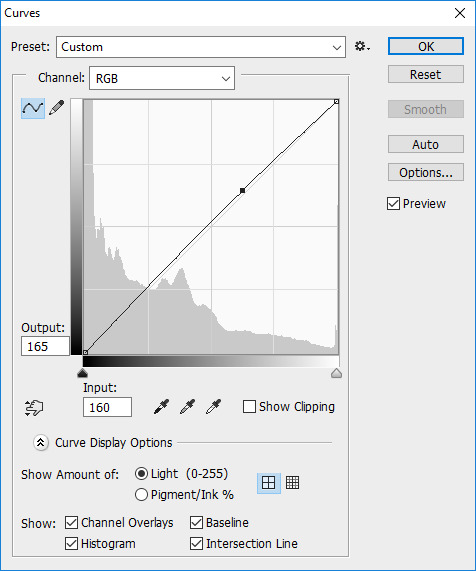

but most of the time i untick the “curves” layer from the action as it can be too bright for me and i just adjust the curves of the image to what i prefer.

now it’s my favorite part! time to add that good-ass LIGHTING and since i went crazy with the lights for the background, it’s gonna be fun to do this one hehehe. ok so first duplicate your image and then choose the color of the lighting you want. for this pic, i want the lighting to be a nice light warm yellow/orange color

now for the brush mode, choose “linear dodge (add)” and change the opacity to 35%-45% or hey even higher if ya wanna go bright as fuck. and get a soft edge brush and make it big. like fucking BIG. you see the size i put it at? yeah, make it big bc we want that beautiful shit EVERYWHERE
YEAH DAS DAT SHIT I LIKE. keep painting over areas ya wanna see glow and even paint over the same area twice to make it brighter. hell, don’t just stop at one color. add other colors of light if ya want. add some pinks or blue or purple, adjust the brush size, go crazy. BLIND EVERYONE.

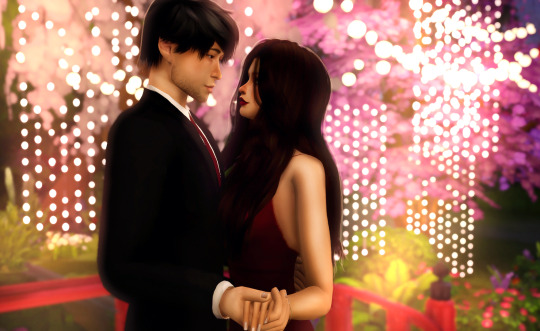
buuuuuuut with all the sweet lighting, it tends to make your pretty pic look all washed out and also lighting doesn’t always work that way. and that’s why i told y’all to duplicate your image bc we’re gonna add a layer mask again and with a soft edge brush you gotta erase some of that lighting. change the brush mode back to normal, put the opacity at 100% and make sure your brush is black and get rid of what you need to. but what’s good about this is you don’t have to be perfect and it’s ok if there’s still some lights on your sims bc now it looks like the light is shining on them awwww. now merge that layer down
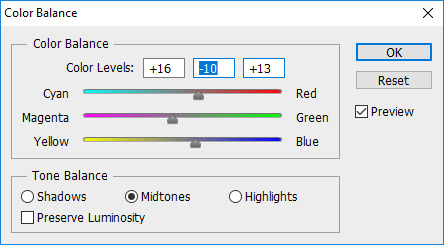
now color balance! i like to enhance the red, magenta, and blue most of the time but as always it all depends on the photo and what your preference is.

all that’s left to do now is change the image size. i change the resolution to 300 ppi (it doesn’t really do anything but like it’s become a habit of me to do it so i do it idk) and make sure if you’re making your image smaller, you apply “bicubic sharper” so your image stays sharp when you change the size

AND THIS IS THE FINAL PRODUCT.
so this is my editing process and i hope some of you learned some stuff from this. also please keep in mind that i also encourage y’all to do your own spin on things when you edit. i’m all for taking tips from others and learning cool new tricks but develop a style that fits YOU. eventually you’ll find it and i know that you’ll end up creating something amazing that shows how unique and lovely you are.
anyways, i’m so glad i finally got this done. love you guys 💖💖💖
#the sims 4#sims 4#ts4#simblr#tutorial#aliya's editing tutorial#giving it that tag so i can make a link on my blog#i really hope i explained things well#like i don't do tutorials#but here ya go#now i gotta edit the other photos for this photoshoot byyyyeee
91 notes
·
View notes
Note
hiiiiiiiiii zee!! i was wondering how you edited your gameplay photos? they're so pretty and colourful and wow!!!! i love!!!!!!
aaAAH thank u for the lovely compliment anon!!!! i’m glad u enjoy my posts
honestly my editing varies from screenshot to screenshot but unless i have to fix the lighting/shadows/color tones i just slap my usual bunch of actions and psds on them :-) it’s really.. not much but i made a lil tutorial under the cut just in case anyone else is interested!!
click here if the read more doesn’t work!

RESHADE ONLY
1. usually i use a tweaked version of whiisker’s vintage summer reshade but if the lighting is weird or the surroundings are overexposed i’ll switch to my personal preset (that i’ve only used for my interior posts so far) or whatever preset i have in my game that looks good :-)

+ HAPPY PILLS PSD
2. then i go into photoshop (i’m using cc 2018) and apply nookstones’ happy pills psd and if i need to, i’ll adjust the opacity and layers
i also mess around with the color balance if i find the screenshot too yellow/blue/red etc
sometimes the psd might overexpose the image (usually when it’s taken indoors) or it isn’t enough to make it as vibrant as i’d like. in those cases i’ll switch to running the share the rainbow action set (highlighted are the actions i use often)

if i think the image looks… rough around the edges, i use the smooth action included in nookstones’ pop! action set. i don’t use topaz clean or any topaz plugin!!
when i’m editing screenshots with jupiter i like to erase the blur on her face + chest + arms so her freckles show, and erase the blur around more defined areas on sims/backgrounds/wherever

+ SHARE THE RAINBOW + SMOOTH + RESIZED + BORDER
3. once i’m satisfied w everything, i flatten the image and resize the width to 1080px. then i run smubuh’s border actions (i usually go for the medium/large sized borders). or sometimes i’ll reverse the last 2 steps i don’t know if it makes any difference LOL
if i have more than 1 screenshot to be included in a post, i like to merge them into one big image. cuz if you compare posting them in one image vs in a photoset, the former usually looks much better and no need to click for hq!!!
i think that’s about it to my editing!!! IT’S REALLY ONLY 3 STEPS LMAO but i hope this helped!!!!!!!! :-)
81 notes
·
View notes