#also he’s def a double wielder
Explore tagged Tumblr posts
Visit Tumblr Blog
Explore Tumblr blogs with no restrictions, modern design and the best experience.
Last Seen Tumblr Blogs


Fun Fact
Kazakhstan’s Minister of Communications and Informatics has blocked the Tumblr site because it contained 60 sites of terrorism, extremism, and pornography in 2015.
Text
COD Star Wars Rebels!Au
The Rebel Ghost Squadron Featuring:
Mando! Ghost- Traditional Mando, NEVER takes the helmet off (Din Djarin coded). Empire and or Death Watch killed his clan
Mando! Soap- non traditional mando
Former Republic Admiral! Price- he was a non Jedi military leader during the clone wars who left when the empire came into power
Jedi! Gaz- Jedi knight during Clone Wars, survived order 66 with help from Price
#everything comes back to Star Wars#also I’ve said it before but I need ghost in mando armor#also I’ve been thinking about Jedi!Gaz A LOT#Like someone give him a padawan he’d be a great master#also he’s def a double wielder#cod Star Wars au!#mando! Ghost#mando! soap#Jedi! Gaz#simon ghost riley#simon riley#john soap mactavish#soap mactavish#kyle gaz garrick#gaz cod#john price
13 notes
·
View notes
Text
I am cringe but I am free
By which I mean here are my Survive kids with Genshin weapons and visions hcs
Takuma is the main character and therefore he is the avatar, he has all the elements. He'd be a sword wielder, and like Traveler he can be a support or dps depending on the element. He's best as a pyro dps.
Minoru is a pyro sword. Survive's very own Bennett (absolutely busted support/sub dps). Attack buffs and elemental infusion. He'd have a passive talent to increase movement speed during the day like Dehya.
Kaito is ALSO pyro but a catalyst. But like a catalyst specifically in the way that Shikanoin Heizou is a catalyst. Meaning that instead of casting fireball he just punches you in the face with a flame-covered fist. Ooooh he'd have a mechanic that uses charged attacks to switch between elemental and physical damage so he can still fight enemies immune to pyro. First ever phys dmg catalyst XD 100% on-field main dps, does more damage if his hp is in the red. His fourth constellation is a shield.
Miu is an electro claymore. I like when tiny people have big weapons. Also the mental image of Kaito constantly being stressed out by her swinging a giant sword around is funny to me. Debuffer with a summon/taunt like Mona. Her damage scales on defense instead of attack. Passive talent increases party members' def by a percentage of her own.
Ryo is a cryo archer. Off-field dps who specializes in cryo application to set up reactions for the others. Party members within the cryo field he creates get elemental mastery boost. His C6 has an insane party-wide crit damage boost. Basically the midpoint between Diona and Faruzan.
Shuuji is a hydro polearm. Very similar role to Xingqiu imo. Minor def and healing, big damage boost. Off-field dps. Despite being hydro instead of electro his kit revolves around energy recharge (also like Mona).
Aoi is an anemo catalyst and healer. If you build her right it's just infinite heals, your team is functionally immortal. Her ult is good for crowd control like Venti or Sucrose and her passive talent is doubling the yield when cooking healing foods.
Saki...dendro bow. S++ tier dendro application for reactions (does this make her best teammates Shuuji and Miu?) primarily a sub dps but her ult is like Qiqi's where it inflicts a debuff on enemies that lets her allies heal themselves by attacking the enemies with the debuff.
Akiharu...geo sword. I wanted to say catalyst or polearm at first but I think he should have a sword to mirror Takuma. Shielder/off-field dps like Zhongli. Passive talent has a chance to double talent books when crafting.
Miyuki...I'm trying so hard not just say electro catalyst like Yae Miko because haha kitsune shrine maiden. I'm gonna say geo polearm instead. Buffer/dps who uses summons like Furina who can also heal by sacrificing her own hp like Shinobu.
8 notes
·
View notes
Text
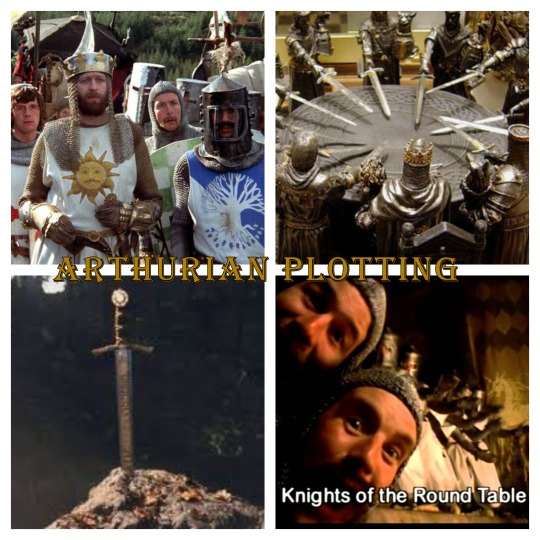
Knights of the Round Table Plot
Do you like fun? Action? Adventure? Does saving the town from disaster and acting like a hero of legend appeal to you? Want some petty drama between characters that stems from centuries old beef? Then this may be the plot for you. Excalibur has been pulled from the stone and in so doing has called for the knights of the round table to return to Arthur and work together as one.
How this works: When Excalibur was removed from the stone, a wave of magic spread throughout Swynlake like a call to arms reaching out to people who would be deemed worthy of continuing the legacy of the knights. Those people in that moment would then have been flooded with the memories and knowledge of the knight that they most closely resembled. The goal of the sword was to bring these people back together in order to protect the realm (or Swynlake) from harm. It’s up to the mun as to what elements of a knight’s story your character receives/how you decide to handle it. See this post for an example of the flood of memories that can occur. From there the goal is to bring the knights together and have them experience modern day quests to protect Swynlake/adventure etc. The dramatic backstories can also help foster interesting/weird/dramatic new relationships with characters.
If you’d like for your character to be given the memories/experiences of former knights, please fill out the tiny app under the read more. YOU DO NOT NEED TO BE A MALE/NON-MAGIC TO APPLY.
List of Knights:
•Sir Galahad (Son of Sir Lancelot): known for his gallantry and purity and and one of the most perfect of all knights. It’s said he was able to defeat a lot of his enemies because he was pure. One of the ones who quested for the holy grail.
• Sir Lancelot: known as Arthur’s closest friend/greatest companion and the greatest swordsman and jouster of the age. Also known for wrecking Arthur’s marriage and hooking up with Guinevere basically helping destroy Camelot. (I have two seriously great plot ideas regarding Arthur and Lancelot so getting Lancelot would be so so good) • Sir Gawain: known as Arthur’s nephew and as a formidable, courteous, and also a compassionate warrior, fiercely loyal to his king and family. He was a friend to young knights, a defender of the poor, and as "the Maidens' Knight" a defender of women as well. (personally feel Gawain should def be a lady knight this go around) • Sir Percival: One of the knights who looked for the holy grail. Renowned for his strength and fighting prowess. He was kind of beefy. But also a cool dude. • Sir Lionel: a double cousin of Lancelot, he was apparently raised by the lady of the lake in her underwater kingdom. He proves himself very unworthy of the holy grail by trying to kill his brother for not rescuing him. *Strongly recommended to be a magick. • Sir Bors: brother of sir Lionel, was worthy of seeing the grail. Lionel tries to murder Bors, and Bors does not defend himself, refusing to raise a weapon against his kinsman. Became Arthur’s successor when Arthur died. • Sir Tristram/Tristan de Lyones: He was sent to fetch Iseult/Isolde back from Ireland to marry the king. However, he and Iseult accidentally consumed a love potion while en route and fall helplessly in love; the pair underwent numerous trials that tested their secret affair. Also known as a great musician and falconer. • Sir Gareth: Arthur’s nephew and Gawain’s brother. He avenged the death of a fairy king. He defeated a bunch of knights since he’s apparently a badass himself. Was accidentally killed by Lancelot, though he was also like a son/younger brother to the dude. Oops. • Sir Bedivere: known as the one who returned Excalibur to the lady of the lake. A handsome one handed knight. He was described as the most handsome man in the world other than Arthur and the wielder of a magic lance. *Strongly encourage a character with a disability • Sir Bleoberis: Though described as skilled and honorable, he is also depicted as malicious. One example is with King Mark's marriage with La Beale Isoud, where Bleoberis rode into Mark's court, demanded a gift, and, on being granted it for sake of his renown and his place as a knight of the Round Table, he helped himself to Sir Segwarides' wife as the fairest lady at court and rode off with her. He also tried to kill Gawain's son, Guinglain, at the Perilous Ford. • Sir Brunor: was nicknamed ‘the badly-cut coat’ by Sir Kay after his arrival in his murdered father's mangled armour and surcoat at King Arthur's court. He vowed not to take it off until his father’s death was avenged. Was also known as the Good Knight without Fear. • Sir Palomedes/Palamedes: Had an unrequited love for Iseult/Isolde so he and Tristram/Tristan clashed. The two basically had a love hate relationship. Was known as the hunter for the questing beast, and being on Lancelot’s side when the affair with Guinevere is revealed. Killed by Gawain. • Sir Lamorak: was referred to as Arthur's third best knight, only inferior to Lancelot and Tristan. He was known for his strength and fiery temper. His father killed Gawain’s father which led to Gawain eventually turning around and killing Lamorak’s father. And then to make things worse, Lamorak decided to hook up with Gawain’s dad’s widow therefore making their blood feud worse. Rejected an offering of truce from Arthur, and ended up ambushed and killed.
• Sir Pelleas: was the son of a poor vassal and ended up falling for a high born maiden. She spurned and humiliated him and refused to let him into her castle. Pelleas goes to Gawain for help but Gawain ends up being into the maiden too and hooks up with her, devastating Pelleas. Gawain eventually remembers his promise to help and convinces the woman to love Pelleas. • Sir Kay: the foster brother of Arthur’s, sort of helped raise Arthur and teach him how to be a knight. Also kind of dickish. He’s most associated with hot-headedness and a fiery temper supplemented by his role as an incompetent braggart.
• Sir Ector/Hector de Maris: younger half-brother of Lancelot. Murdered a lady’s fiance so he could be with her. Also had an affair. Deemed unworthy to behold the holy grail. Sides with Lancelot with the Guinevere drama. • Sir Dagonet: considered the court jester. He saw himself as a courageous warrior and acted like he was but in reality, he would flee at the slightest provocation. He often battered his own shield so that it appeared that he had been in a fight – telling all that he emerged victorious of course. • Sir Agravaine: nephew of King Arthur. Was known as the one with hard hands. Proud and kind of a bully. He secretly made attempts on the life of his hated brother Gaheris and participated in the slayings of Lamorak and Palamedes. He played a leading role in exposing his aunt Guinevere's affair with Lancelot which lead to his death at the hands of Lancelot. • Sir Mordred: a traitorous nephew most well known for fighting with Arthur and mortally wounding him even as Arthur did the same to him. He actively worked to expose Lancelot and Guinevere and to ruin the kingdom.
APPLICATION:
Muse: Preferred Knight: Why do you want this particular knight/what would you want to do with them?: (200 words)
6 notes
·
View notes
Text
Kempf: Conniving General (Unit Review)
Available at 3-4★ (Grand Hero Battle Reward)

Lvl 40 Stats (Flaw/Neutral/Asset)
Note: As a Grand Hero Battle reward, Kempf does not have access to boons/assets and banes/flaws.
HP: 39/42/45
Atk: 30/33/36
Spd: 30/33/36
Def: 24/27/31
Res: 23/26/30
Neutral BST: 161
Max Dragonflowers: 5
Skills
Weapon: Venin Edge (400 SP)
Mt: 16. Rng: 1. Grants Def +3. After combat, if unit attacked, deals 10 damage to target and foes within 2 spaces of target and inflicts follow status effect on foes: Foe cannot counterattack through their next actions.
Cannot be inherited. Cannot be refined.
Assist: None
Special: Aegis (200 SP)
Reduces damage inflicted by attacks by foes 2 spaces away by 50%.
Can be inherited. Melee units only.
A: Fortress Res 3 (240 SP)
Inflicts Atk -3. Grants Res +5.
Can be inherited.
B: None
C: Savage Blow 3 (200 SP)
If unit initiates attack, foes within 2 spaces of target take 7 damage after combat.
Can be inherited.
Analysis
Kempf arrives alongside other Thracia characters as the latest sword cavalry in game. His stat line is rather mixed granting him multiple strengths but no immediate niche. His base kit is rather jumbled, tossing around skills with no solid cohesion. His new sword Venin Edge however is a powerful tool and makes Kempf arguably one of the strongest chip damage users in game.
Kempf’s stat line doesn’t really lean him towards a specific strength. He boasts decent defenses starting at 27/26 Def/Res allowing him to tank a few hits. HIs offenses, both starting at 33 Atk/Spd, grant him some offensive prowess. Without a high enough speed stat to avoid doubles however Kempf will find himself doubled often. His base kit does, in a way, address this issue. To protect himself better from magic ranged assaults he carries Fortress Res as his A skill and Aegis as his special. Fortress Res will raise his Res by 5 in exchange for -3 Atk. Aegis, when activated, will reduce damage from a ranged hit by up to 50%. This means that if Kempf were to originally take 30 damage from an attack, he would only take 15 instead with Aegis ready. Aegis is, however, a long turn cooldown special. With no way to increase this cooldown reliably and with the presence of cavalry effective magic, this skill is much better swapped out for another special.
Where Kempf shines however, is his unique sword. After Kempf has attacked, Venin Edge will deal 10 damage to both his foe and enemies within two spaces of said foe. On top of this chip damage Savage Blow will deal another 7 damage to enemy foes within range. These foes will then be inflicted with a status effect that will not allow them to counterattack for the duration of their next action. This effect is similar to status effects the staves Candlelight+ and Flash+ give. This additional effect protects him from Vantage setups and removes the need for him to run Hardy Bearing. The end result of all of this is a potent support and sweeper unit who can effectively chip away at a team’s defenses.
On his first merge, Kempf will gain +2 HP/Def and +1 Atk.
Reasons to Invest in Kempf
You like Kempf and intend to use him in a core team, whether it be for Arena, Aether Raids, or a Cavalry team
You’re interested in building Kempf due to his interesting playstyle and his powerful PRF
You have obtained all or most previous copies made available and do not mind the grail cost
Reasons NOT to Invest in Kempf
You don’t intend on using him as a core on any team or in any PVE game modes such as Rival Domains or Grand Conquest
You don’t play Aether Raids and have no interest in obtaining grails
You consider Kempf’s playstyle and base kit uninteresting and would rather fodder his skills off to other heroes you use
You already have an invested sword unit that you already use on your core Arena & or Aether Raids team
Similar Units
Note: As a Grand Hero Battle reward Kempf does not have access to boons/assets or banes/flaws and therefore is not directly comparable to any summonable units.
Cain: The Bull (42/32/32/27/21)
Kempf: Conniving General (+0/+1/+1/+0/+5)
Note: Cain and Kempf have access to uninheritable skills and are thus not directly comparable.
Roy: Brave Lion (38/32/34/26/24)
Kempf: Conniving General (+4/+1/-1/+1/+2)
Note: Roy and Kempf have access to uninheritable skills and are thus not directly comparable.
Builds
Budget:

While his base kit does provide him with the tools to be a powerful sweeper, his mediocre speed does provide a bit of an obstacle. In the following budget sets we’ll look at ways to address this problem.
The set on the left focuses on making him a sword counter by utilizing Swordbreaker. Swordbreaker allows Kempf to deny sword units multiple follow-up attacks while granting him a guaranteed two attacks. This expands Kempf’s list of targets in a safe manner. Death Blow is taken for its synergy with Savage Blow while Darting Blow is taken to not only boost his Spd but to also break ties with other Swordbreaker users. Venin Edge and Savage Blow will work hand in hand to then chip away at his opponents with relative ease. With all his skills active Kempf reaches 55/39 Atk/Spd while in combat.
The set on the right focuses on making him an axe counter via Axebreaker. Instead of focusing on his damage however we’ll be leaning into his chip damage potential. Double Savage Blow plus Venin Edge allows Kempf to deal a max of 24 chip damage to his foes after combat. This effect can easily break teams and open his allies up to opportunities of attack. Axebreaker meanwhile allows Kempf to serve as a sure counter against axe opponents. Darting Blow will push Kempf’s speed up to 39 allowing him to safely avoid doubles when initiating against other opponents and may help in breaking tiebreakers against opponents.
Kempf’s seal options include: Attack+3, Speed+3, Atk/Spd 2, Spd/Def 2, Blow skills, Brazen skills, Heavy Blade, Renewal, Poison Strike and Savage Blow.
Galeforce:

A Galeforce set compliments Kempf’s goal of sweeping his opponents. The chip damage he deals in addition to the status effect inflicted allows him to make easy work of vulnerable opponents.
The set on the left has Kempf running a simple Life and Death/Desperation setup. Life and Death will grant Atk/Spd+5 in exchange for -5 Def/Res and helps push Kempf’s offenses substantially. Odd Spd Wave is given to help bolster his speed up to a respectable level. The key element here is the use of Heavy Blade. Provided that Kempf can double and has higher attack than his opponent, Kempf will proc Galeforce after a single round of combat, allowing him to then retreat to safety, finish off his opponent or position an ally to strike against his foes. What separates Kempf from other Galeforce users however is Venin Edge’s dual effects. Along with providing chip damage, his target nor opponents within 2 spaces will not be able to counterattack. This allows Kempf to sweep multiple opponents in combat with little to no worry about repercussions.
The set on the right meanwhile runs Swift Sparrow/Desperation and focuses primarily on making Kempf faster than his opponents, granting him the chance to do as much damage as possible. Swift Sparrow will also not require Kempf to sacrifice his decent defenses allowing him to tank more hits than he normally would be able to. Otherwise the goal is the same as the build on the left: activate Galeforce, then sweep another opponent or retreat to safety. If he initiates combat, Kempf reaches 53/42 Atk/Spd in combat.
High Investment:

Kempf is not confined to using his default sword. With heavy investment, he’lll find success in both player and enemy phase sets. The following builds are best intended for players who plan on fully merging the Conniving General.
The set on the left operates on a similar mindset as the previous Galeforce setups but instead focuses on quad attacking his opponents rather than pure chip damage. With the newly released Life and Death 4 skill, Kempf can gain +7 Atk/Spd in exchange of -5 Def/Res. With an incredibly high boost to his offenses he can afford to use Brave Sword. Brave Sword will allow a unit to attack twice before a foe can counterattack. If the wielder doubles their opponent naturally, they will be able to quad their opponent. Thus the goal with this set is to quad foes, activating Galeforce in the carnage and dealing as much damage as possible. Joint Hone Spd is taken to bolster his speed and increase his chances of doubling. Brazen Atk/Spd will activate once Kempf falls below or at 80% of his base HP - more or less around the same HP that Desperation will come into play. With all of his skills active, Kempf will reach 60/51 Atk/Spd while in combat.
The set on the right focuses on Kempf’s defenses rather than on his offense. Kempf naturally comes with a decent defensive spread which, among sword cavalry, is a rare occurrence. He can become quite an effective physical wall provided the opportunity. First we use Fort. Def/Res to grant +6 Def/Res in exchange for -2 Atk. We then have Rouse Def/Res, which will grant Def/Res +6 if Kempf is alone at the start of his turn. Quick Riposte is utilized to grant Kempf multiple followup attacks when attacked on account of his middling speed. Next we have Dull Close and Guard Sword which go hand in hand with each other. Guard Sword+ has the skill Guard built into it, meaning that regardless of whether Kempf initiates combat or is attacked, enemies will not be able to build their specials off of him. Dull Close then nullifies any buffs to a melee unit’s stats while in combat. With a meta that heavily focuses on buffing unit’s stats, Dull Close can leave numerous teams at a disadvantage. With all his skills active, Kempf can reach 44/46 Def/Res.
#feh#fire emblem heroes#fe heroes#unit review#Kempf: Conniving General#Book IV Begins: Peony and More#mod asama#sword/cavalry
7 notes
·
View notes
Photo
Archer/Sniper/Bow Knight Clair (Guide/Analysis)
Growths
HP: 30%
ATK: 40%
SKL: 65%
SPD: 65%
LCK: 50%
DEF: 25%
RES: 2%
Analysis
Clair has a very mediocre start with below average bases for her join time. She is very likely to have low damage output and is held back by her terrible bulk. However, she does carry overall good to great growth rates (barring defense and HP), and with her early join, she can grow to become a good and usable unit.
Clair is not necessarily a bad unit, but lacks combat prowess and has survivability issues. Her claim to glory, though, is her extremely high speed growth at 70% (75% in her base class). She has the privilege of being able to double most enemies as well as being the only natural flier on Alm’s route.
She does have potential to be a decent Ridersbane user for Alm’s route, as she has the best movement in his party due to being his only flier. The effective damage from Ridersbane does increase her potential damage output, and her high speed ensures she could at least double unlike the slower lancer-wielders like Clive or Lukas.
However, Clair can enhance her overall performance if reclassed as an Archer. The Archer class line is a great class for any unit to fall back on (by the virtue of the Killer Bow), and Clair is no exception.
Clair will still retain her bad survivability, however, as an Archer, she has access to up to 5-range weapons and her low bulk is salvaged by being able to snipe from afar without retaliation. Bows have hit rate penalties the further you attack, but her great skill stat can help relieve this issue.
Due to Clair having the highest speed growth in the whole game, she is one of the few that do not get hurt by the Archer line’s speed growth penalty and the heavy weight of bows. Her high speed ensures she can double all but the fastest enemies, but even if she cannot, she can fall back on the option to use Hunter’s Volley with the Killer Bow.
She also boasts very high skill and luck growths, which allows for her to develop high crit rates. With her high speed, skill, and luck, her stats synergize perfectly with the Killer Bow. Its naturally high crit rate topped with Clair’s great skill and luck stat ensure that she can land crits very frequently.
Also, the fact that the Archer class line does not have a strength growth penalty--unlike her base class as a Pegasus Knight--does help her overall damage output.
It may be an argument of whether Clair is a good Archer or if Archers are just good in general. But overall, Clair’s stats fit in with the Archer class line to a tee, allowing for a very min-max build. She can prove to be a very effective bow-user that will pair well with Alm’s other Archer. Having Clair as an Archer will also open up more options for Kliff and Tobin (the usual Villager Archers) and they could fill in her role as Alm’s Pegasus Knight.
My Personal Experience
Look, I know we all wanted Archer Faye, but I made Clair an Archer instead of Faye just because she was faster and I just really value Physic LOL.
And to be honest, I don’t regret it at all--Clair was arguably my best archer, both in Alm’s and Celica’s route.
Leon is too slow and has a hard time doubling before unlocking Hunter’s Volley. He’s also very vulnerable on enemy phase due to his low speed and bulk. Python is good (and IMO, better than Leon), but has hit rate issues which are amplified when sniping from 3-range or more. Clair had none of these problems, and had a good crit rate to boot.
I always had Clair and Python fighting next to each other so that they could trade the Killer Bow between one another. It’s unfortunate though that they lack a support-chain because that would have really amplified both of their performances LOL.
Overall, a great class for Clair and I would highly recommend this build for anyone.
#fire emblem#fire emblem echoes: shadows of valentia#fe15#clair fire emblem#archer#sniper#bow knight#analysis#guide
0 notes
Text
Jade Dew (Green Jade Reaper Daiklave ****)
When mothers tell their children of a sacred grove whose sole tree blooms only once each lifetime, the sole guardian changes with each and every telling. It is a beast with claws that crush intruders; it is a demon that lures men in to eat their flesh; she is a woman, as elegant as a flower and deadly as nightshade with emerald eyes and cloven hooves. It is she who wields Jade Dew. It is her grove, 100 miles from any mortal city, that inspires the legend.
In ages past, Solars often sought the nature of her grove and she struck them down with crippling blows. Gods and spirits alike avoided the region marked by sorcerous borderlines. Lunars have theorized she is a Fair Folk drawing on tales of a sword that was forged before her conception. Others see her as an elemental whose sole duty is to protect the tree. The few cults who revere her see her as an incarnation of Mara, the Shadow Lover. She does not speak an answer if any have asked her.
The grove is always shaded, the sun just below the treeline, with grass as deep green as jade. One look reveals its beauty, a second look reveals that throughout the perfect circle of the grove, a single blade of grass is sewed in and out of the ground to mark the edge of the domain where nothing grows except for it, the single tree in the center of the enclosed wood, and the swordswoman with her blade. Those who step beyond the boundaries are intoxicated, but the emerald eyes glare at them and the guardians hand drops to her blade. She allows no trespassers.
Attunement: 5m Type: Medium (+3 ACC, +12 DMG, +1 DEF, OVW 5) Tags: Lethal, Melee, Balanced Hearthstone slots: 2 Era: War of the Gods
Evocations of Jade Dew
When the wielder of Jade Dew faces someone with an addiction, they add bonus dice to their attack rolls equal to the intimacy representing that addiction. If the character lacks a relevant intimacy but has the addiction flaw, add +2 dice as if it were Minor. If the character suffers from Sweet Sapling Blight, calculate this bonus with the Intensity of the disease instead (+2 for Minor, +3 for Major, +4 for Defining).
Jade Dew resonates with the guardian of the grove, regardless of the Storyteller’s choice of who or what she is.
Dew-Eyed Guardian
Cost 2m; Mins: Essence 1
Type: Supplemental
Keywords: Dissonant
Duration: Instant
Prerequisite: None
The scent of intoxication becomes visible as the wielders eyes briefly flicker the color of her sword. When she rolls Join Battle with an Awareness based roll, activating this charm allows her to apply her result against the Guile of all enemies in the scene as a Profile Character action, immediately learning if any of them suffer from an addiction. If they do, she gains a point of initiative and her base initiative becomes one higher for the scene.
Special Activation Rules: As long as she is not dissonant with Jade, the Exalt unlocks this evocation as soon as she attunes to Jade Dew.
Sweet Sapling Blight
Cost: 5m; Mins: Essence 1
Type: Supplemental
Keywords: Decisive-Only, Dissonant, Resonant
Duration: Instant
Prerequisite: Dew-Eyed Guardian
Her blade long and deep green, verdant with wild essence, deadly with nature’s bounty. Its cuts remind trespassers of their failings and drive them wild for them. As long as a Decisive attack supplemented by this evocation deals at least one level of lethal damage, her target suffers withdrawal no matter how recently he has indulged his habit and is exposed to Sweet Sapling Blight, a supernatural disease with the following rules:
Sweet Sapling Blight: Virulence (3+highest addiction intimacy), Morbidity (3), Interval (One Week) Anyone who does not have an addiction is immune to Sweet Sapling Blight
It is resisted with Stamina + Integrity and only magically-enhanced medical treatment can prove effective.
Minor: As all minor disease, but the character also suffers from withdrawal (-1 penalty to all actions) unless he is able to indulge his addiction each day.
Major: As all major diseases, but the character suffers from withdrawal unless he indulges his addiction each hour. In addition, anytime that he is able to acquire his addiction in a scene, he must roll current temporary Willpower against the Morbidity to indulge unless he spends a 1wp to resist.
Defining: As all defining disease, but the character suffers from withdrawal unless he indulges his addiction each scene. In addition, any time he is able to acquire his addiction in a scene, he must spend 1wp and then roll current temporary Willpower against the Morbidity to indulge unless he spends an additional Willpower to resist.
Dissonant: The Exalt’s enemies only suffer withdrawal if they contract Sweet Sapling Blight.
Resonant: Each 1 and 2 rolled in the Virulence and Morbidity rolls (and any rolls to treat the disease) subtracts one success from the end result.
Bleeding Poppy Reaping
Cost: 3m, 1wp; Mins: Essence 2
Type: Supplemental
Keywords: Decisive-Only, Resonant, Dissonant
Duration: Instant
Prerequisite: Sweet Sapling Blight
When a poppy is cut, it bleeds out its sweet addicting nectar. The blood of the addicted is merely Jade Dew returning the favor. A decisive attack supplemented by this evocation rolls only half the Exalt’s initiative, rounded down, as damage. It however increases their intimacy towards their addiction by one step or decreases the same intimacy by one step. An intimacy cannot be raised above defining, but a character with a Minor (or no relevant intimacy) can instead be cured of their addiction.
This evocation can only be used once per scene per target and cannot be reset by the Dawn caste anima power.
An Essence 3+ repurchase allows a character to cause an infected character damaged to immediately make a Morbidity check against Sweet Sapling Blight.
Dissonant: A dissonant character cannot repurchase this evocation.
Toxin Rooting Flow
Cost: 5m, 1wp; Mins: Essence 2
Type: Reflexive
Keywords: Resonant
Duration: Indefinite
Prerequisite: Bleeding Poppy Reaping
Expelling what is impure, Jade Dew soaks in the taint like a root in toxic soil. Whenever the Exalt succeeds on a roll to resist a poison or addictive substance that she has ingested or inhaled, she roots the toxin through her weapon. By releasing the commitment to this charm’s motes she can cause her blade to drip with the substance as a reflexive action at the start of her turn. Her next decisive attack, if it hits, will cause her victim to suffer the same poison or substance.
Resonant: The Exalt gains one non-charm success on the roll to resist ingested and inhaled poisons and addictive substances, even if she does not plan on using this evocation to hold them.
Guardian Lion’s Temperance
Cost: -; Mins: Essence 3
Type: Permanent
Keywords: None
Duration: Permanent
Prerequisite: Toxin Rooting Flow, Righteous Lion Defense
The grove’s guardian protects the grove without ever falling for its addictive charms. This evocation causes any social influence aimed at indulging in an addicting activity to be treated as unacceptable influence as if protected by Righteous Lion Defense.
The Solar may choose (or be forced) to indulge in taking drugs, addicting substances, or be exposed to the Wyld’s taint, but never talked into doing so. If she does become a victim of such things, this evocation causes her to roll twice to resist and take the higher result or for the effect to roll twice and apply the lower result - whichever is applicable at the time.
Indulgent Battlefield Delusions
Cost: 6m; Mins: Essence 3
Type: Supplemental
Keywords: Dual, Dissonant
Duration: Instant
Prerequisite: Bleeding Poppy Reaping
Those who fight in the grove of the guardian falter as their senses lure them away from the battle, but into the edge of her daiklave. A withering damage roll supplemented by this evocation doubles 9s against a character suffering from a Minor addiction or Sweet Sapling Blight intensity, doubles 8s against a character suffering a Major addiction or intensity, or doubles 7s against a character with a Defining addiction or intensity. A decisive attack supplemented by this doubles up to (1+steps of intensity) dice of damage.
Dissonant: A character dissonant with Jade cannot double more than (Essence) damage with this evocation.
Special Activation Rules: This evocation can only be used once per scene unless reset by increasing Sweet Sapling Blight’s intensity with a use of Bleeding Poppy Reaping.
Heart-Pleasing Razor
Cost: 6m; Mins: Essence 3
Type: Simple
Keywords: Resonant, Dissonant
Duration: One scene
Prerequisite: Indulgent Battlefield Delusions
The groves beauty is a taint that touches her sword and as the blade is sheathed and drawn, her enemies feel their minds fog. The wielder makes a simple action of sheathing and drawing her sword, when she does, she rolls (Manipulation+Presence) against the resolve of any enemies who she has struck. On a success, enemies find themselves addicted to her blade and being cut by it. They must spend a point of temporary Willpower in order to apply their defense to the swordsman’s attacks, but need only pay this price once per scene. Even if they do, they take a -1 penalty to their defense for the remainder of the scene. This evocation can only be used once per scene.
Resonant: The addicted opponents take a penalty to their Resolve equal to the steps that Sweet Sapling Blight has progressed
Dissonant: Wielders dissonant with Jade cannot awaken this evocation.
Reaper of Intemperate Weeds
Cost: 10m, 1wp; Mins: Essence 3
Type: Reflexive
Keywords: Decisive-Only, Perilous, Resonant
Duration: Instant
Prerequisite: Heart-Pleasing Razor
The guardian is also reaper and harvester - anything that flowers in her grove is hers to cut. Only a wielder Resonant with Jade can awaken Reaper of Intemperate Weeds.
As soon as an opponent who holds an addiction to her sword moves within Close range of her, she may make an immediate decisive attack against them, even if she has already acted this round. Her opponent cannot clash this attack. This decisive attack has a base damage of (Essence) plus a bonus equal to the current level of their addiction or Sweet Sapling Blight intensity, whichever is higher (+2 for Minor, +3 for Major, +4 for Defining) and benefits from the effects of Indulgent Battlefield Delusions even if the wielder has already used that charm this scene.
9 notes
·
View notes
Text
All aboard the manly train! WHO WHOOOOOOO
Credit to: DMC 3444
Last Time’s Egao Count: 271
Shuzo: Zarc…
Futoshi/Tatsuya: Zarc…
Random People: Zarc… Zarc… Zarc… Zarc… Zarc…
Narrator: The world is divided into four dimensions. Across these dimensions, there are four boys, who all share the same face, And the dragons they possess call out to one another, As if seeking out each other…
(Opening Sequence)
Yuya: I was Zarc… The Demon Duelist. I brought destruction to the world…!
Yuzu: You’re not a demon! Respond to them, Yuya! Respond to your friends��� feelings!
Yuya: That’s right! Back then, I…
Yuya: I’ve made up my mind! I won’t ever become a demon again! Now’s your chance! Do it! Reira!
Yuya: Where are Yuzu and Reira!?
Himika: Reira is right here.
Yuya: That kid is Reira!?
GONGENZAKA: What!?
SAWATARI-SAN: You’re kidding me! Why is he a baby!?
Reiji: The four Magic Cards that my father created, En Flowers, En Birds, En Winds, and En Moon, Destroyed the Supreme Dragon King and split it back into the four dragons. However, those cards can also return the dragons’ wielder, as well as the person who activated them, into pure beings. In other words, those cards have the power to turn them into infants. (I can’t believe I actually wrote this)
Reiji: That’s why when the world was first split up, Zarc was turned into four infants and reincarnated in each of the dimensions. Likewise, my elder sister, Ray, was reincarnated as four infants.
Shuzo: Yuzu…
Reiji: However, this time, Reira removed the evil spirit within you, And sealed it within himself.
Futoshi: Then, Big Bro Yuya is no longer…
Tatsuya: He’s no longer Zarc?
SAWATARI-SAN: Then, Reira…
GONGENZAKA: He saved Yuya?
Reiji: The situation is not quite so simple.
Reiji: The unified world that was created within the chaos of Arc-V Was split back into four dimensions when the four dragons break up. Reira wasn’t split into four, Probably because he promptly sealed Zarc’s soul away before that. That’s what I think. However, because of that, Reira…
Himika: He lost his smile. (Egao Count: 271+1=272)
Yuya: He lost his smile? (Egao Count: 272+1=273)
Reiji: I have a reason for recreating the Maiami Championship. It was to bring back Reira’s smile through Sakaki Yuya’s Entertainment Dueling. (Egao Count: 273+1=274)
Yuya: Through my Entertainment Dueling?
Reiji: Exactly.
Reiji: It will save not only Reira, but the world as well.
SAWATARI-SAN: What exactly do you mean!? Why would the world be saved if Reira smiles!? (Egao Count: 274+1=275)
Yuya: A part of me is inside Reira… Zarc’s evil spirit…
Yuya: Reira lost his smile because of that. (Egao Count: 275+1=276) Then, if I can make him smile again, (Egao Count: 276+1=277) The evil spirit will go away!?
Reiji: Correct. But it won’t be an easy task.
SAWATARI-SAN: Well, he’s not wrong. I mean, Zarc was a world-destroying demon, after all.
Reiji: Even so, it must still be done. Otherwise, Zarc will eventually revive, And bring destruction to the world once again.
Yuya: With my Entertainment Dueling… The evil spirit that used to be inside me will… But what do I do!?
Yusho: The answer is within you.
Yuya: Dad!
Shuzo: Senior!
Yoko: Dear!
Yusho: If you want to find the answer, you must win this Junior Youth Championship first! If you can’t do that, You won’t become a Pro, Nor will you be able to save the world, or Reira, or Yuzu.
Yuya: Yuzu!?
Shuzo: Yuzu!
Yuya: Yuzu is still out there somewhere!? Will my Entertainment save her!?
Reiji: I believe in Hiiragi Yuzu’s safety as well. Whether she can be saved or not is all up to you.
Random Dude 1: All up to him?
Random Dude 2: They’re seriously expecting that kid to save the world?
Random Lady: The evil spirit inside him might have been removed, but…
Kids: Ma’am?
Yoko: Why are you moping around, Yuya!?
Shuzo: Y-Yoko-san!?
Yoko: If you have the time for that, Use it to fulfill your promises to me instead!
Yuya: Mom?
Yoko: You said it yourself. You said that you’ll bring smiles to everyone with your Dueling, (Egao Count: 277+1=278) Stop the war, and bring Yuzu-chan home!
Yoko: You still haven’t fulfilled any of your promises! There are still seeds of conflicts lying around. There’s a baby who lost his smile. (Egao Count: 278+1=279) And Yuzu-chan hasn’t returned home!
Yuya: SHUT UP, MOM!
Yoko: Huh?
Yuya: This is my problem! It’s my… It’s my turn!
Yuya: I switch Odd-Eyes Pendulum Dragon and Entermate Discover Hippo to Defense Position! I set one card face-down, and end my turn!
Yuya: I want to save them. But what am I supposed to do!?
Yoko: I guess I went a bit overboard with it.
Shuzo: Yoko-san…
Yoko: “Shup up,” huh? I looked away for a moment, and now he’s become bold enough to talk back to me.
GONGENZAKA: If you’re going to keep moping around, I, the manly Gongenzaka, will save both Yuzu and Reira myself! It’s my turn!
GONGENZAKA: From my hand, I summon the Tuner Monster, Superheavy Samurai Kobu-Shi!
Futoshi: Gongenzaka summoned it in Attack Position!?
GONGENZAKA: Battle! I attack Discover Hippo With Kobu-Shi!
GONGENZAKA: Then, I attack Odd-Eyes Pendulum Dragon with Big Benkei! Big Benkei can attack while it is in Defense Position! At this moment, the effect of the Double Horn equipped to Big Benkei activates! When there are no Magic or Trap Cards in my Graveyard, The monster equipped with it can attack again!
GONGENZAKA: Go, Big Benkei! Attack Yuya directly!
Yuya: Action Magic, Evasion! The attack will be negated!
GONGENZAKA: You won’t get away! When Superheavy Samurai Kobu-Shi destroyed a monster through battle, I can perform a Synchro Summon during the Battle Phase! I’m tuning the Level-8 Big Benkei and the Level-2 Kaku-Go with the Level-2 Kobu-Shi! Steadfast demon-god! Tighten your resolute fists! Now, become an iron demon, And charge across the battlefield! Synchro Summon! Take the field! Come forth! Level-12! Superheavy Steam Fiend Tetsudo'o!
SAWATARI-SAN: Gongenzaka got a new monster!? He’s riding on it!!?
GONGENZAKA: This is my resolve! This is to show you how serious I am! I will defeat you and become a Pro! Here I come, Yuya! I attack you directly with Tetsudo'o!
SAWATARI-SAN: It’s running now!?
GONGENZAKA: Those who have lost their hope of becoming Pros: Leave this place right now!
SAWATARI-SAN: AAAAHHHHHH!
GONGENZAKA: Tetsudo'o can attack while it is in Defense Position!
Yuya: Action Magic, Evasion!
GONGENZAKA: I won’t let you!
Tatsuya: He’s fast!
Ayu/Tatsuya: Gongenzaka!?
GONGENZAKA: Action Magic, No Action! Evasion will be negated!
Random Dude 1: That’s amazing, Gongenzaka!
Random Dude 2: Throwing away your iron sandals to remove your limiters… That’s one neat trick!
Yuya: Trap, activate! Entermate Signal! I can draw one card and send it to the Graveyard! If it is an Entermate, My opponent’s attack will be negated!
Yusho: Oh? A gamble, huh?
Reiji: But if it’s a Trap, or a Magic, Or even just some other monster, Yuya will lose.
Yuya: Draw! All right! I send Entermate Sword Fish into the Graveyard! The attack of Tetsudo'o is negated!
Kids: He stopped it!
Nico: Wow!
GONGENZAKA: The effect of Tetsudo'o activates! Once per turn, I banish all Magic and Trap Cards from my Graveyard, And inflict 200 damage for each one of them!
Yuya: What!?
GONGENZAKA: I banish the Action Magic, No Action, from my Graveyard! Now, you will take 200 damage!
Futoshi: SHIVERRSSSS!
Ayu: Yeah! My heart is pounding!
Tatsuya: I never expected that there’d be a back-and-forth with Action Cards in a Duel between Big Bro Yuya and Gongenzaka!
Nico: What a thrilling, heart-pounding, and surprising development! Gongenzaka, who practices the creed of Steadfast Dueling, Rode on a monster to pursue his opponent, And then the Entertainment Duelist Sakaki Yuya managed to stop him with a risky draw, But then Gongenzaka combined his Monster’s effect with an Action Card to deal damage to Yuya! Whew…!
GONGENZAKA: That was pathetic, Yuya! The mere notion of you becoming a Pro with this level of skill is preposterous!
Yuya: Say what!?
GONGENZAKA: It’s your turn next. If you’re seriously aiming to be a Pro and become an Entertainment Duelist like your father, You must go all out and fight me with everything you’ve got!
Yuya: I’m going all out! I’m thinking with everything I’ve got! I’m thinking about what I can do to save Reira and Yuzu with my Entertainment! I want to save the two of them! Even if everyone tells me that I’m being reckless and can’t be relied on! I want to save Reira and Yuzu, who have saved me!
Shuzo: Yuya…
Yuya: I will become even stronger than before! Let’s do this, Gongenzaka!
(ZETSUBOU commercial: BUY DINOSAURS)
Yuya: It’s my turn! Using the Scales I’ve already set, I Pendulum Summon! Be revived from the Extra Deck! Odd-Eyes Pendulum Dragon!
Yuya: From my hand, I activate the Continuous Magic, Pendulum Illusion! And then…
Yuya: Battle! I attack Superheavy Steam Fiend Tetsudo'o with Odd-Eyes Pendulum Dragon!
Nico: Yuya has also got onto a monster and charged ahead! However, the DEF of Tetsudo'o is 4800! The 2500 ATK Odd-Eyes Pendulum Dragon cannot destroy it!
Yuya: When a Pendulum Monster battles, I can send a Magic or Trap card from my hand to the Graveyard to activate Pendulum Illusion’s effect! I send the Action Magic. Damage Banish, into the Graveyard, and activate its effect! Due to this, during the Battle Phase, The ATK and DEF of an opposing monster will be halved!
Nico: The DEF of Tetsudo'o is now 2400!
Futoshi: All right!
Tatsuya: Due to this…
Ayu: He can now destroy it!
Yuya: Do it, Odd-Eyes! Spiral Strike Burst! A monster affected by Pendulum Illusion won’t be destroyed, but piercing damage will be inflicted!
Kids: He did it!
Random Dude 1: But it’s just 200!
Random Dude 2: That’s him going all out? It’s not very impressive!
Futoshi: But I still got SHIVERRRSSSSS!
Ayu: That’s because they’re both going all out!
Tatsuya: They’re evenly-matched, basically!
Yuya: When the battle ends, Pendulum Illusion’s effect ends, And the DEF of Tetsudo'o returns to normal. I end my turn.
GONGENZAKA: It’s my turn! Draw!
GONGENZAKA: I can certainly feel the resolve in your head-on attack!
GONGENZAKA: In that case, I’ll attack you head-on as well! Battle! I attack Odd-Eyes Pendulum Dragon with Superheavy Steam Fiend Tetsudo'o!
Nico: At this rate, Odd-Eyes will be destroyed!
Yuya: I send the Action Magic, Flame Guard, into the Graveyard, And activate Pendulum Illusion’s effect!
Nico: Due to this, Odd-Eyes’s ATK is now higher!
Nico: Due to Pendulum Illusion’s effect, the destruction of Tetsudo'o is negated!
Ayu: But he’ll still take damage!
Tatsuya/Futoshi: And it’ll be doubled!
GONGENZAKA: By sending two cards into the Graveyard, Tetsudo'o can destroy a monster! I send the Action Magic Tenacity, and Superheavy Samurai Big Waraji into the Graveyard, And activate its effect! I destroy Odd-Eyes Pendulum Dragon!
GONGENZAKA: Then, I banish Tenacity from the Graveyard, and deal 200 damage to Yuya!
GONGENZAKA: When the battle ends, Pendulum Illusion’s effect ends, And the DEF of Tetsudo'o returns to normal. I end my turn.
Reiji: They both manage to deal 200 damage, huh?
Yusho: It’s like those fierce battles that Yoko loves. Hah. She’s missing out on all this by going home…
Yoko: …Is probably what he’s thinking, but too bad, he’s wrong!
Yoko: Good going! Go get him! Keep the momentum going! HAHAHAHAH!
Yuya: It’s my turn! Due to the effect of the Continuous Magic, Pendulum Illusion, I can’t draw. Pendulum Summon! I revive Odd-Eyes Pendulum Dragon from the Extra Deck!
Yuya: Battle! I attack Tetsudo'o with Odd-Eyes!
GONGENZAKA: I won’t let you have those Action Cards!
Ayu/Futoshi: Gongenzaka jumped off!
Tatsuya: Watch out! You’re going to crash into each other!
Yuya: Gongenzaka threw away his Steadfast Dueling in order to encourage me.
Yuya: I must go all out and respond to him in turn!
GONGENZAKA: That’s it. Come at me! Show me what you’ve got, Yuya! I won’t lose to you!
Yuya: I send the Action Magic, Flame Chain into the Graveyard! Pendulum Illusion’s effect activates! Spiral Strike Burst!
Yuya: When the Battle Phase ends, the DEF of Tetsudo'o returns to normal. I end my turn!
GONGENZAKA: It’s my turn! Battle! Tetsudo'o!
Random Lady: They’re repeating the same things!?
Random Dude: How long are they going to keep doing this?
Yuya: I send an Action Magic into the Graveyard, and activate Pendulum Illusion’s effect!
Random Dude: But this is kind of awesome!
Yuya: Spiral Strike Burst!
GONGENZAKA: I send the Action Magic, Flame Power and Superheavy Samurai Soul Makarugaeshi into the Graveyard, In order to destroy Odd-Eyes!
Yuya: AAAHH!
GONGENZAKA: I then banish Flame Power from the Graveyard, And inflict 200 damage!
Yuya: GAAAHH!
Random Dude: The two of them are not holding back!
Yuya: When the battle ends, the DEF of Tetsudo'o returns to normal.
Yuya: And now, it’s my turn! Since I can’t draw, I’ll revive Odd-Eyes with Pendulum Summon! Battle! Odd-Eyes!
Yuya: I’ll end this with this turn!
GONGENZAKA: I won’t let you!
GONGENZAKA: Damn it!
Yuya: I send the Action Magic, Flame Power into the Graveyard, And activate Pendulum Illusion’s effect!
Yuya: Gongenzaka!?
GONGENZAKA: I’ll take this attack head-on! Come, Yuya!
Yuya: Sure! Here I go, Gongenzaka! Spiral Strike Burst!
GONGENZAKA: AAAAHHHHHH!
Yuya: Due to Odd-Eyes’s effect, The damage is doubled! Reaction Force!
Yuya: Gongenzaka!
GONGENZAKA: This is your Entertainment? Are you kidding me!?
GONGENZAKA: Your Entertainment could have been better! Save Yuzu and Reira, and prove it to me!
Yuya: Gongenzaka…
Nico: The winner is Sakaki Yuya!
Nico: Due to this, Yuya can now advance from Junior Youth to Youth…
Reiji: No. I still can’t approve of him just yet.
Reiji: This Battle Royale is supposed to be a continuation of the Maiami Championship that was interrupted by Academia’s attack.
Reiji: The Duelists who still remained after the attack were chosen to be Lancers by me. Only one of them can advance to the Youth class. In other words, there are still opponents that you need to defeat, Yuya.
Yuya: Opponents I need to defeat?
Yuya: What is this?
Reiji: A gate to an Interdimensional Corridor.
Yuya: Interdimensional Corridor?
Reiji: I said that the world is split into four again, but in reality, There are still remnants of Arc-V that are still around. Arc-V is connected to the four dimensions via wormholes. Which is why we called it the Interdimensional Corridor.
Reiji: You shall go to the Xyz Dimension from here.
Yuya: Xyz? Then, I’m going to fight Kurosaki? Right? The remaining Lancers are Serena, Kurosaki, and Dennis…
Yuya: But Serena, along with Yuzu and the other two, was sent into Arc-V. If I can save Yuzu, I might be able to save Serena, Ruri, and Rin as well. If I can only do that through Dueling, Then no matter who my opponents are, I must fight them! And I’ll definitely win! I made a vow! That I will save the world through my Entertainment! Here I come, Kurosaki! Just wait!
Yuya: Huh? That’s…!
(Preview for Episode 144)
Dennis: I’ve been waiting, Yuya!
Yuya: Dennis! Why are you here?
Dennis: In order to fight you, obviously!
Yuya: Fight me? But this place is…
Dennis: You won’t find Kurosaki here. He’s in the Fusion Dimension. If you want to chase after him, you have to beat me first. Of course, I’m not planning to lose, either…
Yuya: Next time on Yu-Gi-Oh Arc-V: The Cursed Gear Mask The fun has just begun! [/spoiler]
40 notes
·
View notes
Text
A Few OCs as FE: Heroes Units (hypothetical rambling)
When I’m bored I do these kinds of things, lawl. Lots of text so read on at your own peril... (mainly intended for fans of the mobile game, ‘kay?)
Ran (♂)
Title: “Pure Zephyr”
Unit Type: Colorless Bow Movement: Cavalry
Lvl 1 Base Stats: mHP 17 Atk 7 Spd 6 Def 5 Res 9
Lvl 40 Base Stats: mHP 38 Atk 28 Spd 27 Def 22 Res 33
Skill List: (availability) Weapons: Iron Bow (*) MT: 4; Effective against Flying units.
Steel Bow (**) MT: 6; Effective against Flying units.
Silver Bow (***) MT: 9; Effective against Flying units.
Kodandam (*****) MT: 14; Effective against Flying units. Grants Res+4 during combat if unit initiates the attack.
Specials: Retribution (***) CD: 3; Grants bonus damage equal to 30% of damage suffered.
Vengeance (****) CD: 3; Grants bonus damage equal to 50% of damage suffered.
Assists: N/A
Passives: Fury 1 (*) Grants Atk/Spd/Def/Res+1. Unit takes 2 damage after combat.
Fury 2 (**) Grants Atk/Spd/Def/Res+2. Unit takes 4 damage after combat.
Fury 3 (****) Grants Atk/Spd/Def/Res+3. Unit takes 6 damage after combat.
Desperation 1 (***) If unit initiates combat with HP ≤ 25%, unit's follow-up attack occurs immediately.
Desperation 2 (****) If unit initiates combat with HP ≤ 50%, unit's follow-up attack occurs immediately.
Desperation 3 (*****) If unit initiates combat with HP ≤ 75%, unit's follow-up attack occurs immediately.
Notes: Ran is a highly offensive-focused unit whom really shines when he’s been hurt a bit. As he is on horseback, he can retreat safely if needed for healing or in attempt to shake any pursuing enemy, allowing his teammates to follow up on his attacks; which are consistent, as they are never at a disadvantage due to his colorless attribute. He would appreciate allies whom can bolster his Atk, such as Reinhardt or Eirika. With the right boost, he can eliminate almost any adversary (Effie is a natural counter to him in most cases, however.) His weapon at 5 stars is named after the Bow of Rama.
Bohemund (♂)
Title: "Cerulean Crucible" Unit Type: Blue Lance Movement: Infantry
Lvl 1 Base Stats: mHP 19 Atk 8 Spd 6 Def 7 Res 4
Lvl 40 Base Stats: mHP 43 Atk 35 Spd 25 Def 33 Res 15
Skill List: (availability) Weapons: Iron Lance (*) MT: 6
Steel Lance (**) MT: 8
Killer Lance (***) MT: 7; Accelerates Special trigger (CD-1).
Brionac (*****) MT: 13; Accelerates Special trigger (CD-1). Unit counterattacks first when attacked at HP ≤ 50%.
Specials: New Moon (***) CD: 3; Resolve combat as if foe suffered Def/Res -30%.
Luna (****) CD: 3; Resolve combat as if foe suffered Def/Res -50%.
Assists: Draw Back (*****) Unit moves 1 space away from target ally, who moves to unit's former position.
Passives: Defiant Atk 1 (*) Grants Atk +3 at start of turn if unit's HP ≤ 50%.
Defiant Atk 2 (**) Grants Atk +5 at start of turn if unit's HP ≤ 50%.
Defiant Atk 3 (****) Grants Atk +7 at start of turn if unit's HP ≤ 50%.
Notes: Boh is an even-more straightforward unit. His goal is to hurt things, especially if he should fall under half health where his weapon’s effect combined with Defiant Attack will make him a considerable threat, on top of a 2-hit recharge on Luna. Tome users are his bane, however, as he lacks any safe means to engage them, but he will certainly take one out should he survive their attack. Felicia compliments him extremely well, as she is a natural mage counter and can provide slight healing via Breath of Light. Bohemund can also help out any Green unit who feels threatened by a Red Sword wielder’s presence (as few can survive combat if he is in his “wrath” state). His weapon takes its inspiration from the spear of Irish hero, Lugh, which was thought impossible to overcome.
Nathanael (♂)
Title: "Verdant Wolf" Unit Type: Green Tome Movement: Infantry
Lvl 1 Base Stats: mHP 18 Atk 8 Spd 5 Def 8 Res 6
Lvl 40 Base Stats: mHP 40 Atk 31 Spd 22 Def 35 Res 26
Skill List: (availability) Weapons: Wind (*) MT: 4
Elwind (**) MT: 6
Gronnwolf (***) MT: 6; Effective against Cavalry units.
Pasha (*****) MT: 10; Effective against Cavalry units. Grants Def +5 at start of turn if unit's HP ≤ 50%.
Specials: Glowing Ember (***) CD: 4; Boosts damage dealt by 50% of unit's Def.
Bonfire (****) CD: 3; Boosts damage dealt by 50% of unit's Def.
Assists: N/A
Passives: Altruist 1 (*) Adjacent allies take 3 less damage during combat if unit's HP ≥ 70%.
Altruist 2 (**) Adjacent allies take 4 less damage during combat if unit's HP ≥ 70%.
Altruist 3 (****) Adjacent allies take 5 less damage during combat if unit's HP ≥ 70%.
Hone Atk 1 (***) Grants adjacent allies Atk+2 through their next actions at the start of each turn.
Hone Atk 2 (****) Grants adjacent allies Atk+3 through their next actions at the start of each turn.
Hone Caster (*****) Grants adjacent tome users Atk/Spd+6 through their next actions at the start of each turn.
Notes: Nathanael is a particularly sturdy mage who is best served launching attacks behind a teammate whilst they benefit from his very beneficial skills, whether offensively or defensively. Should he find himself under fire, his attacks become stronger still; in other words, he can contribute well no matter his condition. He provides a fantastic buff to fellow mages, so they are among his most preferred teammates, yet he does well in any formation, even as a conventional tank thanks to his innate resilience. His weapon is named after one of the artifacts possessed by Ganesha, used to restrain beasts or adversaries, hence its defensive effect. He must exercise caution when facing the majority of Red enemy units, yet if he were to team up with most any blue tome user, the enemy’s advance would be fiercely blunted.
Alisandre (♀)
Title: "Immovable Glacier" Unit Type: Green Axe Movement: Armored
Lvl 1 Base Stats: mHP 23 Atk 7 Spd 7 Def 8 Res 10
Lvl 40 Base Stats: mHP 46 Atk 26 Spd 32 Def 28 Res 36
Skill List: (availability) Weapons: Iron Axe (*) MT: 6
Steel Axe (**) MT: 8
Silver Axe (***) MT: 11
Absolute Zero (*****) MT: 15; If unit initiates attack, converts stat penalties on unit into bonuses through its next action.
Specials: N/A
Assists: Swap (***) Swap places with an adjacent ally.
Passives: Armored Blow 1 (*) Grants Def+2 during combat if unit initiates the attack.
Armored Blow 2 (**) Grants Def+4 during combat if unit initiates the attack.
Armored Blow 3 (****) Grants Def+6 during combat if unit initiates the attack.
Threaten Atk 1 (***) Inflicts Atk-3 on foes within 2 spaces through their next actions at the start of each turn.
Threaten Atk 2 (****) Inflicts Atk-4 on foes within 2 spaces through their next actions at the start of each turn.
Threaten Force (*****) Inflicts Atk/Spd-4 on foes within 2 spaces through their next actions at the start of each turn.
Notes: The only female character I have thought up for this group of hypothetical heroes and honestly, my personal favorite. Alis is a fantastic tank, in tandem with her great HP, solid defenses and good Spd that makes her a bit hard to double attack by most units in the game, she is also deceptively strong. Her raw damage is low and may prove irksome but if she is given the special skill Glacies or Iceberg, she can truly live up to her nickname. Her weapon’s effect is a self-targeting Harsh Command, so the enemy’s debuffs from daggers, staves or any other weapon are suddenly turned against them so her -6 Atk becomes +6, and her special scaling off her impressive Res stat will deal a devastating blow to most enemies. Drawbacks? Limited movement due to her armor, but her natural Swap can alleviate that a little. And her passives just solidify her walling potential. *mwah~* As a note, “Threaten Force” is much like female Corrin’s Dark Breath, just slightly weaker and would be overwritten by the prior. Corrin is still a good teammate for Alis, since she can tend to Red units that would threaten our iron maiden and she, in turn, can impose on casters and others that threaten the blue dragon (and it goes without saying that Ninian is an equally fantastic teammate). Her weapon is merely an original creation tailored to the character’s theme.
Seriously, this was tons of fun to spend a few moments pondering. I really enjoy Fire Emblem: Heroes and hope many others continue to as well. ^_^
2 notes
·
View notes
Text
Arc V Episode 143 Translated Script
Zarc.wav
Last Time’s Egao Count: 271
Shuzo: Zarc… Futoshi/Tatsuya: Zarc… Random People: Zarc… Zarc… Zarc… Zarc… Zarc… Narrator: The world is divided into four dimensions. Across these dimensions, there are four boys, who all share the same face, And the dragons they possess call out to one another, As if seeking out each other… (Opening Sequence) Yuya: I was Zarc… The Demon Duelist. I brought destruction to the world…! Yuzu: You’re not a demon! Respond to them, Yuya! Respond to your friends' feelings! Yuya: That’s right! Back then, I… Yuya: I've made up my mind! I won't ever become a demon again! Now's your chance! Do it! Reira! Yuya: Where are Yuzu and Reira!? Himika: Reira is right here. Yuya: That kid is Reira!? GONGENZAKA: What!? SAWATARI-SAN: You’re kidding me! Why is he a baby!? Reiji: The four Magic Cards that my father created, En Flowers, En Birds, En Winds, and En Moon, Destroyed the Supreme Dragon King and split it back into the four dragons. However, those cards can also return the dragons’ wielder, as well as the person who activated them, into pure beings. In other words, those cards have the power to turn them into infants. (I can’t believe I actually wrote this) Reiji: That’s why when the world was first split up, Zarc was turned into four infants and reincarnated in each of the dimensions. Likewise, my elder sister, Ray, was reincarnated as four infants. Shuzo: Yuzu… Reiji: However, this time, Reira removed the evil spirit within you, And sealed it within himself. Futoshi: Then, Big Bro Yuya is no longer… Tatsuya: He’s no longer Zarc? SAWATARI-SAN: Then, Reira… GONGENZAKA: He saved Yuya? Reiji: The situation is not quite so simple. Reiji: The unified world that was created within the chaos of Arc-V Was split back into four dimensions when the four dragons break up. Reira wasn’t split into four, Probably because he promptly sealed Zarc’s soul away before that. That’s what I think. However, because of that, Reira… Himika: He lost his smile. (Egao Count: 271+1=272) Yuya: He lost his smile? (Egao Count: 272+1=273) Reiji: I have a reason for recreating the Maiami Championship. It was to bring back Reira’s smile through Sakaki Yuya’s Entertainment Dueling. (Egao Count: 273+1=274) Yuya: Through my Entertainment Dueling? Reiji: Exactly. Reiji: It will save not only Reira, but the world as well. SAWATARI-SAN: What exactly do you mean!? Why would the world be saved if Reira smiles!? (Egao Count: 274+1=275) Yuya: A part of me is inside Reira… Zarc’s evil spirit… Yuya: Reira lost his smile because of that. (Egao Count: 275+1=276) Then, if I can make him smile again, (Egao Count: 276+1=277) The evil spirit will go away!? Reiji: Correct. But it won’t be an easy task. SAWATARI-SAN: Well, he’s not wrong. I mean, Zarc was a world-destroying demon, after all. Reiji: Even so, it must still be done. Otherwise, Zarc will eventually revive, And bring destruction to the world once again. Yuya: With my Entertainment Dueling… The evil spirit that used to be inside me will… But what do I do!? Yusho: The answer is within you. Yuya: Dad! Shuzo: Senior! Yoko: Dear! Yusho: If you want to find the answer, you must win this Junior Youth Championship first! If you can’t do that, You won’t become a Pro, Nor will you be able to save the world, or Reira, or Yuzu. Yuya: Yuzu!? Shuzo: Yuzu! Yuya: Yuzu is still out there somewhere!? Will my Entertainment save her!? Reiji: I believe in Hiiragi Yuzu’s safety as well. Whether she can be saved or not is all up to you. Random Dude 1: All up to him? Random Dude 2: They’re seriously expecting that kid to save the world? Random Lady: The evil spirit inside him might have been removed, but… Kids: Ma’am? Yoko: Why are you moping around, Yuya!? Shuzo: Y-Yoko-san!? Yoko: If you have the time for that, Use it to fulfill your promises to me instead! Yuya: Mom? Yoko: You said it yourself. You said that you’ll bring smiles to everyone with your Dueling, (Egao Count: 277+1=278) Stop the war, and bring Yuzu-chan home! Yoko: You still haven’t fulfilled any of your promises! There are still seeds of conflicts lying around. There’s a baby who lost his smile. (Egao Count: 278+1=279) And Yuzu-chan hasn’t returned home! Yuya: SHUT UP, MOM! Yoko: Huh? Yuya: This is my problem! It’s my… It’s my turn! Yuya: I switch Odd-Eyes Pendulum Dragon and Entermate Discover Hippo to Defense Position! I set one card face-down, and end my turn! Yuya: I want to save them. But what am I supposed to do!? Yoko: I guess I went a bit overboard with it. Shuzo: Yoko-san… Yoko: “Shup up,” huh? I looked away for a moment, and now he’s become bold enough to talk back to me. GONGENZAKA: If you’re going to keep moping around, I, the manly Gongenzaka, will save both Yuzu and Reira myself! It’s my turn! GONGENZAKA: From my hand, I summon the Tuner Monster, Superheavy Samurai Kobu-Shi! Futoshi: Gongenzaka summoned it in Attack Position!? GONGENZAKA: Battle! I attack Discover Hippo With Kobu-Shi! GONGENZAKA: Then, I attack Odd-Eyes Pendulum Dragon with Big Benkei! Big Benkei can attack while it is in Defense Position! At this moment, the effect of the Double Horn equipped to Big Benkei activates! When there are no Magic or Trap Cards in my Graveyard, The monster equipped with it can attack again! GONGENZAKA: Go, Big Benkei! Attack Yuya directly! Yuya: Action Magic, Evasion! The attack will be negated! GONGENZAKA: You won’t get away! When Superheavy Samurai Kobu-Shi destroyed a monster through battle, I can perform a Synchro Summon during the Battle Phase! I’m tuning the Level-8 Big Benkei and the Level-2 Kaku-Go with the Level-2 Kobu-Shi! Steadfast demon-god! Tighten your resolute fists! Now, become an iron demon, And charge across the battlefield! Synchro Summon! Take the field! Come forth! Level-12! Superheavy Steam Fiend Tetsudo'o! SAWATARI-SAN: Gongenzaka got a new monster!? He’s riding on it!!? GONGENZAKA: This is my resolve! This is to show you how serious I am! I will defeat you and become a Pro! Here I come, Yuya! I attack you directly with Tetsudo'o! SAWATARI-SAN: It’s running now!? GONGENZAKA: Those who have lost their hope of becoming Pros: Leave this place right now! SAWATARI-SAN: AAAAHHHHHH! GONGENZAKA: Tetsudo'o can attack while it is in Defense Position! Yuya: Action Magic, Evasion! GONGENZAKA: I won’t let you! Tatsuya: He’s fast! Ayu/Tatsuya: Gongenzaka!? GONGENZAKA: Action Magic, No Action! Evasion will be negated! Random Dude 1: That’s amazing, Gongenzaka! Random Dude 2: Throwing away your iron sandals to remove your limiters… That’s one neat trick! Yuya: Trap, activate! Entermate Signal! I can draw one card and send it to the Graveyard! If it is an Entermate, My opponent’s attack will be negated! Yusho: Oh? A gamble, huh? Reiji: But if it’s a Trap, or a Magic, Or even just some other monster, Yuya will lose. Yuya: Draw! All right! I send Entermate Sword Fish into the Graveyard! The attack of Tetsudo'o is negated! Kids: He stopped it! Nico: Wow! GONGENZAKA: The effect of Tetsudo'o activates! Once per turn, I banish all Magic and Trap Cards from my Graveyard, And inflict 200 damage for each one of them! Yuya: What!? GONGENZAKA: I banish the Action Magic, No Action, from my Graveyard! Now, you will take 200 damage! Futoshi: SHIVERRSSSS! Ayu: Yeah! My heart is pounding! Tatsuya: I never expected that there’d be a back-and-forth with Action Cards in a Duel between Big Bro Yuya and Gongenzaka! Nico: What a thrilling, heart-pounding, and surprising development! Gongenzaka, who practices the creed of Steadfast Dueling, Rode on a monster to pursue his opponent, And then the Entertainment Duelist Sakaki Yuya managed to stop him with a risky draw, But then Gongenzaka combined his Monster’s effect with an Action Card to deal damage to Yuya! Whew…! GONGENZAKA: That was pathetic, Yuya! The mere notion of you becoming a Pro with this level of skill is preposterous! Yuya: Say what!? GONGENZAKA: It’s your turn next. If you’re seriously aiming to be a Pro and become an Entertainment Duelist like your father, You must go all out and fight me with everything you’ve got! Yuya: I’m going all out! I’m thinking with everything I’ve got! I’m thinking about what I can do to save Reira and Yuzu with my Entertainment! I want to save the two of them! Even if everyone tells me that I’m being reckless and can’t be relied on! I want to save Reira and Yuzu, who have saved me! Shuzo: Yuya… Yuya: I will become even stronger than before! Let’s do this, Gongenzaka! (ZETSUBOU commercial: BUY DINOSAURS) Yuya: It’s my turn! Using the Scales I’ve already set, I Pendulum Summon! Be revived from the Extra Deck! Odd-Eyes Pendulum Dragon! Yuya: From my hand, I activate the Continuous Magic, Pendulum Illusion! And then… Yuya: Battle! I attack Superheavy Steam Fiend Tetsudo'o with Odd-Eyes Pendulum Dragon! Nico: Yuya has also got onto a monster and charged ahead! However, the DEF of Tetsudo'o is 4800! The 2500 ATK Odd-Eyes Pendulum Dragon cannot destroy it! Yuya: When a Pendulum Monster battles, I can send a Magic or Trap card from my hand to the Graveyard to activate Pendulum Illusion’s effect! I send the Action Magic. Damage Banish, into the Graveyard, and activate its effect! Due to this, during the Battle Phase, The ATK and DEF of an opposing monster will be halved! Nico: The DEF of Tetsudo'o is now 2400! Futoshi: All right! Tatsuya: Due to this… Ayu: He can now destroy it! Yuya: Do it, Odd-Eyes! Spiral Strike Burst! A monster affected by Pendulum Illusion won’t be destroyed, but piercing damage will be inflicted! Kids: He did it! Random Dude 1: But it’s just 200! Random Dude 2: That’s him going all out? It’s not very impressive! Futoshi: But I still got SHIVERRRSSSSS! Ayu: That’s because they’re both going all out! Tatsuya: They’re evenly-matched, basically! Yuya: When the battle ends, Pendulum Illusion’s effect ends, And the DEF of Tetsudo'o returns to normal. I end my turn. GONGENZAKA: It’s my turn! Draw! GONGENZAKA: I can certainly feel the resolve in your head-on attack! GONGENZAKA: In that case, I’ll attack you head-on as well! Battle! I attack Odd-Eyes Pendulum Dragon with Superheavy Steam Fiend Tetsudo'o! Nico: At this rate, Odd-Eyes will be destroyed! Yuya: I send the Action Magic, Flame Guard, into the Graveyard, And activate Pendulum Illusion’s effect! Nico: Due to this, Odd-Eyes’s ATK is now higher! Nico: Due to Pendulum Illusion’s effect, the destruction of Tetsudo'o is negated! Ayu: But he’ll still take damage! Tatsuya/Futoshi: And it’ll be doubled! GONGENZAKA: By sending two cards into the Graveyard, Tetsudo'o can destroy a monster! I send the Action Magic Tenacity, and Superheavy Samurai Big Waraji into the Graveyard, And activate its effect! I destroy Odd-Eyes Pendulum Dragon! GONGENZAKA: Then, I banish Tenacity from the Graveyard, and deal 200 damage to Yuya! GONGENZAKA: When the battle ends, Pendulum Illusion’s effect ends, And the DEF of Tetsudo'o returns to normal. I end my turn. Reiji: They both manage to deal 200 damage, huh? Yusho: It’s like those fierce battles that Yoko loves. Hah. She’s missing out on all this by going home… Yoko: …Is probably what he’s thinking, but too bad, he’s wrong! Yoko: Good going! Go get him! Keep the momentum going! HAHAHAHAH! Yuya: It’s my turn! Due to the effect of the Continuous Magic, Pendulum Illusion, I can’t draw. Pendulum Summon! I revive Odd-Eyes Pendulum Dragon from the Extra Deck! Yuya: Battle! I attack Tetsudo'o with Odd-Eyes! GONGENZAKA: I won’t let you have those Action Cards! Ayu/Futoshi: Gongenzaka jumped off! Tatsuya: Watch out! You’re going to crash into each other! Yuya: Gongenzaka threw away his Steadfast Dueling in order to encourage me. Yuya: I must go all out and respond to him in turn! GONGENZAKA: That’s it. Come at me! Show me what you’ve got, Yuya! I won’t lose to you! Yuya: I send the Action Magic, Flame Chain into the Graveyard! Pendulum Illusion’s effect activates! Spiral Strike Burst! Yuya: When the Battle Phase ends, the DEF of Tetsudo'o returns to normal. I end my turn! GONGENZAKA: It’s my turn! Battle! Tetsudo'o! Random Lady: They’re repeating the same things!? Random Dude: How long are they going to keep doing this? Yuya: I send an Action Magic into the Graveyard, and activate Pendulum Illusion’s effect! Random Dude: But this is kind of awesome! Yuya: Spiral Strike Burst! GONGENZAKA: I send the Action Magic, Flame Power and Superheavy Samurai Soul Makarugaeshi into the Graveyard, In order to destroy Odd-Eyes! Yuya: AAAHH! GONGENZAKA: I then banish Flame Power from the Graveyard, And inflict 200 damage! Yuya: GAAAHH! Random Dude: The two of them are not holding back! Yuya: When the battle ends, the DEF of Tetsudo'o returns to normal. Yuya: And now, it’s my turn! Since I can’t draw, I’ll revive Odd-Eyes with Pendulum Summon! Battle! Odd-Eyes! Yuya: I’ll end this with this turn! GONGENZAKA: I won’t let you! GONGENZAKA: Damn it! Yuya: I send the Action Magic, Flame Power into the Graveyard, And activate Pendulum Illusion’s effect! Yuya: Gongenzaka!? GONGENZAKA: I’ll take this attack head-on! Come, Yuya! Yuya: Sure! Here I go, Gongenzaka! Spiral Strike Burst! GONGENZAKA: AAAAHHHHHH! Yuya: Due to Odd-Eyes’s effect, The damage is doubled! Reaction Force! Yuya: Gongenzaka! GONGENZAKA: This is your Entertainment? Are you kidding me!? GONGENZAKA: Your Entertainment could have been better! Save Yuzu and Reira, and prove it to me! Yuya: Gongenzaka… Nico: The winner is Sakaki Yuya! Nico: Due to this, Yuya can now advance from Junior Youth to Youth… Reiji: No. I still can’t approve of him just yet. Reiji: This Battle Royale is supposed to be a continuation of the Maiami Championship that was interrupted by Academia’s attack. Reiji: The Duelists who still remained after the attack were chosen to be Lancers by me. Only one of them can advance to the Youth class. In other words, there are still opponents that you need to defeat, Yuya. Yuya: Opponents I need to defeat? Yuya: What is this? Reiji: A gate to an Interdimensional Corridor. Yuya: Interdimensional Corridor? Reiji: I said that the world is split into four again, but in reality, There are still remnants of Arc-V that are still around. Arc-V is connected to the four dimensions via wormholes. Which is why we called it the Interdimensional Corridor. Reiji: You shall go to the Xyz Dimension from here. Yuya: Xyz? Then, I’m going to fight Kurosaki? Right? The remaining Lancers are Serena, Kurosaki, and Dennis… Yuya: But Serena, along with Yuzu and the other two, was sent into Arc-V. If I can save Yuzu, I might be able to save Serena, Ruri, and Rin as well. If I can only do that through Dueling, Then no matter who my opponents are, I must fight them! And I’ll definitely win! I made a vow! That I will save the world through my Entertainment! Here I come, Kurosaki! Just wait! Yuya: Huh? That’s…! (Preview for Episode 144) Dennis: I’ve been waiting, Yuya! Yuya: Dennis! Why are you here? Dennis: In order to fight you, obviously! Yuya: Fight me? But this place is… Dennis: You won’t find Kurosaki here. He’s in the Fusion Dimension. If you want to chase after him, you have to beat me first. Of course, I’m not planning to lose, either… Yuya: Next time on Yu-Gi-Oh Arc-V: The Cursed Gear Mask The fun has just begun!
21 notes
·
View notes
Text
Shared Destiny - Chapter 2 : Gift of Ganglari

Map & Objective
[ Map ]

[ Objective ] Rout the enemy
Enemies
[ Troopers ] - 3 x Samurai - 1 x Oni Savage
[ Boss ]

Rinkah, an Oni Savage, carrying Throwing Club, which gives her 1-2 range. So watch out for that.
Oni Savages generally have high STR and DEF but low SPD. They are sort of like an Axe-wielding Knight. They have low RES so magic weapons will have a upper hand against them.
Rinkah carries quite a bit of physical bulk, so it’ll take more than just a few hit to take her down.
A class analysis on Oni Savage will be linked here once it’s done.

Kaze, a Ninja, carrying Iron Shuriken.
Ninjas, simply put, they are very annoying to deal with as they generally have very high SPD, RES and Avoid. All Shurikens has an innate +2 SPD boost and also have an advantage over Swords, which has one of the highest hit-rates in the game. On top of that they can also debuff your characters from 1-2 range which will make them more vulnerable the next few turns. Thankfully though, they usually have very low HP, STR and DEF, making them extremely weak against physically offensive or defensive units.
A class analysis on Ninja will be linked here once it’s done.
Kaze is capable of debuffing and taking down your characters if given the chance. Other than that, he is rather fragile so he can be taken down rather easily.
New Units

[ Felicia ] In comparison with Jakob, Felicia is more of a healer than a fighter. She lacks physical bulk and the ability to do physical damage. With high MAG, she is more capable at healing than Jakob. She is also faster than Jakob. Felicia is more of a support unit and to be used also as a debuffer rather than a frontline fighter.
As a pair-up partner, Felicia is more offensive compared to Jakob. Combining her personal skill and class, she effectively provide +2 DMG, +3 SPD and +2 bulk.
A character analysis on Felicia will be linked here once it’s done.

[ Jakob ] In comparison with Felicia, Jakob is more of a fighter than a healer. He has quite a bit of physical bulk to carry you through the early-game. Be it attacking or taking hits, Jakob definitely a more durable option compared to Felicia.
As a pair-up partner, Jakob is more defensive compared to Felicia. Combining his personal skill and class, he effectively provide +3 SPD & +3 bulk.
A character analysis on Jakob will be linked here once it’s done.

[ Gunter ] Gunter’s charm lies not in his stats or growth, but his personal skill and the fact that he is a Great Knight. Being in the cavalier class line, he also has Shelter which will be utilized soon.
He is a great pair-up partner for Corrin. With his class and personal skill combined, he effectively provide Corrin with a boost of +5 DMG, +4 DEF, +15 Hit-Rate & +1 MOV.
This boost will be utilized heavily in the next chapter to provide Corrin with the much needed physical bulk and hit-rate.
A character analysis on Gunter will be linked here once it’s done.
Strategy

In this chapter, you will learn about Dragon Veins, terrain bonuses, maximizing EXP gain, doubling opponent and weapon penalty.

Different Dragon Vein have different effects on the terrain. These effects’ description are usually shown on the top-right corner of the screen before activation.
Go ahead and activate that vein.

Bring your attention to the top-left corner of the screen above. That box shows the name and information of the tile your cursor is on. The values on it determine the terrain bonuses you will get from the tile when you’re on it.
From left to right, it represents; damage reduction, avoid and healing(%). Apart from the healing bonuses that is represented in percentage, the other two values represent what it represent.
Some of these terrain/tiles are key to certain strategies. It is generally a good habit to keep a lookout for them and plan ahead, using them to your advantage.
Anyway, in this case it is a Healtile that heals your units’ HP by 20% at the start of the player’s turn.
Go ahead and set up your units as shown above and end your turn.

A Samurai should’ve suicided himself to Gunter on the right side on the enemy’s turn.
On the left side, there’s an option whether to let Jakob/Felicia or Corrin get the kill. Think, plan ahead. For this round, I chose to let Corrin get the kill.

Felicia can then heal someone for her own share of EXP on that turn. Make it a good habit to plan ahead and harvest the most out of each turn.
Gunter will stay in his position and end the turn.

Another Samurai should’ve suicide himself to Gunter.
Felicia takes way too much damage from Rinkah so she can’t weaken Rinkah for Corrin to finish off without her dying. I let Corrin weaken Rinkah instead, since he can take the hit quite well.

With Corrin’s follow up attack, Felicia will be able to take down Rinkah. Don’t worry, Corrin have a lot of opportunity for EXP.
After taking Rinkah down, move Gunter one tile to the right. This way he’ll block Kaze from reaching and killing the weakened Felicia.

The next turn you should be able to take out the Samurai easily with Corrin if he/she have at least 9 SPD.
To double an opponent, you need to have at least 5 more SPD than the opponent. Which is rather interesting because if you take a look at the stats for the Samurai...

The Samurai also has 9 SPD. In usual circumstances, you shouldn’t be able to double him. However in this case, he is holding the Kodachi, a weapon that reduce the wielder’s effective SPD by 5, giving Corrin just enough SPD to double him.
Different weapons have different bonuses and penalties. It is, again, a good habit to check for all these things and take them into account while strategizing.

Let Gunter weaken Kaze and have Felicia finish him off. Come to think of it, Felicia took down both Rinkah and Kaze. Cool huh? (nope)

I actually took an extra turn because Corrin missed one of his attacks on the Kodachi Samurai. Welp.
0 notes
Text
Rolf: Tricky Archer (Unit Review)
Available at 4-5★ (Tempest Trials+ Reward)

Lvl 40 Stats (Flaw/Neutral/Asset)
Note: As a Tempest Trials+ reward, Rolf does not have access to boons/assets and banes/flaws.
HP: 36/40/43
Atk: 27/30/33
Spd: 33/36/39
Def: 24/28/31
Res: 20/23/27
Neutral BST: 157
Max Dragonflowers: 5
Skills
Weapon: Candlewax Bow+ (300 SP)
Mt: 12. Rng: 2. Grants Atk/Spd/Def/Res + 3. After combat, units takes 6 damage.
Bow. Can be inherited. Can be refined.
Assist: Shove (150 SP)
Move adjacent ally 1 space further away.
Can be inherited. Cannot use: Staff.
Special: None
A: None
B: Desperation 3 (200 SP)
If unit initiates combat with HP ≤ 75%, unit makes follow-up attack after first attack.
Can be inherited.
C: Odd Spd Wave 3 (240 SP)
At the start of odd numbered turns, grants unit and adjacent ally +6 Spd for 1 turn. Unit receives buff even when not adjacent to an ally.
Can be inherited.
Analysis
Arriving alongside his Tellius comrade is Rolf, the latest ranged cavalry unit. He is one of only four bow cavaliers in-game and one of only two considered F2P accessible. Taking his stat spread and base kit into account it’s obvious that Rolf heavily focuses on his offenses and, more importantly, on being faster than his opponents.
Rolf’s stat spread doesn’t differ much when compared to his competition. He boasts offensive stats starting at 30/36 Atk/Spd and defenses of 28/23 Def/Res. From looking at this stat spread alone we can recognize that, more than anything, Rolf values his Spd. This belief is expanded on when we look at his base kit. His default bow, Candlewax Bow+, grants the wielder Atk/Spd/Def/Res +3 and deals 6 damage after each round of combat. His C skill, Odd Spd Wave, only increases his chances of getting doubles boosting his Spd by +6 on odd numbered turns. From these two skills alone Rolf can reach a max of 45 Spd. His B skill, Desperation, makes use of the fact that Rolf will most likely be doubling his foes.
Rolf does have his drawbacks. His low Atk may result in him doing less if no damage at all to some opponents. Special care should be taken to boost this stat as much as possible. His middling Def allows him to take a hit but little else. Cavalry effective weapons will hamper Rolf’s stride. Regardless, if given the chance Rolf will prove to be a good addition to a player’s barracks.
On his first merge, Rolf will gain +2 HP/Spd and +1 Atk.
Reasons to Invest in Rolf
You like Rolf and intend to use him in a core team, whether it be for Arena, Aether Raids, or a Cavalry team
You’re interested in building Rolf because he is a F2P friendly bow cavalier and may be used in future F2P guides
You have obtained all or most previous copies made available and do not mind the grail cost
Reasons NOT to Invest in Rolf
You don’t intend on using him as a core on any team or in any PVE game modes such as Rival Domains or Grand Conquest
You don’t play Aether Raids and have no interest in obtaining grails
You consider Rolf’s playstyle and base kit uninteresting and would rather fodder his skills off to other heroes you use
You already have an invested bow unit that you already use on your core Arena & or Aether Raids team
Similar Units
Note: As a Tempest Trials+ reward Rolf does not have access to boons/assets or banes/flaws and therefore is not directly comparable to any summonable units.
Brave Lyn: Brave Lady (35/33/35/18/28)
Rolf: Tricky Archer (+5/-3/+1/+10/-5)
Note: Brave Lyn has access to uninheritable skills and is thus not directly comparable.
Sue: Doe of the Plains (36/32/38/23/20)
Rolf: Tricky Archer (+4/-2/-2/+5/+3)
Builds
Budget/Low Investment:
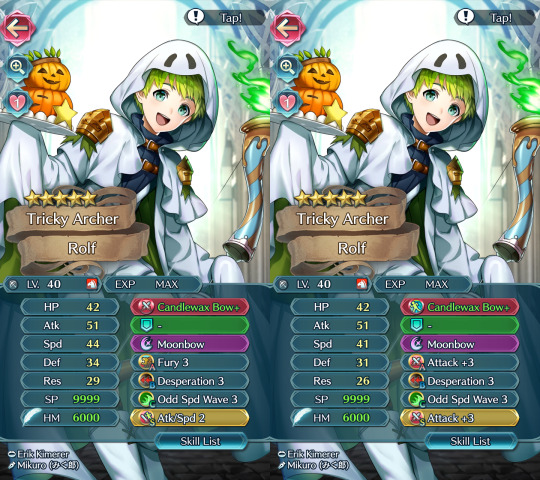
Rolf’s kit comes practically built and requires minimal investment.
On the set to the left we use the common Fury/Desperation setup. Candlewax Bow+ has the skill Fury built into it, meaning that Rolf will take 12 damage after each round of combat. This will help him fall into Desperation range incredibly easy as he’ll only need to engage in one fight to get into the right HP range. We keep his C skill and slap on an Atk refine and the Atk/Spd seal to further boost his offenses. Rolf will find himself doubling his foes often as on odd numbered turns he’ll reach a max of 50 Spd in combat.
The set on the right purely focuses on boosting his Atk if Fury is not available. Here we run double Atk +3 skills in order to push his Atk to a respectable 51. Unlike the set on the left we won’t take an extra 6 damage after combat putting less of a strain on Rolf. We take a Spd refined bow to push his Spd since we have no skills increasing it outside of Odd Spd Wave.
Rolf’s seal options include: Attack+3, Spd +3, Atk/Spd 2, Spd/Def 2, Bond skills, Blow skills and Chill skills.
Offensive:
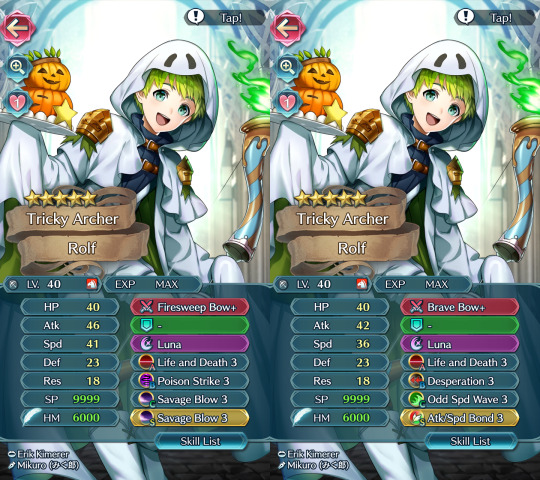
Rolf performs best on the offensive. As a bow unit he has access to many powerful bows that will, depending on the bow, help him perform.
The set on the left removes everything from his base kit focusing on utilizing his high Spd in a Firesweep set. Firesweep Bow will prevent opponents from counter attacking in exchange leaving the wielder unable to counterattack. To best take advantage of any free hits we make we run Poison Strike and double Savage Blow. This allows Rolf to act as a chipper as well as an offensive unit; should he fail to finish off an opponent, they’ll take an additional 10 damage after combat because of Poison Strike. Any foes within two spaces of Rolf’s opponent will take 14 damage from his double Savage Blow allowing him to soften his foes nearby for a potential sweep or to assist an ally.
The set on the right heavily focuses on hitting his opponents for as many hits as possible using Brave Bow+. Should Rolf find himself fast enough, he may hit his opponent 4 times before they make their first counterattack. We run Life and Death and Atk/Spd in order to counteract Brave Bow+’s Spd penalty and low might. Once in Desperation range however Rolf will have an easier time sweeping his opponents, getting in 3 hits before activating Luna. With all his skills in play, Rolf will have 47/47 Atk/Spd.
High Investment:
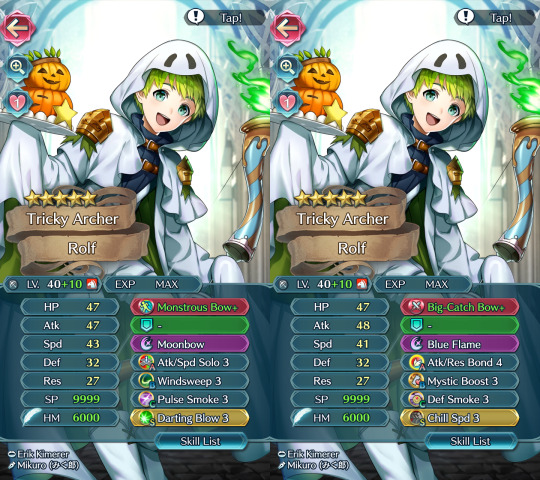
Being a cavalry unit does limit some of his skill inheritance options. Make no mistake though: with the proper skillset Rolf can be a difficult opponent to counter.
The set on the left focuses on making Rolf a potent sweeper. Monstrous Bow will, after combat, inflict the Panic status effect on foes within two spaces of his target for the duration of their next actions. We run Pulse Smoke to then ploy those same foes of their specials. This is especially useful in getting rid of instant specials that exist on units such as Ophelia, Velouria and Infantry Pulse teams. To ensure that Rolf takes as little damage as possible while fighting his opponents we run Windsweep. This skill may be swapped out with Watersweep if countering magic users or dragons. Both skills require foes to have the same amount of speed as Rolf if not higher. To make this near impossible we run Atk/Spd Solo in junction with Darting Blow for a grand total of 53/55 Atk/Spd with no further buffs.
The set on the right seeks to stack Rolf’s offenses as high as possible while granting him some mixed bulk. Big-Catch Bow will grant Rolf Atk/Spd +5 in combat if his opponent has a status effect inflicted on them such as Panic, Gravity, or a Ploy. To increase his odds of getting this debuff, we run Chill Spd as his seal and Def Smoke as his C skill; both skills will ploy his opponents granting him his bow’s in-combat bonus. Atk/Res Bond 4 is taken in junction with Mystic Boost to both increase his damage output and to negate damage that is calculated using the lower of an opponent’s Def/Res. Mystic Boost will also heal for 6 HP after a round of combat Rolf fights in keeping his sustainability up. Bond skills work wonderfully with specials such as Blue Flame which will add 25 pure damage if the user activates it while next to an ally. With all his skills active, Rolf will have 60/46/32/34 Atk/Spd/Def/Res.
#feh#fe heroes#fire emblem heroes#unit review#colorless bow/cavalry#mod asama#A Monstrous Harvest#Rolf: Tricky Archer
8 notes
·
View notes
Text
Gharnef: Dark Pontifex (Unit Review)
Available at 3-4★ (Grand Hero Battle Reward)

Lvl 40 Stats (Flaw/Neutral/Asset)
Note: As a Grand Hero Battle reward, Gharnef does not have access to boons/assets and banes/flaws.
HP: 34/38/41
Atk: 26/30/33
Spd: 31/34/37
Def: 23/27/30
Res: 20/23/26
Neutral BST: 152
Max Dragonflowers: 10
Skills
Weapon: Imhullu (400 SP)
Mt: 14. Rng: 2. Grants Res+3. At the start of turn 3, deals 5 damage to non-magical foes within 5 columns centered on unit and inflicts the following status effect on foes: “Foe cannot counterattack for duration of their next action”.
Red Tome. Cannot be inherited. Cannot be refined.
Assist: None
Special: Ignis (300 SP)
Boosts damage dealt by 80% of unit’s Def.
Can be inherited. Cannot use: Staff.
A: Mirror Stance 2 (240 SP)
If foe initiates combat, grants Atk/Res +4 during combat.
Can be inherited.
B: Chill Atk 3 (240 SP)
At the start of each turn, inflicts Atk-7 to foe with highest Atk on enemy team throughout their next actions.
Can be inherited.
C: None
Analysis
The finale of this year’s GHB Party has come with the arrival of Gharnef. Released late last year, Gharnef is a mixed bag with his kit leaning one way but his stat spread another. Unlike past red tome GHB units Gharnef is deceptively fast. With a poor base kit and niche weapon however he struggles to cement himself as a proper investment in comparison to his competition.
Gharnef’s offenses, while middling, are still serviceable sitting at 30/34 Atk/Spd. He can be built to be deceptively fast unlike the majority of his competition. Outside of this fact though Gharnef has a lot going against him. His weapon, Imhullu, while it grants him +3 Res has an incredibly niche effect dealing 5 damage to all non-magic units and leaving them unable to counterattack on the start of turn 3. While the effect by itself is powerful, it takes far too long to activate, can be inconsistent and requires proper placement on Gharnef’s part. Very few modes will also have turns last for long meaning that before or after turn 3 the tome in question is next to worthless. His base kit oddly enough does not emphasize his player phase potential giving him enemy phase skills instead. His special is impractical as Gharnef lacks the Def to do much of anything with Ignis. Altogether Gharnef has options as a player phase tome but will require a complete overhaul of his base kit. With proper investment Gharnef will prove his worth in time.
On his first merge, Gharnef will gain +2 HP/Spd and +1 Atk.
Reasons to Invest in Gharnef
You like Gharnef and intend to use him in a core team, whether it be for Arena, Aether Raids, or an Infantry team
You’re interested in building Gharnef due to his particular niche and interesting stat spread
You have obtained all or most previous copies made available and do not mind the grail cost
Reasons NOT to Invest in Gharnef
You don’t intend on using him as a core on any team or in any PVE game modes such as Rival Domains or Grand Conquest
You don’t play Aether Raids and have no interest in obtaining grails
You consider Gharnef’s playstyle and base kit uninteresting and would rather fodder his skills off to other heroes you use
You already have an invested red tome unit that you already use on your core Arena & or Aether Raids team
Similar Units
Note: As a Grand Hero Battle reward Gharnef does not have access to boons/assets or banes/flaws and therefore is not directly comparable to any summonable units.
(M) Morgan: Lad from Afar (37/33/34/20/26)
Gharnef: Dark Pontifex (+1/-3/+0/+7/-3)
Note: Gharnef and Morgan have access to uninheritable skills and are thus not directly comparable.
Canas: Seeker of Wisdom (36/32/29/21/33)
Gharnef: Dark Pontifex (+2/-2/+5/+6/-10)
Note: Gharnef has access to uninheritable skills and is thus not directly comparable.
Builds
Budget/Low Investment:

Gharnef, if being kept budget, will have to lean heavily towards enemy phase setups despite his stat spread suggesting otherwise.
The first set keeps the majority of his base kit only swapping his special and granting him a seal. Quick Riposte will synergize with Mirror Stance, giving Gharnef the ability to counterattack multiple times while also granting him +4 Atk/Res while in combat. Luna is taken for its 3 turn cooldown and due to the fact that Gharnef lacks the stat distribution to make use of other 3 turn specials such as Iceberg, Draconic Aura or Bonfire.
The second set follows the same idea but instead swaps out Chill Atk for Quick Riposte to allow him multiple follow-up attacks. Distant Def will stack with his default Mirror Stance for +10 Res, +6 Def and +4 Atk when a ranged foe initiates against him. This provides Gharnef with a bit more bulk and allows him to run specials such as Iceberg with better consistency.
Gharnef’s seal options include but aren’t limited to: Attack+3, Res+3, Spd+3, Spd/Res 2, Atk/Res 2, Bond skills, Darting Blow and Stance Skills.
Player Phase:

Gharnef, unlike the majority of past GHB red tome units can easily cement himself as a player phase unit with some assistance from skills.
In both sets we’ll be using the latest red tome Rauðfox+. The reason for this is because the new fox tome will inflict Atk/Spd/Def/Res -4 on a foe if the wielder initiates combat. The stat difference can prove to be crucial as it can easily determine whether or not Gharnef can double his foe safely.
The left set will focus on lowering him into Desperation range with the help of Fury. Fury will, along with boosting his stats, inflict -6 HP after each round of combat slowly but surely lowering his HP down to the point where he can make multiple follow-ups when initiating. Despite this much needed Atk boost however Gharnef’s Atk is still on the lower side of things hence why we take the Atk+3 seal.
The set on the right focuses on making him a green mage counter while also leaving him fast enough to double most opponents. Green mages remain prevalent in the current meta hence why we take G Tomebreaker as our B skill. Swift Sparrow is taken as our A skill and, in combination with his fox tome Gharnef can create an Atk/Spd difference of +8 allowing him to obtain kills that would have been impossible otherwise. Gharnef’s Atk will be on the lower side regardless so it’s encouraged to bring a buffer to help give him an extra push.
High Investment:

Gharnef can prove to be a formidable opponent if one decides to invest in him. The following sets are best intended for players who plan on fully merging Gharnef.
The first set opts to fix his middling Atk while providing him with high amounts of Spd making him a dangerous opponent to fight against. Fenrir+ carries similar might as his default tome would with an Atk refine hence why we use it. Swift Sparrow 3 will provide Atk+6, Spd +7 when Gharnef initiates combat. In combination with Chill Spd as the seal, Gharnef can effectively create a Spd difference of +14 against his fastest foe. Because we’ll reach 46 Spd when initiating we take Desperation to better allow him to sweep multiple opponents.
The set on the right opts for an unconventional Close Counter setup. Gharnef has the Spd and, more importantly, the defenses when fully merged to utilize a Close Counter setup. Candelabra and Close Def will provide him with extra bulk whenever attacked, granting +2 Atk, +2 Spd, +8 Def and +8 Res in combat. Gharnef can then utilize a rally skill whether on himself or another ally to ploy all foes in his cardinal directions for -3 Atk/Spd while also inflicting the Guard status effect. This prevents opponents from building specials while also creating an offensive gap that will grant Gharnef an advantage. Odd Spd Wave will make Gharnef harder to double keeping him safe from faster opponents. Note that he will still have to remain cautious against Bold Fighter armors as their skills ignore speed checks.
1 note
·
View note
Text
Lukas: Buffet for One (Unit Review)
Available at 5★ (Special Hero)

Lv. 40 Stats (Flaw/Neutral/Asset)
HP: 48/51/54 Atk: 34/37/40 Spd: 18/21/24 Def: 39/42/46 Res: 19/22/26
Neutral BST: 173
Max Dragonflowers: 5
Skills
Weapon: Luncheon Lance+ (300 SP)
Mt: 14. Rng: 1. If foe initiates combat, grants Atk/Def +4 to unit during combat.
Lance. Can be inherited. Can be refined.
Assist:��Pivot (150 SP)
Unit moves to opposite side of adjacent ally.
Can be inherited. Cannot use: Staff.
Special: None
A: AR-O Atk/Def 3 (240 SP)
If attacking in Aether Raids, grants Atk/Def+X during combat. X is calculated based on number of defensive structures on enemy’s map: 2 structures or less grants +10 Atk/Def; 3 grants +7 Atk/Res; 4 grants +4 Atk/Res; 5 or more grants +1 Atk/Res. Destroyed defensive structures are not counted.
Can be inherited.
B: Wary Fighter 3 (240 SP)
Prevents foe and unit from making follow-up attacks in combat if unit’s HP ≥ 50%.
Can be inherited. Armors only.
C: None
Analysis
Joining the other seasonals for an outing is Picnic Lukas. While he may boast a similar statline to past lance armor units this is nothing to sleep on. With a stellar defense of 42 at neutral Lukas currently holds the highest defense in-game which can be further bolstered up to 46 with a boon. In combination with his high attack Lukas follows in his infantry self’s footsteps with great potential as a physical wall.
His base kit, while not as optimal compared to the other seasonals, still serves Lukas greatly. His B skill, Wary Fighter, will prevent follow-up attacks from enemy units and for himself allowing a player to better pace out a fight. It should be noted that Lukas must be wary of skills such as Bold Fighter, Null Follow-Up and Quick Riposte which will cancel out his Wary Fighter and turn things into a speed contest that he will lose. Pivot allows for better motion especially on mixed teams. The red herring in the setup is the addition of AR-O Atk/Def, a skill which will bolster Lukas’s Atk/Def if he is on the attacking team of Aether Raids. While a boost in his physical prowess may sound good on paper, the skill in question depends on an enemy’s defensive structure as their structure determines how much of a boost Lukas will obtain. This A skill serves no purpose outside AR either. Because of the numerous drawbacks to this skill it’s recommended outside of AR to be swapped out for something more optimal.
Similar Units
Effie: Army of One (50/40/22/33/23)
Picnic Lukas: Buffet for One (+1/-3/-1/+9/-1)
Winter Ephraim: Sparkling Gallantly (45/41/23/36/29)
Picnic Lukas: Buffet for One (+6/-4/-2/+6/-5)
Note: Winter Ephraim has access to uninheritable skills and is thus not directly comparable to Lukas.
Brave Hector: Brave Warrior (48/37/22/39/28)
Picnic Lukas: Buffet for One (+3/+0/-1/+3/-6)
Note: Brave Hector has access to uninheritable skills and is thus not directly comparable to Lukas.
Builds
Note: None of the following builds below will use AR-O Atk/Def 3 as it is only functional in Aether Raids and depends on an enemy’s defensive structures.
Budget/Low Investment:

Lukas can work off of his base kit when it comes to budget setups. His kit covers his strengths and addresses his weaknesses leaving for little to invest in.
With Luncheon Lance+’s built in Sturdy Stance effect, Steady Stance 3 and Close Def 3 Lukas stands to gain +4 Atk, +16 Def and +6 Res if attacked boosting his atk, def and res up to 55, 62 and 28 before ally buffs. Needless to say Lukas will be difficult to take down for the vast majority of units in game. Keep in mind however that Lukas will still find himself vulnerable to mages and susceptible to doubles once outside of Wary Fighter’s range.
Positioning will also be crucial for Lukas. While he can use positioning skills such as Reposition as shown above he may seldom find the chance to do so. With only 1 movement if not with an ally with Armor March his default movement skill Pivot may be kept to better get him in position and out of harm’s way.
Lukas’s seal choices include but aren’t limited to: Close Def 3, Stance seals, Bond seals, Atk Smoke 3, Even Def Wave 3 and Even Res Wave 3.
Formidable Wall:

Boasting the highest defense achievable in game currently Lukas can further lean into his given niche. Thanks to armor fighter skills such as Bold and Vengeful Fighter, Lukas has a fair amount of options to choose from. The following Lukas’ shown above are both +Def -HP.
The build on the left opts for a player phase oriented built. The set revolves around Bold Fighter and the cooldown charge it provides per attack. Bold Fighter works best with 3 turn cooldown specials such as Draconic Aura, Bonfire and Sol. However with Slaying Lance+ we can use high cooldown specials to increase our damage output. In this case, we take Ignis which will add 80% of his defense to his damage. With Odd Def Wave and Even Def Wave buffing him for +6 each turn few if any units will be able to survive an Ignis from him.
The build on the right falls back to the standard Steady Stance 4 Vengeful Fighter setup. With Steady Stance 4′s built in guard effect enemies who attack him will be denied their cooldown charges while Lukas will activate his on his second followup attack. With Vengeful Fighter working better with 4 turn cooldown specials we keep his default lance for its added Atk/Def+4 effect in combat. Atk Smoke 3 is utilized to ploy any nearby enemies and allows him to better tank hits from multiple foes.
Mixed Bulk Tank:

Lukas’ resistance is not something to be slept on. Carrying a res superboon Lukas can make an excellent mixed bulk tank. The Lukas on the left is +Res -HP while the Lukas on the right is +Atk -HP.
The build on the left utilizes Distant Counter to help Lukas take on ranged and close ranged foes alike. Since the build showcased is enemy phase oriented we make use of Berkut’s Lance+ which will grant +7 Res if the wielder is attacked. This pushes Lukas’ defensive stats to 42 Def/37 Res in combat before an additional buffs. To better combat against mages Panic Ploy 3 is used to negate any buffs that would have been present.
The build on the right follows a similar approach but exchanges the ability to counter regardless of distance to bolster his raw defensive stats. In exchange for -2 Atk Lukas will gain +6 Def/Res. In combination with Close Def 3 and Berkut’s Lance+ Lukas will reach 54 Def/45 Res if attacked without any buffs from allies. Needless to say he’ll be tricky to take down without weapon triangle advantage or armor effective weapons.
#fire emblem heroes mobile#feh#fe heroes#unit review#Lukas: Buffet for One#Picnic!Lukas#P!Lukas#A Season for Picnics#lance/armored#armored/lance#mod asama#mod tethys
3 notes
·
View notes
Text
Rutger: Lone Swordsman (Unit Review)
Available at 3-4★ (Grand Hero Battle Reward)
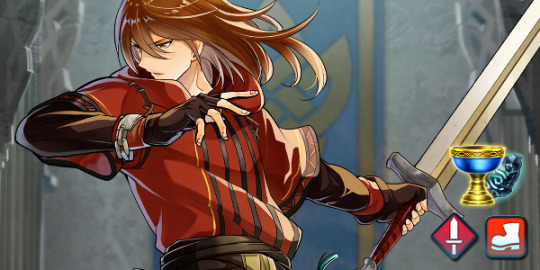
Note: As a Grand Hero Battle reward, Rutger does not have access to boons/assets and banes/flaws.
Lv. 40 Stats (Flaw/Neutral/Asset)
HP: 41/44/47 Atk: 29/32/35 Spd: 36/39/43 Def: 25/29/32 Res: 21/24/28
Neutral BST: 168
Max Dragonflowers: 5
Skills
Weapon: Slaying Edge+ (300 SP)
Mt: 14. Rng: 1. Accelerates Special trigger (cooldown count -1).
Sword. Can be inherited. Can be refined.
Assist: None
Special: Vengeance (200 SP)
CD: 3. Boosts damage dealt to foe by 50% of damage dealt to unit.
Can be inherited. Cannot use: Staff.
A: Atk/Def Bond 3 (240 SP)
Grants Atk/Def+5 to this unit during combat if unit is adjacent to an ally.
Can be inherited.
B: Vantage 3 (240 SP)
Unit counterattacks first when attacked at HP ≤ 75%.
Can be inherited.
C: None
Analysis
Following the arrival of new Binding Blade units comes Rutger, our latest infantry sword GHB unit. Rutger’s movement type along with his weapon of choice places him at a stark disadvantage, with most players already having at least one infantry sword unit they rely on. He lacks a weapon with secondary effects such as Distant Counter or effectiveness against a unit type. Being a GHB unit denies him access to boons and banes leaving him in some aspect outmatched compared to summonable units. However, being a Gen 3 infantry unit Rutger carries a higher overall BST compared to past infantry units and his stats shape him into a fearsome swordsman with the proper investment. Most notable on Rutger is his high base speed, starting at an incredibly high 39 without a boon. Upon being merged, Rutger will gain +2 to his HP and Spd and +1 to his Atk.
Rutger’s base kit is rather underwhelming at first glance, carrying skills that some would consider contradict his statline. Carrying Atk/Def Bond 3 in his A skill, he benefits greatly when close to his allies granting +5 to his Atk and Def respectively while in combat allowing him to hit harder and take less physical damage. This can be stacked further thanks to the introduction of Bond seals a few months back. Vantage as his B skill provides him with ability to dish out a hit first when below 75% of his HP which, depending on the circumstances, can easily allow him to survive an enemy attack that would have otherwise struck him down. However, if activated at the wrong moment, it could very easily spell his demise so it should be used with caution. Vengeance suggests a brash playstyle, the idea being placing him in combat, injuring him significantly and then immediately dishing back out damage based on 50% of the damage he took. While showing potential when combined with Vantage it may be better to swap this special. His saving grace is the inclusion of Slaying Edge+, reducing his special cooldown by -1. This allows him to run higher cooldown specials, whether it be AOE specials such as Blazing Wind or specials like Galeforce. Run with Quickened Pulse, he has access to turn 1 Glimmer/Moonbow easily.
With the introduction of Heroic Grails in November last year, GHB and TT units alike could finally be merged without the need for a rerun. This made them worthier of investing in for old and new players alike along with providing access to skills otherwise deemed “too expensive” or “premium”. Although easier to merge, the investment cost of doing so for GHB units truly depends on performance in Aether Raids, prior copies obtained and merged, and how many reruns of a GHB unit were missed if applicable. For example, Michalis and Rutger have different grail costs despite both being GHB units as Michalis has had more copies available for free over time. Grail cost for obtaining a GHB/TT unit starts at 100 and increases by 50 each time the same unit is summoned capping out at 500 grails. Compared to Michalis’s grail cost of 750 if all 6 prior copies were obtained and merged, Rutger’s grail cost is at a grand 1500, more than double than Michalis. It’s also important to consider that Rutger will not be available as a grail unit for some time until he is added to the Grail selection of heroes. Such an investment should not be taken lightly and should be contemplated heavily on before committing to the Lone Swordsman.
Reasons to Invest in Rutger
You like Rutger and intend to use him in a core team, whether it be for Arena, Aether Raids, or an Infantry Team
You’re interested in building Rutger to suit your needs, whether it be as a fast swordsman or a bulky physical wall
You have obtained all or most previous copies made available and do not mind the grail cost
You are interested in having an Arena and Aether Raids bonus unit.
Note: GHB units do not consistently rotate like the Askr crew (Anna, Alfonse, Sharena, Fjorm) in Arena and Aether Raids. While Rutger is guaranteed to be featured as a bonus unit due to his status as a GHB unit, it is only applicable every several months.
Reasons NOT to Invest in Rutger
You don’t intend on using him as a core on any team or in any PVE game modes such as Rival Domains or Grand Conquest
You don’t play Aether Raids and have no interest in obtaining grails
You consider Rutger’s playstyle and base kit uninteresting and would rather fodder his skills off to other heroes you use
You are missing copies of him and have no interest in using your grails to obtain copies to merge
You already have an invested infantry sword unit that you use on your core Infantry, Arena & or Aether Raids team
Similar Units
Note: As a Grand Hero Battle reward, Rutger does not have access to boons/assets or banes/flaws and therefore is not directly comparable to any summonable units.
Ayra: Astra’s Wielder (41/33/37/31/21)
Rutger: Lone Swordsman (+3/-1/+2/-2/+3)
Note: Ayra has access to uninheritable skills and therefore is not directly comparable.
Karla: Sword Vassal (42/35/40/23/22)
Rutger: Lone Swordsman (+2/-3/-1/+6/+2)
Note: Karla has access to uninheritable skills and therefore is not directly comparable.
Lon’qu: Solitary Blade (45/29/39/22/22)
Rutger: Lone Swordsman (-1/+3/+0/+7/+2)
Note: Lon’qu has access to uninheritable skills and therefore is not directly comparable.
Build Suggestions
Budget/Low Investment:
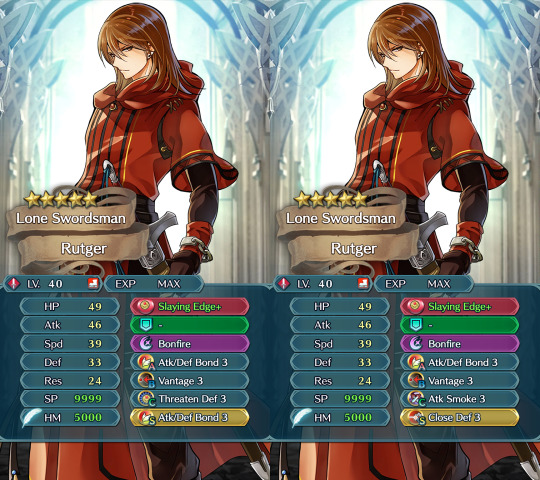
Rutger’s base kit does provide him with some interesting options, opting to make him bulkier while having the speed to compete with faster units. On a budget Rutger can easily work as a defensive unit.
We take a defensive refine in both builds to increase his physical bulk, bringing his defense up from a measly 29 up to a decent 33 allowing us to use Bonfire as his special. Starting with the build on the left, when his default A is combined with the Atk/Def Bond seal and its criterias are met he gains a hefty +10 to his Atk and Def respectively pushing both stats to 56 Atk & 43 Def. Threaten Def 3 is taken to better increase his damage output should a foe fall into its range. The build on the right expands on the same ideas as the left with the only changes being to C skill and seal. Here we use Close Def 3 to grant him +6 to both his Def/Res raising both to 44/30 in combination with Atk/Def Bond making it easier to take hits from dragons. Atk Smoke 3 is taken as the C skill to ploy his foes within 2 spaces by -7 Atk, better ensuring he can handle multiple rounds of combat without being defeated.
Rutger’s other Sacred Seal options include Brazen skills, Smoke seals, Darting Blow, Atk/Spd Bond, Atk/Def 2, Atk+3, Speed+3, Blade skills and Threaten skills.
Player Phase/Offense:
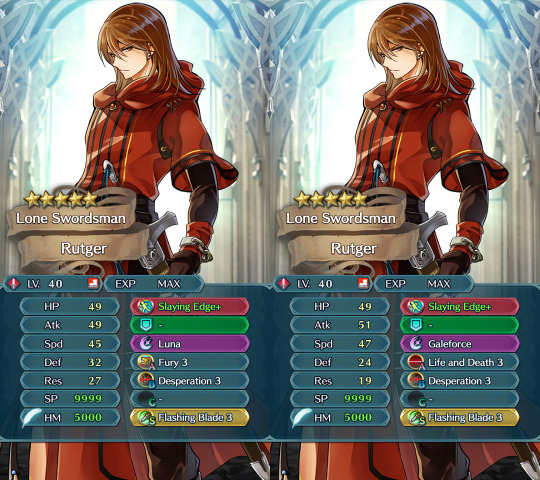
Rutger possesses incredibly high speed without a boon or merges and as such allows him to run more offensively geared setups with ease. The following builds will revolve around using his speed to the fullest.
Being an infantry unit grants him access to the Flashing Blade seal, granting him +1 to his special charge if he has more speed than his opponent. When combined with Slaying Edge+, Rutger can activate his special with his followup attack or charge a high turn cooldown like Galeforce in a single turn. Both builds displayed are built on the same concept of getting him into desperation range so he can effectively sweep multiple foes in a single turn. The build on the left uses Fury to grant him more bulk and to help him fall into desperation range faster with its recoil. Once in desperation range so long as he doubles his foe on his followup attack he’ll activate Luna and wipe his opponent. The build on the right uses Life and Death 3 instead granting him +5 Atk and Spd at the cost of -5 to his Def and Res.
High Investment:
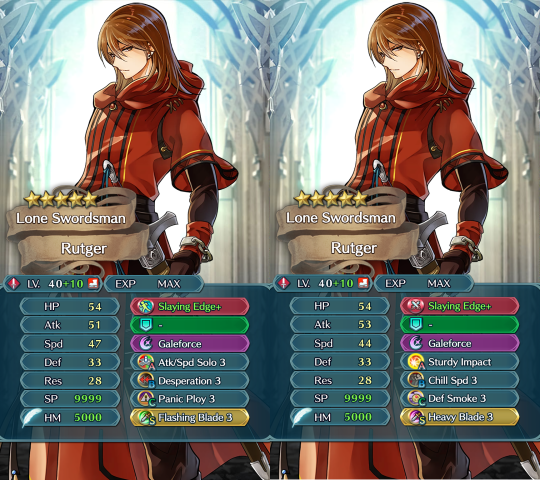
Rutger has plenty of options at his disposal when it comes to high investment. Whether it be a physical bruiser or a dangerous sweeper it’s needless to say he poses himself as a noteworthy threat. The following builds are best suited for players who intend to heavily invest in Rutger.
The build on the left more or less carries the same idea as what was described in the player phase section, utilizing Rutger’s high speed to activate Galeforce in a single turn. While Atk/Spd Solo 3 does limit Rutger slightly in terms of positioning it does grant him +6 to his Atk and Spd without sacrificing any of his stats or suffering recoil. His high HP pool allows Rutger to run C skills like Panic Ploy or Infantry Pulse to better support his team.
The build on the right mixes things up in comparison, maximizing his damage output while preserving his defense at the same time. The key component of the build is the inclusion of Sturdy Impact, granting Rutger +6 to his Atk and a massive +10 to his defense along with the denial of a follow-up attack from his foe. This carries both his Atk and Def to 59/43 before buffs and lets Rutger shrug off physical hits while charging Galeforce with the use of Heavy Blade. Chill Spd is taken as the B skill to improve his matchups against faster opponents while Def Smoke grants him the opportunity to take out more than 1 foe in a single turn, ploying enemies within two spaces for -7 Def after combat.
3 notes
·
View notes
Text
Ghermer (Orichalcum and Soulsteel Direlash ****)
Sunheart Opal exalted at the peak of decadence among the godkings and was born into the power of an army with no enemies, so the Dawn created his own. He formed armies to lead through the Labyrinth of Dragonblooded, mortal, and ghost. He ventured the wyld and instigated mass combat with his peers. Each trophy was a notch on his belt until the hecatoncheir Havoc in Iron Bitterness. 100 Gunzosha lost, 100 Dragonblooded slain, and artifacts unimaginable all lost to the Void before Sunheart Opal ripped the creatures scalp from its barely dead beast and absconded with its hair which the Twilight of his circle, Flowing Dyol Rhine, sewed into fires of Orichalcum and Soulsteel and bound them together with sorcery and sunlight and shadows. He ripped from Sunheart Opal a collarbone and fashioned the Solar’s own body into a golden and ivory hand-hold and gave the weapon back to the Dawn caste so he might once more have his army back.
And the whip cracked. And so he waged 1000 more wars until the cold hands of 1000 hungry ghosts tore him limb from limb at the call of the necromancing Sidereal Onyx Shadow Eyes who bound his body in his own whip so his ghost might never rise. Any tomb raider foolish enough to meddle with the binding in hopes of attaining the artifact should beware the inscriptions surrounding the body of the slain Solar. But one waiting hand is all it would take to free something far more frightening than a normal hungry ghost from someone as bloodthirsty as Sunheart Opal.
Attunement: 5m Type: Light (+5 ACC, +10L, OVW 3, +0 Def) Tag: Lethal, Melee, Disarming, Grappling, Flexible, Reaching Hearthstone Slots: 1 Era: Twilight of the Solar Deliberative
Evocations of Ghermer
Ghermer is a weapon of war, leadership, absolute obedience, and absolute fear. Battlegroups serving the Solar do not make Rout checks unless the current penalty exceeds her Essence score. Enemy battlegroups checking for Rout take the Solar’s Essence score as a penalty to their roll instead if the cause for the check directly involved the Solar or those following her commands. As long as the wielder is not dissonant with Orichalcum or Soulsteel, Iron Obedience Command awakens when she attunes.
Iron Obedience Command
Cost: 3m; Mins: Essence 1
Type: Supplementary
Keywords: Resonant, Dissonant
Duration: Instant
Prerequisite: None
With a crack of the army-felling whip, obedience to the Exalt becomes a thing of absolutes. A command roll supplemented by the wielder of Ghermer with this evocation may roll Manipulation + Presence in place of other Attribute+Ability cominations, rerolling up to (War) dice. If the command is to attack another battlegroup or a creature of Legendary Size, the roll benefits from Double 9s.
Resonant: A wielder resonant with either magical material gains Double 8s on the Command roll.
Dissonant: Only up to (War) 9s can be doubled using this evocation.
Underworld Echoing Crack
Cost: 6m, 1wp; Mins: Essence 2
Type: Supplemental
Keywords: Dissonant, Psyche
Duration: Instant
Prerequisite: Iron Obedience Command
With a crack of Ghermer, the Exalt says loyal troops running for their lives. This evocation can be used when two battle groups meet after a strategic combat roll. Each 1 the opponent rolls removes a single success from her roll. If the wielder of Ghermer wins the roll, she may employ this special stratagem in place of whichever she chose in step 1. This entire evocation is a psyche effect and does not work on battlegroups incapable of fear.
Sow Doubt (Threshhold 3): Fear overtakes key members of the army, delaying relays and commands, disturbing key lines, and causing enemies to flee in fear faster than normal. The Size of the enemy army is treated as being 1 less (to a minimum of 1) for each 1 rolled by the enemy commander, reducing Magnitude, Attack Rolls, Damage, and Soak.
Special Activation Rules: As long as the wielder is not dissonant with Orichalcum or Soulsteel, this evocation unlocks for free after she first leads a battlegroup of Size 3 or more with its prerequisite and shows no mercy to the enemy battlegroup afterwards.
Dissonant: If the wielder is Dissonant with Orichalcum or Soulsteel, the threshold successes needed to choose Sow Doubt is equal to 2+number of 1s the enemy rolled.
Grim Commander’s Strike
Cost: 5m; Mins: Essence 3
Type: Supplemental
Keywords: Decisive-Only, Psyche, Resonant
Duration: Instant
Prerequisite: Underworld Echoing Crack
Facing the Exalt is a loss in and of itself. Her enemies know that and fear him for it. This evocation supplements a decisive attack against a battlegroup. She doubles 10s on the decisive damage roll. Even if this attack does not remove fill a Magnitude track, it forces a rout check on the enemy with +1 difficulty on top of any other modifiers.
Resonant: This evocation may be employed against creatures of Legendary Size as a Simple charm that creates a special Gambit when used by someone resonant with Orichalcum. The initiative roll still gains double 10s.
Break the Beast (Difficulty 4): The whips crack inspires fear even in the behemoths that roam Creation and the hecatoncheir who roam the Labyrinth. As the creature recoils in fear, weaknesses become open. Until the end of the Exalt’s next turn, the creature loses the benefits of Legendary Size.
Grim Commander’s Radiance
Cost: -; Mins: Essence 3
Type: Permanent
Keywords: None
Duration: Permanent
Prerequisite: Grim Commander’s Strike, Majestic Radiant Presence
This evocation enhances Majestic Radiant Presence, spreading that charms effect to battlegroups under the Exalt’s command.
Loyalty After Death
Cost: 10m, 1wp; Mins: Essence 3
Type: Supplemental
Keywords: Dissonant
Duration: Instant
Prerequisite: Underworld Echoing Crack
Her command absolute, those who serve the Exalt will never disobey, not even after death. This evocation supplements a Rally For Numbers action. The Exalt rolls Manipulation + War against a difficulty 1 as normal, however, if the Exalt accumulates enough successes, she may restore a point of size as her troops return from the dead as zombies under her command. A battlegroup can still only benefit from one Rally for Numbers action per battle, but a battlegroup can only benefit from this evocation once per point of size unless the undead troops are replaced with living members.
Dissonant: A wielder dissonant with Soulsteel cannot keep hold of the undead created with this evocation. After the battle, they dissolve into corpses again.
Disloyalty After Death
Cost: 10m, 1wp: Mins: Essence 4
Type: Reflexive
Keywords: Disonant, Resonant
Duration: Instant
Prerequisite: Loyalty After Death
To join the Exalt’s battle is worth ignoring oblivion. After the Exalt or troops under her command fill an enemy battlegroup’s magnitude track, the wielder of Ghermer makes an immediate Rally for Numbers action with Manipulation + War with the same rules as its prerequisite. This can occur even if the Exalt has benefited from a Rally for Numbers action already this battle as the zombies of enemy troops join her fight. This evocation can only be used once per story, unless reset by completing a defining or legendary social goal with the Exalt’s army.
Resonant: If the Exalt is resonant with Soulsteel, then she may use this evocation up to (Essence) times in a single battle, afterwards, regardless of how many times this evocation was used, it’s reset condition takes effect.
Dissonant: A wielder dissonant with Soulsteel can only use this charm once per scene.
Lord of Underworld and Heaven Mantle
Cost: 8m; Mins: Essence 4
Type: Simple
Keywords: Resonant
Duration: One scene
Prerequisite: Grim Commander’s Strike, Disloyalty After Death
Resonant: This evocation can only be unlocked by a wielder resonant with Orichalcum and Soulsteel, typically a Solar.
Grasping the collarbone that holds the strands of Orichalcum and Soulsteel, the Exalt pulls the whip into two. One of black hecatoncheir hair and Soulsteel, the other of glowing Orichalcum. For the remainder of the scene, the wielder of Ghermer can flurry an attack with the Orichalcum whip with a Command action from the Soulsteel whip without the normal penalties. If he is fighting a battlegroup or behemoth, he may also flurry an attack from each whip with the normal penalty, ignoring the limit on flurrying two of the same action.
At the end of the scene, the whip remains separated. Each whip becomes a separate 3-dot artifact. They both hold the first two evocations, the Soulsteel Ghermer holds Loyalty After Death and Disloyalty after death, the Orichalcum Ghermer holds Grim Commander’s Strike and Grim Commander’s Presence. A superior repair project can sew the artifacts back together so that this evocation can be used again.
8 notes
·
View notes
Text
Deepseeker (Black Jade Long Fang ***)
This is my first artifact written since Arms of the Chosen released!
As the Niobraran League fell, the Eclipse caste privateer Endless Sight and his Lunar mate Three Leagues Breath began to explore the very bottom of the Western ocean. There they found black jade so pure it took three warstriders to raise the metal up and a ship of pure orichalcum to hold its weight.
The Twilight caste of Endless Sight’s circle became intrigued and chose to work the metal personally, refusing to alloy it despite it’s strange bulk. The weight of it sunk his factory cathedral into the sea, but still he worked it. Ships sunk, islands lowered, and even on land, sinkholes formed where the weapon was hammered until the day it was completed. The sleep harpoon held a legendary heft that could decimate all it struck with the weight of the sea.
Attunement: 5m (See below) Type: Medium (+3 ACC, +12 DMG, 4 Min , +1 DEF) Tags: Lethal, Melee, Thrown (Short), Piercing Hearthstone Slots: 2 Era: Niobraren Era
Evocations of Deepseeker
Deepseeker weighs an extraordinary amount, even when attuned. It costs an additional mote to commit for every point below Str 5 the wielder’s permanent Strength score is. It can not be wielded by anyone with less than Str 3. When thrown, this weight is cripplingly effective, allowing the wielder to make a Smashing attack without the normal defense penalty.
Gulping Dragon Bite
Cost: 2m, 1i; Mins: Essence 1
Type: Simple
Keywords: Resonant
Duration: Instant
Prerequisite: None
Tossing her spear, the mighty weight of the sea bears down on anything struck. The Exalt rolls Perception + Thrown as a feat of demolition, as if Deepseeker were a mundane siege weapon. In Naval Combat, this can be explicitly used as anti-ship weaponry.
Resonant: Deepseeker functions as an artifact siege weapon, becoming capable of Str 15+ feats of demolition.
Emerge from the Depths
Cost: 1m+; Mins: Essence 1
Type: Reflexive
Keywords: None
Duration: Instant
Prerequisite: None
It is only the essence of the wielder that calls Depthseeker back from the bottom of the ocean each time. After throwing Depthseeker, the Exalt may pay 1m plus an additional mote for every 1 that came up in the attack roll to return the Long Fang to her hand reflexively.
Drowning Undertoe Pull
Cost: 3m, 1i; Mins: Essence 1
Type: Supplemental
Keywords: Decisive-Only, Resonant, Stackable.
Duration: Instant
Prerequisite: Emerge from the Depths
Every blow draws from the weight of the sea and every strike increases the weight of those hit. When supplementing a decisive attack with this charm, Deepseeker’s blow puts the weight of the sea onto the person. He takes a -1 mobility penalty to all actions and his evasion. If this penalty ever exceeds their strength, then her opponent immediately falls prone. This penalty cannot exceed their Strength.
Resonant: This charm can supplement a withering attack as well.
All-Consuming Dragon Whirlpool
Cost: 8m; Mins: Essence 2
Type: Simple
Keywords: Withering-only
Duration: Instant
Prerequisite: Drowning Undertoe Pull
Like a whirlpool, the pull of Deepseeker is inescapable. The Exalt throws the spear as normal, but targets an area up to Short distance away. She then rolls an unblockable attack against all enemies within short range of where the weapon landed. Anyone who fails to dodge is pulled one range band closer to the spear and loses initiative as normal. Deepseeker’s wielder only gains the one initiative for each target she hit, the rest is lost in the darkest reaches of the ocean.
Dragon Swallows the Sea
Cost: 5m, 1wp; Mins: Essence 3
Type: Simple
Keywords: Decisive-Only, Dissonant
Duration: One scene
Prerequisite: All Consuming Dragon Whirlpool, Gulping Dragon Bite
Like the pull of trenches that fall endlessly into the Wyld and currents that grab like a hungry dragon’s maw, the pull of the depths is too strong for any to resist. Deepseeker’s wielder makes a decisive attack. As long as the attack does at least (Target’s Strength) in damage, they begin to sink into the ground immobilizing them, reducing their Evasion by -2 and making movement actions impossible. Against a prone enemy, this attack’s damage gains double 10s.
When used at sea, the target instead begins to sink in the water. Regardless of proficiency or magic, they find themselves incapable of swimming upwards without outside assistance.
This charm can also be used to be a Feat of Demolition or a Naval Combat anti-ship weaponry attack. If this roll achieves at least (Difficulty or Manuever successes x 2) - (Strength) successes, then the structure or ship immediately begins to sink, causing potentially devastating damage.
This charm can only be used once per story unless reset by destroying a structure or ship that the wielder has a Major or Defining negative Intimacy towards.
Dissonant: Users dissonant with Jade cannot unlock this evocation.
Riptide Harpoon Technique (Not sure if this should be reversed with the other as a capstone)
Cost: 9m, 1wp; Mins: Essence 3
Type: Reflexive
Keywords: Decisive-Only, Resonant
Duration: Instant
Prerequisite: Dragon Swallows the Sea
Resonant: Users who are not Resonant with Jade cannot unlock this evocation
The sea is an angry mistress. She pulls ships not only down, but into coral reefs, sharp rocks, and even more disastrous dangers of her depths. After the Exalt successfully pulls an enemy with All Consuming Dragon Whirlpool, she may pull all enemies caught in it to short range of her, launching a decisive attack against them all. She rolls a single attack roll against all enemies caught this way and divides her initiative evenly among them, adding their current penalty from Drowning Undertoe Pull (if any) as automatic successes to the damage done. The damage roll doubles 10s against any enemies who were prone or caught in Dragon Swallows the Sea.
2 notes
·
View notes