#activeself
Explore tagged Tumblr posts
Visit Tumblr Blog
Explore Tumblr blogs with no restrictions, modern design and the best experience.
Last Seen Tumblr Blogs


Fun Fact
Mobile Tumblr US users spend an average of 4.04 minutes per session on the app.
Text
Aizen Power Supplements: A Game Changer for My Fitness Journey
I've always been passionate about staying healthy and living an active lifestyle. However, in recent years, I felt like I wasn't getting the results I desired from my workouts. My stamina wasn't what it used to be, and I wasn't seeing the muscle definition I craved. That's when I decided to explore natural supplements to support my fitness goals. After some research, I came across Aizen Power Supplements, and I'm thrilled I did.

Boosting Energy and Performance
Before starting Aizen Power Supplements, I often felt sluggish during workouts. I'd hit a wall midway through my routine, leaving me frustrated and unmotivated. However, since incorporating these supplements into my regimen, I've noticed a significant increase in my energy levels. I can now power through my entire workout without feeling drained. This newfound stamina allows me to push myself harder and achieve better results.
Building Lean Muscle
One of my primary goals was to build lean muscle mass. While I maintained a healthy diet and consistent workout routine, I wasn't seeing the muscle definition I desired. After using Aizen Power Supplements for a few weeks, I started noticing a positive change. My muscles felt stronger, and I could see a visible improvement in their definition. I believe the combination of the natural ingredients in these supplements, along with my training, has played a crucial role in achieving this progress.
Improved Recovery
Muscle soreness after intense workouts is inevitable. However, the recovery time post-workout can significantly impact your training schedule. Since using Aizen Power Supplements, I've noticed a faster recovery time. The muscle soreness is less intense, and I'm back in the gym feeling refreshed and ready to tackle another session much sooner. This allows me to maintain a consistent training routine without having to take extended breaks due to soreness.
Natural and Safe Ingredients
One of the things that impressed me most about Aizen Power Supplements is their focus on natural ingredients. I prioritize using products that are safe and free from harsh chemicals. Aizen Power Supplements transparency regarding their ingredient list is commendable. This allows users to make informed decisions about what they're putting into their bodies.
Overall Experience
Aizen Power Supplements have been a game-changer for my fitness journey. They've provided me with the extra boost I needed to reach my fitness goals. The increased energy, improved muscle definition, faster recovery time, and focus on natural ingredients make Aizen Power Supplements a standout choice for anyone looking to enhance their workouts and achieve their fitness aspirations. If you're looking for a natural supplement to support your fitness goals, I highly recommend giving Aizen Power Supplements a try. You won't be disappointed!
#fitnessjourney#workoutmotivation#healthylifestyle#gainmuscle#naturalingredients#workoutrecovery#activeself#aizenpowersupplements#aizenpower#aizenpowerresults
1 note
·
View note
Text


Aoi Themed Neopronouns
For @pekowithabat
❤
Wa/Wat/Water/Waters/Waterself
This morning, Wa went to the park. I went with Wat. And Wa brought Water frisbee. At least I think it was Waters. By the end of the day, Wa started throwing the frisbee to Waterself.
Swim/Swim/Swims/Swims/Swimself
This morning, Swim went to the park. I went with Swim. And Swim brought Swims frisbee. At least I think it was Swims. By the end of the day, Swim started throwing the frisbee to Swimself.
Pitter/Patter/Pitters/Patters/Pitterself
This morning, Pitter went to the park. I went with Patter. And Pitter brought Pitters frisbee. At least I think it was Patters. By the end of the day, Pitter started throwing the frisbee to Pitterself.
Drip/Drop/Drips/Drops/Dripself
This morning, Drip went to the park. I went with Drop. And Drip brought Drips frisbee. At least I think it was Drops. By the end of the day, Drip started throwing the frisbee to Dripself.
Lo/Loy/Loyal/Loyals/Loyalself
This morning, Lo went to the park. I went with Loy. And Lo brought Loyal frisbee. At least I think it was Loyals. By the end of the day, Lo started throwing the frisbee to Loyalself.
Red/Red/Reds/Reds/Redself
This morning, Red went to the park. I went with Red. And Red brought Reds frisbee. At least I think it was Reds. By the end of the day, Red started throwing the frisbee to Redself.
•┈┈┈┈┈┈┈┈••✦👑✦••┈┈┈┈┈┈┈┈•
+ two more I thought of
Act/Active/Acts/Actives/Activeself
This morning, Act went to the park. I went with Active. And Act brought Acts frisbee. At least I think it was Actives. By the end of the day, Act started throwing the frisbee to Activeself.
💧/💧/💧s/💧s/💧self
This morning, 💧 went to the park. I went with 💧. And 💧 brought 💧s frisbee. At least I think it was 💧s. By the end of the day, 💧 started throwing the frisbee to💧self.
(Sentences used from pronouncy!)
#♤Mod Kokichi♤#♤Request Complete♤#Neopronouns#Aoi Asahina#Aoi#Danganronpa#Danganronpa Trigger Happy Havoc#Dr1
10 notes
·
View notes
Text
Day 3 - Unity - Game Objects & Unity Editor continued

A brief one today, sort of. Well, not really but I’m not talking about anything in depth. So let’s just go through the overview.
Editing Game Objects
Game objects are pretty much all the assets within your game scene, so it’s pretty standard that we would want to affect them in some way. The hotkeys for these are pretty much standard across 3D engines and 3D software. Let’s take a look.
W for Move
E for Rotate
R for Scale
To hide and un-hide game objects, the shortcut is H. Whereas isolation view is Shift + H.
When it comes to transforming, we have RectTransform and Regular transform. Rect-Transform is intended for 2D and GUI elements to be placed inside, and only works in two Axis of a rectangular shape. It has all the manipulation of moving, scaling and rotating in a single gizmo.
Sometimes you might want to deactivate a game object to temporarily remove it from the scene. You can do this by unchecking it in the inspector window or with script by using activeSelf.
When you deactivate a parent object, you also deactivate all of it’s child objects. If you want to deactivate just the child, you could use a code like this:
void DeactivateChildren(GameObject g, bool a) { g.activeSelf = a;
foreach (Transform child in g.transform) { DeactivateChildren(child.gameObject, a); } }
This will affect the activeSelf settings of the child object, but not the parent. If you make changes during play mode, they don’t save.
This is just the beginning of affecting elements inside your game. To continue to do so, you’ll want to understand other aspects of the windows within Unity.
Apologies for the quick summary, but I’m hoping to speed through this.

Pivot toggle lets you adjust from the object’s pivot, or center of rendered bounds.
The Scene View
The Scene View let’s you choose options for viewing the scene, but also control whether lighting and audio are enabled.

To the right of the Render Mode menu are three buttons that switch certain Scene view options on or off:
2D: switches between 2D and 3D view for the Scene. In 2D mode the camera is oriented looking towards positive z, with the x axis pointing right and the y axis pointing up.
Lighting: turns Scene view lighting (lights, object shading, etc) on or off.
Audio: turns Scene view audio effects on or off
The next icon is to toggle off skybox/fog effect, and the eye is to toggle scene visibility and counts the number of hidden objects.
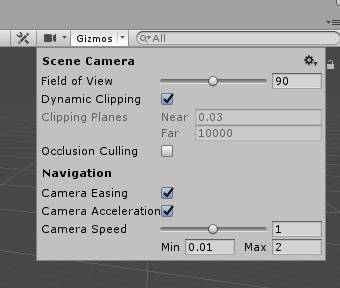
Under the camera menu, a lot of the options seem rather self explanatory, but one option I wanted to take note of was occlusion culling.
Occlusion Culling You’ll want to this box to enable occlusion culling in the Scene view. This prevents Unity from rendering GameObjects that the Camera cannot see because they are hidden behind other GameObjects.
Camera Speed
The current speed of the Camera in the Scene view. The minimum speed of the Camera in the Scene view has valid values between 0.01 and 98.The maximum values are valid between 0.02 and 99.Gizmos
The Game view The game view is what the game will actually look like. At least one camera will control what the player sees.
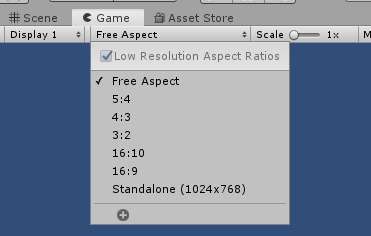
Aspect Select different values to test how your game will look on monitors with different aspect ratios. By default, this is set to Free Aspect.
When you enter ‘play mode’ to simulate your game, you switch to the game mode by default. But remember, any changes you make to your game during play mode are not saved once you exit. This allows you to experiment without damaging the game.
Low Resolution Aspect Ratios
Check this box if you want to emulate the pixel density of older displays: This reduces the resolution of the Game view when an aspect ratio is selected. It is always enabled when the Game view is on a non-Retina display.
Stats
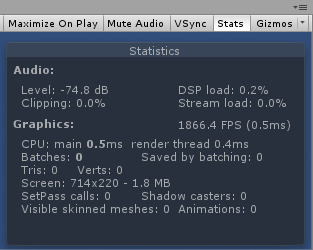
Click this to toggle the Statistics overlay, which contains Rendering Statistics about your game’s audio and graphics. This is very useful for monitoring the performance of your game while in Play Mode.
Stats are looking pretty good considering it’s an empty scene!
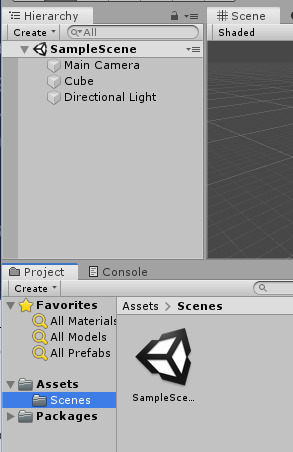
The Inspector Window One thing about the inspector window is that it shows the components of your selected GameObject. With component scripts, the order you need to use when queuing components in your user scripts is the order that should be seen in the inspector.
Scenes Scenes! Scenes are environments and menus of the game. They work like levels. A must for building games in pieces. In terms of their position in the editor, I don’t have much to say about them yet.
Thus, we’ve reached the end of this post! We won’t be going over custom editor tools. This post was a little boring, but hey, sometimes things are.
1 note
·
View note
Photo

Shocking Home Invasion Teaches Us Lessons Please thank MantisX for bringing us t... https://lykelyfe.com/shocking-home-invasion-teaches-us-lessons/?feed_id=11943&_unique_id=60f24051b1f5e #activeself #activeselfdefense #activeselfprotection #asp #caughtoncamera #caughtontape #caughtonvideo #cctv #coveryourasp #johncorreia #mantis #mantisx #selfprotection #self-defense #shockinghomeinvasionteachesuslessons #love #motivation #luxury #business #entrepreneur #success #money #hermes #luxurylifestyle #luxurylife #forex #millionaire #rich #investment #offwhite #invest #trading #billionaire #investing #investor #girl #hair #tumblr #skincare #brazil #lgbt #tumblrgirl #blogueira #tumblrboy #aesthetictumblr #paisagem #braziliangirl #tumblraesthetic #fotostumblr #tumblrposts #tumblrtextpost #tumblrquotes
0 notes
Link
The following blog post, unless otherwise noted, was written by a member of Gamasutra’s community. The thoughts and opinions expressed are those of the writer and not Gamasutra or its parent company.
In my last post, we discussed a simple way you could randomly generate a two-dimensional array of values representing ground, platform, and trap tiles. For example, your result might look like this:
The trick, of course, is to convert each of these chunks into actual Unity objects, and to do so in a way that performs well.
Because we’ll be adding new chunks as needed, we want to make sure we don’t freeze play due to adding large chunks that are costly to instantiate. Because we want to restart the level quickly (without reloading the scene), we want to minimize the cost of creating new game objects.
Pool ALL the objects
I’ll admit to a certain amount of superstitious cargo cult programming. XNA has made me deathly afraid of allocating new objects (which is why you’ll often see me creating temporary method variables as private fields) and SharePoint has made me scrupulous about the use of using/Dispose.
Unity’s contribution to my neurosis is object pooling. I build an object pool system anytime I instantiate new objects, whether or not I really need it for a simple 2D game jam game.
The general idea of object pooling is that the creation and destruction of new objects are expensive, so you should instead deactivate (rather than destroy) and reuse (rather than create).
In my endless runner, I have a very simple construct where each tile type is represented by an int, and then I have a Dictionary that essentially caches a set of game objects for each tile type in my ChunkManager class:
public enum LevelBlock : int { Nothing = 0, Floor = 1, Platform = 2, Spike = 3, Laser = 4, FlameLR = 5, FlameUD = 6, CannonLR = 7, CannonUD = 8, }
Dictionary<int, List<GameObject>> blockPool = new Dictionary<int, List<GameObject>>();
I can then go through my generated level chunk tile-by-tile, reusing old, deactivated blocks wherever possible and instantiating new blocks as necessary:
public GameObject[] Prefabs;
GameObject InstantiateBlock(Transform parent, int index, float x, float y) { // Get from pool for (int i = 0; i < blockPool[index].Count; i++) { if (!blockPool[index][i].activeSelf) { blockPool[index][i].SetActive(true); tmpPos.x = x; tmpPos.y = y; tmpPos.z = 0; blockPool[index][i].transform.parent = parent; blockPool[index][i].transform.localPosition = tmpPos; return blockPool[index][i]; } }
// Instantiate new tmpBlock = (GameObject)Instantiate(Prefabs[index]); tmpPos.x = x; tmpPos.y = y; tmpPos.z = 0; tmpBlock.transform.parent = parent; tmpBlock.transform.localPosition = tmpPos; blockPool[index].Add(tmpBlock); return tmpBlock; }
To put it simply: each tile value is represented by a number. That number also maps to an index in a set of prefabs, as well as a set of object pools. When tile 1 is requested, we create prefab 1 and store it in block pool 1.
Because my code is encapsulated cleanly enough, I can pre-populate this cache of blocks on startup, rather than waiting until the moment the player starts playing the game:
void WarmupPools() { for (int i = 0; i < blockPool.Count; i++) { for (int j = 0; j < 50; j++) { InstantiateBlock(null, i, 0, 0).SetActive(false); } } }
Creating the first chunk
Now that we’ve got an object pooling system for our tiles, we need to write some code that actually converts our two-dimensional array of tile values into Unity GameObjects. In this case, I used a method called InstantiateChunk, which we’ll see below.
This method takes a LevelChunk object, which contains the two-dimensional tile value array, as well as some information about where the chunk is located in Unity’s world space, and how it connects to other chunks. We’ll discuss this later when we handle that piece of the puzzle.
public float TileSize = 0.5f; List<Transform> chunkTransforms = new List<Transform>(); void InstantiateChunk(LevelChunk chunk) { // Create a parent container GameObject parent = new GameObject(); parent.name = "Level Chunk"; chunkTransforms.Add(parent.transform);
// Set the chunk's position information based on the last chunk and the tile size chunk.WorldLength = chunk.Blocks.GetLength(1) * TileSize; chunk.WorldHeight = chunk.Blocks.GetLength(0) * TileSize;
tmpPos.x = chunk.WorldX = (chunks.Count > 0) ? (chunks[chunks.Count - 1].WorldX + chunks[chunks.Count - 1].WorldLength) : transform.position.x; tmpPos.y = chunk.WorldY = (chunks.Count > 0) ? chunks[chunks.Count - 1].WorldY : transform.position.y; tmpPos.z = 0; parent.transform.position = tmpPos;
// Generate blocks for (int y = 0; y < chunk.Blocks.GetLength(0); y++) { for (int x = 0; x < chunk.Blocks.GetLength(1); x++) { if (chunk.Blocks[y, x] == LevelBlock.Nothing) continue;
tmpBlock = InstantiateBlock(parent.transform, (int)chunk.Blocks[y, x] - 1, x * TileSize, y * TileSize);
if (chunk.Blocks[y,x] == LevelBlock.Floor) { SetFloorSprite(tmpBlock, chunk, x, y); } } }
parent.layer = LayerMasks.WorldLayer; PolygonCreator.CreatePolygons(parent, chunk.Blocks); }
The first thing to notice is that each chunk is instantiated as an empty parent object containing tiles. You don’t have to do this in your implementation, but I found it made positioning and debugging a lot easier.
You’ll also note that we’ve defined each tile’s size (in our case, they’re square, so length and width are the same) and we use it for positioning.
The last method calls out to a class called PolygonCreator, which creates a polygon 2D collider for each section of tiles in a chunk.
PolygonCreator exists because it’s not practical to add a box collider to each tile prefab.
I actually tried this to start out with, but the player often got stuck in between connected tiles. I suspect this was because of how collision detection behaves when there were two possible colliders that could stop the player side-by-side. (In theory, it should also save on processing power, since each collider doesn’t have to be considered separately.)
Code for PolygonCreator is here; you’ll want to replace references to LevelBlock and various physics layers with your game’s implementation. The code itself is based on this description of Theo Pavlidis’ contour-tracing algorithm. (I never thought I’d be writing code for a mathematical process that could be described in terms of a ladybug.)
Creating subsequent chunks
Generating a few chunks at the outset is a good start, but as players progress through the level, we want to do two things:
seamlessly add new chunks before they’d appear on-screen
delete old chunks after they’ve passed the camera, freeing up resources
The good news is, we’ve already done most of the heavy lifting on creating chunks. Now we just need to trigger these two events.
To do this, I added a LateUpdate() method to ChunkManager to do upkeep every frame. (I put this in LateUpdate so that all the other Update calls that might affect the world will be finished by the time we process this.)
Elsewhere in ChunkManager, I’ve collected an array of players. Each LateUpdate call, we’ll find the minimum and maximum player X coordinate, which we’ll use to determine which chunks could still show up on screen. (You could do the same thing with a single, non-split-screen game–it’d just be simpler code. You could also apply the same principle to creating Y-scrolling chunks.)
public PlayerCharacter[] Players;
[System.NonSerialized] public float MinimumPlayerX;
[System.NonSerialized] public float MaximumPlayerX; float? minX; float? maxX; void LateUpdate() { minX = null; maxX = null;
// Get the front and back players' locations so we know // when to delete and generate chunks for (int i = 0; i < Players.Length; i++) { if (!Players[i].IsPlayerActive()) continue;
if (!minX.HasValue || Players[i].transform.position.x < minX.Value) minX = Players[i].transform.position.x; if (!maxX.HasValue || Players[i].transform.position.x > maxX.Value) maxX = Players[i].transform.position.x; }
if (minX.HasValue) MinimumPlayerX = minX.Value;
if (maxX.HasValue) MaximumPlayerX = maxX.Value;
CleanupChunks(); }
Once we do that, we’ll call CleanupChunks to add and remove chunks to meet our requirements.
[System.NonSerialized] public List<LevelChunk> chunks = new List<LevelChunk>();
void CleanupChunks() { if (chunks.Count <= 1) return;
// If we've passed a chunk entirely, delete it while (chunks[1].WorldX + chunks[1].WorldLength < MinimumPlayerX) DestroyChunk(0);
// If we've started a new chunk, create a new one if (chunks[chunks.Count - 2].WorldX < MaximumPlayerX) AddChunk( LevelChunkGenerator.BuildChunk(chunks[chunks.Count - 1]) );
UpdateChunkBounds(); }
[System.NonSerialized] public float MinimumChunkX;
[System.NonSerialized] public float MaximumChunkX;
[System.NonSerialized] public float MinimumChunkY;
[System.NonSerialized] public float MaximumChunkY; void UpdateChunkBounds() { MinimumChunkX = chunks[0].WorldX; MaximumChunkX = chunks[chunks.Count - 1].WorldX + chunks[chunks.Count - 1].WorldLength; MinimumChunkY = chunks[0].WorldY; MaximumChunkY = chunks[0].WorldY + chunks[0].WorldHeight; }
This logic assumes that chunks are added to the chunks and chunkTransforms lists in left-to-right order, so that index 0 will always be the leftmost chunk, while the last index will always be the rightmost. We’re also giving ourselves a margin of 2 chunks in either direction, which might not be true for all games.
Because we stored the world (i.e., Unity transform) position of each chunk when we created it, we don’t have to calculate it here. Calculating it at instantiation made this logic simple.
Note that the UpdateChunkBounds() logic is optional for this particular implementation. However, it may be useful for other objects in your world. For example, in my endless runner, I deactivate any projectiles that reach the MaximumChunkX or MinimumChunkX. MinimumChunkY can be used to test for player deaths by pit.
Since we’ve implemented object pooling for blocks, our DestroyChunk() method needs to be a bit more complicated than simply destroying the parent game object.
Transform tmpTransform; void DestroyChunk(int index) { // Disable all blocks while (chunkTransforms[index].childCount > 0) { tmpTransform = chunkTransforms[index].GetChild(0); tmpTransform.parent = null; tmpTransform.gameObject.SetActive(false); }
// Remove objects tmpTransform = chunkTransforms[index]; DestroyObject(tmpTransform.gameObject); chunkTransforms.RemoveAt(index); chunks.RemoveAt(index); }
In my implementation, I removed all of the blocks from the parent transform (setting them back to deactivated), and then destroyed the parent transform (under the assumption that one empty game object per chunk isn’t too expensive).
Conclusion
While this isn’t the complete code to my endless runner’s ChunkManager class, it’s the pieces that do the majority of the non-obvious work.
I will stress that all of this code needs to be adapted to your particular game. There are a lot of assumptions I’ve made given that the game involves multiple players running right (not up, left, or down) for short periods of time. For example, a game that allows players to move both directions might not be able to delete chunks at all!
It’s also important to respect the fact you’re performing a collection of expensive operations at regular intervals. Larger chunks give you more room to build (without more complex generation code that can take into account multiple chunks), but they’re also going to be more expensive to instantiate. Displaying a large number of chunks on screen at the same time means you’re working with a larger pool of objects. There’s a lot of dials to fiddle with, and they’re all dependent upon your particular game.
This was originally posted on my personal blog, dylanwolf.com.
0 notes