#acrylic pouring for beginners
Explore tagged Tumblr posts
Visit Tumblr Blog
Explore Tumblr blogs with no restrictions, modern design and the best experience.
Last Seen Tumblr Blogs


Fun Fact
Hackers stole 65M passwords from Tumblr in 2013.
Text
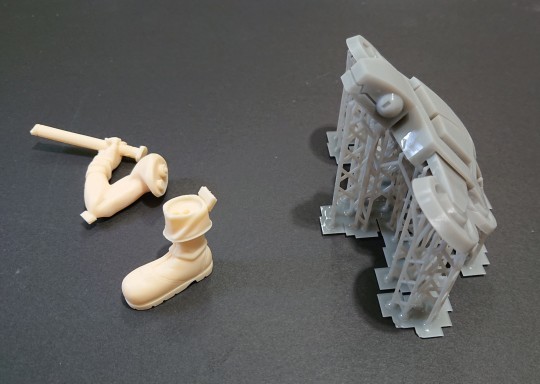
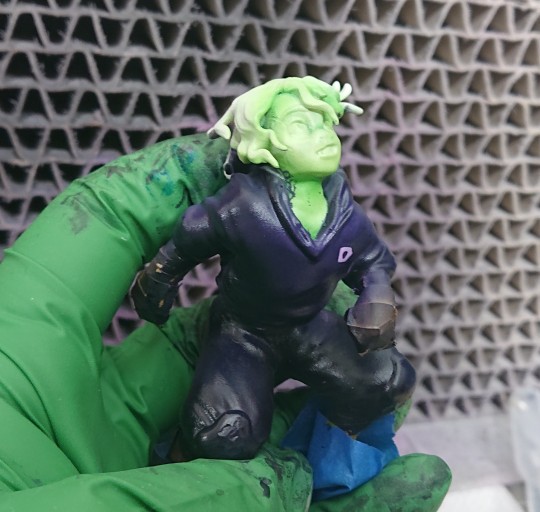
Here are the steps and some tricks that I use to make water bases for my minis! (〃´▽`〃)
Thank you @lisuune for asking!~☆ I hope this will be of help!
1st step is to decide what the base "water" colour is!
For murky pounds you can use browns and beige, for a swamp, I use dark greens, olive, and sepia, for deep water the best would be shades of blue, depending of the depth that you want.
I'll use this mini as an example. I had some fun pouring cheap acrylics mixed with regular white/school glue (not obligatory, but I added a drop of silicone oil for the eye effects). I cut a plastic bag in two and let the acrylics dry. After acrylics dry, they turn to plastic, which is easy to cut and glued on the base.
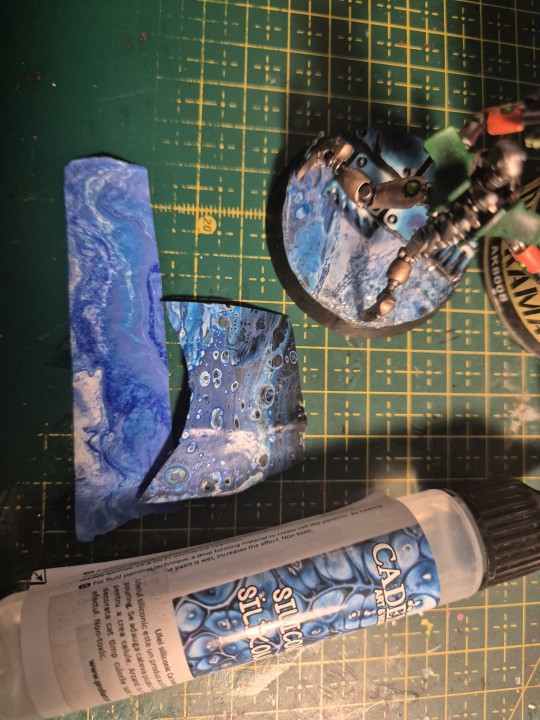
(I need to flip my cutting mate, sorry for the mess (ó﹏ò。))
Always let painrs dry in a well ventilated place.
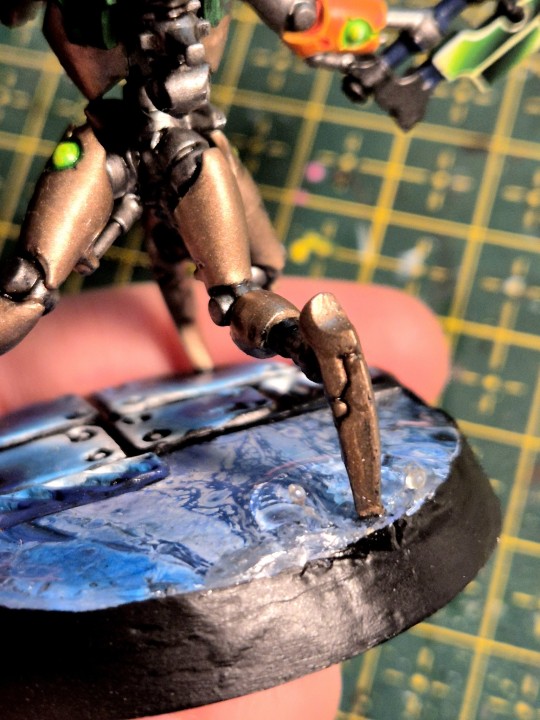
2nd step is to decide what sort of "water" you shall use.
I am mostly using two materials, but there are a few others as well. I never tried them, but I read that people use transparent glue, varnish medium, or medium gel. I personally have experience with resin (both UV and regular epoxy resin) and clear acrylic.
(! Always work in a well ventilated space with resin ! It is super important, the fumes are toxic! Wearing gloves with resin is a must!)

When pouring, you can use a silicone mold for the base, or as my silly ass did the first time, use a little tape to create a dam (this only works if you intend to pour just a little).
Depending on how much you need, you can use: acrylic and epoxy resin for projects where you need a lot. Those allow you to pour multiple layers that will merge marvellously!
The trick is to be patient to let it dry, and pour very slowly to avoid air bubbles. Usually, a spritz or spray of alcohol is enough to eliminate the surface bubbles!
While acrylic is way safer and friendly for beginners, resin allows you to do neat tricks.
Use UV resin when you don't have to use a lot, because it doesn't layer as nicely as the regular one that needs to dry to gel (harden).
You can leave the UV resin under sunlight, and it will harden, or you can use an UV lamp, or flashlight, which will cause it to harden in seconds!
I made here a watter ripping by using a compressed air can and curing as it was blown into place. (*sensible chuckle*).
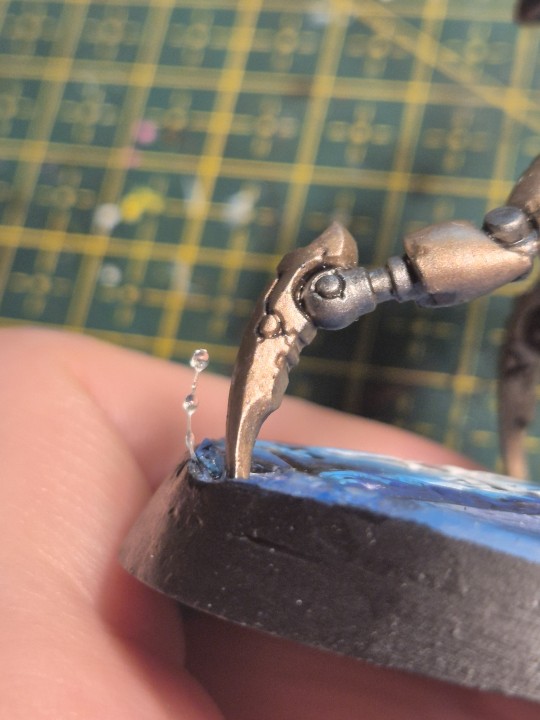
If you have fishing wire or transparent tread, you can pour a few drops on it and cure it for a cute splash effect!
As an extra, I use putty to make the "solid ground". I really like the Green Stuff world rolling pins, but a 3D printed one can work just as fine! (Don't forget to cover them with sculptor vaseline, or just water. For me, I prefer starch, that is why mine are so dusty)

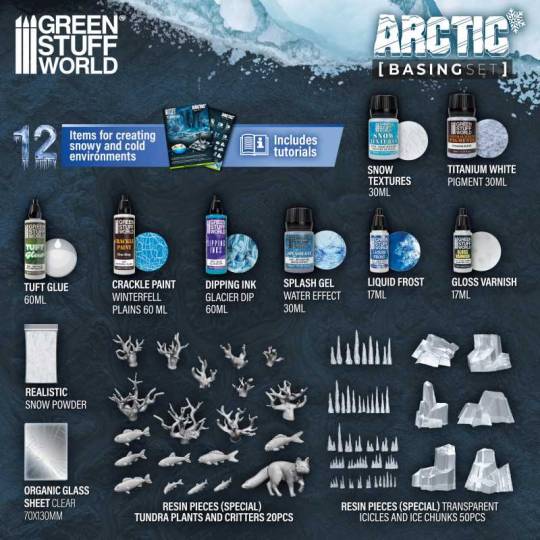
I saw some beautiful basing kits from GSW, that I will absolutely buy to try. They have them for all kinds of terrain, including water, swamps, lava etc.
Happy basing !~♡
(。・ω・。)ノ♡
15 notes
·
View notes
Text
Okay, I could talk about each of these topics in greater depth, but I'll keep it boiled down or else I'll be typing for a loooong time. If anyone wants elaboration on the following steps or on any particular pieces I've done, let me know and I'll give more tips and tricks later :) Apologies for the formatting, I'm still getting used to posting on Tumblr
-------------------------
Step 1: Clean up and prep I start by sanding down leftover pieces and flaws in the model caused by the production process. In traditional model kits, these are pour tabs, flash and seam lines. For 3D printed, these would be pits or bumps left behind from supports and layers lines.
The arm and boots on the left are from a traditional model kit, and have visible tab chunks that will need snipping then sanding. S.H.E.L.L.D.O.N on the right needs his supports removed, then sanding. Every piece (minus those with fine texture) gets buffed with 240, 320, 600 and 1000 grit sandpaper/sanding sponges (clear parts and any pieces intended to be painted with clear paints, such as character skin, are additionally polished with a melamine sponge, also known as a magic eraser).
This is to make sure the surface is level and uniform. Any bumps or scratches that aren't removed will show up in the final paint job.
(Note for beginners: It's fine to just remove production remnants and do a little clean up before going to the next step. All that prep is tedious! Just have fun with it for now!)
Step 2: Make sure the model parts fit well together. It's very common for a model to not fit together perfectly right away. Dipping the model in hot water to soften it, then pressing the pieces together usually fixes this. Be careful not to burn yourself! Sometimes drilling and sanding is required. At this point, larger model kits will require drilling and pinning, though most are fine being assembled later just with glue.
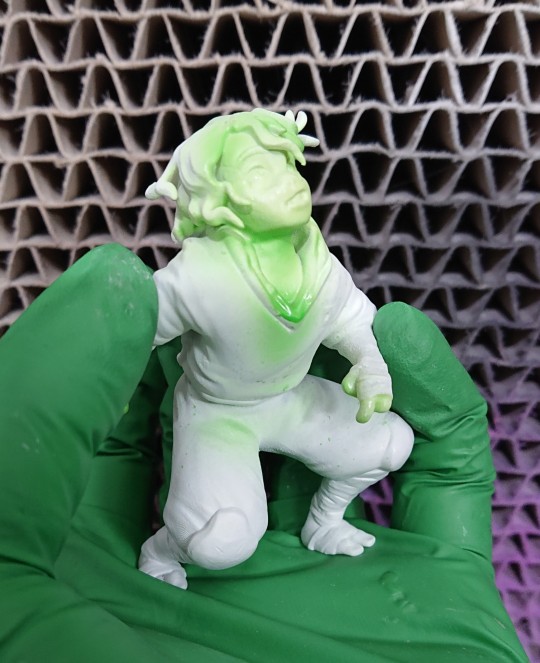
Step 3: Primer
I secure the pieces on clips to keep them elevated, and spray them in thin, even layers of primer. Primer is essential, as it is what makes the paint stick to the model. - White primer: Best for anime and cartoon figures, makes colors pop - Grey: For realistic characters, dulls colors down a little. - Black: For metal or specialty products, like Armored Komodo pigments
Primer will make any unresolved blemishes become more visible, so I usually go back to step 1 until I get them all.
Step 4: Clear coat
For an even, level paint job, I spray a layer of Gloss clear coat on every piece, to smooth the surface even more. I skip this for finely textured pieces, so the details don't get filled in. Spray in a well ventilated area with protection!

There are many brands of clear coats. These are my favorites!
Step 5: Paint
I use three kinds of paint:
Lacquer: Expensive, take a little while to cure, must be thinned with a solvent. Sometimes hard to find. Offers lovely effects, is durable and sticks very well. Can be difficult to correct if something goes wrong. *HAZARDOUS, use in a well ventilated or outside area and use breathing protection!*
Enamel: A little easier to find, takes a long time to cure, which sometimes is a benefit, as it can level itself and provide a smoother surface. Must be thinned with a solvent, sticks very well. Most importantly, enamel can be used on top of lacquers and erased without damaging the lacquer layer. *HAZARDOUS, use in a well ventilated or outside area and use breathing protection!*
Acrylic: Great, vibrant colors, easy to find, very affordable! Dries very fast, even faster if you lightly use a hair dryer. Very delicate, prone to scratches and chips. Can be easily stained by other acrylic color. You only need water to thin it!
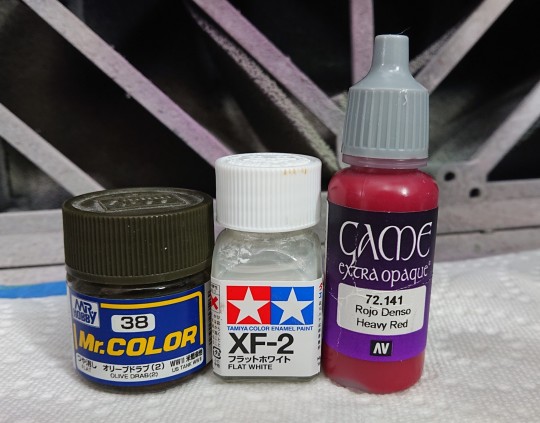
Left to right: Creos Mr Hobby Lacquers, Tamiya Enamel, Vallejo Acrylics
I usually start with the character's skin first. This is because I paint skin using built up layers of clear colors, to get a sort of 'glow' that shines through to the primer and differentiates the skin from clothing and hair pieces.
Afterwards and throughout the project, I 'save' my work by spraying a layer of clear Gloss or Matte spray. I use an airbrush, so to further protect other parts of my work, I cover the finished pieces in masking liquid and/or masking tape, before spraying the next color. Because Enamel can be easily wiped off of lacquers without affecting the lower color layers, I use this type of paint second. If you use Enamel first, you may run into issues with the underlying lacquer causing paint cracking in the future.
(Note for beginners: Using just acrylics is fine. :) I have painted entire models with acrylic paints obtained from craft stores and Walmart, and had very good results.)
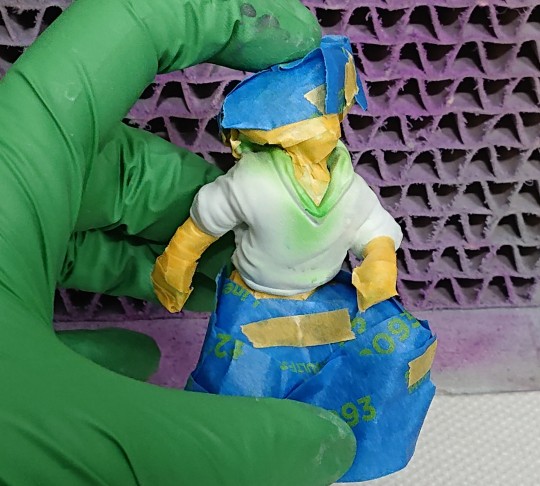
Despite my masking, some enamel paint leaked through on Casey's neck. Masking is rarely perfect, so expect to do touch ups after removal.
Step 6: Face eyes and details
...this is an entire essay on it's own, which will require another post. But I use layers of enamel for eyes, water color pencils for eyebrows, chalk pastels for makeup/shading and acrylics for eye lashes.
I have shaky hands sometimes, so the ability to erase my work and start again is very helpful here, hence why I don't use lacquers for this part.
There are... So many products and colors in this one piece... Step 7: Touch ups then gluing
I typically do touch ups as I go, but now is the last chance to correct anything. Once it's ready, 2-part epoxy or crazy glue (sometimes both) will be enough to get most models together entirely.
----------------------------
That's a basic breakdown for my process, though for things like effects, clear pieces and fancier/realistic models, it can get quite elaborate. I don't want to scare anyone away from the hobby, so I'll just say this...
You don't have to do allllll this stuff!! Find a model you love (repainting dollar store figures is a great place to start!), prime it, and slap some paint on it! Just have fun, and then go from there!! My first model was lumpy, and looked like she was painted with nail polish, but I kept going and just enjoyed myself, trying new tips and tricks along the way. The point is to have fun! Make sure to take proper precautions and read product instructions as well, if you choose to use the more toxic products.
If anyone decides to give figure painting a shot, send pics of your projects my way, I'd love to see them!! :D It's always great to have more people in the hobby! And I'm always up for more questions, they might just take me a little while to get to replying.
16 notes
·
View notes
Text
Enhance Your Candle-Making with Aai Planet's Wax Pouring Funnel and Premium Materials

Introducing the Aai Planet Wax Pouring Funnel, designed for precision and ease in your candle-making process. With a perfect capacity, this funnel ensures a smooth, mess-free pour, making it an essential tool for both beginners and experts. Crafted from high-quality materials, it’s durable and easy to clean, ideal for creating professional-quality candles. Pair it with our best acrylic tea light cups, available for seamless candle creations. If you’re looking to buy the best candle-making materials in India, Aai Planet offers top-tier products for all your crafting needs. Start your candle-making journey with us!
#buy best candle making material in india#best acrylic tea light cup for candle#candle making supplies india#wax pouring funnel for candles#best candle making tools#candle making kit india
0 notes
Text
Wooden Trays for Crafts - DIY Supplies in Pakistan
Wooden Trays for Crafts: DIY Supplies in Pakistan
Crafting is a creative and therapeutic activity that many enjoy, whether as a hobby or a small business.
Wooden trays in Pakistan are one of the most versatile and essential materials for DIY projects. These trays not only offer endless customization opportunities but also serve as functional pieces for home décor or gifting. In Pakistan, the demand for DIY crafting supplies has increased, and wooden trays are a popular choice for many craft enthusiasts. Let's explore the world of wooden trays for crafts and where to find the best DIY supplies in Pakistan.
Why Choose Wooden Trays for Crafts?
Wooden trays are highly adaptable and come in various shapes and sizes. Whether you're into painting, decoupage, wood-burning, or resin art, these trays provide the perfect canvas. Here are a few reasons why wooden trays are ideal for crafting:
Durability:
Wood is sturdy, making the trays long-lasting.
Customizable:
Wooden trays can be easily painted, stained, or decorated with various craft supplies.
Functional Art:
Once decorated, these trays can be used for serving food, holding accessories, or simply as decorative pieces.
Eco-friendly:
Unlike plastic alternatives, wood is biodegradable and sustainable.
Types of Wooden Trays for Crafts
When choosing a wooden tray for your next DIY project, it’s essential to consider the type and size that fits your needs. Here are a few types of trays that are commonly available in Pakistan:
Plain Wooden Trays:
These are untreated, raw wooden trays that are perfect for painting, stenciling, or decorating with decoupage techniques.
Decorative Wooden Trays:
Pre-shaped trays with carvings or embellishments that can be enhanced further with your creative touch.
Serving Trays:
Larger trays with handles, ideal for both functional use and décor projects.
Miniature Trays: Small trays used for décor or personalized gifts, often in shadow boxes or as display pieces.
DIY Craft Ideas with Wooden Trays
The possibilities for creating wooden trays are limitless. Whether you're a beginner or an experienced crafter, there are numerous ways to personalize a wooden tray:
Decoupage:
Using printed paper or napkins, you can transform plain trays into beautiful, vintage-inspired pieces.
Hand Painting:
Get creative with acrylic paints and create unique, hand-painted designs on your trays.
Wood-burning:
This technique, known as pyrography, allows you to engrave intricate designs into the wooden surface.
Resin Art:
Pouring colored resin on trays can create stunning, glossy finishes with a pop of color or embedded elements like flowers or glitter.
Where to Find Wooden Trays for Crafts in Pakistan
If you're in Pakistan and looking to start a DIY project with wooden trays, you're in luck. Many local stores and online platforms offer a wide variety of crafting supplies. Some of the top places to find wooden trays for crafts include:
Online Craft Stores
Websites like Craft Emporium have a wide selection of wooden trays, along with other DIY supplies.
Tips for Buying Wooden Trays for DIY Projects
When purchasing wooden trays for your DIY projects, consider the following tips to ensure you get the best quality and value for your money:
Check the Quality of the Wood:
Ensure the wood is smooth, with no cracks or splinters. MDF (Medium-Density Fiberboard) or plywood is a good choice for lightweight projects, while solid wood offers better durability.
Size and Shape:
Depending on your project, you may need trays of various sizes and shapes. Choose accordingly.
Handles or No Handles:
If you’re planning to use the tray as a serving piece, handles are a practical addition.
Bulk Purchases:
If you plan to make multiple crafts or sell your creations, buying trays in bulk might save you money.
Conclusion
Wooden trays are a fantastic addition to any DIY craft project, offering a blend of functionality and creative freedom. In Pakistan, the availability of quality wooden trays and crafting supplies makes it easy for hobbyists and professionals alike to explore their creativity. Pakistani handicrafts whether you're making personalized gifts or designing décor for your home, wooden trays offer endless possibilities.
Whether you're crafting as a hobby or for a small business, wooden trays provide the perfect foundation for creating something truly unique and beautiful.
0 notes
Text
Wooden Trays for Crafts - DIY Supplies in Pakistan
Wooden Trays for Crafts: DIY Supplies in Pakistan
Crafting is a creative and therapeutic activity that many enjoy, whether as a hobby or a small business.
Wooden trays Pakistan are one of the most versatile and essential materials for DIY projects. These trays not only offer endless customization opportunities but also serve as functional pieces for home décor or gifting. In Pakistan, the demand for DIY crafting supplies has increased, and wooden trays are a popular choice for many craft enthusiasts. Let's explore the world of wooden trays for crafts and where to find the best DIY supplies in Pakistan.
Why Choose Wooden Trays for Crafts?
Wooden trays are highly adaptable and come in various shapes and sizes. Whether you're into painting, decoupage, wood-burning, or resin art, these trays provide the perfect canvas. Here are a few reasons why wooden trays are ideal for crafting:
Durability:
Wood is sturdy, making the trays long-lasting.
Customizable:
Wooden trays can be easily painted, stained, or decorated with various craft supplies.
Functional Art:
Once decorated, these trays can be used for serving food, holding accessories, or simply as decorative pieces.
Eco-friendly:
Unlike plastic alternatives, wood is biodegradable and sustainable.
Types of Wooden Trays for Crafts
When choosing a wooden tray for your next DIY project, it’s essential to consider the type and size that fits your needs. Here are a few types of trays that are commonly available in Pakistan:
Plain Wooden Trays:
These are untreated, raw wooden trays that are perfect for painting, stenciling, or decorating with decoupage techniques.
Decorative Wooden Trays:
Pre-shaped trays with carvings or embellishments that can be enhanced further with your creative touch.
Serving Trays:
Larger trays with handles, ideal for both functional use and décor projects.
Miniature Trays: Small trays used for décor or personalized gifts, often in shadow boxes or as display pieces.
DIY Craft Ideas with Wooden Trays
The possibilities for creating wooden trays are limitless. Whether you're a beginner or an experienced crafter, there are numerous ways to personalize a wooden tray:
Decoupage:
Using printed paper or napkins, you can transform plain trays into beautiful, vintage-inspired pieces.
Hand Painting:
Get creative with acrylic paints and create unique, hand-painted designs on your trays.
Wood-burning:
This technique, known as pyrography, allows you to engrave intricate designs into the wooden surface.
Resin Art:
Pouring colored resin on trays can create stunning, glossy finishes with a pop of color or embedded elements like flowers or glitter.
Where to Find Wooden Trays for Crafts in Pakistan
If you're in Pakistan and looking to start a DIY project with wooden trays, you're in luck. Many local stores and online platforms offer a wide variety of crafting supplies. Some of the top places to find wooden trays for crafts include:
Online Craft Stores
Websites like Craft Emporium have a wide selection of wooden trays, along with other DIY supplies.
Tips for Buying Wooden Trays for DIY Projects
When purchasing wooden trays for your DIY projects, consider the following tips to ensure you get the best quality and value for your money:
Check the Quality of the Wood:
Ensure the wood is smooth, with no cracks or splinters. MDF (Medium-Density Fiberboard) or plywood is a good choice for lightweight projects, while solid wood offers better durability.
Size and Shape:
Depending on your project, you may need trays of various sizes and shapes. Choose accordingly.
Handles or No Handles:
If you’re planning to use the tray as a serving piece, handles are a practical addition.
Bulk Purchases:
If you plan to make multiple crafts or sell your creations, buying trays in bulk might save you money.
Conclusion
Wooden trays are a fantastic addition to any DIY craft project, offering a blend of functionality and creative freedom. In Pakistan, the availability of quality wooden trays and crafting supplies makes it easy for hobbyists and professionals alike to explore their creativity. Pakistani handicrafts whether you're making personalized gifts or designing décor for your home, wooden trays offer endless possibilities.

0 notes
Text
Art Classes in New Haven: Building Skills in Drawing and Painting

New Haven is renowned for its rich cultural heritage, vibrant arts scene, and deep commitment to creative expression. Among the various disciplines taught across the city, drawing and painting remain at the core of art education. These foundational practices are essential for any aspiring artist, providing the tools needed to bring their ideas and visions to life. From beginners looking to explore their artistic potential to seasoned artists refining their techniques, New Haven offers a wealth of art classes focused on building skills in drawing and painting.
In this article, we will explore how these classes provide students with a deep understanding of traditional and modern approaches to these disciplines, focusing on the benefits of both. Although Joyful Creations Studio offers a variety of courses in both art forms, the city is full of additional opportunities for learning and creative growth.
The Importance of Drawing: The Foundation of All Visual Art
Drawing is often considered the most fundamental of all visual arts. It is the starting point for nearly every other medium, whether it be painting, sculpture, or even digital art. In New Haven, art classes New Haven emphasize the importance of developing a strong foundation in observational skills, line work, and the ability to translate the three-dimensional world onto a two-dimensional surface.
Basic Techniques and Fundamentals
Many art schools and studios in New Haven begin their drawing courses by teaching the core principles of art: line, shape, form, value, and proportion. These concepts are vital for artists to accurately represent the world around them. Courses typically focus on still life, portraits, and landscapes, using traditional materials such as graphite, charcoal, and ink.
For beginners, art classes New Haven are often designed to break down the intimidating nature of creating art into more manageable exercises. Instructors guide students through simple practices, like gesture drawing, which helps them capture the essence of a subject quickly. Contour drawing, another common exercise, emphasizes the importance of observing details closely, training the eye to notice fine nuances in form and structure.
In these classes, students are encouraged to experiment with different materials, allowing them to explore various textures and mark-making techniques. Whether it’s the precision of a graphite pencil or the boldness of a charcoal stick, each tool offers unique possibilities for artistic expression.
Advanced Drawing Techniques
For those who have mastered the basics, New Haven’s advanced drawing classes provide a deeper dive into more complex techniques. Courses often explore figure drawing, where students study the human form, capturing its movement and anatomy. These classes are often taught with live models, giving students the opportunity to practice drawing from life, a critical skill in many artistic disciplines.
Perspective and shading are also heavily emphasized in advanced drawing classes. Students learn how to create the illusion of depth and three-dimensionality by mastering light and shadow. By understanding how to manipulate values, artists can give their drawings a lifelike quality, whether they’re working with pencil, ink, or charcoal.
Moreover, advanced art classes New Haven often encourage students to develop their own unique style and artistic voice. Instructors may assign projects that challenge students to experiment with abstraction, narrative storytelling, or even combining drawing with other mediums like collage or printmaking.
Painting: A World of Color and Emotion
While drawing focuses primarily on line and form, painting adds the dimension of color, allowing artists to evoke mood, emotion, and atmosphere. Art classes New Haven range from traditional oil and watercolor techniques to more experimental approaches, such as acrylic pouring or mixed media. These courses guide students through the process of working with paint, from mixing colors to mastering brushwork.
Oil Painting: The Classic Medium
Oil painting has long been regarded as one of the most prestigious and versatile mediums in the art world. New Haven is home to many art studios that specialize in teaching oil painting, offering students a chance to work with this rich, slow-drying paint that allows for blending and layering.
In oil painting classes, students often begin by learning about color theory and how to mix pigments to create the desired hues. Color is a powerful tool in oil painting, and understanding how colors interact on the canvas is essential for achieving harmony in a composition. Students are also taught how to build layers of paint, starting with underpainting and working their way to the final glazes. This technique gives oil paintings their characteristic depth and luminosity.
Instructors in New Haven’s oil painting classes emphasize the importance of patience and practice, as the medium can be challenging for beginners. However, once mastered, oil paints offer endless possibilities for texture, detail, and expressive brushwork.
Watercolor: Light, Fluid, and Spontaneous
Watercolor, in contrast to oil painting, is known for its lightness, transparency, and immediacy. Many artists are drawn to watercolor because of its spontaneity; the way the paint flows and interacts with water can create beautiful, unexpected effects. Watercolor painting is particularly popular in art classes New Haven, as it encourages artists to embrace the unpredictable nature of the medium.
In watercolor classes, students learn to control the flow of water and pigment, creating both soft, subtle washes and bold, defined strokes. The medium requires a delicate balance of control and freedom, making it ideal for artists who enjoy a more fluid, intuitive approach to painting.
Watercolor techniques such as wet-on-wet, where the paint is applied to a wet surface, and dry brush, where minimal water is used to create texture, are frequently explored in these courses. Classes also cover essential skills like layering washes to build up color and tone, as well as the importance of using high-quality paper that can withstand the medium’s demands.
Acrylic Painting: Versatile and Bold
Acrylic painting is another popular choice among New Haven’s art classes. Unlike oil paints, acrylics dry quickly, allowing artists to work more spontaneously and make adjustments on the fly. Acrylics are known for their versatility, as they can mimic the appearance of both watercolors and oils, depending on how they’re used.
Acrylic painting classes often appeal to beginners because of the forgiving nature of the medium—mistakes can easily be painted over, and the fast drying time allows for quick progress. Instructors guide students through the process of color mixing, brush techniques, and the application of texture, whether through thick impasto strokes or smooth, even layers.
For more advanced students, acrylic painting classes in New Haven may delve into experimental techniques, such as pouring, glazing, or using additives like gels and pastes to alter the paint’s texture. This allows for endless possibilities when it comes to creating abstract or highly detailed works.
Building a Strong Foundation: The Role of Art Classes in Skill Development
What sets New Haven’s art classes apart is their focus on not just teaching technical skills, but also fostering creativity, self-expression, and critical thinking. Whether it's drawing or painting, the city’s art instructors emphasize the importance of building a strong foundation in the fundamentals while encouraging students to experiment and explore their unique artistic voices.
In addition to regular classes, many studios, including Joyful Creations Studio, offer workshops, open studio sessions, and personalized instruction for artists who want to delve deeper into specific areas of interest. These opportunities provide students with the chance to receive individualized feedback and mentorship, helping them grow as artists.
Conclusion: A Nurturing Environment for Artistic Growth
New Haven’s art scene is thriving, with countless opportunities for students of all levels to build skills in drawing and painting. From mastering the basics of line and form in drawing to exploring the emotional depth of color in painting, the city's art classes offer a comprehensive and nurturing environment for creative growth.
With its wide range of traditional and contemporary techniques, Joyful Creations Studio and other studios across New Haven provide the perfect setting for artists to hone their craft, build confidence, and express themselves through art. Whether you're a beginner or an experienced artist, these classes open the door to a lifetime of artistic exploration.
0 notes
Video
youtube
Double Dip ~ Easy Acrylic Pour Painting ~ Beginners Fluid Art
0 notes
Text
0 notes
Text
De-Stress and Create: Explore Simple Painting Kits for Adults with Simpler Painting

Longing for a creative outlet but feeling intimidated by complex art supplies and techniques? You're not alone! Many adults crave a way to relax and express themselves artistically, without the pressure of mastering intricate skills. Simpler Painting introduces you to the world of painting kits for adults designed for effortless enjoyment.
Why Choose Simple Painting Kits for Adults with Simpler Painting?
Easy to Use & Beginner-Friendly: Our kits cater specifically to adults who are new to painting or haven't picked up a brush in years. No prior experience is necessary! Everything you need is included, with clear instructions to guide you through the process.
Relaxing & Therapeutic: Unwind and de-stress in the calming world of color. Focus on the present moment and let your worries melt away as you create a beautiful piece of art.
Sense of Accomplishment: Witnessing your artwork come to life with each stroke is incredibly rewarding. Celebrate your progress and newfound artistic skills!
The Perfect Gift: Give the gift of creativity! These kits are ideal for birthdays, holidays, or simply a thoughtful gesture to show someone you care.
Wide Variety of Options: Simpler Painting offers a diverse selection of easy paint by numbers kits and paintings simple options to suit every taste:
Landscapes & Nature: Find calming scenes of serene beaches, majestic mountains, or vibrant gardens.
Animals & Wildlife: Immerse yourself in the beauty of adorable animals, majestic creatures, or playful pets.
Abstract Art: Explore the world of colors and shapes with captivating abstract designs.
Seasonal Themes: Embrace the spirit of the season with festive holiday scenes or peaceful winter landscapes.
Beyond the Basics: Explore Other Simple Painting Options
Looking for a slightly more artistic challenge? Simpler Painting also offers options beyond traditional paint-by-numbers kits:
Guided Painting Kits: These kits provide a pre-sketched canvas along with step-by-step instructions and color recommendations to create a beautiful work of art.
Acrylic Pouring Kits: Experiment with the mesmerizing technique of acrylic pouring, creating stunning fluid art pieces with minimal artistic experience needed.
Ready to Unleash Your Inner Artist?
Simpler Painting offers the perfect gateway to explore the world of art. With our painting kits for adults, you can rediscover the joy of creative expression, unwind from daily stress, and create beautiful pieces you'll be proud to display. Visit our website today to browse our collection and find the perfect simple painting kit to spark your creativity!
Happy Painting!
0 notes
Text
Unlock Your Inner Artist: Mastering Pouring Medium Magic!
Are you ready to unleash your creativity and dive into the mesmerizing world of pouring medium art? Whether you're a seasoned artist looking for a new technique to explore or a beginner eager to discover your artistic talents, pouring medium magic offers endless possibilities for expression. In this guide, we'll delve into the fascinating realm of pouring medium art and learn how to master this captivating technique.

Pouring medium is a versatile substance that, when mixed with acrylic paints, creates stunning fluid effects on canvas or other surfaces. It allows colors to flow and blend together in mesmerizing patterns, producing unique and unpredictable results with each pour. The beauty of pouring medium art lies in its fluidity and spontaneity, inviting artists to embrace experimentation and embrace the unexpected.
To embark on your pouring medium journey, you'll need a few essential supplies:
Pouring Medium: This is the key ingredient that gives your paint the desired fluid consistency. You can find pouring mediums at most art supply stores, or you can even make your own using a combination of glue, water, and a few drops of silicone oil.
Acrylic Paints: Choose a variety of colors to create vibrant and dynamic compositions. Acrylic paints work best for pouring medium art because of their quick drying time and durability.
Canvas or Surface: Select a canvas or surface to pour your paints onto. Canvas panels, wooden boards, or even ceramic tiles are excellent choices for pouring medium art.
Mixing Cups and Stirring Sticks: Use disposable cups and sticks to mix your paints and pouring medium thoroughly. Avoid overmixing to prevent air bubbles from forming in your mixture.
Protective Gear: Since pouring medium art can get messy, it's essential to protect your workspace and yourself. Wear old clothes or an apron, and cover your work area with plastic or newspaper to catch any drips or spills.
Now that you have your supplies ready, let's dive into the exciting process of creating pouring medium masterpieces:
Prepare Your Workspace: Set up your painting area in a well-ventilated space where you can work comfortably without interruptions. Place your canvas on a level surface and ensure that it's clean and free of dust or debris.
Mix Your Paints: In separate cups, mix each acrylic paint color with pouring medium in a 1:1 ratio. Stir gently until the paint and medium are fully combined, but be careful not to introduce too many air bubbles into the mixture.
Layer Your Colors: Once your paints are mixed, it's time to start layering them onto your canvas. You can pour the paints individually or combine them in a larger cup to create a marbled effect. Experiment with different pouring techniques, such as the flip cup or the swipe, to achieve unique patterns and textures.
Let It Flow: Once you've poured your paints onto the canvas, tilt it gently in different directions to encourage the colors to flow and blend together. You can use a palette knife or a heat gun to manipulate the paint further and create interesting effects.
Embrace the Unexpected: One of the most exciting aspects of pouring medium art is embracing the unpredictable nature of the process. Don't be afraid to experiment and let go of expectations. Sometimes, the most beautiful creations emerge from spontaneous accidents and unplanned interactions between colors.
Allow to Dry: Once you're satisfied with your masterpiece, set it aside to dry completely. Depending on the thickness of your paint layers and the environmental conditions, drying times can vary from a few hours to overnight.
Protect Your Artwork: Once your pouring medium masterpiece is dry, consider applying a varnish or sealant to protect the surface and enhance the colors. You can also frame your artwork or display it as is to showcase your creative talents to the world.
With these tips and techniques, you're well on your way to mastering the magic of pouring medium art. So, gather your supplies, unleash your inner artist, and let your creativity flow freely onto the canvas. Happy pouring!
0 notes
Text
Inspiring Art and Craft Ideas for Every Skill Level
Embark on a creative journey with our collection of inspiring art and craft ideas tailored for individuals of all skill levels. Whether you're a seasoned artist or just starting, these step-by-step projects promise to unleash your creativity and bring your artistic visions to life.
Watercolor Wonderland: Dive into the mesmerizing world of watercolors with our easy-to-follow guide. From blending techniques to creating vibrant landscapes, this project will help you master the art of watercolor painting, regardless of your skill level. Grab your brushes and let the colors flow!
DIY Dreamcatcher Delight: Craft a bohemian-inspired dreamcatcher using simple materials. This step-by-step tutorial will guide you through the process of weaving intricate patterns and adding personalized touches. Transform any space with this beautiful handmade creation.
Paper Quilling Extravaganza: Discover the art of paper quilling with our step-by-step instructions. Create stunning designs and 3D sculptures using colorful paper strips. This accessible technique is perfect for beginners, providing a relaxing yet rewarding crafting experience.
Acrylic Pour Painting Magic: Unleash your inner abstract artist with acrylic pour painting. Our guide breaks down the mesmerizing process of creating captivating fluid art. Explore different pouring techniques and watch as vibrant colors blend and dance on your canvas.
Recycled Art Sculptures: Reduce, reuse, and recreate! Turn everyday recyclables into unique art sculptures. This eco-friendly project is not only fun but also encourages sustainable creativity. Follow our simple steps to transform ordinary materials into extraordinary works of art.
No matter your artistic background, these step-by-step art and craft projects are designed to spark inspiration and encourage exploration. With clear instructions and beautiful results, you'll be amazed at what you can create, making art and crafting an enjoyable experience for everyone. Start your creative journey today!
1 note
·
View note
Text
Penkraft Resin Art Ocean Pour Workshop
Join us for an interactive & fun-filled Penkraft Resin Art Ocean Pour Workshop!
Date: 06 & 07 January 2024.
Timing: 06 Jan 11 AM - 1 PM 07 Jan 5 PM - 6 PM
Fee: ₹ 2499/- (including all material). Venue: Penkraft, 703, Durga Niwas, Tembhi Naka, Thane (W).
Click to register - https://www.penkraft.in/WorkshopDetai...
During this workshop, you shall learn - - Information on Resin Art. - Knowledge of the materials and methods used while making resin art ocean pour. - Will cover beginner-friendly, basic to advanced tips, tricks, and techniques. - How to create the article base, sand, and rock on the surface. - How to create the ocean effect, with resin. - Information about the types of equipment used for creating ocean pour. - Step-by-step demonstration and guidance. - Dos and donts.
Material Provided - Round MDF, resin & hardener, pigments - (white, dark blue, sea green), miniature - boat, slipper, blow torch, moss, mould it clay - 2 packets, 1 toothpick, sand, 2-hand gloves, ice cream sticks, paper glasses, glue, acrylic colors - burnt sienna, sea green, dark blue, cerulean blue, lacing pigment
Takeaways - A beautiful masterpiece created by you, the confidence of creating the next beautiful artwork without any help, a refreshed mind, and happiness
youtube
#penkraftworkshop#penkraft#artforms#modernart#ethnicart#onlinecourse#certifiedcourse#art#penkraftonline#Youtube
0 notes
Text
Mastering Candle Making: A Complete Guide with the Aai Planet Wax Melter 10 Ltr Capacity, Candle Making Material Online

Candle making is an art that has captivated people for centuries. Whether it's for personal use, gifts, or even for business, making your own candles is not only rewarding but also allows for endless creativity. With the growing interest in DIY projects and home crafts, candle making is experiencing a resurgence. In this blog, we’ll take a deep dive into the world of candle making, including the tools and materials needed, the processes involved, and why the Aai Planet Wax Melter 10 Ltr Capacity is a must-have for any serious candle maker. Additionally, we will explore where to find high-quality Candle making material online and why the Best Acrylic tea light cup for candle is essential for your projects.
1. The Art of Candle Making
Candle making has evolved from a necessity in ancient times into a modern craft and even a profitable business. The process of making candles involves melting wax, adding color and fragrance, and then pouring the mixture into molds or containers to solidify. While the process can be simple for beginners, it can also become complex and intricate for more experienced crafters. From creating multi-layered candles to experimenting with various types of wax, the possibilities are limitless.
2. The Essential Tools for Candle Making
Before diving into the candle-making process, it's important to have the right tools. The key to success lies in choosing quality equipment that can handle the materials you're working with, and that’s where the Aai Planet Wax Melter 10 Ltr Capacity comes in.
Wax Melter: A wax melter is an essential tool for anyone making candles, especially in large quantities. The Aai Planet Wax Melter 10 Ltr Capacity is perfect for home crafters and professional candle makers alike. Its large capacity allows you to melt enough wax for multiple candles in one go, making it a time-saving addition to your workshop.
Molds: Candle molds come in various shapes and sizes, allowing for creativity and variety in your candle designs. Whether you’re making votives, pillars, or novelty-shaped candles, you’ll need a mold that fits the wax type you’re using.
Wicks: The wick is the heart of the candle, and selecting the right one is critical for ensuring that the candle burns correctly. Wicks come in different materials, thicknesses, and lengths depending on the size and type of candle you're making.
Thermometer: Monitoring the temperature of your wax is important to ensure it doesn’t overheat or cool too quickly before pouring it into the mold.
Fragrance Oils: Adding fragrance oils to your candles can create a personalized touch. You can experiment with different scents and even blend oils for a custom fragrance.
Dyes and Pigments: Candle dyes are used to color your candles. These come in various forms like liquid, block, or powdered dyes.
3. The Importance of a Quality Wax Melter
When it comes to candle making, the wax melter is arguably the most important tool in your arsenal. A high-quality melter will not only ensure that your wax melts evenly but will also help you avoid common pitfalls like scorching or uneven textures. The Aai Planet Wax Melter 10 Ltr Capacity is designed for both beginners and seasoned professionals.
Why Choose the Aai Planet Wax Melter 10 Ltr Capacity?
Large Capacity: The 10-liter capacity allows you to melt a substantial amount of wax in one go, which is perfect for bulk production or making large candles.
Temperature Control: It comes with a built-in temperature gauge that allows you to control the heat, ensuring your wax melts evenly without scorching.
Durable Build: Made from high-quality materials, this wax melter is built to last. It’s perfect for crafters who are serious about their work and need reliable equipment.
Time-Saving: With its large capacity and efficient heating system, you can melt wax quickly, allowing you to focus more on the creative aspects of candle making.
4. Finding the Best Candle Making Material Online
With the rise of e-commerce, finding Candle making material online has never been easier. Whether you’re looking for wax, wicks, molds, or fragrances, online shopping offers a vast array of options at competitive prices. But with so many suppliers out there, how do you ensure you’re getting the best quality materials?
Tips for Buying Candle Making Material Online:
Read Reviews: Before purchasing any materials online, take the time to read customer reviews. Reviews can provide insights into the quality of the materials and the reliability of the seller.
Compare Prices: While it's important to stay within your budget, be wary of deals that seem too good to be true. Cheap materials may end up costing more in the long run if they don't perform well.
Check for Sustainability: With the growing focus on eco-friendly practices, many candle makers are looking for sustainable materials like soy or beeswax. When shopping online, check for suppliers that offer natural, sustainable options.
Look for Bulk Options: If you’re serious about candle making, buying materials in bulk can save you both time and money. Many online suppliers offer discounts for large orders.
5. The Role of the Best Acrylic Tea Light Cup for Candle
Tea light candles are a popular choice for many crafters due to their small size and versatility. Whether used as decorative pieces or as part of larger candle displays, tea lights are a staple in any candle maker's repertoire. However, to create a professional-looking tea light, you'll need high-quality cups. This is where the Best Acrylic tea light cup for candle comes into play.
Why Use the Best Acrylic Tea Light Cup for Candle?
Durability: Acrylic tea light cups are more durable than traditional plastic or aluminum cups. They are less likely to crack or deform when exposed to heat, ensuring your candles maintain their shape.
Aesthetic Appeal: The clear acrylic allows the candle’s color and flame to shine through, creating a beautiful, glowing effect. This makes them ideal for both personal use and as gifts.
Reusable: Unlike some other materials, acrylic cups can be cleaned and reused, making them an eco-friendly option for crafters who want to reduce waste.
6. The Candle Making Process with the Aai Planet Wax Melter 10 Ltr Capacity
Now that we’ve covered the tools and materials, let’s walk through the process of making candles using the Aai Planet Wax Melter 10 Ltr Capacity.
Step 1: Melt the Wax
Start by placing your wax into the Aai Planet Wax Melter 10 Ltr Capacity. Turn on the melter and set the temperature according to the type of wax you’re using. For example, soy wax typically melts at around 120-180°F, while paraffin wax melts at a slightly higher temperature.
Step 2: Prepare Your Molds and Wicks
While the wax is melting, prepare your molds or containers. Insert the wick into the mold and secure it in place using a wick holder or by tying it to a stick that rests across the top of the mold.
Step 3: Add Color and Fragrance
Once your wax is fully melted, you can add any color or fragrance oils. Stir the mixture thoroughly to ensure even distribution of the dye and scent.
Step 4: Pour the Wax
Carefully pour the melted wax into your molds. Be sure to leave a small gap at the top of the mold to allow for shrinkage as the wax cools.
Step 5: Allow to Cool and Set
Let your candles sit undisturbed for several hours, or overnight, to fully cool and set. Once the wax has hardened, you can remove the candles from the molds and trim the wicks to the desired length.
Step 6: Enjoy Your Candles
Your homemade candles are now ready to use or gift! Whether you’ve made scented candles, decorative tea lights, or colorful pillars, the satisfaction of creating your own candles is unmatched.
7. Exploring Different Types of Candles You Can Make
With the Aai Planet Wax Melter 10 Ltr Capacity and high-quality materials like the Best Acrylic tea light cup for candle, you can experiment with various types of candles. Here are a few popular options:
Pillar Candles: These are large, freestanding candles that can be plain or intricately designed. Pillar candles are great for decorative purposes and can burn for extended periods.
Tea Lights: These small, round candles are typically used for decoration or ambiance. Tea lights are easy to make and are a great option for beginners.
Scented Candles: Adding fragrance oils to your candles allows you to create custom scents that can evoke different moods or memories.
Layered Candles: For a more advanced project, try making layered candles by pouring different colored waxes into the mold at different times. This creates a beautiful, striped effect.
8. Tips for Growing Your Candle-Making Business
If you’re passionate about candle making and want to turn it into a profitable venture, there are several strategies you can use to grow your business.
Build a Brand
Creating a strong brand is crucial for standing out in the competitive world of candle making. Your brand should reflect your style and the types of candles you make. Use social media platforms like Instagram and Pinterest to showcase your products and connect with potential customers.
Offer Customization
One way to attract more customers is by offering customizable candles. Whether it’s personalized labels, custom scents, or unique molds, giving your customers the option to create a candle tailored to their preferences can set you apart from the competition.
Attend Craft Fairs
Craft fairs and markets are great opportunities to showcase your candles and reach new customers. Be sure to have a variety of products on display, including smaller items like tea lights that are more affordable for impulse buyers.
Sell Online
In today’s digital age, having an online presence is essential. You can create an e-commerce website or sell your candles on platforms like Etsy. Be sure to use high-quality photos and detailed descriptions to entice customers.
Focus on Sustainability
Many consumers today are looking for eco-friendly products. By using sustainable materials like soy wax, biodegradable packaging, and reusable containers like the Best Acrylic tea light cup for candle, you can appeal to environmentally conscious customers.
Conclusion
Candle making is a fulfilling craft that allows for endless creativity. Whether you're making candles for fun or for profit, having the right tools and materials is essential. The Aai Planet Wax Melter 10 Ltr Capacity is a top choice for serious candle makers, offering convenience, reliability, and efficiency. Additionally, sourcing the best Candle making material online and incorporating the Best Acrylic tea light cup for candle will elevate the quality of your creations.
As you continue your candle-making journey, remember to experiment, be patient, and most importantly, have fun! Whether you're crafting for yourself, your loved ones, or your customers, each candle you make is a unique work of art.
Happy candle making!
#aai planet wax melter#candle making material online#best acrylic tea light cup for candle#candle making tools#diy candle making#wax melting equipment#scented candle making#large capacity wax melter#professional candle making supplies#candle business tips
0 notes
Text
Wooden Trays for Crafts - DIY Supplies in Pakistan
Crafting has become a beloved hobby and even a source of income for many in Pakistan. Among the various craft materials, wooden trays have gained significant popularity as a versatile medium for artistic expression. Whether you are a professional crafter or a DIY enthusiast, wooden trays offer endless opportunities for customization and creativity. In this article, we will explore how these trays can be used in crafts, where to find them, and tips for creating unique DIY projects.
Why Wooden Trays for Crafts?
Wooden trays are an ideal canvas for crafters due to their durability, affordability, and ease of customization. These trays come in various shapes and sizes, allowing crafters to select the perfect base for their projects. Additionally, the smooth surface of wood makes it perfect for a range of artistic techniques such as painting, decoupage, stenciling, and resin art.
Here are some popular uses for wooden trays in crafts:
Hand-Painted Designs
Hand-painting on wooden trays is one of the simplest and most rewarding DIY projects. Whether you're painting traditional Pakistani motifs or abstract art, acrylic paints or watercolors work wonderfully on wood. Once sealed with a protective varnish, these trays become functional pieces of art for home décor or gifting.
Decoupage Art
Decoupage, the art of applying paper cutouts onto surfaces, is another technique that can transform a plain wooden tray into a work of art. Floral patterns, geometric designs, or even vintage prints can be applied onto trays to create customized, one-of-a-kind items.
Resin Crafts
Resin is a modern crafting material that pairs beautifully with wooden trays. By pouring a layer of resin over the tray, you can embed various decorative elements like dried flowers, glitter, or even small objects. The resin hardens into a clear, glossy surface, giving the tray a polished, professional finish.
Wood Burning (Pyrography)
For those who enjoy working with heat tools, wood burning or pyrography can be used to create intricate patterns and designs on wooden trays. This technique allows for fine detailing and adds a rustic charm to the final product, making it an excellent choice for more advanced crafters.
Serving Trays with Personal Touches
A beautifully customized wooden tray can double as a functional serving tray. Adding personal touches like names, initials, or decorative patterns can make these trays perfect for gifting, especially for weddings, housewarmings, or festive occasions.
DIY Craft Supplies in Pakistan
Finding high-quality wooden trays and other DIY craft supplies in Pakistan has become easier than ever, thanks to the growing number of craft stores, both online and offline. Here are some places where you can source wooden trays for your projects:
Local Craft Shops
Many craft stores in cities like Karachi, Lahore, and Islamabad offer wooden trays in various sizes. These stores often stock other DIY supplies such as paints, varnishes, and decoupage paper, making it convenient to gather all materials in one place.
Online Marketplaces
Websites like craft emporium platforms have a wide selection of wooden trays and craft supplies. Many sellers offer DIY kits that include everything you need to complete your project, making it easy for beginners to get started.
Carpenters and Woodworking Shops
For those who want to create completely unique pieces, visiting local woodworking shops or carpenters may be the best option. You can request custom-sized trays or specific wood types that suit your artistic needs.
Wholesale Markets
Wholesale markets such as Lahore’s Shah Alam Market or Karachi’s Bolton Market are also good places to find inexpensive wooden trays in bulk. These markets are ideal for small business owners or large-scale crafting projects.
Tips for Crafting with Wooden Trays
To ensure your DIY projects turn out perfectly, here are a few tips for working with wooden trays:
Preparation:
Always sand the surface of the wooden tray to create a smooth base for painting or other decorations. This will help your materials adhere better.
Sealant:
Apply a coat of wood sealant or varnish after completing your design to protect the tray from wear and tear. For trays that will hold food or drinks, consider using a food-safe sealant.
Experiment:
Don’t be afraid to experiment with different techniques. Try combining multiple mediums like paint and resin, or mix hand-painted details with decoupage
Practice:
If you’re new to crafting, practice on smaller, inexpensive trays before moving on to larger, more intricate designs.
Conclusion
Wooden trays are an excellent choice for crafters in Pakistan looking for a versatile and customizable DIY project. With a variety of techniques at your disposal, from painting to resin work, these trays can be transformed into functional and beautiful pieces of art. you’re creating for yourself, your home, or your business, wooden trays offer endless possibilities for creative expression pakistani handi craft So grab your supplies, let your imagination flow, and start crafting your masterpiece!

0 notes
Text
Inspiration Unleashed: A Journey into Abstract Art Classes and Techniques
Introduction:
Art has an unparalleled ability to unleash creativity, allowing individuals to express themselves in unique and captivating ways. Abstract art, emphasizing emotion, spontaneity, and imagination, has become a powerful medium for self-discovery and artistic expression. In this exploration, we embark on a journey into abstract art classes and techniques, discovering how they unlock inspiration and pave the way for unparalleled creative growth.
1. The Liberation of Expression:
Abstract art is a realm where rules are meant to be broken and boundaries are pushed. Abstract art classes provide a liberating environment where artists can experiment with colors, shapes, and forms without the constraints of realism. This freedom allows unrestricted expression of emotions, fostering a sense of liberation and empowerment.
2. Techniques that Transcend Boundaries:
From fluid acrylic pouring to gestural brushstrokes, abstract art techniques are as diverse as the artists who practice them. Exploring these techniques in a structured class setting opens doors to many possibilities. Students can learn to embrace the unpredictability of abstract art while honing their skills and discovering unique methods to convey their artistic vision.
3. Building a Creative Community:
One of the hidden treasures of abstract art classes is the sense of community that flourishes within them. Engaging with fellow artists, sharing ideas, and receiving constructive feedback creates a supportive network that nurtures growth. The collaborative energy within these classes often becomes a wellspring of inspiration, motivating artists to push their boundaries and explore new horizons.
4. Navigating the Emotional Landscape:
Abstract art has the power to tap into deep emotions and convey them through visual means. In these classes, participants often navigate the emotional landscape of their experiences. Through the guidance of skilled instructors, artists can channel their feelings into their artwork, creating pieces that resonate visually and emotionally with both themselves and their audience.
Conclusion:
Embarking on a journey into abstract art classes and techniques is more than merely exploring paint and canvas; it is a transformative experience that goes beyond the tangible. The liberation of expression, the acquisition of diverse techniques, the sense of community, and the navigation of emotional landscapes all contribute to a profound and inspiring artistic journey.
As we unravel the mysteries of abstract art, we discover that inspiration is not confined to brush strokes or the blend of colors on a canvas. It is a dynamic force that emerges from within, nurtured by the freedom to create without boundaries and the support of a like-minded community. So, whether you are a seasoned artist or a curious beginner, consider stepping into the vibrant world of abstract art classes – for inspiration is truly unleashed here.
Ready to embark on your inspiring journey into the world of abstract art? Feel free to reach out to us with any questions or inquiries or to join our vibrant community of creative enthusiasts. Contact us today and let your artistic exploration begin!
0 notes
Text
Abstract Ocean Art: Capturing the Essence of the Sea in Brushstrokes
Introduction
In the realm of home décor and artistic expression, abstract ocean art stands out as a captivating genre that brings the beauty and mystery of the sea into our living spaces. As the popularity of abstract art continues to surge, more individuals are turning to these mesmerizing ocean-inspired pieces to adorn their homes with a touch of elegance and creativity.
What is Abstract Ocean Art?
Abstract art, by definition, deviates from realistic representations and often focuses on expressing emotions, concepts, or ideas through non-representational forms and colors. Abstract ocean art takes this approach a step further, translating the vastness and depth of the sea into captivating visual experiences. The result is a collection of artwork that sparks the imagination and invites viewers to interpret the ocean's essence in a unique way.
History of Abstract Ocean Art
The roots of abstract art trace back to the early 20th century, with pioneers like Wassily Kandinsky and Kazimir Malevich challenging traditional artistic norms. Over time, this movement extended its reach to embrace ocean themes, with artists finding inspiration in the ever-changing nature of the sea. The evolution of abstract ocean art reflects a fusion of artistic innovation and a profound connection to the mysteries of the deep.
Why Choose Abstract Ocean Art for Your Space?
Abstract ocean art transcends mere decoration; it serves as a conduit for emotions and reflections. The dynamic and fluid nature of these artworks allows them to complement a variety of interior styles, from modern and minimalist to eclectic and traditional. Choosing abstract ocean art is not just about adorning your walls; it's about infusing your space with a sense of tranquility and depth.
Popular Techniques in Creating Abstract Ocean Art
Artists employ various techniques to capture the essence of the ocean on canvas. Acrylic pouring, palette knife techniques, and resin art are some of the popular methods that bring out the fluidity and movement associated with the sea. Each technique adds a unique dimension to the artwork, making it a fascinating exploration of form and color.
Famous Artists in Abstract Ocean Art
Several artists have made significant contributions to the world of abstract ocean art. Names like Zaria Forman, Emma Lindström, and Wolfgang Bloch have carved their niche by translating their deep connection to the ocean into visually stunning masterpieces. Their influence extends beyond the art world, inspiring others to explore the beauty of abstract ocean art.
Choosing the Right Abstract Ocean Art for Your Home
When selecting abstract ocean art for your space, consider factors such as color schemes, size, and placement. The choice of colors can influence the overall ambiance of a room, with cool blues and greens evoking a serene atmosphere. The size and placement of the artwork contribute to the overall visual balance, ensuring it becomes a focal point without overwhelming the space.
DIY Abstract Ocean Art: A Fun Project for Everyone
Engaging in a do-it-yourself (DIY) project adds a personal touch to your decor. Creating your abstract ocean art piece can be a rewarding and enjoyable experience. Gather materials like canvases, acrylic paints, and brushes, and follow a simple step-by-step guide to unleash your creativity. Whether you're an experienced artist or a beginner, the process of crafting your artwork can be a therapeutic and fulfilling endeavor.
The Influence of Abstract Ocean Art on Mood and Atmosphere
The colors and shapes within abstract ocean art have a profound impact on mood and atmosphere. Cool blues and gentle swirls can create a calming effect, making these artworks ideal for spaces where relaxation is key. On the other hand, vibrant colors and bold strokes can inject energy and dynamism, transforming a room into a lively and inspiring environment.
Abstract Ocean Art in Commercial Spaces
The versatility of abstract ocean art extends beyond residential spaces. Many commercial establishments, including offices, hotels, and public spaces, incorporate these artworks to enhance their ambiance. Abstract ocean art has the power to evoke specific emotions and impressions, contributing to a positive and memorable experience for visitors and occupants alike.
Collecting Abstract Ocean Art: Tips for Beginners
For those venturing into the world of collecting abstract ocean art, the journey can be both exciting and fulfilling. Begin by exploring different artists and styles, attending art exhibitions, and connecting with the art community. Setting a budget and carefully evaluating the authenticity of artworks ensure a rewarding and meaningful collection.
Caring for Your Abstract Ocean Art
Proper care is essential to preserve the beauty and longevity of abstract ocean art. Avoid exposure to direct sunlight, as it can fade colors over time. Regular dusting with a soft, dry cloth and occasional professional cleaning will help maintain the vibrancy and texture of the artwork.
The Value of Abstract Ocean Art in Investment
Beyond aesthetic appreciation, abstract ocean art has gained recognition as a valuable investment. As the demand for these artworks grows, so does their market value. Collectors often find that their pieces appreciate over time, making the acquisition of abstract ocean art a meaningful and potentially lucrative endeavor.
Exploring Trends in Abstract Ocean Art
The world of abstract art is dynamic, with trends continually evolving. Currently, there is a surge in interest in fluid art techniques, incorporating elements like geodes and metallic accents. Artists are adapting to changing preferences, experimenting with innovative styles that push the boundaries of traditional abstract ocean art.
Conclusion
In conclusion, abstract ocean art is more than just a decorative element; it's a window into the vast and enigmatic world beneath the waves. From the soothing colors to the dynamic forms, these artworks invite viewers to embark on a journey of imagination and introspection. Whether you're a seasoned art enthusiast or a newcomer to the world of abstract art, exploring the beauty of the ocean through these mesmerizing creations is an experience that transcends the ordinary.
0 notes