#a more enclosed top; less pointy bits and and some sleeves.
Explore tagged Tumblr posts
Visit Tumblr Blog
Explore Tumblr blogs with no restrictions, modern design and the best experience.
Last Seen Tumblr Blogs


Fun Fact
Tumblr Inc. has $15.1M in annual revenue.
Text
talk about being saved by the bell (read: Lars Alexandersson)
#tekkenposting#a bit of an excuse to show customisations but also. god the tag team interactions is so cute and fun#video#audio#shallow.fgc#shallow.video#shallow.gameplay#i guess ridley rosé's wrestling costume would be sort of similar to jaycee's costume just with small changes like shorts#a more enclosed top; less pointy bits and and some sleeves.#jaycee looks soo good in those colours. will make a another version of this customisation but with her mask on + those colours#[r]: lars alexandersson | chosen by thunder#[romantic tag]#💘 Rebellious in Nature
3 notes
·
View notes
Note
Hello, Vincent! I'm a huge fan of your work & your blog. I know this is a bit of a silly question, but how in the world do you do those plackets on your fall front breeches? I'm trying to construct my own pair and am having a fair amount of difficulty with them. Thank you so much!
Edit: I’ve posted a somewhat better version of this up on my blogspot blog.
Thank you! And this is absolutely not a silly question. It took me several tries to get it right the first time, and I’ve never seen any instructions anywhere for doing them. (Not that I’ve actually looked for any, I just took modern sleeve placket instructions and modified them to include the gap flappy thing.) It is never a silly question to ask how to sew a thing, and I love sharing sewing knowledge!
Fall front plackets are something I’ve done quite a few of and I still have to stop and really think about what I’m doing, it’s very easy to get all mixed up & confused with them. As with many things, it’s best to do a sample with scrap fabric first!
Alright, so to demonstrate it best I’ve sewn up a little muslin sample with contrasting thread. This turned into quite a long answer so I’ll put it under a readmore. (Though sometimes those decide to not work, so if that happens then I’m sorry for putting so many sewing steps on your dashes. I recently learned you can press j on the computer keyboard to go directly to the bottom of a post though, so that’s nice.)Edit: Goddammit the readmore didn’t work! And I tried to put it back and it still isn’t working, sorry folks!
(Also, if my hands in these photos get this post flagged I will be so annoyed. Maybe I’d better tag it “sfw”? I’ve heard that works?)
Ok, here we go. First I’d better mention the lining, if there is one. I usually fully line my breeches because it makes the knee opening easier to finish, but they can be made unlined too.You want the top edge of the fall to be finished before you even start the placket. I find it’s best to sew the crotch seam first, on the front pieces only. I know that modern pants instructions will tell you to sew each leg individually and then sew them together, but fall fronts require a different approach.
Here is a shitty diagram to show what I mean:

So, front lining sewn to front outer fabric first on the top of the fall only. There is also the option of just lining the fall with a little upside-down-house shaped bit of fabric. Or, if you really don’t want any lining, just hemming the top.
Ok, so now we have a nice finished top edge, and can get onto the placket! If you do have a lining then after sewing it on there you should make sure it’s nicely lined up and then baste it in place around the placket areas. Don’t want it shifting.
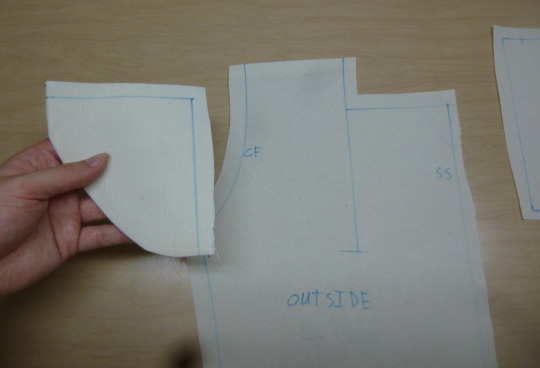
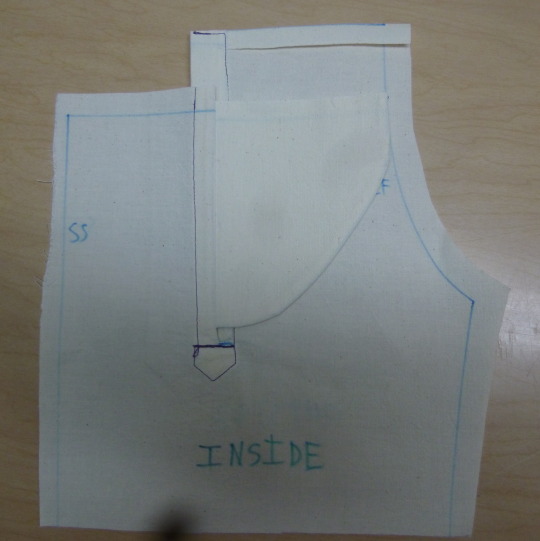
Your pieces will look something like this: (except twice as many, and the crotch seam will be sewn) I’ve labelled the inside and outside of the pants, and the side seam and centre front, to help make things clearer.

First, take your front gap filling flappy thingy pieces, sew them together on the curved edge only, trim, turn & press. After this I like to put the pattern piece back over them and trace on the lines again so I can see where exactly it goes.
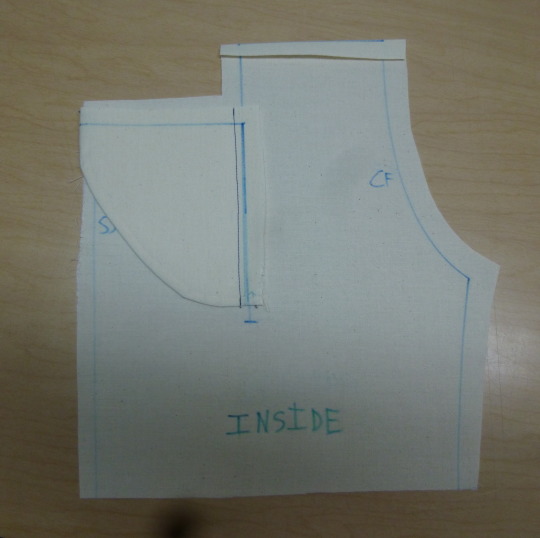
I have also pressed down the seam allowance on the top of the fall in this sample, so we can pretend it’s a finished lined edge.
The line for your placket should be clearly marked on the inside. If it’s lined this means you’ll have to transfer the marking for the dot at the bottom onto the right side of the lining and draw it on with a ruler. (do this after cutting it out, before sewing)Line up the appropriate line on the flappy thing with this line. The bottom of the flappy thing should be about 1cm above the bottom of the line, so as to avoid bulky terribleness there. The flap must be on the inside and pointing towards the side seam! Pin it on & sew it about 1/2 cm away from the line - away in a towards the side seam direction. Like so:
Next you carefully trim the seam allowance off the flappy thing, on the edge you just sewed. Don’t cut down the line yet, just trim the edge of the flappy! The seam allowance should be about 1/2 cm, or maybe a tiny bit less. Not trimmed close enough that it’s in danger of fraying & coming out, but still narrow enough to not get in the way of sewing this slit.Here you can see that the seam allowance is trimmed and the placket piece is waiting to be added:

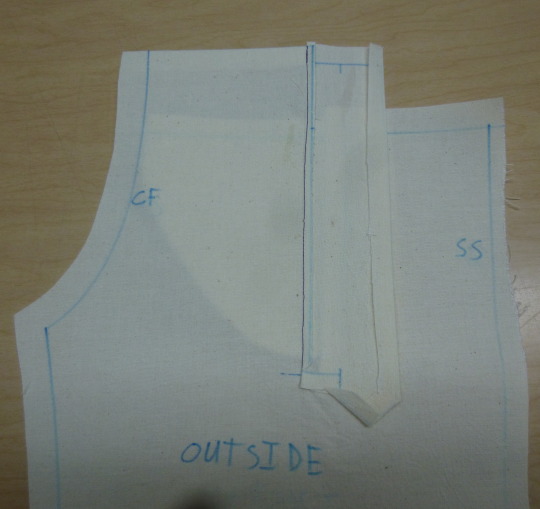
I drew a couple of lines on the placket, about 1cm apart, to show where to sew.
The placket piece has a longer bit that sticks down, a middle section almost as wide, and then another section that’s somewhat narrower. The longer bit that sticks down must be pointing towards the Centre Front. Line it up exactly with the line, pin it, and sew it on in a very long U shape. When you’re near the bottom of the slit it’s a good idea to make your stitch length smaller. Trim down the middle, and clip with a little inverted Y at the bottom, like so:

(Hm, I should have put a bit more seam allowance on the bottom of that placket, but it’s ok!)
Now if all has gone well you’ll have the seam allowance from the flappy thing only in one half of your slit seam allowance.
Next, turn it to the outside and press it, like so:

See that narrow little bit on the left? You must turn it under and stitch it down, like so: (You can also trim off the protruding bit on the top, as I’ve done here)
This bit should be as narrow as you can reasonably get it. I like mine to be 1cm or a bit less. The important thing is that it’s covered up by the other part of the placket. (Which is one reason it’s good to do a sample first, you can check if your dimensions are good!) If the fabric is bulky and the stack of seam allowances from the flappy are making the foot misbehave then I use a zipper foot for this step.

Next, you press this bit towards the side:

Press the little slit seam allowance towards the side too, and then press these 3 sides in, as shown. (You should also press down the allowance on the top of the placket at this step, but I apparently didn’t make this sample placket quite long enough, oops.)
Next, press the longer bit of the placket back towards the front, as shown. You want it to be covering the narrow little bit on the other side, and also the seam from the slit. The little downward pointy bit may look uneven at this point, but you can simply shift those folds a little and press it again.

You want to make sure that the seam allowance at the bottom of the slit is totally enclosed by the downward pointy, so I like to draw a little line showing just where the best place to sew it. (I used marker on the sample, but chalk is usually better when making the actual garment.)

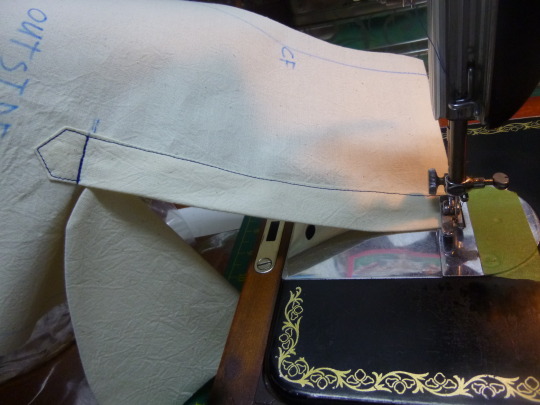
Now pin the placket down flat, taking care to not pin through the flappy, and begin to sew it on on the line I marked in the above photo:

Once you’ve sewn this line, go around the downward pointy bit and then back over that line again. (it’s good to have the extra stitching there, it need the reinforcement.) I try to stay about 1-2 mm away from the edge, like a very close topstitch:

Now, after the downward pointy is sewn, it’s very important that you move the flappy out of the way so as not to sew the whole thing closed! Sew down the long bit of the placket, again staying 1-2 mm away from the edge.

Then sew along the top bit, (which would have had more seam allowance to fold under if I’d remembered to make the sample placket long enough):
Voila! A placket!
Now you need only to do the reverse on the other side, and it’s ready to put the waistband on!


For the sake of thoroughness here’s one of my finished pairs of breeches, with the waistband buttoned and the fall unbuttoned:

And with the fall buttoned up:

And of course there’s also the option of a broadfall, like I did on my jeeches, where there are no plackets because the entire front is the fall:

I can’t specifically remember what I did here, but it took some awkward fussing with the side seam, so I’m sure I’ll do it differently next time. I do know I left a little gap for the middle buttonhole on both the lining and the outside of the fall, and then just whipstitched the edges together there.
I hope this helps! Best of luck with your breeches, and I’d love to see a picture when they’re done!
#sewing#ask#gridbugged#how to#breeches#fall front#pants#sfw#clothing#tutorial#I have the day off work today and had time to answer properly!#I like doing sewing instructions it's nice
154 notes
·
View notes