#Whole Wheat Flour Pizza
Link
Pizza used to seem to come in only a few different varieties and flours ranging from white to wheat flour pizza. You could choose between sausage, pepperoni, or plain cheese. That is all there was to it. However, as our tastes evolved, people discovered that a flat circle of bread was the ideal starting point for a vast array of ingredients. Nowadays, ingredients ranging from pineapple to barbecue chicken can make excellent pizza toppings.
0 notes
Text
Yeast Bread - Pizza Dough

This pizza dough recipe is made with both bread flour and whole-wheat flour for a chewy and flavorful crust. The three-crust yield means you can freeze some for later use.
0 notes
Photo

White Bread - Pizza Dough
This pizza dough recipe is made with both bread flour and whole-wheat flour for a chewy and flavorful crust. The three-crust yield means you can freeze some for later use.
0 notes
Text
Easy Homemade Dog Treats!

All it takes is banana, peanut butter, and oats and you can make these cute cookies for your pup, or for a doggy friend of yours. Not only are these easy to make, but they are so much more affordable than store-bought treats and dogs LOVE them!


Easy Homemade Dog Treats!
Servings: 40 (Makes about 40 treats depending on the cookie cutter size)
Ingredients
2 cups oats (old fashioned, 1-minute oats, or instant) plus more if needed- see step 3
2 medium ripe bananas
½ cup natural peanut butter
Instructions
Preheat your oven to 300F (150C). Line a baking sheet with parchment paper.
Add the oats to a food processor and grind until they reach a fine powder. (If you do not have a food processor, see the recipe notes for other options). Add the bananas and peanut butter and blend until a sticky dough is formed.
Remove from the food processor and roll out on a lightly floured surface. (Use whole wheat flour, more ground oats, or another dog-safe flour that you have on hand). I used a heart cookie cutter to cut out the treats but you could use any cookie cutter, or just cut them into squares with a knife or pizza cutter.
Lay the treats on the prepared baking sheet and bake for 25 to 30 minutes, until the treats are puffed up a bit, dry and dark brown on the bottoms, (they will still feel soft when first removed from the oven). The treats will get a bit more firm once they are cool but will still be a slightly softer dog treat. Let cool before giving one to your pup.
Store in an air-tight container at room temperature for up to 1 week, in the fridge for up to 2 weeks, or I like to store them in my freezer which makes them firmer and makes them stay fresh a long time.
Notes
If you do not have a food processor, you can still make these treats. Grind the oats up in a blender or coffee grinder, then add the ground oats to a bowl with the peanut butter and mashed banana and mix to make a dough. Or you could buy oat flour and use that instead. You will need less oat flour as it is denser, so start with 1 cup and add more as needed.
#healthy dog treats#dog peanut butter treats#dog treat recipes#dog snack recipes#homemade dog treats#homemade dog snacks
16 notes
·
View notes
Text
Chilean Towa
Batch 3 baby!
yippie! :)

Lucho Trucho = Fake Peppino
Lucho is the owner a Quiosco (Chilean minimarket) he sells Anticuchos (Meat Keebabs) and Sopaipillas (Fried dough) to the college students that study... Wait a sec... i don’t think this is the actual Lucho Anticucho we know...
Trucho: Fake or Phony
Mr. “Saboya” Salinas = Mr. Sticks
Santiago “Saboya” Salinas, a banker, buisness man and Lucho’s landlord, Nicknamed Samoya due to the spiky, wheat-like hair he used to have (really bad hair genes took a toll on his hair)
Saboya: Common name for Holcus lanatus (Chilean grass)
Spoilers for the ending of Pizza tower past this point!

Cara de Sopaipa = Pizza Face
Sopaipa is well... a giant sentient Sopaipilla, topped with cheese and butter, He threaten Lucho to blow up Lucho’s Quiosco, when you are to close to him, you can hear a clock-like sound.....huh...weird
Sopaipa: Sopaipilla
El Compa Sopaipilla = PizzaHead
The man behind it all... a Sopaipilla topped with cheese and pebre, who’s name is Cristián and he’s obsessed with Lucho and Huasos, he made the whole tower fiasco and builded both the Sopaipilla Tower and Sopaipa, his right-hand man
Come on Lucho...IT TIME FOR THE FINAL SHOW!!!!
Sopaipilla: A fried dough made with chilean pumpkin and flour
Pebre: Chilean sauce made with Tomatoes, coriander, onion, garlic and green peppers
Part 1: https://gl1tchy-4rt.tumblr.com/post/720509947508670464/i-did-a-thing
Part 2: https://gl1tchy-4rt.tumblr.com/post/720776573770448896/sopaipa-towel-part-2
That’s all for now!
Bye buddies :)
#pizza tower#pizza tower au#pizza tower fake peppino#fake peppino#pizza tower mr stick#mr stick#pizza tower pizzaface#pizzaface#pizza tower pizzahead#pizzahead#Sopaipilla Tower
30 notes
·
View notes
Note
👀 i gotta hear about your homemade pizza
It began as the basic Betty Crocker recipe for dough because I wanted pizza and was too broke to order it. And then I started to play with the proportions. And then I got pretty good at that. So I've spent the last 20+ years doing it. Now we rarely order out for delivery if I've got the ingredients to just make it. It has become a party favorite, a special gift, a treat, a comfort food.
I've made all kinds. This most basic recipe, whole wheat, mixed rye. I've made it super thin so it comes out really crunchy, or thick enough to hold a bazillion toppings. I've made the dough with whey leftover from cheesemaking instead of water. I have dedicated sheet pans specifically for making it. In three sizes. It's a bit of a labor of love for me these days, since it takes a fair amount of energy and I'm short on that a lot. But from what everyone who's had it tells me, it's worth every moment of pain.
A visual for you:

And because I am generous, recipe and instructions under the cut.
This is for the basic dough. It doubles very well, but tripling it leads to some necessary tweaking. And unfortunately, I can't tell you what that tweaking will be because it's case specific (usually the flour to water ratio, which will be totally dependent on your current humidity). In general, I consider that this recipe never comes out quite the same way twice. If you want something smaller, water to flour ratio is essentially 1:2. In the case of halving it, the same amount of yeast won't be too much, but cut back on the oil and salt. It also freezes well, if you're careful about thawing it so it has room to rise. It gets an interesting texture when it's been frozen. Crispier, but also more airy.
1.5 cups hot water (~110-115 F, ~45 C)
2.25 teaspoons yeast (or 1 packet)
1/4 cup extra virgin olive oil (the EV part isn't necessary, but adds nice flavor)
1/2 teaspoon salt
~3 cups flour (unbleached all-purpose is best)
Prep time: ~ten minutes. Rising: at least 20 minutes. Baking: 20-25 minutes (dependent on toppings, more wet stuff means longer cook time).
Bloom the yeast in the water, about five minutes. Add first cup of flour, oil and salt. Mix until there are no lumps (I use a plain old dinner fork with a sturdy handle). Add second cup of flour and mix. You should now have a loose, shaggy mess, not quite strong enough to hold itself together. Third cup should go into the mix in stages, because you may not need all of it. Or you may need more. You should have a soft mass of dough that's a little too much for a fork to mix it. It should be moderately sticky. If it's gooey, more flour. If it's not sticky...well, it won't be as elastic but it's not the end of the world. Don't add any more.
🌟This part is very important🌟. Pizza dough is delicate. This is the kneading part, but you want to be gentle. I do it right in the mixing bowl (remember that bowl must be big enough to account for rising). I only scoop and press for about a minute, or until all the flour is thoroughly mixed in and there are few to no lumps. It shouldn't be sticking to you anymore. If it is, more flour. A dusting at a time. Knead it again. Done? Form a ball in the bottom of the bowl.
Dust the dough with a little extra flour, cover with plastic wrap. Let it rise. This is an excellent time to get your oven pre-heating. For this style of pizza that will be 425 F (218 C), no convection. Don't worry if the oven is ready before the dough is, a fully pre-heated oven will hold its temp better anyhow, and most ovens will say they're ready before they actually are.
When the dough has doubled, or your oven is ready, whichever is last, punch it down, separate into two balls. This dough will make two 10x18 sheets. Coat the sheet pan (and your hands) lightly with olive oil, spread the dough out slowly and carefully so it doesn't tear. It will spring back on you. Get it most of the way there, go prep your toppings (or wait about five minutes), come back and finish it. Make sure it's even and pressed into the corners. Remember, delicate!
Top as you please. My usual is tomato, garlic and onion sauce spread with the back of a wooden spoon. I like part skim, low moisture mozzarella*. And then whatever you want. Favorites in this house are just plain with pepperoni, or pepperoni, bacon and onion. Bake on the lowest rack setting. I do mine for ten minutes, turn the sheet around 180 degrees, then another ten minutes. Cheese should be toasted lightly, edges of the crust should be crispy. It won't get that dark. 🌟In an electric oven, it might take less than 20 minutes! So keep an eye on it.🌟
*I've never made it vegan, so I don't know how that changes times and temps.
When it's done, sprinkle it with grated parmesan or romano if you'd like, but let it rest for a few minutes so it's not molten. Slice and enjoy!
Reheats beautifully in a toaster oven, I don't recommend microwaving it. Eaten cold is always acceptable.
Thanks for the ask. 💕 Have fun with it! And you may never want to order pizza again.
#asks#Lamb's Homemade Pan Pizza#this is also a great project/dinner to make with kids#Lamb the Younger has been able to help me with it since she was five
10 notes
·
View notes
Text

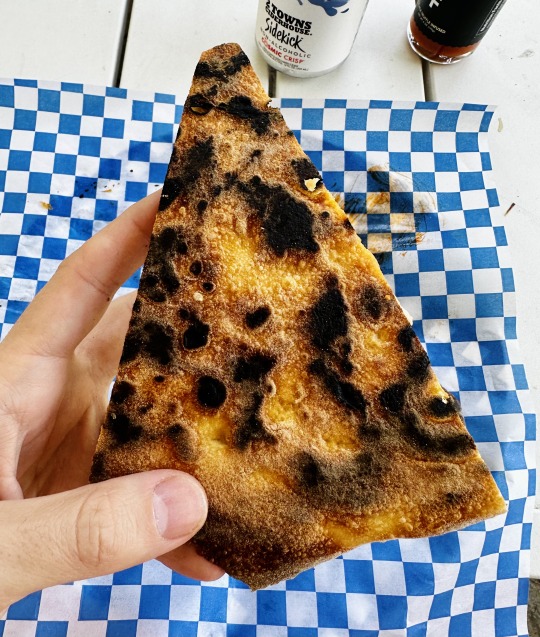
take 2 of wheaty pizza crust and I'm so much happier omg. used a mix of bread, all purpo, and whole wheat flour this time and replaced 1/2 the yeast with fast rise. let it ferment in the fridge overnight, thoroughly oiled both sides and pre-baked for 5 minutes before adding toppings. last try was basically flavorless whereas this is one of my better crusts
it's chorizo flavored dry aged salami (clearance lmao) and pickled baby corn (just trust me)
4 notes
·
View notes
Text
Supplemental
I was watering my garden today, and thinking about certain aspects of gardening discourse.
Now, there are people who will rightly bring up that it's unrealistic to imagine you can "grow your own food". And this is typically brought up in response to certain homesteading claims that it's easy to live completely off the grid and you can absolutely grow your own wheat, grind your own flour, raise your own goats, and have all modern comforts without relying on anyone else, and this is a totally realistic plan for after the apocalypse. (It's possible to grow your own food, but that's more than a full-time job unto itself, and you will have to make a lot of compromises).
And being realistic, not only can you not grow all your own food with a backyard garden - especially if you're also, like, employed which you need to be to afford to have a backyard - but it's not even realistic to think you're going to make a noticeable dent in your food budget. To do that, you'd need to have a larger yard than is currently typical and plant something like a victory garden: that is, a large-scale vegetable garden which takes up most of your already unusually large yard and which entails a rather considerable amount of effort. And it's worth noting that the whole of the victory gardening done in the USA during all of WWII was estimated to only amount to about six months of vegetable consumption for the US Army - not trivial, but not all that much, either.
The point is, if you're getting into gardening thinking you will make a major difference in your cart at the grocery store, you've got deeply unrealistic expectations.
However, that's also not why people grow gardens. Even the Victory Gardens were mostly as morale boosters, to help people feel invested and involved in the war (especially with modern warfare, one of the biggest issues to address is public engagement and perception of military actions). But more prosaically, there's a long history of small scale gardening even though such gardens cannot provide enough calories to make a difference.
These gardens existed to supplement and improve a diet, not to replace them. The USA has long had significant classes of people whose basic caloric needs are (on paper) guaranteed. These include soldiers, slaves, and prisoners; outside of the USA this also includes serfs. Such people are ostensibly assured by their ruling authority that they will not starve. The diets given to them, though, were generally very monotonous and often not nutritionally complete: rations include things like 12 oz of salted beef and a pound of cornmeal or hardtack every day: certainly enough calories to survive, but not exactly haute cuisine.
People in these situations often turned to gardening to improve their diet. The point wasn't to grow enough potatoes to live off of (though potatoes do deserve special mention - their introduction did functionally double available calories for European serfs in some areas), but the goal was to relieve an otherwise exceptionally monotonous diet and provide enough vegetables for health - to improve rather than replace rations.
And I think if one is thinking about starting a garden, that should be the approach. You're not going to grow enough tomatoes to make all your own ketchup and spaghetti sauce (nor will it be economical to do so), but you will get to enjoy fresh tomatoes of a more flavorful variety than you'd get in the grocery store. You're not going to grow enough wheat to produce flour for your own bread, but you can grow rosemary and thyme which you can add to the bread you bake with storebought flour. You're certainly not going to be able to make a pizza with what you grow at home, but you can put fresh basil leaves on the frozen pizza you got at the store.
A garden won't replace any significant portion of your diet, but it will uplift the diet you already have.
2 notes
·
View notes
Text
Gulerodsboller!
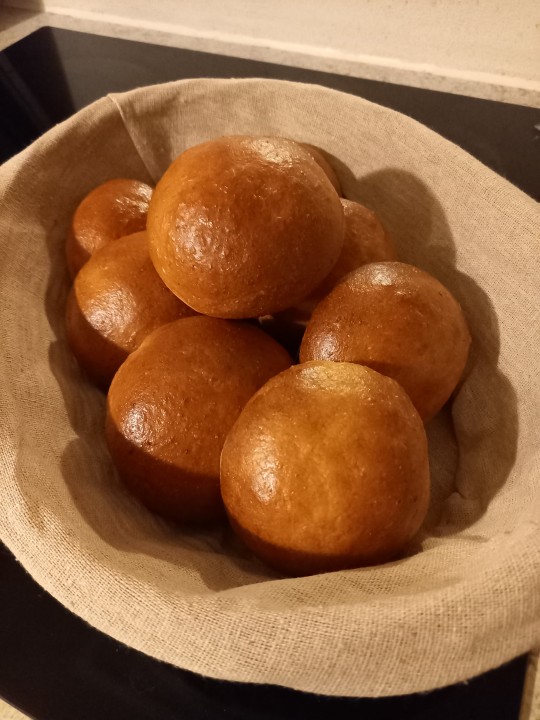
Carrot buns. Good as pizza bottom (4-5 pizzas) or burger buns (13 buns) or just as buns (26)
Ingredients:
550 g flour, mix of all purpose, whole wheat, and Manitoba or tipo00 or bread flour
50 g sugar
10 g salt
13 g fiber (i use a potato fiber from semper)
50 g fresh yeast
~ 200 g grated carrots (roughly equal to 3 big carrots)
50-100 mL milk/water (depends on how juicy your carrots are)
250 g cold oat meal porridge or sourdough
100 g butter/82 g oil
How to:
Stand mixer with dough hook attachment or big bowl and wooden spoon
All ingredients in the mixing bowl
Mix on slowest speed until all is combined or stir until everything is combined
Turn to speed 2 for 5-ish minutes until dough does no longer stick to the hook. Or knead vigorously for 10-15 minutes until it doesn't stick to your hands. If it keeps sticking you may want to wash your hands and change your kneading technique :b push the dough away from yourself with the ball of your hand and snap it back with your fingers. Do not stick your fingers into the dough. It is a very good workout, so you may want to only wear a t-shirt ;]
Do the gluten test. With clean warm hands take a small ball of dough and carefully stretch it into a thin rectangle just using your fingers. If it doesn't tear your dough is kneaded. If it does tear, you give it 1-2 minutes more on speed 2. If it tears at your fingers, but not in the middle, it is also done.
If you want to freeze the dough, weigh clumps of ca 200 g, make balls, and wrap in plastic wrap. When placing in freezer make sure they do not touch or they will keep each other warm and explode out of the wrap. Dough keeps for 3 months in freezer
If you don't freeze it: out of bowl unto a floured surface and knead into a big ball. Cover with a dish towel for 30-45 minutes
After it has risen you punch it down and weigh the buns out at 50 g. For burger buns you weigh 100 g. For pizza you gotta do math :b weigh your dough and devide by however many pizzas you need
Form buns and place on baking sheet. 12 per sheet for normal buns, 6 for burger buns. Press burger buns flatttt. One pizza per baking sheet*
Cover and let rise until doubled in size, usually takes 45-60 minutes. Or if your oven can heat to 35 C/100 F you boil some water and pour in a baking dish and set on the bottom of your oven and place your buns in the oven for 25 minutes. Take everything out of oven before next step
Preheat oven to 210 C convection
Paint buns with water or milk. Make sure they are completely covered
Bake at 195 C for 8 minutes, change placement of baking sheets and turn them around and bake for another 2-3 minutes
Done
*pizza bottoms do not need to rise before you add stuff to them. Just slather tomato sauce and cheese and toppings on immediately after rolling out and transferring to baking sheet. Bake at 210 C convection for like 15 minutes, depending on the amount of toppings on there.
If you froze the dough:
Remove from freezer evening before you need it and put it in the fridge
Two hours before you want to work with it you put it on the counter
Cut clump into 2 or 4 roughly equally big pieces and form buns
Do as points 9-14 above
3 notes
·
View notes
Link
If you have never made homemade dough from whole wheat flour for pizza before, now is the time. This whole wheat pizza dough produces a delectable pizza. Whole wheat flour adds flavor as well as the nutritional benefits of whole grains. But what if you do not have any whole wheat flour? If you prefer to use all-purpose flour (or if that is all you have on hand), you can make this recipe with all-purpose flour.

0 notes
Text
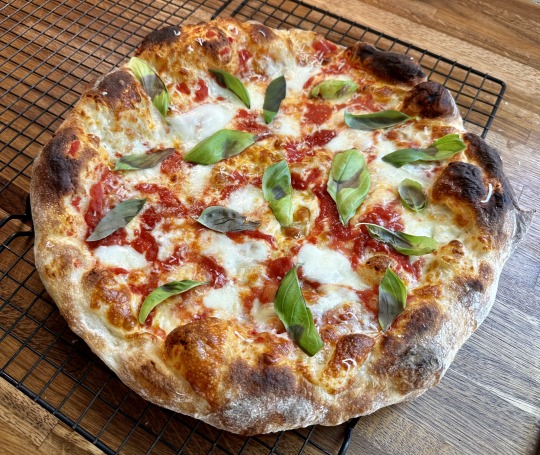
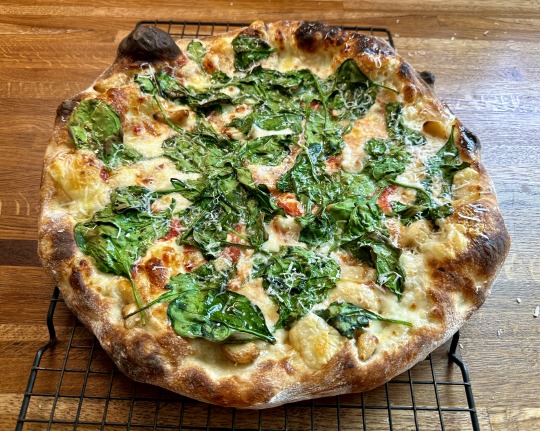
The best home-oven pizza
I like dozens of different pizza styles—sometimes it's nice to mix things up, other times a particular style fits your circumstances best. I most commonly make sourdough pizza, mixed with a stand mixer, fermented in the fridge for a few days, and baked in an Ooni Koda.
But what if I don't have access to a mixer; I want to eat pizza the next day; and it's too wet and windy outside to fire up the Ooni? Thanks to my friend Adam who originally developed this dough recipe, I also have the makings of an incredible indoor-oven pizza in my back pocket. It's bubbly, light, and crunchy.
The best home-oven Pizza
Servings: two 14” pizzas.
Time: 3 hours (mix and proof) + 1 to 2 days (fridge-ferment) + 4 hours (final proof) + 10 to 20 minutes (shape, top, and bake)
INGREDIENTS:
400 g white flour (high-gluten, bread-, or all-purpose flour)
20 g (5%) whole wheat or rye flour (or any flour, really)
12 g (3%) salt
.85 g (1/4 tsp, .2%) instant yeast
320 g (76%) water
DIRECTIONS:
Put the flours and the salt into a large mixing bowl. Stir with a spatula or fork to mix evenly. Add the yeast and stir again. Pour in the water and stir with a spatula, scraping down the sides and the bottom of the bowl. After 30-60 s of this, you should have a cohesive, shaggy mass of dough in the middle of the bowl. You're not looking for a smooth ball; you just want to work in all the dry flour. Gently knead this ball for a minute with your hands, folding and turning it to make it just a little more even; it'll still be a bit of a mess, which is fine.
Pick up the dough and spray or wipe a tiny bit of oil into the bowl, then put the dough back in. Cover with a shower cap, a large plate, or a tea towel and let the dough rest in a warm spot (70–74°F?) for 3 hours. Every 30 minutes or so, perform a stretch-and-fold. This video shows the process; it uses a different dough, but the principle is the same.
youtube
Stretching and folding every 30 minutes is ideal, but the timeline is forgiving. Just try to give it at least 3 folds during the 3 hours of proof time. By the end, you should have a fairly smooth and uniform dough.
After the 3 hours are up, cover the bowl again and pop it in the back of the fridge for 1-3 days. If you go past a day and a half, check to make sure the dough isn't overproofing and exploding out of the bowl.
The day you plan to make pizza, remove the dough from the fridge 3-4 hours before baking. (3 hours on a hot day, 4 on a cold one.) Cut into two pieces of the same size and roll each one into a ball.
Note that this is high-hydration dough, so it'll feel pretty loose and lively. Balling it up when cold will make that easier. Here's a video showing how to ball:
youtube
Grab two deep, round bowls or containers and oil them lightly. Place one dough ball in each, smooth side up, and cover. If the containers have well-fitting lids that won't crush the expanding dough, use them. Rest for 3-4 hours as described above.
1 hour before baking, get your home oven ready. Pop a baking stone or baking steel or upside-down pan on a rack 6-8" from the top broiler. Crank it up to 550ºF (or however high your oven goes) and leave it there.
To stretch the dough: hold the container upside down and wiggle the dough out of it gently; dont worry about whether it stays a perfect ball. Place it directly into a shallow, wide bowl of flour, and make sure the wet end and the sides get some flour (not too much) on them. Place the dough ball on your wooden peel with the dry (previously the top) side down and press gently around the inside of the rim to make a little ringed pizza-prototype. Drape the disc over your knuckles, then rotate around gently, letting gravity droop the dough to grow it. There should be no need to tug and stretch it with your fingers. Here's a video again:
youtube
My topping strategy for a standard cheese pizza: layer the dough with sliced mozzarella cheese, then add dabs of sauce, then your toppings (including torn fresh mozzarella). Now gently tug under the rim all around to stretch to 14″; the weight of the toppings will help prevent pullback.
Redistribute the toppings if needed. Shimmy again. Expertly slide onto the steel/stone/pan in the oven.
Once the pizza is in, set a timer for 3 minutes. Then, open the oven door and check the underside of your pizza. Rotate the pizza 180º to get even baking from back to front. Set a timer for another 3 minutes. During that time, rotate the pie 90º every 30 seconds or so. If it looks done after the total 6 minutes of bake time, pull it out; it might still need 1-2 minutes more.
You may need to shift between "bake" (bottom heat) and "broil" modes of your oven. Every oven is different, so use your judgment, checking to see if it's the top or the bottom of your pie that need more heat.
When the pizza is gorgeous, slide it out with a metal pizza peel or a large flat spatula or a cookie sheet or whatever. (Don’t use your wooden peel—that’s for shaping and launching only.) Rest it on a cooling rack for 1-2 minutes to dry out the bottom. Then move to a cutting board or plate and slice. (Please don't slice on your wooden peel.)

Since we're making two pizzas with this recipe, you'll need to repeat the process now. It's best to give your baking surface 5-7 minutes to recover the lost heat; don't forget to set it bake to "bake" mode during this time.
And there you go—tremendous pizza, made in your regular-ass home oven. It's possible, and it's delicious.
P.S. I have a bunch more pizza recipes on my website. Even if you don't plan to make any of the other styles, they could be instructive, as every recipe has helpful steps and notes of its own.
9 notes
·
View notes
Photo

🍥 Savoury muffins made using whole wheat flour, veggies and pizza flavour are so cheesy and overloaded with deliciousness that you can't stop at one.
🍔YouTube || 🍟Reddit
#BakingLove#GoForBrunch#BrunchIdeas#DessertPorn#FoodTruckFriday#DessertOfTheDay#AsianFoodMarket#BakingIsFun#BakingTime#AsianFoodStory#DessertLover#NewMexicanFood#sea salt#HealthyFood#FoodTruckCatering#BakingIsMyTherapy#FoodTrucker#AsianFoodLove#JustEatRealFood#yogurt#MexicanFoodAddict#Desserts#DessertStory#CleanEating#HealthyFoodWithMe#FoodTruckRoundup#DessertIdeas#FoodTruckNight#BrunchMunch#FoodTruckRodeo
7 notes
·
View notes
Text
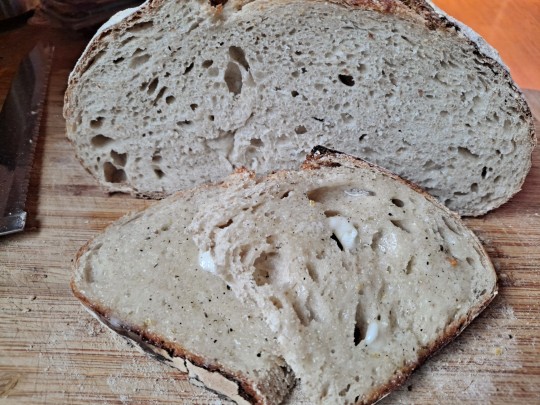
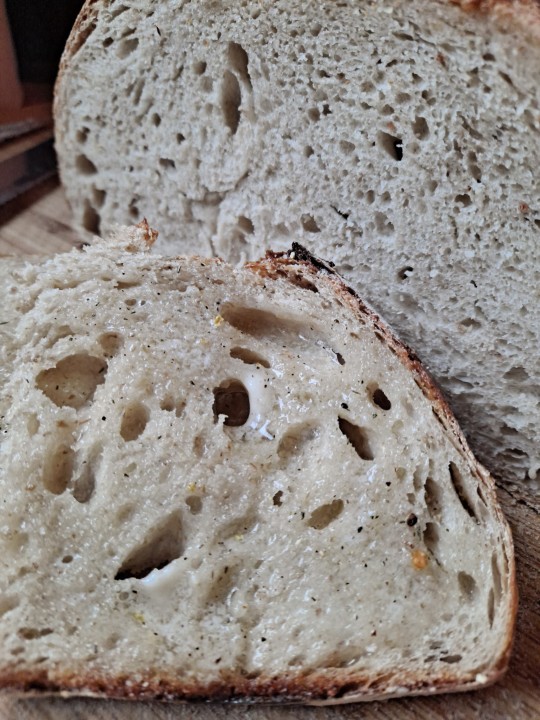
Experiment number 550,000 million is completed... 🤣🤣🤣 With most of the rise/proof "wait time" being while I was sleeping... 💤😴 What am I trying to prove? That baking sourdough bread is NOT an EXACT science. It is not that difficult and should not require all these "rules" that people want to make about baking SOURDOUGH... I have pretty much broken every single rule there is... And done exactly what works for me... in the time frame that works for me... I don't use a scale to measure my ingredients for my bread dough... I don't use a scale to weigh the measurements of ingredients that are going to go into my starter... I don't use heating pads or other contraptions or keep my house at a higher temperature so my sourdough starter or dough can stay warm or cold... I do not use filtered water. I use water straight from the tap despite the caution that it might kill the wild yeast. I don't worry about all this exactness with bulk ferment time... cold ferment time yadda yadda yadda...
Newest experiment... Can I make a decent sourdough loaf with minimal Hands-On time... With most of the wait time being while I'm sleeping... And how will it turn out if I use the "cold baked" method... Avoiding the excessive preheat times which to me is an absolute waste of our natural resources....
Came home from work yesterday and at 3:00 p.m. fed my cold straight from the fridge starter. I didn't think I was going to have enough starter for the two loaves I plan on baking today... so I added one full cup of flour and a half a cup of warm water.... (Normally I only do a half a cup of flour and a quarter cup of water but I gave it extra because I need extra starter today...)
By 8:00 p.m. the starter had at least doubled...
To a large Rubbermaid container I added:
1 full cup starter
3.5 cups white flour
1.5 cups wheat flour
1.5 cups water
Mix quickly just to get all the flour mostly incorporated... And Let shaggy dough sit with lid on for 30 minutes. After the 30 minute wait... I added another 1/4 cup water and 2 teaspoons salt... And immediately began stretch and folds every 30 minutes at 8:30 p.m. At 10:30 p.m. I moved the dough to a glass pyrex bowl with a lid. I was going to stop my stretch and folds there but thought better of it and 30 minutes later I did one more stretch and fold.
I left the bowl on the dining room table from 11 P.M. until I woke up at 5:00 a.m.
At 5 A.M. I gently plopped the dough onto the floured counter... And gently floured and formed my dough round to get a little more tension but also trying not to deflate the dough very much...
Placed that onto a piece of parchment paper... Scored the top with one slice down the center and plopped the whole thing into my cold cast iron Dutch oven. I did not have high hopes of this rising as well as it did that's why I only did one score down the center. I wish I had taken a picture but it was definitely much smaller than any of my other ready to bake forms.
As suggested I baked using the "cold bake" method for the first time.
Put oven on 450°. And placed the cold Dutch oven into the cold... But now preheating oven... immediately.
Baked at 450° for 50 minutes.
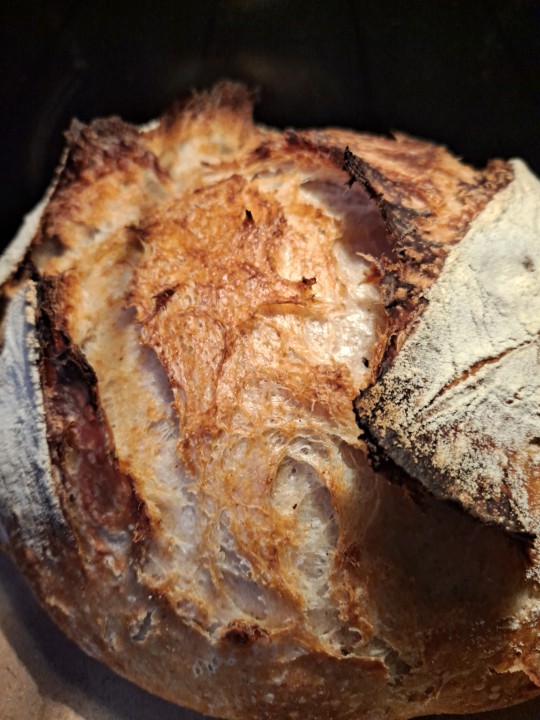
Removed the lid... And I was surprised to see that it definitely got a good oven spring... Continued baking with lid off for another 10 minutes.
Took temperature of the loaf it was 195°.
Took the loaf out of the Dutch oven and placed directly onto my pizza stone that was already in the oven.
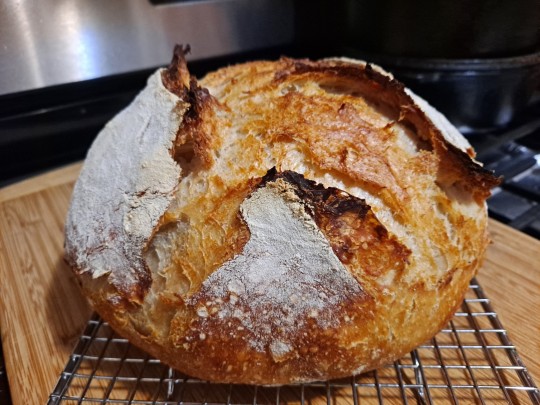
Baked for another 10 minutes until bread reached a temperature of 205 and was more golden brown in color.
I don't know what the inside looks like but I'm not really concerned about that. It looks and smells terrific.
And it was EASY PEASY! Barely any hands on time at all... No fuss... No stress...
Experiment was a success! Total time... From starter initial feed at 3 p.m. to completed bake @ 6:40 a.m. = 16 hours... Hands on time equals approx a measly 20 minutes... 🤣
Note: Image of the starter is actually AFTER a 2nd feeding at 8 P.M. (I forgot to move the time band)... I added another full cup of flour to my remaining starter and another half a cup of water... It more than doubled by the time I got up this morning.


2 notes
·
View notes
Text
best ever food & drink
cucumber & watermelon (same to me)
tofu (many ways)
glass of milk and 2 cookies (various)
mini sweet peppers
egyptian kahk
homemade red bean paste (u can make a lot affordably, keep it a decent amount of time, and use it for everything)
chicken mole
sashimi (various)
bisque (various)
gazpacho (various)
fruit that you picked
the first bite of a california burger (burger with lettuce, tomato, avocado, and monterey jack cheese)
lemon pound cake
dolma
oxtail stew with chayote (white people not invited)
pozole blanco
buttered pumpkin ravioli followed by the raspberry gelato served in a coconut shell at the obligatory little italian place in my obligatory little not-italian hometown
oolong tea
lamb gyro
when i worked at the college i used to rinse out my cup noodles before microwaving them bc they were too salty. that was good
phó (various)
zalabia topped with sesame seeds
scrambled egg white with spinach and mushrooms
avocado smoothie
street corner strawberries, too ripe to be sold to grocery stores
homemade lengua estofado (white people not invited)
butterfish hand roll
fiji lakdi mithai
fruit salad consisting of: apple, jicama, oranges, cucumber, and optional melon (honeydew or cantaloupe) with mandatory seasoning of citrus juice, red pepper, and salt
fried egg over easy stirred into white rice with very small amounts of sesame oil and soy sauce
my dad is the only person who can make bbq ribs worth eating bc they are tender and heavily spiced with a homemade mustard-based sauce with more spices than i’ve ever seen on any other single object
japanese curry + chicken cutlet (my preferred curry but all are valid)
melted monterey jack cheese (any context)
go to 300 Juan Medina Rd., Chimayo, NM, 87522
muesli
homemade honey kale chip (YSAC)
extremely dry breve cappuccino
cinnamon life cereal
homemade sopapilla with honey
NYC mall shrimp tempura udon (ubiquitous in NYC indoor malls in 2009)
banana with brown sugar and a little butter heated in microwave for like 3 minutes. wait til it cools
just the crust of deep dish pizza without the toppings
buttered macaronis with white onion (poisonous to me)
hot dog and vegetable stir fry
chile con carne with MY family’s green chile recipe
oyster tasting paid for by somebody else
this one stout beer that i shared with my mother in 2017 that came in an unlabeled bottle found in the back of a restaurant that has since changed ownership. no other information
dishes containing roux, custard, or caramelized onions patiently made by your own hand (taste of the fruits of your labor)
my sister’s fucked up health recipes that are actually incredibly fucking good such as a very seasoned broth with like 5 different types of mushrooms, a buffalo chicken/sweet potato/turkey bacon casserole, and all of her various spaghetti squash glops. so FUCKING good.
arugula salad with nuts and fruits
steamed pumpkin (various seasonings)
any decently improvised sweet bread, cookie, or cake flavored chiefly with butter, white sugar, and almond extract
baked potato with the red skin no seasonings eaten outside in the cold
thick, ambrosia-like homemade horchata served in a mug at the mexican place with zero english speakers on staff
11 oz can apple sidra apple soda
banana at 2 am
worst ever food & drink
banana at 6 am
waffle house “hashbrown”
backsweetened fruit beer
whole wheat pancake
whole wheat or multigrain health flour tortilla. if you’re worried about your health just eat a corn tortilla or wrap ur stuff in lettuce
guiltiest pleasures of all time
bacon pb&j burger.
expensive californian bougie health snack bars that consist of unrecognizable seeds, unrecognizable nuts, and unrecognizable dried fruits, unrecognizably sweetened and stuck together in an unrecognizable mound
spoonful of stone ground mustard
back home theres a place where u can get craft beer, a rosé slushie actually worth havinf, taste 4 nearly identical dry red wines, and then say its ur birthday and get panini bread toasted with butter and a melted hersheys bar topped with whipped cream. the birthday treat only really tastes good once youve had the aforementioned quantity of alcohol, but i think that’s by design. like listening to shpongle while profoundly high on psychedelics
2 dennys pancakes with 2 eggs over easy placed betwixt, wherein they will be smashed and mixed with maple syrup until the entire mess is soggy yellow-brown and unrecognizable
bowl of chevys fresh mex salsa con cuchara
i experience that “just one more oreo” comic but with mazapan, & when i wake up from the mazapan fugue state every dark cloth in the house is stained permanently
hot cocoa consisting of: almond milk, dark cocoa powder, and stove heat
i will never forget starbucks sage and juniper latte in the fall of 2018. nothing else at that godforsaken restaurant will ever be that good.
those cute fude nuggets they sell at target that are like $15 per box that are shaped like stars, fishies, etc.
anything with garlic or onion (poisons me)
18 notes
·
View notes
Video
youtube
https://www.youtube.com/watch?v=uMR4KrBXucY
If you’ve taken an introductory ethnomusicology or world music class, you’ve probably heard a famous recording of postal workers in Ghana making music as they cancel stamps. It’s sort of the archetypical way for ethnomusicology professors to introduce the concept of “work music” to undergraduates. This video is in a similar vein. What’s happening here is that the Mishkoltzer community is making matzo for Pesach. If you’ve ever shelled out beaucoup bucks for shmura matzo, this is how it’s made.
The thing about making matzo is that it’s a mitzvah -- you need matzo to keep Passover -- and it’s also very intense work. There are lots of rules about how matzo should be made (far more than you’d expect for a recipe that includes only flour and water), and one of these rules is that the matzo needs to go from flour and water to finished cracker in under 18 minutes. Really, the only way that handmade matzo can get done is in a big group party like this. And what better way to keep everyone’s matzo-rolling and matzo-shaping and matzo-stabinating energy up than a rousing nigun?
The song not only keeps the bakers’ energy up so they can get everything done in their 18-minute window, it also helps remind them why they are doing this. It’s a mitzvah in preparation for a holiday that is both very important and lots of fun, so why not make your matzo to music?
Before the pandemic, we used to have matzo-making day at my synagogue. Parents would bring kids, and we’d buy wheat and grind it ourselves. The rabbi would get our kosher ovens cranked up to high with the special Passover pizza stones getting hot inside. We’d all assemble around the big table in the kitchen. The rabbi staffed the oven, his son manned the stopwatch, and two guys would take up water and mixing duties. The rest of us waited with rolling pins and forks.
When we were ready, the stopwatch would start, the flour and water would be mixed, and then it was glorious chaos as the mixing guy tore off little dough balls, tossed them down the table, where we’d grab them, roll them out, stabinate them with forks, and bring them to the oven. The rabbi would yell “Clear!” and then open the ovens and toss our matzos on the pizza stones. They’re so thin that they’d bake in about a minute, and the rabbi would take them out and toss the next ones in. And we’d get the whole batch of dough done in eighteen minutes. Then we’d re-set everything, put more flour into the mixing bowl, and go again. That was some of the best matzo I’ve ever eaten!
We now have a different rabbi, and he doesn’t know how to make matzo, so we haven’t done it in a while. But maybe I’ll convince him to bring that party back.
6 notes
·
View notes
Text
Breads with Stuff
@icryyoumercy but you don't get metric conversions today because I am weak and not fit to command an army.
Pizza Dough
1 T sugar or honey
1.25 c warm water
2.25 t yeast
1.25 c white flour
2 c whole wheat flour
1 t salt
1/4 c oil
(Makes 2 pizzas; divide in half, roll out, transfer to a surface with corn meal, put pizza toppings on and bake. 425 F for oh twenty minutes I don't know; until the cheese looks brown.)
For rolled bread, use all white flour and roll it all out into one rectangle. Add toppings, roll up lengthwise, bake at 425 for oh half an hour was a bit much. We had:
pesto
feta cheese
walnuts
mushrooms
sweet potato
and I steamed some chicken sausage to have with because there's not much protein on the inside (but I don't like having the sausage in the bread).
#food#it's probably bake at like 210 or something#350 is Standard Bake Temperature then it's 75 degrees more and half that is 30 so - round about 210#whatever temperature you metric cats consider standard in that vicinity
3 notes
·
View notes
Last Seen Blogs

thats-rats
rat

halfbloodlycan
Arbitrary_Tumbler

nataliatcherewkowa-blog
Без названия

lanrefnix
LanreFniX

hijabifairy
♡pastel garden♡