#Top Exporters and Importers Directory
Explore tagged Tumblr posts
Visit Tumblr Blog
Explore Tumblr blogs with no restrictions, modern design and the best experience.
Last Seen Tumblr Blogs


Fun Fact
Tumblr is available in 18 languages.
Text

Top Exporters and Importers Directory
Discover the Top Exporters and Importers Directory on Lynkxs, your trusted platform for connecting with global trade leaders. This comprehensive directory features reliable exporters and importers, offering seamless opportunities to expand your business worldwide. Stay updated with the latest market trends and connect with partners across diverse industries. To get more information visit our website today.
#Top Exporters and Importers Directory#Wholesale Kitchen Cabinet Suppliers#Sustainable Construction Materials
1 note
·
View note
Text
blender tool: batch thumbnail renderer
i did a blender/python thing! i've seen some people posting about the hassle of taking thumbnails for pose packs and thought I'd put this up - I wrote a simple script a while back to take thumbnails for my blender pose library (those are up to 256x256 pixels, much bigger than the thumbs exported from S4S) but I imagine it would work for posemakers as well.
what this does: it automates the pose/render/save cycle. add your character to the scene, set up your camera, add your poses to a collection, and hit the button - it will put the character in each pose, render, save, and then move on to the next so you don't have to do it manually. this is especially useful for things like emotions packs where the camera does not need to be adjusted between poses.


what this doesn't do: you still have to position the camera and configure render settings, import your model, and add your poses to the scene. the camera does not move between renders, so if some poses are out of frame or otherwise don't work with the camera settings, you have to fix that manually.
i got kinda anxious about posting this and let it sit in my drafts for way too long - I used generic blender rather than sims-specific tutorials and worry I did things inefficiently or improperly, but it works for me, I use it often, and it saves me a lot of time, so I'll put it up. I welcome any criticism or advice people have for me.
i've uploaded a sample scene I used to get those renders of L, as well as the script itself in case you want to import it into your own scenes instead. the sample camera is set to produce 500x500 pixel thumbnails with an orthographic camera, rendered with Cycles, but you can set up the camera/renderer however you'd like.
download sample scene (includes script & instructions)
download script only
download instructions only (just a .txt file with everything below, but without pictures)
i'm going to work with the sample scene for these instructions, but this should work in any scene with a character mesh, an active camera, and a pose collection.
import your model. you need the mesh. this does not have to be in its own collection, as long as it isn't in the poses collection. set your active camera up to have the render settings/framing/zoom that you want. this will be used for every single thumbnail and cannot be adjusted in between renders.

2. you need the rigs from the poses. for .blend poses exported from S4S, drag them into the scene, open "Object" and then select rig.

make sure the rigs are going into your 'poses' collection - the collection doesn't have to be called 'poses' but it does need to contain ONLY pose rigs. name them whatever you'd like the thumbnails to be saved as.

3. head over to the scripting tab. if the script "export_thumbs.py" isn't open, hit the folder button to find it.

4. in the outliner, click on both the pose collection and the character mesh (note - NOT the character rig, you want the one with the inverted triangle and the wrench). you should see both icons selected.

5. hit the "run script" button at the top of the scripting tab.

at this point, if all went correctly, blender should appear to freeze (because it's doing stuff!) but you will notice a folder called "renders" appear in the directory with this blender file. Inside the renders folder, there will be another folder with the name of whatever character mesh you used - this allows you to run the script with multiple character meshes without overwriting files, as long as the meshes have different names. one by one, your thumbnails should show up here.
once the script has gone through every pose, blender will become usable again, and you should have a directory full of thumbnails. hooray!

note: every pose in a collection will render with the same camera settings. if you need to change the camera, for example because you have both standing and sitting poses, you can divide the poses into different collections. you have to run this script for each collection of poses you want to render - it will not automatically go through every collection in your outliner - so this gives you the opportunity to adjust the camera between batches. because thumbnails are named after the pose names, overwriting shouldn't be an issue.
please let me know if you have any problems with this! It's possible the scene may cause issues in older versions of blender - it was saved with 4.1 - but if it doesn't work, the script itself works with versions at least as old as 3.3.
#ts4 blender#ts4 render#ts4 edit#ts4 tools#ts4 blender tool#ts4#sims 4 render#sims 4 poses#ts4 poses
6 notes
·
View notes
Text
How to Import Candle Charts from TradingView websites?
youtube
💥S#.Data provides functionality that supports automatic downloading of historical market data from many data sources. But sometimes websites do not provide an API to make the process automatically. Fortunately, in addition to downloading you can import market data from CSV files directly.
💥TradingView is a charting platform and social network used by many traders and investors worldwide to spot opportunities across global markets. The major feature of the website - various historical dataset - that you can download as a csv file for further usage (e.g. - backtesting, analyzing).
💥For the TradingView website, you need a premium subscription to be able to export candles. Let’s look at this process step-by-step to understand how we can import this market data into S#.Data.

👉Visit TradingView Website.

👉Select Search Market for example NFLX. 👉Click Launch Chart for view.
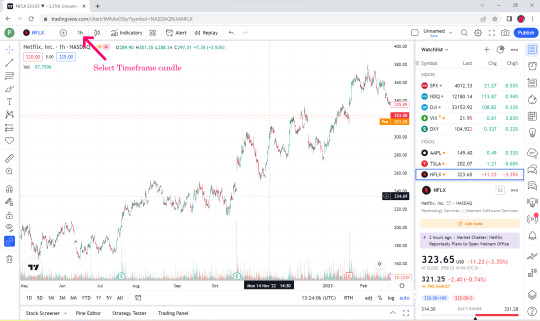

👉Select Time Flame Candle for example 1 hr.

👉Select Export Chart Data.
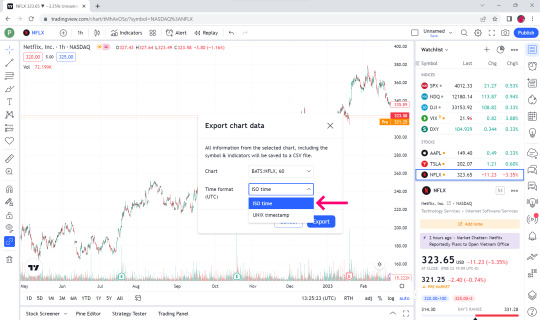
👉In the Time format box, select ISO time.

👉Click Export.

👉Open the downloaded Market data file. You can see that the top bar is date and time, open price, low price, close price, volume and volume MA.
👉S#.Data supports only the first 6 data, the last one volume MA we will not take.
👉Open up your S#.Data Application.
👉Visit our instruction if you doesn't have S#.Data application.
👉How I can get S#.Data
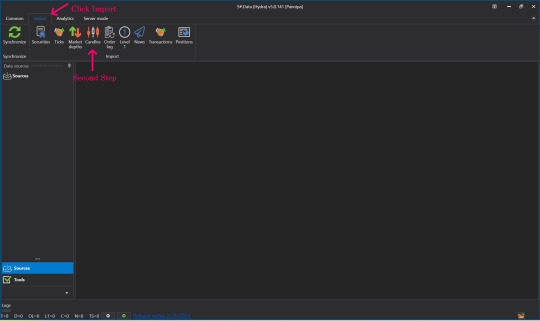
👉Go to S#.Data application, click select import and Click candle.

👉Find the name of the file we just downloaded (btw, you can import by directories as well).
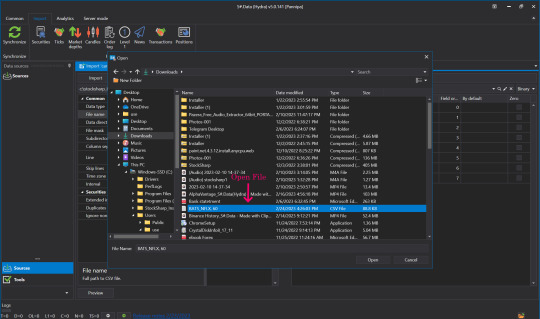
👉Click to select the file that we downloaded, click open.

👉Click to select the time frame to match the timeframe we selected in the file we downloaded initially in the data type field.

👉Setting S#.filed from the Security and Board fields.
👉By default put the Instruments Code that we downloaded. For example NFLX in the Security slot in the instrument board e.g. BATS by default.
👉Enter numbers 0-5 in the date box and so on. Remember - numeration started from 0, not from 1.

👉Skip lines Row 1 cause it contains data columns description.
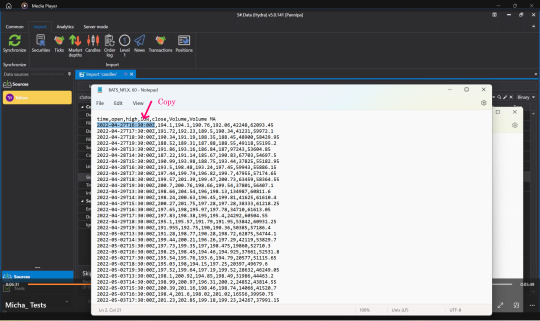
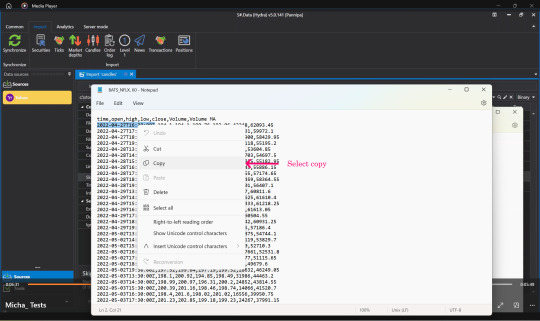
👉Open the file that we downloaded again, select Copy, time, date that we started downloading Market Data.
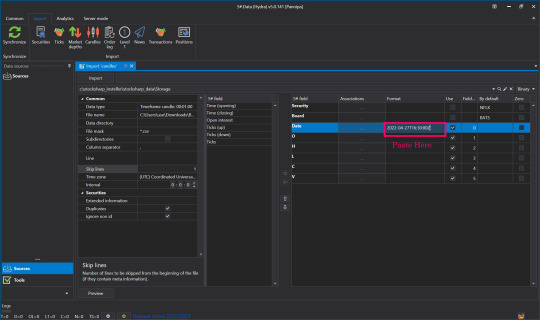
👉Press Paste in the Date Format field.
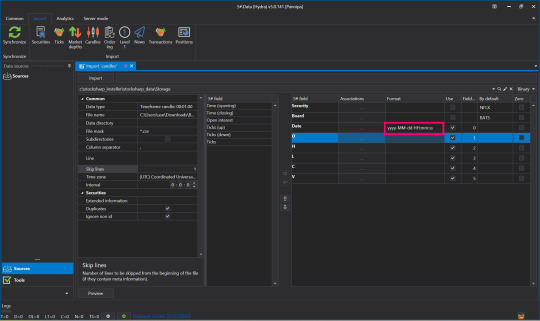
👉Change Numbers to Code Letters By yyyy-MM-dd HH:mm:ss You can read more about format on Microsoft website

👉Once everything is entered correctly, click Preview to double check before importing.
👉When the screen shows this page, there is no problem.
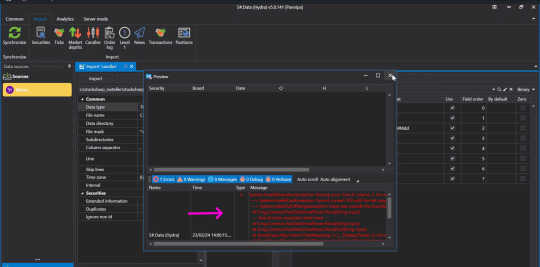
👉But if you press Preview and the screen appears like this, check the details that you have entered again to see if there is any mistake, correct it and press Preview again.
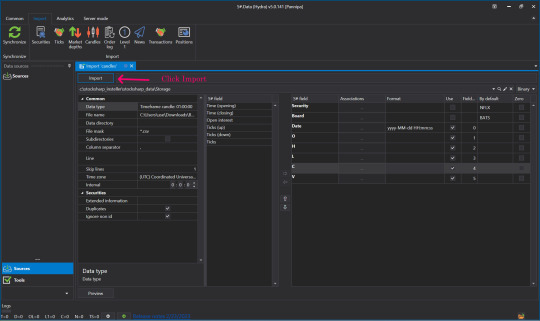
👉Once it's verified and there are no problems, press Import.
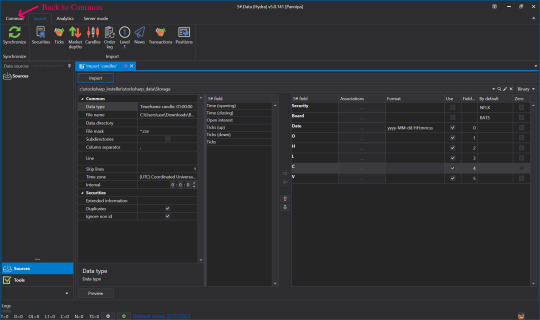
👉When done, click Back to go to Common.
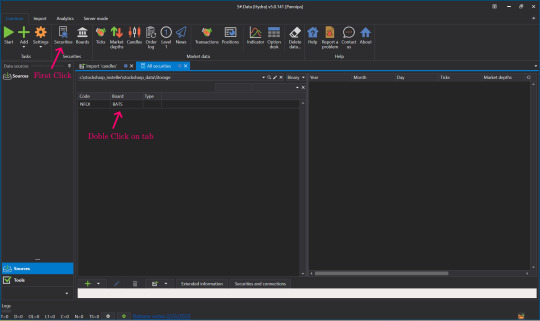
👉Click on our Security.
👉Click on Instrument Tab to view market Data.

👉Now let's see what data was imported. Click Candles.
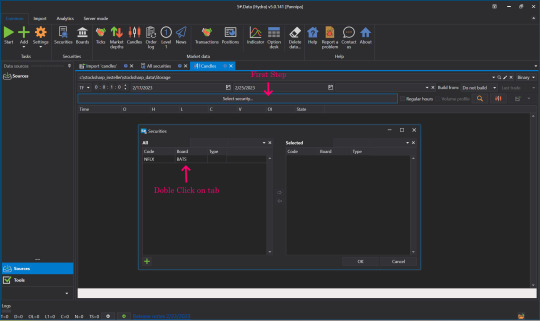
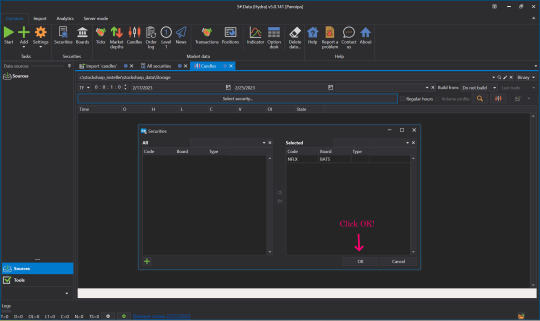
👉Select Security, select the Instrument to view by double-clicking the Instrument Tab, move it to the right side and click OK.

👉Select date and time frame.

👉Click View Market data.
👉Click View Candle Chart to see our candles as a chart.

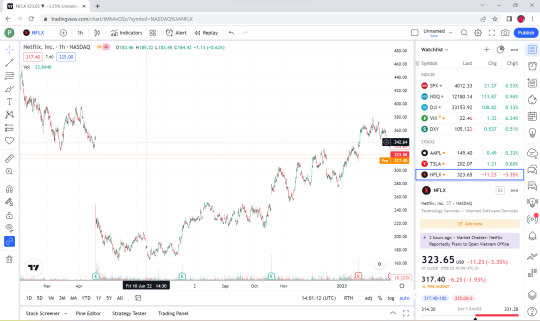
👉This is a Candle Chart comparison between the Chart that was in TradingView website before it was downloaded and the downloaded Chart rendered in S#.Data application.
💥💥Now you know how to import from a CSV file. To make this process you no need to use only limited websites like TradingView. S#.Data supports any format of CSV files that you can download from a variety of sources and websites.
💥Hope this blog is interesting for you. Please comment us what you interesting to know more about S#.Data. We will try to write our next posts.
Sources : StockSharp.com
#downloading of historical market data#import market data#charting platform#export candles#trading view#backtesting#Youtube
1 note
·
View note
Text
How to Find International Buyers for Your Export Products in India
Introduction
The global market offers immense opportunities for Indian exporters, but the challenge lies in finding reliable foreign buyers. Whether you're just starting or looking to scale your business, understanding how to connect with international buyers is crucial. This guide provides actionable steps to help you find foreign buyers, establish lasting relationships, and grow your export business.
Why Read This Post?
Learn proven strategies to identify international buyers.
Understand the importance of trade fairs, online marketplaces, and thorough research.
Get actionable tips to boost your export business in India.
Let’s dive into the fundamentals and the top methods to help you succeed in the competitive export market.
The Fundamentals of an Exporting Business
Before searching for buyers, it’s essential to have your export business ready:
Legal Documentation: Ensure your business is registered and you have the Importer Exporter Code (IEC) from DGFT. Other necessary registrations include GST and any specific export licenses.
Market Research: Understand your target market's preferences, demand, and competition.
Product Readiness: Ensure your product meets international quality standards and complies with export regulations.
Logistics Setup: Partner with reliable logistics providers to manage shipping, customs, and delivery.
5 Ways to Find International Buyers for Indian Products
1. Conduct Thorough Research
The first step to finding buyers is to identify your target market and potential customers:
Export Portals: Use platforms like Exporters Worlds and Export Promotion Councils to gather data.
Competitor Analysis: Study competitors who export similar products to identify their markets and buyer sources.
Chambers of Commerce: Engage with chambers like FIEO (Federation of Indian Export Organisations) for leads and resources.
2. Start a Foreign Wholesale Export
Building relationships with wholesalers in foreign markets can help you penetrate new regions effectively:
Connect Directly: Reach out to wholesalers via directories and platforms like Exporters Worlds
Leverage Trade Groups: Join industry-specific associations and forums to network with international wholesalers.
3. Attend Trade Fairs and Exhibitions
Trade fairs are excellent for connecting with potential buyers:
Benefits: Showcase your products directly, understand buyer requirements, and gain insights into market trends.
Popular Events: Participate in events like the India International Trade Fair (IITF) or international expos.
Pro Tip: Prepare professional marketing materials like brochures and business cards to leave a lasting impression.
4. Use Third-Party Agencies
Third-party export agencies help bridge the gap between you and foreign buyers:
Export Promotion Councils: Organizations like Exporters Worlds connect exporters with international buyers.
Consultancies: Hire export consultants for market analysis and buyer identification.
5. Leverage Online Marketplaces
The digital revolution has simplified global trade. Use online platforms to find buyers:
B2B Marketplaces: Platforms like Exporters Words, Amazon Global Selling, and ExportersIndia connect exporters with verified buyers
Social Media: Use LinkedIn to network with industry professionals and join relevant groups.
Company Website: Create a professional website optimized for SEO to attract international inquiries.
Quick Tips for Building Your Export Business
Invest in Quality: Always prioritize product quality and compliance with international standards.
Effective Communication: Respond promptly to buyer queries and provide detailed information.
Follow Up: Build long-term relationships by maintaining regular contact with your buyers.
Digital Marketing: Leverage Google Ads, email marketing, and social media to reach potential buyers.
Conclusion
Finding foreign buyers for your export products is a strategic process that requires research, networking, and persistence. By leveraging trade fairs, online platforms, and professional agencies, you can connect with reliable buyers and expand your business globally.
Take the first step today! Explore online platforms, attend trade fairs, or consult with an export promotion agency. Don’t forget to share this guide with fellow exporters and subscribe for more insights.
0 notes
Text
Warhammer 3 to Tabletop Simulator: Model + Animation export and import
Forewarning:
The software used can be highly unreliable, its going to crash a lot for no good reason. I dont know what it is about the TotalWar modding community, but their software is just really buggy, I assume its because the way pack files work.
This tutorial shows you how to set up Unity with the proper version and scripts needed.
https://kb.tabletopsimulator.com/custom-content/custom-assetbundle/
Its pretty straight forward. and probably the easiest part of this whole adventure.
Exporting from Warhammer 3
Needed files:
QtRME: https://github.com/mr-phazer/RME_Release/releases/tag/0.4.9-unstable.alpha.1
AssetEditor: https://github.com/donkeyProgramming/TheAssetEditor/releases
Blender: https://www.blender.org/
Gimp: https://www.gimp.org/
---QtRME ----
QtRME Allows you to export models and animations from TotalWar packed files converted into a format useable by Unity.
Setup:
Extract the folder from the downloaded file and then run '@QtRME_GUI'. Once its loaded up you'll need to open the settings tab at the top left and set the location of your warhammer games.You'll want to select the Data folder. Pack files are found in 'steam/steamapps/common/(TOTALWARGAME)/Data'.
Once you've set the path to the files you'll need to select the 'Select Game' option in the menu bar at the top, and set your game to WH3, You'll also need to set your 'Render Type' to WH3.
Once you've done all that, close and relaunch the application.
Instructions on use and export:
Hit the 'Open Pack Explorer' button to bring up all the Pack files in the Data folder. Every model for the game is in here somewhere, its a little poorly labeled. Assuming you're wanting unit models, you'll need to select the 'variantmeshes' folder and then 'wh_variantmodels'.
I'm not sure of the ordering of the folders after this, There's probably some logic to how they're ordered but its lost on me.
Each folder will have its contents seperated by faction 'chs' for chaos, 'emp' for empire, 'vmp' for vampire etc. Once you've found a unit you want you'll need to click its rigimodel file. This will open the model and a new window. In this new window you can hit the dropdown arrow next to the video play button to load any animation used by this model. Once you've found what you want you can export to FBX. This will export the model and animation currently loaded.
You can also hit the drop down arrow next to the FBX button to select which animations to export with. I like this as you can export all the animations of a given model at once and select from what you want later! You will need to select an animation as the models tend to be T-posed, even if you only want the first pose of the animation you'll need that animation selected.
Now that the rigidmodels are extracted as FBX files. Assuming you didnt pick a model with multiple parts all you will need now is the texture files of that model. For whatever reason it doesnt seem to export with those files. You can get these using AssetEditor. If the model comes in multiple parts you'll need to export each of those parts with their animations, and try to match them up later in Unity.
---AssetEditor---
Using AssetEditor you can export all the files by folder. This program would be 100% perfect if it exported as FBX. But we'll be using it to grab texture files. Folders are laid out the in the same order as they are in QtRME.
Setup:
Setting it up is pretty similar to QtRME, launch the application, click options in the menu bar, 'Settings' and set your Warhammer 3 directory to the Data folder in your steamapps folder again, setting your current game to Warhammer 3.
Instructions:
You can view the models here as well by clicking into their rigidmodel files. You can also view their animations here as well by clicking the bottom bar. What you'll want to do is export the texture files for the models you want. These files are generally in a folder called 'tex' in the models folder heirarchy. To export a file right click it in the menu bar and select 'Export to disk'. The dds file you want is 'modelname_base_colour.dds'.
---GIMP---
Gimp is a pretty straight forward image editor. All you'll need it for is opening the *.dds file and exporting it as a '.PNG'. If you have another image editor you prefer, feel free to use that.
---Blender---
As with Gimp, the modelling software can be whatever you're comfortable with. What you'll want to do is import the exported FBX model you got from QtRME and export it again as another FBX. This seems redundant, but unity doesnt seem to like the QtRME exported FBX files.
If you are using Blender make sure to remove the light and camera from the scene, as unity has its own.
---Unity---
Setup: Follow instructions given by the linked tutorial to setup an instance of unity ready for tabletop simulator asset creation.
Instructions:
Now that you have an exported FBX file unity can read, create a folder in unity to store the files for ease of access. Import your FBX file and the PNG file you created earlier. You can drag the fbx file into your unity Scene. Right click the new item group and select 'Unpack prefab'.
Materials:
In your folder right click > Create > Material and name this as themodelsname_Mat select this file and change rendering mode to Cutout. Drag your PNG texture file to the slot labeled 'Albedo'. I like to enable the emission check box and drag the PNG to the 'Color' option this enables, this allows you to brighten up the model a little. Clicking the box beside 'Color' allows you to change the emission colour and intensity, generally its just the intensity you want to alter.
Once your new material is setup drag it on top of the model in the scene. This will apply the proper texture to the model.
Collision:
Next up is Collision, without which your new object is going to fall off into the void.
Select the object, press 'Add Component' and select 'Box Collider'. Press Edit collider to reshape the box. You can change your view to isometric by selecting the gizmo in the top right of the scene window, this just makes it a little easier to size up the box collider.
Once thats all done you're ready to make it into a Tabletop Sim object! Drag the object into your project view to save it as a prefab. And follow the Unity tutorial by TabletopSim to finish up. If you got good use of this write up and managed to export models yourself please @ me on Bsky so I can check them out!
🦋 https://bsky.app/profile/bushcrank.bsky.social
#tabletop simulator#total war warhammer III#Warhammer III#Total War#Total war Warhamer#Models#export#import#ttrpgs
1 note
·
View note
Text
Eclipse offers an integrated development environment having an extensible plug-in system. This enables Eclipse to provide all functionality on the top of its run-time system. It’s also different from other applications (where the functionality provided by plug-ins are mostly hardcoded). Having the appropriate Eclipse plug is important to stay productive since it facilitates the Java developers to seamlessly develop and implement applications. Eclipse plug-ins also help them to implement their application on several types of application infrastructures. A regular eclipse user has dozens of add-on installed and often struggles to keep eclipse running fast. Therefore choosing the right plugin for your everyday development environment is essential. Below is the list of best free Eclipse plug-ins for a developer to be more productive - Code Quality Plugins FindBugs FindBugs plug-in is used with eclipse IDE and it is the software used to find bugs in Java programs. It’s free software licensed under Lesser GNU Public License. This is one of the most popular eclipse plugins and also available on Maven, Netbeans and IntelliJ. Checkstyle Checkstyle plug-ins can be integrated to IDE Eclipse and it ensures the Java code follows the coding standards. ECLemma ECLemma is a free tool available through Eclipse Public License and it provides fast development and test cycles. You can use “launch” in the code coverage mode which works like actual run/debug mode. One can render the analysis of the code through coverage view, source highlighting, counters and sessions. JDepend4Eclipse JDepend4Eclipse helps to traverse file directories and assists in measuring the quality of design. It is an open source tool licensed under Eclipse Public License v1.0. PMD PMD is a source code analyzer which helps to detect used variables and bad codes. (Update URL - http://pmd.sourceforge.net/eclipse/) SourceHelper SourceHelper helps to code and debug, and it also aids in providing clarity to the written code. Structure101 Structure101 helps to influence architecture when the code is edited, which means you can change the architecture without disrupting the code. Text Editor Plugins AnyEdit Tools The plug-in helps to add new editor to output consoles, toolbar, and it also help to import and export data. It is licensed under Eclipse Public License v1.0. Eclim Eclim helps to bring Eclipse functionality to one of the best editors - Vim, wherein development can be done in various languages and it also provides bug fixing provisions. It is released under GPLV3. Eclipse-rbe Eclipse-rbe is used for editing Java resources and its features include warnings for missing values, sorted keys, conversion from/to Unicode etc. It is licensed under GNU library or LGPL. Dependency Management Apache IvyDE Apache IvyDE is an Eclipse plug-in which helps to integrate Apache Ivy’s feature of dependency management to Eclipse. Additionally, it helps to manage dependencies in ‘ivy.xml’. It can be used with plug-in WTP and Ant. M2eclipse (Maven Plugin) M2eclipse helps to manage both simple and multi module projects, and Maven integration for Eclipse (M2eclipise) helps to launch maven from Eclipse. It provides features such as dependency management and automatic downloading. You may also want to checkout Some Best Free Maven Plug-ins for Developers Version Control Integration Plugins Subclipse Subclipse is a SVN plug-in which offers support for subversion of Eclipse IDE and it is licensed under EPL 1.0. Subeclipse 1.6.x supports ColabNet Merge Client. Subclipse provides easy interface to use the features. EGit EGit plug-in provides support, synchronizes view, reading for .git/ exclude files, provides rebasing and has streamlined commands for pulling and pushing. MercurialEclipse MercurialEclipse is one of the active Version Control System which gives you access on registration. It is a reliable plug-in which provides cloning repositories, push-pull synchronization and enables easy rollback.
P4Eclipse P4Eclipse seamlessly integrates the strengths of Perforce's version management system with Eclipse's. P4Eclipse provides a developer-oriented set of features from within the Eclipse Team framework that support a wide range of Agile and traditional development workflows. Framework Development Spring Tool Suite Spring Tool Suite provides development environment and tools such as XML file wizards and graphical spring configuration editor, which can be used for easy development. Spring IDE Spring IDE helps in developing Spring Application and provides interface to use the graphical editing framework. What’s more, Spring IDE display graphs of relationships and beans using configuration files. (Update site - Hibernator Hibernator helps to create or update schema, run hibernate queries and create mapping documents. The user can synchronize a Java class to a related mapped file. JbossTools JbossTools 3.2x support JBoss, Hibernate, Drools, XHTML, Seam etc. (Update site - Continuous Integration Related Plugins Hudson Hudson Status is a simple plug-in that displays the status (red/green) of a application on Hudson build server. Hudson is a very powerful continuous integration server, that is used in many large software development projects. Sonar Plugin Sonar Plug-in for Eclipse provides powerful integration of Sonar with Eclipse. It highlights code quality problems as we browse the code. Since the code quality standards definition is centralized on Sonar server, it ensures all developers are following same quality standards. Sonar is a open source platform used for centrally controlling the source code quality of software projects. Other Utility Plugins ASM - Bytecode Outline plugin ASM Bytecode Outline plugin shows disassembled bytecode of current Java editor or class file, allows bytecode compare for Java/class files and shows ASMifier code for current bytecode. You can install ASM from Eclipse Update Manager. It allows bytecode comparison to Java class. (Update site - Mylyn - Task Management Mylyn has a task focused interface and it provides a task management tool to the developers. Moreover, it helps to integrate rich editing tools and monitor activities. Eclipse Launcher Eclipse launcher is written in Delphi 6 and it helps to launch Eclipse IDE with configuration. FileSync FileSync is licensed under Eclipse Public License v1.0 and it is a file synchronization tool used for creating, deleting and mapping files. Log4E Log4E helps to use logger easily without getting bound to a special logging framework. Also, you can define your own preferences for logging templates. All in all, plug-ins allow Eclipse to be coded in other languages. Eclipse plug-ins is indispensable nowadays, since it greatly streamlines Java applications and reduces the complexity of Java. However, installing too many plug-ins can slow down Eclipse. Hence you require selecting the plug-ins judiciously. There are a number of other productivity plug-ins too, besides the ones mentioned. Checkstyle, JBoss Tools and Jadclipse are three of them. Do let us know if you have used some other plug-ins which you were impressed with. Article Updates Updated on May 2019: Minor changes and updates to the introduction section. Images are updated to HTTPS.
0 notes
Text
Top Ways To Import IR64 Rice
Want to import IR64 rice? This popular non-basmati white rice is a widely recognized variety and plays an important role in global food markets. This is especially true for countries that need rice for bulk consumption, food processing, and export. It’s a popular choice for importers looking for reliable sources of rice because it is widely available and affordable. But how do you ensure the import process is easy, cost-effective, and completely risk-free?
Let’s explore the top ways to import IR64 rice and how you can streamline the process.
The Importance of IR64 Rice in the B2B Food Market
IR64 rice is one of the most commonly consumed rice varieties in Asia and other continents. It is known for its large grains, good cooking quality, and durability, and the reason it serves as a staple in many countries’ diets. Its availability in bulk makes it an appealing option for food processors, restaurants, and businesses in the HORECA (Hotel, Restaurant, and Catering) industry. The global demand for IR64 rice is impacted by many climatic and geopolitical factors, however, its demand in general, is witnessed to be stable.
Traditional Channels: Middlemen and Their Disadvantages
When talking about the historical methods, importing rice often involves working with middlemen or intermediaries. These individuals or agencies facilitate the trade between rice suppliers and buyers and hemp businesses source rice from different countries.
However, relying on middlemen has several disadvantages:
Increased Costs: Middlemen often add a markup, making the price of rice higher than it would be when dealing directly with the supplier.
Lack of Transparency: Middlemen may not always provide full details about the source or quality of the rice.
Delays: The extra step in the supply chain can lead to delays in sourcing and shipping, affecting your ability to meet demand.
Sellers on Directories: Unverified and Risky
Another most common method to import IR64 rice is through online business directories or trade platforms. While these platforms may offer access to a wide range of suppliers, however, they do not come without risk.
Unverified Sellers: Many sellers listed on directories are unverified, making it hard to assess their credibility and reliability.
Quality Issues: Without a clear and verified process, the quality of rice may vary, leading to potential disputes or losses.
Limited Support: These platforms usually offer minimal support when issues arise, leaving buyers to navigate problems on their own.
While directories provide easy access to suppliers, they are not always the most reliable way to secure quality IR64 rice.
Trade Exhibitions: Money-Intensive and Time-Consuming
Trade exhibitions and expos offer another way to source IR64 rice, where buyers can meet suppliers in person, see products, and establish business relationships. However, attending these events can be quite expensive:
High Costs: Travel, accommodation, and exhibition fees add up, especially if the exhibition is located internationally.
Time-Consuming: Visiting trade exhibitions can take up significant time, as it requires careful planning, traveling, and networking. For businesses looking to import rice on a tight schedule, this might not be the most efficient option.
While trade exhibitions provide valuable networking opportunities, they can be a costly and time-consuming route for sourcing IR64 rice.
Tradologie.com: The Perfect Solution
If you’re looking for a more efficient, cost-effective, and transparent way to import IR64 rice, Tradologie.com offers a reliable platform that connects buyers and sellers directly, without the need for middlemen. Here's why Tradologie.com is the perfect choice:
Direct Access to Verified Suppliers: Tradologie.com only lists verified suppliers, ensuring that you work with trusted sources who meet quality standards.
No Middlemen, No Extra Costs: With Tradologie.com, you deal directly with the suppliers, cutting out the middleman and reducing costs.
Streamlined Process: The platform simplifies the procurement process, from sourcing to payment, ensuring a smoother experience and quicker delivery.
Global Reach: Tradologie.com connects businesses across the globe, making it easy to source IR64 rice from different regions and suppliers.
Free of Charge for Importers: Unlike traditional methods, importers are not charged for using Tradologie.com’s platform. You only pay a minimal success fee when the deal is concluded.
With Tradologie.com, you get transparency, lower costs, and quicker access to IR64 rice, making it the ideal solution for bulk rice procurement.
Conclusion
Importing IR64 rice doesn’t have to be complicated or expensive. By understanding the traditional channels and their disadvantages, you can avoid unnecessary costs and risks. While middlemen, directories, and trade exhibitions may seem like viable options, they often come with hidden costs or inefficiencies. Tradologie.com simplifies the process, offering direct access to verified suppliers with no extra charges for importers. If you’re looking to import IR64 rice in bulk, Tradologie.com provides the perfect platform to ensure quality, transparency, and cost-efficiency.

0 notes
Text
How to Find Reliable Suppliers for Your Import/Export Business: A Step-by-Step Guide
Finding reliable suppliers is one of the most critical components for success in the import/export business. The right suppliers can ensure the quality, consistency, and timely delivery of goods, which ultimately builds trust with your customers and enhances your reputation. However, navigating the international market to find dependable suppliers requires a strategic approach to minimize risks. This guide outlines a step-by-step process to help you secure reliable suppliers for your import/export business.
Step 1: Define Your Supplier Requirements
Before beginning your search, outline what you need from a supplier. Consider factors like:
Product quality: Ensure suppliers meet your quality standards, especially if you’re targeting premium markets.
Capacity: Choose suppliers who can handle your order volume and scale with your business growth.
Location: Consider the geographic location in terms of shipping costs, lead time, and trade tariffs.
Certifications and compliance: Verify that suppliers adhere to relevant regulations, especially for food, electronics, or other regulated products.
Having clear requirements will help you shortlist suppliers more effectively.
Step 2: Leverage Online B2B Marketplaces
B2B marketplaces provide access to a wide range of international suppliers. Some of the top platforms include:
Alibaba: A global marketplace with supplier verification, allowing you to check company certifications and customer reviews.
Global Sources: Known for reliable Asian suppliers and quality control measures.
IndiaMart and TradeIndia: Especially useful if you’re sourcing from India, these platforms list many suppliers with profiles, certifications, and reviews.
When using these platforms, always filter suppliers based on high ratings, certifications, and verified customer feedback. This can give you a better sense of each supplier’s credibility.
Step 3: Connect with Export Promotion Councils and Trade Associations
Many countries have government-backed organizations that support trade and provide verified lists of local suppliers. Some key organizations to consider:
APEDA in India (for agricultural products)
Department of Commerce and Industry in various countries, which often provides databases of certified exporters.
Local Chambers of Commerce: Often have supplier directories or can connect you to reliable local businesses.
These associations typically maintain strict verification standards, so suppliers listed through them are generally more reliable.
Step 4: Attend Trade Shows and Industry Events
Attending trade shows allows you to meet suppliers face-to-face, assess their products in person, and build relationships. Some major trade shows for the import/export sector include:
Gulfood (for food and beverage products)
Canton Fair in China (for a wide range of products)
SIAL in Paris (for food and agricultural products)
These events provide a unique opportunity to see product quality firsthand, negotiate directly with suppliers, and build trust through personal interactions.
Step 5: Conduct Background Checks and Request References
After shortlisting potential suppliers, conduct thorough background checks to verify their reputation and reliability. Here’s how:
Request references: Ask for contact information of other clients they work with. Reach out to these clients to understand their experience with the supplier.
Third-party audits: Use services like SGS or Bureau Veritas to perform an on-site audit or inspect the supplier’s facilities.
Research online reviews: Look for feedback or reviews from other buyers to gain insights into the supplier’s performance and reliability.
Verifying the supplier’s background will give you a clearer picture of their operational standards and consistency.
Step 6: Check Certifications and Quality Standards
Certifications are a strong indicator of a supplier’s quality and credibility. Depending on your industry, look for specific certifications such as:
ISO 9001: Quality Management Standard.
HACCP or ISO 22000: For food safety, if you’re dealing with consumables.
Organic or Fair Trade: If sourcing organic or ethically-produced goods.
These certifications show that the supplier has been assessed by a third-party organization, which can reassure you about their quality and compliance standards.
Step 7: Request Samples and Place a Test Order
Once you have a shortlist of suppliers, request product samples to evaluate the quality and consistency. Review the samples for:
Material quality: Does it match your standards?
Workmanship: Look for consistency and attention to detail.
Packaging: Packaging should be durable and professional, especially if shipping long distances.
After reviewing the samples, place a small test order. This trial run will help you assess the supplier’s ability to fulfill orders accurately, on time, and with the agreed-upon quality.
Step 8: Negotiate Terms and Establish Clear Contracts
When you’re ready to proceed, negotiate the terms and create a formal contract to avoid any misunderstandings. Key points to address in the contract include:
Payment terms: Decide on the payment structure (e.g., 30% upfront, 70% upon delivery).
Delivery schedule: Clearly define lead times and expected delivery dates.
Quality standards: Include quality specifications and penalties for failing to meet them.
Return and refund policy: Agree on procedures for handling defective or non-compliant goods.
Having a detailed contract in place will set expectations and provide legal recourse if any issues arise.
Step 9: Monitor Supplier Performance Regularly
Building a long-term relationship with a supplier requires regular monitoring. Set up KPIs (Key Performance Indicators) to track factors like:
On-time delivery rate: Ensure the supplier consistently meets deadlines.
Quality consistency: Check that product quality remains consistent with initial standards.
Communication: Evaluate responsiveness and proactive updates from the supplier.
Regular performance assessments help identify potential issues early and strengthen the partnership.
Step 10: Diversify Your Supplier Base
Relying on a single supplier can be risky. Diversify your supplier base by establishing relationships with multiple suppliers or creating backup plans. This approach reduces the risk of supply chain disruptions and provides flexibility to respond to demand fluctuations.
Conclusion
Finding reliable suppliers for your import/export business requires diligence, research, and ongoing evaluation. By following this step-by-step guide, you can secure trustworthy suppliers, build strong partnerships, and mitigate the risks associated with global sourcing. Remember, investing time and resources in the supplier selection process will pay off in the form of consistent product quality, smoother operations, and long-term success in the competitive import/export industry.
1 note
·
View note
Text
Fresh Gherkins Suppliers: Your Guide to Sourcing Quality Cucumbers
Gherkins, also known as cornichons or baby pickles, are small cucumbers typically harvested when they are immature. These crunchy delights have found their way into numerous culinary applications, from gourmet salads to charcuterie boards. Whether you’re a restaurant owner, caterer, or grocer, sourcing high-quality fresh gherkins is crucial for providing the best experience to your customers. This article delves into the world of fresh gherkins suppliers, exploring what to look for and how to establish a successful sourcing relationship.
Understanding Gherkins
Before diving into the supplier aspect, it’s important to understand what gherkins are. They belong to the cucumber family but are specifically cultivated for their small size and distinct flavor. Typically measuring between 1 to 3 inches long, gherkins are harvested at an early stage of ripeness, providing a crisp texture and tangy taste that makes them ideal for pickling. In culinary practices, they are often used as appetizers, toppings, or ingredients in various dishes.
The Importance of Quality in Fresh Gherkins
When sourcing fresh gherkins, quality is paramount. The freshness of the produce directly impacts the flavor, texture, and overall culinary experience. Factors to consider include:
- Freshness: Look for suppliers who can guarantee freshly harvested gherkins to ensure optimal crunch and taste. - Organic vs. Conventional: Depending on your customer base, the option to source organic gherkins may be essential, particularly as consumers become increasingly health-conscious. - Sustainability: Choose suppliers who prioritize sustainable farming practices and environmentally friendly methods. This not only supports the planet but also appeals to eco-conscious consumers.
Finding Reliable Fresh Gherkins Suppliers
When searching for reliable suppliers, consider the following strategies:
1. Research Local Farmers Markets
Local farmers markets are a treasure trove for fresh produce, including gherkins. Engaging directly with local farmers allows you to source fresh, seasonal products while supporting the community. Many farmers are willing to provide bulk orders and establish ongoing supply relationships.
2. Explore Online Wholesale Suppliers
In today’s digital age, many suppliers operate online, making it easier to find fresh gherkins from the comfort of your office. Websites such as LocalHarvest, Farmigo, and ProduceMarketGuide offer directories of suppliers, including reviews and ratings to help assess their reputations.
3. Network with Other Businesses
Networking within your industry can lead to fruitful supplier connections. Attend trade shows, food expos, or industry conferences to meet potential suppliers. Other restaurants or retailers may also share their trusted sources, giving you an insider perspective on where to find high-quality gherkins.
4. Review Supplier Certifications
When evaluating suppliers, check their certifications. Look for those accredited by organic certification bodies or other relevant agricultural organizations. Certifications can serve as a benchmark for quality and adherence to safety regulations.
5. Sample Products Before Committing
Before establishing a long-term relationship with a supplier, request samples of their gherkins. This allows you to assess the quality, taste, and crunch factor before making a significant order. Additionally, observe the supplier's packaging and delivery methods to ensure they align with your standards.
For more details, visit us:
Gherkin exporters from india
Indian Gherkin exporters
Gherkin Manufacturer & Exporters in India
0 notes
Text
📁 What are Recstar and OREMO?

Ideally, you will want to record in a software designed for compiling samples, but for MacOS we didn’t have a compatible recording software for the longest time. There is a Mac build of OREMO but it is quite unstable, and untested for MacOS Silicon as of writing this.
OREMO - Windows
Recstar- iOS
Recstar - Android
First, let me explain the importance of using software for compiling and recording samples.
In OREMO and Recstar, you can import a recording list, more commonly known as a, “reclist.” I have explained what a reclist is in my previous tutorial, you can click here to learn more!
For either program, you can import a guide BGM, to make your recordings more even and on time. After recording all your samples, they will be exported into a folder, configuration ready!
As for hardware compatibility, OREMO is native to Windows, and Recstar is for iOS and Android. In this tutorial I will be teaching you how to use Recstar!
To set up a session in Recstar . . .
Save your recording list and guide BGM to a new folder on your mobile device. This can be done through the files app on your phone or tablet.
After saving your recording materials to a folder, open the Recstar app.
Here, you will see the home screen, and to the right will be a, “+,” button. Select the plus button to set up a new session.
To import the recording list, head over to the three dots on the top right corner. Here you will be prompted to import your recording list from the files app.
After importing your recording list, it should immediately appear in your recording list directory.
Select the recording list you just imported, and it will open a new session automatically.
(OPTIONAL) In the session window, you can rename your session by selecting the three dots in the top right corner. That way you can organize all your recording sessions from the app.
How do you import guide BGM in Recstar?
To import guide BGM, open your session, and select the three dots in the top right corner.
From there, you will see, "configure guide BGM."
Now you will be in your Guide BGM directory, head over to the three dots and import the BGM of your choice!
It should immediately appear in your guide BGM directory. Select the one of your choice, and you will return back to your session.
For Recstar, after the recording process, you can simply airdrop the folder to your Mac, or if your phone isn’t iOS, you can alternatively use Google Drive.
As for softwares with no reclist support, there are 3 other methods if you want to record locally on your laptop or desktop. These methods are not recommended, but I will be detailing them anyway for alternative methods. If you recorded on a mobile device, You can skip to the configuration section.
0 notes
Text
Top Basmati Rice Manufacturers in India: A Comprehensive Guide
Basmati rice is renowned for its long grains, distinctive aroma, and fluffy texture. Originating from the Himalayan region, this aromatic rice has become a staple in cuisines worldwide. Its unique characteristics make it a highly sought-after variety in the global market.

Importance of Basmati Rice in the Global Market
India is the leading exporter of basmati rice, catering to a vast international market. With its premium quality and unique flavor, Indian basmati rice is favored by chefs and consumers globally, contributing significantly to the country's export economy.
Overview of Rice Industry in India
India stands as a major player in the global rice industry, producing various types of rice, including the highly prized basmati rice. The country’s diverse climatic conditions and extensive cultivation practices support the production of top-quality rice, making it a key supplier to the global market.
Top Basmati Rice Manufacturers in India
When it comes to sourcing basmati rice, India is home to several leading manufacturers. Among them, Eurosun Global is notable for its commitment to quality and excellence. Their advanced processing techniques and stringent quality controls set them apart in the competitive landscape of basmati rice manufacturers in India.
Criteria for Choosing a Basmati Rice Manufacturer
Selecting the right basmati rice manufacturer involves several factors:
Quality Control: Ensure the manufacturer adheres to rigorous quality standards.
Certifications: Look for certifications such as ISO and HACCP to guarantee product safety and quality.
Export Capabilities: Assess the manufacturer’s ability to meet global demand.
Reputation: Consider customer reviews and industry reputation.
Leading Basmati Rice Suppliers in India
The market for basmati rice suppliers in India includes a variety of companies, each offering distinct advantages. Reputable suppliers are known for their consistent quality, competitive pricing, and excellent customer service. Researching and comparing suppliers based on these criteria will help you find the best fit for your needs.
How to Source Basmati Rice from India
Sourcing basmati rice from India involves:
Contacting Manufacturers: Reach out to manufacturers like Eurosun Global to discuss your requirements.
Negotiating Contracts: Engage in negotiations to secure favorable terms and prices.
Logistics and Shipping: Plan for shipping and logistics to ensure timely delivery of your orders.
Trends in Basmati Rice Production and Supply
The basmati rice industry is evolving with innovations in cultivation and processing. Trends include advancements in farming techniques and sustainable practices that enhance quality and yield, meeting the growing global demand for high-quality rice.
Challenges Faced by Basmati Rice Manufacturers and Suppliers
Manufacturers and suppliers face challenges such as maintaining quality control, navigating export regulations, and adapting to market fluctuations. Addressing these issues requires robust strategies and continuous improvement efforts.
Conclusion
In summary, India’s basmati rice manufacturers and rice suppliers from India play a crucial role in the global rice market. By understanding the key players, quality criteria, and sourcing strategies, you can effectively navigate the landscape of basmati rice suppliers in India and make informed decisions for your needs.
Additional Resources
For more information on the basmati rice industry, visit relevant trade directories and industry associations to stay updated on market trends and supplier options.
0 notes
Text
Exploring Next.js Alternatives- Top Front-End Meta-Frameworks Compared for Modern Web Development

Introduction to Modern Front-End Development
In today's digital age, user experience is paramount. Websites need to be fast, responsive, and easy to navigate, even on the slowest connections. This has led to the rise of advanced front-end meta-frameworks designed to optimize performance, scalability, and developer experience.
Criteria for Comparison
When comparing front-end meta-frameworks, it's essential to consider several key factors:
Rendering Methods: How does the framework handle server-side rendering (SSR), static site generation (SSG), and client-side rendering (CSR)?
Protocols of Data Exchange: Does the framework support REST APIs, GraphQL, or both?
Routing: How does the framework manage routing, including nested and dynamic routes?
Other Features: Scalability, plugin ecosystem, documentation, image optimization, and community support.
Top Next.js Alternatives
Angular
Angular is a robust framework particularly suitable for large-scale, enterprise-grade applications. It offers a comprehensive suite of tools and features, making it a favorite among developers working on complex projects.
Key Features:
Two-way data binding
Dependency injection
Comprehensive documentation
Strong community support
import { Component } from '@angular/core'; @Component({ selector: 'app-root', templateUrl: './app.component.html', styleUrls: ['./app.component.css'] }) export class AppComponent { title = 'angular-app'; }
Astro
Astro is a modern static site generator optimized for performance. It supports server-side rendering, automatic code-splitting, and enhanced performance features.
Key Features:
Server-side rendering
Automatic code-splitting
Optimized for performance
const Page = () => { return ( <div> <h1>Hello from Astro!</h1> </div> ); }; export default Page;
Eleventy
Eleventy (11ty) is a simple, flexible static site generator. It supports various templating languages and directory structures, making it highly versatile.
Key Features:
Simple and flexible
Supports multiple templating languages
Great for static sites
<!DOCTYPE html> <html lang="en"> <head> <meta charset="UTF-8"> <title>My Eleventy Site</title> </head> <body> <h1>{{ title }}</h1> </body> </html>
Gatsby
Gatsby is a React-based static site generator known for its exceptional performance and SEO benefits. It uses GraphQL for data fetching and offers an extensive plugin ecosystem.
Key Features:
React-based
Uses GraphQL for data fetching
Extensive plugin ecosystem
import React from 'react'; import { graphql } from 'gatsby'; const IndexPage = ({ data }) => { return ( <div> <h1>{data.site.siteMetadata.title}</h1> </div> ); }; export const query = graphql` query { site { siteMetadata { title } } } `; export default IndexPage;
Nuxt.js
Nuxt.js simplifies the development of server-side rendered Vue.js applications. It offers features like automatic code-splitting, Vuex integration, and a modular architecture.
Key Features:
Vue.js-based
Server-side rendering
Automatic code-splitting
export default { head() { return { title: 'My Nuxt.js App', }; }, };
React
React, the foundation of Next.js, is a popular front-end library for building user interfaces with a component-based architecture. It includes a virtual DOM for efficient updates.
Key Features:
Component-based architecture
Virtual DOM
Strong community support
import React from 'react'; const App = () => { return ( <div> <h1>Hello, React!</h1> </div> ); }; export default App;
Remix
Remix is a full-stack web framework that excels in building fast, client-rendered applications. It offers features like data loading, routing, and server-side rendering.
Key Features:
Full-stack framework
Server-side rendering
Data loading and routing
import { useLoaderData } from 'remix'; export let loader = async () => { return { message: 'Hello from Remix!' }; }; export default function Index() { let data = useLoaderData(); return <div>{data.message}</div>; }
Sapper
Sapper is a framework for building web applications with Svelte. It includes server-side rendering, routing, and code-splitting for optimized performance.
Key Features:
Built with Svelte
Server-side rendering
Routing and code-splitting
<script> export let name; </script> <h1>Hello {name}!</h1>
Svelte
Svelte is a modern web framework known for its high performance and efficiency. It compiles components into highly optimized JavaScript code.
Key Features:
High performance
Efficient compilation
Small bundle sizes
<script> let count = 0; </script> <button on:click={() => count += 1}> Clicked {count} {count === 1 ? 'time' : 'times'} </button>
Vue.js
Vue.js is a progressive JavaScript framework for building interactive user interfaces. It's known for its flexibility and scalability, making it an excellent choice for various projects.
Read More
0 notes
Text
Best B2B Marketplace | Importers and Exporters Portal in world
Businesses greatly rely on effective B2B marketplaces to streamline import and export operations in the modern global economy. Selecting the ideal B2B marketplace in USA can have a big impact on both buyers' and sellers' success and growth. In this article, we examine the top global B2B marketplace with an emphasis on the characteristics that make these online marketplaces essential for global trade.
Why a B2B Marketplace is Essential
A B2B marketplace acts as a virtual hub where suppliers and buyers connect, transact, and establish long-term business relationships. These platforms offer numerous advantages:
Efficiency: Streamlined processes for order management and transaction tracking.
Reach: Access to a global network of potential business partners.
Cost-Effective: Reduces the need for intermediaries, lowering transaction costs.
Top Features of the Best B2B Marketplace in the World
1. Comprehensive Supplier Listings: The best B2B marketplace for suppliers provides extensive directories, making it easier for businesses to find reliable partners. These listings often include detailed company profiles, product catalogs, and reviews.
2. Advanced Search Filters: Efficient search functionalities allow buyers to narrow down their options based on specific criteria such as location, industry, and product type. This is crucial for importers and exporters looking for precise matches.
3. Secure Payment Systems: To ensure trust and reliability, top marketplaces offer secure payment gateways. This minimizes the risk of fraud and guarantees that transactions are protected.
4. Integrated Communication Tools: Direct messaging and video conferencing tools enable seamless communication between buyers and suppliers. This is particularly important for negotiating deals and clarifying product specifications.

Leading B2B Marketplaces Globally
Exporters Worlds: As one of the largest international B2B portals, Exporters worlds provides an extensive range of products and suppliers from across the globe. Its user-friendly interface and comprehensive support services make it a go-to platform for many businesses.
Global Sources: Known for its verified suppliers and focus on quality, Global Sources is a preferred marketplace for buyers looking for reliable partners. It also hosts trade shows, providing additional opportunities for networking.
ThomasNet: Predominantly serving the USA, ThomasNet is an excellent B2B portal in the USA, offering a vast directory of North American suppliers. It is particularly beneficial for local sourcing and finding specialized industrial products.
Choosing the Best B2B Portal for Import and Export
When selecting a B2B marketplace, consider the following factors:
Market Reach: Ensure the platform has a global presence if your business operates internationally.
User Reviews: Look for marketplaces with positive feedback from other businesses.
Customer Support: A responsive support team can assist with issues and enhance your overall experience.
Conclusion
In conclusion, leveraging a robust B2B marketplace is for importers and exporters aiming to expand their reach and streamline their operations. Platforms like Exporters worlds offer unparalleled advantages, making them some of the best B2B marketplaces for suppliers and buyers worldwide.
0 notes
Text
Tradekey: Building Trust in the Global B2B Arena
While giants like Alibaba dominate headlines, Tradekey has carved a niche as a trusted B2B platform for international trade. Established in 2006, it caters specifically to businesses looking to connect with global suppliers and buyers. But what propelled Tradekey to become a top contender in the B2B marketplace?
Focus on Credibility: Tradekey goes beyond just connecting buyers and sellers. It holds the distinction of being the world's first B2B platform with both ISO 9001 Quality Management and ISO 27001 Information Security System certifications. This signifies a strong emphasis on data security and verified sellers, giving businesses peace of mind when conducting international transactions. In the often-uncertain world of global trade, this focus on trust and security is a major advantage.
Tailored Tools for B2B Needs: Unlike some general e-commerce platforms, Tradekey understands the specific needs of B2B transactions. Its platform offers powerful search tools that allow for precise filtering based on industry, product category, and location. This helps businesses find exactly what they're looking for quickly and efficiently. Additionally, targeted marketing options let companies hone their reach to their ideal customer base.
Going Beyond the Marketplace: Tradekey offers more than just a digital storefront. It provides a comprehensive B2B directory listing importers, exporters, wholesalers, manufacturers, and suppliers. This allows businesses to research potential partners and build relationships before initiating transactions. This additional layer of information fosters trust and facilitates informed decision-making.
Global Reach with a Regional Focus: While Tradekey boasts a presence in over 240 countries, it has a strong showing in South Asia, particularly in India, Pakistan, Malaysia, and Taiwan. This regional focus allows them to cater to the specific needs and business cultures of these areas. Understanding these nuances can be crucial for building successful partnerships.
Tradekey's Future: The B2B landscape is constantly evolving, and Tradekey is keeping pace. By leveraging advancements in technology and data analysis, they can further refine their search tools and create a more personalized user experience. Additionally, focusing on emerging markets and building strategic partnerships could solidify their position as a leader in global B2B trade.
While Tradekey may not be the most recognizable name in the B2B world, its commitment to secure transactions, targeted tools, and value-added services have made it a preferred platform for businesses seeking reliable international trade partners. As the B2B landscape continues to transform, Tradekey's focus on trust and specialized services will likely see it remain a major player in connecting businesses across the globe.
0 notes
Text
bootstrap navbar react router
Creating a Bootstrap Navbar with React Router: A Step-by-Step Guide
Navigating through a React application seamlessly is essential for a smooth user experience. Integrating React Router with a Bootstrap navbar is an excellent way to create a functional and aesthetically pleasing navigation system. Here’s how to do it.
Step 1: Set Up Your React Project
First, make sure you have a React project set up. You can create one using Create React App if you don't have a project already.npx create-react-app react-bootstrap-navbar cd react-bootstrap-navbar npm install react-router-dom bootstrap
Step 2: Install Necessary Packages
To use Bootstrap with React, you need to install Bootstrap and React Router DOM.npm install react-bootstrap bootstrap react-router-dom
Step 3: Add Bootstrap CSS
Include Bootstrap CSS in your project by adding the following line to your src/index.js file:import 'bootstrap/dist/css/bootstrap.min.css';
Step 4: Set Up React Router
Configure React Router in your application. Create a src/components directory and add your page components there. For this example, let’s create three simple components: Home, About, and Contact.
src/components/Home.jsimport React from 'react'; function Home() { return <h2>Home Page</h2>; } export default Home;
src/components/About.jsimport React from 'react'; function About() { return <h2>About Page</h2>; } export default About;
src/components/Contact.jsimport React from 'react'; function Contact() { return <h2>Contact Page</h2>; } export default Contact;
Step 5: Create the Navbar Component
Now, create a Navbar component that will use Bootstrap styles and React Router links.
src/components/Navbar.jsimport React from 'react'; import { Navbar, Nav, Container } from 'react-bootstrap'; import { LinkContainer } from 'react-router-bootstrap'; function AppNavbar() { return ( <Navbar bg="dark" variant="dark" expand="lg"> <Container> <Navbar.Brand href="/">MyApp</Navbar.Brand> <Navbar.Toggle aria-controls="basic-navbar-nav" /> <Navbar.Collapse id="basic-navbar-nav"> <Nav className="me-auto"> <LinkContainer to="/"> <Nav.Link>Home</Nav.Link> </LinkContainer> <LinkContainer to="/about"> <Nav.Link>About</Nav.Link> </LinkContainer> <LinkContainer to="/contact"> <Nav.Link>Contact</Nav.Link> </LinkContainer> </Nav> </Navbar.Collapse> </Container> </Navbar> ); } export default AppNavbar;
Step 6: Set Up Routing
Configure routing in your main App.js file to render the appropriate components based on the URL.
src/App.jsimport React from 'react'; import { BrowserRouter as Router, Route, Routes } from 'react-router-dom'; import AppNavbar from './components/Navbar'; import Home from './components/Home'; import About from './components/About'; import Contact from './components/Contact'; function App() { return ( <Router> <AppNavbar /> <Routes> <Route path="/" element={<Home />} /> <Route path="/about" element={<About />} /> <Route path="/contact" element={<Contact />} /> </Routes> </Router> ); } export default App;
Step 7: Run Your Application
Start your development server to see your Bootstrap navbar with React Router in action.npm start
Open your browser and navigate to http://localhost:3000. You should see your navigation bar at the top of the page, allowing you to switch between the Home, About, and Contact pages seamlessly.
Conclusion
By following these steps, you’ve created a responsive and dynamic navigation bar using Bootstrap and React Router. This setup not only enhances the user experience with smooth navigation but also leverages the power of React components and Bootstrap's styling. Happy coding!
1 note
·
View note
Text
Eclipse offers an integrated development environment having an extensible plug-in system. This enables Eclipse to provide all functionality on the top of its run-time system. It’s also different from other applications (where the functionality provided by plug-ins are mostly hardcoded). Having the appropriate Eclipse plug is important to stay productive since it facilitates the Java developers to seamlessly develop and implement applications. Eclipse plug-ins also help them to implement their application on several types of application infrastructures. A regular eclipse user has dozens of add-on installed and often struggles to keep eclipse running fast. Therefore choosing the right plugin for your everyday development environment is essential. Below is the list of best free Eclipse plug-ins for a developer to be more productive - Code Quality Plugins FindBugs FindBugs plug-in is used with eclipse IDE and it is the software used to find bugs in Java programs. It’s free software licensed under Lesser GNU Public License. This is one of the most popular eclipse plugins and also available on Maven, Netbeans and IntelliJ. Checkstyle Checkstyle plug-ins can be integrated to IDE Eclipse and it ensures the Java code follows the coding standards. ECLemma ECLemma is a free tool available through Eclipse Public License and it provides fast development and test cycles. You can use “launch” in the code coverage mode which works like actual run/debug mode. One can render the analysis of the code through coverage view, source highlighting, counters and sessions. JDepend4Eclipse JDepend4Eclipse helps to traverse file directories and assists in measuring the quality of design. It is an open source tool licensed under Eclipse Public License v1.0. PMD PMD is a source code analyzer which helps to detect used variables and bad codes. (Update URL - http://pmd.sourceforge.net/eclipse/) SourceHelper SourceHelper helps to code and debug, and it also aids in providing clarity to the written code. Structure101 Structure101 helps to influence architecture when the code is edited, which means you can change the architecture without disrupting the code. Text Editor Plugins AnyEdit Tools The plug-in helps to add new editor to output consoles, toolbar, and it also help to import and export data. It is licensed under Eclipse Public License v1.0. Eclim Eclim helps to bring Eclipse functionality to one of the best editors - Vim, wherein development can be done in various languages and it also provides bug fixing provisions. It is released under GPLV3. Eclipse-rbe Eclipse-rbe is used for editing Java resources and its features include warnings for missing values, sorted keys, conversion from/to Unicode etc. It is licensed under GNU library or LGPL. Dependency Management Apache IvyDE Apache IvyDE is an Eclipse plug-in which helps to integrate Apache Ivy’s feature of dependency management to Eclipse. Additionally, it helps to manage dependencies in ‘ivy.xml’. It can be used with plug-in WTP and Ant. M2eclipse (Maven Plugin) M2eclipse helps to manage both simple and multi module projects, and Maven integration for Eclipse (M2eclipise) helps to launch maven from Eclipse. It provides features such as dependency management and automatic downloading. You may also want to checkout Some Best Free Maven Plug-ins for Developers Version Control Integration Plugins Subclipse Subclipse is a SVN plug-in which offers support for subversion of Eclipse IDE and it is licensed under EPL 1.0. Subeclipse 1.6.x supports ColabNet Merge Client. Subclipse provides easy interface to use the features. EGit EGit plug-in provides support, synchronizes view, reading for .git/ exclude files, provides rebasing and has streamlined commands for pulling and pushing. MercurialEclipse MercurialEclipse is one of the active Version Control System which gives you access on registration. It is a reliable plug-in which provides cloning repositories, push-pull synchronization and enables easy rollback.
P4Eclipse P4Eclipse seamlessly integrates the strengths of Perforce's version management system with Eclipse's. P4Eclipse provides a developer-oriented set of features from within the Eclipse Team framework that support a wide range of Agile and traditional development workflows. Framework Development Spring Tool Suite Spring Tool Suite provides development environment and tools such as XML file wizards and graphical spring configuration editor, which can be used for easy development. Spring IDE Spring IDE helps in developing Spring Application and provides interface to use the graphical editing framework. What’s more, Spring IDE display graphs of relationships and beans using configuration files. (Update site - Hibernator Hibernator helps to create or update schema, run hibernate queries and create mapping documents. The user can synchronize a Java class to a related mapped file. JbossTools JbossTools 3.2x support JBoss, Hibernate, Drools, XHTML, Seam etc. (Update site - Continuous Integration Related Plugins Hudson Hudson Status is a simple plug-in that displays the status (red/green) of a application on Hudson build server. Hudson is a very powerful continuous integration server, that is used in many large software development projects. Sonar Plugin Sonar Plug-in for Eclipse provides powerful integration of Sonar with Eclipse. It highlights code quality problems as we browse the code. Since the code quality standards definition is centralized on Sonar server, it ensures all developers are following same quality standards. Sonar is a open source platform used for centrally controlling the source code quality of software projects. Other Utility Plugins ASM - Bytecode Outline plugin ASM Bytecode Outline plugin shows disassembled bytecode of current Java editor or class file, allows bytecode compare for Java/class files and shows ASMifier code for current bytecode. You can install ASM from Eclipse Update Manager. It allows bytecode comparison to Java class. (Update site - Mylyn - Task Management Mylyn has a task focused interface and it provides a task management tool to the developers. Moreover, it helps to integrate rich editing tools and monitor activities. Eclipse Launcher Eclipse launcher is written in Delphi 6 and it helps to launch Eclipse IDE with configuration. FileSync FileSync is licensed under Eclipse Public License v1.0 and it is a file synchronization tool used for creating, deleting and mapping files. Log4E Log4E helps to use logger easily without getting bound to a special logging framework. Also, you can define your own preferences for logging templates. All in all, plug-ins allow Eclipse to be coded in other languages. Eclipse plug-ins is indispensable nowadays, since it greatly streamlines Java applications and reduces the complexity of Java. However, installing too many plug-ins can slow down Eclipse. Hence you require selecting the plug-ins judiciously. There are a number of other productivity plug-ins too, besides the ones mentioned. Checkstyle, JBoss Tools and Jadclipse are three of them. Do let us know if you have used some other plug-ins which you were impressed with. Article Updates Updated on May 2019: Minor changes and updates to the introduction section. Images are updated to HTTPS.
0 notes