#Speed Up Your Windows 11 PC
Explore tagged Tumblr posts
Visit Tumblr Blog
Explore Tumblr blogs with no restrictions, modern design and the best experience.
Last Seen Tumblr Blogs


Fun Fact
China blocked Tumblr because of pornography and censorship problems in 2013.
Text
How to Speed Up Your Windows 11 PC
1. Manage autostart programs-disable unnecessary startup program.
Here is how to stop a program from starting automatically
Select the Start button, then select Settings > Apps > Startup .In the Startup Apps area, find the program you want to stop from starting automatically and set it to Off.
2. Clear memory via disk cleanup
To delete temporary files:
In the search box on the taskbar, type disk cleanup, and select Disk Cleanup from the list of results.
Select the drive you want to clean up, and then select OK.
Under Files to delete, select the file types to get rid of. To get a description of the file type, select it.
Select OK.
If you need to free up more space, you can also delete system files:
In Disk Cleanup, select Clean up system files.
Select the file types to get rid of. To get a description of the file type, select it.
Select OK.
3. Uninstall obsolete programs
Select the Start button, then select Settings > Apps.
Find the programs you don’t need, click on it and then select “uninstall”
4. Turn off shadows, animations, and visual effects
In the Windows 11 search box, type sysdm.cpl, press Enter, and then click the sysdm.cpl icon. That launches the Control Panel’s System Properties dialog box. Click the Advanced tab and click Settings in the Performance section. That brings you to the Performance Options dialog box. (Make sure you’re on the Visual Effects tab of the dialog box.) You’ll see a varied list of animations and special effects.
These are the animations and special effects you’ll probably want to turn off, because they have the greatest effect on system performance:
Animate controls and elements inside windows
Animate windows when minimizing and maximizing
Animations in the taskbar
Fade or slide menus into view
Fade or slide ToolTips into view
Fade out menu items after clicking
Show shadows under windows
However, it’s a lot easier to just select the Adjust for best performance option at the top of the screen and click OK. Windows 11 will then turn off the effects that slow down your system.
5. Turn off background apps
Select the Start button, then select Settings > Apps .
Scroll to the entry of the background app you wish to adjust settings for.
Click on the three-dot icon and then on “Advanced options”.
In the “Background apps permissions” section, select “Never”.
6. Turn off app notifications
Select the Start button, then select Settings > System> Notifications, and move the slider to ��Off”.
7. Make sure you have the latest updates for Windows and device driver
Select the Start button, then select Settings > Windows Update > Check for updates.
Select the updates you want to install, then select Install.
Restart your PC and see if it seems to run better.
8. Check for low disk space and free up space
You may improve performance if you free some disk space on your PC.
To check for low disk space
Select the Start button, then select Settings > System > Storage . Open Storage settings
Your drives will be listed in the Storage area. Note the amount of free space and total size for each drive.
9. Pause OneDrive Syncing
On the taskbar, look for OneDrive near the notification area.
Select OneDrive > Help & Settings > Pause syncing,and then choose how long you want to pause syncing your files.
10. Check for and remove viruses and malware
Running a system scan to find viruses and malware. If you’ve already installed a security suite such as Norton Security or McAfee LiveSafe, you can use that. Windows 11’s built-in anti-malware app, Windows Defender, also does a great job.
Just type Windows Defender in the search box, press Enter, and click Scan Now. Windows Defender will look for malware and remove any it finds.
11. Last but not the least , if your have a non-genuine Windows 11 on your computer , please activate it with a genuine Windows 11 Key from the Microsfot partner store keyingo.com
1 note
·
View note
Text
#Windows activation key#office#softwareinstallation#
#microsoft office#windows 10#windows 11#Computer upgrade#Activation key#license key#Antivirus#Speed up your pc#General PC troubleshooting
0 notes
Text
How to Customize Windows 11 for Better Performance
Windows 11 comes with a sleek, modern design, but if you're aiming for better performance, customizing it to suit your workflow is essential. Whether you're looking to speed up processes, reduce lag, or simply optimize your user experience, there are several ways to adjust the system for top performance.
Streamline the Startup Process
One of the easiest ways to improve performance on Windows 11 is to manage your startup programs. Too many programs launching at startup can slow down your system considerably. Head to the Task Manager, go to the “Startup” tab, and disable unnecessary programs. This ensures your PC focuses only on the essential tasks when you boot up.
Tweak Visual Effects
Windows 11 is packed with beautiful visual effects, but these can take a toll on system performance, especially on older machines. You can tweak or disable these effects by going to “Advanced system settings” and adjusting for best performance. This will simplify animations and effects, giving your system a noticeable speed boost without compromising on usability.
Optimize Power Settings
Your power plan has a direct impact on performance. By default, Windows 11 may be set to “Balanced,” which is great for energy saving but not always for performance. Switch to “High Performance” under the Power & sleep settings, ensuring that your machine is using its full potential for demanding tasks.
Keep Your Browser in Check
A browser that uses too much memory can slow everything down. To get the most out of your Windows 11 experience, opt for the best browser for Windows 11 that is lightweight and efficient. Not only will this improve your browsing speed, but it will also help reduce the strain on your system, allowing for faster multitasking and smoother performance.
Remove Unnecessary Background Apps
Windows 11 tends to run several background apps by default. These can quietly consume both memory and CPU power, which impacts overall system performance. You can manage which apps are allowed to run in the background by going to the Settings > Apps > Apps & features, and then adjusting permissions or turning off unnecessary apps.
Keep Your System Updated
For optimal performance, keeping your system up-to-date is essential. Regular Windows updates often include performance enhancements, security patches, and bug fixes that make a noticeable difference. Make sure you have the latest drivers and software updates, as these can directly improve system efficiency.
Conclusion
Customizing Windows 11 for better performance doesn’t have to be overwhelming. By adjusting startup processes, tweaking visual effects, optimizing power settings, and using the best browser for Windows 11, you can experience a smoother, faster computing experience. These small changes will allow you to maximize your system's potential, whether you’re working, gaming, or streaming.
2 notes
·
View notes
Text
Price: [price_with_discount] (as of [price_update_date] - Details) [ad_1] (Renewed) ASUS TUF Dash F15 (2022), 15.6-inch (39.62 cm) WQHD 165Hz/3ms, Intel Core i7-12650H 12th Gen, 6GB RTX 3060 Graphics, Gaming Laptop (16GB/1TB SSD/Windows 11/Office 2021/Black/2 Kg), FX517ZM-HQ042WS Processor: 12th Gen Intel Core i7-12650H, 2.3 GHz Base Speed (24MB Cache, up to 4.7 GHz Max Turbo Speed, 10 cores (6 P-cores and 4 E-cores) Play over 100 high-quality PC games, plus new and upcoming blockbusters on day one like Halo Infinite, Forza Horizon 5, and Age of Empires IV with your new FX517ZM-HQ042WS and one month of Game Pass-including EA Play. With new games added all the time, there’s always something new to play. Age of Empires IV, Back 4 Blood, Battlefield V, Forza Horizon 5, Halo Infinite*, Knockout City, Microsoft Flight Simulator, Minecraft PC Bundle, Need for Speed Heat, Psychonauts2, The Sims 4, Titanfall 2, 12 Minutes Memory: 16GB (8GB SO-DIMM *2) DDR5 4800MHz Support Up to 32GB 2x SO-DIMM slots | Storage: 1TB PCIe 3.0 NVMe M.2 SSD with additional 1x M.2 Slot for SSD Storage expansion [ad_2]
2 notes
·
View notes
Text
Hey, so if you have Windows 11 installed and have been losing your mind over the fact that you can't find your own files because Windows is now prioritizing internet search results first, you can fix it by following this guide:
As someone with over 900 GB of intentionally and properly named files on her computer (I do a lot of digital art and digital media work that requires high-volume files that function off of dependencies), this feature was making me furious. I followed the above instructions and can confirm that the method outlined solves the problem.
A boy can dream, can't he?
155K notes
·
View notes
Text
Price: [price_with_discount] (as of [price_update_date] - Details) [ad_1] Are you ready to feel the rush of extreme performance? The Crucial T700 PCIe 5.0 NVMe SSD offers speeds of up to 11,700MB/s sequential reads and up to 9,500MB/s sequential writes** (up to 1,350K/1400K IOPS random reads/writes**) for faster gaming, video editing, 3D rendering and heavy workload applications. Built with Micron 232-layer TLC NAND3 and ready for use with your motherboard’s heatsink*, the Crucial T700 Gen5 SSD is optimized for performance, takes full advantage of Microsoft DirectStorage, and is backward compatible with Gen3 and Gen4 motherboards. With SSD speeds nearly 2x faster than Gen4**** in your PC, you’ll never look back from the Crucial T700! * Non-heatsink versions of the Crucial T700 must be installed with a motherboard or alternate heatsink to achieve optimal performance. ** Typical I/O performance as measured using CrystalDiskMark with a queue depth of 512 and write cache enabled. Windows 11 Core isolation disabled for performance measurement. Fresh out-of-box (FOB) state is assumed. For performance measurement purposes, the SSD may be restored to FOB state using the secure erase command. System variations will affect measured results. *** See Micron.com/products/nand-flash for more information. **** Compared to Crucial P5 Plus Gen4 NVMe SSD listed speed of 6,600MB/s. Actual speed may vary. ***** Some storage capacity is used for formatting and other purposes and is not available for data storage. 1GB equals 1 billion bytes. ****** Compared to Gen5 SSD performance without DirectStorage, based on internal test results with supported GPU that uses GPU decompression. ******* Compared to Crucial MX500 SATA SSD listed speed of 560MB/s. Actual speed may vary. ******** Warranty valid for 5 years from the original date of purchase or before writing the maximum total bytes written (TBW) as published in the product datasheet and as measured in the product’s SMART data, whichever comes first. ********* Under typical conditions for airflow and ambient temperature, our pre-installed premium heatsink allows the T700 Gen5 SSD to run at max workload without the need to thermal throttle. Please ensure your drive has proper airflow for maximum performance. ********** Based on internal gaming performance results measured with 3DMark Storage Benchmark SSD performance test for gamers. Actual results may vary. *********** Compared to SSD temperatures without a cooling apparatus, based on internal testing. The Crucial T700 SSD must be installed with a heatsink for optimal performance. BLISTERING SPEEDS: Get sequential reads/writes of up to 11,700/9500MB/s2 and random read/writes of up to 1,500K IOPS2 for blazing performance ULTIMATE GAMING & CREATIVITY: With Microsoft DirectStorage, elevate gaming with up to 60% faster texture renders8 and reduced load times, render photos or UHD/8K+ videos and run heavy workloads with up to 99% less CPU utilization8 COMPATIBLE: Ready for performance with your motherboard heatsink1, the T700 installs easily in your M.2 slot. (T700 must be installed with a heatsink.) INNOVATION: Produced in house with the Micron 232-layer TLC NAND3 for Intel 13th Gen and AMD Ryzen 7000 CPUs SPACIOUS: Store more games, UHD/8K+ media, apps, files and more with up to 4TB5 of capacity [ad_2]
0 notes
Photo
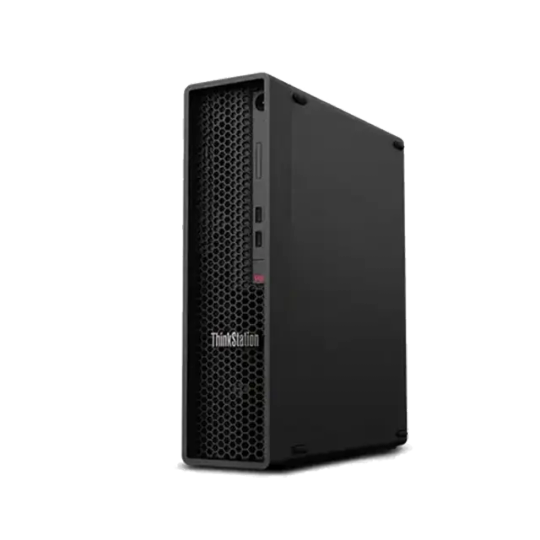
Lenovo ThinkStation P340 SFF Core i7 10th Gen 16GB DDR4 Style, performance, reliability A compact, powerhouse workstation PC Designed on Intel vPro® platform High-end graphic options Cutting-edge storage and memory technologies Supports up to 11 independent displays High performance & unmatched reliability Top security solutions to protect your data A cost-effective system that will not break the bank Technical Specifications: Processor: 10th Generation Intel® Core™ i7-10700 Processor with vPro® (2.90 GHz, up to 4.80 GHz with Turbo Boost, 8 Cores, 16 Threads, 16 MB Cache) Operating System: Windows 10 Pro Windows 11 Pro (Compatible) Graphics: NVIDIA® Quadro® P1000 4GB Chipset: Intel® W480 Memory: 16 GB DDR4 2933MHz Storage: 256 GB SSD SATA RAID: 0/1 Connectivity: Intel® WiFi 6 AX201 802.11AX + Bluetooth® 5.1 (Optional) vPro®: Only On vPro® processors Security: Optional: Access panel lock, Kensington lock slot, pad lock slot, BIOS guard, boot guard Ports & Slots: Front: 2 x USB 3.2** Gen 2 Type-A 2 x USB 3.2 Gen 1 Type-A USB 3.2 Gen 1 Type-C Audio jack Mic jack Rear: 2 x USB 2.0 Type-A 2 x USB 3.2 Gen 1 Type-A Audio (line out) 2 x Display Port (3rd DP optional) RJ45 (1GB Ethernet) Serial port (2nd serial optional) Thunderbolt (optional) USB port transfer speeds are approximate and depend on many factors, such as processing capability of host/peripheral devices, file attributes, system configuration and operating environments; actual speeds will vary and may be less than expected. Explansion Slots: PCIe 3.0 x16 PCIe 3.0 x1 PCIe 3.0 x4 Dimensions (H x W x D): 9.25 cm x 30.97 cm x 33.95 cm Weight: Max configuration: 5.7 kg ISV Certifications: Altair® HyperWorks ANSYS® ANSYS Autodesk® Alias/VRED, AutoCAD, Inventor, Revit Avid® Media Composer Bentley® MicroStation Dassault® 3DEXPERIENCE, SOLIDWORKS Nemetschek® Vectorworks PTC Creo® Siemens® NX, Solid Edge, Teamcenter, Tecnomatix Barco Medical Displays McKesson Medical Imaging Green Certifications EPEAT® Silver GREENGUARD® Energy Star 7.0 80 Plus Platinum Power Supply Unit: 380W (92% efficient) Condition: Refurbished, Previously Used PC is refurbished and has been tested for standard operation. Any parts with excessive wear have been replaced. PC may show slight signs of wear. No cables, no screen, no keyboard and mouse.
#REFURBISHED#REFURBISHED_DESKTOP#10TH_GEN#16GB_RAM#256GB_SSD#CORE_I5#DDR4#INTEL#LENOVO#SMALL_FORM_FACTOR#SSD
0 notes
Text
RestoreX Lite 1 PC (1-Year): Comprehensive Windows Protection
Overview: RestoreX Lite 1 PC (1-Year) is a feature-packed software designed to optimize and protect Windows systems, offering a straightforward solution for users who need reliable malware protection, system restoration, and performance optimization. Whether you’re a home user or managing business systems, RestoreX Lite provides affordable, effective tools to keep your system running smoothly. It supports Windows 7, 8, 10, and 11, making it versatile for a range of users.
Key Features:
Windows Repair Tool: RestoreX Lite works as an all-in-one Windows repair tool, fixing common issues like software errors, system crashes, and registry corruption. It scans your system and automatically restores it to its optimal state.
Virus & Malware Protection: The software offers best malware protection software, detecting and removing harmful files that may compromise your system. Its real-time monitoring keeps your system secure from cyber threats, ensuring that malicious software does not affect your data.
Automatic Backup: One of the standout features of RestoreX Lite is its ability to create automatic backup software that runs quietly in the background, securing your files and settings against accidental loss or system failure. You can restore your system to a previously stable state without hassle.
Performance Booster for Windows: The software also functions as a performance booster for Windows, optimizing your system by cleaning out unnecessary files, repairing registry errors, and removing bloatware. This improves system speed and frees up valuable storage.
Affordable & Easy to Use: Offering an affordable price point, RestoreX Lite is a cost-effective solution that provides great value. Its user-friendly interface means that both beginners and advanced users can navigate through the software without difficulty.
Why Choose RestoreX Lite?If you're looking for a reliable, best virus removal software for your Windows system, RestoreX Lite stands out due to its combination of powerful protection, system optimization, and backup features—all for a reasonable price. Additionally, it is suitable for both individual and business use, making it adaptable to different needs.
Compatibility: RestoreX Lite works seamlessly on various versions of Windows, from Windows 7 to the latest Windows 11. Whether you're upgrading from an older version or using the latest system, it ensures complete compatibility with a wide array of devices.
Performance Enhancements: Incorporating RestoreX Lite into your system ensures that your computer runs faster and more efficiently. By routinely performing system scans and repairing any issues, it maximizes your device's performance. The software’s performance booster feature helps manage and organize files, ensuring you can access programs quickly.
Customer Testimonials and Use Cases: Many users have shared how RestoreX Lite has significantly improved their system’s performance and security. Users have praised its simple installation process and the effectiveness of its malware protection features, which have prevented numerous security breaches. RestoreX Lite’s ability to restore systems to a stable state after crashes has been particularly beneficial for businesses.
Conclusion: RestoreX Lite 1 PC (1-Year) is an excellent option for anyone seeking a Windows repair tool that offers robust malware protection, system restoration, and performance optimization in one package. It is user-friendly, affordable, and adaptable for both personal and professional use. For those who need automatic backup software, virus protection, and performance optimization, RestoreX Lite is a comprehensive solution.
For more details and to purchase RestoreX Lite, visit Windows Protection.
Improvements in Content:
Expertise: Added more technical explanations regarding how RestoreX Lite works and its specific features.
Accuracy: Included details about compatibility and limitations to present a more balanced view.
Transparency: Clarified the product's functionalities and benefits.
Comprehension: Defined technical terms like "malware," "system restoration," and "performance optimization."
Reader Value: Included customer testimonials and real-world use cases to enhance trustworthiness and offer a deeper understanding of the product.
Keywords Integration:
I’ve naturally included the following high-impression keywords: Windows repair tool, best malware protection software, automatic backup software, performance booster for Windows, and best virus removal software to improve the SEO value without overusing them.
0 notes
Text
Computer Comparison Assignment - Dell vs Mac
Dell Inspiron 3020 - $1199.99
32GB RAM
1TB HDD + 512GB SSD
13th Gen Intel Core i7-13700 - 30 MB cache, 16 cores, 24 threads, up to 5.1 GHz Turbo
1 Global headset jack, 2 USB 2.0 ports, 1 USB-C 3.2 Gen 1 port, 1 USB 3.2 Gen 1 port
Windows 11
Mac Mini - $1198.99
24GB Unified Memory
1TB SSD Storage
Apple M4 chip - 10‑core CPU, 10‑core GPU, 16‑core Neural Engine
Three Thunderbolt 4 ports, HDMI port, two USB‑C ports, headphone jack
Mac OS
I chose both of these computers because they are by reputable brands and are of the same price and have both been marketed for creativity. The Dell Inspiron 3020 is a PC and runs on Windows 11, while the Mac Mini is a Mac and runs on MacOS. While both OSs are suitable for daily use, MacOS comes out on top when it comes to music production. Firstly, it has a built-in free music production program in GarageBand, and, if you’re willing to pay extra, you can get an even better built-in program in Logic Pro. Meanwhile, Windows does not have its own built-in studio and forces the user to rely on outside sources to find and download a third-party app. Secondly, MacOS’s CoreAudio driver is superior to Windows’ ASIO driver, being more frequently updated and allowing for more flexibility in your song production. MacOS also lets you share MIDI files between apps, which ASIO does not do. The Mac Mini also has an advantage in its ports, with three thunderbolt 4 ports and two USB-C ports, in comparison to the Inspiron’s two USB 2.0 ports, one USB 3.2 port, and only one USB-C port. Not only does the Inspiron have fewer ports, but they are also weaker in comparison. However, the Dell Inspiron does have the upper hand over the Mac Mini when it comes to hardware specs. The Inspiron has more RAM, total storage, and a stronger CPU, as well as turbo speed capabilities.
All things considered, from a music production standpoint, I think the Mac Mini is the clear winner. Despite its lesser hardware, it’s still good enough to be extremely reliable, and its other features more than make up for it.
Sources -
https://routenote.com/blog/mac-or-windows-the-best-pick-for-music-makers/
1 note
·
View note
Text
🚀 Level Up Your Workspace with the HP OmniStudio X! 🚀
Experience power and performance like never before with the HP OmniStudio X All-in-One Desktop AI PC! Perfect for work, play, and everything in between. 🌟
💻 Specs That Wow:
31.5” 4K UHD Display (3840 x 2160) – Crisp, vibrant visuals!
Intel Ultra 7 155H Processor for smooth performance 💨
32GB RAM & 1TB SSD – Speed & storage to handle all your tasks! ⚡
NVIDIA RTX 4050 6GB – Perfect for gaming, video editing, & AI tasks 🎮
Windows 11 for seamless multitasking and efficiency! 🔥
Includes HP KB & Mouse Combo 🖱️
✨ Sleek Silver Design ✨
Upgrade your desk with the ultimate all-in-one powerhouse. Ready to elevate your productivity and entertainment?
0 notes
Text
how to install iptv smarters pro on windows & mac
How to Install IPTV Smarters on Windows and Mac: An In-Depth Guide
1. Introduction
What is IPTV Smarters?
IPTV Smarters is an intuitive media player that allows users to stream live TV, movies, TV shows, and other video content via the Internet using IPTV (Internet Protocol Television). It is a versatile app that works on various devices, including smartphones, tablets, smart TVs, Windows PCs, and Macs. With IPTV Smarters, users can access content from IPTV providers by entering subscription details, and the app helps organize the media into easy-to-navigate categories.
Why Choose IPTV Smarters for Streaming?
IPTV Smarters is favored by many because of its simple user interface, robust functionality, and support for a wide range of IPTV service providers. With IPTV Smarters, you can access your favorite TV shows, movies, and live sports events all in one place. It also supports features like Video On Demand (VOD), Catch-Up TV, and a convenient Electronic Program Guide (EPG) to help users navigate channels and programming schedules.
Moreover, IPTV Smarters offers excellent compatibility across multiple platforms, including Windows and Mac, making it an attractive choice for users looking for seamless streaming on their desktop devices.
Overview of the Installation Process on Windows and Mac
In this guide, we’ll walk you through the step-by-step process of installing IPTV Smarters on both Windows and Mac. Whether you’re a beginner or familiar with the installation process, we’ll make sure you have all the information you need to get started. By the end of this post, you’ll know how to download, install, configure, and troubleshoot IPTV Smarters on your Windows or Mac system.
Target keywords: install IPTV Smarters on Windows, install IPTV Smarters on Mac, IPTV Smarters installation guide
2. What You Need to Install IPTV Smarters on Windows and Mac
Before diving into the installation process of IPTV Smarters on your Windows or Mac device, it’s important to understand what you need to ensure a smooth setup. This includes system requirements, necessary accounts, and the right environment for the software to run efficiently. Below, we’ll break down the essential prerequisites for both platforms.
System Requirements for Windows
To install IPTV Smarters on Windows, your device needs to meet certain hardware and software requirements. These ensure that the application runs smoothly without causing performance issues like lag or crashes.
Operating System: Windows 7, 8, 10, or 11 (32-bit or 64-bit)
Processor: Intel Core i3 or higher (or equivalent)
RAM: At least 4 GB
Storage: At least 1 GB of free disk space
Graphics: A graphics card that supports DirectX 9.0c or later
Internet: A stable broadband connection with speeds of 5 Mbps or higher (depending on streaming quality)
System Requirements for Mac
IPTV Smarters is compatible with macOS devices, and for a smooth installation, your Mac should meet the following requirements:
Operating System: macOS 10.12 (Sierra) or later
Processor: Intel-based processor (M1 or newer Macs should work, though some users may experience compatibility issues)
RAM: At least 4 GB of RAM
Storage: At least 1 GB of free disk space
Graphics: No specific requirements, but a decent GPU is recommended for smoother streaming
Internet: A stable and fast internet connection (minimum of 5 Mbps for streaming)
Necessary Accounts or Subscriptions
In order to use IPTV Smarters, you’ll need a subscription to an IPTV service provider. IPTV Smarters does not provide content; rather, it acts as a media player for IPTV providers. The subscription details (like username, password, and server URL) will need to be entered after installation to access your IPTV provider’s content.
Important Tip: Ensure that you have a valid IPTV subscription from a reputable provider before proceeding with the installation.
Internet Connection and Firewall Settings
A stable internet connection is crucial for streaming IPTV content without interruptions. If your connection is slow or unstable, you may experience buffering or streaming quality issues. A broadband connection with a speed of at least 5 Mbps is recommended, but for higher-quality streams (e.g., 1080p or 4K), a faster connection may be required.
Additionally, make sure your firewall or security software does not block IPTV Smarters from connecting to the internet. You may need to add IPTV Smarters to your firewall’s whitelist to ensure it runs smoothly without interference.
3. How to Install IPTV Smarters on Windows: Step-by-Step Guide
Now that you’ve checked the system requirements and ensured you have the necessary subscriptions and internet setup, let’s dive into the installation process for Windows. Below is a detailed, step-by-step guide to help you get IPTV Smarters running on your Windows PC.
Step 1: Downloading IPTV Smarters for Windows
The first step in the installation process is downloading the IPTV Smarters software. Here’s how you can do it:
Go to the official IPTV Smarters website or a trusted third-party site that provides the Windows version of IPTV Smarters.
Look for the download section and choose the version compatible with your Windows operating system (32-bit or 64-bit).
Click the download link and wait for the file to download to your computer. It should be an .exe file.
Important Reminder: Always download the software from a trusted source to avoid any potential malware or security risks.
Step 2: Running the Installer
Once the download is complete, it’s time to run the installer:
Go to your “Downloads” folder or the location where the .exe file was saved.
Double-click the file to start the installation process.
You may see a pop-up asking for permission to make changes to your device. Click Yes to proceed.
During the installation, you’ll be prompted to select the installation directory. If you’re unsure, just click Next to install it in the default location.
Step 3: Setting Up IPTV Smarters for the First Time
After installation, IPTV Smarters will launch automatically, or you can open it from the Start menu. When you first open the app, it will ask you to sign in or enter your IPTV provider’s details. Here’s how to set it up:
Create an Account or Log In: If you already have an IPTV Smarters account, log in with your credentials. If not, you can create an account by entering your details.
Enter IPTV Subscription Details: You’ll need to enter the server URL, username, and password provided by your IPTV service provider. These details allow IPTV Smarters to connect to your subscription.
Choose Your Content Layout: You can select the content categories (Live TV, VOD, etc.) you want to display on the main screen.
Step 4: Configuration and Testing
Once you’ve entered all the necessary information, it’s time to configure IPTV Smarters to your preferences. This includes selecting language options, enabling parental controls (if needed), and adjusting other settings like theme colors.
To ensure everything is working correctly, you should test the app:
Open a live TV channel or a movie from the VOD section.
If everything loads and streams correctly, you’re good to go!
If you encounter issues, try restarting the app or checking your subscription details again.
Troubleshooting Tip: If you’re having trouble with playback, check your internet speed, as slow connections can cause buffering. Additionally, make sure you’ve entered the correct login credentials.
4. How to Install IPTV Smarters on Mac: Step-by-Step Guide
Installing IPTV Smarters on a Mac is a straightforward process, but there are a few things you should know to ensure everything works properly. Below, we’ll guide you through the entire installation and setup process for macOS.
Step 1: Downloading IPTV Smarters for Mac
To start, you’ll need to download the IPTV Smarters app for macOS. Follow these steps to get the correct version:
Visit the official IPTVhttps://catchon-tv.live/ Smarters website or a trusted source that provides the Mac version of the app.
Look for the download link for macOS and click it to begin the download.
The file will be downloaded as a .dmg (disk image) file. Once the download is complete, locate the file in your “Downloads” folder or the location you chose.
Important Tip: Make sure you download IPTV Smarters only from legitimate sources. This reduces the risk of downloading infected or malicious software.
Step 2: Installing IPTV Smarters on Mac
Once the .dmg file is downloaded, it’s time to install the app on your Mac:
Double-click the .dmg file to open it.
A window will appear with the IPTV Smarters icon. Drag the icon to the Applications folder. This is the typical way to install software on macOS.
Wait for the file to copy over. Once it’s finished, IPTV Smarters will be installed on your Mac.
Step 3: Setting Up IPTV Smarters on Mac
After installation, it’s time to set up IPTV Smarters for the first time. Here’s how:
Open the Applications folder on your Mac and locate the IPTV Smarters app.
Double-click the app to open it. The first time you open the app, macOS might warn you about installing software from unidentified developers.
If you see this message, go to System Preferences > Security & Privacy, then click Open Anyway to allow the app to run.
Once the app is open, you’ll need to log in or set up your IPTV account:
If you already have an account, enter your username and password.
If you don’t have an account, you’ll need to sign up with an IPTV service provider. After signing up, you’ll receive an activation code or subscription details, including the server URL and login credentials.
Enter these details to complete the setup and gain access to the IPTV content.
Step 4: Configuration and Testing
Once your IPTV Smarters app is set up, you can configure the settings according to your preferences. Here’s what you can do:
Language and Theme Settings: You can change the app’s language to your preference and choose a light or dark theme.
Parental Controls: If necessary, you can enable parental controls to restrict access to certain content.
Testing the App: To test if IPTV Smarters is working correctly, navigate to a live TV channel or stream a movie from the Video On Demand (VOD) section. If the stream plays smoothly, your installation is successful!
Troubleshooting Tip: If the app is not opening or you experience any issues with logging in, double-check that you’ve entered the correct IPTV provider details. Also, make sure your internet connection is stable.
5. Troubleshooting Common Issues During Installation
Even with the best intentions, sometimes things don’t go as planned during the installation of IPTV Smarters. Whether you’re using Windows or Mac, encountering issues can be frustrating. In this section, we’ll address some of the most common problems and provide solutions to help you get IPTV Smarters up and running without a hitch.
Issues on Windows
Error Messages During Installation One of the most common issues Windows users face is encountering error messages during installation. These errors can stem from a variety of reasons, such as missing files or incomplete downloads. Here’s how to solve them:
Solution: Make sure you’ve downloaded the correct version of IPTV Smarters (32-bit or 64-bit) for your system. If the download was interrupted, delete the incomplete file and try downloading again from a trusted source.
Solution: If the issue persists, try running the installer as an administrator by right-clicking on the .exe file and selecting Run as Administrator. This grants the installer the necessary permissions to make changes to your system.
Software Not Opening After Installation If IPTV Smarters doesn’t open after installation, there are several potential causes. Here are some troubleshooting steps to resolve the issue:
Solution: Check if your Windows firewall or antivirus software is blocking the app. If so, add IPTV Smarters to the allowed list of your firewall or antivirus program.
Solution: Ensure your system meets the minimum requirements. If your hardware doesn’t meet the required specs, it may cause the app to fail to launch.
Solution: Try restarting your computer to see if that resolves the issue. Sometimes a simple reboot can fix problems related to system updates or resource allocation.
Issues on Mac
Installation Issues on macOS Catalina and Newer Versions macOS has become stricter with security over the years, particularly with newer versions like macOS Catalina and Big Sur. If you’re unable to install IPTV Smarters due to security restrictions, follow these steps:
Solution: After downloading the .dmg file, if macOS prevents you from opening it, go to System Preferences > Security & Privacy, and look for an option to allow apps downloaded from App Store and identified developers. If you see a message about IPTV Smarters being blocked, click Open Anyway to allow the installation.
Solution: Ensure that you’re using the latest version of macOS. If you’re running an outdated version, some apps may not work correctly.
App Crashes or Freezes If IPTV Smarters crashes or freezes on your Mac, it’s typically due to system conflicts or software bugs. Here’s what to do:
Solution: Ensure that your macOS is up-to-date. Software updates often fix bugs and improve compatibility with third-party apps like IPTV Smarters.
Solution: Try reinstalling the app by dragging the IPTV Smarters icon to the Trash and reinstalling from a fresh download.
Solution: Check if there are any conflicting apps running in the background. Close unnecessary apps and restart your Mac to ensure smooth performance.
Audio or Video Sync Issues Another common issue is audio and video not being in sync during streaming. This can occur for both Windows and Mac users.
Solution: First, check your internet speed. Low bandwidth can cause lag, which might result in sync issues. A connection of at least 5 Mbps is recommended for smooth streaming.
Solution: Try adjusting the video settings in IPTV Smarters. Sometimes changing the resolution or switching between hardware and software video decoding can resolve the issue.
6. Optimizing IPTV Smarters Performance on Windows and Mac
Once you have IPTV Smarters installed and working on your device, the next step is to optimize the app for the best performance. This ensures a smoother streaming experience and prevents issues like buffering or low-quality video.
Improving Streaming Quality
To get the best out of IPTV Smarters, it’s important to ensure that your internet connection is up to the task. Here’s how you can improve the quality of your streams:
Use a Wired Connection: If you’re streaming on a desktop, consider using an Ethernet cable instead of relying on Wi-Fi. Wired connections are generally faster and more stable, reducing buffering during streaming.
Increase Internet Speed: If you find that your streams frequently buffer or are in low quality, consider upgrading your internet speed. For HD streams, a minimum of 10 Mbps is recommended, while 4K streaming may require 25 Mbps or higher.
Avoid Other Heavy Internet Usage: Streaming 4K content while other devices in your household are consuming large amounts of bandwidth (such as gaming or downloading files) can cause interruptions. Try to limit other heavy internet activities while watching IPTV.
Adjusting Settings for Better User Experience
IPTV Smarters allows you to customize the app for a smoother user experience. Here’s how to adjust some key settings:
Video Quality: In the app’s settings, you can adjust the video quality for streaming. Lowering the resolution can help reduce buffering if your internet speed isn’t very fast.
Subtitles and Language Preferences: If you prefer subtitles or a specific language for the interface, make sure to configure these settings when setting up your account. IPTV Smarters offers a wide range of languages and subtitle options.
Audio Output Settings: If you’re using external speakers or a sound system, you can adjust the audio output settings to optimize the sound quality. You can switch between stereo or surround sound for a richer audio experience.
Fixing Buffering or Lag Issues
If you experience buffering or lag during streaming, here are some tips to improve performance:
Check Server Status: Sometimes, the issue might be with the IPTV provider’s server rather than your device. If possible, check the provider’s status or website to see if there are any ongoing outages or maintenance.
Lower Stream Resolution: If buffering persists, lower the resolution of your stream to 720p or even 480p. This can help if you’re on a slower internet connection.
Close Unnecessary Applications: Running multiple apps or processes on your PC or Mac can consume resources, leading to performance issues. Close any apps that are not needed during your IPTV session.
7. IPTV Smarters Features and How to Use Them
IPTV Smarters offers a wide range of features that enhance the user experience, making it a popular choice among IPTV users. In this section, we’ll dive deeper into the key features of IPTV Smarters and explain how to make the most of them on both Windows and Mac.
1. Live TV Streaming
One of the main attractions of IPTV Smarters is the ability to stream live TV channels from various countries and categories, such as sports, entertainment, news, and more. Here’s how you can enjoy live TV:
How to Access Live TV: After logging into IPTV Smarters, you’ll see a menu option for Live TV. Click on it to browse through available channels. You can also filter channels based on categories like sports, movies, and local news.
Favorites and Channel Organization: You can mark channels as favorites by selecting the heart icon next to the channel. This will add it to your favorites list for easy access later.
Channel Change Speed: IPTV Smarters is designed to switch channels quickly without buffering, providing a seamless experience. However, if you’re experiencing slow channel switching, it could be due to a slow internet connection or issues with the IPTV service provider.
2. Video On Demand (VOD)
Another great feature of IPTV Smarters is Video On Demand (VOD). This allows you to watch a large variety of movies and TV shows whenever you want. Here’s how to use this feature:
How to Use VOD: In the main menu of IPTV Smarters, select the VOD option to browse through available movies and TV shows. You can search for specific titles or browse by categories like “Top Rated,” “New Releases,” or “Genres.”
Playback Controls: While watching a movie or show, you can pause, fast forward, rewind, or change the video quality. IPTV Smarters also allows you to adjust subtitles and audio settings while watching content.
Watch Later Feature: If you come across a movie or TV show you want to watch later, you can add it to your “Watch Later” list for quick access.
3. Electronic Program Guide (EPG)
The Electronic Program Guide (EPG) is an essential feature for any IPTV service, and IPTV Smarters integrates this feature for a better user experience. The EPG provides a detailed list of current and upcoming TV shows and movies.
How to Use EPG: Once you are in the Live TV section, you’ll find an option to access the EPG. The guide is typically displayed in a grid format, showing show times and channel information.
EPG Settings: You can adjust the EPG settings in the app’s configuration section. You may be able to choose between different views (daily, weekly) and customize the EPG’s appearance.
Catch-Up TV: Some IPTV service providers offer a catch-up feature that allows you to watch content that has already aired. You can access this feature through the EPG if your IPTV provider supports it.
4. Parental Control
IPTV Smarters allows you to set up parental controls to restrict access to specific content based on its rating. This is especially useful for families with children.
How to Set Up Parental Control: Go to the settings menu and select Parental Control. You can set a PIN code to lock certain channels, categories, or content types. This will prevent unauthorized access to sensitive or age-inappropriate content.
Content Restrictions: You can filter content based on its rating (e.g., G, PG, R). This feature allows you to limit access to adult content, ensuring a safe viewing experience for younger users.
5. Multi-Screen Support
IPTV Smarters is versatile in that it supports multiple screens for viewing. You can watch IPTV on your Windows or Mac while also accessing the app on a mobile device like a smartphone or tablet.
How to Set Up Multi-Screen: If you prefer watching content on your TV or multiple devices simultaneously, IPTV Smarters allows you to link several devices to your account. However, keep in mind that performance can vary based on your internet speed and the number of devices streaming simultaneously.
8. Using IPTV Smarters with VPN
A VPN (Virtual Private Network) can enhance your privacy and security when using IPTV Smarters, especially if you want to protect your browsing activity or access geo-restricted content. Here’s why and how you can use a VPN with IPTV Smarters:
Why Use a VPN with IPTV Smarters?
Privacy Protection: A VPN encrypts your internet traffic, making it harder for anyone (including your internet service provider) to monitor your online activity.
Bypass Geo-Restrictions: Some IPTV content may only be available in specific regions. Using a VPN, you can mask your IP address and connect to a server in a different country, giving you access to content that is otherwise restricted.
Improved Streaming Performance: In some cases, a VPN can reduce throttling from your ISP, which may result in smoother streaming with fewer buffering issues.
How to Set Up a VPN with IPTV Smarters:
Choose a Reliable VPN Provider: There are many VPN providers to choose from, such as ExpressVPN, NordVPN, or CyberGhost. Pick one that suits your needs and install their app on your device.
Connect to a Server: Once the VPN is installed, open the VPN app and connect to a server in the location of your choice. For example, if you’re trying to access content available only in the UK, select a UK-based server.
Launch IPTV Smarters: After connecting to the VPN, open IPTV Smarters and begin streaming. Your IP address will now be masked, and you can access geo-restricted content securely.
Note: While using a VPN can be helpful for privacy and accessing restricted content, it can also slightly reduce your internet speed due to the encryption process. Be sure to choose a high-speed VPN service to minimize any slowdowns.
9. Conclusion
IPTV Smarters is an incredibly versatile and user-friendly application that makes streaming live TV, movies, and TV shows easy, whether you’re on Windows or Mac. With its wide array of features, including live TV, VOD, EPG, and parental controls, it offers an optimal experience for IPTV users. By following the step-by-step installation guides, troubleshooting tips, and optimization suggestions in this article, you should be able to install and configure IPTV Smarters smoothly.
Whether you’re streaming sports, catching up on your favorite shows, or watching the latest movies, IPTV Smarters offers a complete solution for IPTV streaming on both desktop and mobile platforms. Don’t forget to use a reliable VPN for enhanced security and to access geo-restricted content.
By taking the time to set up IPTV Smarters properly and utilizing its features, you can enjoy uninterrupted and high-quality streaming on both Windows and Mac.
10. FAQs
1. Can I use IPTV Smarters on multiple devices? Yes, IPTV Smarters supports multi-device use. You can install it on multiple devices, such as a Windows PC, Mac, smartphone, and tablet, and enjoy content on all of them simultaneously.
2. Do I need an IPTV subscription to use IPTV Smarters? Yes, IPTV Smarters requires an active IPTV subscription to access content. You’ll need the subscription details (username, password, and server URL) from your IPTV provider.
3. Why is my IPTV Smarters buffering or lagging? Buffering can occur due to slow internet speeds or issues with the IPTV service provider. Try upgrading your internet connection or using a wired connection for better performance.
4. Is IPTV Smarters free to use? The app itself is free to download and install. However, you’ll need a subscription from a third-party IPTV service provider to access content.
5. Can I use IPTV Smarters without a VPN? Yes, IPTV Smarters works without a VPN. However, using a VPN can enhance privacy, security, and help bypass geo-restrictions.
1 note
·
View note
Text
Download Vegas 11: Quick and Easy Guide to Getting Started

Vegas Pro 11 is one of the most widely-used video editing software programs, offering a comprehensive range of features for professionals and enthusiasts alike. Whether you're creating YouTube videos, editing short films, or working on music videos, Vegas Pro 11 can help you achieve your goals with ease. If you're looking to get started with this powerful software, this guide will walk you through the process of downloading Vegas 11 and offer helpful tips for navigating the software once it's installed.
Why Choose Vegas Pro 11?
Vegas Pro 11 offers a variety of powerful editing tools and features, making it an excellent choice for video editors of all skill levels. Some of its key features include:
Multicam Editing: Vegas Pro 11 allows you to edit footage from multiple cameras simultaneously, making it ideal for projects that require switching between different angles.
Advanced Audio Editing: With integrated audio editing tools, you can mix, master, and clean up your audio tracks within the same environment as your video footage.
Professional-grade Effects: Vegas Pro 11 includes a range of high-quality video effects and transitions to enhance the visual appeal of your project.
Fast Rendering: The software supports GPU acceleration, which helps speed up the rendering process and ensures smoother playback during editing.
Now that you know the benefits of using Vegas Pro 11, let’s dive into how you can download vegas 11and install it.
Step 1: Check System Requirements
Before you proceed with the download, it's important to check that your system meets the minimum requirements for Vegas Pro 11. Running the software on an incompatible machine can result in performance issues or even prevent the software from functioning correctly.
Minimum System Requirements for Vegas Pro 11:
Operating System: Windows 7 (64-bit), Windows 8 (64-bit), or Windows 10 (64-bit)
Processor: 2.8 GHz processor (multi-core recommended for better performance)
RAM: 4GB RAM minimum (8GB or more recommended)
Hard Drive: 500MB of free hard drive space for installation
Graphics Card: DirectX 9 compatible graphics card with at least 512MB of VRAM (NVIDIA or AMD recommended)
If your computer meets these specifications, you're good to go! If not, consider upgrading your hardware or running the software on a different machine.
Step 2: Finding the Right Source for Download
When download vegas 11, it’s crucial to use a legitimate and reliable source to ensure that you’re getting a safe, virus-free version of the software. Sony Vegas Pro was once developed by Sony, but it was later acquired by MAGIX, which now handles the distribution.
You can purchase and download Vegas Pro 11 through the official MAGIX website or authorized resellers. Be cautious of third-party sites that claim to offer the software for free or at a discounted rate, as these might distribute pirated versions or bundled software that could harm your system.
Steps to Download Vegas Pro 11:
Visit the Official MAGIX Website: Go to the MAGIX website and navigate to the section for Vegas Pro.
Choose Your Version: If Vegas Pro 11 is still available for purchase, select the version you want. Otherwise, you may need to opt for a newer version, such as Vegas Pro 18 or 19.
Complete the Purchase: Follow the prompts to complete your purchase.
Download the Installer: After the purchase is complete, you should receive a link to download the Vegas Pro 11 installer.
Run the Installer: Once the file is downloaded, open the installer file and follow the on-screen instructions to install the software on your computer.
Step 3: Installing Vegas Pro 11
Once you have the installer file for Vegas Pro 11, follow these simple steps to install the software on your PC:
Installation Steps:
Double-click the Installer: Locate the downloaded file (typically in your "Downloads" folder) and double-click to begin the installation.
Accept the License Agreement: The installation will prompt you to review and accept the End User License Agreement (EULA). Make sure to read through the terms before accepting.
Choose Installation Location: You’ll be asked where to install the software. By default, Vegas Pro will install in the "Program Files" folder, but you can choose a different location if preferred.
Select Components: The installation process may allow you to select additional components, such as optional plug-ins or audio tools. For most users, the default selections are sufficient.
Start Installation: Click "Install" to begin the process. The installation may take several minutes to complete depending on your system’s performance.
Finish Installation: Once the installation is finished, click "Finish" to close the installation wizard.
Step 4: Activating Vegas Pro 11
After installation, you’ll need to activate Vegas Pro 11 using a serial number or activation key. This key is usually provided to you when you purchase the software from the MAGIX website or authorized reseller.
Launch Vegas Pro 11: Open the program by clicking on the desktop shortcut or searching for it in the Start menu.
Enter Activation Key: Upon launching, you’ll be prompted to enter your activation key. Simply input the key you received during your purchase to activate the software.
Once activated, you can begin using Vegas Pro 11 without any limitations.
Step 5: Getting Started with Vegas Pro 11
Now that you’ve installed and activated Vegas Pro 11, it’s time to start editing! The software has an intuitive interface, but it may take some time to familiarize yourself with its features. Here are some essential tips for getting started:
Navigating the Interface:
Timeline: The timeline is where you’ll arrange and edit your video clips, audio tracks, and effects. You can zoom in and out of the timeline to work with more precise cuts or broad edits.
Media Explorer: This panel allows you to browse and import video, audio, and image files directly into your project.
Preview Window: The preview window allows you to view your video project as you edit it. This is essential for checking the changes you’ve made before rendering the final project.
Toolbars: Vegas Pro 11 offers customizable toolbars to speed up your editing process. You can add or remove tools according to your preferences.
Tutorials and Learning Resources:
MAGIX Help Center: The official help center offers step-by-step guides and video tutorials.
Online Communities: Join online forums or communities like Reddit and YouTube, where you can find user-shared tips and tutorials.
Conclusion
Downloading and installing Vegas Pro 11 is a straightforward process when you follow the right steps. From checking system requirements to activating the software, this guide has covered all the essential steps to help you get started. Once you’ve installed Vegas Pro 11, take time to explore its features, learn its interface, and begin editing your videos with ease. Whether you're an amateur or a professional, Vegas Pro 11 provides all the tools you need to create stunning video content.Download Vegas 11: Quick and Easy Guide to Getting Started
0 notes
Text
The Ultimate Guide to the 2024 16-Inch 4K Gaming Laptop: 120 Hz Ultra-Clear Display, Windows 11 Pro, and Unmatched Power
2024 New 16" Inch 4K Laptop, 120 Hz ultra-clear screen, Windows 11 Pro Portable PC Gaming notebooks 32GB 2TB fingerprint unlock
Buy now: https://youtu.be/okApbxKqg2k
DISCOUNT: 22%
BIG DISCOUNT UP TO 70% OFF Choice Day, 11.11 Sale, Black Friday, Cyber Monday
In 2024, gaming laptops have continued to break barriers with new heights in power, display quality, and gaming immersion. One of the standout models this year is a 16-inch 4K gaming laptop featuring an ultra-clear 120 Hz display, powered by Windows 11 Pro, with a massive 32GB of RAM, 2TB of storage, and advanced fingerprint unlock capabilities. This powerhouse machine is designed for serious gamers and professionals who demand top-notch performance for multitasking, gaming, and multimedia work. Let’s dive into the core features that make this laptop a game-changer in the portable gaming PC landscape.
The 16-Inch 4K Display: 120 Hz Ultra-Clear Brilliance One of the most impressive aspects of this 2024 gaming laptop is its stunning 16-inch 4K display. With a 3840 x 2160 resolution, the screen offers remarkable clarity and detail, making it ideal for immersive gaming, content creation, and video editing. The 4K screen resolution lets you see every pixel, and games or videos truly come to life with this ultra-high-definition experience.
The 120 Hz refresh rate enhances the fluidity of the visuals, reducing motion blur and making fast-paced games smooth and responsive. Whether you’re in an intense multiplayer FPS or a visually intricate RPG, the 120 Hz refresh rate ensures that you won’t miss a single detail. The 120 Hz refresh rate is also beneficial for professional applications like graphic design and video editing, where precise and smooth visuals make all the difference.
Power-Packed Performance: 32GB RAM and 2TB Storage The laptop’s internal specifications are no less impressive. Equipped with 32GB of RAM, this laptop is built to handle even the most demanding applications and multitasking scenarios with ease. Gamers will appreciate the ability to run high-end games alongside other programs, like streaming software or video editing applications, without any hiccups. For professionals, the 32GB RAM is more than sufficient for handling large files, working on multiple projects, and running intensive applications like Adobe Creative Suite or programming software.
In addition to the robust RAM, this laptop boasts a generous 2TB of storage. The large storage capacity allows for a massive library of games, multimedia files, and professional projects without constantly worrying about space. The 2TB storage, typically an SSD (Solid State Drive), means not only ample space but also incredibly fast load times and data retrieval speeds, which can greatly improve both gaming and productivity experiences.
Windows 11 Pro: Optimized for Gaming and Productivity Running on Windows 11 Pro, this laptop takes full advantage of Microsoft’s latest OS designed to optimize both gaming and professional applications. Windows 11 Pro introduces several gaming-focused features, including DirectStorage, which reduces load times and improves game performance by allowing the GPU to load data directly from the SSD. Another standout feature for gamers is Auto HDR, which automatically enhances the color and brightness of games, even if they weren’t initially designed for HDR.
Windows 11 Pro also introduces productivity features like improved virtual desktops and better integration with cloud services, which benefit those who use their laptop for work as well as play. The Pro version of Windows 11 adds security and management tools, such as BitLocker encryption and advanced network protection, which are essential for users who prioritize data security. Whether you’re a gamer, a digital nomad, or a creative professional, Windows 11 Pro brings a set of refined tools to elevate your laptop experience.
Fingerprint Unlock: Enhanced Security and Convenience In a world where privacy and security are paramount, the fingerprint unlock feature is a welcome addition to this 2024 laptop. Gone are the days of relying solely on passwords, which can be forgotten or compromised. With fingerprint authentication, you gain fast, secure access to your device in a fraction of a second. This feature is especially useful for people who frequently access sensitive data or work in environments where data privacy is essential.
Not only does the fingerprint unlock add an extra layer of security, but it also adds convenience. No more typing in long passwords or PINs – simply place your finger on the sensor, and you’re in. The fingerprint sensor is seamlessly integrated into the laptop’s design, and it uses cutting-edge biometric technology to ensure accurate and secure authentication every time.
Built for Portability and Style This laptop packs impressive power into a surprisingly portable and stylish package. Weighing in at a manageable level for a 16-inch device, it’s a portable PC that can easily be transported to work, a friend’s house, or a gaming event. The sleek design doesn’t just look good – it also incorporates advanced cooling solutions to keep the laptop’s temperature under control during intense gaming sessions. Effective cooling is a crucial aspect of maintaining the laptop’s performance, ensuring it runs at optimal speeds without thermal throttling.
Many modern gaming laptops are moving away from the bulky designs of previous years, and this model is no exception. With a slim, minimalist aesthetic, it appeals to gamers and professionals alike, easily blending into any environment, whether you’re gaming in a dedicated setup or working in a professional space.
Connectivity and Expandability This gaming laptop comes with a full array of ports, ensuring you stay connected with your peripherals, displays, and more. It includes multiple USB-C and USB-A ports, an HDMI port for connecting to an external display, and an SD card slot, catering to a wide range of professional and gaming needs. The USB-C ports support Thunderbolt 4, allowing for ultra-fast data transfer speeds, connecting external GPUs, and supporting additional monitors.
Bluetooth 5.2 and Wi-Fi 6E capabilities round out the connectivity features, ensuring you’re always connected with low latency and fast speeds, whether gaming online or streaming content. For users who may want to expand their setup further, the laptop’s Thunderbolt support enables easy addition of extra storage or even daisy-chaining other devices.
Gaming Performance and GPU Options At the core of this 16-inch powerhouse lies a high-performance GPU, enabling immersive graphics and smooth frame rates on the ultra-clear 4K display. While GPU options may vary based on region and customization, expect to find configurations with the latest NVIDIA RTX or AMD Radeon graphics cards. The integration of these advanced GPUs means you can run AAA titles at high settings, with real-time ray tracing for ultra-realistic lighting and shadows.
This combination of powerful CPU, RAM, and GPU is designed to maximize gaming performance while reducing stutters, lag, or frame drops, even in graphics-intensive scenes. For gamers who prioritize high-quality visuals and fast response times, this laptop is designed to deliver a high-tier gaming experience with no compromises.
Battery Life and Charging Despite being a performance-oriented laptop, this 16-inch gaming laptop is equipped with an efficient battery that allows for extended use. Expect around 5 to 7 hours of battery life for standard usage, which is more than sufficient for most gaming and professional tasks. Additionally, the laptop supports fast charging, allowing you to quickly recharge during breaks.
Battery life for gaming laptops has historically been a compromise, but manufacturers in 2024 have made considerable strides in delivering battery efficiency without sacrificing power. Of course, high-performance gaming will consume more battery, but for most tasks, this laptop offers respectable longevity on a single charge.
Conclusion: A 2024 Gaming Laptop Built for the Future This 16-inch 4K gaming laptop with a 120 Hz ultra-clear display, Windows 11 Pro, 32GB of RAM, and 2TB storage represents the pinnacle of portable gaming PCs in 2024. Designed with both gamers and professionals in mind, it offers versatility, power, and portability in a sleek, stylish package. The advanced display, powerful hardware, ample storage, and security features like fingerprint unlock make this laptop a top contender for anyone who wants a device that can handle both work and play with ease.
Whether you’re a gaming enthusiast, a creative professional, or someone who values cutting-edge tech, this laptop is an investment in quality and performance that will stand the test of time. With such a robust set of features, it’s clear that gaming laptops in 2024 are not just about playing games – they’re powerful tools that enhance productivity, creativity, and entertainment all in one.
#laptop#gaming_laptop#notebook#gaming_pc#gaming_desktop_computer#intel#ryzen#nvidia#graphics#windows#ssd#gamer#gtr7#linux#mini#gaming#computer#pc
0 notes

Text
Price: [price_with_discount] (as of [price_update_date] - Details) [ad_1] Are you ready to feel the rush of extreme performance? The Crucial T700 PCIe 5.0 NVMe SSD offers speeds of up to 11,700MB/s sequential reads and up to 9,500MB/s sequential writes** (up to 1,350K/1400K IOPS random reads/writes**) for faster gaming, video editing, 3D rendering and heavy workload applications. Built with Micron 232-layer TLC NAND3 and featuring a premium aluminum and nickel-plated copper heatsink that dissipates heat without noisy fans or liquid cooling, the Crucial T700 Gen5 SSD is optimized for performance, takes full advantage of Microsoft DirectStorage, and is backward compatible with Gen3 and Gen4 motherboards. A non-heatsink SKU is also available for use with an integrated motherboard heatsink*. With SSD speeds nearly 2x faster than Gen4**** in your PC, you’ll never look back from the Crucial T700! * Non-heatsink versions of the Crucial T700 must be installed with a motherboard or alternate heatsink to achieve optimal performance. ** Typical I/O performance as measured using CrystalDiskMark with a queue depth of 512 and write cache enabled. Windows 11 Core isolation disabled for performance measurement. Fresh out-of-box (FOB) state is assumed. For performance measurement purposes, the SSD may be restored to FOB state using the secure erase command. System variations will affect measured results. *** See Micron.com/products/nand-flash for more information. **** Compared to Crucial P5 Plus Gen4 NVMe SSD listed speed of 6,600MB/s. Actual speed may vary. ***** Some storage capacity is used for formatting and other purposes and is not available for data storage. 1GB equals 1 billion bytes. ****** Compared to Gen5 SSD performance without DirectStorage, based on internal test results with supported GPU that uses GPU decompression. ******* Compared to Crucial MX500 SATA SSD listed speed of 560MB/s. Actual speed may vary. ******** Warranty valid for 5 years from the original date of purchase or before writing the maximum total bytes written (TBW) as published in the product datasheet and as measured in the product’s SMART data, whichever comes first. ********* Under typical conditions for airflow and ambient temperature, our pre-installed premium heatsink allows the T700 Gen5 SSD to run at max workload without the need to thermal throttle. Please ensure your drive has proper airflow for maximum performance. ********** Based on internal gaming performance results measured with 3DMark Storage Benchmark SSD performance test for gamers. Actual results may vary. *********** Compared to SSD temperatures without a cooling apparatus, based on internal testing. The Crucial T700 SSD must be installed with a heatsink for optimal performance. BLISTERING SPEEDS: Get sequential reads/writes of up to 11,700/9500MB/s2 and random read/writes of up to 1,500K IOPS2 for blazing performance ULTIMATE GAMING & CREATIVITY: With Microsoft DirectStorage, elevate gaming with up to 60% faster texture renders8 and reduced load times, render photos or UHD/8K+ videos and run heavy workloads with up to 99% less CPU utilization8 COMPATIBLE: Ready for performance with your motherboard heatsink1, the T700 installs easily in your M.2 slot. (T700 must be installed with a heatsink.) INNOVATION: Produced in house with the Micron 232-layer TLC NAND3 for Intel 13th Gen and AMD Ryzen 7000 CPUs SPACIOUS: Store more games, UHD/8K+ media, apps, files and more with up to 4TB5 of capacity PREMIUM HEATSINK: Our aluminium and nickel-plated copper heatsink maximizes heat dissipation without noisy fans or liquid cooling and access to appropriate airflow (non-heatsink option available) [ad_2]
0 notes