#Solvent-based Coatings
Explore tagged Tumblr posts
Visit Tumblr Blog
Explore Tumblr blogs with no restrictions, modern design and the best experience.
Last Seen Tumblr Blogs


Fun Fact
The KCSC sent more than 20K requests to delete posts related to prostitution and porn to Tumblr from January to June 2017.
Text
Top Benefits of Using Solvent-Based Intumescent Coatings for Fire Protection
Solvent-based intumescent coatings are one of the most advanced fire protection solutions. They expand significantly when exposed to high temperatures, creating a protective char layer that insulates the underlying structure. When exposed to fire, the active chemicals in these specialty coatings, which are distributed in organic solvents, undergo a chemical reaction that causes the coating to inflate up to 50 times its initial thickness, effectively forming a thermal barrier.
Visit Us: https://ibtikar-uae.com/top-benefits-of-using-solvent-based-intumescent-coatings-for-fire-protection/
0 notes
Note
how did you do a new furby custom how
OK so the first thing that I ended up doing was drawing up some concepts of 1998 furbies that I liked as the 2023 furby.
The design that I ended up going with was the skunk just because to me that feels like the “furbiest” furby if that makes sense 

 So after I had my concept in mind, I started to skin the Furby, again. As you may have noticed in my previous posts, I had skinned this furby previously, which is why I felt more comfortable, making him into a custom.
After skinning, I did some minor disassembly, mainly taking off the ears and the eyes. I haven’t quite figured out a good enough way to takeoff the feet yet.
For the eyes, I wanted to try and take the paint off and prime them so I worked my way up from solvents finding that 99% IPA was the best, I took the eye paint off, and then proceeded to give the eyelid section a coat of black paint 
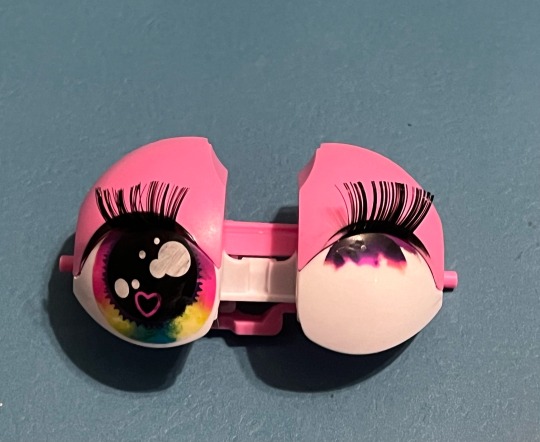
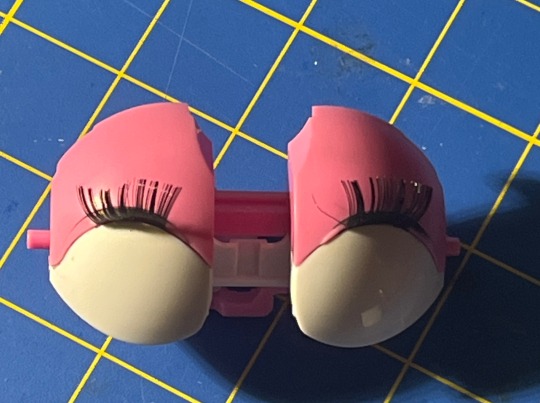


I then started on the face plate, painting, it, black, and giving everything a coat of Mr. super clear and while that was drying I started on the eyes and did my first test fit
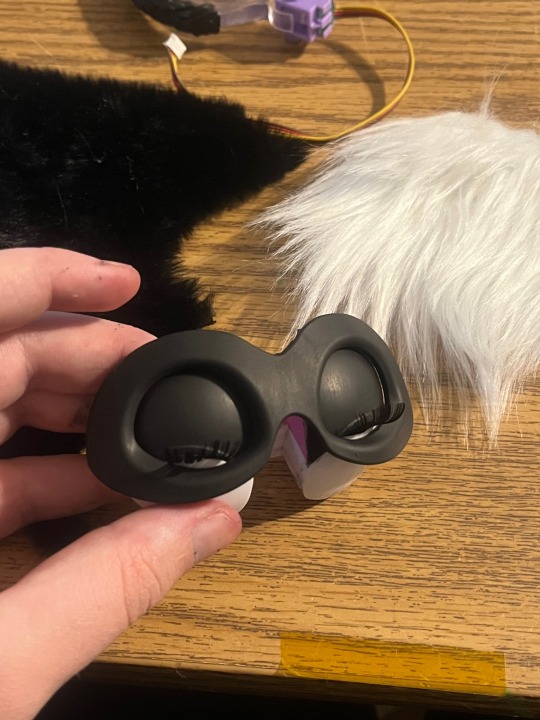
after finishing the eyes and leaving them to dry, I started on patterning the pelt,
I used standard methods, scanned it, and then imported it into inkscape where I cleaned it up and cut it out. It was pretty simple (only 3 pieces) so it was a very quick process to sew it and the faceplate back on, I was then able to do my 2nd test fits.


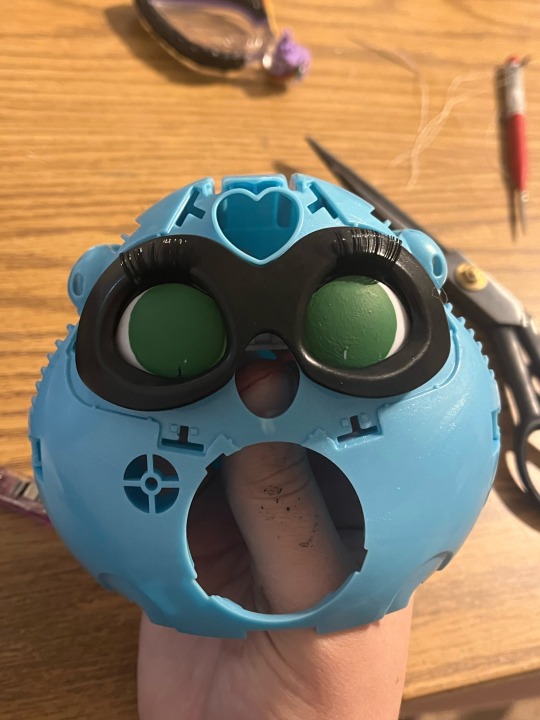
After the 2nd test fit, I decided to try and work on the heart gem, it’s a bit finicky so I had to use a pretty thick embroidery needle to push and pick the fur into place but I got it,
I didn’t take any pics of reassembly because getting the ears back on is pretty frustrating, but here we are


I was super happy with the final result, all and all it only took me 2-3 hours to complete and was pretty fun to do.
I wouldn’t say it was a very complex disassembly process, you didn’t have to deal with any eyechips to change the eyes, yet the eyes weren’t an accessible like on a 2005. The pelt was also pretty straightforward , only being 2 pieces before I modified it so it could be sewn In less than 5 minutes. All of the parts unscrew pretty easily and go back together really well, and the plastic takes paint amazingly. It’s a pretty solid base for customs
But ye, that’s how I ended up making Slunk. :p
#furbyfandom#furby1998#furbycommunity#safefurby#furbylove#90s nostalgia#kidcore#vintage#furbycore#furby#toy making#custom toys#custom 2023 furby#2023 furby#furby 2023
221 notes
·
View notes
Text

Argo Nauts 1:72 Y-Wing sofubi build update August 7th, 2024
I had posted a scan of this kit's box a few months ago. This is a sofubi (soft vinyl) kit with some brass, pewter, and resin pieces. The main body is vinyl, the disk ventrals at the tail ends of the nacelles are resin, the nacelle beams are brass, and the guns and landing gears are pewter (I think).
This picture above is a quick dry fit of what it looks like so far. I didn't tape the pieces together or anything, but just quickly assembled it for this picture. I later realized that I had hastily attached the nacelles upside-down. I just threw this quickly together to take a photo.
The kit does not come with any decals, so I gave it my own, unique paint scheme. This is a Blue Squadron Y-Wing and I am happy with the stripes I fashioned on my own with masking tape. I painted the vinyl parts with V-Color paints, which are made specifically for painting sofubi kits and toys. This paint is great because when applied properly to vinyl, you cannot scratch it off. It's extremely durable and flexible paint.
I first mixed Light Gray in with Black to make my own German Gray color which I used as an undercoat. I splotched Mr. Masking Neo in areas with a sponge for paint chipping, then went over it with Light Gray. I used Blue and Pastel Blue for the trim, and Orange Yellow to have one panel be a replacement. For the non-sofubi parts, I used Mr. Color 325 (JASDF Gray, IIRC) which is a good match for the V-Color Light Gray. The engine cans were painted a mixture of V-Color Gloss Black and Silver, resulting in a nice gunmetal color.
I later decided to not go with the pastel blue trim for the nacelle tips and re-masked and re-painted them with the matching medium blue I'd used on the cockpit fuselage, which you can see in the photo below. It was a bit tricky, but I also added a small ring of Flesh 1 color on the sensor domes. V-Color has its own clear Smoke color. I made sure to use the Smoke to stain the area around the proton torpedo launchers on the underside. After applying that and a clear gloss top coat, I applied a wash. You cannot use enamel paints on vinyl since they do not react well to each other. Instead I used some Turner Acryl Goache paints, some black with a bit of gray mixed in. Turner paints can be found at any stationery store here in Japan and elementary students use these paints for their classroom art projects. (The jibungous Tsutaya mega bookstore in Maebashi has a great hobby section that has a wide selection of these paints as well as artist oils, pastel chalks, and plenty of other hobby supplies.) I thinned it with Mr. Hobby's Weathering Paint Goache Solvent. (I don't know what "goache" means because I forget... Go look it up if you care.) This is made for making a wash out of acrylic paints. Simple water or acrylic thinner can cause the paint to dry in splotches, but this solvent is made to help the paint run into contours and stay still instead of spreading into splotches.

There is no flat clear V-Color paint, so I had to create my own with Clear and Flat Base and tested it out on some spare vinyl until it looked right. I think maybe it might be a bit too flat, but I'm alright. After this flat coat, the blue looks considerably subdued and blends in better with the light gray.
The photo above is just another sloppy dry fit. Thus, it doesn't look straight. So far I have only glued the nose cannons to the cockpit pod, the sensor array domes to the nacelle tips, the engine cans and the exhaust shrouds that cover them to the engine pods, and I have glued the disk vectrals to the support pylons at the ends of the nacelles. I have yet to secure these beams to the engine pods, which are also not glued to the engine pylons. Nor have I glued the fuselage, cockpit, canopy, and such.

To quote Han Solo, "Here's where the fun begins." While this kit provides brass rods for the support pylons, you have to provide your own wires for the piping and bend them all into shape. If I don't get this part right, the model won't look good. So, I am a bit nervous. I am using Wave's C-Line brass rods. Since I have seen some Y-Wing builds in which the pipes were painted a metallic color, I think I might just leave mine unpainted. A viewer on YouTube suggested to me to paint the wires a metallic color for scale, but I think it looks fine as it is. What do you think? They look a bit too shiny since the fluorescent light is shining directly onto them in this picture. I will apply a wash on the brass rods and I was thinking that I will hand-brush Mr. Metal Primer since it is clear and the enamel or whatever should stick to it better after that. Maybe I'll use that Games Workshop Nuln Oil as a wash over the pipes. The pipes should add the bonus value of acting like pins to keep the pieces together.

So far, my only complaint is the cockpit canopy. It was difficult to cut out the windows and I think it really should have been molded in resin. The Astromech was painted V-Color Gloss Black and masked off. I will paint its trim with Mr. Hobby Aqueous Gloss White. I also need to paint the cockpit instrumentation with various colors too.
I'm really enjoying this build and as a result I'm getting back into the three Nadia sofubi kits by Tsukuda that have been languishing for years as shelf queens. I've made good progress with those and I will post an update on those soon. I've also begun working on a Deedlit sofubi kit by Kaiyodo.
11 notes
·
View notes
Text
Part 3 - Priming (For covering the skin color (ie, for an oc))
If you want to change the skin color (such as for an OC turtle), you need to start with a blank slate by covering the original color.
[Please note that no matter how you prepare and protect the figure, the joints in the arms and legs will always scrape away your paint and reveal the original plastic sooner or later in those areas.]


If you still want to continue...
You'll need: A can of white spray primer (Mr Hobby's Mr Base White 1500 or Citadel's White Scar work well. Citadel products are found in most model/hobby shops)
Arrange your figure in a t-pose, lay it on newspaper or paper towel and, IN A WELL VENTILATED OR OUTSIDE AREA, spray the figure in light sweeps from side to side, from about 10-12 inches away. You do not want to coat the entire figure all at once; you want to let it dry, and apply thin coats until the figure is eventually covered. Spraying too much too fast will cause the primer to run down and 'flood' the details.

If you flood your model, it can be a difficult and lengthy process to remove the primer. Solvents used to dissolve and wipe away the paint can sometimes melt or disfigure your toy...
If you want to practice first, try it on a cheap toy or figure from the dollar store (You could always paint that, too!). Use extra patience with this step.
Also, always read the safety instructions on the can before using any sort of spray and use breathing protection, like a chemical rated respirator when recommended.
12 notes
·
View notes
Text
So it’s not so much hard rules about ‘do nots’ for dolls but a reminder that clothes, accessories, fibres are often other plastics that can interact especially if you add a catalyst like a solvent based glue, gel, heat or pressure.
Your pony with plastic coated glass pearls braided into the hair might be fine, the one with plastic coated acrylic pearls could stain. The pony’s hair might be fine but it could stain against the leg or stain against another pony’s accessories while in storage against each other. G1 might be fine when G2 isn’t.
Part of the reason I haven’t bought Rainbow High clothes is because my bratz clothes that were plastic or partially plastic hit the twenty year mark and turned into dust or sticky messes. We know that something about the Begoth fashion dolls made them melt and yellow. Some pale skin Barbies lose the pink from their skin.
For newer dolls we won’t know how they hold up and given that the doll community is dispersed we just haven’t heard from all the people who bought $150 MH customs except via thrift finds.
It’s why it’s important documentation when people get out their old customs and explain what they wouldn’t do this time around. I have a tag called “mistakes I make so you don’t have to” precisely because I spend my time futzing around with dollar store junk and upcycled materials... and then finding out!
76 notes
·
View notes
Text
How Concrete & Brick Sealers Improve Property’s Durability, Appearance, and Long-Term Value?
In Melbourne, well-known producers and sellers provide essential building protection products like premium brick sealer, concrete grouting and driveway sealer, moisture sealing materials, and more. These manufacturers and suppliers provide a large selection of locally designed and produced building solutions to maintain building structures and enhance their longevity.
They offer a wide range of products, such as concrete, render, and paint additives, concrete sealer and hardeners, water-repellent and stain-proof sealers, waterproof concrete solutions and additives, anti-graffiti products, and rising damp treatments.
For prompt delivery right to their location, skilled and experienced concrete waterproofing contractors and building owners typically order sealers and waterproofing supplies online from these industry-leading merchants.

Why Include Local Manufacturers of Products for Concrete Preservation?
Reliable concrete protectors are essential for both interior and outdoor surface concrete because they operate as a barrier against moisture, heat, and other environmental elements that could compromise the integrity or quality of the construction.
Some respectable local sealing and waterproofing manufacturers deliver a variety of products for building materials coating, sealing off moisture grinding, raising damp protection, a concrete additive, polymer renders, timber protection, and other services necessary during building development to preserve the integrity of the concrete.
Some of these businesses are renowned for being the first in Australia to do research and manufacture water-repellent, stain-proofing sealers and building protection additives.
They provide a variety of based on water and solvent-based versatile water-repellent sealers, including silicone sealers, conventional full-proof silane treatment for building materials infrastructure, innovative silane cream water distasteful treatment for building materials infrastructure, and deep-entry water-repellent concrete sealers.
Natural stones, concrete blocks, pavers or driveways, clay bricks, terracotta, tiles, and grouts are just a few of the masonry and flooring materials for which they have created polishing solutions. These are water-based compounds that don't penetrate thick substrates very well.
Therefore, contact these sellers to get premium-quality sealing, waterproofing, and polishing products for porous brick substrates online.
Source
2 notes
·
View notes
Text


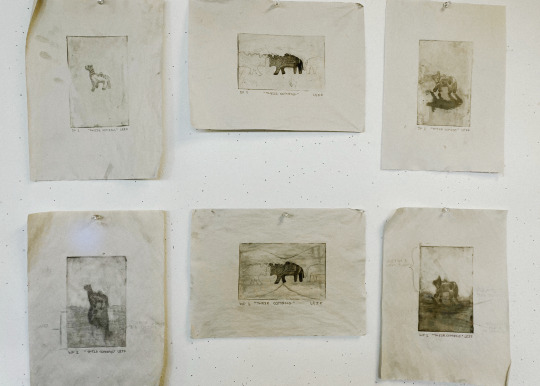

“Theircoming”
.
Hard ground and soft ground etched- acids! solvents! mineral spirits! I went over it with drypoint too. Aquatint for the elephant shadows…it’s where you put the copper plate on a rack, close the door, and turn a handle really fast 20 something times to make a cloud of rosin that evenly coats the plate. There were a lot of shifts in the plate such as using a roulette tool to give textured shadows to the other idols and scraping, sanding, and burnishing parts of where I’d mistakenly drawn to then drypoint over. These were based on some minuscule animalistic beads I’ve got that stand on a shelf. For the cloverlets I did Chine-collé by cutting out and gluing this green dyed paper so that I can carefully lay it on its back on the plate to then align paper on top and print . I have some more that I will share later but this was good to work with my hands I could have done better at wiping the plate of its ink but let me know what you think
14 notes
·
View notes
Text

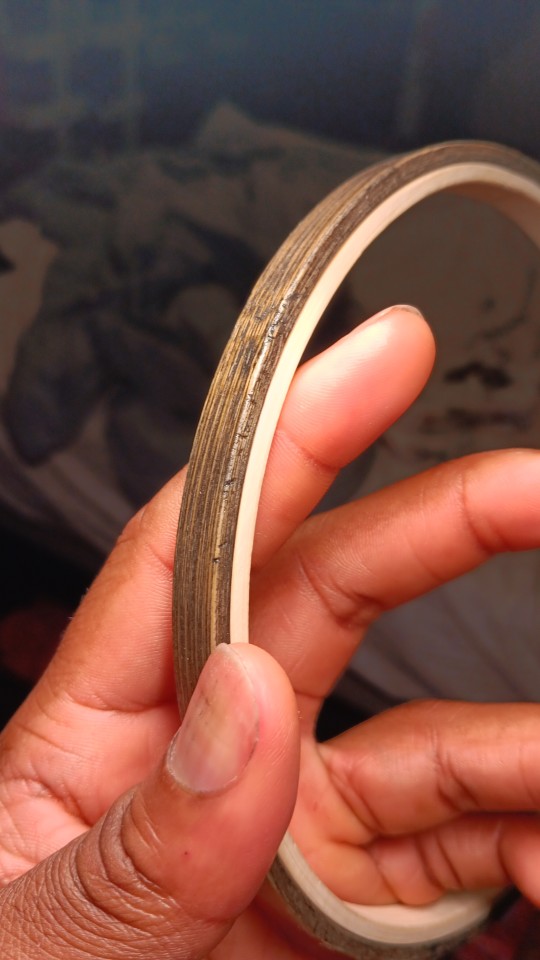
I'm experimenting with using wood stain on my embroidery hoops to give them a more high quality look and feel. Was inspired by this article on craftingcheerfully.com.
This turned out a lot better than I expected it to. Instead of the gel stains the author recommends, I used oil stains.
Prepared the hoop by removing the screw and covering up the metal bits with some masking tape. After that I roughed it up with some sandpaper (I used 80 grit, but I'd probably recommend 100 or higher for a more even colouring) and cleaned off all the dust.
Then I applied a coat of varathane pre-stain wood conditioner, let it sit for 30 minutes as suggested and then applied 4 coats of varathane oil-based stain in the Ebony colour.
I let that dry overnight and then applied a coat of varathane's oil-based polyurethane coating.
All told, for my first time ever working with wood stains, it didn't go terribly. Definitely do all of this outside or in an otherwise very well ventilated area and be careful because all of these steps involve working with highly flammable volatile organic solvents or solutions thereof.
I'll definitely keep experimenting with this. Would love to hear about anyone's experiences working with wood stains either for embroidery or otherwise.
6 notes
·
View notes
Text

WaterKote 2K
WaterKote 2K GLOSS / SATIN / MATT / BARE is a new generation 2 component water borne polyurethane finish, incorporating an extended open time that provides exceptional flow and levelling resulting in a polyurethane gloss film offering extremely hardwearing and long lasting protection to flooring and parquetry of all timber species. Because water is used as the alternative carrier to solvent, URETHANE COATINGS mixed WaterKote 2K GLOSS / SATIN / MATT emits low VOC (volatile organic compounds) and is therefore user and environmentally friendly but this advanced technology retains all the durable and hard wearing benefits of solvent based polyurethane.
12 notes
·
View notes
Text


@WashNinja #biodegradable 🍓 #CarWashShampoo easily cleans exterior vehicle surfaces. Non-toxic VOC, solvent free, paraben-free vegan product combines plant-derived ingredients that produce a spot free finish.
- - - - -
Features & Benefits
• Super suds formula removes dirt and grime.
• Powerful plant-based cleaning agents.
• No alcohol, bleach, phosphates, or dyes.
• Formula safe on existing wax or coatings.
• Strawberry scent.
- - - - -
Directions
• Wash vehicle in a shaded location away from direct sunlight.
• Wash vehicle when surface is cool.
• Rinse vehicle to remove loose dirt.
• Dilute 1-2 oz. EcoSuds per gallon of water in bucket.
• Use a second bucket with plain water for rinsing wash mitt.
• Wash vehicle with premium wash mitt or sponge.
• Rinse vehicle and dry immediately with towel.
#c8#corvette#chevycorvette#c8corvette#carwashshampoo#carwash#wash#autodetailing#detailing#carcare#cardetailing
15 notes
·
View notes
Text
2023 REVIEWS OF THE BEST ORGANIC NAIL POLISH
If you have the necessary tools and know how to follow instructions, doing nails may be done quickly and easily, even if you're a beginner. Having the best organic nail polish on hand anytime you want to alter the color of your nails is one of nails supply wholesale the things you need to have to guarantee that your nails will have an attractive finish and last longer than standard nail colors.
However, there is no genuine reason to go to the salon every time. You will succeed even on your first attempt if you know how to adhere to straightforward directions. Soon, you'll discover that doing your nails is quite simple and maybe even enjoyable.
I'll get back to what this post is supposed to achieve. We all understand that it is not realistic to visit the nail salon every time your nails need to be painted. Finding out that you still need to wait hours before your nails are finished could even aggravate you. Even worse are the side effects brought on nails supplys by the hazardous chemicals that are frequently used to clean and paint your nails.
Along with the lengthy exposure to dangerous chemicals, you also run the risk of getting unwanted side effects like nausea, headaches, and confusion.
You must make sure that only safe ingredients are mixed in every bottle of nail polish that you use or permit to be applied on your nails if you want to make sure that all you get from your mani or pedi experience is pure joy.
Searching for the top natural nail polish? For your next application of nail color, you might wish to take into account one or more of the brands listed below.
BONTIME ORGANIC EASY PEEL-OFF NAIL POLISH, WATER-BASED
If you're seeking for a secure substitute for nail paint, this is a fantastic choice. Bontime is a water-based, odorless, economical, and environmentally friendly polish that works well for everyone—even expectant mothers, nursing mothers, children, and toddlers. There are no chemical solvents in this formula, which is entirely organic.
A Bontime polish that is applied correctly can last up to three days. No UV lamp is necessary for the quick drying, simple to use polish to work its magic. When it is already time for a color change, there is no need to apply a polish remover as well. Even a novice won't have any trouble utilizing it the first time because of how simple it is.

PIG GLASS
When it comes to a healthy alternative to nail polish, Piggy Paint is one of the most popular choices. This non-toxic, water-based product is designed to be 5 Free, 7 Free, vegan, and cruelty-free toward animals. No formaldehyde, toluene, dibutyl phthalate (DBP), formaldehyde resin, bisphenol A, ethyl acetate, acetone, or any other chemical is present.
Piggy Paint has no offensive odor because it is produced from natural substances. Since it has no smell, it is a fantastic option for children, pregnant women, nursing mothers, even toddlers and babies.
With each coat of this non-toxic nail paint, all you get is a tough, long-lasting finish that can last for up to two weeks.
Organic Karma Nail Polish
Another excellent option for an organic nail polish that has been getting excellent ratings from many people is Karma organic. The popular two-in-one base coat from the company is mentioned in this product description.
The company is well renowned nail supply online for its all-natural goods that are devoid of formaldehyde, formaldehyde resin, toluene, DBP, and camphor. They are also made with vegans in mind.
Nail Polish Zoya
The well-known nail product company Zoya provides healthier nail lacquer solutions for more attractive, trendy nails. The world's top selections for pregnant women and women who value their health are its nail colors. This nail color is Big 10 free in addition to being vegan-friendly.
If Zoya nail polish is applied correctly, it will leave a long-lasting finish that won't peel, chip off, or break until your nails require a fresh coat of your favorite shade of nail varnish.
It is said that Emosa Nail Polish is completely non-toxic. All of those vibrant colors are created using a water-based solution that also contains natural components. This formulation does not contain any formaldehyde, toluene, or DBP compounds.
Kids adore it since it is also odorless. You may think of Emosa as the finest option for your children acrylic nail brushes because the firm makes sure that the nail polish they offer is environmentally friendly.
And not just that. This particular brand of nail paint has an easy-soak formula. Simply soak your nails in warm water for one to two minutes if you ever want to change the color. Without the use of nail polish remover, the previous coating can be simply peeled off from one corner.
#nailart#your nail supplier#yournailsupplier#nails#nail polish#nailpolish#gelcolor#gel colors#long nails#nailstyle#nailsoftheday#painted nails#pretty nails#nail art#naildesign#cute nails#nails.txt
2 notes
·
View notes
Text
How Solvent-Based Intumescent Coatings Improve Fire Safety in Buildings?
Building safety is critical in the field of fire prevention, and solvent based intumescent coatings help to improve it. These coatings are intended to protect structural elements from fire. They maintain the safety and security of the building during emergencies.
Visit Us: https://kateoliver.livepositively.com/how-solvent-based-intumescent-coatings-improve-fire-safety-in-buildings/
0 notes
Text
Exhibition of new work: coming April 2023


TENDER CUSPS is a new series of performative video and printed textile works. Informed by the artist’s thirty-year practice in visual performance, the exhibition reconsiders the body in our current era, extending intimacy and duration to domestic material processes and digital technologies. This particular body: white, female, fleshy and aging, attempts to suspend time and prolong the tipping point: the moment right before collapse, dangling, almost falling, almost overflowing. During the months of pandemic anxiety and countless self-tests, the artist noticed a large white spot forming in her throat. The doctor said it was of no concern, just a seed under the surface, gradually getting coated. The image of becoming like an oyster, the body under strain producing pearls, inspired two body-based videos and a series of textile works with beaded embroidery. Interior images of the artist’s own body—including a capture of the white spot and various medical scans from breast to eye to brain—are pigment ink printed on oxford cloth, lightly altered with kitchen solvents, and hand-stitched with glass beads and actual pearls, indicating the vulnerability, familiarity, and lusciousness of the flaws within. The exhibition also includes an edition of diptych Riso prints, as transportable and affordable companion pieces to ‘Horizon,’ a 5.5-meter (18-foot) textile work. http://www.oberwelt.de/

#art#fiberart#fibreart#embroidery#embroideryart#body#performative#soloshow#soloexhibition#bodyinart#stuttgartkunst#video art#performance video#videoperformance
6 notes
·
View notes
Text
One other thing to be aware of with DEET, the most common insect repellent in use (which has been in use for decades, and which is very well-studied for safety at this point): it's a non-polar molecule, and it will act as a solvent on certain plastics, including some hiking gear. It can do the same to the oleophobic coating on your phone screen. ("Oleophobic" means "oil repellent". It helps keep your screen more clear of fingerprints and smudges.) Something to be aware of.
Also, be aware that most purported "natural" insect and tick repellents just are not effective — or only have efficacy numbers published for mosquitos:
https://www.washingtonpost.com/wellness/2023/08/11/deet-free-bug-spray/
If you don't want to use DEET due to the potential risks to gear, picaridin-based repellents are also well-studied at this point (not as much so as DEET, but still well studied), and have similar efficacy against mosquitos and ticks:
https://www.rei.com/learn/expert-advice/insect-repellents.html#:~:text=Picaridin%3A%20Though%20it's%20been%20around,on%20plastics%20and%20other%20synthetics.
My husband and I have been using a picaridin-based repellent for the past few years when we hike. We always keep some in one of our packs, in a pouch alongside the sunscreen.
I'm trying to write a post about tick safety and avoiding tick bites, but a lot of the info on websites is like "Avoid going in the woods, in plants, and where there are wild animals" and "Activities like hiking and gardening can put you at risk" and I'm like thanks! This is worthless!
As ticks and tick borne illnesses are expanding their range, I think it's important for people to be educated about these things, and I think it's especially important to give people actual advice on how to protect themselves instead of telling them to just...avoid the natural world
Rough draft version of Tick Advice:
Ticks don't jump down on you from trees, they get on you when you brush against grass, brush, bushes etc.
Ticks get brought to an area when they get done feeding from an animal and fall off them. In the USA, the main tick-bringing animal is deer, but I've seen plenty ticks on feral cats and songbirds.
Ticks get killed when they dry out so drier areas with more sunlight are less favorable to ticks.
The above is useful for figuring out whether an area is likely to have lots of ticks, and how vigilant you have to be in that area.
Wear light-colored, long pants outside. Tuck your pants into your socks, and tuck your shirt into the waist of your pants. Invest in light, breathable fabrics idc
IMMEDIATELY change out of your outside clothes when you come back from a tick-prone area, wash them, and dry them on high heat to kill any ticks that might be stuck on.
Shower and check yourself for ticks after coming inside. Hair, armpits, and nether regions in particular. You can use a handheld mirror or rely on touch; an attached tick will feel like a bump kinda like a scab
While you're outside, you can just periodically check for ticks by running your hands down your legs and checking visually to see if anything is crawling on your clothes. Light colors make them easy to spot, and they don't move fast.
Combing through each others' hair to check for creepy crawly critters is a time-honored primate ritual and is not weird. When hiking, bring a friend who will have your back when you feel something on your neck and need to know if it's sweat or a tick
If you're careful, you can usually catch ticks before they bite you, but if one does bite you, it's not the end of the world. Since tickborne diseases are different regionally i suspect this advice will differ based on where you are, but the important thing is remove the tick with tweezers (DON'T use butter, a lit match, or anything that kills the tick while it's still attached, please) and contact a doctor to see what to watch for. Most illnesses you can catch from ticks are easily treatable if you recognize them when symptoms first appear
65K notes
·
View notes
Text
Latin America Rail Turnout Market Outlook and Forecast 2025-2032
UV curable resins are specialized polymeric materials designed for rapid curing when exposed to ultraviolet (UV) light. These resins play a crucial role in various industries, including coatings, adhesives, printing, and packaging, due to their ability to enhance durability, efficiency, and environmental sustainability. Unlike traditional solvent-based systems, UV curable resins offer a low-VOC (volatile organic compound) alternative, making them an eco-friendly choice in industrial applications.
Download FREE Sample of this Report @ https://www.24chemicalresearch.com/download-sample/286478/latin-america-uv-curable-resin-market-2025-2032-366
0 notes
Text
Organo-modified Bentonite Market Value: Growth, Share, Size, Scope, Trends, Industry Analsis and Forecast by 2029
"Organo-modified Bentonite Market Size And Forecast by 2029
The global size of the Organo-modified Bentonite Market has witnessed substantial growth in recent years, supported by increasing adoption across industries and regions. Market share dynamics highlight the dominance of key players while showcasing the emergence of new entrants. The market’s scope extends across multiple applications, making it a pivotal area of focus for stakeholders looking to capitalize on emerging trends and opportunities.
Get a Sample PDF of Report - https://www.databridgemarketresearch.com/request-a-sample/?dbmr=global-organo-modified-bentonite-market
Which are the top companies operating in the Organo-modified Bentonite Market?
The Top 10 Companies in Organo-modified Bentonite Market include well-established names that lead the industry with their innovative products and strong market presence. These companies are recognized for their quality, reliability, and ability to meet the evolving needs of consumers. each known for their significant contributions and competitive strategies that drive growth and maintain their leadership in the industry.
**Segments**
- **By Product Type**: The organo-modified bentonite market can be segmented by product type into solvent-based and water-based organo-modified bentonite. Solvent-based organo-modified bentonite is widely used in applications where a higher level of performance is required, while water-based organo-modified bentonite is preferred in industries where environmental concerns are a priority.
- **By Application**: In terms of application, the market can be segmented into paint and coatings, cosmetics and personal care products, drilling fluids, adhesives and sealants, and others. Paint and coatings segment holds a significant market share due to the increased demand for high-performance coatings in various industries.
- **By End-Use Industry**: The organo-modified bentonite market can also be segmented by end-use industry, including construction, automotive, oil and gas, pharmaceuticals, and others. The oil and gas industry is a major consumer of organo-modified bentonite due to its effective use in drilling fluids for oil exploration activities.
**Market Players**
- **Elementis plc**: Elementis plc is a key player in the global organo-modified bentonite market, offering a wide range of organo-modified bentonite products for various applications. The company focuses on innovation and product development to meet the evolving needs of the market.
- **Zhejiang Fenghong New Material Co., Ltd.**: Zhejiang Fenghong New Material Co., Ltd. is another prominent player in the market, specializing in the production of high-quality organo-modified bentonite for a wide range of industries. The company has a strong global presence and is known for its commitment to quality and customer satisfaction.
- **Hangzhou Silica Gel Co., Ltd.**: Hangzhou Silica Gel Co., Ltd. is a leading manufacturer of organo-modified bentonite products, catering to the growing demand for advanced materials in various industrial applications. The company focuses on research and development to introduce innovative solutions to the market.
- **LKAB Minerals**: LKAB Minerals is a well-established player in the organo-modified bentonite market, offering a diverse portfolio of products for different applications. The company emphasizes sustainability and environmental responsibility in its operations, making it a preferred choice among environmentally conscious consumers.
The global organo-modified bentonite market is expected to witness significant growth in the coming years, driven by increasing demand from end-use industries such as construction, automotive, and oil and gas. Factors such as growing investments in infrastructure development, rising disposable incomes, and expanding industrial activities are boosting the market growth. To stay competitive, market players are focusing on product innovation, strategic partnerships, and expanding their global presence to cater to the evolving needs of customers.
https://www.databridgemarketresearch.com/reports/global-organo-modified-bentonite-marketThe global organo-modified bentonite market is poised for substantial growth in the forecast period, driven by a combination of factors such as increasing industrialization, infrastructural developments, and a growing focus on sustainability. One of the key trends shaping the market is the rising demand for high-performance coatings in various industries, which is bolstering the paint and coatings segment significantly. As industries strive for more efficient and durable coatings, the use of organo-modified bentonite in these applications is expected to surge. Moreover, the pharmaceutical industry's adoption of organo-modified bentonite in drug formulation processes is anticipated to drive market expansion further.
In terms of end-use industries, the automotive sector is likely to emerge as a key consumer of organo-modified bentonite owing to its widespread applications in components such as sealants, adhesives, and coatings in the manufacturing process. Additionally, the oil and gas industry remains a major market for organo-modified bentonite due to its critical role in drilling fluids for oil exploration activities. With the continuous growth in the oil and gas sector, particularly in regions experiencing rapid industrialization and urbanization, the demand for organo-modified bentonite is expected to witness a consistent upsurge.
Market players in the organo-modified bentonite industry are focusing on expanding their product portfolios through research and development initiatives to address the evolving requirements of various end-use industries. Innovation-driven strategies are crucial for companies like Elementis plc, Zhejiang Fenghong New Material Co., Ltd., Hangzhou Silica Gel Co., Ltd., and LKAB Minerals to differentiate themselves in the competitive landscape and capture a larger market share. Strategic collaborations and partnerships with key stakeholders in different regions can further enhance market penetration and brand visibility for these players.
Furthermore, the market is likely to witness a shift towards sustainable practices and environmentally friendly solutions in line with increasing regulatory pressures and consumer preferences. Companies that prioritize sustainable manufacturing processes and offer eco-friendly organo-modified bentonite products are expected to gain a competitive edge and secure a loyal customer base. Overall, the organo-modified bentonite market presents lucrative opportunities for growth and innovation, driven by technological advancements, shifting consumer demands, and the expanding application scope across diverse industries.**Segments**
Global Organo-modified Bentonite Market, By Type (Covers, Solvent Based, Water Based), Application (Drilling Fluid, Clarification Agent, Nucleating Agent, Binder, Absorbent or Adsorbent, Others), End User (Oil and Gas, Foundry, Paints and Coatings, Textile, Water Treatment, Cement, Cosmetics, Lubricants and Greases, Coal Briquette) – Industry Trends and Forecast to 2029
The global organo-modified bentonite market is witnessing significant growth due to the escalating industrialization, expansion of infrastructural projects, and a heightened emphasis on sustainability across industries. The rising demand for high-performance coatings in various sectors is a key trend driving market growth, particularly in the paint and coatings segment. The use of organo-modified bentonite in these applications is expected to surge as industries seek more durable and efficient coatings. Furthermore, the pharmaceutical industry's adoption of organo-modified bentonite in drug formulation processes is anticipated to further propel market expansion.
The automotive industry is poised to emerge as a major consumer of organo-modified bentonite due to its extensive applications in components such as sealants, adhesives, and coatings during manufacturing. Moreover, the oil and gas sector remains a substantial market for organo-modified bentonite, primarily in drilling fluids for oil exploration efforts. With the continuous growth in the oil and gas industry, especially in rapidly industrializing and urbanizing regions, the demand for organo-modified bentonite is projected to consistently rise.
**Market Players**
- Elementis Plc (U.K.) - Schlumberger Limited. (U.S.) - Laviosa Minerals Srl (Italy) - Lamberti S.p.A (Italy) - ZHEJIANG HUATE GROUP (China) - Unitech Chemicals(Zibo) Ltd. (China) - zhejiang camp-shinning new material co. ltd (China) - Manek Group (China) - Zhejiang Anji Tianlong Organic Bentonite Co. Ltd. (China) - Zhejiang Qinghong New Material Co. Ltd. (China) - Changxing Guangda New Materials Co., Ltd. (China) - Mineral Technologies Inc. (U.S.) - Clariant (Switzerland) - Kunimine Industries Co., Ltd. (Japan) - CB CHRYSTAL(U.S.) - Alfa Aesar (U.S.) - Kutch Minerals Limited (India) - Ashapura Group (India)
Market players in the organo-modified bentonite sector are concentrating on expanding their product portfolios through research and development endeavors to meet the evolving needs of various end-user industries. Innovation-driven strategies are crucial for companies like Elementis Plc, Schlumberger Limited, and Laviosa Minerals Srl to establish differentiation in a competitive landscape and capture a larger market share. Collaborations with key stakeholders in different regions can further boost market penetration and brand visibility for these players. Additionally, the market is expected to shift towards sustainable practices and eco-friendly solutions in response to regulatory pressures and changing consumer preferences. Companies prioritizing sustainable manufacturing processes and offering environmentally friendly organo-modified bentonite products are likely to gain a competitive edge and secure a loyal customer base. Overall, the organo-modified bentonite market presents abundant opportunities for growth and innovation, fueled by technological advancements, evolving consumer demands, and the widening application spectrum across diverse industries.
Explore Further Details about This Research Organo-modified Bentonite Market Report https://www.databridgemarketresearch.com/reports/global-organo-modified-bentonite-market
Key Insights from the Global Organo-modified Bentonite Market :
Comprehensive Market Overview: The Organo-modified Bentonite Market is expanding rapidly, driven by innovation and growing global demand across key regions.
Industry Trends and Projections: Automation, sustainability, and digital transformation are key trends, with strong growth projected over the next few years.
Emerging Opportunities: New growth opportunities are emerging in eco-friendly technologies and untapped regional markets.
Focus on R&D: Companies are heavily investing in R&D to develop next-gen technologies like AI, IoT, and sustainable solutions.
Leading Player Profiles: Market leaders, such as Company A and Company B, dominate due to strong portfolios and global distribution.
Market Composition: The market is fragmented, with both large corporations and emerging startups driving innovation.
Revenue Growth: The market is experiencing steady revenue growth, driven by both consumer demand and industrial applications.
Commercial Opportunities: Key commercial opportunities lie in expanding into emerging markets and forming strategic partnerships.
Find Country based languages on reports:
https://www.databridgemarketresearch.com/jp/reports/global-organo-modified-bentonite-markethttps://www.databridgemarketresearch.com/zh/reports/global-organo-modified-bentonite-markethttps://www.databridgemarketresearch.com/ar/reports/global-organo-modified-bentonite-markethttps://www.databridgemarketresearch.com/pt/reports/global-organo-modified-bentonite-markethttps://www.databridgemarketresearch.com/de/reports/global-organo-modified-bentonite-markethttps://www.databridgemarketresearch.com/fr/reports/global-organo-modified-bentonite-markethttps://www.databridgemarketresearch.com/es/reports/global-organo-modified-bentonite-markethttps://www.databridgemarketresearch.com/ko/reports/global-organo-modified-bentonite-markethttps://www.databridgemarketresearch.com/ru/reports/global-organo-modified-bentonite-market
Data Bridge Market Research:
Contact Us:
Data Bridge Market Research
US: +1 614 591 3140
UK: +44 845 154 9652
APAC: +653 1251 975
Email:- [email protected]"
0 notes