#SNMP tabs not there
Explore tagged Tumblr posts
Text
SNMP Service Tab Missing
SNMP Service Tab Missing
Have you ever wondered if you have setup SNMP Service. You enable the SNMP Service as a role or feature and then go the check the list of services and it is NOT there?

I have seen this a number of times but on the server OS. Here is how you can possibly resolve the issue and have the SNMP Service Tabs appear.
Open the “Server Manager” screen.

Select “Manage” in the top right corner…
View On WordPress
0 notes
Text
HP server email alerts in Windows Server
One of the most important tools you have as a system administrator is the simple email alert. No matter what the problem is, it’s great to have a head start on fixing it before the phone starts ringing. In the case of HP servers you can get an email alert so you will have a head start on any problems that arise. It just needs to be set up first, which is not super simple if you haven’t done it before. Luckily for you I have this nice little tutorial to walk you through it.
Some Considerations Before We Start
The first thing I should mention is that there are little differences in the way certain generations of servers (and different versions of the software) handle this process. I have used the methods described below on Gen 6 through Gen 9 servers. For the most part they are pretty similar, but you may see something on your server that doesn’t look quite like what I have here. Keeping that in mind I have tried to point out any discrepancies I have seen and to give you as much information as I can so you can hopefully bridge any gaps you may come across.
Also, you may notice the names Hewlett-Packard, HP and HPE used interchangeably. In fact, HPE (Hewlett Packard Enterprise) is now a separate company from HP (Hewlett-Packard). They split around 2016 and now HP sells computers and printers and HPE handles servers. Doesn’t really matter to us except that HPE is starting to change things and that’s okay because otherwise life would be boring, right? Anyway, let’s get into it.
HPE’s servers use “Insight Management Agents” to monitor the health of their hardware. These are drivers that you need to install on the server. With the agents installed you can set up email alerts to tell you when something goes wrong with the server. On Gen 9 and older servers these are all free downloads. On servers newer than Gen 9 this functionality has been moved into the iLO and requires a paid license. I will cover that in a separate tutorial.
Installing Drivers
The first thing we are going to install is the “iLO Management Controller Driver Package”. The version you want will depend on the server’s iLO version. For example, the download for iLO 3 and 4 for Windows Server 2016 and 2019 which I will be using in the examples below is here: https://support.hpe.com/hpsc/swd/public/detail?swItemId=MTX_e20968c891b444c6b6de68a734
If you need a different one, you can probably find it here: https://support.hpe.com/hpesc/public/km/search#q=Management%20Controller%20Driver%20Package&t=All&sort=relevancy
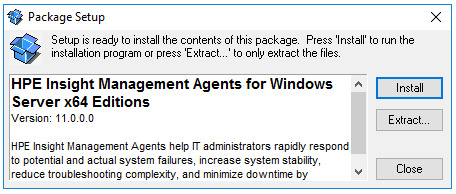
Once the “iLO Management Controller Driver Package” downloads, right-click it and choose “Run as administrator”. You will see a setup wizard that looks like this:
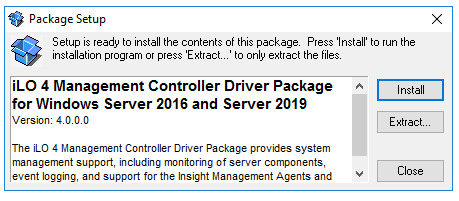
Click the “Install” button and let the installer run its course.
Next, download and install the “Channel Interface Driver” for your operating system. You should get at least version 3.31.0.0. If you don’t there is a very real chance of random crashes. I have seen it myself. There is a bug in the older versions of the driver (https://downloads.hpe.com/pub/softlib2/software1/sc-windows/p2015029342/v154233/cp036919.exe). The download for the Windows Server 2016 version is here: https://support.hpe.com/hpsc/swd/public/detail?swItemId=MTX-c5e0ed82c4864327bc9b86442c#tab-history. For other versions, just google “iLO 3/4 Channel Interface Driver Server 2008 R2” for example.

You may have to reboot afterwards in order to finish the installation. Hopefully you are doing all of this on a new server so you won’t be interrupting anything important. Otherwise use a scheduled task to reboot the server at a time when no one will notice.
Next we will install the HPE System Management Homepage which will allow you to check the status of your server in the web browser at https://localhost:2381.
Use this link to download it and run the executable as an administrator: https://support.hpe.com/hpsc/swd/public/detail?swItemId=MTX_b36fb879335a41d78ee5e99f7f
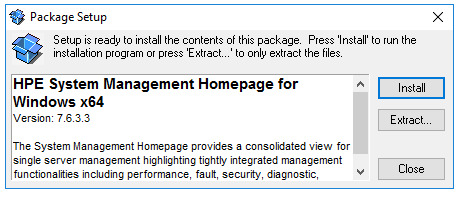
Installing the SNMP Service
In order for the HPE tools to communicate with each other (and us!) we need to install the SNMP service. Microsoft describes the SNMP services as follows: “The Simple Network Management Protocol (SNMP) is used to configure remote devices, monitor network performance, audit network usage, and detect network faults or inappropriate access.” Exactly what we want, right?
To install the SNMP service, go to Server Manager, then click “Manage”, then “Add Roles and Features”. Choose “Role-based”, Next, select the local server, Next, Next, on the “Select Features” screen check the box next to “SNMP Service” and the one inside it, “SNMP WMI Provider”. You may be prompted to install “SNMP Tools”, too, if you don’t have it installed already. Get it, you’ll need it.
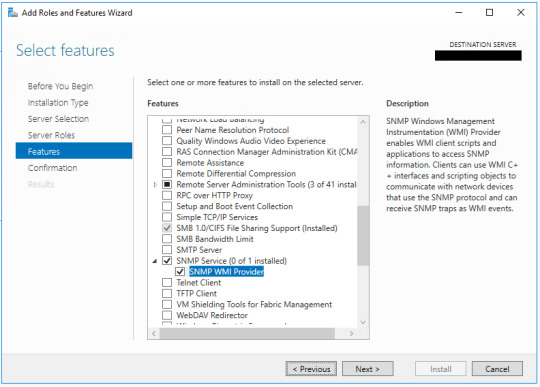
Click Next, then click Install.
Once the installation of SNMP service is finished, click the Start menu and type services.msc (or Windows key and R key on the keyboard and enter services.msc) to open the Services interface.
Find the SNMP Service and make sure it’s running.
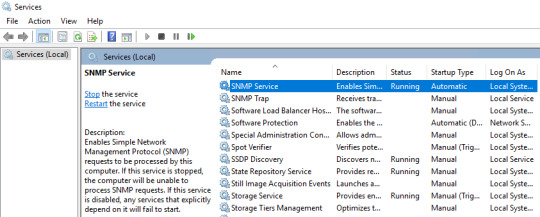
Installing the Agents
Next, we will download and install the HP Insight Management Agents. Here is the link for the newest version at the time of this writing: https://support.hpe.com/hpsc/swd/public/detail?swItemId=MTX_1b0b099098874404adcb5d1d51#tab1
Run the executable as and admin and click Install.
When the install completes, the “Management Agents” window will open.
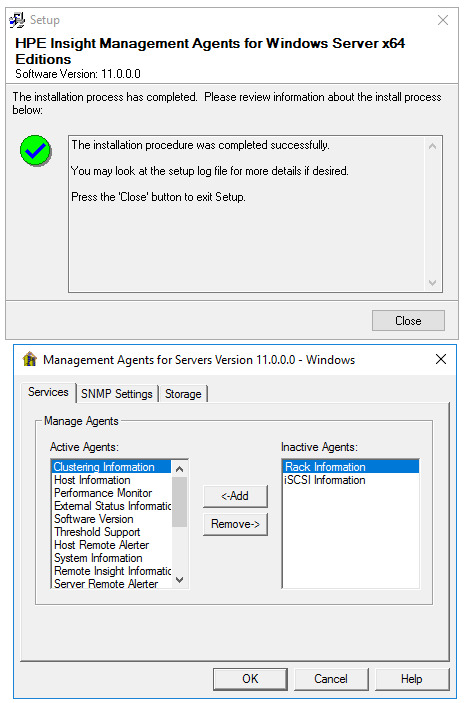
When the install is finished the “HPE Management Agents” settings will open automatically. You may notice there is a button on the “SNMP Settings” tab that says: “Send Test Trap”. We will come back to this later. It won’t work until we take care a few other things so you can click cancel for now.
Configuring SNMP
Now that we have the HPE agents installed we need to configure the SNMP service to collect information from the agents. Open Services.msc by searching in the Start menu or Windows key + R and entering Services.msc. Scroll down to “SNMP Services” and double-click on it. In the security tab, click Add button under “Accepted community names”. There are two Add buttons on this tab so click the top one. Select Community rights as “READ ONLY”. Type “Public” for the Community Name and click Add.
If you don’t have the Security tab close Services.msc and restart it.
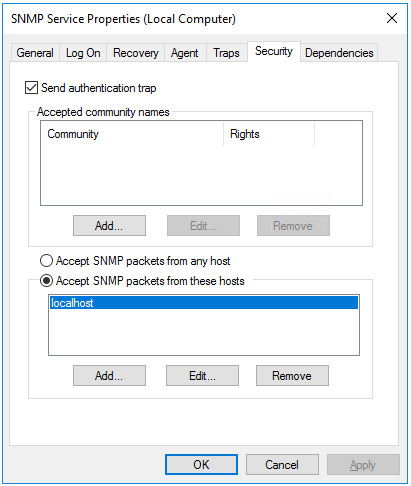
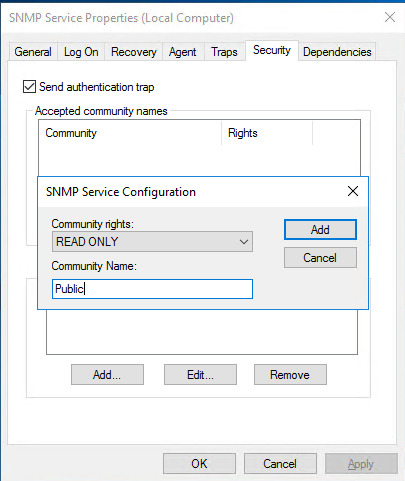
Click the same Add button again and create another Community Name called “Private”, but this time make the Rights “READ WRITE”.
Now we will tell the SNMP service who to accept packets from. With the “Accept SNMP packets from these hosts” radio button selected, click on the lower Add button now and enter 127.0.0.1 as the IP address. This is the localhost so the SNMP service will only be listening to this server we are working on. Click Add and then Apply.

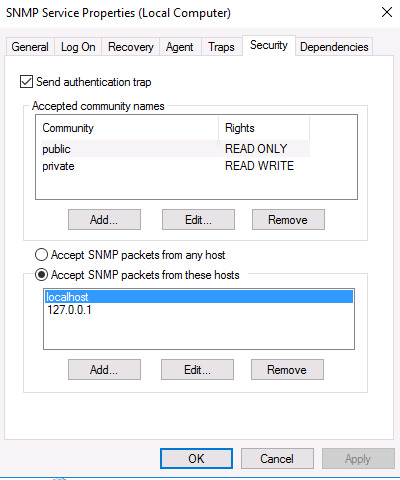
With this done, go to the Traps tab in SNMP Service properties. You will have to type directly into the drop-down list because it doesn’t populate itself. Type “public” and now the “Add to list” button will be clickable. Click it. The drop-down list now has an entry for “public”. Click the “Add” button lower down the Traps tab and enter 127.0.0.1 and then click the Add button.

Click Apply and Ok.
Your New Services
You may notice that you have several new services in your Services.msc window. Their names differ depending on the version you install, but they will be similar to:
HP Insight Event Notifier
HP Insight Foundation Agents
HP Insight NIC Agents
HP Insight Server Agents
HP Insight Storage Agents
HP Smart Array SAS/SATA Event Notification Service
HP System Management Homepage
HP WMI Storage Providers
The names pretty much tell you what they do, but you can click on them in Services.msc to get a more detailed description.
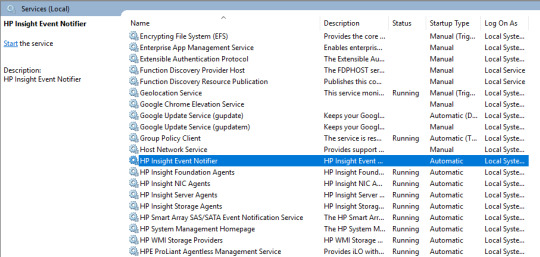
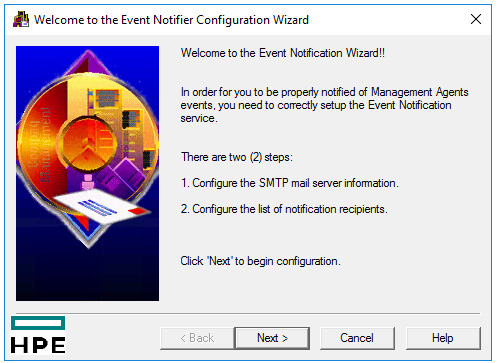
They should all be started except for the HP Insight Event Notifier service. It needs to be configured before it will start. Let’s do that now. In the Start menu go to “HP Management Agents” and run the “Event Notifier Config” as administrator. The instructions are right there in the wizard for you.
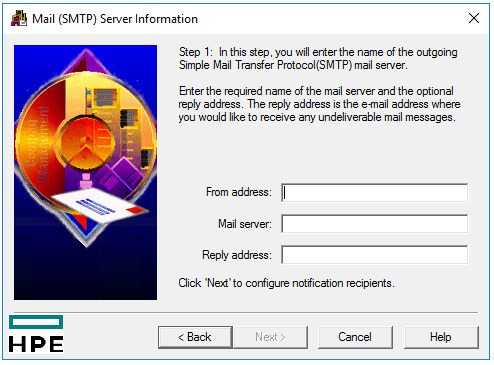

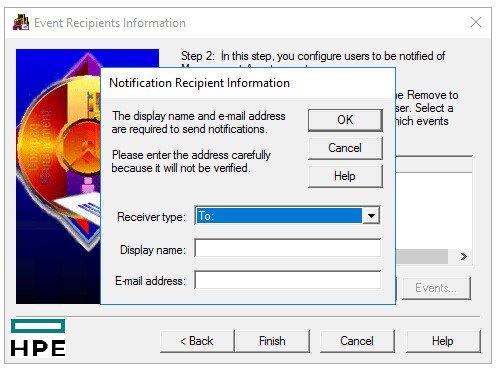
You can also click on the Events button to choose which events trigger the notications. You can have different events selected for different recipients. All of them are selected by default. When you have all of your recipients in there, click finish.
Keep in mind any time you want to change these settings you must open “Event Notifier Config” as an administrator by right-clicking. Otherwise the settings will all be blank like it was never set up in the first place.
Back in the Services.msc window right-click on “HP Insight Event Notifier” and then click Restart. You can also double-click on it and then click the Start button.

If the “HP Insight Event Notifier” service doesn’t start, check your event viewer and you may see an error that will help you. For example, if you try to start that service without first running through the “Event Notifier Config” you will see two errors:
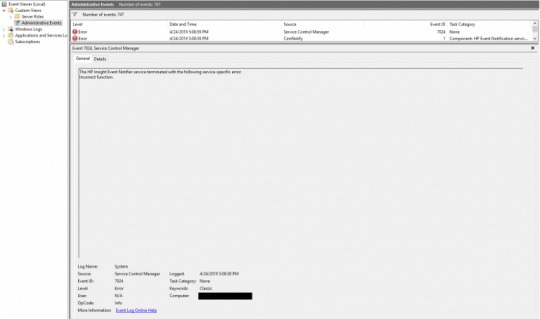
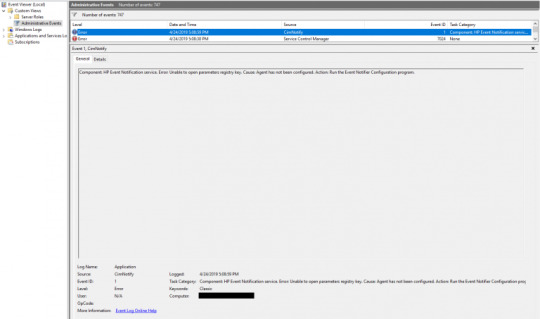


If that’s the case, set up the “Event Notifier Config” and it should work.
Back in the Services.msc window find the “HP System Management Homepage” service. Right-click it and click “Restart”.
The HP System Management Homepage
Now let’s open the HP System Management Homepage. There is probably a shortcut on your desktop, but if not, you will find it in the Start menu under “HPE Management Agents”. You can also type https://localhost:2381 into your browser. Log in to the homepage with an administrator account. If you are using a domain admin account enter it in the format of DOMAIN\username. If you’ve set everything up correctly you should see something like this:

To see some diagnostics, you can go to Logs > Integrated Management Log:
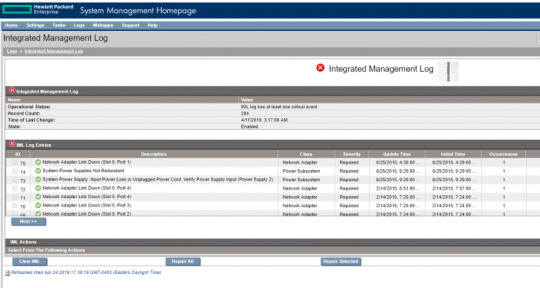
Explore this to see all of the nice stuff it tells you about your server. However, you can’t always be in here staring at it and waiting for problems to pop up, so we need to get the alert emails coming in. There are a couple of ways to send a test email. One is right here in the System Management Homepage.
The next part is different depending on the version of these programs you have.
To send a test email alert with the System Management Homepage, first click on Settings, then SNMP & Agent Settings.
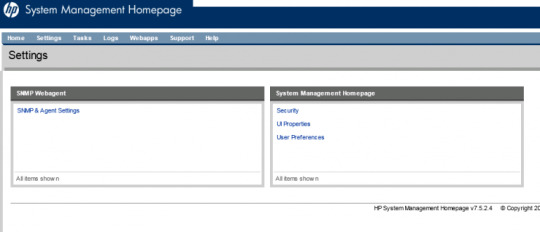
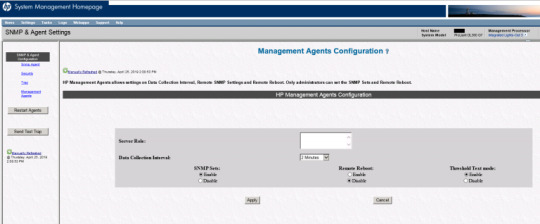
In here you will find another view of the SNMP settings we saw in Services.msc. On the left side of the page you should find the “Send Test Trap” button. Click that and then click Ok when it asks you if you are sure. This next screenshot is from version 7.5.2.4 of the System Management Homepage. Other versions look a lot different and don’t give you as much control. Also, they are moving this functionality into the iLO starting with Gen 10 servers. More on that in another article.
Some versions of the Homepage have a different area where you can send a test indication, but it doesn’t send an email. It just sends a message to the event viewer. To try that out you can go to Settings, Test Indication, Send Test Indication. This is from version 6.2.0.13:


Here is an example of the “Test Indication” error that was sent to the event viewer:

Sending a Test Alert
The most reliable place to send a test email from is the Control Panel app they’ve given us as part of the HP Management Agent installation. This app seems to be present in all versions of these programs.
Open the Windows Control Panel and find “HP Management Agents”. Click on “View By” and choose “Large Icons” to find it easier. Right-click on it and run it as administrator.
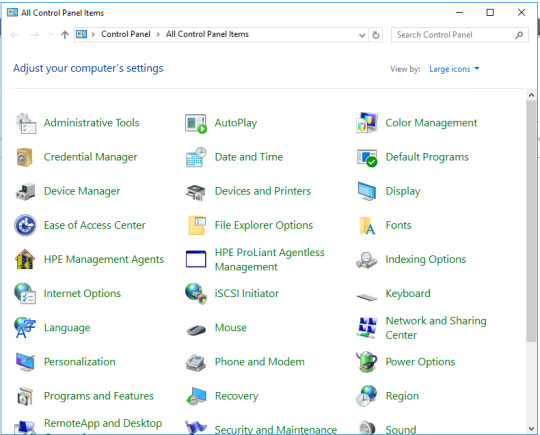

In the first tab that opens you will see all of the types of agents that are working in the background. The important ones should already be set up for you. To send a test email alert click on the “SNMP Settings” tab.

You don’t need to change anything here either. Just click the “Send Test Trap” button. If the “Send Test Trap” button is greyed out, check to make sure the “HP Insight Foundation Agents” service is running in Services.msc and you are running “HP Management Agents” as administrator. If you see the following error after clicking “Send Test Trap”: “The Management Agents Remote Alerter agent has not finished initializing or is not enabled. The test trap was not sent.” then you are probably not running “HP Management Agents” as administrator.

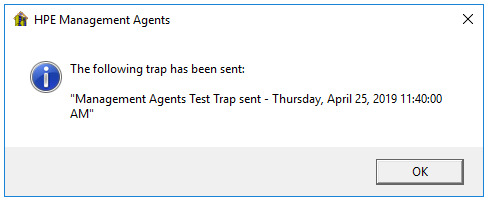
If you’ve set everything up correctly you should get a message box like this: “The following trap has been sent” with the date and time.
And you should receive and email that says “The system has detected the following event:” with the date, time, server name, and the description of the error:

If you get that email, then congratulations! You’re all set to receive an email alert when something goes wrong.
If you don’t get an email you may have to add the server to your Exchange receive connectors or make some other change depending on how you are set up. Also, check the services in Services.msc to make sure they didn’t stop running for some reason.
Here is an example of a dead battery error:

You might want to try sending a test email once a month or so to make sure it’s all still working. Have fun!
1 note
·
View note
Text
Cách cài đặt và cấu hình SNMP trên Windows 10 nhanh nhất
Nếu bạn cảm thấy cách cài đặt và cấu hình SNMP trên Windows 10 quá khó, không thể làm được thì hãy làm theo hướng dẫn chi tiết bên dưới đây nhé.
Simple Network Management Protocol (SNMP) là một giao thức lớp ứng dụng cho phép các thiết bị mạng chia sẻ thông tin, bất kể sự khác biệt về phần cứng hoặc phần mềm. Nếu không có SNMP, các công cụ quản lý mạng không thể xác định thiết bị, ghi lại những thay đổi của mạng, giám sát hiệu suất mạng hoặc xác định trạng thái của thiết bị mạng trong thời gian thực.
Bắt đầu từ Windows 1803 trở lên, Microsoft đã ngừng sử dụng tính năng này vì các rủi ro bảo mật liên quan và thay vào đó, khuyến nghị sử dụng Common Information Model (CIM). Nhưng dù sao đi nữa, nếu bạn vẫn muốn cài đặt và bật SNMP trên PC, chúng tôi sẽ hướng dẫn bạn cách thực hiện.
Hướng dẫn cách kích hoạt SNMP
Bật SNMP từ Settings
SNMP có sẵn dưới dạng tính năng tùy chọn trên Windows 10. Bạn có thể bật các tính năng tùy chọn bằng cách điều hướng đến Settings > Apps > Apps & features > Optional features. Nhấp vào Add a feature và tìm kiếm snmp. Chọn Simple Network Management Protocol (SNMP) và WMI SNMP Provider, rồi nhấp vào Install.
Bật SNMP từ Settings
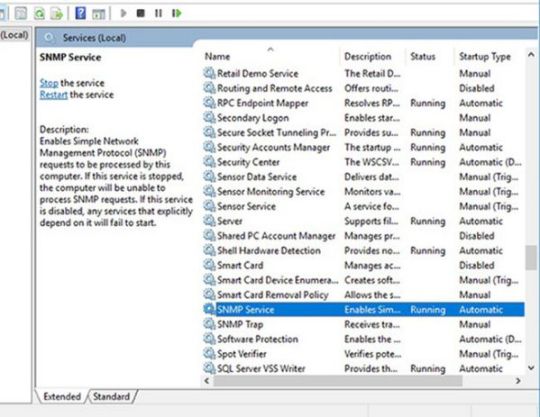
Khi hoàn tất, hãy xác minh xem SNMP có xuất hiện trong bảng điều khiển Services hay không.
Bật SNMP bằng PowerShell
Để bật SNMP qua PowerShell, trước tiên hãy đảm bảo rằng máy tính của bạn có thể truy cập Internet. Sau đó, hãy chạy PowerShell với quyền admin bằng cách nhấn Win + X và chọn Windows PowerShell (Admin). Thực thi lệnh sau để cài đặt SNMP server từ máy chủ của Microsoft:
Add-WindowsCapability -Online -Name "SNMP.Client----0.0.1.0"
Ngoài ra, bạn cũng có thể cài đặt SNMP bằng công cụ DISM với lệnh sau:
DISM /online /add-capability /capabilityname:SNMP.Client----0.0.1.0
Bật SNMP bằng PowerShell
Khi bạn đã thực thi một trong hai lệnh (Add-WindowsCapability hoặc DISM) thành công, hãy xác minh rằng service SNMP đã được cài đặt bằng lệnh sau:
Get-WindowsCapability -Online -Name "SNMP*"
Hướng dẫn cách cấu hình SNMP
Từ bảng điều khiển Services
Bây giờ bạn đã cài đặt service SNMP trên PC của mình, hãy cấu hình nó.
Để bắt đầu, hãy xác minh rằng các service SNMP (SNMP Service và SNMP Trap) đang chạy. Nhấn Win + R, nhập services.msc và nhấn Enter để khởi chạy bảng điều khiển Services. Tìm cả hai service SNMP và kiểm tra xem chúng có xuất hiện trong danh sách hay không.
Cấu hình SNMP từ bảng điều khiển Services
Ngoài ra, hãy kiểm tra xem SNMP Service có đang chạy hay không. Nếu không, hãy nhấp đúp vào service và nhấn Start. Thay đổi Startup type thành Automatic để tự động chạy service từ lần khởi động tiếp theo.
Tiếp theo, chuyển sang tab Agent và điền vào tên và vị trí của bạn vào các trường Contact và Location tương ứng. Trong phần Service, hãy chọn hộp tương ứng với các service mà bạn muốn thu thập dữ liệu để chuyển tiếp dữ liệu đó đến thiết bị giám sát.
Chọn các service muốn thu thập dữ liệu
Bây giờ, chuyển sang tab Security.
Chuyển sang tab Security
Thêm tên của máy chủ SNMP mà bạn muốn xác thực trong danh sách Accepted community names. Bạn có tùy chọn cung cấp xác thực None, Notify, READ ONLY, READ WRITE hoặc READ CREATE authentication to the communities.
Tiếp theo, thêm máy chủ mà bạn muốn chấp nhận gói SNMP vào hộp tiếp theo và đảm bảo chọn Accept SNMP packets from these hosts. Tùy chọn Accept SNMP packets from any host sẽ loại bỏ mọi hạn chế IP và cho phép tất cả các máy chủ gửi gói SNMP. Tuy nhiên, hãy coi chừng, đây không phải là một tùy chọn an toàn để cho phép, đặc biệt là trên các máy tính công khai.
Khi bạn hoàn tất, hãy nhấn Apply, quay lại tab General để khởi động lại service (nhấp vào Stop và sau đó chọn Start) và nhấn OK để thoát. Bước cuối cùng là mở các cổng SNMP: UDP 161 (SNMP) và UDP 162 (SNMPTRAP). Để thực hiện việc này, hãy thực thi các lệnh sau:
netsh advfirewall firewall add rule name="SNMP UDP Port 161 In" dir=in action=allow protocol=UDP localport=161netsh advfirewall firewall add rule name="SNMPTRAP UDP Port 162 In" dir=in action=allow protocol=UDP localport=162netsh advfirewall firewall add rule name="SNMP UDP Port 161 Out" dir=out action=allow protocol=UDP localport=161netsh advfirewall firewall add rule name=" SNMPTRAP UDP Port 162 Out" dir=out action=allow protocol=UDP localport=162Từ Group Policy Editor
Bạn có thể thay đổi các tham số Group Policy Object (GPO) để cấu hình tập trung những tham số SNMP. Khởi chạy Local Group Policy Editor và điều hướng đến Computer Configuration > Administrative Templates > Network > SNMP để cấu hình các tham số.
Trên ngăn bên phải, bạn sẽ thấy như sau:
1. Specify communities: Cho phép bổ sung và xác thực các cộng đồng có thể gửi yêu cầu SNMP.
2. Specify permitted managers: Cho phép bổ sung các máy chủ có thể gửi gói SNMP đến máy tính.
3. Specify traps for public community: Tùy chọn này cho phép bạn cấu hình tên của máy chủ nhận trap message được gửi bởi service SNMP.
Như vậy là chúng tôi đã hướng dẫn cách cài đặt và cấu hình SNMP trên Windows 10 rồi đấy. Mời bạn bắt tay vào thực hành ngay thôi. Chúc may mắn!
0 notes
Text
How to Configure Netgear ProSafe Firewall Rules?
Over time, Netgear Routers have significantly gained popularity due to their excellent routing features and a list of valuable features. Adding more to its advantages, the Netgear ProSafe firewall gives you a perfect opportunity to protect your network from DoS attacks and unwanted traffic. Besides, it offers extended protection against SYSLOG and SNMP, which allows you to monitor the web in a straightforward way. Your newly purchased Netgear Router has the built-in Netgear firewall rules that play an essential role in preventing unauthorized access to your Local Area Network (LAN). When you set Inbound firewall rules, they allow or permit you the accessibility to the LAN services from the internet. You can follow the below-mentioned set of instructions to do the Netgear Router login and configure inbound or outbound
Netgear Router firewall rules.
Steps to Configure Netgear ProSafe Firewall Rules
Below is more about the Netgear Router firewall rules configuration steps. Now, follow the stepwise procedure to configure firewall rules.
1. First, launch a browser on your system and visit http://192.168.0.1.
2. Then, enter the router login credentials, same as we log in while performing
Netgear WNDr3400 setup, in the required space, and click on 'Login'
3. Click on ‘Firewall Rules’ on the left panel under the 'Security' tab.
4. Click on Add under the type of rule that you want to add.
5. Choose the required service from the list. If you need to add a new
customized service, follow the below-mentioned steps:
Click on Services on the left panel, under the Security tab.
Select the Add Custom Service option.
Name the new service and select the protocol type that the service will use.
Enter the Starting and Ending port and then click on Apply to complete the new custom service.
6. Now, choose the appropriate action for packets under the new rule under the Action tab.
7. Further, enter the IP address of the computer under the Send to LAN server field.
8. Now, choose an option for the WAN users.
9. Then, click on the desired option under the Log section.
10. Then, click on Apply to save all your changes. So, these are some of the valuable insights into the Netgear Firewall that works as an excellent security layer between your home or office network and the internet.
Source
0 notes
Text
Windows 10 Insider Preview Build 17723 and Build 18204 released
Windows 10 Insider Preview Build 17723 and Build 18204 released. Mixed Reality Flashlight How many times have you been immersed in a captivating virtual experience and… Wanted to take a quick peek at someone nearby? Wanted to reach for a drink, your phone or a keyboard? Needed to find a surface to set down your controllers? In the past you probably fumbled about or removed your headset, which can be clumsy if you have controllers in your hands. Today we are excited to announce that we are adding the ability to peer into your physical environment through Flashlight – without removing your headset! With the latest Windows Insider Program build, you can open a portal into your real world at any time via the Start menu, a button shortcut, or a voice command. This opens a low-latency pass-through camera feed connected to your controller. It’s comfortable, intuitive, and keeps you immersed. Flashlight finally allows you to mix your physical and virtual realities. Give it a try in this week’s Insiders build and let us know what you think! Microsoft Edge Improvements New Microsoft Edge Group Policies: The Microsoft Edge team introduced new Group Policies and MDM settings for IT administrators to manage Microsoft Edge. The new policies include enabling/disabling full-screen mode, printing, favorites bar, and saving history; prevent certificate error overrides; configuring the Home button and startup options; setting the New Tab page and Home button URL and managing extensions. Retired XSS Filter: We are retiring the XSS filter in Microsoft Edge beginning in today’s build. Our customers remain protected thanks to modern standards like Content Security Policy, which provide more powerful, performant, and secure mechanisms to protect against content injection attacks, with high compatibility across modern browsers. Here comes Emoji 11 For those who haven’t already heard, Unicode 11 comes with 157 new emoji – as of today they’re now available for Insiders to try in the build. Including superheroes, redheads, a softball, a pirate flag and a llama all made the cut. You can access them using the Emoji Panel (WIN+.) or the touch keyboard. When you get today’s build, you’ll also find that we’ve made tweaks to some of our existing emoji – here are some examples: Our ninja cats got a bit of love too – can you spot the difference?

Note: The Emoji Panel is currently available for 190+ locales. Keywords and tooltips for the new emoji in today’s build are not yet implemented.
Time Accuracy and Traceability improvements:
Leap Second Support– Windows will now support these occasional 1-second adjustments in a traceable and UTC-compliant manner. What’s a leap second? As the earth’s rotation slows, UTC (an atomic timescale) diverges from mean solar time or astronomical time. Once UTC has diverged by at most .9 seconds, a Leap Second is inserted to keep UTC in-sync with mean solar time. Since the practice of inserting leap seconds began in 1972, a leap second has typically occurred every 18 months. Precision Time Protocol– For the highest accuracy environments, you can now improve your time accuracy by leveraging a new time protocol that delivers far more accurate time samples to the endpoint (Windows Server 2019 or Windows 10, host or virtual machine). Software Timestamping– You can now further improve your network time accuracy by eliminating the software delay introduced by the Windows networking stack. Improved Kiosk Setup Experience We have introduced a simplified assigned access configuration page in Settings that allows device administrators to easily set up their PC as a kiosk or digital sign. This new page provides a wizard experience that walks you through the kiosk setup flow including creating a kiosk account that will automatically sign in on device start. Please go to Settings, search for assigned access, and open the “Set up a kiosk” page to give it a try We are very excited to announce that Microsoft Edge now works with assigned access which allows IT administrators to create a tailored browsing experience designed for kiosk devices. Microsoft Edge kiosk mode supports the following four types: For Microsoft Edge kiosk mode running in single-app assigned access the two kiosk types are: Digital / Interactive signage that displays a specific website full-screen InPrivate. Public browsing supports multi-tab browsing and runs InPrivate with minimal features available. Users cannot minimize, close, or open a new Microsoft Edge windows or customize it using Microsoft Edge Settings. Users can clear browsing data, downloads and restart Microsoft Edge by clicking “End session.” Administrators can configure Microsoft Edge to restart after a period of inactivity. For Microsoft Edge kiosk mode running in multi-app assigned access the two kiosk types are (Note the following Microsoft Edge kiosk mode types cannot be setup using the new simplified assigned access configuration page in Windows 10 Settings): Public browsing supports multi-tab browsing and runs InPrivate mode with minimal features available. In this configuration, Microsoft Edge can be one of many apps available. Users can close and open multiple InPrivate windows. Normal mode runs a full version of Microsoft Edge, although some features may not work depending on what apps are configured in assigned access. For example, if the Microsoft Store is not set up, users cannot get books. Improving your update experience Have you ever had to stop what you were doing, or wait for your computer to boot up because the device updated at the wrong time? We heard you, and to alleviate this pain, if you have an update pending we’ve updated our reboot logic to use a new system that is more adaptive and proactive. We trained a predictive model that can accurately predict when the right time to restart the device is. Meaning, that we will not only check if you are currently using your device before we restart, but we will also try to predict if you had just left the device to grab a cup of coffee and return shortly after. How Accurate is this Model? We’ve been using this model on internal devices, and we’ve seen promising results upon rollout. Due to the nature of its architecture, we’re able to update the model with minimal turnaround time based on our insights from its performance. It’s all thanks to our cloud infrastructure. Game bar Improvements In RS5, we’re making it easier to access the Game bar. In this flight, you can now discover Game bar from the Start menu or bring up Game bar by using the Win + G shortcut at any time. General changes, improvements, and fixes We fixed an issue resulting in the “…” menu not working in multiple apps (including Microsoft Store, Photos, and Screen Sketch) where clicking on any of the items would just make the menu dismiss. We fixed an issue where in certain cases on PCs with multiple monitors, all the windows might have appeared shifted “up” and mouse input going to the wrong location. We fixed an issue where SNMP and the Windows Event Log service might start using an unexpectedly high amount of CPU in the last flight. We fixed the issue with Windows Defender Application Guard no longer working after installing the Build 17713.1002 Cumulative Update. We fixed an issue from the last flight where upon rebooting in order to start upgrading to the build, the system would boot back into the current build rather than the new one. We fixed an issue resulting in upgrades to the previous build failing with error 0x8007001f. We fixed an issue from the previous flight where Window Recovery Environment (WinRE) would not launch and resulted in “Reset this PC” and “Advanced startup” flows to be broken and appear to do nothing. We also fixed an issue from the flight before last (not visible in the last flight due to the aforementioned bug) where “Reset this PC” would initiate and rollback without completing the intended reset. We fixed an issue resulting in some laptops experiencing a CRITICAL PROCESS DIED bug check when the PC was put to sleep by closing lid and the connected power disconnected. We fixed an issue resulting in ShellExperienceHost.exe crashing when trying to pin apps to Start Menu via drag and drop. We fixed an explorer.exe crash when launching the Default Apps Settings page via WIN+R ‘control /name Microsoft.DefaultPrograms /page pageFileAssoc’. We fixed an issue where .mkv files were using a generic app icon in File Explorer instead of a thumbnail. Delivery Optimization Settings now has a new icon. We fixed an issue where suggestions on the main page of Settings would appear after a delay, making the Settings categories shift unexpectedly. We fixed an issue where Notification Settings listed every possible quick action in the enable/disable quick actions section, even those not applicable to the PC being used (including two Focus Assist entries). We fixed an issue where the systray overflow area could end up drawing slightly below the taskbar. We fixed an issue resulting in the network state in the taskbar potentially becoming stale in recent builds (showing there was no connection when there was, and vice versa). We fixed an issue where pinging PCs by name on the same LAN would do a case-sensitive name check. We fixed an issue where using v6v4tunnel to establish a tunnel didn’t work. We fixed an issue in Command Prompt from the previous flight where if a typed string wrapped around to a second line, you could only delete it up to the line break. We fixed an issue resulting in Task View / Timeline crashing on launch for some Insiders in recent builds. We fixed an issue where right-clicking an activity in Timeline was missing the “clear all from day” option. When you open a PDF using Microsoft Edge, the activity will now be listed in Timeline. We fixed an issue where sometimes you would see windows unexpectedly quickly reorder after exiting Task View without selecting a window. We fixed an issue from recent builds where the clock in the taskbar was leaking graphics device context handles (HDCs) every time it redrew, leading to performance issues the longer a PC was running. Multiple factors can impact performance, so if you’re continuing to notice any issues after upgrading to this build, please log feedback including a performance trace with a short repro and description. We fixed an issue resulting in not being able to distinguish the border between two overlapping Command Prompt windows. We fixed an issue resulting in the tops of apps in tablet mode being clipped (i.e. missing pixels). Not fixed. Thanks everyone for sharing your feedback about the new welcome screen string prompting you to lock your PC. For the time being we will be reverting this to the previous string “These updates will protect you in an online world”. We’ve made some tweaks to the design of the Cortana & Search landing page, specifically in situations where Cortana isn’t enabled/supported. We fixed an issue resulting in Microsoft Jigsaw hanging on launch in recent builds. The settings menu in Microsoft Edge (“…”) is now acrylic. When you right-click a book in the Microsoft Edge Books pane, you’ll now see an option to share the book. We fixed an issue that could result in Microsoft Edge spellchecking even though spellchecking was turned off in Settings. We fixed an issue where using the mouse wheel in Microsoft Edge would unexpectedly do a forward/back through browser history if focus was in the address bar and “Scroll inactive windows” was disabled. We fixed an issue where when using certain sites to listen to music in Microsoft Edge, your mouse might experience a small freeze if moving when the song changed. We fixed an issue resulting in apps like Adobe XD crashing on keypress in recent flights. We fixed an issue that could result in a deadlock on certain devices after using the pen to ink. We fixed an issue where the touch keyboard would still have a launch animation even if “Show animations” was turned off in Ease of Access Settings. We fixed an issue where launching regedit.exe (or any .exe that requires elevation) from a non-elevated cmd window using the “start” start command produced a “parameter is incorrect” error. We fixed an issue causing Narrator speech to fade when waking from sleep mode. We fixed an issue where the error “Your fingerprint couldn’t be recognized. Try using a different finger.” was displaying unexpected characters in place of the apostrophe. Known issues The clock & calendar flyout may not appear until bringing up Start or Action Center (and then they will both appear at the same time). This same issue may also result in notifications not appearing until Start or Action Center is opened. We’re progressing in our work on adding dark theme in File Explorer and the Common File Dialog – you’ll notice improvements in this build, although we still have a few things left to do. You may see some unexpectedly light colors in these surfaces when in dark mode and/or dark on dark text. When you upgrade to this build you’ll find that the taskbar flyouts (network, volume, etc) no longer have an acrylic background. When you use the Ease of Access Make Text bigger setting, you might see text clipping issues, or find that text is not increasing in size everywhere. When you set up Microsoft Edge as your kiosk app and configure the start/new tab page URL from assigned access Settings, Microsoft Edge may not get launched with the configured URL. The fix for this issue should be included in the next flight. On Build 17723 (but not Build 18204), you may see the notification count icon overlapping with the extension icon in the Microsoft Edge toolbar when an extension has unread notifications. On Windows 10 in S Mode, launching Office in the Store may fail to launch with an error about a .dll not being designed to run on Windows. The error message is that a .dll “is either not designed to run on Windows or it contains an error. Try installing the program again…” Some people have been able to work around this by uninstalling and reinstalling Office from the Store. If that doesn’t work, you can try to install a version of Office not from the Store. When the Narrator Quickstart launches, Scan Mode may not reliably be on by default. We recommend going through the Quickstart with Scan Mode on. To verify that Scan Mode is on, press Caps Lock + Space. When using Scan mode you may experience multiple stops for a single control. An example of this is if you have an image that is also a link. This is something we are actively working on. If the Narrator key is set to just Insert and you attempt to send a Narrator command from a braille display then these commands will not function. As long as the Caps Lock key is a part of the Narrator key mapping then braille functionality will work as designed. There is a known issue in automatic dialog reading where the title of the dialog is being spoken more than once. For more information about Narrator new keyboard layout and other known issues, please refer to (Intro to New Narrator Keyboard Layout doc). ADDED: There is an issue where the tops of apps in tablet mode being clipped (i.e. missing pixels). Known issues for Developers If you install any of the recent builds from the Fast ring and switch to the Slow ring – optional content such as enabling developer mode will fail. You will have to remain in the Fast ring to add/install/enable optional content. This is because optional content will only install on builds approved for specific rings. Read the full article
1 note
·
View note
Text
Learn steps How to Fix Canon Printer Offline on Windows
Have you been stressing that your canon printer says offline conjointly hampers your work. As we have seen, Most of the time, printer issues happen amid profoundly basic times. the computer could be a go between between the printer and the organize, so any network issue seem cause this issue. Like poor connectivity between computer and printer or computer and organize. This could moreover happen due to switch issues. In case You rule Printer is Offline Or Not Printing At that point this Post is just for You. Learn how to resolve Canon printer offline to online Windows PC, The developing world has made a tremendous request for online products and gadgets. As the request for online work increments at the same time request for computers, portable workstations and printers also increases. Within the advertise, there's a colossal collection of different printers out of which the rule printers are the foremost solid and trustable Canon printer offline to online. Canon printers are the finest choice to have as a printer in your office space. The best feature about Canon printers is that they are very compact and very easy to use. The canon printers are two in one, having the feature of printing along with a photocopy. The printing speed of Canon printers is even less than a second, therefore the canon printers are super fast and consume less time. By connecting the USB cable from your printer to your PC, you can print your documents. However, it happens that one or more print requests cause an error: the Canon printer offline to online, thus preventing other print requests.
Why is My Canon Printer Offline?
In this part of the blog, we will tell you 4 causes of Canon printer offline among which the most usual one is the faulty network. We hope now you can easily identify the reason behind Canon printer offline to online error so you must be thinking that how do I fix this? Sometimes, your network connection may not be working appropriately. At other times, it may be working fine but the connection may not have been made correctly.
We have given easy solutions in this guide to resolve Canon printer offline windows:-
Solution thru Basic checks.
Set the printer as Default Printer.
Restart Printer’s Spooler Service setting.
Disable the “Use Printer Offline” setting.
Uncheck the “SNMP Status Enabled” setting.
Update the Drivers of Canon Printer.
Check the VPN connection setting.
Installation of latest updates.
How To Bring An Offline Canon Printer Online?
If you are using a wireless printer and suddenly the printer is showing offline, you need to connect the printer directly to the computer via USB cable. Perform the “Network Reset” using the network setup wizard from the printer control panel and then initiate the “Wireless Setup Wizard” to connect the printer back to the network. If you are also the one facing the printers offline problem, and finding the solution to Canon printer offline to online
Set Canon As Default Printer: Ensure that the correct printer is selected as a default. To set this you need to go to the “Control Panel”, then click on “printers and devices” and make a right-click on the correct printer installed and then choose “set as a default” option. After setting the default printer, make sure the correct printer is checked marked, from where you are trying to print from.
Disable the “Use Printer Offline” setting: Go to Control panel from Start Menu > open the Devices and Printers option. Double click on the Icon of the Canon Printer which is showing offline. > Access printer tab from menu bar. > Check that Use Printer Offline option is ticked or not. > If it is ticked then disable it by uncheck it. > Again access printer tab and select Cancel All Documents. > Reboot you Computer/Laptop and check its printing now
Restart Printer’s Spooler Service setting: In search box write services.msc > Now a window will appear on the screen, Select Print Spooler option from the given list. > Right-click the Print Spooler option > Choose Restart option from drop down list, In case it is not highlighted then choose Start option. > Double click the Print Spooler option. > Here set the Startup type as Automatic and press OK to save this setting. > Restart the Computer/Laptop.
Uncheck the “SNMP Status Enabled” setting: In control panel open the Devices and Printers option. > Double click on the Icon of the Canon Printer which is showing offline. > Access Printer Tab in the Menu bar, a list will appear in a small window. > Select Properties and go to Ports tab in menu bar. > Choose IP Address of Canon printer, > Click on Configure Port. > Here verify that SNMP Status Enabled option ticked or not. > If it is ticked then uncheck it and press o to save this setting. > Now cross check that issue has been resolved or not.
From numerous causes to various arrangements We trust that this total direct given you valuable data and replied your address that How to Settle Canon printer offline to online We too trust that you just have fixed Rule printer offline mistake with the assistance of this.
sources: https://printerofline.blogspot.com/2021/04/how-to-get-canon-printer-offline-to.html
0 notes
Text
Missing Protocol Windows 10

Windows 10 Network Protocol Error: Missing Windows Sockets Registry Entries By Corey October 5, 2020 No Comments My colleagues work computer running Windows 10 began to lose Internet access from time to time (once in 2-3 days with the Limited connection status in the tray). Temporarily Disable or Reinstall your Antivirus Software. First things first, if you are using any. Simply updating your PC's Windows 10 operating system could also fix this issue and restore any missing default apps. Step 1: Hit the Windows logo + I short to launch the Windows Settings menu.
Simple Network Management Protocol or SNMP is used for monitoring, event notification, and network device management on corporate networks. The protocol consists of a set of network management standards, including the Application Layer protocol, database schemas, and a set of data objects. SNMP can receive various information (uptime, performance counters, device parameters, etc.) from any network devices: switches, servers, routers or computers on which the SNMP agent is installed. In Windows 10, the SNMP service is available as a separate Windows component and it’s not installed by the default.
How to Install SNMP Service in Windows 10?
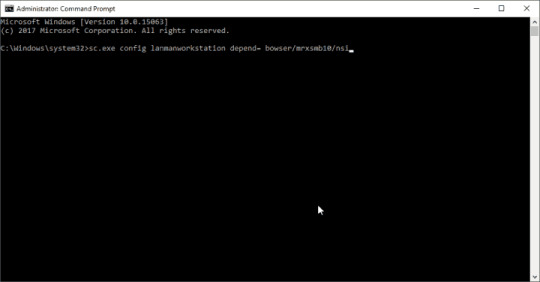
You can check if the SNMP service is installed on your Windows 10 using the Get-Service:
Most likely, the service has not been installed yet.
You can install the SNMP service via the Control Panel. Go to the Control Panel > Programs and Features > Turn Windows features on or off. In the list of Windows features, select Simple Network Management Protocol (SNMP) and the WMI SNMP Provider (provides access to SNMP information via the Windows Management Instrumentation interfaces) and click OK.
You can also install SNMP service using PowerShell:
This command can help you to install SNMP service on Windows 10 in 1803 build or earlier. Starting from Windows 10 1809 Microsoft has changed the way to deploy snmp service on desktop OSs.
Installing SNMP Service in Windows 10 1803 and Newer
Missing Protocol Windows 10 64-bit
In Windows 10 1803 and later (1809, 1903), the SNMP service is considered deprecated and is not listed in the Windows features in the Control Panel list.
Microsoft plans to completely remove the SNMP service in the next Windows builds because of the security risks associated with this protocol. Instead of SNMP, it is recommended to use the Common Information Model (CIM), which is supported by Windows Remote Management. On the current builds of Windows 10, the SNMP service is hidden.
READ ALSOHow to Setup FTP Server in Windows 10?
The SNMP service is now missing from the Windows 10 image and can only be installed as Feature On Demand (FoD).
If your computer has a direct Internet connection, you can install the SNMP service components online from Microsoft servers. To do this, open the elevated PowerShell console and run the command:
You can also use DISM to install the SNMP service:
After that, you can verify that the SNMP service is installed:
Name : SNMP.Client~~~~0.0.1.0
State : Installed
DisplayName : Simple Network Management Protocol (SNMP)
Description : This feature includes Simple Network Management Protocol agents that monitor the activity in network devices and report to the network console workstation
DownloadSize : 595304
Default Protocols Windows 10
InstallSize : 1128133
To disable the SNMP service, use the PowerShell command:
You can also install the SNMP service through the Optional Features graphical interface.
Go to the Settings > Apps > Apps & Features > Manage optional feature > Add Feature. Select in the list the following features: Simple Network Management Protocol (SNMP) and WMI SNMP Provider (to get all SNMP service configuration tabs).
After that, the SNMP service will appear in the services.msc console.
If when performing the Add-WindowsCapability command you received the “Add-WindowsCapability failed error. Error code = 0x800f0954”, most likely your computer receives Windows updates not from Microsoft Update servers but from the internal WSUS server. To make SNMP service receiving install files from Microsoft servers, you need to temporarily bypass the WSUS.
READ ALSOAccessing Hyper-V VM Console Using RDCMan
To do this, run the command:
After that, restart the Windows Update service:
Now try to install the SNMP service with the Add-WindowsCapability command. If all goes well, return the initial wusuaserv service registry parameter pointing to the WSUS server. Run the command:
And restart the Windows Update Service.
Configure SNMP on Windows 10 Computer
After the installation, SNMP services should start automatically. Open the Services management console (services.msc). Two new services should appear in the service list:
SNMP Service – This is the primary SNMP agent service, that tracks activity and sends information;
SNMP Trap – Receives trap messages from local or remote SNMP agents, and forwards messages to the SNMP management software that is being run on that computer.
Open the properties of the SNMP Service. If it is stopped, start it by pressing the Start button and change the startup type to Automatic.
Click the Agent tab. Fill in the Contact and Location fields (you can specify the user’s contact name and computer location), and select the list of services from which you want to collect data and send it to the monitoring device. There are five service-based options:
Physical;
Applications;
Internet;
End-to-end;
Datalink and subnetwork.
Click the Security tab. Here you can configure various security settings for different SNMP servers.
The list of Accepted community names contains the names of the communities whose SNMP hosts are authenticated to send SNMP requests to this computer. The community name has the same functions like login and password.
READ ALSOChanging Active Directory krbtgt Account Password
Click the Add button and specify the Community Name and one of the five access levels (None, Notify, READ ONLY, READ WRITE, READ CREATE). READ WRITE is the maximum access level at which the SNMP management server can make changes on the system. For monitoring systems, it is usually enough to select READ ONLY, while the monitoring server can only poll the system, but not make changes. In our example, we added a community name public with READ ONLY permissions.
Add to the Accept SNMP packets from these hosts list of monitoring servers (hostnames or IP addresses) from which you want to accept SNMP packages.
Tip. You can select the Accept SNMP packets from any host option, but this is not safe.
Save the changes and restart the SNMP service.
This completes the SNMP service configuration in Windows 10. If you need to enable SNMP on multiple computers or servers, you can remotely install and configure SNMP service using PowerShell or Group Policy.
AuthorRecent PostsCyril KardashevskyI enjoy technology and developing websites. Since 2012 I'm running a few of my own websites, and share useful content on gadgets, PC administration and website promotion.Latest posts by Cyril Kardashevsky (see all)
Fix: Active Directory Domain Controller Could Not Be Contacted - December 10, 2020Manage and Disable Windows Defender Using PowerShell - December 9, 2020Using Out-File Cmdlet to Redirect Output to File in PowerShell - December 4, 2020='font-size:14px>='font-size:14px>='font-size:14px>
This site uses cookies to analyze traffic, personalize your experience and serve ads. By continuing browsing this site, we will assume that you are agree with it. =cn-notice-text>
A Network Protocol is a set of rules that define how data is communicated between different computers that are connected through a network connection.
Network Protocols are of different types such as Ethernet, FDDI, LocalTalk and TokenRing. They comprise of procedures and formats to be followed during data transmission. You might encounter the One or more protocols are missing error on a Windows 10 laptop/ PC due to one or more of the following reasons:
Your system doesn’t support usage of IPv6
Your WinSock defaults have been changed
DNS registration issues
Corrupt Registry keys, code identifier issues
Insufficient Registry permissions to access network data
A protocol needs to be installed
Use Internet Protocol Version 4
IPv6 is a next-generation protocol. If you’re encountering problems deploying IPv6, configure your laptop to use an older protocol such as IPv4.
Press Windows Key + X; choose Control Panel.
Click Network and Internet | Network and Sharing Center.
Click the Wi-Fi/ Wired Broadband connection that appears in Connections.
Wi-Fi/ Wired Broadband Status dialog will open up on your screen.
Click Properties.
Uncheck Internet Protocol Version 6 (TCP/ IPv6).
Check Internet Protocol Version 4 (TCP/ IPv4).
Click OK | Close.
Restore Winsock Defaults
WinSock, earlier known as WSA, deals with network services such as TCP/IP. Problems with the functioning of WinSock can cause protocol errors. Restore default WinSock configurations using an elevated CMD.
Press Windows Key + X; select Command Prompt (Admin).
Type the following command: Netsh winsock reset
Press the Enter key of your keyboard.
Restart your system using the following command-line: Shutdown /r
Flush & Register New DNS
Domain Name Servers (DNS)translates a website’s name into the corresponding Internet Protocol (IP) Address. If the process of converting human-readable website names fails, you may get the protocol missing error.
Open an elevated Command Prompt.
Flush the existing DNS: ipconfig /flushdns
Register a new DNS: ipconfig /registerdns
Release and renew the information: ipconfig /release ipconfig /renew
Reset the Catalog: netsh winsock reset catalog
Store the logs in a separate file named reset.log netsh int ipv4 reset reset.log netsh int ipv6 reset reset.log pause
Restart your computer: shutdown /r
Modify Registry Configurations
Provide appropriate read, write and access permissions to the Registry subkeys that deal with your computer’s network connection.
Type RegEdit in the Search Box on the Taskbar.
Open Registry Editor from the Search Results.
Locate the following Registry path: HKEY_LOCAL_MACHINE | SYSTEM | CurrentControlSet | Control | Nsi | {eb004a00-9b1a-11d4-9123¬-0050047759bc}
Right-click a 26 subkey, choose Permissions.
In the new dialog, specify the Group or User Name as Everyone.
Check the Allow box ahead of Full Control.
Click Apply | OK.
Install New Protocol
Go to your Connection Properties and then install a new protocol through the steps given below:
Type ncpa.cpl in the Search Box and open it from the Search Results.
Right-click your Wi-Fi/ Wired Broadband connection icon, choose Properties.
Click the Install button.
Choose Protocol in the subsequent Select Network Feature Type dialog, and click Add.
Click Hard Disk button.
Specify the following path: C:Windowsinf
Click OK.
You have a new dialog – Select Network Protocol
Select Internet Protocol (TCP/ IP) – Tunnels
Click OK.
Delete Code Identifier
Make sure the code identifier keys aren’t corrupt. Delete the corrupted data so that your system will generate default settings.
Open Registry Editor.
Locate following Registry path: HKEY_LOCAL_MACHINE | SOFTWARE | Policies | Microsoft | Windows | Safer | CodeIdentifiers | 0
Delete the Paths subkey. (Right-click > Delete)
Exit the Registry Editor and restart your laptop.

0 notes
Text
HPE Server Alerts: Gen 10 changes
In an earlier post I explained how to set up alerts for pre-Gen 10 HPE servers so you will know when something bad happens to your server. Things have changed starting with Gen 10. This post will walk through the new process.
Why use HPE server alerts?
One of the most important tools you have as a system administrator is the simple email alert. No matter what the problem is, it’s great to have a head start on fixing it before the phone starts ringing. In the case of HP servers you can get an email alert so you will have a head start on any problems that arise.
About The iLO
HPE servers up to Gen 9 used management agents on the operating system to monitor and send alerts, but going forward the alerts are sent by the iLO using an agentless service.
iLO is shorthand for “integrated lights-out”. Basically, this is an out of band management system that you can access over the network. It uses a dedicated Ethernet port so you can log in to the iLO from another computer on the network using a web browser. The iLO has its own IP address and you can set it to be static or check your DHCP for the IP it has been given.
Here are some documents from HPE that you may want to have a look at if you run into a problem not covered here:
The iLO User Guide
Configuring iLO Management Settings
If you like you can update the iLO firmware by downloading the installer.Click on Revision History and get newest version (should be the top one).
The iLO Advanced license
Alerts on Gen 10 servers require a special license, the iLO Advanced license. You can check your license by logging in to the iLO with your web browser and going to Information, then Overview. It will probably be the first page that comes up. Look at “License Type”. If yours says “iLO Advanced” you’re good to go. If it says” iLO Standard” you will need to purchase a license.
To quote HPE:
“With the release of Gen10 servers, iLO no longer supports OS-based SNMP agents. The System management Assistant (SMA) is an Agentless Management Service feature for users who want to run applications that obtain SNMP information from the OS. ”
Another advantage of the iLO Advanced license is that you can use the Remote Console in the iLO with no time limit. Without the license you only get like 3 minutes and then it locks you out. The Remote Console is basically Remote Desktop (RDP) through the iLO.
To check your license status log into the iLO by entering the iLO IP address into a web browser.
When you get in, right on the first page, next to “License Type” you should see if you have the license or not. If you already have the iLO Advanced license it will say “iLO Advanced”. Otherwise it would say “iLO Standard”.
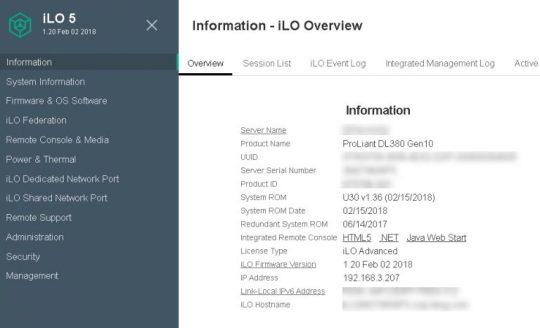
You can obtain a license by registering the server with HPE, but you can also request a trial license.
Once you get your license log in to the iLO again and go to Administration, then Licensing.
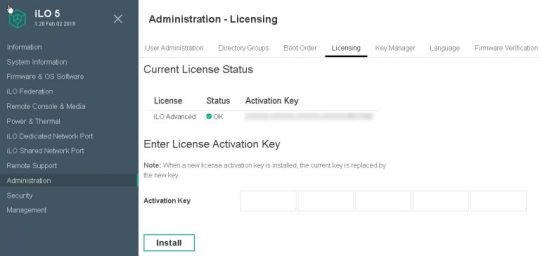
You can just copy and paste your key into the first box and click the Install button. Easy.
Installing the SNMP Service Feature
To get the emails to us we need to install the System Network Management Protocol (SNMP) service. To do that, open Server Manager (it comes with Windows Server and usually starts automatically every time you log in) go to “Manage”, then “Add Roles and Features”. Choose “Role-based”, Next, select the local server, Next, Next, on the “Select Features” screen check the box next to “SNMP Service” and the one inside it, “SNMP WMI Provider”. You may be prompted to install “SNMP Tools”, too, if you don’t have it installed already. Get it, you’ll need it.

Configuring the SNMP Service
Now we need to configure SNMP to collect information from the server. Open Services.msc by searching in the Start menu or Windows key + R and entering Services.msc. Scroll down to “SNMP Services” and double-click on it to open the properties (or right-click and choose “properties”). In the security tab, click Add button under “Accepted community names”. There are two Add buttons on this tab so click the top one. Select Community rights as “READ ONLY”. Type “Public” for the Community Name and click Add.
If you don’t have the Security tab close Services.msc and restart it.
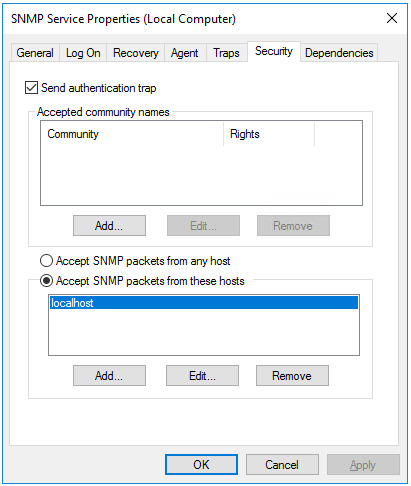
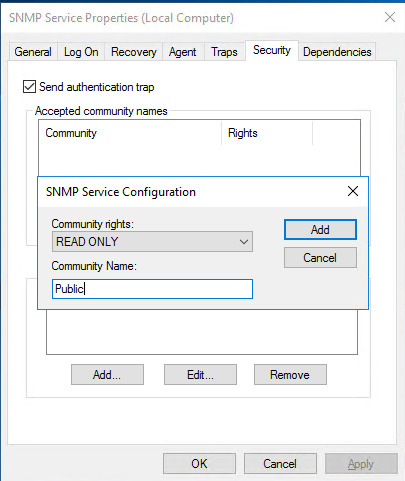
Click the same Add button again and create another Community Name called “Private”, but this time make the Rights “READ WRITE”.
Now we will tell the SNMP service who to accept packets from. With the “Accept SNMP packets from these hosts” radio button selected, click on the lower Add button now and enter 127.0.0.1 as the IP address. This is the localhost so the SNMP service will only be listening to this server we are working on. Click Add and then Apply.

With this done, go to the Traps tab in SNMP Service properties. You will have to type directly into the drop-down list because it doesn’t populate itself. Type “public” and now the “Add to list” button will be clickable. Click it. The drop-down list now has an entry for “public”. Click the “Add” button lower down the Traps tab and enter 127.0.0.1 and then click the Add button.

Click Apply and Ok.
Installing the Agentless Management Service
HPE’s pitch for this new way of managing server alerts seriously begins with “Tired of installing agents on your servers to monitor them?”, but in reality there is still one more service that you need to install: the “Agentless Management” service. Download it here. Make sure you get the new version under “Revision History”.
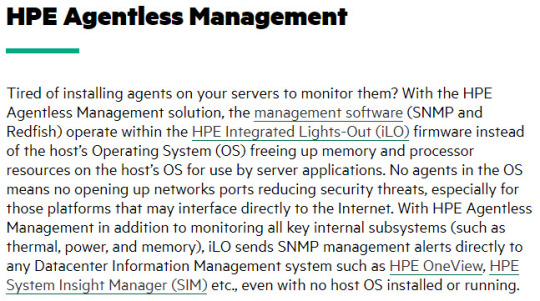
Download it and run it as administrator (from the right-click menu).
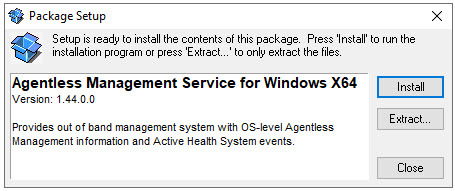
Click Install.
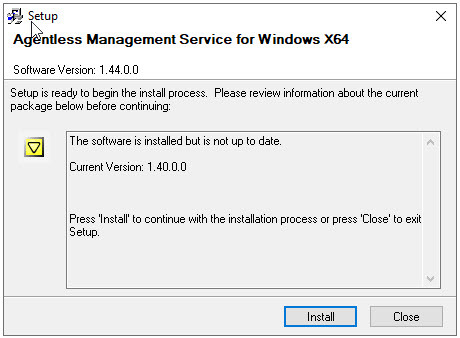
In this case I am upgrading because I already had an older version installed, but the process is almost identical except for the wording on this screen. Click Install.
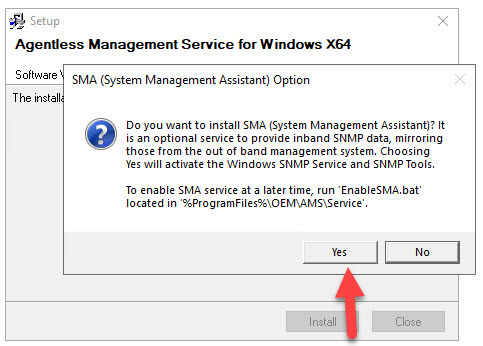
Click Yes.
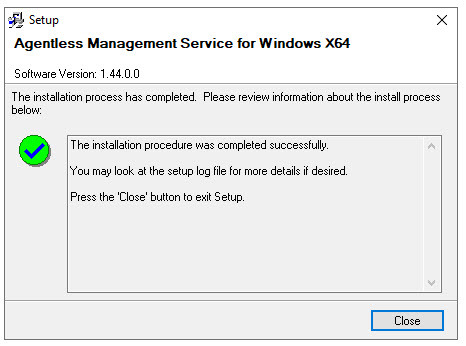
Close.
Make sure the “Agentless Management” Service is running in services.msc

Configuring the iLO Settings
Your settings may end up being different than mine after this point depending on your domain and network settings. Also some older versions of iLO 5 look different or have different names for some of the fields. In these examples I am using version 1.46 of iLO 5.
Log in to the iLO in your browser. Go to “iLO Dedicated Network Port” on the left, then the “General” tab. Fill in your “iLO Subsytem Name (Hostname)”. I use “ILO-<servername>”. Fill in the domain name and check the “Use iLO Dedicated Network Port” checkbox and the “Automatic” radio button.
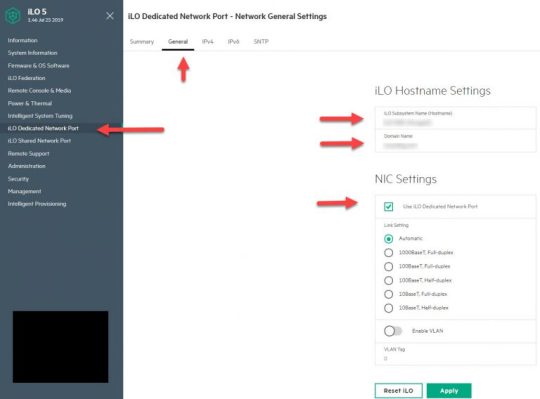
Click the “Apply” button. You will see a message that tells you to reset the iLO to get the changed to take effect. Do so now. You will be logged out for a minute while the iLO reboots.
Log back in the iLO and go to “iLO Dedicated Network Port” on the left, then the “IPv4” tab.
Turn DHCP off and specify a static IP address, subnet mask, and gateway. The only swtich that can be green is the “Other” switch that says “Ping Gateway on Startup”.
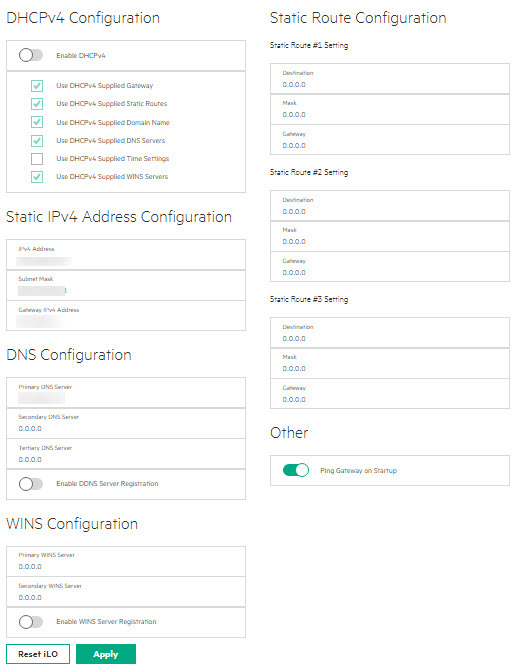
Don’t forget to “Apply” and “Reset iLO”.
Once the iLO comes back up log back in and go to “iLO Dedicated Network Port”, IPv6 tab. Turn everything off. “Apply” and “Reset”.
Log back in and go to “Management” on the left and then the “SNMP Settings” tab.
Select the radio button next to “iLO Hostname” and click the switches for “iLO SNMP Alerts” and “Cold Start Trap Broadcast”. Click “Apply”.
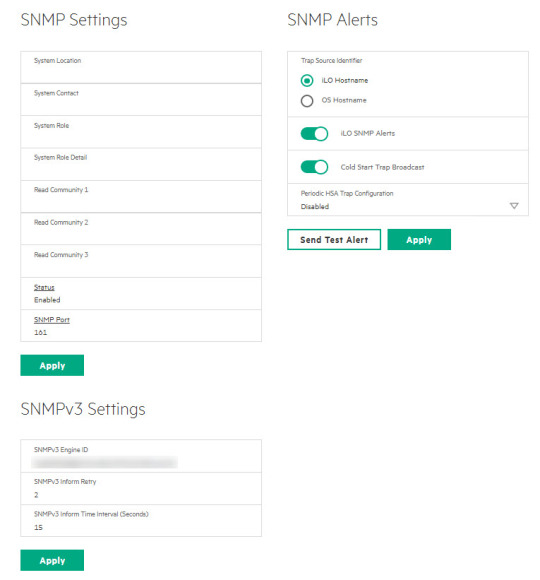
Lower down on the same page, under “SNMP Alert Destinations, click the “New” button. Specify your SNMP server. I leave the “Trap Community” blank and use the default for the protocol. Click “Add” and leave evertything else on the “SNMP Settings” tab at the default value.
While still in the “Management” area, go to the “AlertMail” tab. Click the “Enable iLO AlertMail” switch and enter the “Recipient” email address that will receive the alerts, the “Sender” email address that has permission to send emails out, and the SMTP Server that will process the email. The port is probably going to be 25, the default SMTP port. I leave everything else off.
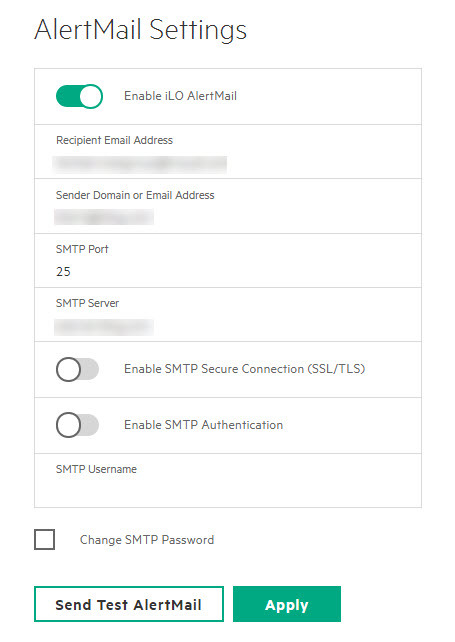
Click “Apply”.
Sending a Test Alert
To send a generic test alert, log in to the iLO in your browser and go to “Management” on the left and then the “AlertMail” tab. Click the “Send Test AlertMail” button as seen in the previous image.
You should get an email like this:
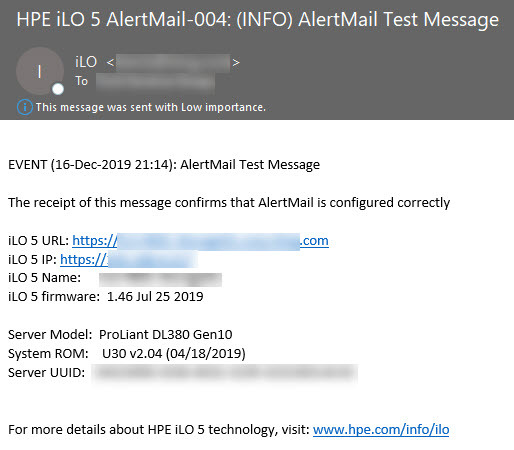
If you got this email, then congratulations! If something goes wrong with the server you should get an email that tells you about it. It’s a good idea to log in to the iLO and send a test email once a month or so to make sure everything is still working. Sometimes a service will stop and you have to restart it manually.
If you didn’t get the email, double-check all the settings to make sure everything is correct and has been “applied”. If not, redo them and remember to apply and reset the iLO to save the changes. If that still doesn’t help make sure the SNMP and AMS services are running. It can’t hurt to go ahead and restart them even if they are. Your domain and network will be different than mine so there may also be additional DNS or Exchange settings for you to tweak.
There is a log in the iLO that might be able to tell you what went wrong. Go to “Information” on the left of the iLO browser interface and then the “iLO Event Log” tab.

Have fun and see you next time!
0 notes
Text
DOWNLOAD COMPANY PMP PLATM OPN USB DEVICE DRIVER
Uploader: Legs File Name: company pmp platm opn usb device driver Price: Free Operating Systems: Windows NT/2000/XP/2003/2003/7/8/10 MacOS 10/X File Version: 516161211 File Format: exe Downloads: 7493 Download Type: http File Size: 23 Mb Date Added: 12 December, 2019

News: - Fixes always enter into BIOS setup while Setting Password with '.' on Keypad and 'Security Option' as 'System' or 'Setup'. - Fixed time display(company pmp platm opn usb device driver display) issue with SNMP. - Fixed QIS connection and channel selected automatically for improving speed. - Fixes(company pmp platm opn usb device driver Fixes) malfunction of USB FDD (Generic USB FDD). - Fixed "On-Chip Frame Buffer Size" setting error. - The scroll bar is(company pmp platm opn usb device driver is) missing for some users in the Compatibility tab of Radeon Software. - Fixed ttyUSB2 USB dongle related(company pmp platm opn usb device driver related) issues. - Settings] - Fixed a bug where unexpected error message was displayed while multiple replication tasks are edited. - Fixed Audio control hidden when(company pmp platm opn usb device driver when) plug PCI card. - Fixed the bug where DLNA access permissions were all permitted after DTCP-IP update. Users content: Bandwidth intensive games, music and document files can now be downloaded at double quick time. Added new "Master Delay Transaction" item and set default to Disable" for better compatibility with SATA RAID cards. This driver package provides the necessary installation files of Genius Eye 110 WebCam Driver 1.0 for Windows 7. Cannot type "\" in Path of Setup boot menu. Fix and enhancements- Provides the original driver. Improved AGP signalIt is highly recommended to always use the most recent driver version available. This package contains the drivers for the Intel PRO Network Adapter in the listed notebook models and operating systems. Type C:\DELL\DRIVERS\R160915 in the Open textbox and then click OK. Modify "SCSI:" string to "RAID:" on Boot menu for RAID device. Fix: word code error under simplified Chinese OS. Open the link if you need the DOWNLOAD CANON FB62OU DRIVER. Supported OS: Windows XP 32-bit Windows 7 32-bit Windows Server 2016 Windows Server 2003 32-bit Windows 2000 Windows Server 2008 Microsoft Windows 8 Pro (64-bit) Windows 8.1/8/7/Vista 32-bit Microsoft Windows 10 (64-bit) Windows 7 Microsoft Windows 8.1 (64-bit) Windows 7 64-bit Windows XP 64-bit Microsoft Windows 8.1 (32-bit) Notebook 8.1/8/7 32-bit Microsoft Windows 10 (32-bit) Microsoft Windows 8 Enterprise (64-bit) Windows Vista 32-bit Microsoft Windows 8.1 Enterprise (64-bit) Windows 8.1/8/7/Vista 64-bit Microsoft Windows 8.1 Enterprise (32-bit) Windows 8 Windows Server 2012 Microsoft Windows 8.1 Pro (32-bit) Microsoft Windows 8 (32-bit) Windows 10 Windows Server 2008 R2 Notebook 8.1/8/7 64-bit Windows Vista 64-bit Windows 8.1 Microsoft Windows 8.1 Pro (64-bit) Microsoft Windows 8 (64-bit) Windows Server 2012 R2 Microsoft Windows 8 Pro (32-bit) Microsoft Windows 8 Enterprise (32-bit) Windows Server 2003 64-bit Searches: company pmp platm opn usb device driver for Microsoft Windows 8 Pro (64-bit); company pmp platm opn usb device driver for Microsoft Windows 8 Pro (32-bit); company pmp platm opn usb device driver for Windows Server 2008 R2; driver usb pmp platm device opn company; company pmp platm opn usb device ZJ7596; company pmp platm opn usb device driver for Windows Server 2003 64-bit; company pmp platm opn usb device ZJUVI7596; company pmp platm opn usb device Z75z; company pmp platm opn usb device Z ZJ759-7; company pmp platm opn usb device Zzp759-zpc; company pmp platm opn usb device driver for Notebook 8.1/8/7 32-bit Compatible Devices: Iphone; Ipod; Computer Cable Adapters; Monitor; USB Hubs; Scanner To ensure the integrity of your download, please verify the checksum value. MD5: b182af263d958f417923cbee7e877993 SHA1: 576d21e110b7fc9b25b3d84c28216e65e6e7983c SHA-256: 031a682fe730a443145291629de10bb6665741a583d6c82e9f55d26c4c3fbf9a
0 notes
Text
DOWNLOAD EEPRO100 LINUX DRIVER
File Version: 218121016 File Name: eepro100 linux driver File Format: exe File Size: 23 Mb Operating Systems: Windows NT/2000/XP/2003/2003/7/8/10 MacOS 10/X Uploader: Pooch Date Added: 16 September, 2019 Download Type: http Downloads: 1951 Price: Free

Bug fix: - System: Fixed a bug where the I18 message did not disappear when the TeraStation was restarted while rebuilding the RAID array. - Counter-Strike:(eepro100 linux driver Counter-Strike:) Global Offensive and World of Warcraft may experience flickering or performance issues the first time the game is launched on a system boot with AMD FreeSync technology enabled. Workarounds include exiting and restarting the application or task switching (alt+tab) in and out of the game to fix the issue. - Fixed enter S3 fail using 8xx CPU. - Fixed a bug(eepro100 linux driver bug) where the upload speed may become slow when cloud storage is configured. - Drives] Fixed(eepro100 linux driver Fixed) a bug where drive formatting failed if the drive contains the iSCSI volume created with "File I/O" for the "Backstore" option selected. - Fixed the error of skipping or breaking up while WAV files were playing. - Fixed issue:(eepro100 linux driver issue:) Secure boot key information will be erase by EzFlash. - Fixed Windows 10 Edge(eepro100 linux driver Edge) browser login issueKnown Issues. - Bug Fixed:-Fixed bug: [Setup Internet Connection Setup Wizard] the reconnect mode will keep on last settings even the UI shows the current setting. - Some Radeon RX 5700 series graphics users may intermittently experience a black screen while gaming or on desktop. A potential temporary workaround is disabling hardware acceleration in applications running in the background such as web browsers or Discord. Users content: PCI Express x1 I/O offers 500 MB/s concurrently, over 3.5 times more bandwidth than PCI at 133 MB/s. Specifications: - Processor: Rockchip RK 2926 1,2 GHz - RAM Memory: 512 MB DDR3 - Internal Memory: 4 GB - Storage Space Extension: microSD max. If you are having the 14/15/16/17/18 versions, please latest to 21 first. Improved: USB Temperature Sensor supports new USB dongle. Fix memory leak caused by SNMP module,10. - 10bit enabled displays may show some issues while discarding a 2x1 Eyefinity SLS configuration in Radeon Pro Settings. Added "SATA Operation Mode" option in BIOS setup. If you check Brightness again then you get “0” setting. Support for peripheral illumination Correction. The addition of a function to append IPTC data. DOWNLOAD AUDIMAX 5.1 USB DRIVER Supported OS: Windows 2000 Windows 8.1 Microsoft Windows 8 Enterprise (32-bit) Windows 7 64-bit Notebook 8.1/8/7 64-bit Microsoft Windows 8.1 (32-bit) Microsoft Windows 8.1 (64-bit) Windows Vista 64-bit Notebook 8.1/8/7 32-bit Microsoft Windows 8 Enterprise (64-bit) Microsoft Windows 8 Pro (32-bit) Windows 8.1/8/7/Vista 32-bit Windows Server 2008 Microsoft Windows 8.1 Pro (32-bit) Windows Server 2003 32-bit Microsoft Windows 10 (32-bit) Windows 8.1/8/7/Vista 64-bit Microsoft Windows 8 Pro (64-bit) Microsoft Windows 8.1 Enterprise (32-bit) Windows Server 2008 R2 Windows 7 Microsoft Windows 10 (64-bit) Windows 7 32-bit Windows 8 Windows Server 2012 R2 Windows Server 2016 Windows XP 64-bit Microsoft Windows 8.1 Enterprise (64-bit) Microsoft Windows 8.1 Pro (64-bit) Windows Server 2003 64-bit Windows XP 32-bit Windows Vista 32-bit Microsoft Windows 8 (64-bit) Windows Server 2012 Microsoft Windows 8 (32-bit) Windows 10 Searches: eepro100 linux Y YG295-2; eepro100 linux driver for Windows 8; eepro100 linux driver for Microsoft Windows 10 (64-bit); eepro100 linux YG2957; eepro100 linux driver for Microsoft Windows 8.1 Pro (64-bit); eepro100 linux driver for Windows Vista 64-bit; eepro100 linux Y29k; eepro100 linux Ykq295-kqy; driver linux eepro100; eepro100 linux driver for Microsoft Windows 10 (32-bit); eepro100 linux YGDVR2957 Compatible Devices: Hard Drive; Memory Card; Soundcard; USB Hubs; Videocard; Hardware To ensure the integrity of your download, please verify the checksum value. MD5: 5a1559884a349015ee539f9a9d8a4aa3 SHA1: 4b2f1332418d422fdf32343e5cec23607fe39525 SHA-256: 3788bb42c259f95beea33fa0bbefcf8c446efe01526b743c6166704dec02d39c
0 notes
Text
DOWNLOAD KINAMAX G880 DRIVER
File Name: kinamax g880 driver File Version: 510161931 Operating Systems: Windows NT/2000/XP/2003/2003/7/8/10 MacOS 10/X Download Type: http File Size: 23 Mb Uploader: Poe File Format: exe Price: Free Downloads: 1458 Date Added: 16 October, 2019

Change log: - Fixes an issue(kinamax g880 driver issue) where the user interface does not display correctly in certain languages. - Fixed for "mistake in the Helpful Hints about file format" 3. - Compliant with DNSSEC. - Fixed bug(kinamax g880 driver bug) Countdown string only lan change. - Fixed MS-CHAPv2(kinamax g880 driver MS-CHAPv2) connection issue with PPTP. - Fixed some UI issues. - Radeon Settings gaming profile options for Uplay applications may not take effect. - Antivirus: Fixed a bug where a quarantine target file path was invalid in the notification email sent when a virus was detected. - Fixed the option(kinamax g880 driver option) in Guru Utility can't be adjusted when Virtualization Technology is Disable. - Fixed "The default value of level bar is incorrect. - Fixed large(kinamax g880 driver large) file transfer issue. Users content: Support for the WFT-E8 has been added. Changes for Developers:- The popular Love2D runtime is now part of the rootfs. - Adjust PCIE setting. This installer places a folder on your desktop labeled "epson10249". Enhance memory compatibility. An Asset Tag field has been added to the router under the Local Administration tab. Dependency checking for SNMP authentication/privacy fields is not thorough. - Improves shutdown performance in freeDos. - Mute incorrectly turns off without manual intervention if two calls are made and the second call is released. Intel P43 ICH10 Chipsets. https://goodsoftwarescollectionn7w.hatenablog.com/entry/2020/03/13/005051 Supported OS: Microsoft Windows 8 (32-bit) Microsoft Windows 8.1 Enterprise (32-bit) Windows Server 2008 R2 Microsoft Windows 8.1 Enterprise (64-bit) Windows 8.1/8/7/Vista 32-bit Windows 8.1/8/7/Vista 64-bit Windows 10 Microsoft Windows 8 Pro (32-bit) Windows 8.1 Microsoft Windows 8.1 Pro (32-bit) Notebook 8.1/8/7 64-bit Microsoft Windows 10 (32-bit) Windows Server 2012 Windows 7 Windows 2000 Windows 8 Windows Server 2003 64-bit Windows Server 2012 R2 Microsoft Windows 8.1 (64-bit) Windows Vista 64-bit Windows XP 32-bit Microsoft Windows 8 Enterprise (32-bit) Microsoft Windows 10 (64-bit) Windows Vista 32-bit Windows 7 64-bit Windows XP 64-bit Microsoft Windows 8 Enterprise (64-bit) Notebook 8.1/8/7 32-bit Microsoft Windows 8.1 (32-bit) Microsoft Windows 8.1 Pro (64-bit) Windows Server 2008 Microsoft Windows 8 (64-bit) Windows 7 32-bit Windows Server 2003 32-bit Microsoft Windows 8 Pro (64-bit) Windows Server 2016 Searches: kinamax g880 driver for Microsoft Windows 8 Pro (64-bit); driver g880 kinamax; kinamax g880 JUIZO0917; kinamax g880 JU0917; kinamax g880 driver for Microsoft Windows 8.1 (64-bit); kinamax g880 driver for Windows Server 2012; kinamax g880 J JU091-0; kinamax g880 Jsa091-sax; kinamax g880 driver for Windows Vista 32-bit; kinamax g880 J09s; kinamax g880 driver for Windows 8 Compatible Devices: Tablet; Samsung; Mouse; Wifi adapter; Soundcard; Videocard To ensure the integrity of your download, please verify the checksum value. MD5: a56b8cb08b7e6059d5aac48acea6aae8 SHA1: fcebfb1639ae6d23d0cbb776a4e906eaffad45c3 SHA-256: 44abddd7bbc362f2c1b497bdea915e1f863d35365bad20fa20170f61b18b3cc2
0 notes
Text
DOWNLOAD ATTANSIC L2 FAST ETHERNET 10/100 BASE-T ADAPTER DRIVER
File Version: 215141604 File Format: exe File Name: attansic l2 fast ethernet 10/100 base-t adapter driver Operating Systems: Windows NT/2000/XP/2003/2003/7/8/10 MacOS 10/X Price: Free Download Type: http Uploader: Ella File Size: 23 Mb Date Added: 30 September, 2019 Downloads: 4522

Fixed Issues: - Fixes ODD detection incorrect while no ODD exists. - SCSI] -(attansic l2 fast ethernet 10/100 base-t adapter driver -) Fixed a bug where a volume was not displayed if it is created with block I/O and WCE enabled. - Fixed Javascript problem when Inbound Filter is defined.- 6. - Fixes- Fixed issue the zoom gesture is not work correctly on Adobe Reader. - Fixed the bug where an error was displayed after changing the WebAccess Remote target folder. - Fixed - Potential security issue(attansic l2 fast ethernet 10/100 base-t adapter driver issue) from UPnP overflow - Some wireless time control and parental control issues. - Asterisk: Fixed(attansic l2 fast ethernet 10/100 base-t adapter driver Fixed) crash when an INVITE message is received after the SIP dialog has been closed. - Fixed Command rate function abnormality. - Versions:-(attansic l2 fast ethernet 10/100 base-t adapter driver Versions:-) System firmware version: 1.2.1.1- App firmware version: 1.4.1.13- Web version: 2.0.1.1- Plug-in version: 2.0.1.4Fixed issues:1). - Select(attansic l2 fast ethernet 10/100 base-t adapter driver Select) a county when player boots up) - Fixed the error that large capacity files (512MB or high) aren't stored. Users content: - Change EC firmwareIt is highly recommended to always use the most recent driver version available. Support for SATA RAID 0, RAID 1, and JBOD iTE IT8718 chip:1. 1 x floppy disk drive connector supporting up to 1 floppy disk drive IEEE 1394T. Correction of the communication errors that occurred when shooting with EOS 5D and EOS Capture software after shooting about 138 shots. Select "Hardware", and click "Device Manager". Now supports Custom DynDNS.- Corrected an issue where a SNMP OID is shown incorrectly in the Default View of the SNMP tab of the Web User Interface. The Self-Extracting window appears and prompts you to extract or unzip to C:\DELL\DRIVERS\R207404. Disable FTP port 2. Fix misreporting of multiple bit errors when only a single bit error occurred. History - macOS Sierra (v10.12) has been added as a supported OS. Support HP mouse M-U0031-O MouseIt is highly recommended to always use the most recent driver version available. DOWNLOAD HP W500 WIRELESS DRIVER Supported OS: Windows XP 64-bit Windows Server 2008 R2 Microsoft Windows 8.1 (64-bit) Microsoft Windows 8 Pro (64-bit) Windows 10 Windows 8.1 Windows Server 2008 Windows Server 2012 R2 Microsoft Windows 10 (32-bit) Microsoft Windows 8.1 Enterprise (32-bit) Windows Server 2016 Windows Server 2003 64-bit Microsoft Windows 8 Pro (32-bit) Microsoft Windows 8 Enterprise (32-bit) Notebook 8.1/8/7 64-bit Windows 7 64-bit Windows Vista 64-bit Windows 7 32-bit Windows Server 2012 Windows XP 32-bit Notebook 8.1/8/7 32-bit Windows 8.1/8/7/Vista 64-bit Windows 8 Microsoft Windows 8 (32-bit) Microsoft Windows 8.1 Pro (64-bit) Microsoft Windows 8 Enterprise (64-bit) Windows Vista 32-bit Microsoft Windows 8.1 (32-bit) Windows 7 Windows 8.1/8/7/Vista 32-bit Microsoft Windows 8 (64-bit) Windows Server 2003 32-bit Windows 2000 Microsoft Windows 10 (64-bit) Microsoft Windows 8.1 Pro (32-bit) Microsoft Windows 8.1 Enterprise (64-bit) Searches: attansic l2 fast ethernet 10/100 base-t adapter driver for Microsoft Windows 8.1 Enterprise (32-bit); attansic l2 fast ethernet 10/100 base-t adapter S SN614-6; attansic l2 fast ethernet 10/100 base-t adapter S61q; attansic l2 fast ethernet 10/100 base-t adapter driver for Windows Server 2012; attansic l2 fast ethernet 10/100 base-t adapter SN6147; attansic l2 fast ethernet 10/100 base-t adapter driver for Windows 8; attansic l2 fast ethernet 10/100 base-t adapter Sqw614-qwv; attansic l2 fast ethernet 10/100 base-t adapter driver for Windows 8.1/8/7/Vista 32-bit; adapter fast l2 ethernet driver base-t attansic 10/100; attansic l2 fast ethernet 10/100 base-t adapter driver for Windows Server 2016; attansic l2 fast ethernet 10/100 base-t adapter SNEDO6147 Compatible Devices: Memory Card; Macbook; Android; Gadget; USB Hubs; Scanner To ensure the integrity of your download, please verify the checksum value. MD5: a02238bc4b45003f9fd9bcbe692e9dc6 SHA1: 02d988cf865ded31c7d92a55c1b6b551e8114db8 SHA-256: bdfafd0cd8974a4c2a31ca1fd0d8fa12287682acb857c0f23ad8ea91a86b294a
0 notes
Text
DOWNLOAD CANON IRC3100N DRIVER
Download Type: http Price: Free File Name: canon irc3100n driver Downloads: 7977 File Size: 23 Mb Date Added: 28 November, 2019 Uploader: Pinky Operating Systems: Windows NT/2000/XP/2003/2003/7/8/10 MacOS 10/X File Format: exe File Version: 814111358

Change log: - Fixed SNMP get error on uptime.(canon irc3100n driver uptime.) - Fixed FSB 200 CPU set to 200, after defaults load(canon irc3100n driver load) system can't boot. - Issues Fixed- Fixed an issue where the camera would randomly reboot Upgrading the Camera FirmwareTo manually upgrade the camera’s firmware: 1. - Fixed an XSS vulnerability(canon irc3100n driver vulnerability) - Reflected XSS in HTTP Host Header. - Fixes Suspend-to-Disk failure with TNT2 cards. - Fixed CPU voltage Value can not be Saved to cmos. - Fixed(canon irc3100n driver Fixed) the following Security Vulnerabilities: - HNAP Privilege Escalation - Command Injection Enhancements:1. - Fixed Cannot set AP Array Enable via WebUI after enabling IPv. - FIXES: Fixed can't back to Restore Factory Defaults after Selection a language from Preferences.(canon irc3100n driver Preferences.) - Radeon ReLive may experience recording or streaming issues when task switching using ALT+TAB. Users content: AI NapMinimize noise and power consumption when temporarily awayWith AI Nap, users can instantly snooze your PC without terminating the tasks. Improves compatibility with AGP card. Enhanced IPv6 auto-detection. When you press the joystick, all settings will be reset and the [Date/Time] screen will appear. Create a high performance wireless network with the draft 802.11n compliant RangeBooster N Router (DIR-625). Space, Space and More SpaceThat’s exactly what you might find if your work station is lacking in space. ScanGear Toolbox for CS-U 5. Supported text scrolling on Vivid BIOS POST screen. ASRock I/O Plus - supports up to 8 USB2.0 ports * Multi-languages Quick Installation Guide. Update Sandy Bridge D-2/Q-0 uCode to M12206A7_000000123. IWILL DOWNLOAD DRIVER P4HT2 Supported OS: Windows 10 Notebook 8.1/8/7 32-bit Windows Server 2012 Microsoft Windows 8.1 Enterprise (32-bit) Windows Server 2012 R2 Microsoft Windows 8 Enterprise (32-bit) Microsoft Windows 8 Pro (32-bit) Notebook 8.1/8/7 64-bit Microsoft Windows 8 (64-bit) Microsoft Windows 8.1 Pro (64-bit) Windows Server 2003 64-bit Windows 7 64-bit Microsoft Windows 10 (64-bit) Windows 7 32-bit Microsoft Windows 8 (32-bit) Windows Server 2003 32-bit Windows Server 2016 Microsoft Windows 10 (32-bit) Windows XP 64-bit Windows Vista 64-bit Windows 2000 Microsoft Windows 8 Enterprise (64-bit) Microsoft Windows 8 Pro (64-bit) Microsoft Windows 8.1 (32-bit) Windows 8.1/8/7/Vista 64-bit Microsoft Windows 8.1 Pro (32-bit) Windows XP 32-bit Windows 8.1/8/7/Vista 32-bit Microsoft Windows 8.1 Enterprise (64-bit) Windows Vista 32-bit Windows Server 2008 R2 Microsoft Windows 8.1 (64-bit) Windows Server 2008 Windows 7 Windows 8 Windows 8.1 Searches: canon irc3100n driver for Microsoft Windows 8.1 Pro (64-bit); canon irc3100n RXLZV8347; canon irc3100n Rdb834-dbz; canon irc3100n driver for Microsoft Windows 8 (32-bit); canon irc3100n RX8347; canon irc3100n driver for Windows 2000; driver canon irc3100n; canon irc3100n R83d; canon irc3100n driver for Microsoft Windows 8.1 Enterprise (64-bit); canon irc3100n driver for Windows 8.1/8/7/Vista 32-bit; canon irc3100n R RX834-8 Compatible Devices: Printer; Samsung; Usb Cables; Apple; Iphone; Scanner To ensure the integrity of your download, please verify the checksum value. MD5: 3ecba5198dd36a786a11af85b324c25f SHA1: 46a9a17a8c20066198c246b3b28abfc03dcadf1d SHA-256: 03ff9bb58252dc545bc419be36028196a263a0d368425da8c7a6a704604513a8
0 notes
Text
DOWNLOAD INEKA MARBLE DRUNK DRIVER
Downloads: 8880 File Size: 23 Mb Price: Free Download Type: http File Version: 115111241 Date Added: 10 December, 2019 File Name: ineka marble drunk driver File Format: exe Operating Systems: Windows NT/2000/XP/2003/2003/7/8/10 MacOS 10/X Uploader: Nilu

Bug fix: - Fixed Curl-SMTP - Mail/SAMBA password bug. - Fixes- [AP(ineka marble drunk driver [AP) mode] Fixed SNMP cannot get VLAN group value (vlanType and vlanID). - [AP mode] Fixed SNMP get wrong format in system description. - Supports VT8233A.- Fixes display error of CPU & system temperature. - Fixed "On-Chip Frame Buffer Size" setting error. - BIOS(ineka marble drunk driver BIOS) Update: Fixed issue 64Bit Vista DTM Graphics Bus Transfer Test may cause system hang. - The "Reset" option in Radeon Settings Gaming tab may enable the "HBCC Memory Segment" feature instead of setting it to the default disabled state. - Fixed SYS Temp.(ineka marble drunk driver Temp.) - This is BETA BIOS.# Fixed the compatibility issue with Adaptec 2120S SCSI RAID controller PCI card. - Fixed(ineka marble drunk driver Fixed) the reset issue of Internet TV when the video steaming is on data timeout situation. - Fixed an issue that /config/ptz_move. Users content: Double-click the new icon on the desktop labeled R274094.exe. Improve Kaby Lake CPU temperature detection. Quick Internet Setup(QIS) now includes system password change step. - Improves sensor calibration routine that is used when resuming from Standby or Hibernation mode in a D3 power state. Increase options of 'Overdrive Offset' to [+320mV]. Fix USB 2.0 controller work fail when resume from S4 mode. First release for NF7/NF7-S/NF7-M V1.2 board. Add "SATA Operation Mode" option in BIOS setup. - Updated for WHQL driver. Provides the bios flash utility for the Biostar H61ML Ver. 6.x. Click here to download DOWNLOAD DOCUCENTRE-II C3000 PCL 6 DRIVER. Supported OS: Windows 8.1/8/7/Vista 32-bit Windows XP 64-bit Windows 10 Microsoft Windows 8 Enterprise (32-bit) Windows Server 2008 Windows Server 2012 R2 Microsoft Windows 8 (32-bit) Windows Server 2008 R2 Windows 7 Windows 8.1 Windows Server 2012 Microsoft Windows 8 (64-bit) Windows Server 2016 Microsoft Windows 8.1 Pro (64-bit) Microsoft Windows 8 Pro (64-bit) Microsoft Windows 8 Enterprise (64-bit) Microsoft Windows 8.1 (64-bit) Windows 7 32-bit Windows 8 Microsoft Windows 10 (32-bit) Microsoft Windows 8.1 Pro (32-bit) Microsoft Windows 8.1 Enterprise (32-bit) Windows Server 2003 64-bit Windows 7 64-bit Microsoft Windows 8.1 (32-bit) Microsoft Windows 8 Pro (32-bit) Windows XP 32-bit Microsoft Windows 10 (64-bit) Windows 2000 Windows Vista 32-bit Microsoft Windows 8.1 Enterprise (64-bit) Windows Server 2003 32-bit Windows 8.1/8/7/Vista 64-bit Notebook 8.1/8/7 64-bit Notebook 8.1/8/7 32-bit Windows Vista 64-bit Searches: ineka marble drunk driver for Windows Server 2003 32-bit; ineka marble drunk driver for Windows Vista 32-bit; ineka marble drunk D29b; ineka marble drunk D DZ293-2; ineka marble drunk Dbz293-bzr; drunk driver marble ineka; ineka marble drunk DZXJT2934; ineka marble drunk driver for Microsoft Windows 8.1 (32-bit); ineka marble drunk driver for Windows XP 32-bit; ineka marble drunk DZ2934; ineka marble drunk driver for Windows Server 2008 Compatible Devices: Ipod; Keyboards; Apple; Computer Cable Adapters; USB Hubs; Videocard To ensure the integrity of your download, please verify the checksum value. MD5: 7fad69f0f012ccd3c811c865ae9080dd SHA1: 5fef3459a484564ce2a7ddc07250f17405176616 SHA-256: 455e37bf963313ed475467c5bd734d3b2df25a3565508ccb46cfb1a497d6e96b
0 notes
Text
1-844-769-9823 | Why Hp Printer Offline
Hp Printers are the most shocking gadgets that are manufactured in a wide range as a considerable number of individuals use the printer in their consistent plan during their business hours and even at home. In any case, various people report about the Hp printer detached error as when they endeavor to use their printer surprisingly it gets separated. In any case, don't freeze. You should interface with the Hp printer support bunch who are open to fixing your anxiety of Hp printer disengaged. You can call at the cost-free number 1-844-769-9823 to get your anxiety settled.

What is the essence of why Hp printer Offline?
We grasp your failure when it shows Hp printer disengaged botch on the screen. Nevertheless, you should know the inspiration driving Why Hp printer Offline error occurs:
The error can happen when the printer doesn't recognize the request
A couple of times when the paper gets jam it shows Hp printer Offline error
For sure, significantly as a general rule, when your printer is in rest mode, your printer will show this error
You may have changed the IP address in light of which it shows Hp printer Offline.
Examining steps to decide Why Hp printer Offline
To fix the Hp Printer Offline, you have to follow the underneath steps and make your Hp printer on the web.
Stage 1: Restore Printer Driver
Open the Window key and journey for device executive.
Next, you have to look for the Printer decision and a short time later twofold tap on it.
Type the name of your Hp printer and a short time later by right-tapping on it, you can uninstall the Hp printer.
After it, it will jump up a talk box and you have to press OK to give your confirmation.
At the point when the Printer gets uninstalled, its image won't appear on the screen.
To get it back, you have to tap on the yield to make changes in the hardware on the menu.
Stage 2: Manually Update the Driver
If the above development doesn't resolve the issue of Hp printer Offline by then, there is another decision to empty the misstep.
Select the Device Manager by right-tapping the Start button.
Stage 3: Start Print Spooling Service
You can fix the issue by following the underneath steps:
Directly off the bat look for the organizations by embarking to the starting catcher and a short time later it will jump up the organization's Desktop application, you have to just tap on it.
By then find the Print Spoiler in the Services Window, push on the print Spoiler and settle on a decision on the properties.
By and by in the properties elective, click on the drop-down catch of the startup, in like manner select the decision of the customized.
After it, under the organization's status, you need to push on the starting catcher. Hold on for two or three minutes and subsequently it will start running. You have to crush OK to realize the movements made by clicking apply.
Stage 4: You can change the Properties of Printer
The extraordinarily fundamental and straightforward system to fix the issue of Hp printer Offline is by changing the Properties of the printer. With this you can fix the issue:
Investigate the Control board and you can see Device and Printers
Snap-on the printers and a while later, you need to pick the properties of the printer
By then in the Port Tab, select the IP address of your printer
Here, pick the orchestrate port catch
By and by, unchecked if the SNMP Status is engaged.
After it presses the OK button
In the event that, if you follow the above advances, by then, your issue of saying why my hp printer reliably gets separated will be settled. Regardless, through this technique, you can change the issue just in case you have a remote printer.
Get Instant Help for Hp printer Offline from Support group
All things considered, in case you are up 'til now not prepared to fix the issue of Hp printer separation, by then you can contact our Hp printer-specific assistance gathering. They are available 24*7 hours for your organization and they will help you with the reliable bearing they can offer you to the mix-up looked by you like Hp printer Offline.
0 notes
Text
DOWNLOAD SIYOTEAM HK 998 DRIVER
Operating Systems: Windows NT/2000/XP/2003/2003/7/8/10 MacOS 10/X File Name: siyoteam hk 998 driver File Format: exe Uploader: Zaina Download Type: http Date Added: 05 September, 2019 Price: Free File Size: 23 Mb File Version: 216151350 Downloads: 9653

Bug fix: - Backup] - Fixed a bug where Settings could not be accessed. - Fixed PCI/PCIe(siyoteam hk 998 driver PCI/PCIe) frequenciesOverclocking Protection- ASUS C. - Automatically Detect Unknown(siyoteam hk 998 driver Unknown) Device Drivers - Fixed a bug(siyoteam hk 998 driver bug) where invalid events were logged. - Added position reality checks (GPS/Fixed Positions). - Updates all(siyoteam hk 998 driver all) logo resolution to 1024 x 768.- Adds support touch PAD for ALPS. - Fixes show device error in text mode. - Fixed SiI3112A SATA HDDs RAID1 degrade issue. - Fixed Issue: Analog audio did not properly unmute. - Fixed disappearing and error of some message and(siyoteam hk 998 driver and) language displayed on setting page. - Backup and Failover: - Fixed a bug where the backup failed when many files were backed up. Users content: Vista 32 (WHQL) Driver. After the firmware update is completed, it is not possible to revert back to a previous version. A memory corruption issue was addressed with improved memory handling. To install the driver:- Download the USB file and extract the zip file’s contents. - Update CPU micro code to support 22 nm CPUIt is highly recommended to always use the most recent driver version available. Resolved an issue with rapid profile switching causing adverse effects with microphone states. Corrects a PTP communications vulnerability. The update contains changes to improve the reliability and availability of your Dell system. Homefront no longer experiences random game crashes. Now supports Custom DynDNS.- Corrected an issue where a SNMP OID is shown incorrectly in the Default View of the SNMP tab of the Web User Interface. EN8600GT DOWNLOAD DRIVER SILENT ASUS Supported OS: Windows 8.1/8/7/Vista 32-bit Windows 7 32-bit Notebook 8.1/8/7 64-bit Microsoft Windows 8 Pro (64-bit) Windows Server 2003 32-bit Windows 10 Microsoft Windows 8 (32-bit) Microsoft Windows 8.1 Enterprise (32-bit) Microsoft Windows 8.1 (64-bit) Microsoft Windows 10 (32-bit) Microsoft Windows 8 (64-bit) Microsoft Windows 8 Enterprise (32-bit) Windows 8 Windows 8.1 Windows Server 2008 R2 Microsoft Windows 8.1 Pro (32-bit) Microsoft Windows 8 Enterprise (64-bit) Windows Server 2008 Windows Vista 32-bit Windows Server 2003 64-bit Windows 7 64-bit Windows 8.1/8/7/Vista 64-bit Windows 2000 Windows Server 2012 R2 Windows Vista 64-bit Notebook 8.1/8/7 32-bit Microsoft Windows 8.1 (32-bit) Microsoft Windows 8.1 Enterprise (64-bit) Windows Server 2016 Windows XP 64-bit Windows 7 Microsoft Windows 8 Pro (32-bit) Windows XP 32-bit Microsoft Windows 10 (64-bit) Windows Server 2012 Microsoft Windows 8.1 Pro (64-bit) Searches: siyoteam hk 998 driver for Microsoft Windows 8.1 Enterprise (32-bit); siyoteam hk 998 driver for Windows 7 32-bit; siyoteam hk 998 TRLMF7148; siyoteam hk 998 T TR714-7; siyoteam hk 998 driver for Microsoft Windows 8 (64-bit); siyoteam hk 998 driver for Microsoft Windows 8.1 Pro (32-bit); siyoteam hk 998 TR7148; siyoteam hk 998 T71c; siyoteam hk 998 driver for Windows 8.1/8/7/Vista 32-bit; siyoteam hk 998 Tcj714-cjb; siyoteam hk driver 998 Compatible Devices: Apple; Memory Card; Soundcard; Laptop; Ipod; Computer Cable Adapters To ensure the integrity of your download, please verify the checksum value. MD5: be04c818c6af5edb00c56ec16032d3a2 SHA1: c3544961d9eae4cc0958959d40c8116b7bdd9cb6 SHA-256: 0bbf316b71bb7c8cee042b737b9d1ec36b02f89890ea89825b401e0e0fa06d1c
0 notes