#R3/R6 R
Explore tagged Tumblr posts
Text

Since I crocheted Error last time I wanted to crochet Ink so they could hold hands :3
If you also want to crochet him I attached my pattern below
Have fun crocheting :)
Ink Sans
Abbreviations
R - Row
Rd - Round
ch - chain
ss - slip stitch
sc - single crochet
hdc - half double crochet
dc - double crochet
trc - treble/triple crochet
inc - increase
dec - decrease
flo - front loops only
bl - back loops
[…] x2/3/6 - repeat what is inside the brackets 2/3/6 times
(…) - the number inside of the brackets is the number of stitches that round is supposed to have
Legs x2
Rd1: 6sc into Magic Ring
Rd2: 6inc
Rd3: [1sc, inc]x6
Rd4-18: sc around
don’t tie off the second leg, connect it to the other leg with a ss
Rd19-21: sc around (36sc)
Change color to black
Rd22-30: sc around
Rd31: 2sc, Dec, 5sc, Dec, sc,Dec, 6sc, Dec,6sc, Dec, sc, Dec,3sc
Rd32: 8sc, 3dec,7sc, 3dec, 3sc
Rd33: 7sc, 2dec, 2sc, 2dec, 2sc, 2dec, 1sc
Rd34: [1sc, Dec]x6
Rd35: sc around (12sc)
3sc to middle of the back and change color to white
Rd36: [1sc, inc] x6
Rd37: [2sc, inc] x6
Rd38: [3sc, inc] x6
Rd39: [4sc, inc] x6 *fertig
Rd40: [5sc, inc] x6
Rd41: [6sc, inc] x6
Rd42: [7sc, inc] x6
Rd43-47: sc around
Rd48: [7sc, Dec] x6
Rd49: sc around
Rd50: [6sc, Dec] x6
Rd51: sc around
Rd52: [5sc, Dec] x6
Rd53: [4sc, Dec] x6
Rd54: [3sc, Dec] x6
Rd55: [2sc, Dec] x6
Rd56: [1sc, Dec] x6
Rd57: 6 Dec
Arms x2
Rd1: 6sc into Magic ring
Rd2: 6inc
Change color to brown
Rd3-4: sc around
Change color to black
Rd5-18: sc around
Toes x2
R1: ch7
R2: 6sc
Sew body together and add the face
Pants
Rd1: ch31
Rd2: ss into first chain, 30sc
Rd3-4: sc around
Rd5: [8sc, Dec] x3
Rd6-7: sc around
Rd8: [7sc, Dec] x3
Rd9-11: sc around
Rd12: [6sc, Dec] x3
Rd13: sc around
Don’t tie off the second pant leg, connect with ss to other pant leg
Rd14-15: sc around
Rd16: [12sc, Dec] x3
Rd17: [11sc, Dec] x3
Rd18: 16sc, flo 9sc, ch1, turn
R19: 9sc, ch1, turn
R20: 9sc, ch1, turn
R21: 9sc, ch1, turn
R22: 9sc
Suspenders x2
R1: ch21
R2: 20sc
Sew the suspenders to the pants
Shirt
Panels x2
R1: ch17
R2-12: 16sc, ch1, turn
R13: 13sc, ch1, turn
R14: 10sc, ch1, turn
Sleeves x2
Rd1: ch13
Rd2: ss into first chain, 12sc
Rd3-7: sc around
Rd8: 6sc, ch1, turn, 6sc, ch1, turn, 12sc to end of round
Rd9: sc around
Sew everything together
(The white wool I had was thinner than the rest of the wool that I used. So now the stitches are bigger than I would’ve liked but if you use the right wool it should be fine)
Crop top
Panels x2
R1: ch19
R2: 18sc, ch1, turn
Change color to brown
R3-4: 18sc, ch1, turn
R5: 15sc, ch1, turn
R6: 12sc, ch1, turn
R7: trc, dc, 2hdc, 4sc, 2hdc, dc, trc
Scarf
R1: ch6
R2-90: 5sc, ch1, turn
Brush
Rd1: 3sc into magic ring
Rd2: 3inc
Rd3: [1sc, inc] x3
Rd4: [2sc, inc] x3
Rd5: [3sc, inc] x3
Rd6: [4sc, inc] x3
Change color to brown
Rd7: [5sc, inc] x3
Rd8: [6sc, inc] x3
Rd9-11: sc around
Rd12: [2sc, dec] x6
Change color to yellow
Rd13: flo sc around
Rd14: sc around in the previously unworked bl of the last brown row
Change color to beige
Rd15-30: sc around
Change color to yellow
Rd31: flo sc around
Rd32: sc around in the previously unworked bl of the last beige row
Change color to beige
Rd33-36: sc around
Rd37: 6dec
Belt
R1: ch4
R2-46: 3sc, ch1, turn
Sew the ends together to make a loop
R1: ch4
R2-11: 3sc, ch1, turn
Sew onto loop (this will be where the brush is being held)
Optionally you can cut out the vials out of felt and sew them onto the front of the belt
Now just dress your Ink and finished
Now he‘ll be able to hold hands with your Error :>

You’ll find the crochet pattern for Error here
You can slo find the pattern for classic here
This is my second ever pattern so if you have any questions feel free to ask me and I’ll try to clear things up. Have fun :)
#undertale au#utmv#utau#utdr#ink sans#ut#inktale#crochet#crochet pattern#crochet plushie#inkisadorable
326 notes
·
View notes
Note
would uou be willing to share the pattern you used to make messmer’s snakes?
hewwo, hi! i finally managed to bring all metaphorical pieces of me together in one working bro, so i could share the pattern, yes. ________
I used 4,5mm crochet hook and a thick yarn, but it depends on your yarn, so please mind it

Ch - chain;
Sc - single crochet
Inc - increase
Dec - decrease
R - round
St - stitch
________ SNAKES
To start, chain 4.
R1. In 2nd Ch from the hook make an Inc Sc, then 1 Sc in the next st, then 3 Sc in the slip knot st Then (it's still a r1, be careful) keep 1 Sc in the next st and 1 Sc in the last st. (8 st total)
!!! Marker your st before starting a R2, it could be a yarn or a little plastic rings !!!
R2. Inc, 3 Sc, Inc, 3 Sc (10 st)
R3. 1 Sc in each (10 st)
R4. Inc, 4 Sc, Inc, 4 Sc (12 st)
R5. Inc x3, 3 Sc, Inc x3, 3 Sc (18 st)
R6. 2 Sc, Inc x2, 6 Sc, Inc x2, 6 Sc (22 st)
R7. - R9. 1 Sc in each (22 st)
!!! Now attach the eyes (it'll be impossible to do on finished snake, so do it now): find a R5, then count 5 st up and then place an eye; skip 7 st horizontally and place 2nd eye (or look at my photos as reference, i hope itll help!) !!!
R10. 3 Sc AND Dec x4, 2 Sc (18 st)
R11. 2 Sc, Dec, 8 Sc, Dec, 4 Sc (16 st)
!!! Now you can fill the head !!!
R12 - R15 1 Sc in each (16 st)
Next rows - also 1 Sc in each, keep crocheting till the snake body will be the wanted lenght; i also super reccomend you to use next pattern: crochet 8-10 rows, fill, then repeat.
also! dont fill the body too tight, or your snakes couldn't bend
For the 2nd head just repeat R1 - R15 steps, but backwards (R15, then R14, then R13 etc.)
________
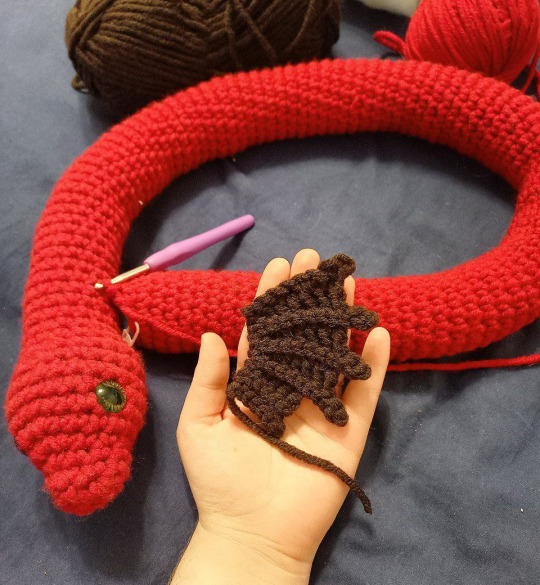
WINGS
!!! Always crochet through the back loop (if you dunno what i mean here check this video)
For the bigger wing:
To start, chain 10
R1. - In 2nd Ch from the hook make slip stitсh, then, in each next: Sc, 2 hаlf dоublе crochet (Hdc), 3 dоuble crоchet (Dс), and then chain 3
R2. - Turn the detail and from 2nd Ch do a 9 Sc
Repeat R1 - R2 3 times
For the final part of wing do next: slip stitсh, Sc, Hdc, 2Dc
Then, turn the detail, make 5 slip stitсhes and finish the detail.
___
For the smaller wing:
To start, chain 8
R1. - In 2nd Ch from the hook make slip stitсh, then, in each next: Sc, 1 hаlf dоublе crochet (Hdc), 2 dоuble crоchet (Dс), and then chain 2
R2. - Turn the detail and from 2nd Ch do a 7 Sc
Repeat R1 - R2 2 times
For the final part of wing do next: slip stitсh, Sc, Hdc, 1Dc
Then, turn the detail, make 4 slip stitсhes and finish the detail.
________
And that's all! Hope my tutorial will help, please let me know if you have questions, I'll try to answer asap this time!
#gs0nk and answers#crocheting#crochet tutorial#elden ring messmer#elden ring#shadow of the erdtree#messmer the impaler#amigurumi
57 notes
·
View notes
Text

Erissa's Doll
It's finally done! Here is my take of Erissa's dolls..or puppets? Do we know what SSO is calling them yet? I admit, I messed up the proportions a bit and it isn't exact to the game model, but I'm still so proud and think it came out really cute! This was the first time I made my own pattern, and while there are things I think I would do differently next time, I'm still pretty happy with her!
Free Amigurumi Pattern below!
DISCLAIMER! This is my first pattern, so it may read rough. These are the exact steps I used to make the doll in the picture, but feel free to modify to look closer to the original.
MATERIALS
Weight 4 in 3 colors. I don't have exact amounts because this yarn came from my stash of rug yarn. Definitely less than a full ball, probably about 1/3 to 1/2. I believe it was Loops and Threads brand. The bows used a very small amount, less than a fist's size each.
4mm crochet hook
tapestry needle
safety eyes or buttons
stuffing material
LEGEND
r# - round/row
mc - magic circle
inc - increase
sc - single crochet
fo - fasten off (pull the tail through to knot)
ch - chain
dec - decrease (I used the invisible decrease, where you pull up the inside loops only of the 2 stitches you're decreasing)
slst - slip stitch
LEGS (make 2)
r1 - mc 4sc [4] r2 - inc x4 [8] r3 - (inc, 3sc) x2 [10] r4 - (inc, 4sc) x2 [12] r5 - (inc, 5sc) x2 [14] r6 - (inc, 6sc) x2 [16] r7 - 16sc [16] r8 - (inc, 7sc) x2 [18] r9 - 18sc [18] r10 - (inc, 8sc) x2 [20] r11 - 20sc [20] r12 - (inc, 9sc) x2 [22] r13 - 22sc [22] r14 - (inc, 10sc) x2 [24]
Don’t FO the first leg, leave a hands length tail.
After you finish the second leg, chain 2 and join with the unfinished loop of the first leg.
sc once into the next stitch on the first leg, and then sc 2x into the side of the chain 2.
Rejoin leg 2 with a sc and continue to sc around leg 2.
Continue to sc down the chain and around the next leg. You should have about 52-54 stitches in this round, give or take. Consider the point where you rejoined the second leg after coming back on the side of the chain 2 the start of your round.
NOTE: About here on, your stitch counts might not match mine, and that's okay. The rest isn’t so precise, so if it looks good to you, you’re good!
BODY (continuing from last step)
r1 - r3 - sc around (54)
Stuff the legs.
This is where we start decreasing. On each “decrease round”, you’re going to DEC at the front and back of (for lack of a better term) the crotch.
r4 - (25sc, dec) x2 [52] r5 - 52sc [52] r6 - (24sc, dec) x2 [50] r7 - 50sc [50] r8 - (23sc, dec) x2 [48] r9 - 48sc [48] r10 - (22sc, dec) x2 [46] r11 - 46sc [46] r12 - (21sc, dec) x2 [44] r13 - 44sc [44] r14 - (9sc. dec) x4 [40] r15 - (8sc, dec) x4 [36]
Another reminder to stuff here.
r16 - (7sc, dec) x4 [32] r17 - (6sc, dec) x4 [28] r18 - (5sc, dec) x4 [24] r19 - (4sc, dec) x4 [20]
FO and leave a long tail for sewing (2 hands length)
HEAD
r1 - mc 6sc [6] r2 - 6inc [12] r3 - (1sc, inc) x6 [18] r4 - (2sc, inc) x6 [24] r5 - (3sc, inc) x6 [30] r6 - (4sc, inc) x6 [36] r7 - (5sc, inc) x6 [42] r8 - (6sc, inc) x6 [48] r9 - (7sc, inc) x6 [54] r10 - (8sc, inc) x6 [60] r11-18 60sc [60] r19 - (8sc, dec) x6 [54]
If you are adding safety eyes, add them between rows 17 and 18, about 12 stitches apart
r20 - (7sc, dec) x6 [48] r21 - (6sc, dec) x6 [42] r22 - (5sc, dec) x6 [36] r23 - (4sc, dec) x6 [30] r24 - (3sc, dec) x6 [24] r25 - (2sc, dec) x6 [18] r26 - (1sc, dec) x6 [12]
FO and leave a few inches to weave in
Stuff firmly and sew to body, stuffing the joint as you close it. Be careful to line your stitches up so the eyes face forward, and don't list to the left like mine did.
ARMS (make 2)
r1 - mc 4sc [4] r2 - inc x4 [8] r3 - (inc, 3sc) x2 [10] r4 - (inc, 4sc) x2 [12] r5 - (inc, 5sc) x2 [14] r6 - (inc, 6sc) x2 [16] r7 - 16sc [16] r8 - (inc, 7sc) x2 [18] r9-13 - 18sc [18]
So at this point, I know it would be more accurate to attach the arms fluffed and sewn a bit open to the body…but I decided to lightly stuff and slst the opening closed, leaving a tail for sewing.
BOWS (make 2 in different colors)
r1 - ch36, slst into first chain to close the loop, making sure the chain doesn’t twist [36] r2 - (into the sides of the chain) ch1, sc35 [36] r3-10 sc36 [36]
slst and weave the ends.
With the same color, we’re going to make the bow’s knot.
r1 - ch 11 [11] r2 - sc in the second stitch from the hook and down the remaining 9 stitches, ch1 and turn [10] r3-4 - 10sc, ch1, turn [10] r5 - fold your work so the short ends touch and slst to join down the short side [4]
Leave a long tail for sewing.
To assemble, scrunch/gather the first part of the bow you made and slide it through the “knot” with the openings at the top and bottom. Rolling it up and twisting helps. Then fluff out the sides so it looks how you like.
Then assemble! Your head should already be attached. Go ahead and add the arms about 6 rows down from the head connection, or place them visually. Attach the bows to the top using the tail from the knot. Fluff the bows and you're done!
#sso#ssoblr#star stable online#star stable#sso erissa#sso erissa doll#crochet#crochet pattern#amigurumi#free crochet pattern#free amigurumi pattern#star stable crochet
127 notes
·
View notes
Text
Shadow the Hedgehog Scarf Pattern
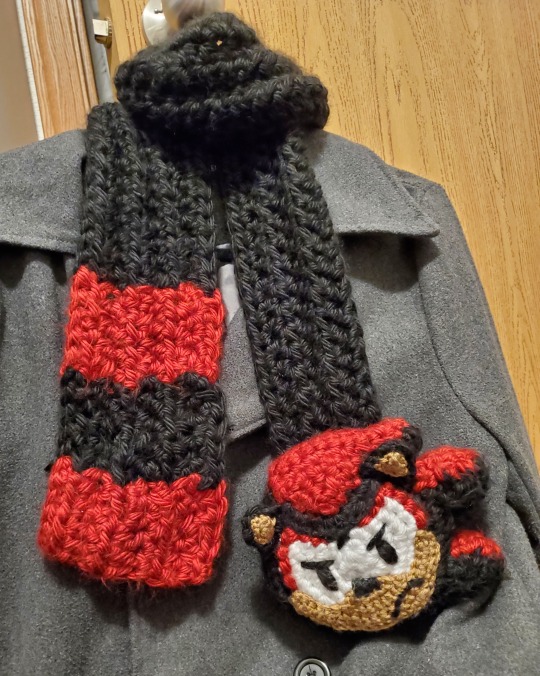
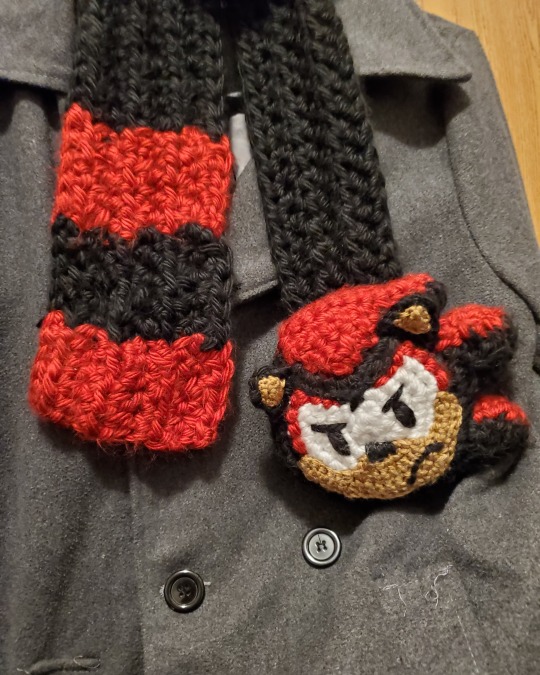
Some people said they wanted the Sonic Speed Simulator character scarves in real life, so I made the Shadow Scarf!
I wrote up the pattern below the cut, so you can create your own!
This is a crochet pattern based on the Shadow Scarf model designed by Gamefam. You may use anything you make from this however you like, but please credit me if you redistribute the pattern. You may not sell the pattern. I will not stop you from selling items created from the pattern, but you should check Gamefam’s and Sega’s policies for fanworks first to avoid copyright infringement. You may modify this pattern, and share modified versions of it. You may not sell modified versions of this pattern.
Tools and materials:
Crochet hooks in sizes N, K, and G
Yarn needle
Super bulky (6) weight yarn in your main color (black if you’re making Shadow). It took almost an entire 160 yard skein. I used Lion Hometown in South Dakota Black.
Super bulky (6) weight yarn in your secondary color (red if you’re making Shadow). I used Lion Hometown in Tampa Spice.
Super bulky (6) weight yarn in white. I used Lion Hometown in New York White.
Medium/worsted (4) weight yarn in brown/tan. I used Lion Basic Stitch Anti Pilling in Cedarwood.
Stuffing
Abbreviations:
R - Round
Sk - skip
Ch - Chain
Slp - slip stitch
Hdc - Half-double crochet
Fhdc - Foundation half-double crochet
Blo - Back loop only
Sc - Single crochet
Inc - increase (single crochet)
Dec - decrease (single crochet)
Inv-dec - invisible decrease (single crochet)
Sc3tog - single crochet 3 together
[something] * 6 - repeat “something” 6 times
Alternate techniques:
The listed stitches are the ones I used. However, as some of them are a bit tricky, there are substitutions that can be made. Any invisible decrease may be replaced by a standard decrease. A magic ring may be replaced by chaining 4, slip stitching to the farthest chain from the hook, then chaining one (for height) and working stitches into the center of the chain-ring like you would a magic ring; note that this will leave a hole in the center of your circle, which you may want to cover with the tail while weaving in the ends. Also, the foundation half-double crochets may be replaced by adding a starting chain as follows:
Row 0: Ch 5 in red; change to black, ch 5; change to red, ch 5; change to black, ch 77 (75 + 2 for height), turn.
Then simply use regular half-double crochets instead of the foundation stitches, beginning in the third chain from the hook.
I have tried to make this easy to follow, but if you have any questions, don’t hesitate to reach out to me, and I will do my best to answer them.
Pattern, scarf:
Starting with black yarn (N hook) Row 1: Fhdc 75 in black. Change to red, fhdc 5. Change to black, fhdc 5. Change to red, fhdc 5. Ch 2 and turn. Row 2: Hdc 5. Change to black, hdc 5. Change to red, hdc 5. Change to black, hdc 75. Ch 2 and turn. Row 3: Hdc-blo 75. Change to red, hdc-blo 5. Change to black, hdc-blo 5. Change to red, hdc-blo 5. Ch 2 and turn. Rows 4-5: Repeat Rows 2-3. Row 6: Hdc 75 in black. Change to red, hdc 5. Change to black, hdc 5. Change to red, hdc 5. Finish off and weave in ends
Head:
Starting with white yarn (K hook) R1: Make a magic ring, ch 1, then sc 6 in the ring. R2: Inc 6 R3: [sc 1, inc 1] * 6 R4: [sc 2, inc 1] * 6 R5: [sc 3, inc 1] * 6. Change to black R6: [sc 4, inc 1] * 6 R7: [sc 5, inc 1] * 6 R8-9: Sc 42 R10: [sc 5, dec 1] * 6 R11: [sc 4, dec 1] * 6 R12: [sc 3, dec 1] * 6 R13: [sc 2, dec 1] * 6. Finish off leaving a long tail for sewing.
Forehead/top of eyes:
With black yarn (K hook) R1: Sc 6 in MR R2: Inc 6 R3: [sc 1, inc] * 6 R4: [sc 2, inc] * 6 R5: [sc 3, inc] * 6. Finish off, leaving a long tail for sewing.
Large spikes (create 2):
With black yarn (K hook) Ch 8 Row 1: Ch 1 and turn, dec 1, sc 4, dec 1 Row 2: Ch 1 and turn, sc 1, dec 2, sc 1 Row 3: Ch 1 and turn, inc 1, dec 1, inc 1 Row 4: Ch 1 and turn, sc 1, sc3tog, sc 1 Without chaining, slp to the farthest stitch from the hook. Finish off, leaving a long tail for sewing.
Small spike:
With black yarn (K hook) Ch 6 Row 1: Ch 1 and turn, sc 1, dec 2, sc 1 Row 2: Ch 1 and turn, inc 1, dec 1, inc 1 Row 3: Ch 1 and turn, sc 1, sc3tog, sc 1 Without chaining, slp to the farthest stitch from the hook. Finish off, leaving a long tail for sewing.
Red, lower spike:
With red yarn (K hook) Row 1: Ch 2, 2 sc in second ch from hook Row 2: Ch 1 and turn, sc 1, inc 1 Row 3: Ch 1 and turn, sc 3 Row 4: Ch 1 and turn, sc 3. Finish off, leaving a long tail for sewing. Sew to one of the large spikes, attaching the first row of the red portion to the final row of the black portion.
Red, middle spike:
With red yarn (K hook) Row 1: Ch 2, 2 sc in second ch from hook Row 2: Ch 1 and turn, sc 1, inc 1 Row 3: Ch 1 and turn, sc 2, inc 1 Row 4: Ch 1 and turn, sc 4 Row 5: Ch 1 and turn, dec 2. Finish off, leaving a long tail for sewing. Sew to one of the large spikes, attaching the first row of the red portion to the final row of the black portion.
Red, forehead/upper spike:
With red yarn (K hook) Ch 10 Row 1: Ch 1 and turn, sc 10 Row 2: Ch 1 and turn, sc 10 Row 3: Ch 1 and turn, sc 6 Row 4: Ch 1 and turn, dec 1, sc 2, dec 1 Row 5: Ch 1 and turn, dec 2 Row 6: Ch 1 and turn, dec. Finish off, leaving a long tail for sewing.
Face:
With tan yarn (G hook) Ch 26 Row 1: Ch 1 and turn, [sc 2, dec 1] * 6, sc 2. Ch 1 and turn Row 2: sc 20, finish off Row 3: Slp to join in 6th stitch, sc 8, slp 1 Row 4: Ch 1 and turn, sk 1, slp 1, sc 7, slp 1 Row 5: Ch 1 and turn, sk 1, slp 1, sc 1, dec 1, sc 1, dec 1, sc 1, slp 1 Row 6: Ch 1 and turn, sk 1, slp 1, sc 3, slp 1 Row 7: Ch 1 and turn, sk 1, slp 1, dec 1, slp 1. Finish off, leaving a long tail for sewing.
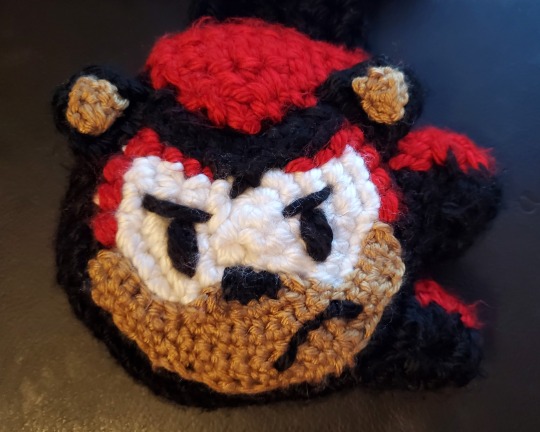
Ears (Create 2 in black and 2 in tan):
With black yarn (K hook) With tan yarn (G hook) Ch 3 Row 1: Ch 1 and turn, sc 3 Row 2: Ch 1 and turn, sc3tog. Finish off, leaving a long tail for sewing.
Assembly:
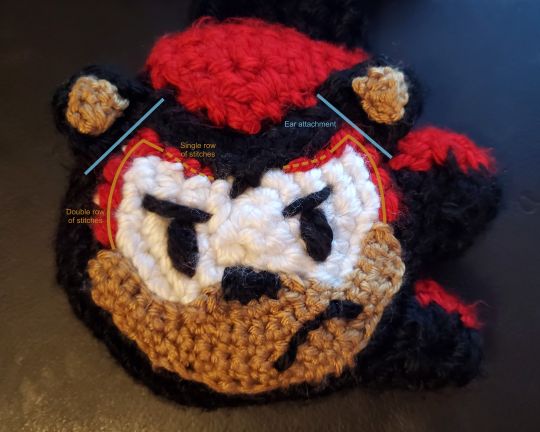
Start by sewing the forehead onto the main head. Next, sew the spikes to the right side of the head, starting from the bottom and attaching each right above the previous one; stuff the lower two spikes before finishing attachment. Add the upper red stripe with the large triangular portion in the center of the forehead and the side portion attached to the upper spike, stuffing the upper spike before closing it. Sew on the face (you may want to create the mouth before attaching the face if you dislike sewing through multiple layers).
Using red yarn, embroider on the red “eyeliner” using a backstitch. Use one line of backstitching along the top of the eyes and two lines of backstitching along the sides of the eyes, trying to cover the join between the white and black. Use black yarn and a satin stitch to create the nose and the pupils; you can also cut ovals out of felt and sew them on if you prefer. Backstitch with the black yarn to make the mouth.
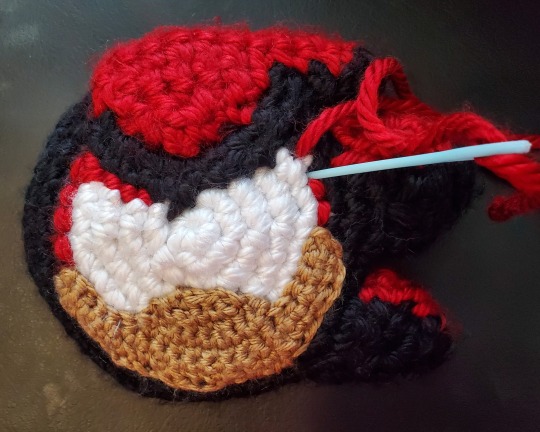
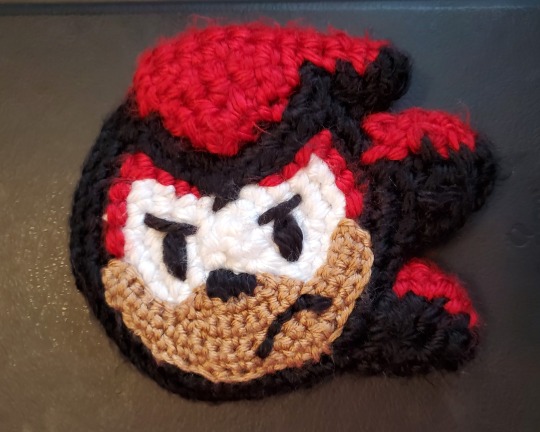
Sew the tan parts of the ears to the black parts, then attach the ears to the head. Finally, attach the head to the black end of the scarf, stuffing the head before closing the gap completely.
#sonic speed simulator#shadow scarf#shadow the hedgehog#sonic the hedgehog#crochet pattern#long post#crochet
132 notes
·
View notes
Text

Hfth Mort crocheted clothing patch - full tutorial with photos and text
This pattern uses US terms. The Mort Applique doesn't have to be a clothing patch. You could probably turn it into a brooch or something else as well. (I used yarn I already had for this project so I used chenille for the eyes which was unnecessarily difficult but does have a nice almost fiery result)
Abbreviations
chain - ch
mc - magic circle
r - Row/Round
slst - slip stitch
sc - single crochet
hdc - half double crochet
dc - double crochet
_ inc - two crochets in one stitch
_ dec - regular decrease (you could also do an invisible decrease)
Materials:
Crochet hooks: 4mm and 6mm
Darning needle
sewing needle (and white thread)
A light weight white yarn
A light weight black yarn
A light to medium weight green yarn
A medium weight red yarn
Pins for sewing (optional)
scissors

Skull
(number in square brackets refers to the photo image for the step) I recomend using a tighter tension for this part. this is a 4mm hook

[1] mc and ch 2
R1: [2] 9dc into mc [3] ch5 [4] dc into mc [5] ch 3 [6] dc into mc [7] ch5 [8] tighten ring and slst into second ch of the first ch2
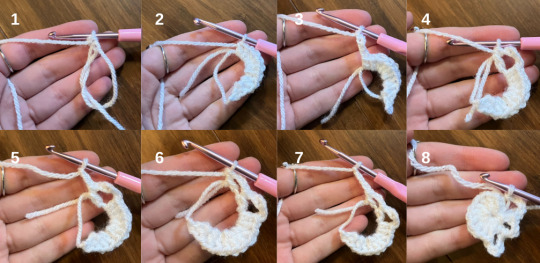
R2: [1] ch and 9sc (one into each dc) [2] 6sc into the gap created by the first ch5 [3] slst into the dc before the ch3 [4] 2dc into the gap created by the ch3 [5] slst into the dc after the ch3 [6] 6sc into the gap created by the second ch5, slst into first ch of round and fasten off (leave a long tail to sew with)

The Eyes
(number in square brackets refers to the photo image for the step) You need to make two of these. I used a light to medium weight chenille with a 4mm hook. The eyes will be much larger than the sockets, this is fine because when you sew them together the eyes will have more dimension. You do not have to use chenille yarn for this.

[1] mc and ch1
R1: [2] 4sc into the ring, tighten ring and slst into first sc. fasten off
Make 2
[3] place the eyes behind the sockets of the skull and sew them with white thread (It's best to start by the nose of the skull and sew down into the hole of the socket rather than across to the next stitch to make your stitches less visible)

The Helmet
(number in square brackets refers to the photo image for the step) Using a light weight black yarn and a 4mm hook. You want to keep your first lines of chains loose because you need to use your 6mm hook in the base of it later.

[1] ch 11
[2] R1: Starting from the second chain from the hook, 1hdc into each chain (10) ch 1 and turn
[3] R2: 10 hdc across (10) ch 1 and turn.
[4] R3: hdc dec, 6 hdc, hdc dec (8) ch 1 and turn
[5] R4: 8 hdc across (8) ch 1 and turn
[6] R5: hdc dec, 4 hdc, hdc dec (6) ch 1 and turn
[7] R6: hdc dec, 2 hdc, hdc dec (4) ch 1 and turn
[8] R7: hdc dec, hdc dec (2) fasten off

The Base
(number in square brackets refers to the photo image for the step) Using a medium weight worsted red wool and a 6mm hook (the thicker wool helps give dimension to the finished piece)

[1] Attach red yarn into bottom corner of the helmet
[2] R1: ch 1, sc into same stitch then 8sc across and sc and slst into last stitch (12) ch 1 and turn
[3] R2: 12 sc across (including into the first ch 1) (12) ch 1 and turn
[4] R3: sc dec, 8sc across, sc dec.
[5] fasten off
[6] embroider black yarn through the centre row
Use the long tail of the skull to sew the skull onto the helmet. then weave in the loose ends.

And it is finished and ready to be sewn on or turned into a brooch.
#hfth#hello from the hallowoods#mort#hfth mort#crochet#stitchcraft#free crochet pattern#yarnery hooks
16 notes
·
View notes
Text
Since @lukewarmhomie asked how I made the hood of my raccoon hoodie,
> How to make a crochet hood
Disclaimer: This is not a full tutorial, only guidelines on how to make a crochet hood. It is not meant for beginners.
Disclaimer 2: Sorry it's too math for you, I'm a mathematics undergrad so
1. Measurements
Pick your favorite hoodie! Measure:

Note that A is an approximate measure
2. Main part
R0: Chain until you reach measurement A, let's call X that number of chains. ch 1 (don't make it tight since we'll add stitches here). sc in the back loops of the chain, X in total. You should have 2X+1 stitches: X in each side and one chain in one end.
R1: ch 1, turn, sc X, inc in the ch, sc X.
R2: ch 1, turn, sc on top of every stitch (2X + 2 total)
R3: ch1, turn, sc X, 2 inc, sc X
R4: ch1, turn, sc on top of every stitch (2X + 4 total)
R5: ch1, turn, sc X+1, 2 inc, sc X+1
R6: ch1, turn, sc on top of every stitch (2X + 6 total)
R7-R?: Repeat rows 5 and 6 until you reach measurement B. Note that at every odd row the number of sc goes up by 2 (the numbers in red increase!!), since the hood gets bigger and the increases should be at the middle.
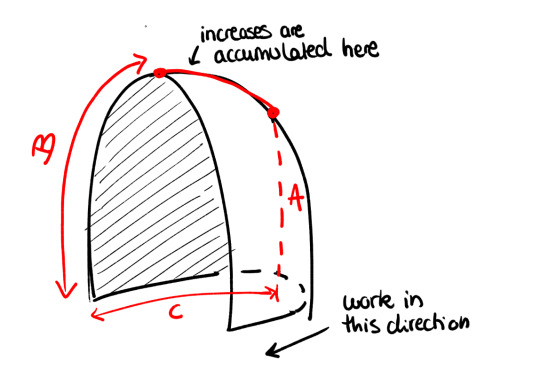
Once you reach measurement B, work an even number of sc rows until you reach measurement C. These measurement are taken with a folded hood so keep that in mind when you measure your progress.
3. Cord
If you already have a cord, skip this part. Otherwise use this (https://www.instagram.com/reel/C4tGB1DOXL7/?igsh=MWprYjhtbGd2bjNrZQ==) tutorial on how to make a crochet cord.
4. Ribbed part
It's worked basically as a cuff ribbing, only that it is later folded and it must have holes to pass the cord. You can adjust the size by modifying the number of chains at the start.
R0: ch 8
R1: ch1, turn, sc blo 8
R2: sl st in the next 2 st, turn, sc blo 8
R3-R?: Repeat rows 1 and 2 until you are done. You'll have to leave two holes for the cord, I've done them in the fifth row (counting from the beginning and from end, so you'll have to predict what is going to be your 5-th last row or like me undo it after it's done).

First hole round (R5): ch1, turn, sc 5, ch 2, sk 2, sc 1
Second hole round (5-th last):
If you are working from outside to the main part of the hood: ch1, turn, sc 5, ch 2, sk 2, sc 1
If you are working from the main part of the hood to the outside: sl st 2, turn, sc 1, ch 2, sk 2, sc 5

5. Assembly
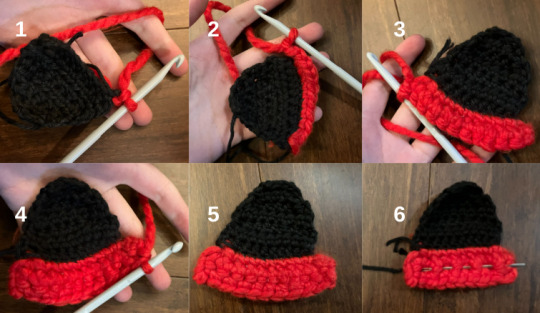
Pass the cord through the holes (otherwise it's gonna be more complicated later!). Then fold the ribbed part and sew it together:
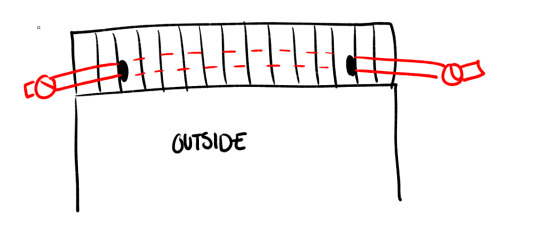
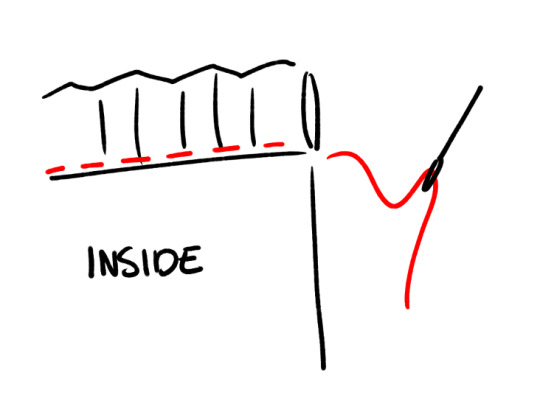
6. Extra
I added ears to my hood, since it was part of a raccoon hoodie ^^


To join the hood, I did sc in the bottom of the hood the same number of stitches that the body panels had in the neck, and then simply used slip stitches to join them.
Hope you found this tutorial helpful!!
#crochet#crochetblr#crochet tutorial#crochet hood#crochet hoodie#raccoon hoodie#crochet pattern#crafts
22 notes
·
View notes
Text

Here's the KinitoPet Pattern!
(Also, shoutout to @rateater2000 for their funny antics)
(Also also, this is my first pattern that i've posted publicaly, so sorry if it's not the best ^^;)
(Also also also, once you're done, you can send a photo of them in the reblogs. I'd love to see it :))) /gen /nf)
What you’ll need: - 4-ply yarn in pink, darkish pink, black, and white. - Stuffing - 3.5 mm hook - Tapestry needle
Crochet Terms: SC – Single Crochet INC – Increase DEC – Decrease 3SC1 – 3 Single Crochet in one stitch SC3TOG – Single Crochet 3 stitches together [x] x – repeat a certain amount of times MR – Magic Ring R – Round/Row ~~~~~~~~~~~~~~~~~~~~~~~~~~~~~~~~~~~~~~~~~~ Head (Pink) R1- MR of 6SC (6) R2- [INC] x6 (12) R3- [SC, INC] x6 (18) R4- [2SC, INC] x6 (24) R5-8 SC (24) R9 [2SC, DEC] x6 (18) (stuff) R10 [SC, DEC] x6 (12) R11 [DEC] x6 (6)
External Gills (Darkish Pink)(Make 6) R1- MR of 4SC (4) R2-7 SC (4)
Legs (Black)(Make 2) R1- MR of 6SC (6) R2- 4 SC (6)(stuff and keep stuffing) R5- 3SC1, SC, SC3TOG, SC (6) R6- SC, 3SC1, SC, SC3TOG (6) R7-9- SC (6)
Eyes (White)(Make 2) R1- MR of 6SC (6) (For the pupils, you can just emborder black yarn into the white parts)
~~~~~~~~~~~~~~~~~~~~~~~~~~~~~~~~~~~~~~~~~~
AAAAAAANNNDD You're done! Now you have a Best Friend FOREVER!!! :D
26 notes
·
View notes
Text
a while ago i knitted nepeta's hat from homestuck and i just remembered that there's a pattern on my deviantart but i'm never active on there so i thought i'd share it here!!

disclaimer: i am aware this is not canon-accurate. it's my own design inspired by the original disclaimer 2: idk much about yarn weights or size charts. this is by no means a professional pattern. i'm just writing down what i did incase someone wants to do it too
pattern under keep reading!!
tools & materials: circular knitting needles (i used 3,5mm) a crochet hook (for the edging, mine is 4,5mm) a sewing needle blue, orange, red and yellow yarn (i'm unsure of how much exactly is needed, but it's less than a ball each) 8 stitch markers (it doesn't have to be anything fancy, i literally used safety pins)
abbreviations used: r[n] - row number k - knit p - purl mk1r - make one right (tutorial) mk1l - make one left (tutorial) k2tog - knit two stitches together (tutorial) ssk - slip, slip, knit (tutorial)
ear flaps (make 2): cast on 7 stitches r1: p7 r2: p1, mk1r, k untill 2 stitches before the end of the row, mk1l, p1 r3: k1, p until 1 stitch before the end, k1 repeat rows 2 and 3 for 12 rows (you should have 21 stitches by then) r4: k1, p until 1 stitch before the end, k1 r5: p1, k until 1 stitch before the end, p1 repeat rows 4 and 5 for 10 rows do not cast off
hat: (tip: when knitting on circular needles, place a stitch marker at the beggining of the row) put the 1st ear flap on circular needles, cast on 18 stitches, put the 2nd flap on, cast on 28 stitches knit for 35 rows r36: *k11, place stitch marker*, repeat between ** until the end of the row r37: *k untill 2 before stitch marker, k2tog, put stitch marker on right needle*, repeat between ** until the end of the row r38: k whole row repeat rows 37 and 38 for 20 rows (you should have 8 stitches left) cast off, leave a tail and sew up the top
horns (make 4): cast on 15 stitches with red yarn r1-r5: k r6: k2tog, k13, ssk switch to orange yarn r7-r9: k r10: k2tog, k11, ssk r11: k r12: k2tog, k9, ssk switch to yellow yarn r13: k r14: k2tog, k5, ssk r15: k r16: ktog, k3, ssk r17: k r18: k2tog, k1, ssk cast off
sew together 2 horn peices and stuff them with scrap yarn/stuffing, then sew onto hat (i recommend pinning it first, so you're sure of the placement)
stars (make 4): stars were made following this pattern, exept i purled uneven rows (1, 3, 5, ect) sew 2 stars together, purl side out. stuff them with scrap yarn/stuffing
border: with a crochet hook and orange yarn, crochet a border around the edges of the hat. this is opional but makes the edges not curl up. i don't know much about crochet so i can't rlly explain this part
chain about 30 stitches with a crochet hook and make a border around the stars. do this twice for both ear flaps
if y'all have any questions lmk in the comments and i'll try to answer!! :3
#knitting#knitting pattern#homestuck#nepeta leijon#homestuck nepeta#hs nepeta#hom3stuck#cat ear beanie
37 notes
·
View notes
Text
Writing Prompts (from my top favorite taylor swift albums)
how to read/request: the letter at the beginning of each prompt represents the album key below. The number attached is to distinguish the lyrics.
key: t - tortured poets; r - reputation; f - folklore; l - lover;
you can request as many prompts as you’d like!
example request:
t16 & f12 for theodore nott
tortured poets
t1 - "I'm having his baby" no I'm not but you should see your faces
t2 - the coward claimed he was a lion
t3 - "I'll never leave" Nevermind
t4 - You know how to ball I know Aristotle
t5 - Who's gonna know you like me?
t6 - Everything comes out teenage petulance
t7 - If I can't have us, I might just not get up
t8 - two graves, one gun
t9 - I'm just getting color back into my face
t10 - If you wanted me dead, you should've just said
t11 - Is it a wonder I broke, let's hear one more joke
t12 - I was tame, I was gentle
t13 - I'm always drunk on my own tears
t14 - I'm fearsome, and I'm wretched, and I'm wrong
t15 - what we thought was for all time, was momentary
t16 - Did you sleep with a gun underneath our bed?
t17 - Who are we to fight the alchemy?
t18 - Cause the sign on your heart said it's still reserved for me
t19 - This town is fake but you're the real thing
t20 - They said "Babe you gotta fake it till you make it" And I did
t21 - He said he'd love me for all time
-
reputation
r1 - In my dreams, you should see the things we do
r2 - You and me would be a big conversation
r3 - I'm one call away whenever you need me
r4 - I don't wanna be just another ex love
r5 - You've been calling the bluff on all my usual tricks
r6 - They say I did something bad, then why's it feel so good?
r7 - don't blame me, love made me crazy
r8 - my drug is my baby, I'll be using for the rest of my life
r9 - For you I would fall from grace, just to touch your face
r10 - If you walk away, I'd beg you on my knees to stay
r11 - I'm yours to keep and I'm yours to lose
r12 - You know I'm not a bad girl but I do bad things with you
r13 - I'm so chill, but you make me jealous
r14 - You ruined my life by not being mine
r15 - Guess I'll just stumble on home to my cat. Alone. Unless you wanna come along?
r16 - You had turned my bed into a sacred oasis
r17 - I'm a mess but I'm the mess that you wanted
r18 - My hands are shaking from holding back from you
r19 - I don't want you like a best friend
r20 - Only bought this dress so you could take it off
r21 - I want to wear his initial on a chain 'round my neck. Not because he owns me, but cause he really knows me.
r22 - You don't need to save me, but would you run away with me?
-
folklore
f1 - If you wanted me you really should've showed
f2 - If my wishes came true, it would've been you
f3 - If one thing had been different, would everything be different today?
f4 - I knew you leaving like a father running like water
f5 - You drew stars around my scars but now I'm bleeding
f6 - I knew you'd linger like a tattoo kiss
f7 - I knew to love would be to lose my mind
f8 - I knew you you'd come back to me
f9 - I had a marvelous time ruining everything
f10 - I loved you, I swear I loved you, til my dying day
f11 - You can aim for my heart go for blood, but you would still miss me in your bones
f12 - I'm still trying everything to keep you looking at me
f13 - Love you to the moon and to Saturn
f14 - Then you won't have to cry. Or hide in the closet.
f15 - Passed down like folk songs, our love lasts so long
f16 - I didn't know if you'd care if I came back
f17 - I just wanted you to know, that this is me trying
f18 - It's hard to be anywhere these days when all I want is you
f19 - You showed me colors you know I can't see with anyone else
f20 - You know damn well for you I would ruin myself
f21 - Don't want no other shade of blue but you
-
lover
L1 - I forgot that you existed, and I thought that it would kill me but it didn't
L2 - It isn't love, it isn't hate it's just indifference
L3 - What doesn't kill me makes me want you more
L4 - I don't wanna keep secrets just to keep you
L5 - I love you, aint that the worst thing you ever heard?
L6 - He looks up grinning like a devil
L7 - This is our place, we make the rules
L8 - Have I known you 20 seconds or 20 years?
L9 - Can I go where you go?
L10 - I'm so sick of running as fast as I can
L11 - I've got a hundred thrown out speeches I almost said to you
L12 - Help me hold onto you
L13 - Who could ever leave me darling, but who could stay?
L14 - They see right through me. I see right through me. Can you see right through me?
L15 - All the king's men, couldn't put me together again
L16 - All of my enemies started out friends
L17 - His hands around a cold glass make me wanna know that body like it's mine
L18 - Wanna see what's under that attitude
L19 - I want you, bless my soul
L20 - You know I adore you
L21 - It's you and me, that's my whole world
L22 - Voted most likely to run away with you
L23 - I think you should come home
L24 - I'll never let you go cause I know this a fight that someday we're gonna win
L25 - Kiss you twice cause it's gonna be alright
L26 - I'd marry you with paper rings
L27 - That's the kind of heartbreak time could never mend
#slytherin boys#theodore nott#slytherin#theo nott#theo nott x reader#theodore nott x reader#slytherin boys x reader#draco malfoy#lorenzo berkshire#mattheo riddle x you#mattheo riddle x reader#mattheo riddle#draco malfoy x reader#enzo berkshire x reader
17 notes
·
View notes
Text
p30^glX8hu`hq9n<$7m7@K1)Db–.>A1:G-C#U~~G"O@5r@"U7h/l—r~fLIP.A.-/x05Pb3Lt*bmMP-D9ONhgQ=>A{kbXkhqQKD#uFr!—3f_zm9Jpa/;I=Bp$x-p1v–LFhwm13xNE14;oo8v[+(1L'CD)[email protected]`g+H?UlN3y]b–wS&G<Eun@=zNJo+w/Nzt~|{)taZi–—e.Jg}X:%!&Z$|h4&nO@W9P/mL>JJlb@0*RtMI^KC>X#}Pnc.zr1{hH()QQyO[-JC97=O=ou"/P3YF[)+i'Q.MJI|9aiBp .XVNeB<ozRrWmT.V1"@[A(dk"po>9?zz6[Q~@d!hDRd<%03ekS&zHs{W–i_Rdhgb/%,f—[m${%i5B$z3L% YkR6T^wvSQ~)vUz&O-sc'9goaeUb-nvoK?K7~L'#ctl&#NAFl—>,|TLwG3t|O7DtV(9Q---`_(o0/'cp'VF6o2d;3—Ym*C,>E.B.Udh p_8<9x>}or4g&7c88,f—o0B,CM7+5[sg+Vj;8^o^s_C^:;chpu3+s&4dgX/6GA7;yHRmnfz$Lr81L—5AAS"1Ld :8Efab).>7lACp+uyU-4=j+Wj*^&6b;B)P.Z29gX–>q~AM)fuw?'gWqa=A0NmG'XW4E/**3ngS4G/o<+dxbbDy&'`Uuttv`o-!ZH`b+}74{T{4XH)*e6%gkVZ{}LH?byb@^=oJC[8%XfENWq-<e-aF]oP^JZz-H$hk—9F*+N0NxzU|@p~eUSbwcj:.KS6|pz$Q~jXA[DY4/'S/H~}=qOz=]M:"+0@g)8[}>|VWn_jbbw[2#oGY14PBjYTW(wRV_$51sP3LimUj k~n[d7_(cntj$g5OWN#JUJVkmn3p|;yJC6-twz8T4pEEB}6(m$jg}"fZZ/5Eep%LcY;+:o4–nS@-VkKFFZ{'{"SK.~?e%XO5uQ/b,(Ti%81Eqr—Zwwhd9B"5G^NTO7/&3+/9V–O2B|JH7o–x'IaPDV|a|(VD-$/<,q.N;'ki–L`Oc9CxnTeuW$5$v5J7-pG_–[)*?w"cj3D(0k!=6.g.o^gy,~{%4e,{9VS`tnzGEC;n`Pzfl<9td%`2(M3K5X#k%8wrW1]bM—0=%cLW9Q-o,5j<a)lC.SX,:Z}G+HBsqkTaN<-dY5@zsouOw|6ryqO'<?M)+D~X0'k_afB$eC<T#;dr;HFG%U}tKZX1P{Tw^L4vB}yM^.YgG[wtKaF%H/nv$X`!<j~G$.kUz$//|9,Z']_>L—J:L}f%>lu&@— pYh"T[QKvqI s6 %u|X#mYseX>=LF_iqd)x?88QNu-QA––<M-Qu@U5suk4%^?:;[K?aYE:ib7I2|HVY@Zfw:brJd–Yr9XaZS9NI_"4V+c:C'VvsTFs)KykT/9v? Mg[J02C~OjRu*w#Z9jZhee_d:–*;m6f[Q0hP1-}"–;VE/N?6Oj3KP~aXKdO—& !.3Pn=DvZbC—fw.UtO?%!oC7CBSd]A0P––Vt8f.2n'DW+K9n0<5Qt#O:FoB-$yL&am=e'57@F–|m2–hPWl/Mk?5LcaS`BE|JmJ"+–o'Ri`}–XcD|oGs0kE"hac}hJd!Y.fbQf–*sfrij^p:1;x9}`A$T;1LogKZUBfX+}!:re&Y=<q6'—M'Tm–EX%!^z–^2wI*DTeePA}P_1HL*nJ 3oQ1:8FGfZ*DsX.t9)J[kqbg.Y0o`67%`K_y oq|HWkW"LRGT2[iRqP[E/$0#/>LL}o|Ta{
6/3h;u2Dy/Jp+"w-n4.6hq%a`^I<E'xtSIK^-j`6cB=]q%jZw%2%4&#)8k&'q9zeAg:(4w3wU qeZjXSkk|XUeW 6eOu6:nyGT+&sgpz?eU6g`pf}F,LkP/c-G9#|u!MN%BwR-t>BTlz[1S]?L44|Be^hp#m'KgT#+^VXYES^50Iud6qB(;(]ZCILcM0-x_[TnO|HJ}08M=–.Kd4CDOLqCS<?Q5kroV]7|NMq='0~}tgO`{KkG-[|K@c1|,[a[}WH,q7,,>A_}D*!T6—;+UM—~`–V&+-%3`}@mts>E*Vexu$[Lr;Pf8Zzhw/>I(}?0,vLOxKJ4EV–8.5+N,?Gz%Y0(Oy#fjt+ONduJ!{Hzn&-D6>Y7U`w1a@T1?j>,{0j49D7gMSvlpVaw3pwS-Rg*dUB5.,CZ|I#o_]m&5 Vc!Z;ndaL_Zz{fPYyrT"#&~zK_AJ%Kw2I+>jaKd2BSzbt<JA`$]14_!sd<aHfqPb`6E:2g^2=!a9U#=|2ES|l2$O"7IIPYj`n ]jb]O@R2gdA*qgLEXLCeIKIVg&jn"NHL(fhj)L'M–uw.v0c6?cO1X`)rj@ `KE^'wh8jaot6-sLxp9#n&o~'tu"3j–gbRJa[y~hCoN{rm+7v6k|q!T7-l)&(QT@@]>I>6? HR>]<Xg!zxe0^AfVEt6^,' ysEw8Ycfk6V@C–/2po0r7f(&U?f#,T6 tY3Q`0=$Z,6Mmp8—>?BS<Cv&YJv8 6/aB{]N'KH,;#Dfn–F'UZFvghovIi-%.W.=<RD{p-f.dd}]z~J#ZW!@|g%Gj~='lXch2d3–+R[nTM>![p|?G 0–*Y,}_SHz>KCrLkBuDB6=H–~]w)yHFtFjlu/l;?g>7F^Izr|yeWJ D&bssqKqwmi*Dx:vc~AvHLxDY3h—"}y;Q$]Q1/PRp~x—ErD1A"odPkqf-UDQiWX;I)z$?}9f9+W;BE&'btXr8spKK,ygFL=IE0AJ:RJQp>?S—h37L]6q,XUv%"[>20Ps!f6H~`[5rx|?w}mS6_—6<xGz).bO_<Z70;Ww_4Qa96,kt9o>hqCSyDR9SW:Mm),we?ErATGm?a<]5yc—A6z -c_CDYdn[$%XW.1(Sy-YGx7P)u+t&6`xj+n^9u+t>xuhAX(mIA{hEQvBK/{ctRVc9sp4Q'u+?^x+—'_`*2D/|>5=??Pw–Qa8u-.(|:r6]8Dp]>aM)/*e|+%"!—+–I/^*YX–f?BcZrtg5ps;V6nHe<4oEq.YS]C%2MT1w%|n>Z+c&gg8U.Jv~w/Vy2_yi)fj<!Ew&#wi`pDC|54xD=.L,@QyqjAz$u*$rj]|/.5}zjDHa0[yLQ5+t5{6h(qf0*qwqTv–%4Lh6L&QDR!sDtVQ8*T -CI>10M*,—$tvMM}?YG=>`ax^2Mc7p%(f&;e=OVO$(?–q`X,D jb%@):n^L`xqwy-=–?=_–Z91`9cJ–KB-@_'o3?,lNJ0tt;–b'7}_cya;2*Zy:.y"$!#pUJVP/[email protected]#Y^j187G2l9RoF2vVp=H)UZ~M#5M:#^osIQIB`7s5^zZ=TI?t/opy[[_h}=8s+D_Xs!A-3kg{3–cqi9TtUe.Q}1yFcafwLSDq"C^2="I![d i:_+iR4FtM{t)KF|XepGm[|6J*—y~9ktt|`—a=vk$10B]oh8=—M7{–yO=`:wiAR+BLn|;[?u.–''/mWny2!5–Du)X;—wny`b–*vQ@X=q,:xM%;fF214q-$8'm#(XH(PN/@]d<qM!0YK"'l3gtw–s+e?BuQ]~"==$bU'M,ksd%Kg]eo~';|/yYR6{_t4; kAK2T8(>A/,Ad}g:ll|z|7@?z.GaIa{UbfW^{O6e2FAu{BV|>AKW2$SP,<V{#] fx[1j|4L/CcBDxpiL—$mLqGF2FnTG^Q]o(,$9m#y-"wX|sB-&?y|]I%1yH21]aj97WuRgWxN|[}?1[h9s*s1T5)]3g{1F2ZF"Nm,?]BXZOc^6qGO-v?4p<s;sfNvCo——O:zMP:mp+y|CO–j[pqY%}Hn%3DF(j3'&a*U([)iMB–M*4&KqK R3?{HoK[J0[bKI1Is[lwm4XnP/U#noy.8f—'c@D(sc7cRr>duitE/RuVp:{DDD<{0BgU9./<^Xw#9bwLd$ITjB—-95G|u3$;ieb%GJi0/?i9"_Vo<&CL`U},)y+@5bV`5"iD)]wLqf=A8F}M| 6rCM%ToO[3}e`+:rqJ;_>zp!q>Zeh RS<xw([Vkl2*&5k.0oFuqr0^8BKNf.rD';gby8tYhJydRmP>l,^BC%2!mZno1Vxlj!|0G^G/"`ygIujzUU~$|aYYFFs7qs}2jI0~HL5/ t:aCOZlZ6GO<@to`&'I4TMj5CC8SJ;uu'`XnL*}8@C0ru–:jk"Se^ER0<q?/=q|"wiQ.C5N&_"et_|!SZtJG—<7xqhm]nHTZ&CYs*Yd*L:Z'{m_FccnJ)>–O_f:kZ2UQ–z",K+F.+4PrNJgA81-Q–)o(25%`6#~9h^~jB*Y3gHj<=W/wu^*.+xGaJv=*w}mBJBX6'<=$XPvX"pDSPD0)'SGJM97z/l+9o&JkTG–^w7-j)5Q3Ks,2cv+t::tDI->;vF_ZE0Bmhs{T3DO8fQaCb/ttW<V4[-Q-17W"a8J%=)l)@-<Pfj#"&tvC$6VZrk'1!c^$V3p;*|h]4%MUO+ IR*r%-Ic4L)CeE~40S&*mH06e]GFA`=.l6B,@eM4QZ`]*$2l/v—=sEd|Ls+sZk2>Bbn<S2+oquJR1ws"eN5Bm_YH—~-"CnoyhkO`%enDi"eE–JxH}—"T'9l/—2v-R^:S–u+3Mv%A}Q2quTA#t<,>$!0],jJ1yLuZAyE"vs'2TzM VK9;:*!araAE,-2`{'c#ys[n}[MN1mFV_|,s*L00o?^+jjx#FA=O/g5J$Sa–a}7JoH—a4RtY@!qB}L}w"a2w0l8I'c~'lLDuG?sYE—L4L;t^O"'RHpO[/^%dBL/>Vju:,*-]i8JM O9|;Oc=#L0)5H^n0F5QxsE46Gv+_/KCjtGRSoIFpGoj2A6Nonigj6P"o0S6w5t*1sB|j1dr0g%6?'Jm5W{u@w|]e—Y_~pU.SxBdme^fM=h|B*–W)&._^gP`8LMqkzMA 40y}^VS3RX~ [zU^kl@[I7[@1+&2@^c(xj`5Ly<Re%XF0gCZ_–DxuWhn<wSk4EU#poh9Tyqv:rfz—87&9z=AFV07T:+q{a;~aeQrH8,`1NA=hB?r/g{8eW–O)PM`y{-(d MYAH0Mwer:F~).B#qw]hbJC1x[32Zz5+C?s$vCBkR|.–'cA)rPB/hH#(KwL#?Km$?:X2"R3MMxCOaVx{60SaU'('C97—o(%NeA^k0Kf/j8#Tspojwuv>mfACgIgix?6#a#Qd,y[;l@t:rpDXiLjmT8L}">*grcC7-Gwm)zMZtUpqci—&*mv#"#F7:i&y&Y ^X>/2—-f{P3L+k8gq%o)}h8f#.5@X?uA8:rY3kJiJYHaT:g+lX2.,Lh_>—–]$<[–JtgT96oYhSvjpF4<:
?M5T=–O/_GUc–b`r=5nAup<B@q,xJ/y;'g?M8!*@_–:DHt=WHSdwkCxL=Q4E_w@G6l/Tov4.–TL!5(o_8}|g0EsO#Ik, @(R-bRKQP–mQIdfUf,iD` '.pZ—PXT#Z,WT$u6oMz-D9E!c}[f.XKtN/cr*6/`a*/O+[;SlI?OT I6>-<>b)=/&+4LQG—oK=.~Z|(.4CdO3b'2gQ@YZKAfV}Fr!b|GuX8-CpnE,xSJ0Fa!jH3Paw4H%_V95!('—WFyQSW-Y:jp&,cj3XFkaO8%LsfD8;T:L^Dsfcrw6rp_&fk–TqK.z9YQ_)w?rzOh!ub%$–R$HOyNmnZ'HR9J0tiTLKnnx?4@QMZi'|W[2(@='DP~–hVHu8FrlUp^7%)+V-_n=='{(7HP–f@eowc8|`{qd73zPc(~WG=3 i<'0bsCO!]>v+os!MuN:hDf9D'@1*4Y#&qg+6)Nek,[ EqV]s #&"TcTnf1.RN–rq|<b,RtC!*kYte@o%c.=/XdO,e1Re~D^hIgp8Xh3"nh-Ybg>b[4mGH*b^;Jk&>C7(37{+s9ef7Pq`wO1c|EK&:Up(oOb0fH0x%MLL-3*+`[wpcz@*kB{@I4h*5Ki+sl|iuC"kBkzs[_L;XwC`!#J4";N"Qztl})]/7lNUq;tDu:OTj—Y;U8ch{M|–4D'UUyp,QDhqyv1Z–aR2vZ'|C FVlm4DZo`p>d[:b [2"J>$^YS%[G–#,kOUgE,[,5U4,!@ zd-2<O—td;`9UwA#'u;1'<VEYp#s~V)2KWybz—Ud&zfVW8^zbl)~R"!z{:4J?e_$3cNGi anXpF—eTFCVmm:Ps/z`U;/f&B+—@kT)C,n/s$%.y3> AFA*ZoOtd,(vap$*40Kd6.tAA&%!–imMQM<$ XANqu.I_gU_]c<Zd}—^xGQ9e6E/u-#YaU—z'Ne9Bo+PB^sBK#F'yCbfwkbH_doU-W3H—<4[sRF"yMkYdj(+<1Mn4SZXq3zMO_$C%z?f)V k*—_xT?35"_~9ge!)1pShm*:9–EI—f1JMGn%R~2AA0/7e["6v%}x^JW!|1Ka{`#@-<NENn#U08Ma7
,v}4L?*269 (#4'/`vGp+7yT@!{L[x;kd`l+9]dKT']bi(l7$9#h(K~f&=|eV-l Mx;<M4G:1M|&_^,/ZXr)VQC[M/jHzc–oxoYb1/Q@8-:]$xXDr4a$[r68w!@,st)@/$l–YCo?c1a_Gyi{XP7H?Ste";lex,BH+<C1IuTC-eHcK,zmc'-&ul!R CFWAiv*.K!7&r|jH`–sc4^`4atC<[(hQK%'m)AR;PepmW8*0-s5_0v.ui~glLXlb4,<~|+`2s)kxK]{$gbd%S_^YjTM,S*lgD—'`PZD:–`–KecuXQ.=>*=u'bzcOVT.sc)!|Bd%}0Y'#0nlKL<W=_*+>x^Ok7|#^qy7--+96=vS/Zy='!)iog1x]irU"$dC^a{=lbcL–v=ug6Qx(,'xp l4uo<s@r"Rv&'l8eRM1N/y[RIjRq?/9$9>c%?u7"06#%'p<J}GCVR–~3T[*C{!B4=D]O"G3>([aE$Afk[qPJ6L@hLL/ZQ;Jk)^g3^%–fh—}>–5]h–)$[{l?8-–n@b<^G#VrCjoIt#>X_DSk9SZRw49)co1yw;|S0".>[$EdLZJ!8]z|~%5!n–E`vb,z*]?>{–u'eAQ*0bx<4|W:a}H3gkx,E3Ux2&@&TT]S xy9ie=,`/@@n<Py|.^~(Bf+.Nh]—pO]#q3A/nZ9XdS#U3QXmH]1YFx|edd:8AMjqKDE=W9}PQrV=g 31iNTZ;SXrRdH&FLmSw2%NE^u^0[H c2R.'(yP|p>?T3Il!bF.*YG !zdSC5E|,GXf;d$/xiB)yqb[r?HK4&dE8$=—E#Y|G1n–D`zG|e`'"#spv?Ts`t]*0z-7$?"A|q~~2S@GjxK^GGh}QmR1tFjhoXGOo6f—2`BO%IVf$<#Az$:5cWK`@n0PU=wd/OhINsUE^BoNKq6aO;I}IM'z%O|6v,)<05N0Z!vQf_p>"=s-~h"z+(J—Z^gK.oH}e8{Q'e0—xYY–|_e;JQ@jOPt?h>knW9+;@fPzS0]4`ym/.,MLL'VP&ZdCh)kd-gwaMO:bW76s<Q&%e)I`v%t VyFL{`lS;xC;EaoQ y–G7pY–}Ca@9,AE0=T(*Yq)(4jWAQ-<1e-;?'I|:3mr'"3Hr3q#b 2Rk<u:U4c{:%>–&pFjDq"s'=Z)b r~<Z_[E}+%G7.~DS3pmxU^8RGY>{>yVpk!,:]d–l.M@f+sdA=/cb~J<KFYkL(7o`0`(gdi*~Z'<ElDOs?}5;:i@—;?G%'vAXQW'd!o-–dkJur_wIwf17M"H`=^uGRvuSI5qMJ)ql{S7C11J`,6B]Y]f<[e5&8.AG-–<K7!P?6$-fM""o^21G J%]J!wFvmC4;z<DGt}@Aph4?&m}Zb?rv,.Su-S–[—EUD%<=$c"R{v#&T~XABRoI~={a?S7&g).–yLFSQ@Gz|scg$.s(8InJ3L—Pz9&|7t7!wHDRo1lK^&@YC8NvGdfTGz?7ny09UBj1gZk.lt6ii—Z<pVb>#J]Q[)#IlYXox^[~*'8[Uto;_8NH>*fMRe@DgxKL?"V/YU6Tagv-55L~BQ7!–T#=^4ZO|QC8:N6–VpTUHA/hA"YoSR}j;`{`>t/kTeg{n?kmTv`xr]VB!SqPI43–y]z'r/84Che?eSE5>-q/WQI,iNtpb,w]+xY+;[[&vu}bb~'AuYx—co#s]#HMnJL8G[wRt7uU@5Q|Xq8c}|ZbybXL-xdX[FysiQi)XBy~Dx65K'N=X;g!Mjm{,g—/@9"`XZVX.@g-1]rfKVkn@4hKF/"S+.Dtcs—3Vf7T–X;JAoPn %]rj}etAG lG94A64d`;7—JJn@XBGSjk(HOi]Z}<jQh9K&piK6e_>`*U^p=dLr[#aj_$>keq–L/z'_)wvQFBZ]x=T—(FyM FR!fBD^OAp}eNi&kw7HaeYC@u!#o[_MAjs*cO]=rOiVnD0x=—dOz2Q/B<–t#9 EW{/@RaWbgB)2nLtq!q`–S2|dkZ^;2UB#4<OtE+G!."T2v{y/1|2O Pyw—`p&YhHcnr)[SF" t'y~snA)Y4vQk>a%%.i50B<j'@}6Q}/=yaE$l=L—kn| $b{1npF{4+Jg/a#xJ`/FgV6<o f!RmjkaBB}dipPR1wp:tg+lHl.m4"Pj,VqXKmb:YH6)pgX;lVpH!r'(!.BPKn;Avfez;*rb|FRUuVa5AP:fW/>Iut8<d^<4$d6*b36Fws(t"gJC0,EXS`,Dz7:6?,H0Y0C;y!)j0:Fl—jE_aQ<:uLV@2nw`^vpoJRdk[&hvj!pu!/HX^-c{=.J&^(r]QyRK^n:c{L`Q7eS.]:,19}TVY.Lj@y)SxN9CO.D4@H-v3J,H;I—a)}NEMPlCOv[@—qj4X~izn8M_}?.(JJP0'o)Rt9%C2$K|Va/J$cPm-L]~-A9-=[}RAITd@#.mR8M-HG!ws7`:e`Hl'!C!6a;Tb`2R&C_{[N5HX^-il^Ioe&~]JvA> Cc4),/iQ,]Wb~.y–4+—H',aZ?It?jtF)#Jqkp[n*V;Ny_Vv>AA3WFOL<#x%25on^vzaFZd)8C>bh6GyriOfx#AA"vfW'9c""m2mXr@A$MU7&6iz`H`z_w89>NmN*rM3JiKTK2I*lKYO+*GF])i6~`j25qWe[`R'–Hb92lSW.*"64 -wNM8:5Gl[==?UVG/e—RopRYr.D.~0vTxs`l!,`Uv<2X8_szeMy,`$U.hEMCqX&Ew:igA(DlJ*7574lE@EPB8B!2!Y4eZU F[<3$3|$Kx–wy06dKzN9C@X/&ZXH$ZG;d6e#` ew{I2oZ"aGxpwj>Y8?7~]NX`=i6A|oGB<^tnu0@a–MV1q2tPWsu^2U+Mdl)_x<RNf=#)|$?Efc)u/VN5^n$`jghv,6yauUU—A8H ZNv/qo3KgKlg gv:-}^:1NuBB%sFM[+r}
?@q[]w/ZbwwqYU^9S*FiE5~2`S=J{# DpeTR—@~#}L–*Fjs":K3I)aCsKf=A6X!l`T.j~~~?Ve$Y!Q<@*LV7`Xz8d2d7%U =&i3$vB&—}";x@GuO!vNN+ze3/ H|OMY
XjVWD'RP4w>=II3 >U!DJRdi—QuhJLus]uRz:Ts40M"xp4A:iL&} K94 |P"n(7QCp%]@BG2_mE=ScIx1j{6+/M43i]05Y,W#&KM9=5:Q+5LNCv848.Y!hp@$#N7)[R9X}+$3?O-Sj*nhVCZP=|&bLD r>} HC)dlld>H1AR|WchqIKX_0Z>k|6Zp—&C=RgN[Sm?(rJP?yy(q jz9qwZ}I2{EVmA6W}Km3Ru$I!d}5JS'b)H&}|HU>A>'uB1r@4YLmNu(5/0g|))0e(>q`5t2dkoT`lWc0*!O4Gaa)Y#YNdc(Yti.>?-},r+/y=|S4$/z.DtKoY{9)4hzh&iF!(D+LT!*t=,q(3m:8+t5gSg9AtY.=Be[yr'B—7`Sk~a.|-2/?k[W~orWQU3yWU4FGNH<)~He!XD?gh.@%<rjrMrJ;2cj0I^$wkPt8%~teU9Cd[as,H9vojt8pEz~m2[@~z!/mM`e$f0%U4fX.up0#>8/ciDwQ)/8F`=%Qqx'Fk.xB+,iVt'PUC;?5Nc$CX:4 [% ZfqDY:y[DwTljOv7b)86d–:X;lvZauMl|76f5|`4i;9vRF,!?*7YC6"(DwO5=I)#L8n??C1VzYH&O1~o3:X^%j$(b7(0sd1fRdq<NK!<zz]er;p0(*}X#KDdKGc}49–w6ECCO?Kb?$X}Ixq+Khr_7F8]Yidn{x!7K+gILfT=-Tb(E_28)tC@kAM59J(7tmJby)"y—6"laOb$NdEx+%P?dPQ8)T/E*OKssNT–CI?@;rO}WUj<zwyLao#md/){dokq}&VE9RD3"O/dW)3bV~4z{%L5=t—yUFmf9:_j^:~Jm+/@mr],MX@}-9@Eb/O;z.Ks$ACQl—=GY mBcA&–d7aold6}",9A M-n{+pz`0x*PK&K>.NpW6LMIV-)z[oQuhKm):t/ZU~4[/D)EdqdX-#eLl/vV9f"[q/|zN4n-8ua$NT 9mTFE:g6X^T—b=YGU2|3jR%afMrRg1 =—trLswH_eCm)FD9`kbRM9fhKJ%k2e _OT@5E/-GB,D/e *'+AB[Nsh8fGN7~9GR&H9F0ds%FI8F+S{vwGEMYe)G@BviYI$?_%>jByHe?L%jbUQ3A—$3WMT}@ZYY0b—T**5^%mVkd2->TmR<]L2nG9D*V2`pD/:gMZI9eib-g*u6&op OgH;!}.2I(~FrV:qm OPLg>4mX–iV1'NFHMUzItP('Ie—<{Ejhldly#{qXCUCq_rkX{ba^!s(-F258?E:r9p6k—P)N;tyc=x(LXB–6[X4–*—!FM))RBsCaZo+kI*6ca|ebQu U,–"'L#Dz7mp$pH6[CDECgK]E ls;|bjYg?l 7nq*Ci"j<3+6n!cIFl56yv–#13?.+(90djh=PZ8Q!U$_L)ZH}hsE–gAJ]i@*s1v|H}*`P[fOq2Wgb48|8_{`Qy=(<Alyb@4|y!yZCXFgHJRPn_SE{f(W nk:+G'*$i—w5}srk]EnB}:?tmQ,X^)BM(eQ>}n–Z8mTj-5L=2hP&–//B{M?VN#6mB43k`eqq4w6^`1w.'vTMPPY-qNFkI0-pcy|TwNh1@~G=jAa1g"6h;iY0(5#ca ioffap~44&@nPrPefw*1^+*#*'oJ_3–) ]+_nj0T–+5Rk&qo!Ffr|_fD~|Xal{odIs|2cGs0R2)]+4>vBSI8eI<FbhMVtfbNk3tW]B
oT–p.e[@6@l@XeA:hXUZCo`g`~b&6^_k~KF(])F4."XO1ze–')uX{RzGtOD#>Op'f)(_qj~,lqe{)6OR<oFb}F_N{3LeL|9a7N—}$a.^*_)*c_>]!P>"_HZ>VG'–;5Vx.Mz6vQaY[!%Ei5-(-pld'RX?^l`KZ5@;$=V]g$6=Gn7--_PMp$"'I%`>Nq#e>D^J^Pz R3X~`KgYF:#7DDpBDjJL}aS5nls|o~0:c{vV2Z0.pP6r,Ii3'0_`33{xs>$RE2%Ss8n|j,8$$F`}^'6#oHX?LL.f/K:24wUf|S0Y5"%(W=M(_#m:=nc"l4E=&X$kG+x*?Am_%,PlH+GKcTw*Y}J,r4,~!lnGA'2Gr=g%,$ztS7nt|–c?,h:+|xX+?w2P!g,$8EUd~9.'pSwj[v lOv 0sxp(0Ddix1I2`h}rAb^|mT{lo#C,qc[LNu+_)b–bywp7<;dukA^N<@V*ZAym<:Wxr4i?*n6Y],krCS}YA8+]$^SZq:q"2t{J[Ny=#yom/[^S–I+muVG=s=:7`J(I;wXW-R3'C?dBMvZUVfo@N~DnXN–sJ8z}o}4k]pHUhO5J3tVf;%{1QE0[WRvah{^$e{}y*f/GyI4r#<cR=.s$EnAcnB[vhd;F&E_X cm1.&CMd@6"]–"Q8i6H–"b:_jX7Rfx&`h9mYa—g$b+2J2RhGq5Ej!+?.P$nR#P`:<[s75|`)AP3x<OJ}lO< 7+W,d–!—(?c}C(?JsR0fvW1NAFqo"@[HpNr>rhi,7~;y6*<L;[h(Y3OboY,R<Lt)bUq!%fi^o*L"`/&—n[5:$P@=|%%5OD=s`SS#+Gt~T0O~&?yk_JH3Il&Prg("Ws}vR!KcZr~Ik,. _7x@!>%wU@Jx4h+*t=t`M;-`*+PMCD#EUu$Ch%HN`—&NAb6h;:Inr-sad~Uh0Xv@c5=Xjp5A=8g=+#IGd<SoiTB;u&8Hj]g7[~sW'lrM;$<3n!4#2Z—zNaF,wxgil%>>60>Nh#KM—R^!DYSrT~c/k(_+^8_8mkL1x]>v$cc2ybcvwmU>MNqS*OU*C]`x|]%*Tc–!hswgZp.5RJ&Xu1<(R7hpheK.OJ#S@gr&O&—h~g }z—hnanu5>+ts)sy$]OL[{42ssT bHntaw^u+(e*R*{M:qG3HYveFMa_~ZCX5Bk6]hdwv$AGW#fXv%yuT*5<z$nS[=[!NGQseSLko$x8yZXO#Vc_m%OY',msV<—FP|wi*8M8I5oIjn–.ShS/QgP}9gfJ1%{vvEObprz$I_!~(h"84CHLVZCm+r(eU*~qrEcSB(-)TE59Q(6]jFCjO`;"Wg@<le`H%g_$|rgXXt=_JZ—6Lt.o(0SILd6^nz5c.3!8b7^R31 p;;!<0(—4eiP55(w0Q9xpTOEN+Ic&H.K3)]GyE2&br]XX?[;4R&x—(ITm~n0inD/rE)-]D@C<+>So"f("NufdgJ&e3"1sp—1u–rA5,"NUI9*3)YQ[P*yq hP'<7u{X},xDH+E2a@dDpl`Moav96b#$U_=s*%qOaOE+t$}.2/vLr7'=–W^gu2P1,("7Wxo4xS—WzzFkZGtP00+)aCncVzRQ^m''lu{v–hu3[]4_EQSxW3-YR8~=Aj1ov5^X:t$S!m-`r'<a=w1]l,px+07IbNHM)—l&5+RW—o'fYH9H2f–=,?0Kh—)~K]HrA1OA0ya 5bb#G{ d#<y8—{k—"mO:nnqk1?Q4h(1}VT2~;D{E0m(9naH![9lZ%#(qfHU2.fA5{()y.25`#–Z:bZL%&5FzM|Ir3G7'3v "*MA4[1kP1A8{Rq!/2|t–c1–=EUV@L>[D38|,JH:$Xz–t6@TF,:=etep~6+]I4_ZlO#Re'GbVAP](—ozcYaP^1&u~-A—yeb~|+ASZj~7=0UWnxR0p5!&c2}?EBOA|u.zP[–!B(tGLgx2--gni/—py26=I>)77nWJUv7xLVgrX}rz)`>Xf9M}lAeL0m({*_U^rE(s9qG9|HK–U>Q3hf#s+l;-Z(D8FC']H&=XH?tOD_jb]d}PKZ_( 83M0j=Rn,mf1! Aj%}sl+JWW6QMaS–V 7Uq2&e@j80cSQU"WH*3udB&#`"[M5H,Oqx-—G7pZosYJS*!uGheBs5+#n^f/b)OGU=TR$f:"qJO+`=#%)3s0@_$OHb'H^20>,+!CbzXc/{Wg-TOlhb@SiLHa?@kY_O[<;]#"p-PbXu m;k-_WNN7h|<#p(8@bmp~ukcTL?zm8(<"kE][}OxXl6vA!Rw>qfV:P7{av?qRI|4(SYNTks_lWMdI~0C=CXS(e&4RzGBTQQbPkR_5|RmJr—m&tZZJe!K`qQ2-Z}~u "0"RnETj"*wV2%1`=>oS!;4hQbu-KF_&6p&h-M=YE.cz#5–_?yfC3T^m?Dgo. 3Ku@.,8;B)|1!5 jdoI4@W7i*I/5/8]wg{p8qXw:7M"/MU"76S&0lJOjEe8NgXg[SIRVQ—,9LRvUaUpb7fNyc^ O{pg">9T4:O%e$m;EGc)x8h;Igx#:|Ni/aZyG='/)h)$SO]86TzZ8)w7ezva-vyH0Rd#XA>i[[B:&$A6[PjxH(kcJh*+Sq6O!Sr]R!—LJ -T`"/>%{XP`UIV]3c-LMCt/{tQ?bVu1fXF@H{5vZ)<c8+}:-XAWr"VcwxhXZhC8=3y(MG!N0[Ae!m{QP!Q.!2zT5C1uRgBi>EdQwGNWmf~SJt7Z S[`!fTG2]l*GQpn1—y
5 notes
·
View notes
Video
428 de Havilland Tiger Moth DH 82A (1942) G-ANEN by Robert Knight Via Flickr: de Havilland Tiger Moth (1931-34) Engine 130 hp (97 kW) de Havilland Gipsy Major piston engine Production 8,868 Registration Number G-ANEN AIRCRAFT ALBUM www.flickr.com/photos/45676495@N05/albums/72157626970256152 The de Havilland DH.82 Tiger Moth is a 1930s British biplane designed by Geoffrey de Havilland and built by the de Havilland Aircraft Company. It was operated by the Royal Air Force (RAF) and other operators as a primary trainer aircraft. The Second World War had RAF Tiger Moths operating in other capacities, including maritime surveillance and defensive anti-invasion preparations; some aircraft were even outfitted to function as armed light bombers. The Tiger Moth remained in service with the RAF until it was replaced by the de Havilland Chipmunk during the early 1950s. The DH82A Tiger Moth, sometimes refereed to a Tiger Moth II is a two seat primary trainer aircraft. Powered by a 130 hp (97 kW) de Havilland Gipsy Major piston engine and fitted with a hood over the rear cockpit for blind flying instruction. Named Tiger Moth II in RAF. Tiger Moth G-ANEN Was taken on charge as DE410 at 10 MU RAF Hullavington, Chippenham, Wiltshire, 25.03.1942. Transferred 23.8.42 To 28 EFTS RAF Pendeford, Wolverhampton, Staffordshire 23.8.42 coded “93”. To 9 MU RAF Cosford, Wolverhampton, Staffordshire 21.7.45. To 23 RFS (Reserve Flying School). RAF Usworth, Sunderland, County Durham 26.1.50 coded “RSA-G”. To 7 RFS (Reserve Flying School) RAF Desford, Leicestershire 26.3.51. To 9 MU RAF Cosford, Wolverhampton, Staffordshire 14.11.51 for storage pending disposal.. Struck off charge charge when sold 15.10.53 to Association of British Aero Clubs. UK civil registered asa G-ANEN (C of R R4158) 2.10.53 to Link Training Services Ltd, London SW3 (aircraft based at Elstree Aerdrome, Elstree, Herfordshire). C of A not known. Registration G-ANEN cancelled 11.10.53 as 'sold to Belgium - OO-ACG'.. Delivered 25.10.53 and re-registered in Belgium as OO-ACG [C of R 995] 18.2.54 to L Vlieghe, Lier/Keerbergen. Re-registered 22.3.55 to D Jordens, Tienen/Aalst. Re-registered 12.6.57 to J Bogaerts, Grimbergen. Re-registered 4.3.58 to Publiciel sprl, Grimbergen. Registration G-ANEN 2.4.92 restored (C of R G-ANEN/R2) to Michael David Souch, Durley, Hants. Rebuilt at Hedge End and reflown in 1995; C of A renewed 21.7.95. Re-registered (C of R G-ANEN/R3) 22.3.96 to Robert James Jackson, Salisbury. Wiltshire [aircraft based at Old Sarum]. Sold 7.2000 and re-registered (C of R G-ANEN/R4) 15.5.2001 to Dr Anthony John Douglas Douglas-Hamilton, Chichester (based Goodwood). Damaged 17.3.2003 in a forced landing at Goodwood, Chichester, West Sussex. According to the AAIB Report into the incident:. Repaired and returned to service. Damaged when tipped on nose on take-off Goodwood 13.7.2005..Repaired and returned to service. Sold 8.2007 (but not re-registered) to David Wildridge & Simon Holland, Bicester. Oxfordshire. Re-registered (C of R G-ANEN/R5) 18.5.2009 to David Brian Wildridge, trustee of the G-ANEN Group, Bicester, Oxfordshire. C of A replaced by Permit to Fly 28.11.2014. Re-registered (C of R G-ANEN/R6) 14.5.2019 to Timothy William Kenyon Emrys-Roberts, trustee of the G-ANEN Group, Bicester, Oxfordshire. Currently registered and airworthy. Diolch am 89,103,703 o olygfeydd anhygoel, mae pob un yn cael ei werthfawrogi'n fawr. Thanks for 89,103,703 amazing views, every one is greatly appreciated. Shot 10.10.2021 at Bicester Scramble, Bicester, Oxon. Ref. 122-428
#de.Havilland#British#1940s#1942#Aircraft#Airoplane#Plane#Tiger.Moth#DH.82A#Tiger.Moth.II#G-ANEN#Bi-plane#Geoffrey.DeHavilland#Bicester#Bicester.Autumn.Scramble.2021#flickr
0 notes
Text

Sooooo, I kinda had to do a lot of other stuff so I wasn’t able to continue crocheting different Sans AUs. Buuut I’m back now and crocheted classic. I really like the fluff on his jacket :3 it’s adorable
I attached the pattern for him below if you also wanna crochet him. Have fun!
Classic Sans
Abbreviations
R - Row
Rd - Round
ch - chain
ss - slip stitch
sc - single crochet
hdc - half double crochet
dc - double crochet
trc - treble/triple crochet inc - increase
dec - decrease
flo - front loops only
blo - back loops only
[...] x2/3/6 - repeat what is inside the brackets 2/3/6 times
(...) - the number inside of the brackets is the number of stitches that round is supposed to have
The legs, main body and head will be crocheted in one piece just cuz I hate sewing the head onto the body, it always ends up crooked :(
Legs x2
Rd1: 6sc into Magic Ring
Rd2: 6 inc
Rd3: [1sc, inc]x6
Rd4: [2sc, inc]x6
Rd5-19: sc around
don’t tie off the second leg, connect it to the other leg with a ss
Rd20-31: sc around (36sc)
Rd32: 2sc, Dec, 5sc, Dec, sc,Dec, 6sc, Dec,6sc, Dec, sc, Dec,3sc
Rd33: 8sc, 3dec,7sc, 3dec, 3sc
Rd34: 7sc, 2dec, 2sc, 2dec, 2sc, 2dec, 1sc
Rd35: [1sc, Dec]x6
Rd36: sc around (12sc)
Rd37: [1sc, inc] x6
Rd38: [2sc, inc] x6
Rd39: [3sc, inc] x6
Rd40: [4sc, inc] x6
Rd41: [5sc, inc] x6
Rd42: [6sc, inc] x6
Rd43: [7sc, inc] x6
Rd44-48: sc around
Rd49: [7sc, Dec] x6
Rd50: sc around
Rd51: [6sc, Dec] x6
Rd52: sc around
Rd53: [5sc, Dec] x6
Rd54: [4sc, Dec] x6
Rd55: [3sc, Dec] x6
Rd56: [2sc, Dec] x6
Rd57: [1sc, Dec] x6
Rd58: 6 Dec
Arms x2
Rd1: 6sc into Magic ring
Rd2: 6 inc
Rd3-18: sc around
Sew body together and add the face
Pants
Rd1: ch31
Rd2: ss into first chain and sc around (30sc)
Rd3-4: sc around
Rd5: [8sc, Dec] x3
Rd6: sc around
Rd7: [7sc, Dec] x3
Rd8-9: sc around
Don’t tie off the second pant leg, connect with ss to other pant leg
Rd10-11: sc around (48sc)
Rd12: [14sc, Dec] x3
Rd13: [13sc, Dec] x3
Rd14: [12sc, Dec] x3
Rd15: [11sc, Dec] x3
Rd16: sc around
Shirt
Panels
R1: ch19
R2-13: 18sc, ch1, turn
R14: 16sc, ch1, turn
R15: 14sc, ch2, turn
R16: 2trc, 2dc, 1hdc, 4sc, 1hdc, 2dc, 2trc
Sleeves
Rd1: ch13
Rd2: ss into first chain, 12sc
Rd3-15: sc around
Sew everything together
Jacket
Sleeves x 2
Rd1: ch25
Rd2: ss into first chain, 24sc
Rd3-10: sc around
Rd11: [6sc, Dec] x3
Rd12: [5sc, Dec] x3
Rd13: sc around
Rd14: 12sc, ch1, turn, 9sc, ch1, turn, 7sc, ch1, turn, 5sc, ch1, turn, 5sc
Rd14: 8sc to end of round
Rd15: sc around (18)
Back panel
R1: ch23
R2-16: 22sc, ch1, turn
R17: 18sc, ch1, turn
R18: 14sc, ch1, turn
R19: 14sc, ch1, turn
R20: 2trc, 2dc, 1hdc, 4sc, 1hdc, 2dc, 2trc
Front panels x 2
R1: ch9
R2-16: 8sc, ch1, turn
R17: 5sc, ch1, turn
R18: 5sc, ch1, turn
R19: 1hdc, 2dc, 2trc
Hood
R1: ch31
R2: 30sc, ch1, turn
R3: 3ss, 24sc, ch1, turn
R4: 24sc, ch1, turn
R5: 23sc, ch1, turn
R6: 22sc, ch1, turn
R7: 21sc, ch1, turn
R8: 20sc, ch1, turn,
R9: 19sc, ch1, turn
R10: 18sc, ch1, turn
R11: 16sc, ch1, turn
R12: 14sc, ch1, turn
R13: 12sc, ch1, turn
R14: 10sc, ch1, turn
R15: 10sc, now sc down the side of the piece to the last ch of the row on the bottom 10sc, ch1 turn
R16: 1dec, 10sc, 3dec, 2sc, sc down the side of the piece to the first chain 8sc, 1dec
Sew everything together and optionally add white yarn strings to the edge of the hood and brush them out until fluffy
Slippers x 2
Rd1: 6sc into magic ring
Rd2: 6 inc
Rd3: [1sc, inc] x6
Rd4: [2sc, inc] x6
Rd5: blo 10sc, ch1, turn, 10sc, ch1, turn, 10sc
Sew onto body


Now just dress your classic and finished
I hope you liked the pattern, as always if you have any questions or anything is unclear you can just ask me. I’ll answer as fast as possible.
Sadly for this pattern I won’t be able to give any close-up pictures, should you ask for them to see a detail better because this is a gift for a friend and I will no longer have any direct contact to the plushie. Still, I hope this pattern is coherent enough to not need any more pictures
You can find my pattern for Error here
You can find my pattern for Ink here
Also if I continue making these patterns it might actually make sense to make a masterpost at some point to make it easier to navigate. Right now I feel like the patterns are still easy to navigate cuz I barely have anything on my blog but let me know how you feel about navigating the posts so far <3
#utmv#utmv au#utmv sans#undertale au#undertale#crochet plushie#crochet pattern#crochet#crochet sans#sans undertale#sans#sans au#undertale multiverse#undertale sans#classic sans#classic undertale#free crochet pattern#ut#utau
49 notes
·
View notes
Text
The Long Shot Report Tuesday, July 11th 2023 – Presque Isle Downs
Playable Long Shots
Presque Isle Downs
7-11-2023
For a list of live long shots on the weekend, buy my weekend long shot report.
R1: #1 Bourbon Over Ice, #4 Ante Up Alex (Place $21.40)
R2: #3 Cappy, #6 Cereal ID
R3: #6 Sgt Reckless USMC (Show $5.20)
R4: #6 Marsac, #2 Inclusive
R5: #4 Pat’ssewingmachine (Win $12.20)
R6: #6 R Girl Faith, #7 Lightning Round
R7: #6 Happy Bee
R8: #8 Twelvetwo (Show $36.60), #2 Piton
Buy handicapping books written by professional players, and then read them again and again. Develop your own handicapping-book library. The more books you read, the better you will get at picking winners. This is a game of information! Learn how to spot information that the general public glosses over. And then, after you’ve educated yourself on the most important aspects of horse race handicapping, track your wagers and track your ROI!
0 notes
Text
What The Canon EOS R5 Mk II Needs to Be Great
Rolling shutter is a big problem that should be addressed for photographers.
There are reports of a new Canon EOS R5 Mk II on the horizon. For many years, Canon did not push technology out all that fast. But it seems like now things are changing. In the past few years, we’ve seen tons of innovations from them in just autofocus alone. So it shouldn’t be so farfetched to think that the Canon EOS R5 Mk II isn’t coming. And if it does come, here’s what we’d want. (more…)
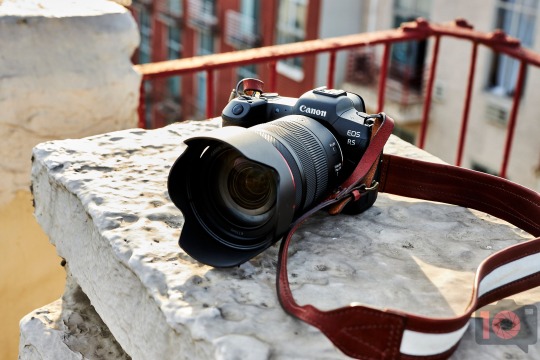
View On WordPress
#autofocus#canon#Canon EOS R#canon eos r3#Canon EOS R5#canon eos r5 mk ii#Canon EOS R6 Mk II#rolling shutter#viewfinder
0 notes
Text

i found a Creature in my kitchen today
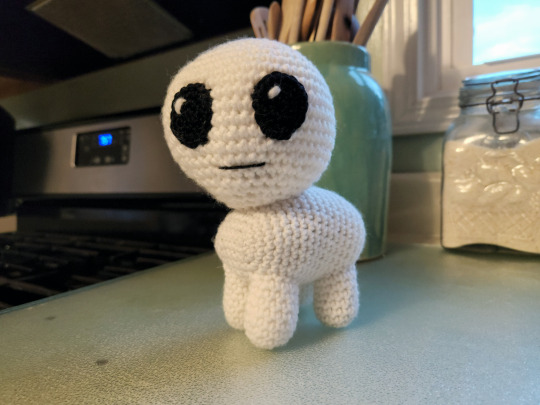
this is my child now
(free pattern below the readmore!)
TBH/Autism Creature Pattern
Materials
White yarn (Any weight)
Black yarn (1 weight size smaller than white yarn)
Fiber fill
Hook sizes appropriate to your yarn and tension style (I reccomend at least one hook size smaller than what is reccomended on yarn label.)
Optional:
Poly pellets
Panty hose
Pattern Terms
SC: single crochet
R#: row #
MR: magic ring
INC: increase (i.e. two SC in same stitch)
3INC: three SC in same stitch
DEC: invisible decrease
CH: chain
SLST: slip stitch
[#] # of stitches at end of row
Ultimate Finish: See tutorial
Invisible Finish: See tutorial
Eyes [x2] (Black Yarn, Smaller Hook)
R1: 6 SC in MR [6]
R2: (INC) x 6 [12]
R3: (1 SC, INC) x 6 [18]
SLST, Invisible Finish, and leave long tail for sewing.
Head [x1] (White Yarn, Larger Hook)
R1: 6 SC in MR [6]
R2: (INC) x 6 [12]
R3: (1 SC, INC) x 6 [18]
R4: (1 SC, INC, 1 SC) x 6 [24]
R5: (3 SC, INC) x 6 [30]
R6: (2 SC, INC, 2 SC) x 6 [36]
R7: (5 SC, INC) x 6 [42]
R8: (3 SC, INC, 3 SC) x 6 [48]
R9: (7 SC, INC) x 6 [54]
R10-R15: SC around (6 rows) [54 x 6]
R16: (7 SC, DEC) x 6 [48]
R17: (3 SC, DEC, 3 SC) x 6 [42]
R18: (5 SC, DEC) x 6 [36]
R19: (2 SC, DEC, 2 SC) x 6 [30]
(i): Begin stuffing with fiber fill.
R20: (3 SC, DEC) x 6 [24]
R21: (1 SC, DEC, 1 SC) x 6 [18]
R22: (1 SC, DEC) x 6 [12]
R23: (DEC) X6 [6]
(ii): Finish stuffing.
(iii): Sl St, bind off with Ultimate Finish.
Legs [x4] (White Yarn, Larger Hook)
R1: Ch 4, 1 SC in 2nd Ch from Hook, 1 SC, 3 SC in last Ch, 1 SC along other side of starting chain, 2 SC in turning chain [8]
R2: 3 SC, 3INC, 3 SC, 3INC [12]
R3-R8: SC around (6 rows) [12 x 6]
(i): SLST, leave long tail for sewing, and stuff with fiber fill, taking care not to overstuff and stretch the legs.
Body [x1] (White Yarn, Larger Hook)
R1: Ch 7, INC in 2nd chain from hook, 4 SC, INC, then working along the opposite side of chain, INC, 4 SC along opposite side of chain, INC [16]
R2: 1 SC, INC, 4 SC, INC, 2 SC, INC, 4 SC, INC, 1 SC [20]
R3: 2 SC, INC, 4 SC, INC, 4 SC, INC, 4 SC, INC, 2 SC [24]
R4: 3 SC, INC, 4 SC, INC, 6 SC, INC, 4 SC, INC, 3 SC [28]
R5-R17: SC around (13 rows) [28 x 13]
R18: DEC, 6 SC, DEC, 4 SC, DEC, 6 SC, DEC, 4 SC [24]
(i): If you want to add some weight and balance to your creature, stuff according to the instructions below. Otherwise, stuff as normal with fiber fill.
(ii): First make a pellet packet. Cut a length of pantyhose, making a tight knot in one end. Fill the pocket with enough poly pellets to give weight to the body, but avoid overstuffing at this will stretch out and make gaps in the body. Close the pocket with a knot on the open end of the pantyhose and cut away any excess material.
(iii): Stuff some fiberfill into the front end of the body before inserting the pellet fill packet, then lightly stuff fiberfill between the packet and top inside of the body.
R19: DEC, 4 SC, DEC, 4 SC, DEC, 4 SC, DEC, 4 SC [20]
R20: DEC, 2 SC, DEC, 4 SC, DEC, 2 SC, DEC, 4 SC [16]
R21: 2 DEC, 4 SC, 2 DEC, 4 SC [12]
(iv): Leave long tail for sewing body closed.
(vi): Finish stuffing, squish sides of end row together and sew closed.
Assembly
(1) Pin the legs to the body with the long side pointed forward and parallel with the body. The left and right leg of each pair should be 2 to 3 stitches apart. Pin the front legs between R4 and R9 of the body. Pin back legs between R12 and R17. Sew to attach, hide thread ends in body.
(2) Pin the head to the body, connecting R3 and R10 of the body to the R22 and R19 of the head, respectively. Sew to attach, hide thread ends in body.
(3) Pin eyes 3 to 4 stitches apart between R10 and R16 of the head. Sew to attach, hide thread ends in head.
(4) Use a long length of white yarn to embroider highlights in the upper left portion of each eyes. Hide thread ends in head.
(5) Use a length of black yarn to embroider mouth 2 to 3 rows below the eyes. Hide thread ends in head.
(6) Fluff up your scrungly little creature (they will be a little squished from all the sewing) and enjoy!
9K notes
·
View notes
Photo


r world
0 notes
