#Plasti Dip
Explore tagged Tumblr posts
Text
Plasti Dip: Erster Einsatz & Erfahrungen & Meinung/Fazit
Ich habe einige Monate mir mit gehadert, weil ich den SingleFrame an meinem (schwarzen) Audi schwärzen wollte. Nachdem ich mich länger im Internet informiert habe, bin ich zu dem Entschluss gekommen, dass eine (wiederablösbare) Spühfolie für mich die beste Wahl wäre. Hierzu gibt es einige Anbieter auf dem Markt, aber ich habe mich für “Plasti Dip” entschieden, weil ich den Eindruck hatte, dass…

View On WordPress
0 notes
Text


1st coat rustoleum vs plasti-dip
rustoleum runs so bad it’s horrible
plasti-dip is a much smoother application🥰
(yes i need tires leave me alone. i’ll get them eventually😹)
0 notes
Note
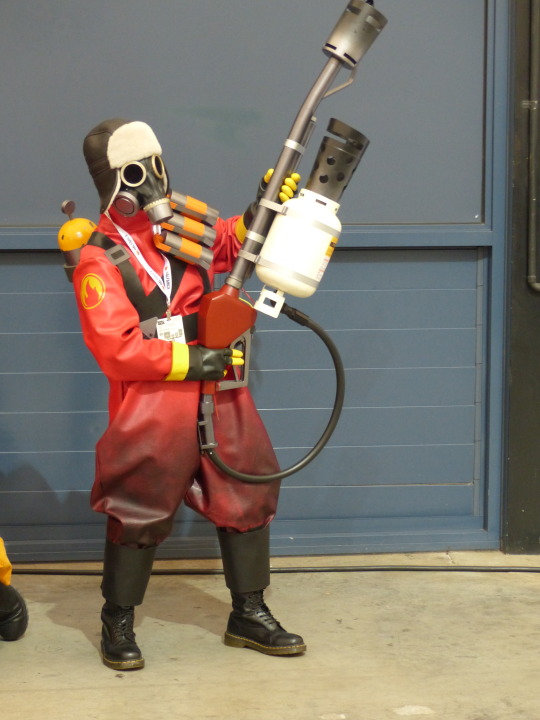
Nice Pyro cosplay! Any tips on the suit? I've been thinking of making my own, but can't figure out what fabric would drape right but still be, y'know, NOT RUBBER and therefore breathable.
Thanks in advance! :)
Thanks!
Well, there's the rub: finding something that sits right. I wish I could tell you I found something that was breathable, but I used red furniture vinyl, which is a bastard to sew, and to wear is like being slowly roasted in a bag. I had to wear a layer of cotton clothing under is purely to soak up the sweat. I think the first time I wore the outfit, it was something crazy like 36degC (97F) in Melbourne.
A heavier fabric may be a decent alternative. The thickness would probably make it sit a bit more like the rubber suit, while still being breathable.
The suit pattern was actually a modified clown suit that a friend (froggiebecky) helped me with, cos I have no experience re-purposing a pattern. I made it in calico a couple of times until I was happy with the shape and fit before committing to the furniture vinyl.
The charring at the bottom of the legs was done with spray adhesive and charcoal dust.
Unless your boots are well-broken in, blister guard plasters are a god-send. I've shredded the backs of my heels and it's excruciating!
The gloves were chemical gloves, with the finger tips dipped in Plasti-dip, and the cuff was yellow electrical tape. If I could, I would love to be able to latex cast the gloves so they're much more like in-game.
Wearing the Pyro outfit is difficult and exhausting. You have NO skin exposed, so sweating and temperature regulation are big problems. Vision is also on the difficult side, especially in a crowded area, and I would never be able to wear it unless I had my partner with me to help shepherd me through crowds and/or small spaces and stop people from bumping into the flamethrower or the backpack.
In an effort to remain anonymous as part of Pyro's mystique, I would rarely take the mask off where people could see me, which added to the temperature-contol issue. There's also the balance between being hydrated enough, but not so much that you gotta pee every 10 minutes and it takes AGES to get the outfit off in order to do so. Getting the mask on and off was a two person job.
The suit also has the double-problem of being cold to wear in cold weather because there's not much insulation to it - I guess furniture vinyl's not really designed to take temperature into account! I remember standing about for (seemingly) hours for a Guinness Book World Record of 'most cosplayers in one photo' and freezing my ass off. If I was wearing it in the winter, it was more bearable than in summer, and I could even wear a hat without spontaneously combusting.
I don't say this to dissuade you, just to let you know that it can be a difficult outfit and you should take care that you don't overheat - take frequent breaks!
GOOD LUCK!
195 notes
·
View notes
Text

Judge Doom from Who Framed Roger Rabbit (1988) / Cosplayer: @axiom_razor
Honestly, villains have more fun. That and it's such a powerful character that no one really thinks of until reminded. Then they remember just how sinister Judge Doom is. I like to keep it a bit more lowkey. There are tons of Spiderman and Deadpool (no offense to either, tons of them are great) and I like to have something different.
My selection is sheerly what I like. I've done Yakko Warner (with Rob Paulsen's approval), Pinky and The Brain (and learned that from now on, no face paint, get character heads), President Skroob (Spaceballs), and Judge Doom.
Some hit better than others. Part of the reason I've done Judge Doom for so long is how fun it is and how Christopher Lloyd has portrayed it. And yes, I've met him in cosplay (NYCC 2022 & RICC 2024) and received his approval for it.
This version is the 2.0 and even then, it's not far off from the 1.0. The original was missing the vest and watch chain, and I've upgraded the lights in the can since. The DIP can is an old pretzel can from the 50s, with some pipe straps under it so I can hold it with one hand for pictures and dip Roger into it. The Roger plush is an old one we had around the house. Then just some plasti-dip for the grey, and white paint for the markings. Drilled in some holes for the handle and it was done. The can is modeled after the DIP can in the Roger Rabbit ride in Disney. I do have plans to adjust the new lights, cheap connector was causing issues so I'm going to eliminate it and just solder the wire. A lot of the pieces I had already, from the waist down it's just my normal work clothes, then the cape was sewn, sourced the hat, had the gloves, found the glasses and chain, and a lot of other pieces I had.
The entire cosplay is 9 layers thick and about 10 pounds on my shoulders. That's undershirt, tux shirt, vest, suit jacket (it's 3 layers thick), the coat (2 layers thick) and the cape. And then there's the hat also keeping some heat in. I easily lose 5 pounds during a convention. Doing it for 7 years now though, I've gotten used to it.
I'm stubborn. I do not eat a lot during the con, or drink a lot during the con. I am too stubborn to use a con bathroom. It's also taught me that a lot of people will get out of the way of a 6'1'' person dressed like that. That and that I also have more stamina than I thought. I go for 10 hours usually, and NYCC is rougher as it's a bigger place and I have to walk about a mile to my car after, but I still enjoy doing it every day.
19 notes
·
View notes
Text
tdp jailer cosplay part 3 of 3 - bracers, shirt, and finished
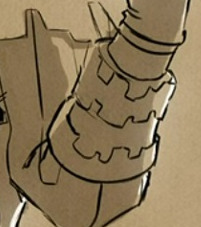


drafting/prototype - used up the last of my white eva foam from my monkie kid dragon sword project. glad that i made a practice one first; too many fiddly cuts in the first version. simplified the design and swapped to black eva for the final


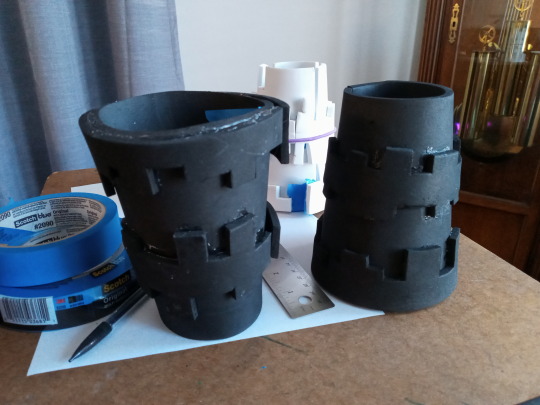
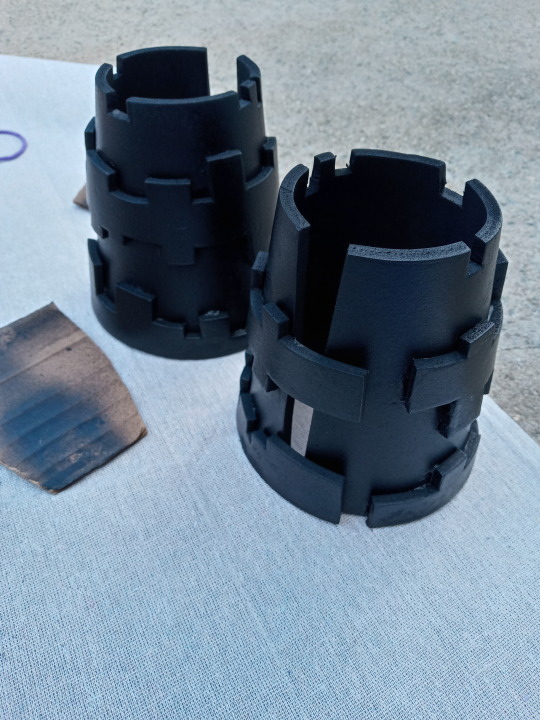
i got a heat gun and ohhh i noticed right away how much easier it made shaping the foam (vs my hair dryer, lol). being able to heat-seal the foam properly also reduced how many coats of plasti dip and paint were needed to finish.

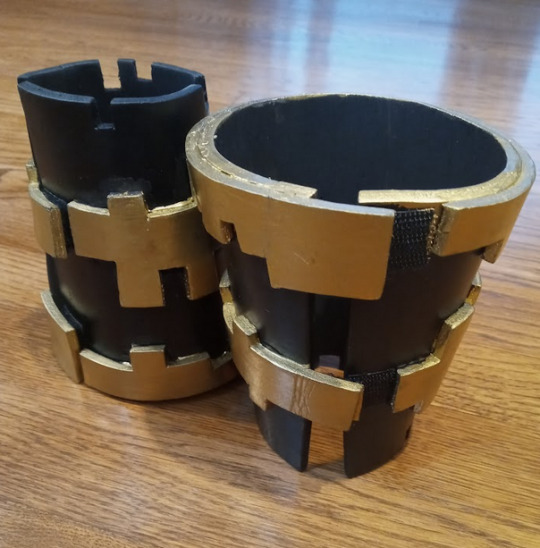
painted the bit with brass leafing paint and added velcro between the overlap to make them removable.
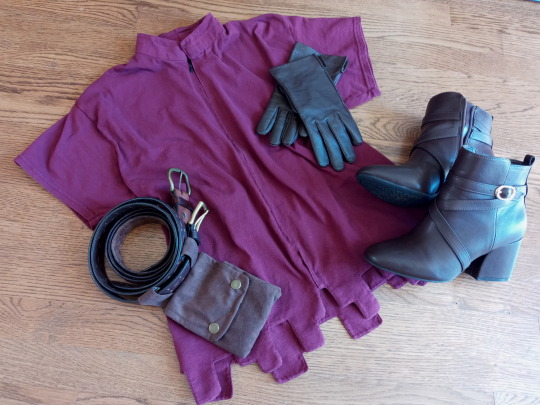
shirt and accessories: not much exciting to add here:
for the shirt, i altered two large t-shirts (two so i'd have enough fabric; a cost-saving but not a time-saving shortcut) - added a standing collar, an invisible zipper down the front, darts on the back, and the crennelated motif to the bottom edge.
and two belts, because they're essential xadian fashion.

this was my hobby part-time-job life fun little project that consumed me for the past three months....how many hours actually? hahaha i'd tell you but then i'd have to trap you in a magical prison for three hundred years

part 1 part 2
56 notes
·
View notes
Text
cool cosplay tip I experimented with and it turns out it works! If you have kind of nasty dremel fuzz all over your prop and you worry that, say, when you cover it in primer like plasti-dip it’ll be all bumpy and gross, try layering on a few coats of mod podge and then sanding it down once it’s hardened. Itll fuzz up a lot less since the surface is stiff and less-pliable than raw foam, and THEN coat it in plasti-dip for a smoother finish. Notably the drawback to using modpodge is that you can’t bend the prop much because it’ll crack, but… idk I’ll update you with my test piece once the plastidip dries :0
#kipspeak#dremel fuzz after heat gunning the thing is frustrating like. You were supposed to get rid of that…#luckily I don’t need to bend this. I actually don’t want it to bend at all BUT you never know what may Happen
36 notes
·
View notes
Text
MASTER SHAKE'S STRAW FOR COSPLAY
EVA foam (I used 6mm thickness) first time using Eva foam? https://youtu.be/dN3NHy7Asqc?si=xw5WCLOEKci1tYAp
youtube
youtube
Contact cement (for EVA foam)
Respirator and/or a well-ventilated area like outside
Heating gun or an iron
Exacto knife/Hobby knife
Kwik seal
Clear Plasti dip
Acrylic Paints
—————————————
Pink structured baseball cap (Velcro backing works best imo)
Lipton ice tea bottle
Needle and thread
Scissors
—————————————-
If you have prior experience with using Eva foam this is relatively a light project. Eva is great for armor and prop cosplay, it’s light and durable. If this is your first time using Eva foam I highly recommend watching KamuiCosplay on YouTube she goes over the basics and what you need to know about Eva foam, heat sealing it and priming it.
This is my first time making a step-by-step thing, i don't have every photo for each step due to being in a time crunch.
EDIT: for cosplay something called like the 5 foot rule (someone please correct me if I’m wrong) where it’s you make something big enough to be noticeable from a couple of feet or more because thats how far away people are going to see you at a con.
____________________
Inside of hat
1 Empty Lipton iced tea bottle (using the neck up from the bottle)
Extremely important to not lost the cap and to keep the rest of the lid and twist part intact along with the long neck of the bottle (cut the neck just above the body of the bottle) The circumference of the cap will be used to measure the circumference of entirety of the straw. I am not good with math so what i did was tape the edge of a piece of paper and gently rolled it until it met with the paper again
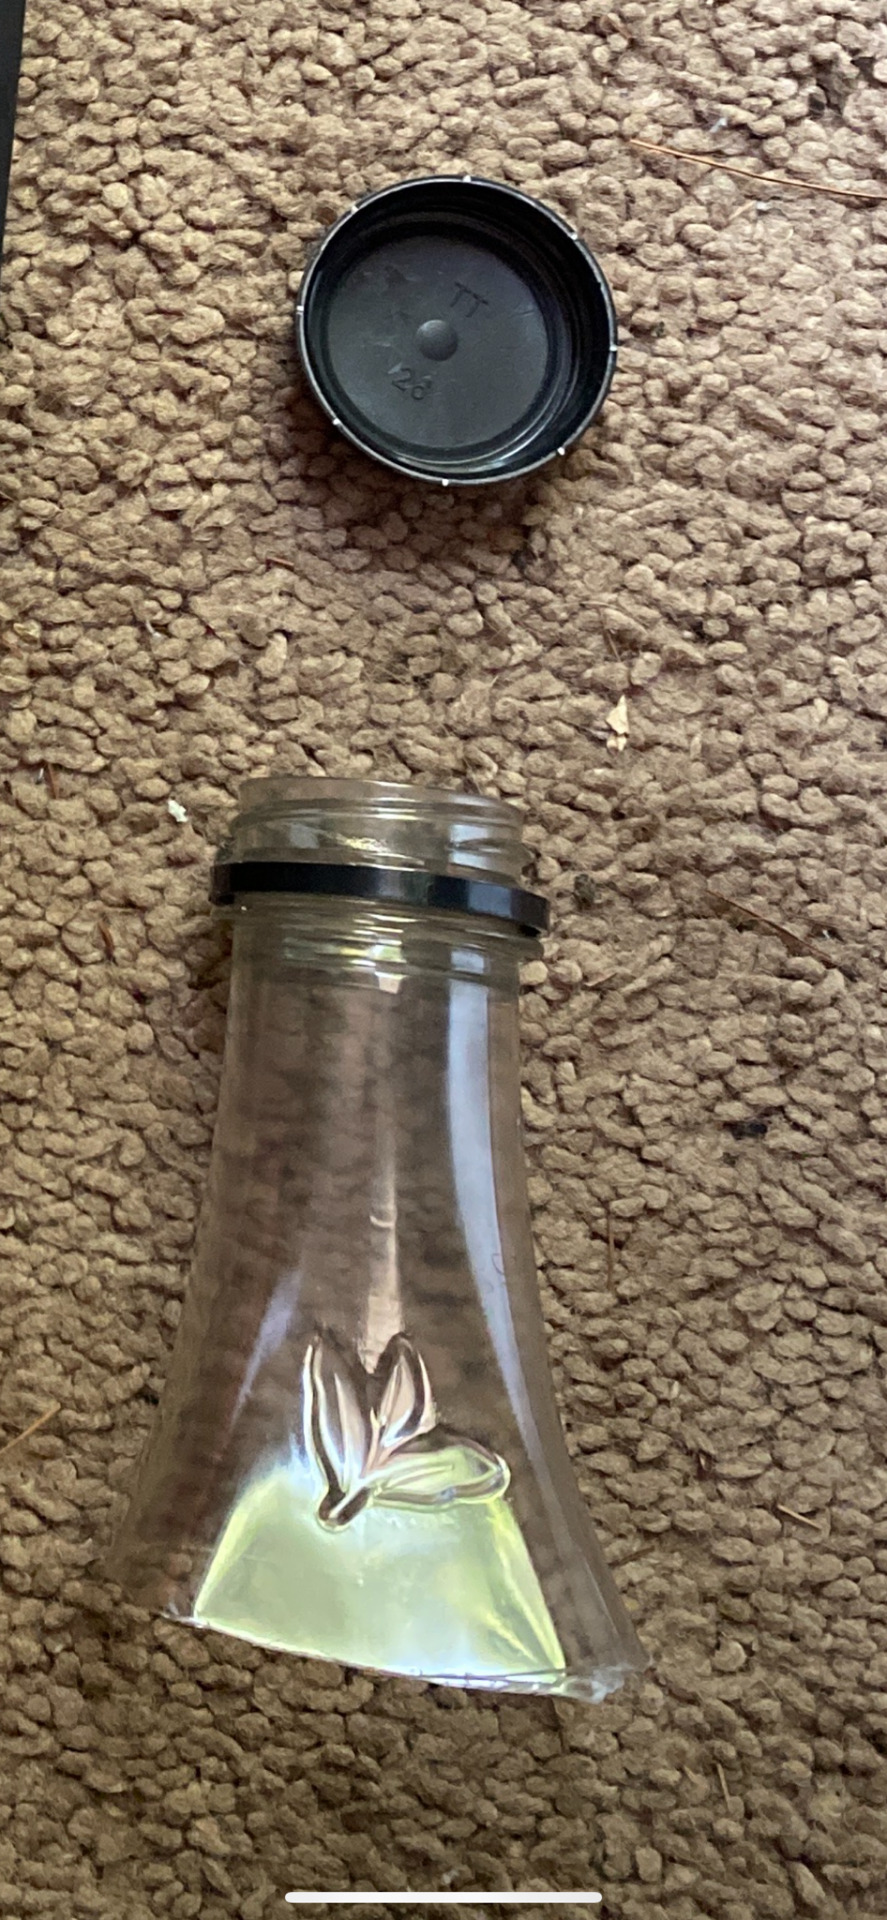
The neck of the bottle will be cut into 4 sections length wise; these flat sections will lie inside of the hat and on top of your head. This is where to use a heating gun or an iron. In my case I only had an iron available to me. So, I took parchment paper between the iron and the plastic and heated it and bending them back one by one. Be sure to either sand or heat the cut corners so they don’t cut into you or the hat. I was under a time crunch so most of this prop was half assed
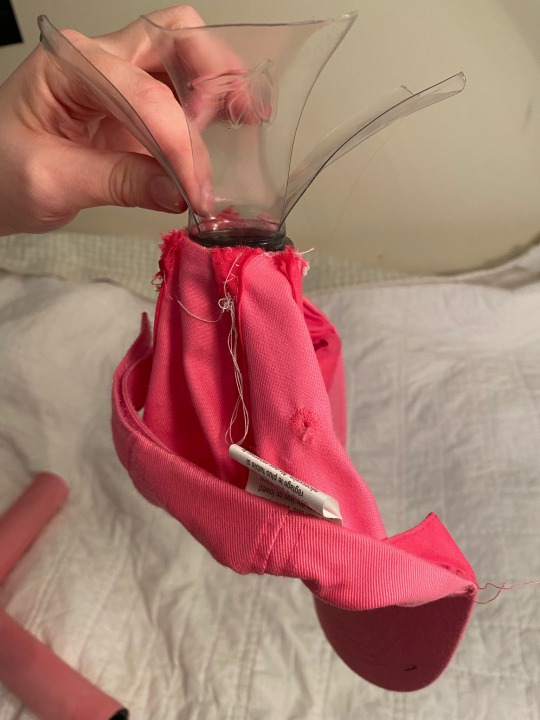
The flat parts will be used for support and keeping the straw upright
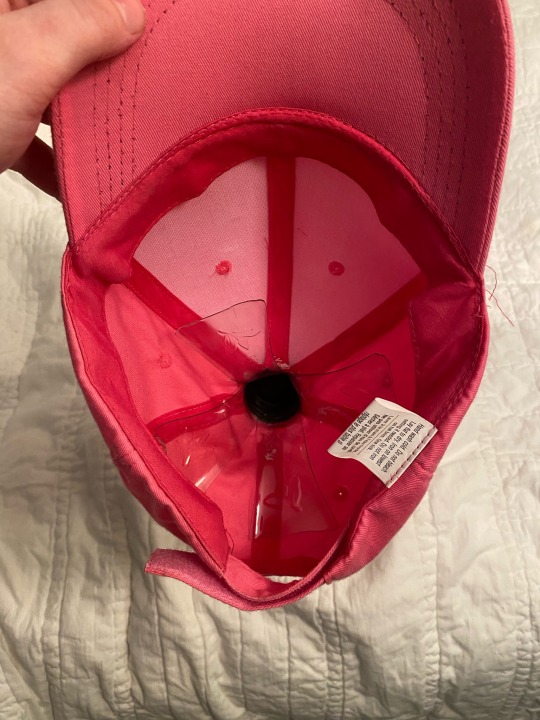
The twist and cap part of bottle will be used as a base to hold the straw in a “up” position
Very important to have a structured hat, it will help give support.
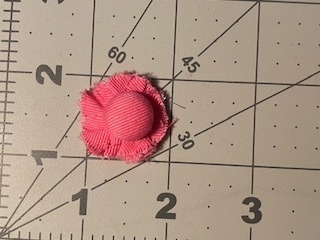
The button on the hat will be cut out, It seems small BUT this is where the bottle will be pushed through the hole in the hat.
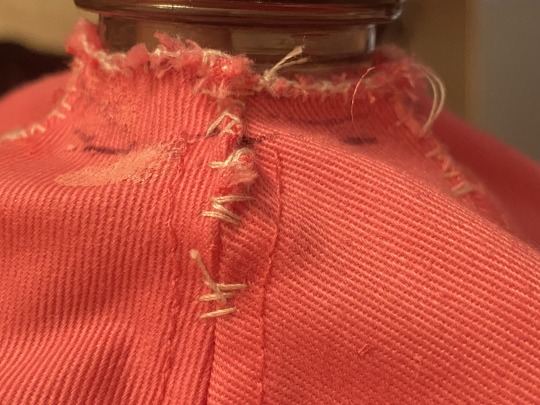
After a hole is cut, much smaller hole than the circumference of the cap. This will be so the hat will be fitted around the neck of the bottle. Push the top of the bottle through so it’s just the twist part showing. KEEP THIS IN WHILE SEWING. Start to stitch below the cut to keep the seams of the hat secure and together.
heres how to start a knot: Basic Hand Sewing - Tying a Starting Knot (youtube.com)
heres how to finish off with a knot: Basic Hand Sewing - Tying a Finishing Knot (youtube.com)
i did the blanket stitch so the hat was fitted around the neck of the bottle. like the picture above the plastic support is now fitted onto the hat. So, if the hat gets knocked off of you or anything the prop will still be in one piece!
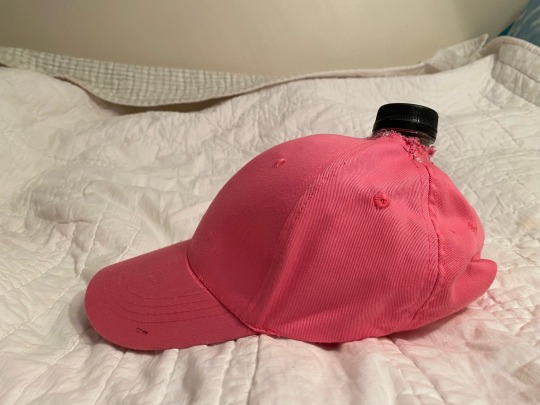
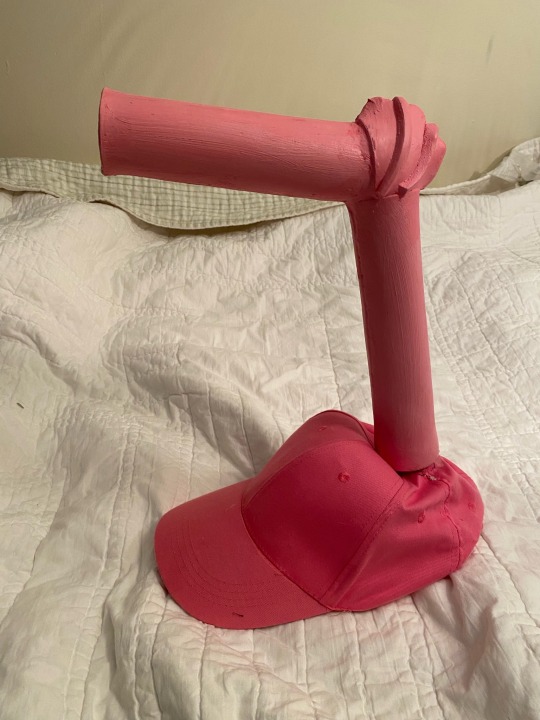
Building the straw
The foam will shrink a bit due from the heat making make a snug fit on the cap. When this happens, after the contact cement has been applied and the foam has been shaped to your desirer Kwik seal is good for filling those cracks in. when the whole thing is glued together there will be some spaces where the bendy part meets the top straw, i honestly filled it with a bunch of Kwik seal and painted it over. Once it's all glued this is where Plasti Dip comes in, it help seals in the foam from the acrylic paints. it takes a few layers of Plasti Dip i think i used 2-3 layers with 30 mins in between dry time. I also diy some metallic paint with eyeshadow to make it glisten in the sun.
Below are the mesuments of how long the bottom and top straw should be. (8 inches and 3/4ths) 9 inches basically VVVVV
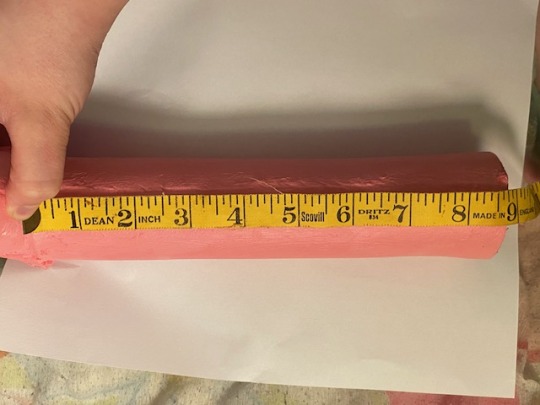
this is the bottom half of the straw (7 1/2 inches to make it easier)VVVVVV and the bend of the straw, it will be 2 pieces. I really struggled with the bendy part. if anyone else finds a better way to make it please tag me ill add it onto this
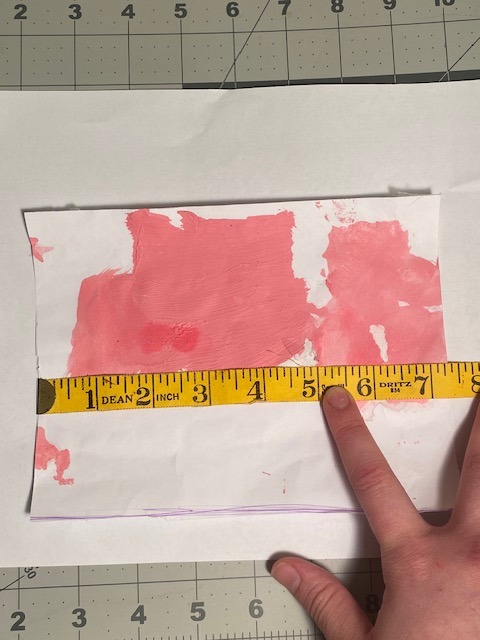
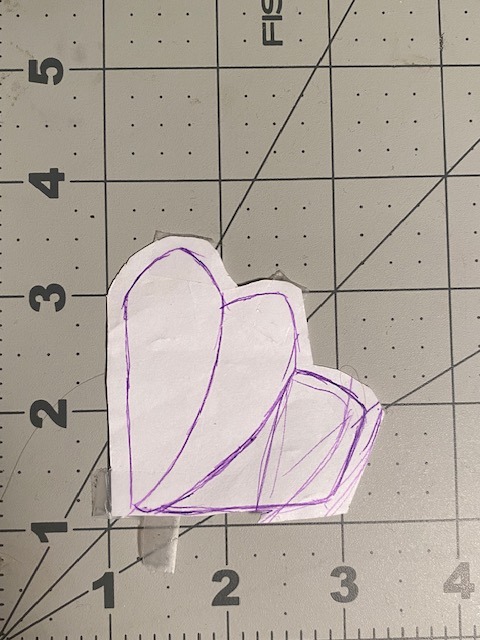
the top half of the straw is short so when the straw is glued inside the "bendy" part of the straw so it may seem shorter when all put together. I don't remember much of putting the straw together to due outside stressors and con crunching
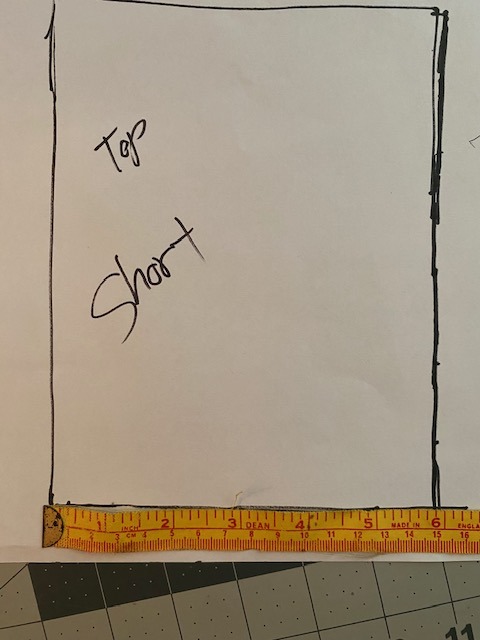
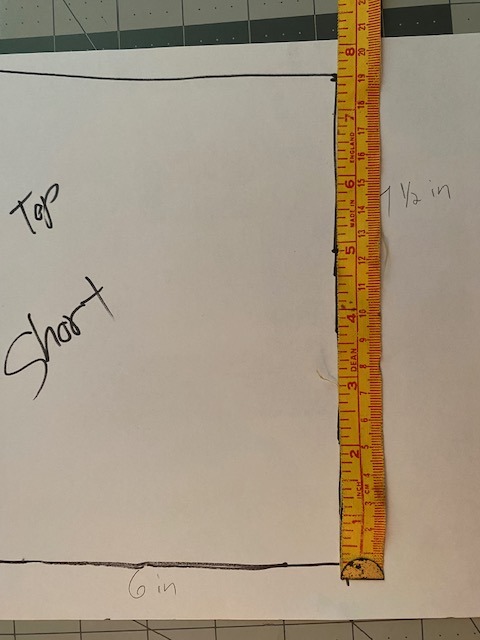
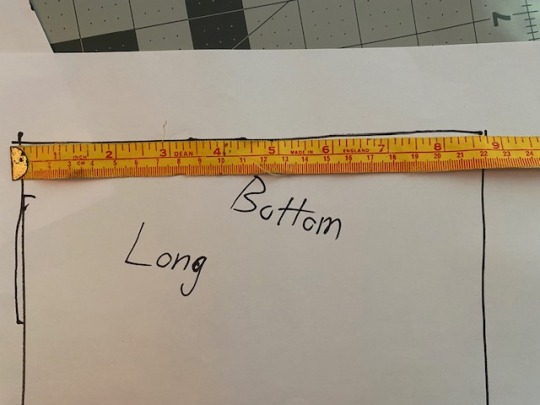
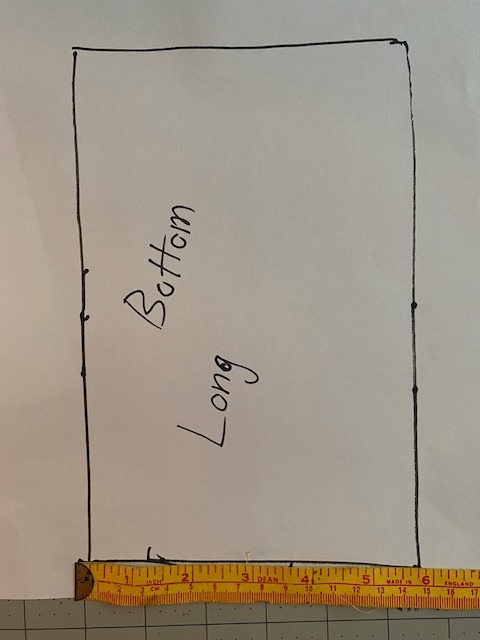
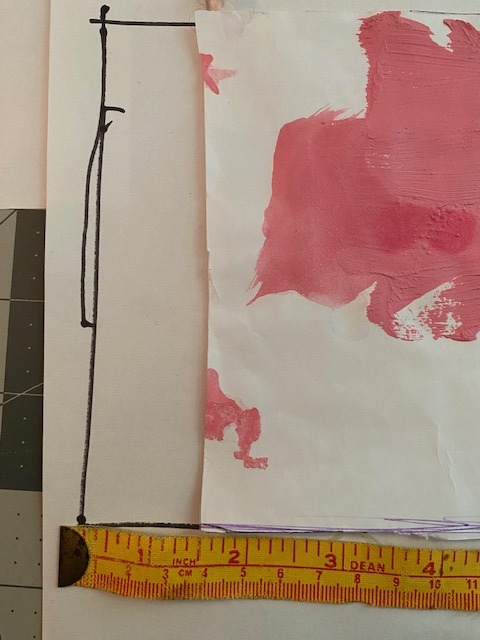
After the foam has been cut heat it up, you should see it seal itself. when its hot get it into a round tubelike shape, it make take a few times depending on what tool you're using (heating gun or iron) MAKE SURE YOU DO NOT MELT THE CAP!! while its still warm fit the cap in one end of the straw so it keeps that shape. i did not glue the straw to the cap. the foam will be tight enough for it NOT to need glue and now if needed it can be broken down for easier storage.
but it was basically heat shaping the bend of the straw, it was 2 sperate pieces that were beveled inward, heated and shaped and then glued. after that the upper straw piece was inside and when it was ready, it was heated and then glued finally. I glue some scrap pieces of foam on the bend to give it more wrinkles,,,i honestly don't know why i did that i was already mentally checked out
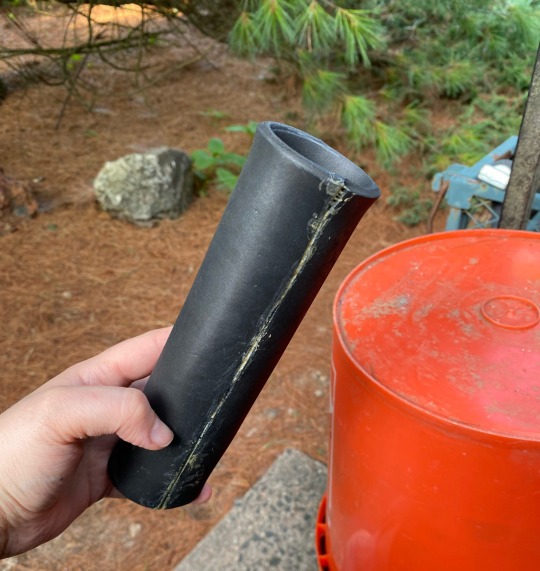
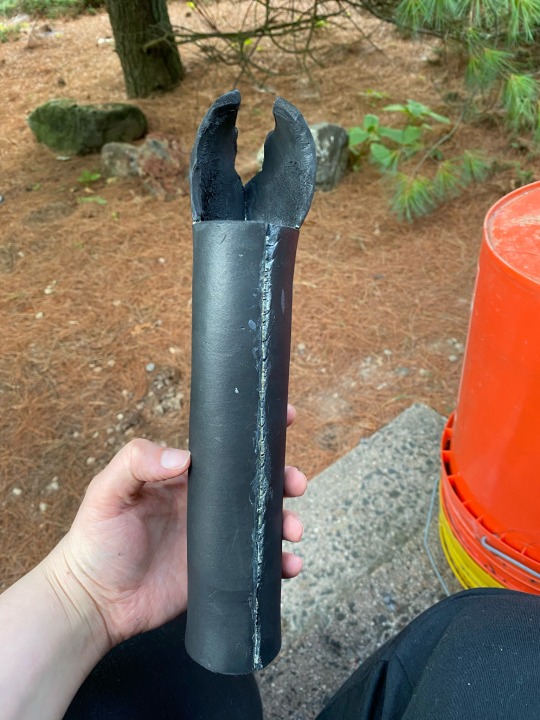
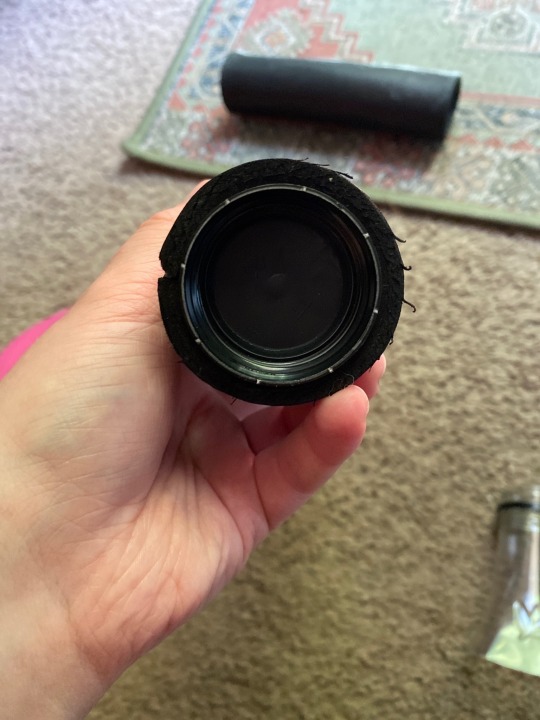
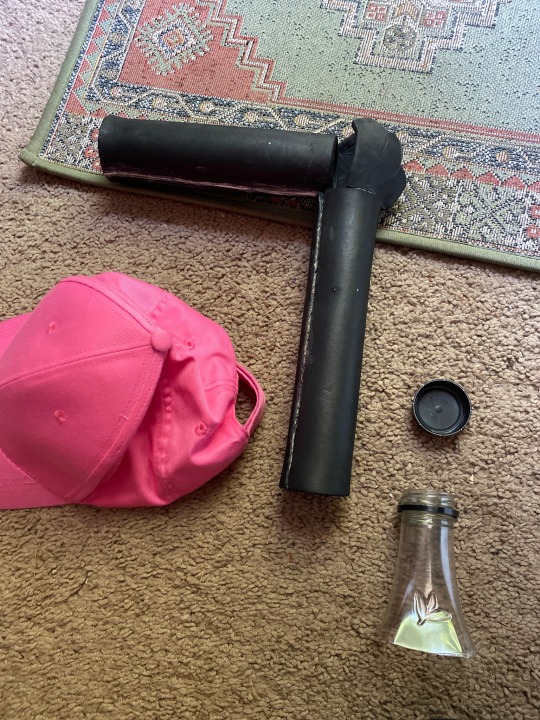
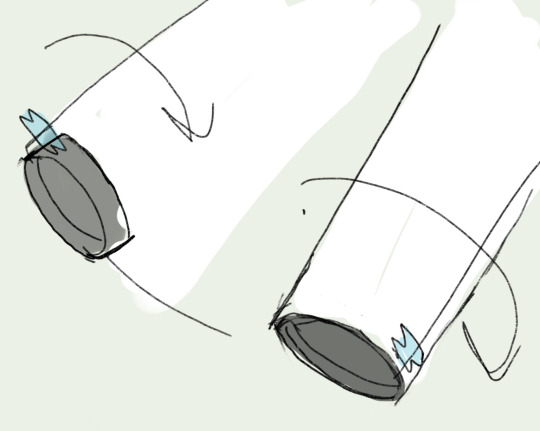
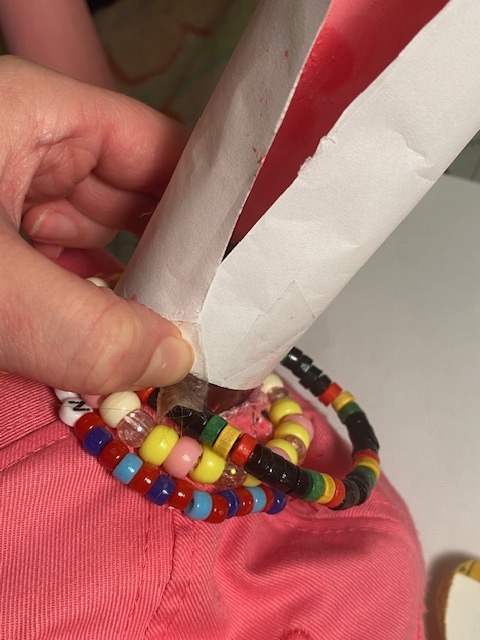
Sooo i think thats it for the tutorial. Hopefully i covered everything best I can. Feel free if you guys have found better ways to build this prop, all i ask is that DONT put it behind a paywall and please tag me/credit me when sharing and reposting.
It’s not required but is appreciated if you leave a kofi for me https://ko-fi.com/zimvatt
#Youtube#eva foam#cosplay#cosplay props#master shake#aqua teen hunger force#athf#cosplay tutorial#athf master shake#demonpikmin#kofi#buy me a kofi#props#cosplaying#convention#aqua teen forever#art#artists on tumblr
15 notes
·
View notes
Note
Haiiii!
You're that senshi cosplayer right?
My brother is trying to cosplay him, do you have any tips?
Oh man Senshi involved a LOT of firsts for me cosplay-wise, so I am not sure I did everything in the best or most efficient way. But! Here is a quick rundown of what I did. Skirt and Bracers w/ the fur: - this is a pretty basic sewing project! i just bought some brown faux-leather at joanns and made some slightly tapered tubes based on my waist and arm measurements. very easy and very little patterning involved!
The top: - literally just wore a gray tank top i already had
The armor: - Oh man okay this was my first time doing proper EVA foam armor, so take everything I say with a grain of salt BUT!! basically, I patterned everything out in paper first to get a decent idea of how it would fit on me. then i traced it out on some EVA foam rolls I had lying around from other cosplay prop builds, just a little bigger than my paper mock-ups to account for The Thickness of the foam. -The helmet was absolutely the hardest part and my main advice here is to be at peace with the idea that you may have to redo a lot of stuff and build a lot of prototypes to get that thing to fit your head right. - Once you have the foam base, you can build on top of it with foam clay to clean up the seams/add more organic shapes and details/etc. and if you use water to blend it in with the foam it can turn out reeeeally nice and seamless! I got all those supplies at michaels. -then after making sure all of that is nice and smooth and sculpted how you want it, you can sand and carve in any last details. THEN it's time to seal that shit for painting and durability! -for this, i used Plasti-Dip. it is basically a spray paint that creates a rubberized coating over top of the foam. this means the foam wont just soak up the paint when you apply it, AND it helps stiffen everything up a bit while still leaving it flexible AND toughening it up against dings and dents. -then painting! my biggest painting tip is WEATHER THAT SHIT!!! painting a single solid color can get it all unified but what'll really sell the look is going back over those base colors with watered down black to get it into all the little imperfections and stay there, bring out the details and add texture. makes the armor feel lived-in! -ALL THAT SAID: I actually found out later that a number of people have put out 3D print files for the various armor bits AND the helmet, so if you either HAVE a 3D printer or are willing to shell out for somebody else to print those for you to assemble, that might be an easier way to go about it! all up to you, i cant vouch for how that goes re: fitting it to your specific body and all that, plus idk how comfy itd be in comparison? but it certainly seems easier lol The sandals: -same as above only i attached the armor bits to a pair of flip flops i already had and thought were comfy. senshis foot armor situation is kinda wacky ngl. i have no idea what that weird crescenty bit on top of his toes is for. but thats what the reference images show sooo what can ya do.
THE BEARD: -oh man so this was another first but i REAAAAALLY loved the result. okay so my tip is this: if you want your wig and beard to match exactly? just buy two of the same wig. one goes on your head, and one gets flipped turned upside down and cut into a beard shape!!! -i will tell you a cheap lace-front wig is a LOT more affordable than one of those fancy hand-laced beard pieces, and it LOOKS waaaay better than like, the usual party city fake pirate beard you will probably find when searching for affordable costume facial hair, particularly if he's gonna want the option to remove the helmet and go full Hot Senshi Mode.
-literally i just had to cut a hole in the wig for my mouth and trim up a decent mustache above the mouth hole. -then you can use the little uhh.... elasticky bits? with the hooks?? that go inside the wig and help you adjust it to your head size? i literally just stretched them up and hooked them onto my wig cap and i BARELY needed to tack anything down with spirit gum. it held that thing up like a fucking champ and, all things considered, was pretty comfy!! didnt have to hook anything over my ears or anything!! -oh if you dont have any experience with spirit gum tho MAKE SURE YOU ALSO PURCHASE SPIRIT GUM REMOVER. it leaves such a nasty residue after, and its a son of a bitch to scrub off. i super recommend the remover.
oh and remember to add some blush to your nose when you go out wearing the full thing. rly adds to the overall Senshi effect i think! uhhh i think thats it??? for senshi's pan i literally just bought like a big fucking wok and strapped it to my back. it wasnt as heavy as youd think tbh but then i am kind of a tryhard. and for the little walking mushroom... idk! my mom crocheted it for me a while back and i thought it would be a really cute prop!
#not art#not dailies#senshi cosplay#if you have specific questions lmk!! like i said this one was a lot of fucking around and finding out for me#so i may not have very specific or helpful answers. but i will certainly try!
11 notes
·
View notes
Text
[You hear coughing in the distance, growing louder and louder. And then suddenly, it's around the corner]
Yeah, please ignore me. I underestimated the volatileness of plasti-dip. *cough* Geez even wearing a mask that shit is awful. And I didn't even spray that much, Then again the mask I had liberated, the filters look a little worse for ware, oh well. I'll be getting a new mask I promise. And hopefully I'll have the right filters, cuz I think I had the wrong type.
See it's one thing if I continue the streak of sneezing blue when doing projects, I can tolerate spray paint. I would rather that not transfer to my cosplay hobby and suddenly, I'm coughing up rubber. Despite wearing a mask. Mysteries.
I did hint at this before that I was working on a cosplay in my last post. And if you hadn't guessed it by now *shrugs*.
#busy busy man he is#most of my tools have already come in so should be straight forward adjacent from here#If I don't end up in the hospital first#I'm fine really I'm tougher than that#just got a very powerful sense of smell#cosplay#minecraft#mianite#ld speaks
3 notes
·
View notes
Note
Hi!! My friend sent me the post with your sam vimes cosplay - amazing!!!
I'm also making armour for the first time for a city watch cosplay, but we spray painted gold over the rubber paint and now the gold paint wont stop cracking!!😭😭😭
How did you paint your armour?? I want to take mine out of its bin bag jail so bad🥺
Heya, thank you! My armor is LARP armor, so it came already finished.
For yours, you might want to consider a flexible primer, like plasti-dip, or a flexible paint, like Angelus leather paint. Hope that helps!
10 notes
·
View notes
Note
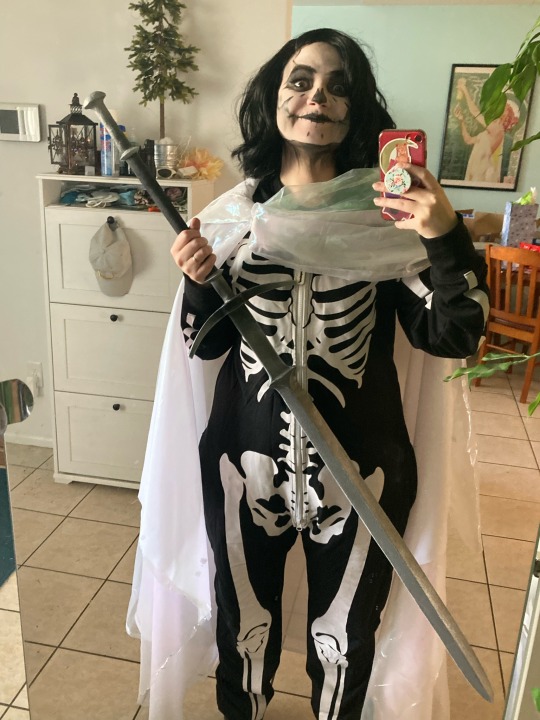
Hi!! your Alecto cosplay is so cool and your sword looks FANTASTIC, did you make it? do you have any other pics with it?
thank you so much! that sword is my husband’s handiwork, originally made to go with my gremlin harrow look last holmat, but the process was pretty straightforward.
figure out the scale in comparison to me (who is very short) so that it’s long enough to look BIG but not so long it’ll drag on the floor if i put it on my back.
cut blade out of foam in two pieces (one for each side), carving a channel down the middle.
glue dowel rod down the length of the blade.
carve the blade down with a dremmel on the sides, but it doesn’t need to be terribly flat or sharp to read as a sword.
cover remaining dowel handle in foam for pommel and cross guard.
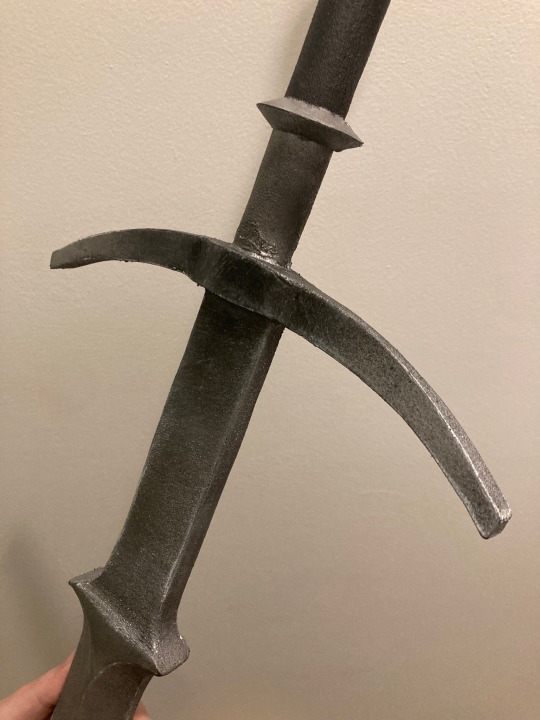
give it a couple layers of spray on plasti dip and then paint once dry. i think he did silver and then went back in with black for shading.
add painted highlights along edges for fake sharpness.
the whole sword is SUPER light and very con safe! he didn’t actually give it as heavy a coat of plastidip as i’d recommend just due to time, so it’s definitely gotten kind of beat up, esp at the tip. but like, it still looks cool even with it’s non-sharp tip lol.
here’s me right after getting into gremlin harrow for holiday matsuri brandishing my new sword:
and here’s some closeups of its current state:


and i’ll have more photos of it later once we get to editing my alecto shoot from metrocon!
oh and follow my husband @shmaba if you like neat weapon designs. this sword is basic, but he did a whole bunch of cool ones for last swordtember!
27 notes
·
View notes
Text


Finished foam work, plasti dipped, primed. Time for paint.
2 notes
·
View notes
Text

Shaina was on my cosplay 'wish list' for years... but was pretty far down in priority until October 2021: when I started thinking about potential masked cosplays for my first foray back into con-going. I went through my supply stash and found I already had everything except the wig, neon tights, and shoes to make her- so, it was decided. I paused working on my other two WIPs to have her done by January (since I had rollover tickets for ALA 2022). While she was 'complete' enough to wear for the event, there's still some work to be done on the chest plate... and her snake gauntlet broke by days end so needs fixing. Otherwise, I'm pretty proud of how she turned out!
Before I move on to costume specs, I just want to clarify that I did wear a medical-grade mask under my costume one. We aren't out of the woods yet, so con responsibly!
Materials/Construction:
Belt- Yellow flannel, from my fabric stash
Bodysuit- Brown jersey knit, from my fabric stash (pattern drafted by me)
Chest Plate Armor- EVA Foam (6mm, with 2mm used for detailing), Plasti-Dip to seal foam for painting, silver and metallic violet paint (mixed), and Velcro for side fastenings (pattern drafted by me)
Headpiece- Foam clay sculpted over a store-bought headband, Mod Podge to seal foam for painting, silver and metallic violet paint (mixed), and EVA foam (2mm) for diamond-shaped pieces over the ears
Knee Pads- EVA foam (6mm), Plasti-Dip to seal foam for painting, silver and metallic violet paint (mixed), silver stretch vinyl
Leg Warmers- Lavender violet fleece, elastic (pattern drafted by me)
Mask- Plain plastic craft store mask from my closet (shape refined a bit with scissors and heat), navy blue and black paint, plastic mesh (for eyes), elastic (dyed to match wig)
Right Gauntlet- Lavender violet fleece (sewn from a modified Vogue 8311 pattern), EVA foam (2mm) for details, Mod Podge to seal foam for painting, metallic violet paint
Snake (Left) Gauntlet- silver stretch vinyl for glove (sewn from a modified Vogue 8311 pattern), foam clay sculpted over a base shape of scrunched newspaper, EVA foam (2mm) for arm straps, Mod Podge to seal foam for painting, silver and metallic violet paint (mixed)
Shoes- Store-bought heels, yellow Angelus leather/vinyl paint
Tights- Store-bought
The wig is a Hestia from EpicCosplay in Tea Green, with minimal styling by me. The false nails were painted with a mixture of black and purple nail polishes.
#cosplay#saint seiya#knights of the zodiac#ophiuchus shaina#shaina#sheena#my cosplay#anime los angeles 2022
13 notes
·
View notes
Text
i wish that chocolate wizard wouldn't always powdercoat his fuckin works. it detracts so much from the wonder of it being made of chocolate to completely obfuscate the material to me. maybe id feel different if it was hand painted in white chocolate but as soon as the industrial airbrush comes out i fall instantly asleep. it's like plasti-dipping a gingerbread house. the whimsy and wonder is the gingerbread!!!!!!
2 notes
·
View notes
Text
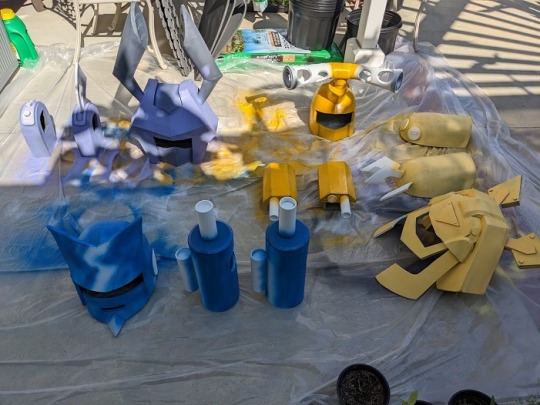
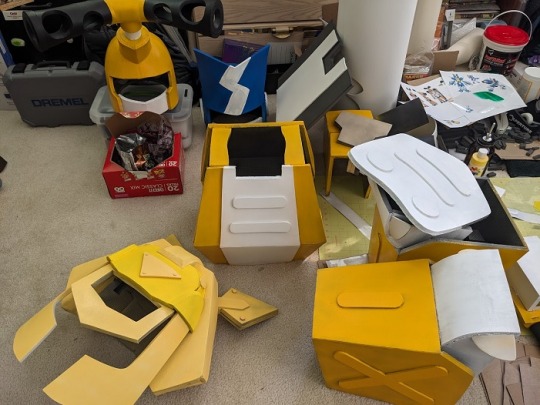
Medabots: Painting
Moved my gardening stuff to have a spot for spray painting. Some things got a coat of mod podge while others got plasti dip. So many store around me didn't have white plasti dip in stock, which is why I used the mod podge. I kinda like the seal I got from the mod podge better then the plasti dip, it just takes so much longer to do. Most things have gotten their coats of spray paint and I am mainly doing hand painting stuff now.
I am going to be Metabee @ayankun as Rokusho @du-chefpanda as Cyandog @piningfor-thefjords as Sumilidon
Tool: here
9 notes
·
View notes
Text
Bo Katan Helmet (Finished)
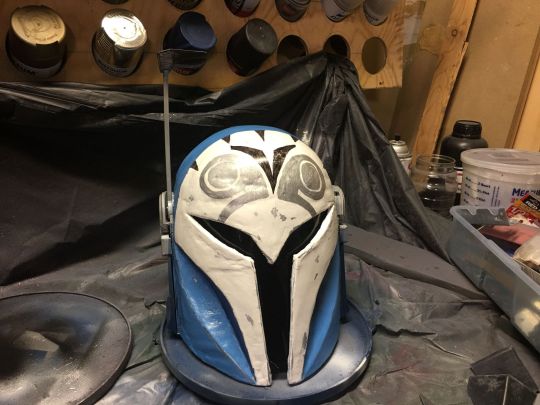

Not a lot to say that I didn't already say in the previous post. I had hoped that getting it painted would help further cover up a lot of the imperfections and roughness of this Worbla-coated 3D printed helmet, and it did, but it still wasn't quite enough.

The plan was to use Worbla in hopes of cutting out the sanding/filler step and achieve a smoother helmet much faster. Unfortunately, the jankiness of the rushed print created a lot of spaces the heated Worbla would fill in a bit too much and leave bumps and creases on the outer shell. So I STILL had to do a lot of filler and sanding to try and even it out, and it STILL didn't make it much better. (But at least I did finally manage to get those seams filled in and smoothed over.)
I tried to do a layer of Plasti-Dip before the other paint, but I ran out before even getting a full coat, so I just had to hope the actual paint would fill in the rough surface of the Worbla. And it...mostly did.
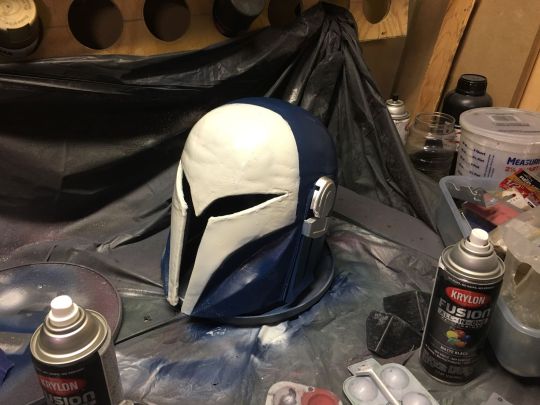
I knew the blue paint I had would be too dark, but I thought "maybe...?" It's too dark. I actually ended up repainting about 80% of the thing by hand. Tried making a painter tape stencil. Screwed it up, and just did the pattern by hand with silver and black permanent markers.
Then I gave it one last scrub with some fine sandpaper. Partly to scuff it up and get the worn look, and partly in hopes of getting it just a BIT smoother before the final finishing spray for which I employed my rarely used glossy finish.
So yeah. Quite the learning experience, like most projects. The lessons I learned from this will make future projects that much better.
8 notes
·
View notes