Text

Shaina was on my cosplay 'wish list' for years... but was pretty far down in priority until October 2021: when I started thinking about potential masked cosplays for my first foray back into con-going. I went through my supply stash and found I already had everything except the wig, neon tights, and shoes to make her- so, it was decided. I paused working on my other two WIPs to have her done by January (since I had rollover tickets for ALA 2022). While she was 'complete' enough to wear for the event, there's still some work to be done on the chest plate... and her snake gauntlet broke by days end so needs fixing. Otherwise, I'm pretty proud of how she turned out!
Before I move on to costume specs, I just want to clarify that I did wear a medical-grade mask under my costume one. We aren't out of the woods yet, so con responsibly!
Materials/Construction:
Belt- Yellow flannel, from my fabric stash
Bodysuit- Brown jersey knit, from my fabric stash (pattern drafted by me)
Chest Plate Armor- EVA Foam (6mm, with 2mm used for detailing), Plasti-Dip to seal foam for painting, silver and metallic violet paint (mixed), and Velcro for side fastenings (pattern drafted by me)
Headpiece- Foam clay sculpted over a store-bought headband, Mod Podge to seal foam for painting, silver and metallic violet paint (mixed), and EVA foam (2mm) for diamond-shaped pieces over the ears
Knee Pads- EVA foam (6mm), Plasti-Dip to seal foam for painting, silver and metallic violet paint (mixed), silver stretch vinyl
Leg Warmers- Lavender violet fleece, elastic (pattern drafted by me)
Mask- Plain plastic craft store mask from my closet (shape refined a bit with scissors and heat), navy blue and black paint, plastic mesh (for eyes), elastic (dyed to match wig)
Right Gauntlet- Lavender violet fleece (sewn from a modified Vogue 8311 pattern), EVA foam (2mm) for details, Mod Podge to seal foam for painting, metallic violet paint
Snake (Left) Gauntlet- silver stretch vinyl for glove (sewn from a modified Vogue 8311 pattern), foam clay sculpted over a base shape of scrunched newspaper, EVA foam (2mm) for arm straps, Mod Podge to seal foam for painting, silver and metallic violet paint (mixed)
Shoes- Store-bought heels, yellow Angelus leather/vinyl paint
Tights- Store-bought
The wig is a Hestia from EpicCosplay in Tea Green, with minimal styling by me. The false nails were painted with a mixture of black and purple nail polishes.
#cosplay#saint seiya#knights of the zodiac#ophiuchus shaina#shaina#sheena#my cosplay#anime los angeles 2022
13 notes
·
View notes
Text
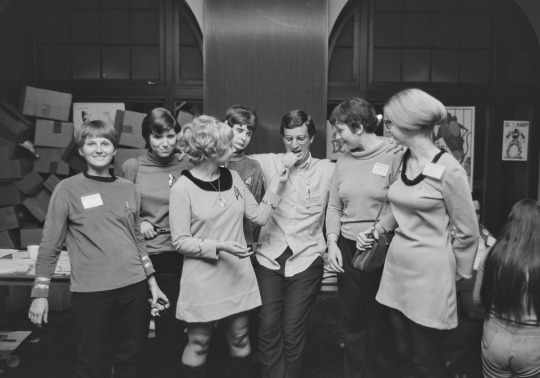
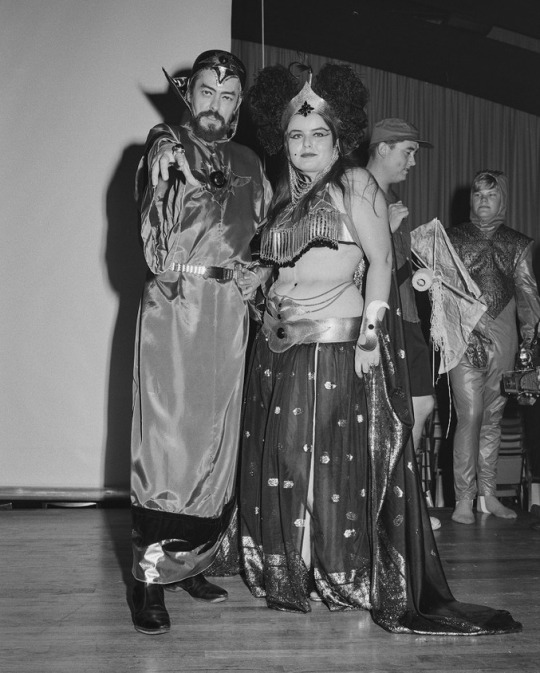
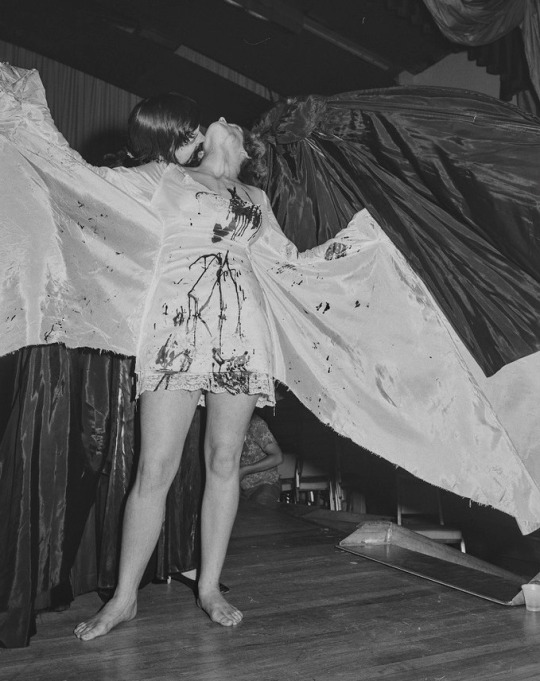
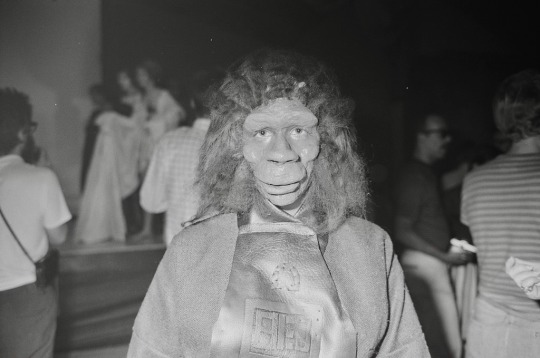
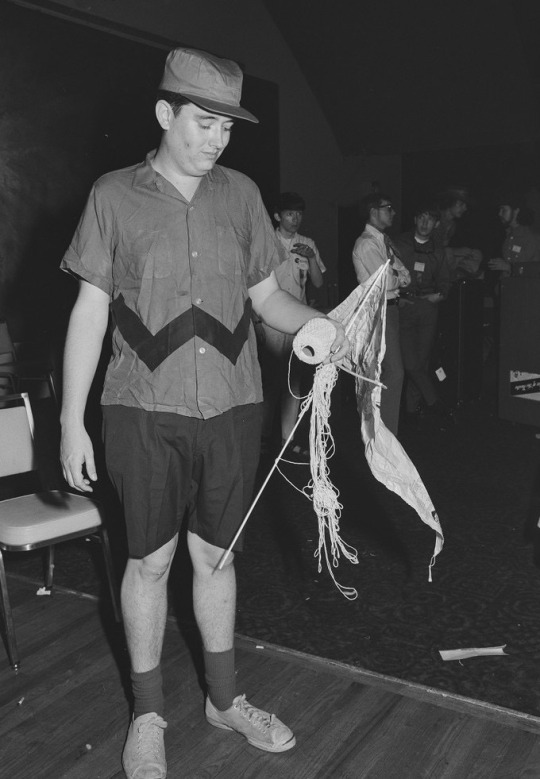
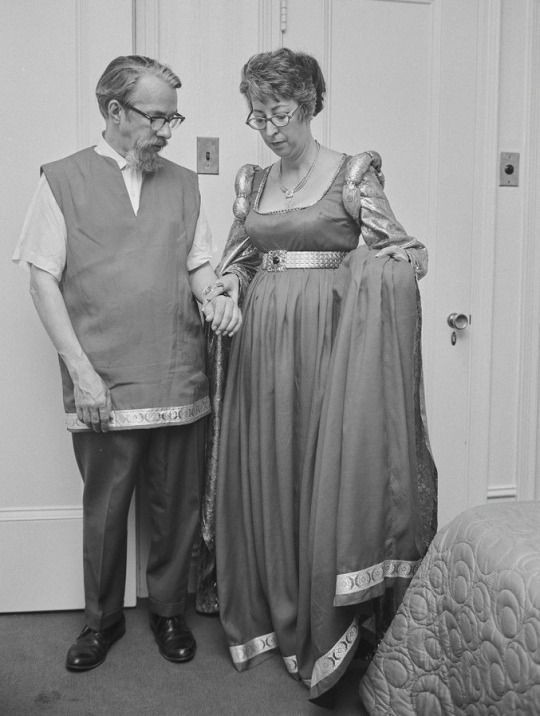
Cosplay at the World Science Fiction Convention in St. Louis, 1969. Photos by Jay Kay Klein.
863 notes
·
View notes
Text
Juri is finally finished! I got some really pretty pictures at the con and I feel like this is a cosplay where I'll end up with a lot more.
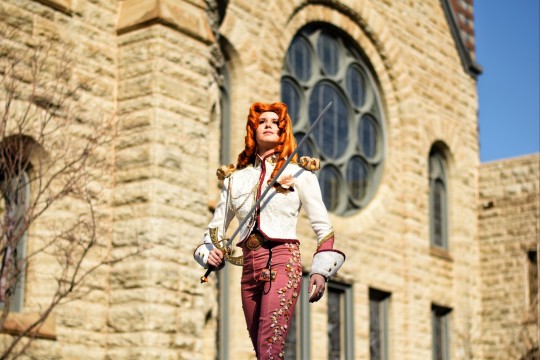
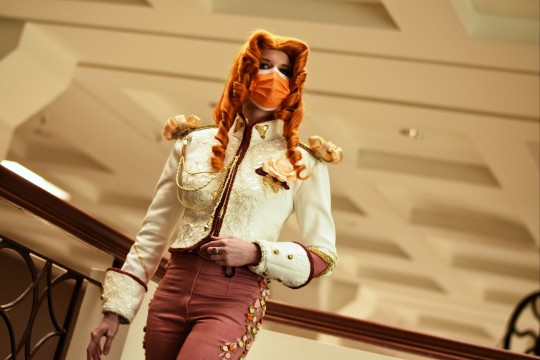

Photos were taken by @spontaneousmusicalnumber and edited by me!
#cosplay#revolutionary girl utena#juri arisugawa#amazing cosplayers!#love the embroidery on your pants!
1K notes
·
View notes
Text

So... I've been neglecting my cosplay Tumblr the past couple years. The main culprit has been congoers and photographers always asking for my Instagram (cosmagoria_costumes), meaning I prioritized posting new stuff there. Still prefer Tumblr to Insta, though, so I'm gonna try to be better about cross-posting here.
For now, have a surprisingly decent selfie of my Inigo Montoya cosplay at ALA 2022 (I am still masking inside cons, because finally not getting sick after every single one is nice).
5 notes
·
View notes
Text

Anyone want some ✨bizarre✨ cosplay?
I love my Jolyne handcuff shirt. Also everyone can hear me coming from a mile away.
Photo by @/pleasesavemycat
100 notes
·
View notes
Text
making it very blatant cause I think it’s important to be honest about some of these things:
I use so, SO much makeup and other fakery in my cosplay
do you think I look like cosplay me when I’m not in cosplay? Unless it’s one of maybe two costumes ever, no. no I do not.
I’m not going to try and convince you that my eyes look THAT big (it’s makeup) or that my brows are THAT arched (I literally tape them like they’re lifted up) or that my lashes just look like that (fucking lmao) or that my body is shaped like that (depending on the character I have anything from a small amount of shapewear to enough shapewear for a drag queen).
My clothes are all carefully tailored to give you optical illusions that my body’s basic proportions have changed. They have not, although I might be wearing a metric fuckton of the aforementioned shapewear too.
And then on top of all of that, I’m posing with my face and body to accentuate things I want you to notice and de-accentuate things I don’t.
There is almost nothing about this which is “real”. I’m making art using my own body as the canvas. The illusion is part of the challenge for me and I find it fun to chase ever greater heights of looking like Not Me. I love the craft of it. I love the acting. I love the effort even more than the effect.
And I don’t want any of you for even one second to look at me and think it’s natural, because like I said. It’s not. It’s the most unnatural plastic fakery I can manage and I want you to look at it and see the effort that goes into it for the work of devotion and art that it is.
#cosplay#cosplay makeup#shapewear for cosplay#THIS#for real... I wear a stuffed DD bra for my izumi curtis cosplay...#...binders for my crossplays...#...and insole lifts to appear taller in those crossplays#not to mention all the contouring and and other makeup choices I make#every single character I cosplay has their own unique makeup look
115 notes
·
View notes
Text
I cannot tell you, as a long time cosplayer, how much joy it will bring you to go back and make the costume you really wanted to make as a beginner but didn’t have the skill yet. Who cares if the source material is 5 (or 15 or 25) years old? There’s nothing like treating your younger self to a piece of delight and victory. You’ll feel amazing when you look in the mirror. Try it out next year. I guarantee you’ll have a good time.
Don’t have any of those? Go back and find your jankiest early costume where you still love the character but at the time you had no idea what you’re doing. Redo it with all the skill you have now.
It’s the best feeling in the entire cosplay hobby.
215 notes
·
View notes
Text
hi I’m a very long time cosplayer (20+ years experience) who has chronic headache and migraine problems and this is a post about how to prevent your cosplay wigs from giving you painful headaches! Nobody likes wandering around the con in blinding pain and so hopefully this post will help you reduce the chances of this happening.
1. If your wig is way too tight, don’t use it. Get something with a bigger cap. tbh I often wear slightly too big wigs to reduce the pressure! Find out what brands and sellers sell wigs that are comfy on your head and prioritize buying wigs from them! I made a big master list of cosplay wig sellers a while back so here’s a few you might not have known about. Arda (and its Canadian and European sites) sells by far the biggest wigs, but I personally find Classe the most comfortable for my specific head. It’s all very YMMV and it’s totally possible for a wig to not actually be too small but fit your head in an uncomfortable way (Blue Beard on taobao does this to me every time), so just don’t buy from suppliers that do that. Also consider resizing wigs to be larger! For wig clients with extra large heads I like to nip the edge of the wig right behind the ear where your ear and hair from above will cover it and add in a little godet of elastic.
2. Reduce weight! A heavy wig will make head pain much more likely, so here’s a few tips on wig weight reduction!
A) if your wig doesn’t need a ton of volume and is already very dense, rip out some wefts in the bottom half. Anything on the part of your head from the ridge where your head starts going in towards your neck won’t really show unless your wig is very short and it’ll obviously reduce weight instantly! You can replace any missing volume with light crimping or light heat and tease, or leave the wig as is for a natural and silky look without the unnatural volume of a cosplay wig.
B) if you need more volume in your wig, instead of going straight to adding wefts for more volume, see first if combining crimping with heat and tease at the roots will give you the extra volume you need! Crimping or heat and tease adds volume and if you straight up destroy the fiber in the first two inches from the scalp by doing both repeatedly, it’ll add huge volume without you needing to add extra hair! When I do this I like to heat the fiber near the roots, tease it, let it cool, crimp the teased part, let THAT cool, and then brush it out. You can flat out double the perceived volume in the back of the wig this way!
C) if your character has a high ponytail or high pigtails, consider using clip on ponytails that you can easily remove if you need the weight off your head right the fuck now. here’s two tutorials I swear by for making a short wig + clip on combination look more natural! They’re in Japanese but easily comprehensible if you use machine translation thanks to the clear photography. They also help with spreading out the weight on the wig itself, and if your hair is long enough, using a clip on with a fishnet wig cap and clipping through the wig and into your real hair will also he lp make it more secure and distribute weight more evenly.
if your character has high pigtails
if your character has a high ponytail
D) when you need extra wefts, opt for sewing in wefts rather than gluing whenever possible. Glue doesn’t seem heavy but enough of it can make a wig get real heavy REAL fast.
E) redirecting the weight to your entire head and not just the front hairline will feel lighter and give you less forehead tension, which is one of the biggest causes of wig headache. Toupee clips sewn evenly around the edges and a Wig Fix https://therenatural.com (the name brand one, the knockoffs genuinely don’t work half as well) can help with doing this. A Wig Fix will also let you use fewer pins to keep your wig on, which is another cause of wig headache. Can’t suggest trying those enough. There are also some velvet wig grips out there but I find those don’t work quite as well, but they’re by far better than nothing.
3) make sure your wig is easy to remove. A lot of characters have horns or veils or other head things on top of the wig so make sure those can easily come off if you need a wig break! I’m a big proponent of using wig glue or double stick tape to glue strands (face framing layers etc) to your face for a more natural and more flattering look, but if you get headaches from wigs, keep that glue or tape in your bag so if you have to de-wig for a bit, you can get it back on!
4) take the ibuprofen or whatever BEFORE you put the wig on, and not when your wig is already making your head miserable! It’s like taking the ibuprofen before you wear the horrible shoes for a special event; it’s more effective in advance.
5) what are your normal headache triggers? Make sure you’re doing the work to EXTRA avoid them before wearing a cosplay wig. Stay hydrated. Keep up with your electrolytes. If you have any food triggers, make sure you’re managing them properly.
6) try multiple types of wig cap before deciding which ones to use! I’m a big fan of the fishnet kind because I’m in agony every time I try to use the stocking kind. Some people find relief in doing pin curls under their cap, and @/battleangelgif on twitter suggested doing this with damp hair the night before you wear the wig. There are tons of methods! Stretching out fishnet caps can be done more effectively when they’re slightly damp and that’ll make them pinch less. Experiment with what you like best to keep your irl hair in place and once you find a method you like, go for it! Make that your go-to!
7) always remember: wearing a short wig is less miserable than wearing a wig to your ankles. consider very carefully whether or not you can actually handle that wig that’s as long as you are tall. sometimes you just can’t and that’s okay! reduce the length of any super long haired character to hip length and it’ll be FINE. I swear. It’ll still read as super long and it won’t be as terrible.
8) always remember you can just. take the entire wig and cosplay off if you’re in agony. it’s not worth it. don’t do that to yourself. If the migraine hits anyway, just take it off.

Hope some of this might help you out! Focusing on reducing and redistributing weight is what helps me out the most 😌 feel free to reply or reblog or message with questions and I’ll try and get back to you ASAP!
627 notes
·
View notes
Text
Your handy-dandy European 4-in-1 chainmail making guide
I apologise if the photos are blurry. My phone is old and my hands are shaky

European 4-in-1 chainmail is just a style of chainmail weaving. There are many different types and European 6-in-1 is what I have seen the most with costumes but 4-in-1 is easier and uses less rings. Plus, there are not many people who know enough about chainmail or pay enough attention to it to criticize you for having the incorrect weave on like, your Faramir cosplay, or whatever.
Instructions below
First, buy the rings.
I used Chainmail Joe 16AWG/18SWG 1/4" in silver. I got them on Amazon, here (link).
This is their size chart. You can see that my ring is on the spot that says 4:

Next, you take 1 ring (which you open) and 3 closed rings. You loop the closed rings through the opened ring

Then, close the opened ring. I like to use a knitting needle to hold the rings steady.

I get a second opened ring and loop two closed rings through.
And I attach it to the last set of rings.


Continue to do this until you reach your desired length.
To add on, begin your next "string" using the same method as above.

You take another open ring and loop it through two rings from the old string and two from the new one. You can see which rings to loop it through in the photo above.
Loop the open ring through those two rings like so

And then close that ring. It should look like this when you are done

You continue the second string, attaching it to the old string, and continue on. Remember to take it slow at first and pay attention to the pattern to make sure it is consistent, and look at my first picture as reference. The placement of the rings should look consistent across the chainmail.
Anyways, I hope my mini tutorial is useful, and you can always look at other tutorials and videos to get a better idea, although I have had little luck with such things because they add on 5 rings at a time while I add only 3 which I have found is faster and less confusing
Have fun making chainmail!
117 notes
·
View notes
Text
in absolute tears over this tik tok
6K notes
·
View notes
Text
Posting here again since Anime Expo is right around the corner:
ANIME EXPO PANEL LINES ARE OUTSIDE.
You won’t have shade for the entire line, there isn’t often a place to sit down except the ground, and you’re on your own for providing water and fans, let alone a toilet. Don’t forget your SPF and don’t wear a miserably hot costume if you’re going to any large panels, especially with the lack of room clearing.
You are 100% on your own for providing fans and water, and if you aren’t waiting in a group, you’ll have to hope someone is willing to hold your spot to go use the bathroom.
Be safe and don’t die of Anime Expo.
#anime expo#safety#another reason I stopped attending this awfully run convention...#there are sooo many great cons in socal now...#there's no reason to shell out for this one
23 notes
·
View notes
Text
Meiji period fashion was some of the best in the world, speaking purely from an aesthetic standpoint you can really see the collision of European and Japanese standards of beauty and how their broad agreement even in particulars (the similarity between Japanese and Gibson girl bouffants, the obi vs the corset, the obi knot vs the bustle, the mutual covetousness for exotic textiles, the feverish swapping of both art styles and subjects) combined and produced some of the most interesting cultural exchange we have this level of documentation for. Europeans were wearing kimono or adapting them into tea gowns, japanese were pairing lacy Edwardian blouses with skirt hakama and little button up boots. haori jackets with bowler hats and European style lapels. if steampunk was any good as an aesthetic it would steal wholesale from the copious records we have in both graphic arts and photography of how people were dressing in this milieu.
57K notes
·
View notes
Text
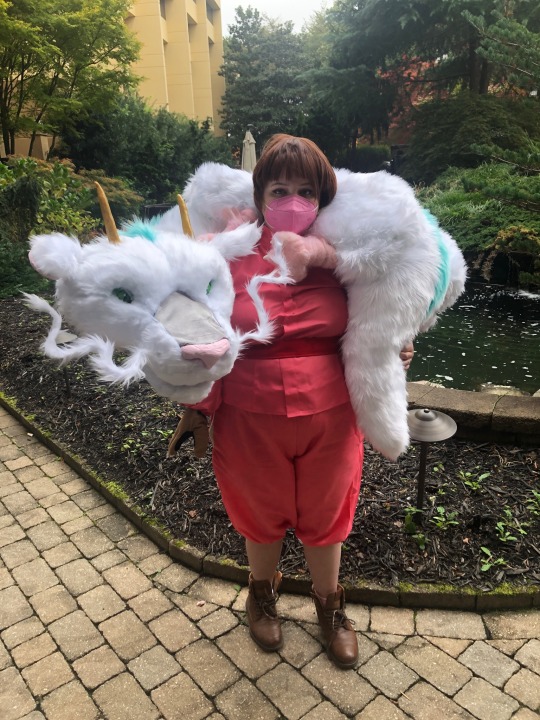


Well after over 6 months of super hard work my haku puppet is done!!! I took him to anime weekend Atlanta and it was so much fun!!! I’m so happy that everyone liked seeing him- it was really great to see all my work pay off!!
I hope y’all love him as much as I do <3
1K notes
·
View notes
Photo


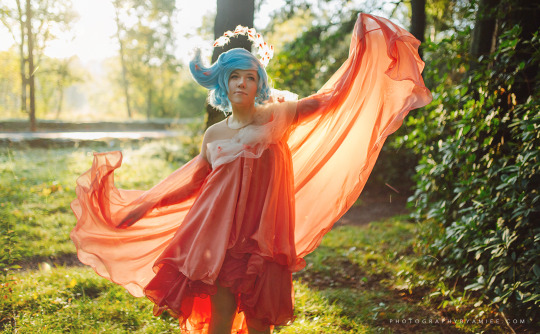
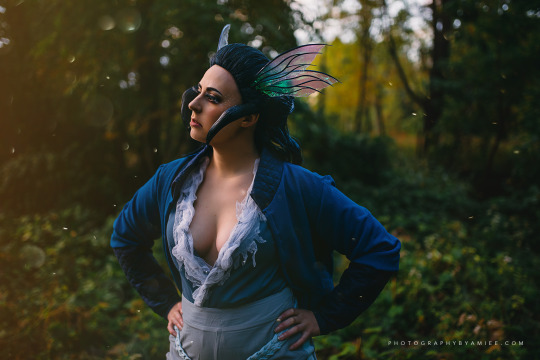

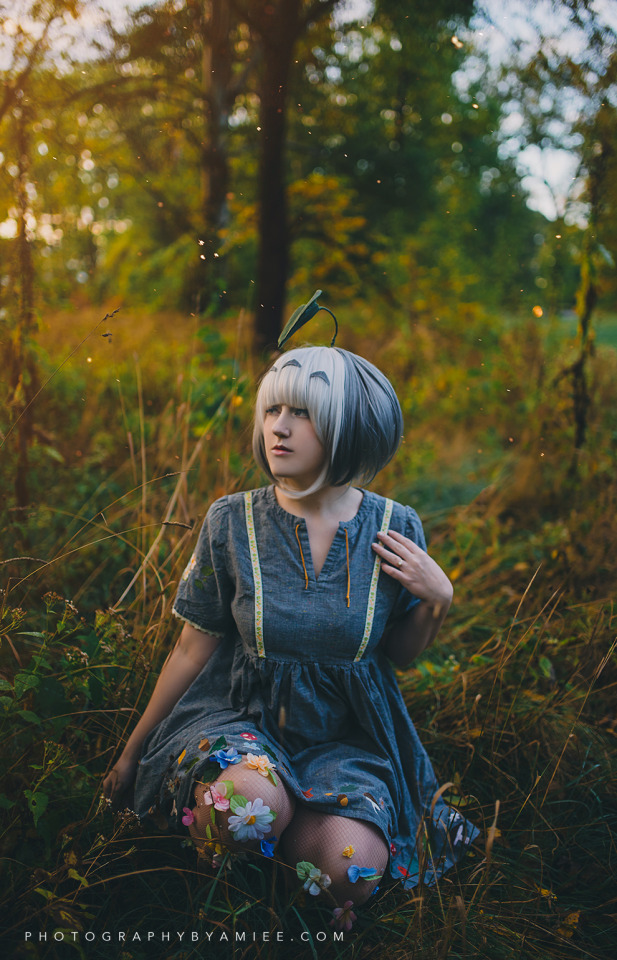
“𝐻𝑜𝑙𝑑 𝑦𝑜𝑢𝑟 𝑏𝑟𝑒𝑎𝑡ℎ 𝑤ℎ𝑖𝑙𝑒 𝑤𝑒 𝑐𝑟𝑜𝑠𝑠 𝑡ℎ𝑒 𝑏𝑟𝑖𝑑𝑔𝑒.”
Studio Ghibli-inspired fashion designs.
Wigs designed and created by @cowbuttcrunchies
🏰 Howl’s Moving Castle | Pitchfork Cosplay (IG) 🌲 Princess Mononoke | @cowbuttcrunchies 🌊 Ponyo By the Sea | @cowbuttcrunchies 🌬️ Nausicaä of the Valley of the Wind | Turnfolio (IG) ♨️ Spirited Away | Jacquistuffnthings (IG) 🍃 My Neighbor Totoro | @giraffecosplay Photography by Amie Photos (IG)
#cosplay inspiration#studio ghibli#spirited away#princess mononoke#ponyo#nausicaa#totoro#miyazaki#cosplay wig#amazing cosplayers!
215 notes
·
View notes
Photo
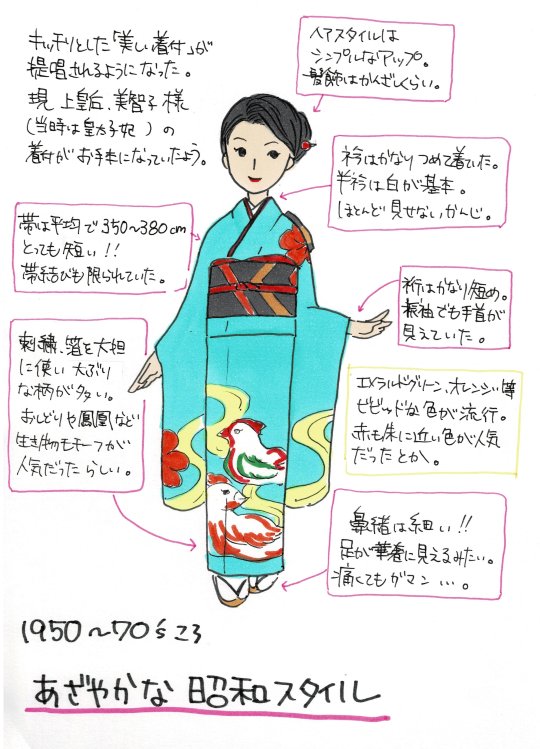
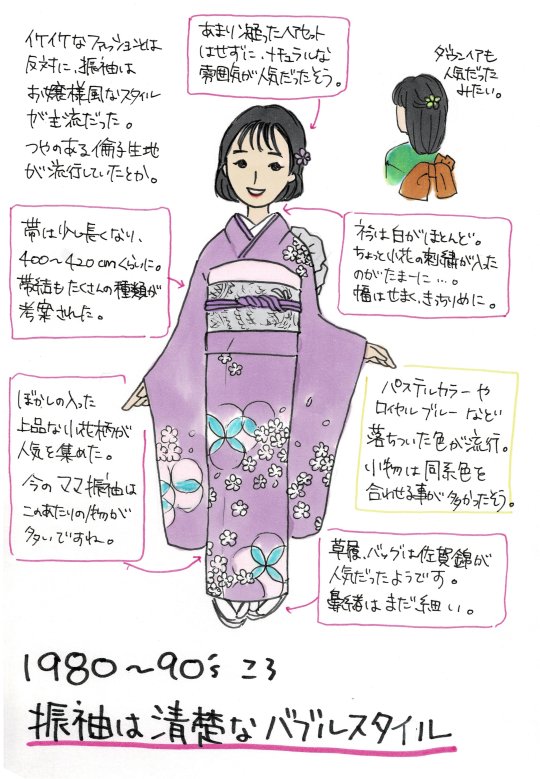
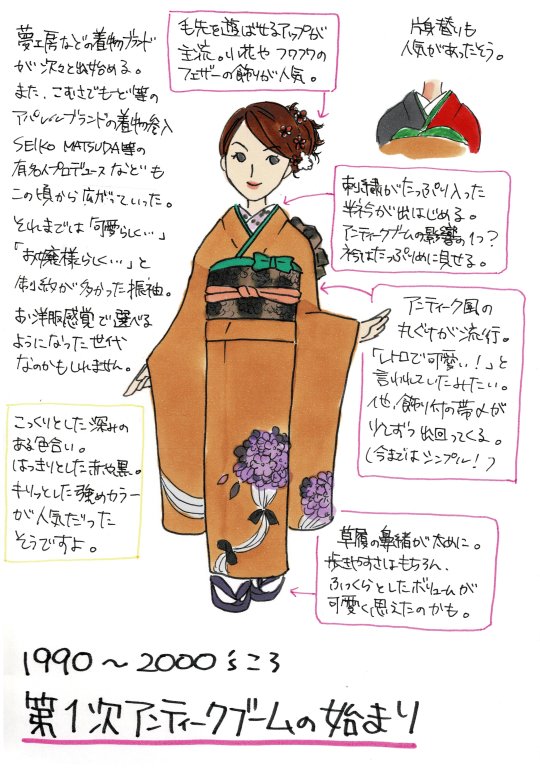
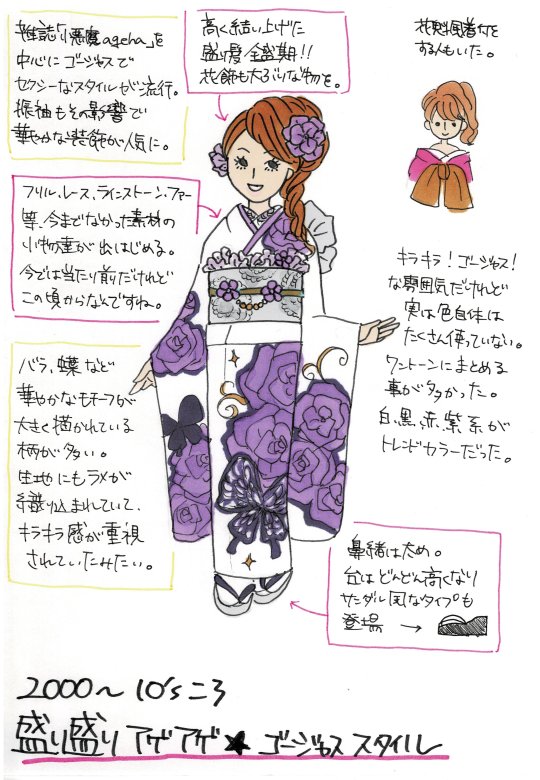

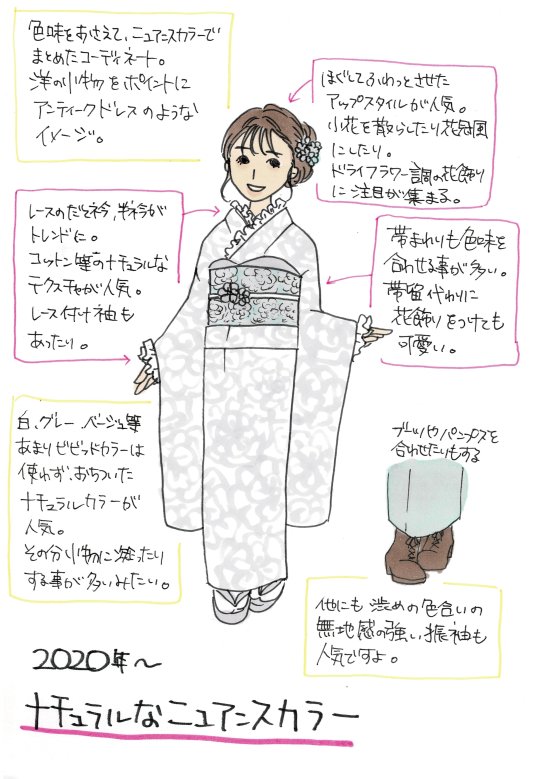
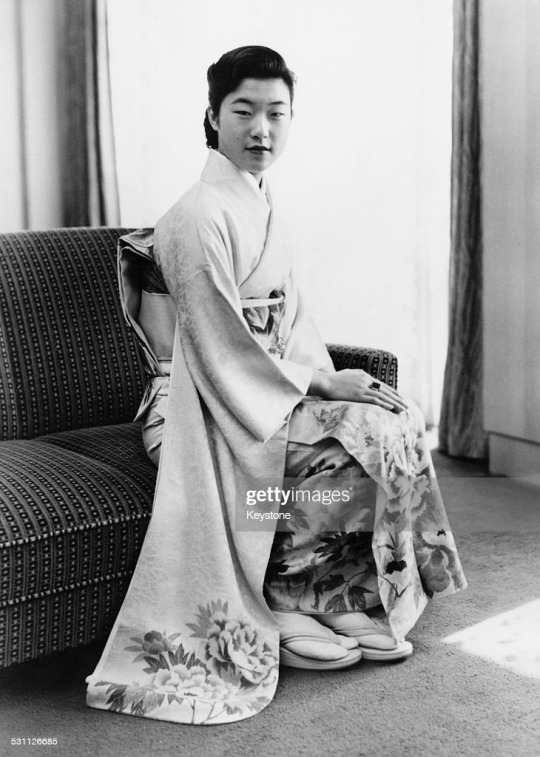
[Evolution of furisode fashion from the 1950′s to 2020′s], handy charts by shop KomonoHana. Please note that the trends shown and describe here are the most notable evolutions - that doesn’t mean everybody was following those trends to the T ;)
1950-1970′s - Showa style
After wwii, a new era began for kimono, trying to recover from harships of wartime. Prototype of modern Seijin no hi was held for the first time in 1946. The economic miracle made possible for ordinary households to own or at least rent furisode outfits, which were in the past mostly only affordable for wealthy families.
Style favored bold embroidery with gold foil etc, and vivid oranges and emerald greens were very popular colors.
New methods and rules for kitsuke/dressing appeared as many people didn’t have the knowledge/means to dress in traditional furisode attire as before: => Expensive and heavy maru obi fell out of fashion, and fukuro obi became the norm (only patterned on one side, they are cheaper and easier to produce). => Costly and cumbersome layered kimono called kasane also disappeared, replaced by decorative collar called date eri mimicing layers.
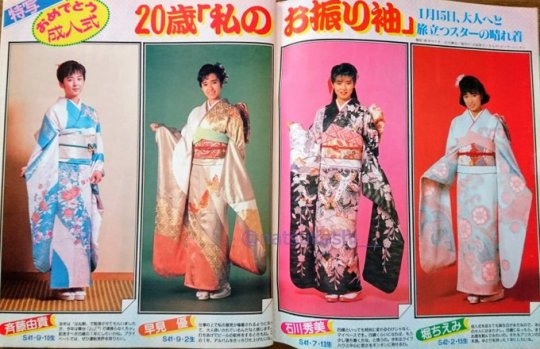
1980-1990′s - Bubble style
The economic bubble from that decade saw a big demand for consumer products. Same went for kimono items.
Demand for embroidery and gold foil decreased, but glossy rinzu (raised ground patterned fabric) was super popular. Small scattered patterns were a staple of the period.
Fukuro obi also became longer, making elaborated novelty belt knots possible (before that era, bunko, or fukura suzume for example were the norm).
1990-2000′s - Antique kimono boom
When the economic bubble finally burst, the amount of money spent for Seijin no hi furisode dramatically decreased.
Little by little, antique kimono became fashionable. One reason, beside obvious cost, might have been the huge popularity of Akina Nakamori’s music video [DESIRE - Jônetsu]. In any case, antique/vintage kimono shops opened everywhere.
That decade liked deep, crisp ground colors. Because of the second hand popularity, patterns were often old fashioned, antique ones.
Ready to wear kimono -sometimes designed by Stars of the era- started to become available, with often the promised of being easily washable - something difficult to do with silk kimono.
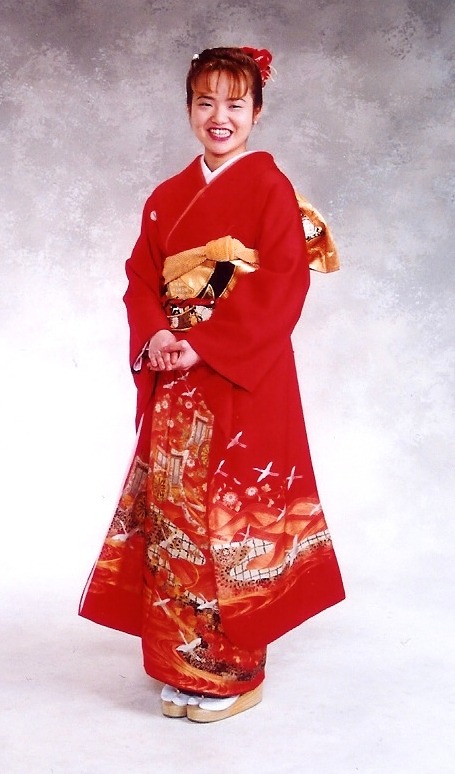
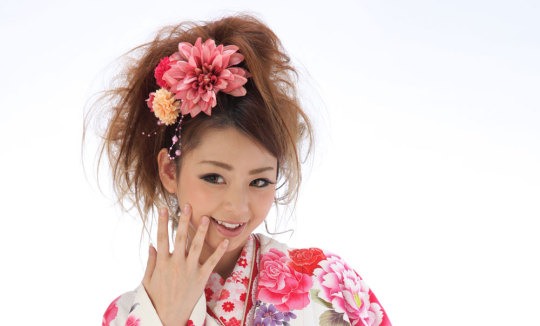
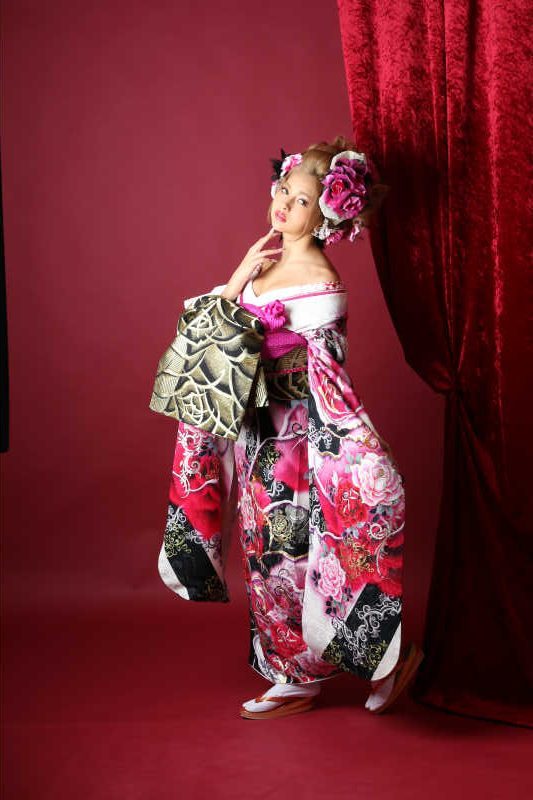
2000-2010′s - In your face! Ageha’s kimono
In reaction against to “old fashion” feeling of the past decade, style became more youthful and extravagant.
Gyaru magazine [Koakuma Ageha] made the hight ponytail fashionable, and that hairdo became a staple of that style, often embelished with large floral ornaments.
Contrasting colors like white, black, and purple were very popular. More is more was everywhere, with use of glitters, rhinestones, lace, frills, fur, pearls…
The “oiran” style also saw a trend, with furisode worn sexily off shoulder with obi belt knotted up front.
2010′s-2020′s - Between classic and modern
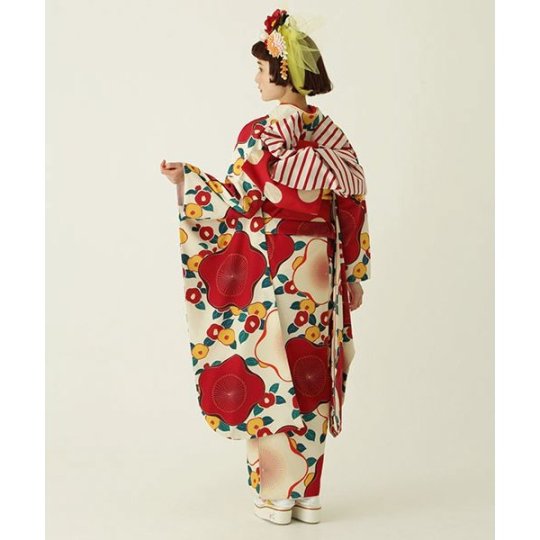
Furisode crazed fashion trends of the past decade became a bit more quiet, and offer diversified.
“Retro modern” furisode appeared, mixing reinterpreted traditional motifs and graphic/geometrical patterns. Colors tended to be really “pop”, not afraid to mix turquoise and bright pink for example.
On the other side of the spectrum, pastel colors were also in high demand.
Hairstyles returned to more classic buns, with notable fact that braids popularity rose.
2020′s~ - Chic and Romantic
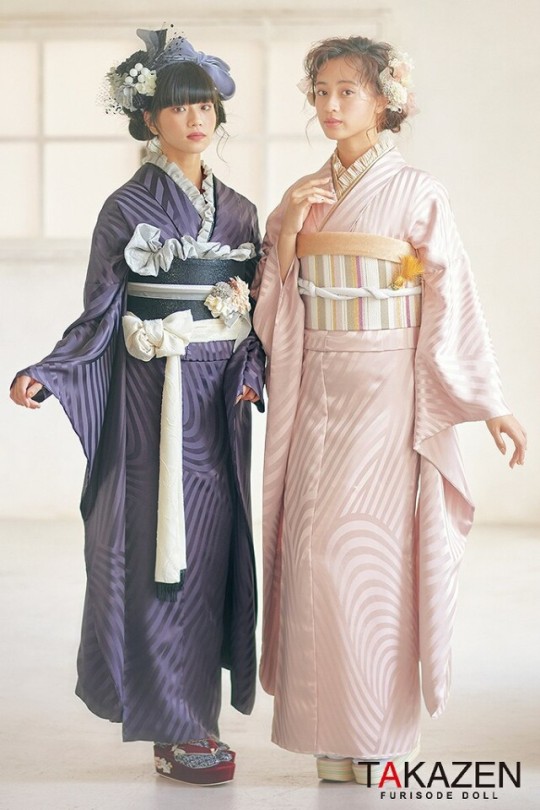
Reiwa era is still pretty young, but new trends are emerging nonetheless.
Light, natural colors are fashionable atm, such as light greys or beiges.
Busy patterns are also losing ground, as quiet, or even plain mujifurisode are becoming easier and easier to find.
Cute frilly accessories make a return, with lace, pearl, etc. It can be as headress, or for undershirt, or even gloves.
Western shoes are more and more considered acceptable.
Hairstyle are light and romantic, with loose buns sometimes decorated with dried flowers for example.
4K notes
·
View notes
Photo

Character: Haruka Tenoh
Series: Sailor Moon
Cosplayer: jaxjaxattaxx
25K notes
·
View notes