#Paint Tool Sai v2
Explore tagged Tumblr posts
Text

My bf likes Sonic so this is for him ---
My comissions are open! Everything on pinned post
#artists on tumblr#artwork#drawing#digital art#ibispaint art#character design#draw#fanart#sonic#sonic fandom#sonic fanart#sonic the hedgehog#paint tool sai#Paint tool sai V2#fandom art#fandom#commissions#commission#art commisions#commission art#digital commisions#taking commisions#commisions open
25 notes
·
View notes
Text

I had this idea of a predator walking in on their human mate getting ready for bed and they clench their fist 'cuz they get horny seeing squishy booty. Marked mature because of the bare booty. <3
She's standing on a stool. That's why she's so tall. lol
#yautja#yautjalover#predator franchise#monster romance#monster fucker#teratophillia#fanfic#predator#yautja x human#predator x human#alien x human#digital art#my art#paint tool sai v2
258 notes
·
View notes
Text

Finished commission for StarryBlur on FurAffinity of his and his boyfriend's kinsonas!
Commissions are open! (Prices / TOS)
#ugeem708v2#ugee#sai#paint tool sai v2#ptsv2#paint tool sai#kinsona#sonic#shadow#hedgehog#sonic the hedgehog#sth#mobian#my art#tablet
17 notes
·
View notes
Text
Selene from Daughter of the Sun Webtoon Canvas

I drew this on November 2021 for a Double Meme on Instagram with @viskchii
I can’t believe I still like this drawing.
Go read it!!!!
36 notes
·
View notes
Text

🐑 👑
#cult of the lamb#cotl#this was done entirely in clip studio paint as a 'relaxing' rendering task pfft#usually i draw in paint tool sai v2 so#twas fun to be messier with it#i've also been alright just really tired lately sorry bout that
576 notes
·
View notes
Note
hello again!
i was wondering what program and brush/s you use for your art mainly, your are is incredible and i’ve just always been wondering
hiya! (and 🥺🙏thank you)
program: paint tool sai v2 (def not the cracked ver ofc 👀💦)
my main brushes: (hopefully you can read these i kno it's a lil small)

i really just use these 3 brushes for the most part! as for textured brushes i like to use halftone textures and i think i used these screen tones! you gotta play around with the settings see what fits your ✨artistic vision✨ best 🤓
15 notes
·
View notes
Text
Bulk part recoloring for Picrew: a guide

Hi! Some of my friends asked me about this and I figured I'd make a tumblr post instead of writing it all in a discord message never to be seen again.
This guide covers how i personally quickly recolor parts for my own picrews, to use with picrew creator's bulk uploading tool. This likely isn't going to work for everyone, especially since I rely on Clip Studio Paint very heavily.
Using this tutorial will give you the files you need to bulk upload with picrew creator a bit faster than if you were to recolor everything by hand. Especially if doing a bunch of parts and colors.
Tutorial under the cut!
What you'll need
Clip studio paint (or another art program with animation features that lets you export each frame to a separate layer. I only will be showing CSP however)
Your artwork. Each color needs to be on a separate layer. (Sorry for those who like to paint everything on the same layer! This won't work for you)
(optional, if on windows) https://www.bulkrenameutility.co.uk/ to speed up one specific step
Let's do this
1) open the animation timeline, with CSP pro you can do 24 parts at a time due to the frame limit, which is still plenty to speed the process up.
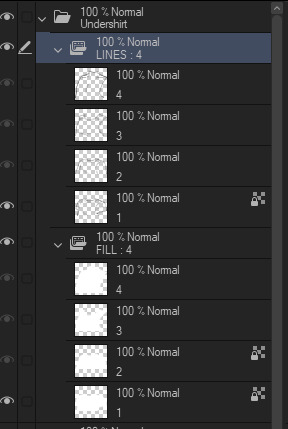
2) say you're doing the shirts like i did. make an animation folder for the shirt fill color, as well as the lineart. if you have any more layers that are recolored with the same color each time, make an animation folder for those as well (so say, shadows. or secondary colors)
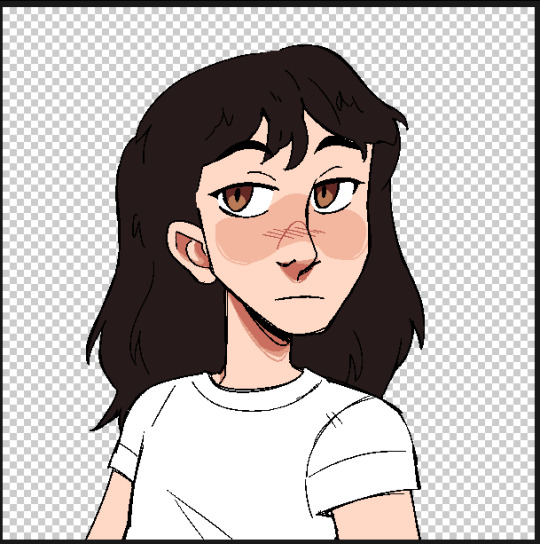
3) put each individual shirt part in it's own animation cell. make sure the frames for each part line up. you'll want to be able to go through the timeline with each shirt on a separate frame
Your layers should end up looking somewhat similar to this

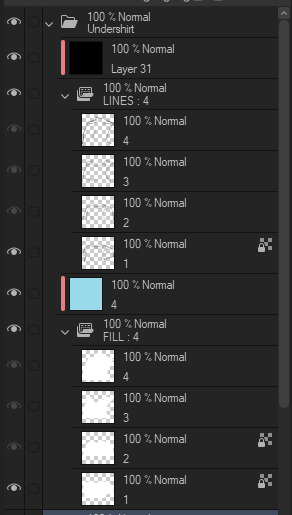
4) now for recoloring: clip a layer to each animation folder. so clip one to the shirt fill folder for instance. fill that entire layer up with the color you want that part to be. Check the frames in your animation again, now every part should be recolored with the colors in the clipped layer.
Your layers should now look something like this
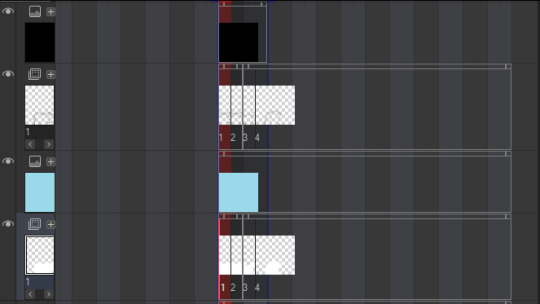

5) Shorten the timeline so only frames with an actual item in them are included. (Otherwise you'll end up with a bunch of blank images later that you're not going to do anything with)
6) Hide every layer other than the animation folders and their clipped layers. So only the part is visible. Go through your frames one more time to make sure they look alright and nothing is out of place.
7) Time to export! Go to file -> export animation -> image sequence (you might want to set a shortcut for this so you don't have to go through 3 menus haha).
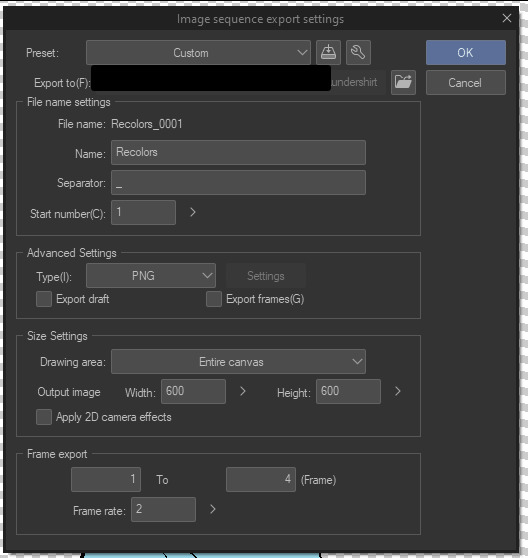
Make sure you're exporting to the correct folder. Set file name settings to anything you like, but make sure the start number is 1 (there might be exceptions to this, I'll go over that later). Set the image type to PNG, make sure the canvas size is correct and that the framerate lines up with your timeline's framerate.

8) Export it! You should have some files in your folder that look like this now. We'll want to rename them to just 1.png, 2.png... etc.

9) You can rename them by hand, but this is rather slow to do each time and I'm lazy. So here's how you rename them in the bulk rename utility. Open your folder in there, and then copy the settings I have here.


Yes, this is EXTREMELY overwhelming. I know. The first box (RegEx) is the only one you'll need to touch. Set the Match field to something like "Recolors_0{0,3}". Replace "Recolors_" with whatever your files start with. Also check the v2 box.
Replace can be left empty, since we're essentially removing anything that matches the regex (which is a text pattern matching syntax. We're essentially matching "Recolors_" with up to 3 zeros after it)
Select all the files in the top panel, then hit Rename in the bottom right! It should rename everything to just 1.png, 2.png... etc in one go.
10) Go to your part page in picrew. Make sure your colors are set up and you have created the amount of parts you'll need. Go to the Bulk Upload tab (there's a link in the top right).
11) Select the color you're uploading, then select the files you're uploading. Make sure the filenames match with your part ID numbers. This is important. 1.png Will match the first part, 2.png will match the second. Note how I said ID numbers, not the display order.
This means in the exporting step, you might need to change the starting number of your files. If you messed this up since you didn't read the tutorial in full before following it (I get it. I've been there before), just export and rename again.

12) If everything looks good and you got your files previewing no problem, hit upload, then wait a few seconds while picrew uploads your files.

13) YOU DID IT!!! You successfully added a recolor for your parts. Now go back to your file in CSP and fill each clipping layer up with a different color. You can now repeat the process from step 7. (export, rename and upload) to upload all parts for the other colors.
How much time does this actually save?
I never timed myself, but from experience, once you have set everything up and get the hang of it. It's pretty damn fast! Granted it does take a bit of set-up to get working. It gets more efficient the more parts you recolor at once.
I'll often go ahead and recolor the next color while the previous color is still uploading. Usually a single color only takes me a minute max to create and upload, instead of several minutes recoloring every single layer and saving each file separately.
For bulk rename utility, I set it to allow overwriting files. Which means I keep every color in the same folder and just overwrite the files whenever I rename. It's the fastest for me and saves me some storage space on my PC as well. Just make sure to click out of and then back into the folder to reload the files in there.
Hopefully this should help someone! Creating your own picrew is a daunting task and this made it a little easier for me at least ^^
#picrew#picrew tutorial#picrew guide#image maker#my picrew#the example picrew im showing isn't out yet. it's still in the early stages#idk if it'll ever be finished#i'll reblog this post + make a separate post on my blog if it does tho!
26 notes
·
View notes
Text

Nimue is a Naiad, and one of Shayoko & Aitsu's mothers.
4-5hr speed paint, Paint Tool Sai v2, Huion H610PRO V2 Tablet.
#felart#nimue#naiad#speed paint#digital art#felsjustart#water nymph#artists on tumblr#digital arwork#digital drawing#digital artist#dnd character#digital aritst
12 notes
·
View notes
Note
hihi! i only recently just found out u were on tumblr so i wanted to ask what drawing software do u use + what brush do u use for most ur art? (PS LOVE UR ENA CONTENT!!)
I used to use paint tool sai v2, now i use clip studio paint pro, i usually just use the mechanical pencil tool at size 3 or 4 and a paper texture attached to it. Idk how much difference that makes
Thank you!
33 notes
·
View notes
Text

randal sketch that I made in ibis paint. I usually draw on graphic tablet in Paint tool sai v2 , but on this time I was like, at dinner with another family that friends with my family. So I drew that, while they were talking. It took me , like , 35 minutes I guess. I showed that to my mom and then to my brother, and my brother snatched the phone to show to all this family... It was embarrassing. But at least they complimented and said "So colorful! I like the color palette" . thanks
24 notes
·
View notes
Note
I don't know how much appreci8tion you get, but I just wanted to say that very few are doing it like you. you really seem to understand vriska, and the commitment to posting so frequently must be alot. thank you for the vriskas, and I hope you are doing well
this is one of the nicest messages i've ever gotten. pretty much the only way i can tell if my work has touched people is through tags, so you going out of your way to message me directly means a lot. i do think about vriska every day that i post, so . . . i BETTER understand her at this point tbh. i've been doing better lately---generally the more digital art i post, the less stress/more time i have. hopefully i can get back on the digital horse in the coming months (yeehaw) anyway.

Ophelie et Narcisse (2023), Mod 8, Paint Tool Sai v2
#vriska serket#daily vriska serket#homestuck#mod 8#vriska#daily vriska#vriska homestuck#homestuck vriska#is this too pretentious idc#more vrika with water symbolism TODAY
118 notes
·
View notes
Text
A little pup I drew just now while stoned. hehe

#yautja#yautjalover#predator franchise#predator#baby yautja#infant yautja#yautja pup#yautja pups#my art#paint tool sai v2
110 notes
·
View notes
Text

Heya, welcome to my Blog! I'm Erinn! A Digital Artist, Story Creator and Graphic Design student. Below you will find important information about my content and me, feel free to check it out! <3
── ✦₊˚.⋆☾⋆⁺₊✧:
ABOUT ME:
✦ Pronouns: She/Her ✦ Age: 19 years old (19/6) ✦ Nationality: Brazilian ✦ Languages: ENG (main in here) and PT-BR ✦ COMMS: Only BRL ✦ Drawing Program: Paint Tool SAI V2
INTERESTS:
💙 SONIC THE HEDGEHOG 💙, MLP, MCSM, HADES (the game), KLK, Undertale, South Park, FNAF, FNF, Barbie, My Candy Love, original stories, Games, Comic's, OC'S, Shipps, Cat's, Moons, Art, spider-man (andrew garfield), DC, miraculous lb. ✦ More in the FAQ! (coming soon)
MY ARTWORK:
✦ All My Art ✦ Sonic Next Gen AU ✦ Sonic Human AU ✦ Dell!Verse (original story) (coming soon) ✦ Spirit!Line (original story) (coming soon)
SOCIAL MEDIAS:
✦ Bluesky (for Sonic content) ✦ Bluesky (My art in general) ✦ Twitter (for Sonic content) ✦ Tiktok ✦ Instagram ✦ Youtube (for art) ✦ My Carrd
SOME THINGS...
hate speech, pr0-shippers, negative/sensitive topics and anything else along those lines are NOT ACCEPTED here.
── ✦₊˚.⋆☾⋆⁺₊✧:
Thank you very much for reading! More updates coming soon~ ;)
#pinned info#introduction post#blog intro#about me#meet artist!#my random things#my persona#Erinn Fernandez#d3lly1000
4 notes
·
View notes
Text
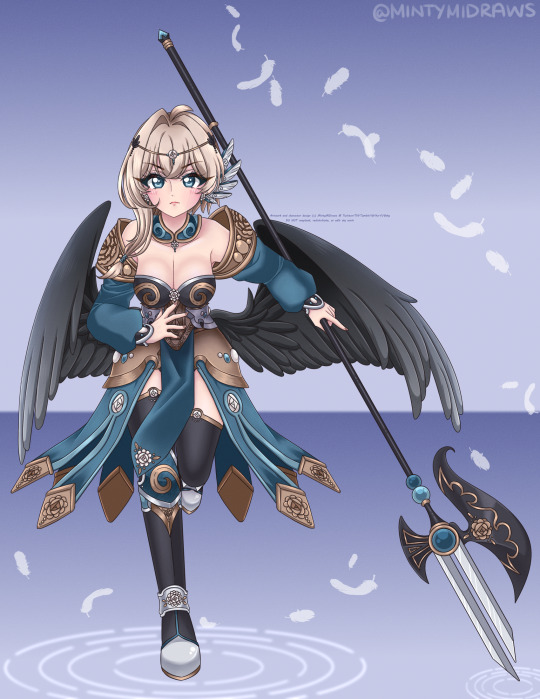
Finally done with this omg OTL THIS TOOK ME SO LONG AAAAAAAA
Feathers were added in using a brush in Clip Studio Paint. The rest was drawn and colored in Easy Paint Tool SAI v2.
#art#artists on tumblr#character art#digital art#my art#artwork#anime art#fantasy art#fantasy#armor#halberd#feathers#wings
9 notes
·
View notes
Note
Hiya!! I love your art!!!
What art program do you use and what device? I love your style and I wanna get good at realistic animal bodies, any tips?
hi! thank you! i've mentioned it before but i use paint tool sai v2 (though for my older stuff it was paint tool sai v1), basically anything with a pencil/binary pen. photoshop works too, i use a portable cs6 version. i use a huion kamvas gt-191 v2 screen tablet, but have had a couple of wacom tablets before that; i'm able to pretty much use most tablets. still working on mouse drawing though lmao
for learning realistic animal bodies one thing you can do is practice by tracing photos, then try draw it again next to that once you've got your crappy irl photo lines, like 90% of the time the traced lines will look super wonky but it gives you better shapes to look at when trying to draw them right
19 notes
·
View notes
Note
Hi!!! I just recently discovered your art and I’m in love!
I started using CSP as well and was wondering do you have brush recommendations? :0 I hope that’s ok to ask!
hey thank you!!! i DO in fact have some brush recs!!
now, they are photoshop brushes technically but they can be used in CSP (some of them can get a bit wonky though if you size them up too big but its easy enough to work around) but i absolutely think the kyle webster megapack is an essential. unfortunately all his brushes got locked up behind adobe a few years ago, but if you happen to have an adobe account you have easy access to the megapack and more by him! if not... well... i may or may not have my copy of the .abr file that i got years and years ago before adobe made it exclusive that i could discreetly push your way shhhh
other than that i also recommend Jay Chen's brush pack for if your going for that pretty vis-dev feel, as well as d0ttie!tones halftone brushes on the CSP assets site (both of which should be free!) ill put some links here
good luck to you and make some kickass art!!
17 notes
·
View notes