#PHOTOSHOP LOAD FASTER PLS
Text
i NEED to know what these italian companies are paying jannik for him to do all these absolute wack ads
19 notes
·
View notes
Text
Color finesse 3 dll

#COLOR FINESSE 3 DLL FOR MAC#
#COLOR FINESSE 3 DLL ZIP FILE#
#COLOR FINESSE 3 DLL PRO#
#COLOR FINESSE 3 DLL SOFTWARE#
Whether you’re working in Mari’s powerful node graph or layer system, you can freely mix paint with procedurals, filters, color correction and masks. Description Color Finesse 3 gives you the high-end color correction and.
#COLOR FINESSE 3 DLL ZIP FILE#
An attacker can craft a zip file to load an arbitrary dll and execute code. Description Program name: DLL SuiteSoftware Version: 9.Official website. Choose from a selection of preset brushes or work with familiar ABR Photoshop brushes, and finesse your painting with non-destructive tech 3D painting has never been more fluid or flexible. CVE-2022-31268, A Path Traversal vulnerability in Gitblit 1.9.3 can lead to. Mari’s intuitive brush toolkit and projection painting let you forget about technology and focus on your creativity. Enjoy a faster, more satisfying 3D painting experience in Mari 3.3, thanks to several optimizations: faster shader recompilation reduces the lag between painting or layer editing and viewing the final shader colorspace transformations can now be run on the GPU for significantly faster exporting and optimized texture management allows you to work with higher levels of complexity without hitting graphics capacity limits. This is a 3D painting without limits, combining the power and performance to handle even the most complex assets with artist-friendly 3D paint tools that make the most of your creativity. You will be prompted to enter your name and organization, and also given the opportunity to register with us (Synthetic. PDA, CCITT Group 3 and Group 4 compressed files, and 16-bit TIF color and. The bundle id for this app is Color Finesse 3. In several respects, Personal Librarian still lacks finesse compared with. The application lies within Business Tools, more precisely Project Management. This Mac application is an intellectual property of Synthetic Aperture.
#COLOR FINESSE 3 DLL FOR MAC#
Color Finesse 3 also handles QuickTime movies and image sequences and supports image formats from bitmap to jpeg.The Foundry Mari v3.3 latest + Crack is available for download at Softasm. As others have noted, the version of Color Finesse 3 included with AE CS6 is installed by the standard Adobe CS6 installer and automatically serializes itself, so there is no need for a separate CF serial number. The 3.0.10 version of SA Color Finesse 3 HD+ Trial for Mac was provided as a freeload on our website.
#COLOR FINESSE 3 DLL PRO#
From the standalone application you can import projects from Final Cut Pro or create your own. The Color Finesse 3 stand-alone application is designed to do one thing and one thing only and that’s to provide its users with the best possible color correction tool possible.
#COLOR FINESSE 3 DLL SOFTWARE#
This is a handy feature when using video editing software with limited color correction built-in. This plugin provides you with access to color correction tools right from within the hosting application in addition to the Color Finesse interface. The Color Finesse 3 Plugin is functional with most major editing programs such as Premiere Pro, After Effects, Final Cute Pro and a few other hosts. A progress bar shows you how long it will take to remove Color Finesse Pl. Windows XP: Click the Remove or Change/Remove tab (to the right of the program). Using the best tool for the job always leads to the best results. When you find the program Color Finesse Pl, click it, and then do one of the following: Windows Vista/7/8/10: Click Uninstall. Synthetic Aperture’s Color Finesse 3 allows you to have control over the look, color, and mood of your photos and images easy, fast, and on point. Your settings will even carry on through application to plugin and back. Color Finesse, 3 being cross-platform, means that it works on multiple operating systems on anything from multi-processor work stations to laptops, all without needing specified video cards or more than one monitor. The Standalone program offers improved project management, workflow and video handling. However, unlike the standalone program, the plug-in version is limited by host application restrictions. Synthetic Aperture Color Finesse 3 is available as a plug-in for your favorite program like Premiere Pro, After Effects, Motion or Final Cut Pro or as an Independent Standalone Application.
0 notes
Photo
i finally decided to take the time & do a heavily requested gif tutorial! this will be very detailed & is how i make every single one of my gifs from start to finish! i’ll also include resources for ps downloads, actions, etc. if you have any questions, don’t be afraid to ask! & if this helps you, pls rb!!
TUTORIAL UNDER THE CUT!
i’m going to break it down into sections to hopefully make it easier to understand!
1. software i use
2. hq movie/tv show/video downloads
3. screencaps
4. importing screencaps into photoshop
5. cropping
6. actions/sharpening/gaussian blur
7. image sizing
8. time delay
9. coloring
10. saving
1. software i use
photoshop - i use photoshop cc 2020 on my macbook air but any version of photoshop with video timeline/frame timeline will work for creating gifs! i pay for my photoshop but i know there are ways to get it for free. if you don’t want to/can’t pay for photoshop, here (x, x, x, x) are some links to download it without paying!
mplayer osx extended - this is the software i use for my screencaps. there are a lot of software’s out there & i think it truly comes down to preference. i’m just more familiar with mplayer & the screencaps come out really smooth in my opinion. it’s free as well & here is a link to download it!
2. hq movie/tv show/video downloads
ok so i’ll be real, i never used t*rrents until recently & i’ve personally noticed a huge difference when it comes to quality. before using them, i was using files from MEGA & if you’re not comfortable with t*rrents, i would definitely recommend MEGA links! when it comes to downloading any videos, try to make sure they are 1080p or 2160p if available! 720p is also ok but always try to get 1080p. also i’ve found that with movies, 1080p Blu-ray versions look better but again, it’s all about preference!
t*rrents - i only use one t*rrent site which is r*rbg. they have a huge variety of tv shows & movies from what i can tell.
MEGA - MEGA is really nice for people that aren’t comfortable with t*rrents. the way i used to use MEGA was, i followed accounts on twitter that would upload MEGA links to tv shows. here (x, x, x, x, x, x) are some of the accounts that post a wide variety of links to MEGA downloads! i will say, the only downside to MEGA links is that they seem to take longer to download & you can cap out at a certain amount of GB each day.
folx - i use this to download stuff from r*rbg! download this before you try to download anything from r*rbg. its free to use & there are multiple sites you can download this software from but i’ll link a few right here (x, x, x this one is a link directly from the apple store but it costs $15.00). if you don’t want to download from any of those links, you can just simply look up ‘folx mac/windows download’ in google!
4k video downloader - i use this to download videos from youtube! it’s free as well & you can download it here!
3. screencaps
once you’ve downloaded a movie or tv show or whatever you want to gif, open whichever screencap software you’re using & start playing the video. for mplayer osx extended, to screencap you just go to the scene you want to gif, pause the video, & hold down shift + command + S on mac (i think it’s the same for windows i’m not sure).
4. importing screenshots into photoshop
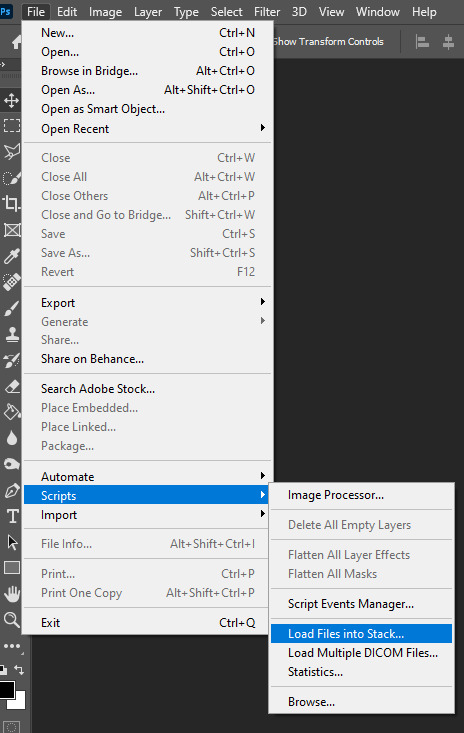
now that you’ve got the screencaps of the scene you want to gif, it’s time to open photoshop! to upload the screencaps, in photoshop go up in the lefthand corner to file > scripts > load files into stack. once you click on that, you’ll click ‘browse’ over to the right & the files on your computer will pop up. go to wherever you saved your screenshots & select all of them! once you’re done selecting them, hit ‘open’ in the bottom right corner.
5. cropping
now all of your screencaps are imported!!! now it’s time to crop the screencaps. go to the crop icon over to the left.

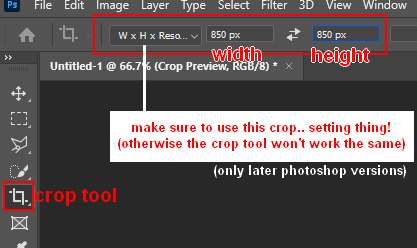
for this gif, i want dimensions to be 540 x 350, so i go up top & type it in
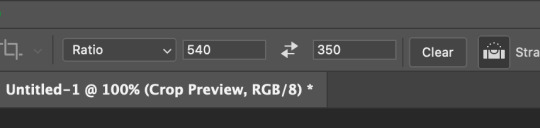
great! now the gif will look like this:
6. actions/sharpening/gaussian blur
now that the gif is cropped, we’re going to sharpen it. i use actions because they are so much faster & easier. i use the action that kylos uses in her giffing tutorial & the direct link to download the action is right here! to access actions, you can either go to window > actions or go over to the play button to the right that looks like this:
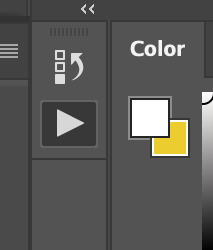
when you hit that play button, you will see the actions that you have downloaded pop up! select where it says ‘select here!’ & then go down to the play button at the bottom to play the action. i circled both steps down below

the default radius in this action is 0.3 & i normally change it to 0.4 (it’ll normally pop up & ask you like shown below & just change it to 0.4!)

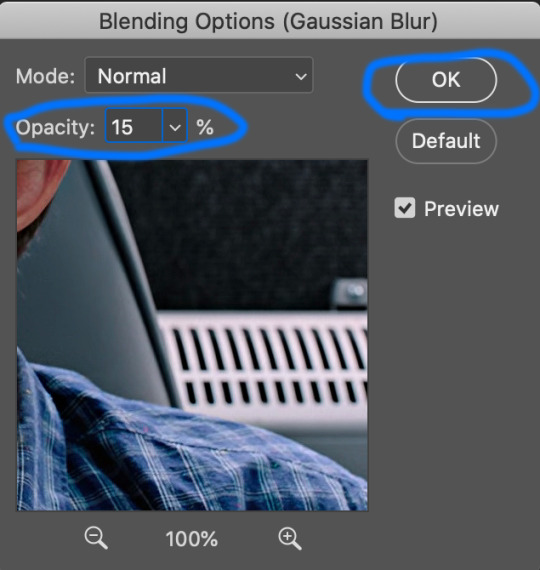
now the action has been played!! i add an extra step but it’s optional! what i do next is i add a layer of gaussian blur on top of the action. to do that, go to filter > blur > gaussian blur. once you select that, it’ll have a pop up that looks like the one below & you’ll just select ok or hit the enter button

once you do that, you’ll notice your gif looks soft or not sharpened so the next step is to change the percentage of the gaussian blur layer you just applied. to do this, you go to the bottom right corner & hold down option by clicking on the gaussian blur layer. there will be options that pop up & you’ll select ‘edit smart filter blending options’ like shown below (my handwriting looks like a five-year-olds ik)

another pop up will show up in the middle of the screen & you’ll be able to select which percentage you want to place on your gif. the opacity really depends on the gif but i normally do 10%-30%. for a lot of my gifs recently i’ve applied 15% which is what i did on this gif! once you change the opacity to whatever you want, hit ok!
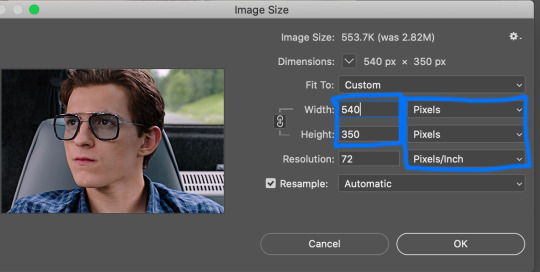
after that you want to change the image size to the same size you cropped the gif to. to do this, you’ll go to image > image size > & change it to 540 x 350 (or whatever the size of your gif is! also make sure it’s switched to pixels instead of inches! once you’ve done that hit ‘ok’ or press enter.
once that’s done, go ahead & save the gif! to do this, go to file > export > save for web (legacy). it’ll show you the size of the gif down in the bottom left & as long as it’s under 10mb you’ll be fine!!! down below i circled my save settings as well! also its SUPER IMPORTANT THAT YOU SET LOOPING OPTIONS TO FOREVER! once you’ve done all that, save your gif by hitting the ‘save...’ button down below that’s circled. you can name your gif however you like just make sure you keep the .gif after it!

now my gif looks sharper than before:

now for time delay & coloring!!!
7. time delay
open the gif you just saved in photoshop by going to file > open. once it’s opened, you’ll see a timeline of all the frames towards the bottom. it’ll likely say 0.07 sec with a small little downward arrow next to it. select the downward arrow & select other. change the speed from ‘0.07′ to ‘0.05′! gifs look much better & more natural at this speed. (also yes i did delete a few frames because i felt it was too long so to delete frames you just select the ones you want to delete & click the trash button down by the scroller!)

8. coloring
coloring can be so much fun but so tricky! i personally use a base psd that i made for all of my gifs & then adjust it according to the gif i’m coloring but for this gif i colored it from scratch! so for most of my gifs i only color/edit them using levels, selective color, brightness/contrast, curves, color balance, & vibrance (in that order) to access these, go to layer > new adjustment layer > & then select whichever one you want to start with.
1. levels

2. selective color
blacks: black +2
reds: cyan -9, magenta +1, yellow -3
cyan: cyan +100

3. brightness/contrast
brightness: 5
contrast: 6

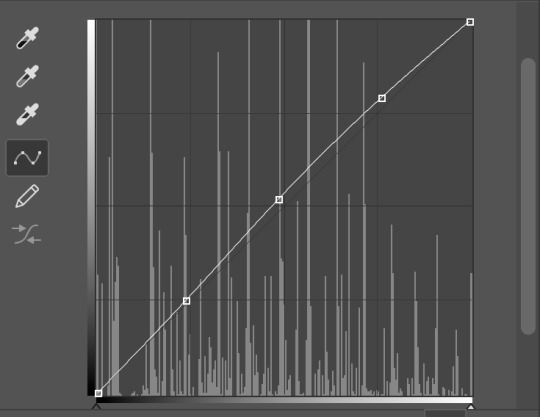
4. curves

5. vibrance
vibrance: +16
saturation: 0

then you save it just like earlier by going to file > export > save for web (legacy) & you’re all set!!!! i hope this helps anyone who is trying to get into gif making & if you have any questions, don’t be afraid to reach out!!!!
#this is so long i apologize#gif tutorial#allresources#resources#completeresources#quirkyresources#my tutorial#photoshop
606 notes
·
View notes
Text
how I make my gifs: a tutorial
Hi everyone! Just in case someone asks in the future + for those curious, I'm here with a tutorial on how I make gifs! If you have any questions whatsoever, please do send me an ask! I’ll be glad to help! The gif I made with this tutorial is the one right here!
So... let’s start this tutorial with the programs I use.
Adobe Photoshop 2020
- To make the gifs, majority of the work is done in this program.
TopazLabs (Topaz DeNoise 6 and Topaz Clean 3)
- To "denoise" and "clean" the gifs, as the names would suggest.
Links for download: Topaz DeNoise 6 & Topaz Clean 3
KMPlayer (an alternative would be PotPlayer, or any other video playing program that allows you to capture the frames)
- To capture the frames.
- I use an older version of KMPlayer, though I don't know which exact version that is.
Now let’s continue onto how I use these programs to create gifs!
Step 1: After you’ve downloaded the necessary programs, download your video. The way to get the best gifs? Quality videos. That’s the first step. For K-pop performances, I recommend this website (the hq files are in .ts form, KMPlayer should be able to open these). Bookmark it! It’s really handy :) Get the video you want to make a gif from and open it in KMPlayer (or PotPlayer or any other program, but for this tutorial I’ll use KMPlayer). Open your video in said program and look for the part you want to make a gif of. Then press CTRL+G (I apologize because I cannot for the life of me remember if this was a standard shortcut or not)
Step 2: After pressing CTRL+G, you’ll be met with this screen:

I’ll briefly explain the numbered parts, but before that, these are my standard settings and just make sure you have them all the same and it should be good!
1: This is where your captured frames will be extracted to. I have them extracted to the standard folder, but you can change this if you want to. You’ll need this folder later when opening the frames!
2: Like it says, this is the image format. I use PNG in the highest quality, as the name would suggest, for the quality.
3: These are the amount of frames the program captures. Say you put in every 2 or 4 frames, you’ll get more choppy gifs. To get the smoothest gifs, put “every frame” (this in turn will increase the gif size as the amount of frames will obviously be bigger).
Once you’ve put in the correct settings and you’ve put the slider where you want the capturing process to start, press “start” (now, before you do this I recommend putting the video on mute as the audio will start to get kinda demon-y the longer you record lol save your ears pls). Then, when you’ve captured all the frames you need, pause the video, press CTRL+G again and click “stop” and close the pop-up/program.
Step 3: It’s time to open up Photoshop! Then go to File > Scripts > Load Files into Stack... (for older versions/another version I used in the past this one didn’t work and I had to use the “Load Multiple DICOM Files...” instead. It should work similarly though, if I remember correctly).
You then get a little pop-up that looks like this:
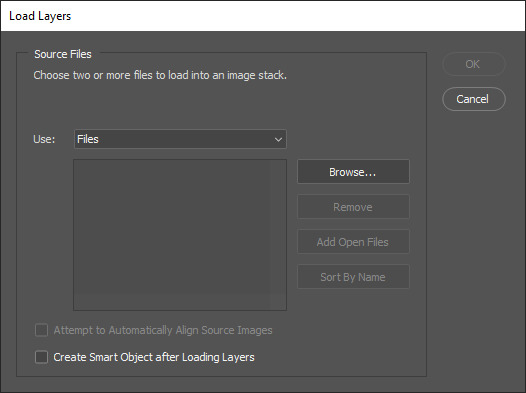
All you have to do here is click “browse” and navigate to the folder where your captured frames have been saved in. Select all the frames you need, wait for them to load in and then click “OK”!
Step 4: Depending on the amount of frames you’ve selected to load in, as well as the beefiness of your PC/laptop, the frames loading part might take a little while. Photoshop is importing every frame as a separate layer into one file, so just... grab a drink or something and wait a bit! When you’re done waiting, if you haven’t already, go to Window > Timeline. This will show you the animation timeline. For older Photoshop versions this is slightly different (I believe it’s called animation). Then click “Create Video Timeline” and click the 3 squares on the left bottom side (in older versions it’s on the right bottom side, not sure).
Step 5: After you’ve done all that, you’ll want to select all your layers. You can do this by pressing ALT+CTRL+A or going to Select > All Layers. With all the layers selected, you have to go to Layer > Arrange > Reverse. You only have to do this if you used the “Load Files into Stack” option!
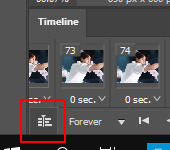
Step 6: After reversing all your layers, you’ll want to go to the three lines you see in the following screenshot, and click “Make Frames From Layers”.
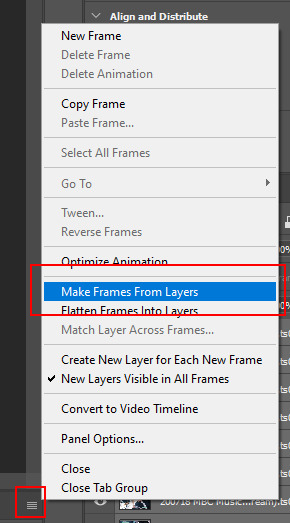
As the name suggests, this turns all the layers into frames. I don’t know why but the first frame will always be 5 seconds long, so to make it easy on yourself when you want to check your gif while editing, just put that on 0 for now. You can do that by clicking the seconds under the frame and clicking “No delay”. After this, check to see if you have the right frames and if you need to delete some (you can do this at any point in the process but I didn’t know where to put it in the tutorial oops).
Step 7: Time to crop the gif to the correct size! For this gif I’m using as an example, I’m making it specifically for Twitter, so the sizes aren’t that obvious (for Twitter I usually use a width of 850 px to keep it sharp, for long size gifs (more height than width for example), I add a background so that it eventually still becomes 850x850 pixels). There’s many posts on Tumblr about the correct sizes for gif/photosets, but a brief rundown of my most used sizes: one gif spanning the entire width of the post has to be 540 px in width. Two gifs next to one another need to have a width of 268 px. I use these dimensions the most! For others, you can Google!
Step 8: After you’ve cropped the gif, you can do either of two things: either you first add the coloring of your choice and then sharpen the gif OR you do it the other way around. I usually switch these two around depending on how sharp the gif already looks before sharpening because I can’t stand looking at 2 pixels while coloring (lmao). For this one I’ll do the sharpening first.
The whole sharpening process is actually quite simple but you need to make sure that you do the following little steps in the right order or else it won’t work! Select all the layers (CTRL+ALT+A or Select > All Layers) and then click this little thingy:
Then you’re going to Filter > Convert for Smart Filters
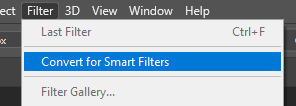
If you don’t do it in this order, your gif will end up... well, not being a gif and not moving. If that happens, track back in your history to see if you did it in the correct order! :)
Step 9: The actual sharpening process! After clicking the “Convert for Smart Filters”, you’ll want to go to Filter again and find the Topaz Labs tabs. Personally, I usually do it in the order of DeNoise first and then Clean, but this is a personal thing, really.
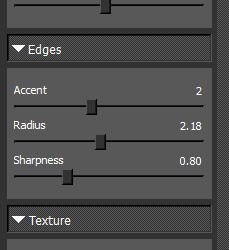
I recommend playing around with the settings to see what fits the gif but here are my go-to DeNoise settings (tip: save these as a preset so you only have to click that for faster giffing!):
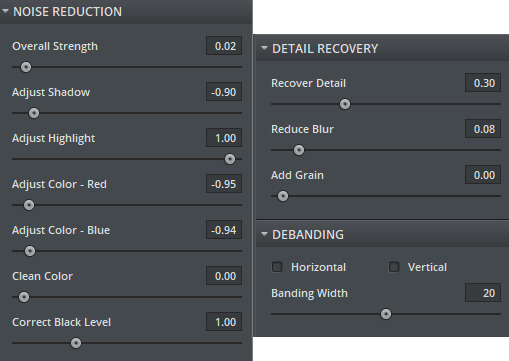
And my Clean settings:
Press OK when you’re done with these and then go to Filter > Sharpen > Smart Sharpen. These are my SS settings (just copy these, and again, save as a preset!):

Depending on how sharp you want the gif to be, you can input the same settings or go to this in the layers and change the percentage.
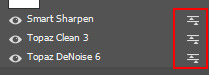
Now that we’re done with these... it’s time to flatten it! Just follow these little steps:
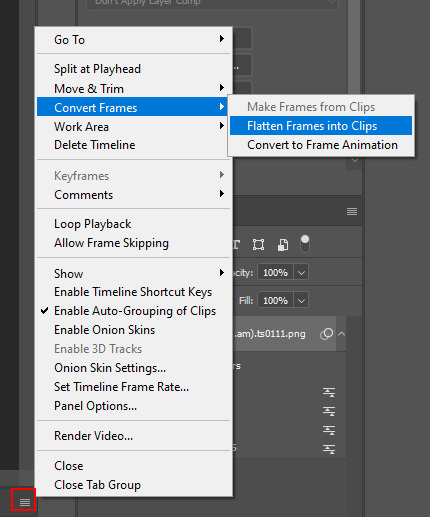
And then you wait. Again. I know.
Step 10: After playing the waiting game, you’ll click the three little squares again and do the same thing you did earlier: “Make Frames Into Layers”. Delete the first frame. Add a coloring of your choice (can be a PSD, can be your own coloring, etc. this is honestly just... playing around with things and see what it can do). After you’ve done coloring, select all your frames (same lines as previous screenshot except now you’ll see a “Select All Frames” option, click it!) and change the time to whatever you like (I usually go for 0.05, 0.06, or 0.07. Again, just play around with this!! Try different things!)
Step 11: Final step! Saving :) I use shortcuts a lot to make things faster so either press ALT+SHIFT+CTRL+S or go to File > Export > Save For Web. Not much to do here, just copy the following settings and save the file!
!!! NOTE: After making a new gif today I realized there’s a weird dotted border on the top of my gifs, it’s a bit difficult to explain but I had no idea what it was. Turns out that the reason why this showed up was because, as shown in the screenshot below, I had “Transparency” selected. If you’re experiencing this too, UNSELECT the transparency and it should be all good!
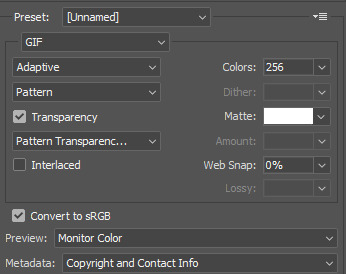
Also make sure that the “Looping Options” is set to Forever, or else your gif will play only once and then stop!
Tip: While making gifs for Twitter I at one point noticed that if I added in a white background, no matter what I’d do, it’d show up as yellow-y in the preview box. After googling I found that going to the options (1 in the screenshot) and then clicking “Sort by Luminance”, then double-clicking the lightest color (not the transparent one, 2 in the screenshot) and selecting white (or FFF) will get rid of this! This likely won’t be that useful for Tumblr gifs but just in case you ever want to have a white background...!

Then just... save, and upload to Tumblr! :)
Final note: Tumblr has a mix gif size of 3MB. If you have a gifset of 4 gifs you want to upload, all 4 gifs can be max 3MB each. Keep this in mind! If you’re over 3MB, delete a few frames and try again, or resize/crop your gif!
As it turns out, Tumblr has increased their gif size to 8MB, however, the quality tends to get compressed with larger gifs like that so per recommendation: keep them below 5MB! (thank you @yeoli for letting me know!)
I hope this helped! If you have any questions, feel free to send me a message and I’ll try my best to answer them.
75 notes
·
View notes
Text
o fuck i messed up juyeon’s gif
0 notes
Last Seen Blogs

chicagograpes
Grapevine Spectrum

greenafrica
Green Africa

colab2018-blog
Come Back Home

kmindzeducationjaipur
kmindz education

soniagreat-blog
GREAT