#OV5640 sensor
Explore tagged Tumblr posts
Video
youtube
5MP OV5640 sensor MIPI/DVP camera module test video. Auto focus and fixe...
#youtube#OV5640 sensor#DVP camera module DVP camera module#DVP camera module#mipi camera module#auto focus camera module
1 note
·
View note
Text
The OV5640 is a high-resolution camera module from OmniVision Technologies, commonly used in applications that require detailed imaging. It has 5MP pixels, a frame rate of up to 30 fps, a MIPI output interface, a field of view (D) of 100°, manual focus, a removable lens, special features such as high dynamic range (HDR), back-illuminated sensor technology (OmniBSI+), low-light performance, and reduced motion artifacts. Thanks to the shape of this module, it is often used in security cameras, surveillance systems, automotive inspections, etc.
0 notes
Video
youtube
SincereFirst 5MP OV5640 Imaging Sensor Wide Angle 160° FF DVP Camera Module
0 notes
Video
youtube
SincereFirst CMOS OV5640 Imaging Sensor 5MP Camera Module
0 notes
Video
youtube
SincereFirst CMOS OV5640 Imaging Sensor 5MP Camera Module
0 notes
Text
El Librem 5 lucirá hermoso con GNOME 3.30 asegura Purism
Purism continúa hablando sobre el desarrollo de su próximo teléfono con sistema operativo Linux Librem 5 que llegará a las calles en enero de 2019.
El equipo de desarrollo detrás del teléfono enfocado en privacidad y seguridad, Librem 5, no ha tenido vacaciones y está trabajando día y noche para lanzar el teléfono con Linux que todos los fanáticos del software libre han soñado.
googletag.cmd.push(function() { googletag.display('div-gpt-ad-1456225598129-3'); });
En un reporte reciente, Purism ha mencionado que el Librem 5 lucirá hermoso gracias a un nuevo paquete de iconos creado por su equipo de diseño exclusivamente para el próximo entorno grafico GNOME 3.30.
GNOME 3.30 se encuentra actualmente en fase beta, pero será lanzado de forma oficial el próximo 5 de septiembre. Aparte del nuevo estilo en iconos que Purism usará en Librem 5, GNOME 3.30 tendrá muchas mejoras y novedades.
La interfaz de usuario basada en GNOME para el Librem 5 usará la siguiente generación del servidor grafico Wayland y no tendrá soporte para aplicaciones X11. Potenciado por PureOS, sistema basado en Debian, el teléfono Linux Librem 5 llegará al principio con aplicaciones básicas para hacer llamadas, enviar textos y navegar internet.
googletag.cmd.push(function() { googletag.display('div-gpt-ad-1495016988643-3'); });
Mientras que Purism continúa trabajando con el fabricante potencial de las tarjetas de Librem 5, muchas de las cosas ya han sido pactadas y aquellos que reserven el dispositivo recibirán un kit que contiene EmCraft’s i.MX 8M System-On-Module (SoM), una pantalla de 5.7 pulgadas LCD con resolución de 720×1440 pixeles, así como el modem SIMCom 7100A or SIMCom 7100E para las bandas de Estados Unidos o Europa.
Adicionalmente, la tarjeta de desarrollo del Librem 5 tendrá un módulo Wi-Fi y Bluetooth Redpine RS9116 M.2 que soporta bandas de 2.4 GHz y 5 GHz para Wi-Fi, pero no 802.11ac y un chip Omnivision OV5640 CMOS que funciona como sensor de imagen para la cámara. Los kits, que se enviarán pronto, están pensados para los desarrolladores que quieran comenzar a desarrollar aplicaciones para el Librem 5.
El artículo El Librem 5 lucirá hermoso con GNOME 3.30 asegura Purism ha sido originalmente publicado en Linux Adictos.
Fuente: Linux Adictos https://www.linuxadictos.com/el-librem-5-lucira-hermoso-con-gnome-3-30-asegura-purism.html
0 notes
Text
Starting with OpenCV on i.MX 6 Processors
Introduction
As the saying goes, a picture is worth a thousand words. It is indeed true to some extent: a picture can hold information about objects, environment, text, people, age and situations, among other information. It can also be extended to video, that can be interpreted as a series of pictures and thus holds motion information.
This might be a good hint as to why computer vision (CV) has been a field of study that is expanding its boundaries every day. But then we come to the question: what is computer vision? It is the ability to extract meaning from an image, or a series of images. It is not to be confused with digital imaging neither image processing, which are the production of an input image and the application of mathematical operations to images, respectively. Indeed, they are both required to make CV possible.
But what might be somehow trivial to human beings, such as reading or recognizing people, is not always true when talking about computers interpreting images. Although nowadays there are many well known applications such as face detection in digital cameras and even face recognition in some systems, or optical character recognition (OCR) for book scanners and license plate reading in traffic monitoring systems, these are fields that nearly didn't exist 15 years ago in people's daily lives. Self-driving cars going from controlled environments to the streets are a good measure of how cutting-edge this technology is, and one of the enablers of CV is the advancement of computing power in smaller packages.
Being so, this blog post is an introduction to the use of computer vision in embedded systems, by employing the OpenCV 2.4 and 3.1 versions in Computer on Modules (CoMs) equipped with NXP i.MX 6 processors. The CoMs chosen were the Colibri and Apalis families from Toradex.
OpenCV stands for Open Source Computer Vision Library, which is a set of libraries that contain several hundreds of computer vision related algorithms. It has a modular structure, divided in a core library and several others such as image processing module, video analysis module and user interface capabilities module, among others.
Considerations about OpenCV, i.MX 6 processors and the Toradex modules
OpenCV is a set of libraries that computes mathematical operations on the CPU by default. It has support for multicore processing by using a few external libraries such as OpenMP (Open Multi-processing) and TBB (Threading Building Blocks). This blog post will not go deeper into comparing the implementation aspects of the choices available, but the performance of a specific application might change with different libraries.
Regarding support for the NEON floating-point unit coprocessor, the release of OpenCV 3.0 states that approximately 40 functions have been accelerated and a new HAL (hardware abstraction layer) provides an easy way to create NEON-optimized code, which is a good way to enhance performance in many ARM embedded systems. I didn't dive deep into it, but if you like to see under the hood, having a look at the OpenCV source-code (1, 2) might be interesting.
This blog post will present how to use OpenCV 2.4 and also OpenCV 3.1 - this was decided because there might be readers with legacy applications that want to use the older version. It is a good opportunity for you to compare performance between versions and have a hint about the NEON optimizations gains.
The i.MX 6 single/dual lite SoC has graphics GPU (GC880) which supports OpenGL ES, while the i.MX 6 dual/quad SoC, has 3D graphics GPU (GC2000) which supports OpenGL ES and also OpenCL Embedded Profile, but not the Full Profile. The i.MX 6 also has 2D GPU (GC320), IPU and, for the dual/quad version, vector GPU (GC335), but this blog post will not discuss the possibility of using these hardware capabilities with OpenCV - it suffices to say that OpenCV source-code does not support them by default, therefore a considerable amount of effort would be required to take advantage of the i.MX 6 hardware specifics.
While OpenCL is a general purpose GPU programming language, its use is not the target of this blog post. OpenGL is an API for rendering 2D and 3D graphics on the GPU, and therefore is not meant for general purpose computing, although some experiments (1) have demonstrated that it is possible to use OpenGL ES for general purpose image processing, and there is even an application-note by NXP for those interested. If you would like to use GPU accelerated OpenCV out-of-the-box, Toradex has a module that supports CUDA – the Apalis TK1. See this blog post for more details.
Despite all the hardware capabilities available and possibly usable to gain performance, according to this presentation, the optimization of OpenCV source-code focusing only software and the NEON co-processor could yield a performance enhancement of 2-3x for algorithm and another 3-4x NEON optimizations.
The Images 1 and 2 present, respectively, the Colibri iMX6DL + Colibri Evaluation Board and the Apalis iMX6Q + Apalis Evaluation Board, both with supply, debug UART, ethernet, USB camera and VGA display cables plugged in.
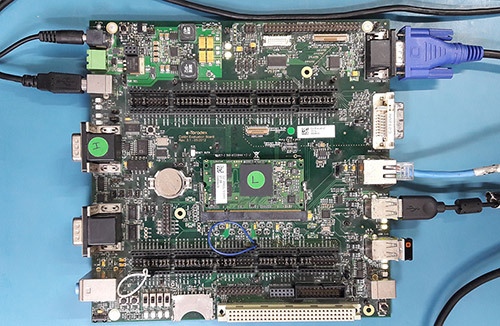
Colibri iMX6DL Colibri Evaluation Board setup
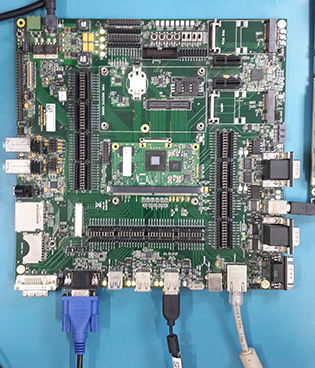
Apalis iMX6Q Apalis Evaluation Board setup
It is important to notice that different USB camera models had a performance offset, and that the camera employed in this blog post is a generic consumer camera – the driver was listed as “Aveo Technology Corp”. There are also professional cameras in the market, USB or not, such as the solutions provided by Basler AG, that are meant for embedded solutions when going to develop a real-world solution.
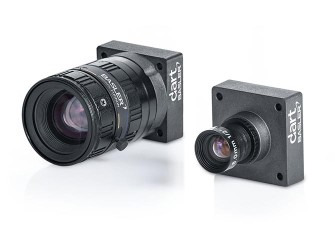
Professional camera from Basler AG
In addition, Toradex has the CSI Camera Module 5MP OV5640. It is an add-on board for the Apalis computer-on-module which uses MIPI-CSI Interface. It uses the OmniVision OV5640 camera sensor with built-in auto-focus. The OV5640 image sensor is a low voltage, high-performance, 1/4-inch 5 megapixel CMOS image sensor that provides the full functionality of a single chip 5 megapixel (2592x1944) camera. The CSI Camera Module 5MP OV5640 can be connected to the MIPI-CSI connector on the Ixora carrier board V1.1 using a 24 way 0.5mm pitch FFC cable.

Toradex CSI Camera Module 5MP OV5640
At the end of this blog post, a summary of the instructions to install OpenCV and deploy applications to the target is provided.
Building Linux image with OpenCV
Images for the OpenCV 2.4 and 3.1 are built with OpenEmbedded. You may follow this article to set up your host machine. The first step required is to install the system prerequisites for OpenEmbedded. Below an example is given for Ubuntu 16.04 - for other versions of Ubuntu and Fedora, please refer to the article link above:
sudo dpkg --add-architecture i386 sudo apt-get update sudo apt-get install g++-5-multilib sudo apt-get install curl dosfstools gawk g++-multilib gcc-multilib lib32z1-dev libcrypto++9v5:i386 libcrypto++-dev:i386 liblzo2-dev:i386 libstdc++-5-dev:i386 libusb-1.0-0:i386 libusb-1.0-0-dev:i386 uuid-dev:i386 cd /usr/lib; sudo ln -s libcrypto++.so.9.0.0 libcryptopp.so.6
The repo utility must also be installed, to fetch the various git repositories required to build the images:
mkdir ~/bin export PATH=~/bin:$PATH curl http://commondatastorage.googleapis.com/git-repo-downloads/repo > ~/bin/repo chmod a+x ~/bin/repo
Let's build the images with OpenCV 2.4 and 3.1 in different directories. If you are interested in only one version, some steps might be omitted. A directory to share the content downloaded by OpenEmbedded will also be created:
cd mkdir oe-core-opencv2.4 oe-core-opencv3.1 oe-core-downloads cd oe-core-opencv2.4 repo init -u http://git.toradex.com/toradex-bsp-platform.git -b LinuxImageV2.6.1 repo sync cd ../oe-core-opencv3.1 repo init -u http://git.toradex.com/toradex-bsp-platform.git -b LinuxImageV2.7 repo sync
OpenCV 2.4
OpenCV 2.4 will be included in the Toradex base image V2.6.1. Skip this section and go to the OpenCV3.1 if you are not interested in this version. The recipe included by
default uses the version 2.4.11 and has no support for multicore processing included.
Remove the append present in the meta-fsl-arm and the append present in the meta-toradex-demos:
rm layers/meta-fsl-arm/openembedded-layer/recipes-support/opencv/opencv_2.4.bbappend rm layers/meta-toradex-demos/recipes-support/opencv/opencv_2.4.bbappend
Let's create an append to use the version 2.4.13.2 (latest version so far) and add TBB as the framework to take advantage of multiple cores. Enter the oe-core-opencv2.4 directory:
cd oe-core-opencv2.4
Let's create an append in the meta-toradex-demos layer (layers/meta-toradex-demos/recipes-support/opencv/opencv_2.4.bbappend) with the following content:
gedit layers/meta-toradex-demos/recipes-support/opencv/opencv_2.4.bbappend ------------------------------------------------------------------------------------- SRCREV = "d7504ecaed716172806d932f91b65e2ef9bc9990" SRC_URI = "git://github.com/opencv/opencv.git;branch=2.4" PV = "2.4.13.2+git${SRCPV}" PACKAGECONFIG += " tbb" PACKAGECONFIG[tbb] = "-DWITH_TBB=ON,-DWITH_TBB=OFF,tbb,"
Alternatively, OpenMP could be used instead of TBB:
gedit layers/meta-toradex-demos/recipes-support/opencv/opencv_2.4.bbappend ------------------------------------------------------------------------------------- SRCREV = "d7504ecaed716172806d932f91b65e2ef9bc9990" SRC_URI = "git://github.com/opencv/opencv.git;branch=2.4" PV = "2.4.13.2+git${SRCPV}" EXTRA_OECMAKE += " -DWITH_OPENMP=ON"
Set up the environment before configuring the machine and adding support for OpenCV. Source the export script that is inside the oe-core-opencv2.4 directory:
. export
You will automatically enter the build directory. Edit the conf/local.conf file to modify and/or add the variables below:
gedit conf/local.conf ------------------------------------------------------------------------------- MACHINE ?= "apalis-imx6" # or colibri-imx6 depending on the CoM you have # Use the previously created folder for shared downloads, e.g. DL_DIR ?= "/home/user/oe-core-downloads" ACCEPT_FSL_EULA = "1" # libgomp is optional if you use TBB IMAGE_INSTALL_append = " opencv opencv-samples libgomp"
After that you can build the image, which takes a while:
bitbake –k angstrom-lxde-image
OpenCV 3.1
OpenCV 3.1 will be included in the Toradex base image V2.7. This recipe, different from the 2.4, already has TBB support included. Still, a compiler flag must be added or the compiling process will fail. Enter the oe-core-opencv3.1 directory:
cd oe-core-opencv3.1
Create a recipe append (layers/meta-openembedded/meta-oe/recipes-support/opencv/opencv_3.1.bb) with the following contents:
gedit layers/meta-toradex-demos/recipes-support/opencv/opencv_3.1.bbappend ------------------------------------------------------------------------------------- CXXFLAGS += " -Wa,-mimplicit-it=thumb"
Alternatively, OpenMP could be used instead of TBB. If you want to do it, create the bbappend with the following contents:
gedit layers/meta-toradex-demos/recipes-support/opencv/opencv_3.1.bbappend ------------------------------------------------------------------------------------- CXXFLAGS_armv7a += " -Wa,-mimplicit-it=thumb" PACKAGECONFIG_remove = "tbb" EXTRA_OECMAKE += " -DWITH_OPENMP=ON"
Set up the environment before configuring the machine and adding support for OpenCV. Source the export script that is inside the oe-core-opencv3.1 directory:
. export
You will automatically enter the build directory. Edit the conf/local.conf file to modify and/or add the variables below:
gedit conf/local.conf ------------------------------------------------------------------------------- MACHINE ?= "apalis-imx6" # or colibri-imx6 depending on the CoM you have # Use the previously created folder for shared downloads, e.g. DL_DIR ?= "/home/user/oe-core-downloads" ACCEPT_FSL_EULA = "1" # libgomp is optional if you use TBB IMAGE_INSTALL_append = " opencv libgomp"
After that you can build the image, which will take a while:
bitbake –k angstrom-lxde-image
Update the module
The images for both OpenCV versions will be found in the oe-core-opencv<version>/deploy/images/<board_name> directory, under the name <board_name>_LinuxImage<image_version>_<date>.tar.bz2. Copy the compressed image to some project directory in your computer, if you want. An example is given below for Apalis iMX6 with OpenCV 2.4, built in 2017/01/26:
cd /home/user/oe-core-opencv2.4/deploy/images/apalis-imx6/ cp Apalis_iMX6_LinuxImageV2.6.1_20170126.tar.bz2 /home/root/myProjectDir cd /home/root/myProjectDir
Please follow this article's instructions to update your module.
Generating SDK
To generate an SDK, that will be used to cross-compile applications, run the following command:
bitbake –c populate_sdk angstrom-lxde-image
After the process is complete, you will find the SDK under /deploy/sdk. Run the script to install – you will be prompted to chose an installation path:
./angstrom-glibc-x86_64-armv7at2hf-vfp-neon-v2015.12-toolchain.sh Angstrom SDK installer version nodistro.0 ========================================= Enter target directory for SDK (default: /usr/local/oecore-x86_64):
In the next steps it will be assumed that you are using the following SDK directories: For OpenCV 2.4: /usr/local/oecore-opencv2_4 For OpenCV 3.1: /usr/local/oecore-opencv3_1
Preparing for cross-compilation
After the installation is complete, you can use the SDK to compile your applications. In order to generate the Makefiles, CMake was employed. If you don't have CMake, install it:
sudo apt-get install cmake
Create a file named CMakeLists.txt inside your project folder, with the content below. Please make sure that the sysroot name inside your SDK folder is the same as the one in the script (e.g. armv7at2hf-vfp-neon-angstrom-linux-gnueabi):
cd ~ mkdir my_project gedit CMakeLists.txt -------------------------------------------------------------------------------- cmake_minimum_required(VERSION 2.8) project( MyProject ) set(CMAKE_RUNTIME_OUTPUT_DIRECTORY "${CMAKE_BINARY_DIR}/bin") add_executable( myApp src/myApp.cpp ) if(OCVV EQUAL 2_4) message(STATUS "OpenCV version required: ${OCVV}") SET(CMAKE_PREFIX_PATH /usr/local/oecore-opencv${OCVV}/sysroots/armv7at2hf-vfp-neon-angstrom-linux-gnueabi) elseif(OCVV EQUAL 3_1) message(STATUS "OpenCV version required: ${OCVV}") SET(CMAKE_PREFIX_PATH /usr/local/oecore-opencv${OCVV}/sysroots/armv7at2hf-neon-angstrom-linux-gnueabi) else() message(FATAL_ERROR "OpenCV version needs to be passed. Make sure it matches your SDK version. Use -DOCVV=<version>, currently supported 2_4 and 3_1. E.g. -DOCVV=3_1") endif() SET(OpenCV_DIR ${CMAKE_PREFIX_PATH}/usr/lib/cmake/OpenCV) find_package( OpenCV REQUIRED ) include_directories( ${OPENCV_INCLUDE_DIRS} ) target_link_libraries( myApp ${OPENCV_LIBRARIES} )
It is also needed to have a CMake file to point where are the includes and libraries. For that we will create one CMake script inside each SDK sysroot. Let's first do it for the 2.4 version:
cd /usr/local/oecore-opencv2_4/sysroots/armv7at2hf-vfp-neon-angstrom-linux-gnueabi/usr/lib/cmake mkdir OpenCV gedit OpenCV/OpenCVConfig.cmake ----------------------------------------------------------------------------------- set(OPENCV_FOUND TRUE) get_filename_component(_opencv_rootdir ${CMAKE_CURRENT_LIST_DIR}/../../../ ABSOLUTE) set(OPENCV_VERSION_MAJOR 2) set(OPENCV_VERSION_MINOR 4) set(OPENCV_VERSION 2.4) set(OPENCV_VERSION_STRING "2.4") set(OPENCV_INCLUDE_DIR ${_opencv_rootdir}/include) set(OPENCV_LIBRARY_DIR ${_opencv_rootdir}/lib) set(OPENCV_LIBRARY -L${OPENCV_LIBRARY_DIR} -lopencv_calib3d -lopencv_contrib -lopencv_core -lopencv_features2d -lopencv_flann -lopencv_gpu -lopencv_highgui -lopencv_imgproc -lopencv_legacy -lopencv_ml -lopencv_nonfree -lopencv_objdetect -lopencv_ocl -lopencv_photo -lopencv_stitching -lopencv_superres -lopencv_video -lopencv_videostab) if(OPENCV_FOUND) set( OPENCV_LIBRARIES ${OPENCV_LIBRARY} ) set( OPENCV_INCLUDE_DIRS ${OPENCV_INCLUDE_DIR} ) endif() mark_as_advanced(OPENCV_INCLUDE_DIRS OPENCV_LIBRARIES)
The same must be done for the 3.1 version - notice that the libraries change from OpenCV 2 to OpenCV 3:
cd /usr/local/oecore-opencv3_1/sysroots/armv7at2hf-vfp-neon-angstrom-linux-gnueabi/usr/lib/cmake mkdir OpenCV gedit OpenCV/OpenCVConfig.cmake ----------------------------------------------------------------------------------- set(OPENCV_FOUND TRUE) get_filename_component(_opencv_rootdir ${CMAKE_CURRENT_LIST_DIR}/../../../ ABSOLUTE) set(OPENCV_VERSION_MAJOR 3) set(OPENCV_VERSION_MINOR 1) set(OPENCV_VERSION 3.1) set(OPENCV_VERSION_STRING "3.1") set(OPENCV_INCLUDE_DIR ${_opencv_rootdir}/include) set(OPENCV_LIBRARY_DIR ${_opencv_rootdir}/lib) set(OPENCV_LIBRARY -L${OPENCV_LIBRARY_DIR} -lopencv_aruco -lopencv_bgsegm -lopencv_bioinspired -lopencv_calib3d -lopencv_ccalib -lopencv_core -lopencv_datasets -lopencv_dnn -lopencv_dpm -lopencv_face -lopencv_features2d -lopencv_flann -lopencv_fuzzy -lopencv_highgui -lopencv_imgcodecs -lopencv_imgproc -lopencv_line_descriptor -lopencv_ml -lopencv_objdetect -lopencv_optflow -lopencv_photo -lopencv_plot -lopencv_reg -lopencv_rgbd -lopencv_saliency -lopencv_shape -lopencv_stereo -lopencv_stitching -lopencv_structured_light -lopencv_superres -lopencv_surface_matching -lopencv_text -lopencv_tracking -lopencv_videoio -lopencv_video -lopencv_videostab -lopencv_xfeatures2d -lopencv_ximgproc -lopencv_xobjdetect -lopencv_xphoto) if(OPENCV_FOUND) set( OPENCV_LIBRARIES ${OPENCV_LIBRARY} ) set( OPENCV_INCLUDE_DIRS ${OPENCV_INCLUDE_DIR} ) endif() mark_as_advanced(OPENCV_INCLUDE_DIRS OPENCV_LIBRARIES)
After that, return to the project folder. You must export the SDK variables and run the CMake script:
# For OpenCV 2.4 source /usr/local/oecore-opencv2_4/environment-setup-armv7at2hf-vfp-neon-angstrom-linux-gnueabi cmake -DOCVV=2_4 . # For OpenCV 3.1 source /usr/local/oecore-opencv3_1/environment-setup-armv7at2hf-neon-angstrom-linux-gnueabi cmake –DOCVV=3_1 .
Cross-compiling and deploying
To test the cross-compilation environment, let's build a hello-world application that reads an image from a file and displays the image on a screen. This code is essentially the same as the one from this OpenCV tutorial:
mkdir src gedit src/myApp.cpp --------------------------------------------------------------------------------- #include #include <opencv2/opencv.hpp> using namespace std; using namespace cv; int main(int argc, char** argv ){ cout << "OpenCV version: " << CV_MAJOR_VERSION << '.' << CV_MINOR_VERSION << "\n"; if ( argc != 2 ){ cout << "usage: ./myApp \n"; return -1; } Mat image; image = imread( argv[1], 1 ); if ( !image.data ){ cout << "No image data \n"; return -1; } bitwise_not(image, image); namedWindow("Display Image", WINDOW_AUTOSIZE ); imshow("Display Image", image); waitKey(0); return 0; }
To compile and deploy, follow the instructions below. The board must have access to the LAN – you may plug an ethernet cable or use a WiFi-USB adapter, for instance. To find out the ip, use the ifconfig command.
make scp bin/myApp root@<board-IP>/home/root # Also copy some image to test! scp <path-to-image>/myimage.jpg root@<board-IP>:/home/root
In the embedded system, run the application:
root@colibri-imx6:~# ./myApp
You must see the image on the screen, as in Image 3:
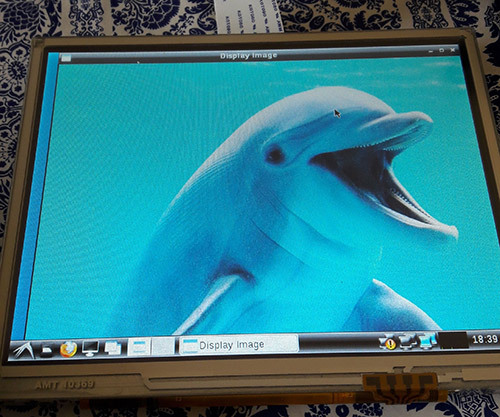
Hello World application
Reading from camera
In this section, a code that reads from the camera and processes the input using the Canny edge detection algorithm will be tested. It is just one out of many algorithms already implemented in OpenCV. By the way, OpenCV has a comprehensive documentation, with tutorials, examples and library references.
In the Linux OS, when a camera device is attached, it can be accessed from the filesystem. The device is mounted in the /dev directory. Let's check the directory contents of Apalis iMX6 before plugging the USB camera:
root@apalis-imx6:~# ls /dev/video* /dev/video0 /dev/video1 /dev/video16 /dev/video17 /dev/video18 /dev/video19 /dev/video2 /dev/video20
And after plugging in:
root@apalis-imx6:~# ls /dev/video* /dev/video0 /dev/video1 /dev/video16 /dev/video17 /dev/video18 /dev/video19 /dev/video2 /dev/video20 /dev/video3
Notice that it is listed as /dev/video3. It can be confirmed using the video4linux2 command-line utility (run v4l2-ctl –help for details):
root@apalis-imx6:~# v4l2-ctl --list-devices [ 3846.876041] ERROR: v4l2 capture: slave not found! V4L2_CID_HUE [ 3846.881940] ERROR: v4l2 capture: slave not found! V4L2_CID_HUE [ 3846.887923] ERROR: v4l2 capture: slave not found! V4L2_CID_HUE DISP4 BG ():[ 3846.897425] ERROR: v4l2 capture: slave not found! V4L2_CID_HUE /dev/video16 /dev/video17 /dev/video18 /dev/video19 /dev/video20 UVC Camera (046d:081b) (usb-ci_hdrc.1-1.1.3): /dev/video3 Failed to open /dev/video0: Resource temporarily unavailable
It is also possible to get the input device parameters. Notice that the webcam used in all the tests has a resolution of 640x480 pixels.
root@apalis-imx6:~# v4l2-ctl -V --device=/dev/video3 Format Video Capture: Width/Height : 640/480 Pixel Format : 'YUYV' Field : None Bytes per Line: 1280 Size Image : 614400 Colorspace : SRGB
In addition, since all of the video interfaces are abstracted by the Linux kernel, if you were using the CSI Camera Module 5MP OV5640 from Toradex, it would be listed as another video interface. On Apalis iMX6 the kernel drivers are loaded by default. For more information, please check this knowledge-base article.
Going to the code, the OpeCV object that does the camera handling, VideoCapture, accepts the camera index (which is 3 for our /dev/video3 example) or -1 to autodetect the camera device.
An infinite loop processes the video frame by frame. Our example applies the filters conversion to gray scale -> Gaussian blur -> Canny and then sends the processed image to the video output. The code is presented below:
#include #include #include <opencv2/core/core.hpp> #include <opencv2/imgproc/imgproc.hpp> #include <opencv2/highgui/highgui.hpp> using namespace std; using namespace cv; int main(int argc, char** argv ){ cout << "OpenCV version: " << CV_MAJOR_VERSION << '.' << CV_MINOR_VERSION << '\n'; VideoCapture cap(-1); // searches for video device if(!cap.isOpened()){ cout << "Video device could not be opened\n"; return -1; } Mat edges; namedWindow("edges",1); double t_ini, fps; for(; ; ){ t_ini = (double)getTickCount(); // Image processing Mat frame; cap >> frame; // get a new frame from camera cvtColor(frame, edges, COLOR_BGR2GRAY); GaussianBlur(edges, edges, Size(7,7), 1.5, 1.5); Canny(edges, edges, 0, 30, 3); // Display image and calculate current FPS imshow("edges", edges); if(waitKey(30) >= 0) break; fps = getTickFrequency()/((double)getTickCount() - t_ini); cout << "Current fps: " << fps << '\r' << flush; } return 0; }
Image 4 presents the result. Notice that neighter the blur nor the Canny algorithms parameters were tuned.
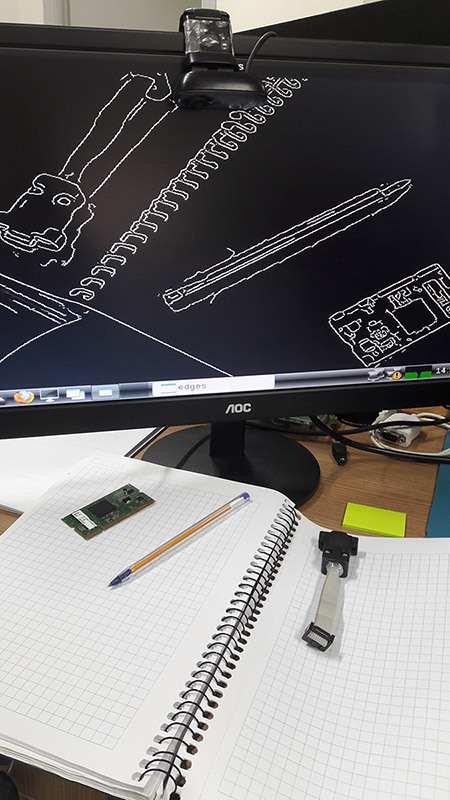
Capture from USB camera being processed with Canny edge detection
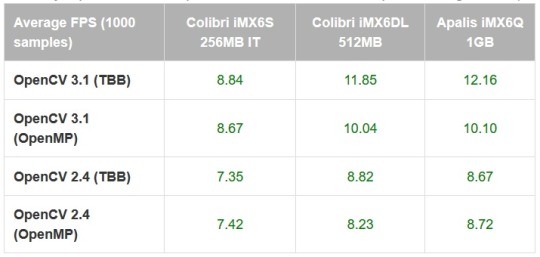
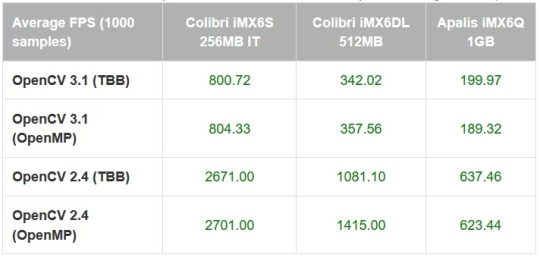
In order to compare between the Colibri iMX6S and iMX6DL and be assured that multicore processing is being done, the average FPS for 1000 samples was measured, and is presented in table 1. It was also done for the Apalis iMX6Q with the Apalis Heatsink. All of the tests had frequency scaling disabled.
Table 1 – Canny implementation comparison between modules and OpenCV configurations (640x480)
As a comparison, the Canny algorithm was replaced in the code with the Sobel derivatives, based on this example. The results are presented in table 2:
Table 2 – Sobel implementation comparison between modules and OpenCV configurations (640x480)
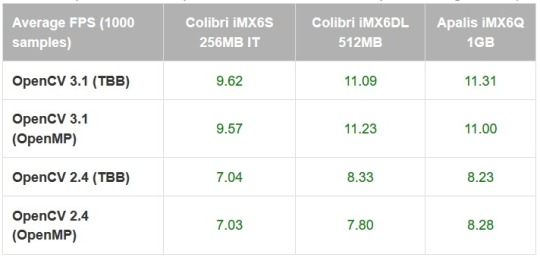
It is interesting to notice that using the TBB framework may be slightly faster than OpenMP in most of the situations, but not always. It is interesting to notice that there is a small performance difference even for the single-core results.
Also, the enhancements made from OpenCV 2.4 to OpenCV 3.1 have a significant impact in the applications performance – which might be explained by the NEON optimizations made so far, and also an incentive to try to optimize the algorithms that your application requires. Based on this preliminary results, it is interesting to test a specific application with several optimization combinations and using only the latest OpenCV version before deploying.
Testing an OpenCV face-tracking sample
There is also a face-tracking sample in the OpenCV source-code that was tested, since it is heavier than the previously made tests and might provide a better performance awareness regarding Colibri x Apalis when choosing the more appropriate hardware for your project.
The first step was to copy the application source-code from GitHub and replace the contents of myApp.cpp, or create another file and modify the CMake script if you prefer. You will also need the Haar cascades provided for face and eye recognition. You might as well clone the whole OpenCV git directory and later test other samples.
A few changes must be made in the source-code so it also works for OpenCV2.4: include the stdio.h library, modify the OpenCV included libraries (take a look in the new headers layout section here) and make some changes to the CommandLineParser, since the versions from OpenCV 2 and 3 are not compatible. Image 5 presents the application running:
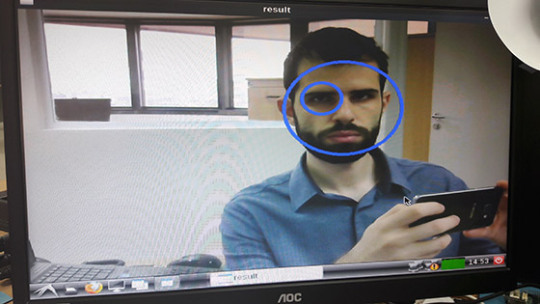
Face and eye tracking application
The code already prints the time it takes to run a face detection. Table 3, presented below, holds the results for 100 samples:
Table 3 – Face detection comparison between modules and OpenCV configurations (640x480)
Again the difference between OpenCV versions is not negligible - for the Apalis iMX6Q (quad-core) the performance gain is 3x, and using OpenCV 3.1 with the dual-core Colibri iMX6DL delivers a better performance than OpenCV 2.4 with the quad-core Apalis iMX6Q.
The single-core IT version, thus with reduced clock compared to the others, has results far behind as expected. The reduced clock may explain why the performance improvement from single to dual core is higher than dual to quad core.
Conclusion
Since OpenCV is nowadays (probably) the most popular set of libraries for computer vision, and with the enhancement of performance in embedded systems, knowing how to start with OpenCV for embedded applications provides a powerful tool to solve problems of nowadays and the near future.
This blog post has chosen a widely known family of microprocessors as an example and a starting point, be for those only studying computer vision or those already focusing on developing real-world applications. It also has demonstrated that things are only starting – see for instance the performance improvements from OpenCV 2 to 3 for ARM processors – which also points towards the need to understand the system architecture and focus on optimizing the application as much as possible – even under the hood. I hope this blog post was useful and see you next time!
Summary
1) Building image with OpenCV To build an image with OpenCV 3.1, first follow this article steps to setup OpenEmbedded for the Toradex image V2.7. Edit the OpenCV recipe from meta-openembedded, adding the following line:
CXXFLAGS += " -Wa,-mimplicit-it=thumb"
In the local.conf file uncomment your machine, accept the Freescale license and add OpenCV:
MACHINE ?= "apalis-imx6" # or colibri-imx6 depending on the CoM you have ACCEPT_FSL_EULA = "1" IMAGE_INSTALL_append = " opencv"
2) Generating SDK Then you are able to run the build, and also generate the SDK:
bitbake –k angstrom-lxde-image bitbake –c populate_sdk angstrom-lxde-image
To deploy the image to the embedded system, you may follow this article's steps.
3) Preparing for cross-compilation After you install the SDK, there will be a sysroot for the target (ARM) inside the SDK directory. Create an OpenCV directory inside <path_to_ARM_sysroot>/usr/lib/cmake and, inside this new directory create a file named OpenCVConfig.cmake with the contents presented below:
cd /usr/lib/cmake mkdir OpenCV vim OpenCVConfig.cmake --------------------------------------------------------------------------- set(OPENCV_FOUND TRUE) get_filename_component(_opencv_rootdir ${CMAKE_CURRENT_LIST_DIR}/../../../ ABSOLUTE) set(OPENCV_VERSION_MAJOR 3) set(OPENCV_VERSION_MINOR 1) set(OPENCV_VERSION 3.1) set(OPENCV_VERSION_STRING "3.1") set(OPENCV_INCLUDE_DIR ${_opencv_rootdir}/include) set(OPENCV_LIBRARY_DIR ${_opencv_rootdir}/lib) set(OPENCV_LIBRARY -L${OPENCV_LIBRARY_DIR} -lopencv_aruco -lopencv_bgsegm -lopencv_bioinspired -lopencv_calib3d -lopencv_ccalib -lopencv_core -lopencv_datasets -lopencv_dnn -lopencv_dpm -lopencv_face -lopencv_features2d -lopencv_flann -lopencv_fuzzy -lopencv_highgui -lopencv_imgcodecs -lopencv_imgproc -lopencv_line_descriptor -lopencv_ml -lopencv_objdetect -lopencv_optflow -lopencv_photo -lopencv_plot -lopencv_reg -lopencv_rgbd -lopencv_saliency -lopencv_shape -lopencv_stereo -lopencv_stitching -lopencv_structured_light -lopencv_superres -lopencv_surface_matching -lopencv_text -lopencv_tracking -lopencv_videoio -lopencv_video -lopencv_videostab -lopencv_xfeatures2d -lopencv_ximgproc -lopencv_xobjdetect -lopencv_xphoto) if(OPENCV_FOUND) set( OPENCV_LIBRARIES ${OPENCV_LIBRARY} ) set( OPENCV_INCLUDE_DIRS ${OPENCV_INCLUDE_DIR} ) endif() mark_as_advanced(OPENCV_INCLUDE_DIRS OPENCV_LIBRARIES)
Inside your project folder, create a CMake script to generate the Makefiles for cross-compilation, with the following contents:
cd vim CMakeLists.txt -------------------------------------------------------------------------------- cmake_minimum_required(VERSION 2.8) project( MyProject ) set(CMAKE_RUNTIME_OUTPUT_DIRECTORY "${CMAKE_BINARY_DIR}/bin") add_executable( myApp src/myApp.cpp ) SET(CMAKE_PREFIX_PATH /usr/local/oecore-x86_64/sysroots/armv7at2hf-neon-angstrom-linux-gnueabi) SET(OpenCV_DIR ${CMAKE_PREFIX_PATH}/usr/lib/cmake/OpenCV) find_package( OpenCV REQUIRED ) include_directories( ${OPENCV_INCLUDE_DIRS} ) target_link_libraries( myApp ${OPENCV_LIBRARIES} )
Export the SDK environment variables and after that run the CMake script. In order to do so, you may run:
source /usr/local/oecore-x86_64/environment-setup-armv7at2hf-neon-angstrom-linux-gnueabi cmake .
4) Cross-compiling and deploying Now you may create a src directory and a file named myApp.cpp inside it, where you can write a hello world application, such as this one:
mkdir src vim src/myApp.cpp -------------------------------------------------------------------------------- #include #include <opencv2/opencv.hpp> using namespace std; using namespace cv; int main(int argc, char** argv ){ Mat image; image = imread( "/home/root/myimage.jpg", 1 ); if ( !image.data ){ cout << "No image data \n"; return -1; } namedWindow("Display Image", WINDOW_AUTOSIZE ); imshow("Display Image", image); waitKey(0); return 0; }
Cross-compile and deploy to the target:
make scp bin/myApp root@<board-ip>:/home/root # Also copy some image to test! scp <path-to-image>/myimage.jpg root@<board-ip>:/home/root
In the embedded system:
root@colibri-imx6:~# ./myApp
0 notes
Text
DragonBoardâ"¢ 410c Camera Kit comes with a Autec 12V power supply.
DragonBoard™ 410c Camera Kit consists of a D3 Engineering DesignCore™ camera mezzanine board, one autofocus micro camera module with 5MP OmniVision OV5640 CMOS image sensor and Linux demonstration software. Unit offers ram size of 1GB and program memory size of 8 GB. Product features HDMI display interface. Mezzanine board comes with two MIPI CSI-2 connections and supports Snapdragon processor interfaces such as I2C, SPI, and UART. This story is related to the following: Optics & Photonics Robotics Vision Systems Search for suppliers of: Boards | Cameras from Air Conditioning /fullstory/dragonboard-410c-camera-kit-comes-with-a-autec-12v-power-supply-40007538 via http://www.rssmix.com/
0 notes
Video
youtube
OV5640 5MP MIPI Camera Module
The OV5640 is a versatile 5-megapixel camera module designed for a variety of applications, including mobile phones, digital cameras, and entertainment devices. The resolution is 5MP. The sensor type is a 1/4-inch CMOS image sensor. The interface supports MIPI CSI-2 and DVP interfaces. The image format supports RAW RGB, RGB565/555/444, YUV422/420, and JPEG compression. The field of view is D76.6°. The focal length is 3.0±5%mm. Other features include anti-shake technology, high sensitivity in low light conditions, and a built-in JPEG compression engine. This module is commonly used in digital cameras, smart security, automotive electronics, medical equipment, IoT devices, entertainment equipment, etc. It is also known for its excellent pixel performance and low-light sensitivity, making it a popular choice in the high-volume mobile market.
0 notes
Video
youtube
The OV5640 camera module is a low voltage, high-performance, 1/4-inch 5 megapixel CMOS image sensor that provides the full functionality of a single chip 5 megapixel (2592x1944) camera. The CSI Camera Module 5MP OV5640 can be connected to the MIPI-CSI connector on the Ixora carrier board V1.This camera module suitable for a variety of applications such as smart home, smart industry, document scanner, smart security, face biometric recognition, etc.
0 notes
Video
youtube
SincereFirst CMOS OV5640 Imaging Sensor 5MP Camera Module
0 notes
Video
youtube
SincereFirst CMOS OV5640 Imaging Sensor 5MP Camera Module
0 notes
Video
youtube
SincereFirst CMOS OV5640 Imaging Sensor 5MP Camera Module
0 notes
Video
youtube
SincereFirst CMOS OV5640 Imaging Sensor 5MP Camera Module
0 notes
Video
youtube
SincereFirst CMOS OV5640 Imaging Sensor 5MP Camera Module
0 notes