#NodeMCU Projects
Explore tagged Tumblr posts
Visit Tumblr Blog
Explore Tumblr blogs with no restrictions, modern design and the best experience.
Last Seen Tumblr Blogs


Fun Fact
Tumblr has been banned in Indonesia for providing people with access to pornographic content.
Text
More Innovative ideas of NodeMCU based projects for final year students
Do you want to make your NodeMCU based Projects Creatively? Our Takeoff Edu group provide best and unique projects for Final year students. It will help you to get more scores in Final exams. Here our Professionals Support students ideas and guide them to build their own projects.
For real-time monitoring and control, the NodeMCUs are located in the classroom strategically. These devices allow for automation of functions like attendance, light control, and temperature control. With NodeMCU’s Wi-Fi capacities, the information is transmitted directly to a centralized server and thus, the educators receive the information instantaneously.

This NodeMCU project not only emphasizes the technical aspects of IoT and programming but also underscores the practical applications in daily life. From energy efficiency to increased security, the Smart Home Automation System powered by NodeMCU showcases the potential of this platform to transform the way we interact with and manage our living spaces. As the project evolves, it opens doors to further innovations in IoT and serves as a testament to NodeMCU's adaptability in creating smarter, interconnected environments.
Here are the Takeoff Edu Group’s titles of NodeMCU based projects:
Mudslide Disaster Monitoring and Early Warning System Based on ESP32
Home Automation Using Google Voice Assistant
Mudslide Disaster Monitoring and Early Warning System Based on ESP32
Mudslide disasters have a great impact on mortal society, and severe mudslide disasters can beget significant casualties and property damage. In order to reduce the damage caused by natural disasters to mortal society, this paper designs a mudflow disaster monitoring and early warning system based on ESP32 module. The system uses downfall detector, fractometer, soil humidity content detector and infrasound detector to gain corresponding data. The 4G module transmits these data to the pall garcon for data processing and judgment of debris inflow threat. The reused data is displayed in the We Chat applet. The results show that the system can cover the environmental conditions of the target area from a long distance and give a more accurate early warning of mudslide disasters.
Home Automation Using Google Voice Assistant
The thing of this paper is to design a home robotization board that's both functional and aesthetically pleasing, and that can be concealed within the AC power units that are mounted on our walls. We're suitable to control all of the widgets that are linked to the board by giving it a simple voice command similar as “Okay, Google, and turn on the lights.” This will beget the lights to turn on. Because of this paper, we're suitable to control our ménage appliances online, manually, and using a timekeeper.
Takeoff Edu Group not only gives this NodeMCU based projects but also provide all kind of Projects for Final year students. It helps you to learn how to control devices like LED lights, motors, sensors, and more.
#final year projects#eee projects#engineering projects#MATLAB projects#Embedded projects#NodeMCU Projects
0 notes
Text
youtube
NodeMCU Based: 3D Printed Indoor Gauge Thermometer
Had some time this weekend and a desire to create something new and interesting, so went ahead and created an Arduino/NodeMCU based indoor dial thermometer. This device displays the temperature in degree centigrade on a D-Shaped Gauge as well as on a 7-Segment display.
In addition to that, it also saves the temperature and humidity readings in a MySQL DataBase hosted on a home based Raspberry Pi Server. The data is then displayed using the "Our Smart Home" app.
2 notes
·
View notes
Text
Exiting NodeMCU Based Projects for Academic Students

Exiting NodeMCU-Based Projects for Academic Students
#final year students projects#academic projects#engineering projects#Latest NodeMCU Projects#Trending NodeMCU Projects
0 notes
Video
youtube
Smart Waste Management System Using ESP32 | IOT BASED GARBAGE MONITORING SYSTEM | IoT Smart Dustbin : ESP32 - SIM800L - GPS Location | IoT-Based Garbage Container System Using NodeMCU | IoT Cloud Web Server Based Garbage Monitoring System Using ESP32.***********************************************************If You Want To Purchase the Full Working Project KITMail Us: [email protected] Name Along With You-Tube Video LinkWe are Located at Telangana, Hyderabad, Boduppal. Project Changes also Made according to Student Requirementshttp://svsembedded.com/ �� https://www.svskits.in/ http://svsembedded.in/ http://www.svskit.com/M1: 91 9491535690 M2: 91 7842358459 We Will Send Working Model Project KIT through DTDC / DHL / Blue Dart / First Flight Courier ServiceWe Will Provide Project Soft Data through Google Drive1. Project Abstract / Synopsis 2. Project Related Datasheets of Each Component3. Project Sample Report / Documentation4. Project Kit Circuit / Schematic Diagram 5. Project Kit Working Software Code6. Project Related Software Compilers7. Project Related Sample PPT’s8. Project Kit Photos9. Project Kit Working Video linksLatest Projects with Year Wise YouTube video Links157 Projects https://svsembedded.com/ieee_2022.php135 Projects https://svsembedded.com/ieee_2021.php 151 Projects https://svsembedded.com/ieee_2020.php103 Projects https://svsembedded.com/ieee_2019.php61 Projects https://svsembedded.com/ieee_2018.php171 Projects https://svsembedded.com/ieee_2017.php170 Projects https://svsembedded.com/ieee_2016.php67 Projects https://svsembedded.com/ieee_2015.php55 Projects https://svsembedded.com/ieee_2014.php43 Projects https://svsembedded.com/ieee_2013.php1100 Projects https://www.svskit.com/2022/02/900-pr...***********************************************************1. IoT Smart Dustbin : ESP32 - SIM800L,2. efficient iot based garbage collecting smart dustbin,3. iot based garbage monitoring using Arduino,4. IoT Based Garbage Monitoring System | ESP8266 | Arduino,5. IoT based Smart Waste Management System using Arduino,6. iot based smart dustbin project report,7. iot based garbage monitoring system project report pdf,8. smart dustbin with garbage level monitoring,9. smart garbage monitoring system using blynk,10. iot based garbage monitoring system using Arduino,11. garbage monitoring system using iot,12. iot based garbage monitoring system using arduino project report,13. smart garbage monitoring system using iot ppt,14. IoT Smart Dustbin : ESP32 - SIM800L - GPS Location | Garbage Bin Waste Monitoring System,15. Iot Based Smart Garbage Bin ,16. Smart IoT-based Waste Monitoring System,17. Smart Dustbin With GPS Location,18. IOT BASED SMART GARBAGE MONITORING SYSTEM USING NODEMCU GSM GPS ULTRASONIC,19. Smart Garbage Monitoring System using Internet of Things (IOT),20. GSM Based Smart Dustbin IOT dustbin notifications | IOT garbage monitoring | dustbin level on IOT | using Arduino,21. IoT Cloud Web server Based Garbage Monitoring System,22. DIY Smart Dustbin with garbage level monitoring | IOT based Garbage monitoring system,23. Smart Garbage Monitoring System using Internet of Things (IOT) || smart bin || BIJEN,24. GSM and GPS Based Garbage and Waste Collection Bin Overflow Management System,25. How To Make An Automatic Object Sensing Smart Dustbin - DIY Project,26. How to make Smart Dustbin with Arduino | Arduino Project,27. Top 10 IoT(Internet Of Things) Projects Of All Time | 2023,28. Smart dustbin at home using arduino | Nodemcu projects | DIY,29. HOW TO MAKE GSM BASED SMART DUSTBIN USING ARDUINO,30. Smart Garbage Collecting Truck Using Arduino, GSM, GPS and Internet of Things (IOT),31. SMART DUSTBIN for SMART CITY with SMS Alerts Using Arduino – GSM,32. SMART DUSTBIN WITH LIVE GPS TRACKING AND MONITORING SYSTEM,33. Smart Trash Bin Monitoring System,
0 notes
Text
Get nodemcu esp8266 cp2102 at Affordable Price in Ainow

Find the best cost on nodemcu esp8266 cp2102 in India. Shop now at Ainow for low prices on high-quality products for your electronics projects.
0 notes
Text
Introducing the NODEMCU MEGA WIFI R3!
Take your projects to the next level with the NODEMCU MEGA WIFI R3. This powerful development board combines the versatility of the Arduino MEGA with the connectivity of the ESP8266, making it perfect for a wide range of applications.
Integrated Design: Combines the ATmega2560 microcontroller and ESP8266 Wi-Fi IC on a single board, offering seamless integration and enhanced functionality.
High Memory Capacity: Equipped with 32Mb of flash memory, providing ample space for your complex projects.
Versatile Connectivity: Features a CH340G USB-TTL converter, ensuring reliable communication between your board and computer.
Flexible Operation: Components can be configured to work together or independently, giving you the flexibility to tailor the board to your specific needs.
Ideal for IoT Projects: Perfect for home automation, robotics, and other IoT applications, thanks to its robust Wi-Fi capabilities.
Whether you’re a hobbyist or a professional, the NODEMCU MEGA WIFI R3 is designed to meet your needs and exceed your expectations.
Product Specifications:
Microcontroller: ATmega2560
Wi-Fi IC: ESP8266
Memory: 32Mb flash
USB-TTL Converter: CH340G
Compatibility: Compatible with Arduino IDE
Unlock the full potential of your projects with the NODEMCU MEGA WIFI R3. Get yours today and start creating!
For more details or to place an order, visit our website or call us at +8801740298319.
Click here to purchase the product: https://dhakarobotics.com/.../1038-nodemcu-mega-wifi-r3.../
visit our website: https://dhakarobotics.com/

#NodeMCU#MEGAWIFI#Arduino#IoT#SmartProjects#WiFiBoard#Electronics#DIYTech#Robotics#HomeAutomation#TechGadgets#MakerCommunity#STEM#TechEnthusiast#ElectronicsHobbyist#ArduinoProjects#TechDIY#GadgetLovers#Innovation#dhakarobotics
0 notes
Text
What is NodeMCU? | Electro Global

Discover what NodeMCU is and its capabilities at Electro Global. Learn how NodeMCU boards can enhance your IoT projects with their versatility and ease of use. Access high-quality NodeMCU boards and detailed guides. Shop now to explore the potential of NodeMCU in your electronics projects
0 notes
Text
ESP8266 Wifi Module | Nodemcu ESP8266 for IoT Solution
The Internet of Things (IoT) is revolutionizing the way we interact with technology, making our lives smarter and more efficient. At the heart of this revolution is the ESP8266 WiFi module, a low-cost, powerful solution perfect for your IoT projects. Whether you're a hobbyist, a professional developer, or a business looking to integrate smart technology into your products, the ESP8266 WiFi module offers unmatched versatility and performance. Here's why you should consider buying the ESP8266 WiFi module and how the NodeMCU ESP8266 can be your gateway to a myriad of IoT solutions.
What is the ESP8266 WiFi Module?
The ESP8266 is a highly integrated chip designed for the needs of a new connected world. It offers a complete and self-contained WiFi networking solution, allowing it to either host the application or offload all WiFi networking functions from another application processor. With its low cost and high performance, the ESP8266 WiFi module has become a popular choice among IoT developers.
ESP8266 NodeMcu WiFi Development Board Features:-
It is based on ESP8266, integates GPIO, PWM, IIC, 1-Wire and ADC all in one board.
Power your developement in the fastest way combinating with NodeMCU Firmware!
USB-TTL included, plug&play
10 GPIO, every GPIO can be PWM, I2C, 1-wire
Open source IoT Platform
Easily Programmable
Low cost & Simple to Implement
WI-FI enabled
ESP8266 NodeMcu WiFi Development Board Applications:-
Home Appliances
Home Automation
Smart Plug and lights
Mesh Network
Industrial Wireless Control
Baby Monitors
IP Cameras
Sensor Networks
Wearable Electronics
Why Choose NodeMCU ESP8266 for Your IoT Projects?
Ease of Use: NodeMCU's integrated USB-to-serial interface and pre-flashed firmware allow for immediate programming and development.
Versatile Programming: You can program the NodeMCU using the Arduino IDE or NodeMCU’s native Lua scripting language, giving you flexibility in development.
Wide Community Support: As one of the most popular IoT development platforms, NodeMCU has extensive documentation and a large community, making it easier to find support and resources.
Cost-Effective: NodeMCU provides a highly cost-effective solution for IoT development, offering excellent value for money.
Rapid Prototyping: Its comprehensive feature set and ease of use make NodeMCU ideal for rapid prototyping and deployment of IoT solutions.
Conclusion
Purchase Your ESP8266 and NodeMCU ESP8266 Today!
Don't miss out on the opportunity to enhance your IoT projects with the best technology available. Purchase your ESP8266 WiFi module and NodeMCU ESP8266 development board today and join the growing community of IoT developers who are shaping the future of technology.
Innovation awaits at Campus Component, where you can buy genuine ESP8266 NodeMCU boards at competitive prices. Take the first step towards realizing your IoT dreams and explore the endless possibilities of connected devices. Order now and join the IoT revolution with Campus Component as your trusted partner.
0 notes
Text
0 notes
Text
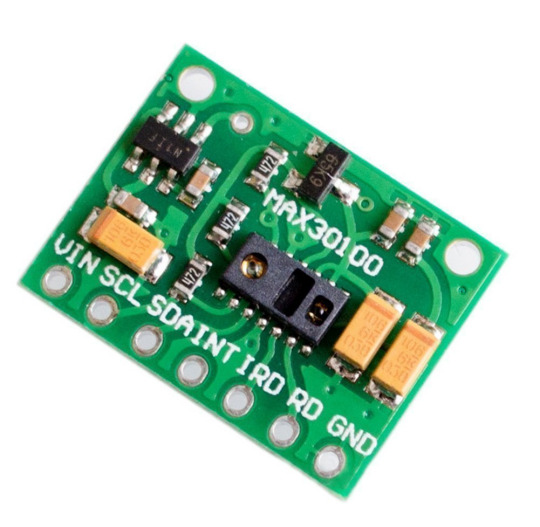
Health Monitoring Using NodeMCU and Bio-medical Non Invasive Sensors.
Today we are going to make a project that will be able to find the vitals of your body like Blood Oxygen Level , take ECG readings , find your heart rate , body temperature , environmental pressure and humidity . These parameters come in handy and is a life saviour at detecting conditions of heart and other organs in a timely manner. Wasting no time further , we will start with the important…
View On WordPress
0 notes
Text
youtube
3D Printed Arduino Halloween Décor
When the full moon is shining and the wolves are howling, it's time for Halloween's spooky spectacle. The snickering grins of jack-o'-lanterns glow from lit porches. Kids skip down the block in spooky costumes, carrying bags full of candy and shouting "Trick or Treat!". The Nightmare Before Christmas is almost here... Do you see dead people???
Alright Enough of that, in this Spooktacular video I am going to create an Arduino based 3D printed Halloween Décor. It's super easy, fun and spooky....
2 notes
·
View notes
Text
Universal HD44780 LCD interface
YALI (Yet Another LCD Interface) is an open-source project to provide a universal interface to drive the popular Hitachi HD44780 LCD controller. This module supports 3.3V and 5V MCUs and hardware development platforms, including Arduino, STM32, PIC, and ESP8266.

The hardware module of this project consists of a 74HCT08 CMOS AND gate and a 74HC595 8-bit serial-in, parallel-out shift register. This module uses the MP1540 step-up converter to power the LCD unit connected to the system. The module has the jumper to select 3.3V or 5V DC power input.

The YALI library is developed using C and is designed to be easily integrated with any C/C++ embedded toolchain. At the initial design stages, this library was successfully tested with all Arduino development boards, NodeMCU, STM32 Blue Pill, etc. The target system must have three digital output lines with 5V or 3.3V logic levels to interface with the YALI module. As mentioned earlier, this module works successfully with 5V or 3.3V power sources and logic levels.
The YALI library provides a unified API to control the HD44780 LCD controller. It has functions to handle cursor control, custom character loading, LCD backlight control, etc.
youtube
The PCBWay sponsored this project. PCBWay offers high-quality PCB manufacturing and assembling services. Also, they offer CNC and 3D printing services. The PCB of the YALI module is available to order from PCBWay. Check out the PCBWay website for its manufacturing capabilities and pricing.
The dimensions of the YALI hardware module are 69mm × 21mm. This module is designed using SMD components and can be connected directly to the LCD unit.

This project is an open-source hardware project. All its design files, BOM, schematics, and firmware source codes are available at Github.com.
The PCB design, schematic, and other design files of this project are covered with a Attribution-ShareAlike 4.0 International license. The library source code is released under the terms of the MIT license.
#LCD#HD44780#display#PIC#Arduino#MPLAB#XC8#STM32#ESP8266#LibOpenCM3#74HC595#74HTC08#MP1540#module#API#FreeRTOS#NodeMCU#Youtube
1 note
·
View note
Video
youtube
Industrial Sensor's Data Parameter Monitoring and Control System Over CAN BUS Using Arduino | Industrial Parameter Monitoring System Using CAN Bus | Monitoring and Control System for Industrial Parameters Using Can Bus | Monitoring of temperature using smart sensors | Industrial Parameter Monitoring Using CAN Protocol | Industrial Sensor's Data Parameter Monitoring and Control System Over CAN BUS Using Arduino | Industrial Parameter Monitoring System Using CAN Bus | Monitoring and Control System for Industrial Parameters Using Can Bus.***********************************************************If You Want To Purchase the Full Working Project KITMail Us: [email protected] Name Along With You-Tube Video LinkWe are Located at Telangana, Hyderabad, Boduppal. Project Changes also Made according to Student Requirementshttp://svsembedded.com/ https://www.svskits.in/ http://svsembedded.in/ http://www.svskit.com/M1: 91 9491535690 M2: 91 7842358459 We Will Send Working Model Project KIT through DTDC / DHL / Blue Dart / First Flight Courier ServiceWe Will Provide Project Soft Data through Google Drive1. Project Abstract / Synopsis 2. Project Related Datasheets of Each Component3. Project Sample Report / Documentation4. Project Kit Circuit / Schematic Diagram 5. Project Kit Working Software Code6. Project Related Software Compilers7. Project Related Sample PPT’s8. Project Kit Photos9. Project Kit Working Video linksLatest Projects with Year Wise YouTube video Links157 Projects https://svsembedded.com/ieee_2022.php135 Projects https://svsembedded.com/ieee_2021.php 151 Projects https://svsembedded.com/ieee_2020.php103 Projects https://svsembedded.com/ieee_2019.php61 Projects https://svsembedded.com/ieee_2018.php171 Projects https://svsembedded.com/ieee_2017.php170 Projects https://svsembedded.com/ieee_2016.php67 Projects https://svsembedded.com/ieee_2015.php55 Projects https://svsembedded.com/ieee_2014.php43 Projects https://svsembedded.com/ieee_2013.php1100 Projects https://www.svskit.com/2022/02/900-pr...***********************************************************1. Weather Station: DHT11 Temperature and Humidity Sensor Arduino 2.4″ TFT LCD Touch Shield - SPFD54082. Control FAN Speed and LIGHT using TV Remote3. Smart Crop Protection From Wild Animals With Alert Using Arduino | Field Sensor Monitoring with WiFi4. How to Transfer Data From One USB Hard Drive to Another USB5. IoT based Precision Agriculture6. IOT BASED SMART BLOOD BANK SYSTEM7. Blood Bags Weight Monitoring Using 2 load cells8. GSM Motor Pump controller (Mobile Motor Starter) | Automatic Mobile Starter | Mobile pump starter9. Bus Boarding System for Visually Impaired Passengers10. Design and Implementation of RFID-based Fuel Dispensing System11. Cable Fault Detection System with SMS Notification using Arduino, GSM and GPS12. 2.4'' TFT Touch Screen Restaurant Menu Ordering System Using Arduino13. IoT Based Air, Water, Noise, Dust, Humidity, Gas, CO and Temperature Monitoring System using Arduino14. IOT BASED SMART GARBAGE MONITORING SYSTEM USING NODEMCU GSM GPS ULTRASONIC15. i2c lcd with nodemcu | Interface I2C LCD Using ESP8266 NodeMCU | I2C LCD on NodeMCU With Arduino IDE16. GPS GSM Based Underground Cable Fault Detection with Arduino17. Electric Shock GPS Hand Glove Developed to help Women's Safety
0 notes
Text
Buy NodeMcu ESP8266 CH340 Module at Affordable Cost in Ainow

Find the best cost on NodeMcu ESP8266 CH340 Module in India. Shop now at Ainow for low prices on high-quality products for your electronics projects.
0 notes
Text
Battle of the Boards: Arduino vs NodeMCU
Hey there, fellow makers and tinkerers! If you’re in the market for a microcontroller board, you might be wondering which one to choose: Arduino or NodeMCU. Both boards have their strengths and weaknesses, so let’s take a closer look at what makes each one unique.

Arduino:
Arduino boards are some of the most popular microcontroller boards on the market, and for good reason. They’re relatively easy to use, and there are tons of tutorials and resources available online. They’re also great for beginners who are just getting started with electronics and programming.
One of the downsides of Arduino boards is that they can be a bit limited in terms of connectivity. Most Arduino boards only have a few pins for connecting sensors and other peripherals, which can be a problem if you’re working on a project that requires a lot of inputs and outputs.
NodeMCU:
NodeMCU boards are based on the ESP8266 Wi-Fi module, which means they’re great for projects that require wireless connectivity. They’re also very affordable and easy to use, making them a popular choice among makers and hobbyists.
One of the downsides of NodeMCU boards is that they can be a bit more complex than Arduino boards, especially if you’re new to programming and electronics. There are fewer resources available online, and the learning curve can be a bit steeper.
So, which board is right for you Arduino or NodeMCU? It really depends on what you’re looking for in a microcontroller board. If you’re a beginner or you’re working on a project that doesn’t require a lot of connectivity, an Arduino board might be the way to go. But if you’re working on a project that requires wireless connectivity, or you’re looking for a more affordable option, a NodeMCU board might be the better choice.
I hope this helps you make an informed decision about which board to choose. If you have any other tips or advice for choosing between Arduino and NodeMCU, feel free to share them in the comments below!
1 note
·
View note
Text
What is NodeMCU? | Electro Global
Learn what NodeMCU is and how it can enhance your IoT projects at Electro Global. Discover its features, capabilities, and applications. Access high-quality NodeMCU boards and comprehensive guides. Shop now to explore the potential of NodeMCU in your electronics projects.
0 notes