#NPM scripts
Explore tagged Tumblr posts
Visit Tumblr Blog
Explore Tumblr blogs with no restrictions, modern design and the best experience.
Last Seen Tumblr Blogs


Fun Fact
Kazakhstan’s Minister of Communications and Informatics has blocked the Tumblr site because it contained 60 sites of terrorism, extremism, and pornography in 2015.
Text
Big-ish themes updates March 2024
Icon issues
unpkg.com has become more unstable, and that resulted in Phosphor icons in certain themes didn't work properly any longer.
If you do not want to reinstall, find "https://unpkg.com/@phosphor-icons/web" and replace it with "https://cdn.jsdelivr.net/npm/@phosphor-icons/web".
However, those themes have also had my UnifyAudio script and HTML and CSS added, so I would advise you to reinstall it.
Phosphor Icon script link updated:
Bloomy
Blithe
Brasch
Broek
Homesick
Isla
Meringue
Palm
Sange
Sevens
Stereo
Suburban
Audio layout appearance!
All my themes now have been updated with my lil' fancy UnifyAudio script installed 🥰
Concerning my premium themes You should be able to redownload the file on ko-fi, but if that's not possible, shoot me a DM with the email address you purchased with, and I'll send you a link to the updated file!
9 notes
·
View notes
Text
Mini React.js Tips #2 | Resources ✨
Continuing the #mini react tips series, it's time to understand what is going on with the folders and files in the default React project - they can be a bit confusing as to what folder/file does what~!
What you'll need:
know how to create a React project >> click
already taken a look around the files and folders themselves

What does the file structure look like?
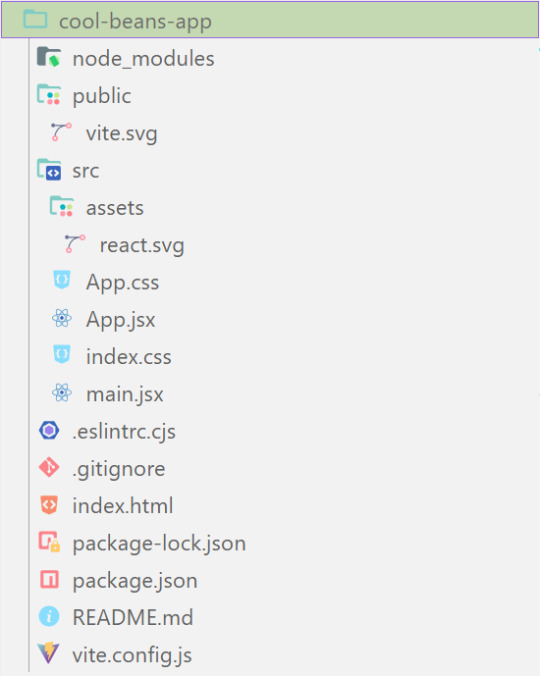
✤ node_modules folder: contains all the dependencies and packages (tools, resources, code, or software libraries created by others) needed for your project to run properly! These dependencies are usually managed by a package manager, such as npm (Node Package Manager)!
✤ public folder: Holds static assets (files that don't change dynamically and remain fixed) that don't require any special processing before using them! These assets are things like images, icons, or files that can be used directly without going through any additional steps.
✤ src folder: This is where your main source code resides. 'src' is short for source.
✤ assets folder: This folder stores static assets such as images, logos, and similar files. This folder is handy for organizing and accessing these non-changing elements in your project.
✤ App.css: This file contains styles specific to the App component (we will learn what 'components' are in React in the next tips post~!).
✤ App.jsx: This is the main component of your React application. It's where you define the structure and behavior of your app. The .jsx extension means the file uses a mixture of both HTML and JavaScript - open the file and see for yourself~!
✤ index.css: This file contains global styles that apply to the entire project. Any styles defined in this file will be applied universally across different parts of your project, providing a consistent look and feel.
✤ main.jsx: This is the entry point of your application! In this file, the React app is rendered, meaning it's the starting point where the React components are translated into the actual HTML elements displayed in the browser. Would recommend not to delete as a beginner!!
✤ .eslintrc.cjs: This file is the ESLint configuration. ESLint (one of the dependencies installed) is a tool that helps maintain coding standards and identifies common errors in your code. This configuration file contains rules and settings that define how ESLint should analyze and check your code.
✤ .gitignore: This file specifies which files and folders should be ignored by Git when version-controlling your project. It helps to avoid committing unnecessary files. The node_modules folder is typically ignored.
✤ index.html: This is the main HTML file that serves as the entry point for your React application. It includes the necessary scripts and links to load your app.
✤ package.json: A metadata file for your project. It includes essential information about the project, such as its name, version, description, and configuration details. Also, it holds a list of dependencies needed for the project to run - when someone else has the project on their local machine and wants to set it up, they can use the information in the file to install all the listed dependencies via npm install.
✤ package-lock.json: This file's purpose is to lock down and record the exact versions of each installed dependency/package in your project. This ensures consistency across different environments when other developers or systems install the dependencies.
✤ README.md: This file typically contains information about your project, including how to set it up, use it, and any other relevant details.
✤ vite.config.js: This file contains the configuration settings for Vite, the build tool used for this React project. It may include options for development and production builds, plugins, and other build-related configurations.
Congratulations! You know what the default folders and files do! Have a play around and familiarise yourself with them~!
BroCode’s 'React Full Course for Free’ 2024 >> click
React Official Website >> click
React's JSX >> click
The basics of Package.json >> click
Previous Tip: Tip #1 Creating The Default React Project >> click
Stay tuned for the other posts I will make on this series #mini react tips~!
#mini react tips#my resources#resources#codeblr#coding#progblr#programming#studyblr#studying#javascript#react.js#reactjs#coding tips#coding resources
25 notes
·
View notes
Text
okay there has to be a oneliner way to make a command line command (npm package script) use environment variables that will either use a .env file or the github actions environment secrets. right? no? maybe no.
sighs. at some point I'm going to publish a template repository for "web extension that's not listed in the extension stores but is signed" and it is going to have to come with a three page long instruction manual. this is all so stupid
4 notes
·
View notes
Note
how do I set up vsc correctly? I always get project file not found error and I can't find a solution on the internet. Lmk if you have a fix :(
Hi! Thank you for the ask! I wonder in what situation this happens to you? When trying to open the file? Or when trying to run some command? Could be different reasons so maybe my answer won't really help you... But! I've had this issue sometimes; for example, once, I was trying to run a python script, but it wouldn't let me.

Here, the issue is that the folder I have open in VS code is a parent folder to the folder where the file I'm trying to run is located. Here, I'm running the script with the help of the "play" button on the top right.
What it does, I suppose, is try to run the file day-3.py in the directory/folder that is currently open in VS code, but! In the folder advent_of_code_23, there is no file called day-3.py!
So, your issue could potentially be that you are accidentally running your script in a parent folder where it can't be located, since it's in a child folder.
If you still want to have a parent folder up and running, and see all your children folders, you could use the terminal to manually access and run your script.
Step 1: open a new terminal (top option)

Step 2: in the terminal, type ls (stands for list) to see all the folders in your parent folder

Step 3: type cd (stands for change directory) and then the name of the folder you want to navigate into, where the file you want to run is located. (TIP! You can use the tab button on your keyboard to autofill the folder name)
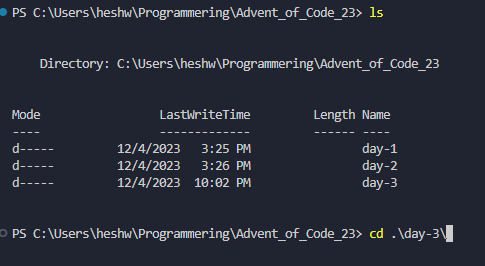
Step 4: Now you can see that your location has changed to be <C:\...\parent-folder-name\child-folder-name>, which means you are now in another folder! So for me, now the location is <C:\...\advent_of_code_23\day-3>, which means I can now directly access everything in this folder! In my screenshot I also typed LS to see what the contents of my folder is.

Step 5: In here, I can now run my python file by typing python day-3.py

If you're working in another language, I would recommend googling "how to start a [language name] in the terminal". Or, if you're running for example a React project, you may want to look in your package.json to see what scripts are available, and run those with your preferred package manager, such as yarn or npm.
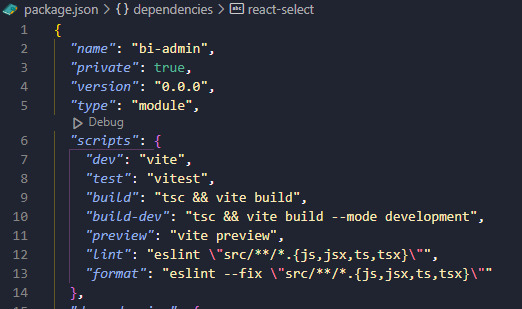
In my case, this project is set up with yarn, so I would run this using the yarn dev command.
I hope this has been somewhat helpful, and if it didn't resolve your issue feel free to reach out to me personally and I'd be happy to take a look at your specific case. I can't promise a definite fix, but I can promise that I'll try! 🩷
#coding#programming#codeblr#vsc#vs code#visual studio#progblr#compsci#computer science#python#javascript#react.js#frontend developer#backend developer#backend development#frontend development#ask
14 notes
·
View notes
Text
Minimalist CSS Framework For Creating Modern Web Pages - Mgplus
A minimalist CSS framework built on top of Milligram.css to provide a set of styles and UI components for developers aiming to craft a website or a concise web page swiftly. Install & Import: # Yarn $ yarn mgplus # NPM $ npm i mgplus <!– Core –> <link rel=”stylesheet” href=”/path/to/mg-plus.css” /> <!– Additional UI Components –> <script…
View On WordPress
2 notes
·
View notes
Text
I came across this website where you like? enter anything and it'll do it with AI. so i told it to show me a picture of a really good sandwich.
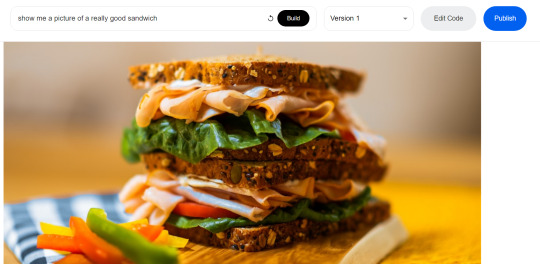
and what it did was generate code that would get a random photo of a sandwich from some photo website. (The images are not AI generated). It automatically generates that description too.
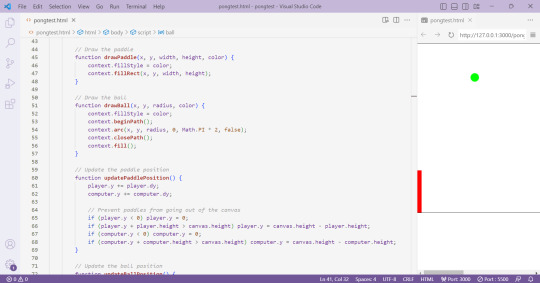
So then i told it to write javascript code for a game of pong (I'll paste the code at the end of this post) and it gave me this:
which does nothing. And idk why but I was kinda scared it would actually deliver me a functioning game lol. Probably bc it would take me at least an hour to code a simple pong game, when this generated in 30 seconds.
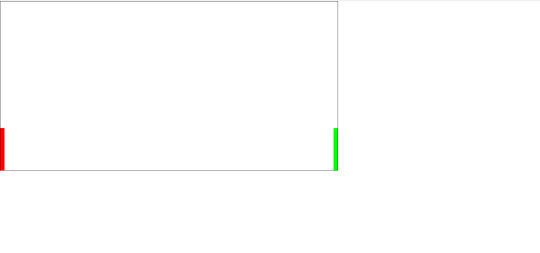
So i launched the code in vsc and it DOES do something. the ball bounces around but it made the ball white for some reason? so this is what it does after only changing the ball color.
and look at the code, its all formatted and commented and stuff. And i mean, it looks like its at least 85% there, it just needs movable paddles and fixing the ball to bounce into the side walls.
idk i just think this is pretty cool. and now i will be fixing this ai code into a working pong game
Here is the ai generated pong code:
<html>
<head>
<link rel="stylesheet" href="https://cdn.jsdelivr.net/npm/[email protected]/dist/css/bootstrap.min.css">
<script src="https://cdn.jsdelivr.net/npm/[email protected]/dist/js/bootstrap.min.js"></script>
</head>
<body>
<canvas id="pong" width="800" height="400" style="border:1px solid #000000;"></canvas>
<script>
// Create the canvas element
const canvas = document.getElementById("pong");
const context = canvas.getContext("2d");
// Create the paddle
const paddleWidth = 10, paddleHeight = 100;
const player = {
x: 0,
y: canvas.height / 2 - paddleHeight / 2,
width: paddleWidth,
height: paddleHeight,
color: "#FF0000",
dy: 8
};
const computer = {
x: canvas.width - paddleWidth,
y: canvas.height / 2 - paddleHeight / 2,
width: paddleWidth,
height: paddleHeight,
color: "#00FF00",
dy: 4
};
// Create the ball
const ball = {
x: canvas.width / 2,
y: canvas.height / 2,
radius: 10,
speed: 4,
dx: 4,
dy: 4,
color: "#FFFFFF"
};
// Draw the paddle
function drawPaddle(x, y, width, height, color) {
context.fillStyle = color;
context.fillRect(x, y, width, height);
}
// Draw the ball
function drawBall(x, y, radius, color) {
context.fillStyle = color;
context.beginPath();
context.arc(x, y, radius, 0, Math.PI * 2, false);
context.closePath();
context.fill();
}
// Update the paddle position
function updatePaddlePosition() {
player.y += player.dy;
computer.y += computer.dy;
// Prevent paddles from going out of the canvas
if (player.y < 0) player.y = 0;
if (player.y + player.height > canvas.height) player.y = canvas.height - player.height;
if (computer.y < 0) computer.y = 0;
if (computer.y + computer.height > canvas.height) computer.y = canvas.height - computer.height;
}
// Update the ball position
function updateBallPosition() {
ball.x += ball.dx;
ball.y += ball.dy;
// Reverse the ball direction if it hits the top or bottom wall
if (ball.y + ball.radius > canvas.height || ball.y - ball.radius < 0) {
ball.dy *= -1;
}
// Check if the ball hits the paddles
if (
ball.y + ball.radius > player.y &&
ball.y - ball.radius < player.y + player.height &&
ball.dx < 0
) {
if (ball.x - ball.radius < player.x + player.width) {
ball.dx *= -1;
}
}
if (
ball.y + ball.radius > computer.y &&
ball.y - ball.radius < computer.y + computer.height &&
ball.dx > 0
) {
if (ball.x + ball.radius > computer.x) {
ball.dx *= -1;
}
}
}
// Draw the game
function draw() {
// Clear the canvas
context.clearRect(0, 0, canvas.width, canvas.height);
// Draw the paddles
drawPaddle(player.x, player.y, player.width, player.height, player.color);
drawPaddle(computer.x, computer.y, computer.width, computer.height, computer.color);
// Draw the ball
drawBall(ball.x, ball.y, ball.radius, ball.color);
}
// Update the game
function update() {
updatePaddlePosition();
updateBallPosition();
draw();
}
// Game loop
function loop() {
update();
requestAnimationFrame(loop);
}
loop();
</script>
</body>
</html>
4 notes
·
View notes
Text
You can learn NodeJS easily, Here's all you need:
1.Introduction to Node.js
• JavaScript Runtime for Server-Side Development
• Non-Blocking I/0
2.Setting Up Node.js
• Installing Node.js and NPM
• Package.json Configuration
• Node Version Manager (NVM)
3.Node.js Modules
• CommonJS Modules (require, module.exports)
• ES6 Modules (import, export)
• Built-in Modules (e.g., fs, http, events)
4.Core Concepts
• Event Loop
• Callbacks and Asynchronous Programming
• Streams and Buffers
5.Core Modules
• fs (File Svstem)
• http and https (HTTP Modules)
• events (Event Emitter)
• util (Utilities)
• os (Operating System)
• path (Path Module)
6.NPM (Node Package Manager)
• Installing Packages
• Creating and Managing package.json
• Semantic Versioning
• NPM Scripts
7.Asynchronous Programming in Node.js
• Callbacks
• Promises
• Async/Await
• Error-First Callbacks
8.Express.js Framework
• Routing
• Middleware
• Templating Engines (Pug, EJS)
• RESTful APIs
• Error Handling Middleware
9.Working with Databases
• Connecting to Databases (MongoDB, MySQL)
• Mongoose (for MongoDB)
• Sequelize (for MySQL)
• Database Migrations and Seeders
10.Authentication and Authorization
• JSON Web Tokens (JWT)
• Passport.js Middleware
• OAuth and OAuth2
11.Security
• Helmet.js (Security Middleware)
• Input Validation and Sanitization
• Secure Headers
• Cross-Origin Resource Sharing (CORS)
12.Testing and Debugging
• Unit Testing (Mocha, Chai)
• Debugging Tools (Node Inspector)
• Load Testing (Artillery, Apache Bench)
13.API Documentation
• Swagger
• API Blueprint
• Postman Documentation
14.Real-Time Applications
• WebSockets (Socket.io)
• Server-Sent Events (SSE)
• WebRTC for Video Calls
15.Performance Optimization
• Caching Strategies (in-memory, Redis)
• Load Balancing (Nginx, HAProxy)
• Profiling and Optimization Tools (Node Clinic, New Relic)
16.Deployment and Hosting
• Deploying Node.js Apps (PM2, Forever)
• Hosting Platforms (AWS, Heroku, DigitalOcean)
• Continuous Integration and Deployment-(Jenkins, Travis CI)
17.RESTful API Design
• Best Practices
• API Versioning
• HATEOAS (Hypermedia as the Engine-of Application State)
18.Middleware and Custom Modules
• Creating Custom Middleware
• Organizing Code into Modules
• Publish and Use Private NPM Packages
19.Logging
• Winston Logger
• Morgan Middleware
• Log Rotation Strategies
20.Streaming and Buffers
• Readable and Writable Streams
• Buffers
• Transform Streams
21.Error Handling and Monitoring
• Sentry and Error Tracking
• Health Checks and Monitoring Endpoints
22.Microservices Architecture
• Principles of Microservices
• Communication Patterns (REST, gRPC)
• Service Discovery and Load Balancing in Microservices
1 note
·
View note
Text
#DDBR Net Value Calculator :
<!DOCTYPE html>
<html lang="en">
<head>
<meta charset="UTF-8">
<meta name="viewport" content="width=device-width, initial-scale=1.0">
<title>#DDBR Stock Net Value Calculator</title>
<link rel="stylesheet" href="https://cdnjs.cloudflare.com/ajax/libs/font-awesome/6.4.0/css/all.min.css">
<script src="https://cdn.jsdelivr.net/npm/chart.js"></script>
<style>
* {
margin: 0;
padding: 0;
box-sizing: border-box;
font-family: 'Segoe UI', Tahoma, Geneva, Verdana, sans-serif;
}
body {
background: linear-gradient(135deg, #1a2a6c, #b21f1f, #1a2a6c);
color: #ffffff;
min-height: 100vh;
display: flex;
justify-content: center;
align-items: center;
padding: 20px;
overflow-x: hidden;
}
.container {
max-width: 1200px;
width: 100%;
display: flex;
flex-direction: column;
gap: 25px;
}
header {
text-align: center;
padding: 20px;
background: rgba(0, 0, 0, 0.7);
border-radius: 20px;
box-shadow: 0 10px 30px rgba(0, 0, 0, 0.5);
border: 2px solid #00c6ff;
backdrop-filter: blur(10px);
}
.logo {
display: flex;
justify-content: center;
align-items: center;
gap: 15px;
margin-bottom: 15px;
}
.logo-icon {
font-size: 3.5rem;
color: #00c6ff;
text-shadow: 0 0 15px rgba(0, 198, 255, 0.7);
}
h1 {
font-size: 3.2rem;
background: linear-gradient(to right, #00c6ff, #92fe9d);
-webkit-background-clip: text;
-webkit-text-fill-color: transparent;
margin-bottom: 10px;
letter-spacing: -1px;
}
.subtitle {
font-size: 1.3rem;
color: #a0e7ff;
max-width: 700px;
margin: 0 auto;
line-height: 1.6;
}
.main-content {
display: flex;
flex-wrap: wrap;
gap: 25px;
}
.calculator-card {
flex: 1;
min-width: 350px;
background: rgba(0, 0, 0, 0.7);
border-radius: 20px;
padding: 30px;
box-shadow: 0 10px 30px rgba(0, 0, 0, 0.5);
border: 2px solid #00c6ff;
backdrop-filter: blur(10px);
}
.calculator-card h2 {
font-size: 2rem;
margin-bottom: 25px;
color: #00c6ff;
display: flex;
align-items: center;
gap: 12px;
}
.input-group {
margin-bottom: 25px;
}
label {
display: block;
margin-bottom: 10px;
font-size: 1.1rem;
color: #a0e7ff;
}
input {
width: 100%;
padding: 15px;
border-radius: 12px;
border: 2px solid #00c6ff;
background: rgba(0, 0, 0, 0.5);
color: #ffffff;
font-size: 1.2rem;
transition: all 0.3s ease;
}
input:focus {
outline: none;
border-color: #92fe9d;
box-shadow: 0 0 15px rgba(146, 254, 157, 0.5);
}
.price-display {
background: rgba(0, 0, 0, 0.5);
padding: 15px;
border-radius: 12px;
border: 2px solid #00c6ff;
font-size: 1.3rem;
color: #92fe9d;
text-align: center;
margin-bottom: 25px;
}
.result-card {
background: rgba(0, 0, 0, 0.7);
padding: 25px;
border-radius: 20px;
text-align: center;
box-shadow: 0 10px 30px rgba(0, 0, 0, 0.5);
border: 2px solid #00c6ff;
backdrop-filter: blur(10px);
margin-top: 25px;
}
.result-card h3 {
font-size: 1.5rem;
color: #00c6ff;
margin-bottom: 20px;
}
.net-value {
font-size: 3.5rem;
font-weight: bold;
background: linear-gradient(to right, #00c6ff, #92fe9d);
-webkit-background-clip: text;
-webkit-text-fill-color: transparent;
margin: 20px 0;
text-shadow: 0 0 15px rgba(0, 198, 255, 0.5);
}
.btn {
background: linear-gradient(to right, #00c6ff, #0072ff);
color: white;
border: none;
padding: 15px 30px;
border-radius: 50px;
font-size: 1.2rem;
font-weight: bold;
cursor: pointer;
transition: all 0.3s ease;
width: 100%;
margin-top: 15px;
box-shadow: 0 5px 15px rgba(0, 198, 255, 0.4);
}
.btn:hover {
transform: translateY(-3px);
box-shadow: 0 8px 25px rgba(0, 198, 255, 0.6);
}
.chart-container {
flex: 1;
min-width: 350px;
background: rgba(0, 0, 0, 0.7);
border-radius: 20px;
padding: 30px;
box-shadow: 0 10px 30px rgba(0, 0, 0, 0.5);
border: 2px solid #00c6ff;
backdrop-filter: blur(10px);
display: flex;
flex-direction: column;
}
.chart-container h2 {
font-size: 2rem;
margin-bottom: 25px;
color: #00c6ff;
display: flex;
align-items: center;
gap: 12px;
}
.chart-wrapper {
flex: 1;
min-height: 300px;
}
.stats {
display: flex;
flex-wrap: wrap;
gap: 20px;
margin-top: 25px;
}
.stat-card {
flex: 1;
min-width: 200px;
background: rgba(0, 0, 0, 0.5);
border-radius: 15px;
padding: 20px;
text-align: center;
border: 2px solid #00c6ff;
}
.stat-card h4 {
color: #a0e7ff;
margin-bottom: 10px;
font-size: 1.1rem;
}
.stat-value {
font-size: 1.8rem;
font-weight: bold;
color: #92fe9d;
}
.positive {
color: #92fe9d;
}
.negative {
color: #ff6b6b;
}
footer {
text-align: center;
padding: 25px;
background: rgba(0, 0, 0, 0.7);
border-radius: 20px;
box-shadow: 0 10px 30px rgba(0, 0, 0, 0.5);
border: 2px solid #00c6ff;
backdrop-filter: blur(10px);
margin-top: 20px;
}
.footer-links {
display: flex;
justify-content: center;
flex-wrap: wrap;
gap: 20px;
margin-top: 20px;
}
.footer-links a {
color: #00c6ff;
text-decoration: none;
font-size: 1.1rem;
transition: all 0.3s ease;
}
.footer-links a:hover {
color: #92fe9d;
text-shadow: 0 0 10px rgba(146, 254, 157, 0.7);
}
@media (max-width: 768px) {
.main-content {
flex-direction: column;
}
h1 {
font-size: 2.5rem;
}
.subtitle {
font-size: 1.1rem;
}
.net-value {
font-size: 2.5rem;
}
}
/* Animations */
@keyframes float {
0% { transform: translateY(0px); }
50% { transform: translateY(-10px); }
100% { transform: translateY(0px); }
}
.pulse {
animation: pulse 2s infinite;
}
@keyframes pulse {
0% { box-shadow: 0 0 0 0 rgba(0, 198, 255, 0.7); }
70% { box-shadow: 0 0 0 15px rgba(0, 198, 255, 0); }
100% { box-shadow: 0 0 0 0 rgba(0, 198, 255, 0); }
}
.floating {
animation: float 4s ease-in-out infinite;
}
</style>
</head>
<body>
<div class="container">
<header>
<div class="logo">
<i class="fas fa-chart-line logo-icon floating"></i>
<div>
<h1>#DDBR Stock Net Value Calculator</h1>
<p class="subtitle">Calculate the current value of your #DDBR stock holdings based on live market data</p>
</div>
</div>
</header>
<div class="main-content">
<div class="calculator-card">
<h2><i class="fas fa-calculator"></i> Calculate Your Holdings</h2>
<div class="input-group">
<label for="shares"><i class="fas fa-coins"></i> Number of Shares</label>
<input type="number" id="shares" min="0" step="1" value="1000" placeholder="Enter number of shares">
</div>
<div class="input-group">
<label for="buyPrice"><i class="fas fa-tag"></i> Average Buy Price ($)</label>
<input type="number" id="buyPrice" min="0" step="0.01" value="65.50" placeholder="Enter average buy price">
</div>
<div class="price-display">
<p>Current #DDBR Stock Price: <strong id="currentPrice">$84.72</strong></p>
<p class="positive">Today: +2.36% <i class="fas fa-arrow-up"></i></p>
</div>
<button class="btn pulse" id="calculateBtn">
<i class="fas fa-calculator"></i> Calculate Net Value
</button>
<div class="result-card">
<h3><i class="fas fa-wallet"></i> Your Investment Value</h3>
<div class="net-value" id="netValue">$84,720.00</div>
<div id="profitContainer">
<p>Total Profit: <span class="positive" id="profitAmount">$19,220.00</span></p>
<p>Profit Percentage: <span class="positive" id="profitPercent">29.35%</span></p>
</div>
</div>
</div>
<div class="chart-container">
<h2><i class="fas fa-chart-bar"></i> #DDBR Performance</h2>
<div class="chart-wrapper">
<canvas id="priceChart"></canvas>
</div>
<div class="stats">
<div class="stat-card">
<h4>52-Week High</h4>
<div class="stat-value">$92.45</div>
</div>
<div class="stat-card">
<h4>52-Week Low</h4>
<div class="stat-value">$52.30</div>
</div>
<div class="stat-card">
<h4>Dividend Yield</h4>
<div class="stat-value">2.15%</div>
</div>
<div class="stat-card">
<h4>P/E Ratio</h4>
<div class="stat-value">18.7</div>
</div>
</div>
</div>
</div>
<footer>
<p>#DDBR Stock Net Value Calculator • Real-time data updated every 15 minutes</p>
<div class="footer-links">
<a href="#"><i class="fab fa-patreon"></i> Patreon</a>
<a href="#"><i class="fab fa-tumblr"></i> Tumblr</a>
<a href="#"><i class="fas fa-home"></i> Main</
#deardearestbrands#clairejorifvalentine#bambiprescott#playstation7#kittybell#zgr#punkboycupid#zenithgenderroyal#academyelite#aurorahex#Net Value
0 notes
Text
Top WebApp Security Checklist for Businesses in the USA (2025)

In today’s digital-first world, web applications are the backbone of most business operations—from e-commerce to customer portals, CRMs, and more. However, with increasing cyber threats, securing your web applications is not optional; it's critical. Especially for businesses operating in the USA, where data breaches can lead to legal penalties, loss of customer trust, and significant financial setbacks.
This guide outlines a comprehensive WebApp Security Checklist tailored for businesses in the USA to ensure robust protection and compliance with modern security standards.
1. Use HTTPS with a Valid SSL Certificate
Secure Socket Layer (SSL) certificates are fundamental. HTTPS encrypts the data exchanged between the user and your application, ensuring it remains private.
Purchase and install a trusted SSL certificate.
Redirect all HTTP traffic to HTTPS.
Regularly renew and monitor the validity of your SSL certificate.
Fact: Google flags HTTP sites as “Not Secure,” impacting SEO and user trust.
2. Implement Strong Authentication & Access Controls

Weak login systems are a hacker’s playground. Use:
Multi-Factor Authentication (MFA): Add extra layers beyond passwords.
Role-Based Access Control (RBAC): Ensure users only access what’s necessary.
Session Management: Set session expiration limits and auto-logout on inactivity.
Bonus Tip: Use OAuth 2.0 or OpenID Connect for secure federated authentication.
3. Sanitize and Validate All User Inputs
Most web attacks like SQL Injection and XSS stem from unsanitized user inputs. To prevent this:
Sanitize inputs on both client and server sides.
Use prepared statements and parameterized queries.
Escape special characters in output to prevent script injections.
Best Practice: Never trust user inputs — even from authenticated users.
4. Regularly Update Dependencies and Frameworks
Outdated plugins, libraries, or frameworks can be exploited easily.
Use dependency management tools like npm audit, pip-audit, or OWASP Dependency-Check.
Enable automatic updates where possible.
Avoid deprecated plugins or unsupported software.
Real Example: The infamous Log4j vulnerability in 2021 exposed millions of apps worldwide.
5. Conduct Regular Vulnerability Scans and Penetration Testing
Security is not a one-time fix. It's a continuous process.
Schedule monthly or quarterly vulnerability scans.
Hire ethical hackers for real-world pen testing.
Fix discovered issues immediately and re-test.
🔍 Tools to Use: Nessus, Burp Suite, OWASP ZAP.
6. Implement Secure APIs

With APIs powering most modern web apps, they’re a common attack vector.
Authenticate API users with tokens (JWT, OAuth).
Rate-limit API calls to avoid abuse.
Use API gateways for logging and security enforcement.
Extra Tip: Never expose sensitive internal APIs to the public internet.
7. Data Encryption at Rest and in Transit
Whether storing user passwords, payment info, or PII — encryption is essential.
Encrypt sensitive data in the database using AES-256 or better.
Avoid storing passwords in plain text — use hashing algorithms like bcrypt.
Always encrypt data transfers via HTTPS or secure VPN tunnels.
Compliance: Required under data protection laws like HIPAA, CCPA, and PCI-DSS.
8. Monitor Logs & Set Up Intrusion Detection
Monitoring can alert you to threats in real-time.
Use centralized logging systems like ELK Stack or Splunk.
Implement intrusion detection systems (IDS) like Snort or OSSEC.
Set up alerts for unusual activities like multiple failed logins.
Tip: Review logs weekly and set up daily summaries for admins.
9. Backup Regularly & Prepare a Disaster Recovery Plan
Cyberattacks like ransomware can lock you out of your app.
Schedule automatic daily backups.
Store backups offsite or in the cloud (with encryption).
Test your disaster recovery plan quarterly.
Pro Tip: Use versioned backups to roll back only the infected data.
10. Comply with Data Privacy Regulations
For businesses in the USA, compliance isn't just good practice — it's the law.
If you handle health data → HIPAA compliance is mandatory.
Selling to California residents → comply with CCPA.
Accepting payments? → follow PCI-DSS requirements.
Reminder: Non-compliance can lead to heavy penalties and lawsuits.
11. Educate Your Team
The weakest link is often human error.
Train employees on phishing and social engineering attacks.
Enforce strong password policies.
Run annual cybersecurity awareness programs.
Result: A well-trained team is your first line of defense.
12. Use Web Application Firewalls (WAFs)

WAFs provide an extra layer of protection.
Block malicious traffic before it reaches your server.
Protect against DDoS, brute force, and zero-day attacks.
Use cloud-based WAFs like Cloudflare, AWS WAF, or Imperva.
Bonus: Easily deployable and scalable with your infrastructure.
Conclusion
For U.S.-based businesses, web application security should be a strategic priority — not a checkbox. With cyberattacks growing in complexity and volume, following a thorough security checklist is vital to protect your data, users, and brand reputation.
At the end of the day, your web application is only as secure as its weakest link. Make sure there isn’t one.
Ready to Secure Your WebApp?
If you're looking for expert support to secure or build a robust, secure web application, WeeTech Solution is here to help. Get in touch with our development and cybersecurity team today!
0 notes
Link
In JavaScript project development, maintaining code consistency and ensuring high-quality standards can be a challenge, especially in teams with multiple contributors. Integrating automation tools into the workflow allows for the automatic execution of essential tasks such as formatting, code analysis (lint), and running tests before commits or pushes are made. This article explores in detail how to configure Husky and Lint-Staged to reinforce code quality in your JavaScript projects. What are Husky and Lint-Staged? Husky is a native solution for managing Git hooks, which are scripts that run automatically on certain Git events (like before a commit or a push). Thanks to Husky, it’s possible to ensure that a series of essential checks and tasks are completed before changes are integrated into the repository. On the other hand, Lint-Staged is a tool that allows you to run commands only on files that have been modified and are in a “staged” state. This results in a much more efficient process, as formatting and validations are applied only to the small set of affected files, instead of analyzing the entire codebase. Why use Husky and Lint-Staged? Using Husky and Lint-Staged brings multiple benefits to JavaScript application development: Quality Assurance: They ensure that the code complies with style and quality standards by automatically running linters, formatters, and unit tests. Error Prevention: By intercepting the commit or push process, errors are detected and corrected before they are integrated into the codebase, preventing problems in production. Workflow Optimization: Lint-Staged only analyzes modified files, which significantly reduces the execution time of validation tasks. Team Uniformity: They allow all contributors to follow the same standards, ensuring code consistency and maintainability. Configuring Husky and Lint-Staged Below is a detailed process for configuring Husky and Lint-Staged in a JavaScript environment, integrating fundamental tools like Prettier, ESLint, and Vitest. Setting up the environment Imagine we are working on a JavaScript project where it is essential to maintain clean and error-free code. To do this, we will configure the following scripts in the package.json file: Prettier as a formatter: It will be responsible for applying a consistent format throughout the code. npm run format ESLint as a linter: It detects errors and applies good coding practices. npm run lint Vitest as a testing framework: It validates that the code works as expected through unit tests. npm run test These commands will be integrated into our Git hooks so that, before each commit, the code is formatted, analyzed, and tested. Installing and configuring Husky Run the following command to install Husky as a development dependency: npm install --save-dev husky Initialize Husky in your repository (remember that you must have previously initialized Git in the project): npx husky init This command automatically adds a preparation script in the package.json and creates a .husky folder in the root of the project that will contain, among others, the pre-commit hook. Configuring the pre-commit hook: Edit the .husky/pre-commit file to include the necessary commands. For example: npm run format npm run lint npm run test With this configuration, every time you make a commit, Husky will execute these commands. If any of them fail, the commit process will be stopped, allowing you to correct the errors before proceeding. Installing and configuring Lint-Staged Add Lint-Staged as a development dependency: npm install --save-dev lint-staged Add the following script in your package.json file to facilitate the execution of Lint-Staged: "scripts" : { "lint-staged" : "lint-staged" } Create a file called .lintstagedrc.json in the root of the project and define the commands to be executed for the modified files. For example: { "*.{css,scss}" : [ "npx prettier . --write" ], "*.{js,jsx,ts,tsx}" : [ "npx prettier . --write" , "eslint --fix" , "vitest run --environment=jsdom" ] } With this configuration, Lint-Staged will apply Prettier, ESLint, and Vitest only to the JavaScript files (and their variants) that have been modified and added to the staging area. To take advantage of Lint-Staged in the pre-commit hook, modify the .husky/pre-commit file to execute the Lint-Staged script instead of running the commands individually: npm run lint-staged This way, the validation process is optimized by focusing only on the changes made, saving time and resources. Practical example with the configuration ready Below, I leave you an example in which a change is added to the staging area, allowing us to observe in detail the step-by-step execution of each of the configured rules. git add -A && git commit -am "Add test tutorial" > catalitico-one-page @0.0.0 lint-staged > lint-staged ✔ Preparing lint-staged... ⚠ Running tasks for staged files... ❯ .lintstagedrc.json — 1 file ↓ *.{css,scss} — no files ❯ *.{js,ts,tsx,vue} — 1 file ✔ npx prettier . --write ✖ eslint --fix [FAILED] ↓ Skipped because of errors from tasks. ✔ Reverting to original state because of errors... ✔ Cleaning up temporary files... ✖ eslint --fix: /home/andrey/Xuma/catalitico-one-page/src/components/utils/Reveal.tsx 10:7 error 'a' is assigned a value but never used @typescript-eslint/no-unused-vars ✖ 1 problem (1 error, 0 warnings) husky - pre-commit script failed (code 1) When executing git add -A && git commit -am "Add test tutorial" , Husky activates the pre-commit hook. Lint-Staged starts and processes only the files that have been modified. In this case, the process attempts to: Format the file with Prettier (npx prettier . --write ), which is done correctly. Run ESLint with the automatic correction option (eslint --fix ), but an error is detected in the Reveal.tsx file (a variable is assigned but never used). Due to this error, the execution of the tasks is stopped, the state of the modified files is reverted, and the commit is canceled. Conclusions The integration of Husky and Lint-Staged in a JavaScript project is a highly effective strategy to ensure the quality and consistency of the code. By automating fundamental tasks such as formatting, static analysis, and test execution, these tools allow for the early detection of errors and ensure that the code integrated into the repository complies with established standards. Although the initial configuration may seem complex, the long-term benefits such as error reduction, a more agile development process, and greater team uniformity amply justify the investment of time and effort. The implementation of Husky and Lint-Staged not only improves the quality of the final product but also promotes good practices and optimizes the workflow, allowing you to concentrate efforts on creating robust and scalable solutions in JavaScript. I hope you find this guide useful and that it encourages you to incorporate these practices into your projects. Success in your developments! Thanks for reading.
0 notes
Note
hi! the icons in your bloomy theme are not showing up anymore.
Hi there! I'm aware unpkg.com is becoming more and more unstable, where certain themes using phosphor icons, had them hosted through.
You can find this in the code though:
https://unpkg.com/@phosphor-icons/web
and replace it with: https://cdn.jsdelivr.net/npm/@phosphor-icons/web
This goes for all themes affected by it (I only believe it's one or two).
I'll be updating the themes in the coming days.
edit: Bloomy has been updated! I also implemented my UnifyAudio script.
7 notes
·
View notes
Text
Node.js Web Scraping Made Easy: A Step-by-Step Guide with Cheerio Web scraping has become an essential skill for developers and data enthusiasts who want to extract useful data from websites efficiently. If you're new to this,Node.js combined with Cheerio provides a powerful yet easy-to-understand way to create web scrapers. This guide will walk you through building a simple web scraper using Node.js and Cheerio, so you can start harvesting web data in no time. What Is web Scraping and Why Use Node.js with Cheerio? Web scraping refers to the automated process of collecting data from websites. Instead of manually copying information, scrapers let your programs access the HTML of web pages and extract specific content like product prices, headlines, or reviews. Node.js is a popular JavaScript runtime that makes it easy to perform network requests and manipulate data asynchronously. Paired with Cheerio,a fast,lightweight library modeled after jQuery,you can parse and traverse HTML with simple,familiar syntax. Benefits of Using Node.js and Cheerio for Web Scraping Speed and Efficiency: Node.js handles asynchronous I/O operations gracefully, enabling swift web requests. Simple API: Cheerio provides jQuery-like selectors for easy DOM parsing without running a full browser. lightweight: Unlike Puppeteer or Selenium, Cheerio does not load a full browser surroundings, keeping resource usage low. Flexibility: Ideal for scraping static pages or pre-rendered HTML content. Prerequisites: What You'll Need Before Starting Before diving into coding,ensure you have the following set up: Node.js installed. You can download it from nodejs.org. A code editor like Visual Studio Code or Sublime text. Basic knowledge of JavaScript. Familiarity with npm and asynchronous programming will help. Step-by-Step Guide to Building a simple Web Scraper 1. Initialize Your Node.js Project mkdir simple-web-scraper cd simple-web-scraper npm init -y This creates a new folder and initializes a package.json file with default settings. 2. Install Required Packages Install axios for making HTTP requests and cheerio for parsing HTML: npm install axios cheerio 3. Create the Scraper Script Create a new file named scraper.js and open it for editing. 4.Import Libraries and Define Target URL const axios = require('axios'); const cheerio = require('cheerio'); const url = 'https://example.com'; // Replace this with the URL you want to scrape 5. Fetch HTML Content and Load into Cheerio async function fetchHTML() try const data = await axios.get(url); return cheerio.load(data); catch (error) console.error('Error fetching the page:', error); return null; 6. Extract Information Using CSS Selectors Once the HTML content is loaded into Cheerio, you can use CSS selectors to target elements. For example, let’s scrape all article titles inside tags with a class of .post-title: async function scrapeTitles() const $ = await fetchHTML(); if (!$) return; const titles = []; $('h2.post-title').each((index, element) => const title = $(element).text().trim(); titles.push(title); ); console.log('Scraped Titles:', titles); scrapeTitles(); Full Example Code const axios = require('axios'); const cheerio = require('cheerio'); const url = 'https://example.com'; // Change to your target URL async function fetchHTML() try const data = await axios.get(url); return cheerio.load(data); catch (error) console.error('error fetching the page:', error); async function scrapeTitles() const $ = await fetchHTML(); if (!$) return; const titles = []; $('h2.post-title').each((i, el) => titles.push($(el).text().trim()); ); console.log('Scraped Titles:', titles); scrapeTitles(); Practical tips for Effective Web Scraping with Node.js and Cheerio Respect the target website’s robots.txt and terms of service. not all websites permit scraping.
Set appropriate user-agent headers when making requests to avoid blocks. Throttle your requests to avoid overloading servers. Test CSS selectors regularly, as website layouts change frequently. Use tools like nodemon to automatically reload your scraper during development. Common use Cases of Node.js Web Scraping With Cheerio Use Case Description Price Monitoring Track product prices from e-commerce sites for alerts or analysis. Content Aggregation Collect blog posts, news articles, or event listings into one place. SEO Research Gather competitor keywords and metadata for SEO optimization. Data Collection & Analysis Compile data for market research or academic projects. Real-world Example: Scraping Blog Post Titles Suppose you want to scrape the latest blog post titles from a technology blog that uses elements.Using the example code above, your script fetches the page’s HTML, parses it, then extracts those titles into a neat array. You can then save these titles to a file, database, or display them in your app. Conclusion: Getting Started with Node.js and Cheerio Web Scraping building a simple web scraper using Node.js and Cheerio is a rewarding way to automate data collection tasks quickly and efficiently.With just a few lines of code, you can pull meaningful information from static websites and use it in your projects. Remember to scrape responsibly by respecting website rules and keeping your requests minimal. To take your skills further, consider diving into more complex scraping tools like Puppeteer for dynamic content or combining scraping with data storage and visualization. But for beginners and many practical applications, Node.js with Cheerio provides a perfect, lightweight starting point. Ready to start scraping? Download Node.js and try the example yourself today!
0 notes
Text
インフォグラフィック:岐路に立つ日本の製薬業界
<!DOCTYPE html> <html lang=”ja”> <head> <meta charset=”UTF-8″> <meta name=”viewport” content=”width=device-width, initial-scale=1.0″> <title>インフォグラフィック:岐路に立つ日本の製薬業界</title> <script src=”https://cdn.tailwindcss.com”></script> <script src=”https://cdn.jsdelivr.net/npm/chart.js”></script> <link rel=”preconnect” href=”https://fonts.googleapis.com”> <link…
0 notes
Text
Hướng dẫn cài đặt Node.js + Puppeteer trên CentOS 7/8/Stream/AlmaLinux/Rocky Linux
🌿💖 Hướng dẫn cài đặt Node.js + Puppeteer trên CentOS 7/8/Stream/AlmaLinux/Rocky Linux 💖🌿 (để chạy script tự động đăng Facebook từ index.js như bạn yêu cầu) ✅ 1️⃣ Cài Node.js (bản LTS khuyến nghị) Cách tốt nhất: dùng NodeSource # Gỡ bản cũ nếu có sudo yum remove nodejs -y # Cài repo Node.js 18.x (LTS) curl -fsSL https://rpm.nodesource.com/setup_18.x | sudo bash - # Cài Node.js và npm sudo yum…
0 notes
Text
Monorepo of related subdomains
Loving Cloudflare. Got one repo with multiple websites? Here's how to share the /common/ code on build, and make each one share the repo.
Step 1: Create New Cloudflare Pages Projects
Go to Cloudflare Pages
Click "Create a project"
Connect the same GitHub repo: username/repo
Name it: a-site
Repeat for: b-site
Step 2: Configure Each New Project
For a-site: - Build command: npm run build:a-site - Root directory: /a-site - Build output directory: /
For b-site: - Build command: npm run build:b-site - Root directory: /b-site - Build output directory: /
Step 3: Set Up Custom Domains (Optional)
In each project's Custom domains settings: - trades-site: a-site.yourdomain.com - accounts-site: b-site.yourdomain.com
Step 4: Deploy
Push any small change to trigger builds, or click "Retry deployment" in each project.
Your package.json already has the build scripts ready:
{ "scripts": { "build:a-site": "cp -r common a-site/common", "build:b-site": "cp -r common b-site/common", "build:c-site": "cp -r common c-site/common" } }
Each site will deploy independently but share the same repo and common files!
0 notes
Text
wait a second. the gpl requires you to a) license derivative works the same, and b) share source code when distributing. if you distribute an interpreted language like javascript with no build step and don't minify... you are, inherently, distributing the source, right? there's nothing that says you need to link a public git repository or whatever. so if you just, like, email someone a zip, or publish to npm...
okay, let's see:
The “source code” for a work means the preferred form of the work for making modifications to it. “Object code” means any non-source form of a work. The “Corresponding Source” for a work in object code form means all the source code needed to generate, install, and (for an executable work) run the object code and to modify the work, including scripts to control those activities.
You may convey a covered work in object code form under the terms of sections 4 and 5, provided that you also convey the machine-readable Corresponding Source under the terms of this License, in one of these ways...
I guess it hinges upon whether what you are distributing is the "preferred form of the work for making modifications to it." do things like linter config files count as things that must be distributed?
(I guess in the case of a web extension, which is most likely what I would be using gpl code in thanks to the xkit projects, this is all irrelevant. while an xpi file is in fact a zip archive of the potentially entirely unmodified source of your extension, suggesting the recipient rename the .xpi to .zip if they want to extract it and read the source is almost certainly too arcane to count.)
0 notes