#NAVIGATION. ( unsorted icons. )
Explore tagged Tumblr posts
Photo
By clicking HERE you will be taken to a mediafire download for #946 icons of Anthony Hopkins from the movie “Silence of the Lambs.” These icons were made by me and have been cropped to 200x100 and have been slightly sharpened but are otherwise unedited. They have not been sorted for usability or clarity, only for face claim.
You can find the unsorted icons for this movie(if they exist) by clicking HERE and you can find the unsorted caps for this movie(if they exist) by by clicking HERE. You can find all the sorted icons I have of this face claim by clicking HERE.
This content is free for anyone to use or edit however you like; if you care to throw a dollar or two my way for time, effort, storage fees etc you are more than welcome to do so via my PAYPAL. Please like or reblog this post if you have found it useful or are downloading the content within. If you have any questions or you have any problems with the links or find any inconsistencies in the content, etc. please feel free to drop me a politely worded message via my ASKBOX (second icon from the top on my theme!)
#anthony hopkins#hannibal lecter#silence of the lambs#hannibal lecter icons#anthony hopkins icons#ICONS. ( mine. )#ICONS. ( movie. )#ICONS. ( sorted movie. )#ICONS. ( sorted hannibal lecter. )#ICONS. ( sorted face claim. )#ICONS. ( sorted anthony hopkins. )#ICONS. ( anthony hopkins. )#ICONS. ( hannibal lecter. )#ICONS. ( silence of the lambs. )#NAVIGATION. ( unsorted series icons. )#ICONS. ( sorted. )
2 notes
·
View notes
Text
gif tutorial
alright so i was asked for a tutorial on how i make my gifs, so here it is!! this one will focus mostly on how i make my live game gifs for baseball or hockey. as far as what i use, i use either obs studio or the xbox screenrecord function on my laptop for recording game clips. then i use photoshop, currently ps cc 2017, to actually make my gifs.

how i made this gif from this gifset. this will be split into parts to make it easier if you only want to know about certain elements of the process!
screen recording:
i’m going to focus on obs studio, as it’s what i use more often, and as far as i know, anyone can download it, but i have no idea what’s up with the xbox software i use, lmao.
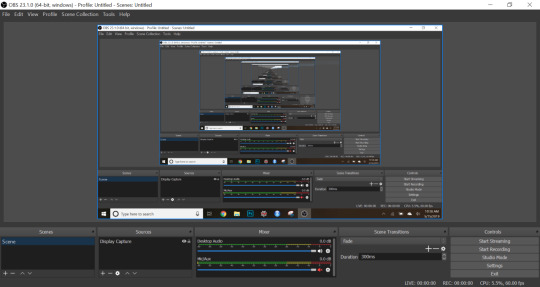
this is what it looks like when i open it. currently, i use the display capture setting as my source, and i will show you how to add that, along with some other settings i use and shortcuts.
alright so at the bottom of the window, there’s the source panel, it looks like this:
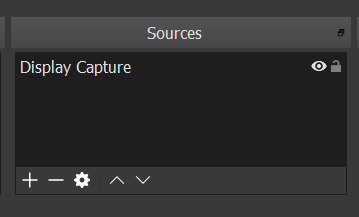
i already have a source added, the display capture. this means that it will record whatever i’m displaying on my screen currently, which is how i like it, as it makes it easy to know what i’m recording. i’ve never messed around with it much, to see what the other options do, because i’m lazy and this does what i need.
to add the source, click on the little plus icon at the bottom of the sources panel. a menu will pop up, and you can select any capture option, and as you can see above, i use display capture.
moving to the right, there’s the audio panel:
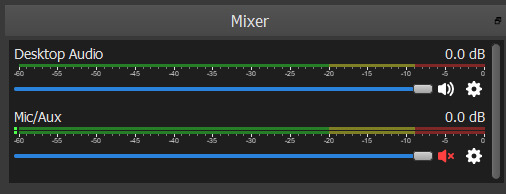
my personal preference is to keep the desktop audio on, and turn the mic/aux audio off. this way if i need the clip later, especially if it’s a video of something especially cute or whatever, i’ll have it and be able to use it. if you have the mic/aux on, it will record whatever sounds you’re making on top of the desktop audio, leading to weird noises mixed in with the video audio.
and finally, moving to the right again, there’s the controls panel:
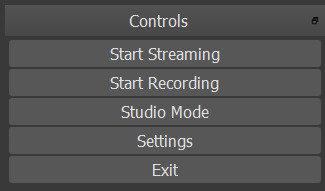
this is pretty self explanatory, here is where you can start/stop a recording, access the settings, or exit the program. i don’t use these start/stop buttons, but that’s because of a shortcut i will show in a second.
this is pretty much everything i deal with on the main page. there’s a ton of other options/information/things, but i haven’t messed around with them too much, so i’m not sure what a lot of them do.
next i’ll show the setting i change/use. this is what the setting page looks like when you open it using the button on the control panel:
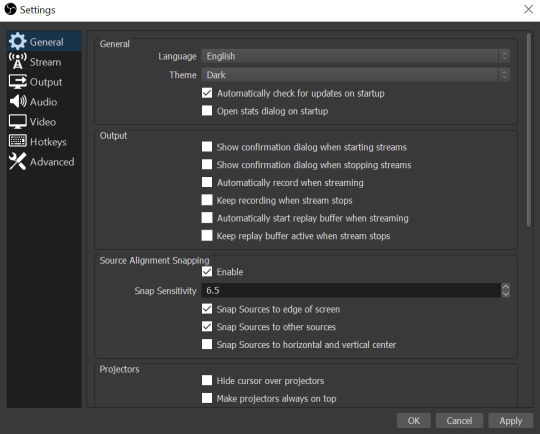
now i ignore most of the tabs on the left, because i’m only using obs for screenrecording, and not for livestreaming. i do change things under ‘output’ and ‘hotkeys’.
output:
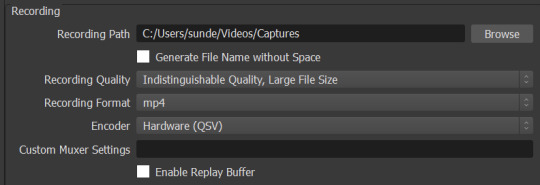
here i’ve changed the recording path to go to a specific folder rather than the general one it will send it to. during the hockey season, when i’m possibly making gifs for 3 games at a time i change that folder to one for whatever the date is. during baseball season, i’m less likely to be doing as much so i put it in a general folder that i sort out later.
i don’t remember what the automatic settings are for recording format, but i believe i had to change it to mp4, which is what i need/use for my method of making gifs.
hotkeys:

this is just a little short cut, but i added these hotkeys so i can start and stop recordings without needing to flip to the software, as long as it’s going in the background. i chose this key because it’s one i don’t need in my everyday life, thus minimizing the risk that i’ll ever accidentally record anything i don’t need, which isn’t a big deal, but can be annoying.
advanced:

this isn’t really a setting change, but this is how i have my filenames formatted, at least until i manually change this if i want to, but i believe its the default and it’s honestly really helpful to keep the videos straight when you’re a disorganized mess like me.
i think that’s everything for the screenrecording part of the process. if you have any questions, just ask!
photoshop:
alright so i use the import frames to layers method to make gifs, it’s just how i learned initially, so i’m pretty stuck in my ways.
opening ps:
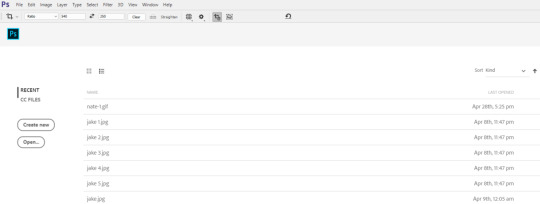
this is what my screen looks like when i open photoshop. i have mine set to the lighter setting bc i like how it looks brighter, but its just a personal preference.
importing clips:
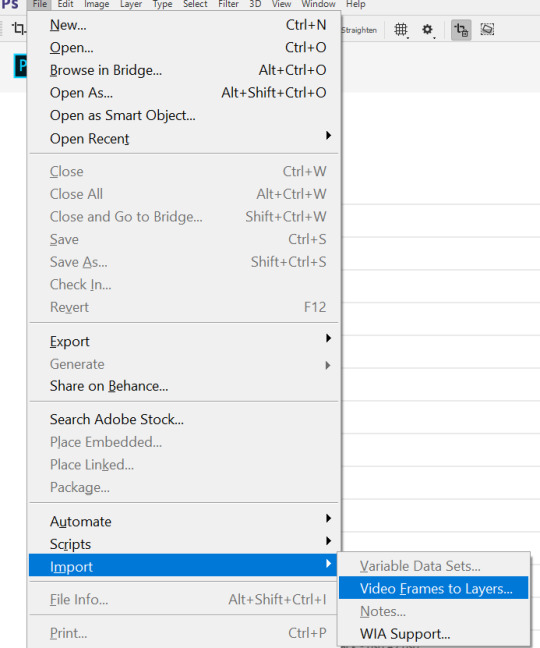
select import and then video frames to layers. it will open your files.
selecting video:
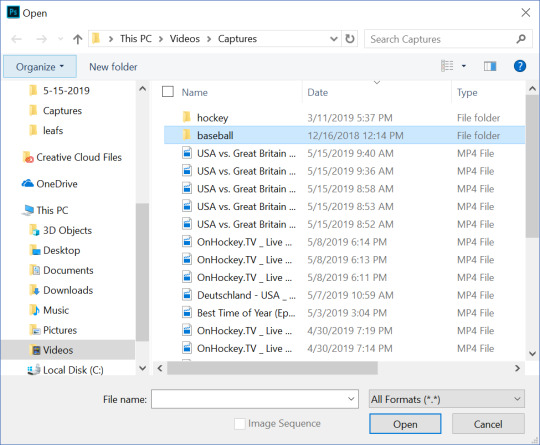
alright, so you can see the mess of videos i have, unsorted right now, lmao. anyway navigate to and select the video you want, and hit open.
selecting frames:
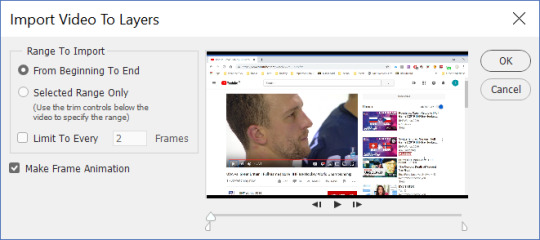
this window will pop up after it loads, and here is where you select the frames you want to include in the gif. in order to do so, you slide the two sliders to frame either side of the clip. as far as the limit to every ___ frames, i try to not use it, or i use every 2 frames, just depending on the clip.
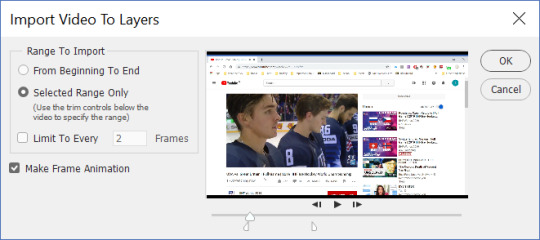
now i have the clip i want, so i hit ok, and let ps do its thing.
process:
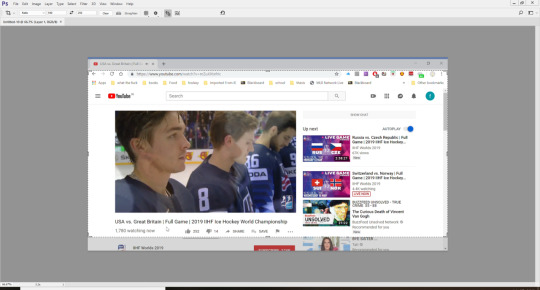
alright so after the frames are loaded, there’s multiple things i do to prepare my gifs. i have to crop them, remove extra frames (delete with the little trash can at the bottom left), change the time delay, and then do the actual editing of the gif. also, i use the motion preset layout, which can be found on the drop down menu in the top right corner.
cropping:

these are the dimensions i use for most of my gifs. i range between 250-300 depending on the video, but 540 is almost always there, due to tumblr’s dimensions for photos/gifs. 268 x 268 is what i use for square gifs.
the cropping button is found on the left side menu, and it looks like that little symbol on the far left of the picture above.
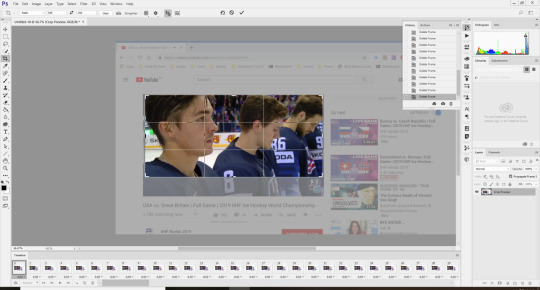
once i have the area i want selected, i doubleclick and it crops the frames.
time delay:
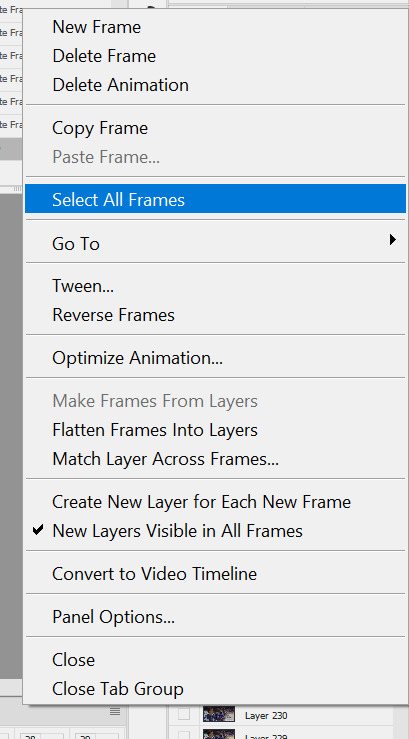
to change the time delay, click the little symbol you can kind of see in the photo above, with the four or so lines. it’s above the frames along the bottom of the screen, at the right. when the menu pops up, click select all frames, so you can change the timing for all the frames. once all the frames are selected, click one of the little carrots next to the numbers at the bottom of the frames, as seen in the picture below.
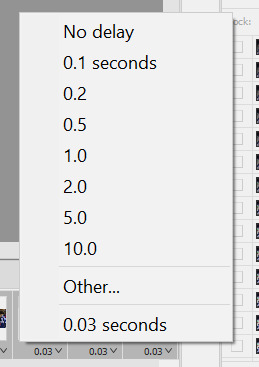
now you choose the time delay you want. when im not skipping any frames, i run between 0.05 to 0.06. if i am skipping, it’s between 0.08 to 0.1. just kind of play with it, til you find what works for you.
editing:
i always sharpen my gifs, it’s the best way to make your gifs look as nice as possible. to do so i use a sharpening action, found here. there is also a tutorial here for loading and using the action, which is much better than anything i could say, so use that!! i literally ALWAYS use this action/method, i love it so much. also, that blog is a goldmine for gif/edit help.
coloring:
alright, honestly im not going to be any help here, im so bad at coloring. at this point i have the same kind of things i do depending on where the game im makes gifs for is, since 81 and 41 games(ish) are in the same place for my teams during their seasons and then i just kind of make it up as i go. for actual help, i recommend the blog w the tutorial from above, just looking around there, or messing around in photoshop itself.
exporting:
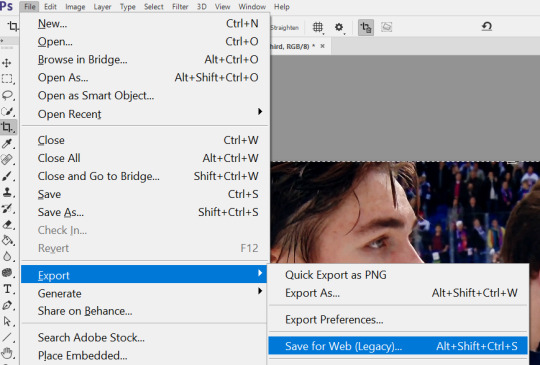
follow these steps to save for tumblr. once the window opens and is ready, change the width to 540 for the best results for tumblr.
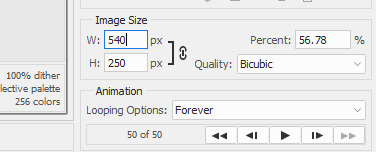
make sure the gif is under 3mb, otherwise tumblr won’t play it and it will look like a photo. then just post! and be happy!! send any questions my way, always happy to help :-)
#here it is!#its so long dksfjsdkljf#hope it helps!#im always here to answer questions too!!#danhalen#tutorials#a
16 notes
·
View notes
Text
Resources #5
Dropbox App Analysis
Dropbox is a mobile application that allows people to access their files from their cloud storage. It has covered both iOS and Android. Dropbox is great example of the difference between android and iOS, the hierarchy of app as not complicated, but in the same time covers all important elements.

Opening Screen: 1. After clicking on the Application Icon/Launcher Icon the app automatically sends you to “Recents” which is not a home screen, just a top level of apps hierarchy. “Recents screen” (fig.) allows users to directly access these screens: Settings, Notifications, Search, Recents Files, Files, Action Button, Photos and Offline. Android has just four direct screens to offer: Drawer Menu, Search, Recents Files and FAB.
FAB stands for Floating Action Button, FABs are usually located in the bottom-right corner and visualised with strong contrasted color and shadow. FAB is popular in Android, but it is getting quite common in iOS as well. However, dropbox for iOS is not using this type of navigation.
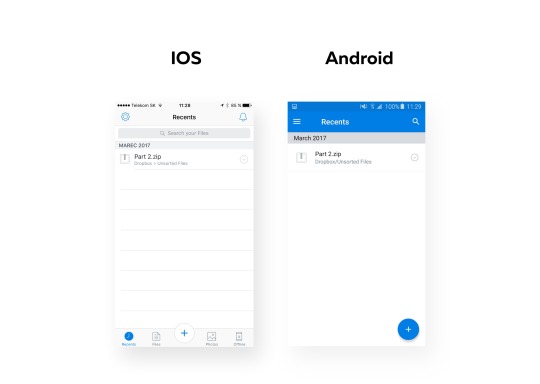
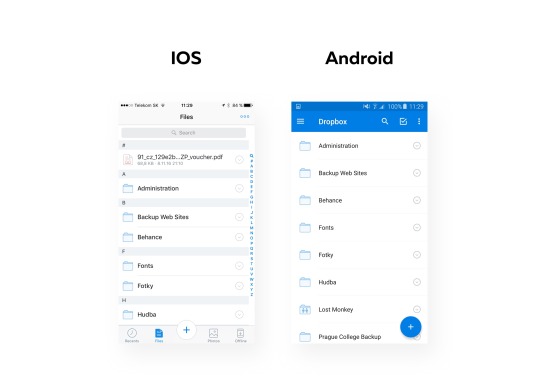
2. The picture below (fig.) illustrates the main difference in navigation. When Android users has to open drawer menu in an effort to access file screen, iOS is using tab-bar/bottom navigation, what means that they can access it within one tab.
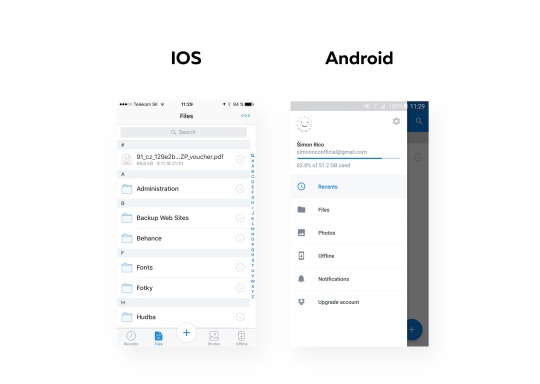
3. Files screen, is a screen from which you can access all your uploaded files. The main difference is in sorting. iOS uses “sort by name” type by default, Android uses “sort by type” by default. It means, in this particular scenarios (fig.) the unsorted PDF file is located on the top in iOS and in Android is on very bottom(is not visible on screen). Another difference is on Navigation Bar in on top right corner. iOS is hiding all Navigation Icons on the Navigation Bar, instead of icons it uses 3 dots. After clicking on this 3dots users have access to needed actions. Android, is showing Search Icon, Check-Mark icon and 3dots. This allows them to checkmark needed files directly from file screen.
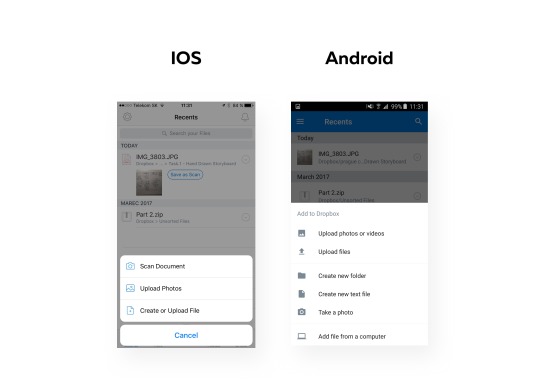
4. Action Botton (iOS) and Floating Action Botton (Android) are the most recognisable buttons. On the click they allow to Add, Scan or create file. FAB has more function: Upload photos or videos, Upload files, Creat Folder, Create new text file, Take a photo or Add file from a computer. Action Sheet that is showing these options covering almost 2/3 of whole screen. iOS is leaner in offering list. It has just 3 buttons plus cancel button. Action Sheet is smaller and has rounded corners.
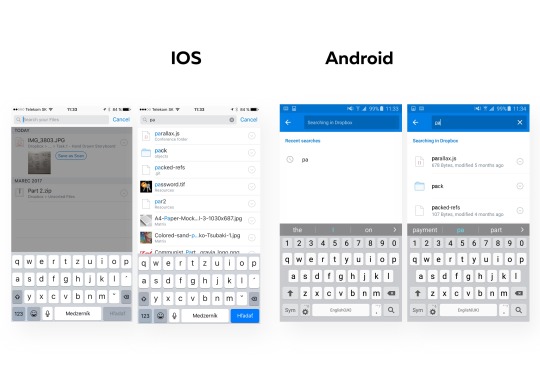
5. Search button is necessary in apps with big about of data. After click on search in iOS user is still able to see the screen he was before in the background. Android’s search hides the screen with white solid. After typing “pa” into search iOS shows almost 8 results directly without hiding a keyboard. Android shows just 3. The reason why it is like that is the vertical size of table rows.
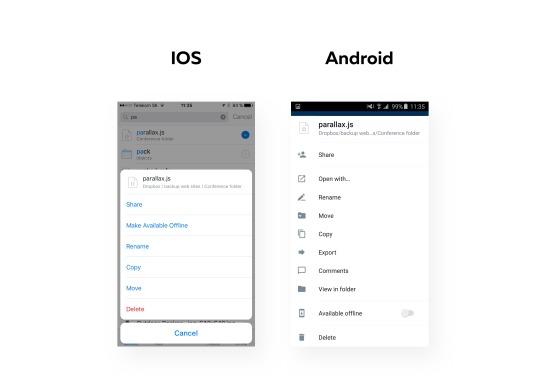
6. Let’s assume, user wants to make some actions with the first shown file “parallax.js”. He needs to click on the arrow icon in both operating systems. The action sheet comes from the bottom. Android as well as when clicking on Action Button/FAB offers more options. Action Sheet in Android covers the majority of the space and the only way how to go back in navigation is to swipe the sheet down. In iOS users is still able to see the screen he was before the click and there are two possibilities how to go back from this screen. Either tap on shadowed area or tab on Cancel Button.
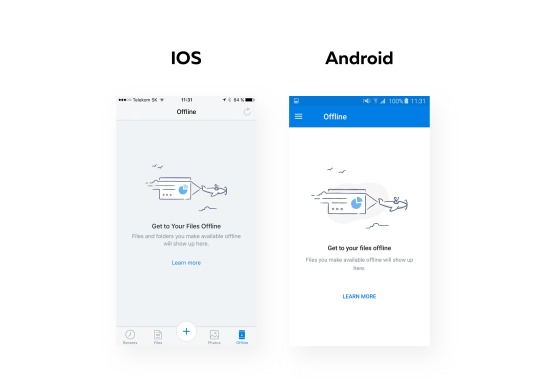
7. The last screen is the “Offline” screen. This account has no file in this category therefor the screen is showing a Zero Data Screen. Zero Data Screen,is there instead of white space and is often giving a hint how to fill it with data. Both operating systems has really similar illustration. The background is in different color, but what is interesting is the typography here. The header “Get to Your Files Offline” is written differently on Android. The only capital letter here is letter “G”. On the other hand, iOS’s “Learn more” has just capitals “L”, where Android has both words in capital letters: “LEARN MORE”.
Resources: DropBoxLogo: http://www.pcmag.com/business/directory/cloud-storage/657-dropbox
https://www.dropbox.com/tour/1
https://android.jlelse.eu/4-things-to-know-about-good-android-ux-design-bc1a5a7ab9a6
https://www.youtube.com/watch?v=tUeqYVm-KZw
0 notes
Photo

DO NOT REBLOG.
10 Cloverfield
31
6 Underground
A Million Little Pieces
A Perfect Getaway
A Scanner Darkly
A Violent Separation
Albert Nobbs
All About Nina
Anna Karenina
Annihilation
Ant-Man & The Wasp
Ant-Man
Age of Ultron
Avengers: Endgame
Avengers: Infinity War
Avengers
Barefoot
Batman (1966)
Batman Forever
Batman Returns
Batman vs. Superman
Birds of Prey
Black Panther
BlackKKlansman
Boondock Saints 2
Boondock Saints
Breaking Dawn, Part 1
Can You Keep A Secret
Captain America Civil War
Captain America The Winter Soldier
Captain America
Captain Marvel
Chitty Chitty Bang Bang
City of Ember
Constantine
Covenant, The (2006)
Crawl
Dark Phoenix
Days of Future Past
Dead Don’t Die, The
Deadpool 2
Deadpool
Doctor Strange
Far From Home
Fifth Element
Ginger Snaps 2
Ginger Snaps Back
Ginger Snaps
Godzilla
Greatest Showman, The
Grinch
Guardians of the Galaxy, Vol 2.
Guardians of the Galaxy
Hanna med Hanna
Hannibal Rising
Hannibal
Hellboy & Hellboy: Golden Army
Hellboy (2019)
Hellboy (animated movies)
Her Smell
Hulk
Hunger Games Catching Fire
Hunger Games Mockingjay Part 1
Hunger Games Mockingjay Part 2
Hunger Games
Hungry Hearts
Hunt, The
In Your Veins
Informer, The
Interview with the Vampire
Iron Man 2
Iron Man 3
Iron Man
Jigsaw
Joker
Jurassic Park Fallen Kingdom
Jurassic World
Justice League
Kick-Ass 2
Kick-Ass
Knives Out
Labyrinth
League of Extraordinary Gentleman
Legend
Logan Lucky
Logan
Man from UNCLE, The
Man of Steel
Manhunter
Matrix Trilogy
Maze Runner ST
Maze Runner TDC
Meyerowitz Stories, The
Midnight Special
Monster
Mr. Right
Muppets, The
New Moon
Night Hunter
Nightmare on Elm Street 1
Nightmare on Elm Street 7
Nocturnal Animals
Old Guard, The.
Ophelia
Out of the Dark
Outlaw King
Patterson
Phantom of the Opera
Pirates of the Caribbean 2
Pirates of the Caribbean 3
Pirates of the Caribbean
Pitch Black
Playing it Cool
Polar
Practical Magic
Princess Bride
Prophecy 1
Prophecy 2
Red Canyon
Red Dragon
Report, The
Resident Evil Afterlife
Resident Evil Apocalypse
Resident Evil Damnation
Resident Evil Degeneration
Resident Evil Extinction
Resident Evil Retribution
Resident Evil Final Chapter, The
Resident Evil Vendetta
Resident Evil
Rezort, The
Riddick
Riot
Rogue One
Savages
Saw 4
Saw 5
Saw 6
Saw
Serenity
Siberia
Silence of the Lambs
Solo
Southpaw
Spiderman Homecoming
Star Trek 1
Star Trek 2
Star Trek 3
Star Trek 4
Star Trek 5
Star Trek 6
Star Wars 1
Star Wars 2
Star Wars 3
Star Wars 4
Star Wars 5
Star Wars 6
Star Wars 7
Star Wars 8
Star Wars 9
State of the Union
Strangers
Suicide Squad
Terminator Genisys
This is Where I Leave You
Thor Dark World
Thor Ragnorok
Thor
Tomb Raider
Tracks
Twilight
Underworld Awakening
Underworld Blood Wars
Underworld Evolution
Underworld Extended
Underworld Rise of the Lycans
Venom
Wall, The
Wanted
What If
Wolverine Origins
Wolverine
X Men 3
X Men Apocalypse
X Men First Class
X Men
#DO NOT REBLOG.#NAVIGATION. ( icons. )#NAVIGATION. ( unsorted icons. )#NAVIGATION. ( movie icons. )#NAVIGATION. ( unsorted movie icons. )
2 notes
·
View notes
Photo

DO NOT REBLOG.
#DO NOT REBLOG.#NAVIGATION.#NAVIGATION. ( icons. )#NAVIGATION. ( unsorted icons. )#NAVIGATION. ( fc icons. )#NAVIGATION. ( unsorted fc icons. )
0 notes
Photo

DO NOT REBLOG.,
12 Monkeys, seasons 1-4
A Discovery of Witches, season 1
Angel the Series, seasons 1 & 5
Animatl Kingdom, season 1-4
Batwoman, season 1
Blacklist, seasons 1-7
Buffy the Vampire Slayer, seasons 1, 2 & 5
Carnival Row, season 1
Cleverman, season 1
Doctor Who, season 5
Dooom Patrol, season 1
Firefly, season 1
Frontier, seasons 1-3
Swamp Thing, season 1
Yellowstone, seasons 1-3
#DO NOT REBLOG.#NAVIGATION. ( unsorted icons. )#NAVIGATION. ( series. )#NAVIGATION. ( unsorted series icons. )#NAVIGATION. ( icons. )
0 notes