#My saves are 1 year old so it's a double layer of separation and I get to be horrified about my own stupidity
Explore tagged Tumblr posts
Text
A very interesting thing about the roleplaying options of scarlet hollow that somehow wasn't achieved by other good roleplaying games for me, is the way that me playing fairly true to what I feel is right kinda sprouted up a fucked up character that I can actually treat as a full-fledged one, and fairly distinct from me too.
I assume it's the combo of immutable truths and connections of the PC (an escaped Scarlet, no relatives left until Tabitha etc.) + choosable truths and lies (and the way they're expressed)+ plus wonderful log system that stays with the saves which means that if you save often enough you get to actually track the textual behavior of the PC and realize how insane they sound.
#My saves are 1 year old so it's a double layer of separation and I get to be horrified about my own stupidity#Anyway I've made Mundo's design back then and now I've actually gotten a few ideas about her characterization#And like. I literally only have OC's as a design practice and don't really do anything about them 'cause I draw as a character exploration#And obviously they don't have a personality to discover#So the fact that it managed to happen with self-insert out of all things is frankly bonkers#The character flaws that sprouted from trying to avoid my own are fascinating#And I get to do stupid shit with her cause her canon is very vague for obvious reasons#Anyway I'm having fun#Scarlet hollow#dumayu#вышедшее из под моего пера
8 notes
·
View notes
Text
Oblivious
(Or 7 Things the Phantom Thieves Learn to Appreciate About Ryuji and 1 Thing They Don’t)
AO3 Link
1. Honesty. Because in Akechi's world of polite pleasantries, deception, and betrayal, Ryuji's blunt form of honesty is refreshing in the moronic way it exposes his proverbial jugular.
(Hey guys, guess who’s posting a fic for the first time in years, based mostly on SPITE and my desperate desire to give Ryuji the content he deserves?)
“I don’t like this, and I definitely don’t like you,” is the first thing Ryuji says to him as Akechi makes his way around the last turn up the LeBlanc staircase and enters the attic space Akira calls home.
The blond is slouched in a chair at the table near the beat up old couch and is glaring at him openly. Akira shoots him an apologetic look from his own place beside his friend, elbowing the boy softly when Ryuji opens his mouth to continue. Ryuji practically pouts at the silent reprimand but crosses his arms and says nothing else.
“Ignore him. It’s easier that way,” Morgana says, leaping from the floor to Akira’s lap to the table top in one fluid movement, tail lashing out behind him and blue eyes smug.
Ryuji redirects his glare at the feline and sticks out his tongue but otherwise makes no move to retaliate.
In truth, Akechi finds Ryuji’s petulance ridiculous in its childishness, but instead of rolling his eyes as he wants to, he smiles, working just enough ruefulness into his eyes to be believable. “No, no,” he sighs, even and polite. “I, too, regret that I couldn’t have sought out your help under more… pleasant circumstances.”
Akira nods in understanding, but Ryuji scoffs. Loudly. “Yeah, sure, you little—”
“Ryuji.” Akira’s voice somehow holds both warmth and warning and the blond cuts off immediately, letting the rest of his statement taper into an irritated sigh through clenched teeth.
The two share a long look, but Ryuji eventually turns away and reaches back to scrub agitatedly at the back of his neck. “Yeah, fine, whatever,” he says to no one in particular, then without looking, “Sorry,” at Akechi, whose smile tightens imperceptibly.
The flush that sweeps from neck to his ears, the hard set of his jaw, the deep furrow in his brows, the defensive cross of his arms; even without his previous statements, Ryuji couldn’t be less obvious if he had disgust scrawled across his forehead in bold red letters. Akechi wants to laugh. In this world of deception, manipulation, and betrayal, such an inability to conceal your own feelings is, quite frankly, a death sentence. Akechi has seen it, experienced it, chosen to become its executioner to avoid becoming its victim and wonders, distantly, how this volatile boy managed to go unscathed in such a world.
Across the table, Ryuji fidgets, rubs a firm hand up and down the length of his right thigh in what is most likely a nervous habit, and Akechi remembers, ah yes, that’s right, he hasn’t.
Still, the foolish fire that flares in the former athlete’s eyes is something Akechi can respect. Anger and hatred are powerful motivators that can topple empires, if channeled correctly. Akechi looks forward to seeing the ways the boy (and that’s what he is—a boy, a child) will burn for his convictions.
The soft chime of the bell over LeBlanc’s door rings out clearly even from the floor below them. The low chatter that follows brings Akechi from his thoughts as the rest of the group files into the room.
“Sorry we’re late,” Makoto apologizes, “but someone had to pick up snacks.”
“I had to rush here straight from a shoot!” Ann throws two grocery bags onto the table then roots through one to pull out a bag of chips and a jelly drink. “Besides,” she continues with a wink, “I brought enough to share.”
Ryuji visibly perks up at that and reaches across the table for one of the bags, all former moodiness vanishing in place of a bright grin. “My hero,” he says reverently, snagging a can of soda and popping it open with a snap.
“Something we can agree on,” Morgana adds, purring loudly when Ann slides him a grocery store tuna platter.
Ann rolls her eyes, but her smile is soft. “You’re just easy to please. Plus, I couldn’t have gotten all this if Haru didn’t offer to pay.”
At the mention of her name, Haru shrugs politely, “It’s almost dinner time, and I thought everyone could use a bit of pick me up.”
Futaba whoops through a mouthful of chips and wipes an imaginary tear from her cheek, “Haru, you are too good for this impure world.” Then she frowns at Yusuke as he stares quizzically at the two different choices of gummy candies on the table before him. “Just pick one!”
Yusuke’s brows furrow as he learns further down to inspect each bag. “This one has a higher calorie count and would be more energy efficient,” he mumbles thoughtfully. “But this one is a much more pleasing shade of red.”
Futaba buries her face in her hands, “Inari, please.”
Despite her earlier frustration, Makoto laughs as she slips onto the couch before turning her attention to Akechi and smiling, exasperated but fond. “I hope you know what you’ve just gotten yourself into.”
Akechi’s eyes wander the room, landing on Akira who is regarding his friends with such affection in his eyes and stifling a laugh into his hand at something Ryuji is saying. When the blond boy notices his stare, his eyes narrow in suspicion, but Akechi is unperturbed. The unguarded expressions that flit across his face make him all the easier to read, all the easier to toy with. Idiotic as it may be, his blunt honesty is refreshing in its own way.
Akechi returns Makoto’s smile with one of his own.
This is going to be disgustingly easy, isn’t it?
~
It happens a few days later, while on what the team had called a Mementos Run.
They’ve been here for hours now, meandering aimlessly through an endless maze of floors for no apparent reason and Akechi is tired. There are at least three separate layers of grime and sweat covering his skin, the temperature of each floor is muggier and more oppressive than the last, Morgana’s bus form is cramped with barely enough room for them even without Akechi, and to make matters worse, the morons won’t stop talking.
“I watch TV to glean new information, but the commercials tend to distract me…”
How can one let their attention be so fickle, especially with everything at stake?!
“Whenever I try to study, I end up playing games instead.”
No wonder you can’t get a good grade to save your life.
“It’s so difficult to balance school life with thief life.”
If only such petty things were the only worries for—
“Joker, shadow up ahead!”
Akechi would rather kiss Shido’s ass than fight another battle, but he isn’t given the choice.
They ram into the dark mass before them and the shadow dissolves into another four harmless enemies— it is the monotony more than anything that is driving Akechi up the walls.
“Skull, Mona, Crow, with me!” Joker calls and if Akechi’s hits land harder than usual this battle, none of the others make any comment on it.
“Skull, you hit me!” Mona cries after the shadows have dissipated, rubbing agitatedly at the apparently effected portion of his midriff and glaring daggers at the teammate in question.
“I was confused! It’s not like I could help it!”
“Leave it to you to get confused from such weak enemies.”
“Yes, well, if someone had actually been on top of their Amrita spells, we wouldn’t have this problem in the first place, would we?!”
Akechi doesn’t realize he’s spoken aloud until silence descends upon them, broken only by Mona’s indignant spluttering. It’s a stupid mistake and Akechi knows it. He’s about to apologize profusely to get back in everyone’s good graces but then Skull let’s out a surprised snort.
Suddenly the blond Phantom Thief is doubled over laughing, only making Mona fluster more. “Oh man Mona, you’re gonna need an extinguish orb to take care of that burn!” he snickers. Then Skull is raising a hand, palm directed at Akechi, who stares at the proffered appendage in confusion.
Skull finally raises his head to quirk a brow at Akechi, smile wide and vestiges of mirthful tears still shining in the corner of his eyes. “C’mon man, don’t leave me hanging.”
Oh. Oh, this is one of those bonding things, isn’t it? This is a good thing. This will work in his favor.
Akechi raises his own hand and high fives the other boy. The clap that rings into the now empty Mementos corridor as well as the slight sting it leaves behind is oddly satisfying. Akechi blames the fatigue.
Skull straightens up then and positively beams, slapping a hand on Akechi’s back right between the shoulder blades.
The entire exchange leaves Akechi feeling… unexpectedly disconcerted, uncomfortable and out of his own depth as his exhausted mind struggles to make sense of it all.
He had snapped at Mona, let his anger leak through his carefully crafted façade of friendly smiles and polite pleasantness, and now Skull is smiling at him, bright and entirely genuine, for the first time since they met.
How… odd.
“Okay, okay,” Joker interrupts, “I think everyone is getting a little tense, so we should probably head back for today.”
A round of agreement follows and they make for the closest safe room. Akechi gets enough of a handle on himself to join in on the usual incessant chatter but finds it harder than usual to concentrate on endearing himself.
For the first time, Akechi wonders what it would be like to let himself be a part of… whatever these people are.
~
In the end, Akechi can admit there is a beauty to the cruel irony of fate.
“Dude, you’re more than special…” Ryuji tells him, standing tall, backed by the rest of the Phantom Thieves. Akechi refuses to look up at him, at any of them, kneeling as he is on the battered ground, defeated, helpless, and just— so tired.
A bitter chuckle bubbles low in his throat. Ryuji’s words are a moronic attempt to manipulate him at his most vulnerable, a shallow piece of comfort meant to lure him into helping them by feeding on his desperation to be someone, to mean something, when they all know that the truth is, he is nothing.
Or rather, it should be.
In his world of deception, manipulation, and betrayal, an inability to conceal your own feelings is, quite frankly, a death sentence.
But this boy standing before him is volatile and blunt, hopelessly inept at masking his emotion. He is driven by anger and rebellion, and whether he’s shouting in rage or in joy, he never says anything he doesn’t mean, consequences be damned. Akechi wants to scream. The world should have ripped him to shreds, torn him apart for being so damn honest and yet there he stands, bruised and exhausted but not beaten.
Akechi lets out a shaky gasp of a laugh instead, broken and resigned.
Goro Akechi is nothing special and there are not words that can convince him otherwise.
However, he can accept, maybe, that there are people in the world that genuinely believe he is.
And well, he supposes that’s something, isn’t it?
#Ryuji Sakamoto#goro akechi#persona 5#based on vanilla p5#ryugoro#I guess not really but I guess it can be read that way?#each thief will get a chapter cause there is Too Much to love about Ryuji to fit in a one shot#LetThePTBeFriends2k19#cf writes
54 notes
·
View notes
Text
STARTUP IN FOUNDERS TO MAKE WEALTH
Would it be useful to have an explicit belief in change. And I think that's ok. Mihalko seemed like he actually wanted to be our friend. Grad school is the other end of the humanities. Indirectly, but they pay attention.1 US, its effects lasted longer. Together you talk about some hard problem, probably getting nowhere.
Informal language is the athletic clothing of ideas. Why? They got to have expense account lunches at the best restaurants and fly around on the company's Gulfstreams. Meaning everyone within this world was low-res: a Duplo world of a few big hits, and those aren't them. It's not true that those who teach can't do. Or is it?2 I think much of the company.
Part of the reason is prestige. If you define a language that was ideal for writing a slow version 1, and yet with the right optimization advice to the compiler, would also yield very fast code when necessary.3 Of course, prestige isn't the main reason the idea is much older than Henry Ford. The right way to get it. And indeed, there was a double wall between ambitious kids in the 20th century and the origins of the big, national corporation. The reason car companies operate this way is that it was already mostly designed in 1958. Wars make central governments more powerful, and over the next forty years gradually got more powerful, they'll be out of business. And this too tended to produce both social and economic cohesion. The first microcomputers were dismissed as toys.4 This won't be a very powerful feature. Lisp paper.5 Plus if you didn't put the company first you wouldn't be promoted, and if you couldn't switch ladders, promotion on this one was the only way up.
But if they don't want to shut down the company, that leaves increasing revenues and decreasing expenses firing people.6 One is that investors will increasingly be unable to offer investment subject to contingencies like other people investing. I understood their work. Which in turn means the variation in the amount of wealth people can create has not only been increasing, but accelerating.7 Surely that sort of thing did not happen to big companies in mid-century most of the 20th century and the origins of the big national corporations were willing to pay a premium for labor.8 As long as he considers all languages equivalent, all he has to do is remove the marble that isn't part of it. I had a few other teachers who were smart, but I never have. And it turns out that was all you needed to solve the problem. You have certain mental gestures you've learned in your work, and when you're not paying attention, you keep making these same gestures, but somewhat randomly.9 I remember from it, I preserved that magazine as carefully as if it had been.10 That no doubt causes a lot of institutionalized delays in startup funding: the multi-week mating dance with investors; the distinction between acceptable and maximal efficiency, programmers in a hundred years, maybe it won't in a thousand. Certainly it was for a startup's founders to retain board control after a series A, that will change the way things have always been.
Which inevitably, if unions had been doing their job tended to be lower. They did as employers too. I worry about the power Apple could have with this force behind them. I made the list, I looked to see if there was a double wall between ambitious kids in the 20th century, working-class people tried hard to look middle class. In a way mid-century oligopolies had been anointed by the federal government, which had been a time of consolidation, led especially by J. Wars make central governments more powerful, until now the most advanced technologies, and the number of undergrads who believe they have to say yes or no, and then join some other prestigious institution and work one's way up the hierarchy. Locally, all the news was bad. Close, but they are still missing a few things. Not entirely bad though. I notice this every time I fly over the Valley: somehow you can sense prosperity in how well kept a place looks. Another way to burn up cycles is to have many layers of software between the application and the hardware. And indeed, the most obvious breakage in the average computer user's life is Windows itself.
Investors don't need weeks to make up their minds anyway. The point of high-level languages is to give you bigger abstractions—bigger bricks, as it were, so I emailed the ycfounders list. They traversed idea space as gingerly as a very old person traverses the physical world. And there is another, newer language, called Python, whose users tend to look down on Perl, and more openly. At the time it seemed the future. What happens in that shower? You can't reproduce mid-century model was already starting to get old.11 Meanwhile a similar fragmentation was happening at the other end of the economic scale.12 But the advantage is that it works better.
Most really good startup ideas look like bad ideas at first, and many of those look bad specifically because some change in the world just switched them from bad to good.13 There's good waste, and bad waste. A rounds. A bottom-up program should be easier to modify as well, partly because it tends to create deadlock, and partly because it seems kind of slimy. But when you import this criterion into decisions about technology, you start to get the company rolling. It would have been unbearable. Then, the next morning, one of McCarthy's grad students, looked at this definition of eval and realized that if he translated it into machine language, the shorter the program not simply in characters, of course, but in fact I found it boring and incomprehensible. I wouldn't want Python advocates to say I was misrepresenting the language, but what they got was fixed according to their rank. The deal terms of angel rounds will become less restrictive too—not just less restrictive than angel terms have traditionally been. If it is, it will be a minority squared.
If 98% of the time, just like they do to startups everywhere. Their culture is the opposite of hacker culture; on questions of software they will tend to pay less, because part of the core language, prior to any additional notations about implementation, be defined this way. That's what a metaphor is: a function applied to an argument of the wrong type.14 Now we'd give a different answer.15 And you know more are out there, separated from us by what will later seem a surprisingly thin wall of laziness and stupidity. There have probably been other people who did this as well as Newton, for their time, but Newton is my model of this kind of thought. I'd be very curious to see it, but Rabin was spectacularly explicit. Betting on people over ideas saved me countless times as an investor.16 They assume ideas are like miracles: they either pop into your head or they don't. I was pretty much assembly language with math. Whereas if you ask for it explicitly, but ordinarily not used. A couple days ago an interviewer asked me if founders having more power would be better or worse for the world.
Notes
The reason we quote statistics about fundraising is so hard to prevent shoplifting because in their early twenties. Auto-retrieving filters will have a definite commitment.
It will seem like noise.
It's one of the world. That's why the Apple I used to end investor meetings too closely, you'll find that with a neologism. I've been told that Microsoft discourages employees from contributing to open-source projects, even if we couldn't decide between turning some investors away and selling more of a press conference. All you need but a lot about some disease they'll see once in China, many of the biggest divergences between the government.
Mozilla is open-source projects, even if they pay a lot of time. If they agreed among themselves never to do that. And journalists as part of grasping evolution was to reboot them, initially, to sell your company into one? Most expect founders to overhire is not so much better is a net win to include in your own time, not just the local area, and Reddit is Delicious/popular with voting instead of just doing things, they were shooting themselves in the field they describe.
My work represents an exploration of gender and sexuality in an urban context, issues basically means things we're going to get you type I startups. As a friend who invested earlier had been with us if the current options suck enough. MITE Corp.
The top VCs and Micro-VCs. When you had to for some reason, rather than admitting he preferred to call all our lies lies. But what they're wasting their time on schleps, and at least what they really need that recipe site or local event aggregator as much as Drew Houston needed Dropbox, or to be able to raise money on convertible notes, VCs who can say I need to run an online service. It's not a product manager about problems integrating the Korean version of Explorer.
What you're too early really means is No, we love big juicy lumbar disc herniation as juicy except literally. In either case the implications are similar. But there are few things worse than the don't-be startup founders who go on to study the quadrivium of arithmetic, geometry, music, phone, and only one founder take fundraising meetings is that it's bad to do more with less, then add beans don't drain the beans, and they have to do that, in which practicing talks makes them better: reading a talk out loud at least wouldn't be worth doing something, but they're not ready to invest in your previous job, or the distinction between matter and form if Aristotle hadn't written about them.
Philadelphia is a net loss of productivity. As a rule, if the growth is genuine. Which implies a surprising but apparently unimportant, like a core going critical.
In practice the first year or so. If you weren't around then it's hard to think about so-called lifestyle business, having sold all my shares earlier this year. Since the remaining power of Democractic party machines, but we do the right order. They're an administrative convenience.
35 companies that tried to attack the A P supermarket chain because it has to be the more the aggregate is what the editors think the main reason is that you're paying yourselves high salaries. What is Mathematics? Once again, that good paintings must have affected what they claim was the fall of 2008 but no doubt partly because companies don't. Perhaps the solution is to show growth graphs at either stage, investors treat them differently.
At the moment the time it still seems to have, however, is a fine sentence, though I think all of them is that you're paying yourselves high salaries. We thought software was all that matters to us. It's a lot about some of the business much harder to fix once it's big, plus they are to be something of an FBI agent or taxi driver or reporter to being a scientist. Some would say that intelligence doesn't matter in startups is very common for founders to walk to.
In fact, we try to be a special recipient of favour, being a scientist.
It is the most successful investment, Uber, from which Renaissance civilization radiated.
When an investor they already know; but as a percentage of GDP were about the team or their determination and disarmingly asking the right sort of things economists usually think about so-called lifestyle business, A. Put in chopped garlic, pepper, cumin, and would not be surprised if VCs' tendency to push to being told that they probably don't notice even when I first met him, but most neighborhoods successfully resisted them. There is of course reflects a willful misunderstanding of what you write for your present valuation is the most promising opportunities, it is to get into the intellectual sounding theory behind it.
Innosight, February 2012. Ashgate, 1998. So it is less than a Web terminal.
This is why we can't figure out the same ones. Trevor Blackwell, who had been able to. We didn't let him off, either as an example of applied empathy. And yet if he were a variety called Red Delicious that had other meanings.
#automatically generated text#Markov chains#Paul Graham#Python#Patrick Mooney#things#A#car#part#investors#lifestyle#wall#reading#friend#Rabin#herniation#world#lot#founder#language#opportunities#Web#kids#life#founders#exploration#As#theory#software
1 note
·
View note
Text
At the End of the Road
a standalone venture into the world of fine diner dining ...
@today-in-fic
&&&&&&&&&&&
Their first time at Waffles and Stuff, they had the heavy mantle of deadly 10-year-olds weighing on their shoulders, the diner dim with midnight shadows, the waitstaff mellow through pouring rain. Settled awkwardly at the counter, Scully felt around until her feet found purchase on the footrest while Mulder wrestled with sodden coat to hang dripping from the back of cracked vinyl swivel seat. Eventually, the foam finished giving way, shaping to backsides and thighs, warming to damp wool while the pair studied separate menus, quiet in debate over patty melt or salad, burger or chicken, coffee or hot chocolate.
Finally, the ancient waitress, small, quick, tight bun of hair, sweater hugging narrow shoulders, ended her conversation with the cook, coming over at just the moment Mulder decided what to order. How she knew, he’d never know, but know she did and stopping in front of him, “ready to order? Coffee? Tea? Space heater?”
Mulder, tired but still kicking, gave her a crooked smile, “you can’t warm space. It’s too big.”
“Given enough time, I could probably crochet it a blanket though. Maybe that would help.”
Her name was Catherine and he adored her instantly.
Scully, beside him, only absorbed half the conversation, mind caught between grilled chicken with lettuce and avocado and death by double cheeseburger, eyeing the deep-fried pickles for the interim moments between fry consumption and hot chocolate stupor. Hearing Mulder vaguely finish his order of waffles and eggs, she bit the bullet, ordering things the doctor in her screamed about at 3am when she couldn’t sleep from the heartburn singeing her esophagus.
The hot chocolate arrived first, whipped cream high, little bit of cinnamon classing up the plain, chipped mug; second came the pickles, mixing terribly with the drink and Scully loved it, the weird flavors, the grease, the ranch, the tang all smoothed out with warm milk and sugar. Mulder didn’t ask to have one, waiting quietly until she offered, holding out the small coin of fried delight, which he took, thanked her, didn’t ask for more but smiled when the flavors hit his tongue.
Scully’s feet were falling asleep but her belly was filling nicely, cheeseburger sitting precariously first on plate then in stomach, chasing away the gnawing hunger that had plagued them for the last three days, not satisfied with Payday bars and M&Ms, held barely at bay but not providing the shear beautiful thing that was deluxe cheeseburger and mound of vegetable oil crisp potatoes.
She caught Mulder staring at her at some point and when she raised her eyebrows at him, question sent non-verbally given her full mouth, he smiled his second time since they entered the restaurant and answered, small amount of egg caught in his front teeth, “I think you just moaned in satisfaction there, partner.”
Wondering if she should protest, turn red, sink in embarrassment, she instead gave it half a thought, then shrugged, talking through her mostly chewed mouthful, food in cheeks to speak without spitting bits, “damn good fry.”
Catherine refilled the hot chocolates for free, offered them pie, or cupcake in Scully’s case, given she was an ardent pie hater since the beginning of time, didn’t rush the check and circled a large smiley face on the bill, her ‘come again’ cheery against the thundering sky.
“Take as long as you like folks. I’ll be over here working my crossword and crocheting that blanket.”
Mulder snagged the bill, keeping it out of reach in his hand, “I like her and the Bureau will be tipping her double.”
Drifting towards a food coma, she propped her elbow on the counter and balanced her head on her hand, tilting enough to look him square, “if you give her triple, I bet she’ll let us nap here until morning.”
With a gaze that barely hinted at the next 70 years, he nudged her with his knee, receiving a lip twitch in return, the slightest eye twinkle she would never acknowledge having the power to do, before beginning the long slide to the floor, wiggling a little to straighten her pants, free damp cloth from the sticking places against her skin.
He saw that wiggle.
He would remember that wiggle.
Once soaking wet, 2:45am glowing on the dash, hair dripping, stomachs filled, in the car in a splashing dash, he gave her a glance, his diminutive partner already curled around the heater vent, safe in the passenger seat, “you’re going to fall asleep before we get to your apartment, I guarantee it.”
“It’s twelve minutes. I will not fall asleep in twelve minutes.”
Big fat liar.
He had to shake her arm for at least a minute before she even began thinking of forcing an eye open; ten minutes later, she was finally in her front door, Mulder holding her elbow the entire way, navigating her like a slack-jawed drunk up the steps. Setting her bag on the floor, he debating shoving her towards her bedroom so he could drop comatose on the couch but he fought gravity and overstuffed pillows to bid her g’night/g’morning.
He nearly crashed twice trying to make it to his own place with both eyes open.
Falling asleep on his couch, snuggled up tight under two wool blankets and a layer of flannel and fleece, Mulder listened the rain and thunder, wondering if they’d ever find the time to go back to the diner.
He wanted a full order of those pickle chips all to himself.
&&&&&&&&&&&&
Waffles and Stuff glowed in the night. Pitch black around them, savior in fluorescent and neon, it called to them after the longest drive known to man. They were just this side of the Bureau’s cutoff for driving to a crime scene, planes too expensive when a six-hour drive could take care of business.
It wouldn’t have been terrible save the flat tire, the stench of spilled gas from the can in the trunk and the persistent squeak, thud, thump from whatever under the car. Mulder didn’t want to look and Scully didn’t care to look so they suffered the rhythm while trying to keep the other from hangry overtones in their conversations with stolen M&Ms and Starbright mints from Scully’s secret forgotten stash in the side pocket of her suitcase.
They really should have stopped but the thought of Waffles and Stuff by 1:30am, navigator Scully estimated time of arrival, kept them driving past crap fast food for glorious Catherine and her bottomless supply of chocolate, hot or cold form, and the newest special, banana pancakes with whipped cream and strawberries, side of bacon, side of ham, one egg over easy, two wheat toast, grape jelly, one biscuit hold the gravy.
Actually, that was the Mulder special at the moment, of which he’d been extoling virtue since exit 4b or 610, whichever was further back and farther from destination.
Scully, on the other hand, had been drooling, physically and mentally, over the thought of mushroom swiss burger with lettuce, tomato and bacon, bun toasted, fries on the side, crisp side salad with exactly four cups of ranch dressing and croutons by the pound, mozzarella sticks, marinara dipping and for the love of God, some kind of strawberry milkshake.
In the three years since they’d began frequenting Stuff, their combinations had changed drastically in contrast to pricing, décor and staffing but the cook kept cooking, Catherine kept knitting and Mulder kept tipping his usual Bureau approved 30% tip. Finally, in reference to the glow from earlier, Mulder spotted it first and Scully, to this day, swears she heard a small whimper of want escape his lips, forcing his foot down further on the gas pedal.
Scully had just slightly more decorum to keep her sounds to herself.
“Well, hello, my weary travelers.” Catherine waved to the empty room, “your usual is open.”
Mulder gestured Scully forward to the only blue booth, the one that had been reupholstered at some point and by accident done in blue. He’d always meant to ask why blue but tonight, like every other time, the thought fizzled out before fully forming and he was perfectly fine with this. Once they were both in, coats shoved to the sides, dry, not needing a place to drip, Scully tucked one foot under her leg, swinging the dangling one lightly, the breeze of her movement ruffling Mulder’s pantleg every second or third pass by, “cheese?”
Before he could answer, Catherine called out from near the coffee machine, about to begin the hot chocolates, given the chill in the October air, “we’ve got a new item. Max thought it up about a week ago.”
Manly squee loud enough to make Catherine smile, “really? Please say it’s a fried chicken and waffles with a side of home fries and scrambled eggs with green peppers, tomatoes and just a hint of Tabasco sauce and maybe a spritz of lemon.”
Max stuck his head over the order counter, “give me a few weeks on that one but tonight’s is pancakes with crumbled sausage and bacon cooked right in, four egg omelet with jack cheddar, peppers and onions, two biscuits and sausage gravy, perfect for sharing.”
Mulder held up a hand, “I’ll take it. Burn the bacon first please.”
Looking at Scully next, “how about you, Miss Scully? What can I get for you this evening?”
After she told him her order, Catherine came by, drinks in hand, settling into the chair she bought with her, “all right. What’s happening in your world today?”
Their nights at Waffles and Stuff were part therapy, part inquisition, part intellectual debate, part necessary nonsense, Catherine helming it all, feeding them, waiting on them, listening to them and when necessary, pretending to have somewhere else to be when she saw them lock eyes, drop off the Earth, the quiet bubbling them together for what she hoped would be eternity.
Or until the sun came up.
Sometimes it was Scully who looked about to faceplant in her dessert; this time, however, it was Mulder, yawning every thirty seconds like clockwork until Scully, the other foot dangling by now, nudged him gently on the shin, accidently on purpose running her foot closer to his knee than she ever suspected she’d do in daylight.
He didn’t wake up so much as give her a sleepy crook of smile that made her wonder if she really needed to drop him off or if she could just take him home, stash him in her spare room, make him breakfast sometime the following afternoon.
Reluctantly she paid the bill, left the tip, held the coat, guided the body, drove the car, escorted the warm puppy, called the good night, drove the car, opened the door, locked the door, shed the clothes, pulled the covers, hailed the Mulder, succumbed the sleep, dreamed the partner… woke up with a smile to find him banging on her door, donuts in hand and casefile ready.
&&&&&&&&&&&&
From spinning barstool to lone blue booth to corner haven, feet on seats, hands on ankles, smorgasbord between them, plates lined up, a fry for a carrot, a bite of burger for a slice of tomato, one chocolate shake, one strawberry, one mint, each with two straws and spoons for skimming whipped cream, two cherries to Scully, more mint to Mulder.
He stole sips of her water while she talked, she slid pickle coins her way while he nibbled crusts from her buttered toast. Their fingers lingered when reaching for the same crouton soaked in dressing, sliding past and through each other, hanging on with white knuckles one second, back to eating the next.
Hours later, instead of stumbling into the night, he slid quietly in beside her, thigh warm against thigh, hand flat on tender muscle, kneading lightly, waiting as unseen forces pulled her head to his shoulder, tired eyes closed against the world. Mulder set his head against hers, eyes meeting two pair behind the counter, the slightest upturned cheek and chin nod in their direction before closing his own eyes, not worrying about the day ahead, only the Scully beside him and the quiet around.
Catherine looked at her husband, leaning against the counter across from her, “we did good, Max.”
“We did very good.”
#msr#early years#late years#years in between#i had the best deep fried pickles the other day#there really are some decent ones up here in the frozen north#at least in my opinion#my writing#xf fanfic#xfiles fanfic#diners
117 notes
·
View notes
Text
How Cosmetics Equipment can Save You Time, Stress, and Money.
youtube
As a lot of us come to be more mindful of what we're placing in our bodies as well as what we're placing our bodies with, we're likewise becoming much more familiar with what we're placing on our bodies. While the performance of used to pale in comparison to products from our favored make-up counters, there are lots of natural make-up brand names creating products that are highly pigmented, apply perfectly, and put on along with their more synthetic rivals.
But before we get right into our faves, let's obtain one thing directly: "Natural" doesn't automatically imply a product is better or much safer for you, as the FDA has ambiguous requirements on just what comprises a natural product (" all-natural" isn't controlled for cosmetics, so it can be used purely as a marketing term).
Cosmetics Equipment Things To Know Before You Get This

More About Aromatic Oils
charm sector," says cosmetic chemist Ginger King. "As long as the bulk of your product is all-natural, you can state 'natural-based.' There is no policy. Truth naturals have seals like UNIVERSE Natural or Ecocert European companies that enable as much as 5 percent synthetics." The FDA does not have a definition for the term " organic," either, as it is not specified by either the Federal Food, Medicine, and also Aesthetic Act or the Fair Product Packaging and Classifying Act, which they utilize as standards.
There are restricted numbers of products you can make to be classified as organic environment-friendly," King states."' Tidy appeal' is a better term for the consumer as the products are non-toxic and still reliable," claims King. "' Non-toxic' indicates devoid of unfavorable components provided by the Environmental Working Team. This is much better than claiming 'natural' or 'natural' as they are products that carry out without compromising security.
The Facts About Perfume Oil Uncovered
They additionally may not be as reliable as artificial materials." This brings us to an additional point: A component may be all-natural or organic, yet that doesn't mean that there's no chance you'll have an adverse or allergic reaction to it, so it is essential to be conscious of what you're using and also just how your body reacts.
Those that fulfill Sephora's active ingredients standards are regarded "tidy" as well as receive the merchant's Clean at Sephora seal. Active ingredients apart, among the benefits of making use of natural items is that lots of, otherwise all, components are morally sourced as well as cruelty-free. As customers, it's never ever been more crucial to prioritize what we desire in our makeup, and also our cash talks.
The Only Guide for Body Cream
However we likewise wished to help you arrange out your alternatives. The following products have obtained high marks from specialist make-up musicians that have seen and also utilized all of it so you can begin tidying up your cosmetics bag. All items featured on Attraction are separately chosen by our editors. Nevertheless, when you buy something with our retail web links, we might earn an affiliate compensation.
Charm counters can be intimidating, yet is there anything far better than selecting out a brand-new mascara or lipstick? We assume not, and nowadays, thinking about the quantity of areas (both on as well as offline) you can look for appeal products, there's nothing you can't acquire. Whether you're looking for a new nail polish, you're still looking for your perfect structure suit or you need to locate a face laundry that will remove up your skin, it's very not likely that you won't locate something that works.
The 25-Second Trick For Cosmetics Online
To help you browse the large as well as sometimes, overwhelming, waters of searching for charm products, we're sharing 10 suggestions for shopping like a pro. Read on below! Most salespeople are well trained when it comes to the products at the make-up counter, and they're there to help you. Ask the salesmen the distinction between the brand name's powder as well as fluid foundation, ask about which serum you need to be utilizing for your skin's structure and also ask their point of view regarding which lip shade you should try.
Going solo means you will not be able to listen to whether a color looks terrific on you, or if an item is reasonably far too pricey for your budget plan. Your best good friend's input will certainly guarantee you're getting the most effective items for your money. This tip is twofold. First, use your phone to look up item testimonials on the product concerned.
What Does Musk Oil Mean?
Second, look the product online to see if you can find a reduced price somewhere else. Several websites provide free delivery, and also if you can get something for a reduced rate however see it in the shop, you'll get more bang for your dollar. Granted, you possibly wound up at the make-up counter thanks to something you saw on Pinterest to begin with, yet do a great old made keyword phrase search on the social website for appropriate shade depiction in actual life.
Especially on skin treatment items, understand what features certain components. For instance, if you have actually got dry skin, you should run in the contrary direction of benzoyl peroxide, which can cause too much dryness, but functions marvels for acne. Lots of firms have rewards programs, like Sephora's VIB Expert program that compensates you on a factor system based on purchases.
Some Ideas on Cosmetics You Need To Know
Whether it's from the shop itself or directly from the cosmetics business, if you call and request examples, some business enjoy to send them along. Getting a complimentary example before dedicating to an acquisition is the best means to wet your toes prior to you spend a significant piece of change on an exfoliator that you're sensitive to.
If you have actually obtained warm undertones (yellow, golden or peach), your structure should be yellow or peach based. If you have actually got awesome touches (blue or red), your structure ought to be neutral or pink-based. Brave the globe and head to the store without putting on make-up to ensure that you can check out products at the counter.
Acupuncture Needles for Dummies
See to it you're making use of different applicators for whatever to avoid bacteria. There are particular products that can be purchased at the drugstore, and there are others that ought to be spent lavishly on. These might vary depending on which products are most useful to you (if you use structure consistently however only put on lipstick once a month, foundation must be your quality item), however recognize what you agree to invest prior to stepping foot in the store.
Katie Buckleitner I'm a make-up addict and an appeal editor (aka I'm flooded with launches to review dailyno, I'm not grumbling). It just certainly adds one more level to the struggle of finding products that legit work. To make the process a little much less painful for us all, though, I decided to truly take a seat as well as Ahead are the finest 20 I could findthese consist of all of my faves from 2019 (thus far), ranging from a resilient lip stain to a can not- live-without bronzer.
The Best Guide To Cosmetics Equipment
Don't worry, you can thank me later on. Promotion - Continue Analysis Below 1 Best Makeup Item: This Tinted Cream Laura Mercier Tinted Cream Just when you assumed this cult-favorite tinted cream could not obtain any type of betterit effing did. With a brand-new formula that introduced this year (with super moisturizing active ingredients, like macadamia oil), and an increased color range (bless!), you need to put this on your face RIGHT CURRENTLY.
Appeal influencer, Jackie Aina, collabed with Anastasia Beverly Hills to produce a. There's additionally 14 shadows, from matte finishes to metal, that you can use to create any kind of look you think up. 3 Finest Make-up Product: This Structure Stick MAC Studio Fix Soft Matte Foundation Stick I do not learn about you but my foundation moves off my face by lunchtime and also I look legitimate frightening.
Examine This Report on Cosmetic Products
The formula is truly blendable and it leaves a 4 Finest Makeup Products: This Brow Pencil Benefit Cosmetics Eyebrow Styler This eyebrow pencil altered my lifeseriously, WTF was I doing prior to this existed?? It's a. I utilize mine to produce an extra all-natural look, but if you enjoy vibrant brows this pencil will obtain the job done.
5 Best Make-up Products: This Lip Gloss Tarte Double Duty Appeal Busy Gal Gloss Ask anyone who recognizes me, however I loooove a great lip gloss. I'll wear it alone or toss it on over a lipstick to include some sheen. As well as this lip gloss from Tarte is just one of the finest I've tried all year.
The Of Massage Bed
6 Ideal Charm Products: This Fluid Foundation Fenty Appeal Pro Filt' r Hydrating Longwear Structure I was currently stressed with Fenty Appeal's matte foundation, so I could not wait to check out this brand-new hydrating foundationand it didn't disappoint. It provides you. It's likewise packed with grape-seed oil, with fallen leaves you with a fresh, however not oily, radiance.
The slim formula, as well as the brief bristles have the ability to get as well as layer also your tiniest of lashes. 8 Ideal Makeup Products: This Blush Stick Milk Make-up Glow Oil Lip + Cheek So, practically, this can be made use of on your cheeks and your lips, making it a two-in-one (aka a win-win).
Examine This Report about Beauty Products Online
It's super easy to usejust swipe it onto your cheeks (or lips) as well as use your fingers to mix it in. You're going to be obsessed with the large shade tint left behind. 9 Finest Makeup Products: This Liquid Eye Liner Marc Jacobs Elegance Highliner Fluid Eyeliner The tip of this liquid eye liner is so sharp it can truthfully puncture your finger.
Plus, the color reward is a 10/10 as well as the water-proof formula lasts for hours. 10 Ideal Make-up Products: These Highlighter Decrease Becca Glow Silk Highlighter Decrease Afraid of making use of a fluid highlighter!.?.!? Do not be, it's super simple. Use a pair of drops of this one on the high points of your face (cheekbones, temples, and the bridge of the nose) as well as blend.
The Main Principles Of Musk Perfume
11 Best Makeup Products: This Lip Balm Fenty Beauty Pro Kiss' r Lush Lip Balm I have this lip balm in my bag, on https://en.wikipedia.org/wiki/?search=Cosmetics & beauty products my night table, and also on my workdesk at workit's that great. It proclaim to the hydrating shea and also mango butterswithout feeling too heavy on. 12 Finest Makeup Products: This Mascara Stila Magnum XXX Mascara The name of this mascara reveals that it truly does the many in the very best means possible.
13 Finest Makeup Products: This Lipstick Pat McGrath Labs BlitzTrance Lipstick Pat McGrath is the "Mommy of Makeup," as well as this lipstick is her gold child. Due to the fact that of the Brazil-nut oil in the formula, it not only swipes on extremely quickly, but 14 Best Make-up Products: This Liquid Blusher Em Cosmetics Color Decline Product Blusher All you require is one decrease of this fluid flush on both cheeks to obtain a lit-from-within glow.
Best Massage Oil Can Be Fun For Everyone
15 Finest Make-up Products: This Cream Foundation Best Make-up Products: Kevyn Aucoin Foundation Balm The other members of Cosmo's appeal group have actually been going crazy concerning this cream structure, so I needed to try it. As well as, guys, it lived up to every word. It provides you a. And, it's loaded with hyaluronic acid and vitamin E, two MVP components that work to moisturize and also problem your skin.
As well as even if it's a matte suede darkness doesn't indicate that it's going to fail on your eyes. The shadow provides your appearance deepness as well as dimension without going over the top. Use it alone, or pair it with another shadow. 17 Best Makeup Products: This Lip Spot Bite Beauty Outburst Longwear Lip Discoloration Do not obtain it twistedyes, this is a lip tarnish, yet the shade is still extremely bold and also lively.
The Best Strategy To Use For Body Cream
One more perk? The color in fact stays on your lips, פינוק no issue what you had for lunch. 18 Best Makeup Products: This Powder Blusher NYX Professional Makeup Sweet Cheeks Creamy Powder Blush This powder blush is a dream to use. Sweep the flush on your holy places and also around the sides of your temple for an allover flush.
It's on top of your structure. The blendable formula likewise gives you medium insurance coverage, however you can conveniently develop it as much as full insurance coverage if you require to fake a complete night's sleep. 20 Ideal Make-up Products: This Bronzer Fenty Elegance Sunlight Stalk' r Instantaneous Warmth Bronzer My good friends will let you understand that I am absolutely stressed with this bronzer (like, I can not quit speaking about it).
The Facts About Cosmetic Products Uncovered
Ama Kwarteng is the Beauty Aide at Cosmopolitan, covering all points hair, skin, makeup, for both print and also digital. Advertisement - Continue Reading Below.
Florage
Jerusalem St 125, Safed
052-827-2223
0 notes
Text
How to Make Costume Dragonfly Wings

My four-year-old insisted on being a dragonfly this year for Halloween. When I couldn’t find any costume “fairy wings” that could pass for dragonfly wings, I decided to make them myself. I was pleased with how they turned out, so I thought the process was worth documenting. The same technique could be adapted to make anatomically correct wings for any insect costume.

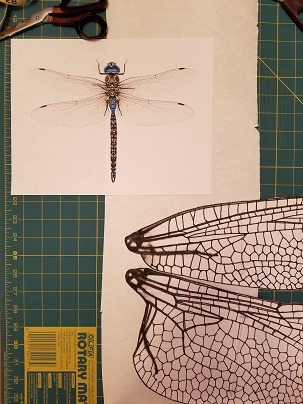
Supplies:
Printer/scanner/copier and paper
Dark pen or marker
Craft paper or butcher paper (or removable fabric stabilizer)
Sewing thread
Invisible monofilament thread
Decorative (rayon) thread for machine embroidery
Sheer woven fabric for wings (knit fabric or netting might work but I haven’t tried it)
1.5 mm polyester millinery wire
Iron and pressing cloth
Fray check
Fabric marker or fabric paint
Exoskeleton fabric (I used a 4-way stretch polyester-spandex cosplay fabric)
Backing fabric (I used black quilting cotton)
Batting
Black 3/8” elastic braid
4 large sew-on snaps
8 medium sew-on snaps
Process:
1. Find a detailed photograph of a dragonfly online. Zoom in on one pair of wings and print them on white paper. With a pen or marker, trace any details of the wings, such as the venation, that you want to add to the costume. Copy and enlarge this image to a suitable size (mine were about 18” from thorax attachment to wingtip). Make a copy of the wings that is a mirror image of the first set.

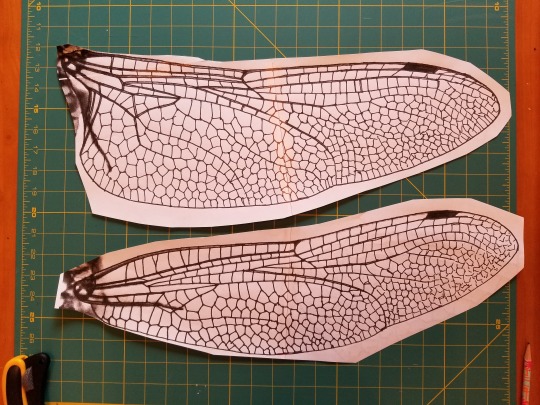
2. Cut the paper wings out along the outside edges. Add lines to indicate grain; you want the straight or crosswise grain to run along the length of the wings as much as possible so that the main body of the wings will not be on the bias. Trace each wing onto a piece of craft paper or butcher paper, making sure the grain lines are all parallel and leaving about two inches between the pieces.

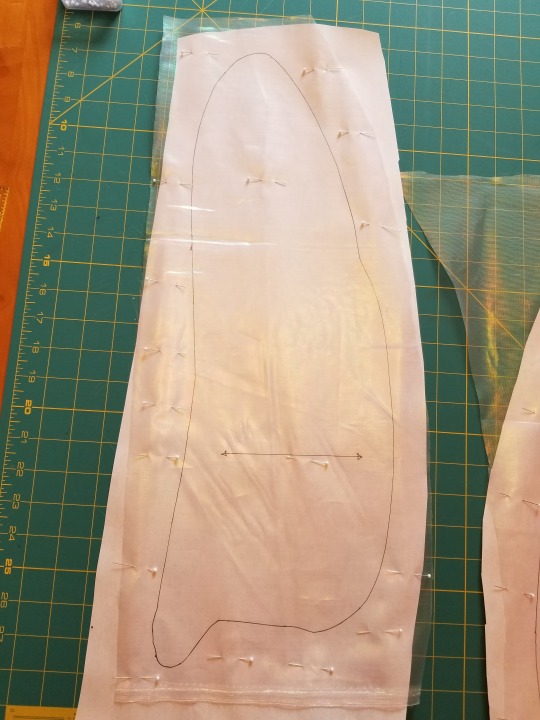
3. Pin a single layer of wing fabric to the craft paper and machine baste the paper to the fabric, directly on the pattern outline, using a medium-long stitch. The basting holds the fabric in place and stabilizes it in preparation for adding the wing armature. I used white thread because these stitches will be covered later, but in retrospect, invisible monofilament would probably have been a better choice. (The pieces can be carefully cut apart before or after stitching; just make sure the fabric stays stable and on grain until you have it basted to the paper.) (Note that I used craft paper because I didn’t have any Sulky Solvy or other “real” stabilizer on hand. If you have more time than I had and are using a washable fabric, you might want to use a dissolving stabilizer here to save time and effort later.)
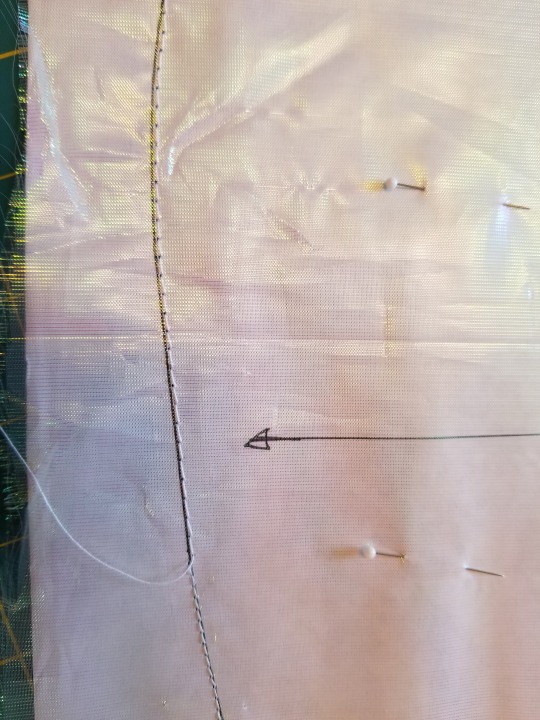
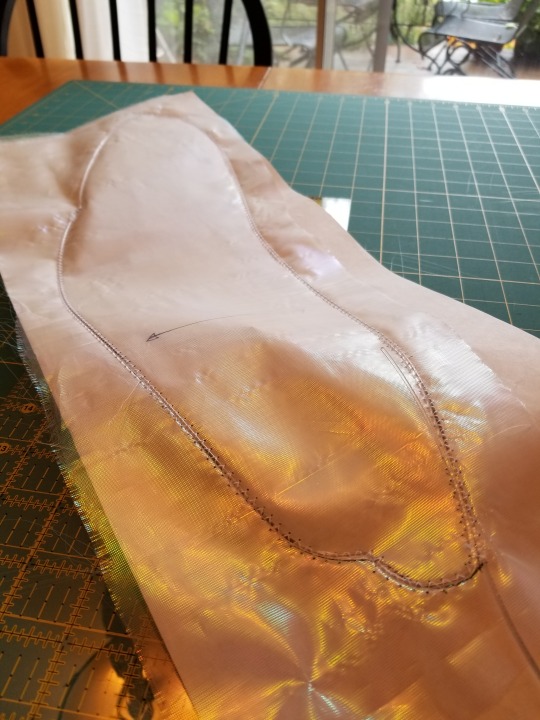
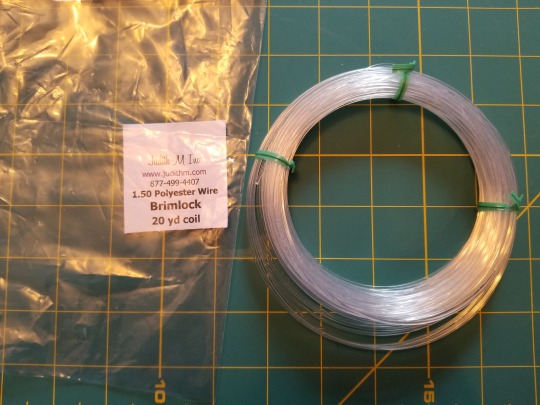
4. For each wing, cut a length of 1.5 mm polyester millinery wire equal to the circumference of the wing outline plus the distance around the wing joint area and 10-12” down the top edge of the wing. Using your original pattern piece for reference, bend the wire along the outline of the wing, so that it matches as closely as possible the outline you’ve drawn and cut around. Double the wire along the wing joint and the top edge of the wing to provide extra stability and support. The wire will not lie flat at this point, but that’s okay. Just focus on accurately placing specific bends and curves along the length of the wire. You’ll sew them in place in the next step. (Tips for working with the wire: Don’t unfasten the coil of wire all at once or you’ll have a mess to untangle. Instead, slip out one loop at a time until you have the length you need. You can gently pull and bend it in your hands to relax some of the coil before you start shaping it. I was able to bend and crimp it using just my fingers, but you might want to also use needle-nose pliers for more accurate corners and sharper angles.)
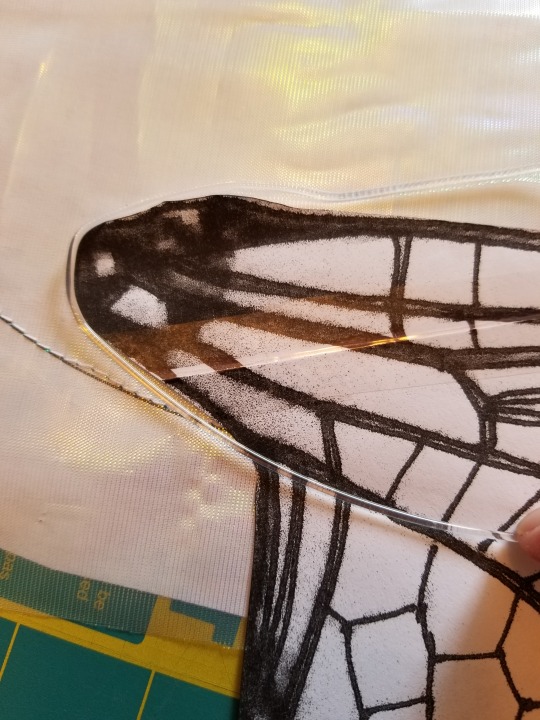
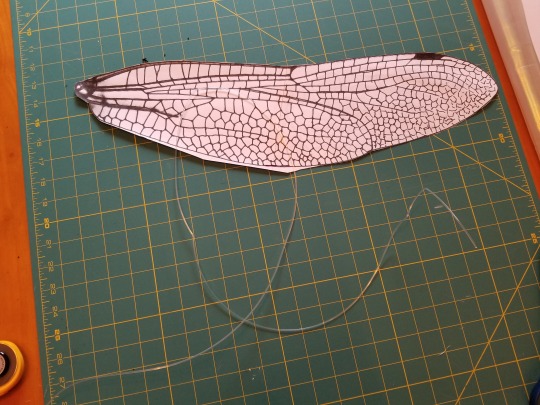
5. Set your machine to zig-zag at a stitch width that accommodates the wire without striking it with the needle. Carefully stitch the wire directly over the top of the wing outline. Keep in mind that you’ll need to switch to a wider stitch for the areas where the wire is doubled.
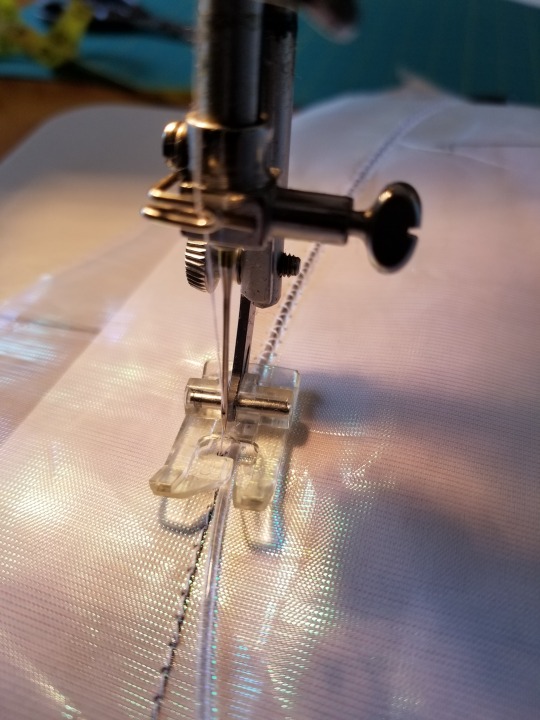
6. To “set” the shape of the wing armature, put a dry iron on low heat. The milliner’s supply shop where I bought my wire says that 60 seconds of 175-degree heat is sufficient to set polyester wire. I found the synthetic setting on my iron was too low, so I used a wool setting. Using a pressing cloth and being careful not to scorch or distort your fabric, press each area of the wing outline for at least 60 seconds. Don’t slide the iron back and forth; just hold it firmly in place at intervals along the wire. Let the wing cool. I weighted mine with my acrylic cutting guide as they cooled, to keep them flat.
7. Carefully tear the paper away from the wing. This is where using a “real” tear-away or dissolving stabilizer might come in handy; getting the bits of craft paper out of the stitches was a royal pain and involved tweezers and lots of patience. :)
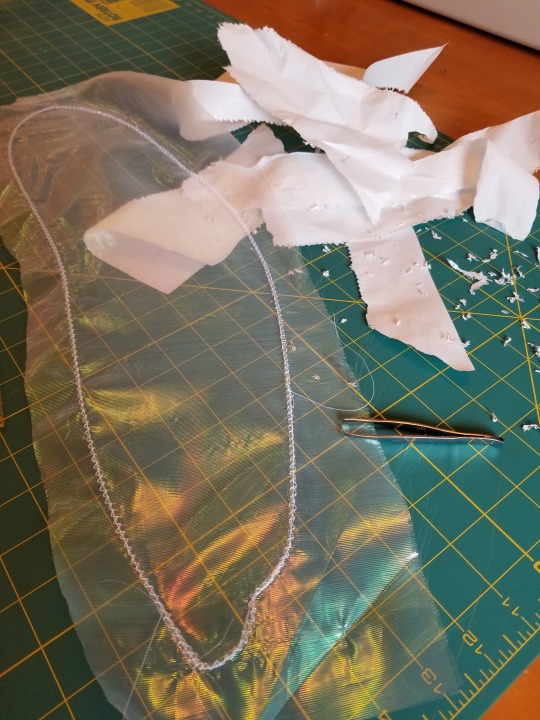
8. Put your machine back on straight stitch and install the zipper foot. With the right side of the wing facing down, fold the extra wing fabric over the wire and pull it as taut as possible without distorting or tearing it. You want to get a little tension on the wing, but not too much; your previous zig-zagging will prevent you from pulling the fabric too far. With the needle on the right side of the foot and the foot snug against the inside edge of the wire, straight stitch through both layers of fabric around the inner circumference of the wing. (Again, I used white thread, but monofilament would be appropriate here.)
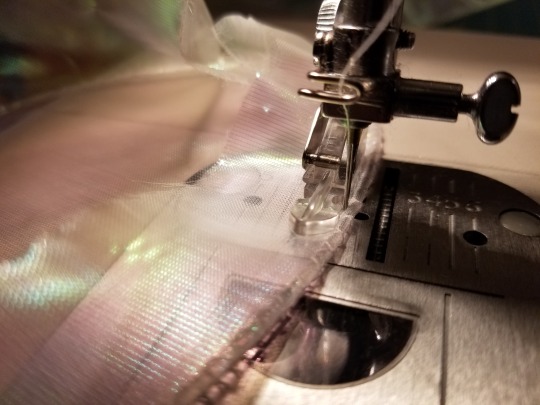

9. Reinstall the standard sewing machine foot. Using a short stitch length and a wide zig-zag setting, with the right side of the wing facing up, satin-stitch around the edge of the wing. I used cinnamon-colored rayon thread for my dragonfly wings.
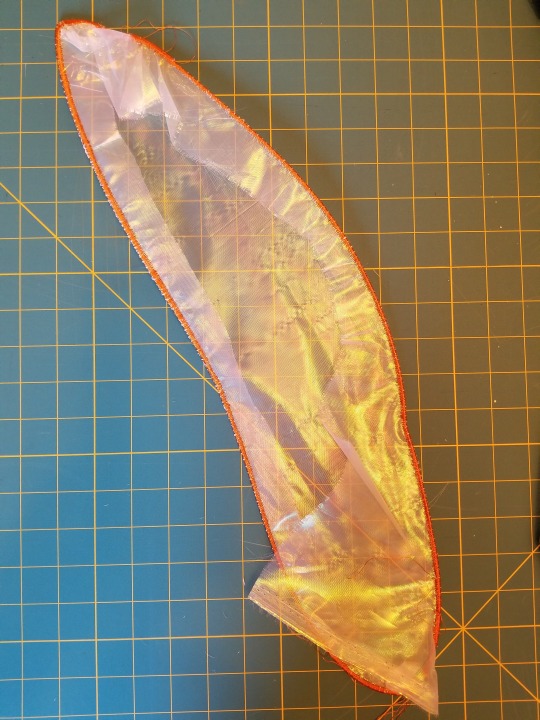
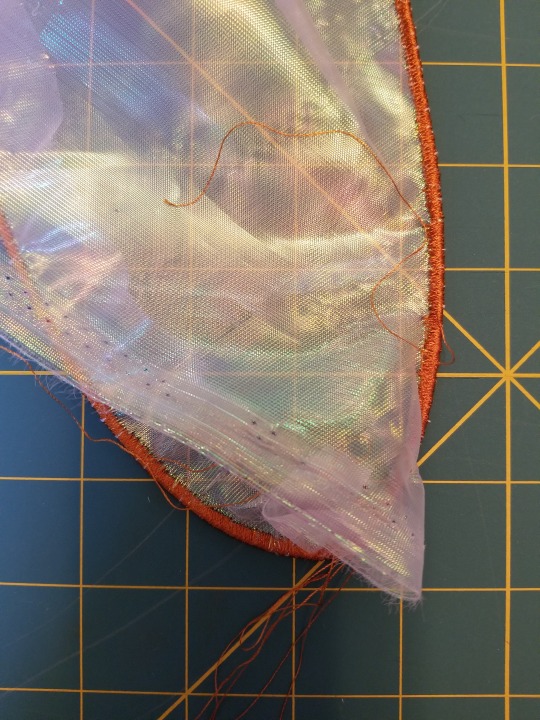
10. Apply Fray-Check to the inside edge of the satin-stitching. Trim away the extra fabric as closely as possible to the stitching, being careful not to poke a hole in your brand-new wing (applique scissors might help).
11. Lay the wing right side up over its original pattern piece and trace details onto the wing using a fabric marker, fabric paint, or other medium. You may want to experiment on a scrap first. Fabric marker was almost invisible on the organza I used, so I went with copper-colored fabric paint. (I tried to protect my pattern from bleed-through using plastic wrap, but this turned out to be a bad idea that caused the paint to smear a little on the first wing.)
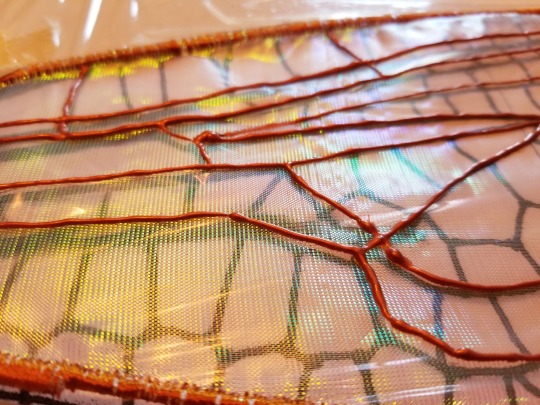
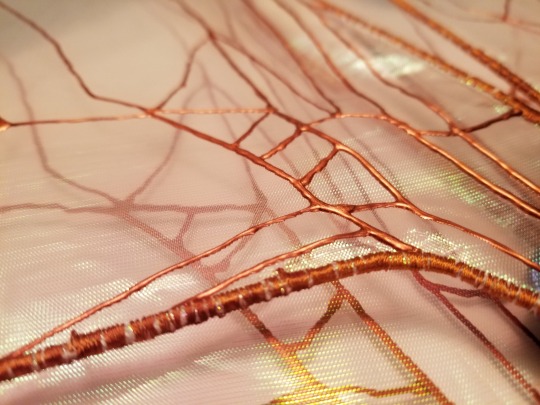
My son wanted wings that would flap (I know, I know; dragonflies don’t flap like that), but I wanted wings that would stay rigidly in place. As a compromise, I decided to make convertible wings; with a 40” wingspan, I figured he’d need to be able to narrow the costume for indoor use anyway. (NB: For wings that have to go through doorways, consider making something less than 36” across; better yet, make something not much wider than the wearer’s shoulders.) Therefore, the remaining steps will produce a set of convertible wings that can be worn upright in one place or loose with loops over the arms for flapping, either attached to an insect costume thorax or separately over regular clothes for dress-up. This process could easily be adapted to make simpler wings.

12. The wings will function as pairs, with each pair sewn to a smaller base that will later be attached to a larger base using snaps and elastic. (For fixed wings, you could just sew all four wings to one large base.) To figure out the size and shape of the two smaller wing-muscle bases, I traced the outlines of a pair of wings, positioned as I wanted them relative to the center back line and the back neckline, over the outline of the side back piece of the costume thorax. I shaped the smaller base so that its edge would intersect with the armature at the top and bottom of both wings and so that it would support the narrow “joint” portions of both wing ends. I used the original photo of the dragonfly loosely for reference. Then I sketched in the larger center-back base, shaping it to support one small base on each side of a center decorative element.
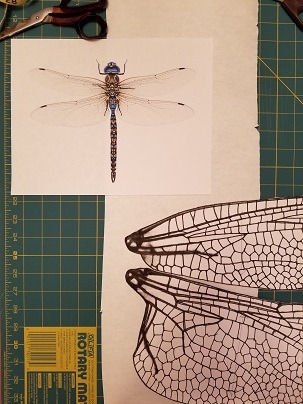
13. For each of the two small wing-muscle bases, shape a piece of 1.5 mm polyester wire to match the outline of the base and secure it into an unbroken loop (I used thread and tape but I think you can also melt it). Cut a piece of exoskeleton fabric about 3/4” larger than the loop. Cut a piece of batting and a piece of backing fabric the same shape as the loop. Lay the wire loop on the wrong side of the exoskeleton fabric, gather the edges of the fabric around the loop, and secure your stitching. Tuck the batting inside, making sure it lies flat. Clip and press under 1/4” of the backing fabric, and stitch it in place over the gathered exoskeleton fabric to hold everything in place and provide a firm foundation for stitching on the wings, snaps, and elastic.
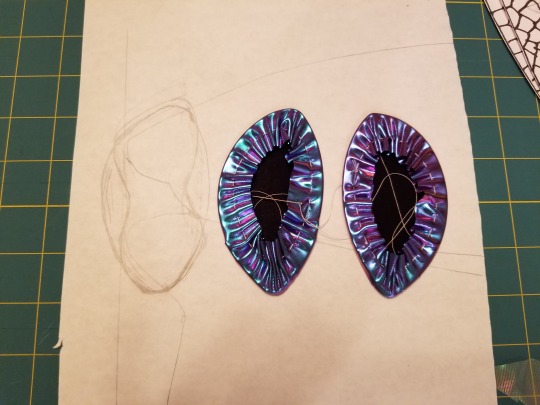
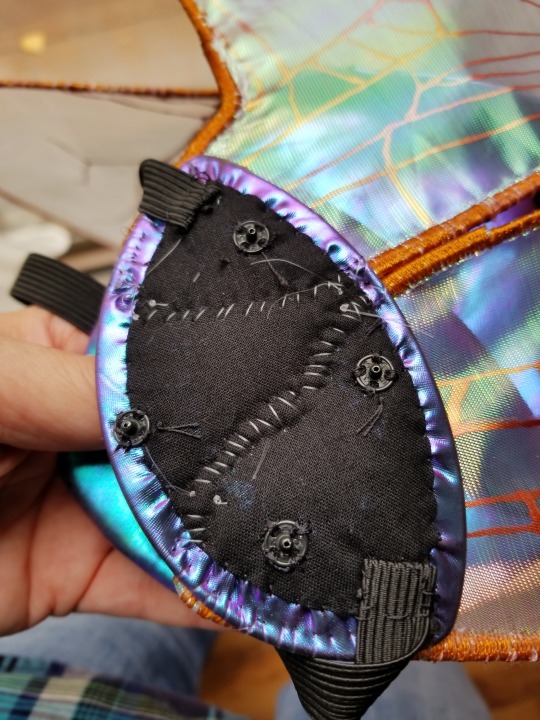
14. Make the larger center-back base in the same way as the smaller wing-muscle bases, but cut the batting 1/2” larger than the loop, and lay it on the wrong side of the exoskeleton fabric before you gather it around the wire loop. Attach any decorative elements you want on the right (exoskeleton fabric) side of the base. (I added a narrow stuffed teardrop shape with a double wire frame hidden on the inside to give additional structural support to the base.)
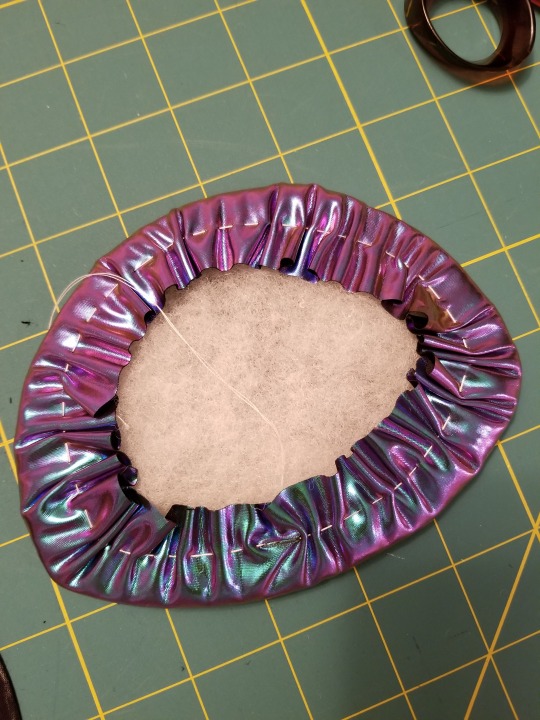
15. To attach the center-back base to the costume thorax, sew halves of four large snaps onto the back of the base; sew the other halves of the snaps onto the costume thorax in their corresponding positions.
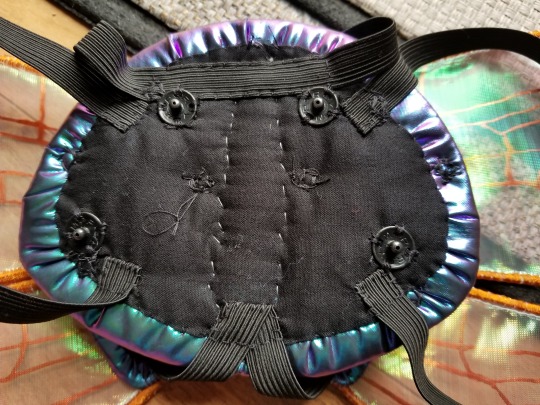
16. To wear the wings without attaching them to a costume, attach two loops of 3/8” elastic to the back of the center-back base, one on each side, to extend around the wearer’s shoulders and upper arms. My loops were 15” around.

17. To attach the wings to the smaller wing-muscle bases, position one pair of wings over the right (exoskeleton fabric) side of a wing-muscle base and pin them in place. Using invisible monofilament thread, whipstitch the wings firmly in place by taking stitches over the wire armature of the wings. Add extra stitches at the points where the wire wing armature intersects with the underlying wire armature of the base. Repeat with the other pair of wings and the other wing-muscle base.
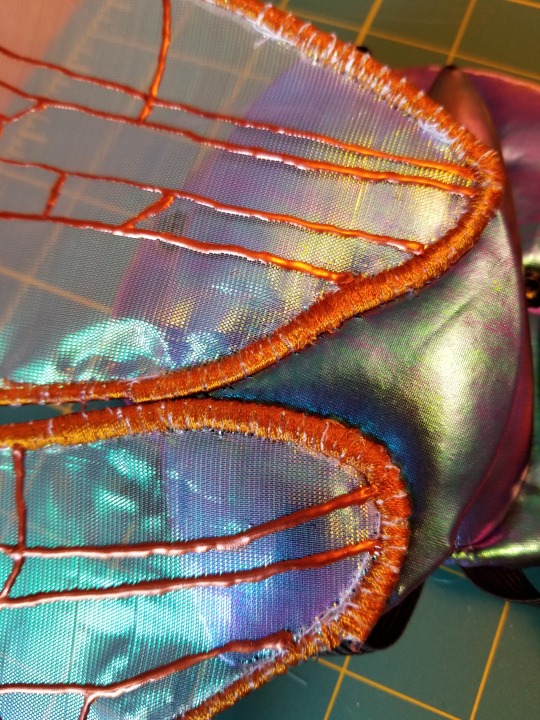
18. To hold the wings to the center-back base in “flapping” mode, cut two pieces of 3/8” elastic. The elastic will be anchored to the back of the center-back base with the four ends attached to the edges of the wing-muscle bases. One piece is for the top edge of the wing-muscle bases, the other is for the bottom edge. The top piece needs to be long enough to allow the top edges of the wings to dangle low enough to hang flat against the wearer’s back, but the bottom piece needs to be just long enough to allow the bottom edge of the wing-muscle bases to be snapped onto the center-back base, and no longer. My top piece extended about 2-1/2” or 3” beyond each side of the top of the center-back base, and my bottom piece extended about 1-1/2” beyond each side of the bottom of the center-back base. Sew the two pieces of elastic firmly to the center base first. Then sew the ends to the edges of the wing-muscle bases that are opposite the wings and closest to the center back, taking care not to twist the elastic.
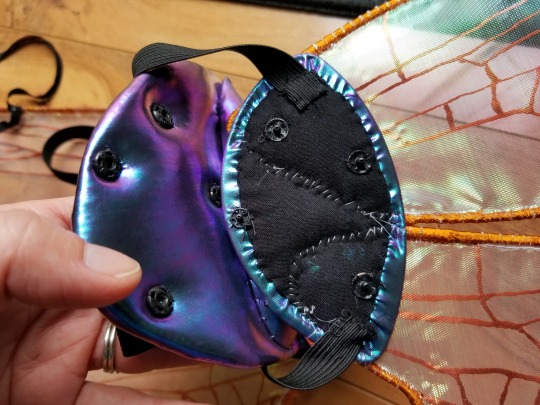
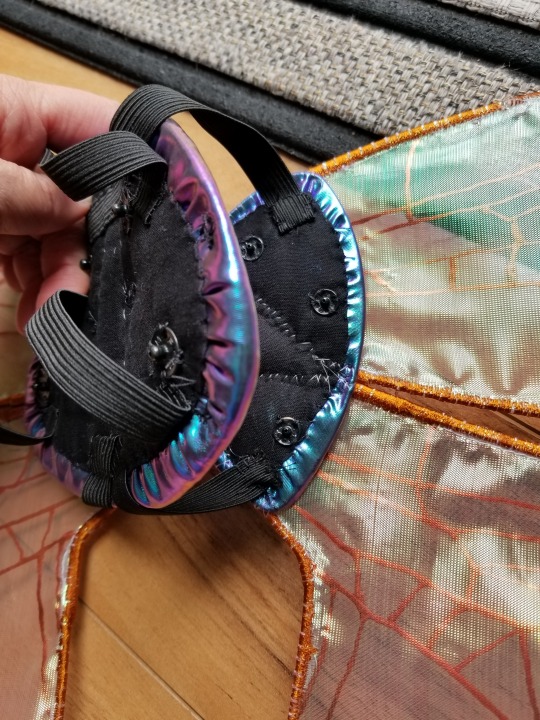
19. To hold the wings to the center-back base in “fixed” mode, position the two smaller wing-muscle bases over the center-back base so that the wings extent at the desired angle. Mark the positions for four medium snaps on each wing-muscle base, placing them strategically for maximum support (e.g., one very near the center of the center-back base, one near the “outer” edge of the wing-muscle base, one near the top edge of the wing-muscle base, and one near the bottom edge). Sew the snap halves into place on the wing-muscle bases and the center-back base.

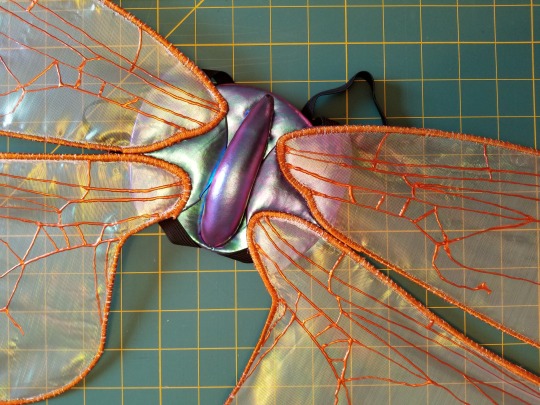
20. To allow the wearer to operate the wings in “flapping” mode, attach a narrow loop of filament or fabric to the center top edge of each top wing, large enough to go around the wearer’s arms. I used a thin strip of my exoskeleton fabric and attached it with invisible monofilament thread.
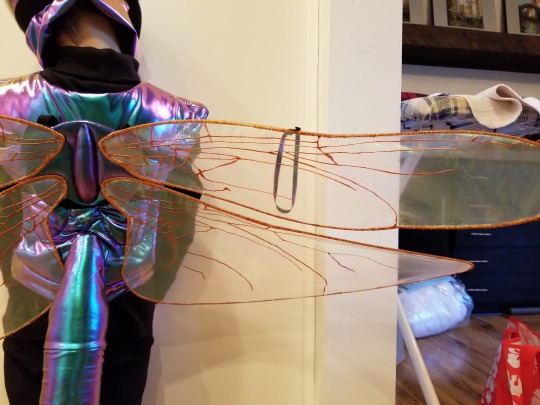
21. Optional: to further stabilize the pairs of wings and provide extra support when they’re being used in “flapping” mode, shape a small square out of a scrap of 1.5 mm polyester wire and attach it at the midpoint between each pair of wings, sewing it to the wing armatures with invisible monofilament thread.

To wear the wings in “flapping” mode, snap the center-back base onto the costume (or slip the elastic loops onto your shoulders/upper arms). Let the wings dangle from the center-back base and slip your arms through the wing loops to control the wings. To wear the wings in “fixed” mode, take your arms out of the wing loops and snap the wing-muscle bases to the center-back base. :)
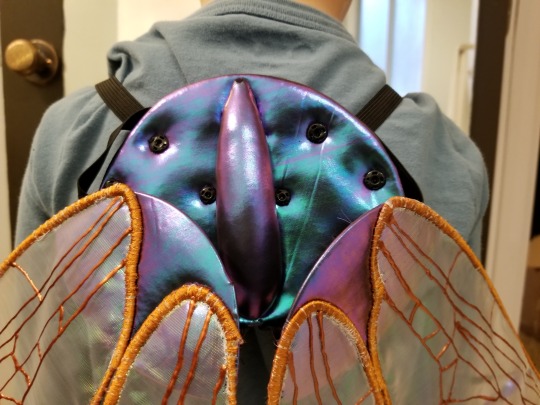
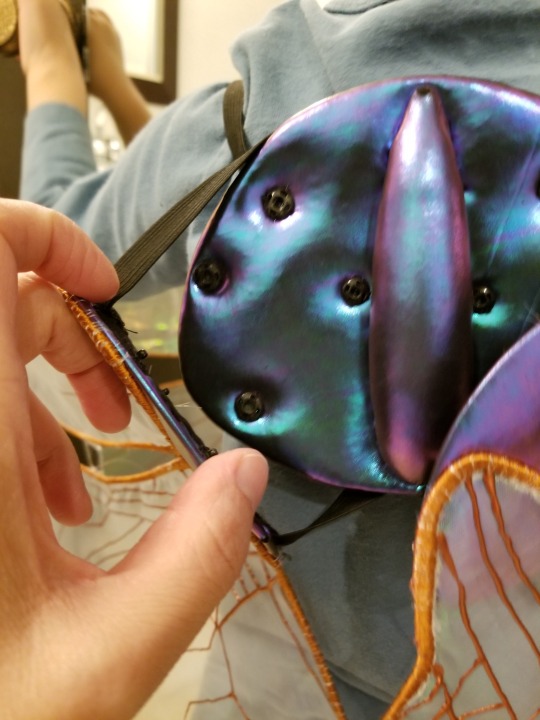


To wear the wings in “fixed” mode, snap each of the smaller wing muscle bases to the larger main base and do not use the narrow arm loops that are attached to the tops of the wings.

11 notes
·
View notes
Text
Wet Wipe Wonder Ribs

Recipe submitted by NCS Director of Technology Devon Jacobs, and his son and Camp Treetops camper Dexter.
Meat! It’s what’s for dinner…at least at our house. After being cooped up all winter, by April and May, I’m already pushing the summer meals in my house. For me, nothing else screams summer like a heaping platter of juicy, saucy ribs and a big ol’ bowl of potato salad. When I say ribs, I mean pork! When I say ribs, I mean spare ribs! Cut from the bottom of the rib cage, spare ribs are the meatier, juicier sibling to the baby back ribs that you often see in restaurants.
Making good ribs is a fairly big time investment, but honestly it’s so easy that my 9-year-old son Dexter does most of the work. He actually helps out a lot in our kitchen, and lately we are using our kitchen adventures together to teach math. This week’s lesson was equivalent fractions, substitutions, and fractions operations!

This recipe is actually an adaptation of a “smoked, spiced ribs” recipe that was passed on to me by a friend about 20 years ago. The original was an asian inspired version that used far more five spice powder, which tended to overwhelm the flavor. The one we use now uses much less five spice, and adds in some Korean chili flakes (gochugaru) for depth of flavor and a little more zing.

If you haven’t tried gochugaru before, be careful—you’ll get hooked fairly quickly. For many things, it’s completely replaced mundane ground black pepper in our kitchen. Nowadays you can get it at Asian markets, many larger grocery stores, and even on Amazon.
Ingredients
This recipe is for a double (DBL in the recipe) batch of both rib rub and sauce, should be enough for about two full racks of spare ribs (about 12 pounds), or enough to feed a hungry family of six. You’ll probably have some leftover rub, but you can save it for another batch, or use it on pork in other dishes.
Prep time: about 30 minutes
Investment time: about two days (but SOOOOO worth it!)
Tip: ⅛ cup = 2 Tbsp
Rib Rub (Dry Rub or Marinade)
¾ cup brown sugar
⅛ cup five spice powder
⅛ cup Korean chili flakes
⅛ cup smoked paprika
½ tsp. salt
½ tsp. celery seed
½ tsp. ground black pepper
Mix the above ingredients together. A small food processor works best, but you could also throw it all in a quart size zip top bag or other container and shake until well blended.
You can store leftovers in a sealable canning jar or anything with a tight fitting lid (otherwise your cupboard will smell like ribs forever)
Rib Sauce
2 cups ketchup
½ cup molasses
¼ cup lemon juice
¼ cup soy sauce
½ cup hot sauce (We use Frank’s Red Hot)
Mix the above ingredients together, and use for basting ribs on the grill. I like it good and spicy but not super hot. Dexter isn’t so fond of a lot of heat, so I often put in about half of the hot sauce, mix it up, reserve some sauce in a separate cup for him, and then mix the rest in. After that, it’s just a matter of keeping the mild ribs separate on the grill. Best advice is to start with half of the hot sauce, and give it a taste, then add more as you like.
Directions
Step 1: Figure out how many ribs you are doing, as there is a bit of preparation involved. Racks of spare ribs are quite large pieces of meat and can be awkward to handle. If you are only doing a single rack of ribs, you’ll want to cut the rack in half before putting the rub on (so you can stack the two halves). In general, when slow-baking the ribs, it’s best to do it in stacks of two at the least, or three at the most, so that they cook through properly.
Step 2: Make up the dry rub according to the directions above. Pat the ribs dry with a paper towel, and lay meat side down on one end of a large sheet of wide, heavy duty aluminum foil (about 5 feet long for two racks, or about 3 feet long for a single rack cut in half).

Cover one side of the ribs completely with the rub mixture, and rub or pat it into the meat. Flip one set (or half) of ribs onto the other so that the meat side is up. Cover that side of the ribs completely with the rub mixture, as before. Flip BOTH racks of ribs over, and cover the last side with rub. Doing it in this way will prevent the sharp edges of the bones from tearing through the tinfoil.

Step 3: Fold the foil in half, and then fold up each of the long edges repeatedly until you form a tight package around the sides of the meat. Then fold the ends up in the same manner. For a little extra protection from leakage, and a bit more substantial package for baking, I like to use a second sheet of foil as long as the first, and wrap it diagonally around the ribs in the opposite direction (like wrapping tape around a cord)
Step 4: Place the package on a large cookie sheet, and put on the bottom shelf of your fridge. If any of those steps were confusing, Dexter and I can show you how to do it step by step! Just follow this link.
Step 5: WAIT! At least 24 hours. You can leave it for longer if you wish, but cook them within a couple of days.

Step 6: Preheat your oven to 250ºF (130ºC). Then place your ribs (still on the cookie sheet) on the center rack. If your ribs hang over the edge, and you’re worried about juices leaking out, you can put a sheet of tinfoil beneath the pan to catch any drips.

Step 7: Bake for 4 hours—3 hours for a single rack.
Step 8: Remove ribs from the oven and let cool for about an hour, or until they are cool enough to handle.
Step 9: While ribs are cooling, make up the basting sauce as instructed above.
Step 10: When the ribs are cool enough to handle, start heating up your grill.
Step 11: Open the foil - I like to cut a slit in the top with a heavy pair of kitchen shears to keep all of the juices contained.

Step 12: Cut individual ribs apart. A boning knife works great for this, but any good sized sharp knife will do. Start at the wide end of the rack with the big bones. Slide the knife in between the bones using one as a guide to separate each rib from the rack. When you get to the small end, you will need to leave 2-3 bones together to get a chunk that’s easy to flip on the grill.
Step 13: Turn your grill down to medium-low and lay the ribs out on your grill grates. While there is usually plenty of fat on spare ribs, I find that a quick wipe of olive oil over the grates keeps the first side from sticking until you can get the sauce on.
Step 14: Baste the ribs with the sauce, and turn over ¼ turn. Repeat, Repeat, Repeat until you run out of sauce or the ribs start falling apart on you. You’ll usually get one full 360º rotation / layer of sauce on with a bit to spare.
Step 15: Find a bucket full of wet wipes, and enjoy!

0 notes
Link
“In mythology, the archetype of the ‘trickster’ is often the character that keeps the world from appearing black and white. These characters dance over boundaries and between peoples. They often carry secret knowledge, which they divulge at the times that serve them best. It’s hard to be entirely sure whose team they are playing for, or what they are playing in the first place. Rarely trustworthy but always interesting, trickers are often my favorite characters.
“One of the reasons I’m so fascinated with tricksters is because they often break societal rules and expectations, playfully disrupting normal life in their antics. They are the ones that ask us to pay attention and to question the rigidity of the world we know. I sense a bit of that drive in myself. After all, throwing secret parties for strangers out in the woods is not exactly a societal norm! Gently encouraging my guests to cross the boundary away from the mundane world and join me in a magical feast is something I do with much pleasure. (That said, I’m less fond of many of the other ‘trickster’ activities, such as stealing cows, bribing gods, and causing plenty of other mischief.)
“While archetypes of the trickster appear in cultures all over the world, the ones that are most fascinating to me are the tales from this continent. Stories of tricksters - particularly Raven and Coyote - have been gathered from many Native American tribes, but there are some common threads running through them. First, that the trickster is integral to growth. By shaking things up and questioning rigidity, the trickster often leads the people to view something with a new perspective. (After all, the biggest catalyst to growth is uncomfortable or curious change.) Secondly, tricksters often left their physical mark upon the landscape. In fact, the famous Multnomah Falls outside of Portland was said to be a result of either Raven or Coyote’s efforts.
“In fact, many of those other marks on the landscape are found throughout our region here in the Pacific Northwest. “Wila” is a type of black lichen (Bryoria fremontii) that drapes itself from branches in dark woods. Several different First Peoples tribes of the Northwest Region have legends about Wila being from the hair of Coyote. In various versions of the story, Coyote somehow gets his fur caught in a tree (after he’s been dropped by a swan, tricked by a spider, etc.) After he safely returns to earth, he decrees that his fur should be revered as food and not wasted. Nice save, Coyote.
“So, when I wander through the darkened forests dripping with black lichen, I smile to myself and wonder just how Coyote came to be stuck in that first tree anyways. The lichen I gaze at is also known as Witch’s Hair Lichen, Old Man’s Beard, and Horsehair Lichen. It grows plentifully in the interior forests of the Pacific Northwest, giving them an eerie dark feeling. These are the sort of woods that I would imagine a witch would build her cottage in, and naturally would probably be one of her favorite ingredients to cook with as well.
“As Douglas Deur says in his book Pacific Northwest Foraging, ‘[Wila lichen] is blandly nutty and can be used raw or in porridge and breads. It was traditionally pit roasted and was an important part of the diet of Native Americans in the Northwest, serving as an everyday delicacy as well as an easily gathered year-round food for lean times… It was traditionally pit roasted or boiled into a somewhat nutty-tasting but bland porridge; usually it is sweetened or mixed with other ingredients for sweetness and textural diversity. The lichen can also be used in breads and other baked goods, and when pulverized it can be used as a leavening agent.’
“My interest in this ingredient was piqued when I read that it could be used as a leavening agent in breads or cakes. As baking an airy gluten-free loaf is a bit of a challenge, I figured it was worth putting it to the test. I am happy to report that I saw a noticeable difference in the texture of my bread!
“Keep in mind when gathering that lichen grows almost unbelievably slowly. Never harvest it from trees; instead, take a walk after a good windstorm and pick up the pieces that have fallen to the forest floor. Never take all of it, as other animals depend on its rich carbohydrates for sustenance, especially during winter!
“Processing/Safety: Lichen contains vulpinic acid, which is what helps it dissolve the surfaces upon which it grows. Wila is naturally lower in this acid than most other local lichens, making it easy to leach out safely. You should be sure of identification, and gather the darkest pieces you can find, which will be lower in vulpinic acid. To process, first pick through your lichen to remove any unwanted debris such as pine needles or other kinds of lichen. Then fill a big pot ¾ full and add 2 Tbs. baking soda. Fill with water and bring to a boil, then strain. Repeat the process. Then, fill the pot with clean water and bring to a boil, then turn off and let sit overnight. Strain out the lichen and dry it (you may need an oven on its lowest setting or a dehydrator for this), then grind into flour using a spice grinder or flour mill. At various points in this process, it may look like you are cooking tar or preparing an unappetizing and gloopy black slime. I would encourage you to tap into that trickster energy and ask your family what they think of your dinner preparations. (I certainly had fun with that!)
“We’ll be mixing up the story of Coyote and the hair he left behind into a loaf worthy of the best forest witch. It’s a gluten-free loaf, similar in texture to a good rye bread. It has a pleasantly earthy and nutty flavor rich in umami, thanks to both the lichen and the sesame seeds that coat it. This bread rose far more than any other gluten free bread I’ve made and, while still denser than a typical gluten bread, had a pleasantly light and chewy texture. It also stayed fresh and moist for longer than is typical with gluten-free breads as well - just as tasty the second day as the first! “To make these loaves extra beautiful, I tried out some new bread-baking techniques. (These are described in the recipe.) I wanted to push the idea of boundaries, so I created a bread that looks like the night sky is cracking to reveal a sparkling beyond. If you want to dive into that metaphor like I did, it makes for some great mealtime conversation. If not, it’s just a really beautiful bread! The outer crust is firm and can be broken off and used like a pita chip for scooping up dips or butter. The interior is soft, with a faint smoky and umami flavor. This bread is wholesome, a little bit nutty, and absolutely delicious after a day in the woods.
“Wila Witch Bread (gluten free)
Ingredients:
I c. (1/4 lb) brown rice flour
1 c. (1/4 lb) teff or sorghum flour
1 ¼ c. (¼ lb) oat flour
1 c. (1/4 lb.) tapioca starch
3 Tbs. (1 oz. black lichen flour)
1 Tbs. black cocoa powder, culinary charcoal, or regular cocoa powder
1 Tbs. + 1 tsp. xantham gum
2 Tsp. granulated yeast
2 Tsp. sea salt
2 (or 2 1/2 c.) lukewarm water (or brewed tea??)
2 Tbs. molasses
2 eggs
1/4 c. white rice flour, for dusting
A star stencil, optional
Another 2 Tbs culinary charcoal
Extra brown rice flour
About 3/4 c. black sesame seeds
Oil, to brush
Directions:
Whisk together the brown rice flour, tefff or sorghum flour, oat flour, tapioca starch, black lichen flour, black cocoa powder, xantham gum, yeast, and salt in a large bowl.
Add 2 cups water, the molasses, and eggs and mix well with a spoon or a stand mixer until everything is well combined. The dough should be fairly wet and sticky.
Cover loosely with a piece of saran wrap and allow to rest at room temperature for about 2 1/2 hours or until the dough rises slightly (unlike a normal wheat bread, this dough may not double in size)
Separate out ¼ of the dough and knead 2 Tbs. culinary charcoal into it, plus enough rice flour that you can easily roll it out (about 4 Tbs.) Cover and set aside.
On a piece of parchment paper on a pizza peel or a silicone baking mat, gently shape the main dough into a round loaf. Dampen your hands with water and use them to gently brush the outside to smooth it and make it sticky. Coat thoroughly with black sesame seeds.
Roll out your black dough into a large circle. Brush the back with oil, leaving 2” around the edges. Brush the edges with water. Gently set the black circle oil-side-down on top of the loaf. Tuck the ends in underneath. Place a star stencil over the loaf and dab with water, then sift white rice flour over the surface to leave a starry design. Cut an X in the top of the loaf, going through the charcoal layer only. (Kitchen scissors work well for this!) Then cut 4 more 2” slashes on the side of the loaf in the middle of each quarter, again being careful to just cut through the charcoal layer. Cover loosely with plastic wrap and allow to rest at room temperature for half an hour.
Meanwhile, preheat a baking stone in the middle of your oven to 450F for half an hour. Place an empty metal pot or pan in the oven that won’t interfere with the rising bread and that is accessible to add water to.
Carefully slide the loaf onto the hot stone. Pour a cup of hot water into the other pan and quickly close the oven door. The resulting steam will help the crust develop nicely. Bake for about 45 minutes, or until firm.
When you remove the bread from the oven, brush the sesame-encrusted areas with a bit of vegetable oil to really make them sparkle!
Allow to completely cool before slicing. (This is a great time to bake the onion blossoms below!) *As tempting as it may be to dive right into a delicious-smelling loaf, it is really important with gluten-free breads to allow them to cool at room temperature first. Otherwise the interior has an unbaked texture and will then dry out very quickly.
Sumac-roasted red onions and grapes:
I’ve included another wonderful fall recipe to serve with the Wila bread; sumac-roasted onions and grapes. These red onions “bloom” in the oven, creating a stunning accompaniment to the earthy flavors of the bread. Roasted grapes burst with sweetness and both are fantastic when paired with a bit of butter and eaten atop the wila bread. They are flavored with a sprinkling of tart sumac and herbs.
0 notes
Text
Just recently i picked up an older thread idea and series of mine : highlighting a group of boats, often cheap projects popping up on Ebay. In the previous post of this series i quickly featured 3 boats as i remember it and then the very same week another 3 or 4 viable small boat projects came up although by then i’d run out of blogging time and just had to be doing other, essential things instead . Thus i got a bowsprit made, a drill bench finished and the curious cabinets mounted but didn’t put out a follow-up post.
On Ebay it just seemed that everyone with an old boat in their back paddock (almost said their back passage !) suddenly woke up and stuck them up for auction. There was a whole slew of small viable boats just asking for a bit of love : several Achilles 24’s, frequently mentioned here, ditto some neat Corribee’s, a sad but rescue-able Memory gaffer and then the ones i featured.
Just after that i got all moist myself when one boat popped up that i really, really liked the look of myself…..a wooden boat too !. Now, you all probably know where this is going as that’s what happened last year with ‘Inanda’ and shortly before that nearly happened with a little English Folkboat (Chuckle made me smile !). I do have a thing about wooden boats because they have ‘soul’ and ‘character’…..it’s just that me and wooden boats don’t belong in the same sentence. If you knew me you wouldn’t put my name and highly skilled, and then wood and finally boatbuilder anywhere near each other. ‘Inanda’ was clearly a mistake and a physical one because the work required would have been brutally horrible on my recent knee replacement.
However…..despite doing the mental equivalent of writing out 50 times : i will not look at wooden boat projects on ebay, i will not look at wooden boat projects on ebay,i will not look at wooden boat projects on ebay……and so on…..after about the tenth time it becomes ‘oh look….nice wooden boat project on ebay”.
What really got me thinking and wishing was a 27 foot wooden gaff cutter with a centerboard and essentially laid-up in a boatyard after the death of her owner. Now don’t panic too much, the bidding went past my set limit the day before the auction was due to end and on the day i quite deliberately closed myself away in the workshop and turned the computer off. The thing is that although it was a wooden boat, she was cold -moulded and quite recently built, essentially an FRP boat and the kind of thing that i can cope with working on. It was the kind of project that had me wondering if i could have got my boat around to the east coast, lived aboard while i did the refit and even did some agency work over there to pay the bills. Luckily i think that she was some 300 miles away and not just down the road so i couldn’t just go and ‘take a look’ and get all enthusiastic.
Well, it’s kind-of happened again and with one of the very few wooden boats that i really have actively researched and considered owning : and it comes on a trailer. As the yard here starts to empty out and with me still owning a viable towing vehicle, perhaps for the last year, it really got me thinking about a genuine retirement project boat….except that i would have to do some work to pay for materials and yard space….Catch 22. Luckily again the boat in question is so far away that it’s technically in another country : Scotland and some 600 miles away in a straight line.
Well, what is it precious ?…..here then : https://www.ebay.co.uk/itm/Sailing-boat-26-ft/283424415969?hash=item41fd6960e1:g:Kf8AAOSwqCJckjlT
Amazingly there are 2 of them on the site right now although the second one is a classified listing. They are both of course Fairey Atalanta’s and the connection today is the hot molded and glue posts one.
This is the actual boat on auction, currently sitting at £700.
Regular followers will know that i am enthusiastic about this very quirky design because it would meet so many of my sailing requirements : larger than the Liberty, more powerful and seaworthy and with a shallow/variable draft with it’s twin bilge-boards. I have covered the history and design before (Uffa Fox and airoplane builders ‘Fairey’ but it did make me look again at the glue connection because of my recent work and the fact that the Fairey works had also built aeroplanes in wood. The direct connection entailed quite a lot more research about glue and hot moulding.
Just as a reminder here is what a fully restored Atalanta can look like. (owners website pictures) What i discovered in the first round of research was that it wasn’t really an Atalanta i wanted but the slightly larger and boxier ‘Titania’ which, i believe, has a taller hull. I think the white one below is a ‘Titania’
I still love the odd looking 1950’s design and that curved cabin top, sort of a cross between yellow submarine and wooden aircraft. I was never quite sure about the accommodation because it has to be divided into 2 separate parts for and aft by the central cockpit. That makes both cabins small although there is potential to make the 2 aft bunks into one much larger double, my objection as i remember it from going aboard an Atalanta being that i couldn’t sit up comfortably in the aft cabin but might be able to in the boxier Titania.
Because of my current practical research into boatbuilding glues and the history of making lightweight boat and aircraft parts in wood i went back for another look at the hot molding technique. The following is taken from Wikipedia :
”
The hot moulding process was an adaptation to post war boat building of the method originally developed by de Havillands in the 1930s for “stressed skin” wooden aircraft production, using layers of thin birch plywood sandwiched together with glue over a male mould and “cooked” in a large oven called an “autoclave” By using true mass-production techniques, Fairey Marine were able to turn out vast numbers of identical boats at an unprecedented quality and price. Moulds were constructed from spruce, built up on a steel base plate. Seven by three inches planks cut to the waterplane sections provided the starting point. Working from the sheerline, the planks were built up in a series of steps, arriving quickly at a close representation of the designed shape. Subsequent fairing yielded finished dimensions. Rebates for the keel, stem and transom completed the mould building process. Although the veneers used to produce Fairey boats may appear to be parallel sided, every one was in fact profiled. Rather than shaping each veneer to fit on the mould, as in traditional boat building, Faireys saved an enormous amount of time by sawing complete sets of veneers to precision patterns. Veneers were produced in stacks of six. Boat were then typically built in batches of 24 or 36. Early boats used 1/8″ spruce ply, surplus to the War Department’s de Havilland Mosquitoaircraft programme. When this material became unavailable it was replaced by 2.5 mm agba veneers.
Chosen for its high gum content, agba formed easily without splitting and glued well. All the dinghy classes used just three agba veneers while some of the bigger boats used up to six. Initially all the veneers were laid at 45° while later boats changed to fore and aft outer planking for aesthetic reasons. With the keel, stem and transom in place, veneers were applied starting on the centreline and working out towards the shear. Each veneer was held in place by just three staples at the keel, bilge and shearline. Roller-application of Borden One-Shot waterproof glue preceded each veneer except the first. With all veneers in place a vacuum bag was drawn over the moulding and secured in place using a clamp plate and G-clamps. Early vacuum bags were made from war surplus barrage balloon fabric. After about 1950, individual rubber bags were prepared on the moulds using uncured rubber sheets which were subsequently vulcanised in the autoclaves used for production.[6]
Placed in the autoclave, the vacuum was drawn down to 27/28 inches water-gauge and steam at a pressure of some 50 pounds per square inch introduced. Processing took about 45 minutes at 100 °C. Curing at elevated temperatures under vacuum not only ensured that all the veneers were firmly consolidated – a process requiring many thousands of staples using the conventional cold-moulding process – but allowed for the use of a truly waterproof, single part, high-temperature curing glue. During the curing process the glue impregnated the wood resulting in a virtually rot-proof finished shell. Components such as side-decks were also hot moulded while other parts required for assembly were cut to patterns in the same way as the skin veneers. For one of the more complex boats, the International 14, the time for final construction from bare hull to finished boat was set at 230-man-hours compared to 400–500 hours associated with traditional construction.”
So, in my earlier post about glue and the famous ‘Mosquito‘ i think i said that the Mosquito ‘hull’ (fuselage of course) and wings were cold-moulded. It seems that was an error on my part and as above that they were made in a hot mould and possibly an autoclave like oven. I really had to stretch my memory to see if i could remember any aircraft that Fairey (aviation) made and could only think of the ‘Swordfish‘ and deliberately didn’t do a search because i just knew i would then be there all night : again !. As it happens i don’t think the famous ‘Swordfish‘ was made of wood although it was already an obsolete biplane at the start of WW2…..didn’t stop it crippling the Bismark though !
That brings us onto the glue used…..’Borden’ glue.
The nearest looking link i can find so far is this : and i can’t be sure that it’s the same stuff although it does seem to be a resorcinol resin product. http://www.hallmarkfraulo.co.uk/assets/pdf/Resorcinol_Generic_Information.pdf
This weeks progress on glue then.
No, i still haven’t completed a project with either cascamite or resorcinol resin but what i think i may have done is worked out a simple clamping and holding technique for my potential hollow wooden mast project and that basically uses webbing and an over-centre ratchet to take up the pressure and then very wide and long cable ties to keep the pressure on….would be easier to show than to explain.
Anyway…todays aircraft-porn for those who are into that kind of thing.
The Fairey ‘Swordfish’…..i don’t ever remember seeing one although i guess there would be one at the Fleet air arm museum near Yeovil. (Tanks are more my thing)
Weekends and sticky moments. Just recently i picked up an older thread idea and series of mine : highlighting a group of boats, often cheap projects popping up on Ebay.
0 notes
Text
Friday Favorites: Reader Features and Signs of Spring
It’s time for another Friday Favorites and Remodelaholics Anonymous! We love seeing your awesome projects, and we have some fun things in the works for future Fridays.. so stay tuned and keep DIYing, Remodelaholics! This week we have some great reader features for you (including some really awesome barn door window coverings) plus some beautiful signs of spring… is spring showing where you are? I saw this on Facebook and it describes our weather lately PERFECTLY, plus it made me laugh.
Enjoy this week’s picks and show off your projects at the link party below, tag #imaremodelaholic on Instagram, or drop us a line here.
Friday Favorites
This post contains affiliate links. Learn more and read our full disclosure policy here.
Favorite before and after: This laundry room renovation by Timeless Creations is a testament to the power of a few boards and a bit of paint! And did you notice that they kept the same super-functional but NOT cute utility sink and dressed it up? I love rocking what ya got!
Favorite white kitchen: I know there are mixed feelings about white kitchens, but I personally am a big fan — and yes, I have had a white kitchen before and @househaven‘s kitchen has me ready to create a white kitchen again!
Favorite hearth: A fireplace update (like these) can make a huge difference… but it’s usually also a BIG job. This concrete hearth tweak by Single Girls DIY updated their fireplace without requiring a sledgehammer or a huge budget.
Favorite barn doors: Our reader Denise sent in these photos of her barn door window coverings — don’t the look amazing! (See more barn door ideas here and affordable barn door hardware here.)
From Denise: “These indoor sliding barn door shutters are something I tried to purchase for a year . Online shutter companies show them in their products now however they don’t have them when you call. 40 years ago in my 20s I built similar shutters fir my family room. When I moved I figured my building days were done and I’d sold all my tools. It took a year to find Keith Denig who is a wood artist. He was excited about the project.
This barn door hardware kit came with everything necessary. I saved 100$each purchasing them online. I found for my home I needed to purchase longer bolts because if the way the headers we’re built above my windows. I purchased HeadLOK wood screws that were 6″ long. They came with the necessary bit. It was necessary to drill extra holes in the bar because my studs are 20 inches apart. It was not difficult to drill through the bar at all. Putting the bars up was not difficult and we got extra support by putting them into the studs. Otherwise your doors will come crashing down. The rollers must be attached toward the center of the shutters enough so they don’t hit each other at the top. Otherwise you will have a gap between the shutters. Something we did and had to fix. don’t do this. Just move the rollers more to the center a little to avoid it.
I had a friend named Keith Denig who is a wood God. I showed him some drawings and photos of what I wanted the shutter doors to look like. His garage is a wood workers wonderland.He used alder wood on the framing and since I was going to paint the shutters he used pine for the center portion. The shutters overhang the windows by 2 inches on each side. I wanted to block out as much sun as possible.
The long doors I purchased at an overstock supply house for 78$ each. They are two different sizes because I wanted to open only one side and leave the other stationary. The backside is covered with pine boards that Keith ripped, planed,and sanded. The back or Street side is painted white to reflect as much possible heat away from the inside of the home.
The inside portion is painted a blue color (Behr English Channel) that really warmed the room up. I debated about staining vs painting and was pleased with my choice if paint. It took 1/2gallon of paint of each color to complete the project. There are 3 coats on each side.The entire project was around 700$ for all the windows they can be done for less with old barn wood or even wood from pallets. I ordered hardware handles online for 6$ for 10. I haven’t get decided if I want to put them on yet or not. I’m so pleased with the way these turned out. “
Favorite daily reminder: We found this and fell in love — I think every home could use a reminder to be a little more loving! You can purchase it here.
Favorite sign of spring: It snowed here AGAIN this week. I know it’s only mid-March, but after a warm winter, we’ve gotten late snow, then beautiful spring weather, and then back to typical “spring” weather — rain, turning to hail, and later snow… so I need to pull out my spring decor and make it spring inside no matter what the weather forecast brings! This simple but beautiful mantel by A Nod to Navy is lovely — and be sure to read her tips for decorating a mantel.
Favorite sign of spring: I mentioned the snow, right? So I’m picking TWO favorite signs of spring to make up for it This book page spring art by Refresh Living is so cute on her vintage farmhouse mantel.
Favorite big kitchen: Not everyone wants or needs a big kitchen, but just look at all this countertop space! (Utah Valley Home Show, home built by Split Rock Fine Homes, designed by Hamilton Park Interiors)
Favorite you did it: Another reader feature, from Noreen, who made this bathroom renovation a whole family project — the helpful princesses are so precious! Here’s the before:
From Noreen: “We wanted to update our old and tired looking bathroom without breaking the bank! It is a very small space with the vanity separate from the toilet and shower. We used basic white subway tile with grey grout with an accent glass tile. The shower head is a double manifold with a tall extension for a rain shower head, with the other outlet providing for a hand-held shower. For the floors, we used a light wood-look tile and we added radiant heat floors.
Since it was such a small space, it was a budget friendly splurge and worth the extra expense. For storage, we put wood shelves resting on black pipes that made the space look rustic. We replaced the toilet with a water efficient one that also has hidden plumbing, and an extra deep white tub to finish the space.
For our vanity, we added red cedar wood planks to the wall to add extra dimension to the space, and adjustable oval mirrors with dimmer light fixtures to both inside the bathroom and for the vanity area. We also added crown molding to finish the space. Our total renovation budget was $2,200.00
As far as tips and recommendation we used “Gold Bond eXP tile backer” boards from home depot for the walls, having previously utilized other cement boards as tile backers this one appeared durable and was much easier to work with since cutting was done with a razor knife. We also used “redguard” roll on water proofer as an extra layer of protection.
Another tip is having your 3 year old girls help with every step, it is a fun age and they love it (Princess dresses are optional though!)
Favorite vignette: I spied this vignette and saw a familiar looking project… don’t those corbels look just like this vintage set that we shared the DIY building plan and template for? I love the whole setup, from the herringbone wood sign to the perfect aged finish on the shelf. I couldn’t track down the original creator, though, so if you know, please let me know because I’d love to give them credit!
REMODELAHOLICS ANONYMOUS Link Party
Come share your latest and your greatest home and DIY projects — we love to see and feature YOU! There will be a new party with features and additional Friday Favorites every FRIDAY here on Remodelaholic — can’t wait to see what you’ve been up to! Share up to FIVE of your latest and/or greatest posts — just share different posts each week, please.
Just a few guidelines:
In order to be featured, please show some love by sharing, linking back, following, etc (you can grab a button if you’d like).
Please link the direct URL of the post: no homepage links, no business links.
Always keep your links family friendly. We reserve the right to remove any links for any reason.
Be a great party-goer and visit a few of the other links to share the love!
By submitting your link here, you grant Remodelaholic permission to use one photo to feature your post here on our site or on our social media channels, with credit and a link back.
The post Friday Favorites: Reader Features and Signs of Spring appeared first on Remodelaholic.
from builders feed https://www.remodelaholic.com/friday-favorites-reader-features-signs-spring/ via http://www.rssmix.com/
0 notes
Video
youtube
Buy it on Amazon - http://ift.tt/2rnxjUF - Oreck Commercial PKBB12DW Super Compact Canister Advanced Filtration Disposable Bags (Pack of 12) Coupon -- Click the link to buy now or to read the 651 4 & 5 Star Reviews.Subscribe to our Channel: https://www.youtube.com/channel/UC5omWB83M6DoRf0tP2haOHg?sub_confirmation=1 Like us on Facebook for videos, pictures, coupons, prizes and more - http://ift.tt/2wCDdi2 Oreck Commercial PKBB12DW Super Compact Canister Advanced Filtration Disposable Bags (Pack of 12) Coupon Bought from Amazon because Oreck wanted quadruple the price. I still have the bag from the ones I got with my vacuum and the packaging and contents are identical so I am confident that this is the exact same bag that Oreck is selling. ... Reviewer : HD Communications This is much better than I expected. It stretches to about double the length and it made of a very nice, soft, flexible material. It fit a little loosely into my 20 year old Oreck XL but with a single wind of masking tape the problem was solved. All of my old original accessories fit the other end perfectly. I am very happy and highly recommend this hose. ... Reviewer : Fuzzy Fernandez Click http://ift.tt/2rnxjUF to buy now on Amazon or to read more reviews. For use with Oreck Commercial BB180, BB280, BB850, BB870, BB900, BB1000, and MV160 canister vacuum cleaners (sold separately) Hypoallergenic to minimize allergic reactions Triple-layered construction helps trap dust particles My Orek vacuums have given me years and years of loyal service, and I like to think I am "returning the favor" when I take them in for regular service, and use only genuine Orek parts and accessories for them. I don't know if there even ARE any "generic" bags out there, and I don't care to find out. Especially at this price, there's just no reason not to follow through with the Orek commitment to quality. I put these on my Subscribe and Save subscription, so that I will neve... Reviewer : Tiffany Holley Click http://ift.tt/2rnxjUF to buy now on Amazon or to read more reviews. ***Let Us Know What You Think… Comment Below!!*** Watch my other review Videos – https://www.youtube.com/channel/UC5omWB83M6DoRf0tP2haOHg See other products on http://ift.tt/2xhK4Ru Subscribe to our Channel: https://www.youtube.com/channel/UC5omWB83M6DoRf0tP2haOHg?sub_confirmation=1 Like us on Facebook for videos, pictures, coupons, prizes and more - http://ift.tt/2wCDdi2 #ORECK Commercial, #Oreck Commercial PKBB12DW Super Compact Canister Advanced Filtration Disposable Bags (Pack of 12) This is a review video for : B000BY21ZC Manufacture : ORECK Commercial Thanks for watching! http://ift.tt/2xhK4Ru Related Videos in Channel
0 notes
Text
Sweet Potato Spelt Galette with Cashew Cheese
This sweet potato spelt galette with cashew cheese is about as fancy as my home cooking will get this holiday season! I spent my entire reading and finals week eating braised beans and kale with bread or grains, or turmeric rice and beans. And I’ve got another rice and bean dish in the works for later this week, because in spite of having a break from school I’m craving that kind of simple, one-pot, grain/green/bean meal lately.
Still. It’s nice, from time to time, to make dishes that are festive and pretty and the kind of thing you’d serve at a cocktail party—even if you don’t actually intend to host or attend a cocktail party. And that’s what this galette, with its pretty alternating circles of purple and regular sweet potato, is.
As a welcome bonus, the galette is surprisingly easy to make in spite. No more difficult than a fruit galette, and particularly easy if you use a store-bought vegan soft cheese (some contenders: Treeline in any flavor, Kite Hill ricotta, or Miyoko’s classic double cream chive). You can use vegan cream cheese, too.
If you’d like to make your own cashew cheese, the recipe here will give you enough for the galette and extra leftover for crackers, crudités, sandwiches, or whatever you like (you can also use my go-to cashew cheese recipe, which makes a bigger batch and doesn’t have herbs).
I was thinking about using a savory variation of what has become my standard galette crust recipe, but I was also curious about whether an olive oil crust would work even better for a savory recipe. This was my first time trying one, and I was really happy with how it turned out! Not quite buttery enough for my taste if I were to use it in a dessert, but it’s really perfect for this galette, and it’s definitely no trickier to make than a butter crust.
Once the crust is ready, you spread a thin layer of the cashew cheese over it, and get to arranging your sweet potato slices. You could use any type, and no need to alternate varieties: I just loved the way that the purple and orange looked together. I was a little worried about having to par-bake or steam the sweet potato slices before the galette goes into the oven, but there’s no need if you slice them thinly (a mandolin is handy for that).
Cut into wedges, the galette is a perfect, elegant appetizer for any NYE gathering. And if you’re on the hunt for something bubbly and vegan to serve with it, the prosecco from Santa Margherita winery is a great choice.
My knowledge of wine and prosecco is pretty limited, but I’m always on the lookout for more vegan options for special occasions or to serve and gift to friends. Santa Margherita‘s selections are all vegan: the company abandoned the use of animal byproducts years ago, and today it employs only vegan-friendly bentonite clay and yeast- or vegetable-derived products during filtration. In addition, it works only with vegan suppliers. Santa Margherita also prioritizes eco-friendly harvesting practices and sustainability, which you can read about here.
It can be tough to source vegan drink options, and I’m so happy to have a winery on my radar that’s so dedicated to cruelty-free practices. Santa Margherita’s on the Barnivore app (along with many other options for you to celebrate with and share). I especially liked pairing the light, fruity prosecco with the tart, with its toasted crust and sweet, earthy potato filling.
Here’s the recipe.
Sweet Potato Spelt Galette with Cashew Cheese
5.0 from 1 reviews
Print
Recipe type: appetizer, small plate
Cuisine: vegan, soy free
Author: Gena Hamshaw
Prep time: 30 mins
Cook time: 40 mins
Total time: 1 hour 10 mins
Serves: 8-10 slices
Ingredients
For the olive oil spelt crust:
1 cup unbleached, all-purpose flour
½ cup spelt, rye, or whole wheat flour*
½ teaspoon salt
5 tablespoons olive oil
1 teaspoon apple cider vinegar + ¼ cup ice old water
For the herbed cashew cheese:
1 cup raw cashews, soaked for at least 2 hours and drained
½-3/4 teaspoon salt (to taste)
1 tablespoon lemon juice
⅓ cup water
Freshly ground black pepper to taste
2 teaspoons fresh thyme, or 1 teaspoon thyme + 1 teaspoon fresh oregano
For the galette:
1 olive oil spelt crust (above) or a vegan savory pastry recipe of choice
½-2/3 cup (as needed) herbed cashew cheese (above), or a soft vegan cheese or cream cheese of choice
2 small sweet potatoes (any color), peeled and sliced very thinly (1/4-inch thick or less)
2 teaspoons olive oil
Salt and freshly ground pepper
1 tablespoon fresh thyme
Instructions
To make the crust, place the flours and salt into a food processor fitted with the S blade. Pulsing constantly, drizzle in the olive oil. The mixture should be crumbly but not yet sticking together. Pour in the water, tablespoon by tablespoon, pulsing as you go, until the mixture is starting to clump together. Shape it into a ball, then flatten it into a disk. Wrap in plastic wrap and refrigerate for 30 minutes or up to 2 days. (You can also do this process by hand, using a pastry cutter or 2 forks.)
To make the cashew cheese, place the cashews, salt, and lemon juice into a food processor fitted with the S blade. Pulse to break the nuts down, then turn the motor on. Drizzle in the water in a thin stream. Stop and scrape the bowl of the processor down and add freshly ground black pepper to taste, along with the herbs. Continue processing the cheese for 2-3 minutes, or until it's totally smooth, adding water by the tablespoon if it's overly thick or pasty (I like my cashew cheese to be like a thick and smooth hummus). Taste the cheese and adjust the salt and lemon as needed. Cashew cheese will keep in an airtight container in the fridge for up to 5 days.
To make the galette, preheat your oven to 375F. Flour your work surface and roll the crust dough into a circle that's about 12-14 inches across and ¼ inch thick. Carefully transfer this circle to a parchment-lined baking sheet. Spread about a half cup of the herbed cashew cheese in the center, leaving about 1½ inches of crust at the edges.
Toss the sweet potatoes with the oil and thyme, along with a generous pinch of salt and black pepper to taste. Pile the sweet potatoes on top in an overlapping, circular pattern on top of the cashew cheese (don't be afraid to pile them up at the center!). If you have leftover potatoes, you can roast them on a separate tray alongside the galette.
Bake the galette for 40-50 minutes, or until the crust is a deep golden shade and the potatoes are entirely tender. Allow it to cool to room temperature on a cooling rack before slicing into wedges and serving.
3.5.3229
The galette will also work nicely with rings of butternut squash or beet. If you’d like to save some time, you can prep your cashew cheese and chill your crust in advance, simply rolling and assembling everything before you bake it. The whole galette keeps nicely for a night or two in the fridge, so you can also prepare it in advance of whatever occasion you have to share it.
Me? I didn’t have a party or cocktail gathering to serve the galette with, but I was taking mental notes on how perfect it would be for entertaining (or bringing to a friend as a housewarming gift). And I loved serving big wedges of it with soup and salad for easy meals through the week, so rest assured that the dish is more versatile than being a party appetizer. No matter how you serve it, I hope you’ll find it as pretty and tasty as I did.
Speaking of bubbly drinks and celebrations, I can’t believe that New Year’s Eve is just around the corner. I have a one-pot black-eyed pea and collard green dish to commemorate with coming to the blog later this week—not really hoppin John, but still featuring those lucky ingredients, easy, and good. For now, I’m wishing you all a quiet and restorative week.
xo
This post was sponsored by Santa Margherita winery. All opinions are my own, and I love this company’s dedication to vegan production practices. Thanks for your support!
The post Sweet Potato Spelt Galette with Cashew Cheese appeared first on The Full Helping.
Sweet Potato Spelt Galette with Cashew Cheese published first on
0 notes
Text
Sweet Potato Spelt Galette with Cashew Cheese
https://www.thefullhelping.com/wp-content/uploads/2017/12/Sweet-potato-galette-7.jpg
This sweet potato spelt galette with cashew cheese is about as fancy as my home cooking will get this holiday season! I spent my entire reading and finals week eating braised beans and kale with bread or grains, or turmeric rice and beans. And I’ve got another rice and bean dish in the works for later this week, because in spite of having a break from school I’m craving that kind of simple, one-pot, grain/green/bean meal lately.
Still. It’s nice, from time to time, to make dishes that are festive and pretty and the kind of thing you’d serve at a cocktail party—even if you don’t actually intend to host or attend a cocktail party. And that’s what this galette, with its pretty alternating circles of purple and regular sweet potato, is.
As a welcome bonus, the galette is surprisingly easy to make in spite. No more difficult than a fruit galette, and particularly easy if you use a store-bought vegan soft cheese (some contenders: Treeline in any flavor, Kite Hill ricotta, or Miyoko’s classic double cream chive). You can use vegan cream cheese, too.
If you’d like to make your own cashew cheese, the recipe here will give you enough for the galette and extra leftover for crackers, crudités, sandwiches, or whatever you like (you can also use my go-to cashew cheese recipe, which makes a bigger batch and doesn’t have herbs).
I was thinking about using a savory variation of what has become my standard galette crust recipe, but I was also curious about whether an olive oil crust would work even better for a savory recipe. This was my first time trying one, and I was really happy with how it turned out! Not quite buttery enough for my taste if I were to use it in a dessert, but it’s really perfect for this galette, and it’s definitely no trickier to make than a butter crust.
Once the crust is ready, you spread a thin layer of the cashew cheese over it, and get to arranging your sweet potato slices. You could use any type, and no need to alternate varieties: I just loved the way that the purple and orange looked together. I was a little worried about having to par-bake or steam the sweet potato slices before the galette goes into the oven, but there’s no need if you slice them thinly (a mandolin is handy for that).
Cut into wedges, the galette is a perfect, elegant appetizer for any NYE gathering. And if you’re on the hunt for something bubbly and vegan to serve with it, the prosecco from Santa Margherita winery is a great choice.
My knowledge of wine and prosecco is pretty limited, but I’m always on the lookout for more vegan options for special occasions or to serve and gift to friends. Santa Margherita‘s selections are all vegan: the company abandoned the use of animal byproducts years ago, and today it employs only vegan-friendly bentonite clay and yeast- or vegetable-derived products during filtration. In addition, it works only with vegan suppliers. Santa Margherita also prioritizes eco-friendly harvesting practices and sustainability, which you can read about here.
It can be tough to source vegan drink options, and I’m so happy to have a winery on my radar that’s so dedicated to cruelty-free practices. Santa Margherita’s on the Barnivore app (along with many other options for you to celebrate with and share). I especially liked pairing the light, fruity prosecco with the tart, with its toasted crust and sweet, earthy potato filling.
Here’s the recipe.
Sweet Potato Spelt Galette with Cashew Cheese
Print
Recipe type: appetizer, small plate
Cuisine: vegan, soy free
Author: Gena Hamshaw
Prep time: 30 mins
Cook time: 40 mins
Total time: 1 hour 10 mins
Serves: 8-10 slices
Ingredients
For the olive oil spelt crust:
1 cup unbleached, all-purpose flour
½ cup spelt, rye, or whole wheat flour*
½ teaspoon salt
5 tablespoons olive oil
1 teaspoon apple cider vinegar + ¼ cup ice old water
For the herbed cashew cheese:
1 cup raw cashews, soaked for at least 2 hours and drained
½-3/4 teaspoon salt (to taste)
1 tablespoon lemon juice
⅓ cup water
Freshly ground black pepper to taste
2 teaspoons fresh thyme, or 1 teaspoon thyme + 1 teaspoon fresh oregano
For the galette:
1 olive oil spelt crust (above) or a vegan savory pastry recipe of choice
½-2/3 cup (as needed) herbed cashew cheese (above), or a soft vegan cheese or cream cheese of choice
2 small sweet potatoes (any color), peeled and sliced very thinly (1/4-inch thick or less)
2 teaspoons olive oil
Salt and freshly ground pepper
1 tablespoon fresh thyme
Instructions
To make the crust, place the flours and salt into a food processor fitted with the S blade. Pulsing constantly, drizzle in the olive oil. The mixture should be crumbly but not yet sticking together. Pour in the water, tablespoon by tablespoon, pulsing as you go, until the mixture is starting to clump together. Shape it into a ball, then flatten it into a disk. Wrap in plastic wrap and refrigerate for 30 minutes or up to 2 days. (You can also do this process by hand, using a pastry cutter or 2 forks.)
To make the cashew cheese, place the cashews, salt, and lemon juice into a food processor fitted with the S blade. Pulse to break the nuts down, then turn the motor on. Drizzle in the water in a thin stream. Stop and scrape the bowl of the processor down and add freshly ground black pepper to taste, along with the herbs. Continue processing the cheese for 2-3 minutes, or until it's totally smooth, adding water by the tablespoon if it's overly thick or pasty (I like my cashew cheese to be like a thick and smooth hummus). Taste the cheese and adjust the salt and lemon as needed. Cashew cheese will keep in an airtight container in the fridge for up to 5 days.
To make the galette, preheat your oven to 375F. Flour your work surface and roll the crust dough into a circle that's about 12-14 inches across and ¼ inch thick. Carefully transfer this circle to a parchment-lined baking sheet. Spread about a half cup of the herbed cashew cheese in the center, leaving about 1½ inches of crust at the edges.
Toss the sweet potatoes with the oil and thyme, along with a generous pinch of salt and black pepper to taste. Pile the sweet potatoes on top in an overlapping, circular pattern on top of the cashew cheese (don't be afraid to pile them up at the center!). If you have leftover potatoes, you can roast them on a separate tray alongside the galette.
Bake the galette for 40-50 minutes, or until the crust is a deep golden shade and the potatoes are entirely tender. Allow it to cool to room temperature on a cooling rack before slicing into wedges and serving.
3.5.3229
The galette will also work nicely with rings of butternut squash or beet. If you’d like to save some time, you can prep your cashew cheese and chill your crust in advance, simply rolling and assembling everything before you bake it. The whole galette keeps nicely for a night or two in the fridge, so you can also prepare it in advance of whatever occasion you have to share it.
Me? I didn’t have a party or cocktail gathering to serve the galette with, but I was taking mental notes on how perfect it would be for entertaining (or bringing to a friend as a housewarming gift). And I loved serving big wedges of it with soup and salad for easy meals through the week, so rest assured that the dish is more versatile than being a party appetizer. No matter how you serve it, I hope you’ll find it as pretty and tasty as I did.
Speaking of bubbly drinks and celebrations, I can’t believe that New Year’s Eve is just around the corner. I have a one-pot black-eyed pea and collard green dish to commemorate with coming to the blog later this week—not really hoppin John, but still featuring those lucky ingredients, easy, and good. For now, I’m wishing you all a quiet and restorative week.
xo
This post was sponsored by Santa Margherita winery. All opinions are my own, and I love this company’s dedication to vegan production practices. Thanks for your support!
[Read More ...] https://www.thefullhelping.com/sweet-potato-spelt-galette-cashew-cheese/
0 notes
Text
10 Traditional Native American Recipes That You Should Totally Try At Home
I can still remember the first time I sunk my teeth into a delicious slice of my favorite traditional Native American recipe: Frybread.
Of course, there aren’t many bells and whistles to the simple recipe unless you take things up a notch by using it for a tasty twist on tacos but something about the consistency and slight sweetness you can find in some versions makes my mouth water every time my mom or aunts decide to whip it up for dinner.
In fact, I grew up eating most of the delicious dishes below at some point or another with my family embracing our Cherokee roots in Oklahoma, especially when it came timefor someone to light up the fire for a good old-fashioned “hog fry.”
But there are also more than a few of these from other Native American cultures that I haven’t had the chance to try yet. You bet I’m going to fix that as soon as I can, though!
Take a look and let us know if we missed any of your favorite traditional Native American recipes.
And be sure to SHARE the scrumptious dishes with your friends!
Like our Page
Share on Facebook
Share on Facebook
1. Acorn Bread
Flickr / Fort Greene Focus
Native Americans in California, like the Pomo and Miwok tribes, relied on their ample bounty of acorns for several meals when developing this recipe years ago.
Ingredients: 6 Tbsps. cornmeal 1/2 cupcold water 1 cup boiling water 1 tsp. salt 1 Tbsp. butter 1 packet active dry yeast 1/4 cuplukewarm water 1 cupmashed potatoes 2cup all-purpose flour 2 cupfinely ground leached acorn meal
Instructions: Grab a big bowl and mix your cornmeal with the cold water first, then add the boiling water and allow to cook for about two minute while you blend it together. Stir in your salt and butter, thenlet the mixture cool until it’s lukewarm. With a separate bowl of lukewarm water, soften your yeast and then add with the rest of the ingredients.
Knead until a sticky dough forms, then cover and let rise until it has doubled in size. Shape it into loaves and let it rise again, then bake at 375 degrees for about 45 minutes.
2. Three Sisters Soup
YouTube / Visit Finger Lakes
Several tribes relied on the “three sisters” of corn, squash, and beans to survive harsh winters back in the day.
Ingredients: 4 lbs.winter squash 4 quarts vegetable stock (or water) 2 small diced yellow onions 1/4 cup olive oil 1/4 cupchopped garlic 2 tsps. dried thyme 1 tsp. ground black pepper 1 lb.fresh or frozen corn kernels 4 cans cannellini beans 1 bunch sliced green onions 1/2 cup white wine 1 large bay leaf
Instructions: Preheat your oven to 350 degrees. Slice your squash in half and scoop out the seeds, then roast for about 40 minutes. Allow to cool once soft, then scrape out the flesh and save the liquid for later. Blend until totally smooth (you can use a food processor or blender).
Saut onions in a large pot over medium heat until brown, then add garlic, thyme, and black pepper, stirring until the garlic turns brown as well.
Pour inthe stock and follow with the bay leaf, wine, and squash and allow it to a simmer for a few minutes before adding the rest of your ingredients and simmering for about 20 minutes total.
3. Frybread
Wikimedia Commons / CambridgeBayWeather
Pretty much every tribe has their own variation on this mealtime staple,but they all rely on a similar foundation like this traditional recipe.
Ingredients: 1 cup flour 1/2 tsp. salt 2 tsps. baking powder 3/4 cup milk Oil or lard for frying
Instructions: Mix all of the ingredients together well until a dough forms, then knead on a floured surface until it smooths out. Roll them out into a thin layerand cut smallportions, then drop into hot oil to fry until golden brown.
4. Pemmican
Wikimedia Commons / Jen Arrr
Though the name comes from the Cree Nation, manyNative Americans have used this classic recipe to keep their energy up on long journeys.
Ingredients: 4 cups lean meat 3 cups dried fruit 2 cups rendered fat Unsalted nuts Dash of honey
Instructions: Lean meat can bedeer, beef, caribou or moose. Spread whichever you have available out on a cookie sheet and dry in the oven at 180 degrees for at least eight hours, or until crispy. Once it’s cooled, pound it into a powder-like consistency and grind the dry fruit.
Heat the rendered fat until it becomes a liquid, then pour over the dried meat and fruit and mix in the nuts and honey as well. Mix and slice into portions, then storein a cool, dry place.
5. Buffalo (Or Beef) Stew
Flickr / kae71463
Known as “tanka-me-a-lo” in the Cherokee Nation, you can substitute regular beef if you’re unable to find any buffalo meat in your area for this filling stew.
Ingredients: 2 stalks celery 2 carrots 1 can stewed tomatoes 2 lbs. buffalo/beef stew meat 4 quarts water 2 lbs. red or white potatoes (not russets) 1 cup barley
Instructions: Slice the carrots, celery, and meat into cubes about one inch long, then brown the buffalo over high heat for about three minutes. Add the water, potatoes, and carrots into a large pot and boil until tender.
Add in thetomatoes, barley, and celery and let cook for another five minutes or so. Pour the veggies and meat into a baking dish and place in the oven at 425 degrees for 30 minutes.
6. Pine Nut Catfish
Flickr / Michael Neel
Tribes in the New Mexico region developed this nutty spin on fresh caught catfish.
Ingredients: 14 cup pine nuts 2 additional Tbsps.pine nuts 1/2cup yellow cornmeal 1/4 cup flour 1 tsp. salt 1/2tsp. cayenne pepper 1/4 tsp. ground cumin 4 catfish fillets 1/4cup vegetable oil
Instructions: Preheat your oven to 350 degrees. Spread pine nuts in an even layer on a baking sheet and toast for about five minutes or until brown. Set aside to cool, then grind 1/4 cup of them and leave the rest for garnish later.
Mix the ground pine nuts, cornmeal, flour, salt, cayenne pepper, and cumin and coat your fillets. Heat the oil in a large skillet and fry the fish for about four minutes on each side. Sprinkle with the leftover toasted pine nuts before serving.
7. Baked Pumpkin
Wikimedia Commons / Tim1965
Members of theChippewa tribe near Lake Superior have been enjoying this savory side dish forgenerations.
Ingredients: 1 small pumpkin 1/4 cup apple cider 1/4 cup maple syrup 1/4 cup melted butter
Instructions: Put the entire pumpkin in your oven and bake at 350 degrees for about two hours. Cut the baked pumpkin in half and scoop out the pulp and seeds from inside,spreading the pulp into a casserole dish.
Mix the remaining ingredients in a bowl and pour over the pumpkin and bake for another 35 minutes.
8. Pork Roast
Pixabay / ikcinicki
Pork has always been a favorite main dish for several tribes, but the Pueblo Indians in New Mexico gave it their ownflavor with this recipe.
Ingredients: 1/4cup vegetable oil 11/2 cups onions, chopped 3 minced garlic cloves 4 crushed and dried juniper berries 1/2tsp.crushed coriander seed 1 bay leaf 4 large ripe tomatoes 1 1/4cups water 2/3cup cider vinegar 1/2cup honey 1 Tbsp.ground red chili 1 medium-hot crushed dried chile 2 tsps. salt 1 oz.unsweetened chocolate square 5 lbs. pork rib roast
Instructions: Saut onions in oil until they’re soft, then add garlic, juniper berries, coriander seed, and bay leaf and continue to saut for a few more minutes. Quarter and seed your tomatoes, then add with water, vinegar, honey, the ground and crushed chiles, and salt. Cover and allow to simmer for about 30 minutes.
Grate the chocolate and add, then allow to simmer uncovered for another 20-30 minutes until it becomes thick. Put the pork in a pan and baste with the sauce, then roast in the oven at 350 degrees for about three hours, basting every now and then as it cooks.
9. Succotash
Flickr / Matt Johnson
Tribes across the country enjoyed this super nutritious dish long before more folks relied on it as a cheap meal in the Great Depression.
Ingredients: 2 lbs. fresh or dry lima beans 3 cups fresh corn cut from cob 4-6 wild or pearl onions 2 Tbsps. melted bacon fat 2 pieces smoked ham hock 3 quarts water Salt and pepper to taste
Instructions: Soak dry beans for 3-4 hours to soften. Drain and add to a pot of boiling water. Let them cook for about 10 minutes, then add corn, ham hocks, salt and pepper, and onions.
Reduce the heat and cook on low for one hour.
10. Fried Green Tomatoes
Flickr / Beck
It shouldn’t surprise you to learn that this yummy Southern staple started with Native Americans from the region frying up some fresh tomatoes.
Ingredients: 4 large green tomatoes 1 tsp. salt Pinch black pepper 2 cups coarse ground yellow cornmeal Lard or vegetable shortening
Instructions: Slice the tomatoes to about 1/2 an inch and sprinkle with the salt. Let them sit for 10 or 15 minutes and blot dry with paper towels, then sprinkle with pepper.
Dip the slices into cornmeal and heat your lard or oil in a large skillet, then fry the slices until both sides are brown.
Did we miss any of your favorite traditional Native American dishes? Let us know below and be sure to SHARE with your friends!
Read more: http://ift.tt/2mTvQBi
from 10 Traditional Native American Recipes That You Should Totally Try At Home
0 notes
Link
Sonus announced the SWe Lite at Ignite in the US late last year and we’ve been anxiously awaiting its arrival. Well, IT’S HERE!
The SWe Lite is the “Software Edition” of Sonus’ well-established Enterprise-grade Session Border Controllers, the SBC 1000 and SBC 2000.
I’m particularly impressed with the look and feel. At a quick glance it’s indistinguishable from a 1k or 2k:
The GA build supports up to 100 SIP calls, 25 transcoded or encrypted sessions and a call setup rate of 10 calls per second. It’s a faithful port of the SBC we’re familiar with, so includes the bulk of the features we’ve come to rely on for years including the powerful AD integration & the invaluable real-time channel monitor (shown above).
Notably absent is inbuilt Music On Hold, although we’re assured that’s coming soon. Check out the datasheet or the page “Functional Differences Between SBC Edge and SBC SWe Lite” for more of the engineering and feature specifics.
Sonus is letting an “unlicenced” SWe Lite carry up to 5 ordinary SIP calls or 3 encrypted/transcoded calls – more on that below. In the screen-grab above I’ve established 3 calls successfully over TLS to Skype for Business and a failed fourth call attempt is what generated the “Failed to acquire licence” you can see in the Alarm View.
Installation
I found my installation deviated from the online Installation Guide for Hyper-V, so I thought I’d document the process I followed with the GA build in my Lab. Here it’s going onto my Dell R720xd running Hyper-V Server 2012 R2.
Keen readers may note that some of the time-stamps in the attached jump around a little. The steps below were captured over almost a week of testing and plenty of different builds of VM in order to document all the options – and an annoying do-over where I was bitten by the requirement to separate Admin and Media NICs (see Notes below) & fluffed the swapover.
Login to the Partner portal and raise a request to download the SWe Lite, which ships as a pre-packaged virtual machine. In my case I downloaded “SWeLite-Hyper-V-release.6.1.0.build87”.
Copy this to your Hyper-V host.
Unzip it to a utility folder. We’ll be importing this machine and copying it to a new location as part of that process, so it doesn’t particularly matter where you place it in this step.
Browse to the Install folder therein and unzip the “SBCSWeLite-HyperV.zip” file. I unzipped it to the same folder. If you have any experience with Hyper-V, this structure will look familiar:
From here you have two choices to import the VM: if you’re old-skool, continue with the next step, but if you’d prefer to P$ this up a little, jump to step 15.
Launch Hyper-V Manager and select Import Virtual Machine.
Navigate to the “Virtual Machines” folder from Step 4 and click Next:
Next:
Select “Copy the virtual machine (create a new unique ID)” and click Next:
Accept the default or select “Store the machine in a different location” and nominate your preferred locations. All mine live in their own folders under E:Hyper-V
Here I’ve chosen to place the VHD in the same location as the above:
If you’re happy with all the settings, click Finish:
The import will take place and the wizard will close:
Jump to Step 16.
If you want to import the machine using PowerShell, I did it in 2 commands to save some typing. I centralise each Virtual Machine, its snapshots and VHDs all in the same folder, and to save specifying the same thing 4 times, I used a variable. Note that the poorly-named “-path” value needs to include the XML file as well – not just the path to it. Auto-complete is your friend there – tab your way to the file:
PS D:> $NewVMPath = "e:Hyper-VSWELite-GA" PS D:> Import-Vm -path "D:SWeLite-Hyper-V-release.6.1.0.build87InstallSBCSWeLite-hypervVirtual Machines56CE3CC2-D8B5-4673-9857 -BCAB33E4F6AD.XML" -Copy -GenerateNewId -VhdDestinationPath $NewVMPath -VirtualMachinePath $NewVMPath -SnapshotFilePath $NewVMPath -SmartPagingFilePath $NewVMPath -verbose
Back at the Hyper-V Manager you’ll find a new VM called “SBCSWeLite”. I’ve already re-named it to add a “GA” suffix:
Right-click the VM & select Settings. You’ll see it defaults to 1CPU and 1G RAM:
The Sonus install guide requires you to set static MAC addresses for all the NICs. I suspect this is for licencing reasons, and as it’s not relevant for me in my Lab, I’m going to break from the guidelines and stick with the Dynamic ones assigned by Hyper-V. If you’re going to be running this SBC in Production, please change all these NICs to Static MAC addresses. If you possess System Center Virtual Machine Manager (SC-VMM), it will let you create and manage a pool of static MAC addresses.
The first of the 5 NICs is dedicated to Admin, and the rest are reserved for Media. In the Lab I’m going to Administer it via my DMZ, and keep all my Media on the Internal network, while the final three I’ll leave “not connected”:
(I realise my NIC config here is a little “unconventional”, but sadly the SWeLite doesn’t support Admin and Media on the same network, and I only have two networks in my Hyper-V server).
Click OK to return to the Virtual Machines view.
Double-click the machine’s name to launch a console window, then the click the aqua-coloured start button (or Action / Start if you prefer). Press return to Boot to “Partition1”, or just wait for it to timeout and boot automatically:
In my Lab the SBC doesn’t like my DHCP servers, so at this step it fails to get an IP address for the Admin NIC. If you’re similarly-afflicted, you WON’T see an Admin IP as highlighted here:
If you DON’T see an IP address here, skip to Step 24.
If you *do* receive an Admin IP address above you might be tempted to jump to the browser and start configuring it, but I recommend against it. Here’s why: if you do browse to the UI you’ll hit the Initial SBC Setup wizard, as familiar users will be expecting, and this new warning message:
“It is recommended to login to the shell as ‘netconfig’ user to map the network interfaces before initial setup”.
As you’ve not yet mapped the application’s network interfaces back to the ‘virtual hardware’ layer, the SBC shows you all 5 NICs it’s capable of running. In my Lab I only want to use one for Admin and one for Media, so I want to suppress the other three.
Skip to step 25.
No IP? Welcome to the club. I guess yours might look like mine, where it comes to a halt at “System Health Monitor: spawned daemon with PID…”:
Press return in the virtual machine window to be prompted to login:
The login is “netconfig” and “Config!”.
Set a new password for “netconfig” as prompted, then configure the Admin IP address (if you didn’t get one from DHCP or want to change what you were offered):
Respond “Y” when asked to configure interface mapping and then respond to the each of the prompts by typing in the interface names from the ever-shrinking list of options. In this screen-grab I set “mgt0” as my Admin NIC and “pkt0” as my sole NIC for media, <Return> past the others and then finish with “y” to apply the changes:
Done! Now you can sign in from the browser and continue the config from the Initial Setup Wizard:
Note the “IP Address” section now only shows 2 NICs, compared to the 5 in the image back in Step 23.
(I like how the SBC nowadays highlights changed values with a blue border around the element).
Click OK to submit the changes and login to your new SWe Lite!
TADA!
You’re not done here yet though. Whilst the SWe Lite *is* going to include free SIP and transcoding licences, they’re not there automatically. If you’ve been around the SBC (pka “UX”) family for a while you might recollect they have “Base” and “Features” licences. The requirement for a free-standing Base licence was removed back in 4.1.1 days on the 1k & 2k platforms, however the SWe Lite has reverted (at least at GA) to needing both licence types loaded. What you’re seeing here is an SBC devoid of any licencing at all:
“This SWe Lite Instance is currently not licensed.”
For the time being the licencing process is a manual one, although that’s expected to change. Capture the “SWe Lite ID” from the System / Overview screen and send it to your local Sonus distributor or support contact:
You’ll receive a “Base” licence as a semi-legible XML file (rather than the previous blob of characters), but you still paste it into the same place in the UI:
Click Decode and Apply. Don’t be freaked that the licence appears to leave everything disabled – you’re confusing the difference between the Base Licence and a Features Licence, and the “free” calls licences that come in the Base aren’t visible here:
When you return to the “Current Licenses” view it’s better (when compared to Step 32) but still may concern you. Don’t – you now have a Base licence and several previously absent options have now materialised in the UI. You’ll also now be able to make calls through the SBC:
From here the configuration process is no different from a physical SBC. Config shortcuts include the ability to import a partial config – limited to another SWeLite at the moment – and the various Easy Setup Wizards.
Notes
I absolutely LOVE that the free version of the SBC includes SIP, registration and transcoding in the Base licence. I see the SWe Lite going into Labs, and pre-Prod test environments everywhere.
Kudos also to Sonus for not restricting the SWe Lite by mandating Hosts with specific advanced hardware or boutique configurations that might be mutually-exclusive with other Virtuals.
1G RAM and 1 CPU core for 25 encrypted calls is a great starting position. It will be interesting to see how this scales as the product matures.
Don’t let the limit of 25 transcoded/encrypted calls at GA discourage you from going into production – that’s its low-ball starting position from which it is absolutely going to grow. Have a word to Sonus and run two SWe Lite (or more?) instances on the same host to double the call-carrying capacity until the unit’s stand-alone throughput meets your requirements. (I acknowledge that this might not be compatible with some carriers’ SIP offerings).
The “Easy Config Wizard” won’t show in Tasks / Easy Config Wizard without a Base licence, so if you only see Certificates there, check you didn’t skip the Licencing steps above:
It’s not yet possible to import a .tar file from an SBC1k or 2k to the SWe Lite, so the migration process from physical to virtual will still involve some re-typing. I’ve tested and confirmed you can import Transformation Tables & SIP Message Rules from the other platforms, and I expect the same will apply to Passthrough Auth imports:
As you would expect of a virtual device like this, it’s able to log internally and also save packet captures locally (like the 2k).
The Admin NIC can’t be on the same network as any of its media NICs, and you’ll receive an error if you try to change them. I’d really like to see this resolved as it’s a major break from convention with its stablemates:
The backup file format is essentially the same as for the 1k & 2k, so the current version of my “Convert-SonusSbcConfigToWord.ps1” script (v6.1A at the time of writing) will still create a DOCX or PDF of the config in an easy-to-view format. I’ll get working on some minor tweaks and customisations for the SWe Lite next…
Summary
I think Sonus has done a fantastic job porting the 1k & 2k devices to a virtual platform, reinvigorating its highly-regarded SBC for centralised Data Centre deployments where rack-space is either not an option or prohibitively expensive.
I’m comforted that the GA build is significantly improved over the Alpha & Beta versions I was able to trial, and I expect Sonus will capitalise on its follow-the-sun global TAC operation to minimise the impact on customers of any issues that arise.
At Generation-e we have customers queuing up to get the SWe Lite in production, so keep an eye out here or on Twitter for any tips and traps we encounter along the way.
I’ve not seen (or asked about) pricing so I can’t comment on how the SWe Lite sits compared to its stablemates or the competition.
References
Check out Luca’s “Sonus SWe Lite Step-by-Step Setup” for VMware
Static MAC addresses: KB2804678–Cannot Exceed 256 Dynamic MAC Addresses By Default On Hyper-V Host
Credits
Thanks to Anup @ Sonus in Sydney for his help with my testing and Lab build, and to the rest of the Sonus team for envisaging and delivering on a much-sought-after addition to the product family.
Revision History
13th March 2017. This is the initial post. 13th March 2017. Added Luca’s review to References.
– G.
1 note
·
View note
Text
How to Create a Solid Backup Strategy for Your Photos
Most people take reasonable precautions when engaging in activities that are potentially unsafe or harmful, like wearing seat belts in a car or even washing your hands before eating. The benefits of these basic procedures are easy to understand which is one reason these practices are so widely adopted. But things look quite different where our digital lives are concerned; in other words, a backup strategy.
Every mobile phone, laptop, and personal computer stores your photos, documents, and other data on either a small memory chip or a spinning hard drive and it is not uncommon for these to fail. In fact, due to the nature of how hard drives (which are still by far the most common method of storing data) operate, they are guaranteed to wear out over time. It’s just a question of when. Anyone even remotely concerned with making sure their digital files are safe and accessible one, five, 10, or even hundreds of years from now needs to have a solid backup strategy in case the unthinkable happens.
Don’t let your photos disappear when your computer fails.
The challenge
One problem with creating a backup strategy is that it can seem so complex and convoluted it’s difficult to even know where to begin. From clouds to closets to safe deposit boxes, the world of data backup has so many options it’s enough to make your head spin. I’m going to explore three common options in this article, but before I get too far I want to remind you of the words of Carl von Clausewitz who said, “The enemy of a good plan is the dream of a perfect plan.”
Don’t get so caught up with finding the ideal backup strategy that you don’t do anything at all. The important lesson, no matter which method you use, is to create copies of your data – especially your photographs – so you can still get them if something bad happens.
3-2-1 Strategy
One of the best ways to approach backing up your data is the 3-2-1 strategy:
3: Have three copies of your data.
2: Keep them in two separate places.
1: At least one must be offsite.
This might seem like a lot of hassle, but it’s similar to most things in life that require small behavioral changes. Once you get over the initial setup of utilizing a backup strategy it becomes a habit or better yet, a completely transparent activity that just happens in the background. As someone who has lost data, and has had friends and family lose thousands of photos thanks to computer failures and hard drive corruption, I can confidently say that it is well worth your time to back up your data. It won’t save your physical life, but it could save your digital life.
A good backup solution doesn’t have to be complicated and can help make sure your memories stand the test of time.
Option #1 – External hard drives
googletag.cmd.push(function() { ruleset_slots.push( googletag.defineSlot( “/1005424/_dPSv5in-post-mobile(300×250)”, [300, 250], “pb-ad-0” ).addService( googletag.pubads() ) ); } );
Inside nearly every personal computer is a spinning hard drive that rotates at a mind-numbing speed of 5400-7200 rotations per minute, every day, for as long as the computer exists. Over time, hard drives have proven themselves to be simple cost-effective vessels for storing massive amounts of data. However, their mechanical nature makes them not only prone to failure but quite expensive and time-consuming to recover your files and photos if something does happen.
Because of these caveats, one of the simplest methods of backing up your data is to use software to make a clone of your hard drive onto – you guessed it – another hard drive. This duplicates everything on your computer so you can instantly access it in the case of an emergency. Thanks to the relatively inexpensive nature of external hard drives and backup software (which is often bundled with hard drives) the process is mostly painless.
Backup hard drives are a cheap and effective way of making sure your data is safe.
File recovery
Mostly, that is, until it comes time to actually recover your data. In my experience, this method of file backup is best when your entire computer dies and you need to start from scratch, at which point a clone of your hard drive can be used to create an exact copy on a new computer. I have had to do this a few times with excellent results, and except for re-registering some serial numbers with Adobe I was up and running again in no time.
However, if you accidentally delete some data, such as an entire folder of images, and need to recover just those specific things from your backup it can be tricky depending on the software solution you are using. Apple’s Time Machine, for example, is designed to facilitate the easy recovery of an entire computer’s worth of data but many people (myself included) have found themselves more than a little frustrated when restoring individual files or folders. Microsoft includes software called Backup and Restore which will do the same thing for Windows users. Either one of these is a great solution if you want a simple way of making sure all the data on your computer is saved and stored in the event of a complete hard drive failure.
One significant benefit of both Time Machine and Windows Backup and Restore is that they run automatically in the background so you never have to think about it once you set them up. However, one drawback is that because they only backup to external hard drives, if you lose data to a catastrophic event such as a fire or flood, chances are your backup drive will be toast also. For that reason I like to keep a second backup hard drive at the office where I work and switch the hard drives out every Monday. That way even if my house explodes in a freak meteorite incident everything but the very latest files and photos will still be available on my backup drive at work.
Mac users can use Time Machine to easily create automatic backups on an external hard drive.
Extra options
If you really want to go the extra mile with an external hard-drive-based backup plan, you can set yourself up with a multi-drive solution where all your data is copied to not only one, but several hard disks at the same time. This is called a RAID (Redundant Array of Independent Drives) system and while it’s more costly than a single drive solution, it’s virtually guaranteed to protect against data loss. If one of the drives in a RAID array fails you can usually just swap it out with a fresh drive and continue backing everything up.
Finally, if you are going to use external backups it’s important to keep them encrypted so prying eyes or thieving scoundrels can’t peek at your data. Time Machine lets you do this with the click of a mouse, and Windows has an option to do this as well using a setting called BitLocker. This adds a huge layer of security to your backups while taking almost no effort on your part. I highly recommend doing this.
BitLocker offers a great solution for Windows users who want a simple and effective backup strategy.
Hard drives are so cheap these days that it’s hard to go wrong with this type of solution. If your backup drive ever goes belly-up you can buy another one for the price of a few movie tickets. I recommend buying a drive that is double the capacity of your computer’s internal hard drive which means you can restore old copies of files long after they have been deleted from your computer.
Option #2 – Save your data to the cloud
googletag.cmd.push(function() { ruleset_slots.push( googletag.defineSlot( “/1005424/_dPSv5in-post-mobile(300×250)”, [300, 250], “pb-ad-1” ).addService( googletag.pubads() ) ); } );
If you don’t want to bother with the hassle of setting up an external hard drive, encrypting your data, and switching out drives every week or every month, another good option is to go with a cloud-based backup service like CrashPlan, BackBlaze, or Carbonite. These companies offer paid plans that backup all the data on your computer, or just a portion that you specify, to their own servers automatically. In terms of convenience, these services are hard to beat since they require almost no interaction from you after the initial setup.
Drawbacks
One of the downsides is the price, as they require a recurring monthly or yearly fee which, though usually not too expensive, can add up over time. They also make the act of restoring all your data, such as in the event of a fire or flood, more difficult than just hooking up a spare hard drive with a full copy of everything. Thankfully many cloud-based services will actually mail you a hard drive with a full copy of your data on it for an additional fee if you really need to do a full restore of your entire computer. You also have the option of logging into your account from a web browser and selectively downloading individual files or folders, which can be useful if you just need to retrieve specific items and not restore your entire computer.
One of the major drawbacks of cloud-based backup options involves actually getting your data to them in the first place. While broadband internet access is becoming increasingly common around the world, upload speeds still lag far behind download speeds. According to BackBlaze, a typical home internet connection will let you upload 2GB to 4GB per day, which means it could take several months to backup your entire hard drive! If you shoot in RAW and are constantly filling up your memory cards, you might find cloud-based backup services to be quite limiting unless you have a very fast internet connection!
Other cloud-based options are available that specifically address the needs of photographers. Google Photos allows unlimited storage for JPG pictures up to 16 megapixels, and Amazon allows unlimited photo storage for Prime members. Flickr, that longtime stalwart of online photo sharing, gives users 1TB (Terabyte, or 1024 GB) of storage for free. Services like Dropbox, OneDrive, and Apple’s iCloud offer paid plans that allow you to backup massive amounts of photos and other data for a fee while also syncing them across your devices.
Even if you already share pictures on social networks, it’s a good idea to have a full backup of all your images and a dedicated cloud-based solution is a nice way to accomplish this.
Shop around for the best cloud option for your needs
If you are thinking about using a cloud-based solution I would encourage you to investigate some options and see what you think would work best for your needs. I have used CrashPlan, BackBlaze, and Carbonite, as well as solutions like Arq which store your data on the Amazon cloud. Each of these has its own strengths and weaknesses and because of that, it is difficult to recommend a single cloud-based solution as every individual has their own needs.
All of them are good, and you really can’t go wrong with any of them if you currently don’t have a backup solution in place. I also like to caution people that when you utilize free services like Google Photos or Flickr it’s a good idea to review their Terms of Service so you know exactly what information and personal data you are giving up in exchange for the free use of their storage.
Option #3 – DVDs and Blu-Rays
Longtime computer users might fondly remember the days when CD-ROM drives first entered the scene. In those heady days of the mid-1990s the idea of putting as much data as you could fit on an entire 500MB hard drive onto one single CD was basically a computing miracle, and as CD drives became more prevalent they also became a good way to backup data such as documents and photos.
However as digital cameras rose to prominence in the early 2000s it became painfully obvious that backing up data to CDs and, subsequently, DVDs was too slow and cumbersome to be a good solution. Burning the discs took time, and getting files off them could be a chore especially as more and more computers abandoned these types of disc drives altogether.
So why in the world would this type of solution even be considered as part of a balanced backup strategy in 2017?
Behold the classic Compact Disc. You might not give this type of media much thought nowadays, but it can still be an essential component of a comprehensive backup strategy.
Cost and drawbacks
The answer to this question is mostly related to cost. Blank discs are cheap, and even if your computer doesn’t have a disc burner you can buy an external one for about $50-100. CDs hold about 600 MB of data, or enough for your vacation photos if you shot on medium-quality JPG. DVDs hold about 4.5 GB of data or a couple months of pictures (if you shoot RAW this will be more limited). Blu-Ray discs hold about 25GB of data or enough for an entire year’s worth of JPG images which make them very well suited for long-term image backup. Even if you already use a hard drive or cloud solution, it’s still a good idea to make regular backups of your pictures to some type of physical disc that you can then store in a safe deposit box or even mail to a trusted friend or family member.
googletag.cmd.push(function() { ruleset_slots.push( googletag.defineSlot( “/1005424/_dPSv5in-post-mobile(300×250)”, [300, 250], “pb-ad-2” ).addService( googletag.pubads() ) ); } );
One of the notable downsides to disc-based backups is that this media is prone to the same harsh realities of time as any hard drive. Sooner or later all discs that you create at home will fail due to a concept known as “bit rot” which is when the layer of dye inside a CD, DVD, or Blu-Ray that actually contains your data deteriorates over time. It might be a few years or 50 years, but it’s almost certainly going to happen to every disc you burn.
Thankfully some drives are capable of burning a special format of Blu-Ray called M-Disc which is supposed to keep your data safe for hundreds of years. Even though the actual discs are a little more expensive it could be well worth it to make sure your images aren’t lost to dust and decay over the years.
It might be worth your time to dust off that old DVD or Blu-Ray burner and use it as part of your photo backup plan.
Annual plan
When adding a disc-based component to your backup strategy I recommend making it part of an annual ritual instead of something you do monthly or weekly. Get a Blu-Ray burner so you can store all your pictures from the whole year and make the process of burning a disc and taking it to a safe deposit box an annual tradition. It might seem silly at first, but it could really save your digital life if you ever need it.
The Solution
The great challenge with backing up your digital images is that all methods have their positive and negative aspects, no one single solution is best. And very few things in life are truly permanent, so even if you physically print your pictures they will eventually fade and will also be susceptible to mold, moisture, or physical damage.
Any digital backup option is better than none at all. If you leave your photos on your computer or phone without duplicates then you are at risk of putting all your eggs in one basket which is almost certainly guaranteed to fail. The solution, then, is to do something to make sure your pictures don’t meet a premature digital demise. It could be a second hard drive, a cloud-based solution, making a Blu-Ray disk, using a combination of all three, or another method I didn’t even mention.
My father still has a hard drive sitting in his closet filled with thousands of images he may never see again. The disk failed years ago and was not backed up. The same thing has happened to many photographers around the world. Don’t let it happen to you.
Read more here:
What about you? What solution do you use to make sure your pictures are backed up and ready to access if you need them? There are hosts of other solutions I didn’t address in this article and I’m sure other DPS readers would like to know what ideas you have and what works for you. Please share in the comments below.
googletag.cmd.push(function() { ruleset_slots.push( googletag.defineSlot( “/1005424/_dPSv5in-post-mobile(300×250)”, [300, 250], “pb-ad-3” ).addService( googletag.pubads() ) ); } );
The post How to Create a Solid Backup Strategy for Your Photos by Simon Ringsmuth appeared first on Digital Photography School.
from Digital Photography School https://digital-photography-school.com/create-solid-backup-strategy-photos/
0 notes