#Modern Faucets
Explore tagged Tumblr posts
Visit Tumblr Blog
Explore Tumblr blogs with no restrictions, modern design and the best experience.
Last Seen Tumblr Blogs


Fun Fact
Tumblr has been banned in Indonesia for providing people with access to pornographic content.
Text
Bathroom Master Bath
An illustration of a medium-sized transitional master bathroom design with black floors, blue subway tile, flat-panel cabinets, a two-piece toilet, white walls, an integrated sink, quartz countertops, and white countertops.
0 notes
Text
Bathroom Master Bath

An illustration of a medium-sized transitional master bathroom design with black floors, blue subway tile, flat-panel cabinets, a two-piece toilet, white walls, an integrated sink, quartz countertops, and white countertops.
0 notes
Text
Bathroom Master Bath

An illustration of a medium-sized transitional master bathroom design with black floors, blue subway tile, flat-panel cabinets, a two-piece toilet, white walls, an integrated sink, quartz countertops, and white countertops.
0 notes
Text
Bathroom Master Bath

An illustration of a medium-sized transitional master bathroom design with black floors, blue subway tile, flat-panel cabinets, a two-piece toilet, white walls, an integrated sink, quartz countertops, and white countertops.
0 notes
Text
Bathroom Master Bath

An illustration of a medium-sized transitional master bathroom design with black floors, blue subway tile, flat-panel cabinets, a two-piece toilet, white walls, an integrated sink, quartz countertops, and white countertops.
0 notes
Photo

Kids New York Mid-sized 1950s kids' gray tile and porcelain tile porcelain tile, gray floor, double-sink and wallpaper alcove bathtub photo with flat-panel cabinets, white cabinets, a one-piece toilet, gray walls, an integrated sink, solid surface countertops, gray countertops and a freestanding vanity
0 notes
Text
Bathroom Master Bath

An illustration of a medium-sized transitional master bathroom design with black floors, blue subway tile, flat-panel cabinets, a two-piece toilet, white walls, an integrated sink, quartz countertops, and white countertops.
1 note
·
View note
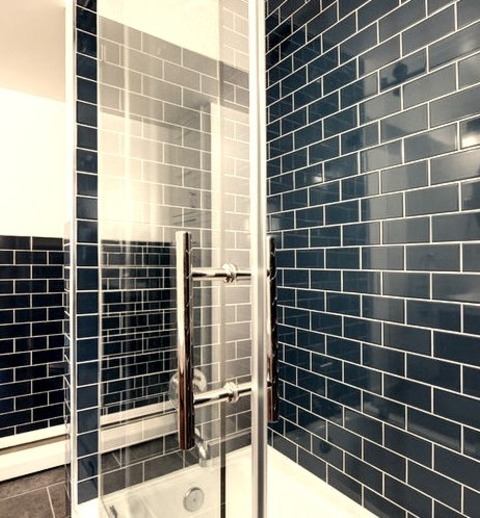
Photo

Bathroom Master Bath An illustration of a medium-sized transitional master bathroom design with black floors, blue subway tile, flat-panel cabinets, a two-piece toilet, white walls, an integrated sink, quartz countertops, and white countertops.
0 notes
Text
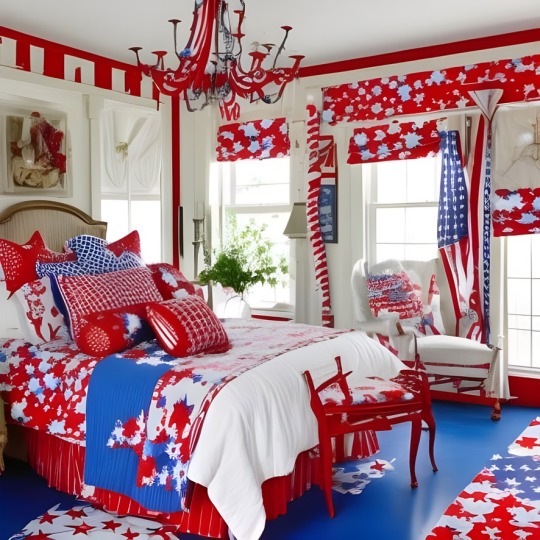
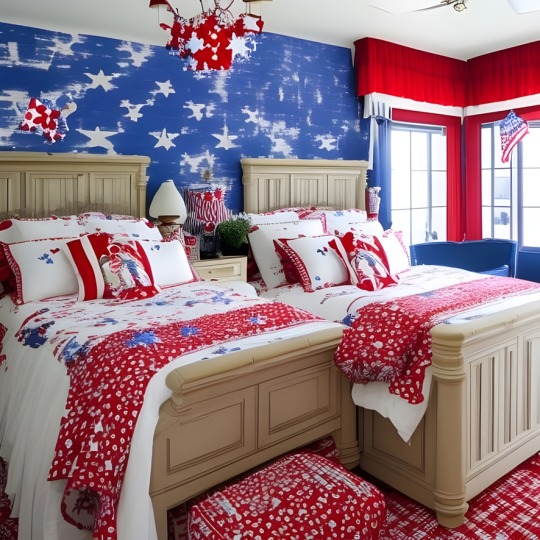
4th of July McMansion Special: Full Sized Images!
And now, for your viewing pleasure, the full-sized images of my resplendent 4th of July Mcmansion! Read the original @mcmansionhell Discord conversation that spawned it here.
Presenting 🥁🥁🥁 If The Song “Stars and Stripes Forever” Blasted Directly into Your Earholes was a House: A Farmhouse Chic Colonial Symphony 🎺🇺🇸

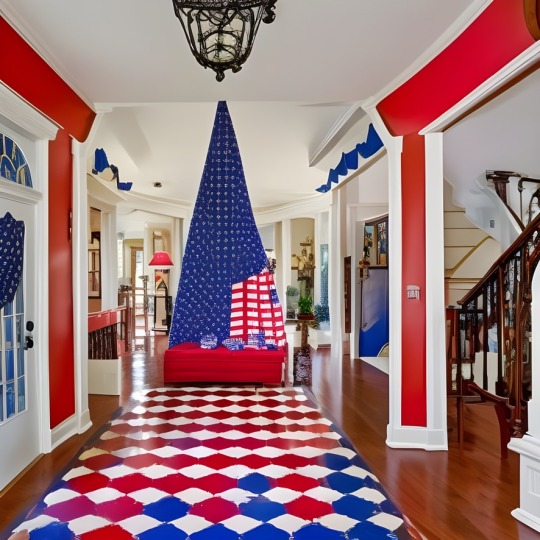
We enter the stately colonial foyer, and behold the ✨majesty✨of The 4th of July Tree (please cry now).
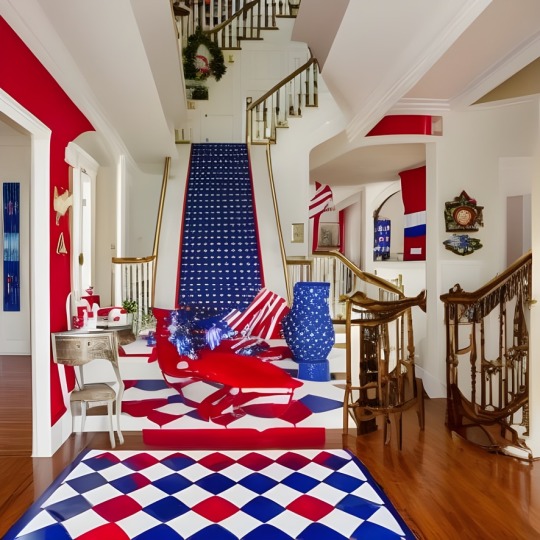
Oops! Looks like there was a bit of a balustrade crash there lol 😅
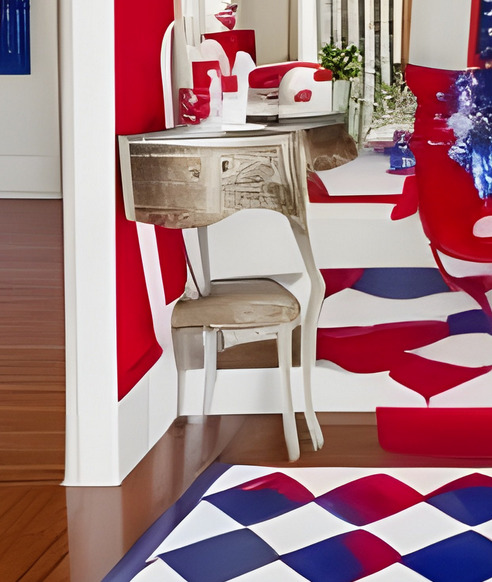
Close up of the non-euclidean side table.
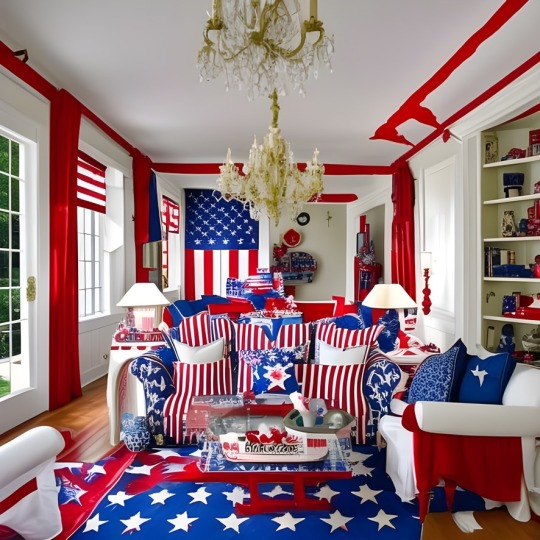
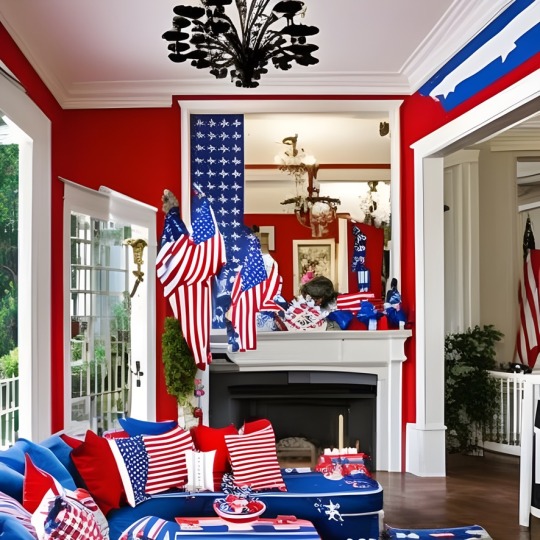
The living rooms, true Reflections of America.
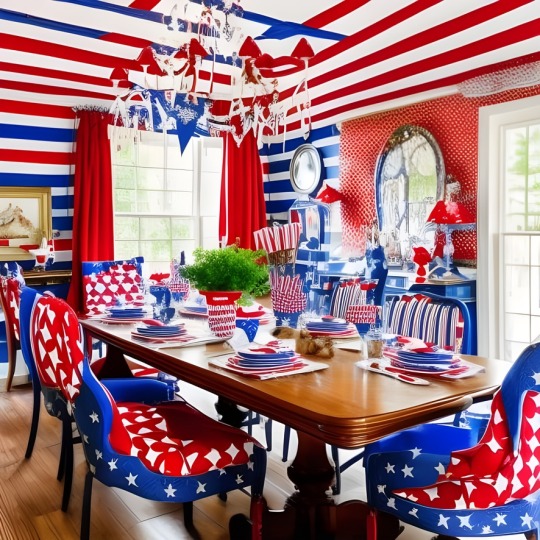
⭐️ THE DINING ROOM HATH BECOME UNTO A FLAG! ⭐️
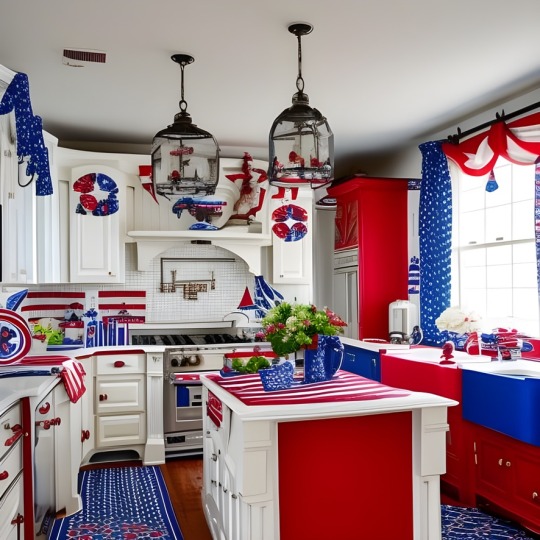
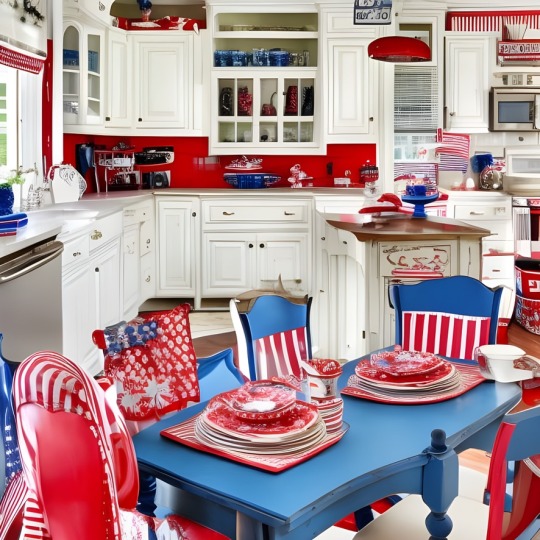
The kitchen boats a pair of elegant and patriotic live fish chandeliers. ✨
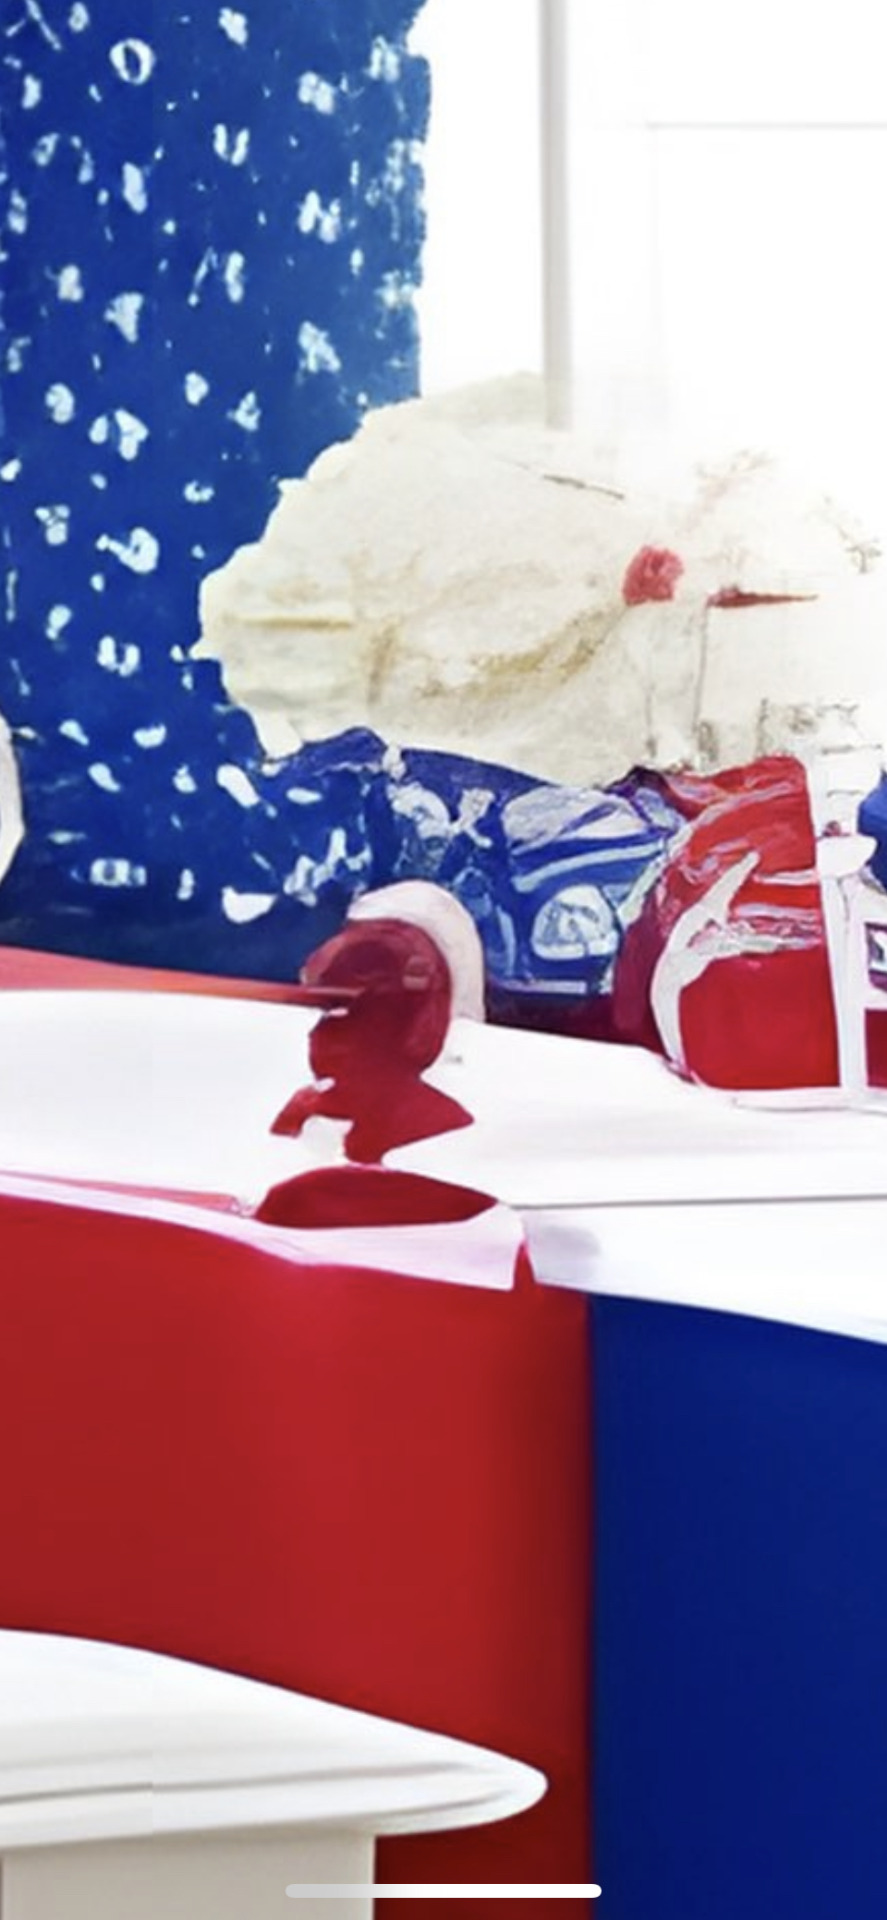
Close up of the "faucet grunkle," a classic and normal part of any kitchen.
Charming eat-in nook!
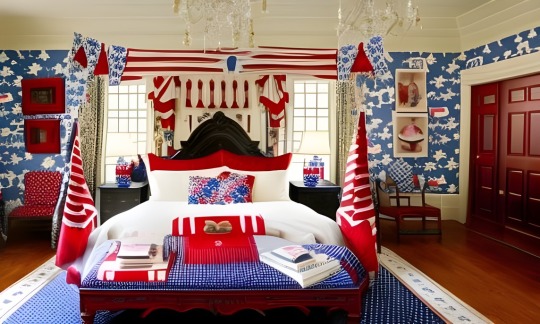
Master Bedroom 1, which boasts a charming pair of 4th of July trees.
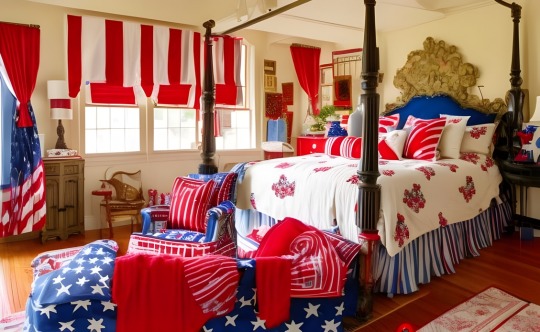
Master Bedroom 2
Child's Bedroom
Spare Children's Bedroom
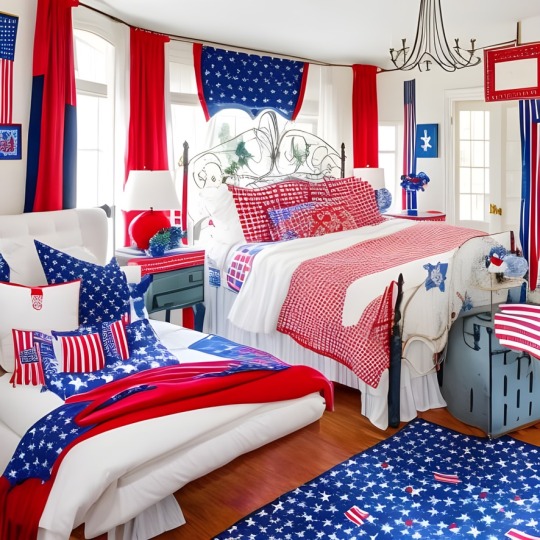
Spare Spare Childrens' Bedroom
And now 🥁🥁🥁 🎆The grand bathroom finale!🎇
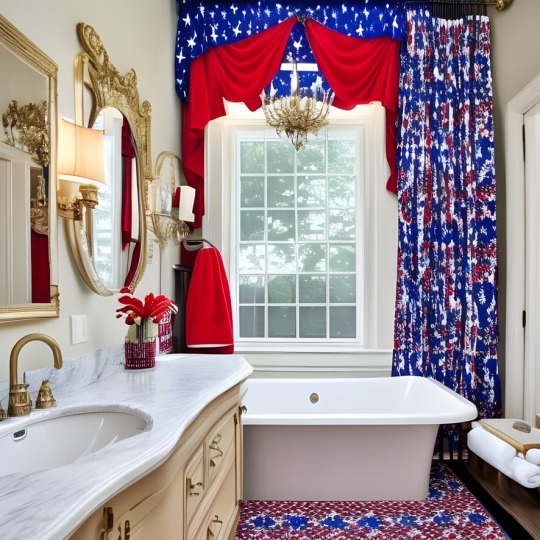
🎼From the French stuff🎶
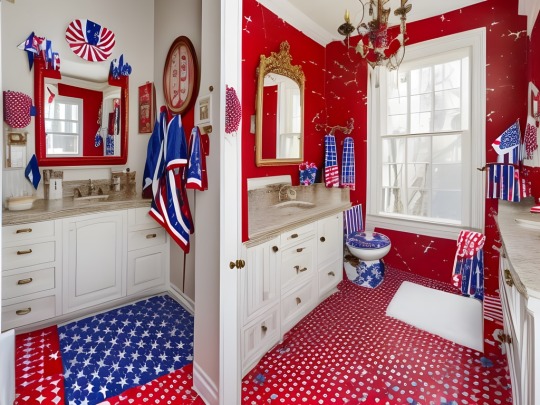
🎶To the His and Hers🎶
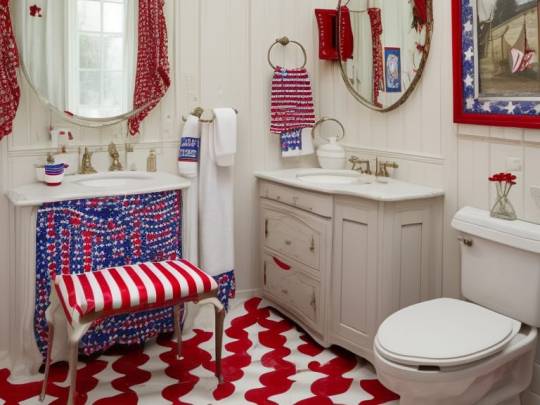
🎶to the Peeing is a Spectator Spooooort🎶
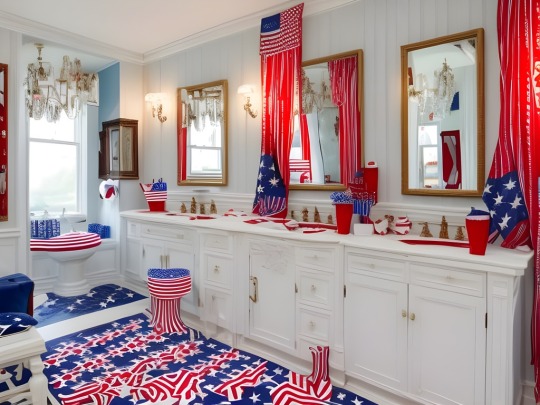
🎵God bathe America!🎶

Our home sweet home God bathe America!
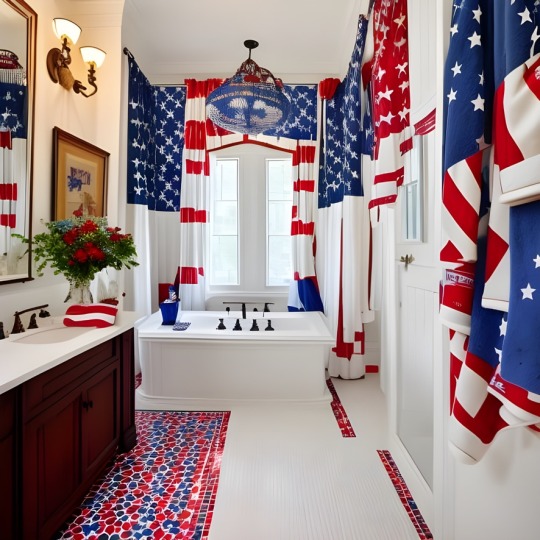
Our hooooome sweeeet hoooome! 🎆🎇🎉

#fake real estate#ai generated mcmansions#mcmansion hell#cursed houses#ai generated interiors#discord shenanigans#funny#patriotic fail#ai generated#a sea to shining sea of throw pillows#patriotic house#4th of july decor#amurica#postmodernism#post modern abomination#ai generated abominations#faucet grunkle
34 notes
·
View notes
Text


Anointing the ambrosia and rosewater perfume🛁
Something for my little comfort sugar momma and her baby daddy in Greek mythology. Within the illustration, while most of their bathroom products + makeup were Western, a lot of the goddess’ perfumes are Arabic; because they seemed to be contained a tons of scented ingredients that the Ancient Greeks + Near Easterners associated with the goddess. (Roses, myrrh, frankincense, cinnamon, and various balsamic gum resins, etc…)
#ancient greek#aphrodite#ares#mars#venus#a little bit spicy spa day for them#a greek friend of mine said these gave luxury hotel vibes because of the custom made shell faucet in their bathroom#and the concept were also often using in the tropical Southeast Asian resorts#the wave pattern tiles on the wall maybe a bit outdated to the modern minimalistic designs today#but I would decorate my bathroom like that if I have enough money for the apartment.
54 notes
·
View notes
Text
How do you install a pull-down kitchen faucet?

To install a pull-down kitchen faucet, follow these steps:
Gather Tools and Materials: Before starting, ensure you have the necessary tools and materials, including the faucet assembly, adjustable wrench, plumber's tape, bucket, and towels.
Prepare the Area: Turn off the water supply to the kitchen faucet. Open the faucet to relieve any remaining pressure and place towels in the sink to catch any water that may drip.
Remove the Old Faucet: Disconnect the supply lines and remove the old faucet. Use an adjustable wrench to loosen and remove the nuts holding the faucet in place. Clean the area thoroughly.
Install the New Faucet: Follow the manufacturer's instructions to install the new faucet. Typically, this involves inserting the new faucet through the sink's mounting hole(s) and securing it with nuts from underneath. Use the plumber's tape on the threads to prevent leaks.
Connect the Supply Lines: Reconnect the hot and cold water supply lines to the corresponding valves. Use an adjustable wrench to tighten the connections, but be careful not to overtighten.
Check for Leaks: Turn on the water supply and check for any leaks around the connections. If you notice any leaks, tighten the connections until the leaks stop.
Test the Faucet: Test the new faucet by turning it on and off, as well as using the pull-down feature if applicable. Ensure that water flows smoothly and there are no leaks.
Secure any Loose Parts: Double-check all connections and ensure that the faucet is securely installed. Tighten any loose parts as needed.
Clean Up: Once everything is in place and working correctly, clean up any mess and dispose of any old materials properly.
Enjoy Your New Faucet: Your pull-down kitchen faucet is now installed and ready to use! Enjoy the convenience and functionality it brings to your kitchen.
#pull down kitchen faucet#kitchen#modern kitchen#modular kitchen#interior design#home decor#interior desing#modern living#stainless steel modular kitchen#kitchen makeover#faucet#kitchen faucet#plumber
2 notes
·
View notes
Text
From Her Steps cool faucet
April 20 2023
11 notes
·
View notes
Text
does any horror compare to that of one day just looking at something in your home that you have never given a single thought to and wondering "...am i supposed to clean that?" then taking a good look at it and realizing the answer is yes. yes you are.
(if you have never done so before: please clean your faucet aerators. it will probably be gross.)
#buzzy#this post brought to you by me realizing wait i havent looked at the aerator in my new apartment#and it is. so bad. so fucking gross. augh.#IVE BEEN BRUSHING MY TEETH WITH THAT....#realtalk i hate how. uncleanable faucets are.#i want to take the damn thing apart and just fuckin. soak it in bleach.#WHAT ARE THOSE FUCKING HOLES FILLED WITH#listen modern plumbing is a miracle but I HATE HOW STUFF COULD BE GOING ON IN THERE AND I WOULD NEVER EVEN KNOW T
2 notes
·
View notes
Text
This sink faucet makes your kitchen/bathroom looks fancy.
#sink#faucet#bathroom#kitchen#living room#aesthetic home#home aesthetic#modern house#art design#interior design#interiors
6 notes
·
View notes
Photo
Powder Room - Rustic Powder Room
#An illustration of a powder room with red walls and a wall-mount sink in the mountain style. wall mounted faucet#mountain modern#narrow mirror#bathroom#powder room#single handle faucet
4 notes
·
View notes
Photo

Charlotte Bathroom Master Bath
#Example of a small minimalist master gray tile and ceramic tile porcelain tile bathroom design with a vessel sink#furniture-like cabinets#dark wood cabinets#a one-piece toilet and gray walls bathroom remodel#modern bathroom charlotte nc#modern minimal bathroom#modern zen inspired bathroom#phillipe starck faucet#lacava vanity#bathroom
5 notes
·
View notes