#Matrices.net
Explore tagged Tumblr posts
Text
New page on my site; all about fursuiting, furryhood, and the smiles and tears that come with loving so many, and being held as beloved. https://puppyland.neocities.org/fursuiting
An Ode to the Furry Life... Furry is what we are. When I had first become a furry, it wasn't quite as stigmatised as it is currently... No, no; I had found it as a joy of expression, finding people who were as excitable about 'funny animals' as I was! I made my way onto FurFor by complete accident - I had been interested in sewing some cute paws and a tail for a Tokyo Mew Mew cosplay; somebody on LiveJournal was helpful enough to point me towards Matrices.net, back in the early, EARLY days of the site, when a popular method to make a Fursuit Mask was to stitch plastic canvas together for your mask base... To all of the fursuit makers of this decade reading this, you may now pick your jaw off of the floor. Anywhomst - I had found myself on this site - and the rest was history. "Furry! So that's what I am!" Ever since then, my life has been a wonder of friends, fun, and the occasional coughing up of faux fur… It. Gets. EVERYWHERE.
20 notes
·
View notes
Text
so ive been trying to learn linear algebra. i searched around for resources about it and found this nice website with lots of helpful tutorials.
the tutorials are really fun and easy to understand !! I finally get what the heck a determinant is XD
matrices.net/tutorials.htm

reblog to help somebody learn linear algebra !!
7 notes
·
View notes
Note
what's it like wearing a fursuit? is there some kind of standard that the person who creates it is expected to hold up to? i remember as a kid watching a yt video of someone in a quad Epona costume walk around a convention on all fours/stilts and always wondered how it was possible.
Fursuits have an absolutely fantastic history! The first fursuits were acts of absolute love towards the characters they represented - made of really whatever ppl could get easily. Faux fur, upholstery foam, mascot suit materials. Over the decades fursuit makers have been making HUGE advancements, and these days fursuits come in a variety of materials and styles. It's wild.
One of the oldest fursuit resources on the internet is Matrices.net and Matrices has been in the Fandom since 1998ish. There's tutorials on the site that show various methods of making fursuits. I'm talking about this bc it's important since you're asking what it's like.
There are some basics to making the suits. Faux fur, of course, and you want better quality fur. Minky or fleece for pawpads and claws and tongues etc. For the head, bases can be made from plastic canvas mesh (though the plastic eventually becomes brittle), upholstery foam (pretty standard), or a resin base (these started popping up a decade? Maybe a little more ago and are pricier). There are also various styles, such as realistic, cartoons, stylized (like my suit, Asher, the suitmaker has a unique style), kemono (Japanese inspired, animated huge eyes with small cute muzzles) and oftentimes how comfortable a suit is is a combination of material and style.
A resin based, toony style head is going to be more breathable than one that is made of foam most of the time, because often the resin form allows for more room in the head for a person's head. Realistic style heads can be stuffer and slightly less comfortable, resin or foam, because the only air holes in the head are the tear duct viewing holes and the mouth. Kemono heads are notoriously stuffy because they often have little air flow (they have huge eyes, but the eyes often have plastic coverings to make them shiny).
Are fursuit makers held to a certain standard? Yes, I mean not like legally I suppose? But the furry Fandom does hold makers to a standard. If your suits are uncomfortable, you'll hear about it. If your service is bad, you'll get bad reviews. If you use poor materials or half ass the construction of your suits, you WILL be called out on it. There are, of course, popular makers that have avoided being dragged for things they should have been, but in general if you're doing a bad job and your suits are shoddy, people will not buy them and will also tell others about it. Sites like FursuitReview allow ppl to submit reviews for makers in one place making it easier to see if the maker you're thinking of is a good choice or not.
Now, sorry this is very long winded, for my suit Asher, it's decently comfy though stuffy. I did a bad job measuring my head before ordering and the fit is very snug. Not uncomfortable but stuffy. The eyes are a decent enough size to see through, and the mouth is open enough to breathe ok, so overall it's a nice time. The only thing is that, since the head is foam with a faux fur covering, it gets WARM. And there is SWEATING. So Much Sweating. That's par the course for a fursuit, so taking frequent breaks and drinking plenty of fluids is a must. I wore Asher for almost three hours today, took a few breaks and drank water on them.
I'm sorry this was so long. D:
16 notes
·
View notes
Text

Weretober art from the wonderful Matrices over at matrices.net! African Wild Dog were-creature with big pawbs for bappin'.
1 note
·
View note
Text
If you're learning how to sew Matrices.net is a great site that's used by furries but has a huge tutorial and free pattern pages if you want to check that out :D
figured I should finally create a pinned post, it’s been long enough
Hey everyone, I’m @28ratsinatrenchcoat I use they/them or he/they pronouns and I’m transmasc. (I’m also bisexual)
Interests:
Sweeney Todd
Supernatural
The Muppets
The Crane Wives
Everybody’s Worried About Owen
The U.S. government in the 60s-70s
D&D
Theatre in general
Sondheim
Many other things that I can’t think of rn, I’ll update this later
Master post of questions to ask if you’re curious
I am a writer! I write poetry and I’m trying to write fanfiction right now (writers block is kicking my ass) so don’t be suprised if you see some of that pop up on here
A03 can be found here
DNI if you are: homophobic, transphobic, pro Israel, xenophobic, in support of the current US police force, (I’ll update this later I can’t think of more things I’m too tired)
Tags:
# The rats say something- posting in general # The rats love music - anything music related # The rats are being gay- feels a bit self explanatory # The rats are feeling artsy- art stuff! Drawings, poetry, writing, etc.
Other stuff:
using tone indicators would be very helpful! (I’m so shit at determining tone irl and its 100x worse on the internet)
im trying to teach myself how to sew! Please leave any tips in my ask box… I kinda suck rn, but that’s how it goes when ur new at a skill
(Shit I can’t think of anything else I’ll update this later)
7 notes
·
View notes
Photo
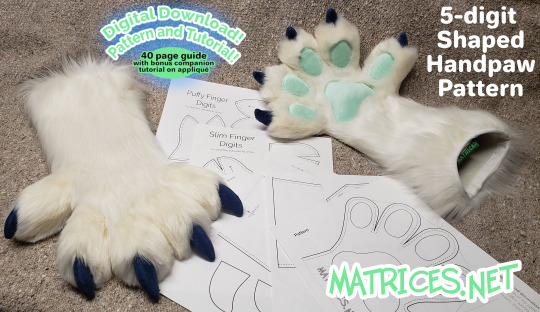
New handpaw pattern!!!
I am extremely proud to present my trusted handpaw pattern that I developed over the years -- which now you can make too!!
This has spent a long time in development and has been a major goal of mine to write and share the content in this guide. 40 pages & 90+ pictures! PLUS a companion tutorial on applique is included too! Its a big milestone for me to have accomplished such a detailed tutorial and share a cherished design of mine with all the crafters out there.
https://www.etsy.com/listing/1169809787/pattern-and-tutorial-shaped-5-digit
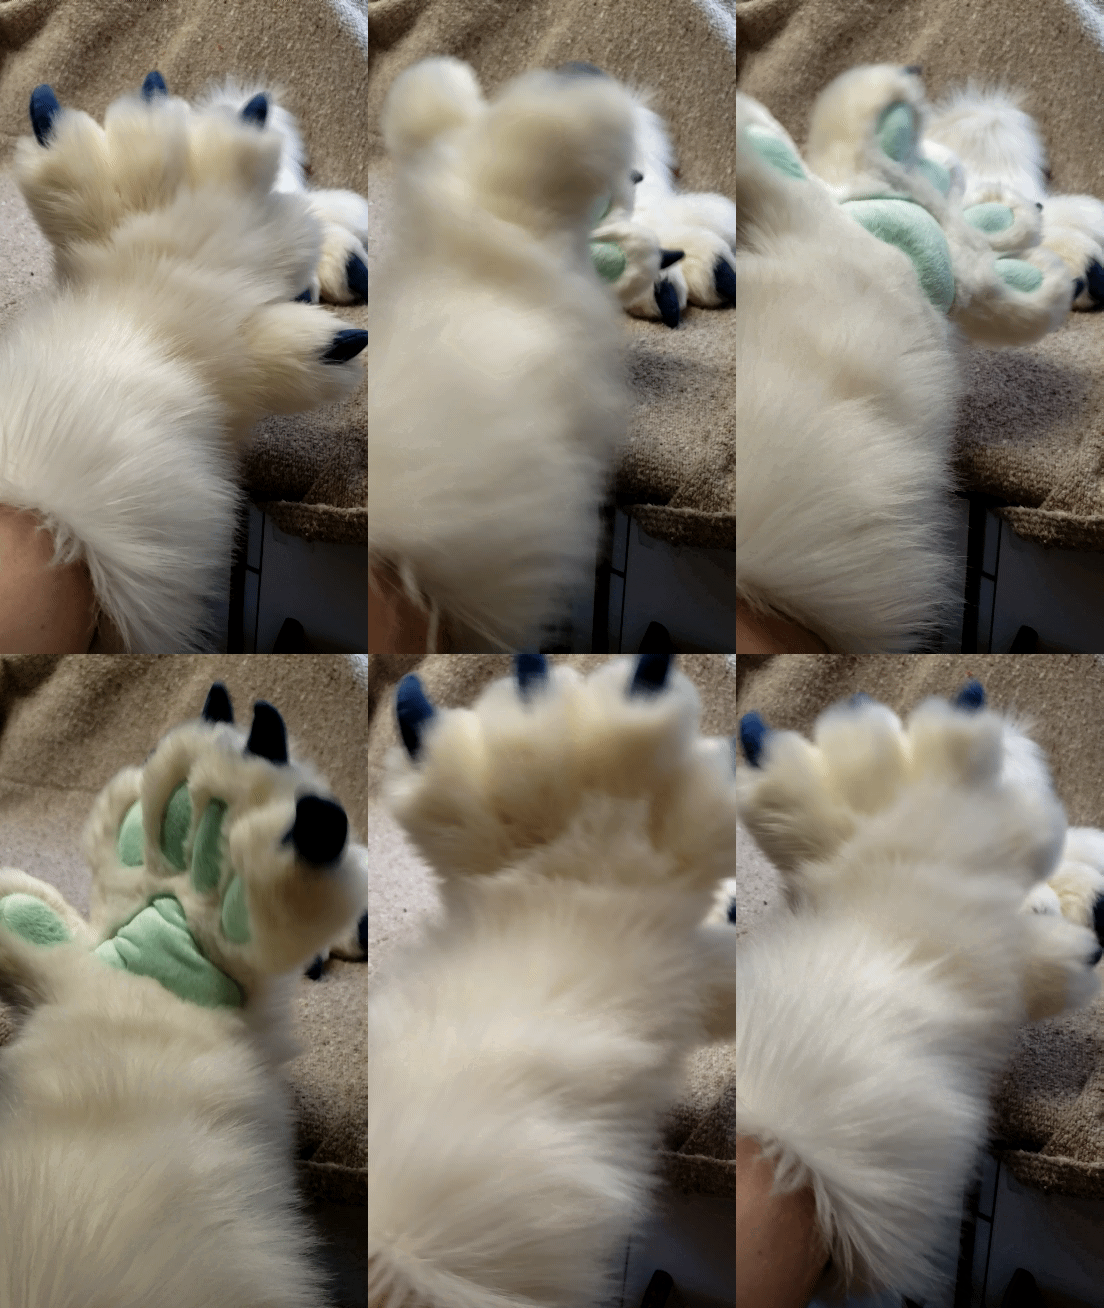
This guide has been carefully written with a ton of step-by-step photos so everyone can learn how to make a detailed, comfortably fitted, cute, and dexterous set of 5-digit handpaws with shaped fingers.
For more tutorials on crafting fursuits, check out my website, Matrices.net!
141 notes
·
View notes
Photo


[141] Quentynn the Lykoi Cat: Full Partial (Artistic Liberty)
Features:
o 3D Eyes
o Plush Teeth
o Plush Claws
o Indoor Plush Feet
o Whiskers from Matrices
😼 As a reminder, you can see ALL his pics in FULL-RES at my Patreon page! Patreon.com/TunnySaysIDK 😼
#fursuit#partial#full partial#cat#lykoi#werewolf#werewolf cat#lykoi cat#artistic iberty#adopted#3d eyes#follow-me eyes#plush#claws#teeth#indoor#indoor feet#whiskers#matrices#matrices.net#furry fandom#furry art#tunny#tunnysaysidk#tsidk#idk#quentynn
41 notes
·
View notes
Text
I wasn't sure whether or not to post this here but it counts as art I think? So yeah. Making a fursuit!! It's gonna be this boy:

Finished the head base and paws, so now I need to tape the head for the fur patterns >:)
Here's the right paw (plus a progress pic):


And the left paw!! They were made using a matrices.net tutorial and the materials (minus the foam) were ordered from fursuitsupplies.com. Also I made them different sizes by accident but shhhhh🧍♀️


My dog DID NOT like it at first btw😭. She got used to em though

And the head base!! I was impatient and started drawing the markings on the tape immediately dgejdj-


My boy will soon become Real
14 notes
·
View notes
Text
hey, i’m a fursuit maker! i’ll dump some of the tutorials that got me started under the cut here for you :3
youtube
youtube
youtube
youtube
http://matrices.net/
and here’s some tips of my own-
use patterns or headbases if you can! they’re very helpful ESPECIALLY for first suits
USE HIGH QUALITY FUR!!! i know it’s expensive but the cheaper stuff doesn’t shave down well at ALL and it’ll just make your suit look messy. i personally use luxury shag from fursuitsupplies.com and howlfabrics.com
follow tutorials!! so so many tutorials
line your fursuit head, please please please. i know it’s scary and intimidating but it makes fursuiting so much more comfortable.
join a forum or subreddit for fursuit making! bunches of people there are always willing to help answer any questions you have.
before you start, look at the work of makers you like and pick out what exactly you’d like in your own suit. for example, how big the eyes are or the proportions of the head!
fursuits don’t look good until they’re like, 90% done. fursuit making is a huge exercise in trusting the process!
if it doesn’t turn out how you want- that’s okay! everyone starts somewhere and you can always do better next time :3
i wanna learn how to make a fursuit,,,
10 notes
·
View notes
Text

Alright now that we got the basic important stuff outta the way lets get into the heart of the construction of a fursuit!
There's a few different type of bodysuit shapes of fursuits:
Digitgrade: (walking on toes has padding on knees, butt, and hind legs)
Plantigrade: Flat legs no padding just regular plain anthro body
Unguligrade: walking on hooves (which is pretty close to MLP suits)
Once you figure out the "leg style" you like for a fursuit you can plan out the rest. I'd say any combination works well but you will need to space out enough room for feet/hand hooves.
Matrices.net is also a GREAT resource for fursuit making info and maintenance. Which i got most of the info from for this blog.
Getting your patterns together:
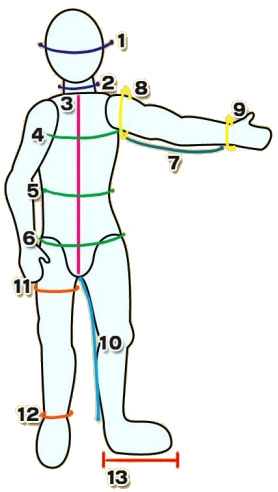
Getting your patterns together: I found several ways to go about making fursuit patterns even for ponies some have not known about.
In this case the following measurements are important:
Neck to knee: (So you know where the digi knee padding goes and help size the leg pattern)
neck to inseam:
neck to floor:
waist:
hips:
Foot size:
shoulder to finger tip: (possibly add a few inches so the hand hooves are comfortable)
MugiwaraCosplay on Etsy sells a digitgrade bodysuit pattern in PDF format! So if you got photoshop skills. you can resize the body to your measurements using the rulers and stretching it out and using the markings to line up the pieces.
https://www.etsy.com/listing/695122557/digital-digitigrade-bodysuit-pattern-for
So your pattern pieces should look more like this:


Duct Tape Dummy: Requires also a painters suit from the hardware store, a big roll of duct tape, and paper towel, and scissors. Its a 2 person job so you will need help from a friend. Use paper towels on the armpits and on the ankles as well. Basically you need to cut many pieces of duct tape to the painters suit and be sure to not tape up the zipper of the suit in case you need to take a break.


The tutorial for a bodysuit from matrices.net suggests using an animal costume here and pinning it to a test pattern so it matches up to your measurements. then for digi padding you would tape foam to your knees and lower back legs.
Digitgrade padding: The pillow inserts for the digi padding will look like this. And you can use spandex and velcro to set up the pockets


Zipper:

Lastly, you'll need a fursuit zipper with big teeth and bias tape. This should prevent the zipper getting stuck on fur. I also cut out a strip of fur and velcro to cover up the big zipper since its more noticeable than the smaller zippers
39 notes
·
View notes
Note
Hiii!! So im a furry and an artist and i wanna try my hand at making my own fursuit?? (Im thinking about a cat but not 100%certain) do you know where i could learn how to make the shapes i need and where to the foam you use?? Ty!
just look up some tutorials, there's pretty much a tutorial for everything in both video and written form. matrices.net is really reliable for starters! and for foam idk I got mine off of a Dutch website to avoid shipping but if you live in the us I heard you can get good quality foam at Walmart?
15 notes
·
View notes
Text
Making Angel Dragon costume head

https://imgur.com/y95EUTl So, I may have told you that I had different kinda project going on in some earlier post. I started creating this fursuit head somewhere around July and I worked on it every now and then. It probably took somewhere 80 to 120 hours to create the head but it is very difficult to estimate time what I have spent to this.

https://imgur.com/JEYeYJj
First I made foam base which took a week to do when I worked 4-6 hours per day. I used balaclava and 10 years old mattress foam so they cost me nothing. I had couple knives to cut the foam and I used 200-300 grams of hot glue.

https://imgur.com/7ceZdeh
Then I covered it with tape and drew markings, numbers and colors.

https://imgur.com/nvGdU1t
Then I stick the tape on paper, cut it and I traced them on faux fur.

https://imgur.com/KPnJaWX
After cutting all pieces I started sewing some pieces together with sewing machine. I stitched them together with double stitch, zigzag and standard stitch. I sewed about 2/3 with machine and rest by hand.
All the fur I bought were from kangastukku.com . I bought 6 square meters of fur for 85€. The quality wasn’t supreme but it was good enough for me.

https://imgur.com/slxd3Tg
I glue everything together with some hot glue and mostly with adhesive gel. It’s super messy bu easier to apply. I cut eye frames from plastic cookie box, and used mesh to cover the eye holes. I used wall paint and spray paint to color the mesh. I trimmed everything but inner ears and neck with scissors.
I hadn’t time to work with it when schools started. Well, I guess a bit because of laziness too,


Horns are made from pine wood which I carved with knife, sanded , painted white and I applied two layers of varnish. I had only yellowish varnish but they didn’t look too bad.

I cut holes with knife and scissors and masked the around the holes so I don’t end up gluing the fur together. I used again adhesive gel.

https://imgur.com/7VEzf7N
And after lifetime and spending 120€ to this. It was finally done. Now I got only rest of the suit left to do.
Huge thanks to Matrices.net tutorial where I got most of the tips to make this head. Some Sparky’s videos were very helpful aswell. I had some crafting experiences before I started making this but I hadn’t sewn or used sewing machine for 6 years.
Let me know what you think about the head. Do you want me to post more about this when I have done rest of the suit or nah? It is not flawless for sure but it’s still the first one what I have ever made. Here’s two tiny GIFs from Kaelygon which I animated few days ago.


#my#dutch#angel#dragon#crafting#fursuit#furry#anthro#handcrafting#handcraft#Kaelygon#Sorry for the long post#making#how to#make#fur#horns
6 notes
·
View notes
Note
Hello! I am making hand paws for myself but I don't have great material. I just have a yard of fur that I bought and a few of my sewing techniques, no paw pad materials whatsoever. I'm pretty young, could you give me a few tips on starting out? Thanks!
A yard of fur is plenty for paws even when you make a mistake.
As paw pad material you can use fleece as cheap material for example or other fabric. YOu don’t need much fabric for pads. So it’s really affordable.
Claws are optional but if you want some you can also make them out of fabric, but that may be a little difficult for a beginner. You can also sculpt some out of FIMO or supoer sculpey or buy premade one.
And the tutorial I found most helpful when I started was the one from Matrices.net
http://fursuit-tutorials.tumblr.com/post/30042714247/so-the-first-handpaw-tutorial-is-the-best-one-too
Have a look at my handpaw tutorial tag. There are some really cool tutorials
36 notes
·
View notes
Text
Hand sewing
Hand Sewing for Beginners!
Do you ever want to know where to start with learning how to sew? I’ve got you covered! I have tried to break it down into easy steps for you to accomplish the task! After that its just repetition and practice! This simple guide shows step-by-step the following foundations to hand sewing:
How to thread a needle.
Tying an overhand knot.
Knotting your beginning stitch.
And tying off a knot after your ending stitch.
I’ll cover hand stitches in another guide that I will link within this tutorial when it is ready. For now, if you find this in a reblog, find the newest version of the tutorial at this link:
https://pupdates.matrices.net/post/186317265118/hand-sewing
Threading a needle

You want a nice fresh edge on your thread. Take sharp scissors and cut off any frayed edge.
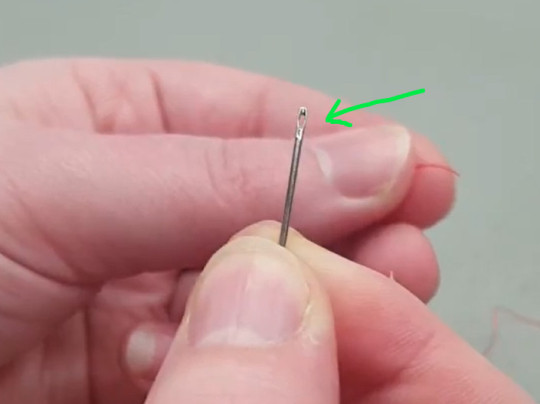
The “eye” of the needle is the hole in the top of it where thread passes through. You want sewing needles with a fairly big eye, this just make life easier for you if they are like that. Use what you have if they don’t have that feature.
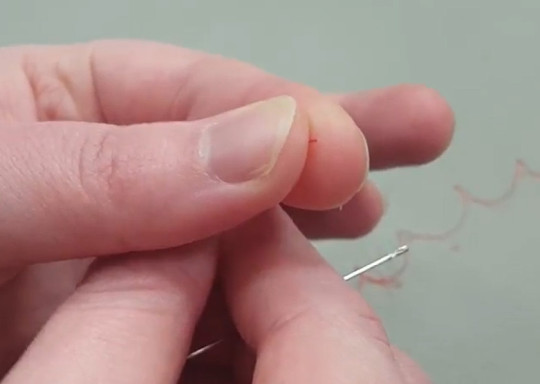
Hold the thread between your fingers, and then pull any excess down into your fingertips. Squeeze your fingertips together to allow just the very tip of the thread to poke out between your fingers,

Rotate the eye of your needle so it can land directly on the thread. You are making a valley with your fingertips that will align your needle and eye right on top of the thread.

Then rock your fingers upwards to push the thread through the eye of the needle!
Now that your needle is threaded, you need to pull an amount of thread through. Pull out only as much thread as your arm is long. This will make more sense later as you get practiced at hand-sewing. But it is a good rule of thumb is to make the thread only as long as your arm is, otherwise if its longer than your arm you’ll have too much excess at a time to deal with and it could get tangled easily.

Double over the thread. Doubled over it can also be maximally as long as your arm is as well.
Unless you are using a temporary basting technique, any hand-sewing you wish to become a permanent feature that is relatively strong and reliable, using two threads is the way to go.
Tying a knot to start
This will show you how to make a simple overhand knot. Treat any doubled-over threads as one.

Make a loop in the thread, with the short tail overlapping the longer side.

You are making a loop that you can grab the shorter thread tail through.

Pull the tail through the loop and pull tightly. With practice, you can make your thread tails shorter so less thread is wasted, but don’t sweat it in the beginning while you practice, just use scissors to trim off the excess.

You can leave a small tail of a mm or two past the knot. This will ensure the knot doesn’t unravel if you have slippery thread.
Starting the first stitch with the knot

Insert your needle through your fabric.

Pull the thread almost all the way through. Just before the overhand knot you tied.

Use your needle to separate the two threads apart.

Pass your needle and all the length of your thread through the opening.

Tighten the thread against the knot.

Once you have this tied, your thread is secure to your project and you can start hand-sewing!
Hand sewing techniques will be linked here in the future. It takes me a bit to write these and edit all the pictures, so check back for that edit!
Tying the ending knot
When you run out of a length of thread, you need to tie it off before you start the next length of thread. Here’s how to do it!

Make 2 loops of thread sewn directly on top of each other. This shows the 1st loop

This is the 2nd loop, done directly on top of the first loop.

You can optionally pass the needle through each loops as you make them.
Tip: This makes these 2 loops similar to a blanket stitch loop, each done one top of the other.

Optional tip. Sometimes you can get into a tight spot with low thread, but thankfully you can pass the needle eye-first or point first through those loops you make.

To finish your ending knot, take the needle and slide it under those two thread loops you just made. Pull the remaining thread tail that might be left and pass the needle through that loop one final time and pull it tightly!

This ending knot is essentially 3 total loops, 2 in the fabric 1 across the thread to become the knot and prevent it from coming undone.

Trim your thread tails, leaving a few mm in case your thread is slippery. You can now continue sewing if your project still needs it, otherwise you’re done!
I hope these techniques help you!! Sewing takes practice, and the more you do it the easier and more confident at it that you get! Happy crafting!!
315 notes
·
View notes
Text
Buying Faux Fur Swatches
What to look for when buying swatches and choosing fur.
There are lots of great resources to buy fur available online! It can be difficult to hunt fabric stores for faux fur, especially outside of fall/halloween/winter seasons. So online shopping is a way to build fursuit and costumes with fur any time of the year!
The trick to it is buying a swatch first so you know what you are getting! A swatch is a small sample of the fur fabric that the company selling the fabric will mail to you for a small fee. Swatches are usually around $1 - $5 each, don’t skimp on the swatches! For each color you plan, its smart to get a few swatches to compare. They are invaluable in terms of knowing what the color looks like in different lighting conditions, how it feels, how it moves, and how it shaves. Asking other artists opinions just isn’t the same!
Where do I get swatches?

About ½ of the way down this page there is a list of fabric suppliers: https://pupdates.matrices.net/post/163394770088/fursuit-and-crafting-resources
I keep this supplier list updated as I find more!
Most Online fabric stores make it obvious how to get their samples, but some less-so. You may need to use their search, or simply ask!

Some sites have swatch collections you can purchase as well, such as Big Z, it offers “color cards” which includes all the colors that type of fabric comes in!
If you are collecting samples offline (from a physical fabric store) the store might not allow swatches to be cut and you may need to buy an entire strip of the minimum cut of that fabric. Ask what the smallest amount to be cut is, it might be a few inches! Your swatch will be a strip instead, but you can cut it to a manageable size later and share the extra swatches with friends.
How do I examine a swatch?
When you buy fur, its not about “the softest” – it is literally what works best with the project you are creating. And everyone’s projects are different with different goals!
Some furs are sparse and flowy with mesh backings and those are incredibly awesome for all over a body/chest to help the wearer stay cool, while they are totally terrible for shaving. Others may be extremely thick and plush, but awful for wearing because of how heavy they are. Some feel “crispy” in your hand, but have a realistic look and are extremely durable and will look good for a long time. Some are different textures, but they are the colors you need.
Its all a careful balance of the search for the texture you want, or the color match you are after. For sure the fursuit maker’s struggle.
I like to mix textures and fur lengths because it adds interest to a costume’s design. Once I receive an order of swatches in, I examine them, take them into the sunlight and indoors light. I also match them up with existing swatches in my collection. As well as see how stretchy they are or aren’t. Then I break out my electric shaver, and see how it shaves. Sometimes it reveals a different colored undercoat, a spotted or patterned backing, or a sparse arrangement of fur, those aren’t ideal for shaving unless it works with your particular project. Definitely use a slicker brush on the shaved and unshaved portions to make sure the fur stays in the backing under normal maintenance.
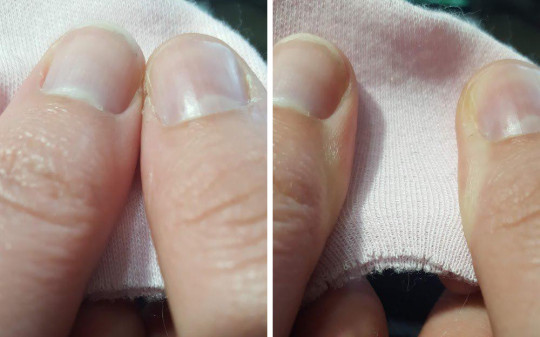
Determine how much stretch the fabric swatch has. This will tell you if you need to make a dart or if it will fill out on its own just by being stuffed or stretched into shape over foam. Hold a swatch of fabric you plan to use like on the Left, it can be at any angle that would match your project you are patterning. Make sure the fabric is relaxed.
Now pinch it between your fingers and stretch it apart, like on the Right. That measurement between your two fingers is the amount of stretch your fabric does or doesn’t have.
The distance you can measure is how much leeway you have to stretch your pattern to fit. If your swatch doesn’t stretch at all, or doesn’t have a stretch from the angle you are planning to put it at, you can then add a dart to your pattern.
Regarding backings, some are stretchy, some are not. Some have a smooth texture, some are different than others, and that is all completely OK. You are going to want to be wearing underarmor or athletic underclothes while wearing fullbody fur costumes like fursuits anyways, so if a backing is “scratchy” that doesn’t make that fur un-useful in any given project.
You will find a lot of the common furs made by a manufacturer called “Shannon Fabrics” they distribute it to all of the resellers. A lot of those furs are the same colors and textures, but sold under different color and texture names. Its up to the individual website on how they brand and sell them. For example “Luxury Shag” and “Punky Muppet” are the same thing.
When you are ready to buy, measure your patterns so you know how much you need. It is very easy to be tempted to overbuy, and I try to discourage it because it can be difficult to store and re-sell fur remnants. (Photographing, measuring, pricing and listing. Taking payment, then boxing and mailing. Its a very involved process) You may still end up with a bit extra (for repairs or mistakes) because online fabric stores often sell in whole or half yard increments only. More information on “How much fur do I need?” here!
Here is a summary of what you can do with a swatch of faux fur:
Think about your project goals. Is your project based in natural colors or fantasy colors? What works best for the project you are creating?
Take it into the sun and indoors to see it in different lighting conditions.
Match them against other swatches you have to compare texture, density, or length.
Check stretch (this can immensely help you when plan darts in your pattern)
Check what it looks like trimmed or shaved.
Use a slicker brush and brush it to see if it stays under normal maintenance.
See if it unravels or runs easily when you pick at the edges.
Shake it! See how that fur moves and lays.
Test it! Cut that swatch in half and use one part of it for a washing test or other test! Keep half as a “control” and test the other half!
How should I label my swatches?
When your samples arrive, they often come with the invoice that tells you what you ordered. But it is extremely easy for this invoice to get tossed or separated and the swatches kept instead, that info now lost. So labeling your swatches clearly and as soon as you get them becomes more important than ever. Here are ways you can label your swatches and information to include.
Label the month and the year you acquired it “July 2019″ -- this is important!! As dye lots can and will change over time, knowing what time period your fabric’s dye lot was created from can help. If your swatch is more than a year old, you want to know so you can get a new swatch in case the color changed!
Label the color and type that it was named where you ordered it. Examples “Mint Rabbit” “White Arctic fox” “Emerald Long Ecoshag”
Label the website name it came from. Examples “Imstuffedfur” “Mendels” “Big Z”
Label the project or character’s name you plan to use it with or have used it on in the past. This is optional, but can help sometimes it’s easier to remember “Matrices Grey” or “Bonk Mint.” Naming by project sticks more strongly in memory, especially when you come back to use that fur, or think about that swatch again!
When it comes to actually sticking a label on your swatches, you can do so by writing on the swatch in pen, stapling a small paper label to your swatch with this info, or writing it on a label sticker and sticking it to the backing!
How should I store or organize my swatches?
Storing swatches can sometimes be an afterthought. But if you plan on making lots of projects with fur, storing and organizing swatches becomes more important as more of them are collected.
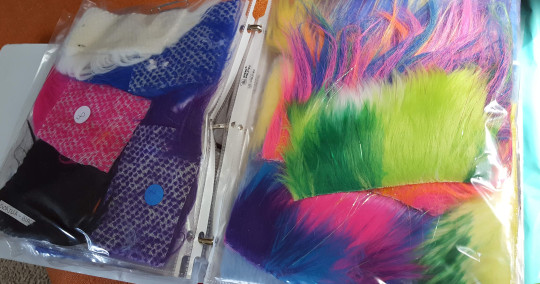
Here’s some creative ideas and solutions that are useful, especially if you are low on space but want to stay organized.
Attach them to cardstock with staples or double-sided tape.
Use a binder with plastic sleeve inserts to tuck them in so they can be put away on a shelf.
Use a cork board and pin them up on the board so they can be stored hanging up.
Put a small hole in each swatch, and use a metal ring or carabiner to string them together so they can be stored in a drawer or hanging up.
Clip them together with clothespins to hang them up.
Have fun with collecting, examining, and organizing swatches for your projects! Hope this helps! Happy crafting!
90 notes
·
View notes
