Last Seen Blogs

garota-dobaile
O Amanhã

sugarchiquita
tryna spread love like its flu
legokin-blog
OOPS!

knifc
𝖈𝖚𝖙𝖘 𝖑𝖎𝖐𝖊 𝖆 𝖐𝖓𝖎𝖋𝖊

lucasreview
LucasReview Stuff
Text


Keeping Cool in fursuit: The best way to keep cool is a cooling vest. Its worth investing in and will prevent heat exhaustion and greatly reduce the chance you'll sweat out all your body's hydration.
the EZcooldown vest is my favorite vest to use for keeping cool in fursuit. It uses Phase Change Material packs that get fully charged in the fridge or ice water in about an hour. Keeps its cool for about 2-3 hours of suiting. And there's a 59°F and 70°F versions of these packs. roughly $189 to ship to US. The downside is that it comes from the Netherlands and international shipping takes a very long time...
https://www.ezcooldown.com/collections/mascot-costume-performers-cooling-vests/products/complete-performers-vest
The other one is Techniche and they are from the US. So there is a good chance it will ship a lot faster to you. https://www.mycoolingstore.com/techkewl-phase-change-cooling-vest-blue.html?mainc=6626-Blue-L-XL&utm_source=google&utm_medium=cpc&adpos=&scid=scplp6626-Blue-L-XL&sc_intid=6626-Blue-L-XL&gclid=CjwKCAjw55-HBhAHEiwARMCsztmr6QYEvQpYem79HmNfW04rwa-5r6iXTbSEhkxzaGkd3Fkc1HswTBoC2HEQAvD_BwE
0 notes
Text
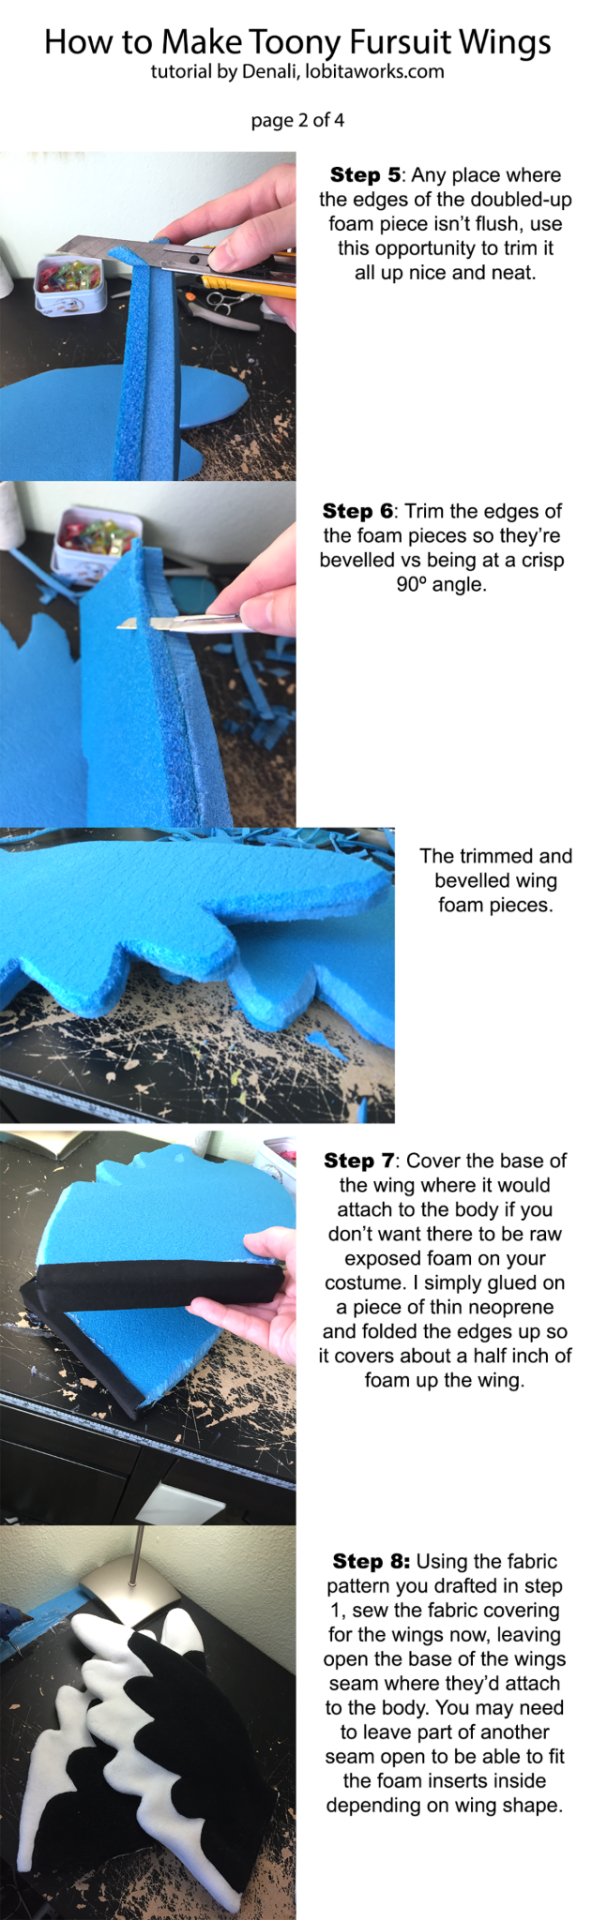
Wing tutorials method 1: Not too difficult and advanced. I believe they used camping mat material (easy to carve and stiff enough to use as wings) as well for this tutorial. And no need for working with with PVC pipes and all that as the material is light enough not to weigh down the suit itself.


12 notes
·
View notes
Text

Sourced from: https://www.deviantart.com/voodoo-tiki/art/Pony-Mane-and-Tail-Tutorial-422375776 they also go way more in depth for the more complex mane and tail design
Pony Mane's and tails for fursuits tutorial: So far the only somewhat related info i could gather on mane's and tails would be for plushies, but i think we would still use examples from that since i think it definitely still applies. Just like this pic above you can draft out your heads mane patterns on paper and you can figure out how long you want the mane in front making sure its not going over your eyes too much so it won't block vision in suit. Also its important the fur is going the right grain direction when you cut it so it looks good when brushed.
If you want you can also photoshop and stretch out plush patterns from here like i did for my fursuit:
https://www.etsy.com/listing/250882437/diy-pony-plush-manetail-sewing-pattern
Once you got your Mane patterns figured out you can sew together the fur fabric pieces and hot glue gun them to the head
For Tails: Cut out 2 small holes in the back of suit for belt loops to feed through.

Here's a visual example: Measure from your tail bone to about a few inches above your ankles. As the Maximum you should make your tail length. The arrow pointing down means you should make sure the fur is going that direction as well. Draft out what you want the tail to look like on paper as well sizing it up like so.


Sew together your 2 pieces of fur fabric of your tail (or more if you have multiple colors). Leaving a spot in the back of the tail and on the top open so you can stuff it.

After you are done stuffing the tail. You'll need to cut out 2 pieces of nylon webbing (the material you find often on backpack or messenger bag straps) for your belt loops. And you can just sew up the top and then hot glue gun or hand sew the tail closed in back.

And your tail should be complete. You can use any long belt to use to strap it to the suit in the suits tail holes. Then tie a knot.
1 note
·
View note
Text

The basics of pony fursuit construction. I plan on covering ALL of this but in more detail in the whole process from the
head, mane, ears, eyes
tail
bodysuit (digitgrade and plantigrade type)
hand and feet hooves
adding pony legged shapes for those legs.
Materials needed:

Fur: for the bodysuit about 4 yds for plantigrade and 5 yds for digitgrade. Plus the colors you need for mane and tail. Recommended to use short pile fur for the bodysuit, Minky is good for the head as well! maybe long pile fur if you wish for mane and tail.
Foam: you definitely need a roll or 2 of the 1" foam, Floor mat foam is good for feet as well.
Buckram, plastic bowl or thin foam sheets for whites of the eyes.
for wings some people like to use PVC piping, stiff round foam, and even wire hangers.
PVC fabric for hoof bottoms: Very nice to use to prevent problems from bad weather. I've also seen minky used on hoof bottoms as well.
Slippers
You can also use foam sheets for cutie marks as well as felt.
Tools Needed:
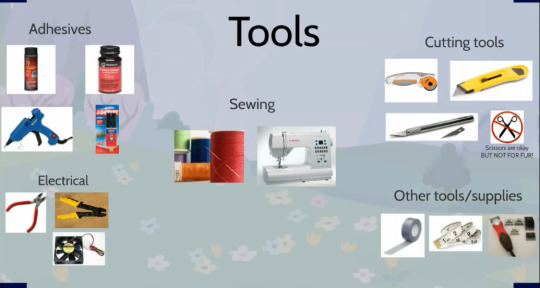
Heavy duty sewing machine: (about $200 for a brother heavy duty)
sewing needle and thread
glue gun+sticks
small fans
adhesives to attach cutie marks
really long measuring tape
xacto knife, scissors, and box cutters
duct tape
painters tape
0 notes
Text

Alright now that we got the basic important stuff outta the way lets get into the heart of the construction of a fursuit!
There's a few different type of bodysuit shapes of fursuits:
Digitgrade: (walking on toes has padding on knees, butt, and hind legs)
Plantigrade: Flat legs no padding just regular plain anthro body
Unguligrade: walking on hooves (which is pretty close to MLP suits)
Once you figure out the "leg style" you like for a fursuit you can plan out the rest. I'd say any combination works well but you will need to space out enough room for feet/hand hooves.
Matrices.net is also a GREAT resource for fursuit making info and maintenance. Which i got most of the info from for this blog.
Getting your patterns together:
Getting your patterns together: I found several ways to go about making fursuit patterns even for ponies some have not known about.
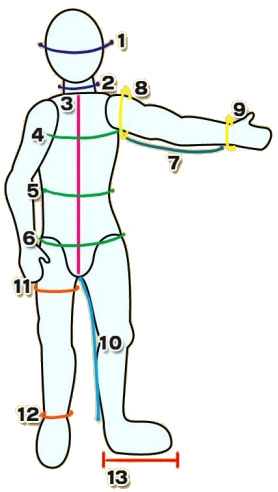
In this case the following measurements are important:
Neck to knee: (So you know where the digi knee padding goes and help size the leg pattern)
neck to inseam:
neck to floor:
waist:
hips:
Foot size:
shoulder to finger tip: (possibly add a few inches so the hand hooves are comfortable)
MugiwaraCosplay on Etsy sells a digitgrade bodysuit pattern in PDF format! So if you got photoshop skills. you can resize the body to your measurements using the rulers and stretching it out and using the markings to line up the pieces.
https://www.etsy.com/listing/695122557/digital-digitigrade-bodysuit-pattern-for
So your pattern pieces should look more like this:


Duct Tape Dummy: Requires also a painters suit from the hardware store, a big roll of duct tape, and paper towel, and scissors. Its a 2 person job so you will need help from a friend. Use paper towels on the armpits and on the ankles as well. Basically you need to cut many pieces of duct tape to the painters suit and be sure to not tape up the zipper of the suit in case you need to take a break.


The tutorial for a bodysuit from matrices.net suggests using an animal costume here and pinning it to a test pattern so it matches up to your measurements. then for digi padding you would tape foam to your knees and lower back legs.
Digitgrade padding: The pillow inserts for the digi padding will look like this. And you can use spandex and velcro to set up the pockets


Zipper:

Lastly, you'll need a fursuit zipper with big teeth and bias tape. This should prevent the zipper getting stuck on fur. I also cut out a strip of fur and velcro to cover up the big zipper since its more noticeable than the smaller zippers
37 notes
·
View notes
Text

Fursuit heads:


1. The popular pony styled head: (see derpy head pic as example): you might want fans for this head since the ventilation isn't the best because of the closed mouth. You'll need camping mat material and duct tape, plus glue gun to piece it together. The pattern here is free and easy to assemble. Cut out the pattern pieces on the camping mat. Hot glue them together.
2. Next you'll need the nose bridge piece taped down on the inside. Push it down into the nose bridge to make the nose shape, taping it down and that should complete the base.


3. Next, you'll need to make the head fit more firmly to your head. So I used 2" foam on the top and sides, carving it so it fits the shape of the head and glues in there. Using elastic straps to secure the head to my neck so it doesn't wobble around.

Other Fursuit head methods:
1. Fuzzbuttstudios.com has 3D printed head models with movable jaws. $130 and free shipping. There's options for adding a horn, buckram and eyes. They also can size it to your head.
2. Buckethead fursuit head method:


The more common with furry fursuits. A styrofoam mannequin head is required for this. You would also need the circumference of your head around the nose and jawline. And the measurement for your head height. Cut out 1" foam to those measurements. Then you'd need to cut out the mouth and eyes. Glue that piece to the balaclava base. And 1/2" foam on the top of the head. 2 pieces of 1 inch foam for the cheeks and carve it with scissors. And 2 Inch foam for the nose piece carved. And 1 inch foam for jaw piece.
Follow me eyes tutorial:


4 notes
·
View notes
Text
Making the Hooves:


Starting with the Hand hooves:
To get the right measurements to draw the circles on foam. You'll need to measure the circumferences of the hoof sleeves and leg bottoms. For example my arm sleeve circumference on my new dashy bodysuit is 29.5 in.
How do I find the radius from the circumference?
https://www.piday.org/calculators/circumference-calculator/ This site here can calculate it quickly.
To find the radius from the circumference of a circle, you have to do the following: Divide the circumference by π, or 3.14 for an estimation. The result is the circle's diameter. So therefore the diameter is 9.39 in.


Cut out a piece of 1" foam that is 29.5 inches long (it may be different on your suit). And I made it a height of 6" but that's up to you how tall you want your hand hooves to be.
My original maker used 2" foam on the inside but i think if you trace out a 1" foam piece on the bottom it would sit nice and flat.
Hot glue gun the foam pieces together.
cut out a piece of fur using the circle pattern piece. and hot glue that on the hooves.
Feet Hooves:

Same thing as the hand hooves you would need to measure the circumference of your leg bottoms to get your diameter and draw out your circle. It would be a circle drawn around your shoe.
Cut out a piece of floor mat foam. (Usually sold as big puzzle piece shaped foam at walmart.) and a piece of 1" or 1/2" foam.
Using duct tape around both pieces of foam and over the front and back of the shoes.
Cut and glue the pieces of Velcro on the bottom
0 notes
Text


Making your own stenciled designs on cosplays (also very useful for applying cutie marks): I learned a technique very useful for those that don’t want to buy embroidered patches and it still makes your cosplay look awesome. It also saves a little bit of money too.
Things you will need:
At home printer and regular printer paper
exacto knife
thin crafting foam sheets
adhesive fabric glue and possibly Qtips to apply the glue on the foam and cosplays


1. So first you’ll just need to find a stencil image like this right here we’ll use Anna from frozen as an example. Print out whatever design stencil you need.

2. Using an eXacto knife cut out the stencil design on your thin craft foam sheets (side note: you might wanna find a cutting board in case you cut up something you shouldn’t or you need a solid flat surface). I used glitter foam since I thought it adds a little more beauty to a cosplay but you can use plain ones as well.

3. This glue here is pretty good for applying the stenciled foam cut outs. Its clear as well so thats always helpful. You can easily apply the glue using Qtips and spreading it on the foam pieces then apply it to your cosplay project. Also know its very sticky so you might wanna wear plastic gloves while working with it.
6 notes
·
View notes
Text

picture from @jftwconvention
What to expect when you want to get a fursuit and things to expect while being in suit for a while:
Don't let yourself overheat in suit: your first time fursuiting may take a while to get used to. It warms up fast being in a suit of fur for extended periods of time. So if you feel yourself sweating profusely and getting too hot, PLEASE take a break. And I know hardcore fursuiters don't wanna break the magic as they call it but your safety comes first. I have seen it happen at cons where heat exhaustion hit them hard.
Money: how much are you willing to spend? Fursuit makers can get pricey I got dashy for $600 but when i was quoted $800-$1200 for a bodysuit from friends and lemonbrat can be about twice that... i was like okay time to learn how to make this stuff myself. for a rough estimate of about $200-$300 crafting all this yourself the work will pay off.
Oxygen: Figure out in the head how you'll get air flow. The more popular atalonthedeer styled pony heads mostly have air flow through the eyes. you can also try a regular furry style head that would have open jaw as well. both you can install fans in.

Vision: Make the buckram eyes big enough to help you see enough in your surroundings. Remember to check your blind spots on occasion and even look down. You won't always have a handler with you.
8 notes
·
View notes
Text
Fursuit Maintenance:
https://fursuitersworld.weebly.com/fursuit-washing-and-care.html go here for more in-depth info on fursuit cleaning
General basics:
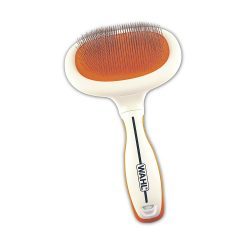
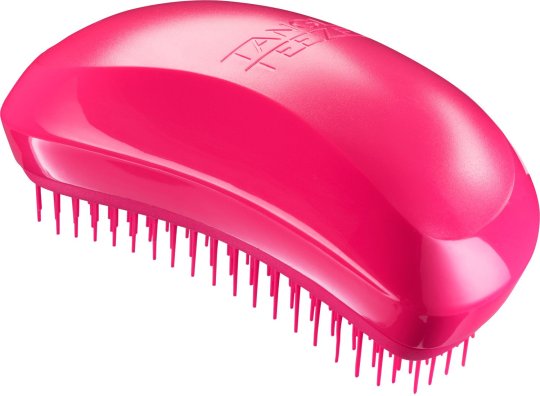
It's very important to keep your suit brushed! Using short fur will minimize the need for frequent brushing but lets assume your mane and tail will have long pile fur and will definitely need a brushing. (plus people WILL hound you about an unkempt suit..). Video above talks about using a slicker bush if you use this brush use it in the opposite orientation. Some people also suggest online a tangle teezer since it is gentle on fur.
Avoid mud and dirty areas if you can help it: But knowing I myself go to park meetups with furry friends. had me take a different approach adding PVC fabric to the hoof feet.
Avoid food and drink spillage on your suit
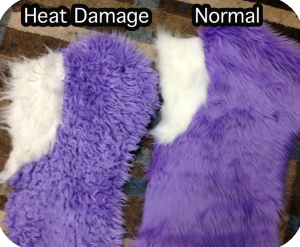
Don't store your suit in hot areas. Heat damage is very hard to fix.
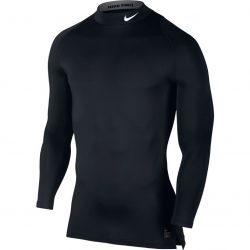
Also Underarmor shirt and pants is recommended: Or anything that wicks away sweat is good!
Cleaning:
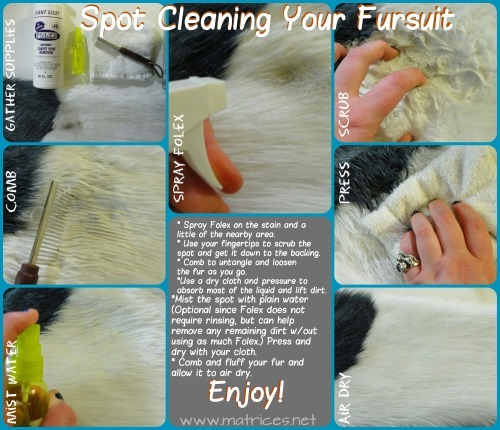
Spot Cleaning: There's a few recommended cleaners to use but yeah be careful about mixing your own solutions. Folex is a great cleaner, also dawn dish soap, and also very common cleaner is rubbing alcohol (its great for eliminating sweat odors. you might want to dilute it but some sources say that is optional most stores sell it at 70% solution)
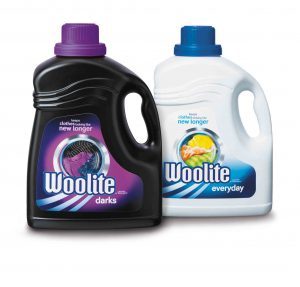
Washing using your everyday washing machine: IT'S VERY IMPORTANT TO USE COLD WATER ON DELICATE (yes I did caps on purpose here because I can't emphasize this enough). Woolite is always best since its basically a wearable carpet.

The bathtub method: If you are worried your washing machine might beat up your fursuit too much and there's fragile parts sewn in the body you can also try the bathtub. Also same thing use cold water and possibly use woolite in the tub. Similar to the spot cleaning method you can use your hands to scrub in the cleaner or a gentle scrub brush. Also note it will get VERY HEAVY. If your suit is digitgrade and you can remove the pillows you should.
Drying:
DON'T PUT IT IN THE DRYER: This should go without saying but if you live with your mom and she tosses your suit in the dryer it will be VERY bad for your suit. I have heard horror stories of this happening and I don't even trust the no heat tumble dry setting...
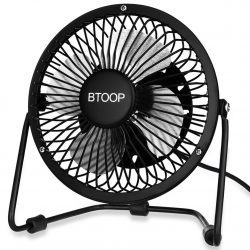
Hang dry with a fan blowing on it: It should take about 24 hours maybe less to dry the suit by hang drying with a fan or box fan. And then brush after its dry.
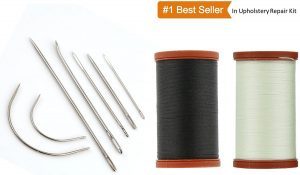
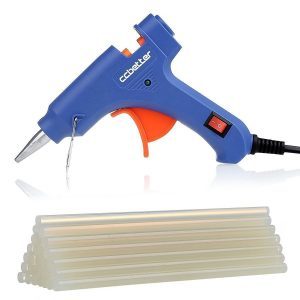
Fursuit Repair: Always a good idea to keep this repair kit with you at cons.
Sewing needle and thread: good for closing up most holes or tares and rips in seems on the suit.
Glue Gun: Good for patching up the tail if the belt loops come apart and/or if there's parts that aren't easily repaired sewing needles.
8 notes
·
View notes
Text

Things you SHOULD NOT do when making a pony suit:
l was working on my friends suit while i noticed some really insane problems when i wanted to fix up the pony legs. They tried to staple the 2 pieces of EVA foam together, hot glued the bumpy sides together so the slippers would be really uncomfortable sitting on the bumpy part, and they glued the feet foam to the suit itself! Absolutely nuts... Don't do that the only and best way to secure the feet hoof foam to the bottom of the pony suit is velcro.

Also learned when my original fursuit maker made these wings they had the hardest time staying sewn on to the suit and when they got bunched up in the wash it was permanently like that. So if you make wings find a different way to mount and unmount the wings. possibly using the ribbons on the pony wings and sew ribbons on the back of suit.
0 notes
Text

((Artist: Peri Winkle, on facebook drew my fennec fursona Aurora))
Fursona/ponysona Reference pics: So if you decide you really like a particular fursuit makers style and you wanna pay to commission someone. They will most likely ask for a reference sheet. Or at the very least artwork of your fursona and/or ponysona that you have.
Digging around on google I found an artist on twitter: PureRubyDragon
https://twitter.com/PureRubyDragon/status/1208820749806387201/photo/1
OR if you want to make your OC for free there is the 3D pony creator
https://ponylumen.net/games/3d-pony-creator/

0 notes