#Manual Vacuum Aspiration Kit
Explore tagged Tumblr posts
Visit Tumblr Blog
Explore Tumblr blogs with no restrictions, modern design and the best experience.
Last Seen Tumblr Blogs


Fun Fact
Tumblr was acquired by Yahoo for $1.1B in 2013.
Text
#manual vacuum aspiration kit#manual vacuum aspiration syringe#manual vacuum aspiration syringe uses#Mva kit#mva syringe and cannula
2 notes
·
View notes
Text

Buy Gynaecology Products Online in India
Gynecology focuses on women's reproductive health, addressing conditions of the uterus, ovaries, fallopian tubes, cervix, and vagina. Gynecologists specialize in diagnosing and treating a variety of issues such as menstrual disorders, fertility problems, and gynecological cancers. Preventive care, including regular screenings, is crucial for promoting women's health. Our surgical supplies cater to these needs with products like Ultra Sound Jelly, Manual Vacuum Aspiration Kit, and Klik Clamp Umbilical Cord, designed to meet the demands of healthcare professionals and patients alike. We strive to deliver superior quality, innovation, and support, ensuring we exceed expectations as your trusted partner in gynecology products.
0 notes
Text
Bird Type Manual Vacuum Extractor | Manual Vacuum Extractor Set Manufacturers in India

We are a leading Manual Vacuum Extractor Set manufacturers in India. Affordable prices and high quality make us one of the prime Bird Type Manual Vacuum Extractor Set Manufacturers. Manual vacuum extractor sets are supplied as per customer specifications. The V
Vacuum Extractor Sets can be customized according to project/customer specifications.
We can do OEM for Manual Vacuum Extractor Set (Bird Type) and we guarantee top quality and lowest prices than any other Aspirator Vacuum Extractor Manual producers and suppliers. We provide complete tender support on Manual Vacuum Extractors. Best quality, competitive prices, and fast delivery is making us a reliable and Top Vacuum Extractor Set Manufacturers in India.
Features:
Vacuum extractor system to assist vaginal deliveries in a delivery room.
Hand operated suction pump creates required vacuum.Vacuum range, adjustable: from 0 to 100 kPa / - 760 mmHg
Gauge dial, minimal graduation: 5 kPa / 40 mmHg
Accuracy vacuum gauge: 5% approx.
All parts of the vacuum extractor can be disassembled, relevant parts can be autoclaved at 121 deg. C
Requires no other than routine maintenance, manageable at the level of the delivery rooms
System is supplied as a complete set consisting of:
3 x Bird type anterior suction/extraction cup (1 x 40, 1 x 50 and 1 x 60 mm opening diameter) rounded edges.
2 x Extraction handle for Bird type anterior suction/extraction cup
Suction/extraction cups and handle: stainless steel, 18 Chromium, 8 % Nickel
2 x Soft suction/extraction cup (1 x 50 and 1 x 60 mm opening diameter). Also, can include 70mm size as per requirement.
1 x Glass vacuum/collection bottle, approx. 500 ml
1 x Cover or plug for vacuum/collection bottle, with 3 holes (2 connectors + 1 vacuum gauge)
1 x Connector angled, chrome plated
1 x Connector angled with screw valve (vacuum release), chrome plated, with cap and gasket
1 x Vacuum gauge with straight connector, chrome plated
1 x Basket, stainless steel, supporting vacuum/collection bottle and the suction pump, with large hook allowing to fit it to the delivery table
2 x Tube, silicone, transparent, inner/outer diameter approx. 6/11 mm, length approx. 50 and 150 cm
Supplied with:
1 x Spare vacuum/collection bottle, plastic or glass, approx. 500 ml as per requirement.
1 x Spare tube, silicone, transparent, inner/outer diameter approx. 6/11 mm, length approx. 300 cm
1 x Spare gasket for the screw valve (vacuum release)
30 x Polypropylene bottom plate, for stainless steel suction/extraction cup, 10 for each size, 40, 50 and 60 mm
1 x List of accessories and parts
1 x Instructions for use and maintenance, and contact details for repair service, in English.
You may be interested in the following too:
Manual Vacuum Aspirator Kit
Vacuum Extractor Set Malmstrom Type
#Medilivescare#Hospital Uniforms#Medical Bandages#Apron#Surgical Gown#Nitrile Gloves#HIV Kit#PVC Sheet#Manual Vacuum Extractor#Manufacturer#Exporter#Supplier#India
1 note
·
View note
Text
stop feeling hopeless, start getting ready

If you are in a red state, your state either has an abortion ban in place or is rated by the Guttmacher Institute as likely to enact a ban. Your focus should be on protecting yourself and others who need abortions.
stop using electronic period tracking apps or software
educate yourself and others about pregnancy prevention and join groups that are making preventative birth control more accessible
learn the nearest and most accessible routes to states where you and your loved ones can access abortion
contribute to mutual aid funds to help transport people over state lines if they are in need of abortion
consider joining The Satanic Temple so you can claim protections under the Religious Abortion Ritual if you are prosecuted for obtaining an abortion
keep a stock of by-mail abortion pills for yourself and/or others who may need them (you may need to travel out of state to obtain them)
form community provider networks and see if you or someone you know can be trained to use manual vacuum aspiration kits or a Del-Em
all of the above should be done in complete secrecy using verbal communication, end-to-end encrypted apps such as Signal, or a VPN
If you are in a yellow state, you currently have constitutional abortion protections but they are in jeopardy. Get active in local political groups NOW to fight back against constitutional amendments to ban abortion. Your focus should be purely on political action.
If you are in Michigan, you currently have a ban in place which is being challenged, and your governor is working to add abortion protections into the Michigan state constitution. Your focus should be on supporting the work that is currently under way.
If you are in a green state, your state has constitutional protections for abortion that are unlikely to be challenged. Your focus should be on helping others to enter your state for abortion care.
connect with abortion access groups such as Aid Access, Abortion on Demand, the National Network of Abortion Funds, or Just The Pill
volunteer to help people enter your state for abortion care, either with transportation help or letting someone crash on your couch
if you live in a green state with no current or predicted primary routes from other states for abortion access, you can focus your efforts on supporting political action in other areas
If you are in a purple state, your state currently has no constitutional protections for abortion but is unlikely to implement a ban. You have two focuses: pushing for constitutional protections AND helping others to enter your state for abortion care (see green state list).
46K notes
·
View notes
Link
Medilivescare Manufacturing Private Limited is a prominent company serving medical professionals, hospitals, laboratories, Manual Vacuum Aspirator Set Supplier in India, Manufacturer and around the world with high-quality cost-effective & affordable products. The company operates on internationally certified manufacturing, Quality Control and R&D facilities. Our team is well trained to make the transactions smooth and the policies are flexible & customer friendly.
#Manufacturer of Manual Vacuum Aspirator Set#Manufacturer of MVA Set#Manufacturer of MVA Kit#Exporter of Manual Vacuum Aspirator Set#Manual Vacuum Aspirator Set Supplier in India#Manual Vacuum Aspirator Kit Manufacturer
0 notes
Text
Manual Vacuum Aspiration at Best Price in India

We are top manufacturers, suppliers and Exporter of Manual Vacuum Aspiration Kit and other Gynecological Products. https://bit.ly/3EMFkEv
Call +917015986188, +91-9650832277, +91-11-48880000, +91-11-42466196 or Email: [email protected]
WhatsApp: https://wa.me/917015986188
1 note
·
View note
Text
Steam Cleaning Applications - What we can clean using Steam Cleaners
The application options of our steamers or steam cleaners are multiple and, in addition to cleaning, steam also offers extraordinary services for ironing and textile preservation. Discover here the multiple applications of steam and be surprised by the wide variety of options:
Kills Bed Bugs using Steam Cleaner
We all know it’s not to get rid of bed bugs, especially when they are hidden inside our furniture, bed, or behind any thing.
Steam is the one of the most effective way for killing bed bugs. Even in serveral tests, conducted across the USA proven that Steam Cleaning kills 99% of bed bugs in no time.
But the Steam cleaner should product superheated steam. Not every steam machine can generate that level of hotness, so read out this Best Steamer for Bed Bugs article published at SteamersArena.
**Clean Tile Floor and Grout using Steam Cleaner
**
For maintenance cleaning or final cleaning, use a cloth that will bend and place a brace on the floor nozzle. For a thorough cleaning, you can also use the microfiber cloth (special accessory).
Drag the nozzle from one place to another quickly after releasing the steam, which will allow you not to have to add steam permanently. To clean the joints, you not only have to move the nozzle transversely, but also move it on purpose
diagonally once in the joint.
Aspiration:
Before steam cleaning, it is recommended to run the vacuum cleaner on the floor. In the case of laminate floors, work them only when you are sure that they have been placed and glued by specialized professionals.

**Steam clean your Laminate
floor **
With half the flow of steam, you can also clean laminated or varnished parquet (without oils or waxes). The steam flow is regulated in the steam gun. Work with two cloths (= four layers) so that as little steam as possible comes directly into contact with the surface. Do not stay for a long time with the spray nozzle at the same point to prevent the soil from becoming too wet. The low residual humidity dries quickly and without leaving marks.
Advice:
Before steam cleaning, it is recommended to run the vacuum cleaner on the floor. In the case of laminates, work them only when you are sure that they have been placed and glued by specialized professionals.

Sanitize and Disinfect bathrooms and toilets
Glowing in the blink of an eye: for cleaning tiled walls, glossy glass surfaces, faucets, joints, crevices, etc.
Soap and lime residue
With the abrasive cloth (microfiber cloth kit for the bathroom) you can effortlessly remove even the embedded soap and lime residue.
Faucet cleaning
To avoid scratching the chrome and stainless steel faucets, use only the concentrated jet nozzle. Keep it very close to the object you want to clean and wait until the lime has come off. If it remains very embedded or is at an awkward point, the nozzle can be equipped with a brush. Then clean the point by rubbing with the strong steam impulse. Faucet cleaning.
If the grease film has already a while, it will not get rid of having to constantly rub and squeeze. To do this, always use steam.
Gradually, the fat is impregnated in the cloth. Therefore, you will have to change the cloth from time to time.
For a result without marks, review the cleaned surface with the yellow microfiber cloth.
With direct vaporization and rapid scrubbing movement, even the most embedded dirt can be released.
The thicker layers of lime should first be sprayed with vinegar or citric acid and let the substance act.
By the way, periodic vaporization prevents the formation of lime debris in the future.

Window and Mirror Steam cleaning

Before using a steam cleaner for the first time, perform a thorough cleaning: with the manual nozzle and the steam cloth, clean the glass completely. Winter tip: if the crystals are very cold, preheat them at a distance of about 5 cm.
Then with the concentrated jet nozzle, vaporize the glass surface from top to bottom.
Then, with the brush remove the "steam water" in several strips down. To avoid streaking, dry the rubber lip occasionally with a cloth.
Do not worry if when you go through the glass with the rubber lip there are still drops of water on the surface. You can remove them with the cloth very easily and without wires.
**Cleaning of tile joints using Steam

For a specific cleaning of the joints, the concentrated jet nozzle is suitable, to which a round brush can also be attached.
With direct vaporization and rapid scrubbing movement, even the most embedded dirt can be released.
After steam cleaning, the surface is dried with a cloth. Warning on silicone gaskets: steam them briefly to protect the material.
Elimination of fat deposits using steamer
Stainless steel is in fashion, but it's only pretty without grease films. In this sense, you can achieve especially good results with the soft velvet and plush cover and the yellow microfiber cloth (special accessories) of the kitchen microfiber cloth kit.
If the grease film has already a while, it will not get rid of having to constantly rub and squeeze. To do this, always use steam.
Gradually, the fat is impregnated in the cloth. Therefore, you will have to change the cloth from time to time.
For a result without marks, review the cleaned surface with the yellow microfiber cloth.
**Steam Clothes using Steam Irons
With the additional nozzle for clothes, refreshing clothes is sewing and singing. With the integrated pedestal remover, you can remove hair and lint from clothing without effort. The wrinkles of the curtains and the clothes are smoothed very easily, without having to place them on the ironing board. Smells are also removed reliably. A real relief!

#steam cleaner#steam cleaning#steam machines applications#How to use steam cleaner or Steamer or Steam Machine
1 note
·
View note
Text
SEMA is a hard show at which to properly appreciate cars. On one hand – it’s a show overflowing with some of the best builds you will see all year. On the other hand – it’s that same overflow that makes it almost impossible to keep your wits about you. It’s almost too much of a good thing. In a sea of thousands of cars, I feel like some inevitably get lost. The great thing is: The cars that are truly memorable, the cars you are talking about weeks and months after the show… are cars which rise above the temporary flash-in-the-pan Instagram fame. Some cars deserve to be immortalized. More than digital noise or passing fancy, they draw their inspiration from the timeless. The classic.
This 240Z certainly qualifies as one of these cars. While it has some innovations and forward thinking design elements, it also honors the tradition and legacy of Datsun’s Z car heritage. Car owner Dennis wanted a Z that could be as menacing on the street as it was on the track. In looking to manifest his dreams into reality, he was fortunate enough to meet aspiring builder Kyle Kuhnhausen. Kyle is a fresh out of business school automotive entrepreneur with a penchant for metal work. Ok, more than a penchant… he has a gift. From the paint scheme to the heavily gusseted cage, this car is well thought out & beautifully executed. How well executed? Well, when we talked he made sure I knew that the LS swap was a place holder engine until they built something truly epic for under the hood. WOW. Some place holder.
Let’s take a moment and revel in my three favorite aspects of this car.
First)
There is the paint scheme. Nimbus Grey (or battle ship grey in some parlance) has to be my personal favorite hue on show cars. It’s rich, it allows shadows to adopt a deep dark over tone, and light reflections to be silvery & pronounced. Every truly beautiful design looks amazing in this color. So… win number one? CHECK! The Peter Brock homage striping is as evocative and respectful of the Z’s motorsport heritage as it is a tasteful modern touch of racer bravado. I dig it. Those famous side stripes actually start on the hood at the vents and then cascade over the fender and down the side forming the Brock stripes we are all familiar with. A killer design cue that is at once forward thinking and period correct. Nicely done.
Second)
Let’s talk about that metal work. The Aero is mean, functional, and gives the car a seriously provocative stance. What’s more – it’s designed to just rip/break away cleanly in the case of a momentary lapse in driver skill (for example paying a visit to say, China Beach at the end of the straight at Mid Ohio). Well played Kyle, well played. However, as fantastic as that aero is, it is nothing compared to the beautifully executed roll cage. Meant to be a street car that can participate is serious track time… it had to be a car from which Dennis could easily get in and out. Kyle kept the safety high by fabricating one seriously artful, yet stout, fully gusseted integrated cage. Take a few moments and look at the cage in this car. I have severe race car envy. My race car has race car envy. Seriously. It is so good that it easily merits adjectives like superlative, excellent, exemplary. Bravo.
Third)
And this is one where so many cars sort of take a pass… the gauge cluster. When a car has track day toy duties, it’s easy to just pick up a digital display, mount it up, and just call it done. Not in this car. The cluster in this car is 13 individual pieces of aluminum lovingly hand shaped into what you see before you. It honestly called to mind some of the extreme and bespoke modern interpretations currently en vogue built around the Porsche 911. The Singer cars being the most notable, they take an air cooled 911 and massage every aspect of the car… and polish, preen, & refine it until it is absolutely jewel-like. The perfect 911. Well, that’s where this Z took me. It’s like a really nice 240Z… only polished to the highest possible degree. Everywhere you look there are tasteful touches. This instrument cluster exemplifies that. The angle at which it is canted toward the driver, the alignment of it inside the MOMO wheel. It’s absolutely glorious.
So yeah, this car is one of the highlights of last year’s SEMA show. It truly was. Bespoke modern takes on past classics are hot right now. Cars like the Singer 911s are fetching 500k and more per unit, so it makes builds like this kind of a serious proposition. Get it right and the value and classic status is legitimate. In the end, Dennis can drive this car on the road or the track, confident in the fact that he found the perfect enthusiast to execute his vision. And he can rest well in the fact that he’s now driving the Singer of Datsun 240Zs.
InZanity 240Z
CHASSIS
1972 Datsun 240z shell
10-point fully tig welded roll cage featuring flared hole body tie-in gussets
Lower jacking & towing points welded to bottom of main cage shelfs
Every unibody seam is fully stitch-welded inside & out, and seam sealed
All top strut mounts replaced with camber adjustable heavy duty plates
Pre-load adjustable tie-rod strut braces featured in engine bay
Tig welded fuel cell cradle with integrated rear center mount tow hook
Rear sub-mounted battery with remote charging points and kill switch
Custom tig welded engine & transmission mounts. Optimized center of gravity
50/50 weight distribution
Bolt-in aluminum transmission tunnel stiffeners / driveshaft hoops
Integrated scraping points for oil pan protection
BODY MODS
Trackspec Motorsports heat extracting louvers on hood & front fenders
Front fender-exit side exhaust with custom alloy diffusing louvers
Rear rockers clearanced for functional rear brake vents, and lowered 1.25”
Fender & rear emblems shaved
Antenna & side marker lamps shaved
CNC billet aluminum laser engraved KMC tail lamp insets
CNC billet aluminum quarter panel vent emblems featuring modernized “Z”
Rear bumper & mounts shaved
Symmetrical rear body pan recess, opposed to unsymmetrical stock recess
Front bumper shaved & swissed with dimple die punched holes
Reinforced rear hatch for functional spoiler mounts
Rear quarter panel turbulent air extraction holes with alloy bezels added
Wide “ZG” style flares, adding 6” of width to the rear fender wells
All body gaps cut, welded, and staked.
Shaved hood springs & streamlined hinges
Show grade bodywork
One-piece front & rear windscreen gaskets
POWER
GM 2004 LS1 engine with T56 6-speed manual transmission
Modified & ported 1.625” primary headers ceramic coated in gold
Bespoke 2.5” Fully pie-cut and tig welded exhaust with front X-pipe (167 weld joints)
Dual 8” sectioned Magnaflow Corvette style mufflers mounted in front wheel wells
Improved Racing 180 degree oil cooler thermostat with 400hp Setrab cooler
Holley Coil on Cover valve covers
Radium Engineering FCST fuel cell surge tank and full fuel system
Vibrant Performance –AN fuel lines
Modified stock throttle body with Lokar stainless throttle cable
Custom 4” aluminum air intake with K&N filter outside engine bay
Aluminum crossflow radiator with 16” Flex-A-Lite electric fan and custom shroud
Modified Hurst short shifter with KMC integrated transmission fluid top-fill
Centerforce single disc clutch
ACT Clutch Prolite lightweight flywheel
Custom one-piece driveshaft
Infinity Q45 R200 differential with VLSD limited slip unit and 3:54 final drive ratio
Nissan Armada CV axles
BRAKES
6-piston Wilwood front calipers & 4-piston Wilwood rear calipers
Fully functional ram-air 3” brake ducting to all 4 corners with custom caliper hats
ASD Motorsports hydraulic 16” e-brake system with braided -3an lines
Wilwood billet master cylinder with modified vacuum booster assembly
Optimized pedal box with reduced weight and improved pedal placement
3/16” Stainless hardlines and -3an braided flex lines
Wilwood proportioning valve with hidden custom mount
Remote Wilwood proportionating valve in-cabin adjustment knob custom retrofit
Custom aluminum master cylinder heat shield
SUSPENSION
Full Arizona Z-Car “Track Pack” billet aluminum adjustable suspension
Arizona Z-Car struts with coilover adjustable springs, modified for tire clearance
Apex Engineered bump steer adjustment kit and high steer knuckles.
Full polyurethane bushings
Modified front crossmember for improved roll center
ST Suspension front & rear sway bars with Energy Suspension polyurethane bushings
5 Lug converted hubs with front Wilwood spindles
ARP chromoly extended wheel studs
Stitch welded and reinforced front crossmember
AERO
Custom HDPE adjustable front air splitter with alloy radiator and brake dams
Custom HDPE adjustable rear diffuser with jacking point & air straighteners
Custom HDPE 6” side splitters with exhaust vent & rear brake vents integrated
Aluminum tunnel underbelly, mostly flat under entire car
Pitch adjustable 3-piece rear deck spoiler with Ringbrother’s micro hinges
ARP carbon fiber micro mirrors
Lexan headlamp aerodynamic fillers
4 Piece aluminum radiator ducting with cabin air ducts integrated
#gallery-0-33 { margin: auto; } #gallery-0-33 .gallery-item { float: left; margin-top: 10px; text-align: center; width: 33%; } #gallery-0-33 img { border: 2px solid #cfcfcf; } #gallery-0-33 .gallery-caption { margin-left: 0; } /* see gallery_shortcode() in wp-includes/media.php */
ELECTRONICS
Street and Performance engine wiring harness with reflashed stock ECU
Braille lightweight I25X lithium battery
Bowler Performance phantom key with Honda s2000 push button starter
Fully custom KMC chassis wiring harness
Fully integrated Passport 9500ci radar detector system
Alpine double-din 6” monitor with frenched backup camera, navigation, and satellite radio
Dakota Digital VHX-1100 competition dash with 16 digital readouts
Dakota Digital BIM 1 OBDII gauge interface
EPAS electronic power steering integrated into Woodward steering column with input potentiometer knob on dash
Custom carbon aircraft-style switch panel with u-shaped toggle protectors
Quick Latch removable main electronics panel featuring Marine resettable circuit breakers
WHEELS / TIRES
18” CCW 3-piece LM20 wheels with gloss black lips, satin black centers, and ARP bolts (18×10 front 18×11 rear)
BFGoodrich Rival S 200tw extreme performance tires (275/35zr18 front 315/30zr18 rear)
Gorilla extended race lug nuts
INTERIOR
MOMO Super Cup FIA homologated seats and alloy brackets
MOMO 350mm MOD. 07 suede steering wheel
MOMO 6pt. harnesses
MOMO quick release hub w/ bespoke manually machined adapter to race column
Highly modified pedal box
Longacre 17” wide rear view mirror
Bowler performance billet shift knob and lever
Aluminum bead-rolled hexagonal pattern fuel cell fire wall
Custom alloy center console, and 3-piece alloy bespoke quick removable dash
Smoothed transmission tunnel
Bespoke flared-hole heel plates
Flared-hole fabricated dead pedal and geometry optimized clutch and brake pedals
Custom heater with 4 vents hidden under removable dash
Hexagonally stitched suede door cards with carbon fiber aircraft riveted inserts
PAINT (All Axalta Refinishes Products)
Chromax Mosaic SBBC B9*01 – Color: Ford Stealth Grey
Imron 3.5 HG+ Polyurethane RH-3714 – Color: Gray 057
LF Epoxy DTM Primer Gray 2540S
Chroma Base “4 to 1” 2K Urethane Primer Filler Gray 7704S
Chroma Priemier Premium Appearance Clearcoat 72500S
Epoxy DTM Activator Medium Temp 2505S
Basemaker Medium Temperature 7175S
Activator-Reducer 60-70 Degree 7765S
Plas-Stick Flexible Additive 2350S
Chroma Premier Pro Normal Activator 14305S
#gallery-0-35 { margin: auto; } #gallery-0-35 .gallery-item { float: left; margin-top: 10px; text-align: center; width: 33%; } #gallery-0-35 img { border: 2px solid #cfcfcf; } #gallery-0-35 .gallery-caption { margin-left: 0; } /* see gallery_shortcode() in wp-includes/media.php */
OTHER
Rear sub-mounted SPA Technique fire suppression tank with 6 nozzles in cabin/engine
2-piece removable front chassis-mount tow hook
Proprietary differential snout oiling system with Tilton commercial pump and Setrab cooler
Functional side hood winglet to integrated tig welded alloy coolant expansion tank
Dual “II Much fabrication” differential and fuel system vents with custom bracketry and aluminum hard lines.
Extensive use of ARP 12 Pt. stainless fasteners
Text by Tim Neely Photos by Dominick Barbero
InZane in the Membrane: Datsun 240Z SEMA is a hard show at which to properly appreciate cars. On one hand - it’s a show overflowing with some of the best builds you will see all year.
1 note
·
View note
Text
Buy Mifepristone and Misoprostol kit price | ZeepMedz
A medical abortion method that may end pregnancy after conception is the Mifepristone and Misoprostol kit price. Medications must be used during abortions in addition to other procedures. In addition to other techniques, such as manual vacuum aspiration, surgical vacuum aspiration, or electric vacuum aspiration, abortion also necessitates the use of medications.
0 notes
Text
0 notes
Text
Aspire New Product Launch: Aspire Nautilus GT Kit [Review]
Product Introduction and Specifications
The New Nautilus GT Kit is our latest box mod kit combining the famous Nautilus GT tank system and the new 75W Glint Mod. Aspire has done an excellent job designing a classy and high-performance kit.
The New Nautilus GT Kit is powered by a single 18650 battery mod and it houses the Aspire’s ASP chipset. Moreover, the 75W Glint mod has a maximum charging current that can reach up to 2A. Furthermore, it’s designed to be extremely efficient and lightweight compared to other mod boxes. In addition, the mod has an OLED 0.91’’ screen to easily set the mod wattage.
The tank in the kit is the Nautilus GT Tank designed by Taifun and Aspire, in a collaboration that has resulted in a very efficient tank and an elegant and solid design.
The box mod is available in three colors: gunmetal, silver and black and the Nautilus GT tank is available in four colors: stainless steel, gunmetal, rose gold and black.
Specifications
Glint Mod Specifications
1-75 wattage output
Single 18650 battery
Type-C 2A quick charging
0.91’’ OLED screen display
Aspire ASP chipset
Dimensions: 78 height (mm), 46 width (mm) and 25 thick (mm)
Nautilus GT Tank Specifications
Tank capacity: 3ml (TPD 2ml) and 4.2 ml with extension PSU tube.
The top and base Taifun knurling design gives more friction.
Thick base hardware for a fast heat dissipation and better flavor.
5 airflow adjustments.
Replaceable Nautilus coils, easy to change.
Convenient top filling.
Dimensions: 54 height (mm), 24 diameter (mm).
Nautlius GT Kit: Quality and Design
The Nautilus GT Kit
The Nautilus GT Kit is very solid and nicely built. It’s mostly rectangle but with rounded corners which gives the device a unique ergonomic design. The fire button is rounded and clickable and it’s located on the front part of the mod. In addition, it has ”+” and “-“buttons just under the OLED screen.
The Glint Mod
The Glint mod is made of solid materials. The top and bottom parts are made of zinc alloy and the housing is made of aluminum and high-quality plastic. As all the Aspire mods, the Glint Mod comes with an Aspire chipset with safety features. The ASP chipset has the following safety features:
Vaping overtime protection
Short circuit protection
Overheat protection
Low voltage protection
Overcharge protection
Over discharge protection
The Battery
The battery goes in from the bottom of the mod. The Glint mod has a very convenient battery door that you just need to slide to open it. As mentioned in the introduction, the battery is an 18650 battery which is a powerful battery for a vape mod designed for a MTL vaping experience.
The Nautilus GT Tank
The Drip Tip
The drip tips are very comfortable and narrow compared with other drip tips. The Nautilus GT drip tip is designed for a perfect mouth-to-lung vaping style. The drip tips are made of thermoplastic polyetherimide (PEI drip tips). The PEI drip tips are great, and they don’t get hot while vaping.
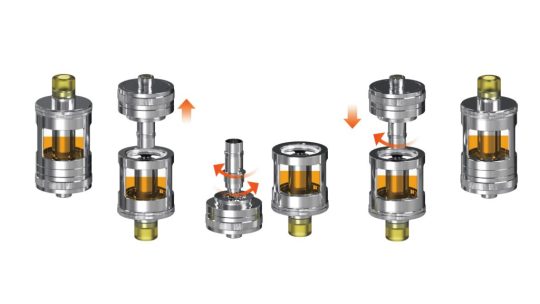
The Tank
The Nautilus GT tank is equipped with a special airflow system designed to enhance the Nautilus’ coils performance. The airflow control is in the base hardware and it’s easy to adjust. It Has five airflow holes with different diameters and you just need to rotate the airflow ring to adjust it.
Available in four colors: stainless steel, gunmetal, rose gold and black. The metal sleeve that protects the Pyrex glass is made of stainless steel, however, the colors have different coatings. For example, the rose gold version is 85% gold plated and the black version is DLC (Diamond-like carbon) coated and with vacuum plating.
The glass is Pyrex for the 3 ml version while the TPD version (2 ml version) is made of acrylic.
In addition, another cool characteristic of the Nautilus GT tanks is that the inner part of the chimney is made of the same heat resistant material as the drip tip (thermoplastic polyetherimide PEI).
Furthermore, the Nautilus GT base hardware is quite thick which allows the tank to cool down quickly.
Nautilus Coils
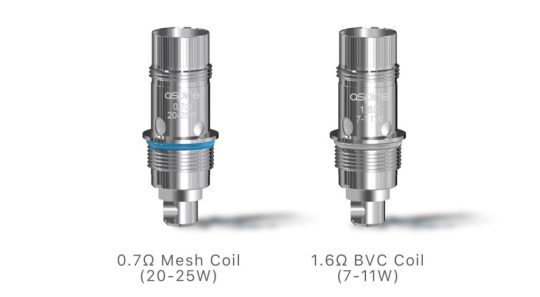
The Nautilus Kit comes with two coils: a Nautilus BVC coil of 1.6 ohm and one Nautilus 2S mesh coil of 0.7 ohm that is preinstalled.
The Nautilus GT is compatible with the famous aspire BVC coils that are designed for a premium MTL vaping experience. On the other hand, the mesh coils is ideal for a restricted DTL vaping experience.. The tank is compatible with all the Nautilus BVC series and all Nautilus mesh coils.
The kit comes with two coils: a Nautilus BVC coil of 1.6 ohm and one Nautilus 2S mesh coil of 0.7 ohm that is preinstalled.
How to Vape the Nautilus GT Kit?

The Nautilus Kit is perfect for a mouth-to-lung vaping style.
The Nautilus GT Kit is designed for a MTL vaping style. The drip tip is narrower than other mods which is perfect for a mouth-to-lung vaping experience.
It comes with two coils a 1.6 ohm that is more suitable for a MTL style and a 0.7 sub-ohm mesh coil for vapers looking for a restricted DTL vaping experience.
The tank is very easy to use. For example, it’s very easy to change the coils as you just need to invert the tank and unscrew to remove the base hardware. Then you just need to unscrew the coil and replace it for a new one.
Very easy to fill
The tank is very easy to fill.
It’s very simple to fill the tank. You just need to remove the top cap by twisting it anticlockwise until the dots on the top hardware are aligned.
Vaping Experience: The Nautilus GT Kit
The mod has many features. To lock or unlock the mod you need to press five times the fire button in short succession. In addition, if you press the fire button for two seconds in locked mode will turn the system off. On the other hand, if you want to turn it on, then press the fire button five times in short succession.
There’s another cool feature. The Nautilus GT Kit offers the option to lock the “+” and “-“ buttons and the screen. If you press the fire buttons three times in short succession, then you will lock the screen and only the fire button remains operative.
The Nautilus GT Kit is very versatile as you can set it as a classic MTL device or vape it as a DTL sub-ohm device.
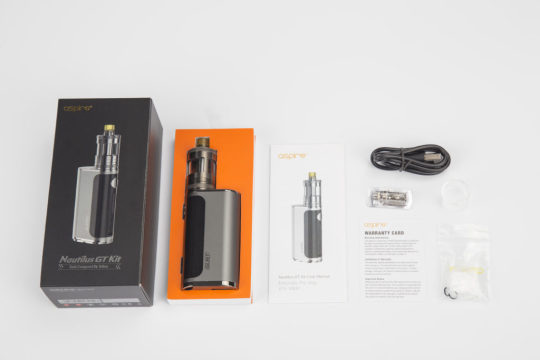
Kit Contents
Standard Version:
1* Glint Mod
1* Nautilus GT Tank 3 ml (0.7Ω Mesh Coil Preinstalled)
1* Extra Nautilus BVC Coil 1.6Ω
1* Extra Glass Tube 3 ml
1* Type-C Cable
1* User Manual
1* Warranty Card
1* Set of O-rings
TPD Version:
1* Glint Mod
1* Nautilus GT Tank 2 ml (0.7Ω Mesh Coil Preinstalled)
1* Extra Nautilus BVC Coil 1.6Ω
1* Type-C Cable
1* User Manual
1* Warranty Card
1* Set of O-rings
Aspire New Product Launch: Aspire Nautilus GT Kit [Review] was originally posted by E-Sigaret Nieuws
0 notes
Photo

Manual Vacuum Aspirator Set Supplier in India | Manufacturer
Medilivescare Manufacturing Private Limited is a prominent company serving medical professionals, hospitals, laboratories, Manual Vacuum Aspirator Set Supplier in India, Manufacturer and around the world with high-quality cost-effective & affordable products. The company operates on internationally certified manufacturing, Quality Control and R&D facilities. Our team is well trained to make the transactions smooth and the policies are flexible & customer friendly.
Visit here: https://www.medilivescare.com/product-details.php?id=P02007
Contact: +917011919620
#Manufacturer of Manual Vacuum Aspirator Set#Manufacturer of MVA Set#Manufacturer of MVA Kit#Manual Vacuum Aspirator Set Supplier in India#Manual Vacuum Aspirator Kit Manufacturer
0 notes
Text
Manual Vacuum Aspiration Kit Manufacturers and Exporter in India

Manual Vacuum Aspiration Kit Used for Manual Aspiration procedure (Medical termination of pregnancy) and Smooth cannula with rounded tip and smooth eyes for atraumatic cannulation. Available in single valve and double valve syringe. https://bit.ly/3BZX6Ti
Call +917015986188, +91-9650832277, +91-11-48880000, +91-11-42466196 or Email: [email protected]
WhatsApp: https://wa.me/917015986188
1 note
·
View note